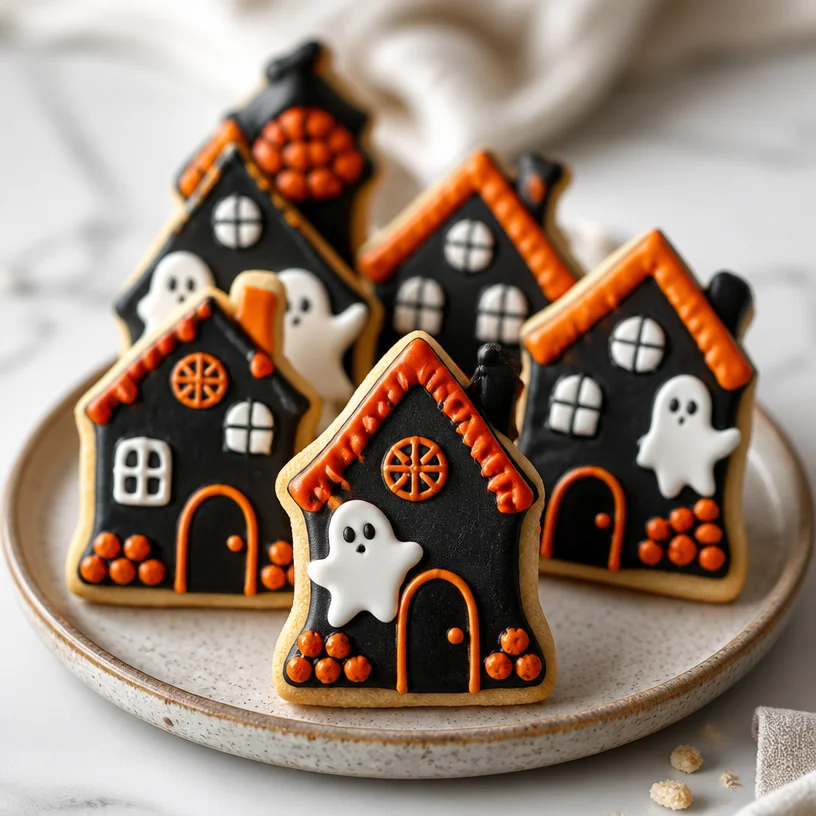
Minute Haunted House Cookies for a Spooky Halloween Treat
Spook-tacular Haunted House Cookies: A Treat for Your Halloween Gatherings!
Hello there, fellow food enthusiasts! As the leaves turn golden and the air gets that crisp bite, it’s time to channel our inner ghouls and goblins. If you’re anything like me, you can’t resist the seasonal charm that Halloween brings. Amongst the eerie decor and restless spirits, the real magic happens in the kitchen, and I have the perfect treat to elevate your spooky celebrations: Haunted House Cookies!
These aren’t just any cookies; they’re whimsical works of art that you and your little ghosts can create together. Picture this: ahouse made of delicious sugar cookies, drizzled with royal icing, and dusted with colorful sprinkles, all beckoning for a Halloween-themed gathering at your table. They’re ideal for crafting with kids, impressing your friends, or simply indulging your artistic spirit. Ready to get your mix on? Let’s dive into this delightful journey of baking!
A Whimsical Memory
Growing up, Halloween was my favorite holiday—not just because of the costumes and candies but because of the annual tradition of cookie decorating with my family. I can still recall the smell of sugar cookies baking in the oven, making the house feel warm and inviting, even when the weather outside was a bit frightful.
One crisp autumn evening, my mom and I decided to host a small gathering for my friends. We whipped up a massive batch of sugar cookie dough and rolled it out into all sorts of spooky shapes. Ghosts, tombstones, and of course, miniature haunted houses!
I remember the laughter as my friends and I got creative with icing; some cookies ended up looking like they came from a haunted nightmare, while others were surprisingly elegant! That magical night spent with family and friends over a table laden with colors, laughter, and stories is a sweet memory I carry with me. And today, I want to help you sprinkle some of that joy into your kitchen with these Haunted House Cookies!
Ingredients
Here’s what you’ll need to create your Haunted House Cookies:
-
Sugar Cookies
- These are the canvas of your cookie art! Their simplicity allows the decoration to shine through.
-
Royal Icing
- This icing is your magical glue and decorating medium. It hardens beautifully and is perfect for intricate designs. You can substitute it with buttercream icing if you prefer a softer frosting, but it won’t hold up quite as well for decoration.
-
Food Coloring
- Gel food coloring works best for bright, vibrant hues. You can get creative with shades of black, purple, and orange for that Halloween themed flair.
-
Sprinkles
- Think of sprinkles as the finishing touch or the festive confetti of your haunted houses. Without them, it’s like Halloween without a pumpkin—unthinkable!
-
Edible Decor (Candy Corn, Chocolate Chips, etc.)
- Use these to add some personality and charm to your haunted houses. They make for great windows, doors, and spooky decorations!
Step-by-Step Instructions
Grab your apron, pour yourself a spooky drink, and let’s get to baking these Haunted House Cookies!
-
Prepare the Sugar Cookie Dough
- In a large bowl, cream together softened butter and sugar until light and fluffy. (Tip: Using room temperature butter cream will ensure it mixes well and creates a light texture!)
- Mix in one egg and a splash of vanilla extract—trust me, this is the magic ingredient. Pro Tip: For an extra kick, you can add a dash of almond extract for a unique flavor!
-
Combine Dry Ingredients
- In a separate bowl, whisk together all-purpose flour, baking powder, and a pinch of salt. Gradually add this into the butter mixture until just combined. (Don’t overmix; it’s important for our cookies to be tender!)
-
Chill the Dough
- Divide the dough into two halves, wrap them in plastic wrap, and refrigerate for about 30 minutes. This step is crucial; it prevents the cookies from spreading too much while baking, keeping those beautiful shapes intact!
-
Preheat the Oven
- While the dough chills, preheat your oven to 350°F (175°C).
-
Roll Out the Dough
- Once chilled, on a floured surface, roll out the dough to about 1/4-inch thickness. Use cookie cutters to cut out spooky shapes! If you’re making haunted houses, use house-shaped cookie cutters.
-
Bake the Cookies
- Place the cookies on a parchment-lined baking sheet, giving them a little space to breathe. Bake for 8-10 minutes or until the edges are lightly golden. (Note: They’ll harden further while cooling!)
-
Cool the Cookies
- Transfer the cookies to a wire rack to cool completely. Patience, friends! You don’t want to ice warm cookies as they can melt your icing away.
-
Make the Royal Icing
- In a bowl, beat egg whites and powdered sugar until smooth and stiff peaks form. This can take a few minutes, but it’s worth the effort for that gorgeous hold. (Did you know you can use meringue powder as an egg white substitute? Perfect for those with egg allergies!)
-
Color the Icing
- Divide the icing into bowls and mix in your food coloring. For a traditional haunted house, try a spooky black, purple, and orange!
-
Decorate!
- Using piping bags, pipe outlines and details on your cookies. Don’t rush! The creative part is where the fun and stories come in. Let your imagination run wild—you might just create the next haunted cookie masterpiece!
Serving Suggestions
When it’s time to serve, gather your Haunted House Cookies on a charming platter and maybe even add a few floating candles for that spooky, enchanting ambiance. Dim the lights and let their glow highlight the edible artistry you’ve created.
For small gatherings, you can even create “cookie take-home bags” filled with a couple of decorated cookies for your guests—just tie them with a whimsical ribbon!
Recipe Variations
Now, if you’re looking to shake up the traditional haunted house vibe, here are a few creative twists:
- Gingerbread Houses: Use a gingerbread cookie recipe for a spicier twist that pairs wonderfully with icing.
- Gluten-Free Option: Substitute regular flour with a 1:1 gluten-free baking flour. Your cookies will still be tasty with an added crunch!
- Spooky Themed Flavors: Infuse your cookies with seasonal extracts, like pumpkin spice or maple, for a unique flavor experience.
- Fillings: Consider sandwiching your cookies with a layer of delicious pumpkin or gingerbread-flavored cream cheese filling. Treat yourself to that creamy goodness!
- Themed Toppers: Use different candies or edible glitter to decorate based on a theme—think “zombie apocalypse” or “witch’s brew”!
Chef’s Notes
These haunted house cookies bring back fond memories of Halloween, and over the years, I’ve expanded my decorating techniques and flavor profiles to keep the tradition alive. From my family’s kitchen to yours, these cookies have seen their fair share of spooky stories and laughs.
I can’t tell you how many Halloween parties I’ve attended with a batch of these cookies in tow, and it never fails—people love the creativity and fun that comes with decorating! Once, I brought to a party a cookie specifically designed to look like a creepy cat; let’s just say it garnered quite a few laughs and complements!
FAQs and Troubleshooting
Q: My cookies didn’t hold their shape. What went wrong?
A: This usually happens when the dough is too warm or isn’t chilled enough before baking. Make sure to chill the dough and keep your work surface floured.
Q: How can I achieve the perfect consistency for royal icing?
A: Aim for a flowy consistency that holds shape but isn’t too runny. If it’s too thick, add a tiny bit of water. If too runny, add more powdered sugar.
Q: How do I store my decorated cookies?
A: Allow the icing to dry completely before stacking or storing. Place them in an airtight container, and they can last for up to a week!
Q: Can I make these cookies in advance?
A: Absolutely! You can bake the cookies up to a week in advance and decorate them the day before your event.
Nutritional Info
While I believe good food should nourish the soul, it’s nice to keep track! One haunted house cookie roughly contains:
- Calories: 120 kcal
- Total Fat: 4 g
- Carbohydrates: 20 g
- Sugar: 10 g
- Protein: 1 g
Remember, enjoy in moderation—these cookies are certainly a treat worth every bite!
Onward to Spooky Delights!
Gather your family, your friends, or even whisk away your favorite little ghoul, and embark on this joyful baking adventure together. I promise that the laughter, creativity, and deliciousness are priceless. Wrap up your time crafting these Haunted House Cookies with a mug of hot cider or your favorite Halloween-themed drink.
Happy Halloween, my lovelies! May your days be filled with joy, creativity, and a sprinkle or two of magic. Until next time!
PrintHaunted House Cookies
Delightful sugar cookies shaped like haunted houses, perfect for Halloween gatherings!
- Prep Time: 30 minutes
- Cook Time: 10 minutes
- Total Time: 40 minutes
- Yield: 24 cookies 1x
- Category: Dessert
- Method: Baking
- Cuisine: American
- Diet: Vegetarian
Ingredients
- 3 cups all-purpose flour
- 1 cup unsalted butter, softened
- 1 cup granulated sugar
- 1 large egg
- 1 teaspoon vanilla extract
- 1/2 teaspoon almond extract (optional)
- 1 teaspoon baking powder
- 1/2 teaspoon salt
- 2 cups powdered sugar (for royal icing)
- 2 egg whites (or meringue powder)
- Gel food coloring (black, purple, orange)
- Sprinkles
- Edible decorations (candy corn, chocolate chips, etc.)
Instructions
- Prepare the Sugar Cookie Dough: In a large bowl, cream together softened butter and sugar until light and fluffy. Mix in one egg and a splash of vanilla extract; add almond extract if desired.
- Combine Dry Ingredients: In a separate bowl, whisk together flour, baking powder, and salt. Gradually add this to the butter mixture until just combined.
- Chill the Dough: Divide the dough in half, wrap in plastic, and refrigerate for 30 minutes.
- Preheat the Oven: While the dough chills, preheat your oven to 350°F (175°C).
- Roll Out the Dough: On a floured surface, roll out the dough to about 1/4-inch thickness and cut out spooky shapes.
- Bake the Cookies: Place them on a parchment-lined baking sheet, and bake for 8-10 minutes until edges are lightly golden.
- Cool the Cookies: Transfer to a wire rack to cool completely.
- Make the Royal Icing: Beat egg whites and powdered sugar until smooth and stiff peaks form.
- Color the Icing: Divide icing into bowls and mix in your food coloring.
- Decorate</strong!: Using piping bags, outline and detail your cookies creatively.
Notes
Allow the icing to dry completely before storing in an airtight container.
Nutrition
- Serving Size: 1 cookie
- Calories: 120
- Sugar: 10g
- Sodium: 50mg
- Fat: 4g
- Saturated Fat: 2g
- Unsaturated Fat: 1g
- Trans Fat: 0g
- Carbohydrates: 20g
- Fiber: 0g
- Protein: 1g
- Cholesterol: 30mg
Keywords: Halloween cookies, spooky treats, haunted house cookies
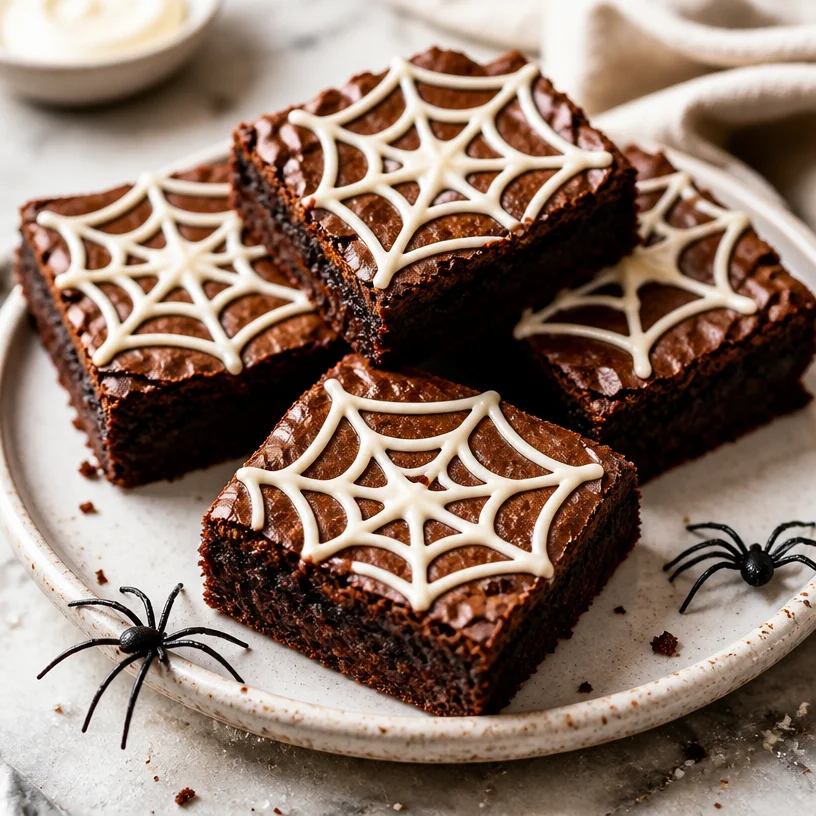
Halloween Spider Web Brownies: Easy Crowd-Pleasing Treat
Spider Web Brownies: A Spooktacular Treat for Every Occasion
Hello, fellow food lovers! Get ready to indulge in a delightful fusion of decadence and whimsy with my Spider Web Brownies. These rich, fudgy brownies topped with easy-to-make white icing are sure to be a hit at any gathering—be it a Halloween celebration, a cozy get-together, or even a potluck. The combination of ooey-gooey chocolate and a playful spooky design will have everyone reaching for seconds!
A Taste of Nostalgia
When I think about brownies, I can’t help but remember my childhood baking marathons with my grandmother. She would invite me into her warm kitchen, filling the air with rich chocolate aromas that felt like a warm hug. We would whip up her famous brownies, and she would let me add the finishing touches—sometimes nuts, sometimes frosting, but always with a sprinkle of love.
One Halloween, we got a bit adventurous and decided to turn those classic brownies into Spider Web Brownies. With some white icing for web designs and a few plastic spiders as dramatic decor, we transformed her tray of delectable treats into spooky masterpieces. Watching my friends’ eyes widen with delight when they saw those eerie yet adorable treats is a memory I’ll always cherish. Let’s dive into this joy of baking together!
Ingredients
To create your own Spider Web Brownies, you’ll need the following ingredients:
-
1 batch of brownies (your favorite recipe or box mix)
- Chef Insight: If you opt for a box mix, choose a high-quality one to ensure rich flavors. Can’t find a mix? My simple homemade brownie recipe uses dark chocolate for extra depth!
-
White icing (store-bought or homemade)
- Substitution Tip: If you prefer to avoid store-bought icing, mix powdered sugar with a tiny bit of milk and vanilla extract until you reach a smooth, pipeable consistency. Easy and delicious!
Step-by-Step Instructions
Ready to dive into the fun? Let’s get those brownies baking!
-
Prepare Your Brownies:
- Preheat your oven as per your brownie recipe’s instructions (usually around 350°F or 175°C).
- Grease a baking pan with non-stick spray or line it with parchment paper for easy removal. Trust me; you’ll thank me later!
-
Mixing the Batter:
- If you’re making brownies from scratch, melt your chocolate and butter together. Stir in sugar, then eggs, followed by flour and vanilla. Mix until combined, being careful not to over-mix.
- For boxed brownies, follow the package instructions—make sure to mix until smooth.
-
Bake the Brownies:
- Pour your batter into the prepared pan, spreading it evenly. Bake for the recommended time (usually about 20–25 minutes) until a toothpick inserted comes out with a few moist crumbs. Remember, it’s okay if they look a little gooey—they’ll firm up as they cool!
-
Cool and Decorate:
- Once baked, remove the brownies from the oven and let them cool completely in the pan before transferring them to a wire rack.
- Once cool, drizzle the white icing on top. This is where the fun begins! To make a spider web, start by piping a spiral from the center outward. Then make straight lines from the center to the edge of the pan to create the iconic web design. Use a toothpick or skewer to gently drag lines for the web effect.
-
Add Some Spooky Flair:
- As a final touch, you can add some plastic spiders (or candy spiders for a sweeter twist) on top. They’ll give your brownies that perfect spooky vibe.
Serving Suggestions
Serve your Spider Web Brownies on a festive platter, and don’t forget to decorate the table with some fall-themed items. Add a few mini pumpkins or fake cobwebs to create an inviting atmosphere. When serving, be sure to cut generous squares—these treats are meant to be shared and savored!
Recipe Variations
Feeling adventurous? Here are some fun twists you can try with your Spider Web Brownies:
- Peanut Butter Swirl: Before baking, swirl in some peanut butter for an extra layer of flavor.
- Minty Madness: Add a drop of peppermint extract to the brownie batter for a minty surprise.
- Nutty Delight: Toss in some chopped walnuts or pecans to add a crunchy texture.
- Gluten-Free Alternative: Substitute traditional flour with a gluten-free blend for a delicious inclusive option.
- Flavored Icing: Use colored icing or flavored icings (like vanilla or almond) to switch things up!
Chef’s Notes
These Spider Web Brownies have a special place in my heart and have evolved over the years. Initially, I used to go all out with themes for every holiday. Now, I appreciate the simplicity of elegant touches. Although I still sprinkle in those fun designs, I love how they can add a little magic to everyday moments.
Once during a cooking class, I jokingly added gummy worms to the mix thinking it’d be hilarious. Let’s just say, it was way more popular than I anticipated! Though I’m back to spiders for the classic Halloween vibes, don’t be afraid to get creative with toppings.
FAQs and Troubleshooting
1. Why are my brownies too cakey?
If your brownies turned out too cakey, it may be because you overmixed the batter or baked them too long. Stick to the cooking time indicated in the recipe, and resist the urge to over-mix!
2. My icing is too runny. How can I fix it?
If your icing is runny, add more powdered sugar a tablespoon at a time until it reaches your desired thickness. You want it smooth but pipeable!
3. Can I freeze the brownies?
Absolutely! Once the brownies are fully cooled, you can freeze them before icing. Wrap them tightly in plastic wrap and foil, and they’ll last up to three months in the freezer. Just thaw and ice them when you’re ready to enjoy!
4. How do I store the decorated brownies?
Store your decorated brownies in an airtight container at room temperature for up to five days. If using icing, it’s best to consume them sooner for the best taste and presentation.
Nutritional Info
While nutritional information will vary based on your chosen recipe for brownies and icing, a typical serving boasts around 250-300 calories. Each brownie brings a delightful mix of fats, sugars, and carbohydrates that cater to your sweet tooth while keeping those moments around the table joyful. Just remember: moderation is key!
There you have it—a whimsical yet delectable recipe for Spider Web Brownies that will bring delight to any gathering. I hope you enjoy making these spooky treats as much as I enjoyed sharing the recipe with you! Tie on that apron, have some fun in the kitchen, and remember that every bite should be as joyous as the gathering itself. Happy baking!
PrintSpider Web Brownies
Delightful fudgy brownies decorated with a spooky spider web design, perfect for Halloween or any gathering.
- Prep Time: 15 minutes
- Cook Time: 25 minutes
- Total Time: 40 minutes
- Yield: 16 servings 1x
- Category: Dessert
- Method: Baking
- Cuisine: American
- Diet: Vegetarian
Ingredients
- 1 batch of brownies (your favorite recipe or box mix)
- White icing (store-bought or homemade)
Instructions
- Preheat your oven as per your brownie recipe’s instructions (usually around 350°F or 175°C).
- Grease a baking pan with non-stick spray or line it with parchment paper for easy removal.
- Melt your chocolate and butter together if making from scratch, then stir in sugar, eggs, flour, and vanilla until combined.
- Pour your batter into the prepared pan and bake for 20–25 minutes until a toothpick comes out with a few moist crumbs.
- Cool completely in the pan before transferring to a wire rack.
- Drizzle white icing on top to create the spider web design by piping a spiral and dragging lines with a toothpick.
- Add plastic spiders or candy spiders on top for decoration.
Notes
These brownies can be customized with different toppings and flavors to suit your taste. Enjoy the festive presentation!
Nutrition
- Serving Size: 1 brownie
- Calories: 300
- Sugar: 25g
- Sodium: 200mg
- Fat: 15g
- Saturated Fat: 8g
- Unsaturated Fat: 6g
- Trans Fat: 0g
- Carbohydrates: 40g
- Fiber: 2g
- Protein: 4g
- Cholesterol: 30mg
Keywords: brownies, Halloween, dessert, spider web, chocolate
Ghost Cupcakes
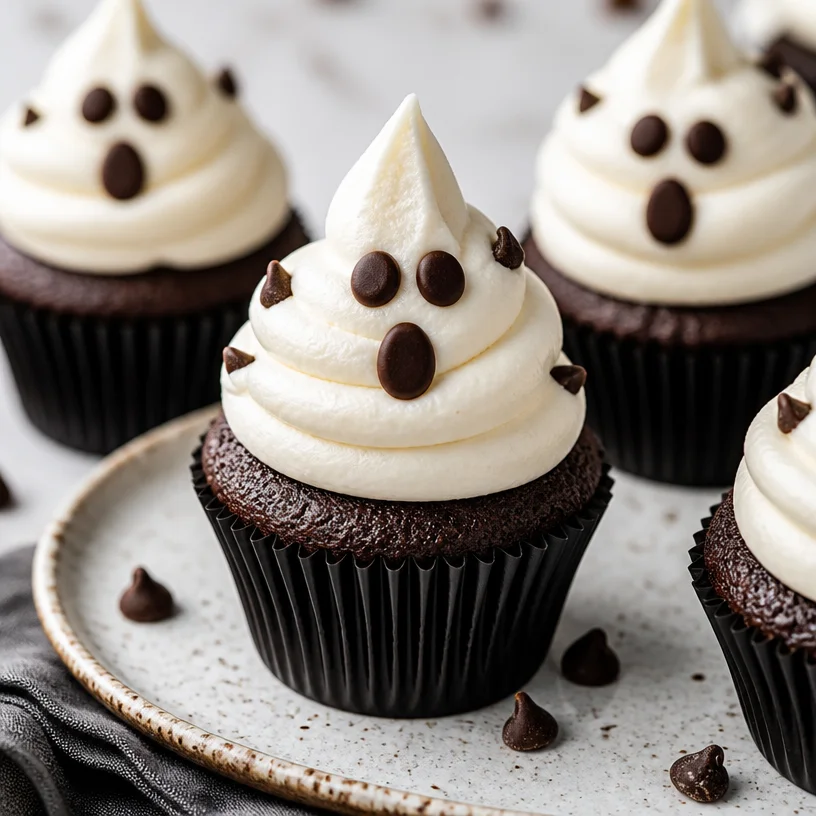
Ghost Cupcakes: A Spooktacular Treat for Ghoulish Gatherings
Hello, fellow food enthusiasts! Today, we’re diving into the whimsically delicious world of Ghost Cupcakes—the perfect treat to haunt your kitchen and delight your guests! Whether you’re hosting a Halloween bash or simply looking to add a touch of seasonal fun to your dessert table, these charming little cupcakes will brighten any gathering with their spooky faces and delightful flavors.
Imagine soft, fluffy cupcakes topped with silky buttercream, decorated to look like friendly little ghosts—irresistible, right? I remember the first time I made these whimsical treats with my niece. We set out on an adventurous baking mission, armed with a sprinkle of mischief and a whole lot of enthusiasm. As we whipped up the batter, flour flew into the air like a cloud of spooky magic, and giggles echoed throughout the kitchen. The best part? Licking the bowl and, of course, decorating those cupcakes to capture the perfect ghostly spirit!
Baking allows us to create memories and share joy, and these Ghost Cupcakes are no exception. So, let’s slip on our aprons, grab those mixing bowls, and channel our inner ghostly chefs!
My Ghostly Baking Memory
One Halloween night, many years ago, I found myself whipped up a cupcake party in our kitchen with friends. We were a motley crew of aspiring bakers, and our task was to concoct the spookiest treats we could dream of. Little did we know that what started as a quest for the creepiest cupcake would result in a night of belly laughs, flour fights, and plenty of ghostly confections.
As the evening rolled on, we experimented with flavors, and I decided to add a light touch of almond extract to my batter. My friends were curious—how would that taste? By the end of the night, those cupcakes turned out not just to be frighteningly adorable but also absolutely delicious! That night, amidst the laughter and chaos, I learned a valuable lesson: Baking isn’t just about the final product; it’s about the joy of creating together. And now, I’m excited to share this ghostly delight with you!
Ingredients
Let’s gather our ingredients for these delightful Ghost Cupcakes! I promise you’ll find every bite worth haunting.
-
1 ½ cups all-purpose flour
A vital ingredient for structure and stability. For gluten-free options, you can swap this with a 1:1 gluten-free baking flour blend. -
1 ½ teaspoons baking powder
This is our little magic ingredient that makes cupcakes rise and become fluffy! Make sure it’s fresh; old baking powder can lead to dense cupcakes. -
½ teaspoon salt
A pinch of salt enhances the flavor of the sweet ingredients, bringing balance to your cupcakes. -
½ cup unsalted butter, softened
Creaming butter adds a rich flavor and tender texture. If you’re dairy-free, substituting with coconut oil or a vegan margarine works just as well. -
1 cup sugar
This is essential for sweetness! For a healthier option, you could use coconut sugar or a sugar substitute, but make sure to check your ratios. -
2 large eggs
Eggs help bind the ingredients, creating a wonderful structure. For vegan cupcakes, you can use ½ a mashed banana or ¼ cup of applesauce per egg. -
1 teaspoon vanilla extract
Pure vanilla extract adds fragrance and depth of flavor. If you’re in a pinch, imitation vanilla works, but there’s no substitute for the real thing! -
½ cup milk
This moisture-rich ingredient keeps your cupcakes tender. You can easily use any plant-based milk, like almond or oat milk, to suit dietary needs. -
1 cup buttercream frosting
The ghoulish topping! If time is tight, you can use store-bought buttercream or whip up a quick homemade version. -
Chocolate chips, for eyes
Mini chocolate chips are perfect for creating a spooky yet cute look for our ghosts!
Step-by-Step Instructions
Now that we have our ingredients, let’s get our ghostly bake on! Follow these steps for perfectly fluffy Ghost Cupcakes:
Step 1: Preheat and Prep
Preheat your oven to 350°F (175°C). Line a cupcake pan with paper liners—choose fun ones to add to the spirit of the occasion. I like to use white liners to complement the ghostly theme!
Step 2: Whisk Dry Ingredients
In a large mixing bowl, whisk together the flour, baking powder, and salt. Get your whisk moving! This is crucial for ensuring the baking powder is evenly distributed, leading to beautifully risen cupcakes.
Step 3: Cream the Butter and Sugar
In another bowl, cream the softened butter and sugar together until light and fluffy—about 3–4 minutes. If your butter isn’t soft enough, cheat a little and microwave it for 10 seconds. Just remember, we want it soft, not melted!
Step 4: Add Eggs and Vanilla
Crack in the eggs one at a time, mixing well after each addition. Pour in that glorious vanilla extract and give it a quick mix. Your kitchen should be starting to smell divine by now!
Step 5: Combine Wet and Dry
Next, alternate adding the flour mixture and milk to the butter mixture, starting and ending with the flour. This method ensures that the batter remains light and fluffy. Mix just until combined—don’t overdo it!
Step 6: Fill the Cupcake Liners
With a spoon (or a cookie scoop for even portions), fill each cupcake liner about ⅔ of the way full with batter. This gives them enough room to rise without overflowing.
Step 7: Bake!
Place your cupcake pan in the preheated oven and bake for 18–20 minutes, or until a toothpick inserted in the center comes out clean. Every oven is different, so start checking at the 18-minute mark.
Step 8: Cool Completely
Once baked, let your cupcakes cool in the pan for 5 minutes, then carefully transfer them to a wire rack to cool completely. Resist the urge to frost them when they’re warm; let them cool down to prevent your buttercream from melting away!
Step 9: Frost the Ghosts
Once the cupcakes are completely cool, it’s time to frost! If you have a piping bag, use a round tip for that ghostly swirl, or you can apply frosting with a spatula. Let your creativity flow like a spooky apparition!
Step 10: Create Ghostly Faces
Use mini chocolate chips to stick onto the buttercream, creating cute little eyes. You can make them happy, surprised, or even mischievous! Just remember, the scarier the face, the sweeter the treat.
Serving Suggestions
To serve, arrange your Ghost Cupcakes on a spooky-themed cake stand or a simple white platter. They look fabulous when surrounded by seasonal décor—think pumpkins, spider webs, and a few flickering candles for a hauntingly festive atmosphere!
Recipe Variations
Feeling adventurous? Here are some fun twists you can try with your Ghost Cupcakes:
- Choco-Ghost Delight: Incorporate mini chocolate chips into the batter for extra chocolatey goodness.
- Pumpkin Spice Ghosts: Replace ½ cup of the flour with canned pumpkin puree and add 1 teaspoon pumpkin spice for a fall twist.
- Colorful Spooks: Tweak the vanilla buttercream with some food coloring for pastel or vibrant ghosts.
- Vegan Ghosties: Follow the substitutions mentioned in the ingredient section to make your treats vegan-friendly.
- Spicy Cinnamon Ghosts: Add a teaspoon of cinnamon and a pinch of nutmeg for a warm, spicy flavor perfect for autumn.
Chef’s Notes
Ghost Cupcakes hold a special place in my heart—not only for their incredible flavors but also for the joy they bring when shared. Over the years, this recipe has evolved; whether experimenting with different flavors or offering gluten-free choices, each iteration has added to the fun! The true essence of these cupcakes lies in the smiles they bring as friends and family gather around. So, grab your favorite spooky playlist, and let’s bake up a storm!
FAQs and Troubleshooting
Q: My cupcakes sunk in the middle. What went wrong?
A: Most often, this can be due to overmixing the batter or not testing your oven temperature accurately. Always ensure your batter is mixed just until combined, and consider using an oven thermometer for precision!
Q: Can I make the batter ahead of time?
A: You can prepare the batter in advance, but I recommend baking them right before you need them. Freshly baked cupcakes yield the best flavor and texture.
Q: How do I store unused cupcakes?
A: Store your Ghost Cupcakes in an airtight container at room temperature for up to 3 days. If you frost them, they can last a little less. For longer storage, freeze un-frosted cupcakes for up to 3 months.
Q: What should I do if my frosting is too runny?
A: If your buttercream is runny, try adding more powdered sugar to thicken it up. You can also refrigerate it for a short while to firm it up before frosting.
Now that you’ve dipped your toes into this delightful Halloween treat, I hope you feel inspired to bake your own Ghost Cupcakes! They’re not just a treat; they’re a chance to create connections and build memories around your table. Happy baking!
PrintGhost Cupcakes
Whimsical Ghost Cupcakes topped with silky buttercream, perfect for Halloween gatherings.
- Prep Time: 15 minutes
- Cook Time: 20 minutes
- Total Time: 35 minutes
- Yield: 12 servings 1x
- Category: Dessert
- Method: Baking
- Cuisine: American
- Diet: Vegetarian
Ingredients
- 1 ½ cups all-purpose flour
- 1 ½ teaspoons baking powder
- ½ teaspoon salt
- ½ cup unsalted butter, softened
- 1 cup sugar
- 2 large eggs
- 1 teaspoon vanilla extract
- ½ cup milk
- 1 cup buttercream frosting
- Chocolate chips, for eyes
Instructions
- Preheat your oven to 350°F (175°C). Line a cupcake pan with paper liners.
- Whisk together the flour, baking powder, and salt in a large mixing bowl.
- Cream the softened butter and sugar together until light and fluffy—about 3–4 minutes.
- Add the eggs one at a time, mixing well after each addition. Pour in the vanilla extract and mix again.
- Combine the flour mixture and milk to the butter mixture, alternating between the two, starting and ending with flour.
- Fill each cupcake liner about ⅔ of the way full with batter.
- Bake for 18–20 minutes, or until a toothpick inserted in the center comes out clean.
- Cool the cupcakes in the pan for 5 minutes, then transfer to a wire rack to cool completely.
- Frost the cooled cupcakes with frosting and use mini chocolate chips for eyes to create ghostly faces.
Notes
For gluten-free cupcakes, swap all-purpose flour with a gluten-free baking flour blend. You can personalize frosting colors and add flavors to the batter for variations.
Nutrition
- Serving Size: 1 cupcake
- Calories: 200
- Sugar: 15g
- Sodium: 150mg
- Fat: 8g
- Saturated Fat: 5g
- Unsaturated Fat: 2g
- Trans Fat: 0g
- Carbohydrates: 28g
- Fiber: 0g
- Protein: 2g
- Cholesterol: 30mg
Keywords: Ghost Cupcakes, Halloween Treats, Dessert, Fun Recipes, Baking