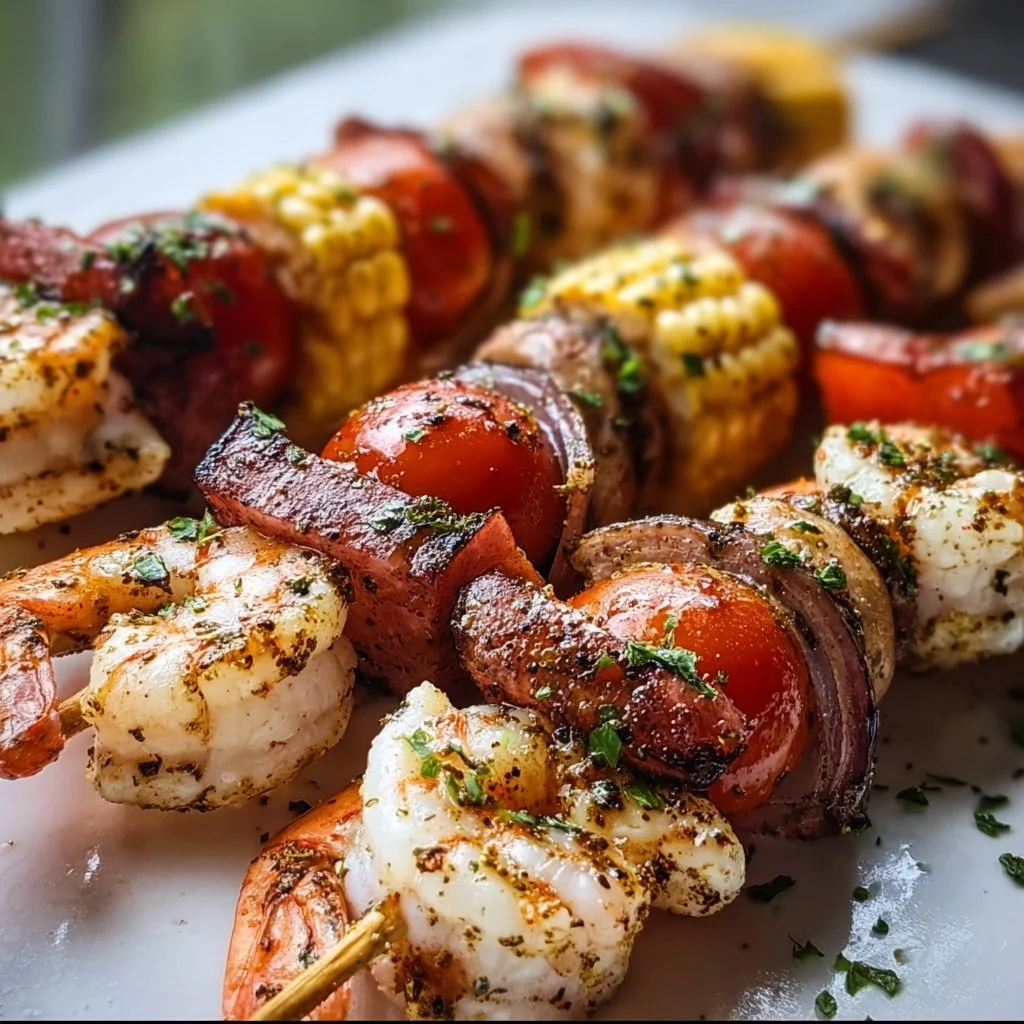
Grilled Seafood Skewers
Flavorful Grilled Seafood Skewers: A Taste of the Seas and Savory Delight
Hello, fellow culinary adventurers! Are you ready to embark on a delicious journey with me today? Let’s fire up the grill and whip up something incredibly enticing: Grilled Seafood Skewers! Imagine a platter filled with colorful, juicy shrimp and spicy sausage perfectly intertwined with crisp, fresh vegetables that promise to add a burst of flavor to your summer gatherings or cozy weeknight dinners.
Grilled seafood skewers bring a certain joy to any meal, don’t they? The sizzle of the grill, the inviting aroma wafting through the air, and the sight of those beautifully charred pieces coming together are enough to make any foodie excited. They’re not just food; they’re an experience! These skewers are an epitome of effortless elegance — they look impressive, but they’re surprisingly straightforward to prepare. Plus, eating skewers is inherently fun; there’s something about picking them off the stick that brings out the playful side of dining.
And, let’s be real: grilling gives our food a delightful smoky flavor that simply can’t be replicated in the oven. Whether you’re hosting friends for a summer barbecue or looking to spice up your dinner routine, these skewers will delight your palate and might even turn your kitchen into a gathering spot. So, tie on that apron, grab a refreshing beverage, and let’s create something delightful together!
Personal Story
Ah, grilled seafood skewers! They remind me of summer evenings spent at my grandparents’ house. Every year, as soon as the weather warmed up, my family would gather for what we affectionately dubbed “Grill Nights.” My grandfather was the king of the grill, a culinary wizard with an eye for balancing flavors. He’d set up a table under the twinkling fairy lights in the backyard, the grill glowing with anticipation.
One of my fondest memories was when I was tasked with assembling the skewers. My grandma would hand me the skewers and a basket of vibrant vegetables – the bell peppers jiggled with color while the zucchini came fresh from her garden. I vividly recall the thrill of pairing the juicy shrimp with spicy sausage and the crackling sound of the grill as I dropped them on.
Each skewer was a little masterpiece of its own, and with every bite, we savored not just the amazing flavors but the warmth of family, laughter, and satisfaction of a meal well-earned. Today, I carry this tradition with pride and love sharing these delectable skewers with friends and family, continuing the legacy of summers spent enjoying good food and togetherness.
Ingredients
Here’s what you’ll need to craft your own grilled seafood skewers:
-
1 pound shrimp, peeled and deveined: Shrimp are quick to cook, flavorful, and irresistibly tender when grilled. You can substitute with scallops or chicken breast if you’re craving variety.
-
1 pound sausage, sliced: I love using spicy Italian sausage for that extra kick! You could easily switch to a different type of sausage for varying flavor profiles — think chorizo or even turkey sausage for a lighter option.
-
2 bell peppers, cut into chunks: Color adds life to your dish! Use a mix of red, yellow, and green for a visual feast. If you’re out of fresh peppers, you can try zucchini or cherry tomatoes as substitutes.
-
1 zucchini, sliced: This veggie is not only nutritious but also grills beautifully. If you’re not a zucchini fan, squash or mushrooms can work wonders in their place.
-
1 red onion, cut into chunks: Grilling mellows the sharpness of onions and adds a hint of sweetness. If red onions aren’t available, yellow onions or even shallots could do the trick!
-
2 tablespoons olive oil: This helps keep everything moist and contributes to a slight richness. You can replace it with avocado oil or melted butter for a different flavor twist.
-
1 teaspoon garlic powder: A pantry staple that brings a delectable aroma to your skewers. Fresh minced garlic could substitute if you prefer a more potent garlicky flavor!
-
1 teaspoon paprika: Paprika lends a beautiful color and warmth. You can opt for smoked paprika for an added smoky note or skip it altogether for a more neutral flavor.
-
Salt and pepper to taste: Essential for elevating the flavors of your dish. Don’t hesitate to add more or less based on your preference.
-
Skewers (wooden or metal): Remember, if you opt for wooden skewers, soak them in water for a bit beforehand to prevent burning on the grill.
Step-by-Step Instructions
-
Prep Your Ingredients: Start by peeling and deveining the shrimp if you haven’t done so already. Rinse them under cold water and pat them dry with a paper towel. This step is important because excess moisture can result in a less-than-ideal grilling experience.
-
Chop the Vegetables: Next, take a chopping board and cut your bell peppers, zucchini, and red onion into chunks. Think bite-sized pieces to ensure even cooking. Visualize how beautiful the colors will be once they’re caramelized on the grill — it’s pure magic!
-
Create the Marinade: In a large bowl, add the olive oil, garlic powder, paprika, salt, and pepper. Mix it well to create your marinade. Let’s be honest: this mix is going to make everything so delicious!
-
Combine Ingredients: Toss in your shrimp, sausage, and the chopped veggies. Make sure all the ingredients are well coated in your marinade. Feeling adventurous? You can even let this marinate for 30 minutes if you have time.
-
Skewering Time!: Start threading your ingredients onto the skewers. I like to alternate between the shrimp, sausage, and vegetables for a colorful presentation. This not only looks appetizing but also ensures even cooking.
-
Preheat Your Grill: While you’re assembling the skewers, fire up your grill (or grill pan) on medium-high heat. The grill needs to be hot to get those lovely grill marks and achieve that fantastic flavor.
-
Grill the Skewers: Place the skewers on your preheated grill. Grill each side for about 2-3 minutes; the shrimp should turn opaque, and the sausage will get those lovely char marks. Keep an eye on them; nobody likes a burnt skewer!
-
Finishing Touches: Once they’re cooked, remove the skewers from the grill (carefully, they’ll be hot!) and allow them to rest for a few minutes. This helps retain their juices.
Serving Suggestions
Now, it’s time to plate up your culinary masterpiece! I recommend serving the skewers on a large, rustic wooden board or a vibrant platter. You could sprinkle some freshly chopped herbs like parsley or cilantro on top for that final touch. A side of lemon wedges can brighten the dish’s flavors too! Drizzling a bit of balsamic glaze or a yogurt sauce on the side can take your presentation (and flavor) to the next level.
Recipe Variations
Want to mix things up? Here are a few creative twists on these grilled seafood skewers:
-
Citrus Infusion: Add slices of lemon or lime onto your skewers for a zesty twist that complements seafood beautifully.
-
Spicy Kick: Spice things up by marinating your shrimp in a mixture of chili flakes or hot sauce for a fiery flavor.
-
Herb Bliss: Brighten up this dish by adding fresh herbs like basil or cilantro to the marinade or garnishing your skewers afterward.
-
Sweet Treat: Consider adding pineapple chunks for a tropical twist. The sweetness caramelizes on the grill, pairing wonderfully with the savory elements!
-
Vegetarian Option: Swap the shrimp and sausage for hearty cubed tofu and hearty veggies like eggplant or Portobello mushrooms for a satisfying vegetarian option.
Chef’s Notes
Over the years, my grilled seafood skewers have evolved significantly. Initially, I would just throw everything together with minimal thought, but as I experimented more, I realized how truly magical marinades could be. The simple act of letting the shrimp soak in a flavorful mix does wonders! I’ve also embraced the idea that presentation counts. A little effort in the plating can elevate a dish from good to show-stopping!
And let’s not forget the ingredients! Using seasonal veggies truly enhances the dish, so don’t hesitate to adapt based on what you find in your farmer’s market. Get creative and make this recipe your own!
FAQs and Troubleshooting
1. My shrimp ended up rubbery. What did I do wrong?
- Overcooking can lead to rubbery shrimp. Make sure to grill them just until they turn opaque, which usually takes just 2-3 minutes on each side.
2. Can I prep the skewers in advance?
- Absolutely! You can assemble the skewers and store them in the fridge for a couple of hours before grilling. Just ensure they are covered to avoid drying out.
3. What if I don’t have a grill?
- No problem! You can use a grill pan on your stove or even bake them in the oven at 400°F for about 15-20 minutes, flipping halfway.
4. How can I make these skewers gluten-free?
- This recipe is already gluten-free! Just be sure to choose gluten-free sausage if you’re using store-bought.
Nutritional Info
While the nutritional specifics can vary based on your sausage choice and quantities, a typical skewer serving is packed with protein, fiber, and plenty of vitamins from the veggies. With shrimp being a fantastic source of lean protein and the array of colorful vegetables providing fiber and antioxidants, you’re definitely nourishing your body while enjoying these delightful skewers!
Whether you’re savoring them solo or sharing them with loved ones, these Grilled Seafood Skewers are sure to bring joy to your table. Embrace the warmth of cooking, the thrill of grilling, and the love of sharing food. Until next time, happy cooking!
PrintFlavorful Grilled Seafood Skewers

Delicious grilled skewers featuring juicy shrimp, spicy sausage, and fresh vegetables, perfect for summer gatherings or cozy dinners.
- Prep Time: 15 minutes
- Cook Time: 15 minutes
- Total Time: 30 minutes
- Yield: 4 servings 1x
- Category: Main Course
- Method: Grilling
- Cuisine: Seafood
- Diet: Gluten-Free
Ingredients
- 1 pound shrimp, peeled and deveined
- 1 pound sausage, sliced
- 2 bell peppers, cut into chunks
- 1 zucchini, sliced
- 1 red onion, cut into chunks
- 2 tablespoons olive oil
- 1 teaspoon garlic powder
- 1 teaspoon paprika
- Salt and pepper to taste
- Skewers (wooden or metal)
Instructions
- Prep your ingredients: Start by peeling and deveining the shrimp if you haven’t done so already. Rinse them under cold water and pat them dry with a paper towel.
- Chop the vegetables: Cut your bell peppers, zucchini, and red onion into chunks.
- Create the marinade: In a large bowl, mix the olive oil, garlic powder, paprika, salt, and pepper.
- Combine ingredients: Toss in your shrimp, sausage, and the chopped veggies.
- Start skewering: Thread your shrimp, sausage, and vegetables onto the skewers, alternating for a colorful presentation.
- Preheat your grill: Fire up your grill on medium-high heat.
- Grill the skewers: Place them on the grill and cook for about 2-3 minutes per side.
- Remove the skewers from the grill and allow them to rest for a few minutes before serving.
Notes
Feel free to swap out the ingredients for your preferred flavors or seasonal veggies! Wooden skewers should be soaked in water beforehand to prevent burning.
Nutrition
- Serving Size: 1 skewer
- Calories: 250
- Sugar: 3g
- Sodium: 600mg
- Fat: 15g
- Saturated Fat: 4g
- Unsaturated Fat: 9g
- Trans Fat: 0g
- Carbohydrates: 10g
- Fiber: 2g
- Protein: 20g
- Cholesterol: 150mg
Keywords: grilled skewers, seafood, shrimp, summer recipes, BBQ, healthy dinner

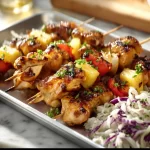
Easy Hawaiian Chicken Kabobs
# Easy Hawaiian Chicken Kabobs: A Tropical Escape on a Stick

## Introduction

Aloha, food friends! 🌺 If you’re in the mood to take your taste buds on a little tropical vacation, you’ve landed in the right place. Today, we’re diving into the delightful world of **Easy Hawaiian Chicken Kabobs**. These kabobs are not just a meal; they’re an experience. With a sweet and savory glaze that brings the flavors of the islands to your table, they’re perfect for summer barbecues, family dinners, or even a cozy nighttime grill session.

Picture this: the sun is setting, the smell of grilled chicken wafts through the air, mingling with juicy pineapple, and laughter fills the backyard. These kabobs are not just about food; they’re about creating beautiful moments with family and friends. The best part? They are oh-so-easy to whip up, so you can focus more on the company around your table and less on the kitchen chaos.

At Ivory Apron, we believe that cooking should feel elegant but never intimidating. With just a handful of ingredients and a few simple steps, you’ll be on your way to having a delicious feast that looks like you’ve been slaving away in the kitchen—without all the effort!

So, grab your apron and let’s get cooking. I promise you’ll be wanting to make these kabobs over and over again!

## Personal Story

I’ll never forget the summer of my ninth birthday. My parents threw a luau-themed party in our backyard, complete with hula decorations, grass skirts, and a whole lot of tropical flair. My favorite part? The food! We had a feast of grilled chicken marinated in pineapple juice and soy sauce, fresh fruit skewers, and a coconut cake that was to die for. I remember running around with my friends, our fingers sticky from juicy fruits and messy BBQ sauce, laughing and playing until the sun went down. It was the shining highlight of my childhood, a magical day where food and fun came together.

As I grew older and started hosting my own gatherings, I often looked back to that unforgettable birthday party for inspiration. Those kabobs became a staple in my recipe repertoire. They are just as vibrant and festive as I remember, and every bite takes me back to those carefree sunny days. The other goal? To recreate that feeling of joy and connection through food for those I host.

## Ingredients

Let’s talk about what you’ll need to create these Hawaiian Chicken Kabobs, and a few handy tips along the way:

- **3/4 cup pineapple juice**: This sweet nectar is the key to bringing that island vibe! You can use store-bought juice or, better yet, fresh juice for a more vibrant flavor. If you don’t have pineapple juice, orange juice works in a pinch.

- **1/2 cup coconut aminos**: A scrumptiously savory alternative to soy sauce, it provides a hint of sweetness and umami without soy. If you can’t find coconut aminos, low-sodium soy sauce or tamari will work, although the flavor profile will shift slightly.

- **1/2 cup ketchup**: This adds a rich sweetness and thickness to your sauce. If you’re looking for a healthier option, try substituting with a homemade tomato sauce or ketchup made with less sugar.

- **1/2 cup brown sugar**: Sweetness is essential for balance in this dish. You can substitute with honey or maple syrup, however, you may need to adjust the liquid ratios in your marinade.

- **2 tablespoons Frank’s Red Hot sauce**: This adds just a touch of heat and a tangy kick! For a milder flavor, you could use a little less or swap it with a sweet chili sauce.

- **1 tablespoon minced garlic**: Fresh garlic is always the way to go! If you’re in a hurry, you can use garlic powder, but fresh gives off a more vibrant aroma.

- **1 tablespoon minced ginger**: The fragrant and zesty punch of ginger enhances the flavor profile. You can use ground ginger as a substitute, but fresh is always preferred for that zing!

- **1 1/2 lbs chicken thighs (skinless and boneless)**: Chicken thighs are juicy and forgiving, making them perfect for grilling. If you prefer, chicken breasts can also be used, though they are leaner and might dry out more easily.

- **20 oz can pineapple chunks**: These not only add sweetness but juiciness to the kabobs. If fresh pineapple is available, feel free to use it! Just be sure to cut it into similar-sized chunks.

- **6 kabob skewers**: If you’re using wooden skewers, don’t forget to soak them in water for 30 minutes to prevent burning on the grill. Metal skewers are reusable and fit the eco-friendly bill!

- **Sea salt and black pepper (to taste)**: Essential seasonings for bringing out the best flavors in your dish.

## Step-by-Step Instructions

1. **Prepare the Marinade**: In a mixing bowl, whisk together the pineapple juice, coconut aminos, ketchup, brown sugar, Frank’s Red Hot sauce, minced garlic, and minced ginger until smooth. This is where the magic happens! You’re creating a balance of sweetness and zing that embodies tropical flavors.

2. **Marinate the Chicken**: Place the chicken thighs in a resealable plastic bag or a bowl. Pour about two-thirds of the marinade over the chicken, toss to coat, and seal the bag or cover the bowl. Let it marinate in the fridge for at least 30 minutes, but ideally, a couple of hours will let those flavors simmer through the chicken.

3. **Prep the Pineapple**: If you’re using canned pineapple, drain and pat the chunks dry with paper towels to avoid excess moisture. If you’re using fresh pineapple, cut it into bite-sized pieces to match the chicken.

4. **Skewering Time!**: Preheat your grill to medium-high heat. Thread the marinated chicken thighs and pineapple chunks alternately onto the skewers. Leave a little space between each piece for even cooking. I like to place a piece of chicken, then a chunk of pineapple, and repeat!

5. **Grilling**: Lightly oil the grill grates before placing your kabobs on. Grill the skewers for about 10-15 minutes, turning occasionally, until the chicken is cooked through and has beautiful grill marks. This is where you’ll want a basting brush handy to apply the reserved marinade for the last few minutes of grilling! This not only reinforces flavor but makes the kabobs shiny and appealing.

6. **Serve**: Once cooked, remove the kabobs from the grill and let them rest for a few minutes. This allows the juices to redistribute, making each bite succulent. Drizzle any remaining marinade over the kabobs for an extra layer of flavor.

## Serving Suggestions

When it comes to plating these Hawaiian Chicken Kabobs, let’s keep it fun and vibrant! Serve them on a large platter surrounded by fresh greenery like cilantro or mint for that tropical vibe. A bowl of extra pineapple chunks and lime wedges will add a refreshing touch on the side. You can also pair these kabobs with a coconut rice or a light salad to create a perfect meal that embodies the essence of summer!

## Recipe Variations

Feel like switching things up? Here are some delicious variations you can try:
1. **Veggie Kabobs**: Add bell peppers, red onions, and zucchini for a colorful vegetarian option. Marinate the veggies in the same sauce for a cohesive flavor.

2. **Teriyaki Twist**: Swap out the marinade for a teriyaki sauce for a different flavor profile. Just ensure to balance the sweetness with some lime juice!

3. **Pineapple Salsa Topping**: Top your kabobs with a fresh pineapple salsa made of diced pineapple, jalapeño, red onion, and cilantro for an explosion of freshness.

4. **Spicy Mango**: Spice things up by adding fresh mango chunks instead of pineapple. The sweet and spicy combo will leave your tastebuds dancing!

5. **Gluten-Free Option**: For a gluten-free rendition, simply substitute coconut aminos with tamari or a gluten-free soy sauce.

## Chef’s Notes

Over the years, my Hawaiian Chicken Kabobs have evolved into different variations, but the heart of the recipe remains the same—delicious, vibrant, and easy to make. I once made these for a potluck, and someone accidentally spilled half the marinade on one of the kabobs just before grilling. Rather than toss it, I grilled it anyway. And guess what? It turned out to be the star of the show! Sometimes, culinary accidents can create delightful surprises, so don’t be afraid to experiment!

The best tip? Always taste as you go. Cooking is an evolving art, and finding your flavor balance is part of the joy of being in the kitchen.

## FAQs and Troubleshooting

1. **What if my chicken is dry?**
   - Overcooking is often the culprit for dry chicken. Chicken thighs are more forgiving than breasts, but it’s always good to use a meat thermometer; aim for an internal temperature of 165°F for perfectly juicy chicken!

2. **Can I use frozen chicken?**
   - Yes, but you’ll want to fully thaw your chicken thighs first to ensure an even marinade and cooking. When in doubt, marinate overnight for the best flavor absorption!

3. **What sides pair well?**
   - Fresh coleslaw, grilled corn on the cob, or a cooling cucumber salad complement these kabobs beautifully. A tropical fruit salad makes a colorful and refreshing addition!

4. **How do I store leftovers?**
   - These kabobs can be stored in an airtight container in the fridge for up to 3 days. Simply reheat gently in the oven or on a stovetop grill for the best results.

## Nutritional Info (per serving)

- Calories: Approx. 280
- Total Fat: 7g
- Saturated Fat: 2g
- Cholesterol: 84mg
- Sodium: 640mg
- Total Carbohydrates: 27g
- Dietary Fiber: 1g
- Sugars: 15g
- Protein: 28g

---

Well, there you have it! A tropical delight that’s sure to impress—whether it’s at a family gathering or a cozy dinner for two. Let these Easy Hawaiian Chicken Kabobs take you on a flavorful journey to the islands, allowing you to connect over good food and even better company. Happy cooking, and remember, every meal is a chance to create memories!
Easy Hawaiian Chicken Kabobs
Delicious Hawaiian Chicken Kabobs with a sweet and savory glaze, perfect for summer gatherings.
- Prep Time: 15 minutes
- Cook Time: 15 minutes
- Total Time: 30 minutes
- Yield: 4 servings 1x
- Category: Main Course
- Method: Grilling
- Cuisine: Hawaiian
- Diet: Paleo
Ingredients
- 3/4 cup pineapple juice
- 1/2 cup coconut aminos
- 1/2 cup ketchup
- 1/2 cup brown sugar
- 2 tablespoons Frank’s Red Hot sauce
- 1 tablespoon minced garlic
- 1 tablespoon minced ginger
- 1 1/2 lbs chicken thighs (skinless and boneless)
- 20 oz can pineapple chunks
- 6 kabob skewers
- Sea salt and black pepper (to taste)
Instructions
- Prepare the Marinade: In a mixing bowl, whisk together the pineapple juice, coconut aminos, ketchup, brown sugar, Frank’s Red Hot sauce, minced garlic, and minced ginger until smooth.
- Marinate the Chicken: Place the chicken thighs in a resealable plastic bag or a bowl. Pour about two-thirds of the marinade over the chicken, toss to coat, and seal the bag or cover the bowl.
- Prep the Pineapple: If you’re using canned pineapple, drain and pat the chunks dry with paper towels.
- Skewering Time!: Preheat your grill to medium-high heat. Thread the marinated chicken thighs and pineapple chunks alternately onto the skewers.
- Grill: Lightly oil the grill grates before placing your kabobs on. Grill the skewers for about 10-15 minutes, turning occasionally.
- Serve: Once cooked, remove the kabobs from the grill and let them rest for a few minutes.
Notes
For best flavor, marinate the chicken for at least 30 minutes, ideally a couple of hours. Adjust the spices according to your taste.
Nutrition
- Serving Size: 2 skewers
- Calories: 280
- Sugar: 15g
- Sodium: 640mg
- Fat: 7g
- Saturated Fat: 2g
- Unsaturated Fat: 3g
- Trans Fat: 0g
- Carbohydrates: 27g
- Fiber: 1g
- Protein: 28g
- Cholesterol: 84mg
Keywords: kabobs, chicken, Hawaiian, summer recipes, grilling, easy recipes, tropical

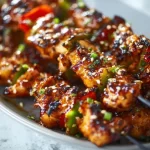
Honey Garlic Chicken Kabobs
# Sweet and Savory Honey Garlic Chicken Kabobs

## Introduction

Hey there, fellow foodies! Welcome to another delicious adventure in my kitchen. Today, we’re diving into a dish that’s equal parts comforting and exciting: **Honey Garlic Chicken Kabobs**. Perfect for grilling up in the summer or roasting during colder months, these skewers are bursting with flavor that’ll make your taste buds dance!

Now, I have to say, there’s something undeniably fun about cooking kabobs. Maybe it’s the beautiful colors of the ingredients, or perhaps it’s the memories they bring back of gathering with family and friends around a smoky grill. Whatever it is, when I think of kabobs, I’m immediately transported to sunny backyard barbecues, laughter echoing in the air, and the intoxicating aroma of grilling chicken wafting through the neighborhood.

The joy of assembling skewers can’t be understated. It’s like food art—each ingredient gets to shine, all while creating a symphony of flavors. And trust me, when you drizzle that sweet honey garlic sauce over the chicken and veggies, it’s pure magic.

So, roll up your sleeves, tie on that apron, and let’s create something unforgettable together! Whether you’re hosting a gathering or just treating yourself to a satisfying meal, this recipe is sure to impress. Plus, the best part? It’s super approachable, so you can get glorious results even if you’re just starting your cooking journey. Let's dive in!

## Personal Story

I remember the first time I made kabobs—it was a warm summer evening, and I had invited a few close friends over for a barbecue. It was one of those magical nights where everything seems effortless. I had marinated the chicken earlier in the day, prepping the honey garlic sauce and fresh veggies. The kitchen filled with sweet and savory aromas, making even my impatient friends hang around, eagerly awaiting the grilled delight.

As the sun dipped below the horizon, we gathered in the backyard, the grill crackling with heat. I handed each friend a skewered kabob, and we toasted with our glasses of lemonade, laughing as we cooked together. The moment we took that first bite was unforgettable; the combination of juicy chicken, crisp veggies, and that sticky honey glaze was nothing short of heavenly.

That night not only filled our bellies but also created cherished memories. It solidified the notion that food isn’t just about the ingredients—it's about the people and moments we share. To me, that’s what cooking is really about: bringing people together around the table (or grill, in this case) to savor beautiful moments and delicious flavors.

## Ingredients

Here’s what you’ll need to whip up these scrumptious **Honey Garlic Chicken Kabobs**:

- **2 lbs chicken breast, cubed**: Chicken breast is our star ingredient here. Use fresh, high-quality chicken for the juiciest results. If you’re looking for a leaner option, boneless, skinless thighs work beautifully too.

- **1/4 cup honey**: This is what adds that delightful sweetness and glossy finish. If you’re out of honey, maple syrup can be a fun and tasty substitute that also brings a touch of sweetness.

- **1/4 cup soy sauce**: Packed with umami, soy sauce balances the sweetness of the honey. You can opt for low-sodium soy sauce if you’re watching your sodium intake, or even coconut aminos for a gluten-free option.

- **3 cloves garlic, minced**: Garlic adds depth and flavor to our marinade. Fresh is key here, but you can use powdered garlic in a pinch. Just remember that it’s more potent, so use about 1 teaspoon.

- **1 tablespoon sesame oil**: This oil infuses a nutty flavor that enhances our dish. If you’re looking to cut calories, you can use olive oil instead, though you’ll miss that sesame allure.

- **1/2 teaspoon black pepper**: A dash of black pepper adds a subtle kick. If you want to spice things up, feel free to add red pepper flakes or even a pinch of cayenne!

- **Bell peppers, cut into pieces**: I love using colorful bell peppers for their crunch and sweetness. Throw in some red, yellow, and green for a vibrant dish! If you prefer other veggies, zucchini, mushrooms, or cherry tomatoes work excellently here.

- **Onions, cut into pieces**: Onions caramelize beautifully on the grill and add a nice flavor contrast. Red or yellow onions are perfect for this. If you want a milder taste, consider using sweet onions.

- **Skewers (wooden or metal)**: Whether you use wooden skewers or metal ones is a matter of preference. If you’re going with wooden skewers, don’t forget to soak them in water for about 30 minutes beforehand to prevent burning on the grill!

## Step-by-Step Instructions

### Step 1: Marinate the Chicken

In a mixing bowl, combine the honey, soy sauce, minced garlic, sesame oil, and black pepper. Whisk until well blended.

**Chef Tip:** If you have time, marinate the chicken for at least 30 minutes or even overnight in the refrigerator. The longer it sits, the more flavorful it becomes!

### Step 2: Cube Your Chicken

Cut the chicken breasts into 1-inch cubes, making sure they’re all around the same size for even cooking.

**Chef Hack:** If your chicken is a bit too slippery to cut, try placing it in the freezer for 15–20 minutes. This firms up the meat, making it much easier to slice.

### Step 3: Assemble the Kabobs

Thread the marinated chicken onto your skewers, alternating with pieces of bell peppers and onions.

**Chef Insight:** Don’t crowd the skewer! Leave a little space between each ingredient to allow for even cooking and that beautiful char we all crave.

### Step 4: Preheat the Grill

Get your grill sizzling hot over medium-high heat. If you're using a grill pan, heat it on the stovetop until it’s hot.

### Step 5: Grill the Kabobs

Place the skewers on the grill and cook for about 10-12 minutes, turning them occasionally. You want that char to develop on all sides and ensure the chicken is fully cooked (165°F or 75°C internal temperature).

**Chef Tip:** Avoid constantly flipping the kabobs too early! Let them get a nice sear before turning them to lock in those flavors.

### Step 6: Glaze and Serve

In the last few minutes of grilling, brush on any leftover marinade for an extra layer of flavor.

**Chef Hack:** Just be sure to reserve a small amount of marinade beforehand if you want to avoid cross-contamination!

### Step 7: Check for Doneness

Once the kabobs are beautifully charred and the chicken is no longer pink, remove them from the grill. Let them rest for a couple of minutes to allow the juices to redistribute.

## Serving Suggestions

To plate these kabobs, simply arrange them on a large platter, garnishing with fresh herbs like parsley or cilantro for a pop of color and freshness. Serve them warm alongside a refreshing side salad or fluffy rice to soak up that marvelous honey garlic sauce.

## Recipe Variations

1. **Spicy Honey Garlic Kabobs:** Add a splash of Sriracha or a pinch of red pepper flakes to the marinade for a kick!

2. **Teriyaki Twist:** Substitute the honey with a sweet teriyaki sauce for a different flavor profile that will still wow your guests.

3. **Vegetarian Delight:** Swap out the chicken for cubed firm tofu or tempeh, marinating it the same way. Toss in assorted veggies like zucchini and mushrooms for a delightful plant-based option.

4. **Herb-Infused Kabobs:** Add fresh herbs like rosemary or thyme to the marinade for an aromatic touch.

5. **Fruit & Chicken Combo:** Add chunks of pineapple to the skewers for a sweet twist that complements the savory chicken beautifully.

## Chef’s Notes

Every time I make these kabobs, I’m reminded of how versatile they are! I’ve adapted the recipe over the years, playing with different marinades and veggie combinations. Sometimes, I’ll even stuff the chicken with cheese for a gooey surprise!

A funny memory that comes to mind is the time I got a little too creative with the skewers. I decided to mix chicken, shrimp, and veggies on the same skewers. Let’s just say, I learned that some proteins cook at different rates. I ended up with perfectly cooked shrimp and slightly undercooked chicken! Lesson learned—stick with one type of protein per skewer for the best results.

## FAQs and Troubleshooting

### 1. **What if my chicken is dry?**

Overcooking is the most common culprit for dry chicken. Always use a meat thermometer—aim for 165°F (75°C) for perfectly juicy chicken. If you’re grilling on high heat, remember it cooks faster, so keep an eye on it!

### 2. **How do I prevent veggies from burning?**

To ensure your veggies cook evenly, cut them into larger pieces than the chicken. Also, give them a light coat of oil to prevent direct charring. If you’re worried about burning, consider grilling them in a grill basket.

### 3. **Could I bake these kabobs?**

Absolutely! Preheat your oven to 400°F (200°C) and place the kabobs on a foil-lined baking sheet. Bake for about 15-20 minutes, turning halfway through. I still recommend broiling the last couple of minutes for that nice char.

### 4. **Can I use frozen chicken?**

While it’s best to use fresh chicken, you can use frozen chicken as long as you thaw it fully before marinating and grilling. Just remember that thawing will take time, so plan ahead!

## Nutritional Info (Optional)

While this recipe offers a delightful serving of protein and veggies, I recommend checking nutritional values based on your specific ingredient brands and quantities!

---

So, are you ready to don that apron and get started on these delicious **Honey Garlic Chicken Kabobs**? Whether it's a casual weeknight dinner or an exciting grilling party, this flavorful dish might just become a new favorite. Happy cooking, and don’t forget to gather those you love around the table to enjoy!
Honey Garlic Chicken Kabobs
Delicious honey garlic chicken kabobs bursting with flavor, perfect for grilling or roasting.
- Prep Time: 30 minutes
- Cook Time: 12 minutes
- Total Time: 42 minutes
- Yield: 4 servings 1x
- Category: Main Course
- Method: Grilling
- Cuisine: American
- Diet: Gluten-Free
Ingredients
- 2 lbs chicken breast, cubed
- 1/4 cup honey
- 1/4 cup soy sauce
- 3 cloves garlic, minced
- 1 tablespoon sesame oil
- 1/2 teaspoon black pepper
- Bell peppers, cut into pieces
- Onions, cut into pieces
- Skewers (wooden or metal)
Instructions
- Marinate the chicken: In a mixing bowl, combine honey, soy sauce, minced garlic, sesame oil, and black pepper. Whisk until well blended.
- Cube your chicken: Cut the chicken breasts into 1-inch cubes, making sure they’re all around the same size for even cooking.
- Assemble the kabobs: Thread the marinated chicken onto your skewers, alternating with pieces of bell peppers and onions.
- Preheat the grill: Get your grill sizzling hot over medium-high heat.
- Grill the kabobs: Place the skewers on the grill and cook for about 10-12 minutes, turning them occasionally.
- Glaze and serve: In the last few minutes of grilling, brush on any leftover marinade.
- Check for doneness: Once the kabobs are beautifully charred and the chicken is no longer pink, remove them from the grill.
Notes
For added flavor, allow the chicken to marinate for a longer time. Serve with fresh herbs for garnish.
Nutrition
- Serving Size: 1 kabob
- Calories: 350
- Sugar: 14g
- Sodium: 750mg
- Fat: 10g
- Saturated Fat: 2g
- Unsaturated Fat: 8g
- Trans Fat: 0g
- Carbohydrates: 25g
- Fiber: 2g
- Protein: 30g
- Cholesterol: 70mg
Keywords: chicken kabobs, honey garlic, grilled chicken, summer recipe, easy dinner