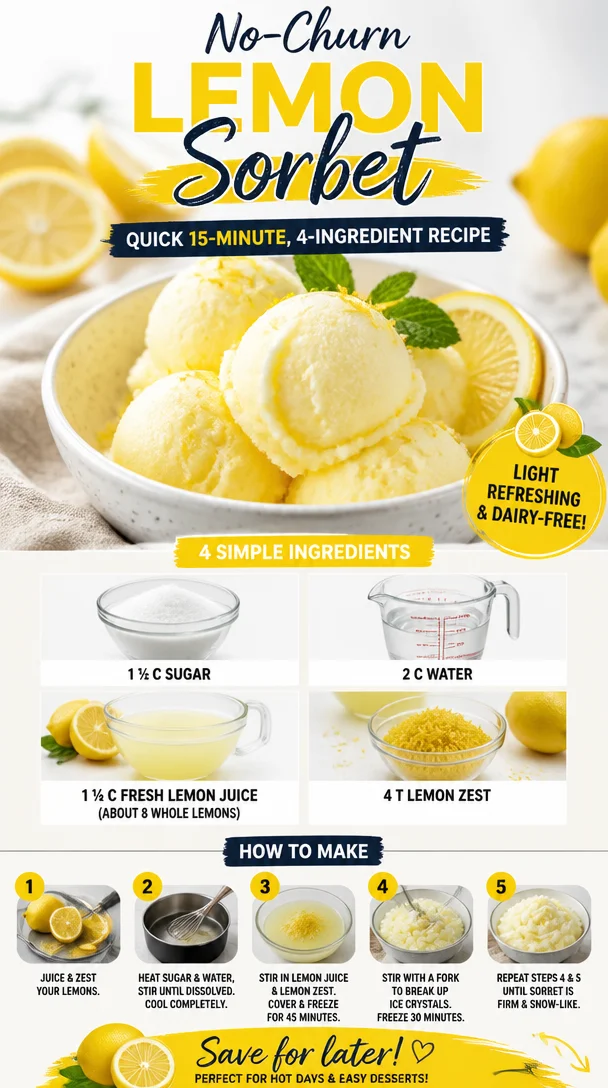
No-Churn Lemon Sorbet: Quick 15-Minute, 4-Ingredient Recipe
The Ultimate No-Ice Cream Maker Lemon Sorbet Recipe
Hello, fellow foodies! It’s Savannah from Ivory Apron, and I’m so excited to share a refreshing recipe that transports me to idyllic summer days — Lemon Sorbet. This dessert is not only incredibly simple to make, but it also brings a burst of sunshine to your table, regardless of the season. You won’t need any fancy equipment; all you need is a few pantry staples and a little bit of time.
Whether you’re wrapping up a dinner party or just trying to provide a sweet finish to a weekday meal, lemon sorbet is the perfect palate cleanser and a delightful treat that everyone will adore. Let’s dive into this simple yet elegant recipe!
A Dash of Nostalgia
Back when I was a child, summers meant long, sun-drenched days filled with family BBQs and laughter. My grandmother had this magical little lemon sorbet recipe that we all awaited each summer. I can still picture the cheerful yellow of the sorbet served in those quaint dishware she saved for special occasions. As my family and I took our first bites, the flavors danced on our tongues like a refreshing breeze wafting through the warm air.
Now, as a recipe creator, those memories encourage me to whip up sorbet every summer. Every spoonful is a nostalgic journey, and I love sharing it with friends and family, just like my grandma did. Let’s recreate those sweet memories together with this recipe that is both effortless and rewarding!
Ingredients You’ll Need
To make this delightful lemon sorbet, gather these ingredients:
-
1 ½ cups of sugar
This acts as the sweetener to balance the tartness of the lemons. You can substitute with half the amount of honey or agave syrup for a different flavor profile that adds a lovely depth. -
2 cups of water
Essential for creating a simple syrup when combined with sugar. If you want a more herbal note, consider using herbal teas like chamomile or mint as the liquid base. -
1 ¼ cups of fresh lemon juice (approximately 8 whole lemons)
Fresh is best! The acidity and brightness of the lemons provide a refreshing zing. In a pinch, you might use bottled lemon juice, but trust me, fresh lemons elevate the flavor immensely. -
4 tablespoons of lemon zest
This zest adds an extra layer of lemony goodness and aroma. If you’re out of lemons, you could use the zest of limes for a tropical twist.
Step-by-Step Instructions
Let’s get to the fun part — making the sorbet! Follow these steps to achieve a smooth, luscious lemon sorbet without needing an ice cream maker.
-
Make the Simple Syrup
In a medium saucepan over medium heat, combine the 2 cups of water and 1 ½ cups of sugar. Stir gently until the sugar dissolves completely. This should take about 3-5 minutes. You want the mixture to come to a gentle simmer — no need to boil vigorously! Once the sugar has dissolved, remove it from the heat and let it cool. -
Juice the Lemons
While your syrup is cooling, it’s time to juice the lemons! Roll them on the countertop for a few seconds to release more juice. Cut the lemons in half and use a citrus juicer or your hands to extract 1 ¼ cups of fresh lemon juice. Strain the juice to remove seeds and pulp if desired for a smoother texture. -
Combine
Once the syrup is at room temperature, mix in the fresh lemon juice and 4 tablespoons of lemon zest. This combination is the heart of your sorbet! Give it a good stir to ensure all ingredients meld beautifully. -
Pour and Freeze
Pour the lemon mixture into a shallow dish, preferably a metal pan as it conducts heat better to freeze faster. Cover it with plastic wrap. Place it in your freezer for about 4-5 hours. You want the mixture to be solid, but not rock-hard. -
Scrape for Fluffiness
After 4-5 hours, take the dish out of the freezer. Using a fork, scrape the frozen layer to break it up. This will give your sorbet that light, fluffy texture. If you prefer a creamier consistency, you can blend the mixture briefly in a food processor. -
Final Freeze
Return the sorbet to the freezer for an additional 2 hours to firm up. Trust me; it’ll be worth the wait!
Serving Suggestions
Once your lemon sorbet is ready to serve, scoop it into charming bowls or elegant glasses. A sprig of fresh mint or a twist of lemon peel can elevate the presentation. Serve this sorbet as a stand-alone dessert or alongside a fruit salad or a slice of cake for added flair.
Recipe Variations
Feeling adventurous? Here are a few creative twists you can add to the classic lemon sorbet:
- Berry Lemon Sorbet: Blend in some pureed berries like strawberries or raspberries before freezing for a vibrant twist.
- Minty Lemon Sorbet: Add a handful of muddled fresh mint leaves to the mixture, giving your sorbet a refreshing herbaceous finish.
- Ginger Lemon Sorbet: Grate fresh ginger and add it for a zesty and spicy kick.
- Honey Lemon Sorbet: Swap sugar with honey (use about 1 cup as it’s sweeter) for a unique flavor profile and added health benefits.
- Creamy Lemon Sorbet: Stir in a bit of coconut cream or yogurt for a richer texture.
Chef’s Notes
This recipe holds a special place in my kitchen because it harkens back to those sun-soaked summers spent with my grandmother. As I refine it, I’ve learned that adjusting the sweetness to your taste is completely normal! Depending on the tartness of your lemons, you might want to add a bit more sugar — that’s the beauty of cooking! Feel free to experiment a bit and find the right balance for you.
And fun fact: I once made this sorbet for a big family gathering and forgot to set a timer. When I finally remembered it, I rushed to the kitchen in a panic, but to my delight, it turned out perfectly! A little spontaneity can sometimes lead to the most delightful surprises in cooking.
FAQs and Troubleshooting
-
My sorbet is too hard. What can I do?
If your sorbet is rock-hard, let it sit at room temperature for about 10 minutes before scooping. You can also blend it in a food processor with a splash of water or juice to soften it up. -
Can I use store-bought lemon juice?
Yes, while fresh lemons are best for flavor, if in a pinch, bottled juice can work. Just ensure it’s 100% lemon juice with no added sugars or preservatives. -
What if I don’t have a shallow dish?
A shallow dish helps the mixture freeze evenly, but you can use any container. If using a deeper container, check the sorbet more frequently and scrape it with a fork as it freezes. -
Can I make it ahead of time?
Absolutely! This lemon sorbet can be made a few days in advance. Just give it a good scrape before serving!
And there you have it — a refreshing, chic, and utterly delightful lemon sorbet that’s perfect for any occasion. It’s a beautiful way to wrap up a meal or simply cool down on a warm day. There’s something undeniably special about whipping up something so simple yet stunning. So, tie on your apron, grab those lemons, and let’s make some delicious memories together! Cheers to crafting culinary magic!
PrintThe Ultimate No-Ice Cream Maker Lemon Sorbet
A refreshing lemon sorbet that is simple to make and a perfect palate cleanser.
- Prep Time: 10 minutes
- Cook Time: 15 minutes
- Total Time: 150 minutes
- Yield: 4 servings 1x
- Category: Dessert
- Method: Freezing
- Cuisine: American
- Diet: Vegan
Ingredients
- 1 ½ cups of sugar
- 2 cups of water
- 1 ¼ cups of fresh lemon juice (approximately 8 whole lemons)
- 4 tablespoons of lemon zest
Instructions
- Make the Simple Syrup: In a medium saucepan over medium heat, combine the 2 cups of water and 1 ½ cups of sugar. Stir gently until the sugar dissolves completely, about 3-5 minutes. Remove from heat and let cool.
- Juice the Lemons: Roll them on the countertop to release more juice. Cut in half and extract 1 ¼ cups of fresh lemon juice. Strain to remove seeds and pulp if desired.
- Combine the cooled syrup with the fresh lemon juice and 4 tablespoons of lemon zest. Stir to mix.
- Pour the mixture into a shallow dish and cover with plastic wrap. Freeze for about 4-5 hours until solid but not rock-hard.
- Scrape the mixture with a fork to achieve a fluffy texture. Optionally, blend briefly in a food processor for creaminess.
- Final Freeze: Return the sorbet to the freezer for an additional 2 hours to firm up.
Notes
Adjust sweetness to your taste depending on the tartness of the lemons. This sorbet can be made a few days in advance.
Nutrition
- Serving Size: 1 serving
- Calories: 180
- Sugar: 36g
- Sodium: 5mg
- Fat: 0g
- Saturated Fat: 0g
- Unsaturated Fat: 0g
- Trans Fat: 0g
- Carbohydrates: 46g
- Fiber: 0g
- Protein: 0g
- Cholesterol: 0mg
Keywords: lemon sorbet, dessert, vegan, refreshing, summer treat
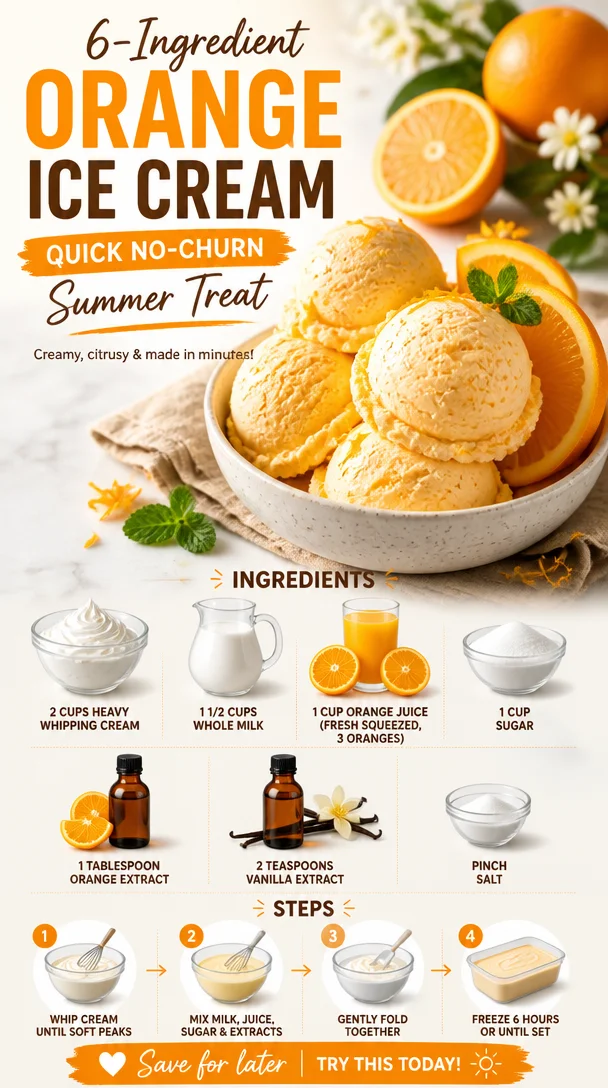
Ingredient Orange Ice Cream: Quick No-Churn Summer Treat
The Creamy Sunshine of Summer: Homemade Orange Ice Cream Recipe
There’s something magical about homemade ice cream that brings a smile to everyone’s face. It’s a simple pleasure, a labor of love, and a nostalgic taste of summer wrapped in a sweet, creamy dream. Today, I’m excited to share my Orange Ice Cream recipe with you – a vibrant, refreshing treat that’s perfect for warm days and a delightful way to gather family and friends around the table.
This Orange Ice Cream will not only cool you down but also evoke the joy of summer picnics and family gatherings. Imagine yourself lounging on the porch, the sun setting in a blaze of orange and pink, with a bowl of this luscious ice cream in hand. I still remember the first time I made this recipe; it was during a family barbecue, and everyone was so excited about the sweet citrus flavor that they couldn’t resist coming back for seconds (and thirds!).
This isn’t just any frozen dessert; it’s a creamy embrace, a scoop of sunshine to brighten your day. Ready to roll up your sleeves? Let’s dive into the delicious world of homemade Orange Ice Cream!
A Taste of Nostalgia
I can still picture it: a backyard full of laughter, the smell of grilled burgers wafting through the air, and my grandma pulling out the old ice cream maker from the back of the pantry. It had a few dents and a faded paint job, but to me, it was a treasure chest of sweet memories. Every summer, she’d gather the family for homemade ice cream day, a tradition we all eagerly anticipated. She’d mix the ingredients by hand, and I remember how the kitchen would be filled with the zesty aroma of fresh oranges.
As she patiently cranked away, we’d gather round, eyes wide with excitement, waiting for that delicious treat to reveal itself. When it finally emerged, creamy and perfectly orange, we knew it was worth the wait. Each scoop was a celebration of summer—the citrus notes bursting with flavor, each bite reminding us of sun-kissed days and carefree moments spent together.
Making this Orange Ice Cream transports me back to those cherished summers, and I love sharing this joyful recipe with friends and family. It’s not just about the ice cream; it’s about creating memories. So tie on your apron, and let’s make some of our own!
Ingredients
Here’s a list of everything you’ll need to create this delicious treat:
-
2 cups heavy whipping cream
The star of the show! This is what gives our ice cream that luxurious, creamy texture. If you want something lighter, you can substitute half-and-half, but the end result won’t be quite as rich. -
1 1/2 cups whole milk
This balances the creaminess and keeps the texture smooth. If you’re looking for a lower-fat version, you can use 2% milk, but it might be slightly less creamy. -
1 cup orange juice (fresh squeezed, about 3 oranges)
Fresh is key here! The bright flavor from freshly squeezed oranges can’t be beaten. If you’re short on time, use 100% pure orange juice without added sugars for a quicker option. -
1 cup sugar
This sweetens the deal! If you’re looking to cut down on sugar, you can try using agave syrup or honey, but keep in mind the balance of flavors may shift a bit. -
1 tablespoon orange extract
This boosts the orange flavor! If you find yourself without orange extract, vanilla extract can substitute, imparting a different kind of flavor but still very tasty. -
2 teaspoons vanilla extract
A classic addition that rounds out the flavors beautifully. You could also experiment with almond extract for a twist! -
Pinch of salt
A touch of salt enhances the sweetness and balances the flavors. Don’t skip it; it makes a difference!
Step-by-Step Instructions
Now that we’ve gathered our ingredients, let’s whip up this delicious Orange Ice Cream!
-
Mix the Base: In a large mixing bowl, whisk together the heavy whipping cream, whole milk, and granulated sugar. Keep whisking until the sugar fully dissolves. This step is crucial for a smooth finish—no one likes grainy ice cream!
-
Add the Citrus: Pour in the fresh orange juice, orange extract, vanilla extract, and a pinch of salt. Mix gently but thoroughly—this is where the flavor magic happens! Tasting your mixture at this point is key; it should be sweet and bursting with citrus goodness.
-
Chill the Mixture: Cover your bowl and place it in the fridge for at least one hour. This allows the flavors to meld beautifully! If you’re in a hurry, chilling for 30 minutes will work, but I promise the extra time is worth it.
-
Churn the Ice Cream: After chilling, pour the mixture into your ice cream maker and churn according to the manufacturer’s instructions. Most machines take about 20-30 minutes to churn to a soft-serve consistency. Pro tip: If you don’t have an ice cream maker, you can use a blender; just blend your mixture until smooth, pour it into a container, and freeze it, stirring every 30 minutes for the first 2-3 hours to break up ice crystals.
-
Freeze to Firm Up: Once churned, transfer the ice cream to a lidded container and freeze for at least 4 hours, or until firm. If you like a softer ice cream, feel free to eat it right away after churning—it will have a lovely, soft, scoopable texture!
-
Serve and Enjoy: Scoop into bowls, add your favorite toppings, and dig in! I love adding a sprinkle of zest or a slice of fresh orange for that extra pop of color!
Serving Suggestions
For the perfect serving experience, scoop your Orange Ice Cream into chilled bowls for that ultra-refreshing feel. A few sprigs of fresh mint or a thin slice of orange on the edge can elevate the look of your dish while adding a pop of color. Feeling extra fancy? A drizzle of honey or a sprinkle of crushed pistachios on top adds a delightful crunch that perfectly complements the creamy texture.
Recipe Variations
- Citrus Blast: Mix in zest from lemons or limes for a tangy twist.
- Creamy Dreamsicle: Add a swirl of vanilla ice cream to create a dreamy creamsicle effect.
- Orange Chocolate Delight: Fold in some dark chocolate chips or orange-infused chocolate shavings for an indulgent treat.
- Tropical Vibes: Combine orange juice with pineapple juice for a fruity tropical ice cream!
- Dairy-Free Option: Swap out the cream and milk for coconut cream and almond milk for a delicious dairy-free treat.
Chef’s Notes
Having fun in the kitchen can come with its fair share of mishaps! One time, I thought I’d be clever and try adding a batch of frozen berries to my orange ice cream. Let’s just say, “swampy orange” wasn’t quite the look I was going for. That’s the beauty of experimenting, though; if you try something new, you can learn what works and what doesn’t! My Orange Ice Cream recipe has evolved over the years, and I find new ways to put a twist on it with every batch. It’s all about making it your own!
FAQs and Troubleshooting
-
Why is my ice cream icy?
If your ice cream has ice crystals, it’s likely due to not enough fat in your base or not mixing it often enough while it freezes. Make sure to use full-fat cream and stir if you’re not using an ice cream maker! -
My mixture isn’t sweet enough. What can I do?
Taste your mixture before churning! If it’s lacking sweetness, feel free to add a little more sugar or honey until it hits just right. -
Can I make this without an ice cream maker?
Yes! If you don’t have an ice cream maker, simply blend your mixture until smooth, pour it into a freezer-safe container, and freeze, stirring every 30 minutes for the first few hours to break up ice crystals. -
How long does homemade ice cream last?
If properly stored in an airtight container, this Orange Ice Cream will last about 2-3 weeks in the freezer. However, I doubt it’ll last that long—it’s too delicious not to devour!
Nutritional Info
While homemade ice cream can be a tasty indulgence, moderation is key. This Orange Ice Cream will typically have around 240 calories per ½ cup serving, with about 14 grams of fat, 21 grams of carbohydrates, and 3 grams of protein. Nutritional values can vary based on substitutions and portion sizes, so always feel free to adjust according to your dietary needs!
There you have it – a delectable, refreshing Orange Ice Cream recipe that’s perfect for summer. I can’t wait for you to try this and create your own memories in the kitchen. Whether you’re enjoying it on your porch or serving it at a family gathering, I hope it brings as much joy to you as it has to me. So grab your ingredients, tie on that apron, and let’s make some kitchen magic happen together!
PrintHomemade Orange Ice Cream
A vibrant and refreshing Orange Ice Cream recipe, perfect for warm summer days.
- Prep Time: 15 minutes
- Cook Time: 0 minutes
- Total Time: 5 hours 15 minutes
- Yield: 8 servings 1x
- Category: Dessert
- Method: Churning
- Cuisine: American
- Diet: Vegetarian
Ingredients
- 2 cups heavy whipping cream
- 1 1/2 cups whole milk
- 1 cup orange juice (fresh squeezed, about 3 oranges)
- 1 cup sugar
- 1 tablespoon orange extract
- 2 teaspoons vanilla extract
- Pinch of salt
Instructions
- Mix the Base: In a large mixing bowl, whisk together the heavy whipping cream, whole milk, and granulated sugar until the sugar fully dissolves.
- Add the Citrus: Pour in the fresh orange juice, orange extract, vanilla extract, and a pinch of salt. Mix gently.
- Chill the Mixture: Cover your bowl and place it in the fridge for at least one hour.
- Churn the Ice Cream: Pour the mixture into your ice cream maker and churn according to the manufacturer’s instructions.
- Freeze to Firm Up: Transfer the ice cream to a lidded container and freeze for at least 4 hours.
- Serve and Enjoy: Scoop into bowls, add your favorite toppings, and dig in!
Notes
Serve with fresh mint or a slice of orange for added freshness. For a touch of elegance, drizzle with honey or sprinkle with crushed pistachios.
Nutrition
- Serving Size: 1/2 cup
- Calories: 240
- Sugar: 21g
- Sodium: 50mg
- Fat: 14g
- Saturated Fat: 8g
- Unsaturated Fat: 3g
- Trans Fat: 0g
- Carbohydrates: 21g
- Fiber: 0g
- Protein: 3g
- Cholesterol: 50mg
Keywords: orange ice cream, homemade ice cream, summer dessert, creamy dessert
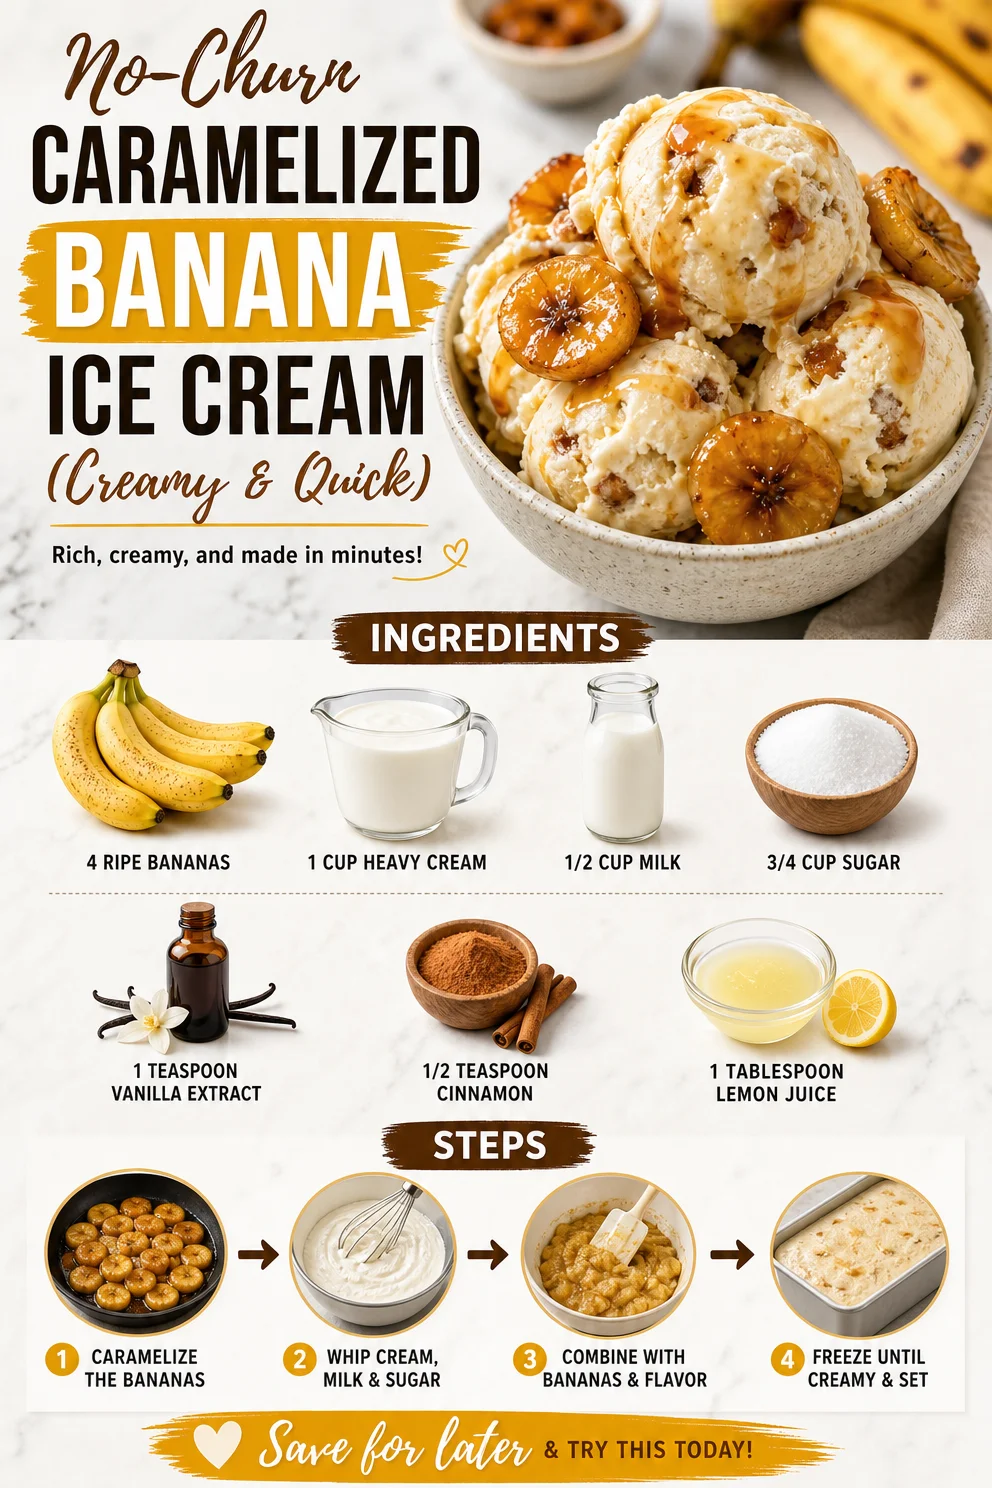
No-Churn Caramelized Banana Ice Cream (Creamy & Quick)
The Joy of Caramelized Banana Ice Cream: A Sweet Treat for Every Occasion
Hello, fellow food lovers! Today, I’m bursting with excitement to share with you a delightful dessert that has the potential to become your new favorite: Caramelized Banana Ice Cream. Trust me, this isn’t just any ordinary ice cream. It’s a creamy, dreamy concoction that marries the rich sweetness of caramelized bananas with a velvety creaminess that will have you swooning. Let’s dive into why this dish is so special and how you can make it effortlessly at home.
A Personal Story: Sweet Memories in the Kitchen
When I think of bananas, I can’t help but recall my grandma’s kitchen—the heart of our family gatherings. She had a knack for turning simple ingredients into magical creations. I remember one summer afternoon when I was about ten years old, we decided to make banana bread together. As we peeled back the skins, she dulcetly shared stories of her childhood while I mashed the bananas with glee.
Her secret, she revealed, was caramelizing bananas beforehand for added flavor. That day, we didn’t just make banana bread; we crafted a memory that’s been beautifully stitched into the fabric of my culinary journey. Fast forward to today, it’s those caramelized bananas that inspired me to create this velvety Caramelized Banana Ice Cream. Every scoop feels like a warm hug, reminiscent of those cherished moments spent in her vibrant kitchen.
Ingredients
Here’s what you’ll need to bring this delicious creation to life:
-
4 ripe bananas: Look for bananas that are speckled and slightly soft. They should be sweet! If you’re missing bananas, you can use frozen ones, but make sure they’re thawed and drained of excess moisture.
-
1 cup heavy cream: This gives the ice cream its luscious texture. If you’re looking for a lighter option, you can substitute with half-and-half, but the richness will be compromised.
-
1/2 cup milk: Whole milk is ideal for creaminess; however, any milk can work. If you want a dairy-free version, try coconut milk for a delightful twist!
-
3/4 cup sugar: This sweetens our ice cream. If you prefer, you can replace it with brown sugar for a deeper caramel flavor or use honey, though this may alter the texture.
-
1 teaspoon vanilla extract: A must-have to enhance the flavors. For a twist, try using almond extract instead!
-
1/2 teaspoon cinnamon: The warmth of cinnamon elevates the caramelized bananas. If cinnamon isn’t your thing, feel free to experiment with a dash of nutmeg or cardamom.
-
1 tablespoon lemon juice: This brightens the overall flavor and prevents the bananas from browning too much. Lime juice is a fun substitute, bringing a zesty kick.
Step-by-Step Instructions
Now, let’s get to the fun part—making the Caramelized Banana Ice Cream! Follow along step-by-step:
-
Prepare the Bananas:
Start by peeling the ripe bananas and slicing them into rounds. This ensures they caramelize evenly and allows more surface area for that glorious sweetness. -
Caramelize the Bananas:
In a skillet over medium heat, melt a tablespoon of butter (or a splash of coconut oil for a dairy-free option) until it foams. Add the sliced bananas and sprinkle with 1 tablespoon of sugar. Cook for about 5 minutes, gently stirring, until the bananas are golden, tender, and slightly bubbling with caramel goodness. You want them to be perfectly caramelized but not overly mushy. Remove from heat and stir in the lemon juice to brighten the flavors.Chef’s Tip: Remember to let the bananas cool for a bit before blending; this will prevent your ice cream base from turning too warm.
-
Blend the Creamy Base:
In a blender, combine the heavy cream, milk, remaining sugar, vanilla extract, cinnamon, and the cooled caramelized bananas. Blend on high until smooth and creamy, about 30 seconds. Taste and adjust the sweetness if needed.Chef Hack: For a little extra texture, reserve some of the caramelized banana pieces to fold into the mixture after blending—trust me, it adds a fun surprise!
-
Chill the Mixture:
Place your blended mixture in the refrigerator for at least one hour. Chilling ensures your ice cream churns beautifully, leading to that heavenly creamy texture. -
Churn the Ice Cream:
Once chilled, pour the mixture into an ice cream maker and churn according to the manufacturer’s instructions. Usually, this takes about 20-30 minutes.Pro Tip: If you don’t have an ice cream maker, you can pour the mixture into a shallow dish and freeze it, whisking every 30 minutes to break up ice crystals until it’s fully frozen.
-
Freeze to Firm Up:
After churning, transfer the soft ice cream to a freezer-safe container and freeze for at least 4 hours to firm it up.
Serving Suggestions
When it’s time to enjoy your Caramelized Banana Ice Cream, scoop it into your favorite bowls or elegant dessert glasses. You could drizzle some warm caramel sauce over the top for that extra touch of indulgence. Garnish with a sprinkle of cinnamon or some chopped nuts for a delightful crunch!
Recipe Variations
Looking to switch things up? Here are some ideas to personalize your ice cream:
-
Nutty Addition: Stir in chopped walnuts or pecans for a delightful crunch.
-
Chocolate Burst: Fold in some mini chocolate chips or swirl in chocolate syrup for a chocolate-banana combo.
-
Spicy Twist: Add a pinch of cayenne pepper for a surprising kick!
-
Fruit Fusion: Combine with a layer of berry puree for a fruity contrast.
-
Dairy-Free Delight: Replace cream and milk with coconut milk and use a sweetener like maple syrup for a lactose-free version.
Chef’s Notes
This recipe has a special place in my heart, not just for the memories it holds but for how versatile it is. I’ve adjusted and played around, making it richer or lighter depending on the mood. On one memorable occasion, I found myself with a batch of overripe bananas and decided to create a makeshift ice cream party! It turned into a joyful experiment that my friends still talk about. Ice cream making is all about having that fun spirit; embrace it!
FAQs and Troubleshooting
1. Why is my ice cream icy?
This could be due to not churning enough or not mixing often enough during freezing. Ensure your base is well combined and churned properly for a creamier texture.
2. Can I make this without an ice cream maker?
Absolutely! Pour your mixture into a shallow dish and stir every 30 minutes until frozen. This will help break up ice crystals and create a smoother texture.
3. Can I use frozen bananas?
Yes, you can! Just make sure to thaw them before caramelizing, and drain any excess moisture to prevent your mixture from getting too watery.
4. How long does this ice cream last in the freezer?
While it’s at its best within the first two weeks, you can keep it for up to a month if stored correctly. Just remember to tightly seal your container to prevent freezer burn.
Nutritional Info (Optional)
While this recipe is a sweet treat that’s best enjoyed in moderation, here’s a quick breakdown per serving (based on 8 servings):
- Calories: 230
- Total Fat: 14g
- Saturated Fat: 8g
- Carbohydrates: 26g
- Fiber: 1g
- Sugars: 17g
- Protein: 2g
Now, dear friends, I can’t wait for you to try this Caramelized Banana Ice Cream. You’ll not only enjoy a taste of nostalgia but also create new memories around your table. So, tie on that ivory apron, scoop out those bananas, and let’s create something delicious together. Happy cooking!
PrintCaramelized Banana Ice Cream
A creamy, dreamy ice cream made with caramelized bananas that offers a rich sweetness and nostalgic flavors.
- Prep Time: 15 minutes
- Cook Time: 10 minutes
- Total Time: 4 hours 25 minutes
- Yield: 8 servings 1x
- Category: Dessert
- Method: Churning
- Cuisine: American
- Diet: Vegetarian
Ingredients
- 4 ripe bananas
- 1 cup heavy cream
- 1/2 cup milk
- 3/4 cup sugar
- 1 teaspoon vanilla extract
- 1/2 teaspoon cinnamon
- 1 tablespoon lemon juice
Instructions
- Prepare the bananas by peeling and slicing them into rounds.
- Caramelize the bananas in a skillet with butter and sugar over medium heat for about 5 minutes, then stir in lemon juice.
- Blend the heavy cream, milk, remaining sugar, vanilla, cinnamon, and cooled caramelized bananas until smooth.
- Chill the mixture in the refrigerator for at least one hour.
- Churn the mixture in an ice cream maker according to the manufacturer’s instructions for about 20-30 minutes.
- Freeze the churned ice cream in a freezer-safe container for at least 4 hours or until firm.
Notes
Serve with warm caramel sauce or garnish with cinnamon or nuts for extra flavor.
Nutrition
- Serving Size: 1 serving
- Calories: 230
- Sugar: 17g
- Sodium: 50mg
- Fat: 14g
- Saturated Fat: 8g
- Unsaturated Fat: 6g
- Trans Fat: 0g
- Carbohydrates: 26g
- Fiber: 1g
- Protein: 2g
- Cholesterol: 40mg
Keywords: ice cream, banana, caramel, dessert, sweet treat