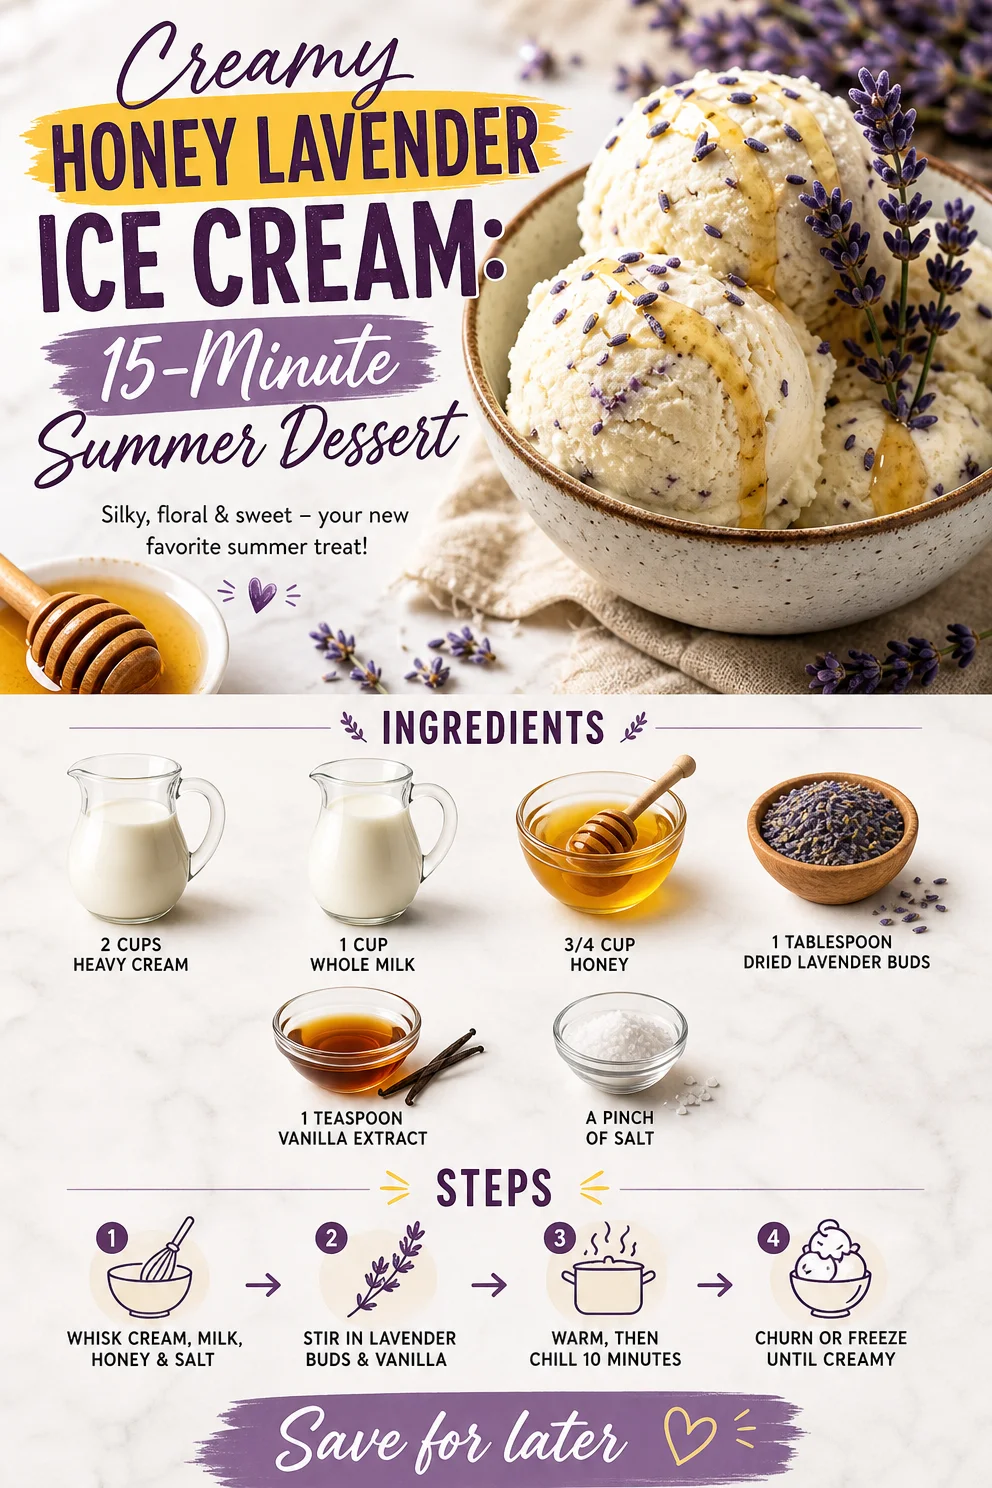
Creamy Honey Lavender Ice Cream: 15-Minute Summer Dessert
Indulge in Summer: The Sweet Serenity of Honey Lavender Ice Cream
Welcome to the whimsical world of sweet treats! If you’re anything like me, you agree that there’s no better way to celebrate a sunny day than with a scoop—or two—of homemade ice cream. And today, dear food lovers, we’re diving deep into the enchanting flavors of Honey Lavender Ice Cream. Imagine a creamy, dreamy concoction that beautifully marries the floral notes of lavender with the natural sweetness of honey. It’s like summer in a bowl!
Picture this: You’re lounging in the garden, surrounded by blooming flowers and the warm sun kissing your skin. You take a bite of this ice cream, and suddenly, it feels as though the world has slowed down. Ah, bliss! Making this delightful treat isn’t just a cooking task; it’s a lovely ritual that transforms your kitchen into a serene escape. And the best part? You don’t need an ice cream machine to create this luscious dessert.
This recipe exudes sophistication, yet its simplicity makes it perfect for anyone looking to impress friends or simply indulge on a quiet evening at home. Allow me to guide you through this enticing culinary experience—let’s scoop into the art of crafting Honey Lavender Ice Cream!
A Beautiful Memory in Every Scoop
When I think of lavender, I don’t just see a pretty purple flower; I’m transported back to my grandmother’s garden. As a child, I would scamper barefoot through her flower-laden oasis, stopping to sniff every lavender bunch I could find. My grandmother would weave lavender sprigs into little bouquets while sharing stories of summers past, all while a gentle waft of honey and fresh cream danced in the air from her kitchen.
One day, she let me help her churn the most magical ice cream filled with her signature lavender flavor. I remember the exhilaration of licking the bowl afterward—savoring the combination of floral and sweet that felt simply ethereal. Now, every time I make Honey Lavender Ice Cream, I’m right back in that garden, savoring memories and sharing stories with friends and family, just like my grandmother taught me.
Ingredients: The Essence of Flavor
Let’s gather our essential ingredients that will create this divine ice cream:
-
2 cups heavy cream: This is the base of our ice cream, providing richness and creaminess. Opt for organic cream for the best flavor. If you’re looking for a lighter version, try blending with half-and-half, though it will be less creamy.
-
1 cup whole milk: It adds a necessary balance of liquid to our cream, helping to create that perfect scoopability. If you’re lactose intolerant, almond or coconut milk can substitute, but the texture will differ.
-
3/4 cup honey: Sweetness at its finest! Opt for a high-quality, raw honey for deeper flavor notes. You can try agave syrup or maple syrup for a vegan option, though the taste would slightly differ.
-
1 tablespoon dried lavender buds: This is where the magic truly happens! Make sure they’re culinary-grade lavender, often found at specialty shops. Not a fan of lavender? Try infusing with vanilla bean instead for a straightforward yet delicious treat.
-
1 teaspoon vanilla extract: Vanilla enhances the floral notes and adds warmth. Pure vanilla extract is the way to go. If unavailable, a few drops of vanilla essence will work too.
-
A pinch of salt: Don’t skip this! Salt enhances the sweetness and balances the flavor. You can use sea salt for a fine finish or Himalayan salt for its unique taste.
Step-by-Step Instructions: Crafting Creamy Bliss
Now that we have our ingredients ready, let’s bring this indulgent treat to life!
Step 1: Infuse the Cream
In a medium saucepan, combine the heavy cream, whole milk, and lavender buds over medium heat. Just heat it until bubbles form around the edges—don’t let it boil! Stir gently and enjoy the aroma filling your kitchen. This infusion is crucial for extracting all those heavenly floral notes from the lavender.
Step 2: Sweeten Up the Magic
Once your cream mixture is warm, remove it from the heat. Add in the honey and vanilla extract, stirring until completely dissolved. The cream should now have a beautiful golden hue, hinting at the luscious sweetness that awaits!
Step 3: Let It Chill
This step is essential! Transfer this mixture into a glass bowl, cover it with plastic wrap, and refrigerate for at least 4 hours, or preferably overnight. This will allow the flavors to develop and the mixture to cool properly before we churn it.
Step 4: Strain the Mixture
After chilling, strain the mixture to remove the lavender buds. You can use a fine mesh sieve or cheesecloth for this. Press gently to extract as much liquid as possible. This step ensures a creamy texture without any floral surprises in your scoops!
Step 5: Chill, Churn, and Freeze
If you have an ice cream machine, pour the mixture into that and churn according to the manufacturer’s instructions until it reaches a soft-serve consistency. If you don’t have an ice cream maker, pour the mixture into a shallow dish and place it in the freezer. Stir it every 30 minutes with a fork for the first 4 hours. This helps to break up any ice crystals, giving you a creamy result.
Step 6: The Waiting Game
Once it’s churned or frozen to your desired consistency, transfer it to an airtight container and let it freeze solid for at least 4 hours. Now, patience is key—allow those heavenly flavors to meld together!
Serving Suggestions: A Feast for the Eyes
When you’re finally ready to serve your Honey Lavender Ice Cream, it’s time to get a little creative! Serve it in elegant ice cream bowls or whimsical cones, topped with a drizzle of honey for that beautiful glisten. Fresh lavender sprigs make a stunning garnish, and don’t shy away from adding chopped pistachios or a sprinkle of sea salt for crunch and contrast.
Drizzle Option: Elevate your experience even further by adding a simple blueberry compote or wrapping it in a delicate crepe for a delightful dessert!
Recipe Variations to Explore
Feeling adventurous? Here are a few variations to spark your creativity:
-
Honey Lemon Lavender: Add zest from one lemon to the mixture for a refreshing citrus twist.
-
Lavender-Wildflower Honey Swirl: Use wildflower honey in the base and swirl in a lavender syrup before freezing for an extra layer of flavor.
-
Minty Lavender: Substitute some of the lavender with fresh mint. Infuse that delicious mint alongside the cream for a refreshing take.
-
Choco-Lavender Delight: Fold in finely chopped dark chocolate after churning for a luscious twist!
-
Dairy-Free Delight: Replace heavy cream and whole milk with full-fat coconut milk for a vegan option that still captures that creamy texture.
Chef’s Notes: Stories from the Kitchen
Every recipe has its quirks and tales, and this Honey Lavender Ice Cream is no exception! Several years back, I tried making this at a friend’s summer garden party. I was so excited that I forgot to strain out the lavender buds. Let’s just say, it ended up being a light floral surprise for my guests! It turned into a laughable memory, and now I always remind myself that the simplest mistakes can create beautiful moments in the kitchen.
This recipe has evolved into a family favorite, sparking curiosity and joy in every scoop shared at gatherings—just like it did in my grandmother’s garden. Plus, I’ve refined the method over the years for a perfectly creamy texture that works every single time.
FAQs and Troubleshooting
Q: How can I tell if my ice cream is ready to serve?
A: It should be firm but still scoopable. If it’s too hard, let it sit at room temperature for a few minutes before serving.
Q: Can I use fresh lavender instead of dried?
A: Absolutely! You’ll want to triple the amount, as fresh lavender is less concentrated than dried.
Q: What if I over-infused the lavender?
A: If it’s too strong, a little extra cream can help balance the flavors! Just remember to chill it again before churning.
Q: My ice cream turned out icy—what went wrong?
A: This usually happens if it hasn’t been stirred enough during the initial freezing process or if it’s been frozen for too long. Remember to stir or churn to break up ice crystals!
Nutritional Info
While I believe in enjoying ice cream in moderation, it’s helpful to know what you’re indulging in! For a 1/2 cup serving, you can expect around 250 calories, 18 grams of fat, and an ample dose of sweetness. Again, these values may vary based on ingredient choices.
So, will you join me in creating this airy Honey Lavender Ice Cream to elevate your dessert game? Remember, cooking is all about experimenting, enjoying, and creating memories around the table. Grab that apron, call some friends, and let’s scoop into summer together! Invite the magic of lavender and honey into your kitchen, and experience the joy of crafting creamy delights that truly feel timeless. Here’s to sweet moments, always. 🍦✨
PrintHoney Lavender Ice Cream
A creamy and dreamy ice cream that combines the floral notes of lavender with the natural sweetness of honey, perfect for summer indulgence.
- Prep Time: 20 minutes
- Cook Time: 10 minutes
- Total Time: 260 minutes
- Yield: 4 servings 1x
- Category: Dessert
- Method: Churning
- Cuisine: American
- Diet: Vegetarian
Ingredients
- 2 cups heavy cream
- 1 cup whole milk
- 3/4 cup honey
- 1 tablespoon dried lavender buds
- 1 teaspoon vanilla extract
- A pinch of salt
Instructions
- Infuse the cream: In a medium saucepan, combine the heavy cream, whole milk, and lavender buds over medium heat. Do not let it boil!
- Sweeten up the magic: Once warm, remove from heat, add honey and vanilla, stirring until dissolved.
- Let it chill: Transfer the mixture into a bowl, cover, and refrigerate for at least 4 hours or overnight.
- Strain the mixture: Use a fine mesh sieve to remove lavender buds, pressing gently.
- Chill, churn, and freeze: Pour into an ice cream machine or shallow dish to freeze. Stir every 30 minutes for the first 4 hours.
- Transfer: Once desired consistency is reached, store in an airtight container and freeze solid for at least 4 hours.
Notes
For variations, consider adding lemon zest for a citrus twist or using coconut milk for a dairy-free version.
Nutrition
- Serving Size: 1/2 cup
- Calories: 250
- Sugar: 25g
- Sodium: 50mg
- Fat: 18g
- Saturated Fat: 11g
- Unsaturated Fat: 7g
- Trans Fat: 0g
- Carbohydrates: 30g
- Fiber: 0g
- Protein: 3g
- Cholesterol: 65mg
Keywords: honey lavender ice cream, homemade ice cream, summer dessert
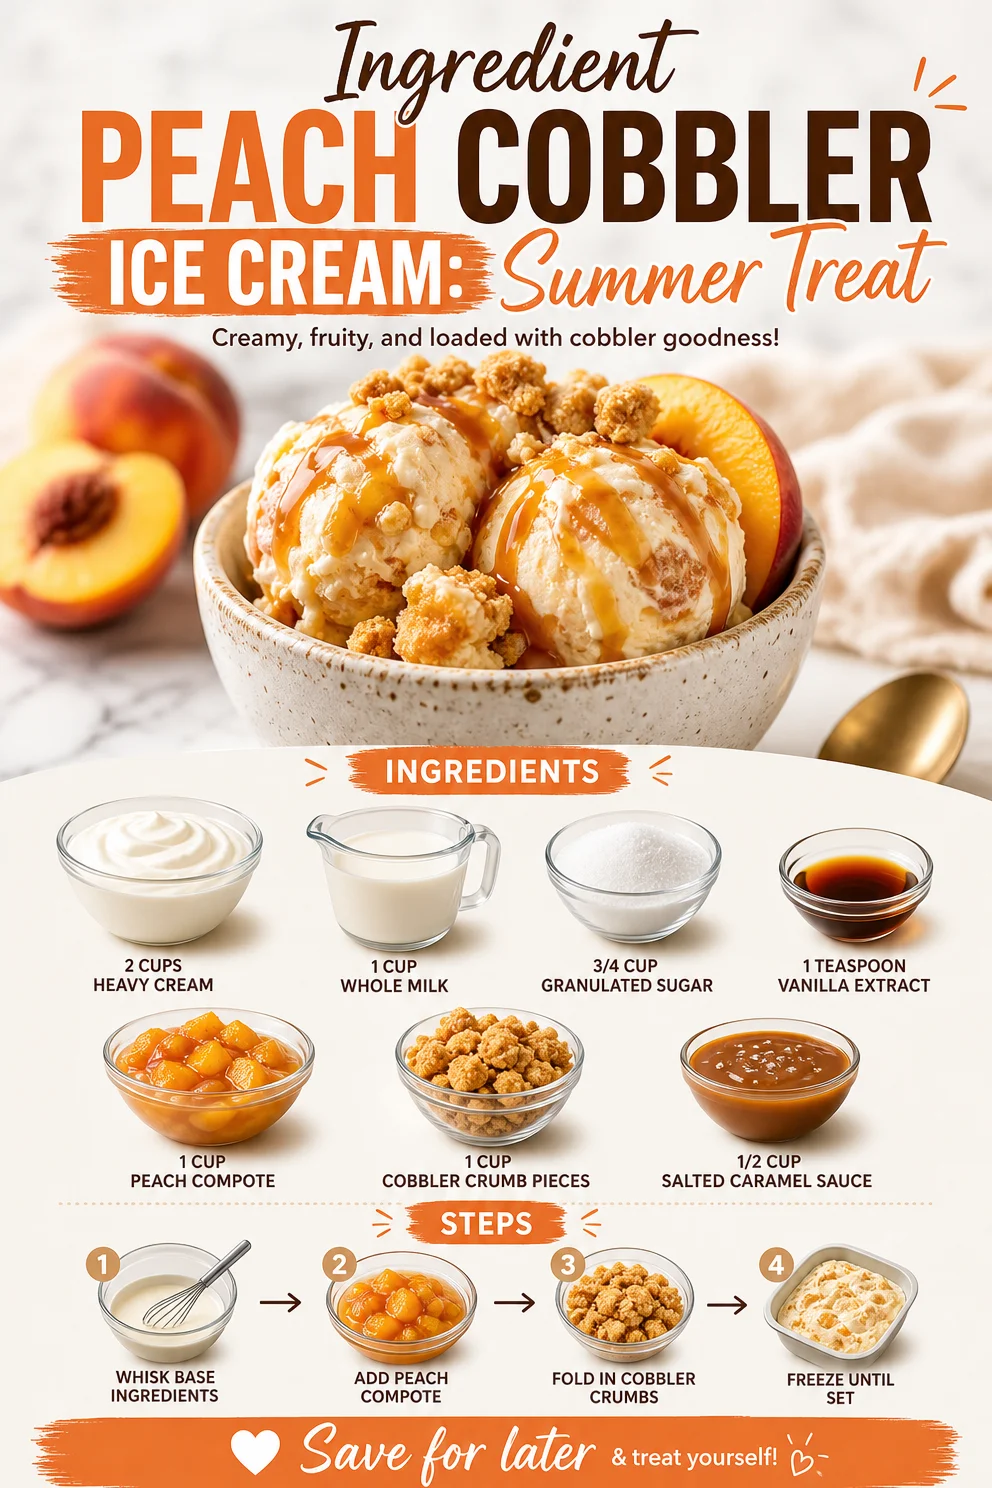
Ingredient Peach Cobbler Ice Cream: Summer Treat
Scoops of Summer: Peach Cobbler Ice Cream Bliss
Hello there, my fellow food enthusiasts! Today, I’m bringing you a delightful sweet treat that perfectly captures the essence of summer: Peach Cobbler Ice Cream. Picture this: warm, sunny days filled with laughter, friends gathered around, and you, the star of the show, serving up scoops of creamy goodness infused with the taste of sweet peaches and baked cobbler. Sounds dreamy, right?
Why Peach Cobbler Ice Cream?
Peaches are one of summer’s greatest gifts. Juicy, succulent, and bursting with flavor, they remind me of lazy afternoons spent in my grandmother’s backyard, where she’d serve us homemade peach cobbler fresh from the oven. That crispy, buttery crust paired with the warmth of vanilla ice cream made it an unbeatable summer dessert. As I grew older and started experimenting in my own kitchen, the idea popped into my head: why not merge those two summer staples into one heavenly dessert? Thus, Peach Cobbler Ice Cream was born—a treat that brings back those sweet memories while keeping things vibrant and fun.
You’ll appreciate how effortless this recipe is to whip up at home using simple ingredients that elevate a classic cobbler with velvety ice cream. And trust me, once you make this, you’ll find yourself indulging in it long after summer fades away.
The Ingredients You’ll Need
Let’s talk about the star players of this dessert. Each ingredient is chosen for its role in delivering that beloved peach cobbler flavor. Here’s what you’ll need:
-
2 cups heavy cream
- This is the base of your ice cream, giving it that rich, creamy texture. If you prefer a lighter option, you can substitute half of this with coconut cream!
-
1 cup whole milk
- Whole milk adds a perfect balance of creaminess without being overly rich. Feel free to use low-fat milk, but do note that the texture may be less creamy.
-
3/4 cup granulated sugar
- Sugar is essential for sweetness and to help prevent ice crystals from forming, giving a smoother texture. You can try using a sugar alternative like honey or agave if you’re looking to cut out refined sugar.
-
1 teaspoon vanilla extract
- Vanilla enhances the flavor of the ice cream, making it taste homemade and oh-so-delicious. High-quality pure vanilla extract yields the best results; it’s totally worth it!
-
1 cup peach compote
- This will be your rich, peachy layer. You can make your own compote with fresh peaches or buy a jar from your favorite store. Make sure it’s flavorful and sweet.
-
1 cup cobbler crumb pieces
- Nothing says cobbler like those little bits of buttery, crispy goodness. Use leftover cobbler, or crumble up your favorite biscuit recipe as a topping.
-
1/2 cup salted caramel sauce
- This is the pièce de résistance! It adds a luxe touch while balancing the sweetness of the peaches. Don’t skimp on this step; homemade or store-bought works fabulously.
Step-by-Step Instructions
Now, let’s dive into the magic of making this Peach Cobbler Ice Cream! The process is straightforward and will have your kitchen smelling divine.
-
Prepare the Peach Compote
If you’re starting from scratch, peel and chop about 4 ripe peaches and cook them over medium heat with a bit of sugar (about 2 tablespoons) until they break down and become syrupy (around 10-15 minutes). Allow it to cool. -
Mix the Base
In a large mixing bowl, combine the heavy cream, whole milk, and granulated sugar. Whisk until the sugar dissolves completely. It’s important to mix until you don’t see any granules of sugar; this ensures a silky ice cream. -
Add the Flavor
Stir in the vanilla extract and peach compote, mixing well. The vibrant orange-peach color is a sure sign that you’re headed in the right direction! To intensify the peach flavor, you can add an extra splash of peach nectar if you’d like. -
Chill the Mixture
Cover your bowl with plastic wrap and refrigerate the mixture for at least 2 hours (or even overnight!). This helps develop flavor and ensures your ice cream churns up nice and creamy. -
Churn the Ice Cream
Once chilled, pour the mixture into your ice cream maker. Follow your manufacturer’s instructions: typically, this takes about 20-30 minutes until it thickens. -
Incorporate Cobbler Crumbs
Near the end of churning, add the cobbler crumb pieces to the mix. These delicious bits will make your ice cream feel like a true cobbler experience. If you like a swirl instead, just fold them in gently after churning. -
Transfer to a Container
Scoop your ice cream into a lidded container, layering in additional cobbler crumbs as you go if you want extra crunch. Drizzle all that caramel sauce over the top like an artistic drizzle! This will ensure every scoop has that divine caramel flavor. -
Freeze Until Firm
Cover the container and pop it into the freezer for at least 4 hours, or until it’s firm enough to scoop. Patience is key here, but it’ll be so worth it when you dig in!
Serving Suggestions
When it comes time to serve your Peach Cobbler Ice Cream, a little presentation goes a long way. Serve in rustic bowls or elegant dessert cups, and don’t forget to drizzle a little extra salted caramel on top for that mouth-watering finish. Garnish with fresh peach slices and crushed cobbler crumbs for added flair. You can also add a sprig of mint for a pop of color!
Recipe Variations
Feeling adventurous? Here are some creative tweaks to customize your Peach Cobbler Ice Cream:
- Frozen Yogurt Twist: Swap half the heavy cream for Greek yogurt for a tangy and creamy texture.
- Berry Blend: Mix in some fresh or frozen berries (like blueberries or raspberries) with the peach compote for added color and flavor.
- Nutty Crunch: Throw in some chopped pecans or almonds during the churning process for an irresistible crunch.
- Pre-Made Mixes: Use store-bought seasonal fruit compotes instead of making your own. Set yourself up for easy and quick enjoyment!
- Tropical Vibe: Incorporate coconut flakes and perhaps a hint of lime juice for a tropical twist to your summer favorite.
Chef’s Notes
As a passionate home cook, I’ve seen my recipes evolve over the years. Peach Cobbler Ice Cream is a reflection of that growth—a recipe that started as simply a craving for summer comfort food but morphed into a beloved centerpiece at gatherings. The beauty of cooking is experimentation; don’t hesitate to tweak it until it feels just right for you! O, and children absolutely adore this; you’ll definitely get requests for seconds—and thirds, I promise you that!
FAQs and Troubleshooting
-
Why is my ice cream icy?
Ice crystals can form if not enough sugar is added. Ensure you’re mixing the sugar well and consider adding a bit more if your mixture doesn’t taste sweet enough. -
How do I get a smoother texture?
Ensure your base is chilled thoroughly and churn it until it thickens well. Over-churning can lead to icy textures; know when to stop! -
Can I make this without an ice cream maker?
Absolutely! After mixing everything, pour it into a container and freeze. Stir every 30 minutes for the first 2-3 hours to break up ice crystals and create a creamier texture. -
How long does this ice cream last?
Typically, it’ll last about 2 weeks in the freezer. But let’s be real—isn’t ice cream always better fresh?
Nutritional Info
For those keeping an eye on nutritional intake, here’s a rough estimate per serving (based on eight servings):
- Calories: 400
- Total Fat: 25g
- Saturated Fat: 15g
- Carbohydrates: 45g
- Sugars: 35g
- Protein: 3g
Now that you’re all set to make this Peach Cobbler Ice Cream, know that each scoop brings back memories and creates new ones. Whether it’s a summer gathering or cozy night at home, this dessert is sure to brighten your day. So, tie on that cute apron, grab some friends, and let’s create something timeless! Enjoy! 🍑🍦
PrintPeach Cobbler Ice Cream

A delightful summer treat that combines the flavors of peach cobbler and creamy ice cream.
- Prep Time: 15 minutes
- Cook Time: 15 minutes
- Total Time: 240 minutes
- Yield: 8 servings 1x
- Category: Dessert
- Method: Churning
- Cuisine: American
- Diet: Vegetarian
Ingredients
- 2 cups heavy cream
- 1 cup whole milk
- 3/4 cup granulated sugar
- 1 teaspoon vanilla extract
- 1 cup peach compote
- 1 cup cobbler crumb pieces
- 1/2 cup salted caramel sauce
Instructions
- Prepare the peach compote by peeling and chopping peaches, then cook with sugar until syrupy.
- Mix the heavy cream, whole milk, and sugar in a bowl until sugar dissolves.
- Add the vanilla extract and peach compote, stirring to combine.
- Chill the mixture in the refrigerator for at least 2 hours.
- Churn the mixture in an ice cream maker according to the manufacturer’s instructions.
- Incorporate the cobbler crumbs near the end of churning.
- Transfer the ice cream to a lidded container, layering in extra crumbs if desired.
- Freeze for at least 4 hours until firm.
Notes
Serve in rustic bowls garnished with fresh peach slices, crushed cobbler crumbs, and a drizzle of salted caramel.
Nutrition
- Serving Size: 1 serving
- Calories: 400
- Sugar: 35g
- Sodium: 100mg
- Fat: 25g
- Saturated Fat: 15g
- Unsaturated Fat: 5g
- Trans Fat: 0g
- Carbohydrates: 45g
- Fiber: 1g
- Protein: 3g
- Cholesterol: 80mg
Keywords: peach cobbler, ice cream, summer dessert, frozen treat, homemade dessert
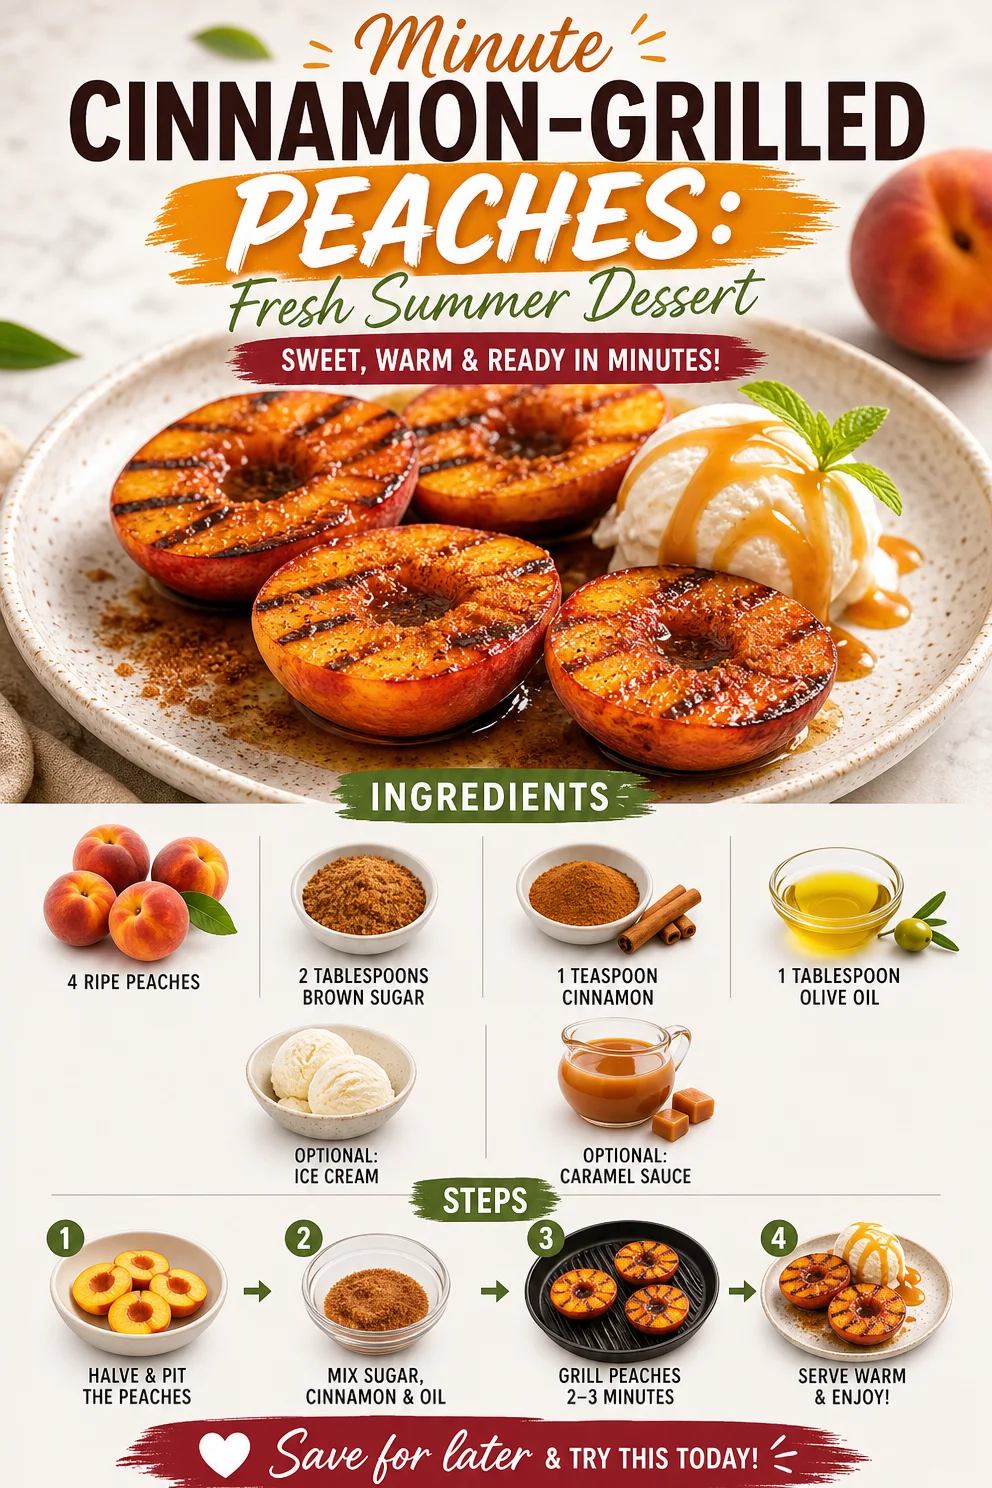
Minute Cinnamon-Grilled Peaches: Fresh Summer Dessert
Grilled Peaches with Cinnamon: A Sweet Summer Delight
Hello, fellow food lovers! Today, I want to take you on a flavorful journey with a dish that embodies the essence of summer: Grilled Peaches with Cinnamon. Every bite of this delightful dessert captures the warmth of the sun and the sweetness of ripe, juicy peaches. It’s an absolutely effortless way to elevate these beautiful fruits, and trust me, your taste buds are in for a treat!
There’s something simply special about grilled peaches. They bring back memories of backyard barbecues, gatherings with friends, and lazy summer afternoons. You’ll find that grilling deepens the flavor of the peaches, creating a caramelized crust that adds a whole new layer of deliciousness.
Whether you dress them up with a scoop of ice cream, drizzle them with caramel sauce, or enjoy them as is, you’ll be amazed at how such simple ingredients can create a moment of pure bliss around your table.
So grab your apron, fire up that grill, and let’s make magic happen!
A Sweet Memory
I vividly remember the first time I tasted grilled peaches—how could I forget? It was at my dear friend Mia’s summer barbecue a few years ago. The sun was setting, casting a golden hue over the backyard, and the air was filled with the tantalizing aroma of grilled meats and charred vegetables. As we sat around the table, laughter echoing into the evening, Mia brought out a platter of perfectly grilled peaches.
“Oh, you have to try these!” she insisted, and I obliged, intrigued by her enthusiasm. The moment the warm, caramelized peach hit my palate, I was hooked. The smoky flavor mingling with the sweetness of the fruit was a taste revelation! A light sprinkle of cinnamon only elevated the experience, making each bite feel indulgent and comforting.
That evening inspired me to experiment more with grilled fruits, and now, every summer, grilled peaches have become a staple at my gatherings. Each time I prepare this dish, I’m reminded of that unforgettable night, and I look forward to creating new memories around the grill with friends and family.
Ingredients
To make these delicious Grilled Peaches with Cinnamon, you’ll need just a handful of ingredients. Here’s what to gather:
-
4 ripe peaches: Look for peaches that are slightly soft to the touch but not overly squishy. If they’re a bit firm, you can leave them at room temperature for a day or two until they ripen. Substitute with nectarines if you like a similar texture!
-
2 tablespoons brown sugar: This adds a lovely caramel flavor. If you’re out of brown sugar, you can use granulated sugar; just consider adding a drop of molasses for that signature richness.
-
1 teaspoon cinnamon: A warm spice that compliments the sweetness of the peaches perfectly. If you’re feeling adventurous, feel free to swap it for nutmeg or cardamom for a unique flavor twist!
-
1 tablespoon olive oil: A light drizzle helps prevent sticking on the grill and adds a subtle richness. Avocado oil or melted coconut oil can work as alternatives, too!
-
Optional: Ice cream or caramel sauce for serving – the choice is yours! Vanilla ice cream pairs incredibly well with warm peaches, while a drizzle of caramel adds a gourmet touch.
Step-by-Step Instructions
Ready to grill some peaches? Here’s how to do it step by step, with a few handy chef tips to make the process even easier:
-
Preheat the Grill: Start by preheating your grill to medium heat (around 350°F or 175°C). A hot grill will create those delicious grill marks and help caramelize the sugar!
-
Prepare the Peaches: Before grilling, wash and dry your peaches. Then, halve them and remove the pits. Here’s a little hack: to make it easier, twist the halves gently after cutting to help them release from the pit!
-
Make the Cinnamon Coating: In a small bowl, combine the brown sugar and cinnamon. This simple mixture adds a delightful sweetness to your peaches. If you’re using granulated sugar as a substitute, just stir well to ensure even distribution.
-
Brush with Olive Oil: Lightly brush the cut sides of the peaches with olive oil. This step not only enhances flavor but also prevents sticking during grilling. Remember, a little goes a long way!
-
Sprinkle with Cinnamon Sugar: Generously sprinkle the cinnamon sugar mixture over the cut sides of the peaches. Don’t be shy—this adds a delicious caramel crust when they hit the grill.
-
Place on the Grill: Carefully place the peaches cut-side down on the grill. Close the lid and let them cook for about 4 to 5 minutes. You’re looking for those gorgeous grill lines and a bit of caramelization.
-
Flip and Finish: After 5 minutes, flip the peaches over and cook for an additional 2 to 3 minutes. This softens the inside while the sugars continue to caramelize. If you notice they’re getting too dark, don’t worry! Just keep an eye on them.
-
Serve and Enjoy: Once they’re beautifully grilled, remove the peaches from the grill. You can serve them warm with a scoop of vanilla ice cream or a drizzle of caramel sauce for that extra touch of indulgence.
Remember, tasting is always key! If you feel like they could use a hint more sweetness, don’t hesitate to sprinkle on a little more cinnamon sugar while they’re still warm.
Serving Suggestions
Plating these grilled peaches is a breeze! For an inviting presentation, set the warm peaches on a decorative plate. If you’re adding ice cream, place a generous scoop right in the center of each peach half. Finish with a drizzle of caramel sauce and a sprinkle of crushed nuts or fresh mint for an extra pop of color and texture. Get creative and make it a shared experience by serving them on a rustic wooden board; it adds warmth and charm to your summer gathering!
Recipe Variations
Want to mix things up a bit? Here are a few fun variations you can try with this dish:
-
Spiced Grilled Peaches: Mix in a pinch of cayenne pepper with the cinnamon sugar for a surprising twist!
-
Coconut Grilled Peaches: After grilling, top with toasted coconut flakes for added texture and a tropical flair.
-
Honey Glazed Peaches: Instead of sugar, brush the cut sides of the peaches with honey before grilling for a natural sweet touch.
-
Nutty Toppings: For added crunch, sprinkle crushed pistachios, almonds, or walnuts on top before serving.
-
Mint Infusion: Add fresh mint leaves for a refreshing note. You can muddle some mint into the brown sugar before sprinkling it on the peaches.
Chef’s Notes
Grilled peaches have become a staple in my kitchen not only for their deliciousness but also for their versatility. I’ve played around with different fruits like strawberries and pineapple, and they all take beautifully to the heat and flavor infusion. One summer, while trying to impress some friends, I accidentally let a batch of grilled peaches sit on the grill just a tad too long. They were a little charred but surprisingly good! That day, I learned that there’s beauty in imperfections and that improvisation can lead to tasty surprises.
FAQs and Troubleshooting
1. Can I use firm peaches?
Yes! If your peaches are a little firmer, they will just need a bit more time on the grill. Just keep an eye on them and test for doneness.
2. How do I know when the peaches are done?
You want them to be soft to the touch. They should give a little when pressed gently, and you should see nice caramelization on the cut side.
3. What if I don’t have a grill?
Not to worry! You can use a grill pan on the stovetop or even a broiler in the oven. Just keep in mind that cooking times may vary.
4. Can I make this ahead of time?
While grilled peaches are best served warm and fresh off the grill, you can prep them by seasoning and adding the sugar mixture ahead of time. Just grill them right before serving for the best results.
Nutritional Info
(Per serving – based on 1 grilled peach half with ice cream):
- Calories: 200
- Total Fat: 8g
- Saturated Fat: 5g
- Carbohydrates: 36g
- Fiber: 2g
- Sugars: 30g
- Protein: 2g
With the right balance of flavors and a sprinkle of creativity, Grilled Peaches with Cinnamon captures the essence of summer in every delicious bite. It’s perfect for sharing with friends or enjoying solo on a warm evening. So fire up that grill, gather your loved ones, and let’s create some sweet memories together!
Happy grilling, and don’t forget—good food is all about showing up and making moments special. Until next time, my fellow foodies, keep cooking with intention and joy!
PrintGrilled Peaches with Cinnamon

A delightful summer dessert featuring grilled peaches caramelized with brown sugar and cinnamon.
- Prep Time: 10 minutes
- Cook Time: 10 minutes
- Total Time: 20 minutes
- Yield: 4 servings 1x
- Category: Dessert
- Method: Grilling
- Cuisine: American
- Diet: Vegetarian
Ingredients
- 4 ripe peaches
- 2 tablespoons brown sugar
- 1 teaspoon cinnamon
- 1 tablespoon olive oil
- Optional: Ice cream or caramel sauce for serving
Instructions
- Preheat the grill to medium heat (around 350°F or 175°C).
- Prepare the peaches by washing, drying, halving, and removing the pits.
- Make the cinnamon coating by combining brown sugar and cinnamon in a bowl.
- Brush the cut sides of the peaches with olive oil.
- Sprinkle the cinnamon sugar mixture generously over the peaches.
- Place the peaches cut-side down on the grill and cook for 4 to 5 minutes.
- Flip the peaches and cook for an additional 2 to 3 minutes.
- Serve warm with ice cream or caramel sauce if desired.
Notes
For added flavor, consider topping with toasted coconut flakes or crushed nuts. Adjust sweetness with extra cinnamon sugar if needed.
Nutrition
- Serving Size: 1 peach half
- Calories: 200
- Sugar: 30g
- Sodium: 0mg
- Fat: 8g
- Saturated Fat: 5g
- Unsaturated Fat: 3g
- Trans Fat: 0g
- Carbohydrates: 36g
- Fiber: 2g
- Protein: 2g
- Cholesterol: 0mg
Keywords: grilled peaches, summer dessert, cinnamon dessert
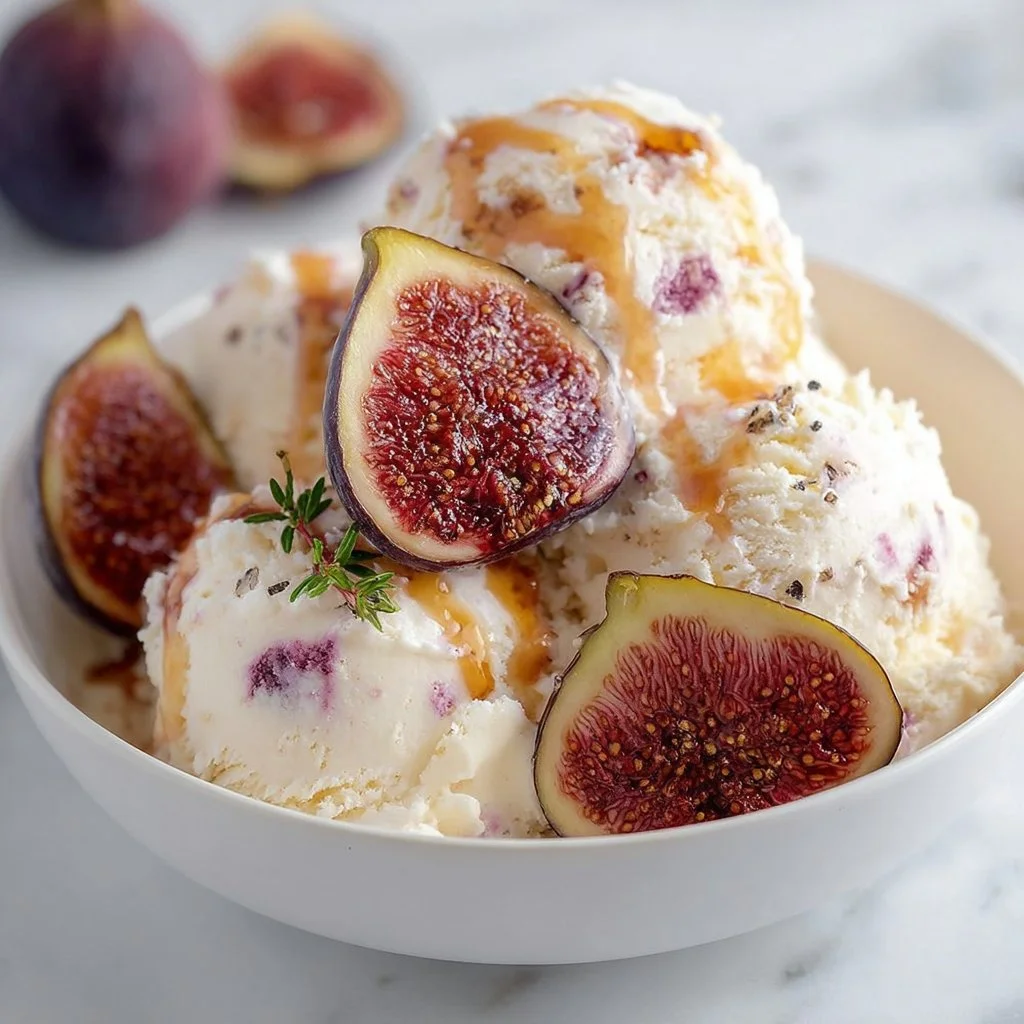
Creamy Fig & Ricotta Ice Cream: 5-Ingredient Quick Fix
Luscious Fig and Ricotta Ice Cream: A Sweet Treat for Any Occasion
Hello food lovers! Today, I’m excited to share something truly special with you: a luscious Fig and Ricotta Ice Cream that will awaken your taste buds and elevate your dessert game to new heights. Whether you’re hosting a fancy dinner party or just want to indulge in a sweet treat after dinner, this recipe is here to impress — without the fuss!
Finding the Inspiration
To understand my deep-rooted love for figs and ricotta ice cream, let me take you back to a sun-drenched summer afternoon spent in my grandmother’s kitchen. The gentle hum of the old fan whirred softly, mixing with the sweet scents emanating from her oven. She would often turn to her vast collection of cookbooks, and that day was no different. “Savannah,” she said, her eyes sparkling with mischief, “let’s make something unforgettable.”
We decided to venture into the world of ice cream. As a child, I was enchanted by the idea of making something so magical from scratch. We combined creamy ricotta cheese — a staple in her Italian repertoire — with fresh figs plucked from the tree in her backyard. The moment that creamy mixture hit the icy churn, I knew we had created something remarkable.
The way the sweet, juicy figs melded with the rich, creamy flavor of ricotta was pure alchemy. That day in the kitchen birthed countless memories – laughter, stories, and of course, that unforgettable fig and ricotta ice cream. Now it’s time to pass this recipe to you, so you can create your own memories in the kitchen.
Gather Your Ingredients
To make this fig and ricotta ice cream, you’ll need the following ingredients:
-
1 cup ricotta cheese: A creamy cheese that adds a luxurious, smooth texture to the ice cream. If you can’t find ricotta, mascarpone makes a great substitute for a richer flavor.
-
1 cup heavy cream: This is essential for giving your ice cream that signature creamy body. If you prefer a lighter version, half-and-half will work too, but your ice cream may be less rich and creamy.
-
1/2 cup sugar: Sweetness is the secret here! You can substitute granulated sugar with coconut sugar or honey, but keep in mind it may alter the flavor slightly.
-
1 teaspoon vanilla extract: This adds warmth and depth of flavor. For a twist, try almond extract or even a few grated lemon zests for a brighter taste.
-
1 cup fresh figs, chopped: Fresh figs bring a natural sweetness and beautiful texture. If fresh figs are out of season, you can use dried figs (but soak them in warm water for an hour to soften).
-
A pinch of salt: Balances the sweetness and heightens all the flavors.
Step-by-Step Instructions
Are you ready to make some ice cream magic? Let’s get started!
-
Prepare the Figs: Chop your fresh figs into small pieces. Here’s a fun tip: If you toss the fig pieces in a tiny bit of sugar, it will help them release their juices, which makes the ice cream even more flavorful. Set them aside.
-
Blend the Base: In a mixing bowl, combine the ricotta cheese, heavy cream, sugar, vanilla extract, and pinch of salt. Use an electric mixer or a whisk to beat the mixture until it’s smooth and creamy. I like to whisk until it reaches a velvety consistency, which just feels luxurious. Remember, we’re aiming for a straight shot of comfort in each bite!
-
Incorporate the Figs: Gently fold the chopped figs into the ricotta mixture. Be careful not to over-mix; we want the figs to remain intact for those delightful bursts of flavor in every spoonful.
-
Chill the Mixture: Cover the bowl and place it in the refrigerator for at least 2 hours, or even better, overnight. This step ensures that all the flavors meld beautifully. You’ll be amazed at how the richness of the ricotta and the sweetness of the figs can develop over time!
-
Churn the Ice Cream: Pour the chilled mixture into your ice cream maker, and churn according to the manufacturer’s instructions. If you don’t have an ice cream maker, no worries! Pour the mixture into a shallow dish, freeze for about 30-40 minutes, then take it out and stir vigorously with a fork to break up any ice crystals. Repeat this every 30 minutes or so until the ice cream is creamy and firm.
-
Freeze and Set: Once the ice cream reaches a soft-serve consistency, transfer it to an airtight container and freeze for at least 4 hours, or until it’s the perfect scoopable texture. Get ready for a thrilling moment when you take a taste for the first time!
Serving Suggestions
When it’s finally time to serve your luscious fig and ricotta ice cream, I suggest plating it in elegant bowls, garnished with a drizzle of honey or a sprinkle of crushed nuts for an added crunch. You could also accompany it with some homemade biscotti or a shortbread cookie for that perfect dessert trio.
Recipe Variations
Want to shake things up? Here are a few ideas:
-
Honey-Roasted Fig Variation: Before mixing figs into your ice cream, roast them with a drizzle of honey in the oven for 10-15 minutes until they caramelize. This brings out another layer of flavor that’s divine!
-
Herbed Infusion: Infuse your cream with rosemary or thyme to add a fragrant herbaceous note. Strain the herbs out before mixing with the ricotta for a sophisticated touch.
-
Chocolate Chip Addition: Fold in semi-sweet chocolate chips to the mixture for a luxurious chocolate-fudge twist.
-
Nutty Twist: Swap out fresh figs for crushed pistachios or walnuts for a delightful nutty ice cream experience.
Chef’s Notes
I have made a few versions of this ice cream over the years, tweaking the recipe as I went. I once added a bit of balsamic reduction to the mix, and wow – it elevated the flavors to a whole different level! It’s fun to experiment with different ingredients and elevate classic tastes into something new. Each spoonful of this fig and ricotta ice cream has a story, a memory, and a bit of love stirred in — that’s what makes cooking so beautiful!
FAQs and Troubleshooting
1. My ice cream is too hard to scoop! What happened?
If your ice cream is too firm, consider letting it sit out for about 5-10 minutes at room temperature before trying to scoop it. Ice crystals may form in solid ice cream; so, be sure to churn it enough if using the no-churn method!
2. What if I can’t find fresh figs?
You can always substitute with dried figs, but keep in mind to soak them beforehand. Frozen figs can also work in a pinch, but be sure to defrost and enjoy the sweetness you want.
3. How long will the ice cream keep?
It’ll last about 1-2 weeks in the freezer if stored properly in an airtight container, but trust me, it won’t last that long!
4. Can I make this dairy-free?
Absolutely! You can use a dairy-free ricotta substitute (like cashew or almond cheese) and use coconut cream in place of heavy cream for a dairy-free treat.
Nutritional Info
Per serving (assuming 8 servings per batch): approximately 225 calories, 15g fat, 20g sugar.
Now that you’re armed with this delightful recipe and plenty of tips, it’s time to don that apron and create your own fig and ricotta ice cream masterpiece. Sharing delicious moments around the table is what it’s all about, so savor every scoop, my friends! Happy cooking, and cheers to beautiful memories around the dinner table!
PrintLuscious Fig and Ricotta Ice Cream
A creamy and luxurious fig and ricotta ice cream, perfect for any occasion.
- Prep Time: 15 minutes
- Cook Time: 4 hours
- Total Time: 4 hours 15 minutes
- Yield: 8 servings 1x
- Category: Dessert
- Method: Churning
- Cuisine: Italian
- Diet: Vegetarian
Ingredients
- 1 cup ricotta cheese
- 1 cup heavy cream
- 1/2 cup sugar
- 1 teaspoon vanilla extract
- 1 cup fresh figs, chopped
- A pinch of salt
Instructions
- Prepare the figs: Chop your fresh figs into small pieces.
- Blend the base: In a mixing bowl, combine the ricotta cheese, heavy cream, sugar, vanilla extract, and pinch of salt.
- Incorporate the figs: Gently fold the chopped figs into the ricotta mixture.
- Chill the mixture: Cover the bowl and place it in the refrigerator for at least 2 hours, or overnight.
- Churn the ice cream: Pour the chilled mixture into your ice cream maker, and churn according to the manufacturer’s instructions.
- Freeze and set: Once the ice cream reaches a soft-serve consistency, transfer it to an airtight container and freeze for at least 4 hours.
Notes
Serve in elegant bowls garnished with honey or nuts for added crunch. Try different variations like honey-roasted figs or chocolate chips.
Nutrition
- Serving Size: 1 serving
- Calories: 225
- Sugar: 20g
- Sodium: 50mg
- Fat: 15g
- Saturated Fat: 10g
- Unsaturated Fat: 5g
- Trans Fat: 0g
- Carbohydrates: 25g
- Fiber: 1g
- Protein: 5g
- Cholesterol: 50mg
Keywords: ice cream, fig, ricotta, dessert, homemade
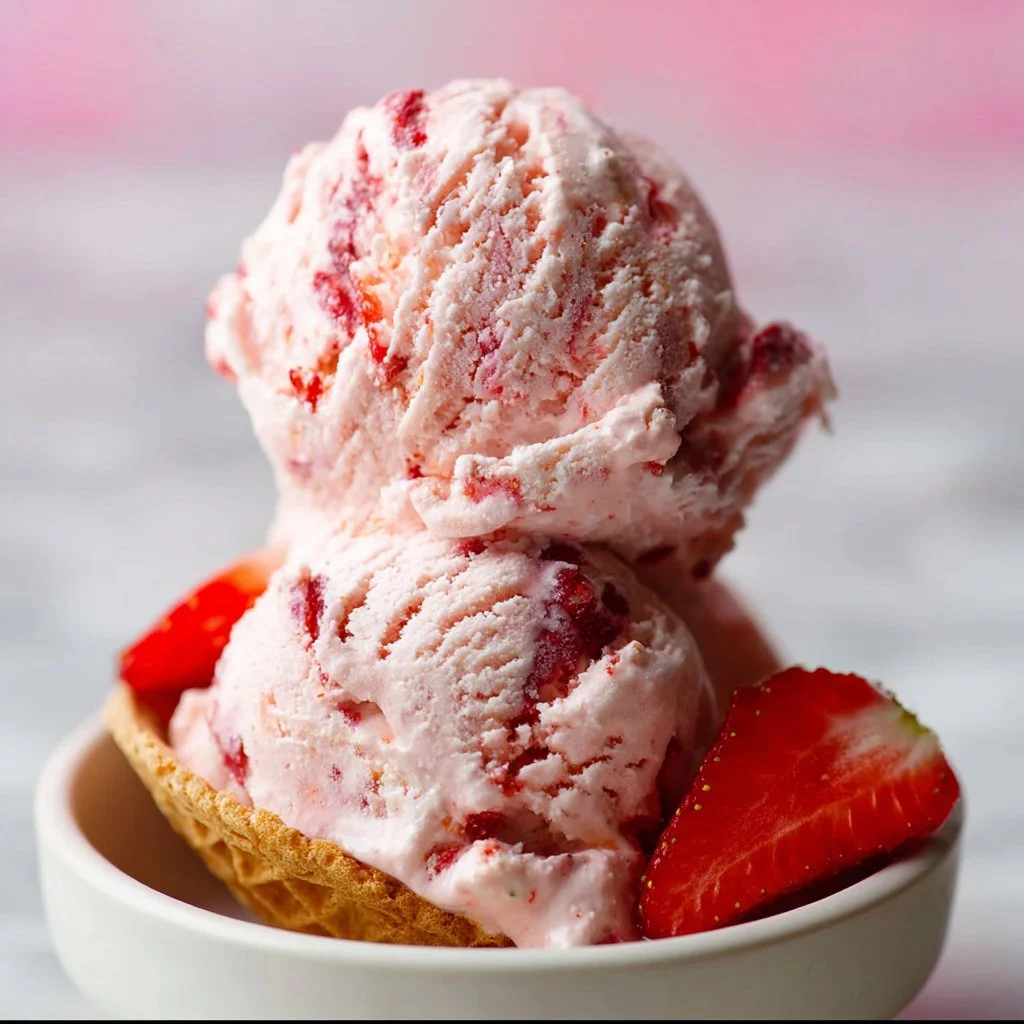
Fresh Strawberry Ice Cream – Vegan Recipe
Fresh Strawberry Ice Cream – Vegan Delight
Introduction
Hello, fellow food lovers! I’m so excited you’re joining me today as we dive into the delightful world of homemade ice cream. There’s something about ice cream that brings instant joy, isn’t there? The way it melts in your mouth, the burst of flavor—oh, it’s pure magic! Today, we’re making Fresh Strawberry Ice Cream, a vegan treat that’s not just delicious but also perfectly creamy. Plus, this recipe happens to be super simple and requires only a handful of fresh ingredients.
Growing up, summer days meant endless hours spent at the local strawberry farm. Picking ripe berries, getting a bit messy, and laughing with friends and family are some of my happiest memories. We’d come home with baskets brimming with strawberries, ready to create something delicious. One of my absolute favorite things to do was to whip up a batch of strawberry ice cream. But it wasn’t just any ice cream—it was a luscious, creamy concoction that felt indulgent yet was somehow still wholesome.
Fast forward to today, and I’m thrilled to share my vegan version with you. Trust me, whether you’re a full-time vegan or just dipping your toes into plant-based recipes, you’re going to love this! It’s creamy, refreshing, and the perfect way to cool off on a warm day. So grab your strawberries and let’s make some magic happen in the kitchen together!
Personal Story
I remember one summer afternoon, my friends and I decided to host an impromptu ice cream party. We had buckets of strawberries from our local farm and a brand-new ice cream maker that was just begging to be used. As we crushed the strawberries together, laughter filled the kitchen, and we each added our favorite ingredients to the mix. My go-to was always coconut milk for that rich, creamy texture. As we watched the ice cream churn and transform before our eyes, we squealed with delight! That day was all about connection—good friends and good food, topped off with a homemade strawberry ice cream that tasted like summer in a bowl.
Ever since then, I’ve been inspired to recreate that joy in the kitchen, and this vegan strawberry ice cream recipe brings me right back to those carefree days. I hope it does the same for you!
Ingredients
Let’s gather our ingredients! Here’s what you’ll need for your delicious vegan Fresh Strawberry Ice Cream:
-
2 cups fresh strawberries, hulled and sliced
Sweet, vibrant, and bursting with flavor! Fresh strawberries will yield the best results, but if you’re out of season, frozen strawberries can work in a pinch. Just let them thaw before you start. -
1 can (14 ounces) coconut milk, full fat
This is the secret to creamy, dreamy ice cream! Full-fat coconut milk gives the right texture and adds a subtle coconut flavor. If you’re not a fan of coconut, you can replace it with cashew milk or another creamy dairy-free milk, but adjust the consistency with a thickener like cashew butter. -
1/2 cup maple syrup or agave nectar
A natural sweetener that adds a delightful caramel-like flavor. If you’re looking for a different twist, consider subbing honey or brown sugar, although honey isn’t vegan. -
1 tablespoon lemon juice
Brightens the flavor of the strawberries, balancing the sweetness. Fresh lemon juice is best, but bottled will work too. -
1 teaspoon vanilla extract
Adds a wonderful depth of flavor. If you have vanilla bean paste or extract, go for it! -
Pinch of salt
Just a touch to enhance all the flavors. You won’t even taste it, but it makes a world of difference!
Step-by-Step Instructions
Now that we have our ingredients ready, let’s jump into the how-to! Following these simple steps will yield an ice cream that’s so good, you’ll want to make it again and again.
-
Prepare the Strawberries: Start by hulling and slicing your fresh strawberries. Toss them into a mixing bowl, and if you’d like, sprinkle a tablespoon of maple syrup over them. Let them sit for about 10-15 minutes. This allows the strawberries to macerate and release their juices, intensifying their sweetness. Simple, right?
-
Blend the Mixture: Once your strawberries are prepped, grab a blender or food processor. Add the macerated strawberries, along with the coconut milk, maple syrup (or agave), lemon juice, vanilla extract, and salt. Blend on high until everything is smooth and creamy. If you’re feeling adventurous, reserve a few strawberry slices to fold in later for extra texture.
-
Taste Test: Here’s the chef’s secret: always taste your mixture before it’s frozen! Adjust the sweetness or acidity to your liking by adding more maple syrup or lemon juice if needed. Remember, the mixture will taste less sweet once it’s frozen, so have fun with it!
-
Chill the Base: Pour the blended mixture into a bowl and cover it with plastic wrap. Let it chill in the refrigerator for about an hour. This step is crucial because it helps the ice cream develop a smooth texture later on.
-
Churn It Up: Once your base is chilled, it’s time to churn! Pour the mixture into your ice cream maker and churn according to the manufacturer’s instructions (usually about 20-25 minutes). If you don’t have an ice cream maker, no worries! Simply pour the mixture into a shallow container and freeze it. Every 30 minutes, stir vigorously with a fork to break up ice crystals until it reaches your desired consistency.
-
Transfer and Freeze: Once the mixture has thickened to a soft-serve consistency, transfer it to an airtight container. Smooth the top with a spatula, and cover it with plastic wrap before sealing the lid. Place it in the freezer for at least 4 hours, or until it’s firm.
-
Scoop and Enjoy: After the ice cream has set, it’s time for the best part—scooping it out! If it’s too hard to scoop, let it sit at room temperature for about 10 minutes to soften slightly. Then, dive right in!
Serving Suggestions
Serve your Fresh Strawberry Ice Cream in elegant bowls or whimsical waffle cones. For an extra touch, consider garnishing with fresh mint leaves or a drizzle of chocolate sauce for a sophisticated flair. You could even layer it with homemade granola for added crunch and texture—yum!
Recipe Variations
-
Berry Medley: Swap out some or all of the strawberries for mixed berries like blueberries, raspberries, or blackberries for a berry blast!
-
Coconut Crunch: Fold in some toasted coconut flakes at the end of churning for an added layer of decadent flavor and texture.
-
Chocolate Swirl: Drizzle some melted dark chocolate into the mixture before freezing for a strawberry chocolate swirl that’s pure indulgence.
-
Minty Fresh: Add a teaspoon of fresh mint extract for a refreshing twist, or toss in a handful of finely chopped fresh mint leaves into the mixture.
-
Creamy Banana: Substitute half of the strawberries with ripe bananas for a creamier, banana-strawberry version!
Chef’s Notes
This recipe has evolved beautifully over the years. Initially, I experimented with loads of additives, but I found that simple, high-quality ingredients truly shine. One time, I accidentally forgot the lemon juice, and while the ice cream was still good, it lacked that zesty brightness that ties everything together. I’ve learned that each element contributes to the final dish, so don’t skip the lemon juice, even if it seems small!
An unexpected kitchen mishap: once I got a bit too ambitious and decided to churn the mixture while chatting with a friend. Let’s just say the blend managed to splatter all over my kitchen—big lesson in multitasking!
FAQs and Troubleshooting
-
Why is my ice cream too hard or icy?
If your ice cream is hard, it may have frozen too long. To achieve a creamy texture, stir or churn every 30 minutes if you’re not using an ice cream maker. Also, adding a bit of vodka (a tablespoon) can help reduce iciness while retaining the flavors. -
Can I use other milk alternatives?
Absolutely! Feel free to use any dairy-free milk you love, just ensure it has a creamy consistency. Almond milk and soy milk can work, but coconut milk yields the best texture. -
How do I store leftovers?
Keep the ice cream in an airtight container in the freezer. It’s best consumed within a week or two, as homemade ice cream often doesn’t have preservatives, which help store-bought last longer. -
What can I do if I can’t find fresh strawberries?
Frozen strawberries can save the day! Just let them thaw and drain excess liquid before using, so you don’t wind up with a watery mixture.
Nutritional Info
While I usually skip the nutritional info, it’s good to know that per serving (based on approximately 8 servings), you’re looking at about:
- Calories: 160
- Total Fat: 7g
- Carbohydrates: 24g
- Sugars: 18g
- Protein: 1g
This delicious vegan treat is dairy-free, gluten-free, and made with wholesome ingredients that allow you to enjoy dessert without guilt!
Conclusion
And there you have it—your very own Fresh Strawberry Ice Cream recipe straight from my heart to your kitchen! I hope this sweet treat brings as much joy and nostalgia to your table as it does to mine. Remember, creating beautiful food doesn’t have to be complex or stressful; it’s all about enjoying the process and sharing those moments with the people you love. So get in there, tie your apron, and let’s make some ice cream magic happen! Cheers to beautiful flavors and sweet memories!
PrintFresh Strawberry Ice Cream – Vegan Delight
A delightful and creamy vegan strawberry ice cream made with fresh ingredients, perfect for summer days.
- Prep Time: 15 minutes
- Cook Time: 30 minutes
- Total Time: 45 minutes
- Yield: 8 servings 1x
- Category: Dessert
- Method: Churning
- Cuisine: Vegan
- Diet: Vegan
Ingredients
- 2 cups fresh strawberries, hulled and sliced
- 1 can (14 ounces) coconut milk, full fat
- 1/2 cup maple syrup or agave nectar
- 1 tablespoon lemon juice
- 1 teaspoon vanilla extract
- Pinch of salt
Instructions
- Prepare the strawberries: Hull and slice your fresh strawberries. Toss them into a mixing bowl, and if you’d like, sprinkle a tablespoon of maple syrup over them. Let sit for 10-15 minutes.
- Blend the mixture: Add the macerated strawberries, along with the coconut milk, maple syrup, lemon juice, vanilla extract, and salt into a blender. Blend on high until smooth and creamy.
- Taste test: Always taste your mixture before it’s frozen and adjust sweetness or acidity as needed.
- Chill the base: Pour the blended mixture into a bowl, cover with plastic wrap, and chill in the refrigerator for about 60 minutes.
- Churn it up: Pour the mixture into your ice cream maker and churn according to instructions (usually 20-25 minutes). If using a shallow container, freeze and stir every 30 minutes.
- Transfer and freeze: Transfer to an airtight container and freeze for at least 240 minutes, or until firm.
- Scoop and enjoy: Let the ice cream sit at room temperature for about 10 minutes before scooping, then serve as desired.
Notes
For added flavors, consider variations like berry medley, coconut crunch, or a chocolate swirl.
Nutrition
- Serving Size: 1 serving
- Calories: 160
- Sugar: 18g
- Sodium: 10mg
- Fat: 7g
- Saturated Fat: 5g
- Unsaturated Fat: 2g
- Trans Fat: 0g
- Carbohydrates: 24g
- Fiber: 1g
- Protein: 1g
- Cholesterol: 0mg
Keywords: strawberry ice cream, vegan ice cream, homemade dessert
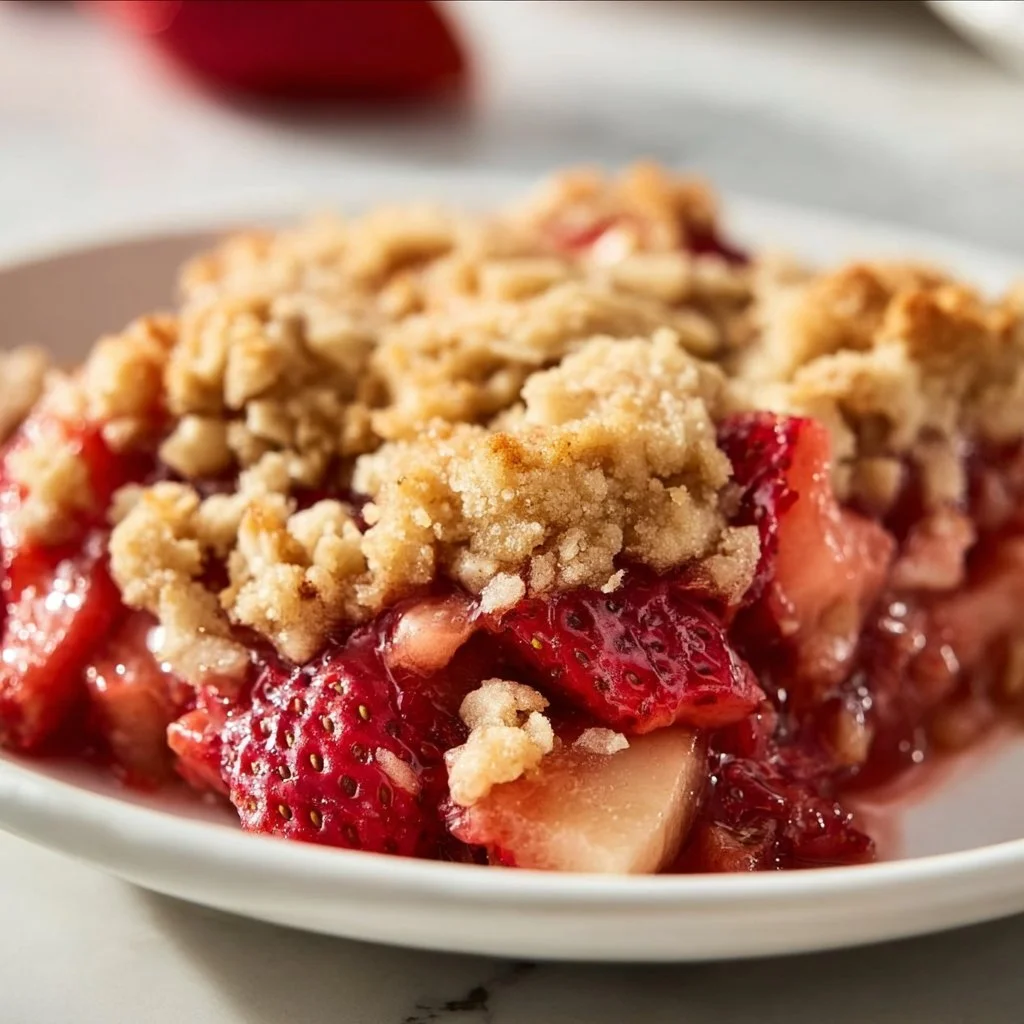
Strawberry Rhubarb Crisp
Indulge in Sweet Nostalgia: Recipe for Strawberry Rhubarb Crisp
Hello, fellow foodies! 🎉 Today we’re diving into a delightful dish that marries sweet and tart in a way that feels like a warm hug from the inside out — Strawberry Rhubarb Crisp! Not only is it a crowd-pleaser, but it’s also a beautiful reminder of those sunny afternoons spent in grandma’s kitchen, where the air was filled with laughter and the sweet scent of baked goods bubbling in the oven.
But before we roll up our sleeves and tie on our aprons, let’s bask in the nostalgia of this classic dessert and the joy it brings to our tables today.
A Whiff of Nostalgia: My Strawberry Rhubarb Crisp Story
I can still picture the sun streaming through the window as I stood on a stool, arms deep in a mixing bowl, on the hunt for the perfect crumble topping for our family’s summer gatherings. My grandmother, the queen of desserts, had a delightful way of turning the simplest ingredients into something extraordinary. Every time she made her famous Strawberry Rhubarb Crisp, the whole house would buzz with excitement.
Rhubarb plants grew abundantly in her backyard, a vibrant pink poking out of the earth, ready to be snipped and tossed into the mix alongside sweet, juicy strawberries. We would rummage through the pantry for oats and flour, a bit of sugar, and, of course, that secret sprinkle of cinnamon that always kept us guessing.
As the crisp baked, we’d hang out in the kitchen, chatting and stealing occasionally glances at the oven, anticipating that bubbling goodness and warm, buttery aroma. The first taste was always magical, that perfect combination of flavors marrying together in a way that only memories can describe. And let me tell you, dear friends, each spoonful tasted like love itself.
We may not have had fancy gourmet gadgets at our disposal, but my grandma taught me the artistry of simplicity. So, roll up those sleeves, and let’s create our own patch of sweet nostalgia!
Ingredients for Your Strawberry Rhubarb Crisp
Let’s get to the good stuff! Here’s everything you’ll need to whip up this delightful crisp. Each ingredient brings something special to the party, and I’m here to share tips to ensure your dish is a hit!
-
2 cups fresh strawberries, hulled and sliced
These juicy gems are the star of the show. Look for plump strawberries that are fragrant — you want the sweetness to shine! If fresh strawberries aren’t available, you can use frozen ones, but reduce the sugar slightly as they can be a bit sweeter. -
2 cups rhubarb, chopped
Ah, the tangy counterpart of the strawberries! Rhubarb adds a lovely tartness that balances the sweetness. If rhubarb isn’t in season, you can use apple or even sour cherries as a substitute. -
1 cup granulated sugar
This brings the sweetness needed to balance the tangy rhubarb. For a healthier option, you can substitute half of this with honey or maple syrup — just note that it will alter the texture slightly. -
2 tablespoons cornstarch
This is our secret weapon for thickening the delicious filling — it helps give the crisp that lovely structure. If you’re out of cornstarch, you can use all-purpose flour, but the filling may be a tad thinner. -
1 tablespoon lemon juice
A splash of acidity that brightens the flavors and enhances the fruitiness. If you’re fresh out of lemon, a splash of orange juice works almost as well! -
1 cup rolled oats
These provide the crunchy topping and a nutty depth of flavor. Quick oats can work in a pinch, but I love the texture that rolled oats provide in this dish. -
1 cup all-purpose flour
Essential for our crumbly topping — it gives the right structure and texture. If you’re looking for a gluten-free option, almond flour or a gluten-free flour blend can do the trick! -
1/2 cup brown sugar
This delivers a subtle molasses flavor that caramelizes beautifully during baking. You can reduce it to 1/3 cup if you prefer less sweetness! -
1/2 cup butter, softened
The source of all that rich, buttery goodness in our crisp! If you want a plant-based version, coconut oil or vegan butter can work well too — just keep an eye on the melting time. -
1 teaspoon cinnamon
Cinnamon is the perfect warm spice that lifts all the flavors in this crisp. Feel free to sprinkle a bit more if you like a stronger flavor or mix in some nutmeg for an extra kick!
Step-by-Step Instructions for the Perfect Crisp
Alright, it’s time to make some magic happen in the kitchen! Grab those ingredients and follow these steps for a delicious strawberry rhubarb crisp that will impress your friends and family.
1. Preheat Your Oven
Set your oven to 350°F (175°C). A preheated oven ensures that your crisp will cook evenly and bubble perfectly!
2. Prepare the Filling
In a large mixing bowl, combine your sliced strawberries, chopped rhubarb, granulated sugar, cornstarch, and lemon juice.
- Tip: Gently toss these ingredients together, ensuring each piece of fruit is coated. You want that sugar to play nice with the fruit juices while you’re combining them!
3. Pour the Fruit into the Baking Dish
Transfer the luscious fruit mixture into a greased 9-inch baking dish. Spread it out evenly so every spoonful will have that sweet-and-tangy combo.
4. Make the Topping
In a separate bowl, combine the rolled oats, all-purpose flour, brown sugar, butter, and cinnamon.
- Chef’s Insight: Use a fork or your fingers to mix everything until it resembles a crumbly texture. You want those bits of butter to stay intact for a beautiful crispy finish!
5. Crumble that Topping
Sprinkle the oat mixture evenly over the rhubarb and strawberry mixture, covering it completely. Don’t hold back — the more, the merrier!
6. Bake the Crisp
Pop it into your preheated oven and let it bake for 40-45 minutes. You’ll know it’s ready when the filling is bubbling and the topping is beautifully golden brown.
- Pro Tip: Toss some foil over the top if it’s browning too quickly, allowing the fruit to finish cooking without burning the crispy goodness.
7. Cool and Serve
Let the crisp cool for about 10-15 minutes before diving in so you don’t burn your taste buds. This also helps stabilize the filling a bit.
Woohoo! Your strawberry rhubarb crisp is ready to shine!
Serving Suggestions
To serve, scoop generous portions into bowls and top with a dollop of fresh whipped cream or a scoop of vanilla ice cream. The warm crisp combined with the cold ice cream creates a dreamy contrast that is absolutely heavenly! You could also sprinkle a few fresh mint leaves on top for a pop of color and freshness.
Recipe Variations to Explore
- Add Nuts: Consider adding chopped walnuts or pecans for an extra crunch to the topping!
- Spiced Crisps: Replace the cinnamon with pumpkin spice or a dash of ginger for a different seasonal twist.
- Berry Mix: Combine other berries, like blueberries or raspberries, for a mixed berry crisp that’s bursting with flavor!
- Vegan Alternative: Substitute the butter with coconut oil and use a flax egg for an easy vegan option.
- Gluten-Free: Use gluten-free oats and flour to create a deliciously inclusive dish for everyone to enjoy!
Chef’s Notes
This recipe has evolved over time in my kitchen and has become a staple for summer gatherings. I cherish how simple it is to make while allowing you to explore flavors based on what’s in season! I once had a little “oops” moment when I accidentally swapped salt for sugar in the filling. Let’s just say that day didn’t go as planned, but it sparked an idea to double-check measurements — a lesson learned with a laugh!
FAQs and Troubleshooting
1. Why is my topping soggy?
If the topping turns out soggy, it might be because the butter was overmixed into the dry ingredients. You want a crumbly texture, not a paste. Also, ensure you’ve added the right amount of cornstarch for thickening the fruit juices.
2. Can I make this ahead of time?
Absolutely! You can assemble the crisp, cover it, and store it in the fridge for 1-2 days before baking. Just make sure to add a few extra minutes to the baking time if it’s chilled.
3. Can I use frozen fruit?
Yes! If using frozen strawberries or rhubarb, there’s no need to thaw, but add a little extra cornstarch to help absorb the extra juices released during baking.
4. How do I store leftovers?
Keep any leftovers in an airtight container in the fridge for up to 3 days. Reheat it in the oven for that fresh-baked taste!
Nutritional Info (Optional)
While not exact, a single serving of this strawberry rhubarb crisp (approximately 1/8 of the dish) may contain around:
- Calories: 250
- Protein: 2g
- Fat: 11g
- Carbohydrates: 39g
- Sugar: 18g
Note: These numbers can vary based on serving size and ingredient brands used.
And there you have it! A delicious, heartwarming Strawberry Rhubarb Crisp that’s bound to evoke joy — whether for yourself or your loved ones gathered around the table. Here’s to the beauty of cooking with intention, letting flavors first speak of memories, and creating new ones with every delightful bite.
If you try this recipe, I’d love to hear how it turned out! Snap a picture, tag me on your social media, and let’s keep the cooking conversation going. Cheers to sweet moments and tasty treats! 🍓🌿✨
PrintStrawberry Rhubarb Crisp
A delightful dessert that marries sweet strawberries and tangy rhubarb, topped with a crunchy oat crumble.
- Prep Time: 15 minutes
- Cook Time: 45 minutes
- Total Time: 60 minutes
- Yield: 8 servings 1x
- Category: Dessert
- Method: Baking
- Cuisine: American
- Diet: Vegetarian
Ingredients
- 2 cups fresh strawberries, hulled and sliced
- 2 cups rhubarb, chopped
- 1 cup granulated sugar
- 2 tablespoons cornstarch
- 1 tablespoon lemon juice
- 1 cup rolled oats
- 1 cup all-purpose flour
- 1/2 cup brown sugar
- 1/2 cup butter, softened
- 1 teaspoon cinnamon
Instructions
- Preheat your oven to 350°F (175°C).
- Combine your sliced strawberries, chopped rhubarb, granulated sugar, cornstarch, and lemon juice in a large mixing bowl.
- Transfer the fruit mixture into a greased 9-inch baking dish.
- In a separate bowl, combine the rolled oats, all-purpose flour, brown sugar, butter, and cinnamon.
- Mix everything until it resembles a crumbly texture.
- Sprinkle the oat mixture evenly over the fruit mixture.
- Pop it into your preheated oven and let it bake for 40-45 minutes.
- Cool for 10-15 minutes before serving.
Notes
Serve with whipped cream or vanilla ice cream for a perfect combo!
Nutrition
- Serving Size: 1 serving
- Calories: 250
- Sugar: 18g
- Sodium: 100mg
- Fat: 11g
- Saturated Fat: 7g
- Unsaturated Fat: 3g
- Trans Fat: 0g
- Carbohydrates: 39g
- Fiber: 3g
- Protein: 2g
- Cholesterol: 30mg
Keywords: Strawberry Rhubarb Crisp, Dessert, Summer Recipe, Warm Dessert
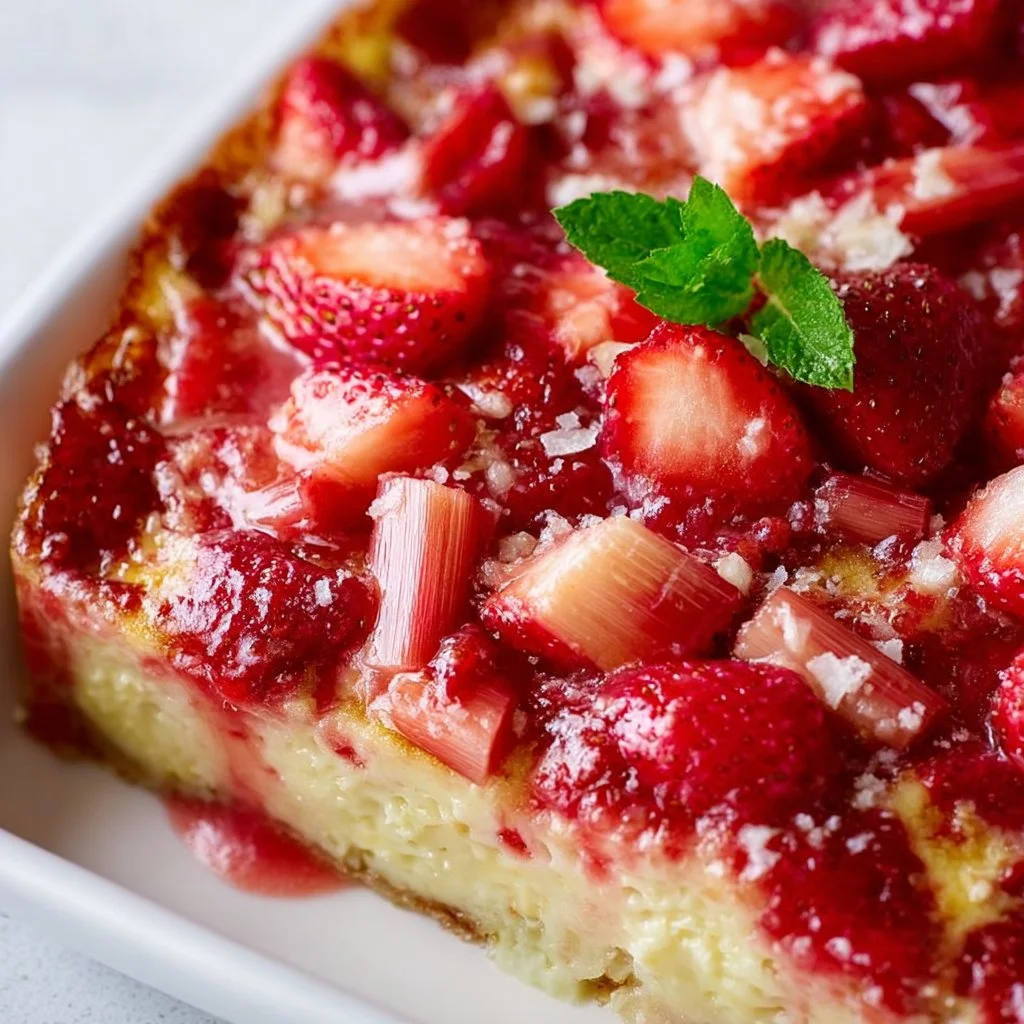
Strawberry Rhubarb Custard Dessert
Sweet Memories: Creating a Strawberry Rhubarb Custard Dessert
Hello there, fellow food enthusiasts! Today we’re diving into a dessert that perfectly marries the sweet and tart: Strawberry Rhubarb Custard Dessert. This dish is not just a treat for your taste buds; it’s a culinary homage to warm summer days, friendly gatherings, and the simplicity of fresh ingredients. With the vibrant colors of strawberries and the tangy crunch of rhubarb, each bite of this dessert sparks joy and nostalgia.
You see, cooking for me goes beyond just the end result. It’s about the stories we craft while whisking batter, the laughter shared over simmering pots, and how a simple dessert can evoke cherished memories. I still remember the first time I tasted strawberry rhubarb pie at my grandmother’s kitchen table. The sun streamed in through the window, illuminating her laughter as she shared stories of her garden adventures, where she lovingly tended to her rhubarb patch. That flavor—sweet strawberries intertwined with the zing of rhubarb—carried with it the warmth of family, love, and tradition. And that, my friends, is how this delightful dessert became a staple in my kitchen.
You’re in for a treat today, as we create this delicious custard dessert that not only looks impressive but is also incredibly attainable. Whether you’re planning to impress guests during a dinner party or simply treating yourself on a cozy night in, this recipe has got you covered. Let’s gather those aprons and dive right in!
Personal Story
The first time I fell head over heels for the combination of strawberries and rhubarb was during a weekend visit to my grandmother’s house in late spring. She was preparing her famous strawberry rhubarb pie, which had been a family favorite for generations. I recall the way her kitchen smelled—sweet and tangy, with the light spice of freshly baked crust wafting through the air.
As she rolled out the pastry, I eagerly helped chop the vibrant red rhubarb stalks and pluck the strawberries from their green tops. It became a delightful assembly line of laughter, flour dusting the countertops, and bowls precariously piled high with the fruits. I can still hear her gentle reminders about the difference between sugar and salt—a kitchen lesson I’ll forever cherish.
That pie made its debut at the kitchen table that evening, shining brightly under the twinkling lights. Each bite was a celebration, a small moment of joy that resonated deeply with everyone around that table. It was in that shared experience that I discovered the magic of cooking: it can unite us, create memories, and often become a delicious legacy. Today, we’re recreating a version of that beloved dish—only this time, we’re crafting a custard dessert that captures all those flavors without the fuss of pie crust. Let’s get started!
Ingredients
For our Strawberry Rhubarb Custard Dessert, you’ll need the following ingredients. Each element plays a significant role in creating that perfect balance of flavors, and I’m also sharing some substitution tips where applicable.
-
1 cup sugar
For sweetness! You can substitute with brown sugar for a deeper flavor or even a sugar alternative like coconut sugar if you’re watching your intake. -
1/2 cup butter, softened
Adds richness to our custard. If you want to make it dairy-free, coconut oil or vegan butter can work nicely too. -
1 egg
Helps to bind everything together. You can replace it with a flax egg (1 tablespoon of ground flaxseed with 2.5 tablespoons of water) for a vegan option. -
1 1/2 cups all-purpose flour
The base of our dessert. If gluten-free is your jam, a 1:1 gluten-free flour blend should do the trick. -
1/2 teaspoon baking powder
To give our dessert structure. You can omit it if you prefer a denser custard. -
1/4 teaspoon salt
Enhances all the flavors. Don’t skip this, it’s essential! -
2 cups chopped rhubarb
This gives our dessert that classic zing. If you can’t find rhubarb, you can substitute with tart apples or a little more strawberries, but you’ll miss that distinct flavor. -
1 cup sliced strawberries
For the sweetness and joy! Feel free to use frozen strawberries in a pinch—just thaw and drain before using. -
2 cups milk
The heart of our custard. Any milk works—whole, skim, almond, or oat milk—for this recipe! -
3/4 cup sugar
For our custard sweetness! You can use the same substitutions here. -
3 tablespoons cornstarch
Helps thicken our custard. If you don’t have cornstarch, you can use flour or arrowroot powder. -
1 teaspoon vanilla extract
Add warmth and depth to the flavors. Always opt for pure vanilla extract if you can find it—it makes a difference! -
4 large eggs, beaten
These are crucial for creating a creamy, luscious custard. For a plant-based option, try silken tofu blended until smooth in equal measurement.
Step-by-Step Instructions
Now that we have all our ingredients ready, it’s time to roll up our sleeves and get cooking! Follow these simple steps for a delightful dessert that’s sure to impress.
-
Preheat the Oven
Start by preheating your oven to 350°F (175°C). This is crucial—no one likes a dessert that’s unevenly cooked, am I right? While the oven is warming, you can prepare the rest of your ingredients. -
Prepare the Fruit
In a medium bowl, combine the chopped rhubarb and sliced strawberries. Toss them with 1/2 cup of the sugar. Set them aside to macerate while you prepare the rest of your batter. This will draw out the juices and create a beautiful mixture of flavors! -
Make the Base
In a large mixing bowl, cream the softened butter and remaining sugar together until light and fluffy (about 3–5 minutes). This process is super important for achieving that dreamy texture. If you’re feeling adventurous, add a dash of almond extract for a unique twist. -
Incorporate the Egg
Add in one egg at a time, mixing well after each addition. This ensures a silky smooth batter. Don’t rush—give each egg time to combine before adding the next. -
Mix the Dry Ingredients
In a separate bowl, whisk together the flour, baking powder, and salt. Gradually add this dry mixture to the butter-sugar-egg mixture. Mix just until combined. Over-mixing can lead to a tougher texture, which we want to avoid! -
Layer the Fruit
Carefully fold in the macerated rhubarb and strawberries into your batter. Here’s a chef tip: to keep your fruit evenly distributed, coat them lightly with flour before folding them in—that way they won’t sink to the bottom during baking. -
Prepare the Custard
In another bowl, whisk together the milk, 3/4 cup of sugar, cornstarch, vanilla extract, and beaten eggs until smooth. This custard will be poured over the fruit later, so it should be creamy and luscious! -
Assemble the Dessert
In a greased baking dish (9×13 works perfectly!), pour the batter first, then gently spoon the custard mixture over the top. You’ll see the fruit peeping through, and that’s exactly what we want! This layer effect makes for a stunning presentation once it’s baked. -
Bake
Pop it in the oven for about 45–55 minutes, or until the custard is set and a light golden crust forms on top. The aroma? Out of this world! If you notice the top is browning too quickly, feel free to cover it gently with foil. -
Cool and Serve
Allow your dessert to cool for at least 20 minutes before slicing into it. This not only helps the flavors settle but makes it easier to serve.
Serving Suggestions
When it comes to serving this delightful custard dessert, presentation is key! I love to serve it warm or at room temperature, topped with a dollop of fresh whipped cream or a scoop of vanilla ice cream. Drizzle some caramel or berry sauce for that extra touch of elegance. And don’t forget a sprig of mint for a pop of color!
Place each slice on a decorative plate, garnished with fresh berries and maybe even a sprinkle of powdered sugar. Your guests won’t just eat with their mouths—they’ll feast with their eyes!
Recipe Variations
While the classic version is unmatched, who says we can’t get creative? Here are some exciting variations you might enjoy:
-
Berry Medley: Swap out the strawberries and rhubarb for a mix of blackberries, blueberries, and raspberries. It adds a different level of tartness and sweetness!
-
Citrus Zing: Add the zest of an orange or lemon to the custard for a refreshing twist. The citrus notes pair beautifully with the berries.
-
Nutty Crunch: Before baking, sprinkle chopped pecans or walnuts atop the batter for added texture and flavor.
-
Coconut Custard: Substitute half of the milk with coconut milk to infuse a tropical vibe into the dish.
-
Spiced Option: Incorporate a dash of cinnamon or nutmeg into the batter for warmth, especially cozy during the colder months.
Chef’s Notes
This Strawberry Rhubarb Custard Dessert has come a long way since those cherished days of baking at my grandmother’s table. It’s evolved into a crowd-pleaser in my kitchen, appearing at everything from casual family dinners to elegant gatherings. I love telling the story of how this dessert came to be, sparking conversations and often, a few nostalgic tears.
Over the years, I’ve had my share of kitchen disasters—like the time I mistook salt for sugar and ended up with a rather sad custard. But those experiences are what have helped shape my approach to cooking. The essence of creating delicious food isn’t in achieving perfection; it’s in sharing love through the process, from mishaps to masterpieces.
FAQs and Troubleshooting
1. My custard didn’t set properly. What went wrong?
It’s likely that the custard didn’t bake long enough, or the eggs weren’t beaten well enough. For a foolproof set, ensure your eggs are well mixed, and let it bake until it just jiggles in the center when you gently shake the pan.
2. How do I store leftovers?
Store any leftovers in an airtight container in the refrigerator for up to 3 days. The flavors will continue to meld, making it even tastier the next day!
3. Can I freeze this dessert?
While it’s not ideal to freeze custard desserts, you can freeze slices of this dessert for up to a month. Just be sure to wrap them tightly. Thaw in the fridge overnight before serving!
4. Can I make this vegan?
Absolutely! Use flax eggs for binding, almond milk instead of regular milk, and coconut oil in place of butter. The flavor will still shine through beautifully!
Nutritional Info
[Optional section based on specific dietary requirements you may want to add here!]
And there you have it, my friends! Your very own Strawberry Rhubarb Custard Dessert—a beautiful blend of nostalgia and flavor that will surely impress everyone around your table. Remember, cooking is an adventure, and every recipe is a chance to create lasting memories. Now, let’s tie on those aprons, pour a little sparkling drink, and get baking!
PrintStrawberry Rhubarb Custard Dessert
A delightful dessert combining sweet strawberries and tart rhubarb, encased in a creamy custard for a nostalgic culinary experience.
- Prep Time: 20 minutes
- Cook Time: 55 minutes
- Total Time: 75 minutes
- Yield: 8 servings 1x
- Category: Dessert
- Method: Baking
- Cuisine: American
- Diet: Vegetarian
Ingredients
- 1 cup sugar
- 1/2 cup butter, softened
- 1 egg
- 1 1/2 cups all-purpose flour
- 1/2 teaspoon baking powder
- 1/4 teaspoon salt
- 2 cups chopped rhubarb
- 1 cup sliced strawberries
- 2 cups milk
- 3/4 cup sugar
- 3 tablespoons cornstarch
- 1 teaspoon vanilla extract
- 4 large eggs, beaten
Instructions
- Preheat the oven to 350°F (175°C).
- Combine the chopped rhubarb and sliced strawberries with 1/2 cup of sugar and set aside.
- Cream the softened butter and remaining sugar together until light and fluffy.
- Add one egg at a time, mixing well after each addition.
- Whisk together the flour, baking powder, and salt in a separate bowl.
- Add the dry mixture to the butter-sugar-egg mixture until just combined.
- Fold in the macerated rhubarb and strawberries.
- Whisk together the milk, 3/4 cup sugar, cornstarch, vanilla extract, and beaten eggs until smooth.
- Pour the batter into a greased baking dish and spoon the custard mixture over the top.
- Bake for 45–55 minutes, until set and golden.
- Cool for at least 20 minutes before serving.
Notes
Serve warm with whipped cream or ice cream for added indulgence. Experiment with variations like berry medleys or citrus zest.
Nutrition
- Serving Size: 1 serving
- Calories: 350
- Sugar: 25g
- Sodium: 180mg
- Fat: 20g
- Saturated Fat: 8g
- Unsaturated Fat: 10g
- Trans Fat: 0g
- Carbohydrates: 45g
- Fiber: 3g
- Protein: 6g
- Cholesterol: 140mg
Keywords: strawberry, rhubarb, custard, dessert, summer, baking, family recipe