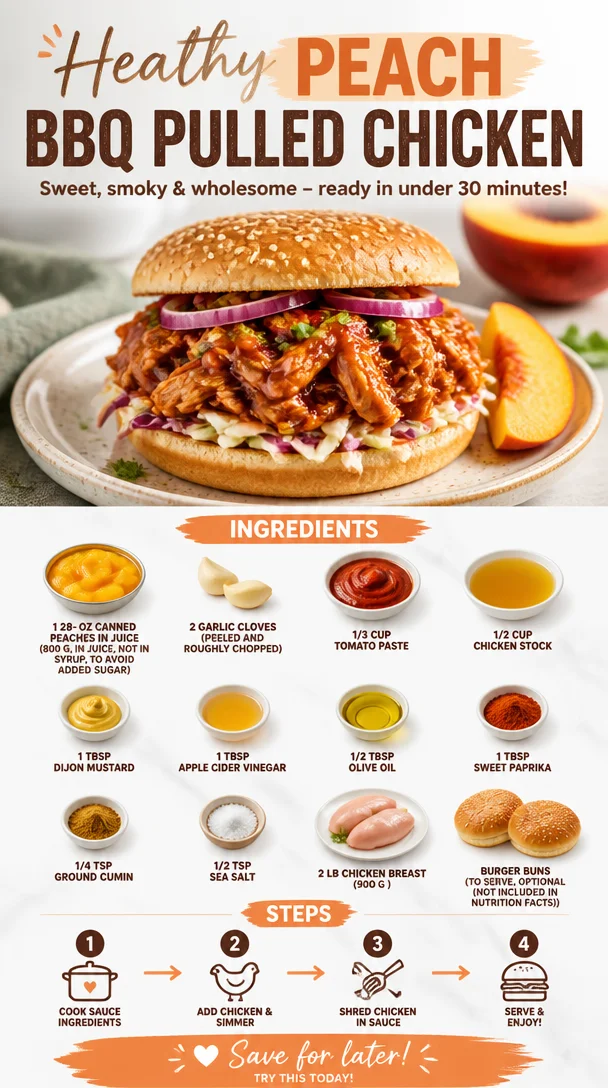
Healthy Peach BBQ Pulled Chicken
Healthy Peach BBQ Pulled Chicken: A Delight for Your Table
Hey there, foodie friends! I’m so excited to share one of my favorite recipes with you today: Healthy Peach BBQ Pulled Chicken. I don’t know about you, but I believe that cooking should be both delicious and healthy, without sacrificing that delightful taste we all crave. Whether you’re having a family dinner, hosting a casual get-together, or simply looking for a weeknight meal that’ll impress even the pickiest eaters, this dish is here to save the day!
Picture this: tender, juicy chicken coated in a luscious, peach-infused barbecue sauce that’s both tangy and sweet. Serve it on warm burger buns or pile it onto a bed of greens for a refreshing salad option—the choice is yours! This recipe takes the essence of summer and captures it right in your kitchen, making your dining table a place of joy and nostalgia.
As a passionate home cook with a love for hosting, I find that great meals are about sharing delightful flavors and making memories. And what better way to do that than with a hearty dish that brings everyone together? Today, we’re diving into the world of healthy barbecue pulled chicken, and I can’t wait for you to create this masterpiece in your home. So, tie on that apron, and let’s get started!
Personal Story
I remember the first time I made pulled chicken for a backyard barbecue with friends. It was warm at dusk, and the smell of grilling chicken wafted through the air, teasing everyone’s taste buds. But here’s the twist: instead of the traditional barbecue sauce, I decided to get creative with peaches. Growing up, we had a peach tree in our backyard, and those sweet, juicy peaches were the highlight of summer. So, it felt only fitting to incorporate that nostalgia into my cooking.
As the chicken cooked low and slow, the aroma filled our outdoor space, mingling with laughter and the sound of clinking glasses. The reaction when I revealed the peach BBQ pulled chicken was priceless! People were amazed not only by the unique flavor but also how it brought a touch of nostalgia to the table. Since then, this recipe has become a family favorite and a staple at gatherings. It reminds me that cooking is not just about the food, but creating beautiful memories with the people we care about.
Ingredients
To create this tantalizing dish, you’ll need the following ingredients:
-
28 oz canned peaches in juice (800 g): Choose peaches packed in juice, not syrup! This keeps our dish naturally fruity without added sugars. If canned peaches aren’t available, you can use fresh or frozen peaches; just cook them down until they’re soft and juicy.
-
2 garlic cloves (peeled and roughly chopped): Garlic is the heart of flavor! Not only gives it that aromatic punch, but it also adds a bit of a health boost. If you love garlic (who doesn’t?), feel free to add more, or substitute with garlic powder if you’re in a pinch.
-
1/3 cup tomato paste: This ingredient adds richness and depth to our sauce. It’s a great base that marries beautifully with the peaches. If you don’t have tomato paste, consider using ketchup, though it may add some extra sweetness.
-
1/2 cup chicken stock: A great broth can elevate any dish! If you’re looking for a vegetarian option, feel free to substitute vegetable stock instead.
-
1 tbsp Dijon mustard: This tangy delight kicks up the flavor profile and offers a bit of zest. You can swap it with yellow mustard if that’s what you have on hand.
-
1 tbsp apple cider vinegar: Adds a refreshing tang and cuts through the sweetness of the peaches. If you don’t have this, white wine vinegar can work just as well.
-
1/2 tbsp olive oil: For sautéing those garlic cloves and locking in flavor. If you’re looking for something different, avocado oil or coconut oil can be nice swaps.
-
1 tbsp sweet paprika: This adds a warm, rich depth of flavor with a hint of sweetness. Smoked paprika is fantastic if you want a smoky element.
-
1/4 tsp ground cumin: Cumin adds an earthy, aromatic quality that pairs wonderfully with the sweetness of the peaches. Feel free to adjust this based on your preference; a little can go a long way!
-
1/2 tsp sea salt: A pinch of salt to enhance all the flavors at play! You can adjust to taste, especially if you’re watching your sodium intake.
-
2 lb chicken breast (900 g): The star of our dish! Chicken breast is lean and healthy, but thighs can add more flavor if you’re feeling indulgent.
-
Burger buns (optional): If you want to serve it the classic way! Whole wheat or gluten-free buns are excellent alternatives.
Step-by-Step Instructions
Now that we’ve gathered our delightful ingredients, let’s dive into the cooking process!
Step 1: Prepare Your Ingredients
To get things moving, start by chopping your garlic and setting it aside. If you’re using fresh peaches, peel and slice them now—no need to worry about dicing them perfectly as they will break down during cooking. If you’re using canned peaches, simply drain the juices (but hang onto them for later).
Step 2: Sauté the Garlic
In a large skillet or pot, heat up your olive oil over medium heat. Once it’s shimmering, toss in your chopped garlic. Sauté it for about 1-2 minutes until it’s fragrant and glowing but not burnt—trust me, burnt garlic can ruin the dish.
Step 3: Make the Sauce
Next, add the tomato paste to the garlic and stir it in well. Let it cook for another minute to caramelize slightly before adding the canned peaches (or fresh), chicken stock, Dijon mustard, apple cider vinegar, sweet paprika, ground cumin, and sea salt.
Stir everything together, and allow it to simmer for about 5-10 minutes until the peaches break down and the sauce thickens slightly. This is where that divine aroma fills your kitchen!
Step 4: Introduce the Chicken
Now, it’s time for our chicken! Nestle the chicken breasts into the sauce, ensuring they are fully submerged. Cover your skillet and let it simmer on low heat for about 30-40 minutes. The goal is to gently poach the chicken until it’s cooked through and juicy—this will help it shred easily!
Step 5: Shred the Chicken
Once the chicken reaches an internal temperature of 165°F (75°C), remove it from the skillet and set it aside on a cutting board. Allow it to cool slightly before pulling out two forks to shred the meat. This should feel cathartic and easy!
Step 6: Combine and Serve
Place the shredded chicken back in the skillet and stir it into the peach sauce. Let it cook together for an additional 5-10 minutes to absorb those flavors. Serve it warm atop burger buns or as a served warm over a fresh salad, and don’t forget a drizzle of that irresistible sauce!
Serving Suggestions
Presentation is everything! Serve your Peach BBQ Pulled Chicken generously piled onto toasted burger buns for that classic look, topped with fresh arugula or crispy cabbage for a satisfying crunch. If you’re opting for a lighter meal, serve the chicken over a bed of mixed greens, drizzled with a splash of lemon juice for added zing. Arrange colorful sides like roasted veggies or cornbread to make your meal visually stunning!
Recipe Variations
Feeling adventurous? Here are a few creative twists to make this recipe your own:
-
Spicy Kick: Add chopped jalapeños or a pinch of cayenne pepper to the sauce for a bit of heat.
-
Tropical Twist: Substitute the peaches with diced pineapple or mango for a refreshing tropical flavor.
-
Sweet & Savory: Mix in some hoisin sauce or a splash of soy sauce for an Asian-inspired fusion.
-
Herb Infusion: Blend in fresh basil or cilantro before serving for an unexpected herbal freshness.
-
Vegan Option: Swap chicken for jackfruit to make this dish vegan-friendly. The jackfruit mimics the texture perfectly when cooked down.
Chef’s Notes
This recipe has definitely evolved for me over time. It originally started as a way to use up extra chicken from a weekend roast, but it quickly became a family favorite. I often find myself adjusting the ingredients based on whatever is in my pantry. Plus, the beauty of this dish is how adaptable it is—you can have it with rice, in tacos, or even as part of a meal prep bowl!
Funny story: the first time I made this for a large group, I accidentally left out the mustard! No one noticed, but I definitely learned to always double-check my ingredients list beforehand (oops!). It taught me to be organized in the kitchen, and now I always measure and prep in advance.
FAQs and Troubleshooting
-
What if my chicken isn’t shredding easily?
- If it’s tough, it might need more time cooking. Ensure it’s cooked through and tender before shredding!
-
Can I make this ahead of time?
- Absolutely! The flavors deepen as it sits, making it even more delicious. Store it in an airtight container in the fridge for up to 3 days.
-
How do I store leftovers?
- Keep any leftover pulled chicken in an airtight container in the fridge for up to 5 days, or freeze it in portions for up to 3 months.
-
Can I make this recipe in a slow cooker?
- Yes! Just combine all ingredients into your slow cooker and cook on low for 6-8 hours or high for 3-4 hours until the chicken is tender.
Nutritional Info (optional)
While I won’t delve too deeply into the numbers, this recipe is a fantastic source of protein and rich in vitamins from the peaches and herbs. It fits well within a balanced diet, particularly if you focus on whole grains and fresh veggies in your meal combinations!
So there you have it, my lovely foodies! Healthy Peach BBQ Pulled Chicken is not just a dish; it’s an experience waiting to unfold at your table. I can’t wait for you to try it and make it your own. Remember, cooking is about joy, creativity, and sharing beautiful moments. Keep gathering around your table, and let’s keep spreading that love one recipe at a time! Happy cooking!
PrintHealthy Peach BBQ Pulled Chicken

A deliciously healthy dish featuring tender pulled chicken in a sweet and tangy peach-infused barbecue sauce, perfect for any meal.
- Prep Time: 15 minutes
- Cook Time: 40 minutes
- Total Time: 55 minutes
- Yield: 4 servings 1x
- Category: Main Course
- Method: Stovetop
- Cuisine: American
- Diet: Gluten Free
Ingredients
- 28 oz canned peaches in juice (800 g)
- 2 garlic cloves, peeled and roughly chopped
- 1/3 cup tomato paste
- 1/2 cup chicken stock
- 1 tbsp Dijon mustard
- 1 tbsp apple cider vinegar
- 1/2 tbsp olive oil
- 1 tbsp sweet paprika
- 1/4 tsp ground cumin
- 1/2 tsp sea salt
- 2 lb chicken breast (900 g)
- Burger buns (optional)
Instructions
- Prepare your ingredients: chop garlic and slice fresh peaches if using.
- Sauté the garlic in olive oil over medium heat for 1-2 minutes until fragrant.
- Add the tomato paste and cook for 1 minute before stirring in peaches, chicken stock, Dijon mustard, apple cider vinegar, sweet paprika, cumin, and salt.
- Simmer the sauce for 5-10 minutes until peaches break down and thicken.
- Introduce the chicken breasts into the sauce, cover, and simmer on low for 30-40 minutes until cooked through.
- Shred the chicken once cooled slightly and return it to the skillet, stirring into the sauce.
- Serve warm on burger buns or over greens with extra sauce on top.
Notes
This dish can be made ahead of time and tastes even better when reheated. It can also be adapted with different fruits or spices to suit your taste.
Nutrition
- Serving Size: 1 serving
- Calories: 400
- Sugar: 12g
- Sodium: 500mg
- Fat: 10g
- Saturated Fat: 2g
- Unsaturated Fat: 8g
- Trans Fat: 0g
- Carbohydrates: 30g
- Fiber: 3g
- Protein: 35g
- Cholesterol: 80mg
Keywords: peach, BBQ, pulled chicken, healthy, summer, family meal, easy recipe
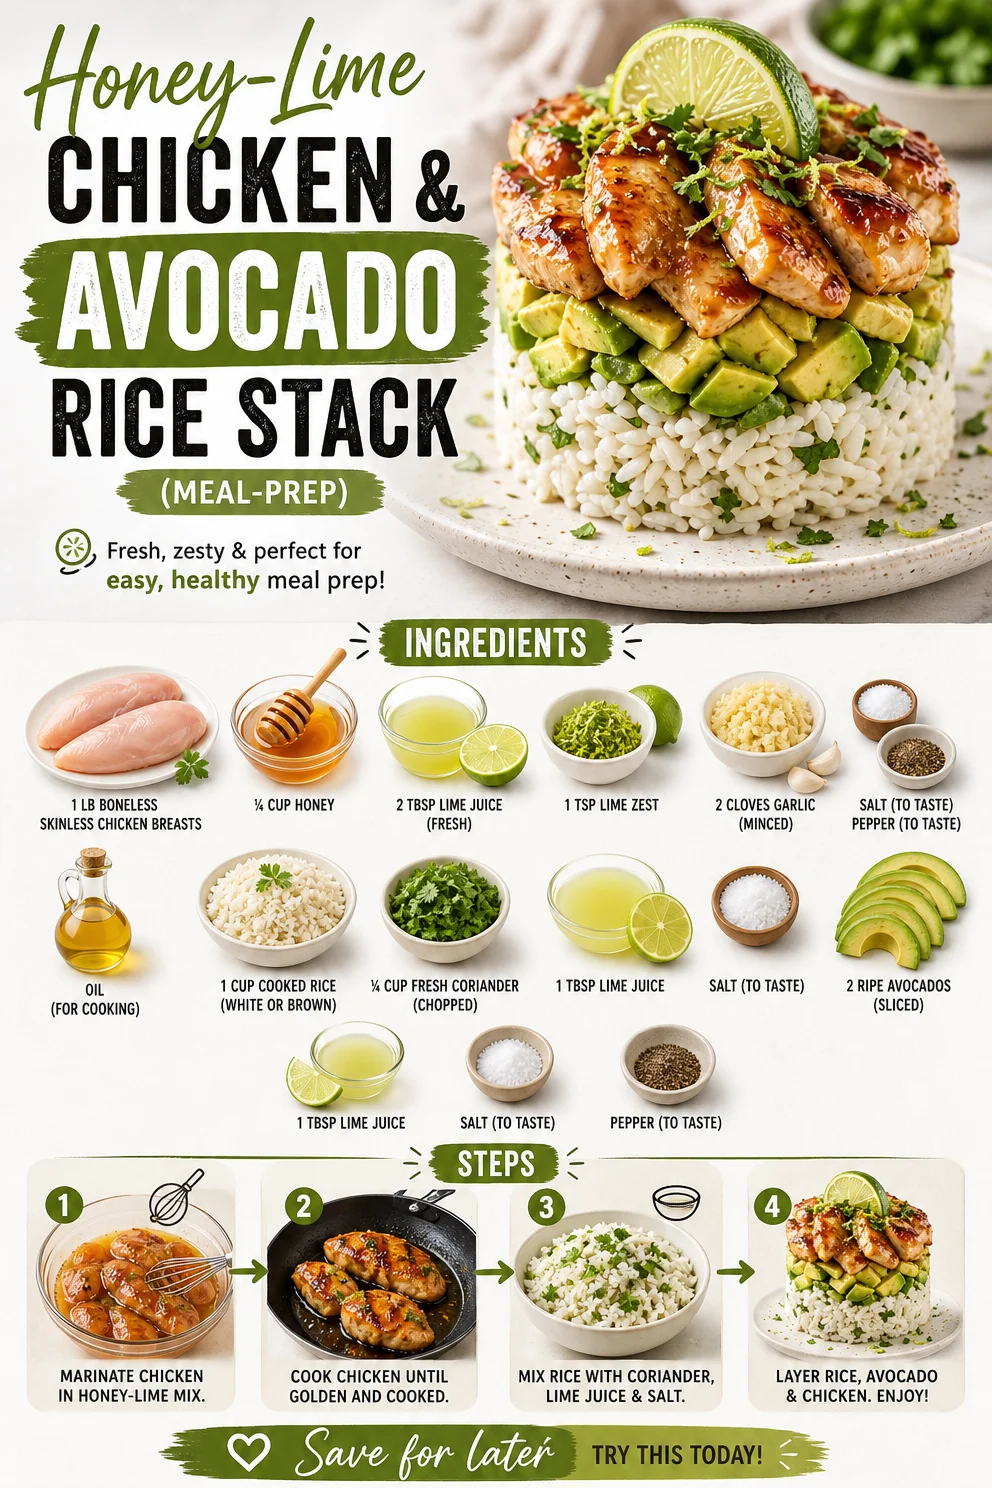
Honey-Lime Chicken & Avocado Rice Stack (Meal-Prep)
Honey Lime Chicken & Avocado Rice Stack: A Delicious Journey
Welcome to Ivory Apron, where cooking meets comfort and elegance! Today, I’m thrilled to share a recipe that brings together a delightful explosion of flavors while still feeling approachable—Honey Lime Chicken & Avocado Rice Stack. This dish is perfect for both a cozy weeknight dinner and an elegant dinner party. So, grab your apron and let’s jump into this beautiful culinary creation!
A Bite of Nostalgia
Growing up, some of my fondest memories involve summer barbecues at my grandma’s house. She would always have a spread of fresh ingredients ready to create incredible meals. One particular dish that stands out is her honey lime chicken, marinated to perfection and grilled with love. I remember the warm summer evenings, family gathered around, the air fragrant with the sweetness of honey and the zing of lime. It was more than a meal; it was a celebration of flavors and togetherness—something I aspire to replicate in my own cooking.
The inspiration for today’s Honey Lime Chicken & Avocado Rice Stack comes from those cherished moments. I took the essence of my grandma’s recipe and transformed it into something visually stunning and wonderfully balanced. It’s simple yet sophisticated, just like those joyful gatherings around her table. I can’t wait for you to create your own memories with this delightful dish!
Ingredients
Before we dive into cooking, let’s gather our high-quality ingredients for that perfect honey lime chicken and creamy avocado rice stack.
-
1 lb boneless, skinless chicken breasts
Tender and juicy, chicken breasts soak up the marinade beautifully. If you prefer a different protein, try using boneless thighs or even tofu for a vegetarian option. -
¼ cup honey
This natural sweetener adds a rich, floral sweetness. Pure honey will give the best flavor, but maple syrup can be a fantastic substitute if you’re looking for a vegan option. -
2 tablespoons lime juice (fresh)
Freshly squeezed lime juice heightens the dish’s flavor. Bottled lime juice won’t have quite the same zest, but in a pinch, it works. -
1 teaspoon lime zest
Zest brings a bright, citrusy punch. No lime? Lemon zest can work as a substitute for a similar brightness. -
2 cloves garlic (minced)
Garlic adds depth and aromatic richness. If you’re in a hurry, garlic powder works as a quick substitute—just use about 1/4 teaspoon. -
Salt and pepper (to taste)
Essential for bringing out the flavors in your dish. Always season your dish as you go for the best flavor! -
Oil (for cooking)
Use olive oil for sautéing or grilling. Avocado oil is another great option with a high smoke point. -
1 cup cooked rice (white or brown)
Rice serves as the comforting base of our stack. Quinoa or cauliflower rice can be fantastic alternatives for a gluten-free or lower-carb option. -
¼ cup fresh coriander (chopped)
It adds a delightful freshness to the dish. If coriander isn’t your thing, feel free to swap in parsley or even dill. -
1 tablespoon lime juice
More acidity to elevate your rice! -
2 ripe avocados (sliced)
Creamy and buttery, avocados complete this dish. If avocados aren’t available, try substituting with hummus or a yogurt-based sauce. -
1 tablespoon lime juice (for avocados)
It prevents browning and gives your avocados a fresh kick. -
Salt and pepper (to taste)
You know the drill—season it to your liking!
Gathering these ingredients will ensure you craft a dish that delights the senses!
Step-by-Step Instructions
Now that we have everything ready, let’s get cooking with this easy-to-follow recipe. Here’s how to make Honey Lime Chicken & Avocado Rice Stack.
-
Prep the Chicken
Start by placing your chicken breasts on a clean cutting board. To ensure even cooking, pound them to an even thickness (about ½ inch) using a meat mallet. This step not only makes for a more tender chicken but also allows the marinade to penetrate more effectively. -
Make the Marinade
In a mixing bowl, whisk together the honey, lime juice, lime zest, minced garlic, salt, and pepper. This marinade is where the magic happens—coating the chicken with bold flavors. Add the chicken to the bowl, ensuring each piece is well-coated. Let it marinate for at least 30 minutes (or up to overnight if you’re planning ahead!). The longer you marinate, the more flavor you’ll impart. -
Cook the Chicken
Heat a tablespoon of oil in a large skillet or grill over medium-high heat. Once hot, add the marinated chicken (discard any leftover marinade). Cook for about 6-7 minutes on each side or until the chicken reaches an internal temperature of 165°F (75°C). Don’t rush this step—getting that lovely golden-brown crust will add incredible flavor.Tip: Avoid overcrowding the pan, as this can lead to steaming rather than a nice sear. If you’re cooking multiple pieces, do them in batches!
-
Prepare the Avocado Rice
While the chicken is cooking, combine the cooked rice, fresh coriander, and 1 tablespoon of lime juice in a large bowl. Season with salt to taste. This fluffy, zesty rice will create a vibrant backdrop for your chicken stack. If you want more flavor, feel free to toss in some diced tomatoes or chopped bell peppers. -
Slice the Chicken
After cooking, let the chicken rest for about 5 minutes. This allows the juices to redistribute, resulting in juicy chicken! While it rests, slice the chicken into strips or bite-sized pieces. -
Assemble the Stacks
To serve, start with a generous scoop of the cilantro rice as your base. Next, layer the avocado slices on top, lightly seasoned with salt and pepper and a squeeze of lime juice for brightness. Finally, top it all with the sliced chicken.Chef Hack: You can use a ring mold or even a measuring cup to create neat layers for a beautiful presentation!
Serving Suggestions
Presentation is everything, my friends! Serve your Honey Lime Chicken & Avocado Rice Stack on a large platter or individual plates for a personal touch. Drizzle a bit of extra honey or lime juice over the top for added elegance. Pair it with a refreshing salad or roasted vegetables for a complete meal. Your guests will be impressed, and you’ll feel like a culinary star!
Recipe Variations
Want to switch things up? Here are a few fun and creative twists for your Honey Lime Chicken & Avocado Rice Stack:
- Spicy Kick: Add a teaspoon of chili powder or a splash of hot sauce to the marinade for a kick of heat.
- Tropical Delight: Top with pineapple salsa for a vibrant tropical flair.
- Grain Swap: Use quinoa, farro, or even couscous instead of rice for a different texture.
- Herbaceous Delight: Mix in fresh herbs like basil or mint with your rice for a unique twist.
- Vegan Option: Substitute chicken with grilled portobello mushrooms or chickpeas for a plant-based version.
Chef’s Notes
This recipe has evolved beautifully over time, and I’m still as passionate about it as I was when I first created it. I remember one of my first attempts at this stack—I accidentally overcooked the chicken. As I was trying to salvage it, I discovered that a drizzle of honey and fresh herbs could save the day! The dish transformed into a family favorite and taught me the invaluable lesson that cooking doesn’t have to be perfect.
FAQs and Troubleshooting
Q: My chicken is dry! What did I do wrong?
A: Overcooking is usually the culprit. Using a meat thermometer can help ensure you pull the chicken at the right time!
Q: How do I store leftovers?
A: Store leftovers in an airtight container in the refrigerator for up to 3 days. Reheat gently to avoid drying out.
Q: Can I freeze this dish?
A: Yes! You can freeze the marinated chicken prior to cooking. Once cooked, however, the assembled stack is best enjoyed fresh.
Q: What if I don’t have fresh lime?
A: While fresh lime is preferred, bottled lime juice can work too—just adjust to taste since it can be slightly more sour or acidic.
Nutritional Info
(For reference, typical serving contains approximately):
- Calories: 450
- Protein: 30g
- Carbohydrates: 45g
- Fat: 20g
- Dietary Fiber: 6g
And there you have it! A scrumptious Honey Lime Chicken & Avocado Rice Stack that’s sure to bring warmth, flavor, and joy to your dining table. Whether you’re hosting friends or enjoying a quiet family meal, this dish is a true crowd-pleaser. I hope it inspires you to create beautiful moments around your own table. Happy cooking, and don’t forget to share your creations with me!
PrintHoney Lime Chicken & Avocado Rice Stack
This dish combines honey lime chicken with creamy avocado rice for a delicious and visually stunning meal that’s perfect for any occasion.
- Prep Time: 15 minutes
- Cook Time: 30 minutes
- Total Time: 45 minutes
- Yield: 4 servings 1x
- Category: Main Course
- Method: Grilling
- Cuisine: Mexican
- Diet: Gluten Free
Ingredients
- 1 lb boneless, skinless chicken breasts
- ¼ cup honey
- 2 tablespoons lime juice (fresh)
- 1 teaspoon lime zest
- 2 cloves garlic (minced)
- Salt and pepper (to taste)
- Oil (for cooking)
- 1 cup cooked rice (white or brown)
- ¼ cup fresh coriander (chopped)
- 1 tablespoon lime juice
- 2 ripe avocados (sliced)
- 1 tablespoon lime juice (for avocados)
- Salt and pepper (to taste)
Instructions
- Prep the Chicken: Pound the chicken breasts to an even thickness for tender results.
- Make the Marinade: Whisk together honey, lime juice, lime zest, minced garlic, salt, and pepper. Marinate chicken for at least 30 minutes.
- Cook the Chicken: Heat oil in a skillet, cook the marinated chicken for 6-7 minutes on each side until cooked through.
- Prepare the Avocado Rice: Combine cooked rice, fresh coriander, and lime juice in a bowl. Season with salt.
- Slice the Chicken: Rest the cooked chicken for 5 minutes, then slice into strips.
- Assemble the Stacks: Start with rice, layer avocado, and top with sliced chicken.
Notes
Serve with a drizzle of extra honey or lime juice. This dish can be easily customized with different grains or spices.
Nutrition
- Serving Size: 1 serving
- Calories: 450
- Sugar: 30g
- Sodium: 300mg
- Fat: 20g
- Saturated Fat: 3g
- Unsaturated Fat: 15g
- Trans Fat: 0g
- Carbohydrates: 45g
- Fiber: 6g
- Protein: 30g
- Cholesterol: 75mg
Keywords: Honey Lime Chicken, Avocado Rice, Summer BBQ, Comfort Food, Chicken Recipe
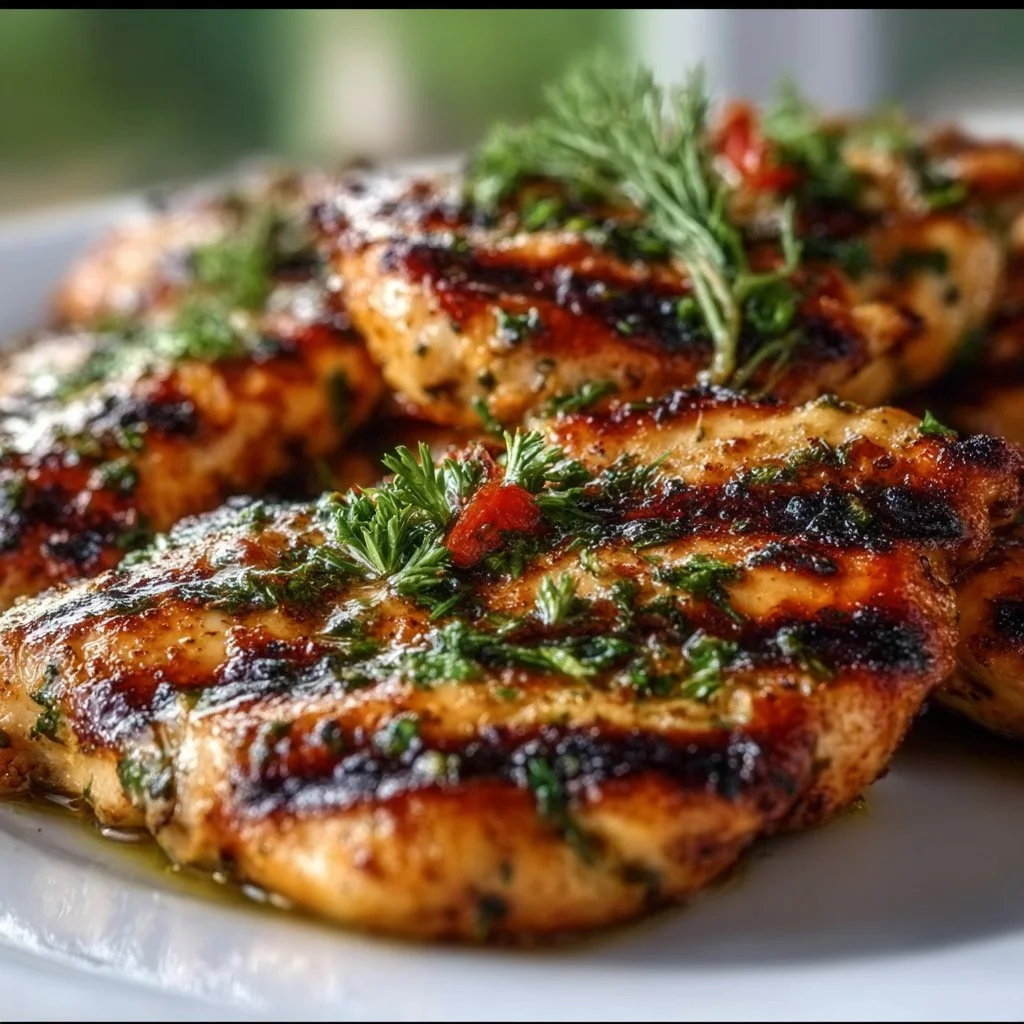
Easy Grilled Chicken
Easy Grilled Chicken: A Flavorful Feast for Everyone
Hello, fellow foodies! Today, we’re diving into one of my all-time favorite staples: grilled chicken! There’s something magical about transforming simple ingredients into a mouthwatering dish that everyone can enjoy. Grilled chicken is not just a summer barbeque hero; it’s a year-round delight that can take center stage on your dining table, regardless of the occasion.
Whether you’re firing up the grill for a weekend gathering, prepping for an easy weeknight dinner, or throwing a casual dinner party, this easy grilled chicken recipe is going to be your go-to. It’s juicy, flavorful, and, best of all, surprisingly simple to pull off! Trust me; your taste buds will thank you for making this dish a regular on your menu.
The magic starts with brining the chicken to lock in moisture and create a delicious base layer of flavor. We’ll add a sprinkle of seasoning for that perfect kick, and you’ll be amazed at how these simple steps elevate your cooking game. Picture this: succulent chicken breasts grilled to golden perfection, with a smoky aroma that’ll have everyone gathered around your table, eager for a taste.
So, grab your apron and let’s get cooking! I can’t wait to share this joyful culinary adventure with you, and by the end of it, you’ll be ready to impress your friends and family with your new grilling prowess.
Personal Story
Growing up, summer evenings were all about the grill at my family’s backyard gatherings. My dad would tend to the barbecue, flipping burgers and chicken while the smell wafted through the air, mingling with laughter and stories over ice-cold drinks. I can still recall my first attempt at grilling with him—how nervous I was about not burning the chicken. He calmed my fears and reminded me that the art of grilling isn’t just about the meat; it’s about the memories you create.
One memorable night, I was in charge of marinating the chicken. I mistakenly added what I thought was a tablespoon of cayenne pepper, but it turned out to be a teaspoon. The chicken was spicier than intended, leading to fits of laughter and plenty of ice cream later to cool off! Even in those fiery moments, the joy of sitting around the table, sharing a meal together, was what truly mattered.
That’s what remains in my heart every time I grill chicken—it’s not just about food; it’s about connection, laughter, and creating lasting memories. With this easy grilled chicken recipe, I hope you create beautiful experiences around your table, just as I have over the years.
Ingredients
To get started, here’s what you’ll need for this delightful grilled chicken:
-
4 boneless chicken breasts (or 8 thighs)
Boneless chicken breasts give you a lean and tender result, but thighs add unbeatable flavor. Choose what you prefer! -
4 cups warm water (for brine)
Warm water helps dissolve the salt and sugar in your brine more effectively. -
1/4 cup kosher salt (for brine)
Kosher salt is ideal due to its larger crystals, making it easy to distribute evenly across the meat. -
2 tbsp brown sugar (for brine)
The sugar not only balances out the saltiness but also helps caramelize the chicken when grilling. -
2 cloves garlic, smashed (for brine)
Garlic infuses the chicken with flavor. Smashing releases more oils and essences for a robust taste. -
2 tbsp olive oil (to coat chicken)
Olive oil keeps your chicken moist while adding a rich taste. A light brush will do wonders! -
1 tsp salt (for seasoning)
This will give your chicken that final boost of flavor. -
1/2 tsp black pepper (for seasoning)
Black pepper enhances all other flavors. A staple in any savory dish. -
1 tsp garlic powder (for seasoning)
An extra punch of garlic goodness! This seasoning makes it easy to distribute flavor evenly. -
1 tsp paprika (adds color)
Paprika not only contributes a vibrant color but also a subtle sweetness and depth. -
1/2 tsp dried oregano (herbal note)
The herbs add a fragrant element that elevates the final dish. -
1/4 tsp cayenne pepper (optional heat)
If you like a kick, throw it in! Adjust to your spice tolerance.
Step-by-Step Instructions
Now let’s get into the nitty-gritty of creating your easy grilled chicken. Follow these simple steps for an effortlessly delicious plate:
1. Make the Brine
In a large bowl or pot, combine the 4 cups of warm water, 1/4 cup of kosher salt, 2 tbsp of brown sugar, and 2 smashed garlic cloves. Stir until the salt and sugar have dissolved completely. This brine will work its magic to ensure that your chicken remains juicy and bursting with flavor.
2. Brine the Chicken
Submerge the chicken breasts or thighs in the brine, ensuring they’re fully submerged. Cover and refrigerate for at least 1 hour or up to 4 hours. This step is crucial because it helps the chicken retain moisture while cooking.
Chef Tip: If you’re short on time, even a quick 30-minute brine can add a world of difference!
3. Prepare the Grill
While the chicken is brining, preheat your grill to a medium-high heat (about 375°F to 400°F). Make sure grates are clean and lightly oiled to prevent sticking.
Chef Hack: If you don’t have a grill, a grill pan on the stovetop works wonders too. Just crank up the heat!
4. Season the Chicken
After brining, remove the chicken from the brine and pat it dry with paper towels. It’s time to add flavor! Drizzle 2 tbsp of olive oil over the chicken, then sprinkle with 1 tsp of salt, 1/2 tsp of black pepper, 1 tsp of garlic powder, 1 tsp of paprika, 1/2 tsp of dried oregano, and 1/4 tsp cayenne pepper (if you like a bit of heat). Use your hands to rub the seasonings into the chicken for an even coating.
5. Grill the Chicken
Place the chicken on the grill and cook for about 6-7 minutes on one side without moving it. This allows for stunning grill marks! Then, flip and cook for an additional 6-7 minutes on the other side until the chicken reaches an internal temperature of 165°F.
Chef Insight: If you’re using thick pieces, cover the grill during the cooking process to trap heat, ensuring thorough cooking. For more flavor, add a few sprigs of fresh herbs to the grill during cooking!
6. Rest and Enjoy
Once cooked, remove the chicken from the grill and let it rest for 5 minutes. This resting period allows the juices to redistribute, ensuring each bite is tender and juicy.
Serving Suggestions
Now for the fun part—plating! Slice the grilled chicken for visual appeal and serve it on a beautiful platter drizzled with a touch of olive oil or a squeeze of fresh lemon for brightness. Pair it with grilled vegetables, a fresh green salad, or fluffy rice seasoned with herbs.
Grill marks and fresh herbs make the dish pop, so consider garnishing with fresh parsley or basil for an elegant touch!
Recipe Variations
Get creative with your grilled chicken! Here are a few variations to keep things exciting:
-
Citrus Marinade: Swap out the brown sugar and garlic for orange or lemon juice, zest, and a splash of soy sauce for a fresh, citrus-driven flavor.
-
Herb Explosion: Instead of dried oregano, use fresh herbs like rosemary or thyme for a more aromatic profile.
-
Mediterranean Twist: Add olives, feta cheese, or a sprinkle of za’atar seasoning to the brine for a taste of the Mediterranean.
-
BBQ Flavor: Slather the grilled chicken with your favorite barbecue sauce during the last few minutes of cooking for a sweet and smoky spin.
-
Honey Mustard Glaze: Brush with honey mustard marinade before grilling for a sweet and tangy flavor.
Chef’s Notes
This recipe is such a crowd-pleaser and has evolved over the years. I often swap ingredients based on what I have in my pantry or what feels right for the season. One of my favorite recent adaptations was adding a splash of balsamic vinegar to the brine, giving the chicken a subtle tang.
I can’t count the number of times I’ve grilled chicken for friends and family, and every gathering is always filled with laughter, stories, and delicious bites. Don’t be afraid to make this recipe your own; experiment and add your flair!
FAQs and Troubleshooting
Q: Why is my grilled chicken dry?
A: Overcooking is usually the culprit. Invest in a meat thermometer (they’re super handy!) to ensure the chicken is cooked just to 165°F.
Q: Can I marinate the chicken overnight?
A: Yes! Just cut back on the salt in the brine, as the longer it sits, the saltier it can become.
Q: Can I grill frozen chicken?
A: It’s best to thaw the chicken beforehand for even cooking. If you’re in a pinch, you can grill them from frozen but cook on low heat to ensure they cook through without burning.
Q: Can I add other flavorings to the brine?
A: Absolutely! Feel free to experiment with different herbs, spices, or even beer or cider for unique flavors.
Nutritional Info (Optional)
Per serving (the following is an estimate):
- Calories: 220
- Protein: 28g
- Total Fat: 10g
- Saturated Fat: 1.5g
- Carbohydrates: 1g
- Sugar: 1g
- Sodium: 800mg
Final Thoughts
And there you have it! With this easy grilled chicken recipe, you’re not just cooking; you’re creating experiences that linger in memories long after the plates have been cleared. Enjoy the process and don’t forget to pour yourself something bubbly while you’re at it! Happy grilling, my friend—here’s to the delicious moments ahead! 🍽✨
PrintEasy Grilled Chicken

A simple and flavorful grilled chicken recipe that’s perfect for any occasion.
- Prep Time: 60 minutes
- Cook Time: 15 minutes
- Total Time: 75 minutes
- Yield: 4 servings 1x
- Category: Main Course
- Method: Grilling
- Cuisine: American
- Diet: Gluten-Free
Ingredients
- 4 boneless chicken breasts (or 8 thighs)
- 4 cups warm water (for brine)
- 1/4 cup kosher salt (for brine)
- 2 tbsp brown sugar (for brine)
- 2 cloves garlic, smashed (for brine)
- 2 tbsp olive oil (to coat chicken)
- 1 tsp salt (for seasoning)
- 1/2 tsp black pepper (for seasoning)
- 1 tsp garlic powder (for seasoning)
- 1 tsp paprika (adds color)
- 1/2 tsp dried oregano (herbal note)
- 1/4 tsp cayenne pepper (optional heat)
Instructions
- Make the brine: In a large bowl or pot, combine the warm water, kosher salt, brown sugar, and smashed garlic. Stir until dissolved.
- Brine the chicken: Submerge the chicken in the brine, cover, and refrigerate for 1 to 4 hours.
- Prepare the grill: Preheat your grill to medium-high heat (375°F to 400°F).
- Season the chicken: Remove the chicken from the brine, pat dry, drizzle with olive oil, and season with salt, pepper, garlic powder, paprika, oregano, and cayenne.
- Grill the chicken: Cook on the grill for 6-7 minutes on each side until reaching 165°F internal temperature.
- Rest and enjoy: Remove the chicken from the grill and let it rest for 5 minutes before serving.
Notes
For extra flavor, garnish with fresh herbs or a squeeze of lemon before serving.
Nutrition
- Serving Size: 1 serving
- Calories: 350
- Sugar: 5g
- Sodium: 800mg
- Fat: 10g
- Saturated Fat: 1.5g
- Unsaturated Fat: 8.5g
- Trans Fat: 0g
- Carbohydrates: 1g
- Fiber: 0g
- Protein: 28g
- Cholesterol: 75mg
Keywords: grilled chicken, easy recipe, summer grilling, healthy meal

Crispy Rotisserie Chicken Tostadas
Crispy Rotisserie Chicken Tostadas: A Flavorful Fiesta
Hello, fellow food lovers! Today we’re diving into a recipe that’s not just delicious but also oh-so-easy to whip up—Crispy Rotisserie Chicken Tostadas! These scrumptious bites are perfect for weeknight dinners, casual gatherings, or even game day munching. Honestly, is there anything more satisfying than biting into a crunchy tostada topped with juicy chicken and vibrant veggies? I don’t think so!
One of the greatest secrets in the kitchen is harnessing the power of rotisserie chicken. You walk into the grocery store, and there it is—golden, fragrant, and ready to go. No fussing with marinating or roasting. It’s practically a culinary cheat code! This dish is all about celebrating that convenience while adding fresh, simple ingredients to create something that looks and tastes spectacular.
As we make our way through this recipe, you’ll see just how flexible and fun these tostadas can be. They’re a canvas for your creativity, whether you’re craving a burst of freshness or a splash of heat. So grab your trusty apron and let’s get this culinary party started!
Personal Story
Let me take you back to one of my fondest kitchen memories: the day our family hosted a spontaneous taco night. We had friends dropping by, and I wanted something quick yet impressive—something that would make everyone feel welcome at our table. That’s when the idea of tostadas struck me!
With a few ingredients on hand, including a rotisserie chicken (thank you, grocery store!), I set to work. I remember the aroma filling the kitchen as I layered crispy tostada shells with beans, tender chicken, and a flash of color from the tomatoes and avocado slices. The joy on my friends’ faces as they customized their own tostadas was priceless. Everyone loved the idea of creating their own combinations, and laughter filled the air—not to mention, it became a new tradition!
This recipe is all about sharing moments around the table, just like that taco night. Let’s recreate those laughs and little moments of joy as we dive into our Crispy Rotisserie Chicken Tostadas!
Ingredients
Here’s what you’ll need to assemble these mouthwatering tostadas. Keep in mind, I’ll share some handy tips on each ingredient so you can craft your dish like a pro!
-
4 Tostada Shells: The crunchy base of our tostadas! You can buy them pre-made, but if you’re feeling adventurous, you can fry your own corn tortillas until golden and crispy.
-
2 Cups Shredded Rotisserie Chicken: The star of this show! It’s flavorful and tender, but you can use leftover grilled chicken or poached chicken breast as a substitute.
-
1 Cup Refried Beans: These add creaminess and depth. If you prefer a lighter flavor, try black beans or make your own from scratch!
-
1 Cup Shredded Lettuce: For that refreshing crunch! Iceberg or romaine works well, but feel free to switch it up with spinach or arugula for a peppery twist.
-
1 Cup Diced Tomatoes: Juicy and packed with flavor! You can easily swap in fresh pico de gallo or diced bell peppers for a different vibe.
-
1/2 Cup Shredded Cheese (Cheddar or Mexican Blend): Cheese makes everything better! If you’re going dairy-free, try a vegan cheese or even nutritional yeast for a cheesy flavor.
-
1/4 Cup Sour Cream: This creamy topping balances the flavors. Greek yogurt makes a fantastic substitute if you’re looking for something lighter.
-
1/4 Cup Salsa: Choose your favorite salsa—mild, medium, or hot! You could even make your own fresh salsa to really elevate the dish.
-
1 Avocado, Sliced: Because avocado is life! If you’re out, a sprinkle of sliced olives could bring in that creamy element.
-
Cilantro for Garnish: This adds a burst of freshness. If you’re not a fan of cilantro, try parsley or even sliced green onions.
-
Lime Wedges: A squeeze of lime is the perfect finishing touch to brighten the dish, so make sure to have these on hand!
Step-by-Step Instructions
Ready to bring these crispy tostadas to life? Let’s dive in with some step-by-step instructions, complete with tips and tricks to keep things breezy in the kitchen.
Step 1: Prepare the Tostada Shells
Start by warming your tostada shells. If you’re using store-bought, simply place them in the oven at 350°F (175°C) for about 5–7 minutes until they’re crispy. If you’re making them from scratch, heat a couple of tablespoons of oil in a pan over medium heat. Fry each tortilla for about 2-3 minutes on each side until golden and crispy. Don’t forget to drain them on a paper towel to absorb excess oil!
Step 2: Shred the Rotisserie Chicken
While the tostada shells are crisping up, let’s get to the chicken! Use your hands or two forks to shred the rotisserie chicken into bite-sized pieces. I like to leave the skin on for extra flavor. If you have leftovers from a previous meal, this is the best time to use them, saving both time and reducing waste.
Step 3: Heat the Refried Beans
In a small saucepan, gently heat the refried beans over low heat. Stir occasionally to ensure they don’t stick to the bottom. Adding a splash of chicken broth or water can help with consistency if they’re too thick. Pro tip: heating the beans enhances their flavor and creaminess!
Step 4: Assemble the Tostadas
Time to assemble! Grab your crispy tostada shells and start layering. Spread about 2–3 tablespoons of refried beans on each shell, followed by a generous portion of shredded rotisserie chicken. Pile on the shredded lettuce, diced tomatoes, and then sprinkle with the cheese.
Step 5: Add Toppings
Now it’s time for the fun part—toppings! Drizzle a dollop of sour cream on top, followed by a spoonful of salsa. For that creamy goodness, add sliced avocado. Don’t forget to sprinkle some cilantro for a burst of freshness and finesse!
Step 6: Serve and Squeeze
Arrange your plated tostadas on a colorful serving platter. Serve with lime wedges on the side for guests to squeeze over their creations, adding a zesty kick.
And just like that, you’ve created a beautiful spread of Crispy Rotisserie Chicken Tostadas!
Serving Suggestions
To take your serving game to the next level, consider plating the tostadas on a vibrant platter surrounded by extra toppings like chopped jalapeños, pickled onions, or sliced radishes. Your guests will love customizing their tostadas! Pair with a refreshing beverage like iced tea or a margarita, and you’re set for a delightful meal.
Recipe Variations
These crispy tostadas are wonderfully versatile! Here are a few fun variations to switch things up:
- Spicy Chipotle Tostadas: Add adobo sauce from a can of chipotle peppers to the shredded chicken for a smoky twist.
- Vegetarian Tostadas: Skip the chicken and load up on roasted veggies like zucchini, bell peppers, and corn.
- Breakfast Tostadas: Top with scrambled eggs and finish with some salsa verde for a breakfast twist!
- BBQ Chicken Tostadas: Swap the usual salsa for barbecue sauce, and add a sprinkle of crispy fried onions on top.
- Mediterranean Tostadas: Use hummus instead of refried beans, and top with grilled veggies like eggplant and zucchini, then finish with feta cheese.
Chef’s Notes
This recipe has evolved over time at my house and has become a beloved go-to meals for impromptu gatherings. I once tried to impress a new friend with fancy tacos, but ended up with a messy situation in the kitchen! Instead, we made tostadas together, and it turned out to be such a fun bonding moment. Cooking is all about those shared experiences!
Oh, and one last tip: Don’t worry if things get a little chaotic in the kitchen. Sometimes, a little mess adds to the flavor of the memories you’ll create!
FAQs and Troubleshooting
-
What if my tostada shells get soggy?
- Make sure to serve immediately after assembling! If you have leftovers, store the components separately to maintain crispness.
-
Can I use a different type of meat?
- Absolutely! Any cooked meat works—shredded pork, beef, or turkey would all be delicious options.
-
How can I make this gluten-free?
- Just check that your tostada shells are labeled gluten-free, or use corn tortillas which are typically gluten-free.
-
What if I don’t like certain toppings?
- No problem! Tailor the dish to your taste. This is your tostada canvas—get creative!
Nutritional Info
This section is optional. If using it, consider including general nutritional details based on standard ingredient choices.
Calories: Approximately 400 per serving (based on 1 tostada)
Protein: 20g
Carbs: 30g
Fat: 20g
There you have it, friends—Crispy Rotisserie Chicken Tostadas that bring joy to your table and make every meal feel special! Enjoy the cooking, enjoy the company, and most importantly, enjoy the delicious results. Happy cooking! 🍽️
PrintCrispy Rotisserie Chicken Tostadas

Delicious and easy-to-make tostadas topped with juicy rotisserie chicken and fresh veggies—perfect for any occasion!
- Prep Time: 15 minutes
- Cook Time: 15 minutes
- Total Time: 30 minutes
- Yield: 4 servings 1x
- Category: Main Course
- Method: Assembly
- Cuisine: Mexican
- Diet: Gluten-Free, Dairy-Free Option Available
Ingredients
- 4 Tostada Shells
- 2 Cups Shredded Rotisserie Chicken
- 1 Cup Refried Beans
- 1 Cup Shredded Lettuce
- 1 Cup Diced Tomatoes
- 1/2 Cup Shredded Cheese (Cheddar or Mexican Blend)
- 1/4 Cup Sour Cream
- 1/4 Cup Salsa
- 1 Avocado, Sliced
- Cilantro for Garnish
- Lime Wedges
Instructions
- Prepare the Tostada Shells by warming them in the oven or frying tortillas until crispy.
- Shred the Rotisserie Chicken into bite-sized pieces.
- Heat the Refried Beans in a small saucepan over low heat.
- Assemble the Tostadas by layering refried beans, shredded chicken, lettuce, tomatoes, and cheese on the tostada shells.
- Add Toppings like sour cream, salsa, avocado, and cilantro.
- Serve with lime wedges on the side for a zesty kick.
Notes
Feel free to customize your tostadas with your favorite toppings and try different variations for a unique twist!
Nutrition
- Serving Size: 1 tostada
- Calories: 400
- Sugar: 3g
- Sodium: 600mg
- Fat: 20g
- Saturated Fat: 8g
- Unsaturated Fat: 10g
- Trans Fat: 0g
- Carbohydrates: 30g
- Fiber: 5g
- Protein: 20g
- Cholesterol: 45mg
Keywords: Tostadas, Rotisserie Chicken, Easy Recipes, Quick Meals, Mexican Food

Coconut Lime Chicken
Coconut Lime Chicken: A Tropical Escape Right in Your Kitchen
Introduction
Hello, dear foodie friends! Savannah here from Ivory Apron, and today we’re diving into something truly special — Coconut Lime Chicken! This dish is not just a recipe; it’s an experience, a little piece of tropical paradise that you can create in your very own kitchen.
Picture this: It’s a balmy evening, the sun is setting, and you can almost hear the distant sound of waves crashing on a beach. While we may not all have access to a tropical paradise, we can certainly bring that flavor to our dinner tables. Coconut Lime Chicken combines the richness of coconut milk with the zesty brightness of lime, perfect for those who crave something light yet satisfying. It’s a dish that’s as comforting as it is refreshing, making it perfect for any occasion, whether it’s a weeknight dinner or a fabulous dinner party!
As a recipe creator, nothing makes me happier than sharing culinary adventures with you all. I believe cooking should feel elegant but not intimidating, and that’s what this Coconut Lime Chicken embodies. So, tie on your apron, grab some tropical music, and let’s get cooking!
Personal Story
I can’t help but smile whenever I think about the first time I made Coconut Lime Chicken. It was a sunny Saturday, and my close friends and I had gathered for our monthly potluck. The theme was “Tropical Escape,” and the minute I heard it, my mind raced with all the possible dishes. But one stood out like a beacon of warmth and comfort — Coconut Lime Chicken.
I still remember mingling in the kitchen, buzzing with excitement, as the chicken marinated in a fragrant coconut-lime bath. The scent of fresh cilantro and garlic filled the air, welcoming my friends as they arrived. We laughed, sipped on fruity cocktails, and reminisced about our last vacation together. When the chicken hit the grill, the chorus of sizzling sound transported us to a little beach hut, surrounded by palm trees and laughter.
That day wasn’t just about the food; it was about creating memories around the table, something I cherish deeply. I can’t wait for you to create your own beautiful moments with this recipe!
Ingredients
Let’s get into the delicious details! Here’s what we’ll need for this mouthwatering Coconut Lime Chicken:
-
4 Chicken Breasts
Thick, boneless chicken breasts work best for this recipe. If you’re feeling adventurous, you can substitute chicken thighs for a juicier option! -
1 Cup Coconut Milk
This creamy goodness is the star of the dish, lending a rich texture and tropical flavor. You can use light coconut milk if you’re looking to cut down on calories — but don’t forget that the creaminess contributes to the dish’s overall feel! -
1 Lime (Juiced)
Fresh lime juice adds a vibrant brightness to the dish. If you don’t have lime, lemon juice can be a great substitute, though it will offer a slightly different acidity. -
1/4 Cup Fresh Cilantro (Chopped)
This fresh herb brings a burst of flavor and a lively green color. If cilantro isn’t your thing (you’re not alone!), parsley can be used instead — it’s milder but still adds a lovely touch! -
2 Cloves Garlic (Minced)
Garlic is a must for flavor! If you’re feeling lazy, garlic powder will do in a pinch — just remember, fresh garlic has that unbeatable aromatic kick. -
1 Teaspoon Ginger (Grated)
A little ginger introduces warmth and depth. If you don’t have fresh ginger, ground ginger will work, just use half the amount as it’s more concentrated. -
Salt and Pepper to Taste
Don’t underestimate these staples! Adjust according to your preference, but definitely taste as you go. -
Olive Oil for Cooking
A drizzle of olive oil is all you need to get things sizzling. For grilling, you can use a neutral oil like canola or avocado oil to step up the heat tolerance.
Step-by-Step Instructions
Ready to create some magic? Let’s get down to business with these simple yet effective steps. Grab your apron and let’s cook!
-
Marinate the Chicken
In a bowl, combine the coconut milk, lime juice, chopped cilantro, minced garlic, grated ginger, salt, and pepper. For an extra flavor boost, feel free to add a pinch of red pepper flakes if you like a touch of heat! Place the chicken breasts in a resealable plastic bag or a shallow dish, pouring the marinade over them to coat thoroughly. Seal or cover and let it marinate in the fridge for at least 30 minutes — or up to 2 hours for more intense flavor.Chef Hack: If you’re in a hurry, you can marinate the chicken for just 15 minutes, but the longer it sits, the more the flavors penetrate the chicken.
-
Preheat Your Grill or Skillet
If grilling, preheat your grill to medium-high heat (about 375°F). If you’re using a skillet, place it over medium heat and drizzle with olive oil. -
Cook the Chicken
Once your grill or skillet is hot, remove the chicken from the marinade (letting the excess drip off) and place it on the grill or skillet. Cook for about 6-7 minutes on each side or until the chicken reaches an internal temperature of 165°F.Chef Tip: Resist the temptation to flip it too often! Let that lovely char develop for a few minutes on each side before flipping.
-
Rest the Chicken
Once cooked, transfer the chicken to a plate and cover it loosely with foil. Allow it to rest for about 5-10 minutes. This step is crucial! It helps the juices redistribute, ensuring your chicken is juicy and flavorful. -
Serve and Enjoy
Slice the chicken against the grain for beautiful presentation and serve it up with extra lime wedges and cilantro if desired. You can drizzle any leftover marinade over it for extra flavor!
Serving Suggestions
To plate your Coconut Lime Chicken, consider serving it on a bed of fluffy jasmine rice or alongside grilled vegetables for a beautiful contrast of colors. A light salad with mango and avocado can also complement the dish perfectly, creating a beautiful, refreshing meal that invites everyone to dive in. And don’t forget to garnish with a sprinkle of fresh cilantro on top — it adds that final pop of color and vibrancy that we all love!
Recipe Variations
Feeling inspired? Here are a few creative twists on this recipe:
-
Spicy Mango Salsa: Top your chicken with a fresh mango salsa made with diced mango, red onion, jalapeño, lime juice, and cilantro for a sweet and spicy kick.
-
Coconut Lime Shrimp: Swap chicken for shrimp! Adjust cooking time accordingly (about 2-3 minutes per side). It’s a quick and fabulous variation.
-
Grilled Pineapple: Add grilled pineapple slices on the side for a delightful sweetness and a taste of the tropics.
-
Vegan Delight: Replace chicken with tofu or tempeh for a plant-based version. Make sure to press out excess moisture before marinating to ensure flavor absorption.
-
Coconut Lime Quinoa Bowl: Serve the chicken over quinoa instead of rice, topped with diced cucumbers, avocado, and a drizzle of coconut sauce.
Chef’s Notes
This Coconut Lime Chicken has become a staple in my kitchen, evolving over the years as I’ve played with flavors and techniques. A fun memory I have is when I decided to grill it one summer evening, and I realized that even a simple family meal could turn into an event with just a little creativity and care. The rhapsody of flavors transported us to sunny shores without needing to leave home!
I often find that this recipe is a conversation starter, allowing everyone to share their own travel stories or culinary adventures. I hope, as you serve this dish, it opens up those beautiful moments for you and your loved ones, too.
FAQs and Troubleshooting
-
What if my chicken is dry?
Make sure you don’t overcook it. Use a meat thermometer to check for doneness. Remember, it should be at 165°F for juicy perfection! -
Can I marinate it overnight?
Absolutely! Marinating overnight enhances the flavors. Just be careful not to exceed that time too much to avoid texture issues. -
What if I don’t have coconut milk?
You can use low-sodium chicken broth or plain yogurt for a different creamy base. Just keep in mind it will change the flavor profile slightly. -
Can I grill this indoors?
Yes! If you have a grill pan, it works beautifully on the stovetop. Just monitor the heat to avoid smoking too much.
Nutritional Info (per serving) (optional)
- Calories: 350
- Protein: 37g
- Carbohydrates: 8g
- Fat: 18g
There you have it, friends! A delightful Coconut Lime Chicken recipe that’s sure to bring a touch of the tropics right to your table. I can’t wait to hear your stories and see your creations. Remember, good food isn’t just about the taste; it’s about the moments we create around it. Happy cooking and see you next time on Ivory Apron! 🍽️✨
PrintCoconut Lime Chicken

A light yet satisfying dish that combines the richness of coconut milk with the zesty brightness of lime, perfect for any occasion.
- Prep Time: 30 minutes
- Cook Time: 15 minutes
- Total Time: 45 minutes
- Yield: 4 servings 1x
- Category: Main Course
- Method: Grilling
- Cuisine: Tropical
- Diet: Gluten-Free
Ingredients
- 4 Chicken Breasts
- 1 Cup Coconut Milk
- 1 Lime (Juiced)
- 1/4 Cup Fresh Cilantro (Chopped)
- 2 Cloves Garlic (Minced)
- 1 Teaspoon Ginger (Grated)
- Salt and Pepper to Taste
- Olive Oil for Cooking
Instructions
- Marinate the Chicken: In a bowl, combine the coconut milk, lime juice, chopped cilantro, minced garlic, grated ginger, salt, and pepper. Place the chicken in a resealable bag or shallow dish, pour the marinade over, seal or cover, and let it marinate in the fridge for at least 30 minutes.
- Preheat Your Grill or Skillet: Preheat your grill to medium-high heat (about 375°F) or place a skillet over medium heat and drizzle with olive oil.
- Cook the Chicken: Remove the chicken from the marinade, letting excess drip off, and place it on the grill or skillet. Cook for about 6-7 minutes on each side until the chicken reaches an internal temperature of 165°F.
- Rest the Chicken: Transfer the chicken to a plate and cover loosely with foil. Allow it to rest for about 5-10 minutes.
- Serve and Enjoy: Slice the chicken against the grain, serve with extra lime wedges and cilantro, and drizzle any leftover marinade over it if desired.
Notes
For spicy flavor, add a pinch of red pepper flakes to the marinade. Serving suggestions include jasmine rice or grilled vegetables.
Nutrition
- Serving Size: 1 serving
- Calories: 350
- Sugar: 4g
- Sodium: 450mg
- Fat: 18g
- Saturated Fat: 15g
- Unsaturated Fat: 3g
- Trans Fat: 0g
- Carbohydrates: 8g
- Fiber: 1g
- Protein: 37g
- Cholesterol: 80mg
Keywords: Coconut Chicken, Lime Chicken, Tropical Recipe, Summer Grilling, Easy Chicken Dinner