Roast Carrots, Potatoes & Onions: A Simple, Flavorful Side Dish
Roast Carrots, Potatoes & Onions: A Simple, Flavorful Side Dish
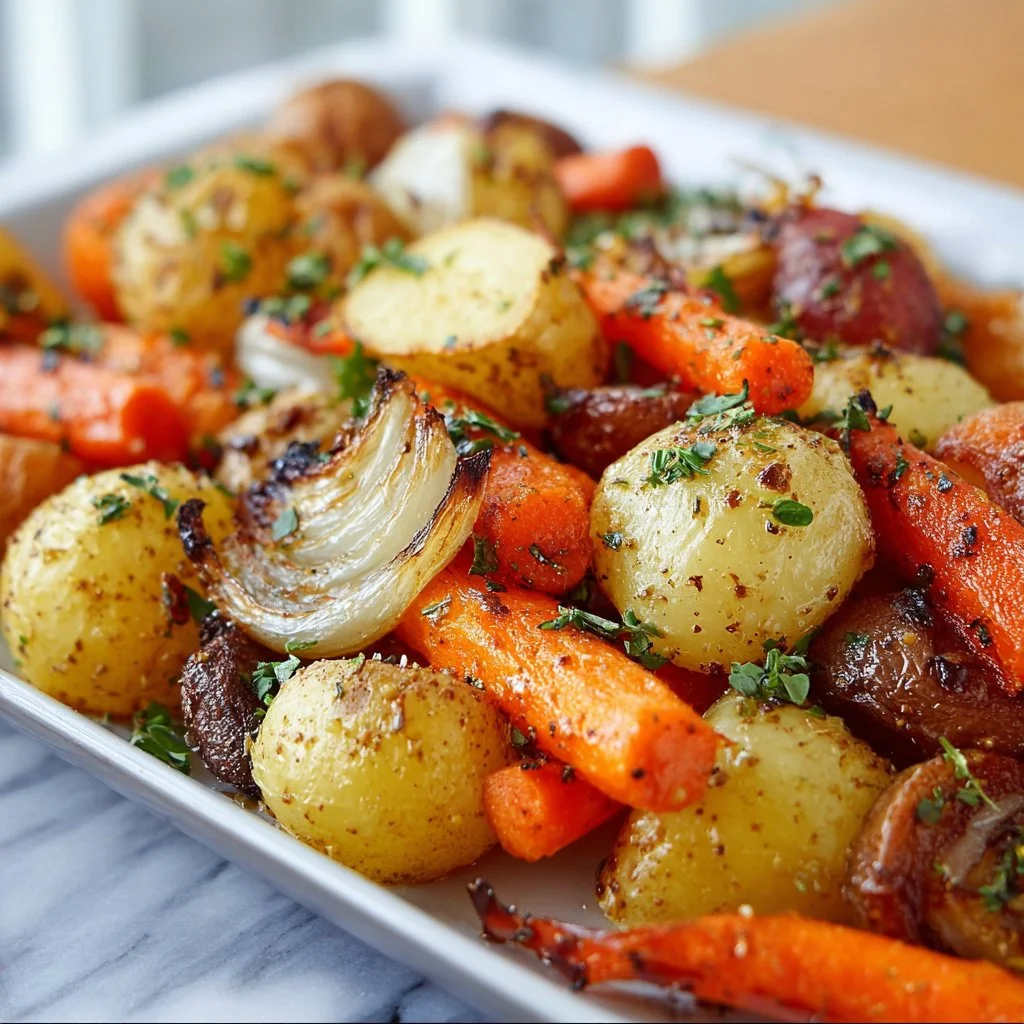
Hello, fellow food lovers! Today, we’re diving into a dish that’s as simple as it is stunning: Roast Carrots, Potatoes, and Onions. Picture it: vibrant orange carrots, hearty potatoes, and sweet onions culminating in a golden-brown roast that enchants your kitchen with mouthwatering aromas. Doesn’t that sound delightful? This isn’t just a side dish; it’s a canvas for flavor and a celebration of seasonal ingredients that can elevate any meal, from casual weeknight dinners to festive gatherings!
Roasted vegetables are like the unassuming heroes of the culinary world. They require minimal finesse but yield extraordinary results. Trust me, if you’re in a pinch and need something to wow your guests, this is it! It’s one of those recipes that embodies my cooking philosophy: elegant yet achievable. Plus, the best part? You don’t need any fancy gadgets or culinary degrees to make this dish shine. Just a few quality ingredients, some love, and a dash of creativity, and you’ll be serving up a side dish that even the pickiest eaters will clamor for!
In this post, I’ll guide you through each step of the process, share some personal stories, and give you a few handy tips to amp up the flavor and presentation of your roasted veggies. So, gather your carrots, potatoes, and onions – let’s set the table for some flavorful fun!
Personal Story
Let me take you on a little trip down memory lane. I remember the first time I prepared roasted vegetables for a gathering. I was hosting a dinner party, filled with laughter, candles, and an air of joyous anticipation. Of course, I wanted everything to be perfect. After scanning countless recipes, I stumbled upon a simple roasted vegetable recipe that spoke to me.
As I chopped the vibrant carrots and chunky potatoes, I could hear my grandmother’s voice in my head, telling me, “Food is an extension of your heart, darling.” She used to roast her veggies with love, wisdom, and just the right amount of olive oil, telling me how roasting brings out the natural sweetness in every ingredient. I was a tad nervous, but as the dish came together, I could smell the warmth enveloping my kitchen.
When the vegetables emerged from the oven, they were caramelized to perfection, and I couldn’t wait to tantalize my guests with their flavors. The crispy edges and soft interiors were a hit! Everyone kept going back for seconds, and that was when I realized that roasting veggies wasn’t just a cooking technique; it was a way to create lasting memories around the table. This roast carrots, potatoes, and onions dish has been a staple in my kitchen ever since, always reminding me of the power of shared meals!
Ingredients
To embark on your journey to perfect roasted vegetables, you’ll need the following ingredients:
-
2 pounds of carrots (peeled and cut into uniform pieces)
Carrots not only add vibrant color but also natural sweetness. Choose firm, fresh carrots for the best flavor. If you prefer, consider using baby carrots for a more rustic look! -
6 whole potatoes (washed and cut into even pieces)
Potatoes bring heartiness to the dish. I often use Yukon Gold for their buttery flavor, but feel free to substitute with red potatoes or sweet potatoes for a twist! -
1 whole sweet onion (peeled and cut into eighths)
Sweet onions, like Vidalia, add elegance and balance. If you want more bite, use yellow onions. They caramelize beautifully and provide a depth of flavor. -
3 cloves garlic (minced)
Garlic enhances the aromatic qualities of the dish. If you’re a garlic lover, feel free to add more or use roasted garlic for a sweeter flavor. -
6 tbsp olive oil (for coating vegetables)
Extra virgin olive oil drizzles lovingly over the veggies, ensuring they don’t stick and enhances their rich flavors. Replace it with melted coconut oil for a different profile! -
1/2 tsp dried thyme (for seasoning)
Thyme pairs beautifully with all root vegetables. If you have fresh thyme on hand, use a tablespoon instead! How delightful would that be? -
1/2 tsp dried parsley (for seasoning)
Parsley brings a refreshing pop of herbaceousness. If you want a punchier flavor, you could substitute fresh parsley. -
Salt (to taste)
The secret to great flavor! Sea salt is my go-to, but kosher salt works just as well. -
Black pepper (to taste)
Freshly cracked black pepper adds warmth and a little heat. If you’re feeling adventurous, use smoked pepper for added depth!
Step-by-Step Instructions
Step 1: Preheat Your Oven
Start by preheating your oven to 425°F (220°C). This high temperature creates those coveted caramelized edges that make roasted vegetables so irresistible. While your oven is warming up, gather your ingredients and get ready to chop!
Step 2: Prep Your Veggies
Next, grab your cutting board and sharp knife. Peel the carrots and cut them into uniform pieces (about 1 inch long works well) to ensure even cooking. Wash your potatoes thoroughly – we want all that earthy goodness! Cut them into half or quarters, depending on their size. Aim for pieces similar in size to your carrot pieces. Finally, slice your onion into eighths, breaking them into individual layers. Aim for a rustic vibe; they’ll caramelize beautifully!
Step 3: Combine Ingredients
In a large mixing bowl, toss together your chopped carrots, potatoes, and onions. Then, sprinkle in the minced garlic, dried thyme, and dried parsley. The flavors will mingle together beautifully!
Step 4: Drizzle & Season
Now for the olive oil! Drizzle 6 tablespoons over the vegetable mix and season with salt and freshly cracked black pepper. Using your clean hands, toss everything together until every piece is glistening with oil and seasoning. This step is crucial—don’t be shy; get your hands in there!
Step 5: Spread on a Baking Sheet
Transfer your vibrant vegetable mixture to a large baking sheet. Make sure they’re spread out in a single layer – overcrowding the pan will lead to steaming instead of roasting. If they’re too close, the flavors won’t meld as beautifully.
Step 6: Roast Away
Pop the baking sheet into your preheated oven and roast for about 25-30 minutes. Halfway through, give them a good toss with a spatula to ensure even browning. You’ll know they’re done when they are fork-tender and have that beautiful golden-brown color—just divine!
Step 7: Cool and Serve
Once they’re out of the oven, let them cool for a few minutes (if you can wait!). Taste a piece and adjust your seasoning if necessary. Those caramelized bits will provide an explosion of flavor, making it hard to resist them straight off the tray.
Serving Suggestions
For presentation, I love serving these roasted veggies in a large, elegant bowl or platter, topped with a sprinkle of fresh parsley for color. If you’re feeling extra festive, drizzle a balsamic glaze over the top or a squeeze of fresh lemon to brighten the flavors even more. Gather your friends and family around the table, and watch them marvel at the beautiful colors and aromas before diving in!
Recipe Variations
Want to switch things up? Here are a few fun ideas:
- Add Spices: Try sprinkling some cumin or paprika for a warm, smoky flavor.
- Cheesy Delight: Add Parmesan cheese during the last 5 minutes of roasting for a savory twist.
- Sweet Surprise: Toss in apple slices or dried cranberries for a sweet and savory combination—perfect for fall gatherings!
- Herb Infusion: Use fresh herbs like rosemary or dill for a fragrant touch.
- Nutty Crunch: Top with toasted nuts or seeds for added texture.
Chef’s Notes
Over the years, my roast carrots, potatoes, and onions recipe has become a fan favorite at my dinner parties. The beauty of this dish is its simplicity and versatility. I once made a double batch for a large family reunion, and it vanished in minutes! I also remember roasting these veggies with my best friend, who hilariously mistook a tablespoon for a teaspoon while seasoning them. The look on her face when we tasted the overly salted dish had us both in stitches!
This recipe has taught me that even in the kitchen, laughing at little mishaps can lead to the best memories—the kind you tell over and over again!
FAQs and Troubleshooting
Q: How do I prevent my vegetables from getting mushy?
A: Always cut your veggies into uniform sizes and avoid overcrowding the baking sheet. This ensures they roast instead of steam!
Q: Can I make this dish in advance?
A: Absolutely! Roast the vegetables, let them cool, and store them in an airtight container. Reheat them in the oven or microwave before serving.
Q: What can I do with leftovers?
A: Leftover roasted veggies make fantastic additions to salads, grain bowls, or omelets. You can even blend them into a soup for a quick meal!
Q: How do I know when they’re done?
A: Look for tender vegetables that are golden-brown on the edges but still have a bit of firmness. You can test with a fork for doneness.
Nutritional Info (Optional)
This dish is chock-full of vitamins and minerals! Here’s a rough estimate per serving (using 6 servings):
- Calories: 180
- Protein: 3g
- Fat: 7g
- Carbohydrates: 27g
- Dietary Fiber: 4g
This nutritional info will vary depending on the exact ingredients used and serving size. Always feel free to adjust based on your dietary needs!
So there you have it—my love letter to Roast Carrots, Potatoes, and Onions! I hope it brings warmth, flavors, and fond memories to your table, just like it has to mine. Tie on your apron, get cooking, and don’t forget to invite your loved ones to gather around! Happy roasting!
PrintRoast Carrots, Potatoes & Onions
A simple yet stunning side dish featuring roasted carrots, potatoes, and onions that elevate any meal with vibrant flavors and aromas.
- Prep Time: 15 minutes
- Cook Time: 30 minutes
- Total Time: 45 minutes
- Yield: 6 servings 1x
- Category: Side Dish
- Method: Roasting
- Cuisine: American
- Diet: Vegetarian
Ingredients
- 2 pounds carrots, peeled and cut into uniform pieces
- 6 whole potatoes, washed and cut into even pieces
- 1 whole sweet onion, peeled and cut into eighths
- 3 cloves garlic, minced
- 6 tbsp olive oil
- 1/2 tsp dried thyme
- 1/2 tsp dried parsley
- Salt, to taste
- Black pepper, to taste
Instructions
- Preheat your oven to 425°F (220°C).
- Prep your veggies by cutting them into uniform pieces for even cooking.
- Combine carrots, potatoes, onions, garlic, thyme, and parsley in a large mixing bowl.
- Drizzle olive oil over the mixture and season with salt and black pepper; toss to combine.
- Spread the vegetable mixture on a large baking sheet in a single layer.
- Roast in the oven for 25-30 minutes, tossing halfway through.
- Cool slightly, taste, and adjust seasoning if necessary before serving.
Notes
For presentation, serve in a large bowl or platter, optionally drizzled with balsamic glaze or fresh lemon juice.
Nutrition
- Serving Size: 1 serving
- Calories: 180
- Sugar: 4g
- Sodium: 200mg
- Fat: 7g
- Saturated Fat: 1g
- Unsaturated Fat: 5g
- Trans Fat: 0g
- Carbohydrates: 27g
- Fiber: 4g
- Protein: 3g
- Cholesterol: 0mg
Keywords: roasted vegetables, side dish, carrots, potatoes, onions, easy recipe

Creamy fruit salad recipe
Creamy Fruit Salad: A Wholesome Twist on a Classic Delight
Hello, wonderful food lovers! Today, I’m excited to share a dish that’s not just about flavor but also about the joyous memories tied to every scoop. Fruit salad may seem like an effortless creation, but when it’s tossed with a creamy dressing and sprinkled with a sprinkle of love, it transforms into a delightful experience.
Picture this: the sun is shining, the day is warm, and you’re hosting a little get-together in your backyard. The air is filled with laughter, and the sweet scent of seasonal blooms surrounds you. As your guests lounge under the sun, you bring out a big bowl of creamy fruit salad—bright, refreshing, and colorful, it’s an instant crowd-pleaser! This isn’t just any fruit salad; it’s a celebration of summer, a nostalgic nod to family picnics, and the perfect cool treat to complement any gathering. Whether you’re prepping for an afternoon BBQ, a brunch with friends, or just looking to elevate your weekday meals, this creamy fruit salad brings smiles all around.
Let’s dig deep into one of my favorites—a recipe that’s easy enough for a weeknight yet stunning enough to impress at any gathering. With luscious fruits combined in a creamy yogurt dressing, it’s the ultimate combination of health and indulgence. Grab your apron, and let’s create something beautiful together!
Personal Story
I still remember the first time I tasted creamy fruit salad. I was about eight years old, and my family had gathered at my grandparents’ house for our annual summer picnic. Grandma always had a knack for making everything feel special—even the simplest of dishes. As each of us piled our plates high with sandwiches, fresh-cut veggies, and all sorts of goodies, I could see the colorful fruit salad glistening under the sun.
Grandma’s secret wasn’t just the impeccable mixture of fruits; it was the creamy dressing that brought everything together. It had a perfect balance of sweetness and tang, and as I took my first bite, I was hooked. I remember the excitement of mixing my favorite fruits together: the juicy strawberries, crunchy apples, and sweet pineapple, all enveloped in that creamy goodness. To this day, whenever I whip up a batch of creamy fruit salad, I’m transported back to that sunlit afternoon filled with love, laughter, and tasty treats.
Ingredients
Here’s what you’ll need to whip up this delightful creamy fruit salad:
-
1 Medium Apple
Tip: Granny Smith or Honeycrisp are great choices for a touch of tartness or sweetness. Slice them just before serving to maintain their crunchiness! -
1 Cup Blueberries
Insider Insight: These little gems are packed with antioxidants. Fresh is best, but frozen will work too! Just be sure to thaw them first and drain any excess moisture. -
1 Tablespoon Lemon Juice
Chef’s Tip: A splash of lemon juice adds brightness and prevents the apples and bananas from browning. It’s a small step that makes a big difference! -
1 Cup Grapes
Substitution Idea: Red, green, or even black grapes, whatever you have on hand! For a fun twist, try freezing them for a refreshing crunch. -
1 Cup Strawberries
Note: Fresh strawberries should be hulled and sliced. If they’re out of season, consider using frozen—just let them thaw and drain well! -
1 Cup Pineapple Chunks
Chef Insight: Fresh pineapple adds a bright sweetness, but canned works in a pinch. Just make sure it’s packed in juice, not syrup, to keep it light! -
1/2 Cup Greek Yogurt
Substitutions: Use regular yogurt for a lighter option or dairy-free yogurt for a vegan twist! The creaminess is what makes this salad special! -
1/2 Cup Marshmallows (Optional)
Fun Fact: Mini marshmallows add a delightful sweetness and texture contrast! If you’re looking to keep things healthier, feel free to leave them out!
Step-by-Step Instructions
Step 1: Prepare Your Ingredients
Start by washing all your fruits thoroughly. Slice your apple and strawberries, and halve the grapes. If you’re using fresh pineapple, cut it into bite-sized chunks. Lay everything out on your counter for easy access. That little bit of prep makes a world of difference!
Step 2: Mix the Fruits
Grab a large mixing bowl, and toss in the apple slices, blueberries, grapes, strawberries, and pineapple chunks. Make sure you’re gentle during this step; the last thing you want is to turn your beautiful berries into a mushy mess!
Step 3: Add the Dressing
In a separate bowl, mix the Greek yogurt and lemon juice until smooth. If you’re feeling adventurous, you can add a drizzle of honey for extra sweetness or a pinch of cinnamon for an unexpected twist! Once combined, pour this creamy dressing over your fruits.
Step 4: Fold Gently
Using a spatula, or even your hands if you’re feeling playful, fold the fruits with the yogurt dressing. Be delicate. You want to coat the fruits while keeping their integrity intact. This is where the magic happens—watch as the fruits glisten in that creamy goodness!
Step 5: Taste and Adjust
Here comes the fun part. Grab a spoon and taste your creamy creation! Does it need a splash more lemon juice for zing? Maybe a touch more honey or even a sprinkle of cinnamon? This is your masterpiece; adjust the flavors until you find that perfect harmony.
Step 6: Chill and Serve
If you can resist the urge to dive in, let the salad chill in the fridge for at least 30 minutes. This resting time helps all the flavors meld together beautifully. If you’re adding marshmallows, wait until just before serving to mix them in, so they stay fluffy!
Step 7: Plate and Enjoy
Spoon the creamy fruit salad into individual bowls or a beautiful serving platter. Don’t forget to garnish with a few mint leaves or an extra sprinkle of chopped nuts for that touch of elegance!
Serving Suggestions
When it comes to serving, presentation is key! For an upscale touch, use clear glass bowls to show off the vibrant colors of the fruits. A sprinkle of chopped fresh mint on top adds not only visual appeal but also a refreshing aroma! Serve this creamy fruit salad chilled and watch your guests dig in!
Recipe Variations
Looking to shake things up? Here are some creative twists to personalize your creamy fruit salad:
- Tropical Style: Substitute the apples with mango chunks and add in some shredded coconut for a tropical feel!
- Nutty Addition: Toss in some chopped pecans or almonds for added crunch and richness.
- Berry Medley: Swap out the standard fruits for all berries—blackberries, raspberries, and strawberries—for a berry bonanza.
- Citrus Burst: Add segments of orange or grapefruit for an extra burst of flavor that contrasts beautifully with the creaminess.
- Chia-Pudding Twist: Mix in some chia seeds for an added health boost; they will absorb some of the moisture and add a delightful texture!
Chef’s Notes
As with all recipes, this creamy fruit salad has evolved over the years. During my experimenting, I found that the addition of a touch of vanilla extract in the yogurt dressing takes it to the next level! Plus, on those hot summer days, this fruit salad doesn’t just cool you down—it also feels nostalgic, reminding me of those sunny picnics with family. And let me tell you, it’s a surefire way to impress any guest or even treat yourself after a long day!
FAQs and Troubleshooting
Why is my fruit salad turning brown?
This happens due to oxidation, especially with apples and bananas. Tossing them in a bit of lemon juice as we discussed helps prevent this!
Can I use frozen fruit?
Absolutely! Just remember to thaw and drain any excess moisture for the best texture.
How long does this salad keep in the fridge?
Typically, this salad should last about 3 days in an airtight container. However, for the best flavor and texture, it’s best enjoyed fresh.
What can I do if the yogurt is too thick?
If your Greek yogurt is too thick, simply whisk in a splash of milk or almond milk until you achieve the desired creaminess.
Nutritional Info (Optional)
While I usually shy away from specifics, a typical serving of this creamy fruit salad offers a delightful blend of vitamins and minerals, coming in around 150-200 calories, depending on the ingredient variations. Full of fiber and antioxidants, this dish is bursting with goodness and has a refreshing effect on not just the palate but the body as well!
So, there you have it—a creamy fruit salad that’s perfect for every occasion. Tie on your apron, gather those delicious fruits, and let’s create some culinary magic. I can’t wait to see you all at the table, enjoying the fruits of your labor—literally! Until next time, happy cooking!
PrintCreamy Fruit Salad

A delightful and refreshing creamy fruit salad perfect for summer gatherings, packed with vibrant fruits and a creamy yogurt dressing.
- Prep Time: 15 minutes
- Cook Time: 0 minutes
- Total Time: 45 minutes
- Yield: 4 servings 1x
- Category: Dessert
- Method: No-Cook
- Cuisine: Global
- Diet: Vegetarian
Ingredients
- 1 Medium Apple
- 1 Cup Blueberries
- 1 Tablespoon Lemon Juice
- 1 Cup Grapes
- 1 Cup Strawberries
- 1 Cup Pineapple Chunks
- 1/2 Cup Greek Yogurt
- 1/2 Cup Marshmallows (Optional)
Instructions
- Prepare Your Ingredients: Wash all fruits, slice the apple and strawberries, and halve the grapes.
- Mix the Fruits: In a large mixing bowl, toss in the apple slices, blueberries, grapes, strawberries, and pineapple chunks.
- Add the Dressing: In a separate bowl, mix the Greek yogurt and lemon juice until smooth.
- Fold Gently: Using a spatula, fold the fruits with the yogurt dressing without breaking them.
- Taste and Adjust: Adjust flavors as needed with more lemon juice or honey.
- Chill and Serve: Let salad chill in the fridge for at least 30 minutes before serving.
- Plate and Enjoy: Spoon into serving dishes and garnish with mint if desired.
Notes
Try adding a splash of vanilla extract to the yogurt for extra flavor, or toss in some nuts for added crunch.
Nutrition
- Serving Size: 1 serving
- Calories: 175
- Sugar: 20g
- Sodium: 50mg
- Fat: 3g
- Saturated Fat: 1g
- Unsaturated Fat: 2g
- Trans Fat: 0g
- Carbohydrates: 35g
- Fiber: 4g
- Protein: 6g
- Cholesterol: 5mg
Keywords: fruit salad, creamy salad, summer recipe, healthy dessert, easy dessert

Honey Feta Sweet Potato Rounds
Honey Feta Sweet Potato Rounds: Elevate Your Appetizer Game
Hey there, food lovers! Welcome back to Ivory Apron, where we turn the everyday act of cooking into something elegant and fun. Today, I’m excited to share with you a fabulous appetizer that’s perfect for any gathering—my Honey Feta Sweet Potato Rounds. Not only are these little bites of joy stunning to look at, but they’re also wonderfully delicious and super easy to whip up.
Imagine popping these beauties in your mouth, where the sweet creaminess of feta meets the warm, earthy goodness of roasted sweet potatoes and honey. It’s the perfect combination of flavors that will have your guests coming back for more—trust me!
I love this recipe because it embodies everything I stand for: simple ingredients, approachable cooking techniques, and the ability to create stunning dishes without feeling overwhelmed. Whether you’re hosting a dinner party, celebrating a special occasion, or just enjoying a cozy night at home, these sweet potato rounds are sure to impress.
What’s even better is how versatile they are! You can get creative with toppings, flavors, and presentation. So, grab your apron, and let’s dive into the delicious journey of making Honey Feta Sweet Potato Rounds!
Personal Story
I remember the first time I made honey-feta sweet potato rounds for friends. It was a chilly evening, and I had invited a few close friends over for a cozy dinner. I wanted to serve something that would not only warm their bellies but also their hearts—a dish that felt personal and homey.
As I roasted the sweet potatoes, the sweet aroma filled the kitchen. The golden-brown rounds were invitingly buttery and soft, and when I topped them with crumbled feta and a drizzle of honey, the transformation was magical! When my friends arrived, they couldn’t get enough of them. They were the star of the evening! We ended up laughing, sharing stories, and most importantly, creating wonderful memories around the table.
Those sweet potato rounds bridged a connection between all of us and became a staple in my entertaining repertoire. It’s amazing how food can evoke nostalgia and foster community, and I’m excited to share that experience with you today!
Ingredients
For these delightful Honey Feta Sweet Potato Rounds, gather the following ingredients:
-
2 large sweet potatoes: Sweet potatoes are rich in flavor and nutrients. Look for firm, smooth ones without any bruises. You can substitute with regular potatoes or squash, although the taste and texture will vary!
-
4 oz feta cheese, crumbled: Feta adds a creamy, slightly tangy contrast to the sweetness of the potatoes. Goat cheese or blue cheese can also be used for a bolder flavor, but keep in mind they will change the overall profile!
-
2 tbsp honey: This natural sweetener complements the salty feta beautifully. If you’re looking for a vegan alternative, consider using maple syrup or agave nectar for similar sweetness with a different flavor twist.
-
2 tbsp olive oil: Olive oil not only helps in roasting the sweet potatoes but also adds healthy fats. Other oils, like avocado oil, can be substituted for a different flavor.
-
Salt and pepper to taste: Seasoning is crucial. Don’t skip this step! Freshly ground black pepper adds a nice kick, while sea salt enhances all the flavors.
-
Fresh herbs (such as thyme or rosemary) for garnish: Fresh herbs bring brightness and complexity to your dish. You can also mix it up with parsley or chives.
Let’s get cooking!
Step-by-Step Instructions
1. Preheat Your Oven
Start by preheating your oven to 400°F (200°C). Preheating is essential for even cooking and ensures that your sweet potatoes roast perfectly golden brown!
2. Prepare the Sweet Potatoes
Wash the sweet potatoes thoroughly and slice them into rounds about 1/4 inch thick. The uniform thickness helps them cook evenly, so don’t rush this step!
3. Season and Toss
In a large mixing bowl, toss the sweet potato rounds with olive oil, salt, and pepper. Make sure every piece is coated; this will enhance the flavor and allow for that beautiful, crispy texture in the oven.
4. Arrange on a Baking Sheet
Spread the sweet potato slices out in a single layer on a parchment-lined baking sheet. This will prevent them from sticking and make cleanup a breeze. If they’re crowded, they’ll steam rather than roast, so give them some space to breathe!
5. Roast Them Up
Pop the baking sheet into the preheated oven and roast for about 25-30 minutes. Halfway through, give them a flip to ensure even browning. You want them to be crispy on the outside and fork-tender on the inside. Just keep an eye on them—they can go from perfectly roasted to charred pretty quickly!
6. Add the Toppings
Once the sweet potatoes are done, remove them from the oven and let them cool slightly. While they’re still warm, sprinkle crumbled feta cheese generously on top of each round. Drizzle them with honey for that sweet contrast—oh, the flavor combination at this stage is simply divine!
7. Garnish and Serve
Finally, finish with fresh herbs like thyme or rosemary for that pop of color and aromatic freshness. You can also drizzle a touch more olive oil if you like. And voila! Your Honey Feta Sweet Potato Rounds are ready to shine at your next gathering!
Serving Suggestions
For presentation, arrange the sweet potato rounds on a beautiful serving platter. You can garnish them with more fresh herbs or even a sprinkle of chili flakes for an unexpected pop! Serve them warm or at room temperature for ease, and set out little picks for a fun finger-food experience!
Recipe Variations
-
Balsamic Cranberry Drizzle: Replace honey with a balsamic reduction and add dried cranberries for a tangy twist.
-
Spicy Kick: Add a pinch of cayenne pepper or paprika to the olive oil mixture to give the sweet potatoes a subtle heat.
-
Mediterranean Style: Toss in some olives or sun-dried tomatoes along with the feta for a more Mediterranean flair.
-
Vegan Delight: Swap feta for a vegan cheese alternative and use maple syrup in place of honey for a plant-based version.
-
Nutty Crunch: Top with toasted walnuts for added texture and flavor!
Chef’s Notes
As I look back on my cooking journey, these Honey Feta Sweet Potato Rounds represent the perfect fusion of simplicity and elegance—the kind of dish that effortlessly elevates any meal. I’ve played around with this recipe over the years, incorporating different toppings and flavors, but the core remains the same: the comfort of sweet potato paired with the rich creaminess of feta is simply irresistible!
I also have to chuckle when I remember the time I accidentally put too much honey on these rounds and ended up creating a caramel-like topping. It was a happy accident, and now I like to keep the honey drizzle a bit on the generous side—an example of moving forward in the kitchen!
FAQs and Troubleshooting
Q: Why are my sweet potato rounds soggy?
A: If your sweet potato rounds are soggy, it may be because they were too crowded on the baking sheet. Always ensure they have enough space for air to circulate!
Q: Can I make these ahead of time?
A: Absolutely! You can roast the sweet potatoes a day ahead, then reheat them in the oven and top with feta and honey just before serving.
Q: What can I serve with these rounds?
A: They are fantastic as an appetizer! Pair them with a light salad, grilled meats, or serve them alongside a charcuterie board for a delightful spread.
Q: What should I do if the feta doesn’t melt?
A: Feta doesn’t really melt the same way other cheeses do. Just sprinkle it on right before serving to keep its lovely texture!
Nutritional Info (Optional)
For a serving size of three sweet potato rounds:
- Calories: Approximately 150
- Protein: 4g
- Fat: 5g
- Carbohydrates: 25g
- Fiber: 3g
- Sugar: 6g
(Note: Nutritional values are estimates and can vary based on specific ingredients used.)
So there you have it—Honey Feta Sweet Potato Rounds, an elegant yet approachable recipe that’s sure to impress and delight at your next gathering. I can’t wait for you to try this fantastic dish, and I’d love to hear how it turns out! Happy cooking!
PrintHoney Feta Sweet Potato Rounds

A delightful appetizer featuring roasted sweet potato rounds topped with creamy feta and drizzled with honey.
- Prep Time: 15 minutes
- Cook Time: 30 minutes
- Total Time: 45 minutes
- Yield: 4 servings 1x
- Category: Appetizer
- Method: Baking
- Cuisine: American
- Diet: Vegetarian
Ingredients
- 2 large sweet potatoes
- 4 oz feta cheese, crumbled
- 2 tbsp honey
- 2 tbsp olive oil
- Salt and pepper to taste
- Fresh herbs (such as thyme or rosemary) for garnish
Instructions
- Preheat your oven to 400°F (200°C).
- Wash the sweet potatoes thoroughly and slice them into rounds about 1/4 inch thick.
- Toss the sweet potato rounds with olive oil, salt, and pepper in a large mixing bowl.
- Spread the sweet potato slices out in a single layer on a parchment-lined baking sheet.
- Pop the baking sheet into the preheated oven and roast for about 25-30 minutes, flipping halfway through.
- Remove them from the oven, and sprinkle crumbled feta cheese generously on top while they’re still warm.
- Drizzle honey over the sweet potato rounds and finish with fresh herbs for garnish.
Notes
These rounds can be made ahead of time and reheated before serving. Consider adding chili flakes for an unexpected twist.
Nutrition
- Serving Size: 3 rounds
- Calories: 150
- Sugar: 6g
- Sodium: 320mg
- Fat: 5g
- Saturated Fat: 2g
- Unsaturated Fat: 3g
- Trans Fat: 0g
- Carbohydrates: 25g
- Fiber: 3g
- Protein: 4g
- Cholesterol: 20mg
Keywords: appetizer, sweet potato, feta, honey, vegetarian, easy recipes, gatherings

Parmesan Pesto Roasted Potatoes
Parmesan Pesto Roasted Potatoes: Simple Elegance on Your Plate
Hello and welcome to Ivory Apron! I’m so excited to share one of my favorite side dishes with you today: Parmesan Pesto Roasted Potatoes. I mean, who doesn’t just adore potatoes? They’re versatile, comforting, and when cooked right, they can take on a life of their own on the plate! And what’s better than the warm, garlicky aroma of potatoes roasting in the oven, all while being dressed in a vibrant basil pesto and a generous sprinkle of zesty Parmesan cheese? It feels like a hug in food form, don’t you think?
What I love about this recipe—and cooking in general—is that it strikes that perfect balance between simplicity and sophistication. With just a handful of ingredients, you can create a dish that looks and tastes like a gourmet treat. Imagine serving these beauties at your next dinner gathering, proudly announcing that "I made these!" Trust me, your guests will be raving!
So, grab your apron, preheat that oven, and let’s dive into this culinary adventure. Because cooking should be fun, delicious, and totally approachable—just like your favorite gatherings around the table. Let’s get started!
Personal Story
As a child, the kitchen was my playground. My parents encouraged me to explore new flavors and techniques, and I remember the first time I made roasted potatoes on my own—I was about ten years old! It was a simple recipe with only olive oil and salt, but as I pulled them out of the oven, the crispiness was magical. Inspired by my love for flavors, I decided to jazz it up with some pesto and Parmesan one day, after a friend of mine brought over a jar of her homemade basil pesto. Right then and there, the idea for these Parmesan Pesto Roasted Potatoes was born!
Standing proudly by the oven with my little apron on, I couldn’t contain my excitement as I watched the potatoes transform into golden bites of perfection. As the aroma wafted through the house, my siblings gathered in the kitchen, all eyes wide with anticipation. When it came time to taste, I watched their faces light up; it was a moment of pure joy. It reminded me that food isn’t just about sustenance; it’s about creating memories, igniting laughter, and sharing love around the table. Those roasted potatoes became a family favorite, and honestly, they still are! I can’t wait for you to experience the same joy these delightful bites can bring!
Ingredients
To whip up these delightful Parmesan Pesto Roasted Potatoes, you’ll need the following ingredients:
-
4 Medium Potatoes:
- Choose Yukon Gold for their buttery texture and flavor, or Russets for a fluffier inside. Don’t forget to scrub and clean them well! If you’re short on time, baby potatoes work too—they’re adorable and cook faster!
-
1/4 Cup Pesto:
- Store-bought or homemade, pesto brings vibrant flavor to the table. If you’re feeling adventurous, you can substitute with sun-dried tomato pesto or make a nut-free basil pesto using nutritional yeast.
-
1/2 Cup Grated Parmesan Cheese:
- These cheese flakes get crispy in the oven and add a salty, savory depth. If you’re going dairy-free, try nutritional yeast or a vegan Parmesan alternative for a similar taste!
-
Olive Oil:
- A good drizzle enhances flavor and ensures even roasting. Extra virgin olive oil is my go-to, but you can use avocado oil for a different flavor profile.
-
Salt and Pepper to Taste:
- Always taste as you go! Freshly cracked black pepper adds a nice kick, while sea salt highlights all those wonderful flavors.
Step-by-Step Instructions
Ready to bring your kitchen to life? Let’s dive into the magic of creating these roasted potatoes!
-
Preheat Your Oven:
- Preheat your oven to 425°F (220°C). This step is essential for achieving that lovely, golden-brown crust we adore. It’s like waking up your oven for a delicious day of cooking!
-
Prepare the Potatoes:
- Wash and scrub your potatoes to remove any grit. Then, chop them into bite-sized pieces—about 1-inch cubes. The uniformity in size ensures they cook evenly. Remember, sharp knives are your best friends!
-
Season to Perfection:
- In a large mixing bowl, toss the chopped potatoes with a couple of tablespoons of olive oil, a pinch of salt, and freshly ground black pepper. This coats each potato nicely, ensuring every bite is seasoned. Plus, we’ll be adding the pesto and cheese later!
-
Add the Pesto:
- Pour in the pesto and mix until the potatoes are beautifully coated. Don’t be shy; you want that vibrant green to hug each potato piece!
-
Cheese the Potatoes (Deliciously!):
- Sprinkle the grated Parmesan cheese over the pesto-coated potatoes and give them one final toss. This is where the magic happens—the cheese will crisp up beautifully in the oven.
-
Prepare for Roasting:
- Spread the potatoes evenly on a baking sheet lined with parchment paper. Avoid overcrowding to give each potato space to brown. Trust me; this will give you that desired crispy texture.
-
Roast Away:
- Place the baking sheet in the preheated oven and roast for about 30–35 minutes. Halfway through, give them a gentle toss to ensure even cooking. You’ll know they’re ready when they’re golden and crispy on the outside and tender on the inside.
-
Final Touches:
- Once out of the oven, taste for seasoning—add more salt or pepper if needed. A squeeze of fresh lemon juice or a sprinkle of more fresh basil also elevates the flavor profile beautifully!
Serving Suggestions
These Parmesan Pesto Roasted Potatoes are just waiting to steal the spotlight! Serve them piping hot alongside your favorite protein—think herb-crusted chicken, grilled steak, or even a beautifully roasted veggie platter. Either way, the potatoes become the star of the meal.
For a fun presentation, you can scatter fresh herbs like basil or parsley on top before serving. And remember, using a white serving dish can make the vibrant greens and yellows of your dish pop! It’s all about that beautiful plating!
Recipe Variations
Ready to get creative? Here are some fun variations you can try:
-
Herbed Variants: Add fresh chopped rosemary or thyme to the potatoes before roasting for an aromatic twist.
-
Spicy Kick: Toss in a pinch of red pepper flakes with the pesto for a delightful heat.
-
Add Veggies: Incorporate halved cherry tomatoes or bell pepper slices for an extra pop of color and flavor.
-
Crispy Toppings: Top with crispy fried onions or bread crumbs for an added crunch.
-
Cheesy Goodness: Mix in crumbled feta or goat cheese for a tangy twist!
Chef’s Notes
Over the years, I’ve tweaked this recipe a few times, and it has become a go-to in my kitchen. One funny story that always makes me smile is when I made these for a large family gathering. I was so excited that I may or may not have thrown in a bit too much pesto! Let me tell you—what resulted was an overly green dish that had everyone talking! We all laughed, but hey, it turned out delicious and was a hit nonetheless!
Cooking is all about experimenting and having fun. Don’t stress if things don’t turn out exactly as planned; embrace them as part of your kitchen journey!
FAQs and Troubleshooting
-
Why are my potatoes not crispy?
- Ensure enough space on the baking sheet. Overcrowding can make them steam instead of roast. Also, dry them well after washing to avoid excess moisture!
-
Can I prepare these potatoes ahead of time?
- Absolutely! You can chop the potatoes and combine them with pesto and cheese a few hours ahead. Just cover and refrigerate, then roast right before serving.
-
What if I don’t have pesto?
- No worries! You can substitute with a mixture of olive oil, garlic, fresh herbs, and a splash of lemon juice to brighten the flavor.
-
How do I store leftovers?
- Store any leftovers in an airtight container in the refrigerator for up to 3 days. Reheat them in the oven for a few minutes to regain that crispy texture!
Nutritional Info (optional)
While I focus on flavor, I understand many of you consider nutrition too. Here’s a rough estimate per serving (based on 4 servings):
- Calories: 250
- Fat: 12g
- Carbohydrates: 30g
- Protein: 7g
- Fiber: 3g
Cooking should be an experience to savor, filled with warmth and memories. I hope this Parmesan Pesto Roasted Potatoes recipe brings just that to your table. I can’t wait for you to try it! Remember, the heart of the kitchen lies in sharing love, laughter, and food—so let’s keep those aprons ties and those pots simmering. Happy cooking! 🍽️
PrintParmesan Pesto Roasted Potatoes

Delicious roasted potatoes dressed in vibrant basil pesto and topped with crispy Parmesan cheese.
- Prep Time: 15 minutes
- Cook Time: 30 minutes
- Total Time: 45 minutes
- Yield: 4 servings 1x
- Category: Side Dish
- Method: Roasting
- Cuisine: Italian
- Diet: Vegetarian
Ingredients
- 4 Medium Potatoes (Yukon Gold or Russets)
- 1/4 Cup Pesto (store-bought or homemade)
- 1/2 Cup Grated Parmesan Cheese
- Olive Oil
- Salt and Pepper to Taste
Instructions
- Preheat your oven to 425°F (220°C).
- Prepare the potatoes by washing, scrubbing, and chopping them into 1-inch cubes.
- Season the potatoes in a large bowl with olive oil, salt, and pepper.
- Add the pesto and mix until the potatoes are well coated.
- Sprinkle the grated Parmesan cheese over the potatoes and toss again.
- Prepare a baking sheet lined with parchment paper and spread the potatoes evenly.
- Roast in the oven for about 30–35 minutes, tossing halfway through.
- Final touches: Once out of the oven, taste for seasoning and adjust if needed.
Notes
Feel free to add fresh herbs or a squeeze of lemon juice for added flavor.
Nutrition
- Serving Size: 1 serving
- Calories: 250
- Sugar: 1g
- Sodium: 400mg
- Fat: 12g
- Saturated Fat: 4g
- Unsaturated Fat: 6g
- Trans Fat: 0g
- Carbohydrates: 30g
- Fiber: 3g
- Protein: 7g
- Cholesterol: 30mg
Keywords: roasted potatoes, pesto, vegetarian side dish
No Bake Cookie Dough Bars
Indulge in No-Bake Cookie Dough Bars: A Delicious Adventure in Your Kitchen
Hey there, fellow food lovers! If you’re anything like me, you’ve had that moment where you find yourself scrolling through endless recipes, craving something sweet, yet wanting it to be easy and fuss-free. Well, today is your lucky day! I’m excited to share with you my all-time favorite recipe for No-Bake Cookie Dough Bars. Picture this: bite-sized morsels of cookie dough goodness that you can whip up in minutes—no oven required. Perfect for a late-night snack, an impromptu gathering, or simply to satisfy those chocolate cravings (which we all know can be quite insatiable).
These bars embody what I love about cooking: they’re simple yet indulgent, and they’re a fun way to create a treat that feels homemade without putting yourself through the wringer in the kitchen. With just a handful of wholesome ingredients, you’ll be able to dig into a dessert that’s creamy, sweet, and oh-so-satisfying. So, tie on your apron and let’s get started on this sweet adventure!
Personal Story
The inspiration behind these No-Bake Cookie Dough Bars comes from my childhood. I remember spending weekends in the kitchen with my grandmother, who had an undeniable talent for whipping up desserts that felt like a warm hug. One afternoon, she introduced me to the joys of cookie dough—sneaking spoonfuls from the mixing bowl while she baked classic chocolate chip cookies. It was pure magic! I can still hear her laughter and the clattering of pots and pans as we made joyful messes together.
Fast forward to now, and I’ve taken that nostalgic memory and put a modern twist on it. These bars remind me of those carefree days, but they also align with my passion for creating approachable, elegant dishes. Whether you’re hosting a casual get-together or enjoying a cozy night in, these No-Bake Cookie Dough Bars bring a delightful taste of nostalgia into the present.
Ingredients
Here’s what you need to create these scrumptious bars:
-
1 cup almond flour
A versatile and gluten-free option that provides a lovely nutty flavor. If you need a substitute, you can use oat flour or all-purpose flour, but keep in mind that the texture may slightly change. -
1/2 cup maple syrup
This natural sweetener offers a rich flavor that balances perfectly with the other ingredients. You can swap it with agave nectar or honey if you prefer, but ensure you’re okay with the flavor variations. -
1/2 cup peanut butter or almond butter
This is where the creaminess comes from! I love the taste of peanut butter, but almond butter will give you a lighter flavor. For a nut-free option, sunflower seed butter works beautifully too. -
1/2 cup dark chocolate chips
Adds that heavenly burst of sweetness and richness! If you’re looking for a dairy-free version, make sure to use vegan chocolate chips. -
1 teaspoon vanilla extract
This ingredient elevates the overall flavor and adds a warm, aromatic essence. You can skip it if you’re in a pinch or substitute with almond extract for a different twist. -
Pinch of salt
A little salt helps balance the sweetness of the bars. Trust me; it makes a world of difference! If you’re avoiding sodium, you can omit it, but I wouldn’t recommend it.
Step-by-Step Instructions
Step 1: Gather Your Ingredients
First things first—before diving in, let’s make sure we have all these beautiful ingredients at hand! Set your workspace with everything ready so you can whip these bars up like a pro.
Step 2: Mix the Base
In a mixing bowl, combine the almond flour and salt. Make sure there are no clumps! The smoother the mixture, the better your bars will be. Add in the peanut butter and mix until you have a thick, paste-like consistency. This is where your fork or spatula becomes your best friend—don’t be shy!
Step 3: Sweeten the Mixture
Now it’s time to incorporate the maple syrup and vanilla extract. Pour them in and mix everything together until you achieve a well-combined dough. Remember, don’t rush this part; letting your ingredients really blend together makes all the difference!
Step 4: Fold in the Chocolate Chips
Once mixed, gently fold in the dark chocolate chips. Use your spatula to ensure an even distribution throughout your dough. This is where the indulgent magic happens—feel free to steal a few chocolate chips for yourself, I promise I won’t tell!
Step 5: Press the Dough into a Pan
Now, choose a square baking dish (about 8×8 inches works great) and line it with parchment paper for easy removal later. Pour your dough mixture into the dish and press it down firmly using your palms or a spatula. This step is essential, as it ensures your bars have a nice structure once they set.
Step 6: Chill
Pop your pan into the refrigerator and let it chill for at least an hour. This waiting can feel like the toughest part, but it’s essential for the bars to firm up and become sliceable.
Step 7: Slice and Serve
Once chilled, remove the bars from the fridge and lift them out using the parchment paper. Cut them into squares or bars, depending on your preference.
Step 8: Enjoy!
Now, it’s time to indulge! Serve these bars at room temperature, or even chilled for a refreshing twist.
Serving Suggestions
Place the bars on a lovely platter and sprinkle with a touch of sea salt to enhance their beauty and flavors. Pair with a dollop of whipped cream or a scoop of vanilla ice cream if you’re feeling extra indulgent. They also make for a fabulous addition to a charcuterie board!
Recipe Variations
- Nut-Free Delight: Replace peanut or almond butter with sunflower seed butter for a nut-free version.
- Protein Punch: Add a scoop of your favorite protein powder for an added health boost.
- Coconut Cream: Incorporate shredded coconut into the dough for a tropical twist.
- Spicy Kick: Add a tiny pinch of cayenne pepper for a surprising, spicy kick.
- Fruit Fusion: Mix in chopped dried fruits like cranberries or apricots for a chewy texture.
Chef’s Notes
I can’t tell you how many times I’ve made these bars with different flavors, simply because I love experimenting! One time, in the middle of summer, I added a handful of crushed graham crackers for a s’mores-inspired treat—let’s just say it was a hit! Remember, this recipe is your playground. Don’t hesitate to make it your own!
FAQs and Troubleshooting
Q: Why are my bars too crumbly?
A: If your bars are falling apart, they might need just a bit more moisture. Try adding a little more maple syrup or nut butter until the mixture sticks together better.
Q: Can I use a different sweetener?
A: Absolutely! You can use honey, agave, or even a sugar alternative like stevia or erythritol, keeping in mind that they may alter the final taste slightly.
Q: How should I store the bars?
A: Store these in an airtight container in the fridge for about a week or freeze them for longer-lasting treats. Just make sure to separate layers with parchment paper to keep them from sticking!
Q: Can I bake these bars instead of chilling them?
A: Though the magic of these bars lies in their no-bake nature, you could experiment with baking in a low oven (around 350°F for 10-15 minutes) for a slightly different texture. Keep an eye on them to prevent overcooking!
Nutritional Info
(Optional and can vary based on specific brands and ingredients used. A rough estimate per bar if cut into 12 servings)
- Calories: 130
- Protein: 4g
- Fat: 8g
- Carbohydrates: 12g
- Fiber: 2g
So, there you have it! Your ultimate guide to making No-Bake Cookie Dough Bars! With a dash of nostalgia and a sprinkle of creativity, I hope this recipe finds a special place in your kitchen. Remember, cooking should be a joyful experience—embrace the process, share the love, and most importantly, enjoy every sweet bite! Happy baking!
PrintNo-Bake Cookie Dough Bars

Indulge in these delicious No-Bake Cookie Dough Bars, a perfect treat that embodies simplicity and nostalgia.
- Prep Time: 15 minutes
- Cook Time: 0 minutes
- Total Time: 75 minutes
- Yield: 12 servings 1x
- Category: Dessert
- Method: No-Bake
- Cuisine: American
- Diet: Vegetarian
Ingredients
- 1 cup almond flour
- 1/2 cup maple syrup
- 1/2 cup peanut butter or almond butter
- 1/2 cup dark chocolate chips
- 1 teaspoon vanilla extract
- Pinch of salt
Instructions
- Gather Your Ingredients
- Mix the Base
- Sweeten the Mixture
- Fold in the Chocolate Chips
- Press the Dough into a Pan
- Chill
- Slice and Serve
- Enjoy!
Notes
For a nut-free version, use sunflower seed butter instead. Experiment with different flavors like coconut, protein powder, or dried fruits.
Nutrition
- Serving Size: 1 bar
- Calories: 130
- Sugar: 7g
- Sodium: 50mg
- Fat: 8g
- Saturated Fat: 1.5g
- Unsaturated Fat: 6g
- Trans Fat: 0g
- Carbohydrates: 12g
- Fiber: 2g
- Protein: 4g
- Cholesterol: 0mg
Keywords: no-bake, dessert, cookie dough, easy recipe, quick treat

Pesto Grilled Cheese
The Ultimate Pesto Grilled Cheese: Elevate Your Comfort Food Game
Hey there, fellow food lovers! Today, we’re diving into the world of elevated comfort food with a fabulous twist on a classic favorite: the Pesto Grilled Cheese. You may be wondering how a simple sandwich can be transformed into something extraordinary. Well, let me tell you—it’s all about the ingredients, the techniques, and, of course, a sprinkle of love.
Imagine sinking your teeth into golden-brown slices of bread stuffed with gooey, melted cheese, and a burst of aromatic pesto that dances on your taste buds. This isn’t just any grilled cheese; it’s a mash-up of childhood nostalgia and culinary creativity.
Whenever I whip up this delightful dish, it transports me back to my carefree days of summer, when friends would gather in my backyard for lazy afternoons filled with laughter and endless chatter. Grilled cheese sandwiches were a staple of those sunny days. But when I discovered pesto—oh, how it changed the game! It was like finding the missing piece to a puzzle I didn’t know needed solving.
So, grab your apron and let’s get cooking. With just a handful of ingredients and a few easy steps, you’ll be well on your way to impressing your friends, family, or even just yourself with this show-stopping Pesto Grilled Cheese. Whether you’re enjoying a cozy night in or entertaining guests, this sandwich will become your go-to recipe for those moments when you crave something comforting yet refined.
Personal Story
Growing up, my family wasn’t one to shy away from good food. My mom was always in the kitchen, experimenting with flavors and bringing us all together for dinner. But it was during those relaxed summer days at my grandparents’ house that I truly fell in love with cooking. My grandmother had a magical touch when it came to grilled cheese sandwiches. We would savor the simplicity of melted cheddar sandwiched between perfectly toasted bread — the smell of butter sizzling in the pan was irresistible.
One day, while rummaging through her fridge, I discovered a jar of homemade basil pesto. Intrigued, I decided to add a dollop to my sandwich. As the cheese melted, the pesto infused its vibrant flavor right into the creamy goodness, and my taste buds were awakened! It was a revelation. From that moment on, the classic grilled cheese would never be the same for me. It was the first time I realized how a simple ingredient could elevate everyday cooking to something magical, and that lesson stayed with me as I continued to explore the world of flavors.
Ingredients
Here’s what you’ll need for this delectable Pesto Grilled Cheese:
-
2 slices of bread
Use any bread you love, from rustic sourdough to hearty whole grain. Want a gluten-free option? Look for a good-quality gluten-free bread—just make sure it’s sturdy enough to hold the fillings! -
2 slices of cheese (e.g., cheddar, mozzarella)
Cheddar adds a sharpness that perfectly complements the pesto, while mozzarella offers a dreamy, stretchy texture. Don’t hesitate to mix cheeses for a more complex flavor! -
2 tablespoons of pesto
Use store-bought for convenience, or better yet, whip up a quick homemade version! Fresh basil, garlic, pine nuts, Parmesan, and olive oil come together beautifully. Have leftover pesto? It freezes well—perfect for future grilled cheese cravings! -
Butter or olive oil for grilling
Butter gives a rich flavor and decadent crispiness, while olive oil adds a lighter touch. Experiment! You can even blend them for the best of both worlds.
Step-by-Step Instructions
Ready to create your masterpiece? Let’s break it down step-by-step!
-
Prep Your Ingredients
Gather your ingredients and assemble everything on the countertop. This not only makes the cooking process smoother but also lets you admire the cheerful colors of the pesto, cheese, and bread! -
Butter Up
Begin by spreading a generous amount of butter on one side of each slice of bread. If you’re going for olive oil, drizzle it over the bread instead. Pro tip: using room temperature butter will make spreading it much easier, and you can layer on more if you like a crispier finish! -
Assemble the Sandwich
With the buttered sides facing down, place one slice of bread in a skillet over medium heat. Top it with one slice of cheese, followed by the pesto. Spoon the pesto on now to ensure it spreads evenly. Add the second slice of cheese on top, then crown it with the second slice of bread (buttered side up). -
Time to Grill
Allow the sandwich to cook slowly—about 3-4 minutes—then lift it gently with a spatula. Look for a lovely golden brown color. If it’s not there yet, be patient! Lower the heat if needed to ensure the cheese melts through without burning the bread. -
Flip and Finish
Carefully flip the sandwich to the other side and press it down slightly with the spatula. Cooking this side should take another 3-4 minutes. If you want to get fancy, add a weight on top—like another frying pan or a sandwich press—to create even more gooey goodness. -
Melty Goodness Alert!
Once you see that lovely golden-brown crust and smell the tantalizing aroma wafting through the air, it’s time to remove the sandwich from the pan. Let it rest for a minute—this ensures you don’t burn your mouth on molten cheese (trust me, I’ve been there!).
Serving Suggestions
To serve your Pesto Grilled Cheese in style, slice it diagonally for that classic, inviting presentation. You can arrange it on a wooden cutting board along with a small bowl of marinara sauce or extra pesto for dipping. A handful of mixed greens dressed lightly with olive oil and balsamic vinegar on the side adds a refreshing contrast. Voilà—you’re ready to impress!
Recipe Variations
Here are some creative twists to keep this dish exciting:
- Caprese Twist: Add sliced tomatoes and fresh mozzarella along with the pesto for a Caprese-inspired grilled cheese.
- Spicy Kick: Mix in some sliced jalapeños or a sprinkle of crushed red pepper flakes for a spicy version!
- Protein Boost: Layer in some cooked chicken, turkey, or crispy bacon for a hearty twist.
- Healthy Swap: Use whole grain or gluten-free bread for a more nutritious option, and opt for low-fat cheese to lighten it up.
- Herbaceous Flair: Mix finely chopped fresh herbs like basil, parsley, or arugula into the pesto for extra flavor!
Chef’s Notes
This Pesto Grilled Cheese has become a staple in my kitchen over the years, evolving from a childhood favorite to a dinner party hit. I can’t tell you how many times I’ve made this while hosting friends. It’s such a forgiving recipe—each time, it somehow turns out perfectly, no matter what tweaks I make. Sometimes, I like to add leftover roasted vegetables for an even heartier sandwich!
If you’re feeling extra adventurous, try experimenting with flavored oils. A drizzle of garlic-infused olive oil takes it to another level! And let’s be real—who doesn’t love the smell of garlic wafting through the kitchen?
FAQs and Troubleshooting
-
Why is my grilled cheese burnt on the outside but cold inside?
Make sure your heat is set to medium or medium-low. Cooking it too fast will brown the bread before the cheese melts. Patience is key! -
What if I don’t have pesto?
No pesto? No problem! You can use herbed cream cheese or a simple blend of olive oil, garlic, and fresh herbs as an alternative. -
Can I make this ahead of time?
While grilled cheese is best enjoyed fresh, you can assemble it ahead of time and grill it right before serving. Just wait to butter the outside until you’re ready to cook it! -
How can I keep it from getting soggy?
Be sure not to overdo the pesto; a little goes a long way! Additionally, using thicker bread can help absorb moisture better.
Nutritional Info (Optional)
Note: Nutritional info will vary based on ingredients and serving sizes. Here’s a rough estimate per sandwich:
- Calories: 450
- Protein: 18g
- Carbohydrates: 40g
- Fat: 25g
Now that you’ve infused your kitchen with the enticing aroma of Pesto Grilled Cheese, all that’s left is to gather your loved ones and indulge in this nostalgic dish. I hope you enjoy making this recipe as much as I have enjoyed sharing it with you. Happy cooking, and remember—every meal has the potential to create beautiful moments around your table. Cheers!
PrintPesto Grilled Cheese

A delicious twist on the classic grilled cheese sandwich, featuring gooey cheese and flavorful pesto for an elevated comfort food experience.
- Prep Time: 10 minutes
- Cook Time: 8 minutes
- Total Time: 18 minutes
- Yield: 1 serving 1x
- Category: Main Course
- Method: Grilling
- Cuisine: Italian
- Diet: Vegetarian
Ingredients
- 2 slices of bread
- 2 slices of cheese (e.g., cheddar, mozzarella)
- 2 tablespoons of pesto
- Butter or olive oil for grilling
Instructions
- Gather your ingredients and assemble everything on the countertop.
- Spread a generous amount of butter on one side of each slice of bread.
- Place one slice of bread in a skillet over medium heat.
- Top it with one slice of cheese, then the pesto, and another slice of cheese.
- Crown it with the second slice of bread (buttered side up).
- Cook slowly for about 3-4 minutes until golden brown.
- Flip the sandwich and press down slightly. Cook the other side for another 3-4 minutes.
- Remove the sandwich from the pan and let it rest for a minute before slicing.
Notes
For added flavor, experiment with different types of cheese and use fresh homemade pesto when possible.
Nutrition
- Serving Size: 1 serving
- Calories: 450
- Sugar: 2g
- Sodium: 600mg
- Fat: 25g
- Saturated Fat: 12g
- Unsaturated Fat: 10g
- Trans Fat: 0g
- Carbohydrates: 40g
- Fiber: 3g
- Protein: 18g
- Cholesterol: 45mg
Keywords: grilled cheese, pesto sandwich, comfort food

Egg and Cheese Toasts: Crispy, Cheesy, and Amazingly Quick
# Egg and Cheese Toasts: Crispy, Cheesy, and Amazingly Quick

## Introduction

Hey there, fellow food lovers! Today, we’re diving into one of my all-time favorite comfort foods: Egg and Cheese Toasts. Now, before you say, “Savannah, I can whip up a plain old egg and cheese sandwich in my sleep!”—let me tell you why this dish will elevate your brunch game and become a staple on your table.

Egg and Cheese Toasts are not just your average breakfast fare; they’re a delightful symphony of crispy, cheesy goodness perched atop a sturdy piece of bread. Imagine sinking your teeth into a perfectly fried egg, its yolk oozing subtly onto a layer of melted cheese, nestled on a crisp, toasty foundation. It’s quick to prepare, bursting with flavor, and oh-so-satisfying. Whether you’re having a lazy Sunday morning, entertaining guests for brunch, or simply need a quick meal that brings joy to your plate, these toasts will fit the bill!

The beauty of this dish is in its simplicity and versatility. You can customize it with your favorite cheeses, herbs, and seasonings. Plus, it comes together in just minutes, making it perfect for those hectic weekday mornings or spontaneous late-night cravings. Stick around, and I’ll share some delightful variations, tips, and anecdotes that will inspire you to make this dish yours.

So grab your apron, and let’s get cooking! Trust me, once you make these Egg and Cheese Toasts, you’ll keep coming back for more. Let’s whisk up something unforgettable together!

## Personal Story

First, let me take you back to my childhood kitchen. I remember Saturday mornings filled with laughter, the scent of brewing coffee, and the sound of sizzling eggs dancing in the pan. My mom had a knack for turning even the simplest meals into something special. One Saturday, she introduced me to her version of Egg and Cheese Toasts.

We had that hearty bread; you know, the kind that has a thick crust and can stand up to a little butter and some crispy edges? Mom would pan-fry the bread with just the right amount of heat, crack a sunny-side-up egg on top, and sprinkle a glorious mound of cheese—usually cheddar because, let’s be honest, it’s the king of comfort cheese! That first bite was pure bliss. The crispiness of the bread, the creamy cheese, and the rich yolk melting together created a heavenly combination.

I can still hear her encouraging me to experiment with toppings—fresh herbs, a dash of hot sauce, even slices of avocado! Those mornings linger in my heart and have inspired my love for cooking to this very day. With every Egg and Cheese Toast I prepare, I’m reminded of those warm, cozy moments shared at our kitchen table. Now, let's create some delicious memories of your own!

## Ingredients

Here’s what you’ll need to make these glorious Egg and Cheese Toasts, complete with some handy insights and substitution tips:

- **2 slices hearty sandwich bread (no large holes)**
  *Look for bread that’s sturdy enough to hold all the toppings without getting soggy. Sourdough, whole grain, or even brioche works beautifully! If gluten-free is your jam, swap it for a great gluten-free bread.*

- **1 large egg**
  *The star of the show! Feel free to use organic or free-range eggs for added flavor and nutritional value. If you’re vegan or have an egg allergy, consider using a flax egg (1 tablespoon ground flaxseed mixed with 2.5 tablespoons water) as a substitute, though the texture will differ.*

- **1/2 cup (2 ounces) grated cheese (cheddar, pepper jack, or gruyere)**
  *Cheddar is classic, but don’t be afraid to experiment! Pepper jack adds a kick, while Gruyère brings complex nutty flavors. For a dairy-free option, try cashew cheese or nutritional yeast.*

- **1 teaspoon finely chopped fresh herbs (thyme or rosemary)**
  *Herbs elevate the dish and add freshness. If you don’t have fresh herbs, 1/4 teaspoon of dried herbs will work too—just crush them a bit to release their flavor. You can also use parsley, chives, or basil for variety!*

- **Salt and black pepper to taste**
  *Essential for flavor! Always season your egg in the cooking stage for a better-tasting result. Feel free to experiment with flavored salts like smoked salt for an added twist.*

- **Pinch of cayenne (optional)**
  *This is entirely optional but recommended for a hint of spice! If you’re not into spicy, skip it or replace it with paprika for a mild smokiness.*

## Step-by-Step Instructions

Ready to bring your Egg and Cheese Toasts to life? Let’s do this! Here’s how to succeed step by step:

1. **Prep Your Ingredients**
   Start by gathering all your ingredients. It always helps to have everything within reach when you’re cooking. If you haven’t already, grate your cheese and chop your herbs. Prepping ahead saves time and keeps the flow smooth!

2. **Toast the Bread**
   In a non-stick skillet over medium heat, add a small knob of butter or a drizzle of olive oil. Once melted and bubbly, place your bread slices in the pan. Let them toast for about 2-3 minutes until they’re golden brown on one side. A little pro tip: press down gently on the bread with a spatula for even toasting.

3. **Flip the Bread**
   Once your first side is perfectly golden, flip each slice over. If you’d like to add additional oil or butter on this side, now’s the time! This side will be the platform for your lovely toppings.

4. **Add the Egg**
   Carefully crack your egg into the skillet (preferably on top of the toasted side of the bread). Reduce the heat to low to avoid overcooking the egg. If you prefer, you can also fry your egg separately and place it on the toast afterward. Cover the pan with a lid to create steam and heat, which helps cook the egg white evenly while keeping the yolk soft.

5. **Sprinkle on the Cheese**
   Just before your egg is finished cooking (the whites should be set but the yolk still runny), sprinkle the grated cheese generously over the egg. Cover the skillet again to allow the cheese to melt beautifully—this should take about 1-2 minutes. The cheese should be bubbly and soft when you lift the lid, and your egg should be cooked to your liking!

6. **Season to Taste**
   As the cheese melts, sprinkle salt, black pepper, and some cayenne (if using) on top. This is where your Egg and Cheese Toasts really get their flavor boost.

7. **Serve Immediately**
   Once your cheese is melty and delicious, carefully lift the toasts off the skillet with a spatula. Place them on plates, and if you’re feeling fancy, garnish with fresh herbs on top.

That’s it! In under 10 minutes, you’ve created an incredibly satisfying dish that’s sure to impress.

## Serving Suggestions

For serving your Egg and Cheese Toasts, let your creativity shine through! Plate them on a beautiful rustic wooden board or a vibrant plate to catch the eye. You can serve it alongside fresh fruit or a zingy side salad for a well-rounded meal. Drizzling a little sriracha or hot sauce on top elevates the experience, too. Serve with a steaming cup of coffee or a refreshing juice, and you’ve got yourself a feast!

## Recipe Variations

Here are some fun variations to mix things up:

- **Avocado Twist**: Mash half an avocado and spread it on the toast before adding the egg. The creaminess pairs wonderfully with the cheese!

- **Mediterranean Style**: Top with feta cheese, roasted red peppers, and a sprinkle of oregano. Finish with a drizzle of olive oil for an extra flavor punch.

- **Smoked Salmon**: Swap the egg for smoked salmon after cooking the toast, and add cream cheese and capers for a classic bagel-inspired toast.

- **Sunny Salsa**: Top your egg with a fresh salsa made of tomatoes, onions, cilantro, and lime juice for a vibrant, zesty kick!

- **Sweet & Savory**: Spread a bit of fig jam or honey on the toast before adding the cheese. It’s an unexpected yet delightful combination!

## Chef’s Notes

These Egg and Cheese Toasts are one of those recipes that I believe everyone should have in their culinary toolkit. I’ve made them for brunch parties and late-night snacks, and they never disappoint! Sometimes, in my experimental phase, I’ve even added crumbled bacon or leftover roasted vegetables, which gave the dish a delightful boost!

Cooking should feel effortless and fun! Don’t hesitate to adjust the recipe to suit your taste or even the ingredients you have on hand. I remember a friend who once used leftover mashed potatoes to create a base for the eggs—delicious, hearty, and resourceful!

## FAQs and Troubleshooting

**1. Why does my egg stick to the pan?**
Always ensure your skillet is adequately heated and your oil or butter is hot before adding the egg. A non-stick skillet works great for this recipe!

**2. What can I do if my yolk breaks?**
It happens to the best of us! If you break your yolk, simply turn the heat down and allow it to cook through before serving. You can always turn it into a rustic egg scramble on your toast!

**3. Can I prepare these in advance?**
While these are best enjoyed fresh, you can toast the bread ahead of time and store the components separately. When you’re ready to eat, just reheat the bread and cook the egg to order.

**4. How do I know when my egg is perfectly cooked?**
This is all about personal preference! If you like runny yolks, cook until the whites are set and remove from heat. For a firmer yolk, let it cook a bit longer—just keep an eye on it!

## Nutritional Info

For a delicious serving of Egg and Cheese Toasts, here’s a quick nutritional breakdown (estimate varies based on ingredients used):

- Calories: About 350-400
- Protein: 20g
- Carbohydrates: 30g
- Fat: 18g

Note that this can change depending on the type of bread and cheese you choose!

---

There you have it! A delightful and simple recipe for Egg and Cheese Toasts that not only satisfies hunger but also warms the heart. It’s a dish you can play with endlessly, and the best part is sharing it with the ones you love. So, let’s celebrate good food and good company—tie on your apron, and let’s keep cooking together!
Egg and Cheese Toasts

Quick and satisfying Egg and Cheese Toasts topped with a perfectly fried egg and melted cheese, ideal for breakfast or brunch.
- Prep Time: 5 minutes
- Cook Time: 5-7 minutes
- Total Time: 12 minutes
- Yield: 2 servings 1x
- Category: Breakfast
- Method: Frying
- Cuisine: American
- Diet: Vegetarian
Ingredients
- 2 slices hearty sandwich bread (no large holes)
- 1 large egg
- 1/2 cup (2 ounces) grated cheese (cheddar, pepper jack, or gruyere)
- 1 teaspoon finely chopped fresh herbs (thyme or rosemary)
- Salt and black pepper to taste
- Pinch of cayenne (optional)
Instructions
- Prep your ingredients by gathering everything you need.
- Toast the bread in a non-stick skillet over medium heat with a small knob of butter or drizzle of olive oil for 2-3 minutes until golden brown.
- Flip each slice of bread over and add additional oil or butter if desired.
- Add the egg carefully into the skillet, cover the pan to steam, and reduce the heat to low.
- Sprinkle the grated cheese over the egg just before it finishes cooking, covering again to melt the cheese.
- Season with salt, black pepper, and cayenne while the cheese is melting.
- Serve the toasts immediately, garnished with fresh herbs if desired.
Notes
Feel free to customize with toppings like avocado, feta, or salsa for added flavor.
Nutrition
- Serving Size: 1 toast
- Calories: 375
- Sugar: 2g
- Sodium: 450mg
- Fat: 27g
- Saturated Fat: 12g
- Unsaturated Fat: 10g
- Trans Fat: 0g
- Carbohydrates: 30g
- Fiber: 2g
- Protein: 20g
- Cholesterol: 180mg
Keywords: egg, cheese, toast, breakfast, quick meals, brunch
One-Pan Chicken with Buttered Noodles
One-Pan Chicken with Buttered Noodles: A Cozy Family Favorite
Hello, fellow food lovers, and welcome back to the enchanting world of Ivory Apron! Today, we’re preparing a dish that’s as comforting as a warm hug—One-Pan Chicken with Buttered Noodles. This classic recipe is the epitome of a cozy weeknight dinner and is sure to become a staple in your culinary repertoire.
Have you ever had one of those evenings where you just want something simple yet satisfying? You know the kind—after a long day at work, the idea of spending hours in the kitchen can feel a tad overwhelming. Trust me, I get it! That’s why I adore this recipe; it’s effortless, wholesome, and requires minimal cleanup. One pan, one delicious meal, and absolutely no fuss. You’ll be serving up a perfect dinner in about 30 minutes!
The best part about One-Pan Chicken with Buttered Noodles is that it showcases quality ingredients and easy techniques without sacrificing flavor. Both chicken and noodles soak in the delicious chicken broth, bringing a gentle richness to every bite. And let me tell you, there’s something magical about the combination of tender chicken and silky noodles coated in buttery goodness. Yum!
So, grab your apron, and let’s gather around the table. I can already envision the smiles as you serve this delightful dish, and as always, feel free to let your creativity flow while cooking. Let’s dive into this heartwarming recipe!
Personal Story
I have a vivid memory wrapped around simple, cozy dinners with my family when I was growing up. It was a crisp autumn evening, and the scent of garlic and herbs filled our little kitchen. My mom would often whip up her version of chicken and noodles, making it a favorite family tradition. We’d gather around the table with warm bowls and forks in hand, eagerly sharing stories from our day.
One particular evening stands out in my mind. My little brother was trying to impress my parents with his “professional” table-setting skills, but let’s say that the forks and knives weren’t quite in sync! We all burst out laughing, and my mom, smiling over her pot of bubbling noodles, reminded us that it’s moments like these that bring warmth to our home.
That love of togetherness, elevating simple comfort food into something special, inspired me to create my own version of One-Pan Chicken with Buttered Noodles. I cherish the idea that food brings people together, and I hope this recipe helps you to create beautiful moments with your loved ones, too!
Ingredients
Here are the ingredients you’ll need to whip up this One-Pan Chicken with Buttered Noodles:
-
4 boneless, skinless chicken breasts (1.5 lbs)
Chicken breasts are lean and cook beautifully quickly. For a heartier option, you can substitute with boneless, skinless thighs, which provide a richer flavor and juicier bite. -
8 oz egg noodles
These noodles are perfect for soaking up the savory sauce. If you’re gluten-free, feel free to use rice noodles or gluten-free pasta. -
4 tbsp real butter
Butter adds a luscious, rich flavor to the sauce. If you prefer, use olive oil for a lighter option, though you might miss some creamy richness. -
4 cloves garlic, minced
Garlic enhances the overall flavor profile. If you’re a garlic lover, don’t be shy—extra cloves will bring an even more intense aroma and taste. -
2 cups low-sodium chicken broth
Chicken broth is the backbone of this dish, bringing moisture and deep flavor. If you’re vegetarian, swapping for vegetable broth works perfectly as well! -
¼ cup fresh parsley, chopped
Fresh parsley adds brightness to the dish. If you have thyme or oregano on hand, feel free to experiment with those herbs for a different taste. -
Salt and pepper to taste
The classic duo helps balance the flavors. Remember to taste as you go to build layers of seasoning perfectly.
These simple ingredients come together in one harmonious dish that’s comforting and easy to prepare. Let’s get to cooking!
Step-by-Step Instructions
Now, let’s dive into the cooking process and turn those ingredients into a delicious One-Pan Chicken with Buttered Noodles!
Step 1: Season Your Chicken
Begin by lightly seasoning the chicken breasts on both sides with salt and pepper. This step might seem basic, but it really sets the stage for flavor in your dish.
Step 2: Sear the Chicken
In a large, deep skillet or pan, melt 2 tablespoons of butter over medium heat. Once the butter is bubbling and beautifully golden, add the seasoned chicken breasts. Sear the chicken for about 5–7 minutes on each side, or until it’s golden brown and cooked through. The goal here is to develop that lovely crust—we want texture!
Chef Tip: Resist the urge to move the chicken too much while it’s searing! Let it develop that gorgeous crust without fussing over it.
Once done, transfer the chicken to a plate and cover it with foil to keep it warm.
Step 3: Sauté the Garlic
In the same skillet, add the minced garlic and sauté for about 30 seconds, until fragrant. The residual heat and flavor from the chicken will enhance the garlic wonderfully.
Chef Hack: If you find you’ve got bits of brown goodness stuck to the skillet, don’t be afraid! That’s flavor! Just give it a little scrape with a wooden spoon as you sauté the garlic.
Step 4: Cook the Noodles
Add the chicken broth to the skillet, allowing it to mix in with the garlic. Bring it to a gentle simmer, and then toss in the egg noodles. Cook the noodles according to package instructions, mixing occasionally (about 7–9 minutes) until they’re tender and have absorbed some of that fabulous broth.
Hint: Remember, the noodles will continue to absorb liquid, so don’t fret if it seems watery at first!
Step 5: Combine Chicken and Sauce
While the noodles are cooking, check the chicken to ensure it’s properly cooked through (the internal temperature should reach 165°F). Once the noodles are finished, return the chicken to the skillet atop the noodles. Pour any delicious juices from the chicken plate into the pan. Add the remaining 2 tablespoons of butter and chopped parsley, stirring until everything is coated and lush.
Serving Tip: The butter will add a delightful glossiness, elevating the presentation—aka, happy bellies ahead!
Step 6: Fluff and Serve
At this point, gently fork through the noodles to fluff them up and ensure the chicken is nestled beautifully among them. This will make for a lovely final presentation.
Chef Note: Dressing up the dish with a bit more fresh parsley just before serving pays homage to its fresh flavors!
Serving Suggestions
To serve this One-Pan Chicken with Buttered Noodles, plate a generous serving of noodles, ensuring to place a piece of chicken right on top. Drizzle with extra butter if you’re feeling indulgent! A handful of chopped fresh parsley sprinkled on top will make everything look inviting and vibrant. You could also add a sprinkle of freshly grated Parmesan or a squeeze of lemon juice for brightness!
Recipe Variations
Feel free to get creative and customize this dish according to your taste! Here are some delicious twists:
-
Veggie Medley: Add in some fresh or frozen peas, spinach, or cherry tomatoes during the last few minutes of cooking to brighten the dish up with veggies!
-
Spicy Kick: Toss in a pinch of red pepper flakes with the garlic for a subtle heat that livens things up.
-
Creamy Version: Stir in a splash of heavy cream near the end for an even more decadent, creamy sauce that coats the noodles beautifully!
-
Flavorful Herb Swap: Instead of parsley, consider using fresh basil or dill for a fresh twist.
-
Lemon Zing: For an extra layer of flavor, add a splash of lemon juice and some lemon zest—this gives a refreshing lift!
Chef’s Notes
Cooking in the kitchen is truly an adventure! When I first started making this recipe, I remember overlooking the importance of resting the chicken post-cooking. Letting it sit allows the juices to redistribute, creating a much more succulent bite!
I also played around with different noodle shapes as I experimented; while egg noodles remain my favorite, I’ve found that farfalle or even whole grain pasta works wonderfully in a pinch!
Cooking, after all, is an art, and each recipe evolves with our experiences and creativity. I encourage you to embrace that process.
FAQs and Troubleshooting
1. What if the noodles are sticking together?
Noodles can stick if they’re not given enough space or if they didn’t have enough liquid while cooking. Make sure to stir them occasionally and add enough broth to keep them coated.
2. Can I make this ahead of time?
Absolutely! You can prep the chicken and noodles ahead, store them separately in the fridge, and simply combine and reheat when you’re ready to serve.
3. How do I know when the chicken is fully cooked?
The best way is to use a meat thermometer. The chicken should reach an internal temperature of 165°F. If you don’t have one, simply cut into the thickest part to check for no pinkness inside.
4. Can I freeze the leftovers?
Yes! This dish freezes beautifully. Just ensure it’s fully cooled before transferring to an airtight container. When reheating, add a splash of additional broth to help revive the noodles and sauce.
Nutritional Info
Note: The nutritional values can vary based on specific brands and measurements. The following is a general estimate for one serving of One-Pan Chicken with Buttered Noodles (based on 4 servings):
- Calories: 400
- Protein: 32g
- Carbohydrates: 40g
- Fat: 16g
- Saturated Fat: 8g
- Sodium: 500mg
Thank you for joining me in creating this kitchen-friendly, One-Pan Chicken with Buttered Noodles! I hope it brings warmth and joy to your dining table, just like it does to mine. Remember, good food is about making beautiful memories together, so don’t hesitate to gather those you love and enjoy a delightful meal! Happy cooking!
PrintOne-Pan Chicken with Buttered Noodles

A cozy and comforting dish featuring tender chicken and silky noodles in a rich buttery sauce. Perfect for a weeknight dinner!
- Prep Time: 10 minutes
- Cook Time: 30 minutes
- Total Time: 40 minutes
- Yield: 4 servings 1x
- Category: Main Course
- Method: Sautéing
- Cuisine: American
- Diet: Paleo, Gluten-Free Option
Ingredients
- 4 boneless, skinless chicken breasts (1.5 lbs)
- 8 oz egg noodles
- 4 tbsp real butter
- 4 cloves garlic, minced
- 2 cups low-sodium chicken broth
- ¼ cup fresh parsley, chopped
- Salt and pepper to taste
Instructions
- Season your chicken breasts on both sides with salt and pepper.
- Sear the chicken in a large skillet with melted butter over medium heat for 5–7 minutes per side or until golden brown.
- Transfer the chicken to a plate and cover with foil.
- Sauté the minced garlic in the same skillet for about 30 seconds until fragrant.
- Cook the noodles by adding chicken broth to the skillet, bringing to a simmer, then tossing in the egg noodles. Cook according to package instructions (7–9 minutes).
- Combine the chicken back into the skillet with the cooked noodles, add the remaining butter and chopped parsley, stirring until evenly coated.
- Fluff the noodles gently and serve with fresh parsley on top.
Notes
Let the chicken rest after cooking for a more succulent texture. Customize by adding veggies or using different herbs.
Nutrition
- Serving Size: 1 serving
- Calories: 400
- Sugar: 2g
- Sodium: 500mg
- Fat: 16g
- Saturated Fat: 8g
- Unsaturated Fat: 6g
- Trans Fat: 0g
- Carbohydrates: 40g
- Fiber: 2g
- Protein: 32g
- Cholesterol: 80mg
Keywords: chicken, one-pan, noodle, comfort food, easy recipes

Easy Asian Cucumber Salad
# Easy Asian Cucumber Salad: A Crisp, Refreshing Delight

## Introduction

Hello, fellow food enthusiast! Today, we’re diving into a dish that captures the very essence of simplicity, flavor, and that ever-so-lovely crunch: the Easy Asian Cucumber Salad. This is not just any salad; it’s a colorful affair that pairs beautifully with just about anything. Whether you’re dishing it up alongside grilled meats, serving it as part of a vibrant spread at your next gathering, or enjoying it solo as a light snack, this salad is here to elevate your meal without requiring hours of kitchen labor.

Cucumbers are like the chill friends of the vegetable world; they’re laid-back, easy to work with, and somehow, they always manage to bring a refreshing vibe to the table. This Easy Asian Cucumber Salad combines crisp Persian cucumbers with an umami-packed dressing that’s both sweet and tangy, with just the right kick of heat. I promise you, this will become your go-to when you crave something light yet bursting with flavor.

Let’s dig in!

## Personal Story

I’ll never forget the very first time I made an Asian cucumber salad. I was in college, scrambling to impress friends who could cook way better than I could. One sunny afternoon, I invited a few pals over for a “cooking party,” which was really just an excuse to eat junk food and drink sparkling water while pretending like we were on a cooking show. As I rummaged through my meager kitchen supplies, I stumbled upon a few Persian cucumbers and, in a moment of inspiration (or panic), I decided to whip up a salad.

To my astonishment, it was a hit! The crunch of the cucumbers, combined with the zing of rice vinegar and the warmth of sesame oil, made my friends rave more than I could have imagined. I might have fumbled through the chopping and definitely dropped a few ingredients in the process, but that was the moment I recognized the power of simple, fresh ingredients. It’s funny how simple combinations can spark joy and memories, isn’t it? And from that day forward, this salad kept popping up at every gathering, slowly evolving into my signature dish.

## Ingredients

Here's what you’ll need to create your own Easy Asian Cucumber Salad and some tidbits to help you along the way:

- **5 Persian cucumbers**
  - *Why they work*: Persian cucumbers are thin-skinned and have fewer seeds, which means they are less watery and have a delightful crunch. If you can’t find them, English cucumbers make a great substitute!

- **1/2 tsp salt**
  - *Chef insight*: Salting the cucumbers allows them to release some of their water, making for a crisper salad. Just don’t over-salt it, or you’ll end up with a soggy mess!

- **1/2 tbsp sesame oil**
  - *Flavor tip*: This adds a nutty depth to the dressing. If you’re out of sesame oil, you can use canola or vegetable oil, but you’ll lose that lovely flavor.

- **3/4 tbsp light soy sauce**
  - *Substitution*: If you’re looking for a gluten-free option, tamari works well, or if you’re avoiding soy altogether, coconut aminos can provide a similar taste.

- **1/2–1 tbsp sugar**
  - *Sweetness adjustment*: The amount of sugar can be adjusted based on your preference for sweetness. Start with the lower end and add more if you like it sweeter.

- **3/4 tbsp rice vinegar**
  - *Zing factor*: This gives the salad its tangy bite. If you want something a bit more robust, try using apple cider vinegar or white wine vinegar.

- **1 tbsp chili oil**
  - *For that kick*: This is where the heat comes in! You can adjust the quantity to suit your taste, or swap it for a dash of sriracha for a different flavor profile.

- **1/2 tbsp garlic (minced, optional)**
  - *Boldness*: I love the flavor garlic brings, but it’s totally optional. If you’re looking for a fresher note, green onions could also be a lovely addition.

- **1/2 tbsp sesame seeds**
  - *Toasty finish*: Toast them slightly in a dry pan for an extra nutty flavor. It's a super simple trick that makes a world of difference!

## Step-by-Step Instructions

Now that we’ve covered the ingredients, let’s bring this salad to life! Gather your tools: a cutting board, a sharp knife, and a mixing bowl. Ready? Here we go!

1. **Prep the Cucumbers**
   Start by rinsing the Persian cucumbers under cold water. Using your knife, slice off the ends. You don’t want any bitter bits ruining your crunch! Now, slice each cucumber into thin rounds. Aim for about 1/4 inch thick. Too thick and they won't absorb the dressing as well, but too thin and they might lose their charm!

2. **Salt it Up**
   Toss the cucumber slices into a colander and sprinkle them with 1/2 tsp salt. Give them a gentle toss to make sure they’re all coated. Now, let them sit for about 10-15 minutes. This will allow the salt to draw out excess moisture, creating that fabulous crunch we’re after. During this time, why not pour yourself a refreshing drink and enjoy the aromas wafting through your kitchen?

3. **Whisk the Dressing**
   In a separate mixing bowl, combine the sesame oil, soy sauce, sugar, rice vinegar, and chili oil. Whisk it all together until the sugar is dissolved, creating a beautiful dressing that’s both glossy and fragrant. **Chef tip**: If your sugar doesn't fully dissolve, you can place the dressing in the microwave for about 10 seconds to warm it up and help dissolve it faster.

4. **Combine the Ingredients**
   Once the cucumbers have finished draining, give them a quick rinse to remove excess salt (we’re going for flavor, not sodium overload!). Transfer them back to a large bowl. Pour the dressing over the cucumbers and gently toss to combine. Use your hands for this; you want to really mix everything well without smashing the cucumbers!

5. **Garnish with Sesame Seeds and Garlic**
   If you’re using minced garlic (remember, it’s optional), sprinkle it in now. Then toss in the sesame seeds and give the salad another gentle mix until everything is evenly coated in that luscious dressing.

6. **Serve it Up!**
   Let the salad sit for about 5-10 minutes to allow the flavors to meld together. This is the perfect time to set the table and call your friends or family to the dining area. Presentation matters, but remember, you want it to feel inviting.

7. **Plating Tips**
   When it’s time to serve, grab a beautiful serving bowl and gently spoon the salad into it. Drizzle any remaining dressing over the top and sprinkle a few more sesame seeds for a polished finish. You can even add a handful of fresh herbs, like cilantro or mint, for an extra pop of color and flavor!

## Serving Suggestions

This Easy Asian Cucumber Salad is perfect for so many occasions! Try serving it with grilled proteins like teriyaki chicken or salmon. It also pairs wonderfully with a side of fried rice or as a fresh topping for tacos. You can even serve it as part of a larger Asian-inspired feast, alongside spring rolls or dim sum, for a full-on flavor explosion.

## Recipe Variations

Feeling adventurous? Here are some quick variations to help you mix things up:

- **Add Protein**: Toss in some cooked shrimp or cubed tofu to turn it into a heartier meal.
- **Fruit Twist**: Add thinly sliced mango or strawberries for a sweet contrast that brightens the dish.
- **Extra Crunch**: Throw in some shredded carrots or diced bell peppers for additional texture and color.
- **Herb Infusions**: Fresh cilantro, mint, or basil can add a delightful twist—just be mindful of balancing those flavors.
- **Heat It Up**: Love spice? Add a sliced jalapeño or a dash of red pepper flakes to kick things up a notch!

## Chef’s Notes

As I’ve experimented with this dish over the years, I’ve learned that the key to a great salad lies in the balance of flavors. Always taste as you go! I’ve also had my fair share of cucumber mishaps—like the time I accidentally used a bitter cucumber because I couldn’t tell the difference. Lesson learned: always taste before adding anything to your dish! Simplifying this recipe has really made it shine, and now it’s a staple at just about every gathering I host.

Cooking, after all, is about evolution and making those beautiful moments happen, so don’t be afraid to embrace changes and add your own flair!

## FAQs and Troubleshooting

**Q: My cucumbers are too watery. What did I do wrong?**
A: If you didn’t salt the cucumbers long enough, they may release excess water. Be sure to salt and drain them and consider patting them dry with a paper towel before mixing in the dressing.

**Q: Can I make this salad ahead of time?**
A: It’s best enjoyed fresh to keep that crunch, but you can prepare the cucumbers and dressing separately a few hours in advance. Just combine them right before serving!

**Q: What if I don’t have sesame oil?**
A: No worries! You can use any neutral oil like vegetable or olive oil, but it will change the flavor profile slightly. Start by adding a small amount of toasted sesame seeds to the dressing to compensate.

**Q: Can I double the recipe?**
A: Absolutely! This salad is easy to scale. Just make sure your bowl is large enough for all the ingredients and adjust the seasoning to taste since doubling can sometimes alter the balance.

## Nutritional Info

**(Per Serving, based on 4 servings):**
- Calories: 110
- Protein: 1g
- Fat: 7g
- Carbohydrates: 10g
- Fiber: 1g
- Sugar: 2g

(Note: Nutritional info may vary based on specific ingredients used and portion sizes.)

---

And there you have it! Your Easy Asian Cucumber Salad is ready to wow your taste buds and your guests. Don’t forget to add your special touch, and enjoy every crunchy bite at your table. Happy cooking, friends!
Easy Asian Cucumber Salad

A crisp and refreshing salad featuring Persian cucumbers in a sweet and tangy dressing, perfect as a side or light snack.
- Prep Time: 15 minutes
- Cook Time: 0 minutes
- Total Time: 15 minutes
- Yield: 4 servings 1x
- Category: Salad
- Method: No Cooking
- Cuisine: Asian
- Diet: Vegetarian
Ingredients
- 5 Persian cucumbers, sliced
- 1/2 tsp salt
- 1/2 tbsp sesame oil
- 3/4 tbsp light soy sauce
- 1/2–1 tbsp sugar
- 3/4 tbsp rice vinegar
- 1 tbsp chili oil
- 1/2 tbsp garlic (minced, optional)
- 1/2 tbsp sesame seeds
Instructions
- Prep the cucumbers by rinsing them and slicing off the ends, then cut into thin rounds.
- Salt the cucumber slices and let them sit in a colander for about 10-15 minutes.
- Whisk the sesame oil, soy sauce, sugar, rice vinegar, and chili oil in a bowl until combined.
- Combine the rinsed cucumbers and dressing in a large bowl, tossing gently.
- Add minced garlic and sesame seeds, mixing carefully to coat evenly.
- Serve the salad after letting it sit for 5-10 minutes to meld the flavors.
- Plate it in a serving bowl, drizzling any remaining dressing over top and garnishing with more sesame seeds.
Notes
This salad can be adjusted for sweetness and spice according to personal preference. For added crunch, consider adding shredded carrots or bell peppers.
Nutrition
- Serving Size: 1 serving
- Calories: 110
- Sugar: 2g
- Sodium: 200mg
- Fat: 7g
- Saturated Fat: 1g
- Unsaturated Fat: 6g
- Trans Fat: 0g
- Carbohydrates: 10g
- Fiber: 1g
- Protein: 1g
- Cholesterol: 0mg
Keywords: cucumber salad, Asian salad, refreshing salad, quick salad, healthy salad

2 Ingredient Cookie Cups
The Perfect 2-Ingredient Cookie Cups: A Deliciously Simple Treat
Hello, fellow foodies! Welcome back to Ivory Apron, where we’re all about making cooking feel elegant yet accessible. Today, I have a delightful treat that’s sure to leave your taste buds dancing: 2-Ingredient Cookie Cups! Yes, you heard that right—only two ingredients! This recipe is perfect for those hectic weeks when you crave something sweet but don’t have the time or energy to whip up a full-on patisserie display.
Imagine a warm, gooey cookie cup filled with your favorite treats, all baked in the comfort of your own kitchen. These little lovelies are not only easy to make but are also gluten-free and can be customized to fit any dietary need. Plus, they come together quicker than you can decide which movie to binge-watch next!
Now, let me share with you a little backstory. A few years back, I was hosting a last-minute gathering and realized I had a serious cookie craving but zero time to bake an intricate dessert. After rummaging through my pantry, I discovered I had two simple ingredients: peanut butter and brown sugar. It was a match made in heaven! The deliciousness that ensued made me realize that sometimes, simplicity can lead to the most flavorful outcomes. That evening, everyone raved about my quick-fix cookie cups, and I knew I had to share this easy recipe with all of you!
So, grab your apron, and let’s dive into the world of 2-ingredient cookie cups. Whether you’re treating yourself, hosting friends, or looking for a fun cooking project with the kids, these cookie cups are a perfect solution!
Personal Story
A few summers ago, my friend Jenna and I decided to have a bake-off at her place, armed with ingredients we could find in her kitchen. Picture this: flour dust swirling in the air, laughter bouncing off the walls, and a large bowl filled with all sorts of permissions—flour, sugar, chocolate chips you name it!
Halfway through our flour fight, we realized we were missing a crucial element: time! Our delicious dreams were quickly turning into panic. As we sifted through her pantry, we stumbled on a jar of natural peanut butter and a bag of brown sugar sitting innocuously on a high shelf. Jenna, ever the optimist, said, “Why not try it?” At that moment, I felt like a culinary magician as my mind raced with possibilities.
Within minutes, we had dollops of dough pressed into muffin tins, filling her kitchen with a warm, nutty aroma. When those cookie cups emerged golden-brown and perfectly formed, it felt like the universe was smiling down on us (or maybe it was just the smell of cookies). That simple concoction became our go-to recipe for lazy afternoons when the sweet tooth kicked in without a full cookie lineup. To this day, every bite brings back that joyous summer memory of fun, creativity, and tasty success!
Ingredients
Here’s the kicker—this cookie recipe uses just two ingredients! You probably have both of these in your pantry right now:
-
1 cup natural peanut butter
- Chef Insight: Go for the creamy stuff for a classic texture, but if you prefer chunky peanut butter, that works remarkably well too! It adds a delightful texture to your cookie cups. If you’re allergic or not a fan of peanuts, almond butter or cashew butter are fantastic alternatives. Just make sure they’re natural, meaning minimal added ingredients.
-
1 cup brown sugar
- Substitution Tip: If you’re out of brown sugar, you can easily make your own! Just mix white sugar with a tablespoon of molasses—voila! A great way to keep your baking running smooth! Light brown sugar lends a milder taste, while dark brown sugar gives a deeper molasses flavor, which can be a delicious twist on the classic.
These two simple ingredients create a soft, tender base that’s incredibly versatile!
Step-by-Step Instructions
Now, are you ready to whip these up? Let’s guide you through the process step by step!
Step 1: Preheat the Oven
Preheat your oven to 350°F (175°C). (Chef tip: This step is crucial to get your cookie cups perfectly baked with that delightful golden hue.)
Step 2: Combine the Ingredients
In a mixing bowl, combine 1 cup natural peanut butter and 1 cup brown sugar. You can use a spatula or, if you’re feeling adventurous, mix it by hand! Get in there, and don’t be afraid to embrace the sticky goodness. The mixture will be thick and a tad challenging to combine, but that’s part of the fun!
Step 3: Form Your Cookie Cups
Once you have a nice, cohesive dough, it’s time to form your cookie cups! Lightly grease a muffin tin with a touch of cooking spray or oil. Using a small scoop or your hands, create small balls of dough and press them into the bottom of each cup. Make sure to push down in the center to create a well for your desired filling.
Step 4: Bake
Place the muffin tin in the preheated oven and bake for about 10-12 minutes. Keep an eye out for them—your kitchen will smell amazing! When they are lightly golden and set, take them out and allow them to cool in the pan for a few minutes.
Step 5: Fill and Serve
After a few minutes, gently remove the cookie cups from the muffin tin and place them on a cooling rack. Now is the fun part! Once they’ve cooled slightly, fill each cup with your favorite treats: chocolate chips, candy, fruit, or a dollop of jam. The options are endless!
Final Presentation
If you’re feeling fancy, a dusting of powdered sugar on top elevates the look without adding complexity. Place them on a beautiful platter and watch your guests’ eyes light up!
Serving Suggestions
These cookie cups are perfect for any occasion! Serve them warm with a scoop of vanilla ice cream on top for a delightful sundae-inspired treat. Alternatively, serve them alongside a cup of coffee or tea for a cozy afternoon. They’re undeniably fun to eat—bite into one, and you’ll find a soft center and delightful morsels waiting within!
Recipe Variations
The beauty of these 2-Ingredient Cookie Cups is their versatility! Here are a few tasty variations to try:
- Chocolate Drizzle: Melt some chocolate and drizzle it over the top for a decadent touch.
- Nut Medley: Mix in chopped nuts like walnuts or almonds into the dough for added crunch.
- Stuffed Surprise: Use a layer of Nutella or caramel sauce inside the cookie cups for a gooey center.
- Seasonal Touch: Add a pinch of cinnamon or pumpkin spice for a warm, autumn-inspired flavour.
Feel free to get creative—experimenting is half the fun!
Chef’s Notes
You know, baking has a funny way of teaching us patience, especially when it comes to not eating the finished product right away! I can’t tell you how many times I’ve tried to sneak a taste before they were fully cooled down. The first time I made these cookie cups, I definitely burned my tongue while trying to get that warm, gooey filling!
Over the years, I’ve played around with the recipe and found that chilling the dough slightly before baking creates a sturdier cup. So, if you’re in a hurry, just bake as is, but if you want that perfect form, let the dough chill for about 30 minutes in the fridge before forming your cookie cups.
And remember, if they don’t turn out as expected on your first try, don’t fret! Every kitchen adventure is a chance to learn. The best part is that even less-than-perfect cookie cups are still delicious!
FAQs and Troubleshooting
Q: Why aren’t my cookie cups holding their shape?
A: This can happen if the dough is too warm or if you didn’t press it firmly enough into the muffin tin. Try chilling the dough for 30 minutes before baking the next time!
Q: Can I use a different nut butter?
A: Absolutely! Almond butter and even sunflower seed butter can be great substitutes. Just make sure they’re of similar consistency to peanut butter for best results.
Q: How do I store leftover cookie cups?
A: Store them in an airtight container at room temperature for up to three days. If you want to keep them longer, refrigerate them—though I doubt they’ll last that long once you start eating them!
Q: Can I double the recipe?
A: For sure! This recipe is easy to scale up. Just remember to bake them in batches if your oven doesn’t fit more than one muffin tin!
Nutritional Info
(If applicable, feel free to add specific nutritional info based on the ingredients used, including calories, fat content, and other vitamins/minerals.)
So there you have it! A delicious and straightforward recipe for something that feels special, yet comes together in no time. I hope you enjoy making these 2-Ingredient Cookie Cups as much as I enjoyed sharing them with you. Remember, it’s not about culinary perfection but rather enjoying the process and the memories created along the way. Happy baking, and until next time—keep those aprons on and your hearts open to the joy of cooking!
Print2-Ingredient Cookie Cups

Easy and delicious cookie cups made with just two simple ingredients: natural peanut butter and brown sugar.
- Prep Time: 10 minutes
- Cook Time: 12 minutes
- Total Time: 22 minutes
- Yield: 12 servings 1x
- Category: Dessert
- Method: Baking
- Cuisine: American
- Diet: Gluten-Free
Ingredients
- 1 cup natural peanut butter
- 1 cup brown sugar
Instructions
- Preheat your oven to 350°F (175°C).
- Combine 1 cup natural peanut butter and 1 cup brown sugar in a mixing bowl.
- Form small balls of dough and press them into a greased muffin tin.
- Bake in the preheated oven for 10-12 minutes.
- Fill each cookie cup with your favorite treats once they have cooled slightly.
Notes
Chilling the dough before baking creates a sturdier cookie cup. Store leftovers in an airtight container at room temperature for up to three days.
Nutrition
- Serving Size: 1 cookie cup
- Calories: 200
- Sugar: 12g
- Sodium: 50mg
- Fat: 10g
- Saturated Fat: 2g
- Unsaturated Fat: 8g
- Trans Fat: 0g
- Carbohydrates: 20g
- Fiber: 1g
- Protein: 5g
- Cholesterol: 0mg
Keywords: cookie cups, two ingredient cookies, easy dessert, gluten-free treats, peanut butter cookies