
Easy Asian Cucumber Salad
# Easy Asian Cucumber Salad: A Crisp, Refreshing Delight

## Introduction

Hello, fellow food enthusiast! Today, we’re diving into a dish that captures the very essence of simplicity, flavor, and that ever-so-lovely crunch: the Easy Asian Cucumber Salad. This is not just any salad; it’s a colorful affair that pairs beautifully with just about anything. Whether you’re dishing it up alongside grilled meats, serving it as part of a vibrant spread at your next gathering, or enjoying it solo as a light snack, this salad is here to elevate your meal without requiring hours of kitchen labor.

Cucumbers are like the chill friends of the vegetable world; they’re laid-back, easy to work with, and somehow, they always manage to bring a refreshing vibe to the table. This Easy Asian Cucumber Salad combines crisp Persian cucumbers with an umami-packed dressing that’s both sweet and tangy, with just the right kick of heat. I promise you, this will become your go-to when you crave something light yet bursting with flavor.

Let’s dig in!

## Personal Story

I’ll never forget the very first time I made an Asian cucumber salad. I was in college, scrambling to impress friends who could cook way better than I could. One sunny afternoon, I invited a few pals over for a “cooking party,” which was really just an excuse to eat junk food and drink sparkling water while pretending like we were on a cooking show. As I rummaged through my meager kitchen supplies, I stumbled upon a few Persian cucumbers and, in a moment of inspiration (or panic), I decided to whip up a salad.

To my astonishment, it was a hit! The crunch of the cucumbers, combined with the zing of rice vinegar and the warmth of sesame oil, made my friends rave more than I could have imagined. I might have fumbled through the chopping and definitely dropped a few ingredients in the process, but that was the moment I recognized the power of simple, fresh ingredients. It’s funny how simple combinations can spark joy and memories, isn’t it? And from that day forward, this salad kept popping up at every gathering, slowly evolving into my signature dish.

## Ingredients

Here's what you’ll need to create your own Easy Asian Cucumber Salad and some tidbits to help you along the way:

- **5 Persian cucumbers**
  - *Why they work*: Persian cucumbers are thin-skinned and have fewer seeds, which means they are less watery and have a delightful crunch. If you can’t find them, English cucumbers make a great substitute!

- **1/2 tsp salt**
  - *Chef insight*: Salting the cucumbers allows them to release some of their water, making for a crisper salad. Just don’t over-salt it, or you’ll end up with a soggy mess!

- **1/2 tbsp sesame oil**
  - *Flavor tip*: This adds a nutty depth to the dressing. If you’re out of sesame oil, you can use canola or vegetable oil, but you’ll lose that lovely flavor.

- **3/4 tbsp light soy sauce**
  - *Substitution*: If you’re looking for a gluten-free option, tamari works well, or if you’re avoiding soy altogether, coconut aminos can provide a similar taste.

- **1/2–1 tbsp sugar**
  - *Sweetness adjustment*: The amount of sugar can be adjusted based on your preference for sweetness. Start with the lower end and add more if you like it sweeter.

- **3/4 tbsp rice vinegar**
  - *Zing factor*: This gives the salad its tangy bite. If you want something a bit more robust, try using apple cider vinegar or white wine vinegar.

- **1 tbsp chili oil**
  - *For that kick*: This is where the heat comes in! You can adjust the quantity to suit your taste, or swap it for a dash of sriracha for a different flavor profile.

- **1/2 tbsp garlic (minced, optional)**
  - *Boldness*: I love the flavor garlic brings, but it’s totally optional. If you’re looking for a fresher note, green onions could also be a lovely addition.

- **1/2 tbsp sesame seeds**
  - *Toasty finish*: Toast them slightly in a dry pan for an extra nutty flavor. It's a super simple trick that makes a world of difference!

## Step-by-Step Instructions

Now that we’ve covered the ingredients, let’s bring this salad to life! Gather your tools: a cutting board, a sharp knife, and a mixing bowl. Ready? Here we go!

1. **Prep the Cucumbers**
   Start by rinsing the Persian cucumbers under cold water. Using your knife, slice off the ends. You don’t want any bitter bits ruining your crunch! Now, slice each cucumber into thin rounds. Aim for about 1/4 inch thick. Too thick and they won't absorb the dressing as well, but too thin and they might lose their charm!

2. **Salt it Up**
   Toss the cucumber slices into a colander and sprinkle them with 1/2 tsp salt. Give them a gentle toss to make sure they’re all coated. Now, let them sit for about 10-15 minutes. This will allow the salt to draw out excess moisture, creating that fabulous crunch we’re after. During this time, why not pour yourself a refreshing drink and enjoy the aromas wafting through your kitchen?

3. **Whisk the Dressing**
   In a separate mixing bowl, combine the sesame oil, soy sauce, sugar, rice vinegar, and chili oil. Whisk it all together until the sugar is dissolved, creating a beautiful dressing that’s both glossy and fragrant. **Chef tip**: If your sugar doesn't fully dissolve, you can place the dressing in the microwave for about 10 seconds to warm it up and help dissolve it faster.

4. **Combine the Ingredients**
   Once the cucumbers have finished draining, give them a quick rinse to remove excess salt (we’re going for flavor, not sodium overload!). Transfer them back to a large bowl. Pour the dressing over the cucumbers and gently toss to combine. Use your hands for this; you want to really mix everything well without smashing the cucumbers!

5. **Garnish with Sesame Seeds and Garlic**
   If you’re using minced garlic (remember, it’s optional), sprinkle it in now. Then toss in the sesame seeds and give the salad another gentle mix until everything is evenly coated in that luscious dressing.

6. **Serve it Up!**
   Let the salad sit for about 5-10 minutes to allow the flavors to meld together. This is the perfect time to set the table and call your friends or family to the dining area. Presentation matters, but remember, you want it to feel inviting.

7. **Plating Tips**
   When it’s time to serve, grab a beautiful serving bowl and gently spoon the salad into it. Drizzle any remaining dressing over the top and sprinkle a few more sesame seeds for a polished finish. You can even add a handful of fresh herbs, like cilantro or mint, for an extra pop of color and flavor!

## Serving Suggestions

This Easy Asian Cucumber Salad is perfect for so many occasions! Try serving it with grilled proteins like teriyaki chicken or salmon. It also pairs wonderfully with a side of fried rice or as a fresh topping for tacos. You can even serve it as part of a larger Asian-inspired feast, alongside spring rolls or dim sum, for a full-on flavor explosion.

## Recipe Variations

Feeling adventurous? Here are some quick variations to help you mix things up:

- **Add Protein**: Toss in some cooked shrimp or cubed tofu to turn it into a heartier meal.
- **Fruit Twist**: Add thinly sliced mango or strawberries for a sweet contrast that brightens the dish.
- **Extra Crunch**: Throw in some shredded carrots or diced bell peppers for additional texture and color.
- **Herb Infusions**: Fresh cilantro, mint, or basil can add a delightful twist—just be mindful of balancing those flavors.
- **Heat It Up**: Love spice? Add a sliced jalapeño or a dash of red pepper flakes to kick things up a notch!

## Chef’s Notes

As I’ve experimented with this dish over the years, I’ve learned that the key to a great salad lies in the balance of flavors. Always taste as you go! I’ve also had my fair share of cucumber mishaps—like the time I accidentally used a bitter cucumber because I couldn’t tell the difference. Lesson learned: always taste before adding anything to your dish! Simplifying this recipe has really made it shine, and now it’s a staple at just about every gathering I host.

Cooking, after all, is about evolution and making those beautiful moments happen, so don’t be afraid to embrace changes and add your own flair!

## FAQs and Troubleshooting

**Q: My cucumbers are too watery. What did I do wrong?**
A: If you didn’t salt the cucumbers long enough, they may release excess water. Be sure to salt and drain them and consider patting them dry with a paper towel before mixing in the dressing.

**Q: Can I make this salad ahead of time?**
A: It’s best enjoyed fresh to keep that crunch, but you can prepare the cucumbers and dressing separately a few hours in advance. Just combine them right before serving!

**Q: What if I don’t have sesame oil?**
A: No worries! You can use any neutral oil like vegetable or olive oil, but it will change the flavor profile slightly. Start by adding a small amount of toasted sesame seeds to the dressing to compensate.

**Q: Can I double the recipe?**
A: Absolutely! This salad is easy to scale. Just make sure your bowl is large enough for all the ingredients and adjust the seasoning to taste since doubling can sometimes alter the balance.

## Nutritional Info

**(Per Serving, based on 4 servings):**
- Calories: 110
- Protein: 1g
- Fat: 7g
- Carbohydrates: 10g
- Fiber: 1g
- Sugar: 2g

(Note: Nutritional info may vary based on specific ingredients used and portion sizes.)

---

And there you have it! Your Easy Asian Cucumber Salad is ready to wow your taste buds and your guests. Don’t forget to add your special touch, and enjoy every crunchy bite at your table. Happy cooking, friends!
Easy Asian Cucumber Salad

A crisp and refreshing salad featuring Persian cucumbers in a sweet and tangy dressing, perfect as a side or light snack.
- Prep Time: 15 minutes
- Cook Time: 0 minutes
- Total Time: 15 minutes
- Yield: 4 servings 1x
- Category: Salad
- Method: No Cooking
- Cuisine: Asian
- Diet: Vegetarian
Ingredients
- 5 Persian cucumbers, sliced
- 1/2 tsp salt
- 1/2 tbsp sesame oil
- 3/4 tbsp light soy sauce
- 1/2–1 tbsp sugar
- 3/4 tbsp rice vinegar
- 1 tbsp chili oil
- 1/2 tbsp garlic (minced, optional)
- 1/2 tbsp sesame seeds
Instructions
- Prep the cucumbers by rinsing them and slicing off the ends, then cut into thin rounds.
- Salt the cucumber slices and let them sit in a colander for about 10-15 minutes.
- Whisk the sesame oil, soy sauce, sugar, rice vinegar, and chili oil in a bowl until combined.
- Combine the rinsed cucumbers and dressing in a large bowl, tossing gently.
- Add minced garlic and sesame seeds, mixing carefully to coat evenly.
- Serve the salad after letting it sit for 5-10 minutes to meld the flavors.
- Plate it in a serving bowl, drizzling any remaining dressing over top and garnishing with more sesame seeds.
Notes
This salad can be adjusted for sweetness and spice according to personal preference. For added crunch, consider adding shredded carrots or bell peppers.
Nutrition
- Serving Size: 1 serving
- Calories: 110
- Sugar: 2g
- Sodium: 200mg
- Fat: 7g
- Saturated Fat: 1g
- Unsaturated Fat: 6g
- Trans Fat: 0g
- Carbohydrates: 10g
- Fiber: 1g
- Protein: 1g
- Cholesterol: 0mg
Keywords: cucumber salad, Asian salad, refreshing salad, quick salad, healthy salad

2 Ingredient Cookie Cups
The Perfect 2-Ingredient Cookie Cups: A Deliciously Simple Treat
Hello, fellow foodies! Welcome back to Ivory Apron, where we’re all about making cooking feel elegant yet accessible. Today, I have a delightful treat that’s sure to leave your taste buds dancing: 2-Ingredient Cookie Cups! Yes, you heard that right—only two ingredients! This recipe is perfect for those hectic weeks when you crave something sweet but don’t have the time or energy to whip up a full-on patisserie display.
Imagine a warm, gooey cookie cup filled with your favorite treats, all baked in the comfort of your own kitchen. These little lovelies are not only easy to make but are also gluten-free and can be customized to fit any dietary need. Plus, they come together quicker than you can decide which movie to binge-watch next!
Now, let me share with you a little backstory. A few years back, I was hosting a last-minute gathering and realized I had a serious cookie craving but zero time to bake an intricate dessert. After rummaging through my pantry, I discovered I had two simple ingredients: peanut butter and brown sugar. It was a match made in heaven! The deliciousness that ensued made me realize that sometimes, simplicity can lead to the most flavorful outcomes. That evening, everyone raved about my quick-fix cookie cups, and I knew I had to share this easy recipe with all of you!
So, grab your apron, and let’s dive into the world of 2-ingredient cookie cups. Whether you’re treating yourself, hosting friends, or looking for a fun cooking project with the kids, these cookie cups are a perfect solution!
Personal Story
A few summers ago, my friend Jenna and I decided to have a bake-off at her place, armed with ingredients we could find in her kitchen. Picture this: flour dust swirling in the air, laughter bouncing off the walls, and a large bowl filled with all sorts of permissions—flour, sugar, chocolate chips you name it!
Halfway through our flour fight, we realized we were missing a crucial element: time! Our delicious dreams were quickly turning into panic. As we sifted through her pantry, we stumbled on a jar of natural peanut butter and a bag of brown sugar sitting innocuously on a high shelf. Jenna, ever the optimist, said, “Why not try it?” At that moment, I felt like a culinary magician as my mind raced with possibilities.
Within minutes, we had dollops of dough pressed into muffin tins, filling her kitchen with a warm, nutty aroma. When those cookie cups emerged golden-brown and perfectly formed, it felt like the universe was smiling down on us (or maybe it was just the smell of cookies). That simple concoction became our go-to recipe for lazy afternoons when the sweet tooth kicked in without a full cookie lineup. To this day, every bite brings back that joyous summer memory of fun, creativity, and tasty success!
Ingredients
Here’s the kicker—this cookie recipe uses just two ingredients! You probably have both of these in your pantry right now:
-
1 cup natural peanut butter
- Chef Insight: Go for the creamy stuff for a classic texture, but if you prefer chunky peanut butter, that works remarkably well too! It adds a delightful texture to your cookie cups. If you’re allergic or not a fan of peanuts, almond butter or cashew butter are fantastic alternatives. Just make sure they’re natural, meaning minimal added ingredients.
-
1 cup brown sugar
- Substitution Tip: If you’re out of brown sugar, you can easily make your own! Just mix white sugar with a tablespoon of molasses—voila! A great way to keep your baking running smooth! Light brown sugar lends a milder taste, while dark brown sugar gives a deeper molasses flavor, which can be a delicious twist on the classic.
These two simple ingredients create a soft, tender base that’s incredibly versatile!
Step-by-Step Instructions
Now, are you ready to whip these up? Let’s guide you through the process step by step!
Step 1: Preheat the Oven
Preheat your oven to 350°F (175°C). (Chef tip: This step is crucial to get your cookie cups perfectly baked with that delightful golden hue.)
Step 2: Combine the Ingredients
In a mixing bowl, combine 1 cup natural peanut butter and 1 cup brown sugar. You can use a spatula or, if you’re feeling adventurous, mix it by hand! Get in there, and don’t be afraid to embrace the sticky goodness. The mixture will be thick and a tad challenging to combine, but that’s part of the fun!
Step 3: Form Your Cookie Cups
Once you have a nice, cohesive dough, it’s time to form your cookie cups! Lightly grease a muffin tin with a touch of cooking spray or oil. Using a small scoop or your hands, create small balls of dough and press them into the bottom of each cup. Make sure to push down in the center to create a well for your desired filling.
Step 4: Bake
Place the muffin tin in the preheated oven and bake for about 10-12 minutes. Keep an eye out for them—your kitchen will smell amazing! When they are lightly golden and set, take them out and allow them to cool in the pan for a few minutes.
Step 5: Fill and Serve
After a few minutes, gently remove the cookie cups from the muffin tin and place them on a cooling rack. Now is the fun part! Once they’ve cooled slightly, fill each cup with your favorite treats: chocolate chips, candy, fruit, or a dollop of jam. The options are endless!
Final Presentation
If you’re feeling fancy, a dusting of powdered sugar on top elevates the look without adding complexity. Place them on a beautiful platter and watch your guests’ eyes light up!
Serving Suggestions
These cookie cups are perfect for any occasion! Serve them warm with a scoop of vanilla ice cream on top for a delightful sundae-inspired treat. Alternatively, serve them alongside a cup of coffee or tea for a cozy afternoon. They’re undeniably fun to eat—bite into one, and you’ll find a soft center and delightful morsels waiting within!
Recipe Variations
The beauty of these 2-Ingredient Cookie Cups is their versatility! Here are a few tasty variations to try:
- Chocolate Drizzle: Melt some chocolate and drizzle it over the top for a decadent touch.
- Nut Medley: Mix in chopped nuts like walnuts or almonds into the dough for added crunch.
- Stuffed Surprise: Use a layer of Nutella or caramel sauce inside the cookie cups for a gooey center.
- Seasonal Touch: Add a pinch of cinnamon or pumpkin spice for a warm, autumn-inspired flavour.
Feel free to get creative—experimenting is half the fun!
Chef’s Notes
You know, baking has a funny way of teaching us patience, especially when it comes to not eating the finished product right away! I can’t tell you how many times I’ve tried to sneak a taste before they were fully cooled down. The first time I made these cookie cups, I definitely burned my tongue while trying to get that warm, gooey filling!
Over the years, I’ve played around with the recipe and found that chilling the dough slightly before baking creates a sturdier cup. So, if you’re in a hurry, just bake as is, but if you want that perfect form, let the dough chill for about 30 minutes in the fridge before forming your cookie cups.
And remember, if they don’t turn out as expected on your first try, don’t fret! Every kitchen adventure is a chance to learn. The best part is that even less-than-perfect cookie cups are still delicious!
FAQs and Troubleshooting
Q: Why aren’t my cookie cups holding their shape?
A: This can happen if the dough is too warm or if you didn’t press it firmly enough into the muffin tin. Try chilling the dough for 30 minutes before baking the next time!
Q: Can I use a different nut butter?
A: Absolutely! Almond butter and even sunflower seed butter can be great substitutes. Just make sure they’re of similar consistency to peanut butter for best results.
Q: How do I store leftover cookie cups?
A: Store them in an airtight container at room temperature for up to three days. If you want to keep them longer, refrigerate them—though I doubt they’ll last that long once you start eating them!
Q: Can I double the recipe?
A: For sure! This recipe is easy to scale up. Just remember to bake them in batches if your oven doesn’t fit more than one muffin tin!
Nutritional Info
(If applicable, feel free to add specific nutritional info based on the ingredients used, including calories, fat content, and other vitamins/minerals.)
So there you have it! A delicious and straightforward recipe for something that feels special, yet comes together in no time. I hope you enjoy making these 2-Ingredient Cookie Cups as much as I enjoyed sharing them with you. Remember, it’s not about culinary perfection but rather enjoying the process and the memories created along the way. Happy baking, and until next time—keep those aprons on and your hearts open to the joy of cooking!
Print2-Ingredient Cookie Cups

Easy and delicious cookie cups made with just two simple ingredients: natural peanut butter and brown sugar.
- Prep Time: 10 minutes
- Cook Time: 12 minutes
- Total Time: 22 minutes
- Yield: 12 servings 1x
- Category: Dessert
- Method: Baking
- Cuisine: American
- Diet: Gluten-Free
Ingredients
- 1 cup natural peanut butter
- 1 cup brown sugar
Instructions
- Preheat your oven to 350°F (175°C).
- Combine 1 cup natural peanut butter and 1 cup brown sugar in a mixing bowl.
- Form small balls of dough and press them into a greased muffin tin.
- Bake in the preheated oven for 10-12 minutes.
- Fill each cookie cup with your favorite treats once they have cooled slightly.
Notes
Chilling the dough before baking creates a sturdier cookie cup. Store leftovers in an airtight container at room temperature for up to three days.
Nutrition
- Serving Size: 1 cookie cup
- Calories: 200
- Sugar: 12g
- Sodium: 50mg
- Fat: 10g
- Saturated Fat: 2g
- Unsaturated Fat: 8g
- Trans Fat: 0g
- Carbohydrates: 20g
- Fiber: 1g
- Protein: 5g
- Cholesterol: 0mg
Keywords: cookie cups, two ingredient cookies, easy dessert, gluten-free treats, peanut butter cookies
Banana Oatmeal Bars
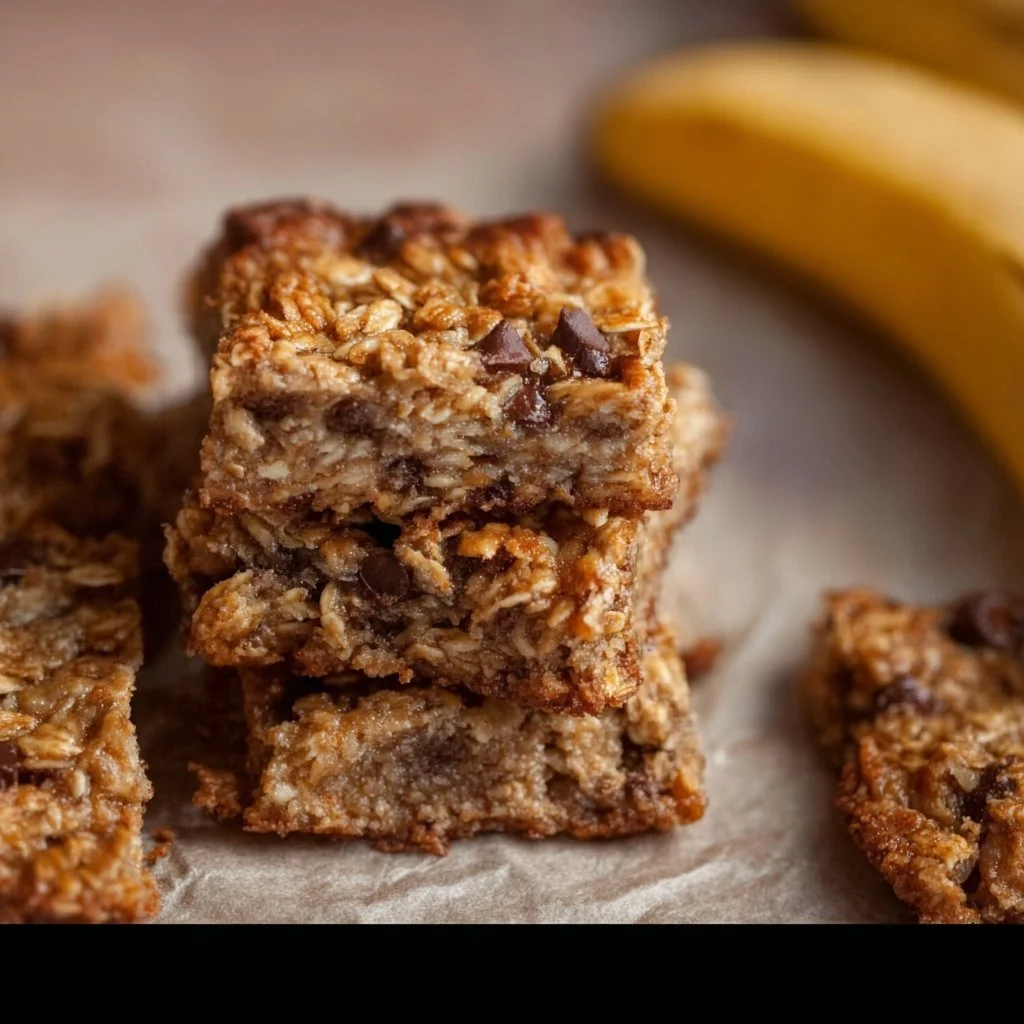
# Delightful Banana Oatmeal Bars: Your Go-To Recipe for Taste and Tradition

## Introduction

Hello, my fellow food enthusiasts! If there’s one recipe that warms my heart and brings back a flood of treasured memories, it’s these scrumptious **Banana Oatmeal Bars**. Not only are they packed with wholesome ingredients, but they also make for a delightful treat any time of the day. Morning snack? Check. Afternoon pick-me-up? Absolutely. Late-night indulgence? You bet!

Let me take you on a little adventure through this easy-to-make recipe that straight up celebrates the beloved banana in all of its glory. Think about the irresistible aroma of baked goods wafting through the kitchen and the sight of golden oatmeal bars. Who can resist that? Making these bars is as much about the process as it is about the product, so roll up your sleeves, and let’s have a blast creating this delicious snack together!

These bars are a hit with everyone—from kids head over heels for the chocolate chips, to adults looking for a healthy option to satisfy their cravings. Whether you’re meal prepping for the week or needing something quick to grab on the go, trust me, these Banana Oatmeal Bars will tick all the boxes!

Moreover, they are incredibly versatile—you can make them gluten-free, nut-free, or even vegan based on your dietary preferences. It’s a win-win situation! And the best part? You might just discover that this recipe becomes a staple in your kitchen, much like it has in mine.

So, are you ready to dive in and create these delightful bars? Grab your apron, and let’s get started!

## Personal Story

Ah, the simple banana. For me, this fruit has been a symbol of comfort and nostalgia, dating back to my childhood. I vividly remember my grandma's kitchen, a cozy haven filled with warmth, laughter, and a whole lot of baking. One of her favorite recipes was her famous banana bread, and every Saturday, we'd earmark our afternoon for baking. As the bananas turned into a velvety batter, we'd sing along to our favorite tunes, waiting for that irresistible hum of anticipation as it baked away in the oven.

Fast forward to today: the flavors and memories of those golden afternoons still linger in my heart and have inspired me to incorporate that sweetness into these Banana Oatmeal Bars. They remind me of the love that was baked into every loaf, and every time I share this recipe, I can’t help but think of my grandma’s infectious laughter echoing off the walls. Those cherished moments in the kitchen are a reminder that the simplest recipes often bring our loved ones together.

## Ingredients

Let’s gather the ingredients for our mouthwatering Banana Oatmeal Bars! Here’s what you’ll need:

- **1½ cups mashed bananas (approx. 3 bananas)**
  *Choose ripe bananas for that natural sweetness and creamy texture. If you don’t have enough ripe bananas, you can combine mashed ripe with a bit of applesauce for balance.*

- **½ cup nut butter (e.g., peanut butter or almond butter)**
  *Nut butter adds richness and binding. If you prefer a nut-free version, swap it with sunflower seed butter or tahini!*

- **2 cups rolled oats**
  *Rolled oats are essential for that chewy texture. For a gluten-free option, ensure you have certified gluten-free oats.*

- **1 teaspoon cinnamon**
  *A warm spice that enhances the overall flavor. If you want to change it up, try adding a pinch of nutmeg for an extra kick!*

- **1 teaspoon vanilla extract**
  *This adds lovely depth to your bars. You can also use almond extract for a unique twist!*

- **3 tablespoons maple syrup**
  *Pure maple syrup serves as a natural sweetener. Honey or agave syrup can work as a substitute, but the flavor will vary slightly.*

- **1 cup chocolate chips**
  *Who doesn’t love a bit of chocolate? Dark chocolate chips pack a punch, but feel free to use white chocolate or even dried fruit for a healthier spin.*

- **½ teaspoon salt**
  *Salt amplifies all the flavors, so don’t skip it! A flurry of sea salt on top before baking can elevate your bars even more.*

Feel free to customize these ingredients based on what you have on hand. The best part of cooking is making a recipe your own!

## Step-by-Step Instructions

Now that we have our ingredients ready, let’s get cooking! Follow along to create these scrumptious bars.

1. **Preheat the Oven**:
   Preheat your oven to 350°F (175°C) and line an 8x8-inch baking dish with parchment paper. Allowing the oven to heat fully ensures even baking. Plus, who doesn’t love the excitement of the warm kitchen ahead of time?

2. **Mash the Bananas**:
   In a large bowl, mash the ripe bananas with a fork until smooth. You want a few chunks for texture, but aim for a mostly creamy experience. Let their sweetness inspire you!

3. **Mix in Nut Butter**:
   Add the nut butter to the mashed bananas, and stir until well combined. There’s something so satisfying about the combination of these two ingredients; it’s like a hug for your tastebuds! If your nut butter is thick, give it a quick microwave for a few seconds to loosen it up.

4. **Add the Sweetener and Flavor**:
   Pour in the maple syrup, vanilla extract, and sprinkle in the cinnamon and salt. Stir until everything is incorporated. Taste the mixture at this point—it should be sweet and aromatic. Adjust if necessary!

5. **Combine the Oats**:
   Next, gently fold in the rolled oats until everything is evenly mixed. This step is crucial for achieving that perfect chewy texture. It’s like embracing a warm blanket of oats and bananas!

6. **Chocolate Chip Magic**:
   Finally, fold in the chocolate chips. Save a handful to sprinkle on top for an extra treat. Mixing the chocolate chips while the batter is still slightly warm will help them melt ever so slightly, giving you gooey pockets of chocolate bliss throughout your bars.

7. **Bake to Perfection**:
   Spoon the mixture into the prepared baking dish and spread it evenly. Bake for about **25-30 minutes**, or until the edges begin to turn golden and a toothpick inserted into the center comes out clean. The aroma wafting through your kitchen will have everyone eagerly awaiting their first bite!

8. **Cool and Slice**:
   Once baked, let the bars cool in the pan for a few minutes before lifting them out. Allow to cool completely on a wire rack. Slice into squares and get ready to enjoy!

### A Little Chef Hack:
If you like extra crispy edges (who doesn’t?), consider baking these bars in a smaller pan for a denser texture!

## Serving Suggestions

I love to serve these Banana Oatmeal Bars either plain or with a dollop of Greek yogurt on the side for a delightful pairing. A sprinkle of nuts or seeds on top also offers a bit of crunch and makes them look irresistible. If you feel like being fancy, drizzle a bit more maple syrup or a sprinkle of cinnamon before serving—that'll definitely impress your guests!

## Recipe Variations

These Banana Oatmeal Bars are incredibly versatile. Here are some fun variations to switch things up:

1. **Nuts Galore**:
   Add ½ cup of chopped walnuts or pecans for a delightful crunch and an extra layer of flavor.

2. **Fruity Twist**:
   Mix in some chopped apples or blueberries to complement the bananas.

3. **Spiced Up**:
   Experiment with different spices, such as ginger or pumpkin spice, for a seasonal twist.

4. **Coconut Love**:
   Toss in some shredded unsweetened coconut for a tropical vibe.

5. ** Vega-licious**:
   To make vegan Banana Oatmeal Bars, simply ensure the chocolate chips are dairy-free and substitute maple syrup with agave nectar.

## Chef’s Notes

I have to admit, I’ve had my fair share of kitchen experiments that didn’t go as planned! There was one time when I boldly decided to throw in a bunch of super ripe pears, thinking I could use them up. Let’s just say, the end result was a rather mushy mess. But through every flop, I’ve learned the creative process in the kitchen is where the magic happens, and these Banana Oatmeal Bars emerged as a true treasure! They have truly evolved and become a crowd-pleaser in my home, a go-to recipe for any occasion—be it breakfast on the run, an afternoon snack, or dessert!

## FAQs and Troubleshooting

1. **Can I pre-make the mix?**
   Absolutely! You can prepare the mixture a day ahead, store it in an airtight container, and bake it fresh the next day.

2. **My bars turned out too mushy—what happened?**
   If the bananas were extra ripe, that might be the culprit. Make sure to measure accurately, and perhaps try letting it bake a bit longer if you prefer a firmer texture.

3. **How do I know when the bars are done?**
   Look for slightly golden edges and use the toothpick test—if it comes out clean, they’re ready to go!

4. **Can I freeze these bars?**
   Yes! They freeze beautifully. Wrap individual bars in plastic wrap, place them in a freezer-safe container, and enjoy them whenever you need a tasty treat!

## Nutritional Info

*Calorie count may vary based on specific ingredients used.*
- Serving size: 1 bar
- Calories: ~150
- Protein: 4g
- Carbs: 20g
- Fat: 6g
- Fiber: 3g

---

There you have it—a delightful recipe that’s equal parts practical and nostalgic! I hope you’ll enjoy whipping up these Banana Oatmeal Bars as much as I do. Tie on your apron and bake with love; remember, sharing the fruits of your labor is one of life’s greatest pleasures. Happy cooking!
Delightful Banana Oatmeal Bars
Scrumptious Banana Oatmeal Bars packed with wholesome ingredients. Perfect for breakfast, snacks, or dessert.
- Prep Time: 15 minutes
- Cook Time: 30 minutes
- Total Time: 45 minutes
- Yield: 12 servings 1x
- Category: Snack
- Method: Baking
- Cuisine: American
- Diet: Vegetarian
Ingredients
- 1½ cups mashed bananas (approx. 3 bananas)
- ½ cup nut butter (e.g., peanut butter or almond butter)
- 2 cups rolled oats
- 1 teaspoon cinnamon
- 1 teaspoon vanilla extract
- 3 tablespoons maple syrup
- 1 cup chocolate chips
- ½ teaspoon salt
Instructions
- Preheat the oven to 350°F (175°C) and line an 8×8-inch baking dish with parchment paper.
- Mash the ripe bananas with a fork until smooth, keeping a few chunks for texture.
- Add the nut butter to the mashed bananas and stir until well combined.
- Pour in the maple syrup, vanilla extract, and sprinkle in the cinnamon and salt. Stir until everything is incorporated.
- Combine the rolled oats until everything is evenly mixed.
- Fold in the chocolate chips, saving a handful to sprinkle on top.
- Bake for about 25-30 minutes or until the edges turn golden and a toothpick comes out clean.
- Cool in the pan for a few minutes, lift out, and allow to cool completely on a wire rack before slicing.
Notes
For extra crispy edges, consider baking in a smaller pan. These bars freeze beautifully for future treats!
Nutrition
- Serving Size: 1 bar
- Calories: 150
- Sugar: 8g
- Sodium: 160mg
- Fat: 6g
- Saturated Fat: 1g
- Unsaturated Fat: 5g
- Trans Fat: 0g
- Carbohydrates: 20g
- Fiber: 3g
- Protein: 4g
- Cholesterol: 0mg
Keywords: banana bars, oatmeal bars, healthy snacks, gluten-free, vegan options, baking
Garlic Butter Beef Bites with Potatoes
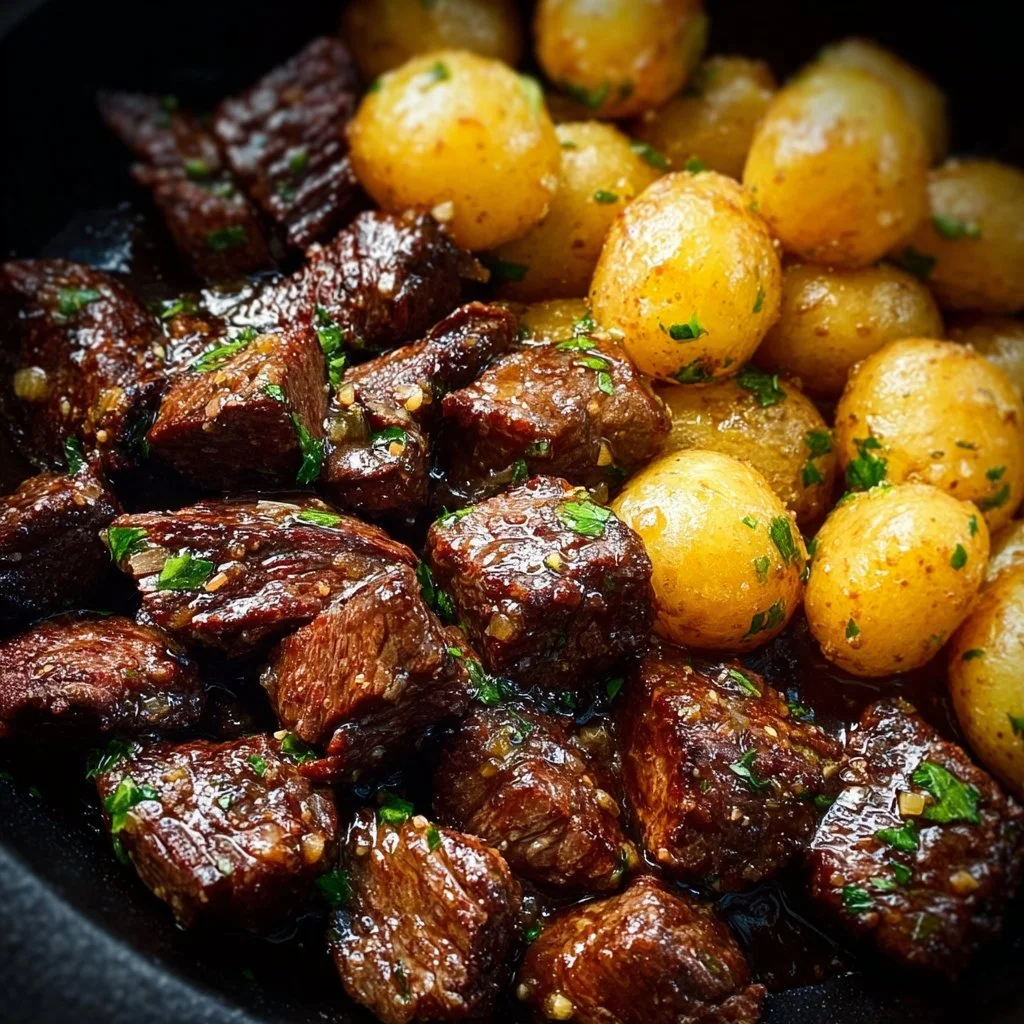
# Garlic Butter Beef Bites with Potatoes: An Irresistible Comfort Dish

## Introduction

Hello, fellow foodies! Today, we're whipping up something that’s sure to warm your heart and satisfy your taste buds: **Garlic Butter Beef Bites with Potatoes**. This dish combines tender beef, golden baby potatoes, and a heavenly garlic butter sauce that will have everyone coming back for seconds. Trust me, it’s the kind of dish you’ll want to make on a cozy night in or when friends are gathered around your table.

Let’s face it—who doesn’t love a plate filled with flavorful bite-sized beef, buttery potatoes, and the aroma of garlic wafting through the kitchen? This recipe is the epitome of comfort food and easy elegance, perfect for any occasion. Whether you’re hosting a casual dinner or enjoying a cozy night at home, these beef bites are the perfect companion.

In my kitchen, they hold a special place because of their simplicity and the absolute joy they bring. Picture yourself plating these irresistible pieces of beef alongside those little potatoes and drenching them in that glorious garlic butter sauce—it's a feast for the eyes and the palate. Ready? Grab your apron, and let's dive into this flavorful adventure!

## Personal Story

I have so many fond cooking memories that revolve around family gatherings, but one stands out vividly. Growing up, my family had a tradition of Sunday dinners where everyone would pitch in to help prepare the meal. One evening, my father decided to make a beef stew, but little did we know that he had something special up his sleeve. With a hefty dose of garlic butter and some fresh herbs, he transformed a simple stew into a dish that still makes my mouth water to this day!

Those Sunday dinners became a joyful cacophony of laughter and chatter, with us all battling for a taste of Dad's delicious creation. Now, years later, I remember those moments when I prepare my garlic butter beef bites and Baby potatoes. I can still hear the clinking of plates, the chatter around the table, and my father’s proud smile as we devoured his handiwork. It’s these love-filled memories that inspire me to create recipes you can share with your loved ones.

## Ingredients

Let’s chat about the ingredients you’ll need for these heavenly Garlic Butter Beef Bites with Potatoes:

- **2 pounds beef stew meat**
  Tender and flavorful, this cut of meat is perfect for searing and soaking up that garlic butter. If you’re looking for a substitution, you can use sirloin or chuck roast cut into bite-sized pieces.

- **1 pound baby potatoes, halved**
  These little gems are not only cute but cook quickly and are fantastic for soaking up the garlic butter sauce. If you can't find baby potatoes, feel free to use diced regular potatoes; just adjust the cooking time.

- **1/2 cup unsalted butter**
  The star of our dish! Unsalted allows you to control the seasoning. Don’t worry; you can use salted butter as well, just reduce the added salt in the recipe.

- **4 cloves garlic, minced**
  Fresh garlic adds a punch of flavor. If you’re in a pinch, you can use pre-minced garlic, but fresh is always best!

- **1 teaspoon salt**
  Seasoning is key! Adjust according to your taste preference, particularly if you're using salted butter.

- **1/2 teaspoon black pepper**
  A little background heat perfectly complements the richness of the butter.

- **1 teaspoon dried thyme**
  Earthy thyme pairs beautifully with beef. You can also use fresh thyme if you have it on hand—just double the amount!

- **1 teaspoon dried rosemary**
  Another herb that boosts this dish’s flavor. Substitute with fresh if you prefer!

- **1/4 cup fresh parsley, chopped (for garnish)**
  Fresh parsley adds a beautiful pop of color and brightness to our dish. Feel free to swap it out for other herbs like chives or cilantro if you’re feeling adventurous!

---

With these ingredients in hand, you’re just a few steps away from a delicious home-cooked meal that will impress everyone at your table!

## Step-by-Step Instructions

Cooking these delightful Garlic Butter Beef Bites is as easy as 1-2-3! Follow along for the detailed steps:

1. **Prep the Beef**:
   Begin by cutting your beef stew meat into 1-inch cubes (if not already pre-cut). This will allow for even cooking and easy serving. Season generously with salt and black pepper. Don’t skip this step—seasoning the meat before it hits the heat can significantly enhance the flavor!

2. **Sear the Beef**:
   In a large skillet or pot, melt 1/4 cup of your unsalted butter over medium-high heat. Once the butter is melted and slightly foamy, add the beef in batches. Sear each side until nicely browned, about 3-4 minutes. Avoid overcrowding the pan, as this can prevent the beef from browning properly. If you have to work in batches, just keep the seared beef warm on a plate while you cook the rest.

3. **Cook the Potatoes**:
   Once all your beef is browned, add the halved baby potatoes to the same skillet. They will soak up all those delicious meat drippings! Stir them around for a couple of minutes until they get a nice glisten from the butter. This step is crucial for flavor development!

4. **Garlic Time**:
   Time for the star of the show—add the minced garlic, dried thyme, and dried rosemary to the skillet. Stir everything together and let the garlic cook for about 30 seconds until fragrant. Be careful not to burn the garlic, as this can lead to a bitter taste.

5. **Simmer & Soften**:
   Pour in a cup of water (or beef broth for extra flavor) and cover the skillet. Lower the heat to medium-low and let everything simmer for about 15-20 minutes until the potatoes are fork-tender. This step allows the flavors to meld beautifully.

6. **Finishing Touches**:
   Once the potatoes are soft, taste for seasoning. Feel free to add more salt and pepper if necessary. Toss the whole mixture around, so everything is well incorporated. If you want an extra hit of richness, add the remaining 1/4 cup of butter. Trust me; you’ll thank me later!

7. **Garnish & Serve**:
   Lastly, sprinkle your fresh parsley on top and give a gentle toss to incorporate it. Your dish is now ready to be served—look at that glorious sheen, inviting aromas and vibrant colors!

## Serving Suggestions

Now that your Garlic Butter Beef Bites with Potatoes is ready, let’s talk about how to plate it up! I recommend serving this dish family-style, straight from the skillet. This not only promotes a warm and inviting atmosphere but also encourages everyone to dig in and help themselves. For an elevated touch, use a beautiful wooden serving platter with a sprinkle of parsley for a pop of color. Pair it with a crisp green salad or some crusty bread to soak up the extra garlic butter sauce—heavenly!

## Recipe Variations

Get creative! Here are some fun twists on this classic recipe:

- **Spicy Garlic Butter**: Add some red pepper flakes to the garlic butter for a spicy kick.

- **Herb-Infused**: Use fresh herbs—such as thyme, rosemary, and oregano—instead of dried for a more vibrant flavor.

- **Savory Add-Ins**: Toss in some diced bell peppers or mushrooms along with the potatoes for added texture and flavor.

- **Creamy Version**: Drizzle some heavy cream into the sauce at the end for a creamy garlic butter sauce that’s irresistible.

- **Gluten-Free Option**: Simply ensure your broth is gluten-free, and you're good to go!

## Chef’s Notes

This recipe has come a long way for me and has evolved over the years. I remember the first time I made it—I used a pre-packaged sauce that made things a whole lot easier but lacked that homemade touch. With each attempt, I began to play around with flavors and techniques, leading to the delicious garlic butter sauce we have today.

Funny story: One time, I was so excited to cook this for friends that I didn’t notice I had added three tablespoons of garlic instead of just four cloves! We had a good laugh, and surprisingly, they loved it! So remember, cooking is an adventure. Trust your instincts, and don’t be afraid to make a few mistakes along the way!

## FAQs and Troubleshooting

1. **What if my beef is tough?**
   If your beef doesn’t seem tender, it may need more time to simmer. Just cover it and let it cook longer on low heat!

2. **Can I use frozen beef?**
   Yes! Just thaw it properly and ensure to sear it well when cooking.

3. **How do I know when the potatoes are done?**
   Simply puncture a potato with a fork. If it goes in easily, they’re done!

4. **Can I prep this ahead of time?**
   While I recommend enjoying this dish fresh, you can certainly chop your ingredients earlier in the day or the night before for less stress when dinner rolls around.

## Nutritional Info

(If applicable) Each serving of Garlic Butter Beef Bites with Potatoes contains approximately:

- Calories: 450
- Protein: 35g
- Carbohydrates: 30g
- Fat: 25g

Remember, these numbers may vary depending on the specific brands and quantities you use!

---

Cooking should be joyful and filled with love! I hope you enjoy making— and most importantly, sharing— these Garlic Butter Beef Bites with Potatoes. Tie on that apron, gather your loved ones, and let’s create something timeless together. Happy cooking!
Garlic Butter Beef Bites with Potatoes

Tender beef bites and golden baby potatoes bathed in a rich garlic butter sauce, perfect for a cozy dinner.
- Prep Time: 15 minutes
- Cook Time: 30 minutes
- Total Time: 45 minutes
- Yield: 4 servings 1x
- Category: Main Course
- Method: Searing
- Cuisine: American
- Diet: None
Ingredients
- 2 pounds beef stew meat
- 1 pound baby potatoes, halved
- 1/2 cup unsalted butter
- 4 cloves garlic, minced
- 1 teaspoon salt
- 1/2 teaspoon black pepper
- 1 teaspoon dried thyme
- 1 teaspoon dried rosemary
- 1/4 cup fresh parsley, chopped (for garnish)
Instructions
- Prep the beef: Begin by cutting your beef stew meat into 1-inch cubes (if not already pre-cut). Season generously with salt and black pepper.
- Sear the beef: In a large skillet, melt 1/4 cup of unsalted butter over medium-high heat. Add the beef in batches and sear each side until nicely browned, about 3-4 minutes.
- Cook the potatoes: Once all your beef is browned, add the halved baby potatoes to the same skillet and stir for a couple of minutes until they glisten.
- Add garlic: Add the minced garlic, dried thyme, and dried rosemary to the skillet. Stir and let the garlic cook for about 30 seconds.
- Simmer: Pour in a cup of water (or beef broth) and cover. Lower the heat to medium-low and let simmer for about 15-20 minutes until the potatoes are tender.
- Finish: Taste for seasoning and add more salt and pepper if necessary. If desired, add the remaining 1/4 cup of butter for extra richness.
- Garnish: Sprinkle the fresh parsley on top, toss gently, and serve.
Notes
Serve family-style directly from the skillet for an inviting experience. Pair with a crisp green salad or crusty bread.
Nutrition
- Serving Size: 1 serving
- Calories: 450
- Sugar: 2g
- Sodium: 800mg
- Fat: 25g
- Saturated Fat: 10g
- Unsaturated Fat: 10g
- Trans Fat: 0g
- Carbohydrates: 30g
- Fiber: 4g
- Protein: 35g
- Cholesterol: 100mg
Keywords: beef, garlic, potatoes, comfort food, hearty meal

Easy Street Corn Chicken Bowl
Easy Street Corn Chicken Bowl: A Flavorful Adventure
Hey there, foodie friend! If you’re anything like me, you probably have a few go-to recipes that never fail to bring joy to your dinner table. Today, I’m thrilled to share one of those delightful creations: the Easy Street Corn Chicken Bowl! This dish is a vibrant medley of flavors and textures — tender chicken, sweet corn, colorful veggies, and creamy avocado, all drizzled with zesty lime juice. Sounds delicious, right?
As we embark on this culinary journey together, I’ll share not only the recipe but also a sprinkle of personal stories and kitchen wisdom I’ve gathered over the years. This bowl is perfect for those busy weeknights when you need something quick yet elegant. Plus, it’s versatile enough for entertaining or just a cozy night in! So, let’s take a step into the kitchen and whip up something wonderful.
Personal Story
One of my fondest memories involving corn goes back to a family gathering in late summer when the corn was at its peak. We gathered at my grandparents’ home, a charming farmhouse surrounded by fields of golden corn swaying in the breeze. My grandmother would always bring out her famous street corn salad, a vibrant mix of grilled corn, fresh lime, and crumbled cheese.
I remember sneaking into the kitchen, practically salivating, as she mixed everything in an oversized bowl. If only you could smell the aroma! That memory still ignites a nostalgic warmth in my heart, and today, as I create my own twist on this classic element with the Easy Street Corn Chicken Bowl, I’m reminded of that love and care that goes into every meal. It’s those small moments around the table that turn into lifelong memories. Now, let’s dive into this bowl of goodness!
Ingredients
Here’s what you’ll need to create your own Easy Street Corn Chicken Bowl:
-
2 cups cooked chicken, shredded
Perfect for using up leftover rotisserie chicken! You can substitute it with grilled chicken or any protein you prefer, like turkey or chickpeas for a vegetarian option. -
1 can corn, drained
Sweet, juicy corn adds a pop of flavor. Fresh corn on the cob works wonderfully, too—just grill or roast it and then cut it off the cob! -
1 cup cooked rice
I love using brown rice for extra nutrients, but white rice or quinoa can also be excellent choices. -
1 bell pepper, diced
Grab any color you like—red, yellow, or green! Each adds a unique flavor and color to the dish, making it visually appealing. -
1/2 cup red onion, diced
For a zesty bite! If red onion is a bit too sharp for your taste, yellow onion or green onions can make a nice substitute. -
1 avocado, sliced
Creamy and dreamy! Not only does avocado add richness, but it also brings healthy fats. If you’re in a pinch, you can replace it with a dollop of Greek yogurt. -
1/4 cup cilantro, chopped
Fresh herbs elevate the dish. If cilantro doesn’t tickle your taste buds, fresh parsley or basil can give a different, yet equally delightful flair. -
1 tablespoon lime juice
Citrus is key here! Fresh lime juice brightens everything up. Lemon juice works too, but I must say, lime has that authentic zing. -
Salt and pepper to taste
Essential for balancing those flavors, so season to your liking. -
1 tablespoon olive oil
A little drizzle adds richness. You can swap it with avocado oil or even skip it entirely if you’re keeping it light!
Step-by-Step Instructions
Ready to start cooking? Here’s how to assemble your Easy Street Corn Chicken Bowl step by step:
-
Prepare the Base: Start by reheating your cooked rice. You can do this in a pot on low heat or in the microwave for a quick fix. If you’re using freshly cooked rice, savor that warm, fluffy goodness!
-
Sauté the Veggies: In a large skillet, heat the olive oil over medium heat. Once hot, add the diced red onion and bell pepper. Sauté for about 3-5 minutes, or until they soften. This little step adds depth and sweetness—the aroma will make your kitchen smell absolutely divine!
-
Add the Corn: Toss in the drained corn after your peppers and onions are soft. Give it a good stir and let it cook for another 2 minutes. The warmth will bring out the sweet flavor and that beautiful golden color will start to shine.
-
Mix in the Chicken: Stir in your shredded chicken. This is where the magic happens, my friends. Mix thoroughly, and allow everything to heat through—about 3-4 minutes. If you want to spice things up a bit, this is the perfect time to sprinkle in some cumin or chili powder!
-
Season to Perfection: Once everything is in the skillet, add salt, pepper, and lime juice. It’s your chance to taste! Adjust as needed—maybe a little more lime for that refreshing zing or a pinch more salt to balance it all out.
-
Assemble the Bowl: Time for the fun part! In a large serving bowl, spoon a generous layer of your warm rice at the bottom. Top it with the chicken, corn, and veggie mixture, then elegantly pile on slices of avocado. Isn’t that a beautiful sight?
-
Finish It Off: Garnish with the chopped cilantro. It’s like confetti for your bowl! Serve it warm, and don’t forget to squeeze a little extra lime juice on top just before digging in. Trust me, it makes all the difference.
Serving Suggestions
Plating can be as simple or elegant as you desire! For a casual touch, serve this bowl family-style, straight from the skillet, allowing everyone to make their own perfect portions. You can offer additional toppings on the side—think shredded cheese, extra lime, or a dollop of sour cream. If you’re aiming for a more refined presentation, layer the components in a clear glass bowl for a beautiful, take-your-breath-away display!
Recipe Variations
-
Spicy Twist: Add some jalapeños or a sprinkle of red pepper flakes to the skillet for those who crave heat!
-
Southwest Flavor: Incorporate black beans and serve with a creamy chipotle dressing to take it to the next level.
-
Taco Bowl: Serve the mixture over crushed tortilla chips for a fun, taco-inspired twist; don’t forget the salsa!
-
Vegetarian Delight: Substitute chicken with roasted butternut squash or add more beans for a satisfying, meat-free alternative.
-
Herb Variations: Experiment with different herbs like dill or tarragon for a flavor bump that takes it in new directions.
Chef’s Notes
Every recipe tells a story, and this one is no different! The Easy Street Corn Chicken Bowl began as a quick weeknight meal where I had a random assortment of odds and ends in my fridge. Over the years, I’ve refined it to strike a balance between comfort and elegance. Just remember that cooking is an adventure—don’t be afraid to make it your own! And trust me, if you overcook the rice or misjudge the lime juice, it’s not the end of the world—just a chance to learn and grow in the kitchen!
FAQs and Troubleshooting
-
What can I use instead of cooked chicken?
You can try roasted veggies, canned chickpeas, or even tofu. Just ensure they’re well-seasoned to taste amazing! -
How can I store leftovers?
Store any leftovers in an airtight container in the refrigerator for up to 3 days. Just keep your avocado separate to prevent browning! -
Can I prep this dish in advance?
Absolutely! You can prepare the chicken and corn mixture ahead of time. Reheat it when ready to serve, then layer it over freshly cooked rice. -
What if my dish turns out bland?
It happens, even to the best of us! Taste it as you cook and add salt, pepper, or a splash of lime juice until it sings!
Nutritional Info
While I like to focus on flavor, I also care about nutrition. Here’s a quick estimate for a serving of this bowl:
- Calories: Approximately 450
- Protein: 30g
- Carbohydrates: 45g
- Fats: 15g
- Fiber: 7g
Remember, each ingredient can alter these numbers, but it shows that you’re on the right path to a balanced meal!
There you have it! The Easy Street Corn Chicken Bowl brings comfort, color, and flavor to your table. I hope this recipe brings a smile to your face and warmth to your heart as you gather around the table with those you love. Happy cooking! 🌟
PrintEasy Street Corn Chicken Bowl

A vibrant medley of flavors and textures featuring tender chicken, sweet corn, colorful veggies, and creamy avocado, drizzled with zesty lime juice.
- Prep Time: 15 minutes
- Cook Time: 15 minutes
- Total Time: 30 minutes
- Yield: 4 servings 1x
- Category: Main Course
- Method: Stovetop
- Cuisine: Mexican
- Diet: Gluten-Free, Dairy-Free
Ingredients
- 2 cups cooked chicken, shredded
- 1 can corn, drained
- 1 cup cooked rice
- 1 bell pepper, diced
- 1/2 cup red onion, diced
- 1 avocado, sliced
- 1/4 cup cilantro, chopped
- 1 tablespoon lime juice
- Salt and pepper to taste
- 1 tablespoon olive oil
Instructions
- Prepare the base: Start by reheating your cooked rice.
- Sauté the veggies: In a large skillet, heat the olive oil over medium heat. Add the diced red onion and bell pepper. Sauté for about 3-5 minutes.
- Add the corn: Toss in the drained corn after your peppers and onions are soft and cook for another 2 minutes.
- Mix in the chicken: Stir in your shredded chicken and heat through for about 3-4 minutes.
- Season to perfection: Add salt, pepper, and lime juice to taste.
- Assemble the bowl: Spoon a layer of warm rice, then top with the chicken, corn, and veggie mixture, and slices of avocado.
- Finish it off: Garnish with chopped cilantro and serve warm with extra lime juice.
Notes
Serve this bowl family-style or in elegant presentations. Add toppings like shredded cheese or sour cream for extra flavor.
Nutrition
- Serving Size: 1 serving
- Calories: 450
- Sugar: 5g
- Sodium: 500mg
- Fat: 15g
- Saturated Fat: 2g
- Unsaturated Fat: 10g
- Trans Fat: 0g
- Carbohydrates: 45g
- Fiber: 7g
- Protein: 30g
- Cholesterol: 75mg
Keywords: chicken, corn, bowl, healthy meal, quick dinner, easy recipe