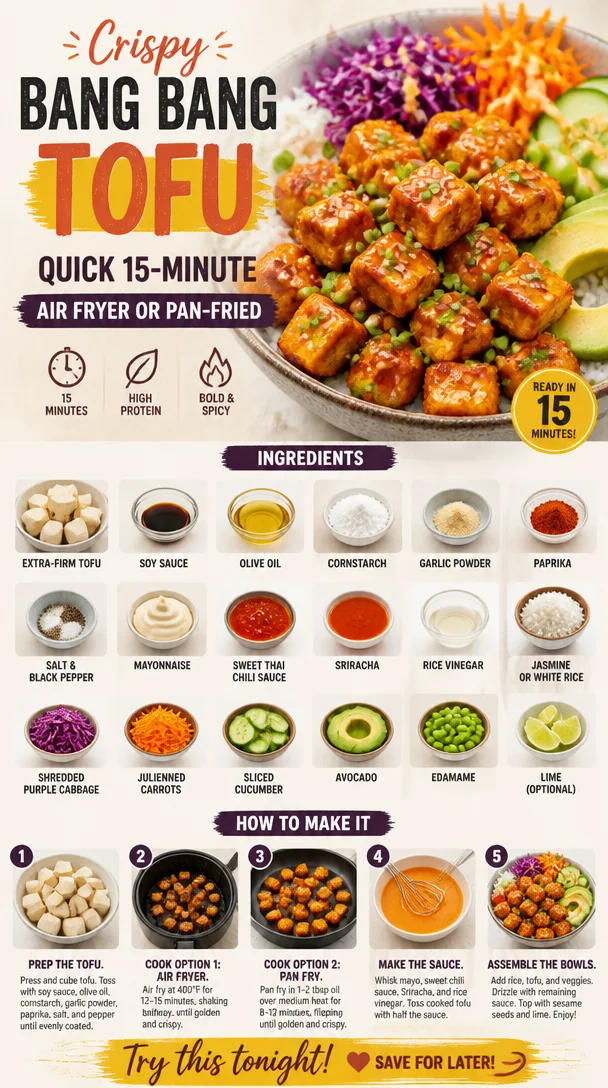
Crispy Bang Bang Tofu: Quick 15-Minute Air Fryer or Pan-Fried
Hello, fellow food lovers! If you’re ready to spice up your weeknight dinners with a dish that’s bursting with flavor, you’ve come to the right place. Today, we’re diving into the world of Bang Bang Tofu, a recipe that’s just as fun to make as it is to eat. Whether you’re a seasoned chef or just starting your culinary journey, this dish is all about embracing the joy of cooking while creating something deliciously satisfying.
Picture this: crispy, golden tofu triangles coated in a creamy, tangy sauce that dances between sweet and spicy. Trust me, once you take a bite, you’ll be hooked. Not only is this dish a feast for the taste buds, but it’s also perfect for those looking to explore a plant-based lifestyle without sacrificing flavor. Plus, we’ll be whipping this up using either an air fryer for that extra crunch or a good ol’ pan-frying technique, so everyone gets a chance to shine in the kitchen!
Now, you might be wondering why it’s called "Bang Bang Tofu." Well, the name is all about that zingy sauce that packs a punch, reminiscent of the famous bang bang shrimp but with a delightful plant-based twist. So, let’s grab our aprons, pour ourselves a glass of something refreshing, and get ready to create a meal that celebrates flavor and fun!
Personal Story
I remember the first time I had bang bang anything—my friend Lisa picked this charming little restaurant for our girls’ night out, and I was completely taken with the vibrant flavors of the dish on her plate. The sweet and spicy sauce was unlike anything I’d ever tried, and it set my creative juices flowing. I knew I had to replicate it at home. After several attempts and a few not-so-successful experiments (let’s just say my kitchen had more than one “creative mess”), I finally landed on a version that not only honored that initial flavor explosion but also featured my beloved tofu, which holds up beautifully to all those bold flavors.
Sharing that dish with loved ones at dinner parties became a tradition, just as important to me as setting the table and gathering everyone together. It perfectly encapsulated my philosophy: good food isn’t just about taste; it’s about creating connections, memories, and full bellies. Now, I’m excited to share this recipe with you, so you can make your own memories around the table!
Ingredients
Gathering the right ingredients is key to making this dish come alive. Here’s what you’ll need to whip up a spectacular batch of Bang Bang Tofu:
-
1 14–16 oz block extra-firm tofu, pressed and cubed
The star of our show! Extra-firm tofu holds up well during cooking and gives you that crispy texture we crave. If you’re in a pinch, soft or silken tofu can work, but the result will be different—more delicate and creamier. -
1 tablespoon soy sauce
Adds a savory umami depth. For a gluten-free option, try tamari instead. -
1 tablespoon olive oil
This helps with crisping up the tofu when pan-frying. Feel free to swap it for sesame oil for an added nutty flavor! -
1-2 tablespoons cornstarch
This is the secret weapon for crunchy tofu! If you’re looking for a low-carb option, arrowroot powder is a great substitution. -
½ teaspoon garlic powder
Brings a subtle garlicky warmth. Fresh garlic is also a delightful option for that extra punch but may yield a stronger flavor. -
½ teaspoon paprika
Adds a hint of smokiness. You can use smoked paprika for an even richer flavor. -
Salt and black pepper (to taste)
Essential for seasoning. Don’t skimp—season your tofu well to enhance its flavor! -
¼ cup mayonnaise
The base of our creamy sauce. If you prefer a vegan option, try silken tofu blended until smooth or a store-bought vegan mayo. -
1 ½ tablespoon sweet Thai chili sauce
Adds sweetness and a delightful kick! Adjust based on your spice tolerance. -
1 ½ teaspoon Sriracha
For that fiery finish! You can adjust the amount to match your heat preference. -
½ teaspoon rice vinegar
Balances out the richness of the mayo. A touch of lemon juice works in a pinch for brightness. -
Optional for serving:
- Cooked jasmine or white rice
For a nice base to soak up all that lovely sauce. - Shredded purple cabbage
Adds a pop of color and crunch. - Julienned carrots
A refreshing, sweet crunch to complement the dish. - Sliced cucumber
Cooling and crisp, perfect alongside the spicy tofu. - Avocado
Creamy slices elevate your dish in a delightful way. - Edamame
A great source of protein, offering a nice bite to the meal.
- Cooked jasmine or white rice
Step-by-Step Instructions
Ready to get cooking? Let’s break it down into easy, manageable steps to make our Bang Bang Tofu shine.
Step 1: Press the Tofu
Before we dive into frying, we need to ensure our tofu is adequately pressed to remove excess moisture. This is crucial for that sought-after crisp! Wrap your tofu block in a clean dish towel or paper towels, and place something heavy on top (like a skillet or canned goods) for about 15-30 minutes. While you wait, you can start preparing your sauce!
Step 2: Prepare Your Sauce
In a small bowl, mix together the mayonnaise, sweet Thai chili sauce, Sriracha, and rice vinegar. Give it a good stir until everything is well combined. Depending on your taste preferences, feel free to adjust the Sriracha for more heat or sweeten it up with a bit more chili sauce. Set this aside while we work on the tofu.
Step 3: Cut the Tofu
Once the tofu is pressed, cut it into even cubes or triangles—whatever shape you prefer! This will help ensure even cooking. The smaller the pieces, the crispier they’ll be, so keep that in mind!
Step 4: Season the Tofu
In a mixing bowl, combine your pressed tofu cubes with soy sauce, olive oil, garlic powder, paprika, cornstarch, salt, and black pepper. Gently toss everything together until each piece of tofu is well coated. This is where the magic begins! The cornstarch helps create that beautiful, crispy crust when cooked.
Step 5: Choose Your Cooking Method
Now, we’ll decide how to cook our tofu. Choose between air frying or pan-frying—both have their perks!
Air Fryer Method:
- Preheat your air fryer to 400°F (200°C).
- Arrange the tofu cubes in a single layer in the air fryer basket (you may need to work in batches).
- Air fry for about 15-20 minutes, shaking the basket halfway through to ensure even crisping. You want them golden brown and crispy!
Pan-Frying Method:
- In a large skillet, heat a few tablespoons of oil over medium-high heat.
- Once the oil is hot, carefully add the tofu in a single layer, making sure not to overcrowd the pan (you may need to cook in batches if necessary).
- Fry each side for about 3-4 minutes or until golden brown and crispy, flipping them gently to avoid breakage. Remove them once they’re perfectly crispy and transfer to a paper towel-lined plate to drain excess oil.
Step 6: Mix the Tofu with the Sauce
Once your tofu is beautifully crispy, return it to the mixing bowl with your prepared sauce. Toss gently to coat each piece without breaking the tofu. You want that yummy sauce to cling to every corner!
Step 7: Assemble Your Dish
It’s time to serve! If you’re adding rice, place a generous scoop on the bottom of your plate. Layer some shredded purple cabbage, julienned carrots, sliced cucumber, and edamame. Finally, finish off by topping with your sauced-up Bang Bang Tofu and a sprinkle of sesame seeds or chopped green onions for that final touch.
Serving Suggestions
For an extra splash of color and texture, consider adding some avocado slices on top of your dish. Not only does it look stunning, but that creamy goodness complements the crispy tofu beautifully. Arrange everything thoughtfully on the plate, showcasing the vibrant colors of the vegetables against the crispy tofu bites. Invite your friends and family to sit down and dig in—this dish is not just a meal; it’s an experience!
Recipe Variations
Let’s sprinkle in some creativity to keep things fresh! Here are a few delightful twist options for our Bang Bang Tofu:
- Spicy Bang Bang Cauliflower: Swap out tofu for cauliflower florets. Just coat them as you would the tofu and roast or air fry until crispy.
- Crispy Bang Bang Eggplant: Eggplant is a fantastic substitution! Slice it into thick rounds, coat similarly, and pan-fry until wonderfully golden.
- Bang Bang Tofu Tacos: Serve your bang bang tofu inside corn tortillas with some fresh cilantro, avocado, and lime for a zesty twist.
- Soy-Free Option: Use coconut aminos instead of soy sauce for a soy-free version while retaining flavor!
Chef’s Notes
Oh, and let me tell you—the evolution of this recipe was a journey! In my early testing days, I experimented endlessly with the sauce, adding ingredients I thought might dazzle. One night, I included too much vinegar by accident—dad walked in, tasted it, and gave me that classic “what have you done?” look. Tuning in to how the flavors meld together was an essential part of the learning process. Perfection comes with practice, and I can promise you, this recipe is a crowd favorite!
FAQs and Troubleshooting
1. Why is my tofu not crispy?
Make sure you press the tofu adequately to remove excess moisture and use cornstarch as a coating. If pan-frying, ensure your oil is hot enough before adding the tofu.
2. Can I make this recipe ahead of time?
You can prep the tofu and sauce ahead, but for the best texture, fry it just before serving. Reheating can make the tofu lose its crispiness.
3. How can I store leftovers?
Store any leftovers in an airtight container in the refrigerator for up to 3 days. To reheat, pop them in the air fryer for a few minutes to revive some of that crispiness.
4. What’s a good dipping sauce?
The bang bang sauce is fantastic on its own; however, a sweet and sour or peanut sauce would also complement the dish beautifully!
Nutritional Info
(Please note this is approximate and may vary based on brands and specific quantities used.)
- Calories: ~350 per serving (based on serving size of tofu and sauce only)
- Protein: ~10g
- Carbohydrates: ~20g
- Fat: ~25g
Conclusion
And there you have it, my friends! A deliciously bold, crispy Bang Bang Tofu dish that’s perfect for any occasion—be it a cozy weeknight dinner or a lively gathering. Remember, the heart of good food is all about making memories, so let this recipe inspire you to gather around the table and share in the beauty of creating meals together.
If you try this recipe (which I guarantee you will love), let me know how it goes! Happy cooking, and here’s to many bang bang moments around your table!
PrintBang Bang Tofu
A crispy, golden tofu dish coated in a creamy, tangy sauce that balances sweet and spicy flavors, perfect for plant-based meals.
- Prep Time: 15 minutes
- Cook Time: 30 minutes
- Total Time: 45 minutes
- Yield: 4 servings 1x
- Category: Main Course
- Method: Air Frying, Pan-Frying
- Cuisine: Asian
- Diet: Vegan
Ingredients
- 1 14–16 oz block extra-firm tofu, pressed and cubed
- 1 tablespoon soy sauce
- 1 tablespoon olive oil
- 1–2 tablespoons cornstarch
- ½ teaspoon garlic powder
- ½ teaspoon paprika
- Salt and black pepper (to taste)
- ¼ cup mayonnaise
- 1 ½ tablespoon sweet Thai chili sauce
- 1 ½ teaspoon Sriracha
- ½ teaspoon rice vinegar
- Optional for serving: cooked jasmine or white rice, shredded purple cabbage, julienned carrots, sliced cucumber, avocado, edamame
Instructions
- Press the tofu to remove excess moisture for about 15-30 minutes.
- Prepare the sauce by mixing mayonnaise, sweet Thai chili sauce, Sriracha, and rice vinegar until well combined.
- Cut the pressed tofu into even cubes or triangles.
- Season the tofu with soy sauce, olive oil, garlic powder, paprika, cornstarch, salt, and black pepper.
- Choose your cooking method: air fryer or pan-frying.
- Mix the crispy tofu with the prepared sauce to coat each piece.
- Assemble the dish with rice and toppings as desired.
Notes
For extra crunch, air fry at 400°F (200°C) for 15-20 minutes, shaking halfway through. Adjust spice levels to personal preference.
Nutrition
- Serving Size: 1 serving
- Calories: 350
- Sugar: 5g
- Sodium: 400mg
- Fat: 25g
- Saturated Fat: 4g
- Unsaturated Fat: 15g
- Trans Fat: 0g
- Carbohydrates: 20g
- Fiber: 3g
- Protein: 10g
- Cholesterol: 0mg
Keywords: Bang Bang Tofu, Vegan Tofu Recipe, Crispy Tofu, Plant-Based Meals, East Asian Cuisine
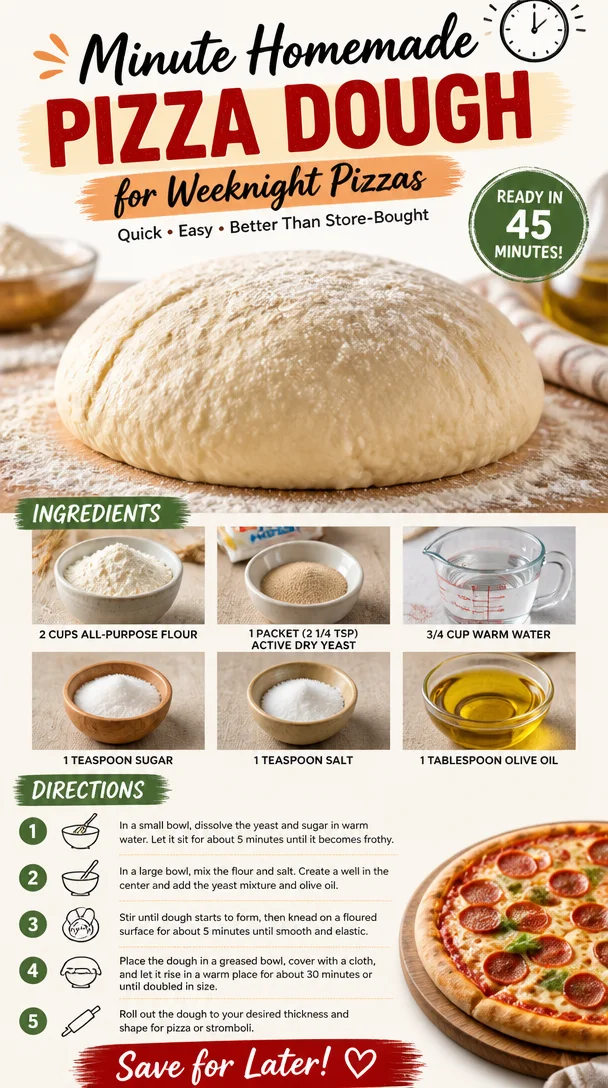
Minute Homemade Pizza Dough for Weeknight Pizzas
The Joy of Homemade: A Simple Guide to Easy Pizza Dough
Hello, kitchen adventurers! Today, we’re diving into something that makes hearts (and stomachs) sing: homemade pizza dough! There’s something so magical about the smell of fresh dough resting on your countertop and the thought of transforming it into your favorite pizza masterpiece. With this easy pizza dough recipe, you’ll be hosting pizza nights that your friends and family will talk about for weeks. So, roll up your sleeves, tie on your ivory apron, and let’s get started!
A Slice of Nostalgia
When I think of pizza, my mind takes me back to childhood, sitting in my grandmother’s dimly lit kitchen surrounded by family. The air was filled with the aroma of melting cheese, bubbling tomato sauce, and the earthy scent of fresh basil. I remember her flour-dusted apron and the twinkle in her eye as she rolled out the dough. We used to gather around the table to shape our own pizzas, each of us crafting our own delicious work of art. It was messy, it was chaotic, but most importantly, it was filled with laughter and togetherness.
One evening, after a bit too much flour had made its way onto the floor, we came up with an “official” title for our creations—“pizza masterpieces.” Each was so unique, from the toppings we chose to the shapes we made. That joyful spirit of creativity and connection is what I want to capture in today’s recipe. Making your own pizza dough might seem a little labor-intensive, but trust me—it’s worth every second when you see your loved ones gathered around the table, ready to enjoy what you’ve created together.
What You’ll Need: Ingredients
Before we jump into the process, let’s gather our ingredients.
-
2 cups all-purpose flour
A versatile choice for creating that perfect base. You can substitute with whole wheat flour for a nuttier flavor or gluten-free flour if you’re avoiding gluten. Just keep in mind that it may affect the texture slightly. -
1 packet (2 1/4 tsp) active dry yeast
This little magic granule helps the dough rise! If you don’t have active dry yeast, you can use instant yeast, which doesn’t require proofing. Just toss it in with the flour! -
3/4 cup warm water
The warmth is crucial for activating the yeast. Make sure it’s not too hot (aim for around 110°F) or it can kill the yeast. If you’re unsure, let it cool for a few moments after boiling. -
1 teaspoon sugar
Just a touch to feed the yeast! It helps the dough rise and adds a hint of sweetness. For a sugar substitute, agave syrup or honey can work too! -
1 teaspoon salt
Essential for flavor! Don’t skip it; it balances the dough. If you’re cutting back on sodium, you can reduce it to 1/2 teaspoon. -
1 tablespoon olive oil
This adds richness and flavor. You can swap it with melted butter or any neutral oil like vegetable or canola oil if you prefer.
Step-by-Step Instructions
Now let’s get to the fun part! Here’s how to make your easy pizza dough step by step:
-
Activate the Yeast: In a mixing bowl, combine the warm water, yeast, and sugar. Stir lightly and let it sit for about 5–10 minutes until it becomes frothy. This shows the yeast is alive and ready to work its magic!
-
Mix the Dry Ingredients: In a large bowl, whisk together the flour and salt. Ensure they’re well combined. Whisking helps to aerate the flour, which makes for a lighter dough.
-
Combine Wet and Dry: Create a well in the center of the flour mixture and pour in the activated yeast mixture and olive oil. Use a fork to mix until a shaggy dough begins to form. It will be quite sticky at this point—don’t worry, that’s perfect!
-
Knead the Dough: Dust your countertop with a little flour and transfer the dough onto it. Knead for about 5–7 minutes until it’s smooth and elastic. If the dough is too sticky, sprinkle a little extra flour as you knead. Proudly channel your inner chef here!
-
Let It Rise: Once kneaded, shape the dough into a ball and place it into a lightly greased bowl. Cover with a damp cloth or plastic wrap. Let it rise in a warm place for about 1 hour, or until it has doubled in size. This is the perfect time to clean up or prepare your toppings!
-
Preheat Your Oven: About 30 minutes before you’re ready to bake, preheat your oven to 475°F (245°C). If you’re using a pizza stone, place it in the oven while it’s heating to ensure it’s hot enough to create a crispy crust.
-
Shape Your Pizza: Once the dough has risen, punch it down to release the air and turn it out onto a floured surface. Divide it into two halves if you want to make two pizzas (or save half for later!). Roll it out with a rolling pin or stretch it by hand to your desired thickness.
-
Top and Bake: Now comes the fun part! Add your favorite sauce, cheese, and toppings. Slide your pizza onto the hot pizza stone or a baking sheet. Bake for 10-12 minutes, or until the cheese is bubbling and the crust is golden brown.
Serving Suggestions
Once your pizza is out of the oven, it’s time to serve! Let it cool for a couple of minutes, then slice it up with a sharp pizza cutter. For an extra touch, drizzle a little olive oil or sprinkle fresh herbs over the top. Presenting your creation on a wooden board with some fresh arugula or a side salad makes it feel extra special. Enjoy with a fresh glass of sparkling water or your favorite beverage!
Recipe Variations
Here are a few fun twists to try with your pizza dough:
-
Herbed Dough: Add 1 tablespoon of Italian seasoning or fresh herbs like rosemary or basil into the flour for extra flavor.
-
Whole Wheat Dough: Swap half of the all-purpose flour with whole wheat for a nutty taste and added nutrition.
-
Cheese-Stuffed Crust: Roll the edges of the dough around some mozzarella sticks before baking for a cheesy surprise!
-
Calzone Variation: Use half the dough to create a delicious calzone stuffed with your favorite fillings.
Chef’s Notes
Over the years, this pizza dough recipe has grown alongside my love for hosting. I started off with a very basic formula and tweaked it as I discovered different flavors and techniques. The best part? I’ve hosted various pizza parties where guests create their own masterpieces, just like I did with my grandmother. There’s magic in that shared experience—the laughter, the taste of crispy crust, and the delight of cooking together.
And don’t get me started on the joy of leftovers! Cold pizza for breakfast? Yes, please! Sometimes I reinvent the dough too, using toppings from the previous night’s meal.
FAQs and Troubleshooting
Q: My dough isn’t rising. What went wrong?
A: It could be that your yeast is expired or the water was too hot. Make sure your water is warm, not boiling! If it’s your first time, double-check the expiration on the yeast packet.
Q: Can I freeze the dough?
A: Absolutely! After the first rise, you can wrap the dough tightly in plastic wrap and store it in the freezer for up to three months. Just defrost in the fridge overnight when you’re ready to use it.
Q: My pizza crust is too thick and doughy. How can I make it thinner?
A: When shaping the pizza, be sure to stretch it out evenly. If you prefer a thinner crust, roll it out to about 1/4 inch thick instead of 1/2 inch.
Q: How can I make the crust crispier?
A: Preheating your oven and pizza stone is crucial! Also, using a baking sheet directly on the oven rack can help. For an even crisper crust, you can also bake the pizza on a perforated pizza pan.
Nutritional Info (optional)
While I focus more on deliciousness than nutritional details, here’s a rough estimation for one serving of this pizza dough (based on the entire recipe divided into 4 servings):
- Calories: 150
- Protein: 4g
- Fat: 3g
- Carbohydrates: 26g
Remember, toppings will vary, so be sure to factor those in as well!
And there you have it! Your easy pizza dough recipe is ready to inspire countless culinary creations. Remember, cooking is all about joy and connection, so gather your friends and family, and let’s make some pizza memories! Bon appétit!
PrintHomemade Pizza Dough
An easy and versatile recipe for making homemade pizza dough, perfect for family pizza nights.
- Prep Time: 15 minutes
- Cook Time: 12 minutes
- Total Time: 1 hour 27 minutes
- Yield: 4 servings 1x
- Category: Main Course
- Method: Baking
- Cuisine: Italian
- Diet: Vegetarian
Ingredients
- 2 cups all-purpose flour
- 1 packet (2 1/4 tsp) active dry yeast
- 3/4 cup warm water
- 1 teaspoon sugar
- 1 teaspoon salt
- 1 tablespoon olive oil
Instructions
- Activate the yeast: In a mixing bowl, combine the warm water, yeast, and sugar. Stir lightly and let it sit for about 5–10 minutes until it becomes frothy.
- Mix the dry ingredients: In a large bowl, whisk together the flour and salt.
- Combine wet and dry: Create a well in the center of the flour mixture and pour in the activated yeast mixture and olive oil.
- Knead the dough: Dust your countertop and transfer the dough. Knead for about 5–7 minutes until smooth and elastic.
- Let it rise: Shape the dough into a ball and place it in a greased bowl. Cover and let it rise for about 1 hour.
- Preheat your oven: About 30 minutes before baking, preheat your oven to 475°F (245°C).
- Shape your pizza: Punch down the risen dough and divide if making two pizzas. Roll out to desired thickness.
- Top and bake: Add your favorite toppings and bake for 10-12 minutes, or until golden brown.
Notes
For a unique flavor, try adding Italian seasoning or using whole wheat flour. Leftover dough can be frozen for later use.
Nutrition
- Serving Size: 1 serving
- Calories: 150
- Sugar: 1g
- Sodium: 400mg
- Fat: 3g
- Saturated Fat: 0.5g
- Unsaturated Fat: 2g
- Trans Fat: 0g
- Carbohydrates: 26g
- Fiber: 1g
- Protein: 4g
- Cholesterol: 0mg
Keywords: pizza, dough, homemade, Italian, family recipe
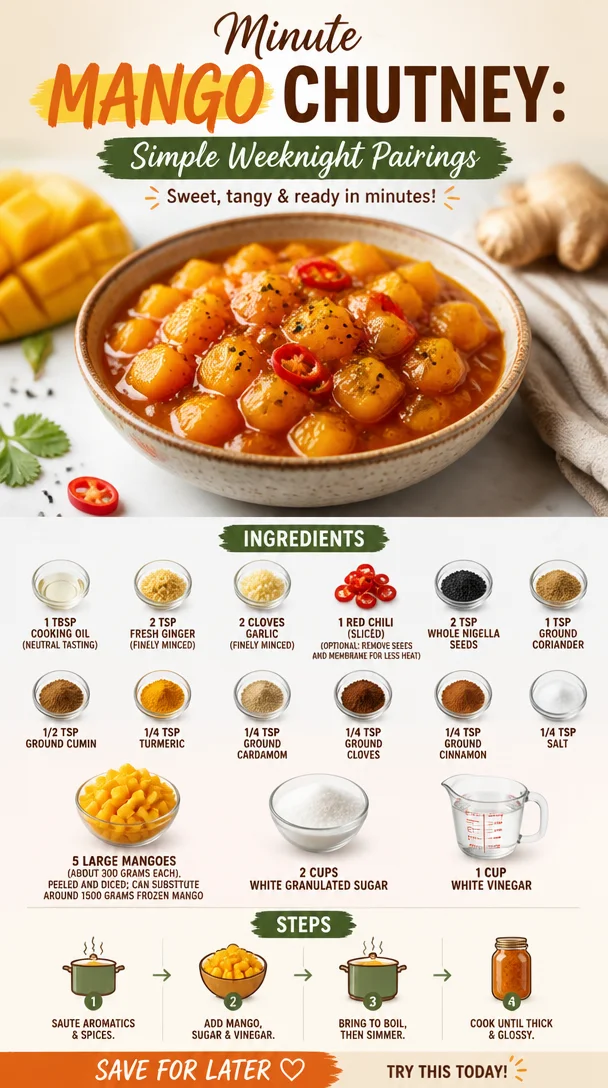
Minute Mango Chutney: Simple Weeknight Pairings
The Best Mango Chutney: A Flavorful Companion for Every Table
Welcome back to Ivory Apron, food lovers! Today, we’re diving into the colorful and aromatic world of Mango Chutney. This delightful condiment is not just a burst of flavor; it’s a bridge between cultures, a celebration of fresh ingredients, and a way to spice up your everyday meals. Whether you’re slathering it on grilled meats or using it to brighten up a simple cheese platter, mango chutney is the sticky-sweet nectar that adds a splash of personality to your dishes.
As you prepare to embark on this culinary adventure, I want you to know that this is more than just a recipe; it’s a chance to gather your loved ones and create beautiful moments around your table. So, let’s roll up our sleeves, tie on our aprons, and get ready to make the best mango chutney you’ll ever taste!
A Personal Story
Ah, mangoes! They hold a special place in my heart. Growing up, my grandmother had a mango tree that seemed to bear fruit all summer long. I remember spending lazy afternoons under that tree, the air thick with sweet, tropical scents. Grandpa would climb up to pluck the ripe mangoes, handing them down to us with a grin. Some would end up in our bellies, while others would be transformed into her famous chutney.
The kitchen was a symphony of sounds: the rhythmic chopping of mangoes, the sizzling of spices, and the occasional giggle as we tasted and adjusted flavors. That chutney was a staple at every family gathering, the perfect accompaniment to curries and grilled meats. As I learned to replicate her recipe, I treasured every bite of nostalgia. Now, it’s time to share that joy with you!
Ingredients
Here’s everything you’ll need to create this vibrant and delicious mango chutney:
-
1 tablespoon cooking oil (neutral-tasting): A light oil like canola or sunflower allows the spices to shine without overwhelming the other flavors.
-
2 teaspoons fresh ginger (finely minced): Ginger adds a warm heat and lots of depth. If you don’t have fresh, you can use ground ginger, but it won’t have the same freshness.
-
2 cloves garlic (finely minced): Garlic brings a savory richness that complements the sweetness of the mango.
-
1 red chili (sliced): For those who crave a bit of spice! Removing the seeds and membrane will tone down the heat, making it milder.
-
2 teaspoons whole nigella seeds: These little black seeds add a unique, slightly onion-like flavor. If you can’t find them, cumin seeds will make a good substitute.
-
1 teaspoon ground coriander: Adds herbal undertones. Ground cumin can replace this if you’re out.
-
1/2 teaspoon ground cumin: Earthy and warm, it pairs perfectly with the sweetness of mango.
-
1/4 teaspoon turmeric: Adds beautiful color and a hint of bitterness, balancing out the sweetness.
-
1/4 teaspoon ground cardamom: This fragrant spice will elevate your mango chutney with a touch of elegance.
-
1/4 teaspoon ground cloves: Strong in flavor, so a little goes a long way here.
-
1/4 teaspoon ground cinnamon: Sweet and warm—this is what gives your chutney that cozy, comforting essence.
-
1/4 teaspoon salt: Don’t skip this; it’ll enhance all those beautiful flavors!
-
5 large mangoes (about 300 grams each, peeled and diced): Ripe, juicy mangoes are the star of this show! If fresh mangoes are out of season, feel free to substitute them with around 1500 grams of frozen mango.
-
2 cups white granulated sugar: This balances the tanginess and adds the classic chutney sweetness. Brown sugar can also work if you want a deeper flavor.
-
1 cup white vinegar: Provides the necessary acidity to balance the sweetness and acts as a preserving agent—essential for keeping your chutney fresh.
Step-by-Step Instructions
Now let’s get cooking! Here’s how to make this mouthwatering mango chutney:
-
Prep Your Ingredients:
Start by gathering all your ingredients. Dice the mangoes and set them aside. Mince your ginger and garlic, and slice your red chili (remember to remove seeds for less heat!). -
Heat the Oil:
In a large saucepan, heat 1 tablespoon of cooking oil over medium heat. You’ll want that oil just hot enough to sizzle when you add your ginger and garlic. -
Sauté the Aromatics:
Once the oil is hot, throw in the minced ginger and garlic. Sauté them for about 1-2 minutes until fragrant. Keep an eye on them; you want them golden, not burnt! -
Add the Spices:
Toss in the red chili, nigella seeds, ground coriander, cumin, turmeric, cardamom, cloves, cinnamon, and salt. Stir everything together for about 30 seconds. This step blooms the spices, releasing their natural oils and enhancing their flavors. -
Incorporate the Mangoes:
Now, it’s time to add your diced mangoes to the pan. Stir gently to coat the mango pieces with the spice mixture. Allow them to cook for about 5 minutes on medium heat until they start to break down. -
Sweeten the Pot:
Pour in the sugar and vinegar. Stir until the sugar has completely dissolved, and the mixture becomes syrupy. Let this cook for another 15-20 minutes on low heat. Stir occasionally to prevent sticking while watching the mangoes transform into a tantalizing chutney. -
Check Your Consistency:
After about 20 minutes, you want your chutney to be thick and glossy. If it’s not there yet, simmer for a few extra minutes, stirring gently. -
Cool and Store:
Once your chutney has reached the desired consistency, remove it from the heat and let it cool. Transfer to a clean, sterilized jar. It will keep well in the fridge for up to a month (although I doubt it’ll last that long!).
Serving Suggestions
Mango chutney is incredibly versatile! Serve it alongside grilled chicken or fish for a tropical twist, or pair it with cheese and charcuterie for a vibrant appetizer spread. A dollop on top of a savory curry can elevate it to new heights. If you have leftovers, try mixing some chutney into a yogurt dip for a refreshing sidekick!
Recipe Variations
-
Spicy Mango Chutney: If you like it hot, be brave! Add a few more red chilies or include a splash of hot sauce for an extra kick.
-
Herbed Chutney: Stir in fresh herbs like cilantro or mint after cooking to add a refreshing element.
-
Peach-Mango Fusion: Swap out half the mangoes for peaches when they’re in season. It makes for a fantastic summer chutney!
-
Apple-Mango Chutney: Try adding diced apples for a crunchy texture and a hint of tartness.
-
Curry-Infused Chutney: Add a teaspoon of curry powder to the spice mix for a unique twist that amplifies the flavors.
Chef’s Notes
You know, every time I whip up a batch of this mango chutney, I can’t help but think of that sunny summer day under my grandmother’s tree. Each preparation feels like a step back in time—a playful mix of nostalgia and innovation. Over the years, I’ve experimented with different spices and fruit combinations, and it has been a thrilling journey.
One funny mishap happened when I accidentally over-sweetened a batch while trying to use up leftover holiday sugar. A quick pinch of salt and a dash of vinegar transformed my gooey mess into a sweet-and-savory masterpiece—sometimes our kitchen “oops” can lead to delightful surprises!
FAQs and Troubleshooting
-
Why is my chutney too sweet?
If your chutney tastes overly sweet, add a splash more vinegar to balance it out. Remember, a little salt can also enhance the flavors. -
Can I use frozen mangoes?
Absolutely! Frozen mango works great, but make sure to let them thaw a bit and drain any excess liquid before cooking. -
How thick should the chutney be?
The chutney will thicken as it cools. Ideally, it should be thick enough to dollop on a plate but still somewhat pourable. -
How should I store the chutney?
Store your chutney in a clean, airtight jar in the refrigerator. It can last for up to a month, but trust me, it won’t last long with how delicious it is!
Nutritional Info
While I believe in enjoying food without guilt, it’s always handy to know what you’re serving. Here’s a simple breakdown per tablespoon of chutney:
- Calories: 70 kcal
- Fat: 0.5g
- Carbohydrates: 17g
- Sugar: 14g
- Fiber: 1g
So there you have it! A lush, delectable mango chutney that’s bound to bring joy to your gatherings and family dinners. This recipe is not just about feeding the stomach; it’s about nourishing the soul and creating memories that will last long after the meal is finished. Until next time, happy cooking, and may your table be filled with love and laughter!
Let’s keep those aprons tied on tight while we create and celebrate together!
PrintThe Best Mango Chutney
A vibrant and flavorful mango chutney that adds a splash of personality to any dish.
- Prep Time: 15 minutes
- Cook Time: 45 minutes
- Total Time: 60 minutes
- Yield: 10 servings 1x
- Category: Condiment
- Method: Cooking
- Cuisine: Indian
- Diet: Vegetarian
Ingredients
- 1 tablespoon cooking oil (neutral-tasting)
- 2 teaspoons fresh ginger (finely minced)
- 2 cloves garlic (finely minced)
- 1 red chili (sliced)
- 2 teaspoons whole nigella seeds
- 1 teaspoon ground coriander
- 1/2 teaspoon ground cumin
- 1/4 teaspoon turmeric
- 1/4 teaspoon ground cardamom
- 1/4 teaspoon ground cloves
- 1/4 teaspoon ground cinnamon
- 1/4 teaspoon salt
- 5 large mangoes (about 300 grams each, peeled and diced)
- 2 cups white granulated sugar
- 1 cup white vinegar
Instructions
- Prep Your Ingredients: Gather all your ingredients. Dice the mangoes and set them aside. Mince your ginger and garlic, and slice your red chili (remove seeds for less heat).
- Heat the Oil: In a large saucepan, heat 1 tablespoon of cooking oil over medium heat until sizzles when you add ginger and garlic.
- Sauté the Aromatics: Add minced ginger and garlic, sauté for 1-2 minutes until fragrant.
- Add the Spices: Toss in red chili, nigella seeds, ground coriander, cumin, turmeric, cardamom, cloves, cinnamon, and salt. Stir for 30 seconds to bloom the spices.
- Incorporate the Mangoes: Add diced mangoes and stir to coat with the spices. Cook for about 5 minutes on medium heat until they start to break down.
- Sweeten the Pot: Pour in sugar and vinegar, stir until sugar dissolves, then cook for another 15-20 minutes on low heat until syrupy.
- Check Your Consistency: Ensure chutney is thick and glossy, simmering longer if needed.
- Cool and Store: Once thickened, remove from heat, let cool, and store in a sterilized jar in the fridge for up to a month.
Notes
Consider adding fresh herbs or spices for variations. Store in a clean, airtight jar for freshness.
Nutrition
- Serving Size: 1 tablespoon
- Calories: 70
- Sugar: 14g
- Sodium: 240mg
- Fat: 0.5g
- Saturated Fat: 0g
- Unsaturated Fat: 0.5g
- Trans Fat: 0g
- Carbohydrates: 17g
- Fiber: 1g
- Protein: 0g
- Cholesterol: 0mg
Keywords: mango chutney, condiment, sweet and spicy, Indian recipes, mango recipes
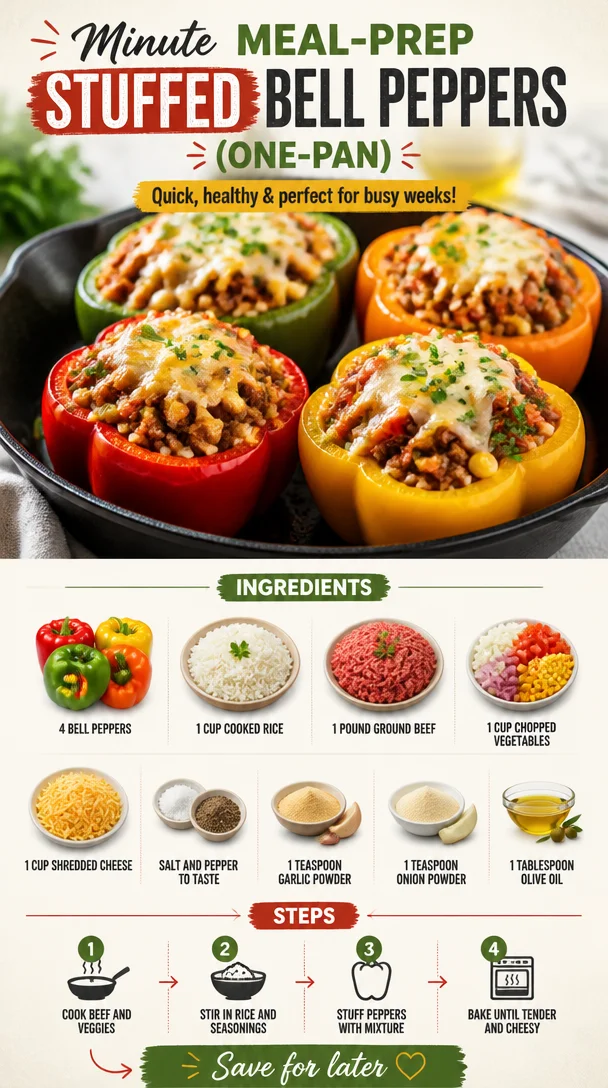
Minute Meal-Prep Stuffed Bell Peppers (One-Pan)
Stuffed Bell Peppers: An Elegant Comfort Food for Every Table
Hello, fellow foodies! Today, we’re diving into a dish that’s not just a staple of cozy family dinners but also a canvas for creativity in the kitchen: Stuffed Bell Peppers. These vibrant vegetables, when filled with a delicious medley of ingredients, transform into a feast for the eyes and the stomach! Plus, they’re as fun to make as they are to eat. So roll up your sleeves, tie on your apron, and let’s create something wonderful together.
Introduction
Have you ever had that moment in the kitchen where you create something so delicious that the entire family gathered around the table falls silent in awe? That’s the magic of cooking, my friends. Stuffed bell peppers are reminiscent of my early kitchen adventures, where I learned that cooking isn’t merely about following a recipe—it’s about storytelling and connection.
These beauties are not only colorful and appetizing but also incredibly versatile. You can stuff them with whatever your heart desires! Classic beef and rice, zesty chicken and quinoa, or even a hearty vegetarian mix. They’re essentially blank canvases ready for you to paint your culinary masterpiece.
When you serve stuffed bell peppers, the world seems a little brighter. Their joyful colors contrast beautifully on any table, inviting guests to dig in and enjoy. It’s a beautiful small act of hospitality, transforming a simple meal into a memorable experience.
So, let’s get cooking! You’ll find a delightful combination of flavors and textures in this stuffed peppers recipe, and I promise it’s easy enough for any level of cook.
Personal Story
I remember the first time I made stuffed bell peppers. It was a rainy Saturday afternoon when my mom casually mentioned she could use some help in the kitchen. I was only about ten years old, and even though I had spent time observing her culinary skills, I wasn’t quite ready for the spotlight. But how could I resist the warm aroma of onions sizzling away?
We decided to turn those beautiful, shiny bell peppers into stuffed marvels. I was so excited! With it being an impromptu cooking class, my mom taught me how to cut the peppers with care, ensuring I didn’t slice my fingers (thanks, mom!). The best part was stuffing them with passion and laughter, sneaking bites of the flavorful filling as we prepared.
Fast forward to now, and I still make these peppers, perhaps with a few more culinary skills under my belt. Each time I whip them up, I’m reminded of those carefree afternoons filled with love and laughter. And now it’s my pleasure to share this beloved recipe so you can create your own memories around the table!
Ingredients
To create these delicious stuffed bell peppers, gather the following ingredients:
-
4 bell peppers: Choose your favorite colors—red, yellow, or green. Each adds its own unique flavor. If you’re short on bell peppers, zucchini or eggplant can be a fun alternative!
-
1 cup cooked rice: It acts as the base of our filling. You can use white, brown, or even cauliflower rice for a low-carb option.
-
1 pound ground beef: This gives a hearty texture. If you prefer leaner meat, turkey or chicken works beautifully too!
-
1 cup chopped vegetables: Think onions, diced tomatoes, or corn. Fresh veggies add crunch and nutrition. Got leftover veggies? Chop them up and toss them in!
-
1 cup shredded cheese: Cheddar, mozzarella, or pepper jack for a kick! Cheese makes everything better, but you can omit it for a dairy-free option.
-
Salt and pepper to taste: Always important for balancing flavors!
-
1 teaspoon garlic powder: A quick and easy way to add mouthwatering flavor.
-
1 teaspoon onion powder: It complements the fresh onions or can stand in if you’re out.
-
1 tablespoon olive oil: For sautéing the vegetables, adding a healthy touch!
Step-by-Step Instructions
Ready to stuff some peppers? Here’s a simple step-by-step guide that’ll have you looking like a pro in no time!
-
Preheat Your Oven: Start by preheating your oven to 375°F (190°C). This is key for getting those peppers nice and tender while the filling gets melty and magical.
-
Prepare the Peppers: Cut the tops off your bell peppers and scoop out the seeds. Don’t toss those tops! Finely chop them and add to your filling later. (Tip: If your peppers won’t stand upright, don’t be afraid to trim a bit off the bottom—just be careful not to create a hole!)
-
Sauté the Vegetables: In a skillet, heat the olive oil over medium heat. Add the chopped peppers, onions (if you’re using them), garlic powder, and onion powder. Sauté for about 5-7 minutes until they soften. This will bring out their natural sweetness.
-
Add the Meat: Crumble in the ground beef, seasoning it with salt and pepper. Cook until it’s browned and no longer pink. (Chef’s hack: Use a wooden spoon to break up the meat for even cooking!)
-
Combine the Filling: Once the meat is nicely browned, turn off the heat and stir in the cooked rice and any additional chopped veggies. If you’re feeling extra saucy, this is when you could mix in some salsa or diced tomatoes for added moisture.
-
Cheese It Up: Fold in half of your shredded cheese into the filling mix. This gives it that creamy texture and helps bind everything together.
-
Stuff Those Peppers: Generously spoon the filling into each bell pepper, pressing it down gently to pack it in. Don’t be shy—overfilling is encouraged!
-
Top with Cheese: Place the stuffed peppers upright in a baking dish and sprinkle the remaining cheese on top (the more cheese, the better!).
-
Bake Them: Cover the dish with foil and bake at 375°F for about 25 minutes. Then, remove the foil and bake for another 10-15 minutes until the peppers are tender and the cheese is bubbly and golden.
-
Rest and Serve: Let them cool for a few minutes before serving. This helps the flavors settle and makes them easier to handle.
Serving Suggestions
For an inviting presentation, arrange the stuffed peppers on a large plate or a wooden serving board. Serve alongside a fresh green salad or some garlic bread. Drizzle with a little olive oil or balsamic glaze for added sparkle. And don’t forget those little touches—a sprinkle of fresh herbs like parsley or cilantro for color and vibrance!
Recipe Variations
-
Mexican Style: Swap the rice for quinoa and add spices like cumin and chili powder. Top with avocado and fresh cilantro for a twist!
-
Mediterranean Delight: Use feta cheese, olives, and cooked couscous for a Mediterranean spin. Finish with a squeeze of lemon juice for brightness.
-
Vegetarian Version: Replace the beef with black beans or lentils. Add in extra veggies like mushrooms, spinach, or zucchini.
-
Spicy Kick: Mix in jalapeños or spicy sausage for those who love a little heat!
-
Comfort Food Classic: Stir in a can of tomato soup into the stuffing for a creamy, comforting surprise.
Chef’s Notes
Ah, stuffed peppers have come a long way since my mom and I first whipped them up! Initially, I was all about the classic beef and rice method. However, over the years, I began exploring different combinations, opening up a world of possibilities. Whether you decide to use leftovers, create a vegetarian option, or even play with spices, this recipe is truly foolproof!
Remember, don’t stress about perfection; cooking should be fun! There are days when the stuffing spills out of the peppers while baking, and that’s OK! It just adds more flavor to the pan. And if a few bits fall onto the plate, that just means more for tasting!
FAQs and Troubleshooting
-
What if my peppers are too firm after baking?
If you prefer softer peppers, simply extend the baking time by 10 minutes. You can also steam the peppers in the microwave for a couple of minutes before stuffing them. -
Can I prepare these ahead of time?
Absolutely! You can prepare the stuffed peppers and store them in the fridge for up to 24 hours before baking. Just add a few extra minutes to the cooking time. -
What’s the best way to reheat leftovers?
Place the peppers in a baking dish with a little splash of water to keep them moist and cover with foil. Heat at 350°F for about 15-20 minutes, or until warmed through. -
How do I choose the right bell peppers?
Look for firm, unblemished peppers with shiny skin—these are the freshest. Heavier peppers usually have thicker walls and more flesh for stuffing!
Nutritional Info
For a rough estimate: Each stuffed pepper contains approximately 350 calories, 20g of protein, and 15g of fat (depending on the chosen ingredients). They are a hearty meal packed with vegetables!
And there you have it—your ultimate guide to making stunning stuffed bell peppers! With this recipe, not only do you get to enjoy a beautiful meal, but you also get to create cherished moments with those around your table. Remember, each dish is an opportunity for love and laughter. So gather those you care about, and let’s make something magical together. Cheers to cooking with the heart!
PrintStuffed Bell Peppers
Colorful and hearty stuffed bell peppers made with a delicious filling of beef, rice, and fresh vegetables, perfect for family dinners!
- Prep Time: 15 minutes
- Cook Time: 30 minutes
- Total Time: 45 minutes
- Yield: 4 servings 1x
- Category: Main Course
- Method: Baking
- Cuisine: American
- Diet: Mixed
Ingredients
- 4 bell peppers (any color)
- 1 cup cooked rice
- 1 pound ground beef
- 1 cup chopped vegetables (onions, diced tomatoes, corn)
- 1 cup shredded cheese (cheddar, mozzarella, or pepper jack)
- Salt and pepper to taste
- 1 teaspoon garlic powder
- 1 teaspoon onion powder
- 1 tablespoon olive oil
Instructions
- Preheat your oven to 375°F (190°C).
- Prepare the peppers by cutting off the tops and scooping out the seeds, saving the tops for later.
- Sauté the vegetables in a skillet with olive oil over medium heat for 5-7 minutes.
- Add the ground beef and season with salt and pepper, cooking until browned.
- Combine the cooked rice and any additional vegetables into the skillet, mixing well.
- Cheese it up by folding in half of the shredded cheese into the filling.
- Stuff the mixture into the peppers, pressing down gently.
- Top the peppers with the remaining cheese.
- Bake for 25 minutes covered with foil, then uncover and bake for an additional 10-15 minutes.
- Rest for a few minutes, then serve warm.
Notes
Feel free to customize the filling with whatever leftover vegetables you have or try different spices for a unique flavor!
Nutrition
- Serving Size: 1 stuffed pepper
- Calories: 350
- Sugar: 5g
- Sodium: 400mg
- Fat: 15g
- Saturated Fat: 6g
- Unsaturated Fat: 8g
- Trans Fat: 0g
- Carbohydrates: 40g
- Fiber: 4g
- Protein: 20g
- Cholesterol: 60mg
Keywords: stuffed peppers, comfort food, family dinner, bell peppers, easy recipes
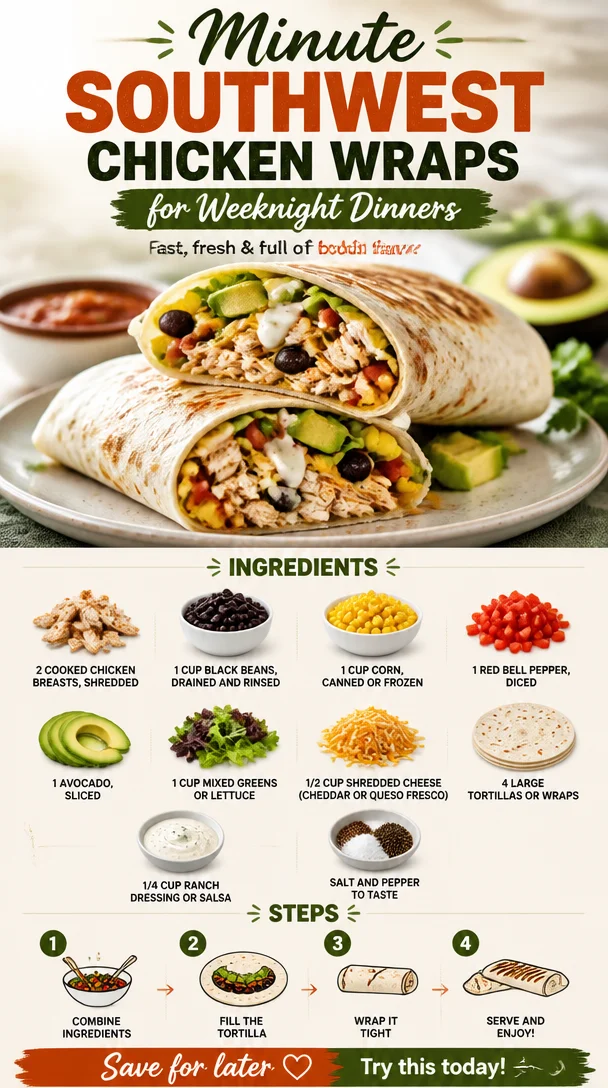
Minute Southwest Chicken Wraps for Weeknight Dinners
Southwest Chicken Wraps: A Flavorful Journey to Your Kitchen Table
Hello, fellow food lovers! Today, we’re diving into a dish that’s not only scrumptious but also a fiesta of flavors: Southwest Chicken Wraps! This recipe is close to my heart for many reasons, from its vibrant ingredients to its effortless preparation. It’s the perfect balance of health, satisfaction, and a touch of fun that makes it an ideal meal for any day of the week! So, grab your apron, and let’s whip up something truly delightful.
A Taste of Nostalgia
One of my fondest memories is from a lazy summer afternoon spent at my best friend Mia’s house. With the sun pouring through her kitchen window and laughter filling the air, we decided to make wraps for lunch—specifically, Southwest Chicken Wraps. I vividly remember the clatter of the knife against the cutting board as we diced bell peppers, the sound of laughter as we debated which dressing was the best, and the satisfaction of rolling our wraps with just the right amount of filling.
Mia’s mom, an expert home cook, quietly guided us while also sharing stories from her childhood in the Southwest. Each ingredient came with a story and a sprinkle of love. Once we sat down to devour our creations, it felt less like a meal and more like a celebration. Every bite was a burst of flavor, and we felt like culinary geniuses. That day instilled in me the joy of cooking for friends and family—something I cherish deeply and aim to replicate with my own recipes today.
Ingredients
Now, let’s talk about what you’ll need to create these delightful Southwest Chicken Wraps. Each ingredient is a key player in shaping the dish—a mix of textures and flavors that come together harmoniously.
-
2 cooked chicken breasts, shredded
For the best results, use grilled or rotisserie chicken. You can substitute with turkey or even chickpeas for a vegetarian twist! -
1 cup black beans, drained and rinsed
These not only add protein but also give a wonderful creamy texture. You could swap them out for pinto beans if you prefer. -
1 cup corn, canned or frozen
Sweet corn brings a burst of freshness. If you’re feeling adventurous, try roasted corn for deeper flavor! -
1 red bell pepper, diced
Sweet, crunchy, and colorful! Feel free to use yellow or orange peppers for a different taste palette. -
1 avocado, sliced
Creamy goodness! If avocados are out of season, consider using guacamole—just keep the seasoning in check! -
1 cup mixed greens or lettuce
Any green will do! Spinach or arugula can add a peppery kick. -
1/2 cup shredded cheese (cheddar or queso fresco)
Add a layer of creaminess with cheese! Try pepper jack for an extra kick or vegan cheese for a dairy-free option. -
4 large tortillas or wraps
Choose whole-wheat for a healthier option or a gluten-free wrap if necessary. -
1/4 cup ranch dressing or salsa
This is where you can really play with flavors! Swap ranch for a creamy chipotle dressing, or go full salsa for something fresher. -
Salt and pepper to taste
Always taste as you go to get the seasoning just right!
Step-by-Step Instructions
Let’s get cooking! Here’s how to bring these mouthwatering Southwest Chicken Wraps to life.
-
Prepare the Chicken
In a large bowl, shred your cooked chicken breasts using two forks. If you’re short on time, pre-shredded chicken from the store could also work! Season with salt and pepper and toss in with a tablespoon of salsa or ranch dressing for added flavor.
Little tip: If you’re using leftover chicken, warming it slightly in a pan can enhance the flavor! -
Mix in the Goodies
Add the drained black beans, corn, diced red pepper, and a pinch of salt to the bowl with the chicken. Mix thoroughly to combine the ingredients. You’re aiming for a colorful combination that looks as good as it tastes!
Commentary: Tossing the ingredients allows the black beans to soak up some of the chicken’s juices, making everything even more flavorful! -
Assemble the Wrap
Lay out your tortillas on a clean surface. Begin by placing a generous scoop of the chicken mixture in the center of each tortilla. Layer on a few slices of avocado, a handful of mixed greens or lettuce, and a sprinkle of cheese. Drizzle with more ranch or salsa if desired.
Chef hack: Always keep your filling towards the center, leaving space on the sides to fold in! -
Rolling It Up
To wrap, fold in the sides first, then roll from the bottom upwards to create a neat little parcel. Make sure to tuck as you roll to keep everything in place!
Pro tip: If you’re worried about your wrap falling apart, you can secure it with a toothpick or wrap it in parchment paper for serving! -
Finish with a Toast
If you’re feeling fancy and want to add a touch of crispiness, place the wraps seam-side down in a skillet over medium heat. Cook for about 2-3 minutes on each side or until golden brown.
Little chef secret: This step not only crisp up the wraps but also warms them nicely!
Serving Suggestions
Now that your Southwest Chicken Wraps are ready, it’s time to plate! Cut each wrap in half to showcase the colorful filling inside. Serve with a side of extra salsa or even guacamole for dipping. You might want to include some tortilla chips or a light salad on the side to balance the meal. Enjoyably messy, these wraps are meant to be eaten with your hands—perfect for a casual gathering or weeknight dinner!
Recipe Variations
A little creativity goes a long way! Here are some fun twists on our Southwest Chicken Wraps:
- Spicy Southwest Wrap: Add diced jalapeños or a drizzle of hot sauce for that extra kick.
- Mediterranean Twist: Swap chicken for shredded lamb or falafel and add tzatziki sauce instead of ranch.
- Vegan Delight: Replace chicken with grilled portobello mushrooms and use hummus instead of ranch.
- Breakfast Wrap: Fill with scrambled eggs instead of chicken, along with sautéed veggies and cheese for a hearty breakfast!
- Mango Salsa Kick: Toss in a spoonful of mango salsa for a sweet and savory flavor.
Chef’s Notes
Making Southwest Chicken Wraps reminds me of those sun-soaked afternoons with friends. They’ve been a staple in my kitchen since that summer, evolving along the way as I experimented with different flavors and ingredients. What started as a fun lunch has blossomed into a delightful dinner favorite.
I must tell you—a funny story: the first time I made these wraps, I was so excited to impress my friends that I forgot the avocado and ran out to the grocery store mid-prep! I laughed at myself for the extra trip, but that’s the beauty of cooking—there’s always room for a little improvisation.
FAQs and Troubleshooting
1. What if my wraps fall apart?
To avoid this, don’t overfill your wraps. Tuck the filling in tightly while rolling, and consider using a toothpick to hold them together until serving.
2. Can I make these wraps ahead of time?
Absolutely! Assemble the wraps, and wrap them tightly in plastic or parchment paper. Store in the fridge for up to 24 hours. Just wait to add the avocado until right before eating to keep it fresh.
3. What if I don’t like ranch dressing?
No problem! You can always swap ranch for your favorite dressing, or simply use a squeeze of lime and sprinkle of cumin for a fresh, zesty flavor.
4. Can I freeze these wraps?
Not ideal for freezing as the veggies may lose their crispness upon thawing. However, you can freeze the chicken mixture and assemble the wraps fresh when you’re ready!
Nutritional Info (Optional)
If you’re interested in the nutritional content of these delicious Southwest Chicken Wraps, a typical serving provides approximately:
- Calories: 450
- Protein: 30g
- Carbohydrates: 40g
- Fat: 18g
(Note: Nutritional values may vary based on specific ingredients used.)
So there you have it, a comprehensive guide to crafting your own Southwest Chicken Wraps from scratch! I hope you find joy in preparing these tasty wraps as much as I do. Remember, cooking is about sharing love and laughter, and there’s no better way to do that than around the table. Until next time, happy cooking, and don’t forget to tie on your apron!
PrintSouthwest Chicken Wraps
A flavorful journey with succulent chicken, black beans, corn, and fresh veggies wrapped in a tortilla, perfect for casual gatherings or weeknight dinners.
- Prep Time: 15 minutes
- Cook Time: 10 minutes
- Total Time: 25 minutes
- Yield: 4 servings 1x
- Category: Main Course
- Method: Assembling and Cooking
- Cuisine: Mexican
- Diet: None
Ingredients
- 2 cooked chicken breasts, shredded
- 1 cup black beans, drained and rinsed
- 1 cup corn, canned or frozen
- 1 red bell pepper, diced
- 1 avocado, sliced
- 1 cup mixed greens or lettuce
- 1/2 cup shredded cheese (cheddar or queso fresco)
- 4 large tortillas or wraps
- 1/4 cup ranch dressing or salsa
- Salt and pepper to taste
Instructions
- Prepare the Chicken: In a large bowl, shred your cooked chicken breasts using two forks. Season with salt and pepper and toss in with a tablespoon of salsa or ranch dressing for added flavor.
- Mix in the Goodies: Add the drained black beans, corn, diced red pepper, and a pinch of salt to the bowl with the chicken. Mix thoroughly to combine the ingredients.
- Assemble the Wrap: Lay out your tortillas on a clean surface. Place a generous scoop of the chicken mixture in the center of each tortilla. Layer on a few slices of avocado, a handful of mixed greens or lettuce, and a sprinkle of cheese.
- Rolling It Up: Fold in the sides first, then roll from the bottom upwards to create a neat little parcel. Tuck as you roll to keep everything in place!
- Finish with a Toast: If desired, place the wraps seam-side down in a skillet over medium heat. Cook for about 2-3 minutes on each side or until golden brown.
Notes
These wraps can be made ahead of time. Store in the fridge for up to 24 hours. Consider using a toothpick to secure wraps while serving.
Nutrition
- Serving Size: 1 wrap
- Calories: 450
- Sugar: 2g
- Sodium: 600mg
- Fat: 18g
- Saturated Fat: 4g
- Unsaturated Fat: 10g
- Trans Fat: 0g
- Carbohydrates: 40g
- Fiber: 8g
- Protein: 30g
- Cholesterol: 70mg
Keywords: Southwest chicken wraps, easy wrap recipe, Mexican wraps, healthy wraps, chicken recipes
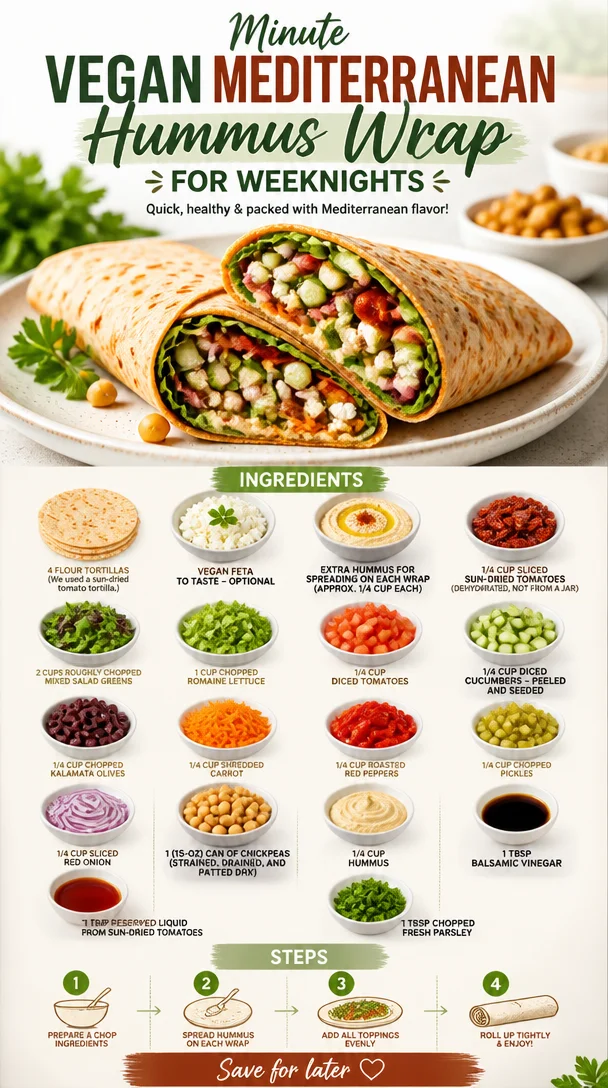
Minute Vegan Mediterranean Hummus Wrap for Weeknights
Vegan Mediterranean Hummus Wrap: A Flavorful Journey
Hello and welcome back to my kitchen! Today, we’re venturing into the vibrant world of Mediterranean cuisine with a recipe that’s as colorful as it is delicious: Vegan Mediterranean Hummus Wraps! If you’ve been looking for a dish that marries simplicity and flavor while embracing the bounties of fresh ingredients, this one’s for you.
These wraps are loaded with fresh veggies, hearty chickpeas, and that creamy, dreamy hummus we all know and love. Not only is this recipe vegan, but it’s also perfect for meal prep, lunchboxes, or a quick and satisfying dinner after a busy day. Let’s dive into this enchanting recipe and I promise, you’ll leave feeling inspired!
My Mediterranean Memory
Let me take you on a little trip down memory lane. I still remember the first time I tasted Mediterranean cuisine. I was at a quaint little café with a friend who raved about their wraps. With each bite, I was transported! The harmonious blend of flavors—crunchy vegetables, rich spices, and that velvety hummus—was absolutely mesmerizing.
I remember how we lingered over our plates, laughing and sharing stories about our day, all while sipping on bright, refreshing lemonade. That experience ignited my passion for cooking and brought me to create comforting yet elegant dishes that celebrate such rich culinary experiences. And now, I want to share that joy with you through these Vegan Mediterranean Hummus Wraps. Let’s create our own beautiful moments around the table!
Ingredients
Here’s what you’ll need to make these vibrant wraps:
-
4 large flour tortillas (Tip: I used a sun-dried tomato tortilla for added flavor, but feel free to choose your favorite!)
-
Vegan feta to taste (optional) (If you want that cheesy burst, this adds a wonderful salty bite, but it’s great without it too!)
-
Extra hummus for spreading (Approx. 1/4 cup for each wrap; because, honestly, who doesn’t love hummus?)
-
1/4 cup sliced sun-dried tomatoes (Opt for dehydrated for deeper flavor; if you’re using those from a jar, just drain them well.)
-
2 cups roughly chopped mixed salad greens (Get creative here! Spinach, arugula, and kale are all great options.)
-
1 cup chopped romaine lettuce (Adds that delightful crunch we all crave.)
-
1/4 cup diced tomatoes (Use fresh tomatoes for a burst of juiciness; cherry tomatoes make a wonderful substitute!)
-
1/4 cup diced cucumbers (Peeled and seeded; for an extra crunch. If you love texture, leave the skin on!)
-
1/4 cup chopped kalamata olives (For those briny, bold flavors; if you’re not a fan of olives, capers work well too.)
-
1/4 cup shredded carrot (Adds sweetness and color. Pre-shredded options are available if you’re in a rush!)
-
1/4 cup roasted red peppers (They bring smoky depth. You can roast your own or buy them jarred—just be sure to drain well.)
-
1/4 cup chopped pickles (Adds a zingy crunch that elevates the dish.)
-
1/4 cup sliced red onion (A little punch of flavor; soak them in cold water for 10 minutes to mellow if you like.)
-
1 15-oz can of chickpeas (Strained, drained, and patted dry; make sure to pat them well to avoid soggy wraps.)
-
1/4 cup hummus (Use your favorite store-bought or homemade for full control over flavors.)
-
1 Tbsp balsamic vinegar (For that sweet tang. A splash of lemon juice would work too!)
-
1 Tbsp reserved liquid from sun-dried tomatoes (Enhances flavor—don’t skip this part!)
-
1 Tbsp chopped fresh parsley (For a fresh, herbaceous finish; basil or dill would also be fantastic!)
Step-by-Step Instructions
Let’s walk through this delightful recipe, step by step, so you can nail it right in your own kitchen!
-
Prep Your Ingredients: Start by gathering all your veggies and equipment. Clean and chop your tomatoes, cucumbers, olives, and any other veggies you’re using. Remember, a sharp knife does wonders! Plus, it’s safer.
-
Make the Filling: In a mixing bowl, combine your chickpeas, diced cucumbers, diced tomatoes, kalamata olives, shredded carrots, roasted red peppers, pickles, and red onion. Drizzle in 1 tablespoon of balsamic vinegar and 1 tablespoon of the reserved liquid from the sun-dried tomatoes. Gently mix, and here’s the fun part—get in there with your hands! This ensures everything is coated evenly. If you want a little more zest, toss in some lemon juice or even a splash of your favorite hot sauce for a kick.
-
Prepare Your Tortillas: Lay your tortillas flat on a clean surface. Spread about 1/4 cup of your favorite hummus across each tortilla. Remember, this is where the flavor begins! Feel free to use a butter knife or even the back of a spoon for an even spread.
-
Layer on the Goodness: Now it’s time to assemble! Start with a generous handful of mixed greens, followed by a cup of your chickpea filling. If you’re adding vegan feta, sprinkle it on top now. Pro tip: don’t overstuff! You want to be able to roll them up neatly without any filling escaping.
-
Rolling Your Wrap: Fold the sides in towards your filling, then roll from the bottom up, tucking in as you go. It might take a little practice, but you’ll get the hang of it! If you find your tortillas tearing too easily, just give them a quick zap in the microwave (about 10-15 seconds) to soften.
-
Cut and Serve: Once rolled tightly, cut each wrap in half diagonally. Voilà! You have beautiful, colorful wraps ready for plating.
-
Presentation Tip: Serve these delightful wraps with an extra dollop of hummus on the side, a sprinkle of fresh parsley, and maybe even a few extra olives for garnish on a rustic wooden board. Your guests will think you’re a culinary magician!
Recipe Variations
Feel like switching things up? Here are some fun twists to make this recipe your own:
- Spicy Kick: Add sliced jalapeños or a spicy hummus variant to bring the heat.
- Mediterranean Grain Bowl: Skip the wraps and serve everything over a bed of quinoa or farro for a nutritious bowl option.
- Herbed Avocado: Swap your hummus with a smooth avocado spread and sprinkle everything with fresh dill or cilantro.
- Crunchy Nuts: Toss in some chopped almonds or walnuts for a satisfying crunch.
- Seasonal Twist: Use roasted seasonal vegetables like zucchini or bell peppers for a fresh twist based on what’s in season.
Chef’s Notes
This recipe has been a constant in my kitchen for years! I love how versatile it is and how it can evolve with seasonal ingredients. One time, I added roasted sweet potatoes on a whim, and let me tell you, it was a game-changer! Also, if you ever have leftover filling, use it as a salad topping or even in a grain bowl the next day—it’s a great way to minimize waste and keep your meals exciting.
FAQs and Troubleshooting
1. My wraps keep unrolling; what do I do?
- A tight roll is key! Make sure to tuck in the sides while rolling and not to overfill. If you’re still having trouble, secure with a toothpick or parchment paper.
2. Can I make this wrap ahead of time?
- Absolutely! Assemble your wraps, wrap them tightly in foil or parchment, and store them in the fridge for up to 2 days. Just know that the veggies may release some moisture, so it’s best enjoyed fresh.
3. What if I want to make these gluten-free?
- It’s easy! Just swap out the flour tortillas for gluten-free wraps, and you’re good to go.
4. I’m not a fan of chickpeas; what can I use instead?
- No problem! Try black beans, lentils, or edamame for a protein-packed twist.
Nutritional Info (Optional)
While I won’t harp on numbers too much, each wrap generally yields a balanced mix of protein, healthy fats, and tons of vitamins from those lovely fresh vegetables. A great meal option for anyone looking to enjoy delicious and nourishing food!
So there you have it—a fantastic, versatile, and scrumptious Vegan Mediterranean Hummus Wrap! I hope you take a moment to gather your ingredients, tie on your apron, and create this with your loved ones. Remember, cooking is about bringing joy, love, and a touch of elegance to the everyday. Happy cooking, friends!
PrintVegan Mediterranean Hummus Wrap
A vibrant wrap filled with fresh veggies, hearty chickpeas, and creamy hummus, perfect for meal prep or a quick lunch.
- Prep Time: 15 minutes
- Cook Time: 0 minutes
- Total Time: 15 minutes
- Yield: 4 servings 1x
- Category: Main Course
- Method: No Cooking
- Cuisine: Mediterranean
- Diet: Vegan
Ingredients
- 4 large flour tortillas
- Vegan feta to taste (optional)
- Extra hummus for spreading (Approx. 1/4 cup for each wrap)
- 1/4 cup sliced sun-dried tomatoes
- 2 cups roughly chopped mixed salad greens
- 1 cup chopped romaine lettuce
- 1/4 cup diced tomatoes
- 1/4 cup diced cucumbers
- 1/4 cup chopped kalamata olives
- 1/4 cup shredded carrot
- 1/4 cup roasted red peppers
- 1/4 cup chopped pickles
- 1/4 cup sliced red onion
- 1 15-oz can of chickpeas
- 1/4 cup hummus
- 1 Tbsp balsamic vinegar
- 1 Tbsp reserved liquid from sun-dried tomatoes
- 1 Tbsp chopped fresh parsley
Instructions
- Prep your ingredients: Start by gathering all your veggies and equipment. Clean and chop your tomatoes, cucumbers, olives, and any other veggies you’re using.
- Make the filling: In a mixing bowl, combine your chickpeas, diced cucumbers, diced tomatoes, kalamata olives, shredded carrots, roasted red peppers, pickles, and red onion. Drizzle in balsamic vinegar and reserved liquid from sun-dried tomatoes.
- Prepare your tortillas: Lay your tortillas flat and spread about 1/4 cup of hummus across each tortilla.
- Layer on the goodness: Start with a handful of mixed greens, followed by a cup of chickpea filling. If using vegan feta, sprinkle it on top.
- Rolling your wrap: Fold the sides in towards your filling and roll from the bottom up, tucking in as you go.
- Cut and serve: Once rolled tightly, cut each wrap in half diagonally.
Notes
For added flavor, use sun-dried tomato tortillas. Enjoy with extra hummus on the side.
Nutrition
- Serving Size: 1 wrap
- Calories: 280
- Sugar: 4g
- Sodium: 350mg
- Fat: 10g
- Saturated Fat: 1g
- Unsaturated Fat: 8g
- Trans Fat: 0g
- Carbohydrates: 40g
- Fiber: 8g
- Protein: 10g
- Cholesterol: 0mg
Keywords: vegan, mediterranean, wraps, healthy lunch, meal prep
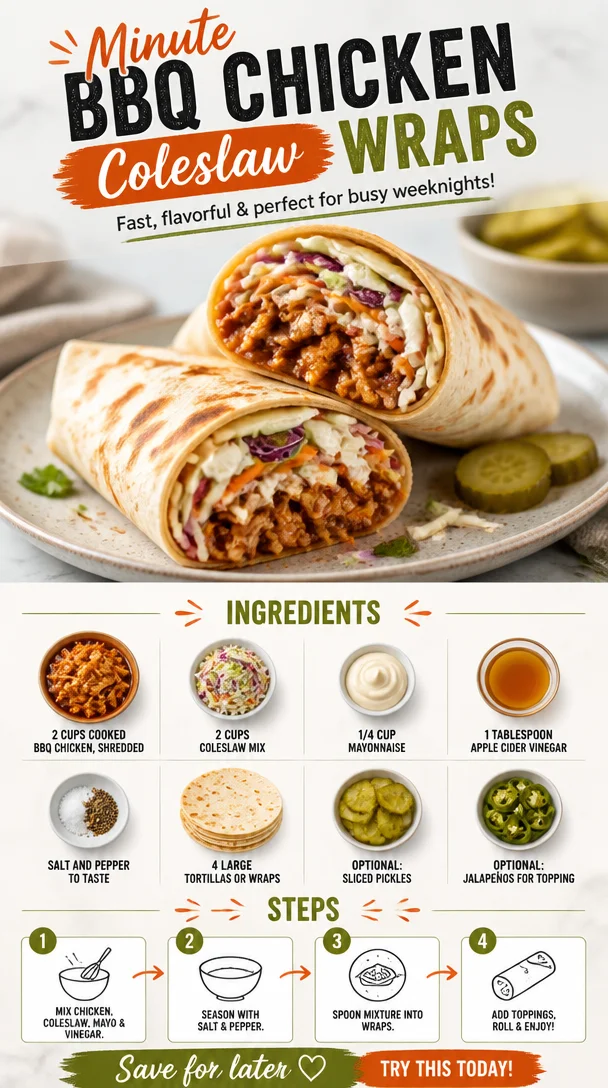
Minute BBQ Chicken Coleslaw Wraps for Busy Weeknights
BBQ Chicken Coleslaw Wraps: A Flavorful Journey
Welcome back, fellow food lovers! Today, I’m thrilled to share with you a dish that’s as vibrant and dynamic as the moments we create around our tables: BBQ Chicken Coleslaw Wraps. Picture this: tender, flavorful BBQ chicken nestled in a chilly, creamy coleslaw, all wrapped up in a warm tortilla. Sounds mouthwatering, right? Trust me, once you try these wraps, they will become a staple in your kitchen repertoire.
Now, let’s be real for a moment. Life can get busy, and sometimes, we need meals that are not only delicious but also quick and easy to prepare. These BBQ Chicken Coleslaw Wraps come together in a flash and are perfect for casual gatherings, fun weeknight dinners, or even a packed lunch. The sweet and tangy BBQ chicken pairs perfectly with the crunchy coleslaw, making each bite a delight.
So gather around, and let’s dive into the process of creating these flavorful wraps, along with a few fun stories and tips to elevate your cooking game. I promise by the end of this post, you’ll want to tie on that apron and give it a whirl!
My BBQ Chicken Memory
Whenever I think of BBQ chicken, I’m transported back to summer BBQs at my childhood home. My family was big on grilling, and my dad was the reigning BBQ champion. He had this sweet and smoky BBQ sauce that made everything it touched sing. I remember those lazy Sunday afternoons when the smell of chicken marinating in that sauce would waft through the air, tantalizing everyone nearby.
On one particularly sun-soaked day, my father decided to try a new recipe he’d found. He marinated the chicken with a hint of tangy apple cider vinegar, which made the flavor pop! As we gathered in the backyard, my siblings and I couldn’t wait for the first bite. Once the chicken was off the grill, we tore into it and, of course, made a huge mess—sauce everywhere! But those moments of laughter and messy fingers are what made those BBQs unforgettable. It is this joyous spirit of togetherness that inspires me to share my BBQ Chicken Coleslaw Wraps with you today.
Ingredients
Here’s what you’ll need to create these delightful wraps:
-
2 cups cooked BBQ chicken, shredded
This can be leftovers or rotisserie chicken for a quick fix! If you don’t have BBQ chicken, feel free to use grilled chicken or even shredded beef with BBQ sauce. -
2 cups coleslaw mix
A convenient pre-packaged mix of shredded cabbage and carrots will save you prep time. If you prefer, shred your own veggies for a fresher feel. You can also substitute with any crunchy veggies you love! -
1/4 cup mayonnaise
This gives the slaw its creaminess. You can replace it with Greek yogurt for a lighter twist or even a vegan mayo if you’re going plant-based. -
1 tablespoon apple cider vinegar
A splash of this tangy vinegar brightens the flavors. If you don’t have apple cider vinegar, white wine vinegar will work just as well. -
Salt and pepper to taste
Don’t skimp on seasoning! Always taste your slaw and adjust as needed for maximum flavor. -
4 large tortillas or wraps
Whole wheat, spinach, or herbed wraps are lovely alternatives. Feel free to use small tortillas for bite-sized appetizers! -
Optional: sliced pickles or jalapeños for topping
Adding pickles brings in a nice crunch, while jalapeños add a spicy kick. Customize the toppings to suit your taste!
Step-by-Step Instructions
Let’s get cooking! Here’s how to make your BBQ Chicken Coleslaw Wraps:
-
Shred or Prepare Chicken
If you’re using rotisserie chicken, shred it with two forks in a bowl. If you have leftover BBQ chicken, simply chop it into bite-sized pieces. For those who prefer to grill, marinate chicken breasts with your favorite BBQ sauce, grill them until fully cooked, and shred when cool. -
Mix the Coleslaw
In a large mixing bowl, combine the coleslaw mix, mayonnaise, apple cider vinegar, salt, and pepper. Mix it well until the veggies are coated evenly with the dressing. Here’s a little tip: taste your coleslaw! If you like it tangier, add a pinch more vinegar. If it’s too thick, consider a splash of water or an extra dollop of mayo. -
Combine Chicken and Slaw
Add the shredded BBQ chicken to the coleslaw mix and gently fold it together until everything is mixed well. This is where the magic happens! The warm chicken mingles beautifully with the cool, creamy slaw, creating a harmony of flavors. -
Warm the Tortillas
Heat your large tortillas in a dry skillet over medium heat for about 20-30 seconds on each side, just until they are pliable. This step is crucial because it ensures your wraps won’t crack or tear when you fill them. -
Wrap It Up!
Lay a warm tortilla on a flat surface, and spoon a generous amount of the BBQ chicken and coleslaw mixture in the center. If you’re feeling adventurous, add some sliced pickles or jalapeños. Fold in the sides of the tortilla and then roll it tightly from the bottom up. Voilà! You’ve created a wrap. -
Slice and Serve
Cut the wrap in half diagonally for a beautiful presentation. Arrange on a plate, and if you wish, serve them with extra BBQ sauce on the side for dipping.
Serving Suggestions
When it comes to serving these BBQ Chicken Coleslaw Wraps, presentation is key. Arrange them on a rustic wooden board or a colorful platter. Drizzle a little extra BBQ sauce on the side and sprinkle fresh herbs, like cilantro or parsley, for a pop of color. You can even add a small bowl of chips for that perfect crunch! These wraps are not just a meal; they’re an experience.
Recipe Variations
One of the best aspects of cooking is the ability to play around with flavors. Here are a few creative twists on the classic BBQ Chicken Coleslaw Wraps:
-
Asian-Inspired Wraps: Swap out BBQ sauce for teriyaki sauce and add sesame oil to the coleslaw for an Asian twist.
-
Spicy Buffalo Wraps: Use shredded buffalo chicken instead of BBQ, and incorporate blue cheese crumbles into the slaw.
-
Taco Variation: Add taco seasoning to the chicken and replace coleslaw with a fresh Pico de Gallo for a zesty taco flavor.
-
Vegetarian Option: Substitute the chicken for charred veggies like zucchini and bell peppers, and use black beans for a protein punch.
-
Fruit and Nut Twist: Toss in some chopped apples and walnuts in the coleslaw for a crunchy, sweet variation.
Chef’s Notes
As I reflect on this recipe, it’s fascinating how BBQ Chicken Coleslaw Wraps can adapt to seasons, occasions, and personal preferences. Over time, my family has turned to these wraps for everything from backyard gatherings to rainy movie nights. And trust me, every time we gather, laughter, stories, and a tiny bit of good-natured kitchen disaster follows! I remember one birthday party when someone forgot to seal the wrap properly, and let’s just say, the chicken got an unexpected adventure. But that’s part of the joy of cooking—embracing the messiness and making laughter a part of the meal.
FAQs and Troubleshooting
Q: Can I make the coleslaw in advance?
A: Absolutely! You can prepare the coleslaw a day ahead, but keep the chicken and coleslaw separate until you’re ready to make the wraps. This ensures your tortillas stay fresh and prevent sogginess.
Q: What if I don’t have BBQ chicken?
A: No worries! You can use any seasoned chicken or even pulled pork. If you want a quick change, roasted vegetables or tofu also work great with BBQ sauce!
Q: Can I freeze the wraps?
A: While these wraps are best enjoyed fresh, you can freeze the fillings separately. Just make sure to wrap them securely, and reheat them from frozen when you crave these beauties again.
Q: What are some good sides to serve with these wraps?
A: Fresh fruit salads, roasted sweet potatoes, or a refreshing cucumber salad make great accompaniments to these wraps!
Nutritional Info
(If you’re keen on tracking your macros or calories, here’s a rough idea per wrap, excluding additional toppings.)
- Calories: Approximately 400
- Protein: 30g
- Carbs: 45g
- Fat: 15g
And that’s a wrap—quite literally! I hope this recipe brings some joy to your kitchen and a burst of flavor to your table. Whether you’re making a casual dinner for two or hosting a backyard gathering, these BBQ Chicken Coleslaw Wraps are sure to impress!
So, grab your apron, pour a glass of something bubbly, and let’s bring a little bit of warmth and joy to your dining experience. Happy cooking, my friends!
PrintBBQ Chicken Coleslaw Wraps
Delicious BBQ Chicken Coleslaw Wraps combining shredded BBQ chicken with creamy coleslaw wrapped in warm tortillas.
- Prep Time: 15 minutes
- Cook Time: 30 minutes
- Total Time: 45 minutes
- Yield: 4 servings 1x
- Category: Main Course
- Method: Wrap
- Cuisine: American
- Diet: None
Ingredients
- 2 cups cooked BBQ chicken, shredded
- 2 cups coleslaw mix
- 1/4 cup mayonnaise
- 1 tablespoon apple cider vinegar
- Salt and pepper to taste
- 4 large tortillas or wraps
- Optional: sliced pickles or jalapeños for topping
Instructions
- Shred or prepare chicken.
- Mix the coleslaw in a large bowl with mayonnaise, apple cider vinegar, salt, and pepper.
- Combine shredded BBQ chicken with the coleslaw mix.
- Warm the tortillas in a skillet until pliable.
- Wrap the mixture in the tortillas, folding in the sides and rolling tightly.
- Slice the wrap in half diagonally and serve.
Notes
Customize your wraps with additional toppings like pickles or jalapeños for added flavor.
Nutrition
- Serving Size: 1 wrap
- Calories: 400
- Sugar: 4g
- Sodium: 600mg
- Fat: 15g
- Saturated Fat: 3g
- Unsaturated Fat: 7g
- Trans Fat: 0g
- Carbohydrates: 45g
- Fiber: 3g
- Protein: 30g
- Cholesterol: 60mg
Keywords: BBQ chicken, coleslaw, wraps, quick meals, easy dinner
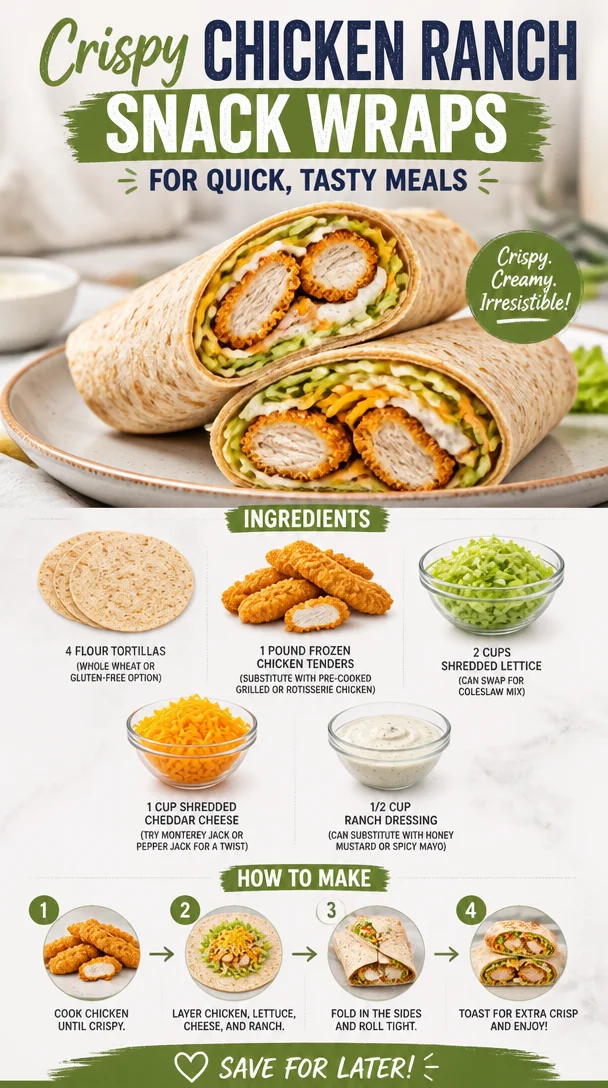
Crispy Chicken Ranch Snack Wraps for Quick, Tasty Meals
Crispy Chicken Ranch Snack Wraps for Quick, Tasty Meals
Hello, friends! Today, we’re diving into a recipe that is a total game changer for quick meals—Crispy Chicken Ranch Snack Wraps. Picture this: it’s a busy weeknight, friends are coming over, or maybe you’ve just had a long day at work. You want to whip up something that feels satisfying yet doesn’t require hours in the kitchen. These snack wraps are not only fast to prepare but also deliver an explosion of flavor in every bite! Trust me, once you fold these up, you’ll wonder where these wraps have been all your life!
Introduction: The Perfect Snack Wrap Solution
One of the things I love most about cooking is its ability to bring comfort and joy, especially when life gets busy. Growing up, there was nothing better than coming home to the smell of something delicious cooking in the kitchen. My mom always had a knack for turning simple ingredients into fabulous meals that felt like a hug from the inside.
When I created my quick Crispy Chicken Ranch Snack Wraps, I wanted to capture that very same feeling: warmth, comfort, and satisfaction—minus the hassle. Now, let’s be honest—when you grab a wrap, you’re grabbing more than just food. You’re grabbing ease, fun, and a little bit of nostalgia. Whether it’s a quick lunch on the go or a crowd-pleasing appetizer for your next gathering, these wraps deliver on all fronts.
The crispy chicken tender, the crunch of fresh lettuce, the creaminess of ranch dressing, and the oozy, melty cheese all come together beautifully, creating layers of texture and flavor that will leave you coming back for more. Let’s get rolling (pun intended!) and whip up a batch of these delightful wraps, shall we?
Personal Story: A Taste of Nostalgia
One of my fondest memories in the kitchen revolves around my college days. I was living with two roommates, and let me tell you, we were all about easy meals that could fuel our late-night study sessions. One of our go-to "late-night hacks" was to throw frozen chicken tenders in the oven, bake them to crispy perfection, and load them into tortillas with all our favorite toppings.
We would gather around the kitchen table, and amid laughter and lighthearted debates over who made the best dip, those humble chicken wraps became our late-night tradition. They sat delicately on our plates, drizzled with ranch dressing, and every bite was bursting with flavor. Those wraps not only fed our tired bodies; they brought us closer together, creating memories that stand the test of time.
Fast forward to today, and I am thrilled to offer you a version of that nostalgic recipe—Crispy Chicken Ranch Snack Wraps—perfect for any occasion, big or small!
Ingredients
Here’s what you’ll need to create your Crispy Chicken Ranch Snack Wraps:
-
4 small flour tortillas
Soft and pliable, flour tortillas are the classic choice. If you’re looking for a healthier twist, opt for whole wheat or even gluten-free alternatives to accommodate dietary preferences. -
1 pound frozen chicken tenders
These are your quick and easy protein source! If you’re in a pinch, feel free to swap them out with pre-cooked grilled chicken or shredded rotisserie chicken for even less prep time. -
2 cups shredded lettuce
Crisp and refreshing, shredded lettuce adds a fantastic crunch. Alternatively, you can use coleslaw mix for a delicious twist that includes added flavor and texture. -
1 cup shredded cheddar cheese
Cheddar is a classic for good reason—it melts beautifully! For a unique flavor profile, experiment with Monterey Jack or even spicy pepper jack cheese to kick things up a notch. -
1/2 cup ranch dressing
Creamy and tangy, ranch dressing is the star of the show here! But if you’re looking for something different, don’t hesitate to substitute it with honey mustard or spicy mayo to match your taste buds.
Step-by-Step Instructions
Let’s roll up our sleeves and get started on these snack wraps!
-
Preheat the Oven: First things first, take a moment to preheat your oven to 400°F (200°C). This will ensure those chicken tenders turn out beautifully crispy.
-
Prepare Your Chicken: Spread the frozen chicken tenders on a baking sheet lined with parchment paper. Bake according to the package instructions—usually about 20-25 minutes—until golden brown and crispy. Flip them halfway through for even cooking. This is where the magic happens!
Tip: While the chicken is baking, you can use this time to chop your veggies and set up your wrap station.
-
Chop & Prep: While the chicken is baking, grab your lettuce and shred it (if it’s not pre-shredded). Feel free to add some diced tomatoes or finely chopped red onions for extra flavor if you’re feeling adventurous.
-
Warm Those Tortillas: Wrap your tortillas in aluminum foil and place them in the oven during the last 5 minutes of the chicken cooking time. Alternatively, you can pop them in the microwave for about 15 seconds to make them warm and supple.
-
Layer It Up: Once your chicken is crispy and your tortillas are warm, it’s time to assemble! Start by placing a warm tortilla on a plate. Lay down a few chicken tenders in the center (about 2-3), followed by a generous handful of shredded lettuce and about 2 tablespoons of cheese.
Chef’s insight: The order of your fillings matters! Place the chicken first to create a sturdy base and prevent your wrap from getting soggy.
-
Dress It: Drizzle your ranch dressing over the top of your fillings, adding however much you like—go big or go home, right?
-
Wrap It Up: Here comes the fun part! Start folding the sides of the tortilla inwards, then roll it up tightly from the bottom. If it feels like it’s going to burst, that’s a good sign—more deliciousness inside!
-
Slice & Enjoy: Finally, slice your wrap in half diagonally for that perfect presentation. Serve alongside extra ranch dressing for dipping, and you’re set!
Chef’s hack: If you want to make it even more fun, you can secure the wraps with a toothpick, or personalize them with colorful skewers before serving!
Serving Suggestions
To elevate your wrap experience, I love serving these crispy chicken ranch wraps on a wooden platter, alongside a colorful array of veggies like baby carrots, cherry tomatoes, and cucumber slices. Lay a few small bowls filled with various dips—think guacamole, salsa, or even a zesty yogurt dip—to create a fun DIY station for your guests. Everyone loves choosing their own adventure!
Recipe Variations
Here are a few fun variations to switch things up:
-
Buffalo Chicken Wrap: Toss the cooked chicken tenders in buffalo sauce for a spicy kick.
-
Mediterranean Style: Substitute ranch with tzatziki sauce, add some cucumber and feta to the mix.
-
Loaded Veggie Wrap: Skip the chicken altogether and load up on grilled veggies, black beans, and avocado.
-
Southwestern Flair: Add corn, black beans, and a dollop of chipotle mayo for a smoky twist.
-
Breakfast Wrap: Scramble some eggs and add them in for a breakfast version, perfect for brunch!
Chef’s Notes
Every time I make these wraps, I can’t help but smile at how simple yet satisfying they are. I remember one time during a particularly busy week, I turned these crispy wraps into an impromptu feast by inviting friends over for a “make-your-own” wrap night. We set up a toppings bar and let everyone personalize their creations. It turned a casual dinner into a lively evening of laughter and cheer. It’s a fun reminder that cooking should be about connecting and enjoying the moment!
FAQs and Troubleshooting
-
Can I use cooked chicken instead of frozen tenders?
Absolutely! Pre-cooked grilled chicken or leftover rotisserie chicken works splendidly. Just warm it through before adding it to your wraps. -
What if my tortillas are breaking?
Warming them is key! If they still break, consider using fresher tortillas or a type with a bit more elasticity, like whole wheat. -
Can I prepare these in advance?
For the best taste and texture, I recommend assembling them fresh. However, you can prep the ingredients (like chopping veggies) a few hours ahead of time. -
How do I keep them crispy?
To maintain that crispy texture, avoid overstuffing your wraps and ensure your chicken is well-cooked and crispy. Serving them immediately after assembling is also a must!
Nutritional Info
While I don’t have specific nutritional info handy, I encourage you to consider the ingredients you choose. Whole wheat tortillas and serving with fresh veggies can elevate the health factor while still keeping it delicious!
There you have it—my Crispy Chicken Ranch Snack Wraps, ready to fit seamlessly into your lifestyle! They’re quick to prepare, share a few laughs over, and serve as a blank canvas for your creativity. So tie on that apron and let’s make some enjoyable moments around the dinner table. Happy cooking, foodie friends!
PrintCrispy Chicken Ranch Snack Wraps

Quick and flavorful Crispy Chicken Ranch Snack Wraps perfect for busy weeknights or gatherings.
- Prep Time: 10 minutes
- Cook Time: 25 minutes
- Total Time: 35 minutes
- Yield: 4 servings 1x
- Category: Snack
- Method: Baking
- Cuisine: American
- Diet: None
Ingredients
- 4 small flour tortillas
- 1 pound frozen chicken tenders
- 2 cups shredded lettuce
- 1 cup shredded cheddar cheese
- 1/2 cup ranch dressing
Instructions
- Preheat the oven to 400°F (200°C).
- Prepare the frozen chicken tenders on a baking sheet lined with parchment paper and bake according to package instructions (20-25 minutes). Flip halfway through.
- Chop your lettuce (and other desired veggies).
- Warm tortillas in aluminum foil in the oven during the last 5 minutes of cooking the chicken.
- Layer a tortilla with chicken tenders, lettuce, and cheese.
- Dress with ranch dressing.
- Wrap tightly by folding the sides and rolling from the bottom.
- Slice in half diagonally and serve with extra ranch dressing.
Notes
Warm tortillas before wrapping for best results. Use pre-cooked chicken for even quicker prep time.
Nutrition
- Serving Size: 1 wrap
- Calories: 350
- Sugar: 2g
- Sodium: 800mg
- Fat: 20g
- Saturated Fat: 5g
- Unsaturated Fat: 10g
- Trans Fat: 0g
- Carbohydrates: 30g
- Fiber: 2g
- Protein: 15g
- Cholesterol: 50mg
Keywords: snack wrap, chicken wraps, quick meal, crispy chicken, ranch dressing
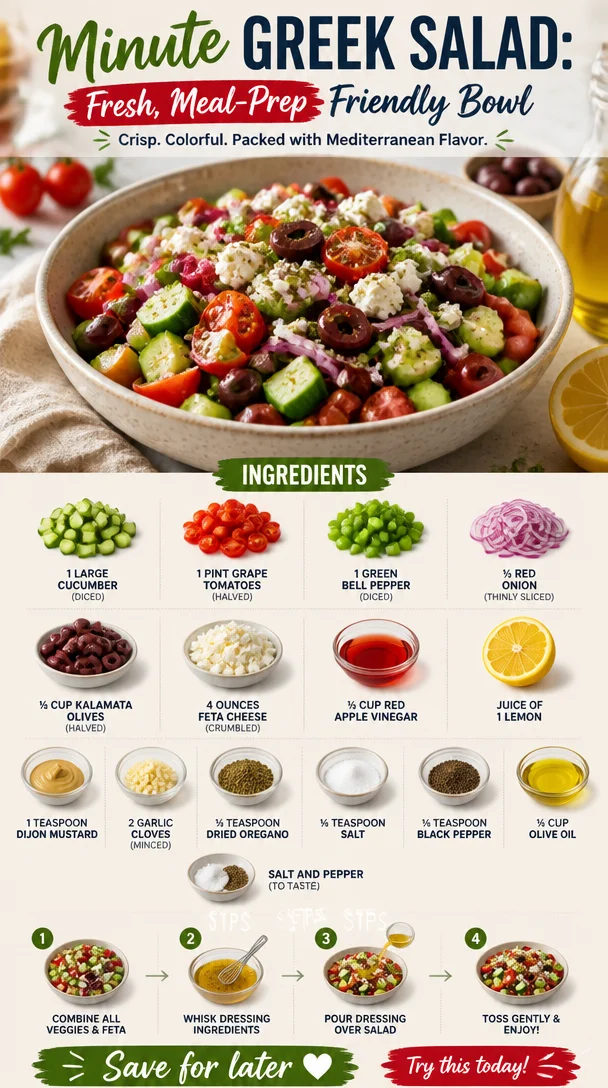
Minute Greek Salad: Fresh, Meal-Prep Friendly Bowl
The Best Greek Salad Recipe
Hello, my fellow food lovers! Today, we’re diving into a dish that perfectly embodies sunny days, vibrant flavors, and the essence of Mediterranean dining: the luscious Greek salad! Whether you’re enjoying a leisurely lunch on the patio or hosting a lively dinner party, this refreshing salad adds a splendid touch to any meal. So grab your apron, and let’s create something truly appetizing together!
A Journey to the Heart of Greece
I can’t help but be transported back to a small rustic taverna in Greece every time I think of Greek salad. Picture it: the sun-drenched terrace, the aroma of grilled seafood wafting through the air, and the sound of laughter around the table. I remember being served a glorious bowl brimming with fresh, colorful ingredients. The vibrant hues of the tomatoes, the deep greens of the cucumbers, and the bright white of the feta were a feast for both the eyes and the palate. It was there that I learned the beauty of simplicity in cooking—fresh ingredients elevated with a drizzle of olive oil and a squeeze of lemon.
Flipping through the pages of my travel journal, I stumbled on notes about every mouthwatering bite I savored. Inspired by that experience, I’m eager to recreate that magic in your kitchen. Greek salad is not just a side dish; it’s a celebration of fresh produce and regional flavors, making it a staple in my home.
Ingredients
Let’s gather our ingredients for this stunning Greek salad! Each component adds a unique flavor, and I’ll share some insights along the way.
-
1 large cucumber (diced): A refreshing crunch! Feel free to peel it if you prefer a smoother texture. English cucumbers are a sweet substitute.
-
1 pint grape tomatoes (halved): These bite-sized gems are juicy and sweet. Cherry tomatoes work just as well for a little burst of flavor.
-
1 green bell pepper (diced): Adds a nice crispness and a pop of color. You can switch it out for a red or yellow bell pepper for a sweeter taste.
-
½ red onion (thinly sliced): Provides a lovely sharpness, balancing the flavors. Soak the slices in warm water for about 10 minutes to mellow the taste.
-
½ cup Kalamata olives (halved): These bold, briny olives are a must! If you’re unable to find them, black olives can serve as a less intense alternative.
-
4 ounces feta cheese (crumbled): The star of the show! For a dairy-free option, try marinated tofu or a nut-based cheese.
-
⅓ cup red apple vinegar: This will bring zest to the salad. White wine vinegar or red wine vinegar are excellent substitutes.
-
Juice of 1 lemon: Fresh lemon juice brightens up the flavors and adds a citrusy zing. Lime juice is a fun alternative.
-
1 teaspoon Dijon mustard: This adds creaminess and depth. You can omit it for a lighter dressing or try whole grain mustard for a twist.
-
2 garlic cloves (minced): For flavor lovers, garlic is essential! Use garlic powder if fresh isn’t available.
-
½ teaspoon dried oregano: This herb is classic in Greek cuisine. Fresh oregano can also impart a wonderful fragrance.
-
¼ teaspoon salt: Essential for enhancing all the flavors! Adjust based on your taste.
-
¼ teaspoon black pepper: Freshly cracked is best for maximum flavor.
-
½ cup olive oil: A drizzle of good-quality olive oil pulls the salad together—don’t skimp here! Avocado oil can serve as a neutral substitute.
-
Salt and pepper (to taste): Always adjust to make sure your salad sings with flavor!
Step-by-Step Instructions
Now that we’re all prepped, let’s get cooking! Here’s how to assemble your Greek salad to perfection:
-
Prep the Ingredients: Start by washing your vegetables thoroughly. We want them clean and ready to shine! Dice the cucumber, halve the grape tomatoes, and dice the green bell pepper. Thinly slice the red onion, and don’t forget to pit and halve your Kalamata olives.
-
Create the Dressing: In a small bowl, whisk together the red apple vinegar, lemon juice, Dijon mustard, minced garlic, dried oregano, salt, and pepper. This simple dressing packs a punch and will marry the flavors beautifully. Chef’s Tip: Make this ahead of time and let it sit; the flavors will intensify!
-
Combine the Vegetables: In a large salad bowl, toss together the diced cucumber, grape tomatoes, green bell pepper, and red onion. You should see an explosion of color already! Get your hands in there—mixing by hand ensures that your ingredients are evenly distributed.
-
Add in Olives and Feta: Gently fold in the Kalamata olives and crumbled feta cheese. The feta adds creaminess, while the olives give a briny depth—such a delightful contrast!
-
Dress the Salad: Drizzle your tangy dressing over the tossed salad. Give it a gentle toss to coat each ingredient, ensuring every bite is flavorful. Chef’s Hack: If you’re serving later, keep the dressing separate until just before enjoying to maintain that crispness.
-
Final Touches: Taste the salad, adjusting your salt and pepper as needed. A sprinkle of freshly cracked black pepper on top adds a lovely finishing touch.
Serving Suggestions
For a delightful presentation, serve your Greek salad in a large, colorful bowl, garnished with extra feta crumbles and a sprinkle of oregano. Pair it with warm pita bread, tzatziki, or even grilled chicken for a full Mediterranean experience!
Recipe Variations
Want to mix things up? Try these creative twists on the classic Greek salad:
-
Mediterranean Grain Bowl: Add cooked quinoa or farro for added texture and nutrition.
-
Seafood Lover’s Delight: Toss in some grilled shrimp or calamari for a seafood twist.
-
Herb-Infused: Experiment with fresh herbs like dill or mint for an added layer of flavor.
-
Spicy Kick: Chop in some jalapeños or sprinkle with red pepper flakes for a spicy kick.
-
Vegan Version: Substitute feta with a nut-based cheese or omit it altogether for a lighter vibe.
Chef’s Notes
Every recipe tells a story, and this Greek salad is no different! I’ve adapted my version many times over the years, tweaking it based on my travels and favorite ingredients. I once made it for a picnic, only to discover I had mistakenly added a tablespoon of sugar instead of salt (oops!). Surprisingly, the sweetness brought out an interesting flavor. That day, I learned that cooking is often about embracing the unexpected!
FAQs and Troubleshooting
-
Can I make this salad in advance? Absolutely! It keeps well in the fridge for about 2 days. Just add dressing just before serving to maintain that fresh crunch.
-
What if I don’t have Kalamata olives? No worries! Any brined olives will do, though they’ll impart a slightly different flavor.
-
How do I store leftovers? Transfer any leftovers to an airtight container. Keep in the refrigerator and consume within 2 days for optimal freshness.
-
My salad is too salty! What can I do? If it’s too salty, consider adding more diced cucumber and tomatoes to balance the saltiness. A drizzle of olive oil can also help mellow the flavors.
Nutritional Info (Optional)
Note: Nutritional values will vary based on specific ingredients, quantities, and brands used.
With roughly 150 calories per serving, this Greek salad is full of vitamins and healthy fats and can be a great addition to your meals.
There you have it! A delightful Greek salad that brings the vibrant tastes of the Mediterranean right into your kitchen. Cooking is a joyous journey, and I’m thrilled to have you join me on this culinary adventure. So, let’s enjoy the process, savor each bite, and create beautiful moments around the table. Happy cooking, friends!
PrintThe Best Greek Salad Recipe
A refreshing Greek salad celebrating fresh produce and Mediterranean flavors, perfect for any meal.
- Prep Time: 15 minutes
- Cook Time: 0 minutes
- Total Time: 15 minutes
- Yield: 4 servings 1x
- Category: Salad
- Method: No Cook
- Cuisine: Mediterranean
- Diet: Vegetarian
Ingredients
- 1 large cucumber (diced)
- 1 pint grape tomatoes (halved)
- 1 green bell pepper (diced)
- ½ red onion (thinly sliced)
- ½ cup Kalamata olives (halved)
- 4 ounces feta cheese (crumbled)
- ⅓ cup red apple vinegar
- Juice of 1 lemon
- 1 teaspoon Dijon mustard
- 2 garlic cloves (minced)
- ½ teaspoon dried oregano
- ¼ teaspoon salt
- ¼ teaspoon black pepper
- ½ cup olive oil
- Salt and pepper (to taste)
Instructions
- Prep the Ingredients: Wash your vegetables thoroughly. Dice the cucumber, halve the grape tomatoes, and dice the green bell pepper. Thinly slice the red onion, and pit and halve the Kalamata olives.
- Create the Dressing: In a small bowl, whisk together the red apple vinegar, lemon juice, Dijon mustard, minced garlic, dried oregano, salt, and pepper.
- Combine the Vegetables: In a large salad bowl, toss together the diced cucumber, grape tomatoes, green bell pepper, and red onion.
- Add in Olives and Feta: Gently fold in the Kalamata olives and crumbled feta cheese.
- Dress the Salad: Drizzle your dressing over the tossed salad and gently toss to coat.
- Taste the salad and adjust your salt and pepper as needed.
Notes
Serve with warm pita bread or grilled chicken for a complete meal. Can be made in advance, just keep the dressing separate until serving.
Nutrition
- Serving Size: 1 serving
- Calories: 150
- Sugar: 3g
- Sodium: 350mg
- Fat: 10g
- Saturated Fat: 2g
- Unsaturated Fat: 7g
- Trans Fat: 0g
- Carbohydrates: 12g
- Fiber: 3g
- Protein: 5g
- Cholesterol: 10mg
Keywords: Greek salad, Mediterranean, healthy salad, fresh vegetables, summer recipe
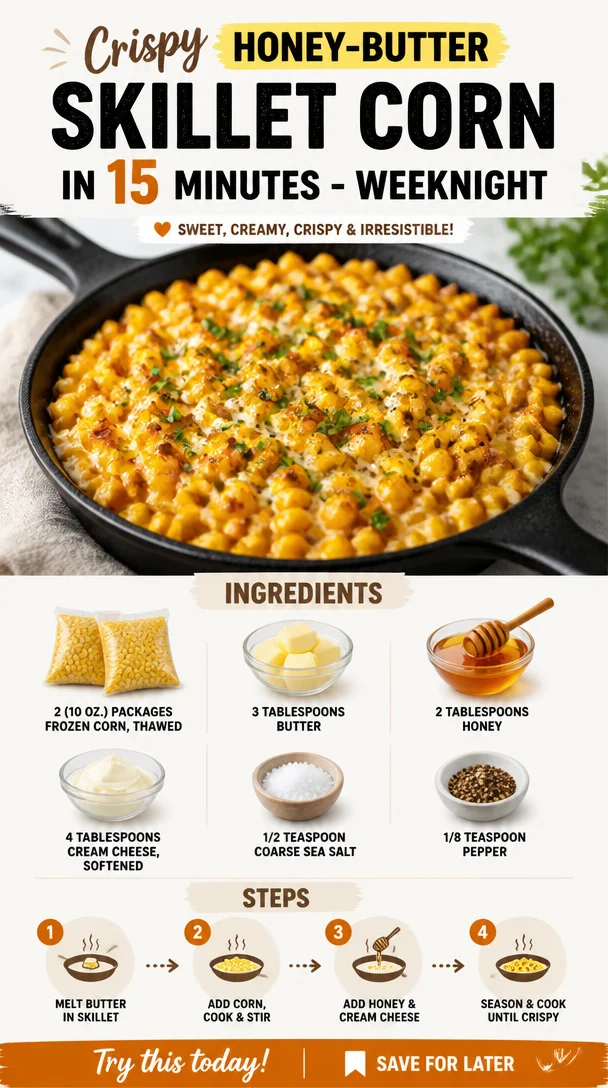
Crispy Honey-Butter Skillet Corn in 15 Minutes – Weeknight
Honey Butter Skillet Corn: A Sweet and Savory Side Dish
Hello there, fellow food enthusiasts! I’m Savannah Pierce, and I’m delighted to have you join me in the kitchen today. This blog post is dedicated to a show-stopping side dish that is bound to steal the spotlight at your next gathering: Honey Butter Skillet Corn! If you’ve never had the pleasure of savouring this sweet and savory blend, you’re in for a treat. Let me take you on a delightful culinary journey that brings together the warm flavors of butter and honey with the crisp essence of corn—perfectly simple yet incredibly satisfying!
So, ready your skillet, and let’s dive into the recipe together!
A Memory with Corn
Let me whisk you back in time to a hot summer day when I was a little girl—my loved ones gathered in my grandmother’s kitchen, laughter bouncing off the walls. The smells of garlic and butter filled the air as we prepared dinner together. My grandma always adored serving corn made fresh from her garden. But what set her corn apart from any other dish was the sweet secret ingredient she added: honey! That unique twist was my introduction to the simplicity of combining sweet and savory, forever changing how I viewed flavors. Whenever I reminisce about those warm summer nights, I can almost hear the clinking of forks and see the smiles around the table. Today, I channel that nostalgic energy into my Honey Butter Skillet Corn recipe, which is a delightful homage to those precious memories.
Ingredients
Let’s gather everything you need to whip up this tantalizing dish:
-
2 (10 oz.) packages frozen corn, thawed: Frozen corn is not only convenient but also retains its sweetness. Don’t have frozen corn? Fresh corn works perfectly too—just make sure to cut it from the cob!
-
3 tablespoons butter: Butter brings that rich, creamy texture. If you’re looking for a healthier alternative, feel free to use olive oil or coconut oil for sautéing.
-
2 tablespoons honey: Honey adds that irresistible sweetness. You can substitute agave syrup or maple syrup if you’re looking for a vegan option.
-
4 tablespoons cream cheese, softened: Cream cheese lends a delectable creaminess to the dish. For a lighter version, you can opt for Greek yogurt instead (but it will have a tangier flavor).
-
1/2 teaspoon coarse sea salt: Salt enhances the sweetness of the corn beautifully. You can use regular table salt if that’s all you have, but the texture of sea salt adds an extra layer of depth.
-
1/8 teaspoon pepper: Freshly ground pepper complements the sweetness of the corn—feel free to adjust it according to your taste!
Step-by-Step Instructions
Now that we have our ingredients, let’s create this magical dish together! Follow along with me for a fun cooking experience.
-
Get Your Skillet Hot: Heat a large skillet over medium heat. Love that sizzle! Adding your ingredients to a properly heated pan ensures a nice sautée without the corn getting watery.
-
Melt the Butter: Add the 3 tablespoons of butter once your skillet is hot. Let it melt completely, swirling the pan to coat its surface evenly. This is where the magic starts! The golden, nutty aroma of melted butter sets the stage for our star ingredient.
-
Sauté the Corn: Add the thawed corn to the skillet. Spread it out evenly to ensure maximum contact with the pan. It should sizzle nostalgically! Stir it frequently for about 5-7 minutes until the corn is heated through and slightly caramelized. That’s how you amp up the flavors and add depth.
-
Incorporate Honey: Drizzle your 2 tablespoons of honey over the corn. Stir gently to combine, allowing the honey to coat each kernel. Feel free to adjust the amount according to your sweet tooth—honey-loving friends will thank you!
-
Add Cream Cheese: Now, drop in the softened cream cheese in dollops. Stir to mix until the cream cheese has melted into the corn and created a luscious, creamy coating. It should feel like a warm hug! Be gentle at this stage—you want everything to blend beautifully.
-
Season It Up: Sprinkle the coarse sea salt and pepper, stirring to combine. Taste and adjust. If you like a bit more sweetness, add a touch more honey. Want more zest? A squeeze of fresh lime juice can brighten it right up!
-
Cook and Tray It Up: Allow everything to simmer together for an additional minute, ensuring all flavors meld. Then, remove it from the heat. It’s time to plate your delicious Honey Butter Skillet Corn!
Serving Suggestions
When it comes to serving, presentation is key! Transfer your Honey Butter Skillet Corn to a beautiful serving bowl, garnishing with fresh herbs like parsley or basil for pops of color. You can also sprinkle some crumbled feta cheese on top for an extra layer of flavor—talk about impressive!
Recipe Variations
The beauty of this Honey Butter Skillet Corn recipe is its versatility! Here are a few fun options to give this dish a twist:
-
Add Fresh Herbs: Toss in some fresh basil or cilantro towards the end of cooking for a burst of freshness.
-
Spicy Kick: Mix in a pinch of cayenne pepper or red pepper flakes for a savory kick to balance the sweetness.
-
Lime-Infused: Add zest and juice from a lime for a citrusy flair.
-
Cheesy Delight: Fold in shredded cheese like cheddar or pepper jack to enhance creaminess and flavor complexity.
-
Bacon Lovers Unite: Sauté chopped bacon before adding your corn for a smoky flavor that pairs beautifully with the honey!
Chef’s Notes
I can’t help but share that this recipe has evolved throughout the years. Early on, I made it for my friends during our summer BBQs, and it quickly became a staple. Over time, I experimented with new ingredients based on what was in season or what I had on hand, leading to the vibrant and luscious version you see today. One never knows when inspiration for a new twist will strike—it could be the random herb in your fridge or a spicy condiment waiting on your shelf. Embrace your creativity, and don’t shy away from making this recipe your own!
FAQs and Troubleshooting
Let’s troubleshoot some common questions you might have as you embark on this culinary adventure!
-
Why is my corn watery? Make sure to sauté it long enough to remove excess moisture! Frozen corn can sometimes retain water, so a few extra minutes cooking will help.
-
Can I make this recipe ahead of time? Absolutely! You can prepare the dish in advance and warm it up gently on the stove before serving. Just be cautious not to overcook it—keep that vibrant corn texture!
-
What can I do with leftovers? This dish makes a fantastic omelet filling or a topping for nachos. Get creative!
-
Can I use canned corn? Yes, but be sure to drain and rinse thoroughly! Sautéing canned corn typically requires less time since it’s already cooked.
Nutritional Info
Though I focus on enjoyment over counting calories, if you’re curious, this Honey Butter Skillet Corn can serve as a delightful addition to any meal. It’s a great source of fiber, thanks to the corn, and provides a touch of healthy fats from the butter and cream cheese.
And there you have it—a delightful journey through the art of Honey Butter Skillet Corn! I hope this dish fills your home with warmth and laughter, just like it does for me. Don’t hesitate to share your own variations and stories in the comments below. Until next time, happy cooking, and remember—good food is about showing up, not showing off!
Let’s get cooking! 🍽️✨
PrintHoney Butter Skillet Corn
A delightful side dish combining the sweet and savory flavors of corn, butter, and honey.
- Prep Time: 10 minutes
- Cook Time: 15 minutes
- Total Time: 25 minutes
- Yield: 4 servings 1x
- Category: Side Dish
- Method: Sautéing
- Cuisine: American
- Diet: Vegetarian
Ingredients
- 2 (10 oz.) packages frozen corn, thawed
- 3 tablespoons butter
- 2 tablespoons honey
- 4 tablespoons cream cheese, softened
- 1/2 teaspoon coarse sea salt
- 1/8 teaspoon pepper
Instructions
- Get Your Skillet Hot: Heat a large skillet over medium heat.
- Melt the Butter: Add the 3 tablespoons of butter once your skillet is hot.
- Sauté the Corn: Add the thawed corn to the skillet and stir it frequently for about 5-7 minutes until heated through.
- Incorporate Honey: Drizzle your 2 tablespoons of honey over the corn and stir gently.
- Add Cream Cheese: Drop in the softened cream cheese in dollops and mix until melted.
- Season It Up: Sprinkle the coarse sea salt and pepper, stirring to combine.
- Cook and Tray It Up: Allow everything to simmer together for an additional minute before plating.
Notes
This recipe can be made ahead of time and reheated before serving. Feel free to add fresh herbs or other variations.
Nutrition
- Serving Size: 1 serving
- Calories: 250
- Sugar: 10g
- Sodium: 300mg
- Fat: 10g
- Saturated Fat: 5g
- Unsaturated Fat: 5g
- Trans Fat: 0g
- Carbohydrates: 35g
- Fiber: 4g
- Protein: 6g
- Cholesterol: 25mg
Keywords: corn, sides, honey butter, easy recipe, summer dish