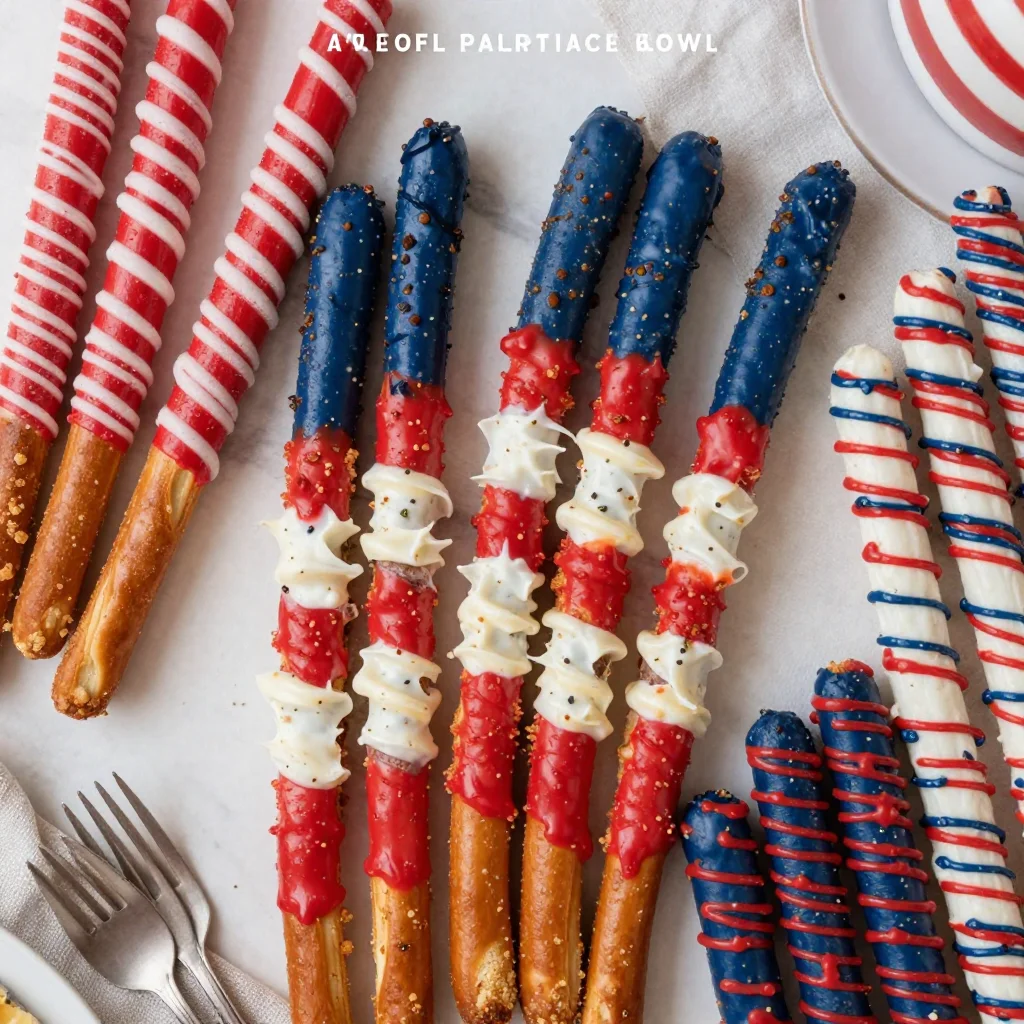
4th of July Patriotic Pretzel Rods: Red, White & Blue Snack
Patriotic Pretzel Rods: A Celebration of Crunch and Color
Hello, friends! If you’ve ever rummaged through your pantry and uncovered a bag of pretzel rods, you know you’re in for a treat! Today, we’re taking those crunchy delights and transforming them into something festive and fun: Patriotic Pretzel Rods. Perfect for summer barbecues, Fourth of July celebrations, Memorial Day picnics, or any reason you want to bring a festive flair to your gathering, these pretzel rods are a delightful combination of sweet and salty that everyone will adore.
Now let’s talk about why I am particularly fond of these treats. As a kid, I always looked forward to summertime, not just for the warm weather and pool parties, but also for the family gatherings where creativity flowed as freely as the lemonade. I remember the excitement of helping my mom make festive snacks for our small neighborhood parades—dipping everything in chocolate and covering them with sprinkles made me feel like a true wizard in the kitchen. Those moments sparked my love for cooking and turned me into the chef I am today.
The Joy of Creating and Sharing
I recall one summer, we decided to make edible decorations for our fourth of July barbeque. Our entire family crowded around the kitchen table, armed with pretzel rods, chocolate, and a rainbow of sprinkles. As we dipped and designed each pretzel, we shared stories, played with textures, and embraced the mess! Chocolate dripped, sprinkles flew, and laughter filled the air. It was a beautiful chaos—all part of the joy of creating.
Those memories are what inspired these Patriotic Pretzel Rods. They capture the essence of family, laughter, and sharing. And the best part? They’re incredibly easy to make, so you can easily invite friends and family to join in on the fun!
Ingredients
Before we get cooking, here’s what you’ll need to make these festive delights!
-
1 bag pretzel rods
The stars of our show! Crunchy and salty, these pretzels act as the perfect canvas for deliciousness. You can substitute with any long pretzel, like pretzel sticks or even chocolate-covered pretzels, if you prefer. -
1 bag white candy melts
This creamy, sweet coating adds a beautiful layer of richness. If you can’t find white candy melts, feel free to use white chocolate instead. Just keep an eye on the melting temperature! -
1 bag red candy melts
These vibrant melts bring the all-important red to our patriotic palette! Alternatives include red chocolate or even strawberry-flavored candy melts for added flavor depth. -
1 bag blue candy melts
Blue completes our festive theme! You can swap these for blue chocolate or even royal blue sprinkles if needed, but the melts give a nice smooth finish. -
Patriotic sprinkles (optional)
Sprinkles add a fun visual effect and texture! Look for red, white, and blue varieties, but feel free to use any sprinkles you love for a personal touch. They’re optional but highly recommended for that extra wow factor!
Step-by-Step Instructions
Ready to dive into the fun? Let’s get started creating these delightful treats!
-
Melt the Candy Melts
Start by melting your candy melts. You can use the microwave or a double boiler. If you go the microwave route, place your candy melts in a microwave-safe bowl and heat in 30-second intervals, stirring in between until smooth. This ensures you don’t overheat them and ruin that gorgeous velvety texture! -
Prep Your Workstation
While melting your candy, lay out some parchment paper on a baking tray or countertop. This will be your cooling station, where all the magic will happen. Having everything within reach will make this process smooth and enjoyable! -
Dip the Pretzels
Choose a melted candy color to start. Holding a pretzel rod by one end, dip it into the melted candy, making sure it’s completely covered. Gently tap off any excess candy—less is more in terms of a neat finish! If the candy isn’t coating well, try quickly reheating it to achieve a smoother consistency. -
Add Sprinkles Immediately
Before the candy hardens, sprinkle your patriotic sprinkles generously over the dipped area. The melts set quickly, so you want to do this while they’re still wet. You can even get creative with the placement for a layered look! -
Repeat with Other Colors
Now, go to town by repeating the dipping process with your other colors. You can do alternating stripes or color blocks—whatever you’re feeling! Watch as your pretzel rods transform into festive masterpieces. -
Cool and Serve
Once coated and sprinkled, place your decorated pretzel rods on the parchment paper to set. If you’re in a hurry, put them in the fridge for about 10 minutes. Once they’ve hardened, they’re ready to serve or package as gifts!
Serving Suggestions
To present your beautiful Patriotic Pretzel Rods, arrange them in a tall glass jar or a cute vase for a striking centerpiece or place them on a decorative platter. You might even want to display them alongside other patriotic treats, like fruit skewers with red and blue berries. A sprinkle of festive table decorations will make your setup complete!
Recipe Variations
Feeling creative? Here are a few twists on this recipe:
- Chocolate Dip Delight: Instead of candy melts, use semi-sweet or milk chocolate for a richer flavor.
- Nutty Sprinkle Surprise: Add crushed nuts like almonds or pecans to your sprinkles for added texture and flavor.
- Flavor Infusion: Mix in a drop of peppermint or vanilla extract into your melted white chocolate for a fun flavor twist.
- Gluten-Free Option: Use gluten-free pretzel rods to accommodate dietary restrictions.
- Colorful Drizzle: After your pretzels set, drizzle some contrasting candy melts over the top for added flair.
Chef’s Notes
These Patriotic Pretzel Rods have been a staple at my summer gatherings for years. I’ll never forget one year when we ended up with chocolate all over our hands and clothes—but the smiles on the kids’ faces made it all worthwhile! While I love how aesthetically pleasing these treats are, the joy really comes from the fun and laughter shared around the creation process. Whenever I make these with friends, I remind myself that cooking is not just about the final product—it’s about the memories we make along the way!
FAQs and Troubleshooting
-
What if my candy melts are too thick?
If your melts aren’t smooth, reheat them in 10-second bursts until they reach a silky consistency. You can also add a teaspoon of coconut oil to thin them out. -
How do I store these pretzel rods?
Keep your pretzel rods in an airtight container. They can last up to two weeks at room temperature, although I doubt they’ll last that long! -
Can I use different color melts?
Absolutely! Feel free to get creative with colors that suit your occasion—think Halloween or Christmas themes! -
Why are my melted chocolate/bark seizing up?
If moisture gets into your melted candy melts, they may seize. Always ensure your bowls and utensils are dry!
Nutritional Info
While the nutritional details may vary based on specific ingredients used, a rough estimate for each pretzel rod would be around 100 calories with a mix of carbohydrates and sugars.
So there you have it, wonderful friends! I hope you feel inspired to tie on your apron, gather those ingredients, and whip up some fabulous Patriotic Pretzel Rods for your next celebration. Cooking is all about joy, creativity, and bringing people together—and I can’t wait to see the delicious treats you create! Let’s make beautiful memories around the table!
PrintPatriotic Pretzel Rods
These Patriotic Pretzel Rods are a delightful combination of sweet and salty, making them perfect for summer gatherings and festive celebrations.
- Prep Time: 15 minutes
- Cook Time: 10 minutes
- Total Time: 25 minutes
- Yield: 20 pretzel rods 1x
- Category: Snack
- Method: Dipping
- Cuisine: American
- Diet: Vegetarian
Ingredients
- 1 bag pretzel rods
- 1 bag white candy melts
- 1 bag red candy melts
- 1 bag blue candy melts
- Patriotic sprinkles (optional)
Instructions
- Melt the candy melts. You can use the microwave or a double boiler. If using the microwave, heat in 30-second intervals, stirring in between until smooth.
- Prep your workstation by laying out parchment paper on a baking tray or countertop for cooling.
- Dip the pretzels by holding a pretzel rod by one end and dipping it into the melted candy until covered. Tap off excess candy.
- Add sprinkles immediately over the dipped area before the candy hardens.
- Repeat the dipping process with other colors to create festive designs.
- Cool and serve by placing the coated pretzel rods on parchment paper to set.
Notes
These pretzel rods are fun to make with friends and family, and they can be creatively decorated for any occasion.
Nutrition
- Serving Size: 1 pretzel rod
- Calories: 100
- Sugar: 8g
- Sodium: 250mg
- Fat: 4g
- Saturated Fat: 2g
- Unsaturated Fat: 2g
- Trans Fat: 0g
- Carbohydrates: 15g
- Fiber: 1g
- Protein: 1g
- Cholesterol: 0mg
Keywords: patriotic snacks, pretzel rods, festive treats, fourth of July, summer desserts
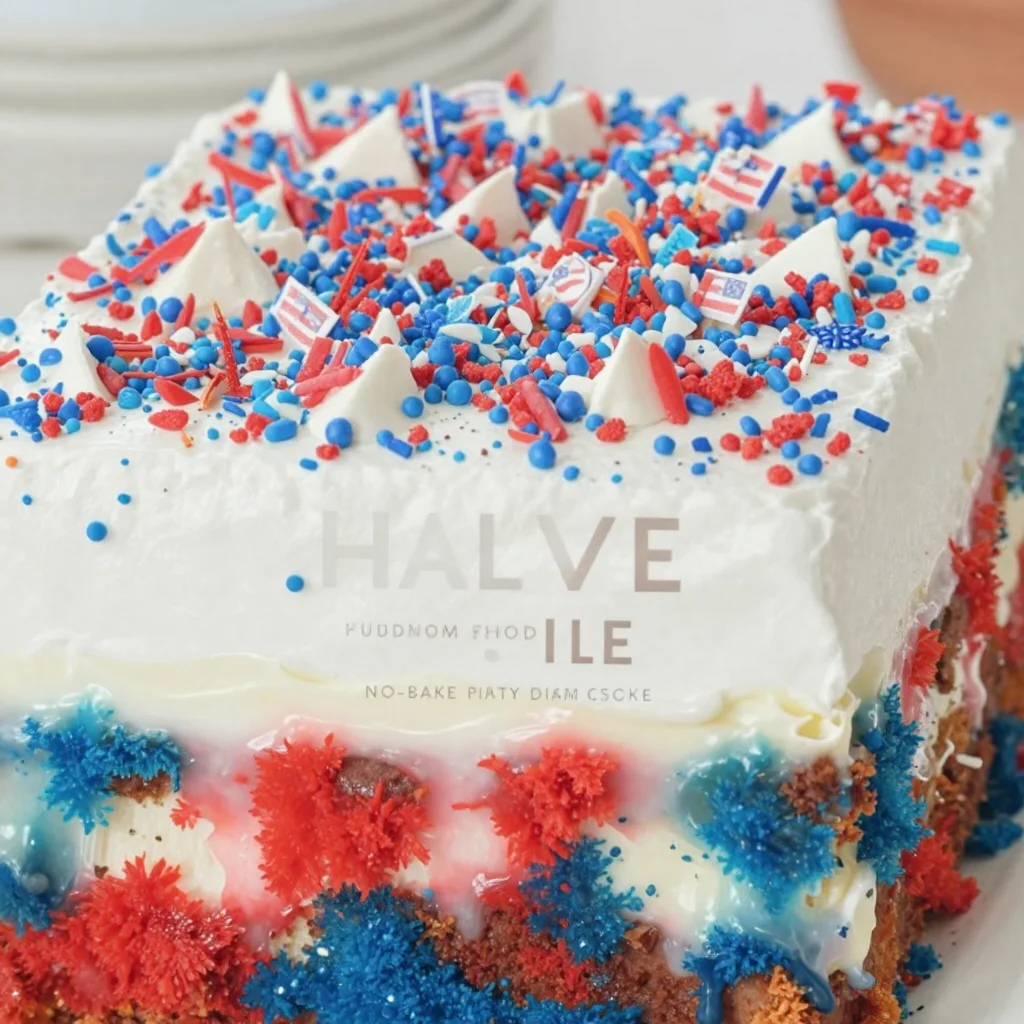
Patriotic Poke Cake: No-Bake Party Dessert for 4th of July
Celebrate with a Patriotic Poke Cake: A Festive Treat for Every Occasion
Hello, darling foodies! Today, we’re diving into a recipe that’s as vibrant as the flag itself — the Patriotic Poke Cake! This delightful dessert is perfect for any summer celebration, whether it’s the Fourth of July, a backyard barbecue, or simply a Sunday dinner that calls for something sweet. The beauty of a poke cake is in its simplicity and approachability. With just a few ingredients, we can create a show-stopper that’ll impress your friends and family, all while bringing a burst of color to the table. So let’s roll up those sleeves, tie on our aprons, and get baking!
A Sweet Slice of Nostalgia
Growing up, many of my fondest memories were shaped around the dinner table during the summer. Our family would gather at my grandmother’s house, where the air was filled with laughter, the sound of sizzling grilled meats, and, of course, the delicious aroma of her famous poke cake. My grandmother had this way of making everything feel special, and her poke cake was a staple for every celebration. I can still see her in her worn apron, gently poking holes into the cake with the end of a wooden spoon, explaining how each hole would capture sweet flavor and moisture.
I love how a poke cake took something simple and let it shine in its own way. The layers of sweetened condensed milk soaking into the delicate cake made it moist and decadent. Topped with fresh strawberries and blueberries, it became a festive masterpiece to celebrate our American spirit. This is a dish that takes me back to those cherished moments, reminding me how good food creates an atmosphere of togetherness.
Ingredients You’ll Need:
Here are your star ingredients for the Patriotic Poke Cake:
-
1 Box of White Cake Mix: The base of our cake. You can use any brand you prefer; just make sure you follow the package instructions for baking.
-
1 Cup Water: Adds moisture to the cake; using room-temperature water helps achieve a fluffy texture.
-
1/3 Cup Vegetable Oil: This keeps the cake tender and moist. If you want a flavor twist, feel free to substitute with melted coconut oil!
-
3 Large Eggs: Eggs help bind the ingredients together and provide a rich flavor. If you’re making it vegan, you can replace each egg with 1/4 cup unsweetened applesauce.
-
1 Cup Sweetened Condensed Milk: The magic ingredient! This rich and creamy milk adds sweetness and moisture. If you prefer a dairy-free option, look for coconut condensed milk.
-
1 Cup Strawberries (sliced): These provide a sweet and fresh flavor — plus, they add a pop of red goodness.
-
1 Cup Blueberries: Another fruit that adds sweetness and provides that beautiful blue hue. Frozen blueberries can be a substitute, just drain them well.
-
1 Cup Whipped Topping: For that final creamy layer, you can use store-bought or homemade whipped cream. If you’re avoiding dairy, a coconut whipped topping works wonderfully.
-
Red and Blue Food Coloring: To enhance those patriotic colors! You can skip this if you prefer the natural look, but a little color never hurts for some festive fun!
Step-By-Step Instructions
Now that we have our ingredients ready, let’s get into the cooking. This cake is a breeze to whip up!
-
Preheat the Oven: Start by preheating your oven to 350°F (175°C). This ensures your cake bakes evenly.
-
Prepare Your Cake Batter: In a large mixing bowl, combine the white cake mix, water, vegetable oil, and eggs. [Chef tip: Mix this on medium speed for about 2 minutes until the batter is smooth and well combined.]
-
Bake the Cake: Pour the batter into a greased 9×13 inch baking dish. [Here’s a little hack: Make sure you spread the batter evenly to avoid uneven baking.] Bake according to the package directions, usually around 30-35 minutes, or until a toothpick comes out clean.
-
Cool the Cake: Once your cake is done baking, let it cool in the pan for about 10-15 minutes. After that, take a skewer or the handle of a wooden spoon and poke holes all over the top of the cake, about an inch apart. This is where all the flavor magic happens!
-
Add the Sweetened Condensed Milk: Carefully pour the sweetened condensed milk over the warm cake, ensuring that it seeps into the holes. [Chef insight: Letting the cake soak while it’s still warm will help it absorb more moisture.]
-
Chill Your Cake: Cover your cake with plastic wrap and pop it in the refrigerator for at least 2 hours, or overnight if you can wait! This step is crucial for flavor development.
-
Top It Off: Once chilled, spread your whipped topping evenly across the cake. Now, here comes the fun part — let’s decorate!
-
Create a Patriotic Design: Arrange the sliced strawberries and blueberries on top of the whipped topping to showcase those red, white, and blue colors. You can create a flag design or any pattern that excites you!
Serving Suggestions
To serve this lovely cake, slice it generously into squares, and plate each piece with a dollop of extra whipped topping and a fresh berry on top for a beautiful presentation. Don’t forget to set the mood! Scented candles, colorful plates, and maybe even some festive napkins will enhance the experience and make your guests feel special.
Recipe Variations
Feel free to get creative with this cake! Here are a few ideas:
-
Layered Poke Cake: Consider making two layers of cake and sandwiching the filling between them for a show-stopping effect.
-
Flavor Twist: Instead of white cake, use lemon or almond cake mix for an unexpected yet delightful flavor.
-
Dietary Swaps: Try a gluten-free cake mix for a gluten-free option or make mini poke cakes in muffin tins for single-serving treats.
-
Fruit Mix-up: Swap the strawberries and blueberries with your favorite seasonal fruits — think peaches or kiwi for a tropical twist!
-
Chocolate Sprinkle: Want to tempt chocolate lovers? Add cocoa powder to the cake mix or use chocolate whipped topping!
Chef’s Notes
I have to tell you, this recipe has evolved beautifully over the years. The first time I made it was quite a spectacle! I forgot to poke holes in the cake, and let me tell you, it turned out like a dense sponge. Lesson learned, but that’s the beauty of cooking — we learn from our moments in the kitchen, and each mistake leads to greater adventures! Now, it’s one of my go-to desserts when I want to impress someone (and, let’s be real, it always gets rave reviews!).
FAQs and Troubleshooting
-
Why did my poke cake turn out dry? Make sure to pour the sweetened condensed milk while the cake is warm. Additionally, letting it chill for at least 2 hours is essential for moistened goodness!
-
Can I freeze my poke cake? Absolutely! Just be sure to wrap it tightly in plastic wrap. It can be frozen for up to three months. Just thaw it in the fridge overnight before serving.
-
My cake fell while baking. What happened? This can happen if you opened the oven door too soon. Always wait for at least the first 20 minutes before peeking!
-
Can I use cool whip instead of whipped topping? Yes! If you’re looking for convenience, Cool Whip is a great alternative, just be sure to defrost it properly before spreading.
Nutritional Info
While nutrition details can vary, a serving of this Patriotic Poke Cake typically contains about 250-300 calories. Remember, it’s all about enjoying the moment around the table!
So, there you have it — a vibrant and delicious Patriotic Poke Cake that will have everyone asking for seconds. Whether it’s for a holiday or a casual gathering, this cake is your ticket to creating wonderful memories. I hope you try it out and make it your own. Happy baking, and let’s raise a slice to all the beautiful moments that food can share!
PrintPatriotic Poke Cake
A festive poke cake topped with strawberries and blueberries, perfect for summer celebrations.
- Prep Time: 15 minutes
- Cook Time: 35 minutes
- Total Time: 50 minutes
- Yield: 12 servings 1x
- Category: Dessert
- Method: Baking
- Cuisine: American
- Diet: Vegetarian
Ingredients
- 1 Box of White Cake Mix
- 1 Cup Water
- 1/3 Cup Vegetable Oil
- 3 Large Eggs
- 1 Cup Sweetened Condensed Milk
- 1 Cup Strawberries (sliced)
- 1 Cup Blueberries
- 1 Cup Whipped Topping
- Red and Blue Food Coloring
Instructions
- Preheat the oven to 350°F (175°C).
- Combine the white cake mix, water, vegetable oil, and eggs in a large mixing bowl, mixing for about 2 minutes until smooth.
- Pour the batter into a greased 9×13 inch baking dish and bake according to package directions for 30-35 minutes.
- Cool the cake in the pan for 10-15 minutes, then poke holes all over the top.
- Pour the sweetened condensed milk over the warm cake.
- Chill the cake covered with plastic wrap in the refrigerator for at least 2 hours.
- Spread whipped topping evenly across the chilled cake.
- Arrange sliced strawberries and blueberries on top in a patriotic design.
Notes
Letting the cake soak while still warm helps absorb more moisture. For different flavors, try lemon or almond cake mix.
Nutrition
- Serving Size: 1 slice
- Calories: 275
- Sugar: 23g
- Sodium: 320mg
- Fat: 9g
- Saturated Fat: 2g
- Unsaturated Fat: 7g
- Trans Fat: 0g
- Carbohydrates: 40g
- Fiber: 1g
- Protein: 4g
- Cholesterol: 50mg
Keywords: poke cake, patriotic dessert, summer cake, festive dessert, easy cake recipe
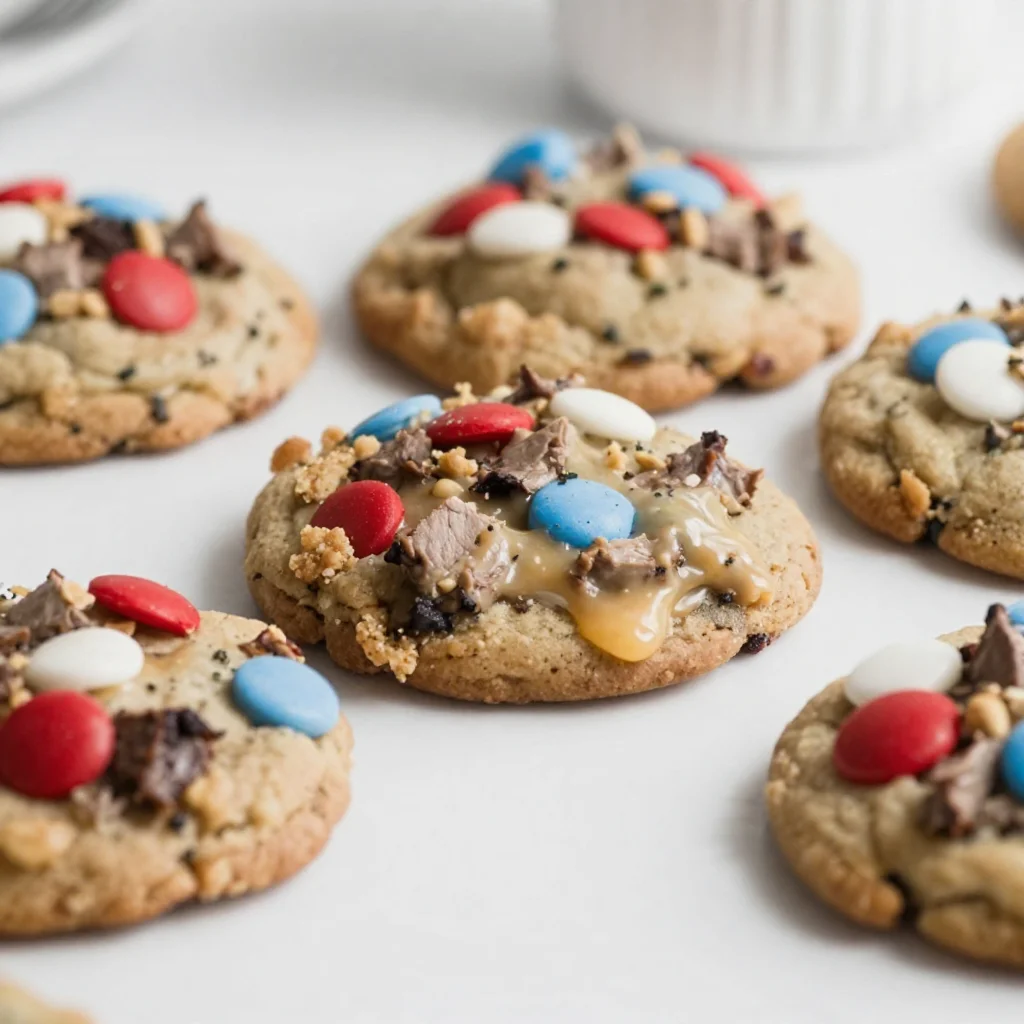
Patriotic 4th of July Monster Cookies: Quick Party Treat
Celebrate with 4th of July Monster Cookies: A Sweet, Festive Treat!
As the summer sun shines bright and the scent of barbecue fills the air, there’s one thing that truly captures the spirit of the 4th of July for me: baking up a storm in my kitchen! And what better way to celebrate America’s birthday than with a batch of vibrant, indulgent Monster Cookies? These spirited confections are the epitome of a festive treat—they’re chewy, chunky, and bursting with flavors that make your taste buds dance!
Picture this: friends and family gathered around, laughter echoing in the warm summer air, as you present a platter of these delightful cookies, each one a masterpiece of flavors and colors. What’s more? Monster Cookies are wonderfully forgiving, allowing even novice bakers to create a stunning dessert that impresses without the fuss. I’m excited to guide you through this family-friendly cookie adventure, so grab your apron, and let’s get baking!
A Cookie That Holds Memories
Let me take you on a little trip down memory lane. I remember the first time I ever made cookies for a party—ironically, it was another 4th of July gathering. Armed with just a worn-out cookbook and my mom’s old mixer, I whipped up a batch of chocolate chip cookies, thinking I could impress a few friends.
What I didn’t anticipate was how they would turn out! The cookies were a complete disaster; they spread too thin and ended up like puddles of goo on the baking sheet! But amidst the culinary chaos, I learned something invaluable: it’s not just about the cookies, but the joy of sharing, creating, and laughing together in the kitchen.
Fast forward a few years, and I’ve perfected my cookie game, adding colorful M&M’s to my classic recipe to create the ultimate Monster Cookies. Now, these festive favorites not only remind me of my early baking days but are also my go-to treat for any celebration—especially the 4th of July!
Ingredients
Here’s what you’ll need to make these festive 4th of July Monster Cookies:
-
1 cup browned butter
Browned butter adds a rich, nutty flavor that transforms basic cookies into something truly special. If you’re short on time, melted regular butter can work as a substitute, although you won’t get that toasty depth of flavor. -
1 cup brown sugar
This adds moisture and a hint of caramel sweetness. If you need a lighter option, you can use coconut sugar, though it may alter the taste slightly. -
1/2 cup granulated sugar
The granulated sugar balances the richness of the brown sugar and helps achieve the perfect chewy texture. You could substitute with a sugar alternative like agave syrup, but the amount will vary. -
2 large eggs
Eggs not only bind the ingredients together but also contribute to the cookies’ rise. For a vegan option, you can use flaxseed meal mixed with water as a substitute. -
1 teaspoon vanilla extract
Pure vanilla extract elevates the cookie’s flavor with a sweet aromatic essence. Try to use pure vanilla rather than imitation for best results. -
2 cups all-purpose flour
This creates the base of the cookie. You can use a gluten-free all-purpose flour blend if you’re looking for a gluten-free option. -
1 teaspoon baking soda
This is essential for leavening, giving your cookies that perfect soft-chewy texture. Don’t confuse it with baking powder; they are NOT interchangeable. -
1/2 teaspoon salt
A pinch of salt enhances the sweetness of your cookies and balances flavors. If you’re watching your sodium intake, feel free to reduce the amount, but don’t omit it altogether. -
1 cup chocolate chips
Semi-sweet chocolate chips are a classic choice, but feel free to mix things up with milk chocolate or dark chocolate, depending on your preference. -
1/2 cup M&M’s
These colorful candies are not only delicious, they also add a pop of fun and color, perfect for the 4th of July festivities! -
1/2 cup oats
Oats add chewiness to each cookie and a bit of heartiness. You can use quick-cooking oats in a pinch, but the texture will be slightly different.
Step-by-Step Instructions
Now that we have our ingredients gathered, let’s dive into the fun part—the baking!
-
Brown the Butter
Start by adding the butter to a saucepan over medium heat. Let it melt and continue cooking until it turns a lovely golden brown, with a nutty aroma wafting through your kitchen. Make sure to stir it occasionally to prevent burning. Once browned, remove from heat and let it cool for a few minutes. -
Combine Sugars
In a large mixing bowl, combine the cooled browned butter with brown sugar and granulated sugar. Using a hand mixer or a whisk, beat until the mixture is smooth and creamy—about 2-3 minutes. This fluffy mixture means we’re on the right track! -
Add Eggs and Vanilla
Next up, add in the eggs one at a time, mixing well after each addition. Then, pour in the vanilla extract, mixing until it’s well incorporated. This step will make your kitchen smell heavenly! -
Mix Dry Ingredients
In a separate bowl, whisk together the all-purpose flour, baking soda, and salt. Gradually add the dry mixture to the wet ingredients, mixing until just combined—overmixing can lead to tough cookies, and we don’t want that! -
Fold in Chocolate and M&M’s
Using a spatula, gently fold in the chocolate chips, M&M’s, and oats. The batter should look thick and luscious—just how cookie dough should be! -
Chill the Dough (Optional)
If you have time, it’s advantageous to chill the dough for at least 30 minutes. This helps to solidify the fats in the dough, leading to thicker cookies. It’s a small step that makes a big difference! -
Preheat the Oven
While the dough chills, preheat your oven to 350°F (175°C). Don’t skip this step; a well-preheated oven is key to even-baked cookies. -
Scoop and Bake
Line baking sheets with parchment paper. Use a cookie scoop (or two spoons) to drop generous mounds of dough onto the baking sheet, spacing them about 2 inches apart. Bake for 10-12 minutes or until the edges are lightly golden but the centers are still soft. Remember, they will continue to cook as they cool! -
Cool and Enjoy
Once baked, let the cookies cool on the baking sheet for a few minutes before transferring them to a wire rack. Warm cookies are the best, especially with a glass of milk!
Serving Suggestions
These beautiful Monster Cookies are perfect for sharing! You can plate them on a festive 4th of July-themed platter or create individual servings in colorful paper bags tied with ribbon for picnics and gatherings. A scoop of vanilla ice cream on the side wouldn’t hurt either—think cookie ice cream sandwiches or simply a delicious accompaniment.
Recipe Variations
Want to customize your Monster Cookies? Here are a few fun variations:
-
Add Nuts: Throw in chopped pecans or walnuts for an extra crunch.
-
Nut Butter Swirl: Mix in a spoonful of peanut butter or almond butter for a nutty twist.
-
Fruit Frenzy: Swap the M&M’s for dried fruits like cranberries or cherries for a chewy, fruity flavor.
-
Spice It Up: Add a dash of cinnamon or nutmeg for a warm, comforting undertone.
Chef’s Notes
I’d be remiss if I didn’t mention that these Monster Cookies have a little history of their own in my kitchen! The recipe has evolved over time based on what’s in the pantry or what I’m craving. Sometimes I experiment with different types of chocolate or even add a sprinkle of sea salt on top right before baking. Do you get the urge to take a bite of your freshly baked cookies while standing over the cooling rack? Guilty as charged! It’s all about the joy of indulging in the fruits of your labor.
FAQs and Troubleshooting
-
Why did my cookies spread too much?
This can happen if the butter is too warm or if you didn’t chill the dough. Make sure to let your cookies rest before baking! -
How do I know when my cookies are done?
Look for edges that are set and a slightly soft center. They’ll continue to firm up while cooling on the baking sheet. -
Can I freeze the cookie dough?
Absolutely! You can scoop the dough into balls and freeze them on a baking sheet. Once frozen, transfer them to a ziplock bag for later baking—great for last-minute cravings! -
What should I do if my cookies turn out too dry?
Overmixing can lead to dry cookies. Make sure to mix until just combined and not too much after adding the flour.
Nutritional Info
While I love indulging during festivities, moderation is key! Here’s a rough outline for one cookie (based on 24 servings):
- Calories: 180
- Total Fat: 9g
- Carbohydrates: 24g
- Protein: 2g
- Fiber: 1g
And there you have it! Your ultimate guide to creating delicious 4th of July Monster Cookies—made with love, laughter, and a pinch of nostalgia. So this holiday season, gather your loved ones, tie on an apron, and whip up a batch of these delightful cookies. Remember, it’s all about creating memories around your table while enjoying the sweet rewards of baking together. Happy 4th of July!
Print4th of July Monster Cookies
Celebrate America’s birthday with these vibrant, chewy Monster Cookies bursting with flavors and colors. Perfect for sharing at summer gatherings!
- Prep Time: 15 minutes
- Cook Time: 12 minutes
- Total Time: 45 minutes
- Yield: 24 servings 1x
- Category: Dessert
- Method: Baking
- Cuisine: American
- Diet: Vegetarian
Ingredients
- 1 cup browned butter
- 1 cup brown sugar
- 1/2 cup granulated sugar
- 2 large eggs
- 1 teaspoon vanilla extract
- 2 cups all-purpose flour
- 1 teaspoon baking soda
- 1/2 teaspoon salt
- 1 cup chocolate chips
- 1/2 cup M&M’s
- 1/2 cup oats
Instructions
- Brown the Butter: Add the butter to a saucepan over medium heat. Let it melt and continue cooking until it turns golden brown, stirring occasionally to prevent burning. Remove from heat and let it cool.
- Combine Sugars: In a large mixing bowl, combine the cooled browned butter with brown sugar and granulated sugar. Beat until smooth and creamy, about 2-3 minutes.
- Add Eggs and Vanilla: Add in the eggs one at a time, mixing well after each addition. Pour in the vanilla extract and mix until incorporated.
- Mix Dry Ingredients: In a separate bowl, whisk together flour, baking soda, and salt. Gradually add to the wet ingredients, mixing until just combined.
- Fold in Chocolate and M&M’s: Gently fold in the chocolate chips, M&M’s, and oats until the batter is thick.
- Chill the Dough (Optional): Chill the dough for at least 30 minutes for thicker cookies.
- Preheat the Oven: While the dough chills, preheat your oven to 350°F (175°C).
- Scoop and Bake: Line baking sheets with parchment paper. Scoop mounds of dough onto the sheets, spaced about 2 inches apart. Bake for 10-12 minutes or until edges are lightly golden.
- Cool and Enjoy: Let the cookies cool on the baking sheet for a few minutes before transferring them to a wire rack.
Notes
For a fun twist, consider adding nuts or a swirl of nut butter. These cookies can also be frozen for later enjoyment.
Nutrition
- Serving Size: 1 cookie
- Calories: 180
- Sugar: 10g
- Sodium: 150mg
- Fat: 9g
- Saturated Fat: 5g
- Unsaturated Fat: 3g
- Trans Fat: 0g
- Carbohydrates: 24g
- Fiber: 1g
- Protein: 2g
- Cholesterol: 30mg
Keywords: Monster Cookies, 4th of July, festive cookies, baking, summer desserts
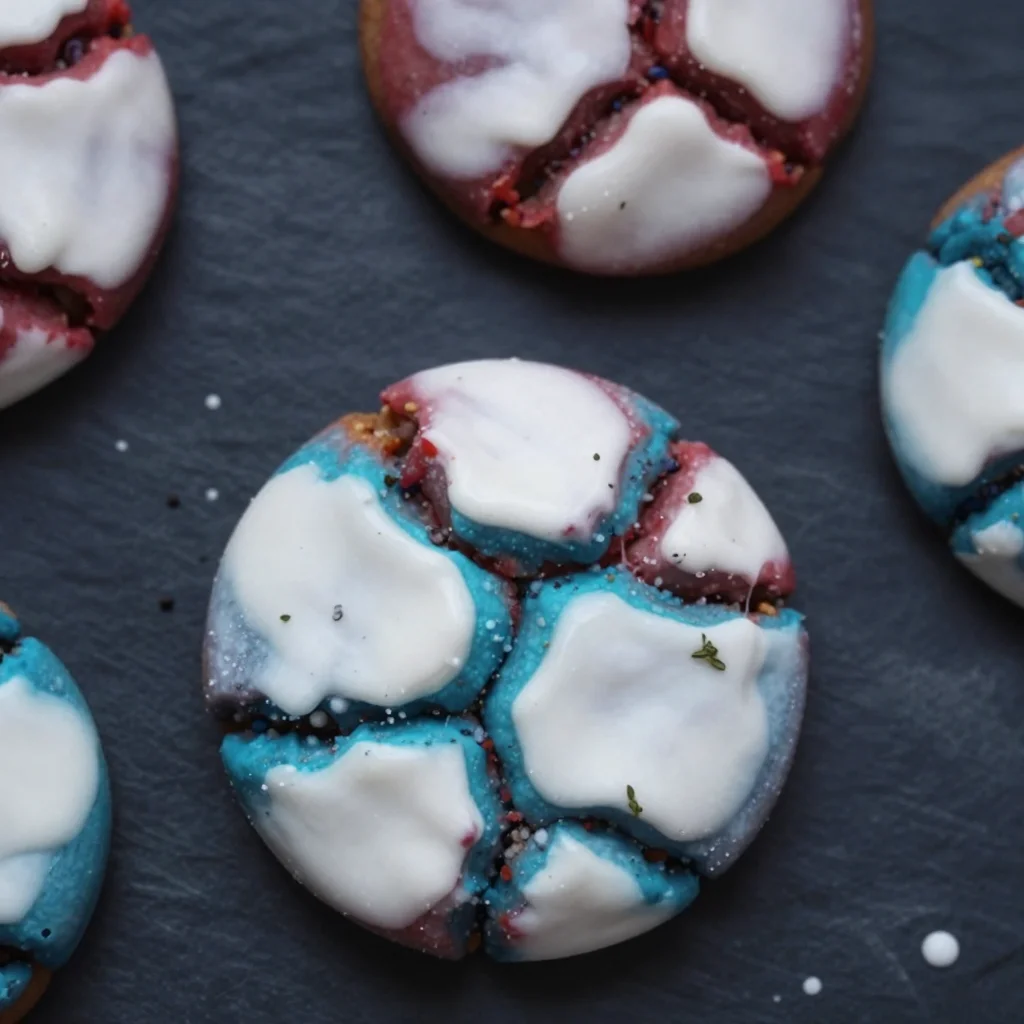
Patriotic Crinkle Cookies: 4th of July Treats in 30 Minutes
Patriotic Crinkle Cookies: A Celebration of Flavor and Fun!
Hello, fellow foodies! 🎉 Today, I’m super excited to share a delightful recipe that’s perfect for any festive gathering, especially those that celebrate our great nation! We’re diving into the world of Patriotic Crinkle Cookies — a whimsical treat that brings a splash of color and loads of flavor to your dessert table. These cookies are not just a feast for the eyes; they’re also incredibly easy to whip up and make a stunning statement at your next barbecue, picnic, or family gathering.
Introduction
Imagine a beautifully sunny day, the sound of laughter filling the air, and the aroma of grilling burgers wafting through the neighborhood. It’s a day to celebrate, to come together with friends and family, and what better way to do that than with some irresistible cookies? Patriotic Crinkle Cookies are not only deliciously chewy and soft but they come dressed up in vibrant red, white, and blue, making them the perfect sweet treat for holidays like the Fourth of July, Memorial Day, or Labor Day celebrations!
What’s great about crinkle cookies is their unique appearance — the way they crack and form lovely fissures as they bake. It’s like they’ve got a story to tell with every bite! They’re also incredibly versatile, allowing you to whip them up with kids or impress even the most discerning cookie lover at your gathering. Trust me when I say, you’ll have people asking for the recipe!
So, grab your apron, preheat that oven, and let’s get cooking! 🎉
Personal Story
As a child, I remember all the excitement that came with holiday celebrations. The sky filled with fireworks, the scent of delicious food wafting from the kitchen, and my mom bustling around, preparing everything to perfection. One of my fondest memories was the first time I helped her bake cookies for a Fourth of July barbecue. We made a simple sugar cookie dough, but with a twist of colors! That day was filled with laughter, flour fights, and the unmistakable joy of creating something scrumptious together.
I loved rolling the dough into balls and watching with glee as they baked, transforming into fluffy bites of happiness. Those cookies became the star of the dessert table, all colorful and crackly, just like our excitement. Fast forward to today, and I still savor that joy with each batch of Patriotic Crinkle Cookies I make, creating new memories while honoring those special times spent in the kitchen.
Ingredients
Let’s get everything you need to create these colorful cookies:
For the Dough:
- 2 cups (240g) all-purpose flour: The foundation of your cookies! All-purpose flour gives the right structure for that soft, chewy texture.
- 2 teaspoons baking powder: This helps your cookies rise and ensures they’re nice and fluffy.
- 1/2 teaspoon salt: Elevates the flavors and balances the sweetness.
- 1/2 cup (113g) unsalted butter, room temperature: Adds richness. If you don’t have unsalted butter, you can use salted butter; just cut back on the added salt.
- 1 cup (200g) granulated sugar: Sweetens the dough and gives that lovely crunch when you coat them in powdered sugar later.
- 2 large eggs, room temperature: Binds everything together. If you need an egg substitute, you can use flax eggs (1 tablespoon flaxseed meal + 2.5 tablespoons water = 1 egg).
- 2 teaspoons vanilla extract: A must for that warm, comforting flavor!
For the Coloring:
- Red gel food coloring: This is what gives our cookies their festive red hue. Gel food coloring is better than liquid because it won’t add extra moisture to the dough.
- Blue gel food coloring: Adds the patriotic pop of blue! Feel free to experiment with other colors for different themes.
For Coating:
- 1 cup (120g) powdered sugar: Creates that delightful, snowy coating that crinkles beautifully as the cookies bake.
Step-by-Step Instructions
Alright, let’s get to it! Here’s how to create these eye-catching cookies just like a pro.
-
Preheat the Oven and Prep: Preheat your oven to 350°F (175°C). Line two baking sheets with parchment paper. This ensures your cookies don’t stick and helps with even baking.
-
Combine the Dry Ingredients: In a medium bowl, whisk together the flour, baking powder, and salt. This combines the ingredients well and gets rid of any lumps. Set aside; we’ll come back to it shortly.
-
Cream the Butter and Sugar: In a large mixing bowl, using a hand mixer or a stand mixer fitted with a paddle attachment, beat the room temperature butter and granulated sugar until the mixture is light and fluffy, about 3-4 minutes. This step is crucial as it incorporates air into the batter, giving your cookies that perfect rise!
-
Add Eggs and Vanilla: Next, add the eggs one at a time, mixing well after each addition. Stir in the vanilla extract. This will create a creamy, smooth batter. A tip here: make sure your eggs are at room temperature for better emulsification!
-
Incorporate the Dry Mix: Slowly add your dry ingredient mixture to the butter mixture; mix until just combined. Overmixing will lead to dense cookies, so stop mixing as soon as you see no dry streaks.
-
Divide and Color: Now, here comes the fun part! Divide the dough equally into three bowls. In one bowl, add red gel food coloring until you reach your desired shade, in the second bowl, add blue gel color. Leave the third bowl plain. This is where the magic happens!
-
Form the Cookie Balls: Using a cookie scoop or your hands, form balls of dough, about 1 tablespoon each. Roll each ball in powdered sugar, ensuring they’re generously coated. This helps create that beautiful crinkled effect while baking.
-
Baking Time: Place the cookie balls onto your prepared baking sheets, arranging them a few inches apart to allow for spreading. Bake in the preheated oven for 10-12 minutes or until they are lightly golden around the edges. They may look underbaked, but they’ll continue to cook slightly on the baking sheet!
-
Cool Down: Allow the cookies to cool on the baking sheets for 5 minutes before transferring them to a wire rack to cool completely. Enjoy the aroma wafting through your kitchen; it’s heavenly!
Serving Suggestions
To serve your Patriotic Crinkle Cookies in style, stack them up on a joyful dessert platter or arrange them in a mason jar tied with a cute ribbon. Garnish with fresh berries or edible flowers for an extra touch of elegance. Pair them with a scoop of vanilla ice cream or serve with cold beverages like lemonade or iced tea for a delightful contrast of flavors.
Recipe Variations
Here are some fun variations to switch things up while keeping that patriotic spirit alive:
- Chocolate Chip Twist: Add a handful of semi-sweet chocolate chips to each dough color for an irresistible chocolatey burst!
- Nuts About It: Fold in chopped pecans or walnuts into the vanilla batter for an extra crunch.
- Sprinkled with Joy: Top each cookie ball with red, white, and blue sprinkles before baking for a festive touch!
- Vegan Option: Substitute butter with vegan butter and use flax eggs for a plant-based version.
- Gluten-Free Delight: Swap all-purpose flour for a 1:1 gluten-free baking blend to cater to gluten-free friends.
Chef’s Notes
Over the years, I’ve played with the original crinkle cookie recipe, experimenting with different flavors and colors. It’s incredible how a little twist can create something extraordinary! One of my favorite kitchen mishaps happened when I grabbed the wrong canister for flour — it was powdered sugar! Thanks to my curiosity, I made an accidental dessert that turned out to be surprisingly delightful! These memorable moments in the kitchen are what make cooking so much fun! It’s about experimenting, learning, and enjoying the process.
FAQs and Troubleshooting
Q1: My cookies turned out flat. What happened?
A1: Flat cookies can occur if your butter was too warm or melted before mixing. Make sure to use room temperature butter, not melted. Also, ensure you’re measuring the flour correctly (spoon and level method) to avoid using too little.
Q2: Can I freeze the dough for later use?
A2: Absolutely! You can freeze the dough balls before baking. Just wrap them tightly in plastic wrap and store in an airtight container for up to 3 months. Just add a couple of extra minutes to the baking time when you’re ready to bake them!
Q3: How can I store these cookies?
A3: Keep your cookies in an airtight container at room temperature for up to a week. If you want to keep them longer, consider freezing them in an airtight container or sealed plastic bag.
Q4: The coating is too thick. What can I do?
A4: If the powdered sugar coating seems excessive, try rolling the cookies a little less or simply brush off the excess sugar after coating. You want a dusting, not a thick layer.
Nutritional Info
(Per cookie, assuming 24 cookies):
- Calories: 110
- Carbs: 15g
- Protein: 1g
- Fat: 5g
- Sugar: 6g
Remember, these are just estimates; it’s always best to calculate your nutritional value based on specific brands and quantities!
And just like that, you’ve created delicious Patriotic Crinkle Cookies that are sure to steal the spotlight at your next gathering! Thanks for joining me in this culinary adventure. I can’t wait to hear how your cookies turn out! Happy baking and let’s keep celebrating with good food and great company! 🍪🎆
PrintPatriotic Crinkle Cookies
Delightful and colorful cookies perfect for celebrating patriotic holidays with a fun twist.
- Prep Time: 15 minutes
- Cook Time: 12 minutes
- Total Time: 27 minutes
- Yield: 24 cookies 1x
- Category: Dessert
- Method: Baking
- Cuisine: American
- Diet: Vegetarian
Ingredients
- 2 cups (240g) all-purpose flour
- 2 teaspoons baking powder
- 1/2 teaspoon salt
- 1/2 cup (113g) unsalted butter, room temperature
- 1 cup (200g) granulated sugar
- 2 large eggs, room temperature
- 2 teaspoons vanilla extract
- Red gel food coloring
- Blue gel food coloring
- 1 cup (120g) powdered sugar
Instructions
- Preheat the oven to 350°F (175°C) and line two baking sheets with parchment paper.
- Combine the flour, baking powder, and salt in a medium bowl and set aside.
- Cream the butter and sugar in a large mixing bowl until light and fluffy, about 3-4 minutes.
- Add the eggs one at a time, mixing well, then stir in the vanilla extract.
- Incorporate the dry mixture to the butter mixture until just combined.
- Divide the dough into three bowls, coloring one red, one blue, and leaving one plain.
- Form balls of dough, about 1 tablespoon each, and roll in powdered sugar.
- Bake for 10-12 minutes or until lightly golden around the edges.
- Cool on the baking sheets for 5 minutes before transferring to a wire rack to cool completely.
Notes
For variations, consider adding chocolate chips or nuts. The dough can be frozen for later use.
Nutrition
- Serving Size: 1 cookie
- Calories: 110
- Sugar: 6g
- Sodium: 50mg
- Fat: 5g
- Saturated Fat: 3g
- Unsaturated Fat: 2g
- Trans Fat: 0g
- Carbohydrates: 15g
- Fiber: 0g
- Protein: 1g
- Cholesterol: 20mg
Keywords: cookies, patriotic cookies, Fourth of July, dessert, baking
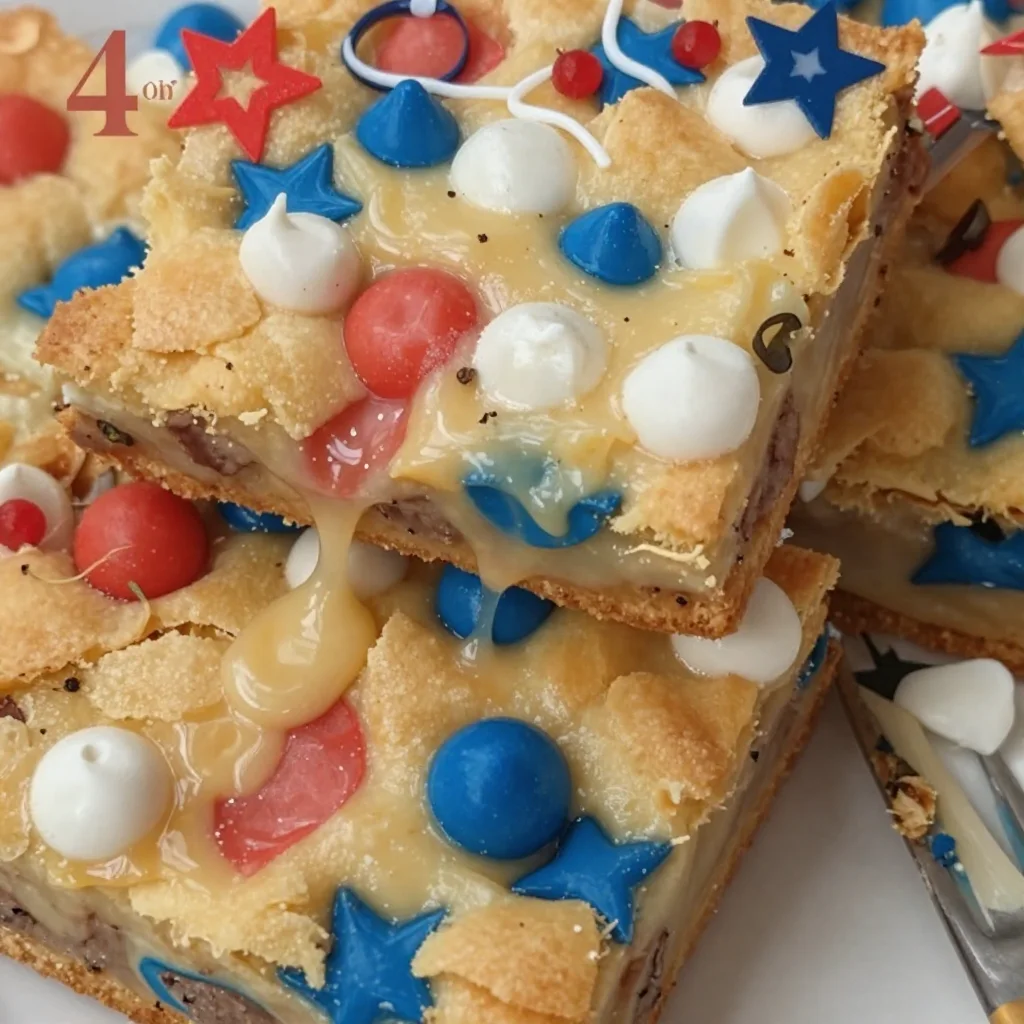
Patriotic 4th of July Cake-Mix Cookie Bars (Quick & Easy)
Celebrate with 4th of July Cake-Mix Cookie Bars: A Sweet Way to Honor Independence Day
Hello, sweet friends! If you’re like me, you’re all about celebrating every little moment with a big, beautiful treat. And as we gear up for a magnificent 4th of July celebration, there’s no better way to honor our independence than with a colorful, festive dessert. Today, I’m thrilled to share my recipe for 4th of July Cake-Mix Cookie Bars — they’re easy to whip up, irresistibly delicious, and bring a burst of red, white, and blue to your table.
Imagine this: warm, gooey cookie bars studded with white chocolate chips, and crunchy M&M’s — they melt in your mouth and are so simple to make. They’ll have your friends and family gathering around the dessert table, and maybe even returning for seconds (or thirds!). So, grab your apron and let’s dive into this delightful, festive treat!
A Sweet Memory: Baking with Mom
I can still remember the thrill of watching my mom whip up a batch of cookies in our cozy kitchen. The air would become sweet and warm, filled with the comforting aroma of baking. One summer, she decided to host a backyard barbecue for our neighborhood, and we made a giant batch of colorful cookies to celebrate the holiday.
Those cookies weren’t just snacks; they were little tokens of joy, sprinkled liberally with love and laughter. With bowls of red and blue sprinkles scattered across the countertops, we talked about our dreams while flour danced through the air. The best part? Watching our neighbors’ faces light up as they took a bite, transforming the simple gathering into a cherished memory.
It’s that spirit of joy and togetherness that inspired me to create these 4th of July Cake-Mix Cookie Bars. They embody the same feelings of love and camaraderie — perfect for sharing with friends and family during summer festivities!
Ingredients
Here’s what you’ll need to create these delightful cookie bars:
-
1 box cake mix (red velvet or vanilla)
A classic cake mix makes this recipe super simple! Either option will work beautifully, but red velvet adds an extra pop of color and flavor. -
1/2 cup vegetable oil
This ingredient keeps our bars moist and delicious. You could substitute it with melted coconut oil for a hint of tropical flavor. -
2 large eggs
These bind our ingredients together, providing structure and richness. If you’re in a pinch, use 1/2 cup of unsweetened applesauce per egg for a great vegan substitute! -
1/2 cup funfetti sprinkles (red, white, and blue)
Rainbow sprinkles bring joy to any dessert and are perfect for our patriotic theme! You can swap these for chocolate sprinkles or omit them if you prefer a more classic look. -
1/2 cup white chocolate chips
They add a creamy sweetness that balances the flavors perfectly. If you’re not a fan of white chocolate, feel free to use semi-sweet chocolate chips or even butterscotch chips for a fun twist. -
1/2 cup blue M&M’s
These festive treats add crunch and color! Swap them out for any colored candy to suit seasonal celebrations or personal favorites. -
1/2 cup red M&M’s
Just like the blue ones, these will provide that lovely crunch. You can easily replace them with peanut M&M’s for an extra layer of flavor.
Step-by-Step Instructions
Let’s get cookin’! Follow these simple steps to create your 4th of July Cake-Mix Cookie Bars:
-
Preheat the Oven: Start by preheating your oven to 350°F (175°C). This ensures that your cookie bars bake evenly and come out perfectly golden brown.
-
Prepare Your Baking Pan: Grease a 9×13-inch baking pan with non-stick spray or line it with parchment paper for easy removal. This is a little chef hack to make sure your cookie bars don’t stick and are easy to cut into neat squares later!
-
Mix the Ingredients: In a large mixing bowl, combine the cake mix, vegetable oil, and eggs. Give it a good stir with a spatula until everything is well mixed. Be careful not to overmix — we want these bars chewy, not tough!
-
Add the Fun Stuff: Gently fold in the funfetti sprinkles, white chocolate chips, and both red and blue M&M’s. Enjoy the beautiful colors as they swirl into the batter — it’s like a little celebration in the bowl!
-
Pour the Batter: Scrape the cookie batter into your prepared baking pan. Use an offset spatula or the back of a spoon to spread it out evenly in the pan. It might be a little thick, but that’s okay!
-
Bake: Place the pan in the preheated oven and bake for about 20-25 minutes. Start checking around the 20-minute mark. You want the edges to be lightly golden and a toothpick inserted in the center should come out mostly clean, meaning a few crumbs are okay — that’s what keeps it chewy!
-
Cool and Cut: Once baked to perfection, take the pan out of the oven and let it cool on a wire rack. Once cooled, carefully lift the bars out using the parchment (if you used it) and cut them into squares.
-
Serve and Enjoy: These bars can be enjoyed warm or at room temperature, but I suggest serving them slightly warm with a scoop of vanilla ice cream for an extra indulgent treat!
Serving Suggestions
When it comes to serving your 4th of July Cake-Mix Cookie Bars, presentation is key! Here’s a simple way to elevate them:
- Plate the bars on a large, colorful platter and sprinkle a few extra funfetti sprinkles around for a festive touch.
- Drizzle a little melted white chocolate on top for a touch of elegance.
- Add fresh berries like strawberries and blueberries around the bars for a pop of natural color and a refreshing balance to the sweetness.
Recipe Variations
Let’s get creative! Here are a few fun variations to customize your cookie bars:
-
Chocolate Chip Cookie Bars: Substitute half of the white chocolate chips for milk chocolate or dark chocolate chips for a classic flavor twist.
-
Nutty Bars: Stir in 1/2 cup of chopped walnuts or pecans for an added crunch and richness.
-
Peppermint Twist: Add ½ teaspoon peppermint extract and replace M&M’s with crushed peppermint candies for a winter holiday twist.
-
Gluten-Free Version: Use a gluten-free cake mix and ensure your other ingredients are gluten-free to make these bars suitable for those with gluten intolerance.
-
Fudge Brownie Bars: Use a brownie mix instead of cake mix for a decadent, fudgy treat your chocolate-loving friends will adore.
Chef’s Notes
This recipe has evolved over my years of baking. I initially started with a basic cookie recipe, but as I learned from friends and family, I incorporated fun flavors and colors to match the lively atmosphere of festive gatherings. Now, these cookie bars are not just a summer favorite but a year-round delight, customizable for any occasion.
One funny memory? I once forgot the eggs! Can you imagine my surprise when the mixture turned out more like a pancake batter? Lesson learned: always double-check your ingredients before mixing!
FAQs and Troubleshooting
-
What should I do if my bars are too chewy?
If your bars turn out too chewy, it might be from overmixing. Next time, mix just until combined and avoid overbaking. A higher ratio of cake mix to liquid can also cause this; always ensure you’re following the measurements closely. -
How do I store leftover cookie bars?
Store your cookie bars in an airtight container at room temperature for up to 4 days. You can also freeze them for later; just wrap them tightly in plastic wrap and then place in a freezer-safe container. -
Can I use another type of cake mix?
Absolutely! Any cake mix flavor can work well. Try chocolate, lemon, or even pumpkin spice for a festive twist depending on the season! -
Why did my cookie bars puff up?
If your bars puffed up while baking, it could be due to overmixing or them being overbaked. Just keep an eye on the baking time and aim for a chewy, slightly underbaked finish!
Nutritional Info
(Optional but helpful: If you wish to include this, it could look something like this):
- Serving Size: 1 bar
- Calories: 210
- Total Fat: 10g
- Saturated Fat: 4g
- Cholesterol: 30mg
- Sodium: 150mg
- Total Carbohydrates: 26g
- Dietary Fiber: 1g
- Sugars: 14g
- Protein: 2g
So there you have it; my delightful 4th of July Cake-Mix Cookie Bars recipe! I hope they add a burst of color and sweetness to your celebrations, just like those cherished memories in my kitchen. It’s all about connection, joy, and a touch of magic in every bite. Happy baking, friends, and let’s make this Independence Day one to remember!
Tie on your apron, pour yourself a sparkling drink, and let’s get baking!
Print4th of July Cake-Mix Cookie Bars
Celebrate Independence Day with these colorful and easy cake-mix cookie bars, perfect for summer festivities!
- Prep Time: 10 minutes
- Cook Time: 25 minutes
- Total Time: 35 minutes
- Yield: 12 servings 1x
- Category: Dessert
- Method: Baking
- Cuisine: American
- Diet: Vegetarian
Ingredients
- 1 box cake mix (red velvet or vanilla)
- 1/2 cup vegetable oil
- 2 large eggs
- 1/2 cup funfetti sprinkles (red, white, and blue)
- 1/2 cup white chocolate chips
- 1/2 cup blue M&M’s
- 1/2 cup red M&M’s
Instructions
- Preheat the oven to 350°F (175°C).
- Prepare a 9×13-inch baking pan with non-stick spray or parchment paper.
- Mix the cake mix, vegetable oil, and eggs in a large mixing bowl until just combined.
- Add the funfetti sprinkles, white chocolate chips, and both red and blue M&M’s.
- Pour the batter into the prepared baking pan, spreading it evenly.
- Bake for 20-25 minutes, until edges are lightly golden and a toothpick comes out mostly clean.
- Cool the bars on a wire rack, then cut into squares.
- Serve warm or at room temperature, optionally with vanilla ice cream.
Notes
For added flavor, substitute half the white chocolate chips with milk or dark chocolate chips. Store in an airtight container for up to 4 days.
Nutrition
- Serving Size: 1 bar
- Calories: 210
- Sugar: 14g
- Sodium: 150mg
- Fat: 10g
- Saturated Fat: 4g
- Unsaturated Fat: 6g
- Trans Fat: 0g
- Carbohydrates: 26g
- Fiber: 1g
- Protein: 2g
- Cholesterol: 30mg
Keywords: 4th of July, dessert, cookie bars, cake mix, festive treats