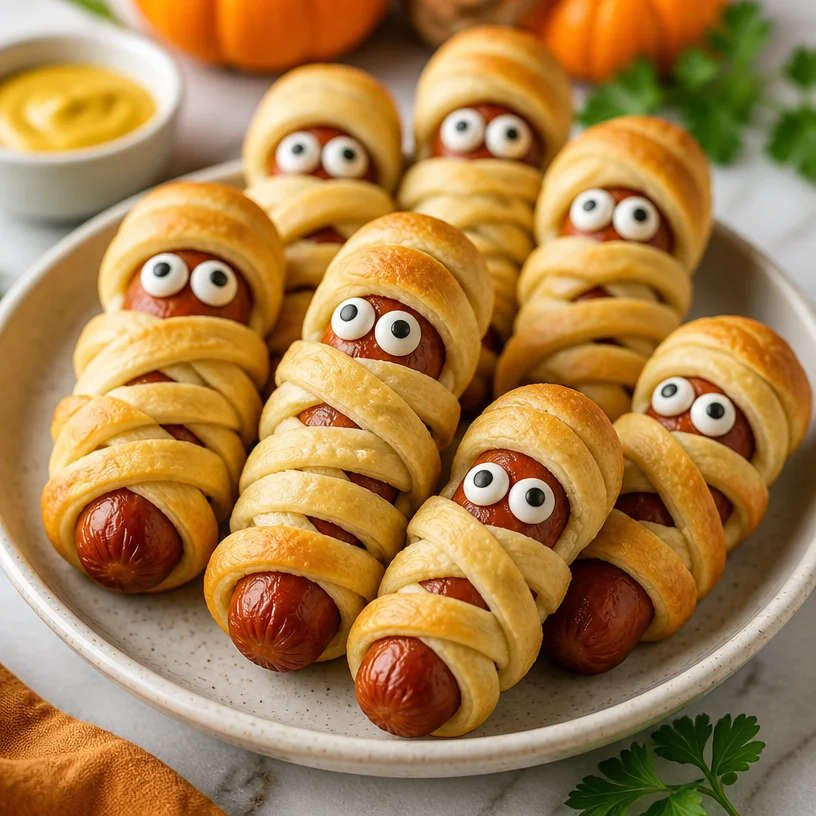
Mummy Hot Dogs
Mummy Hot Dogs: A Halloween Treat That Wows
It’s that exciting time of year again when the leaves change hue, the air turns crisp, and spooky season creeps around the corner. Halloween is a special time for families and friends to come together and indulge in festive treats that are both fun and delicious! This year, let’s put a whimsical spin on a classic favorite with “Mummy Hot Dogs.” This spooky twist is a hit among kids and adults alike, providing not just a taste of nostalgia but a chance to gather around the table for some tasty fun.
As a self-proclaimed lover of culinary creativity, I adore taking simple dishes and giving them a delightful makeover. The best part? These Mummy Hot Dogs are incredibly simple to make, ensuring that even novice chefs can whip them up in no time. Imagine this: you’re stirring a pot while the kids enjoy engaging in Halloween crafts, energy buzzing in the air. You hear laughter, and in the next room, there’s a flurry of activity as they prepare for their Halloween adventure. Just like those happy moments, these Mummy Hot Dogs are here to transport you to a place of warmth, joy, and hearty laughter.
In this post, I’ll walk you through not just the recipe but also some fun kitchen stories, tips to impress your guests, and creative variations to suit every palate. So, grab your apron (no, not ivory this time—with these Mummy Hot Dogs, we might want to keep it a bit more Halloween-themed!), and let’s get cooking!
A Spooky Memory with Mummy Hot Dogs
I still remember the first time I made Mummy Hot Dogs for a Halloween get-together. It was a brisk October evening, and the warmth of laughter filled my home. I had just hosted a Halloween-themed craft party for my children and their friends. The kids were buzzing with excitement, just as much as the adults, who were ready to enjoy some well-deserved treats. As they crafted their ghostly decorations, I decided to surprise everyone with a spooky snack idea I had seen floating around on social media.
I pulled out a package of crescent dough, hot dogs, and some candy eyes. As I wrapped each hot dog with strips of dough, the kids gathered around, intrigued by the unusual combination of ingredients. We giggled at our creations resembling mini mummies, and the anticipation in the air grew palpable. When the golden, flaky dogs came out of the oven, we all gathered around the table for a “mummy feast.”
With the candy eyes perched on top, they transformed into adorable little creatures, and the flavor? Let’s just say they were devoured in minutes! Making Mummy Hot Dogs became a cherished tradition in my family. It reminds me that food is not just about sustenance; it’s about creating shared moments together, weaving stories, and filling the atmosphere with merriment.
Ingredients
To get started on these Mummy Hot Dogs, let’s gather our ingredients. Here’s what you’ll need:
-
Hot Dogs: The stars of the dish! You can use beef, turkey, chicken, or even plant-based links for an alternative option. Don’t forget that the size can change the number of strips, so keep that in mind.
-
Crescent Dough: This flaky dough serves as the mummy wrap. You can substitute it with puff pastry for a different texture. Remember, the dough should be kept chilled until you’re ready to use it; warm dough is much harder to work with!
-
Candy Eyes: These add a fun, spooky touch to your mummies! You can find them at craft stores or online. If you can’t find candy eyes, you can always use small pieces of olives or chocolate chips as substitutes.
-
Ketchup or Mustard (optional): These can serve as dipping sauces for an added zing. A little bit of creativity here can turn an ordinary condiment into something festive—how about a “bloody” ketchup?
Step-by-Step Instructions
Now that we’ve got our ingredients ready, let’s dive into the cooking process!
-
Preheat your oven: Start by preheating your oven to 375°F (190°C). The goal here is to achieve that glorious golden brown on your crescent dough!
-
Prepare the hot dogs: Take your hot dogs and set them aside. You can choose to cut each one in half if you’re craving mini mummies for a fun appetizer variation.
-
Unroll the crescent dough: Carefully take the crescent dough out of its package and lay it flat on a clean, lightly floured surface. Optionally, you can roll out the dough with a rolling pin for a thinner texture.
-
Cut the dough into strips: Using a pizza cutter or sharp knife, cut the dough into thin strips, about 1/4 inch wide. You want enough length to wrap around your hot dogs multiple times.
-
Wrap the hot dogs: Take a strip of dough and start wrapping it around the hot dog. Be creative! Leave gaps here and there, as that’ll give it a more authentic mummy look. The idea is to make it look messy and spooky all at once. Secure the ends to prevent the dough from unraveling during baking.
-
Place on a baking sheet: Line a baking sheet with parchment paper for easy cleanup. Place your wrapped hot dogs on the sheet, ensuring they aren’t too crowded.
-
Bake to perfection: Pop them in your preheated oven and bake for about 12-15 minutes, or until the dough is golden brown and puffed-up. Stay nearby so you can admire them as they bake—seriously, nothing beats that delightful smell wafting through your home!
-
Add candy eyes: Once they’re out of the oven and have cooled for a couple of minutes, it’s time to bring your mummies to life! Dot some hot glue or frosting on the candy eyes and attach them to the hot dogs for that final spooky touch.
-
Serve warm: Serve with ketchup or mustard on the side for dipping. Get ready to hear the giggles and oohs and aahs as everyone dives into these yummy mummies!
Serving Suggestions
To plate your Mummy Hot Dogs, consider serving them on a festive platter lined with parchment paper for that rustic, haunted house vibe. To elevate the theme, you could add a few fake spiders or mini pumpkins around the platter. Not only will it create visual interest, but it also enhances the entire Halloween theme!
Recipe Variations
Feeling adventurous? Here are a few creative twists you might want to explore:
-
Cheesy Mummies: Place a small piece of cheese inside each hot dog before wrapping it with crescent dough for a gooey surprise!
-
Vegetarian Mummies: Swap the hot dogs for veggie dogs or even some cooked tofu to cater to plant-based eaters.
-
Nom Nom Nachos: Cut mini tortillas in the shape of bones for a crunchy side dish, pairing perfectly with your mummy hot dogs!
-
Spicy Mummies: Use jalapeño hot dogs for those who enjoy a bit of heat. These will surely add a kick to your Halloween spread!
-
Saucy Mummies: Incorporate BBQ sauce or a spicy mustard into the mix for fun dipping options. Mix different sauces to create a “Witch’s Brew” for dipping!
Chef’s Notes
These Mummy Hot Dogs hold a special place in my culinary heart. I’ve served them at numerous Halloween parties, always experimenting with different fillings and variations. One year, I decided to put a fun spin on it and invited guests to create their own mummies with various toppings and sauces. Watching everyone’s creativity bloom was the highlight of the evening, and let’s just say, some unique mummies were born!
This recipe, although simple, evolves with the seasons. Every time I make it, I realize that it brings people together, sharing laughs and delighting in the sheer joy of cooking. Remember, the kitchen is not just for cooking; it’s a space for crafting memories.
FAQs and Troubleshooting
-
What if my crescent dough is losing its shape?
Make sure your dough is cold before you start wrapping. If it gets too warm, it may become stretchy and hard to manage. You can pop it in the fridge for a few minutes to firm it back up. -
How do I know when they’re done?
Keep an eye on them! Once they turn golden brown, they’re ready. If they’re golden all around, that’s a sure sign of perfection! -
Can I freeze Mummy Hot Dogs?
Yes! You can freeze unbaked wrapped hot dogs. Just assemble them, freeze on a baking sheet, then store in an airtight container. Bake from frozen, adding a few extra minutes to the cooking time. -
What other sauces go well with Mummy Hot Dogs?
Besides ketchup and mustard, consider ranch dressing, sriracha, or a creamy garlic dip. Each adds its unique flair!
Nutritional Info
While I don’t dwell heavily on the nutritional aspect of cooking, I know it’s important for many. A single Mummy Hot Dog is about 200-300 calories, depending on the type of hot dog and dough. Pair with some veggie sticks for a well-rounded, festive meal that’s as enjoyable as it is delicious!
Now that you have your plan, roll up those sleeves, get your loved ones involved, and let’s create something wonderful this Halloween! Gather around the table, savor the moment, and enjoy making memories with these delightful Mummy Hot Dogs. Happy cooking!
PrintMummy Hot Dogs

A fun and spooky take on a classic favorite, these Mummy Hot Dogs are perfect for Halloween gatherings, combining deliciousness with creativity.
- Prep Time: 15 minutes
- Cook Time: 15 minutes
- Total Time: 30 minutes
- Yield: 8 servings
- Category: Appetizer
- Method: Baking
- Cuisine: American
- Diet: Vegetarian option available
Ingredients
- Hot Dogs (beef, turkey, chicken, or plant-based)
- Crescent Dough (alternatively puff pastry)
- Candy Eyes (or small olives/chocolate chips)
- Ketchup or Mustard (optional)
Instructions
- Preheat your oven to 375°F (190°C).
- Prepare the hot dogs by setting them aside.
- Unroll the crescent dough onto a clean, lightly floured surface.
- Cut the dough into thin strips, about 1/4 inch wide.
- Wrap the hot dogs with strips of dough, leaving gaps for a mummy look.
- Place the wrapped hot dogs on a lined baking sheet.
- Bake for 12-15 minutes or until golden brown.
- Add candy eyes to the cooled mummies using hot glue or frosting.
- Serve warm with ketchup or mustard for dipping.
Notes
Experiment with different fillings and toppings for unique mummy creations. Keep the dough cold for easier handling and best results.
Nutrition
- Serving Size: 1 serving
- Calories: 250
- Sugar: 2g
- Sodium: 600mg
- Fat: 15g
- Saturated Fat: 5g
- Unsaturated Fat: 8g
- Trans Fat: 0g
- Carbohydrates: 20g
- Fiber: 1g
- Protein: 7g
- Cholesterol: 25mg
Keywords: Halloween, Mummy Hot Dogs, spooky snack, festive treat, kid-friendly recipe
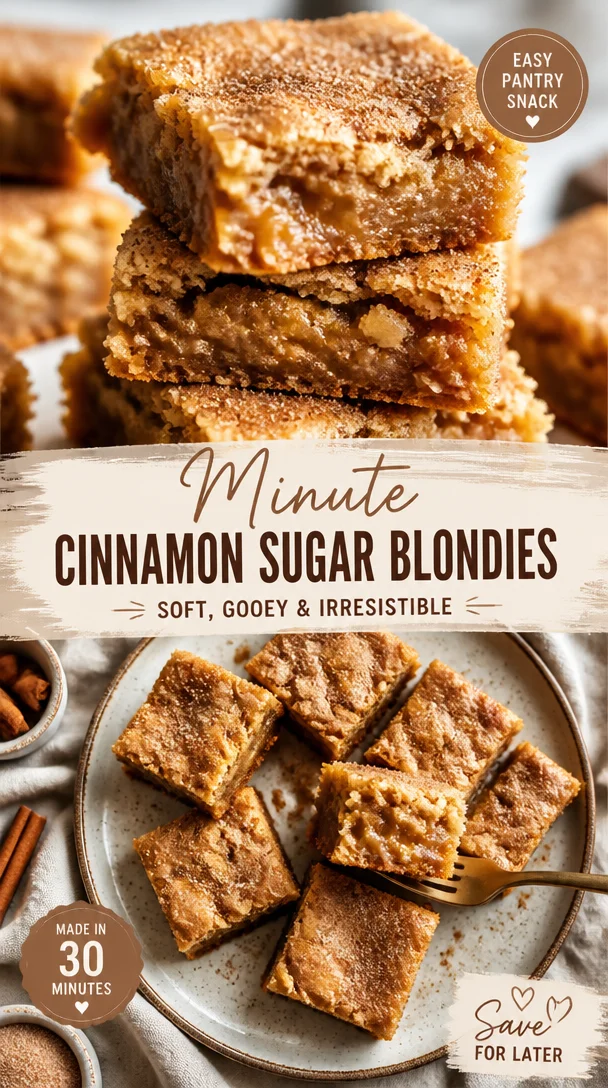
Minute Cinnamon Sugar Blondies (Easy Pantry Snack)
Sweet, Chewy Cinnamon Sugar Blondies: Your New Favorite Treat!
Hello, sweet friends! Welcome back to the warmth of my kitchen! If you’re searching for a dessert that holds a delightful balance of comfort and indulgence, look no further than these Cinnamon Sugar Blondies. They are chewy, loaded with rich, buttery goodness, and topped with a sprinkle of cinnamon sugar to create that perfect finishing touch.
This recipe sings all the right notes for any occasion—be it a cozy night in, a casual gathering with friends, or just a special midweek treat for yourself. Trust me, these blondies are so delicious that you’ll find yourself baking them again and again! So, grab your apron, pour yourself a warm drink, and let’s dive into this delightful treat!
A Sweet Memory
As a little girl, one of my favorite memories was baking with my grandmother on chilly Sunday afternoons. The kitchen would be filled with the comforting aroma of melted butter and sugar as we whipped up her famous desserts. The best days were when we made her legendary blondies. The moment those warm, gooey bars emerged from the oven, we’d sprinkle them with cinnamon sugar—her secret touch—that created a heavenly blend of flavors.
With each bite, I was reminded of her love and the joyful moments we shared. Now, I pass this cherished recipe down to you, with a few of my twists, and hope it brings you as much warmth and happiness as it did for me!
Ingredients
Let’s gather our ingredients! Each one plays a vital role in crafting our perfect blondies. Here’s what you’ll need:
-
1 cup brown sugar: This gives the blondies their rich, caramel-like flavor. You can substitute with light brown sugar for a milder taste or even coconut sugar for a healthier twist.
-
1/2 cup butter, melted: Melted butter creates that sought-after chewy texture. Unsalted butter is best for control over the sweetness, but if you use salted, just omit the extra salt in the recipe.
-
1 large egg: The binding agent! If you’re vegan, you can swap in a flax egg (1 tablespoon ground flaxseed mixed with 2.5 tablespoons water) for a great substitute.
-
1 teaspoon vanilla extract: This adds depth and enhances the sweetness. Pure vanilla extract is always recommended, but imitation can work in a pinch.
-
1 cup all-purpose flour: The base of your blondies. For a gluten-free option, try a 1:1 gluten-free blend.
-
1/2 teaspoon baking powder: This is key for fluffiness. If you’re out, baking soda can work, but use only a quarter teaspoon.
-
1/4 teaspoon salt: Just a touch to enhance all the flavors.
-
1 tablespoon cinnamon sugar (for topping): A glorious finish! Combine cinnamon and granulated sugar to taste; feel free to adjust it for your preference!
Step-by-Step Instructions
Ready to get those sweet smells wafting through the kitchen? Let’s make our Cinnamon Sugar Blondies!
-
Preheat Your Oven: First things first, preheat your oven to 350°F (175°C). This ensures even baking—no half-baked blondies here!
-
Prepare Your Pan: Grease an 8×8-inch baking pan with butter or line it with parchment paper for easy removal. This will help those blondies come out perfectly!
-
Mix the Wet Ingredients: In a mixing bowl, combine your melted butter and brown sugar. Whisk until smooth and creamy—this should take about a minute. The warmth of the melted butter will help dissolve the sugar, leading to a chewy texture.
-
Add the Egg and Vanilla: Next, crack in your egg and pour in the vanilla extract. Give it a good whisk until fully incorporated. Your batter should look shiny and smooth!
-
Combine Dry Ingredients: In a separate bowl, whisk together the flour, baking powder, and salt. This step helps to evenly disperse the baking powder throughout the flour, avoiding any pesky lumps.
-
Incorporate Dry into Wet: Gradually add the dry mixture into the wet ingredients, folding gently until just combined. Avoid overmixing to keep those blondies tender.
-
Spread the Batter: Pour the luscious batter into your prepared baking pan. Use a spatula to evenly spread it out. You’ll notice the rich color and glossy texture—yum!
-
Sprinkle with Cinnamon Sugar: Here’s where the magic happens! Generously sprinkle the cinnamon sugar mixture over the top of your batter. This will create a delightful crust that’s both crunchy and sweet.
-
Bake Away: Place your pan in the preheated oven and bake for 20–25 minutes. Keep a close eye on them, as different ovens can vary in cooking time. They’re done when the edges look golden and the center has set but is still slightly soft to the touch.
-
Cool & Cut: Once out of the oven, let the blondies cool in the pan for about 10 minutes before transferring them to a wire rack. This cooling period helps firm them up for easy slicing. Cut into squares or rectangles, and get ready to enjoy!
Serving Suggestions
When it comes to serving these blondies, the options are as plentiful as the smiles they’ll bring! Plate them with a scoop of vanilla ice cream on the side for a delightful contrast. You can also drizzle a little warm caramel sauce or chocolate ganache over them for an extra layer of indulgence. Trust me, no one will be able to resist!
Recipe Variations
Want to mix things up? Here are a few fun ideas to customize your blondies:
-
Nutty Delight: Add a half-cup of chopped walnuts or pecans to the batter for a delightful crunch.
-
Choco-Lover’s Dream: Fold in semi-sweet chocolate chips or butterscotch chips to create an irresistible sweet sensation.
-
Cranberry Bliss: Toss in a half-cup of dried cranberries for a tart contrast that pairs beautifully with the sweetness.
-
Spiced Up: Add a pinch of nutmeg or allspice to your cinnamon sugar mix for a warm, autumn twist.
-
Caramel Swirl: Drizzle some caramel into the batter before baking for pockets of gooey goodness!
Chef’s Notes
Oh, the stories my kitchen could tell! I can’t help but chuckle thinking about that time I accidentally mistook baking soda for powdered sugar while whipping up a batch of these blondies. Let’s just say they were a little less fluffy than I intended, but the flavor was still spot on!
These blondies have come a long way since my grandmother’s original recipe. Over time, I’ve tinkered and adjusted various elements to create these perfectly chewy treats. It’s amazing how a little bit of experimentation can spark joy in the kitchen!
FAQs and Troubleshooting
Q: Why are my blondies dry?
A: Overbaking is often the culprit! Make sure to watch the timer, and remove them from the oven as soon as they look set but still soft in the center.
Q: How can I store leftovers?
A: Keep your blondies in an airtight container at room temperature for up to 3 days. You can also freeze them (wrapped individually) for up to 2 months. Just thaw at room temperature or pop them in the microwave for a few seconds when you’re ready to enjoy!
Q: Can I double the recipe?
A: Absolutely! Just bake in a 9×13-inch pan and adjust the baking time as needed, checking for doneness as you go.
Q: Can I make these gluten-free?
A: Yes! Use a 1:1 gluten-free flour blend, and the blondies will be just as delicious!
Nutritional Info
While I believe in treating yourself, it’s always nice to know what’s in your food! A typical serving (one blondie) contains approximately:
- Calories: 200
- Fat: 8g
- Carbs: 30g
- Protein: 2g
- Sugar: 15g
(Note: Values may vary based on exact ingredients and portion sizes!)
And there you have it, friends! Your very own Cinnamon Sugar Blondies, ready to spread happiness and bring a bit of sweetness into your life. I can’t wait for you to try this recipe and savor every bite—remember to share your delightful creations with me! Let’s keep the spirit of food and sharing alive, one scrumptious treat and kitchen adventure at a time. Happy baking! 🍪✨
PrintSweet Chewy Cinnamon Sugar Blondies

Delightfully chewy blondies topped with a crunchy cinnamon sugar crust, perfect for any occasion.
- Prep Time: 10 minutes
- Cook Time: 25 minutes
- Total Time: 35 minutes
- Yield: 16 servings 1x
- Category: Dessert
- Method: Baking
- Cuisine: American
- Diet: Vegetarian
Ingredients
- 1 cup brown sugar
- 1/2 cup butter, melted
- 1 large egg
- 1 teaspoon vanilla extract
- 1 cup all-purpose flour
- 1/2 teaspoon baking powder
- 1/4 teaspoon salt
- 1 tablespoon cinnamon sugar (for topping)
Instructions
- Preheat your oven to 350°F (175°C).
- Prepare an 8×8-inch baking pan with butter or parchment paper.
- Mix the melted butter and brown sugar until smooth and creamy.
- Add the egg and vanilla extract and whisk until fully incorporated.
- Combine the flour, baking powder, and salt in a separate bowl.
- Incorporate the dry mixture into the wet ingredients, folding gently.
- Spread the batter into the prepared baking pan evenly.
- Sprinkle the cinnamon sugar over the top of the batter.
- Bake for 20–25 minutes, until golden on the edges.
- Cool in the pan for 10 minutes before transferring to a wire rack and slicing.
Notes
Serve with vanilla ice cream or drizzle with warm caramel sauce for an indulgent treat.
Nutrition
- Serving Size: 1 blondie
- Calories: 200
- Sugar: 15g
- Sodium: 100mg
- Fat: 8g
- Saturated Fat: 5g
- Unsaturated Fat: 3g
- Trans Fat: 0g
- Carbohydrates: 30g
- Fiber: 1g
- Protein: 2g
- Cholesterol: 35mg
Keywords: blondies, dessert, cinnamon sugar, baking, sweet treat
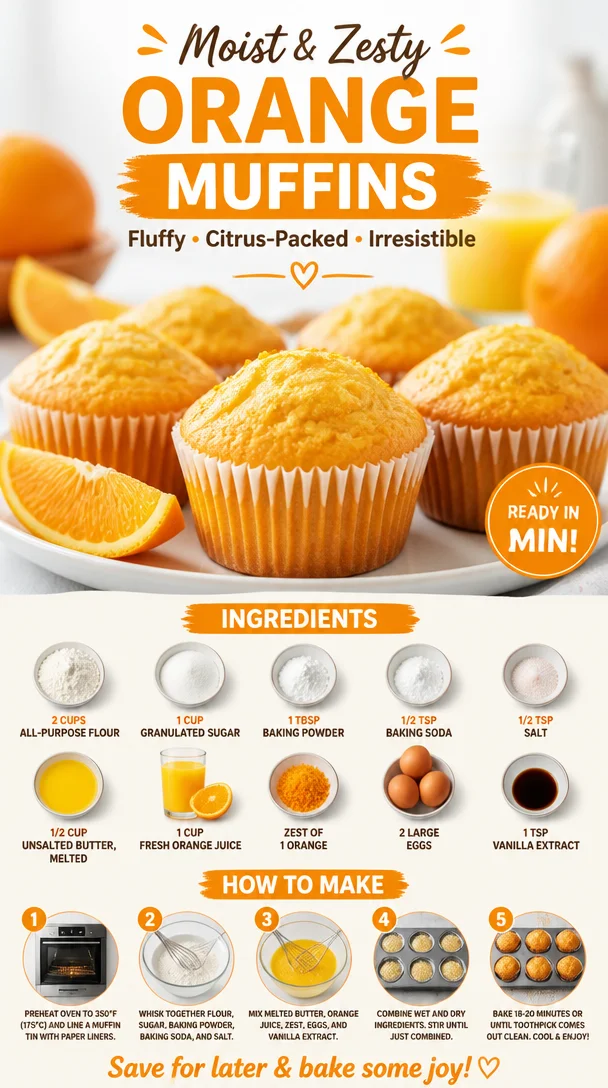
Orange Muffins
The Bright and Zesty Delight: Orange Muffins
Welcome, fellow food lovers! Today, I’m thrilled to share a recipe that brings a sunny burst to any breakfast table: Orange Muffins. The sight of these golden treats lining a plate is enough to make anyone smile, and their sweet citrus aroma has a way of brightening even the gloomiest mornings. Whether you’re whipping them up for a cozy Sunday brunch, an afternoon tea, or just because you love a slice of zest in your baked goods, these muffins are sure to please. Let’s dive into this delightful journey!
A Slice of Nostalgia
I can still vividly recall the first time my grandmother introduced me to the world of citrus baking. We were in her warm, inviting kitchen, the smell of fresh oranges permeating the air as she demonstrated her recipe for orange muffins. The way she expertly zested the orange, letting the colorful shavings fall into the bowl, was nothing short of magic. I watched in awe as she mixed the ingredients, each stir as gentle as the sunlight streaming through the window.
Those muffins became a staple in our family, appearing at gatherings and celebrations. My grandmother always knew how to warm hearts through her cooking, and those orange muffins were a delicious vehicle for her love. Each bite took me back to that sunlit kitchen, a moment frozen in time where the rhythm of baking and laughter melted together. Today, I’ve adapted that cherished recipe just for you, adding my own twists while keeping the essence alive. So, grab your apron—let’s embark on this flavorful adventure!
Ingredients
Here’s what you’ll need for these delightful Orange Muffins:
-
2 cups all-purpose flour: The foundation of your muffins. You can swap it with whole-wheat flour for a heartier muffin or a gluten-free blend if you prefer.
-
1 cup granulated sugar: This is what helps the muffins rise and creates that perfectly sweet flavor! Coconut sugar is a great alternative for a deeper flavor profile.
-
1 tablespoon baking powder: The key to those fluffy muffins that lift beautifully in the oven. Make sure it’s fresh; old baking powder can lead to dense muffins.
-
1/2 teaspoon baking soda: Adds extra lift and balances the acidity of the orange juice, ensuring your muffins are light and airy.
-
1/2 teaspoon salt: A little pinch to enhance all the flavors—don’t skip it!
-
1/2 cup unsalted butter, melted: This brings richness and moisture to the muffins. You can use coconut oil or a dairy-free butter for a vegan version.
-
1 cup fresh orange juice: Fresh is best! It brightens the flavor and aroma. Bottled juice works in a pinch, but the taste won’t be as vibrant.
-
Zest of 1 orange: The zest adds an extra layer of citrus flavor and aroma that you simply can’t replicate with juice alone. Feel free to toss in zest from lemons or limes for a fun twist!
-
2 large eggs: These bind the ingredients together and add moisture. For an egg-free version, use flaxseed meal mixed with water (1 tablespoon ground flaxseed + 3 tablespoons water = 1 egg).
-
1 teaspoon vanilla extract: A classic flavor enhancement that rounds out the sweetness and complements the citrus oh-so-well. You could also use almond extract for a unique twist!
Step-by-Step Instructions
Now that we have our ingredients lined up, let’s get to the fun part—baking! Here’s how to whip up these Orange Muffins step by step:
-
Preheat your oven: Let’s get that oven warmed up to 350°F (175°C). This ensures even baking and beautifully golden muffins. While it’s warming, you can prep the muffin tin.
-
Prepare the muffin tin: Grease your muffin tin with some non-stick spray or line it with paper liners—it makes for easier cleanup later and adds a lovely touch to presentation.
-
Mix dry ingredients: In a large mixing bowl, whisk together the flour, sugar, baking powder, baking soda, and salt. This mixing ensures even distribution of the leavening agents, which is key for consistent muffin texture.
-
Combine wet ingredients: In another bowl, mix the melted butter, fresh orange juice, orange zest, eggs, and vanilla extract. I love taking a moment here to breathe in that vibrant scent before whisking it all together until smooth.
-
Combine wet and dry: Now, add the wet ingredients to the dry ingredients. Gently fold them together with a spatula or wooden spoon. Don’t overmix—this is a common mistake that results in dense muffins. Just bring it together until you see no dry flour.
-
Fill the muffin cups: Using a cookie scoop or a ladle, evenly distribute the batter into the prepared muffin tin, filling each cup about 2/3 full. This allows room for the muffins to rise perfectly without spilling over.
-
Bake: Pop the muffin tin into the preheated oven and bake for about 18-20 minutes. You’ll know they’re done when a toothpick inserted in the center comes out clean—and trust me, the smell will be irresistible!
-
Cool and enjoy: Let the muffins cool in the tin for 5 minutes before transferring them to a wire rack. This step allows the muffins to firm up a bit. Enjoy these warm with a pat of butter or let them cool completely for later.
Serving Suggestions
Serving these Orange Muffins is all about presentation! For a whimsical touch, dust them lightly with confectioners’ sugar or drizzle with a simple orange glaze made from powdered sugar and a splash of orange juice. Arrange them on a bright platter or wooden board, garnished with fresh orange slices or sprigs of mint. Feel free to pair them with a light yogurt and some berries for a delightful brunch spread!
Recipe Variations
Why stop at classic when you can get creative? Here are a few variations you can try with your Orange Muffins:
-
Chocolate Chip Orange Muffins: Fold in a handful of semi-sweet chocolate chips into the batter for a delightful contrast between citrus and chocolate.
-
Cranberry Orange Muffins: Add fresh or dried cranberries for a tart kick that complements the sweetness of the muffins beautifully.
-
Orange Poppy Seed Muffins: Toss in a tablespoon of poppy seeds for added texture and a hint of nutty flavor.
-
Spiced Orange Muffins: Cinnamon or nutmeg can add a warm, comforting spice to every bite. Just a pinch goes a long way!
-
Vegan Orange Muffins: Swap out the eggs for flax eggs or applesauce and use a plant-based butter substitute to enjoy a vegan version of this delicious treat.
Chef’s Notes
When I first made these muffins, I was attempting to recreate my grandmother’s recipe, but as every good chef knows, experimentation is the heart of culinary creation! I added my own flair, adjusting sugar levels and experimenting with different fats (butter vs. oil). Each batch brought joyful memories of baking with her. If a muffin tops a little lopsided? Embrace it! It’s a sign of a home-cooked treat—a friendly reminder that perfection is overrated.
FAQs and Troubleshooting
-
My muffins didn’t rise. What went wrong?
- Ensure your baking powder and baking soda are fresh! Also, don’t overmix the batter; mixing too much can create dense muffins.
-
Why are my muffins dry?
- Overbaking can lead to dryness. Keep an eye on your oven and begin checking for doneness a few minutes before the timer goes off.
-
Can I freeze these muffins?
- Absolutely! Once cooled, you can freeze them in an airtight container for up to 3 months. Just reheat in the microwave or oven when you’re ready to enjoy!
-
Can I add different fruits?
- Yes! Try swapping out the orange juice and zest for lemon, lime, or even grapefruit for a unique twist.
Nutritional Info
(Per muffin, serves approximately 12 muffins)
- Calories: 220
- Total Fat: 8g
- Saturated Fat: 4.5g
- Cholesterol: 40mg
- Sodium: 150mg
- Total Carbohydrates: 34g
- Dietary Fiber: 0.5g
- Sugars: 12g
- Protein: 3g
With each bite, these Orange Muffins deliver familiar warmth and a spark of joy. They are more than just a treat—they carry with them a legacy of love, laughter, and community. So, gather your loved ones around the table, take out those muffins, and create your own delicious memories. Happy baking!
PrintOrange Muffins
Delightful orange muffins that bring a burst of citrus flavor to breakfast or brunch.
- Prep Time: 15 minutes
- Cook Time: 20 minutes
- Total Time: 35 minutes
- Yield: 12 muffins 1x
- Category: Breakfast
- Method: Baking
- Cuisine: American
- Diet: Vegetarian
Ingredients
- 2 cups all-purpose flour
- 1 cup granulated sugar
- 1 tablespoon baking powder
- 1/2 teaspoon baking soda
- 1/2 teaspoon salt
- 1/2 cup unsalted butter, melted
- 1 cup fresh orange juice
- Zest of 1 orange
- 2 large eggs
- 1 teaspoon vanilla extract
Instructions
- Preheat your oven to 350°F (175°C).
- Prepare the muffin tin by greasing it or lining it with paper liners.
- Mix the dry ingredients in a bowl: flour, sugar, baking powder, baking soda, and salt.
- Combine the wet ingredients in another bowl: melted butter, orange juice, zest, eggs, and vanilla extract.
- Combine the wet and dry ingredients, folding them gently together until no dry flour remains.
- Fill the muffin cups about 2/3 full with batter.
- Bake for 18-20 minutes or until a toothpick comes out clean.
- Cool in the tin for 5 minutes before transferring to a wire rack.
Notes
For a fun twist, try adding chocolate chips, cranberries, or poppy seeds.
Nutrition
- Serving Size: 1 muffin
- Calories: 220
- Sugar: 12g
- Sodium: 150mg
- Fat: 8g
- Saturated Fat: 4.5g
- Unsaturated Fat: 2g
- Trans Fat: 0g
- Carbohydrates: 34g
- Fiber: 0.5g
- Protein: 3g
- Cholesterol: 40mg
Keywords: orange muffins, breakfast muffins, citrus baking, homemade muffins
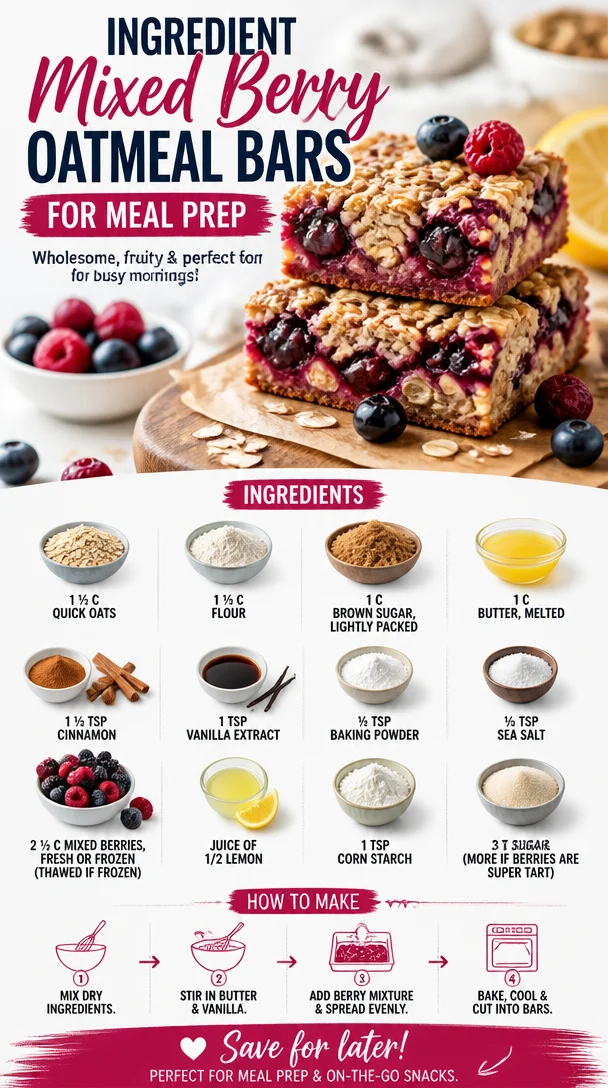
Ingredient Mixed Berry Oatmeal Bars for Meal Prep
Mixed Berry Oatmeal Bars: A Taste of Nostalgia
Hello, lovely foodies! Grab your aprons and get ready to embark on a delicious journey into the world of Mixed Berry Oatmeal Bars. There’s something incredibly special about a recipe that combines simplicity with nostalgia, and these bars do just that. Whether you’re looking for a delightful breakfast treat, a snack for your afternoon tea, or a sweet indulgence to satisfy your dessert cravings, these oatmeal bars are here to steal the show!
Personal Story: A Whiff of Summer
Growing up, my summers were all about vibrant berries. My family had a tradition of heading to the local farm where we’d pick fresh strawberries, blueberries, and raspberries until our baskets overflowed. There was something magical about stepping into those sun-drenched fields, with the air filled with the sweet aroma of ripening fruit. We’d pick, laugh, and eat berries until our fingers (and faces) were stained a deep crimson or azure.
After our adventures, my mother would become our family’s kitchen magician. One of her favorite recipes was a berry crumble that then inspired these oatmeal bars. I can still hear the bubbling sound of berries simmering on the stovetop, mixed with the warm notes of cinnamon wafting through our home. We would gather around the table, eagerly awaiting the first cut into that gorgeous, gooey dessert. It was during those cherished moments that I realized how food could create such lasting connections and memories with loved ones.
So, in the spirit of those beautiful summer days, let’s create a recipe that embodies joy, simplicity, and an abundance of flavor! Here’s how you can make these Mixed Berry Oatmeal Bars at home.
Ingredients
It doesn’t take much to bring these delicious bars to life! Let’s go over the ingredients you’ll need:
-
1 ½ cups quick oats
These oats provide the chewy base for our bars. Quick oats cook faster and offer a delightful texture. If you prefer, you can swap them with rolled oats for a heartier bite. -
1 ½ cups all-purpose flour
This is the foundation of the bars, lending them structure. If you’re going for a gluten-free option, almond flour or a gluten-free flour blend works wonders! -
1 cup brown sugar, lightly packed
Brown sugar gives a lovely depth of flavor, thanks to its molasses content. You can use coconut sugar for a healthier twist or even replace it with granulated sugar if you’re in a pinch. -
1 cup butter, melted
Melting the butter brings richness and helps bind the ingredients together. For a lighter option, substitute half of the butter with unsweetened applesauce! -
1 ½ teaspoon cinnamon
This warm spice adds warmth and depth to our bars. You could swap it out for nutmeg for a completely different spice profile. -
1 teaspoon vanilla extract
Vanilla enhances all the flavors in these bars. Feel free to use almond extract for a nutty flavor! -
½ teaspoon baking powder
This helper gives our bars a slight rise, making them soft and fluffy. Baking soda can be used instead; just remember to decrease the amount slightly! -
½ teaspoon sea salt
Salt balances the sweetness and elevates the overall taste. If you’re watching sodium, kosher salt is a great substitute! -
2 ½ cups mixed berries (fresh or frozen)
The star of the show! Use whatever berries you love. If you’re using frozen, don’t forget to thaw and drain them first. -
Juice of ½ lemon
A splash of lemon juice brightens the berry flavor and helps cut through the sweetness. Lime juice makes a zesty alternative! -
1 teaspoon cornstarch
This thickens the berry mixture, ensuring your bars hold together beautifully. If you don’t have cornstarch, flour will do in a pinch! -
3 tablespoons sugar (more if berries are super tart)
A touch of sugar sweetens the berry filling just right. Adjust based on the sweetness of your berries!
Step-by-Step Instructions
Alright, let’s get cookin’! Follow these simple steps, and soon enough, you’ll have a batch of these scrumptious bars cooling on your counter.
-
Preheat Your Oven
Preheat your oven to 350°F (175°C). This step ensures your bars bake evenly. While the oven warms up, you can prepare your baking pan! -
Grease Your Baking Pan
Grease a 9×13 inch baking pan with butter or line it with parchment paper for easy removal. The parchment will give you crisp edges and prevent any sticky moments. Trust me; it’s worth it! -
Mix the Dry Ingredients
In a large bowl, combine the quick oats, flour, cinnamon, baking powder, and sea salt. Whisk them together until they are evenly mixed. This ensures the flavors distribute evenly throughout the bars. -
Combine the Wet Ingredients
In another bowl, whisk together the melted butter, brown sugar, and vanilla extract until smooth and creamy. Now, here’s a little chef hack: don’t let the butter cool too much before mixing with the sugar; warm butter helps dissolve the sugar, making for a moist bar. -
Create the Oat Mixture
Pour the wet ingredients into the dry mixture and stir until just combined. Don’t overmix! We want a nice crumbly texture where you can see the oats. -
Set Aside for Filling
Reserve about 1 to 1 ½ cups of the oat mixture (we’ll use this for the topping). Press the rest into the bottom of your prepared baking pan. Use a spatula to spread it out evenly. -
Prepare the Berry Filling
In a medium bowl, toss your mixed berries with lemon juice, cornstarch, and sugar. This juicy goodness is what will make your bars sing! Even if I’m using frozen berries, I still love this step; it creates a sweet and zesty burst when baked. -
Spread the Berry Mixture
Carefully spread the berry mixture over the pressed oat base. Don’t be shy; we want to maximize that berry goodness! -
Top It Off
Crumble the reserved oat mixture over the berry layer. There’s no need to cover it completely; let the berries peek through for that gorgeous rustic vibe! -
Bake Until Golden
Pop the pan in the oven and bake for 25-30 minutes, or until the top is golden and the berries are bubbling. The smell that’ll fill your kitchen will make it hard to wait, but trust me; it’s worth it! -
Cool and Cut
Once baked, let the bars cool in the pan for at least 10 minutes, then lift them out with the parchment paper. Cool completely before cutting into squares (if you can resist the temptation!).
Serving Suggestions
When it comes to serving these Mixed Berry Oatmeal Bars, a simple presentation can go a long way. Slice them into squares or rectangles and place them on a beautiful platter. For an elegant touch, dust them with powdered sugar or serve with a dollop of whipped cream or a scoop of vanilla ice cream. They’re perfect for brunch gatherings, afternoon tea, or just as an after-dinner sweet. Pair them with a cup of chamomile tea or a latte, and you’ll be set for a lovely experience!
Recipe Variations
These oatmeal bars are so versatile; you can mix things up with some creative twists!
- Nutty Delight: Add in ½ cup of chopped nuts like almonds or walnuts for an extra crunch.
- Tropical Vibes: Swap the berries for mango and coconut for a tropical twist.
- Chocolate Chip Heaven: Stir in some chocolate chips for a dessert version that’s sure to please!
- Vegan Version: Replace butter with coconut oil and the eggs with flaxseed to make this recipe vegan-friendly.
- Spice It Up: Switch to pumpkin pie spice for a fall-inspired flavor that everyone will adore.
Chef’s Notes
Cooking is a delightful journey; I often find inspiration in the simplest of moments. The original recipe for these bars has evolved over the years, as I’ve experimented with different berries and flavor combinations. One funny kitchen story? Once, I accidentally grabbed cayenne pepper instead of cinnamon! Let’s just say—spicy oatmeal bars aren’t for the faint of heart!
These bars truly capture the essence of what home baking is about. They are comforting, delicious, and somehow remind me of those carefree childhood summers. I hope you create your own memories with this recipe!
FAQs and Troubleshooting
-
Why are my bars crumbly?
If your bars turn out crumbly, it could be due to not using enough butter or not compressing the oat mixture firmly enough into the pan. Make sure to pack the bottom layer down well! -
Can I use frozen berries?
Absolutely! Just remember to thaw them and drain any excess liquid to prevent soggy bars. Trust me, they’ll still be absolutely delicious! -
How do I store leftovers?
Store any leftovers in an airtight container in the fridge for up to a week. You can also freeze them for up to three months; just thaw before enjoying. -
Can I make these bars gluten-free?
Yes! Simply swap out regular flour for a gluten-free flour blend and ensure your oats are certified gluten-free. A marvelous treat for everyone!
Nutritional Info
Note: The nutritional information varies based on ingredient brands and specific substitutions used. Generally, each bar is a delightful balance of fiber, healthy fats, and a hint of sweetness with a burst of berry freshness!
Conclusion
I hope this Mixed Berry Oatmeal Bars recipe brightens your kitchen and brings a smile to your face. Engage your senses and savor the flavors, all while creating warm moments around your table. Let’s continue to celebrate the joy of cooking together, one recipe at a time!
Tie your apron, gather your loved ones, and embrace the warmth of home-baked goodness. Happy cooking!
PrintMixed Berry Oatmeal Bars
Delicious and nostalgic Mixed Berry Oatmeal Bars perfect for breakfast, snacks, or dessert.
- Prep Time: 15 minutes
- Cook Time: 30 minutes
- Total Time: 45 minutes
- Yield: 12 servings 1x
- Category: Snack
- Method: Baking
- Cuisine: American
- Diet: Vegetarian
Ingredients
- 1 ½ cups quick oats
- 1 ½ cups all-purpose flour
- 1 cup brown sugar, lightly packed
- 1 cup butter, melted
- 1 ½ teaspoon cinnamon
- 1 teaspoon vanilla extract
- ½ teaspoon baking powder
- ½ teaspoon sea salt
- 2 ½ cups mixed berries (fresh or frozen)
- Juice of ½ lemon
- 1 teaspoon cornstarch
- 3 tablespoons sugar (more if berries are super tart)
Instructions
- Preheat your oven to 350°F (175°C).
- Grease a 9×13 inch baking pan with butter or line with parchment paper.
- Mix the dry ingredients: oats, flour, cinnamon, baking powder, and sea salt.
- Combine the wet ingredients: whisk together melted butter, brown sugar, and vanilla extract.
- Create the oat mixture by pouring wet ingredients into the dry and stir until just combined.
- Set aside about 1 to 1 ½ cups of the oat mixture for the topping; press the rest into the bottom of your baking pan.
- Prepare the berry filling: mix berries with lemon juice, cornstarch, and sugar.
- Spread the berry mixture over the pressed oat base.
- Top with the reserved oat mixture, crumbling it over the berries.
- Bake for 25-30 minutes until golden and bubbly.
- Cool for at least 10 minutes before lifting out and slicing.
Notes
Store leftovers in an airtight container for up to a week. Can be frozen for three months.
Nutrition
- Serving Size: 1 serving
- Calories: 200
- Sugar: 10g
- Sodium: 150mg
- Fat: 9g
- Saturated Fat: 5g
- Unsaturated Fat: 2g
- Trans Fat: 0g
- Carbohydrates: 30g
- Fiber: 3g
- Protein: 3g
- Cholesterol: 30mg
Keywords: oatmeal bars, berry dessert, easy snack, healthy treats, summer recipes
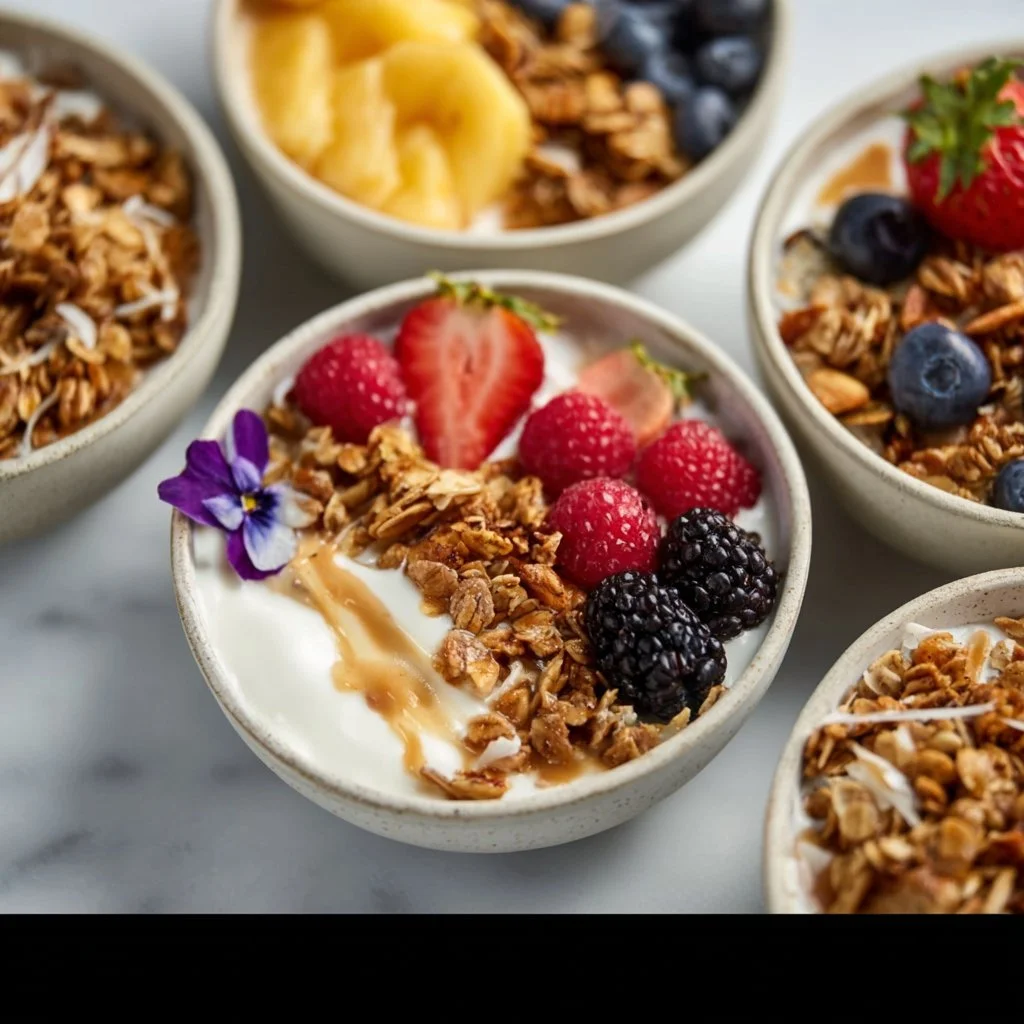
Easy Yogurt Granola Bowls (4 Ways!)
Easy Yogurt Granola Bowls (4 Ways!)
Hey friends! Welcome back to my kitchen! Today, we’re diving into a delightful and versatile breakfast option that’s the epitome of elegance meeting ease—Easy Yogurt Granola Bowls! Whether you need a quick bite before heading out to conquer the day or a leisurely brunch with friends, these bowls have got you covered. They’re not just tasty; they’re a canvas for your culinary creativity!
I love yogurt bowls because they embody the spirit of improvisation in cooking. There’s no right or wrong way to build one, and the combinations are endless! You can wake up each day, peek into your fridge, and whip up something new that’s both nutritious and satisfying. Plus, who doesn’t love a meal that’s as pretty as it is delicious? Trust me; once you get the hang of these yogurt bowls, you’ll find yourself excitedly creating different combinations for any occasion!
Today, I’ll share four distinct ways to craft these yogurt bowls, showcasing various flavors, textures, and seasonal ingredients. So, grab your favorite bowl and let’s get started on this tasty journey!
Personal Story
Growing up, breakfast was a big deal in my family. My mom had this knack for transforming simple ingredients into a feast that everyone would rush to the table for. I remember Saturday mornings, the smell of fresh pancakes wafting through the house while we all debated which toppings to pile on (hello, whipped cream and sprinkles!). But as much as I adored pancakes, I also loved the simplicity of yogurt bowls. They were my go-to for when I needed something quick yet packed with flavor.
I vividly recall one sunny morning in high school, opening the fridge and discovering a stash of fresh berries from the farmer’s market. I grabbed a big bowl, some yogurt, and let my creativity flow—bananas, granola, a drizzle of honey… it was a perfect blend! My dad walked in and raised an eyebrow, surprised that a simple breakfast could look so gourmet. And that’s what these yogurt bowls are all about—they’re beautiful, vibrant, and bursting with flavor, yet approachable for everyone, regardless of culinary skills.
So, let’s celebrate this easy-going dish that gives you room to play in the kitchen while feeling like you’ve hit a home run!
Ingredients
For each of the yogurt granola bowls, the foundation is the same: delicious Greek yogurt and crunchy granola. Below are the essentials and a few fun insights to inspire your bowl-making today!
Basic Ingredients for All Bowls:
-
1 cup plain or vanilla Greek yogurt
A creamy base full of protein that makes each bite satisfying. You can use regular yogurt but Greek offers that extra richness! -
1/3 cup granola
This adds a delightful crunch and is the perfect contrast to the creaminess of yogurt. Feel free to swap in your favorite flavor, whether it’s honey-nut or chocolate chip—just make sure it’s crunchy!
Toppings for Each Bowl:
-
Classic Banana and Peanut Butter Bowl:
- 1/2 banana, sliced
Bananas add natural sweetness and a creamy texture. You can swap with any other fruit or skip if you’re not a fan! - 1 tablespoon peanut butter
A hearty addition that pairs beautifully with banana. Swap it for almond butter if you prefer, just keep the creaminess! - A few chocolate chips
Because who doesn’t love chocolate in the morning? Substitute with nuts for a healthier crunch.
- 1/2 banana, sliced
-
Tropical Mango Coconut Bowl:
- 3/4 cup fresh mango, diced
Brings a burst of sunny flavor! If mango isn’t in season, opt for pineapple or papaya for a tropical twist. - 1 tablespoon shredded coconut
Adds a lovely texture and delightful sweetness. You can switch to chopped nuts if you’re looking for less sweetness!
- 3/4 cup fresh mango, diced
-
Berry Bliss Bowl:
- 1 cup blueberries or sliced strawberries
Packed with antioxidants, they’re fresh and flavorful. Swap berries for peaches or apples if those are your favorites! - 1 tablespoon almond butter or sliced almonds
Almonds provide crunch and a dose of healthy fats. You can also use walnuts for another nutty alternative—just watch those allergies!
- 1 cup blueberries or sliced strawberries
-
Raspberry Peanut Butter Bowl:
- 1 cup raspberries or sliced strawberries
Raspberries add a tart kick that balances out the sweetness of yogurt. Strawberries work beautifully if you want a sweeter option! - A drizzle of honey (optional)
This is more about personal taste—add to satisfy that sweet tooth or leave it out for a healthier version!
- 1 cup raspberries or sliced strawberries
Step-by-Step Instructions
To put together these beautiful yogurt bowls, simply follow these easy steps! Let’s whip up a few flavors together:
1. Prepare the Base
- Scoop Your Yogurt:
Begin by selecting your chosen yogurt—plain, vanilla, coconut—whatever gets your taste buds tingling! Scoop it into your bowl (or if you’re feeling adventurous, a mason jar for that Instagram-worthy look).
Chef’s Tip: If you use plain yogurt, consider adding a touch of honey or maple syrup to sweeten it up! Just start with a teaspoon and adjust to taste.
2. Choose Your Fruits
- Chop and Slice:
Now it’s time to prepare your fruits. Depending on which bowl you’re creating, either slice your banana, dice your mango, rinse your berries, or chop up those raspberries.
Chef’s Hack: Ensure fruits are fresh and in season for maximum flavor! Frozen fruits can also be used; just let them thaw slightly before adding.
3. Add the Granola
- Sprinkle the Crunch:
Grab your granola and sprinkle a hefty 1/3 cup over the yogurt base. This is where the texture comes alive!
Tip: If you’re making these for kids or guests, consider layering the granola to create a “surprise” crunch with every bite!
4. Layer Those Toppings
- Finish It Off:
Top your bowl with the chosen fruits and any additional toppings—peanut butter, honey, or shredded coconut. The fun part here is to arrange everything beautifully; this is where your creativity shines!
Chef’s Tip: Create visual contrast—if using chocolate chips, place a few on top! Spread out the colorful fruits evenly over the yogurt; it becomes a work of art. Plus, it makes for great photos!
5. Serve & Enjoy!
- Dig In with Style:
Grab your favorite spoon, take a moment to admire your creation (yes, food should always be appreciated), and then dig in!
Chef’s Note: These bowls are versatile and can be prepped in advance! Just keep the granola separate until you’re ready to eat to maintain that crunch.
Serving Suggestions
Presentation can make your yogurt bowl even more enjoyable! Consider serving it in clear glass bowls or jars to showcase the colors. A sprinkle of fresh herbs like mint can add a pop of color and freshness. And for those who like a bit of fun, gather small bowls with various toppings so everyone can customize their own yogurt bowl at brunch gatherings!
Recipe Variations
Here are a few clever twists on the basic yogurt granola bowl that you might enjoy:
-
Choco-Peanut Delight:
Mix in cocoa powder into the yogurt for a chocolatey base. Top with sliced bananas, whipped cream, and chocolate granola! -
Savory Yogurt Bowl:
Swap out granola for crunchy chickpeas or seeds, and add roasted veggies, herbs, and feta on top of the yogurt. -
Nutty Oats Bowl:
Instead of opting for yogurt, make a base of overnight oats with almond milk, then top with your favorite granola! -
Fruit Compote Bowl:
Cook down assorted fruits like blueberries and raspberries into a quick compote, and drizzle over your yogurt for an extra fruit punch. -
Overnight Yogurt Bowl:
Mix yogurt with your granola and let it sit in the fridge overnight for a ready-made breakfast!
Chef’s Notes
Yogurt bowls have been a staple in my kitchen for years, but they’ve certainly evolved! I’ve experimented with countless ingredients, and it never ceases to amaze me how versatile they can be. One day, I might throw in some basil or mint for a herbaceous kick, while another day it could be a sprinkle of cinnamon for warmth.
I’ve even created a DIY bar at brunch events, letting guests use their imagination to craft their own perfect bowl! It’s like a little food art project before diving into deliciousness. Plus, who doesn’t love a bit of creativity alongside their breakfast?
FAQs and Troubleshooting
1. Can I use regular yogurt instead of Greek?
Absolutely! Regular yogurt will yield a slightly thinner consistency but will still taste delightful. For a creamier texture, you could strain it a bit to more closely resemble Greek yogurt.
2. How long do these bowls stay fresh?
Prepared yogurt bowls can last about a day in the fridge. It’s best to keep granola separate until it’s time to eat to maintain that delightful crunch!
3. I don’t like granola; what can I use instead?
No worries! You can use any crunchy toppings like chopped nuts, seeds, or even crunchy cereal for that same textural element. Go for what you love!
4. How can I make this bowl more filling?
For a heartier option, add a scoop of nut butter into the yogurt or layer in some chia seeds. These additions will increase protein and fiber, keeping you satisfied longer!
Nutritional Info
(Displayed as a general guide—depending on the specific ingredients and amounts used)
- Calories: 350-500 per bowl, depending on toppings
- Protein: 20-30g (high depending on Greek yogurt)
- Fiber: 5-10g (depending on fruits and granola)
Thanks for joining me on this delicious journey of Easy Yogurt Granola Bowls! I hope this inspires you to get creative and have fun in your kitchen. Dare to mix and match different flavors and toppings, and remember that the best meals are the ones made with love. Happy cooking, and until next time—let’s keep celebrating good food together!
PrintEasy Yogurt Granola Bowls (4 Ways!)
A delightful and versatile breakfast option featuring Greek yogurt and crunchy granola, perfect for any occasion.
- Prep Time: 10 minutes
- Cook Time: 0 minutes
- Total Time: 10 minutes
- Yield: 4 servings 1x
- Category: Breakfast
- Method: No Cooking Required
- Cuisine: Modern American
- Diet: Vegetarian
Ingredients
- 1 cup plain or vanilla Greek yogurt
- 1/3 cup granola
- 1/2 banana, sliced (for Classic Banana and Peanut Butter Bowl)
- 1 tablespoon peanut butter (for Classic Banana and Peanut Butter Bowl)
- A few chocolate chips (for Classic Banana and Peanut Butter Bowl)
- 3/4 cup fresh mango, diced (for Tropical Mango Coconut Bowl)
- 1 tablespoon shredded coconut (for Tropical Mango Coconut Bowl)
- 1 cup blueberries or sliced strawberries (for Berry Bliss Bowl)
- 1 tablespoon almond butter or sliced almonds (for Berry Bliss Bowl)
- 1 cup raspberries or sliced strawberries (for Raspberry Peanut Butter Bowl)
- A drizzle of honey (optional, for Raspberry Peanut Butter Bowl)
Instructions
- Scoop Your Yogurt: Start by selecting your yogurt and scooping it into a bowl.
- Chop and Slice: Prepare your fruits for the selected bowl.
- Sprinkle the Crunch: Add granola over the yogurt.
- Top your bowl: Arrange fruits and toppings beautifully.
- Grab your spoon: Admire your creation and dig in!
Notes
Keep granola separate until ready to eat to maintain its crunch. Experiment with flavors and toppings for variety!
Nutrition
- Serving Size: 1 serving
- Calories: 400
- Sugar: 15g
- Sodium: 50mg
- Fat: 14g
- Saturated Fat: 3g
- Unsaturated Fat: 9g
- Trans Fat: 0g
- Carbohydrates: 54g
- Fiber: 7g
- Protein: 22g
- Cholesterol: 5mg
Keywords: yogurt bowl, breakfast, granola, healthy recipe, easy breakfast