
Lemon Rolls
Warm, Zesty Lemon Rolls
Hello there, fellow food enthusiast! Welcome back to the charming world of Ivory Apron, where cooking becomes a delightful journey rather than a daunting task. Today, we’re diving into something irresistibly sweet and zesty: Lemon Rolls. These lovely rolls are soft, fluffy, and packed with a bright lemon flavor that takes your taste buds on a sunlit adventure. Whether it’s for a weekend brunch or a cozy afternoon treat with coffee, lemon rolls are sure to shine.
A Sunny Memory
Ah, lemon rolls! They remind me of a cherished after-school ritual from my childhood. Growing up, my grandma and I shared a secret garden where we cultivated our favorite herbs and, of course, a few lemon trees along the fence. On particularly sunny days, we would pick those juicy lemons together, giggling as the tangy scent filled the air.
One day, after harvesting the lemons, we decided to bake something special. We tackled a recipe that had been passed down through generations but added our twist of lemon zest and juice. As the rolls baked, the sweet and citrusy aroma is forever etched in my memory. We chatted about everything from school to life lessons, and after what felt like hours, we sat down with a plateful of warm lemon rolls, the icing just slightly melted. Every bite reminded us of sunny days spent together, and a beautifully simple truth: good food brings people closer.
Ingredients
Let’s gather the stars of our show! Here’s what you’ll need to whip up these delightful lemon rolls:
-
2 cups all-purpose flour
A versatile staple that provides structure. You can substitute with whole wheat flour if you want a nuttier flavor; however, adjust the liquid slightly as whole wheat flour absorbs more moisture. -
1/2 cup sugar
Sweetness is key! You can also use coconut sugar or a sugar substitute, but keep an eye on the quantity since they can vary in sweetness. -
1/2 teaspoon salt
A crucial component that enhances flavors. Don’t skip this! You can use sea salt or kosher salt too. -
1 packet instant yeast (about 2 1/4 teaspoons)
This helps our rolls to rise beautifully and create that fluffy texture. If you can’t find instant yeast, active dry yeast works perfectly too—just bloom it in warm milk first. -
3/4 cup warm milk
The warmth activates the yeast. You might use non-dairy milk, like almond milk, for a vegan option, but ensure it’s warm, not hot! -
1/4 cup melted butter
Adds richness and flavor. If you’re looking to lighten it up, try using unsweetened applesauce or coconut oil as substitutes. -
1 egg
This gives richness and helps bind the dough. For egg-free versions, a flaxseed meal mixed with water works great! -
1 tablespoon lemon zest
The zest amplifies the lemony goodness. Make sure to avoid the bitter white pith when zesting! -
1/4 cup lemon juice
Brightens up our rolls. Freshly squeezed is always best, but bottled in a pinch works, just watch for added sugars. -
1 cup powdered sugar
This sugar will make our icing heavenly. If you need a low-sugar option, powdered erythritol can work well. -
2 tablespoons lemon juice (for icing)
It gives our icing that lovely tang. If you’re feeling playful, a splash of vanilla extract would be a delightful addition! -
1 tablespoon milk (for icing)
This thins the icing to the perfect drizzly consistency. Use any milk you like, even plant-based!
Step-by-Step Instructions
Let’s jump into the fun part: making our lemon rolls! Follow these steps for a delightful baking experience:
-
Activate the Yeast: In a small bowl, combine the warm milk with the instant yeast and a pinch of sugar. Let it sit for about 5-10 minutes until it’s frothy. This step is crucial; if your yeast doesn’t foam, it might be expired or the milk was too hot or too cold.
-
Mix Dry Ingredients: In a large mixing bowl, whisk together the flour, sugar, and salt. This helps distribute the yeast and ensures a consistent dough.
-
Combine Wet Ingredients: Add the melted butter, egg, lemon zest, and lemon juice to the dry ingredients. Pour in the activated yeast mixture.
-
Knead the Dough: Combine everything until it comes together. Transfer to a floured surface and knead for about 5-7 minutes until you have a smooth, elastic dough. If the dough is too sticky, sprinkle a little more flour as needed.
-
First Rise: Place the dough in a lightly greased bowl, cover with a clean kitchen towel, and let it rise in a warm place for about 1 hour, or until it has doubled in size. A warm spot near your oven works like a charm!
-
Prepare the Filling: While the dough rises, blend your lemon filling. In a small bowl, mix together more sugar, lemon juice, and lemon zest. This mixture will be spread onto the rolled dough for a burst of flavor!
-
Shape the Rolls: Punch down the risen dough gently to release excess air. Roll it out into a rectangle about 1/4 inch thick. Spread the lemon filling evenly over the dough. Roll it tightly from the long side, creating a log.
-
Cutting: Using a sharp knife or dental floss, cut the log into 1-inch thick pieces. Arrange these rolls in a greased baking dish. They should be snug but not crammed together.
-
Second Rise: Cover the rolls again and let them rise for another 30-40 minutes. They’ll puff up nicely during this time.
-
Bake: Preheat your oven to 350°F (175°C). Bake the rolls for 20-25 minutes, or until golden brown. The aroma will be heavenly!
-
Make the Icing: While they bake, whisk together powdered sugar, lemon juice, and milk. The consistency should be thick but spreadable. Adjust as needed!
-
Drizzle the Icing: Once the rolls are cool enough to touch (but still warm!), drizzle the icing on top. Watch it melt into every crevice—heavenly!
Serving Suggestions
To serve these lemon rolls beautifully, plate them in a charming cake stand or a rustic wooden dish. Dust with a sprinkle of powdered sugar for an elegant touch. Pair them with fresh berries, whipped cream, or a dollop of lemon curd for extra indulgence! They also make gorgeous gifts wrapped in parchment paper and tied with twine—who wouldn’t love that kind of surprise?
Recipe Variations
Feeling adventurous? Here are a few twist ideas to elevate your lemon roll game:
- Lavender Lemon Rolls: Add dried culinary lavender to your filling for a delicate floral note.
- Blueberry Lemon Rolls: Toss fresh or frozen blueberries into your filling for a fruity burst.
- Almond Lemon Rolls: Incorporate almond extract into the icing for a deeper flavor profile.
- Vegan Lemon Rolls: Substitute the egg with ground flaxseed and use plant-based milk and butter to make these rolls completely vegan!
- Spicy Lemon Rolls: Add a pinch of cayenne pepper into the filling for a sweet and spicy contrast.
Chef’s Notes
These lemon rolls have become a staple in my home, transforming over the years. Originally, grandma insisted on a lavish cream cheese frosting, but I found that a simple lemon glaze keeps the focus on the delightful citrus flavor. Plus, every baking session brings back those sun-soaked afternoons in the garden, making these rolls extra special.
And oh, if you ever find the dough too sticky—don’t panic! That’s just the flour’s personality showing off. Instead of stressing, sprinkle in a bit more flour as needed and keep kneading until you find that perfect balance.
FAQs and Troubleshooting
Let’s tackle some common questions:
-
Why didn’t my rolls rise?
Ensure your yeast is fresh and not expired. The milk should be warm (not hot) to activate the yeast effectively. A warm rising environment (like an oven with the light on) can help, too! -
The dough is too sticky, what should I do?
Sprinkle a touch more flour as you knead it. Adjust the flour and liquid balance next time if you regularly face this issue. -
Can I make these ahead of time?
Absolutely! You can prepare the dough, let it rise, shape the rolls, and then refrigerate overnight. Bake them fresh in the morning for the best taste. -
What if I want a less sweet glaze?
You can cut back the powdered sugar or substitute it with less sweet alternatives like maple syrup or honey, mixing in more lemon juice to achieve your desired taste.
Nutritional Info
(You might want to calculate the nutritional information based on the ingredients used. Each serving will vary based on portion sizes and any substitutions).
There you have it! A splendid journey into creating fluffy, bright, and utterly delicious lemon rolls. Remember, cooking is about joy, creativity, and gathering loved ones around the table. So, head to the kitchen, tie on your apron, and let’s embrace the magic of cooking. Happy baking!
PrintWarm, Zesty Lemon Rolls

Delightfully soft and fluffy lemon rolls packed with bright lemon flavor, perfect for brunch or an afternoon treat.
- Prep Time: 15 minutes
- Cook Time: 30 minutes
- Total Time: 45 minutes
- Yield: 12 servings 1x
- Category: Dessert
- Method: Baking
- Cuisine: American
- Diet: Vegetarian
Ingredients
- 2 cups all-purpose flour
- 1/2 cup sugar
- 1/2 teaspoon salt
- 1 packet instant yeast (about 2 1/4 teaspoons)
- 3/4 cup warm milk
- 1/4 cup melted butter
- 1 egg
- 1 tablespoon lemon zest
- 1/4 cup lemon juice
- 1 cup powdered sugar
- 2 tablespoons lemon juice (for icing)
- 1 tablespoon milk (for icing)
Instructions
- Activate the yeast: In a small bowl, combine the warm milk with the instant yeast and a pinch of sugar. Let it sit for about 5-10 minutes until it’s frothy.
- Mix dry ingredients: In a large mixing bowl, whisk together the flour, sugar, and salt.
- Combine wet ingredients: Add the melted butter, egg, lemon zest, and lemon juice to the dry ingredients. Pour in the activated yeast mixture.
- Knead the dough: Combine everything until it comes together and knead for about 5-7 minutes until smooth.
- First rise: Place the dough in a greased bowl and let it rise for about 1 hour, or until doubled.
- Prepare the filling: Mix sugar, lemon juice, and lemon zest for the filling.
- Shape the rolls: Roll out the dough, spread the filling, and roll it tightly.
- Cutting: Cut the log into 1-inch thick pieces and arrange in a greased baking dish.
- Second rise: Let rolls rise for another 30-40 minutes.
- Bake: Preheat oven to 350°F (175°C) and bake for 20-25 minutes.
- Make the icing: Whisk powdered sugar, lemon juice, and milk until thick but spreadable.
- Drizzle the icing on top of the rolls once they cool enough to touch.
Notes
These rolls can be made ahead of time and refrigerated overnight before baking. For a less sweet glaze, reduce powdered sugar or substitute with maple syrup.
Nutrition
- Serving Size: 1 roll
- Calories: 220
- Sugar: 15g
- Sodium: 150mg
- Fat: 8g
- Saturated Fat: 4g
- Unsaturated Fat: 3g
- Trans Fat: 0g
- Carbohydrates: 30g
- Fiber: 1g
- Protein: 3g
- Cholesterol: 35mg
Keywords: lemon rolls, dessert, baking, brunch, sweet rolls

Lemon Muffins with Streusel
The Joy of Baking: Lemon Muffins with Streusel
Hello there, my fellow food enthusiasts! Today, we’re diving into the delightful world of baking with a recipe that’s bright, zesty, and utterly comforting: Lemon Muffins with Streusel. These little gems are not just a morning treat; they’re perfect for any time of day. So grab your apron, and let’s transform our kitchens into a lemony haven!
A Memory to Cherish
I’ll never forget the first time I baked lemon muffins. It was a sunny Saturday morning, and the scent of lemon wafted through my kitchen like a gentle breeze—exciting and invigorating! My dear friend, Mia, had come over, and we decided to whip something up together. Mia has this infectious laugh that can light up any room, and as we mixed the ingredients, we shared silly stories of our culinary mishaps.
As the muffins baked, we were practically bouncing with anticipation. When they finally came out of the oven, golden brown and topped with that crunchy streusel, we couldn’t wait to dig in. One bite, and it was pure magic—tart yet sweet, with a buttery crunch. We ended up devouring the whole batch and laughing about how we’d need to make another one soon, right there and then! Those lemon muffins not only filled our bellies with joy; they filled our hearts with wonderful memories—something every dish should do.
The Ingredients You’ll Need
Let’s gather our ingredients together! Here’s what you’ll need:
-
1 and 1/2 cups all-purpose flour: This forms the base of your muffins. If you’re looking for a gluten-free option, try using a 1:1 gluten-free flour blend.
-
1/2 cup granulated sugar: This adds sweetness and moisture. You can swap it for coconut sugar for a more earthy flavor.
-
2 teaspoons baking powder: Essential for that lovely rise! Ensure it’s fresh for the best results.
-
1/2 teaspoon baking soda: This will enhance the rise and help create a light texture.
-
1/4 teaspoon salt: A little pinch to balance the sweetness. Sea salt can add an extra touch of flavor!
-
1/2 cup buttermilk: This is the secret to a moist muffin. If you don’t have it on hand, you can make your own by mixing one tablespoon of vinegar or lemon juice with enough milk to make 1/2 cup.
-
1/4 cup vegetable oil: Adds richness and keeps the muffins tender. For a healthier option, you could use melted coconut oil.
-
1 large egg: Binds everything together to create a lovely texture.
-
2 teaspoons lemon zest: This brings a burst of fresh lemon flavor. Always zest before juicing for ease!
-
1 teaspoon vanilla extract: Adds depth and warmth to the flavor profile.
-
1/4 cup lemon juice: Freshly squeezed is best! This acidity lifts the flavors in the muffins.
-
For Streusel:
- 1/4 cup brown sugar: This adds a nice caramel note.
- 1/4 cup flour: Helps to bind the streusel.
- 2 tablespoons butter: Use cold butter for that irresistible crumbly texture.
- 1/2 teaspoon cinnamon: A pinch for warmth and comfort; feel free to adjust to your taste!
Step-by-Step Instructions
Ready to bake? Let’s do this!
-
Preheat Your Oven: Start by preheating your oven to 375°F (190°C). Don’t forget to line your muffin tin with cupcake liners or grease it well! It makes for easy cleanup.
-
Mix the Dry Ingredients: In a large bowl, whisk together the flour, granulated sugar, baking powder, baking soda, and salt. Make sure everything is well combined. Pro tip: stir just until combined to prevent dense muffins!
-
Combine the Wet Ingredients: In another bowl, mix the buttermilk, vegetable oil, egg, lemon zest, lemon juice, and vanilla extract until well blended. The zesty aroma will be divine!
-
Get Mixing: Pour the wet mixture into the dry ingredients. Gently fold them together until just combined. It’s okay if there are a few lumps—overmixing can lead to tough muffins!
-
Prepare the Streusel: While the batter rests for a moment, let’s whip up that delicious streusel topping. In a small bowl, combine the brown sugar, flour, butter, and cinnamon. Use your fingertips or a pastry cutter to mix them until you achieve a crumbly texture—this is where the magic happens!
-
Fill the Muffin Tin: Scoop the muffin batter into your prepared muffin tin, filling each well about two-thirds full. Don’t be shy—give them a generous scoop!
-
Top with Streusel: Sprinkle the streusel topping generously over each muffin. Trust me; this adds a delightful crunch that you won’t want to skip!
-
Bake: Place in the preheated oven and bake for about 18-22 minutes, or until the tops are golden brown and a toothpick inserted into the center comes out clean. The smell wafting from your kitchen will make it hard to wait!
-
Cool Down: Once baked, let the muffins cool in the pan for a few minutes before transferring them to a wire rack. This helps them finish baking and prevents the bottoms from getting soggy.
-
Serve and Enjoy: Now comes the best part—enjoying your freshly baked lemon muffins!
Serving Suggestions
These lemon muffins are lovely on their own, but to elevate them even more, consider serving them warm with a dollop of butter or a light dusting of powdered sugar. Presentation can transform a simple muffin into something special. Arrange them on a pretty cake stand or platter and add fresh berries or mint leaves for a pop of color—your guests will feel truly special!
Recipe Variations
Feeling adventurous? Here are some twists to make these muffins your own:
-
Blueberry Lemon Muffins: Add a cup of fresh or frozen blueberries for a burst of flavor.
-
Lemon Poppy Seed Muffins: Stir in a tablespoon of poppy seeds for crunch and visual appeal.
-
Lemon Almond Muffins: Replace half of the granulated sugar with almond flour for a nutty flavor.
-
Glazed Lemon Muffins: Drizzle a simple lemon glaze (mix powdered sugar with lemon juice) over the muffins for an extra sweet touch.
-
Vegan Option: Substitute the egg with a flax egg (1 tablespoon ground flaxseed mixed with 3 tablespoons water) and use almond milk instead of buttermilk.
Chef’s Notes
As I reflect on my journey, I remember how intimidated I felt trying to bake muffins for the first time. But I learned that baking is just like anything else—practice makes perfect! These lemon muffins have evolved in my kitchen over the years. I’ve fiddled with flavors, experimented with ingredients, and now they hold a special place in my heart (and my recipe book!). What started as a simple idea has now become a family favorite, and I’m thrilled to share it with you.
FAQs and Troubleshooting
-
Why did my muffins turn out dense?
- Overmixing can lead to dense muffins. Be gentle when combining your wet and dry ingredients!
-
Can I use other citrus fruits?
- Absolutely! Oranges and limes work beautifully—just adjust the quantity to balance their sweetness.
-
How do I store leftover muffins?
- Place them in an airtight container at room temperature for up to 3 days. You can refrigerate them for a longer shelf life, but they’ll lose some of their fluff.
-
Why didn’t my muffins rise?
- Check the freshness of your baking powder and baking soda. If they’re expired, your muffins might not rise as they should.
Now that you’ve armed yourself with this delightful Lemon Muffins with Streusel recipe, it’s time to create your own kitchen memories. I can’t wait to hear about your baking adventures! Remember, it’s all about the joy of creating—and enjoying—good food together. Let’s get baking, shall we? 🍋✨
PrintLemon Muffins with Streusel

Delightful, zesty lemon muffins topped with a crunchy streusel, perfect for any time of the day.
- Prep Time: 15 minutes
- Cook Time: 22 minutes
- Total Time: 37 minutes
- Yield: 12 muffins 1x
- Category: Breakfast
- Method: Baking
- Cuisine: American
- Diet: Vegetarian
Ingredients
- 1 and 1/2 cups all-purpose flour
- 1/2 cup granulated sugar
- 2 teaspoons baking powder
- 1/2 teaspoon baking soda
- 1/4 teaspoon salt
- 1/2 cup buttermilk
- 1/4 cup vegetable oil
- 1 large egg
- 2 teaspoons lemon zest
- 1 teaspoon vanilla extract
- 1/4 cup lemon juice
- For Streusel:
- 1/4 cup brown sugar
- 1/4 cup flour
- 2 tablespoons butter
- 1/2 teaspoon cinnamon
Instructions
- Preheat your oven to 375°F (190°C) and line the muffin tin with cupcake liners or grease it.
- Mix the dry ingredients: whisk together flour, granulated sugar, baking powder, baking soda, and salt in a large bowl.
- Combine the wet ingredients: mix buttermilk, vegetable oil, egg, lemon zest, lemon juice, and vanilla extract in another bowl.
- Pour the wet mixture into the dry ingredients and gently fold until just combined.
- Prepare the streusel by combining brown sugar, flour, butter, and cinnamon in a small bowl until crumbly.
- Fill the muffin tin with the batter, filling each well about two-thirds full.
- Top with the streusel mixture over each muffin.
- Bake for 18-22 minutes, or until golden brown and a toothpick comes out clean.
- Cool the muffins in the pan for a few minutes before transferring to a wire rack.
- Serve and enjoy your freshly baked lemon muffins!
Notes
Serve warm with a dollop of butter or dust with powdered sugar for an elevated treat.
Nutrition
- Serving Size: 1 muffin
- Calories: 250
- Sugar: 10g
- Sodium: 150mg
- Fat: 10g
- Saturated Fat: 2g
- Unsaturated Fat: 7g
- Trans Fat: 0g
- Carbohydrates: 34g
- Fiber: 1g
- Protein: 3g
- Cholesterol: 25mg
Keywords: lemon muffins, breakfast, baking, muffins, streusel
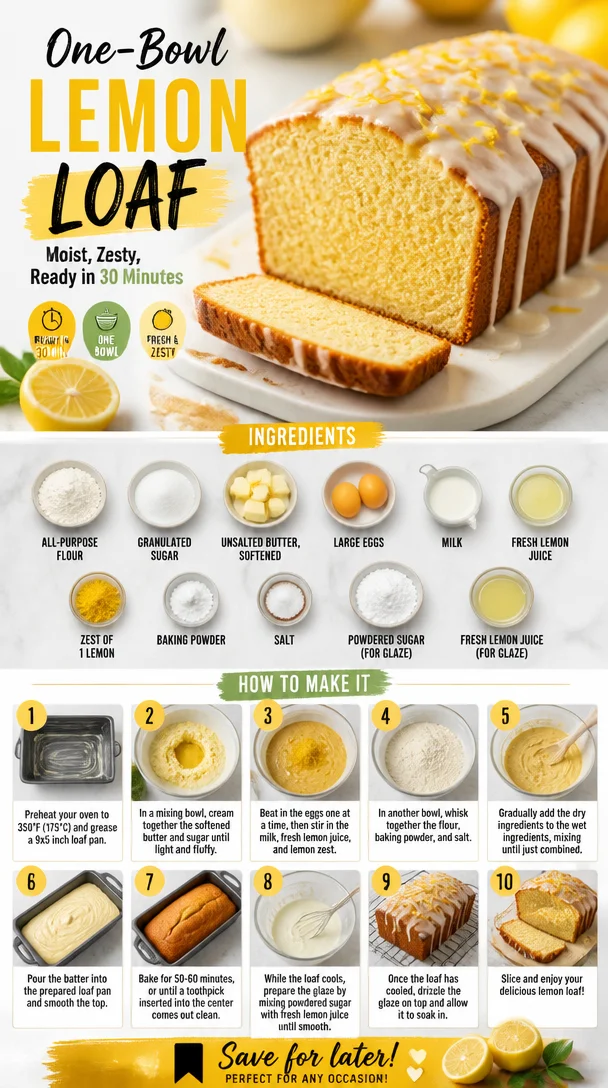
One-Bowl Lemon Loaf: Moist, Zesty, Ready in 30 Minutes
The Ultimate Easy Moist Lemon Loaf: Brighten Your Day with This Delightful Treat
Hello, lovely people! If you’re anything like me, there’s something undeniably uplifting about the aroma of fresh lemons wafting through the kitchen. Today, I’m thrilled to share with you the secret to creating an easy, moist Lemon Loaf that’s sure to brighten any day. Whether it’s a gray afternoon, a weekend brunch, or an unexpected visit from friends, this lemon loaf offers the perfect balance of sweetness and citrus tang, turning any moment into a celebration. So, let’s roll up our sleeves and dive in!
Personal Story: A Zesty Memory
Before I delve into the nitty-gritty of this delightful recipe, let me share a special memory that ties me to lemon loaf. Growing up, my grandmother had a knack for creating comfort with her baking—a warm loaf of lemony goodness was often on the kitchen counter when I visited. There was one summer when my cousins and I would race back from the pool, eager to see if that zesty scent was indeed wafting through the air. The moment we spotted the golden crust, we’d practically tackle each other in our quest for the first slice.
One sunny afternoon, I decided to surprise her and bake my own lemon loaf, using her trusty old recipe. With flour dust flying and laughter echoing throughout the kitchen, I learned not just about the ingredients but about joy, connection, and sharing good food with the people we love. Once the loaf slid out of the oven, its irresistible aroma brought everyone running, just like in the good old days. In that moment, I discovered my passion for baking—and the magic of lemons.
Ingredients
Now, let’s gather our ingredients for this beautifully simple Lemon Loaf:
- 1 1/2 cups all-purpose flour: This is the foundation of your cake. You can substitute it with gluten-free flour for a gluten-free option, just make sure to use a blend designed for baking.
- 1 cup granulated sugar: Provides just the right sweetness. For a healthier take, feel free to swap in coconut sugar or use a sweetener like stevia.
- 1/2 cup unsalted butter, softened: Adds moisture and rich flavor. If you’re looking for a dairy-free option, substitute with coconut oil or vegan butter.
- 2 large eggs: They bring structure and leavening to the loaf. For an egg-free option, use flax eggs (1 tablespoon ground flaxseed mixed with 3 tablespoons water per egg).
- 1/2 cup milk: This adds tenderness. You can use any milk of your choice — almond, oat, or soy — for a non-dairy alternative.
- 1/4 cup fresh lemon juice: This is where the magic happens! For the best flavor, always use fresh lemon juice instead of bottled.
- Zest of 1 lemon: The zest enhances the lemon flavor and gives a lovely fragrance. If you can’t find fresh lemons, try using lemon extract, but use it sparingly.
- 1 1/2 teaspoons baking powder: This helps the loaf rise. If you’re in a pinch, baking soda can work too—just adjust the acidity by adding a little vinegar or yogurt.
- 1/2 teaspoon salt: Balances the sweetness and enhances flavor.
- 1 cup powdered sugar (for glaze): Smooth and sweet, this glaze takes the loaf over the top. Don’t worry, you can reduce the amount if you prefer less sweetness.
- 2-3 tablespoons fresh lemon juice (for glaze): This tangy addition to the glaze is what makes it so irresistible!
Step-by-Step Instructions
Let’s get into the fun part! Follow these steps to whip up your Easy Moist Lemon Loaf:
-
Preheat the oven to 350°F (175°C). This ensures your oven is hot enough to create that lovely crust on the loaf.
-
Prepare your pan: Grease a 9×5 inch loaf pan with some butter or cooking spray, and then line the bottom with parchment paper for easy removal later.
-
Mix the dry ingredients: In a medium bowl, whisk together the flour, baking powder, and salt. This step helps distribute the baking powder evenly, which is key for even rising throughout your loaf.
-
Cream the butter and sugar: In a large bowl, beat the softened butter and granulated sugar together using a mixer on medium speed until the mixture is light and fluffy. This usually takes around 3-5 minutes. The air you incorporate here will create a light texture in the loaf.
-
Add eggs one at a time: Beat in the eggs one at a time, making sure to mix well after each addition. Your batter should be smooth and creamy at this stage. Don’t forget to scrape down the sides of the bowl to include all the buttery goodness!
-
Incorporate the lemon juice and zest: Pour in the fresh lemon juice and lemon zest. Trust me, the aroma will be heavenly! Mix just until everything is combined.
-
Alternate dry ingredients and milk: Gradually add the flour mixture in three additions, alternating with the milk. Start and finish with the flour. Mix until just incorporated—overmixing can lead to a dense loaf.
-
Pour the batter into the prepared pan: Use a spatula to spread the batter evenly. Don’t worry if it doesn’t look perfect; it’ll spread out as it bakes.
-
Bake: Pop it in the preheated oven and bake for about 50-60 minutes, or until a toothpick inserted into the center comes out clean. Your kitchen will fill with a delightful lemony scent as it bakes!
-
Cool: Once baked, let it cool in the pan for about 10 minutes before transferring it to a wire rack to cool completely. This helps maintain the moisture—trust me, it’s worth the wait!
-
Make the glaze: While the loaf is cooling, whisk together the powdered sugar and fresh lemon juice in a small bowl until smooth. You may adjust the consistency by adding more sugar or lemon juice as needed.
-
Glaze the cooled loaf: Once the loaf has cooled, drizzle the glaze over the top, allowing it to cascade down the edges. Lovely, right? Let it sit for a few minutes before slicing for the best presentation.
Serving Suggestions
When serving your Lemon Loaf, a simple plating style works wonders. Cut into generous slices and arrange them on a beautiful serving platter. To elevate the presentation, sprinkle a bit of grated lemon zest on top and add some fresh berries or a sprig of mint for that extra touch of elegance. Serve with a hot cup of tea or a refreshing glass of lemon-infused water to complement the flavors perfectly.
Recipe Variations
Looking to switch it up? Here are a few creative twists you can try:
- Blueberry Lemon Loaf: Fold in 1 cup of fresh or frozen blueberries into the batter for a burst of berry goodness.
- Lemon Poppy Seed Loaf: Add 2 tablespoons of poppy seeds to the batter for that classic combination.
- Lemon Raspberry Swirl: Layer fresh raspberries into your batter for a stunning red and yellow swirl.
- Lemon Parmesan Savory Loaf: Replace some of the sugar with grated Parmesan and add fresh herbs for a savory take on the loaf.
- Gluten-free Lemon Loaf: Substitute the all-purpose flour with a 1:1 gluten-free baking blend for a gluten-free version.
Chef’s Notes
Over the years, my lemon loaf has evolved, and you know what? Each iteration came with a new funny kitchen story! Once, I completely miscalculated and added salt instead of sugar. The shocked look on my family’s faces at the first bite is something I’ll never forget! But from that mistake, I learned how oversights can lead to new recipes, and if you can laugh at the kitchen mishaps, you’re halfway to becoming a culinary pro.
FAQs and Troubleshooting
-
Why did my lemon loaf not rise?
This can happen if your baking powder is expired. Always check the expiration date before using; fresh leavening agents are key! -
My lemon loaf is too dense, what went wrong?
Overmixing can lead to a dense texture. Be gentle when combining the ingredients, especially after adding the flour. -
How do I store leftovers?
Wrap your lemon loaf tightly in plastic wrap or foil and store it in an airtight container at room temperature for up to 3 days. For longer preservation, freeze individual slices! -
Can I make this vegan?
Absolutely! Substitute the eggs with flax eggs and use plant-based milk and butter for a vegan-friendly loaf.
Nutritional Info
While it varies based on substitutions, here’s a rough estimate per slice (based on 12 servings):
- Calories: 220
- Total Fat: 9g
- Saturated Fat: 5g
- Carbohydrates: 32g
- Fiber: 1g
- Sugars: 16g
- Protein: 3g
There you have it—a delightful Easy Moist Lemon Loaf that’s bound to become a cherished recipe in your kitchen! I hope you enjoy this labor of love, and don’t forget to gather your loved ones around the table to share this scrumptious treat. Happy baking, and always remember: good food isn’t just about the dishes you create—it’s about the memories you make. Cheers!
PrintEasy Moist Lemon Loaf

A delightful lemon loaf that balances sweetness and citrus tang, perfect for any occasion.
- Prep Time: 15 minutes
- Cook Time: 60 minutes
- Total Time: 75 minutes
- Yield: 12 servings 1x
- Category: Dessert
- Method: Baking
- Cuisine: American
- Diet: Vegetarian
Ingredients
- 1 1/2 cups all-purpose flour
- 1 cup granulated sugar
- 1/2 cup unsalted butter, softened
- 2 large eggs
- 1/2 cup milk
- 1/4 cup fresh lemon juice
- Zest of 1 lemon
- 1 1/2 teaspoons baking powder
- 1/2 teaspoon salt
- 1 cup powdered sugar (for glaze)
- 2–3 tablespoons fresh lemon juice (for glaze)
Instructions
- Preheat the oven to 350°F (175°C).
- Prepare your pan by greasing a 9×5 inch loaf pan and lining the bottom with parchment paper.
- Mix the dry ingredients in a medium bowl: whisk together the flour, baking powder, and salt.
- Cream the butter and sugar in a large bowl using a mixer until light and fluffy, for about 3-5 minutes.
- Add eggs one at a time, mixing well after each addition.
- Incorporate the lemon juice and zest into the mixture.
- Alternate adding the flour mixture and milk in three additions, starting and finishing with the flour.
- Pour the batter into the prepared pan.
- Bake for about 50-60 minutes, or until a toothpick comes out clean.
- Cool in the pan for about 10 minutes before transferring to a wire rack.
- Make the glaze by whisking together powdered sugar and lemon juice until smooth.
- Glaze the cooled loaf and let it sit for a few minutes before slicing.
Notes
Store leftovers wrapped in plastic wrap or foil for up to 3 days at room temperature.
Nutrition
- Serving Size: 1 slice
- Calories: 220
- Sugar: 16g
- Sodium: 150mg
- Fat: 9g
- Saturated Fat: 5g
- Unsaturated Fat: 3g
- Trans Fat: 0g
- Carbohydrates: 32g
- Fiber: 1g
- Protein: 3g
- Cholesterol: 30mg
Keywords: lemon loaf, quick bread, citrus dessert
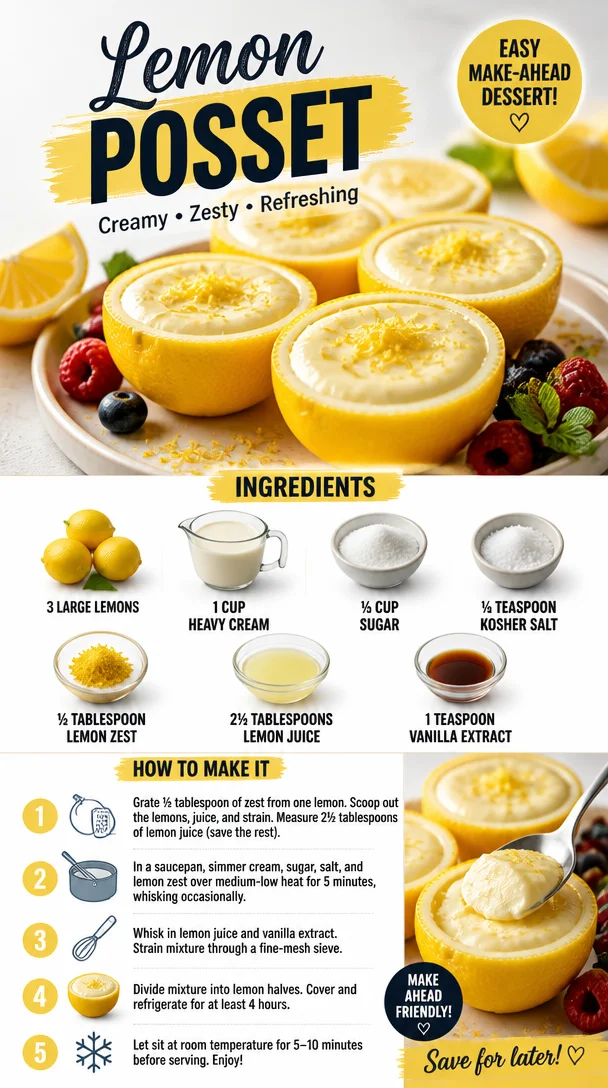
Lemon Posset
Indulge in Elegance: Whip Up a Delightful Lemon Posset
Hello, lovely foodies! Today, I’m thrilled to share one of my absolute favorite treats that embodies simplicity and sophistication: Lemon Posset. This creamy, luscious dessert feels like a warm hug on a plate, and the best part? It’s so easy to make that you’ll wonder why you haven’t been whipping it up all along!
If you’re new to the world of possets, you’re in for a delightful surprise. Imagine velvety cream infused with refreshing lemon zest and juice, all perfectly balanced with a touch of sweetness. Seriously, each bite is like a sunny day in dessert form!
A Slice of Nostalgia: My First Lemon Posset
Let me take you back to a warm summer’s evening. Picture this: I was a young culinary enthusiast, eager to impress my friends with a homemade dessert for our casual gathering. I wanted something that would put smiles on their faces without sending me into a tornado of chaos in the kitchen. That’s when I stumbled upon the wonderful world of lemon posset.
With just a handful of ingredients, I felt like a culinary magician turning basic elements into something truly spectacular. The moment I served it, I watched as everyone took their first spoonful. As they savored the sweet-tart flavors, the room filled with laughter and compliments. I was hooked! That night solidified my love for desserts that were both simple and elegant. Since then, lemon posset has become a staple not only on my table but in my heart as well.
Ingredients You’ll Need
Gather these simple yet essential ingredients to make your lemon posset shine:
- 3 Large Lemons: The star of the show, lemons provide that zesty brightness we adore. Opt for organic if you can, as they tend to have more flavor and less wax on the skin.
- 1 Cup Heavy Cream: This luscious cream is what gives the posset its rich texture. If you must, you can substitute with full-fat coconut milk for a dairy-free version.
- ⅓ Cup Sugar: Sweetness is key! I recommend granulated sugar, but feel free to experiment with honey or agave for a more natural option.
- ¼ Teaspoon Kosher Salt: Just a pinch! It brings out the flavors and balances the sweetness.
- ½ Tablespoon Lemon Zest: Zest is where the lemon’s essential oils shine. Use a microplane for the best results. You can substitute with lime zest for a fun twist!
- 2½ Tablespoons Lemon Juice: Freshly squeezed is always best. Use the juicer to ensure you get every drop!
- 1 Teaspoon Vanilla Extract: This adds a warm undertone to the posset. If you want to keep it more citrusy, you can skip this.
Step-by-Step Instructions
Let’s make this gorgeous Lemon Posset together!
-
Zest and Juice the Lemons: Start by zesting your lemons, then cut them in half and juice them. Pro Tip: Roll the lemons on the countertop before cutting to release more juice!
-
Combine the Cream and Sugar: In a saucepan, combine the heavy cream and sugar over medium heat. Stir gently until the sugar is dissolved. There’s no need to bring it to a boil; just warm it until the sugar is fully incorporated. This step will keep the creamy texture while ensuring the flavors marry beautifully.
-
Add Salt and Zest: Once your cream mixture is warm and sugared, add the kosher salt and lemon zest. Stir to combine and let it simmer for another minute. The zest will infuse your cream with a lovely lemony aroma—it’s heavenly!
-
Incorporate the Lemon Juice: Now, remove the saucepan from heat and stir in the freshly squeezed lemon juice. This is where the magic happens. Watch as the cream thickens slightly; this is the sign of a successful posset!
-
Strain the Mixture: To ensure a silky-smooth consistency, strain the mixture through a fine-mesh sieve into a measuring cup or bowl. This step removes the zest, leaving you with pure, luscious cream.
-
Chill the Posset: Pour the strained posset into your serving cups or bowls. Let them cool to room temperature before refrigerating for at least 4 hours, or until set. Note this is a great make-ahead dessert—wonderful for hosting!
-
Serve and Enjoy: When you’re ready to serve, garnish with a little extra zest, fresh berries, or whipped cream. Delightful!
Serving Suggestions
For presentation, consider serving your posset in delicate glass cups to showcase its creamy texture and zesty hue. A sprinkle of lemon zest or a handful of fresh berries on top not only adds color but also a burst of freshness that complements the dish beautifully.
Recipe Variations
Feeling inspired to shake things up? Here are a few fun variations to try:
- Berry Twists: Add a fruit puree (like raspberry or blueberry) at the bottom of your cups for a delightful layer of flavor.
- Herb Infusion: Infuse your heavy cream with a sprig of rosemary or mint while warming it for an aromatic twist.
- Lime Posset: Swap out the lemons for limes for a refreshing and tropical take.
- Chocolate Drizzle: For a decadent treat, drizzle melted dark chocolate over the top before serving.
- Spiced Citrus: Add a pinch of ground cardamom or ginger when warming the cream for a warm, spiced flavor.
Chef’s Notes
This lemon posset recipe has been with me through thick and thin in my culinary journey! Over the years, I’ve perfected my technique and learned the importance of patience while letting it chill. I still giggle at the time I forgot to strain the mixture, resulting in a zestier dessert than intended—my friends loved it, but I learned my lesson! Long story short? Sometimes a little unexpected twist can make food all the more memorable.
FAQs and Troubleshooting
-
Why didn’t my posset set? If your posset didn’t set, it may be due to insufficient chilling time. It needs to cool completely in the fridge. Also, ensure you used enough fat in your cream—heavy cream is essential for that firm consistency.
-
Can I use low-fat cream? I highly recommend sticking with heavy cream for the best texture and flavor. Low-fat alternatives can end up too runny.
-
How long can I store leftovers? Your lemon posset will keep in the fridge for up to 3 days. Just cover it with plastic wrap to keep it fresh!
-
Can I double or halve the recipe? Absolutely! You can adjust the ingredients as desired. Just make sure to maintain the same ratios for the best results!
Nutritional Info
While I always recommend indulging in treats with mindfulness, here’s a rough estimate per serving of lemon posset:
- Calories: 220
- Total Fat: 21g
- Saturated Fat: 13g
- Sugar: 10g
- Protein: 1g
Whether you savor it alone or share it with loved ones, this lemon posset is a testament to effortless elegance in the kitchen. Remember, cooking is not just about the food but the stories we create around it. So tie on that apron, gather those ingredients, and let’s whip up something beautiful together! Enjoy every delicious bite, my friends!
PrintLemon Posset

A creamy and luscious dessert infused with refreshing lemon zest and juice, simple to make and delightfully elegant.
- Prep Time: 15 minutes
- Cook Time: 10 minutes
- Total Time: 240 minutes
- Yield: 4 servings 1x
- Category: Dessert
- Method: Chilling
- Cuisine: French
- Diet: Vegetarian
Ingredients
- 3 Large Lemons
- 1 Cup Heavy Cream
- ⅓ Cup Sugar
- ¼ Teaspoon Kosher Salt
- ½ Tablespoon Lemon Zest
- 2½ Tablespoons Lemon Juice
- 1 Teaspoon Vanilla Extract
Instructions
- Zest and juice the lemons.
- Combine the heavy cream and sugar in a saucepan over medium heat.
- Add salt and zest to the warm cream mixture.
- Incorporate the lemon juice after removing from heat.
- Strain the mixture through a fine-mesh sieve.
- Chill the posset in serving cups for at least 4 hours.
- Serve with garnish of lemon zest or berries.
Notes
For variations, add fruit purees, herbs, or chocolate drizzles. This dessert can be made ahead of time.
Nutrition
- Serving Size: 1 serving
- Calories: 220
- Sugar: 10g
- Sodium: 50mg
- Fat: 21g
- Saturated Fat: 13g
- Unsaturated Fat: 5g
- Trans Fat: 0g
- Carbohydrates: 24g
- Fiber: 0g
- Protein: 1g
- Cholesterol: 80mg
Keywords: lemon posset, dessert, easy recipe, creamy dessert, summer dessert
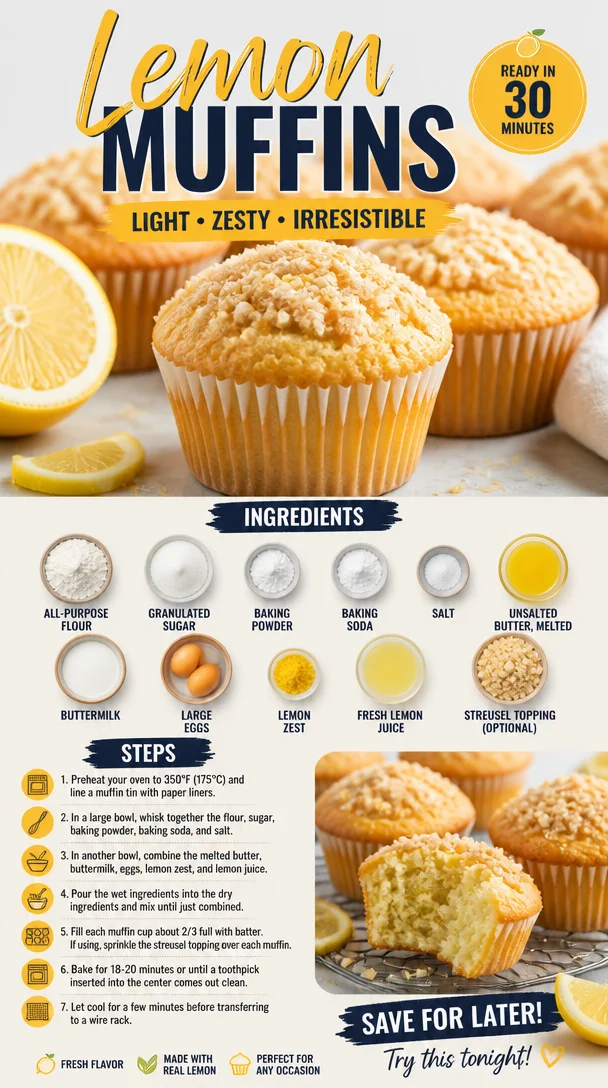
Lemon Muffins
Delightfully Zesty Lemon Muffins: A Sunshine-Packed Delight
Hello, fellow food lovers! Today, we’re diving into a dish that will brighten up your breakfast table or your afternoon snack time — Lemon Muffins. These muffins are a delightful combination of sweet and tangy, with a zesty burst of lemon that feels like sunshine in every bite. Perfectly fluffy with a hint of crumbly joy on top, they are a delicious way to start your day, share with friends, or savor with a cup of tea.
Now, let me take you on a little journey back to my childhood, where the aroma of freshly baked lemon muffins wafted through my grandmother’s kitchen. Every Sunday morning, as the sun peeked through the curtains, we would gather around her quaint wooden table, basking in the golden rays and the warmth of her love. My grandmother had a special knack for baking, and her lemon muffins were a family favorite. She taught me how to balance the perfect amount of sweetness with tartness, turning what could have been an ordinary muffin into something extraordinary.
We’d sit together, her gentle hands guiding mine as we measured ingredients and whisked them together, sharing stories about life, dreams, and the magic of cooking. There was something about mixing the batter and zesting the lemons that felt like a secret rite of passage. That simple act of baking became a cherished memory, one that inspired me to create inviting moments around the table for years to come. Now, it’s my turn to share this recipe with you, hoping to spark joy in your kitchens and create your own delightful memories.
Ingredients
Here’s what you’ll need to whip up these gorgeous Lemon Muffins:
-
1 1/2 cups all-purpose flour
A classic base for baking, all-purpose flour provides the structure needed for fluffy muffins. If you’d like a healthier option, try substituting half with whole wheat flour for added fiber. -
1 cup granulated sugar
Sugar adds sweetness and moisture, balancing the tanginess of the lemons. If you want to cut back on calories, coconut sugar or a sweetener of your choice can work just fine! -
2 teaspoons baking powder
This little powerhouse helps the muffins rise, creating that light and airy texture we all crave. Make sure your baking powder is fresh for the best results! -
1/2 teaspoon baking soda
Baking soda complements the acidity of the lemon juice, helping the muffins get that perfect lift. Store it in a cool, dry place to maintain its potency. -
1/4 teaspoon salt
A pinch of salt brings out all the beautiful flavors in your muffins. It may seem small, but it’s a key player! -
1/2 cup unsalted butter, melted
Butter infuses richness and moisture, creating a tender crumb. You can use coconut oil or a dairy-free butter substitute if you’re looking for a vegan option. -
1 cup buttermilk
Buttermilk adds depth of flavor and a touch of tanginess, contributing to that irresistible moist texture. If you don’t have buttermilk on hand, you can make your own by adding a tablespoon of vinegar to regular milk and letting it sit for a few minutes. -
2 large eggs
Eggs bind everything together and help with leavening. For an egg-free alternative, consider using flaxseed meal — mix one tablespoon of flaxseed with three tablespoons of water and let it sit for a few minutes until it thickens. -
1 tablespoon lemon zest
Highlighting the bright notes of lemon, zest adds an aromatic punch. Make sure to use organic lemons to avoid any waxy residues. -
1/4 cup fresh lemon juice
This is where the magic happens! Freshly squeezed lemon juice packs a vibrant punch. If you’re in a pinch, bottled lemon juice works—but fresh is best for flavor. -
1/2 cup streusel topping (optional)
For that beautiful, crunchy topping, combine flour, sugar, and butter for a decadent touch! Alternatively, you can leave this out for a lighter muffin.
Step-by-Step Instructions
Now that we’ve gathered all our ingredients, let’s get baking! Follow these steps, and I promise you’ll be the proud owner of the zestiest lemon muffins.
-
Preheat the Oven
Start by preheating your oven to 400°F (200°C). This ensures your muffins rise beautifully and get that perfect golden color. Trust me, the anticipation will make it even more delightful! -
Prepare the Muffin Tin
Grease your muffin tin with butter or line it with paper liners. If you’re using a non-stick muffin tin, greasing isn’t necessary, but it sure helps to be safe! -
Mix Dry Ingredients
In a large mixing bowl, whisk together the flour, sugar, baking powder, baking soda, and salt. This is the foundation of your muffins. Mixing them together thoroughly helps distribute the leavening agents evenly. -
Combine Wet Ingredients
In another bowl, mix the melted butter, buttermilk, eggs, lemon zest, and lemon juice until well combined. Feel free to dance as you whisk; it really adds flavor! -
Fold Wet into Dry
Gently fold the wet ingredients into the dry mixture with a spatula just until combined. Don’t overmix; a few lumps are perfect! Think of it as a delicate process — you don’t want to deflate your muffins. -
Fill the Muffin Tin
Spoon the batter into the prepared muffin tin, filling each cup about 3/4 full. This allows enough room for the muffins to rise without spilling over. If you’re using streusel topping, sprinkle it generously over each muffin. -
Bake
Place the muffin tin in the preheated oven and bake for 15–20 minutes, or until a toothpick inserted into the center comes out clean. The smell wafting through your kitchen will be heavenly! -
Cool and Enjoy
Once they’re baked, remove them from the oven and let them cool for a few minutes in the muffin tin before transferring them to a wire rack. This helps them firm up while keeping them deliciously moist.
Serving Suggestions
To showcase your beautiful lemon muffins, serve them on a lovely cake stand with a dusting of powdered sugar for a touch of elegance. Pair them with a side of fresh berries or a dollop of whipped cream for an extra special treat! And, of course, a cup of freshly brewed coffee or tea is an absolute must!
Recipe Variations
Feel free to get creative! Here are a few variations you can try:
- Blueberry Lemon Muffins: Add a cup of fresh blueberries for a delightful berry twist.
- Lemon Poppy Seed Muffins: Incorporate two tablespoons of poppy seeds for added crunch and flavor.
- Glazed Lemon Muffins: For an extra layer of sweetness, drizzle a lemon glaze made from powdered sugar and lemon juice over the cooled muffins.
- Vegan Lemon Muffins: Use almond or coconut milk in place of buttermilk and flaxseed for eggs to create a vegan-friendly option.
Chef’s Notes
Every time I whip up a batch of lemon muffins, I’m transported back to my grandmother’s kitchen. I often think about how her love for cooking shaped my passion for it. The beauty of this recipe is its simplicity; it’s a canvas that allows you to add your own flair. Over the years, I’ve seen these muffins evolve — some days they are just plain lemon, while others they burst with blueberries.
One kitchen story comes to mind: I once mistakenly used baking soda instead of baking powder and ended up with a muffin explosion in my oven! A lesson learned never to rush in the kitchen! So take your time, enjoy the process, and remember that every misstep is an opportunity to create something new.
FAQs and Troubleshooting
Q: My muffins turned out dense and heavy. What went wrong?
A: This could be due to overmixing the batter. Remember, gentle folding is key!
Q: Can I use all whole wheat flour?
A: You can! Just note that it may result in a denser muffin. A mix of whole wheat and all-purpose flour usually yields the best results.
Q: How can I keep my muffins fresh?
A: Store them in an airtight container at room temperature for up to three days, or freeze them for longer storage. They taste delightful even after freezing—just thaw and enjoy!
Q: What if I don’t have buttermilk?
A: No worries! Mix one cup of milk with a tablespoon of vinegar and let it sit for five minutes; voilà, you have homemade buttermilk!
Nutritional Info (Optional)
While I typically focus on the joy and connection that comes from cooking, a rough estimate for each muffin is about 180 calories, 5 grams of fat, 25 grams of carbohydrates, and 3 grams of protein.
And there you have it — my lemon muffin recipe that’s sure to brighten your day! Now, it’s your turn to tie on your apron, gather your ingredients, and create some special memories in your own kitchen. Happy baking, and remember, good food is all about showing up and sharing with those you love! 🍋🧁
PrintDelightfully Zesty Lemon Muffins

A delightful combination of sweet and tangy lemon muffins, perfectly fluffy with a hint of crumbly joy on top. Light and airy, these muffins are a perfect way to start your day.
- Prep Time: 15 minutes
- Cook Time: 20 minutes
- Total Time: 35 minutes
- Yield: 12 servings 1x
- Category: Dessert
- Method: Baking
- Cuisine: American
- Diet: Vegetarian
Ingredients
- 1 1/2 cups all-purpose flour
- 1 cup granulated sugar
- 2 teaspoons baking powder
- 1/2 teaspoon baking soda
- 1/4 teaspoon salt
- 1/2 cup unsalted butter, melted
- 1 cup buttermilk
- 2 large eggs
- 1 tablespoon lemon zest
- 1/4 cup fresh lemon juice
- 1/2 cup streusel topping (optional)
Instructions
- Preheat your oven to 400°F (200°C).
- Prepare your muffin tin by greasing it with butter or lining it with paper liners.
- Mix together the flour, sugar, baking powder, baking soda, and salt in a large mixing bowl.
- Combine the melted butter, buttermilk, eggs, lemon zest, and lemon juice in another bowl.
- Fold the wet ingredients into the dry mixture with a spatula until just combined.
- Fill each muffin cup about 3/4 full with batter.
- Bake for 15–20 minutes, or until a toothpick comes out clean.
- Cool for a few minutes in the tin, then transfer to a wire rack.
Notes
For an extra layer of sweetness, drizzle a lemon glaze made from powdered sugar and lemon juice over the cooled muffins. Store in an airtight container for up to three days.
Nutrition
- Serving Size: 1 muffin
- Calories: 180
- Sugar: 25g
- Sodium: 200mg
- Fat: 5g
- Saturated Fat: 3g
- Unsaturated Fat: 2g
- Trans Fat: 0g
- Carbohydrates: 25g
- Fiber: 1g
- Protein: 3g
- Cholesterol: 40mg
Keywords: lemon muffins, breakfast muffins, dessert, baking, easy recipes

Orange Muffins
The Bright and Zesty Delight: Orange Muffins
Welcome, fellow food lovers! Today, I’m thrilled to share a recipe that brings a sunny burst to any breakfast table: Orange Muffins. The sight of these golden treats lining a plate is enough to make anyone smile, and their sweet citrus aroma has a way of brightening even the gloomiest mornings. Whether you’re whipping them up for a cozy Sunday brunch, an afternoon tea, or just because you love a slice of zest in your baked goods, these muffins are sure to please. Let’s dive into this delightful journey!
A Slice of Nostalgia
I can still vividly recall the first time my grandmother introduced me to the world of citrus baking. We were in her warm, inviting kitchen, the smell of fresh oranges permeating the air as she demonstrated her recipe for orange muffins. The way she expertly zested the orange, letting the colorful shavings fall into the bowl, was nothing short of magic. I watched in awe as she mixed the ingredients, each stir as gentle as the sunlight streaming through the window.
Those muffins became a staple in our family, appearing at gatherings and celebrations. My grandmother always knew how to warm hearts through her cooking, and those orange muffins were a delicious vehicle for her love. Each bite took me back to that sunlit kitchen, a moment frozen in time where the rhythm of baking and laughter melted together. Today, I’ve adapted that cherished recipe just for you, adding my own twists while keeping the essence alive. So, grab your apron—let’s embark on this flavorful adventure!
Ingredients
Here’s what you’ll need for these delightful Orange Muffins:
-
2 cups all-purpose flour: The foundation of your muffins. You can swap it with whole-wheat flour for a heartier muffin or a gluten-free blend if you prefer.
-
1 cup granulated sugar: This is what helps the muffins rise and creates that perfectly sweet flavor! Coconut sugar is a great alternative for a deeper flavor profile.
-
1 tablespoon baking powder: The key to those fluffy muffins that lift beautifully in the oven. Make sure it’s fresh; old baking powder can lead to dense muffins.
-
1/2 teaspoon baking soda: Adds extra lift and balances the acidity of the orange juice, ensuring your muffins are light and airy.
-
1/2 teaspoon salt: A little pinch to enhance all the flavors—don’t skip it!
-
1/2 cup unsalted butter, melted: This brings richness and moisture to the muffins. You can use coconut oil or a dairy-free butter for a vegan version.
-
1 cup fresh orange juice: Fresh is best! It brightens the flavor and aroma. Bottled juice works in a pinch, but the taste won’t be as vibrant.
-
Zest of 1 orange: The zest adds an extra layer of citrus flavor and aroma that you simply can’t replicate with juice alone. Feel free to toss in zest from lemons or limes for a fun twist!
-
2 large eggs: These bind the ingredients together and add moisture. For an egg-free version, use flaxseed meal mixed with water (1 tablespoon ground flaxseed + 3 tablespoons water = 1 egg).
-
1 teaspoon vanilla extract: A classic flavor enhancement that rounds out the sweetness and complements the citrus oh-so-well. You could also use almond extract for a unique twist!
Step-by-Step Instructions
Now that we have our ingredients lined up, let’s get to the fun part—baking! Here’s how to whip up these Orange Muffins step by step:
-
Preheat your oven: Let’s get that oven warmed up to 350°F (175°C). This ensures even baking and beautifully golden muffins. While it’s warming, you can prep the muffin tin.
-
Prepare the muffin tin: Grease your muffin tin with some non-stick spray or line it with paper liners—it makes for easier cleanup later and adds a lovely touch to presentation.
-
Mix dry ingredients: In a large mixing bowl, whisk together the flour, sugar, baking powder, baking soda, and salt. This mixing ensures even distribution of the leavening agents, which is key for consistent muffin texture.
-
Combine wet ingredients: In another bowl, mix the melted butter, fresh orange juice, orange zest, eggs, and vanilla extract. I love taking a moment here to breathe in that vibrant scent before whisking it all together until smooth.
-
Combine wet and dry: Now, add the wet ingredients to the dry ingredients. Gently fold them together with a spatula or wooden spoon. Don’t overmix—this is a common mistake that results in dense muffins. Just bring it together until you see no dry flour.
-
Fill the muffin cups: Using a cookie scoop or a ladle, evenly distribute the batter into the prepared muffin tin, filling each cup about 2/3 full. This allows room for the muffins to rise perfectly without spilling over.
-
Bake: Pop the muffin tin into the preheated oven and bake for about 18-20 minutes. You’ll know they’re done when a toothpick inserted in the center comes out clean—and trust me, the smell will be irresistible!
-
Cool and enjoy: Let the muffins cool in the tin for 5 minutes before transferring them to a wire rack. This step allows the muffins to firm up a bit. Enjoy these warm with a pat of butter or let them cool completely for later.
Serving Suggestions
Serving these Orange Muffins is all about presentation! For a whimsical touch, dust them lightly with confectioners’ sugar or drizzle with a simple orange glaze made from powdered sugar and a splash of orange juice. Arrange them on a bright platter or wooden board, garnished with fresh orange slices or sprigs of mint. Feel free to pair them with a light yogurt and some berries for a delightful brunch spread!
Recipe Variations
Why stop at classic when you can get creative? Here are a few variations you can try with your Orange Muffins:
-
Chocolate Chip Orange Muffins: Fold in a handful of semi-sweet chocolate chips into the batter for a delightful contrast between citrus and chocolate.
-
Cranberry Orange Muffins: Add fresh or dried cranberries for a tart kick that complements the sweetness of the muffins beautifully.
-
Orange Poppy Seed Muffins: Toss in a tablespoon of poppy seeds for added texture and a hint of nutty flavor.
-
Spiced Orange Muffins: Cinnamon or nutmeg can add a warm, comforting spice to every bite. Just a pinch goes a long way!
-
Vegan Orange Muffins: Swap out the eggs for flax eggs or applesauce and use a plant-based butter substitute to enjoy a vegan version of this delicious treat.
Chef’s Notes
When I first made these muffins, I was attempting to recreate my grandmother’s recipe, but as every good chef knows, experimentation is the heart of culinary creation! I added my own flair, adjusting sugar levels and experimenting with different fats (butter vs. oil). Each batch brought joyful memories of baking with her. If a muffin tops a little lopsided? Embrace it! It’s a sign of a home-cooked treat—a friendly reminder that perfection is overrated.
FAQs and Troubleshooting
-
My muffins didn’t rise. What went wrong?
- Ensure your baking powder and baking soda are fresh! Also, don’t overmix the batter; mixing too much can create dense muffins.
-
Why are my muffins dry?
- Overbaking can lead to dryness. Keep an eye on your oven and begin checking for doneness a few minutes before the timer goes off.
-
Can I freeze these muffins?
- Absolutely! Once cooled, you can freeze them in an airtight container for up to 3 months. Just reheat in the microwave or oven when you’re ready to enjoy!
-
Can I add different fruits?
- Yes! Try swapping out the orange juice and zest for lemon, lime, or even grapefruit for a unique twist.
Nutritional Info
(Per muffin, serves approximately 12 muffins)
- Calories: 220
- Total Fat: 8g
- Saturated Fat: 4.5g
- Cholesterol: 40mg
- Sodium: 150mg
- Total Carbohydrates: 34g
- Dietary Fiber: 0.5g
- Sugars: 12g
- Protein: 3g
With each bite, these Orange Muffins deliver familiar warmth and a spark of joy. They are more than just a treat—they carry with them a legacy of love, laughter, and community. So, gather your loved ones around the table, take out those muffins, and create your own delicious memories. Happy baking!
PrintOrange Muffins

Delightful orange muffins that bring a burst of citrus flavor to breakfast or brunch.
- Prep Time: 15 minutes
- Cook Time: 20 minutes
- Total Time: 35 minutes
- Yield: 12 muffins 1x
- Category: Breakfast
- Method: Baking
- Cuisine: American
- Diet: Vegetarian
Ingredients
- 2 cups all-purpose flour
- 1 cup granulated sugar
- 1 tablespoon baking powder
- 1/2 teaspoon baking soda
- 1/2 teaspoon salt
- 1/2 cup unsalted butter, melted
- 1 cup fresh orange juice
- Zest of 1 orange
- 2 large eggs
- 1 teaspoon vanilla extract
Instructions
- Preheat your oven to 350°F (175°C).
- Prepare the muffin tin by greasing it or lining it with paper liners.
- Mix the dry ingredients in a bowl: flour, sugar, baking powder, baking soda, and salt.
- Combine the wet ingredients in another bowl: melted butter, orange juice, zest, eggs, and vanilla extract.
- Combine the wet and dry ingredients, folding them gently together until no dry flour remains.
- Fill the muffin cups about 2/3 full with batter.
- Bake for 18-20 minutes or until a toothpick comes out clean.
- Cool in the tin for 5 minutes before transferring to a wire rack.
Notes
For a fun twist, try adding chocolate chips, cranberries, or poppy seeds.
Nutrition
- Serving Size: 1 muffin
- Calories: 220
- Sugar: 12g
- Sodium: 150mg
- Fat: 8g
- Saturated Fat: 4.5g
- Unsaturated Fat: 2g
- Trans Fat: 0g
- Carbohydrates: 34g
- Fiber: 0.5g
- Protein: 3g
- Cholesterol: 40mg
Keywords: orange muffins, breakfast muffins, citrus baking, homemade muffins
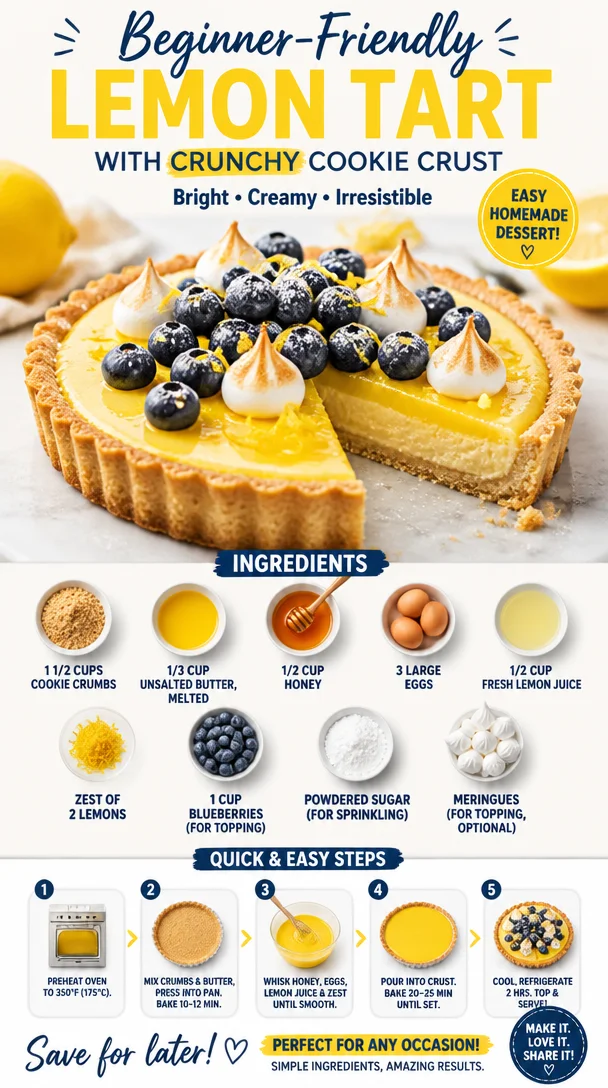
Beginner-Friendly Lemon Tart with Crunchy Cookie Crust
The Perfect Lemon Tart with Cookie Crust: An Easy Yet Elegant Dessert
Hello friends! If you’re in the mood for something refreshing, zesty, and utterly delightful, you’ve come to the right place. Today, we’re diving into the world of tangy goodness with a Lemon Tart that’s perfectly paired with a sweet cookie crust. This elegant dessert proves you don’t need fancy techniques or exhaustive ingredient lists to create something that feels gourmet. So, tie on that apron, and let’s get to it!
A Memory in Every Slice
Let me take you back to my childhood — a time when my sweet tooth had no limits. My grandmother, a petite woman with a heart as vast as her dessert repertoire, would spend hours in her cozy kitchen crafting one dessert after another. But one recipe that always brought the whole family together was her Lemon Tart. I can still picture her bustling around the kitchen, her floral apron slightly dusted with flour, as she mixed and stirred with an enthusiasm that filled the room with warmth.
One sunny afternoon, she and I decided to whip up a Lemon Tart together. The citrusy scent filled the air, and I was mesmerized as she expertly mixed the ingredients, her hands moving with a grace I admired deeply. As the tart baked in the oven, we sat on the porch, sipping lemonade and sharing stories. That Lemon Tart became not just a dessert but a symbol of love and togetherness.
Today, I’m thrilled to share my take on that cherished dessert with you — a Lemon Tart with a delightful cookie crust that’s sure to create just as many sweet memories!
Ingredients
Here’s what you’ll need to create your own slice of sunshine:
-
1 1/2 cups cookie crumbs
- Use your favorite cookies for the crust—think graham crackers, digestive biscuits, or even ginger snaps for a spicy twist! You can also crush them yourself for a more rustic texture.
-
1/3 cup unsalted butter, melted
- This is crucial for binding your cookie crust together. If you’re feeling adventurous, try substituting with coconut oil for a hint of tropical flavor.
-
1/2 cup honey
- Honey adds a lovely natural sweetness with a hint of floral notes. If you prefer, you can use agave nectar or maple syrup.
-
3 large eggs
- Fresh eggs give the tart a rich texture and help set the filling. If you’re vegan, a flax egg can be a great alternative (1 tablespoon flaxseed meal + 2.5 tablespoons water per egg).
-
1/2 cup fresh lemon juice
- Fresh is best! Store-bought lemon juice doesn’t have that same vibrant flavor. If lemons are out of season, you can try bottled, but do taste it first to ensure the tartness shines.
-
Zest of 2 lemons
- Zesting adds an incredible punch of lemon flavor. Make sure to zest before juicing to keep your hands clean and to utilize every bit of the lemon.
-
1 cup blueberries (for topping)
- Fresh blueberries add a splash of color and a burst of sweetness. Swap them with raspberries or strawberries if you prefer!
-
Powdered sugar (for sprinkling)
- It adds the final touch of sweetness and makes the tart visually appealing. A light dusting goes a long way!
-
Meringues (for topping, optional)
- Want to take it over the top? Add some meringue kisses for that café-style look! They’re surprisingly easy to make too.
Step-by-Step Instructions
Ready to embark on your lemony journey? Let’s get started!
-
Preheat the Oven
- Preheat your oven to 350°F (175°C). This is essential for getting that perfect crust and setting your filling.
-
Make the Cookie Crust
- In a mixing bowl, combine the cookie crumbs and melted butter. Stir until the crumbs are evenly moistened. You should end up with a sandy texture that holds together when pressed.
- Chef’s Tip: If you find your crust crumbling, simply add a bit more melted butter. You want it just wet enough to hold together!
-
Press the Crust into a Tart Pan
- Press the cookie mixture firmly into the bottom and up the sides of a 9-inch tart pan. Use the back of a measuring cup or your fingers to get it nice and even. Make sure to pack it tightly!
- Pro Tip: To avoid cracks in your crust, take your time and don’t rush this step. A well-pressed crust will ensure structural integrity later.
-
Bake the Crust
- Place the crust in the preheated oven and bake for about 10 minutes or until it’s golden brown. Remove from the oven and let it cool slightly.
-
Prepare the Lemon Filling
- In a mixing bowl, whisk together the honey and eggs until combined. Then, add in the fresh lemon juice and zest. Keep whisking until the filling is smooth and luscious.
- Kitchen Hack: To maximize the juice from your lemons, roll them on the countertop before cutting. It makes all the difference!
-
Pour the Filling into the Crust
- Carefully pour the lemon filling into your cooled cookie crust. Don’t be afraid to fill it up nice and full — it’ll puff up a bit while baking.
-
Bake the Tart
- Bake the tart for about 20-25 minutes, until the filling is just set and a bit wobbly in the center. It will firm up as it cools.
- Chef Insight: Avoid overbaking! You want that perfect silky texture, not a rubbery one.
-
Cool the Tart
- Allow your tart to cool at room temperature for a bit, then pop it in the fridge for at least an hour to chill and set completely.
-
Garnish and Serve
- Just before serving, sprinkle with powdered sugar, top with fresh blueberries, and add meringues if using. Cut into wedges and watch everyone’s faces light up with joy!
Serving Suggestions
Presentation is key when it comes to desserts, and this Lemon Tart is no exception! Serve slices on elegant dessert plates with a side of whipped cream, and garnish with extra fresh berries or sprigs of mint. This simple step not only enhances the visual appeal but also elevates the overall experience — because we eat with our eyes first!
Recipe Variations
This Lemon Tart is a great base for creative twists! Here are some fun ideas:
- Fruit Variations: Swap out blueberries for strawberries, raspberries, or even a mixed berry medley for a colorful topping!
- Herb Infusion: Add a teaspoon of finely chopped fresh basil or mint to the filling for a unique herbal twist.
- Chocolate Drizzle: Drizzle a bit of melted dark chocolate over the tart for an unexpected yet luxurious flavor combination.
- Gingersnap Crust: Instead of traditional cookies, use gingersnaps for a spiced cookie crust. It pairs beautifully with lemon!
- Vegan Option: Substitute eggs with a flax egg mixture and use maple syrup in place of honey to make a vegan-friendly tart.
Chef’s Notes
Making this Lemon Tart is a walk down memory lane for me. I love how desserts can evoke such strong connections to our past. Over the years, I’ve tweaked my grandmother’s original recipe, made it simpler, and added that crispy cookie crust to enhance the texture. The joy of sharing this dessert with loved ones brings me as much happiness as that sunny afternoon in my grandmother’s kitchen. And remember, it’s all about the experience — so have fun with it!
FAQs and Troubleshooting
Q: My filling turned out runny. What did I do wrong?
A: If your filling didn’t set, you might have undercooked it or not let it chill long enough. Make sure to follow baking times and allow it to cool completely in the fridge.
Q: Can I use bottled lemon juice?
A: While it’s possible, fresh lemon juice really enhances the flavor and gives you that bright tartness we all love. If you must use bottled, taste it first to ensure it has that refreshing kick.
Q: What do I do if my crust cracks?
A: Don’t fret! Cracks are common, especially if the crust is too dry. Next time, ensure you’re mixing the cookie crumbs and butter well, and pack it tightly into the pan.
Q: How long can I store leftovers?
A: Store your Lemon Tart in the refrigerator for up to 5 days. It’s a delightful treat to nibble on for dessert throughout the week!
Nutritional Info (Optional)
For those keeping track, here’s a rough breakdown for one slice (based on 8 slices):
- Calories: 230
- Total Fat: 10 g
- Saturated Fat: 5 g
- Cholesterol: 60 mg
- Sodium: 60 mg
- Total Carbohydrates: 33 g
- Dietary Fiber: 1 g
- Sugars: 15 g
- Protein: 3 g
So, there you have it! A Lemon Tart with Cookie Crust that’s not just a dessert, but a delightful way to create memories. I hope you enjoy making and sharing this recipe as much as I do. Happy cooking, dear friends—let’s create some magic in the kitchen!
PrintThe Perfect Lemon Tart with Cookie Crust

An easy yet elegant lemon tart with a delightful cookie crust, perfect for creating sweet memories.
- Prep Time: 15 minutes
- Cook Time: 30 minutes
- Total Time: 45 minutes
- Yield: 8 servings 1x
- Category: Dessert
- Method: Baking
- Cuisine: American
- Diet: Vegetarian
Ingredients
- 1 1/2 cups cookie crumbs
- 1/3 cup unsalted butter, melted
- 1/2 cup honey
- 3 large eggs
- 1/2 cup fresh lemon juice
- Zest of 2 lemons
- 1 cup blueberries (for topping)
- Powdered sugar (for sprinkling)
- Meringues (for topping, optional)
Instructions
- Preheat your oven to 350°F (175°C).
- In a mixing bowl, combine the cookie crumbs and melted butter. Stir until the crumbs are evenly moistened.
- Press the cookie mixture firmly into the bottom and sides of a 9-inch tart pan.
- Place the crust in the preheated oven and bake for about 10 minutes.
- In a mixing bowl, whisk together the honey and eggs until combined. Add in the fresh lemon juice and zest.
- Carefully pour the lemon filling into your cooled cookie crust.
- Bake the tart for about 20-25 minutes, until the filling is just set.
- Allow your tart to cool at room temperature, then chill in the fridge for at least an hour.
- Just before serving, sprinkle with powdered sugar and top with blueberries and meringues if using.
Notes
For fruit variations, try using strawberries, raspberries, or a mixed berry medley. Consider adding fresh herbs or a chocolate drizzle for a unique twist.
Nutrition
- Serving Size: 1 slice
- Calories: 230
- Sugar: 15g
- Sodium: 60mg
- Fat: 10g
- Saturated Fat: 5g
- Unsaturated Fat: 3g
- Trans Fat: 0g
- Carbohydrates: 33g
- Fiber: 1g
- Protein: 3g
- Cholesterol: 60mg
Keywords: lemon tart, dessert, cookie crust, easy dessert, citrus dessert
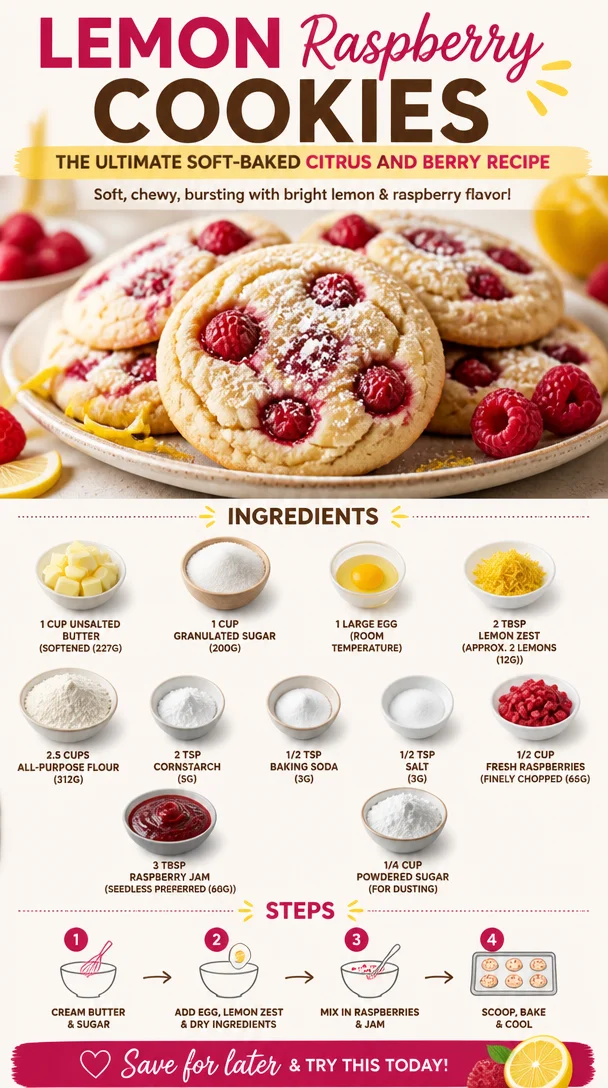
Lemon Raspberry Cookies: The Ultimate Soft-Baked Citrus and Berry Recipe
Lemon Raspberry Cookies: The Ultimate Soft-Baked Citrus and Berry Recipe
Hello, fellow foodies! If you’re ready to elevate your baking game and create a treat that’s bursting with flavor, then you’ve landed in the right spot. Today, we’re diving into the delightful world of Lemon Raspberry Cookies—a soft-baked cookie recipe that combines zingy lemon with sweet, juicy raspberries for a perfect balance that’s undeniably irresistible. Picture this: a cookie that melts in your mouth, leaving you with the bright notes of citrus and the luscious burst of berries. Mmm, can you smell it already? Let’s make it happen!
The Joy of Nostalgia
I can’t help but reminisce about sunlit afternoons in my childhood kitchen, the air filled with the tantalizing scents of fresh citrus. My grandmother, with her warm smile and flour-dusted apron, would gather me into her kitchen to bake treats for our family gatherings. Her lemon bars were legendary, but what I loved most were those moments spent whisking away in laughter, surrounded by the warmth of my family. Years later, I decided to take that nostalgia and infuse it with a touch of modern flair. Enter, the Lemon Raspberry Cookie! Each bite of these cookies transports me back to those sunny afternoons, with a superb burst of flavor. It’s not just about baking; it’s about creating memories, and I can’t wait for you to experience that joy.
Ingredients
Let’s get all our goodies together! Here’s what you’ll need to whip up these citrusy, berry delights:
-
1 cup Unsalted Butter (Softened – 227g)
Softened butter creates a rich, tender texture. If you’re in a pinch, substitute with margarine or coconut oil for a dairy-free option! -
1 cup Granulated Sugar (200g)
Sweetness is key! You can use coconut sugar for a slight caramel flavor, but keep in mind it will darken the cookies. -
1 Large Egg (Room temperature)
This ingredient brings moisture and binds everything together. For a vegan alternative, use a flax egg (1 tbsp ground flaxseed mixed with 2.5 tbsp water). -
2 tbsp Lemon Zest (Approx. 2 lemons – 12g)
Zest adds a bright flavor punch! Don’t skip this; it transforms the cookie into a full citrus experience. -
2.5 cups All-Purpose Flour (312g)
The foundation of any cookie. If you want gluten-free cookies, swap this with a 1:1 gluten-free all-purpose blend. -
2 tsp Cornstarch (5g)
This ingredient gives our cookies that soft-baked quality. If you’re in a bind, you can substitute with an equal amount of arrowroot powder. -
1/2 tsp Baking Soda (3g)
A leavening agent that helps the cookies rise. Make sure it’s fresh for the best results! -
1/2 tsp Salt (3g)
Balances the sweetness and enhances flavors. It can be omitted if you’re watching your sodium intake. -
1/2 cup Fresh Raspberries (Finely chopped – 65g)
Fresh berries bring a juicy burst! You can use frozen but make sure to thaw and pat them dry first. -
3 tbsp Raspberry Jam (Seedless preferred – 60g)
This adds an extra layer of raspberry flavor and moisture. Swap with any other jam if you’re feeling adventurous! -
1/4 cup Powdered Sugar (For dusting)
A simple finishing touch that looks oh-so-elegant on top of your cookies.
Step-by-Step Instructions
Alright, cue the apron and let’s get cooking! Here’s how you make these beautiful cookies:
-
Preheat Your Oven:
Start by preheating your oven to 350°F (175°C). This will ensure that your cookies bake evenly and perfectly. -
Cream Butter and Sugar:
In a large mixing bowl, cream together the softened butter and granulated sugar until light and fluffy—about 2-3 minutes. This step is crucial, as it helps incorporate air into your cookie dough for that lovely fluffy texture! -
Add the Egg and Lemon Zest:
Beat in the egg and lemon zest until well combined. You want that lemon aroma to permeate the batter. Pro tip: Use the microplane grater for fine zesting that packs in the most flavor without the bitter pith. -
Whisk Dry Ingredients:
In a separate bowl, whisk together the flour, cornstarch, baking soda, and salt. This helps to distribute the leavening agent evenly, so no surprise spots of baking soda in your cookies! -
Combine Wet and Dry Mixtures:
Gradually add the dry mixture to the wet mixture, mixing until just combined. Be careful not to overmix! Overworking the dough can lead to tough cookies. Chef hack: You want clumps of flour to still be visible; they will incorporate with the next step. -
Fold in the Raspberries and Jam:
Gently fold in the finely chopped raspberries and raspberry jam, ensuring they’re evenly distributed throughout the dough. The jam will add extra sweetness and moisture, so don’t be shy about it! -
Scoop the Dough:
Using a cookie scoop or tablespoon, drop dough onto a baking sheet lined with parchment paper, spacing them a few inches apart. They will spread a bit, so give them room! -
Bake:
Pop the cookies in the oven for 12-15 minutes, or until the edges are lightly golden. Keep an eye on them—the aroma of lemon and raspberry will have your head spinning! -
Cool Down:
Allow the cookies to cool on the baking sheet for 5 minutes before transferring them to a wire rack to cool completely. This cool-down allows the cookies to set up perfectly! -
Dust with Powdered Sugar:
Once cooled, finish them off with a light dusting of powdered sugar for that elegant touch that makes them look as special as they taste.
Serving Suggestions
To serve these Lemon Raspberry Cookies, arrange them on a beautiful platter or tiered stand, dusting with a bit of powdered sugar just before serving. Pair them with a lovely cup of tea or a refreshing lemon-infused sparkling water for a delightful afternoon treat.
Recipe Variations
- Add White Chocolate Chips: Incorporate white chocolate chips for a creamy contrast to the tart raspberries.
- Swap Berries: Try using blueberries or blackberries instead for a different berry experience.
- Lemon Icing Drizzle: Drizzle a simple icing made of powdered sugar and lemon juice over the cooled cookies for a little extra sweetness and another layer of lemon.
- Make it a Sandwich Cookie: Spread some raspberry jam between two cookies for a tasty twist!
- Add Nuts: Chopped pistachios or walnuts can add crunch and a whole new flavor profile.
Chef’s Notes
I’ve played around with this recipe over the years, trying different combinations and swaps. I once tried adding a touch of rosemary for a fragrant herbal note, which turned out surprisingly delightful! It’s amazing what a little experimentation can yield. Also, remember—these cookies can be a little soft when they come out of the oven, but they firm up as they cool. So when in doubt, wait a few minutes before you start munching!
FAQs and Troubleshooting
-
Why are my cookies flat?
If your cookies spread too much, consider using cold butter instead of softened, or double-check your baking soda to ensure it’s fresh. -
Can I freeze my dough?
Absolutely! Just scoop the dough onto a baking sheet, freeze until firm, and then transfer to a freezer-safe bag. Bake straight from the freezer with an added minute or two to the bake time. -
Can I use frozen raspberries?
Yes, but be sure to thaw and pat them dry to prevent excess moisture that can be released during baking. -
How do I know when they’re done baking?
Look for a light golden edge; they will continue to cook slightly after coming out of the oven, creating that perfect soft-baked texture.
Conclusion
There you have it—Lemon Raspberry Cookies that are not only delicious but wrapped in a story that connects deliciousness to cherished memories. So, tie on that apron, gather your ingredients, and let’s bake something that will bring joy not just to your palate but to your entire kitchen! Happy baking, friends! 🍋🍪❤️
PrintLemon Raspberry Cookies

Delightful soft-baked cookies combining zingy lemon and sweet raspberries for an irresistible treat.
- Prep Time: 15 minutes
- Cook Time: 15 minutes
- Total Time: 30 minutes
- Yield: 24 cookies 1x
- Category: Dessert
- Method: Baking
- Cuisine: American
- Diet: Vegetarian
Ingredients
- 1 cup Unsalted Butter (Softened – 227g)
- 1 cup Granulated Sugar (200g)
- 1 Large Egg (Room temperature)
- 2 tbsp Lemon Zest (Approx. 2 lemons – 12g)
- 2.5 cups All-Purpose Flour (312g)
- 2 tsp Cornstarch (5g)
- 1/2 tsp Baking Soda (3g)
- 1/2 tsp Salt (3g)
- 1/2 cup Fresh Raspberries (Finely chopped – 65g)
- 3 tbsp Raspberry Jam (Seedless preferred – 60g)
- 1/4 cup Powdered Sugar (For dusting)
Instructions
- Preheat your oven to 350°F (175°C).
- Cream together the softened butter and granulated sugar until light and fluffy—about 2-3 minutes.
- Add the egg and lemon zest until well combined.
- Whisk together the flour, cornstarch, baking soda, and salt in a separate bowl.
- Combine the dry mixture with the wet mixture, mixing until just combined.
- Fold in the chopped raspberries and raspberry jam.
- Scoop dough onto a baking sheet lined with parchment paper.
- Bake for 12-15 minutes, until edges are lightly golden.
- Cool on the baking sheet for 5 minutes before transferring to a wire rack.
- Dust with powdered sugar before serving.
Notes
These cookies can be soft when they come out of the oven; they firm up as they cool.
Nutrition
- Serving Size: 1 cookie
- Calories: 200
- Sugar: 12g
- Sodium: 100mg
- Fat: 10g
- Saturated Fat: 6g
- Unsaturated Fat: 2g
- Trans Fat: 0g
- Carbohydrates: 23g
- Fiber: 1g
- Protein: 2g
- Cholesterol: 30mg
Keywords: lemon cookies, raspberry cookies, soft-baked cookies, dessert

Mini Lemon Tart with Lilac Meringue: Spring Dessert
Mini Lemon Tart with Lilac Meringue: A Spring Dessert to Brighten Your Day
Hello there, fellow food lovers! As the days grow longer and the blossoms begin to dance in the gentle spring breeze, there’s nothing quite like the fresh, zesty goodness of lemon to awaken our taste buds. I can still remember the first time I tasted a bright, tangy lemon tart at a quaint little café. It was like sunshine on my plate—crisp, vibrant, and utterly delightful. And now, I want to share that same joy with you through my Mini Lemon Tart with Lilac Meringue!
This dessert is more than just a feast for the senses; it’s a celebration of the season. The buttery crumb crust is perfectly balanced by the creamy lemon filling, while the ethereal lilac meringue adds a whimsical pop of color and flavor. Trust me, friends, this recipe will have you dreaming of picnics in the park, backyard gatherings, and all the sweet moments spring brings.
Gather your favorite apron and let’s whip up this delightful treat together! This isn’t just about following a recipe; it’s about infusing a little love and sunshine into your kitchen. Whether you’re preparing a delightful dessert for a family gathering or simply treating yourself, these mini lemon tarts will surely impress!
Personal Story
Ah, springtime! A season that evokes nostalgia for me, especially when it comes to my love for baking and hosting. I vividly recall the first time I made lemon tarts. It was during an Easter brunch, the sun streaming through my kitchen window, casting a warm glow over everything. My family had gathered, laughter echoing as we set the table. I wanted to serve something special to celebrate the moment—a dish that encapsulated the essence of spring.
After hours of experimenting (and maybe a few kitchen mishaps), I finally settled on a fresh lemon tart with a delicate meringue. It was the first dessert that made my family swoon. They still talk about that very first taste of citrus bliss, and the vignettes of lilac meringue stealing the show! Now, I adore bringing this memory to life every spring, creating little bites of sunshine that capture the warmth of those cherished times.
So, whether this tart becomes a new family favorite or simply a sweet note of spring, I can’t wait for you to create your own delicious memories!
Ingredients
To create your Mini Lemon Tarts with Lilac Meringue, you’ll need the following ingredients:
For the Crust:
- 1 1/4 cups all-purpose flour: This forms the base of your delightful tart crust. If you’re feeling adventurous, substitute with whole wheat flour for a nuttier flavor or almond flour for a gluten-free option.
- 1/4 cup powdered sugar: This sweetens the dough without making it grainy. If you don’t have powdered sugar, you can blend granulated sugar in a spice grinder until fine.
- 1/2 cup unsalted butter, cold and cubed: Butter adds richness and flakiness. Remember, cold butter is key for that melt-in-your-mouth texture! You can replace it with coconut oil for a dairy-free version.
- 1 large egg yolk: This helps bind the dough together. If you’re vegan, consider a flax egg (1 tablespoon ground flaxseed mixed with 2.5 tablespoons water).
- 1–2 tbsp cold water: Just enough to bring the dough together. Use ice water to keep it cold!
For the Filling:
- 1/2 cup fresh lemon juice (about 2 lemons): Fresh is best here—nothing beats that zingy flavor! Bottled lemon juice can be used but may have a more subdued flavor.
- 1 tbsp lemon zest: Adds an extra punch of citrusy aroma. Feel free to use lime zest for a change of pace!
- 3/4 cup granulated sugar: Sweetness to balance out the tartness of the lemon. For a lower sugar option, feel free to use a sugar substitute like coconut sugar.
- 3 large eggs: These create the structure. You could experiment with aquafaba for a plant-based approach.
- 6 tbsp unsalted butter, cubed: Again, for richness and that creamy texture.
For the Lilac Meringue:
- 3 large egg whites: Make sure they’re at room temperature for the best volume! Egg white powder can be a great alternative if you’re avoiding eggs.
- 3/4 cup granulated sugar: This sugar will hold the meringue’s structure. Organic cane sugar can work if you’re looking for a cleaner alternative.
- 1/4 tsp cream of tartar: Helps stabilize the egg whites. If you don’t have it, you can use lemon juice as a substitute.
- 1/2 tsp vanilla extract: For flavor depth. Try almond extract for a unique twist!
- A few drops of violet food coloring or a mix of red and blue: This is purely optional, but who can resist beautiful color? Natural coloring from beet juice or blueberries can be an alternative.
- Optional: edible lilac flowers for garnish: Because we eat with our eyes first!
Step-by-Step Instructions
Let’s jump into the kitchen and get this delightful dish made step by step!
1. Prepare the Tart Crust
-
Mix Dry Ingredients: In a mixing bowl, whisk together the all-purpose flour and powdered sugar until well combined. This ensures an even sweetness throughout the crust.
-
Add Cold Butter: Using a pastry cutter or forks, cut in the cold, cubed butter until the mixture resembles coarse crumbs. If you don’t have a pastry cutter, your hands work well too—just be quick to avoid heating the butter.
-
Add Egg Yolk: Make a well in the center and add the egg yolk. Use a fork to blend it in lightly.
-
Bring Dough Together: Gradually add cold water, one tablespoon at a time, until the dough holds together but isn’t sticky. If it’s too crumbly, add a touch more water.
-
Chill the Dough: Shape the dough into a disc, wrap it in plastic wrap, and refrigerate for at least 30 minutes. Chilling helps prevent the crust from shrinking when we bake it.
2. Blind Bake the Crust
-
Preheat Oven: Set your oven to 350°F (175°C).
-
Roll Out the Dough: On a lightly floured surface, roll out the chilled dough to about 1/4 inch thick. It should feel supple but firm.
-
Cut and Fill: Cut the dough into circles to fit your mini tart pans. Press the dough into the pans gently, ensuring it’s even on the bottom and along the sides.
-
Prick and Chill: Using a fork, prick the bottom of each crust to prevent bubbling, then pop them back into the fridge for another 10 minutes.
-
Blind Bake: Place parchment paper over the crust and fill with pie weights (or dry beans) to keep it from puffing. Bake for 15 minutes, then remove the weights and parchment, and bake for another 10 minutes or until lightly golden. Allow to cool completely.
3. Prepare the Lemon Filling
-
Mix Lemon Ingredients: In a medium bowl, combine fresh lemon juice, lemon zest, granulated sugar, and eggs. Whisk until fully incorporated. The lemon zest adds a fragrant aroma that brings your filling to life!
-
Melt the Butter: In a saucepan, melt the cubed butter over low heat. Once melted, remove from heat, and slowly whisk in the lemon mixture until combined.
-
Cook until Thickened: Return the mixture to the saucepan over medium-low heat. Stir constantly for about 5-7 minutes until it thickens enough to coat the back of a spoon. Be patient; no one likes scrambled eggs in their lemon tart, so keep stirring gently!
-
Fill the Tart Shells: Pour the warm lemon filling evenly into your cooled tart shells. Leave a little room on top as it may puff during baking.
-
Bake Again: Bake at 350°F (175°C) for an additional 10-12 minutes until the filling is set but still slightly jiggly in the center. Let them cool completely on a wire rack.
4. Make the Lilac Meringue
-
Whip Egg Whites: In a clean mixing bowl, add the egg whites and cream of tartar. Using an electric mixer, beat on medium speed until soft peaks form.
-
Add Sugar Gradually: Gradually add the granulated sugar, continuing to beat on high speed until stiff, glossy peaks form. Test it by rubbing a little between your fingers—if it feels smooth without sugar granules, you’re good to go!
-
Flavor and Color: Beat in the vanilla extract and a few drops of violet food coloring. Remember, a little goes a long way! Feel free to play with the color until it’s just right.
-
Top Tarts: Spoon or pipe the meringue over the cooled lemon filling, creating swirls and peaks. This is your chance to get creative!
-
Toast the Meringue: Using a kitchen torch or the broiler, toast the meringue until golden brown. Keep an eye on it—I can’t tell you how many times I’ve gotten distracted and ended up with a blackened meringue!
Serving Suggestions
When it comes to serving your Mini Lemon Tarts with Lilac Meringue, presentation is key! Place each tart on a dessert plate, and consider garnishing them with a fresh lilac flower for that extra touch of elegance. Add a sprig of mint or some edible flowers around the plate for a vibrant and colorful display. A dusting of powdered sugar over the top adds an airy, whimsical finish!
Recipe Variations
- Berry Blast: Add a layer of fresh berries, like raspberries or blueberries, before topping with meringue for a fruity twist.
- Coconut Cream: Mix in some shredded coconut into the lemon filling for a tropical flair.
- Ginger Zest: Incorporate some finely grated fresh ginger into the lemon mixture for a spicy zing.
- Herb Infusion: Add two sprigs of fresh rosemary or thyme to the filling while it cooks for an herbal note—just remember to remove before filling the tarts!
- Chocolate Surprise: Drizzle melted chocolate over the meringue for a decadent chocolate contrast.
Chef’s Notes
As a cook who loves to experiment, this recipe has changed over the years, much like my own culinary journey! I once hosted a spring dinner party where my little cousin declared that nothing could beat the taste of a "rainbow of flavors." That inspired me to play with colors through meringue. I love how a tiny drop of color can transform a dish, just as seasons change how we feel about food.
Also, if you find yourself with leftover meringue, pipe little kisses onto a lined baking tray and bake at 200°F (90°C) until dry for delicious meringue cookies—no waste here!
FAQs and Troubleshooting
Q: My meringue collapsed! What happened?
A: Collapsing meringue can happen if the egg whites weren’t whipped long enough, or if they’ve been over-beaten. Make sure to whip until you have stiff peaks without drying out the meringue.
Q: How can I keep the tart crust from getting soggy?
A: A few tips! Always ensure the crust is cooked until golden before adding the lemon filling. Blind baking is crucial here, as is allowing the tart to cool completely once baked.
Q: Can I make the tarts ahead of time?
A: Absolutely! You can prepare the crust a day in advance and store it in the refrigerator. Fill it with lemon curd and meringue just before serving to keep everything fresh and vibrant.
Q: Is it normal for the filling to be a little jiggly after baking?
A: Yes! The filling will continue to set as it cools. Just make sure it’s not liquid in the center before you remove it from the oven.
Nutritional Info (Approx. per mini tart)
- Calories: 250
- Protein: 4g
- Carbohydrates: 30g
- Total Fat: 12g
- Saturated Fat: 7g
- Fiber: 1g
- Sugar: 18g
Now that we’ve created this beautiful mini lemon tart with lilac meringue, I can’t wait for you to experience that burst of flavor and joy. So, tie on your apron, gather your loved ones, and create your own food memories. Each slice is a little piece of spring, and I promise, they’re meant to be shared. Happy baking, friends! 🍋💜
PrintMini Lemon Tart with Lilac Meringue

A delightful spring dessert featuring a buttery crust, zesty lemon filling, and ethereal lilac meringue.
- Prep Time: 20 minutes
- Cook Time: 40 minutes
- Total Time: 1 hour
- Yield: 12 mini tarts 1x
- Category: Dessert
- Method: Baking
- Cuisine: American
- Diet: Vegetarian
Ingredients
- 1 1/4 cups all-purpose flour
- 1/4 cup powdered sugar
- 1/2 cup unsalted butter, cold and cubed
- 1 large egg yolk
- 1–2 tbsp cold water
- 1/2 cup fresh lemon juice (about 2 lemons)
- 1 tbsp lemon zest
- 3/4 cup granulated sugar
- 3 large eggs
- 6 tbsp unsalted butter, cubed
- 3 large egg whites
- 3/4 cup granulated sugar
- 1/4 tsp cream of tartar
- 1/2 tsp vanilla extract
- A few drops of violet food coloring
- Edible lilac flowers for garnish (optional)
Instructions
- Prepare the Tart Crust:
- Mix dry ingredients: In a mixing bowl, whisk together the all-purpose flour and powdered sugar until well combined.
- Add cold butter: Cut in the cold, cubed butter until the mixture resembles coarse crumbs.
- Add egg yolk: Make a well in the center and add the egg yolk, blending it in lightly.
- Bring dough together: Gradually add cold water until the dough holds together.
- Chill the dough: Shape into a disc, wrap in plastic, and refrigerate for at least 30 minutes.
- Blind Bake the Crust:
- Preheat oven to 350°F (175°C).
- Roll out the dough to about 1/4 inch thick.
- Cut into circles to fit mini tart pans, pressing gently.
- Prick the bottoms of each crust to prevent bubbling, then chill for 10 minutes.
- Blind bake with parchment and pie weights for 15 minutes, then remove weights and bake for another 10 minutes.
- Prepare the Lemon Filling:
- Mix lemon ingredients in a medium bowl until whisked.
- Melt the butter in a saucepan over low heat, remove from heat, and whisk into the lemon mixture.
- Cook until thickened over medium-low heat for about 5-7 minutes.
- Fill the tart shells with the warm lemon filling.
- Bake again at 350°F for 10-12 minutes until set.
- Make the Lilac Meringue:
- Whip the egg whites and cream of tartar until soft peaks form.
- Add sugar gradually, beating until stiff peaks form.
- Flavor with vanilla and color with food coloring.
- Top tarts with meringue and toast until golden brown.
Notes
Garnish with edible flowers for an elegant presentation. You can also experiment by adding fresh berries or coconut to the filling.
Nutrition
- Serving Size: 1 tart
- Calories: 250
- Sugar: 18g
- Sodium: 75mg
- Fat: 12g
- Saturated Fat: 7g
- Unsaturated Fat: 3g
- Trans Fat: 0g
- Carbohydrates: 30g
- Fiber: 1g
- Protein: 4g
- Cholesterol: 55mg
Keywords: lemon tart, spring dessert, mini tart, meringue, baking
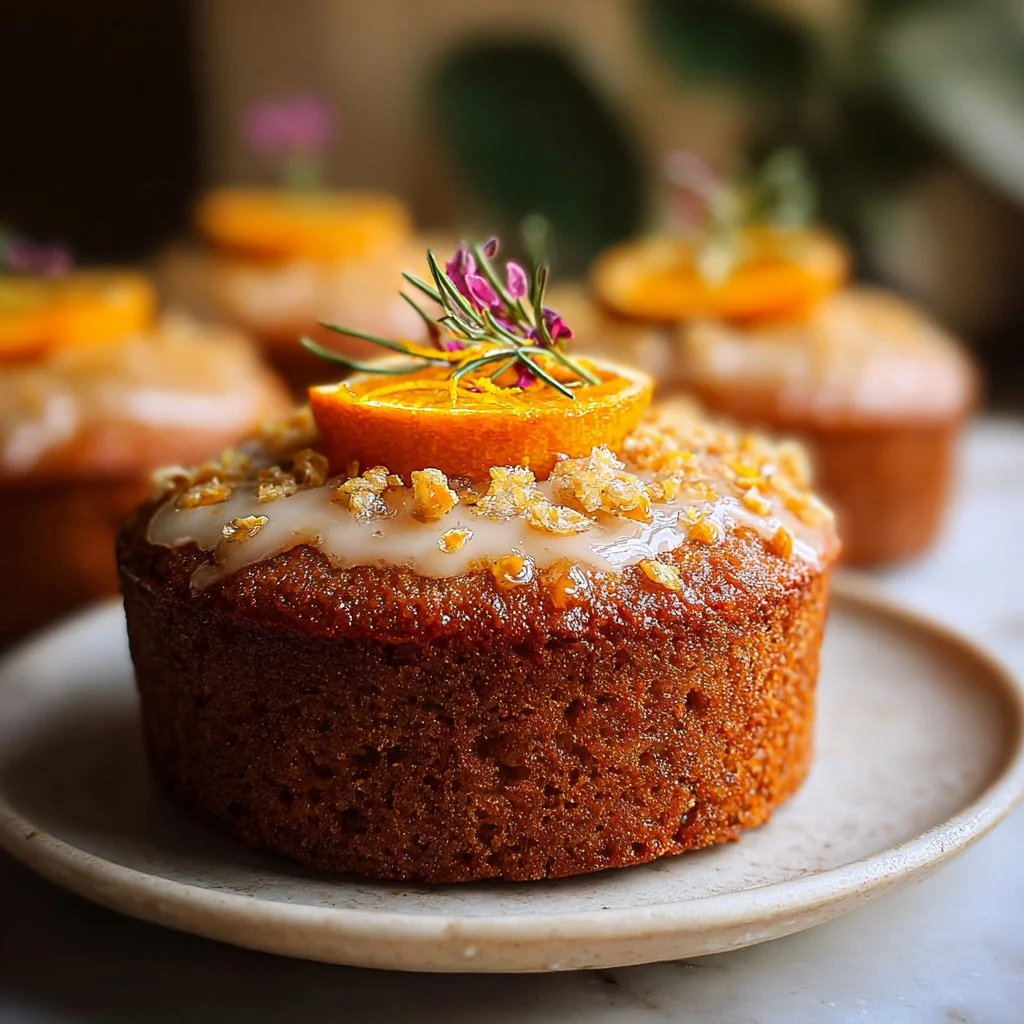
Orange Ginger Honey Cake
Unforgettable Orange Ginger Honey Cake: A Slice of Sunshine in Every Bite
Introduction
Hello, baking enthusiasts and fellow food lovers! Today, I’m absolutely thrilled to share a recipe that holds a special place in my heart: the Orange Ginger Honey Cake. This delightful dessert not only brightens up your kitchen with its incredible aroma but also serves as a sweet reminder of the beautiful moments shared around the table.
Imagine walking into a warm kitchen where the scent of freshly grated ginger intertwines with the vibrant essence of oranges. It’s a nose-tingling experience that instantly transports you to those cozy family gatherings, where laughter spills as freely as the syrup on your pancakes. That’s the magic of this cake!
What I adore about this cake is not just its glorious flavor but the story behind it. A few years back, I decided to experiment with citrus and spices after a friend gifted me a box of fresh oranges from his backyard tree. Armed with my trusty apron and a sense of adventure, I set out to craft a dessert that encapsulated the warmth of friendship and community. After a couple of batches, the Orange Ginger Honey Cake was born!
This cake is a perfect blend of sweet and spice, enhanced by the natural sweetness of honey and the zest of oranges. You can enjoy it as an afternoon treat with a steaming cup of tea or as a standout finale to a dinner party. So, let’s roll up our sleeves and dive into this delicious recipe that brings both comfort and celebration into your home!
Personal Story
Thinking back on the first time I baked this cake always brings a smile to my face. It was a gloomy September afternoon, and the rain was pouring down outside. My friends and I had gathered for what we called a “baking therapy” day, where we’d try out new recipes while enjoying some delightful nibbles and a bit of bubbly. As we rummaged through the pantry, I remembered the gift of oranges from my friend.
With a spark of inspiration igniting my creativity, I whipped out my mixing bowls and set to work on what would become our dessert centerpiece. The vibrant orange juice, aromatic ginger, and golden honey soon filled the kitchen with such mouthwatering scents that we couldn’t help but sneak bites of the batter (don’t tell anyone!).
When the cake finally emerged from the oven, we were practically dancing with joy. We garnished it with a honey-orange glaze and served it warm. One bite was all it took – the sweet, zesty taste coupled with a hint of spice made everyone’s faces light up! We ended up making this cake our go-to recipe for all our future gatherings, and it quickly became a cherished tradition that warmed our hearts, regardless of the weather outside.
Ingredients
To bring this delightful Orange Ginger Honey Cake to life, you’ll need the following ingredients:
Dry Ingredients:
-
2 cups all-purpose flour: This is the backbone of your cake. You can substitute with whole wheat flour for a nuttier flavor, but you may need to adjust the liquid slightly.
-
1 tsp baking soda: Helps your cake rise and gives it a fluffy texture.
-
1 tsp ground ginger: Deepens the flavor profile. If you don’t have ground ginger, freshly grated ginger works too!
-
½ tsp cinnamon: Adds warmth. For a twist, try cardamom or allspice.
-
¼ tsp nutmeg: This spice adds an extra depth of flavor. Use freshly grated for the best taste!
-
Pinch of salt: Enhances all the flavors.
Wet Ingredients:
-
½ cup unsalted butter (melted): This adds richness. You can swap it with coconut oil for a dairy-free version.
-
¾ cup raw honey: Sweetness with a touch of floral flavor. Maple syrup is a great substitute, but it will alter the flavor slightly.
-
2 large eggs: Bind everything together. For a vegan alternative, replace with ½ cup unsweetened applesauce or flax eggs.
-
1 cup fresh orange juice: Adds moisture and brightness. If you want to change things up, use tangerine or grapefruit juice.
-
Zest of 2 oranges: Packs a punch of orange flavor! Don’t skip this step!
-
1 tbsp grated fresh ginger: For an added zing! Ground ginger is fine but fresh gives that vibrant kick.
Optional Glaze:
-
2 tbsp honey: Adds sweetness and shine.
-
2 tbsp orange juice: Brightens up the glaze and ties back to the cake’s flavor.
Step-by-Step Instructions
Now that you’ve gathered your ingredients, let’s get baking! Here’s how to make this spectacular Orange Ginger Honey Cake step-by-step:
-
Preheat Your Oven: Preheat your oven to 350°F (175°C) and grease a 9-inch round cake pan with butter or cooking spray. This will prevent any sticky situations later on!
-
Mix Dry Ingredients: In a large mixing bowl, whisk together your all-purpose flour, baking soda, ground ginger, cinnamon, nutmeg, and salt until well combined. This not only blends the ingredients but also aerates the flour, giving your cake a light texture.
-
Combine Wet Ingredients: In another bowl, combine the melted butter, raw honey, eggs, fresh orange juice, orange zest, and grated ginger. Whisk the mixture vigorously until everything is smoothly incorporated. The blending process will loosen the honey, allowing it to mix seamlessly into the batter.
-
Combine Wet and Dry Mixtures: Pour the wet mixture into the bowl with the dry ingredients. Using a spatula or wooden spoon, stir until just combined—avoid overmixing! A few lumps are perfectly fine; they’ll bake out in the oven.
-
Pour the Batter: Transfer the batter into your prepared cake pan, smoothing the top with a spatula. Don’t be shy about tasting the batter, either—it’s delicious!
-
Bake: Place the cake in the preheated oven and bake for 25-30 minutes or until a toothpick inserted into the center comes out clean.
-
Cool Down: Once done, remove the cake from the oven and let it cool in the pan for about 10 minutes. Then transfer it to a wire rack to cool completely.
-
Prepare the Glaze (Optional): In a small bowl, whisk together the honey and orange juice for the glaze. Once your cake is cool, drizzle it generously over the top for an extra touch of sweetness.
-
Slice and Serve: Serve your cake as is, or pair it with a dollop of whipped cream or a scoop of vanilla ice cream for an indulgent treat!
Serving Suggestions
To make your presentation as delightful as your cake, consider plating it on a beautiful cake stand. A sprinkle of powdered sugar or additional orange zest on top adds a classy touch while enhancing the visual appeal. Pair each slice with a cup of fresh herbal tea or a fun sparkling drink to elevate the experience!
Recipe Variations
Looking to switch things up? Here are a few ideas to put your spin on the Orange Ginger Honey Cake:
-
Nutty Addition: Stir in ½ cup of chopped walnuts or pecans for some crunchy texture.
-
Fruit Twist: Toss in some fresh blueberries or cranberries for a pop of color and tartness.
-
Frosting Switch-Up: Swap the honey-orange glaze for a cream cheese frosting or a citrus buttercream for something extra sweet.
-
Gluten-Free Option: Substitute all-purpose flour with a gluten-free blend. Just make sure it’s a 1:1 ratio to ensure success!
-
Spiced Rum: Add a tablespoon of spiced rum to the wet ingredients for a cozy flavor enhancement.
Chef’s Notes
Every recipe tells a story, and this cake is no exception! Over the years, I’ve adapted it based on feedback and my own culinary explorations. I remember once deciding to bake it in cupcake form for a brunch gathering—let’s just say they disappeared faster than I could decorate them!
This cake has transformed into a versatile dessert that’s become a canvas for my creativity. From festive gatherings around the holidays to quiet weeknight dinners, there’s a piece of joy in every bite. I hope you create your own sweet memories with this recipe, too!
FAQs and Troubleshooting
1. My cake didn’t rise enough. What did I do wrong?
This might be due to improper measuring of the flour or expired baking soda. Make sure you spoon flour into your measuring cup rather than scooping, and check the expiration date of your baking soda for optimal rising!
2. Can I make this cake ahead of time?
Absolutely! This cake stores well in an airtight container for up to 3 days at room temperature, or you can refrigerate it for up to a week. The flavor tends to deepen and develop even more over time!
3. Can I freeze this cake?
Yes! Wrap the cooled cake tightly in plastic wrap and then foil before freezing. It can be stored in the freezer for up to three months. Just let it thaw in the fridge overnight when you’re ready to enjoy.
4. How can I make this cake non-dairy?
Replace the unsalted butter with coconut oil or a vegan butter alternative, and make sure your honey is from a vegan source or substitute it with agave syrup.
Nutritional Info
(For one slice when divided into 12 servings)
- Calories: 190
- Total Fat: 8g
- Saturated Fat: 4.5g
- Cholesterol: 44mg
- Sodium: 88mg
- Total Carbohydrates: 28g
- Dietary Fiber: 1g
- Sugars: 10g
- Protein: 3g
There you have it, my friends – an Orange Ginger Honey Cake that’s not only a treat for your taste buds but also a celebration of shared moments in the kitchen. I can’t wait for you to give it a try! Remember, the heart of good cooking is love, intention, and a little bit of adventure. So, tie on that apron, get baking, and enjoy every delicious moment! 🍊✨
PrintUnforgettable Orange Ginger Honey Cake

A delightful cake blending orange and ginger for a perfect balance of sweet and spice, enhanced with honey.
- Prep Time: 20 minutes
- Cook Time: 30 minutes
- Total Time: 50 minutes
- Yield: 12 servings 1x
- Category: Dessert
- Method: Baking
- Cuisine: American
- Diet: Vegetarian
Ingredients
- 2 cups all-purpose flour
- 1 tsp baking soda
- 1 tsp ground ginger
- ½ tsp cinnamon
- ¼ tsp nutmeg
- Pinch of salt
- ½ cup unsalted butter (melted)
- ¾ cup raw honey
- 2 large eggs
- 1 cup fresh orange juice
- Zest of 2 oranges
- 1 tbsp grated fresh ginger
- 2 tbsp honey (for glaze)
- 2 tbsp orange juice (for glaze)
Instructions
- Preheat your oven to 350°F (175°C) and grease a 9-inch round cake pan.
- Mix dry ingredients: In a large mixing bowl, whisk together flour, baking soda, ground ginger, cinnamon, nutmeg, and salt until well combined.
- Combine wet ingredients: In another bowl, whisk together melted butter, raw honey, eggs, fresh orange juice, orange zest, and grated ginger.
- Combine wet and dry mixtures: Pour wet mixture into dry ingredients and stir until just combined.
- Pour the batter into the prepared cake pan.
- Bake for 25-30 minutes or until a toothpick inserted into the center comes out clean.
- Cool the cake in the pan for about 10 minutes, then transfer to a wire rack to cool completely.
- Prepare the glaze by whisking together honey and orange juice, then drizzle over the cooled cake.
- Slice and serve, optionally with whipped cream or vanilla ice cream.
Notes
Can be made in advance and stores well at room temperature for up to 3 days.
Nutrition
- Serving Size: 1 slice
- Calories: 190
- Sugar: 10g
- Sodium: 88mg
- Fat: 8g
- Saturated Fat: 4.5g
- Unsaturated Fat: 2g
- Trans Fat: 0g
- Carbohydrates: 28g
- Fiber: 1g
- Protein: 3g
- Cholesterol: 44mg
Keywords: cake, orange, ginger, honey, dessert, baking