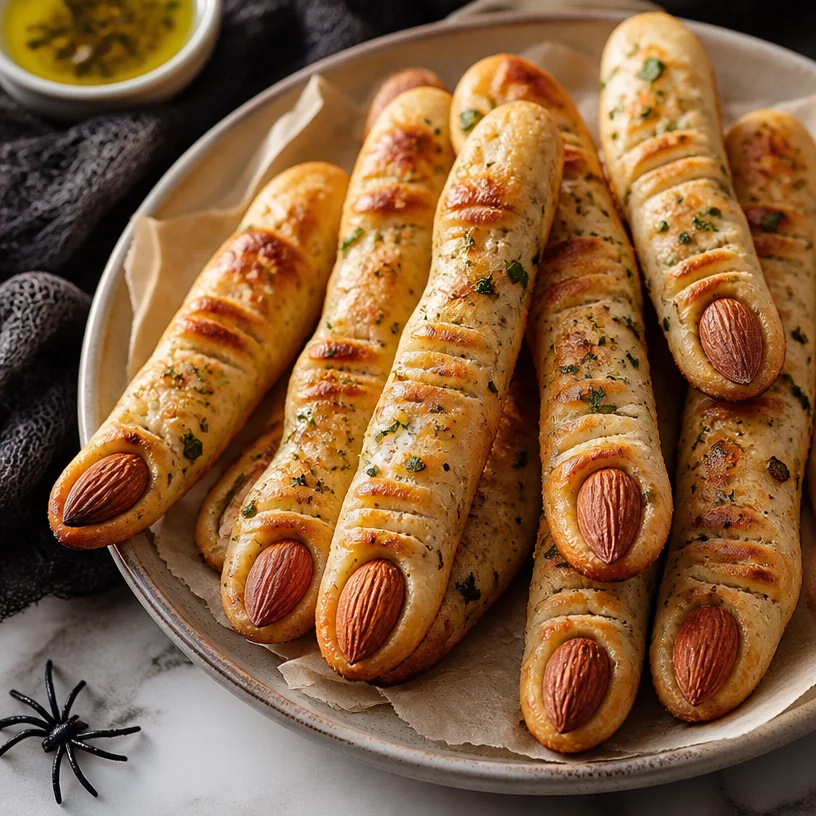
Halloween Witch Finger Breadsticks: 30-Minute Party Appetizer
Witch Finger Breadsticks: A Spooktacular Treat
Hello, fellow food lovers! Savannah here from Ivory Apron, and I’m thrilled to guide you through the delightfully eerie world of Witch Finger Breadsticks. Perfect for themed parties, Halloween feasts, or simply to surprise your loved ones, these breadsticks are as fun to make as they are to eat. Trust me, your friends and family will be intrigued and entertained when they spot these spooky treats on the dinner table!
A Dash of Nostalgia
When I think of Halloween, I can’t help but sway back to the days of crafting creative treats for school parties. Growing up, my friends and I always made a point to outdo each other with extravagant culinary concoctions. One year, I decided to whip up something a little out of the ordinary—Witch Finger Breadsticks! My mom and I spent the afternoon creating a mini culinary masterpiece. The dough shaped like fingers, complete with almond nails painted with garlic butter—pure creativity on a plate. That Halloween, we had not only a tasty treat but the biggest laugh as we handed them out to our friends at school. It was a moment that perfectly embodies what cooking is all about: fun, creativity, and a sprinkle of nostalgia.
Ingredients You’ll Need
Let’s dive into the essentials for your Witch Finger Breadsticks. Here’s what you’ll need:
-
Pizza Dough: This is the star of your breadsticks! You can use store-bought or homemade pizza dough. If you’re looking for a healthier option, whole wheat dough works nicely, too.
-
Almonds: These will serve as your witchy fingernails. Go for slivered almonds for easy application. If you prefer something nut-free, consider using peeled sunflower seeds or even roasted pumpkin seeds for a spooky touch.
-
Garlic Butter: A blend of melted butter with minced garlic, this concoction will add tons of flavor. You can make it healthier by swapping out the butter for olive oil, or even a vegan butter substitute if you want to keep these breadsticks dairy-free.
Step-by-Step Instructions
Ready to conjure up some magic in your kitchen? Let’s bake!
-
Preheat your Oven: First things first, preheat your oven to 400°F (200°C). This ensures your breadsticks get all warm and golden while baking.
-
Prepare the Pizza Dough: If using store-bought pizza dough, let it sit at room temperature for about 15 minutes—this makes it easier to handle. If you’re feeling ambitious, homemade dough always delivers that warm-from-the-oven feel. Roll or stretch your dough into a rectangular shape on a well-floured surface.
-
Cutting the Fingers: Take a sharp knife or pizza cutter and slice the dough into strips about 1 inch wide and 5-6 inches long. Think about the width and length of a finger—after all, we want these to look as ghoulish as possible!
-
Shape the Fingers: Here comes the fun part! Take each strip of dough and gently pinch one end to form a knobby fingertip. You can twist the dough slightly to create a more natural look. Most important? Don’t worry about perfection; the more unique they look, the spookier they’ll be!
-
Add the Almond Nails: Place a slivered almond at the tip of each finger to mimic a fingernail. Press it in gently so it holds during baking.
-
Brush with Garlic Butter: Melt some butter in a small saucepan and add minced garlic. Let it infuse for a minute, then remove from heat. Brush the garlic butter mixture over each breadstick, ensuring to coat them thoroughly—this adds a rich flavor that’ll make your mouth water.
-
Bake the Breadsticks: Place your witch fingers on a parchment-lined baking sheet and pop them into the oven. Bake them for about 15-20 minutes or until they’re golden brown and irresistible to the eye.
-
Serve with Style: Once out of the oven, you may want to brush them again with garlic butter for an extra punch. Let them cool slightly before arranging them on a spooky platter.
Serving Suggestions
Presentation matters almost as much as taste, right? Arrange your Witch Finger Breadsticks in a skeleton hand or atop a spooky-themed platter with some marinara sauce for dipping on the side. Maybe even throw in some creepy decorations like fake spider webs or mini pumpkins to complete the look. The more festive, the better!
Recipe Variations
Let’s explore some fun twists to keep things fresh:
-
Cheesy Witch Fingers: Sprinkle some shredded mozzarella or parmesan cheese on top of the dough before baking for an added cheesy touch!
-
Spicy Twist: Mix in a pinch of red pepper flakes to your garlic butter for a bit of heat that will elevate your Witch Fingers!
-
Herb-Infused: Add some dried herbs like oregano or thyme to your garlic butter for a herbal kick that enhances the flavor.
-
Sweet Version: For a dessert alternative, use crescent roll dough, brush with honey or cinnamon sugar, and use chocolate chips for “nails”!
Chef’s Notes
Oh, where do I begin? Making Witch Finger Breadsticks has become a Halloween tradition in my household. Every year, I seem to come up with new ways to personalize them. One time, we even topped them with pesto for a vibrant green look that absolutely screamed “witch!” I’ve also experimented by adding a drop of food coloring to the dough for an extra spooky twist. Just a reminder, the kitchen is your playground—don’t be shy about getting creative!
FAQs and Troubleshooting
1. Can I freeze these breadsticks?
Absolutely! Prepare them as instructed, but instead of baking, let them cool and pop them in the freezer. When you’re ready, bake from frozen, adding a few extra minutes to the time.
2. My dough didn’t rise — what happened?
Ensure your yeast is fresh if making homemade dough. If you’ve used store-bought dough and it didn’t rise, it might have been frozen for too long. Always check the date!
3. What can I use if I don’t have garlic butter?
No garlic butter? No problem! You can use olive oil with minced garlic or even a blend of butter and Italian herbs for flavor.
4. The breadsticks are too crispy.
If they come out overly crispy, your oven might be too hot, or they may have baked longer than necessary. Ensure you keep an eye on them as every oven is a bit different.
Nutritional Info
For a serving size of approximately 2 Witch Finger Breadsticks, you can expect about:
- Calories: 120-150
- Total Fat: 6g
- Carbohydrates: 15g
- Protein: 3g
Keep in mind, this can vary based on your dough and any toppings you add!
There you have it! Witch Finger Breadsticks are not just a delightfully spooky treat; they embody the essence of crafting beautiful memories in the kitchen. So when you gather your friends or family around the table this Halloween, serve them with a side of laughter, stories, and of course, a sprinkle of culinary magic.
I can’t wait to hear how your Witch Finger Breadsticks turn out! Don’t forget to share your creations with me on social media, and happy cooking!
PrintWitch Finger Breadsticks
Perfect for Halloween feasts or themed parties, these spooky breadsticks are shaped like witch fingers and topped with almond nails and garlic butter.
- Prep Time: 15 minutes
- Cook Time: 20 minutes
- Total Time: 35 minutes
- Yield: 8 servings 1x
- Category: Snack
- Method: Baking
- Cuisine: American
- Diet: Vegetarian
Ingredients
- 1 lb pizza dough (store-bought or homemade)
- 1/2 cup slivered almonds
- 1/4 cup garlic butter (melted butter with minced garlic)
Instructions
- Preheat your oven to 400°F (200°C).
- Prepare the pizza dough by letting it sit at room temperature for 15 minutes.
- Cut the dough into strips about 1 inch wide and 5-6 inches long.
- Shape each strip by pinching one end to form a knobby fingertip.
- Add a slivered almond at the tip of each finger.
- Brush each breadstick with garlic butter mixture.
- Bake for 15-20 minutes until golden brown.
- Serve with marinara sauce on a spooky platter.
Notes
Feel free to experiment with toppings like cheese, herbs, or even sweet variations!
Nutrition
- Serving Size: 2 breadsticks
- Calories: 135
- Sugar: 1g
- Sodium: 250mg
- Fat: 6g
- Saturated Fat: 3g
- Unsaturated Fat: 2g
- Trans Fat: 0g
- Carbohydrates: 15g
- Fiber: 1g
- Protein: 3g
- Cholesterol: 15mg
Keywords: Halloween, spooky snacks, Witch Finger Breadsticks, fun food, party food
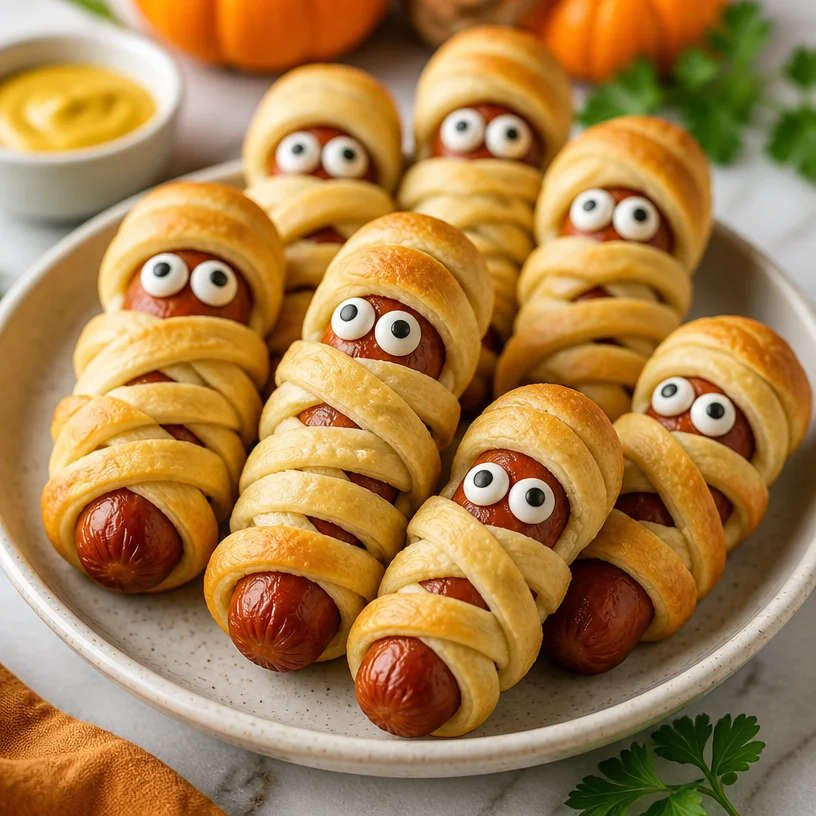
Mummy Hot Dogs
Mummy Hot Dogs: A Halloween Treat That Wows
It’s that exciting time of year again when the leaves change hue, the air turns crisp, and spooky season creeps around the corner. Halloween is a special time for families and friends to come together and indulge in festive treats that are both fun and delicious! This year, let’s put a whimsical spin on a classic favorite with “Mummy Hot Dogs.” This spooky twist is a hit among kids and adults alike, providing not just a taste of nostalgia but a chance to gather around the table for some tasty fun.
As a self-proclaimed lover of culinary creativity, I adore taking simple dishes and giving them a delightful makeover. The best part? These Mummy Hot Dogs are incredibly simple to make, ensuring that even novice chefs can whip them up in no time. Imagine this: you’re stirring a pot while the kids enjoy engaging in Halloween crafts, energy buzzing in the air. You hear laughter, and in the next room, there’s a flurry of activity as they prepare for their Halloween adventure. Just like those happy moments, these Mummy Hot Dogs are here to transport you to a place of warmth, joy, and hearty laughter.
In this post, I’ll walk you through not just the recipe but also some fun kitchen stories, tips to impress your guests, and creative variations to suit every palate. So, grab your apron (no, not ivory this time—with these Mummy Hot Dogs, we might want to keep it a bit more Halloween-themed!), and let’s get cooking!
A Spooky Memory with Mummy Hot Dogs
I still remember the first time I made Mummy Hot Dogs for a Halloween get-together. It was a brisk October evening, and the warmth of laughter filled my home. I had just hosted a Halloween-themed craft party for my children and their friends. The kids were buzzing with excitement, just as much as the adults, who were ready to enjoy some well-deserved treats. As they crafted their ghostly decorations, I decided to surprise everyone with a spooky snack idea I had seen floating around on social media.
I pulled out a package of crescent dough, hot dogs, and some candy eyes. As I wrapped each hot dog with strips of dough, the kids gathered around, intrigued by the unusual combination of ingredients. We giggled at our creations resembling mini mummies, and the anticipation in the air grew palpable. When the golden, flaky dogs came out of the oven, we all gathered around the table for a “mummy feast.”
With the candy eyes perched on top, they transformed into adorable little creatures, and the flavor? Let’s just say they were devoured in minutes! Making Mummy Hot Dogs became a cherished tradition in my family. It reminds me that food is not just about sustenance; it’s about creating shared moments together, weaving stories, and filling the atmosphere with merriment.
Ingredients
To get started on these Mummy Hot Dogs, let’s gather our ingredients. Here’s what you’ll need:
-
Hot Dogs: The stars of the dish! You can use beef, turkey, chicken, or even plant-based links for an alternative option. Don’t forget that the size can change the number of strips, so keep that in mind.
-
Crescent Dough: This flaky dough serves as the mummy wrap. You can substitute it with puff pastry for a different texture. Remember, the dough should be kept chilled until you’re ready to use it; warm dough is much harder to work with!
-
Candy Eyes: These add a fun, spooky touch to your mummies! You can find them at craft stores or online. If you can’t find candy eyes, you can always use small pieces of olives or chocolate chips as substitutes.
-
Ketchup or Mustard (optional): These can serve as dipping sauces for an added zing. A little bit of creativity here can turn an ordinary condiment into something festive—how about a “bloody” ketchup?
Step-by-Step Instructions
Now that we’ve got our ingredients ready, let’s dive into the cooking process!
-
Preheat your oven: Start by preheating your oven to 375°F (190°C). The goal here is to achieve that glorious golden brown on your crescent dough!
-
Prepare the hot dogs: Take your hot dogs and set them aside. You can choose to cut each one in half if you’re craving mini mummies for a fun appetizer variation.
-
Unroll the crescent dough: Carefully take the crescent dough out of its package and lay it flat on a clean, lightly floured surface. Optionally, you can roll out the dough with a rolling pin for a thinner texture.
-
Cut the dough into strips: Using a pizza cutter or sharp knife, cut the dough into thin strips, about 1/4 inch wide. You want enough length to wrap around your hot dogs multiple times.
-
Wrap the hot dogs: Take a strip of dough and start wrapping it around the hot dog. Be creative! Leave gaps here and there, as that’ll give it a more authentic mummy look. The idea is to make it look messy and spooky all at once. Secure the ends to prevent the dough from unraveling during baking.
-
Place on a baking sheet: Line a baking sheet with parchment paper for easy cleanup. Place your wrapped hot dogs on the sheet, ensuring they aren’t too crowded.
-
Bake to perfection: Pop them in your preheated oven and bake for about 12-15 minutes, or until the dough is golden brown and puffed-up. Stay nearby so you can admire them as they bake—seriously, nothing beats that delightful smell wafting through your home!
-
Add candy eyes: Once they’re out of the oven and have cooled for a couple of minutes, it’s time to bring your mummies to life! Dot some hot glue or frosting on the candy eyes and attach them to the hot dogs for that final spooky touch.
-
Serve warm: Serve with ketchup or mustard on the side for dipping. Get ready to hear the giggles and oohs and aahs as everyone dives into these yummy mummies!
Serving Suggestions
To plate your Mummy Hot Dogs, consider serving them on a festive platter lined with parchment paper for that rustic, haunted house vibe. To elevate the theme, you could add a few fake spiders or mini pumpkins around the platter. Not only will it create visual interest, but it also enhances the entire Halloween theme!
Recipe Variations
Feeling adventurous? Here are a few creative twists you might want to explore:
-
Cheesy Mummies: Place a small piece of cheese inside each hot dog before wrapping it with crescent dough for a gooey surprise!
-
Vegetarian Mummies: Swap the hot dogs for veggie dogs or even some cooked tofu to cater to plant-based eaters.
-
Nom Nom Nachos: Cut mini tortillas in the shape of bones for a crunchy side dish, pairing perfectly with your mummy hot dogs!
-
Spicy Mummies: Use jalapeño hot dogs for those who enjoy a bit of heat. These will surely add a kick to your Halloween spread!
-
Saucy Mummies: Incorporate BBQ sauce or a spicy mustard into the mix for fun dipping options. Mix different sauces to create a “Witch’s Brew” for dipping!
Chef’s Notes
These Mummy Hot Dogs hold a special place in my culinary heart. I’ve served them at numerous Halloween parties, always experimenting with different fillings and variations. One year, I decided to put a fun spin on it and invited guests to create their own mummies with various toppings and sauces. Watching everyone’s creativity bloom was the highlight of the evening, and let’s just say, some unique mummies were born!
This recipe, although simple, evolves with the seasons. Every time I make it, I realize that it brings people together, sharing laughs and delighting in the sheer joy of cooking. Remember, the kitchen is not just for cooking; it’s a space for crafting memories.
FAQs and Troubleshooting
-
What if my crescent dough is losing its shape?
Make sure your dough is cold before you start wrapping. If it gets too warm, it may become stretchy and hard to manage. You can pop it in the fridge for a few minutes to firm it back up. -
How do I know when they’re done?
Keep an eye on them! Once they turn golden brown, they’re ready. If they’re golden all around, that’s a sure sign of perfection! -
Can I freeze Mummy Hot Dogs?
Yes! You can freeze unbaked wrapped hot dogs. Just assemble them, freeze on a baking sheet, then store in an airtight container. Bake from frozen, adding a few extra minutes to the cooking time. -
What other sauces go well with Mummy Hot Dogs?
Besides ketchup and mustard, consider ranch dressing, sriracha, or a creamy garlic dip. Each adds its unique flair!
Nutritional Info
While I don’t dwell heavily on the nutritional aspect of cooking, I know it’s important for many. A single Mummy Hot Dog is about 200-300 calories, depending on the type of hot dog and dough. Pair with some veggie sticks for a well-rounded, festive meal that’s as enjoyable as it is delicious!
Now that you have your plan, roll up those sleeves, get your loved ones involved, and let’s create something wonderful this Halloween! Gather around the table, savor the moment, and enjoy making memories with these delightful Mummy Hot Dogs. Happy cooking!
PrintMummy Hot Dogs
A fun and spooky take on a classic favorite, these Mummy Hot Dogs are perfect for Halloween gatherings, combining deliciousness with creativity.
- Prep Time: 15 minutes
- Cook Time: 15 minutes
- Total Time: 30 minutes
- Yield: 8 servings
- Category: Appetizer
- Method: Baking
- Cuisine: American
- Diet: Vegetarian option available
Ingredients
- Hot Dogs (beef, turkey, chicken, or plant-based)
- Crescent Dough (alternatively puff pastry)
- Candy Eyes (or small olives/chocolate chips)
- Ketchup or Mustard (optional)
Instructions
- Preheat your oven to 375°F (190°C).
- Prepare the hot dogs by setting them aside.
- Unroll the crescent dough onto a clean, lightly floured surface.
- Cut the dough into thin strips, about 1/4 inch wide.
- Wrap the hot dogs with strips of dough, leaving gaps for a mummy look.
- Place the wrapped hot dogs on a lined baking sheet.
- Bake for 12-15 minutes or until golden brown.
- Add candy eyes to the cooled mummies using hot glue or frosting.
- Serve warm with ketchup or mustard for dipping.
Notes
Experiment with different fillings and toppings for unique mummy creations. Keep the dough cold for easier handling and best results.
Nutrition
- Serving Size: 1 serving
- Calories: 250
- Sugar: 2g
- Sodium: 600mg
- Fat: 15g
- Saturated Fat: 5g
- Unsaturated Fat: 8g
- Trans Fat: 0g
- Carbohydrates: 20g
- Fiber: 1g
- Protein: 7g
- Cholesterol: 25mg
Keywords: Halloween, Mummy Hot Dogs, spooky snack, festive treat, kid-friendly recipe