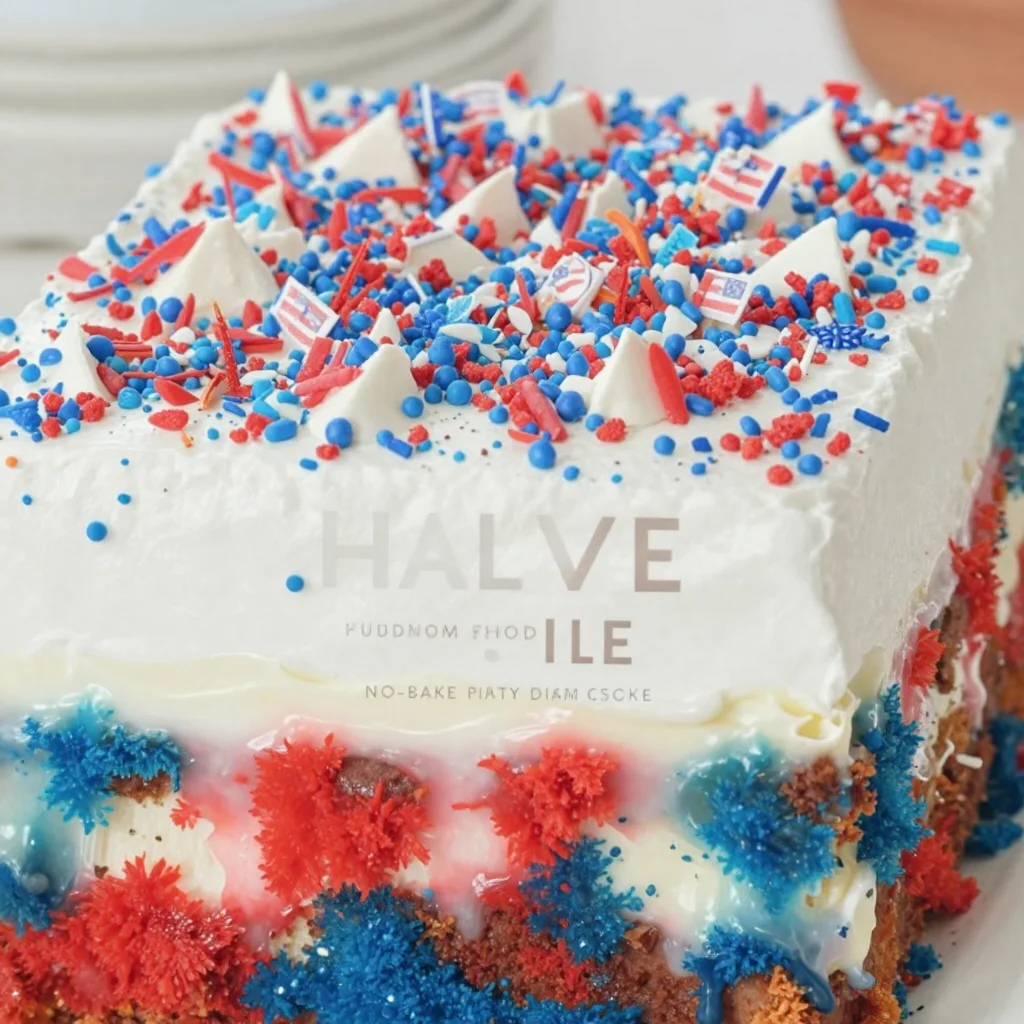
Patriotic Poke Cake: No-Bake Party Dessert for 4th of July
Celebrate with a Patriotic Poke Cake: A Festive Treat for Every Occasion
Hello, darling foodies! Today, we’re diving into a recipe that’s as vibrant as the flag itself — the Patriotic Poke Cake! This delightful dessert is perfect for any summer celebration, whether it’s the Fourth of July, a backyard barbecue, or simply a Sunday dinner that calls for something sweet. The beauty of a poke cake is in its simplicity and approachability. With just a few ingredients, we can create a show-stopper that’ll impress your friends and family, all while bringing a burst of color to the table. So let’s roll up those sleeves, tie on our aprons, and get baking!
A Sweet Slice of Nostalgia
Growing up, many of my fondest memories were shaped around the dinner table during the summer. Our family would gather at my grandmother’s house, where the air was filled with laughter, the sound of sizzling grilled meats, and, of course, the delicious aroma of her famous poke cake. My grandmother had this way of making everything feel special, and her poke cake was a staple for every celebration. I can still see her in her worn apron, gently poking holes into the cake with the end of a wooden spoon, explaining how each hole would capture sweet flavor and moisture.
I love how a poke cake took something simple and let it shine in its own way. The layers of sweetened condensed milk soaking into the delicate cake made it moist and decadent. Topped with fresh strawberries and blueberries, it became a festive masterpiece to celebrate our American spirit. This is a dish that takes me back to those cherished moments, reminding me how good food creates an atmosphere of togetherness.
Ingredients You’ll Need:
Here are your star ingredients for the Patriotic Poke Cake:
-
1 Box of White Cake Mix: The base of our cake. You can use any brand you prefer; just make sure you follow the package instructions for baking.
-
1 Cup Water: Adds moisture to the cake; using room-temperature water helps achieve a fluffy texture.
-
1/3 Cup Vegetable Oil: This keeps the cake tender and moist. If you want a flavor twist, feel free to substitute with melted coconut oil!
-
3 Large Eggs: Eggs help bind the ingredients together and provide a rich flavor. If you’re making it vegan, you can replace each egg with 1/4 cup unsweetened applesauce.
-
1 Cup Sweetened Condensed Milk: The magic ingredient! This rich and creamy milk adds sweetness and moisture. If you prefer a dairy-free option, look for coconut condensed milk.
-
1 Cup Strawberries (sliced): These provide a sweet and fresh flavor — plus, they add a pop of red goodness.
-
1 Cup Blueberries: Another fruit that adds sweetness and provides that beautiful blue hue. Frozen blueberries can be a substitute, just drain them well.
-
1 Cup Whipped Topping: For that final creamy layer, you can use store-bought or homemade whipped cream. If you’re avoiding dairy, a coconut whipped topping works wonderfully.
-
Red and Blue Food Coloring: To enhance those patriotic colors! You can skip this if you prefer the natural look, but a little color never hurts for some festive fun!
Step-By-Step Instructions
Now that we have our ingredients ready, let’s get into the cooking. This cake is a breeze to whip up!
-
Preheat the Oven: Start by preheating your oven to 350°F (175°C). This ensures your cake bakes evenly.
-
Prepare Your Cake Batter: In a large mixing bowl, combine the white cake mix, water, vegetable oil, and eggs. [Chef tip: Mix this on medium speed for about 2 minutes until the batter is smooth and well combined.]
-
Bake the Cake: Pour the batter into a greased 9×13 inch baking dish. [Here’s a little hack: Make sure you spread the batter evenly to avoid uneven baking.] Bake according to the package directions, usually around 30-35 minutes, or until a toothpick comes out clean.
-
Cool the Cake: Once your cake is done baking, let it cool in the pan for about 10-15 minutes. After that, take a skewer or the handle of a wooden spoon and poke holes all over the top of the cake, about an inch apart. This is where all the flavor magic happens!
-
Add the Sweetened Condensed Milk: Carefully pour the sweetened condensed milk over the warm cake, ensuring that it seeps into the holes. [Chef insight: Letting the cake soak while it’s still warm will help it absorb more moisture.]
-
Chill Your Cake: Cover your cake with plastic wrap and pop it in the refrigerator for at least 2 hours, or overnight if you can wait! This step is crucial for flavor development.
-
Top It Off: Once chilled, spread your whipped topping evenly across the cake. Now, here comes the fun part — let’s decorate!
-
Create a Patriotic Design: Arrange the sliced strawberries and blueberries on top of the whipped topping to showcase those red, white, and blue colors. You can create a flag design or any pattern that excites you!
Serving Suggestions
To serve this lovely cake, slice it generously into squares, and plate each piece with a dollop of extra whipped topping and a fresh berry on top for a beautiful presentation. Don’t forget to set the mood! Scented candles, colorful plates, and maybe even some festive napkins will enhance the experience and make your guests feel special.
Recipe Variations
Feel free to get creative with this cake! Here are a few ideas:
-
Layered Poke Cake: Consider making two layers of cake and sandwiching the filling between them for a show-stopping effect.
-
Flavor Twist: Instead of white cake, use lemon or almond cake mix for an unexpected yet delightful flavor.
-
Dietary Swaps: Try a gluten-free cake mix for a gluten-free option or make mini poke cakes in muffin tins for single-serving treats.
-
Fruit Mix-up: Swap the strawberries and blueberries with your favorite seasonal fruits — think peaches or kiwi for a tropical twist!
-
Chocolate Sprinkle: Want to tempt chocolate lovers? Add cocoa powder to the cake mix or use chocolate whipped topping!
Chef’s Notes
I have to tell you, this recipe has evolved beautifully over the years. The first time I made it was quite a spectacle! I forgot to poke holes in the cake, and let me tell you, it turned out like a dense sponge. Lesson learned, but that’s the beauty of cooking — we learn from our moments in the kitchen, and each mistake leads to greater adventures! Now, it’s one of my go-to desserts when I want to impress someone (and, let’s be real, it always gets rave reviews!).
FAQs and Troubleshooting
-
Why did my poke cake turn out dry? Make sure to pour the sweetened condensed milk while the cake is warm. Additionally, letting it chill for at least 2 hours is essential for moistened goodness!
-
Can I freeze my poke cake? Absolutely! Just be sure to wrap it tightly in plastic wrap. It can be frozen for up to three months. Just thaw it in the fridge overnight before serving.
-
My cake fell while baking. What happened? This can happen if you opened the oven door too soon. Always wait for at least the first 20 minutes before peeking!
-
Can I use cool whip instead of whipped topping? Yes! If you’re looking for convenience, Cool Whip is a great alternative, just be sure to defrost it properly before spreading.
Nutritional Info
While nutrition details can vary, a serving of this Patriotic Poke Cake typically contains about 250-300 calories. Remember, it’s all about enjoying the moment around the table!
So, there you have it — a vibrant and delicious Patriotic Poke Cake that will have everyone asking for seconds. Whether it’s for a holiday or a casual gathering, this cake is your ticket to creating wonderful memories. I hope you try it out and make it your own. Happy baking, and let’s raise a slice to all the beautiful moments that food can share!
PrintPatriotic Poke Cake
A festive poke cake topped with strawberries and blueberries, perfect for summer celebrations.
- Prep Time: 15 minutes
- Cook Time: 35 minutes
- Total Time: 50 minutes
- Yield: 12 servings 1x
- Category: Dessert
- Method: Baking
- Cuisine: American
- Diet: Vegetarian
Ingredients
- 1 Box of White Cake Mix
- 1 Cup Water
- 1/3 Cup Vegetable Oil
- 3 Large Eggs
- 1 Cup Sweetened Condensed Milk
- 1 Cup Strawberries (sliced)
- 1 Cup Blueberries
- 1 Cup Whipped Topping
- Red and Blue Food Coloring
Instructions
- Preheat the oven to 350°F (175°C).
- Combine the white cake mix, water, vegetable oil, and eggs in a large mixing bowl, mixing for about 2 minutes until smooth.
- Pour the batter into a greased 9×13 inch baking dish and bake according to package directions for 30-35 minutes.
- Cool the cake in the pan for 10-15 minutes, then poke holes all over the top.
- Pour the sweetened condensed milk over the warm cake.
- Chill the cake covered with plastic wrap in the refrigerator for at least 2 hours.
- Spread whipped topping evenly across the chilled cake.
- Arrange sliced strawberries and blueberries on top in a patriotic design.
Notes
Letting the cake soak while still warm helps absorb more moisture. For different flavors, try lemon or almond cake mix.
Nutrition
- Serving Size: 1 slice
- Calories: 275
- Sugar: 23g
- Sodium: 320mg
- Fat: 9g
- Saturated Fat: 2g
- Unsaturated Fat: 7g
- Trans Fat: 0g
- Carbohydrates: 40g
- Fiber: 1g
- Protein: 4g
- Cholesterol: 50mg
Keywords: poke cake, patriotic dessert, summer cake, festive dessert, easy cake recipe
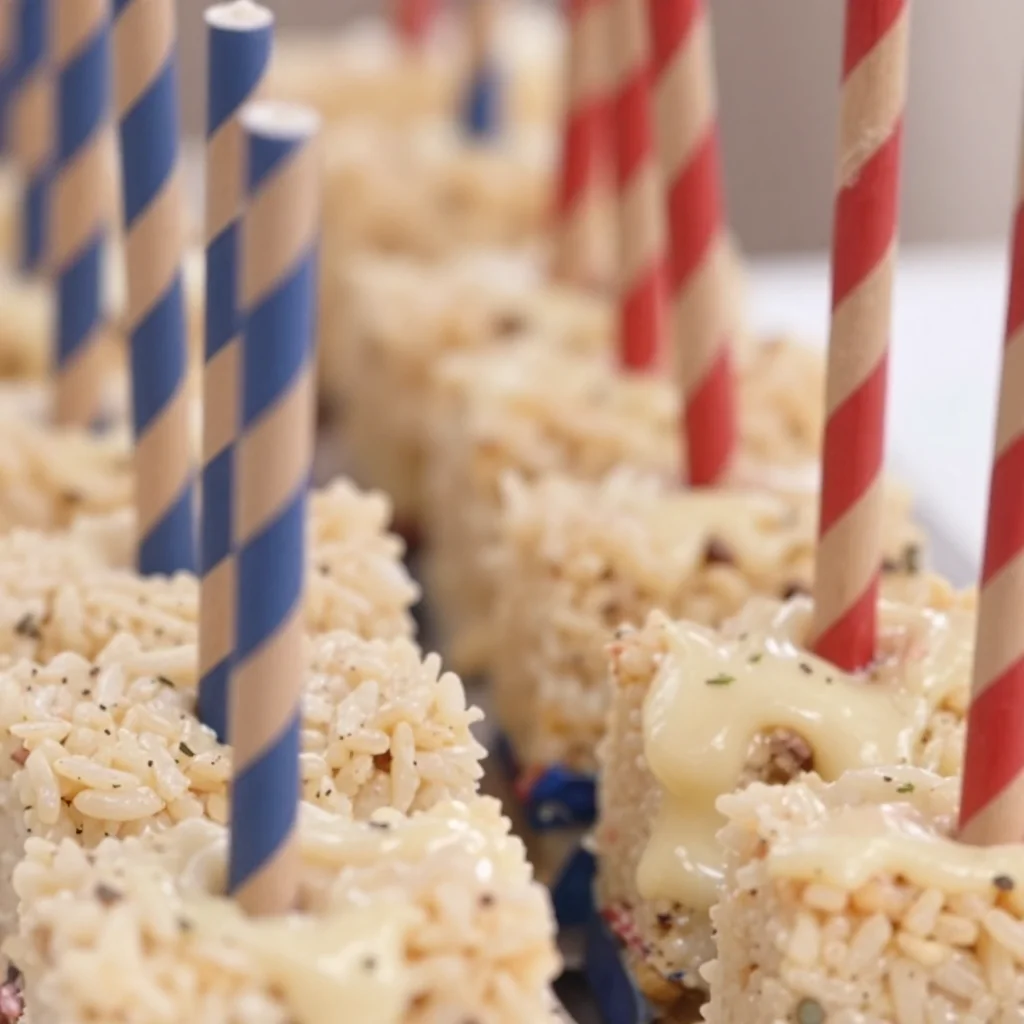
Patriotic No-Bake Rice Krispies Treats: 4th of July Flag
Celebrate the Stars and Stripes with American Flag Rice Krispie Treats
Hello, fellow foodies! Today, we’re diving into a festively sweet treat that’s perfect for your Fourth of July celebration, Memorial Day BBQ, or any backyard gathering where you want to showcase your love for the good ol’ US of A. I’m talking about American Flag Rice Krispie Treats! 🍭 These adorable, gooey delights are not only super easy to whip up, but they also bring a pop of color and fun to your table that will make your guests oooh and ahhh.
Now, if you’re like me, anytime you get together with loved ones, the food is always the heart of the celebration—and that includes fun desserts that bring everyone together. I fondly remember when my family would gather for picnics during the summer, and my mom would come out with a red, white, and blue dessert that made everyone smile. Those moments were filled with laughter, sharing, and lots of sticky fingers from the treats.
What I love about these American Flag Rice Krispie Treats is their versatility; they’re not only tasty but a canvas for creativity and conversation. So, let’s get to it! Grab your apron, and let’s make some memories in the kitchen!
A Nostalgic Kitchen Memory
One of my fondest memories involving Rice Krispie Treats goes way back to elementary school. Our art teacher organized a themed “American Day” celebration, where everyone was encouraged to bring something that represented the USA. My mom and I decided to transform a classic treat into something special—it was a labor of love that taught me how simple ingredients could come together to create something beautiful.
We crafted our very own American flag using a rectangular tray of Rice Krispie Treats, accented with vibrant red and blue candy melts. As my classmates tasted the treats, their faces lit up with delight. We ended the day covered in a sprinkle of powdered sugar and laughter, but the biggest takeaway? Food brings people together in ways that words sometimes can’t.
It’s moments like these that pushed me to create Ivory Apron—to share the joy of cooking and entertaining. So, get ready to roll up your sleeves, because we’re about to make an iconic dessert that’s as much fun to assemble as it is to eat!
Ingredients
Here’s what you’ll need to get started on your colorful adventure:
-
4 paper straws (cut in half)
These will serve as the flagpole! Feel free to use wooden skewers for a sturdier option. -
2 oz white candy melts
Perfect for creating the stars in our flag. Chocolate or white chocolate can work as substitutes if you can’t find candy melts. -
8 pre-packaged Rice Krispie Treats (unwrapped)
The foundation of our dessert. You could also whip up a homemade batch if you’re feeling extra ambitious—just use the classic Rice Krispies recipe! -
5 oz red candy melts
For those eye-popping stripes of our flag! If you want a different hue, red food coloring can be added to white chocolate. -
5 oz blue candy melts
This bright blue will be perfect for the corner of our flag. Again, you can swap in chocolate if necessary. -
Red, white, and blue sprinkles
Because who doesn’t love a little extra crunch and color? Feel free to experiment with any patriotic sprinkle mix!
Step-by-Step Instructions
-
Prepare Your Workspace
Gather all your ingredients and tools. It’s always a good idea to have a clean, organized space—trust me, it makes the process so much smoother! -
Melt the Candy Melts
In separate microwave-safe bowls, melt the red, white, and blue candy melts according to package instructions, heating in 30-second intervals and stirring in between until smooth. This step is my secret for getting perfectly melted chocolate without any clumps. -
Assemble the Base
Line a rectangular baking dish with parchment paper (trust me, it helps with easy removal later). Unwrap the Rice Krispie Treats and layer them tightly in the dish, forming a smooth base for your flag. -
Create the Red Stripes
Now, grab your red candy melts and pour them over the Rice Krispie Treats, spreading it evenly to create alternating stripes. Chef Hack: Use a spatula dipped in warm water for a smooth and clean spread. -
Add the White Stripes
Pour the melted white candy melts over the red layer, smoothing it out as you go. The layers will look beautifully vibrant, just wait until you see the final result! -
Layer in the Blue
Take the remaining Rice Krispie Treats and create a rectangular section on the upper left corner. Pour the melted blue candy melts over it, spreading it evenly once again. -
Sprinkle Some Cheer
Now it’s time for the fun part! While everything is still melted, liberally sprinkle the red, white, and blue sprinkles over the blue layer. Let it all set for about 30 minutes or until the candy melts fully harden. -
Final Touches
Once everything has set, remove the treat from the baking dish using the parchment paper, and carefully cut it into squares or rectangles. Pop your paper straws into the top corner for a fun display!
Serving Suggestions
To showcase your American Flag Rice Krispie Treats, place them on a large white platter to let the colors stand out. You can also add a few festive decorations like mini flags or scatter some extra sprinkles around the base for an elegant touch. Don’t forget to take a moment to snap a photo—this dessert will spark joy on social media!
Recipe Variations
If you want to shake things up a bit, here are some creative twists to consider:
-
Fruit Forward: Layer fresh strawberries and blueberries on top of the Rice Krispie Treat base for a fruity addition!
-
Chocolate Drizzle: Drizzle melted dark chocolate over the final creation for an extra dose of decadence.
-
Texture Play: Toss in crushed graham crackers or mini marshmallows with the sprinkles for a fun texture experience.
-
Different Colors: Don’t be afraid to swap the red and blue for other fun colors—think green for St. Patrick’s Day or pastels for Easter!
-
Peanut Butter Treats: Mix peanut butter into the Rice Krispie Treat base for a nutty twist that adds an extra layer of flavor.
Chef’s Notes
Cooking is all about evolution! This recipe has come a long way from those elementary school days when I first used traditional Rice Krispie Treats. Over the years, I’ve added pops of color and creative flair to enhance the experience and make it even more memorable. And honestly, combining those luscious candy melts with the iconic puffed rice cereal is a match made in heaven.
Plus, don’t be surprised if you find some melted chocolate on your fingers during the process—it’s a sign of good cooking!
FAQs and Troubleshooting
-
Q: What if my candy melts aren’t melting smoothly?
A: Ensure you’re using a microwave-safe bowl and that you’re stirring well between intervals—if they’re burning, reduce the heat! -
Q: Can I make these in advance?
A: Absolutely! Just store them in an airtight container at room temperature to keep them fresh. -
Q: What if I don’t have parchment paper?
No worries! Lightly greasing the baking dish with cooking spray will work fine. -
Q: How do I cut the treats?
Use a sharp knife and a gentle sawing motion for clean cuts. If the edges are sticking, run your knife under warm water for easier cutting.
Nutritional Info (optional)
While I won’t bore you with all the details, it’s good to know these treats are great in moderation! Each square is about 130 calories per serving, depending on how generously you cut them.
So there you have it, folks! A delightfully festive recipe that’s not just about the food but about what it represents—bringing people together, sharing laughter, and creating unforgettable memories around the table. I hope you enjoy making these as much as I do—now let’s get celebrating! Happy cooking!
PrintAmerican Flag Rice Krispie Treats
A festive treat perfect for Fourth of July celebrations, combining Rice Krispie Treats with colorful candy melts to resemble the American flag.
- Prep Time: 15 minutes
- Cook Time: 10 minutes
- Total Time: 25 minutes
- Yield: 8 servings 1x
- Category: Dessert
- Method: No-Bake
- Cuisine: American
- Diet: Vegetarian
Ingredients
- 4 paper straws (cut in half)
- 2 oz white candy melts
- 8 pre-packaged Rice Krispie Treats (unwrapped)
- 5 oz red candy melts
- 5 oz blue candy melts
- Red, white, and blue sprinkles
Instructions
- Prepare your workspace by gathering all your ingredients and tools.
- Melt the candy melts in separate microwave-safe bowls according to package instructions, heating in 30-second intervals and stirring until smooth.
- Assemble the base by lining a rectangular baking dish with parchment paper and layering the Rice Krispie Treats tightly in the dish.
- Create the red stripes by pouring the melted red candy melts over the Rice Krispie Treats.
- Add the white stripes by pouring the melted white candy melts over the red layer.
- Layer in the blue by creating a rectangular section with the remaining Rice Krispie Treats and pouring the melted blue candy melts over it.
- Sprinkle red, white, and blue sprinkles over the blue layer while it’s still melted and let it set for about 30 minutes.
- Final touches involve removing the treat from the baking dish and cutting it into squares or rectangles.
Notes
These treats can be made in advance and stored in an airtight container. Try adding fruit, chocolate drizzle, or mixing in peanut butter for variety.
Nutrition
- Serving Size: 1 serving
- Calories: 130
- Sugar: 15g
- Sodium: 50mg
- Fat: 5g
- Saturated Fat: 2g
- Unsaturated Fat: 3g
- Trans Fat: 0g
- Carbohydrates: 20g
- Fiber: 0g
- Protein: 1g
- Cholesterol: 0mg
Keywords: Rice Krispie Treats, American Flag, Fourth of July, festive dessert, no-bake treat
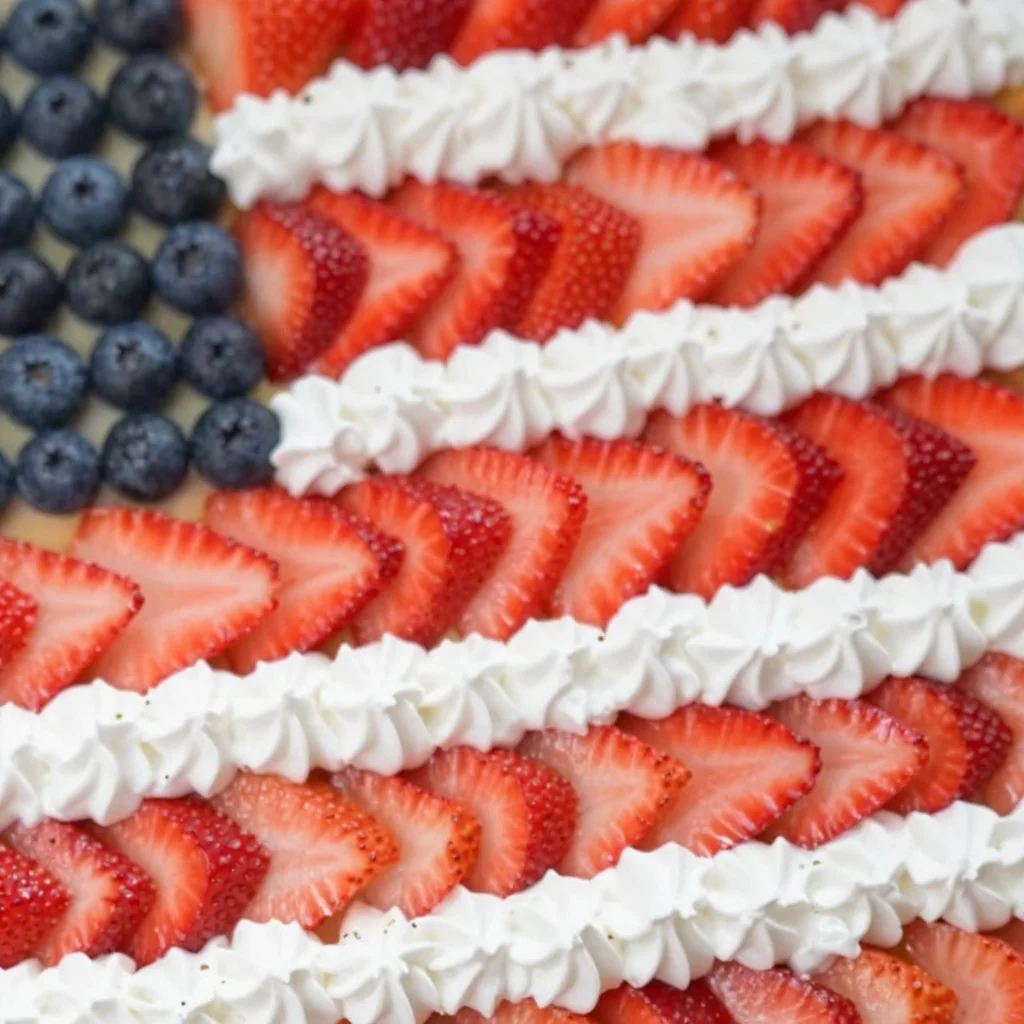
One-Pan Sugar Cookie Flag Fruit Pizza for 4th of July
Sugar Cookie Flag Fruit Pizza: A Celebration of Flavors and Colors
Summer is in full swing, and you know what that means — it’s time for outdoor gatherings, barbecues, and all things vibrant and colorful! Today, I’m excited to share one of my favorite desserts that not only tastes amazing but also looks stunning on any table. Introducing my Sugar Cookie Flag Fruit Pizza — a delightful twist on the classic fruit pizza that celebrates all the colors of the season!
Imagine a sweet, buttery crust made from rich sugar cookie dough, topped with creamy, dreamy frosting, and adorned with a fresh array of seasonal fruits. It’s like a slice of sunshine on a plate! Not only is this dessert a feast for the eyes, but it also creates a joyful experience as friends and family gather to indulge in each colorful bite.
A Sweet Memory: The First Time I Made Fruit Pizza
I still remember the first time I made a fruit pizza. It was a sunny afternoon, and I decided to host a casual get-together for my friends. As I rummaged through my refrigerator, I stumbled upon leftover sugar cookie dough from another baking adventure — you know how it goes! I was inspired to create something fresh and fruity.
With a sense of adventure, I rolled out the dough, baked it into a beautiful round crust, and topped it off with a luscious cream cheese frosting. As I decorated it with strawberries, blueberries, and whipped topping, I couldn’t help but smile at how colorful and festive it looked. When my friends arrived, their reactions were priceless. Each slice brought oohs and aahs, and the laughter that filled the kitchen made my heart warm. This dessert not only tasted good but also created lasting memories. And that’s precisely why I share it with you today — to help you create those same beautiful moments around your table!
The Essential Ingredients
Before we dive into the fun of making this Sugar Cookie Flag Fruit Pizza, let’s go over the star ingredients. Here’s what you’ll need:
-
1 package (17.5 ounces) refrigerated sugar cookie dough
- This dough is a lifesaver for quick desserts. If you’re feeling adventurous, homemade dough works wonderfully too!
-
1 package (8 ounces) cream cheese, room temperature
- Cream cheese gives the frosting a rich, tangy flavor. If you prefer a lighter version, you can use Greek yogurt or mascarpone.
-
1 cup powdered sugar
- This adds sweetness and a fluffy texture to the frosting. For a healthier option, use a sugar substitute, keeping in mind that it may alter the overall taste.
-
1 teaspoon vanilla extract
- This little addition will elevate the flavor of your frosting. Feel free to experiment with almond extract for a subtle twist.
-
Fresh strawberries
- The stars of our show! They add juiciness and a vibrant red color. Substitute with raspberries or cherries if you prefer.
-
Blueberries
- These tiny gems not only look fabulous but also provide a pop of flavor and nutrition. Blackberries are a delightful alternative!
-
Whipped topping
- A dollop of whipped topping adds that finishing touch and cloud-like texture. If you’re looking for a dairy-free option, whipped coconut cream works wonders!
Step-by-Step Instructions to Create the Magic
Now, let’s get into the nitty-gritty of making this delicious dessert. Grab your apron, and let’s get started!
-
Preheat Your Oven
Preheat your oven to 350°F (175°C). A hot oven is crucial for that golden, tender crust! -
Prepare the Sugar Cookie Crust
Unwrap the refrigerated sugar cookie dough and break it into smaller pieces. Place the dough into a mixing bowl (if using homemade dough, roll it out now). Using your hands or a rolling pin, flatten and spread the dough into a large circle on a parchment-lined baking sheet. Aim for about ¼ inch thick for that perfect chewy texture. -
Bake the Dough
Pop the dough into your preheated oven and bake for 15-18 minutes or until it’s lightly golden around the edges. Keep an eye on it, as every oven is different! Once baked, remove it from the oven and let it cool completely (this is crucial, friends!). -
Cream the Frosting
While your cookie crust is cooling down, let’s whip up that cream cheese frosting. In a mixing bowl, blend the room temperature cream cheese with an electric mixer for about 1 minute until smooth. Gradually add the powdered sugar and vanilla extract, mixing until fully combined and fluffy. If it’s too thick, add a splash of milk to reach your desired consistency. -
Spread the Frosting
Once your cookie crust has cooled, spread a generous layer of the cream cheese frosting over the top. Use an offset spatula for a smooth finish; it makes a world of difference! -
Decorate with Fruit
Now comes the fun part! Slice the strawberries into thin pieces and arrange them in rows across the pizza, creating stripes like an American flag (or whatever design speaks to you!). Add blueberries in the top left corner, filling in any gaps and making it as beautiful as possible. The colors should pop and create a lovely visual. -
Top It Off with Whipped Topping
Finally, dollop whipped topping in the empty spaces, or pipe it around the edges for a decorative touch. This fluffy cloud will make your dessert look even more enticing! -
Refrigerate Before Serving
Place your sugar cookie fruit pizza in the fridge for about 30 minutes to allow the frosting to set a bit and help all those flavors meld together. It also makes slicing easier!
Serving Suggestions: Presenting Your Creation
For serving, slide your beautiful fruit pizza onto a cutting board or a decorative platter. Use a sharp pizza cutter or knife to slice into wedges, and if you want to go the extra mile, garnish each slice with more fresh fruit or a sprig of mint. These little touches truly elevate your presentation and make guests smile!
Recipe Variations for Endless Delight
Here are a few creative twists to make this Sugar Cookie Flag Fruit Pizza your own:
-
Chocolate Delight: Swap the sugar cookie crust for a chocolate cookie dough version. Use raspberries or dark chocolate chips for a bold, rich flavor.
-
Tropical Paradise: Top with kiwi slices, mango, and pineapple for a refreshing tropical vibe.
-
Nutty Crust: Substitute ½ cup of the sugar cookie dough for crushed almonds or pecans for extra crunch and flavor.
-
Savory Twist: Add some whipped mascarpone with herbs instead of sweet frosting and pile on vegetables like bell peppers and cherry tomatoes for a savory take.
Chef’s Notes: A Dash of Wisdom
As with any recipe, making it your own is half the fun! I’ve experimented with various fruits, toppings, and even crusts over the years, and it seems each time I make this dessert, it evolves just a little bit. One of my funniest kitchen moments was when I accidentally grabbed salt instead of sugar for frosting. Let’s just say, it wasn’t my finest hour! So, always label your ingredients, my friends!
FAQs and Troubleshooting
How do I store leftovers?
Store any leftovers in an airtight container in the refrigerator for up to 3 days. It may soften over time but will still taste delicious.
Can I make this ahead of time?
Absolutely! You can bake the sugar cookie crust a day in advance. Just frost and decorate right before serving to keep the fruit fresh.
What can I use instead of cream cheese?
If you want a lighter option, you can substitute with Greek yogurt or mascarpone. They offer a slight variation in taste but will hold up well.
What if I don’t have fresh fruit?
While fresh fruit provides that lovely aesthetic, you can also use canned fruit for convenience. Just make sure to drain it well, and it might not look as pretty, but it will taste great!
In Closing
There you have it, my friends! A Sugar Cookie Flag Fruit Pizza that’s not just a dessert but a beautiful way to celebrate life’s moments, big and small. As we gather around table corners, let’s not forget to savor these sweet experiences and fill our lives with laughter, joy, and delicious food.
If you make this recipe, I would love to hear your thoughts and any creative adaptations you try! So, grab your apron, pour yourself a sparkling drink, and let’s make some memories in the kitchen together. Until next time, happy cooking!
PrintSugar Cookie Flag Fruit Pizza
A vibrant and colorful dessert featuring a sweet sugar cookie crust topped with cream cheese frosting and an array of fresh fruits, perfect for summer gatherings.
- Prep Time: 10 minutes
- Cook Time: 18 minutes
- Total Time: 30 minutes
- Yield: 8 servings 1x
- Category: Dessert
- Method: Baking
- Cuisine: American
- Diet: Vegetarian
Ingredients
- 1 package (17.5 ounces) refrigerated sugar cookie dough
- 1 package (8 ounces) cream cheese, room temperature
- 1 cup powdered sugar
- 1 teaspoon vanilla extract
- Fresh strawberries
- Blueberries
- Whipped topping
Instructions
- Preheat your oven to 350°F (175°C).
- Unwrap the refrigerated sugar cookie dough and break it into smaller pieces. Flatten and spread it into a large circle on a parchment-lined baking sheet.
- Bake the dough for 15-18 minutes or until lightly golden around the edges, then let it cool completely.
- Blend the cream cheese with an electric mixer until smooth, then gradually add the powdered sugar and vanilla extract.
- Spread a generous layer of the cream cheese frosting over the cooled cookie crust.
- Slice the strawberries and arrange them in rows across the pizza, adding blueberries in the top left corner for decoration.
- Dollop whipped topping in the empty spaces or pipe it around the edges for decoration.
- Refrigerate the fruit pizza for about 30 minutes before serving.
Notes
Feel free to substitute the fruits based on your preference. Chocolate cookie dough can also be used for a different flavor.
Nutrition
- Serving Size: 1 slice
- Calories: 300
- Sugar: 20g
- Sodium: 200mg
- Fat: 12g
- Saturated Fat: 7g
- Unsaturated Fat: 4g
- Trans Fat: 0g
- Carbohydrates: 38g
- Fiber: 2g
- Protein: 3g
- Cholesterol: 25mg
Keywords: fruit pizza, dessert, summer recipe, easy dessert, colorful dessert
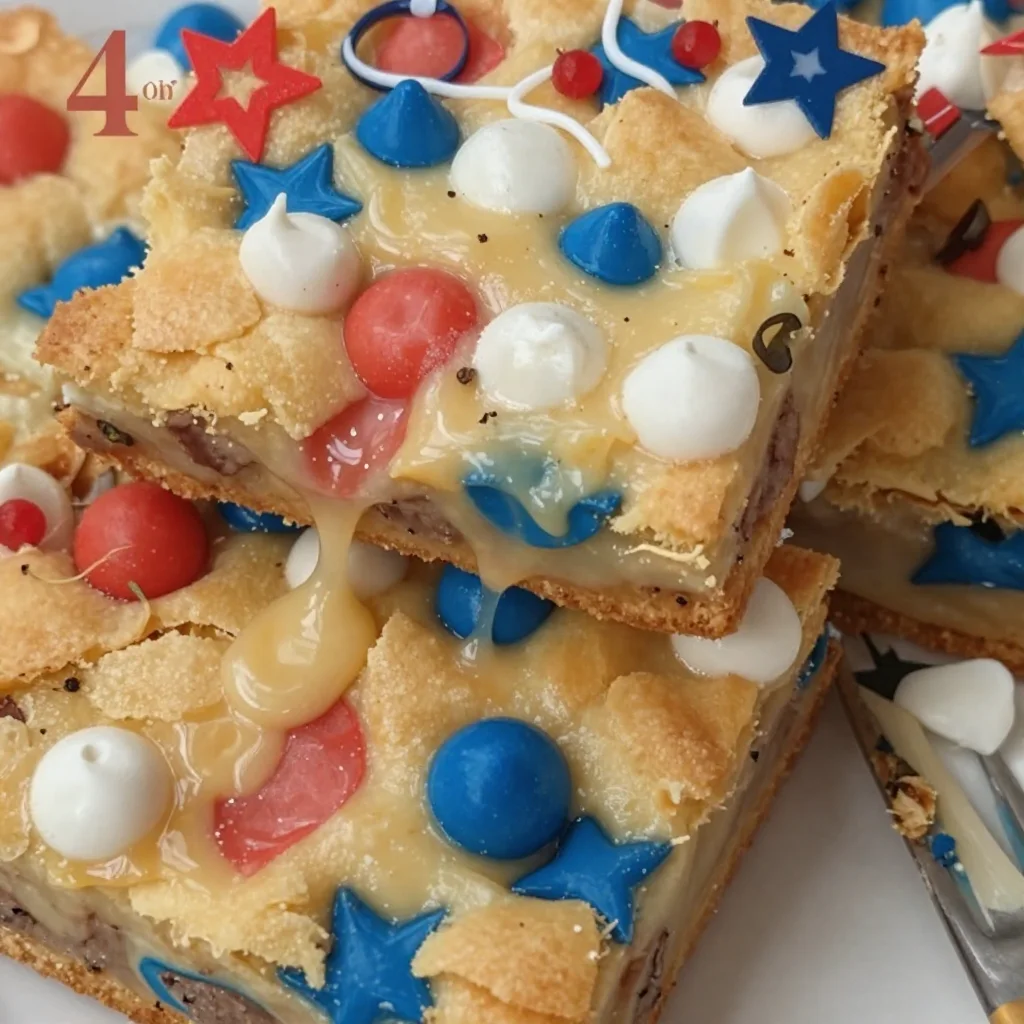
Patriotic 4th of July Cake-Mix Cookie Bars (Quick & Easy)
Celebrate with 4th of July Cake-Mix Cookie Bars: A Sweet Way to Honor Independence Day
Hello, sweet friends! If you’re like me, you’re all about celebrating every little moment with a big, beautiful treat. And as we gear up for a magnificent 4th of July celebration, there’s no better way to honor our independence than with a colorful, festive dessert. Today, I’m thrilled to share my recipe for 4th of July Cake-Mix Cookie Bars — they’re easy to whip up, irresistibly delicious, and bring a burst of red, white, and blue to your table.
Imagine this: warm, gooey cookie bars studded with white chocolate chips, and crunchy M&M’s — they melt in your mouth and are so simple to make. They’ll have your friends and family gathering around the dessert table, and maybe even returning for seconds (or thirds!). So, grab your apron and let’s dive into this delightful, festive treat!
A Sweet Memory: Baking with Mom
I can still remember the thrill of watching my mom whip up a batch of cookies in our cozy kitchen. The air would become sweet and warm, filled with the comforting aroma of baking. One summer, she decided to host a backyard barbecue for our neighborhood, and we made a giant batch of colorful cookies to celebrate the holiday.
Those cookies weren’t just snacks; they were little tokens of joy, sprinkled liberally with love and laughter. With bowls of red and blue sprinkles scattered across the countertops, we talked about our dreams while flour danced through the air. The best part? Watching our neighbors’ faces light up as they took a bite, transforming the simple gathering into a cherished memory.
It’s that spirit of joy and togetherness that inspired me to create these 4th of July Cake-Mix Cookie Bars. They embody the same feelings of love and camaraderie — perfect for sharing with friends and family during summer festivities!
Ingredients
Here’s what you’ll need to create these delightful cookie bars:
-
1 box cake mix (red velvet or vanilla)
A classic cake mix makes this recipe super simple! Either option will work beautifully, but red velvet adds an extra pop of color and flavor. -
1/2 cup vegetable oil
This ingredient keeps our bars moist and delicious. You could substitute it with melted coconut oil for a hint of tropical flavor. -
2 large eggs
These bind our ingredients together, providing structure and richness. If you’re in a pinch, use 1/2 cup of unsweetened applesauce per egg for a great vegan substitute! -
1/2 cup funfetti sprinkles (red, white, and blue)
Rainbow sprinkles bring joy to any dessert and are perfect for our patriotic theme! You can swap these for chocolate sprinkles or omit them if you prefer a more classic look. -
1/2 cup white chocolate chips
They add a creamy sweetness that balances the flavors perfectly. If you’re not a fan of white chocolate, feel free to use semi-sweet chocolate chips or even butterscotch chips for a fun twist. -
1/2 cup blue M&M’s
These festive treats add crunch and color! Swap them out for any colored candy to suit seasonal celebrations or personal favorites. -
1/2 cup red M&M’s
Just like the blue ones, these will provide that lovely crunch. You can easily replace them with peanut M&M’s for an extra layer of flavor.
Step-by-Step Instructions
Let’s get cookin’! Follow these simple steps to create your 4th of July Cake-Mix Cookie Bars:
-
Preheat the Oven: Start by preheating your oven to 350°F (175°C). This ensures that your cookie bars bake evenly and come out perfectly golden brown.
-
Prepare Your Baking Pan: Grease a 9×13-inch baking pan with non-stick spray or line it with parchment paper for easy removal. This is a little chef hack to make sure your cookie bars don’t stick and are easy to cut into neat squares later!
-
Mix the Ingredients: In a large mixing bowl, combine the cake mix, vegetable oil, and eggs. Give it a good stir with a spatula until everything is well mixed. Be careful not to overmix — we want these bars chewy, not tough!
-
Add the Fun Stuff: Gently fold in the funfetti sprinkles, white chocolate chips, and both red and blue M&M’s. Enjoy the beautiful colors as they swirl into the batter — it’s like a little celebration in the bowl!
-
Pour the Batter: Scrape the cookie batter into your prepared baking pan. Use an offset spatula or the back of a spoon to spread it out evenly in the pan. It might be a little thick, but that’s okay!
-
Bake: Place the pan in the preheated oven and bake for about 20-25 minutes. Start checking around the 20-minute mark. You want the edges to be lightly golden and a toothpick inserted in the center should come out mostly clean, meaning a few crumbs are okay — that’s what keeps it chewy!
-
Cool and Cut: Once baked to perfection, take the pan out of the oven and let it cool on a wire rack. Once cooled, carefully lift the bars out using the parchment (if you used it) and cut them into squares.
-
Serve and Enjoy: These bars can be enjoyed warm or at room temperature, but I suggest serving them slightly warm with a scoop of vanilla ice cream for an extra indulgent treat!
Serving Suggestions
When it comes to serving your 4th of July Cake-Mix Cookie Bars, presentation is key! Here’s a simple way to elevate them:
- Plate the bars on a large, colorful platter and sprinkle a few extra funfetti sprinkles around for a festive touch.
- Drizzle a little melted white chocolate on top for a touch of elegance.
- Add fresh berries like strawberries and blueberries around the bars for a pop of natural color and a refreshing balance to the sweetness.
Recipe Variations
Let’s get creative! Here are a few fun variations to customize your cookie bars:
-
Chocolate Chip Cookie Bars: Substitute half of the white chocolate chips for milk chocolate or dark chocolate chips for a classic flavor twist.
-
Nutty Bars: Stir in 1/2 cup of chopped walnuts or pecans for an added crunch and richness.
-
Peppermint Twist: Add ½ teaspoon peppermint extract and replace M&M’s with crushed peppermint candies for a winter holiday twist.
-
Gluten-Free Version: Use a gluten-free cake mix and ensure your other ingredients are gluten-free to make these bars suitable for those with gluten intolerance.
-
Fudge Brownie Bars: Use a brownie mix instead of cake mix for a decadent, fudgy treat your chocolate-loving friends will adore.
Chef’s Notes
This recipe has evolved over my years of baking. I initially started with a basic cookie recipe, but as I learned from friends and family, I incorporated fun flavors and colors to match the lively atmosphere of festive gatherings. Now, these cookie bars are not just a summer favorite but a year-round delight, customizable for any occasion.
One funny memory? I once forgot the eggs! Can you imagine my surprise when the mixture turned out more like a pancake batter? Lesson learned: always double-check your ingredients before mixing!
FAQs and Troubleshooting
-
What should I do if my bars are too chewy?
If your bars turn out too chewy, it might be from overmixing. Next time, mix just until combined and avoid overbaking. A higher ratio of cake mix to liquid can also cause this; always ensure you’re following the measurements closely. -
How do I store leftover cookie bars?
Store your cookie bars in an airtight container at room temperature for up to 4 days. You can also freeze them for later; just wrap them tightly in plastic wrap and then place in a freezer-safe container. -
Can I use another type of cake mix?
Absolutely! Any cake mix flavor can work well. Try chocolate, lemon, or even pumpkin spice for a festive twist depending on the season! -
Why did my cookie bars puff up?
If your bars puffed up while baking, it could be due to overmixing or them being overbaked. Just keep an eye on the baking time and aim for a chewy, slightly underbaked finish!
Nutritional Info
(Optional but helpful: If you wish to include this, it could look something like this):
- Serving Size: 1 bar
- Calories: 210
- Total Fat: 10g
- Saturated Fat: 4g
- Cholesterol: 30mg
- Sodium: 150mg
- Total Carbohydrates: 26g
- Dietary Fiber: 1g
- Sugars: 14g
- Protein: 2g
So there you have it; my delightful 4th of July Cake-Mix Cookie Bars recipe! I hope they add a burst of color and sweetness to your celebrations, just like those cherished memories in my kitchen. It’s all about connection, joy, and a touch of magic in every bite. Happy baking, friends, and let’s make this Independence Day one to remember!
Tie on your apron, pour yourself a sparkling drink, and let’s get baking!
Print4th of July Cake-Mix Cookie Bars
Celebrate Independence Day with these colorful and easy cake-mix cookie bars, perfect for summer festivities!
- Prep Time: 10 minutes
- Cook Time: 25 minutes
- Total Time: 35 minutes
- Yield: 12 servings 1x
- Category: Dessert
- Method: Baking
- Cuisine: American
- Diet: Vegetarian
Ingredients
- 1 box cake mix (red velvet or vanilla)
- 1/2 cup vegetable oil
- 2 large eggs
- 1/2 cup funfetti sprinkles (red, white, and blue)
- 1/2 cup white chocolate chips
- 1/2 cup blue M&M’s
- 1/2 cup red M&M’s
Instructions
- Preheat the oven to 350°F (175°C).
- Prepare a 9×13-inch baking pan with non-stick spray or parchment paper.
- Mix the cake mix, vegetable oil, and eggs in a large mixing bowl until just combined.
- Add the funfetti sprinkles, white chocolate chips, and both red and blue M&M’s.
- Pour the batter into the prepared baking pan, spreading it evenly.
- Bake for 20-25 minutes, until edges are lightly golden and a toothpick comes out mostly clean.
- Cool the bars on a wire rack, then cut into squares.
- Serve warm or at room temperature, optionally with vanilla ice cream.
Notes
For added flavor, substitute half the white chocolate chips with milk or dark chocolate chips. Store in an airtight container for up to 4 days.
Nutrition
- Serving Size: 1 bar
- Calories: 210
- Sugar: 14g
- Sodium: 150mg
- Fat: 10g
- Saturated Fat: 4g
- Unsaturated Fat: 6g
- Trans Fat: 0g
- Carbohydrates: 26g
- Fiber: 1g
- Protein: 2g
- Cholesterol: 30mg
Keywords: 4th of July, dessert, cookie bars, cake mix, festive treats