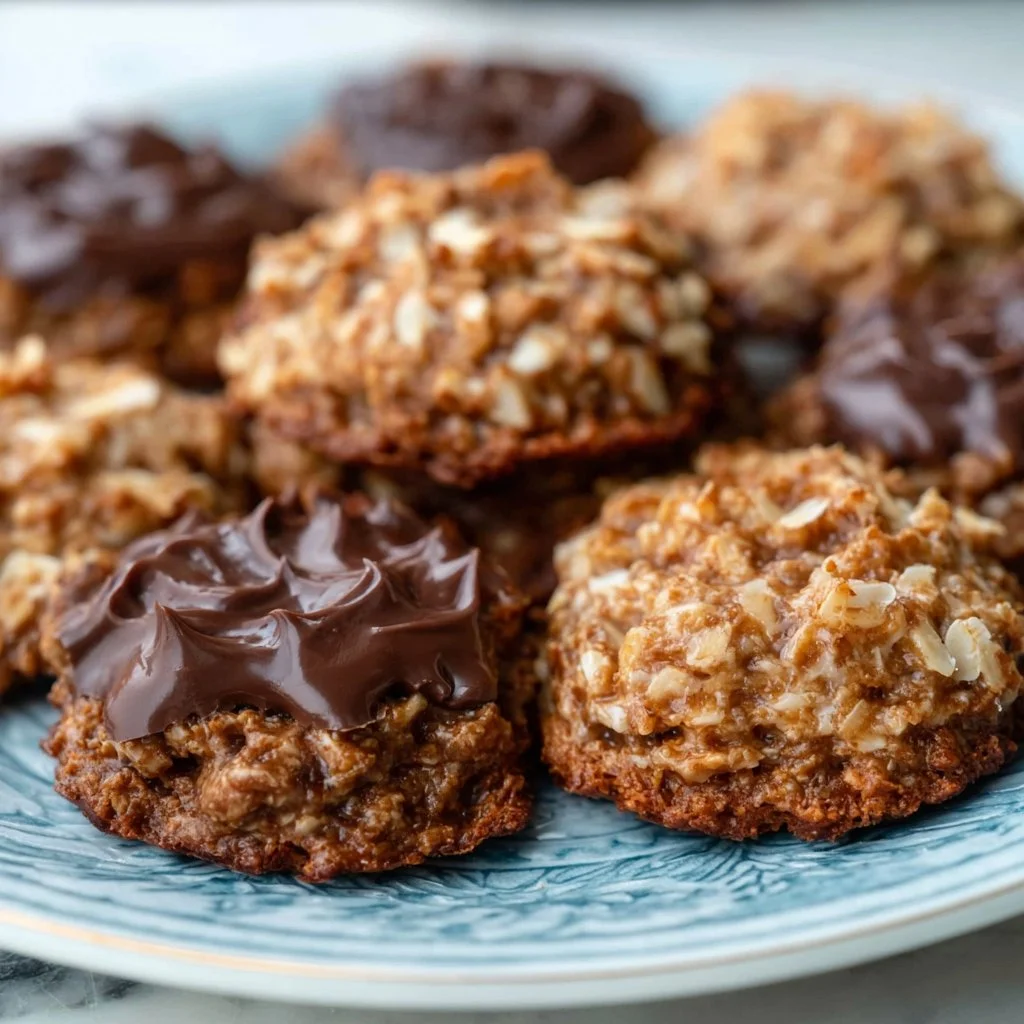
Easy No-Bake Keto Cookies (Low Carb & Delicious!)
Easy No-Bake Keto Cookies (Low Carb & Delicious!)
Hello, fellow foodies! Welcome back to my little corner of the culinary world, Ivory Apron. Today, we’re diving into a deliciously simple treat that’s all about flavor without the fuss—No-Bake Keto Cookies! If you’re following a low-carb lifestyle or just want a sweet pick-me-up without all the guilt, these cookies are both a game changer and a lifesaver.
Picture this: It’s a cozy afternoon, you’ve got your favorite playlist humming in the background, and you suddenly crave something sweet. But here’s the kicker—you don’t want to spend hours slaving away in the kitchen, and you certainly don’t want to turn on the oven in the heat of summer! That’s where these no-bake wonders come in. They’re super easy to whip up and boast ingredients that keep you on track while satisfying that sweet tooth.
These delightful cookies combine rich flavors and healthy fats, making them the perfect snack or dessert option. Plus, you can customize them to suit your taste buds, and they are totally kid-approved! So grab your apron (or just a mixing bowl if you prefer), and let’s create something scrumptious together!
Personal Story
You know, my love for no-bake desserts goes way back to my childhood. I vividly remember those long summer days spent in my grandmother’s kitchen. She had a knack for showing me just how enjoyable cooking can be, and one of her favorite treats was her famous no-bake chocolate oat cookies. The chocolate would melt in your mouth, sweetened just right with a hint of peanut butter.
We would often make a batch to share with family and friends, and honestly, it seemed like they were gone in an instant. It became our little summer tradition; the laughter, the mess, and the sweet smell of chocolate were all part of the experience. Fast forward to today, and while I’ve certainly refined the recipe a bit to fit my keto lifestyle, those warm, nostalgic feelings of joy and togetherness still inspire me to share these delightful No-Bake Keto Cookies with you.
Ingredients
Here’s what you’ll need to make these easy-peasy No-Bake Keto Cookies:
-
1 cup unsweetened almond butter
A creamy, rich base that complements our flavors. If you’re allergic to nuts, you can substitute it with sunflower seed butter or even tahini for a different twist! -
1/3 cup unsweetened cocoa powder
This adds that deep chocolate flavor we all love. Look for a good quality cocoa powder to really elevate your cookies. If you want a hint of sweetness, you can use carob powder instead! -
1/4 cup keto-friendly sweetener (like erythritol or stevia)
This will sweeten your cookies without the carbs! Experiment with different blends to find your perfect level of sweetness. You can use monk fruit sweetener here too! -
1/4 cup coconut oil, melted
Melted coconut oil helps bind everything together while adding a subtle flavor. You can easily replace this with unsalted butter if that’s more your style! -
1/2 teaspoon vanilla extract
A classic addition that brings warmth and depth. Don’t skip it—it makes all the difference! You can experiment with almond extract for a fun variation too. -
1/4 cup unsweetened shredded coconut
This adds a lovely texture and flavor! If you’re not a fan, you can leave this out or substitute it with chopped nuts for an extra crunch. -
1/4 cup sugar-free dark chocolate chips
Totally optional but recommended if you’re a chocolate lover! You could swap these for dried fruit like cranberries or chopped dates—just keep an eye on the carbs!
Step-by-Step Instructions
Ready to get started? Here’s how to whip up your No-Bake Keto Cookies in no time!
-
Gather Your Ingredients
Take a moment to measure out all your ingredients. This not only speeds up the process, but it also ensures you don’t forget anything. You’ll need a medium mixing bowl and a rubber spatula for folding everything together. -
Mix Wet Ingredients First
In your medium bowl, combine the almond butter, melted coconut oil, and vanilla extract. Stir them together until well incorporated. The almond butter should be creamy and smooth. This is where the magic starts! -
Add Dry Ingredients
Now, sprinkle in the unsweetened cocoa powder, keto-friendly sweetener, and shredded coconut. Use your spatula to fold the dry ingredients into the wet mixture gently. You should see a rich, chocolate-y batter starting to form.Chef Tip: If you’re finding the mixture too thick, feel free to add a splash of coconut milk to loosen it up.
-
Incorporate Chocolate Chips
Finally, fold in your sugar-free dark chocolate chips (if using). Make sure they are evenly distributed across your cookie mixture. You want that delicious burst of chocolate in every bite! -
Form the Cookies
Using a tablespoon, scoop out portions of the batter and place them onto a parchment-lined baking sheet. Flatten them slightly with the back of the spoon or your fingers to create a cookie shape.Chef Hack: Wet your hands with a little coconut oil for easier handling!
-
Chill in the Fridge
Pop your baking sheet in the fridge for at least 30 minutes to allow the cookies to set. This is the hardest part! Try not to eat all the batter (although I won’t tell if you sneak a bite!). -
Enjoy!
Once they’re firm, take them out and enjoy these delightful no-bake treats! Store any leftovers in an airtight container in the fridge for a quick go-to snack.
Serving Suggestions
To plate these cookies perfectly, simply arrange them on a rustic wooden board or a pretty plate. You can garnish with a sprinkle of shredded coconut or a drizzle of melted dark chocolate if you’re feeling fancy. They also pair wonderfully with a tall glass of almond milk or your favorite herbal tea—perfect for an afternoon treat.
Recipe Variations
-
Nut-Free Version: Substitute almond butter with sunflower seed butter for a nut-free alternative. This adds a new flavor profile while keeping it low-carb!
-
Chewy Texture: Add 1/4 cup of ground flaxseed or chia seeds for extra fiber and a bit of chewiness.
-
Spicy Twist: A pinch of cinnamon or cayenne pepper can make the flavor profile pop! This is a fun way to give them a bit of a kick.
-
Caramel Lovers: Drizzle in some sugar-free caramel sauce before chilling for that silky sweetness.
-
Nutty Crunch: Fold in some chopped pecans or walnuts for added crunch and healthy fats!
Chef’s Notes
Creating no-bake desserts became a sort of personal mission for me—not only do they save time, but they evoke a sense of nostalgia. Each time I whip up these cookies, I think back to those sweltering summer afternoons spent with my grandmother. It’s incredible how something so simple can carry such vibrant memories.
Over the years, I’ve played with the recipe to make it more versatile and appealing to a wider range of dietary preferences. It keeps evolving, just like my cooking journey, and every batch comes out a little different depending on what I’m feeling that day.
FAQs and Troubleshooting
1. Can I use a different nut butter?
Absolutely! Any nut butter will work, but make sure it’s creamy rather than chunky for the right texture.
2. What if my cookies are too crumbly?
If your cookies are crumbling apart, try adding a bit more melted coconut oil or almond butter. This will help them bind better.
3. How can I store these cookies?
Keep these cookies in an airtight container in the fridge for up to a week. They also freeze well if you want to keep a stash for later!
4. Can I omit the cocoa powder?
Yes, if you prefer a more classic cookie flavor, you can leave out the cocoa powder entirely and maybe add a bit more vaniller or coconut for flavor!
Nutritional Info (Optional)
Each No-Bake Keto Cookie contains approximately:
- Calories: 120
- Total Fat: 10g
- Net Carbs: 2g
- Protein: 4g
So there you have it! These easy No-Bake Keto Cookies are not just a delightful treat but a chance to create memories in the kitchen. Whether you’re indulging solo or sharing with friends, they’re bound to shine. Now, put on your apron, gather your ingredients, and let’s make something delicious together. Happy baking (or no-baking!), everyone!
PrintEasy No-Bake Keto Cookies

Deliciously simple no-bake cookies that are low-carb and perfect for satisfying your sweet tooth without guilt.
- Prep Time: 10 minutes
- Cook Time: 30 minutes
- Total Time: 40 minutes
- Yield: 12 cookies 1x
- Category: Dessert
- Method: No-Bake
- Cuisine: Keto
- Diet: Low Carb
Ingredients
- 1 cup unsweetened almond butter
- 1/3 cup unsweetened cocoa powder
- 1/4 cup keto-friendly sweetener (like erythritol or stevia)
- 1/4 cup coconut oil, melted
- 1/2 teaspoon vanilla extract
- 1/4 cup unsweetened shredded coconut
- 1/4 cup sugar-free dark chocolate chips (optional)
Instructions
- Gather your ingredients.
- Mix wet ingredients first: combine almond butter, melted coconut oil, and vanilla extract.
- Add dry ingredients: sprinkle in cocoa powder, keto sweetener, and shredded coconut.
- Incorporate chocolate chips (if using).
- Form the cookies: scoop portions onto a parchment-lined baking sheet.
- Chill in the fridge for at least 30 minutes to set.
- Enjoy! Store leftovers in an airtight container.
Notes
Feel free to customize with nut substitutes or additional flavors like cinnamon or chopped nuts.
Nutrition
- Serving Size: 1 cookie
- Calories: 120
- Sugar: 1g
- Sodium: 50mg
- Fat: 10g
- Saturated Fat: 8g
- Unsaturated Fat: 2g
- Trans Fat: 0g
- Carbohydrates: 2g
- Fiber: 1g
- Protein: 4g
- Cholesterol: 0mg
Keywords: no-bake, keto, cookies, low carb, dessert
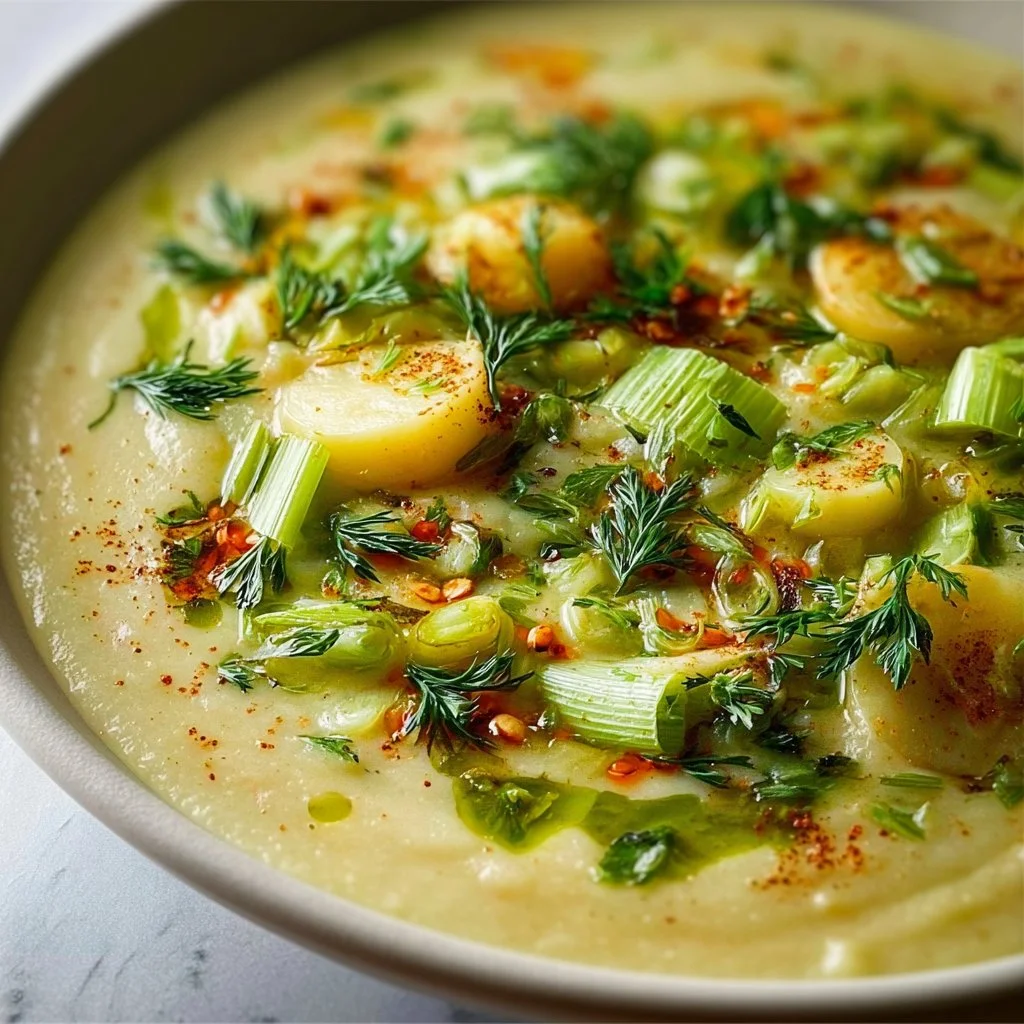
Roasted Celery and Potato Soup
Creamy Roasted Celery and Potato Soup: A Comforting Cozy Bowl
Hello, fellow food lovers! Today, I’m excited to share a recipe that is near and dear to my heart—Roasted Celery and Potato Soup. This warm, creamy soup is the perfect balance of comfort and elegance, promising to wrap you in a cozy hug with each spoonful. Plus, it’s easy enough for a weeknight dinner yet impressive enough to serve at a gathering.
Do you remember the first time you tasted a soup that made you feel instant warmth? For me, it was during a chilly fall evening where the leaves crunched underfoot, and my family gathered around the kitchen table. My grandmother would whip up her special celery soup—simple yet somehow magical, coaxing flavor out of the humblest ingredients.
This recipe revives those memories while adding a twist through roasting—bringing out the natural sweetness of the potatoes and celery. The smoky, charred edges create depth and dimension to the dish, making it not just comforting but incredibly delicious! Perfect for chilly days or when you crave a bowl filled with love.
Are you ready to cozy up in your kitchen and nourish your soul? Let’s dive into this delightful journey of flavors and aromas!
Personal Story
As a child, every autumn my grandmother would host a “Soup Day”—a magical day filled with the simmering scents of her famous soup recipes. There was always a pot bubbling away on the stove, and the kitchen was a hive of activity. Everyone had a role: my sister would chop vegetables, I would stir the pot, and my cousins were tasked with setting the table.
One year, she decided to introduce us to her roasted celery soup—a recipe reserved for family gatherings, no less! The smoky flavor of the roasted celery combined with the creamy potatoes felt groundbreaking. Something about the way she presented it, garnished with a sprinkle of fresh herbs and a drizzle of cream, made us feel like we were dining at a fancy restaurant right at home.
Every spoonful overflowed with nostalgia and warmth, and it wasn’t long before I started experimenting in my own kitchen, hoping to recapture that feeling. This Roasted Celery and Potato Soup is inspired by those cherished moments, sharing the love of cooking through a bowl of joy.
Ingredients
Here’s everything you’ll need to whip up this creamy bowl of goodness:
- 4 medium potatoes: These starchy beauties provide the foundation for your soup’s creamy texture. Feel free to swap with Yukon Gold or Russset potatoes for added creaminess.
- 4 celery stalks: The star of the show! Celery delivers that fresh, herby flavor. If you’re in a pinch, you can use frozen celery.
- 1 onion: A flavor builder that’s crucial! Yellow onions work wonders here, and shallots make a nice substitute for a milder flavor.
- 4 cups vegetable broth: This forms the soup’s base. You can opt for store-bought or homemade—either way, it packs in the flavor. If you’re making it vegan, make sure your broth is plant-based!
- 2 tablespoons olive oil: Adds richness and helps the veggies caramelize beautifully when roasted. You could also try avocado oil or melted coconut oil.
- Salt and pepper to taste: Always essential! Use freshly cracked pepper for a more vibrant kick.
- Optional: cream or milk for serving: This is about making it luxurious! Use heavy cream for a rich finish or a splash of almond milk for a lighter version.
Step-by-Step Instructions
-
Preheat your oven to 400°F (200°C).
- Preheating ensures that your veggies roast perfectly. This step creates that lovely caramelization that makes the flavors pop!
-
Prep your vegetables:
- Start by peeling and dicing your potatoes into even-sized cubes—about 1-inch chunks work well for even cooking.
- Chop your celery into 1-inch pieces and the onion into rough chunks. Remember, we’re going to blend it all later, so don’t stress too much about the size!
-
Toss with olive oil:
- Place your diced potatoes, celery, and onion onto a large baking sheet. Drizzle with 2 tablespoons of olive oil, and season generously with salt and pepper.
- Get in there with your hands! Toss everything together to ensure the veggies are evenly coated. This step is crucial for that roasted flavor.
-
Roast those veggies:
- Pop the baking sheet into the oven and roast for about 25 to 30 minutes. Stir halfway through to ensure even browning. You want those edges to be golden and slightly crisp—this adds wonderful texture!
-
Add vegetable broth:
- Once your veggies are beautifully roasted, transfer them to a large pot and pour in 4 cups of vegetable broth. Stir to combine.
-
Bring to a simmer:
- Turn the heat to medium-high, allowing the mixture to come to a gentle simmer. This will meld all the flavors together!
-
Blend until smooth:
- Remove from heat and let it cool for a few minutes. Using an immersion blender, blend the mixture until it’s creamy and smooth. If you don’t have an immersion blender, you can carefully transfer the soup in batches to a traditional blender. Just leave some room for steam to escape!
-
Adjust seasoning and creaminess:
- Taste and adjust seasoning. If you desire a creamier consistency, stir in a splash of cream or milk at this point. Let it warm through, and it’s ready to serve!
Serving Suggestions
Serving this soup is an art in itself! Ladle the steaming soup into rustic bowls, offering a swirl of cream or milk on top. A sprinkle of freshly chopped herbs like parsley or chives adds a pop of color and freshness. You could also serve it alongside some crusty bread or a simple green salad for a complete meal. Trust me, the presentation will dazzle your guests and make you feel like a culinary artist!
Recipe Variations
Feel free to let your creativity shine! Here are some fun twists on this comforting classic:
- Herb-Infused: Add a few sprigs of thyme or dill while roasting the vegetables for an added flavor boost!
- Spicy Kick: Stir in a teaspoon of red pepper flakes for a gentle heat that pairs beautifully with the soup’s creaminess.
- Cheesy Delight: After blending, stir in some grated cheese like cheddar or Gruyère for a deliciously cheesy version.
- Vegan Option: Swap the cream for coconut milk or a splash of nutritional yeast for a rich, dairy-free version.
- Roots and Greens: Mix in roasted carrots, parsnips, or even kale to pack in extra nutrients and flavors!
Chef’s Notes
Over time, this recipe has become my comforting go-to for chilly evenings or last-minute gatherings. The beauty of this soup is its adaptability—it can transform based on seasonal vegetables or whatever you have on hand! I vividly remember one time I mistakenly added too much salt—what a disaster! The lesson learned? Always taste as you go. It added a layer of absurdity to the evening and turned into a cherished family laugh.
You’ll find that this soup not only fills bellies but offers a sense of nostalgia that turns an ordinary dinner into something exquisite!
FAQs and Troubleshooting
1. My soup is too thick! What can I do?
- No worries! Simply add more vegetable broth or water gradually, stirring until you reach your desired consistency.
2. Can I make this soup ahead of time?
- Absolutely! It stores beautifully in the fridge for up to three days. Just reheat gently before serving!
3. I don’t have an immersion blender—can I still make this soup?
- Yes, you can use a regular blender! Just work in batches and ensure you let the soup cool slightly before blending to avoid splatters.
4. How can I store leftovers?
- Store any leftovers in an airtight container in the fridge. It also freezes well—just ensure it’s completely cooled before transferring to an airtight freezer-safe bag!
Nutritional Info
While this recipe is primarily about comfort and taste, it’s also packed with nutrients! A serving of this soup hits the mark with vitamins and minerals thanks to the potatoes and celery. It’s a great source of potassium, fiber, and vitamins C and K. Just keep an eye on added cream if you’re watching calorie intake!
And there you have it, folks! A heartwarming Roasted Celery and Potato Soup that’s ready to steal the show at your next meal. Gather your ingredients, bring your loved ones to the table, and let’s create some memories. Happy cooking, and remember, good food isn’t about showing off; it’s about showing up! Enjoy every delicious moment!
PrintCreamy Roasted Celery and Potato Soup

A warm, creamy soup blending roasted potatoes and celery for a comforting dish perfect for chilly days.
- Prep Time: 15 minutes
- Cook Time: 30 minutes
- Total Time: 45 minutes
- Yield: 4 servings 1x
- Category: Soup
- Method: Roasting
- Cuisine: American
- Diet: Vegetarian
Ingredients
- 4 medium potatoes, diced
- 4 celery stalks, chopped
- 1 onion, chopped
- 4 cups vegetable broth
- 2 tablespoons olive oil
- Salt and pepper to taste
- Optional: cream or milk for serving
Instructions
- Preheat your oven to 400°F (200°C).
- Prep your vegetables: Peel and dice the potatoes, chop celery and onion.
- Toss with olive oil: Place vegetables on a baking sheet, drizzle olive oil, and season with salt and pepper.
- Roast those veggies for about 25 to 30 minutes, stirring halfway through.
- Add vegetable broth: Transfer roasted veggies to a pot and pour in vegetable broth.
- Bring to a simmer on medium-high heat.
- Blend until smooth: Use an immersion blender to purée the mixture until creamy.
- Adjust seasoning and creaminess to your preference, reheating if necessary.
Notes
Serve with a drizzle of cream and fresh herbs for added flavor. This soup can be adapted with various herbs or spices to suit your taste.
Nutrition
- Serving Size: 1 serving
- Calories: 320
- Sugar: 4g
- Sodium: 450mg
- Fat: 10g
- Saturated Fat: 2g
- Unsaturated Fat: 8g
- Trans Fat: 0g
- Carbohydrates: 48g
- Fiber: 5g
- Protein: 8g
- Cholesterol: 5mg
Keywords: soup, roasted celery, potato, comfort food, vegetarian soup

Ooey Gooey Banana Bars
Ooey Gooey Banana Bars: A Sweet and Comforting Treat
Hey there, fellow foodies! If you’re anything like me, bananas seem to mysteriously multiply in your fruit bowl. One day, you have just a few perfectly ripe bananas, and the next day, they look at you with their sad, spotty faces, practically begging to be used in some delicious way! Well, don’t you worry—I’m here to help you turn those bananas into something ooey, gooey, and utterly irresistible.
Today, we’re diving into the world of Ooey Gooey Banana Bars! These delightful treats are like a hug in dessert form—sweet, comforting, and the perfect balance of chewy and soft. Not only are they easy to prepare, but they also fill your kitchen with an aroma that could lure anyone into the room. This recipe is the embodiment of cozy indulgence, and today, I’m excited to share it with you. Whether you’re looking for a snack for your afternoon coffee, a sweet treat to impress your friends, or a mouth-watering dessert for the family, you’re in the right place.
So, grab your apron and let’s get baking!
Personal Story
Ah, the banana bar! My first experience with these scrumptious little squares takes me back to my childhood kitchen. I must’ve been no older than ten when my grandmother decided to whip up a batch of her famous banana bars. I still remember the way her kitchen felt—a warm, familiar space filled with laughter and the rich essence of vanilla and sugar. She had a magic touch; no one could ever replicate her recipes quite like she did!
One rainy afternoon, we dove into the world of banana baking together. All I remember was the fun we had mashing those bananas, sneaking spoonfuls of batter, and her radiant smile as we pulled the bars from the oven. The gooey centers and the smell of warm caramelized sugar were simply divine. As we shared those bars with the family, I felt a profound connection—not only to food but to the joy of gathering together, sharing stories, and, of course, indulging in life’s sweet moments.
Now, let’s carry that spirit into your kitchen as we create your very own batch of Ooey Gooey Banana Bars!
Ingredients
Before we get started, let’s gather our ingredients. Here’s what you’ll need:
Ingredients List:
-
3 ripe bananas, mashed
- Ripe bananas are sweeter and break down more easily, making them perfect for this recipe. If you don’t have people who eat bananas when they’re ripe, just stick them in a paper bag for a day or two, or bake them for a few minutes until they’re soft!
-
1/2 cup unsalted butter, melted
- I prefer unsalted butter for its versatility, but if you only have salted, just skip adding any salt later! This butter will provide richness and moisture.
-
1 cup brown sugar
- Brown sugar gives the bars that lovely caramel flavor. You can use white sugar, but I highly recommend sticking with brown for that melt-in-your-mouth experience.
-
1 large egg
- The egg is your binder—helping everything come together into a cohesive, gooey treat! For a vegan option, try using a "flax egg" (1 tablespoon ground flaxseed mixed with 2.5 tablespoons water) as a substitute.
-
1 teaspoon vanilla extract
- Vanilla enhances all the other flavors—don’t skip it! If you want to get fancy, try using homemade vanilla extract or a splash of almond extract for a different twist.
-
1 cup all-purpose flour
- This is the base of our bars! If you’re looking for gluten-free alternatives, a 1:1 gluten-free flour blend can do the trick.
-
1 teaspoon baking soda
- This is our leavening agent. It helps the bars rise and become fluffy while granting a lovely texture.
-
1/2 teaspoon salt
- Just a pinch enhances all the sweetness!
-
1/2 cup peanut butter (for drizzling on top)
- This adds an incredible element of indulgence! If you’re not a fan of peanut butter, try drizzling melted chocolate or a caramel sauce instead.
Now that we have our ingredients, let’s get our hands a little messy!
Step-by-Step Instructions
-
Preheat the Oven:
Start by preheating your oven to 350°F (175°C). This step is essential because we want our banana bars to bake evenly and perfectly. And trust me, your anticipation will build as the kitchen fills with that sweet banana aroma! -
Prepare the Baking Dish:
Grab an 8×8 inch baking dish (or any similarly sized dish). Grease it lightly with some butter or line it with parchment paper for easy removal. Honestly, who wants to wrestle with stuck bars? -
Mash the Bananas:
In a large mixing bowl, mash those ripe bananas with a fork or potato masher. Aim for a consistency that’s mostly smooth, with a few chunks to enhance the texture. Fun fact: the more you mash them, the sweeter your bars will be! -
Mix in the Wet Ingredients:
Stir in the melted butter until combined. Next, mix in the brown sugar, followed by the egg and vanilla extract. Ensure everything is well combined—you want that delightful flavor to spread throughout the batter. -
Combine the Dry Ingredients:
In a separate bowl, whisk together the flour, baking soda, and salt. Then, gently fold the dry mixture into the wet mixture. Be careful not to overmix—you want the bars to remain soft and gooey, not tough! -
Pour and Spread:
Pour the batter into the prepared baking dish, spreading it out evenly with a spatula. Now, this is the moment where you can be a little extra! Drizzle the peanut butter over the top in a zigzag pattern. If the peanut butter is too thick to drizzle, warm it slightly in the microwave for easier pouring. -
Bake:
Place the dish in the preheated oven and bake for about 25-30 minutes. Keep an eye on them! The bars are done when the edges are golden and a toothpick inserted into the center comes out with a few moist crumbs. -
Cool and Cut:
Once baked, remove the bars from the oven and allow them to cool in the pan for about 10 minutes. Once they’re slightly cooled, use a sharp knife to cut them into squares. Trust me; the cool-down period is torture, but the excitement is worth it!
Each step brings us closer to banana heaven! Feel free to sing or dance a little while you wait—your kitchen deserves a soulful serenade!
Serving Suggestions
Ah, the moment of truth has arrived! When serving your Ooey Gooey Banana Bars, consider a simple yet effective presentation. You can either serve them warm with a scoop of vanilla ice cream on the side or dust them with powdered sugar for a touch of elegance. For another layer of flavor, drizzle a bit more warm peanut butter or chocolate sauce on top just before serving.
And don’t forget to plate them on your favorite serving platter to add a personal touch to your gathering. They’ll look beautiful and inviting!
Recipe Variations
Want to mix things up? Here are a few delightful variations to suit your taste:
- Nutty Appeal: Add 1/2 cup of chopped walnuts or pecans to the batter for an additional crunch.
- Chocolate Lovers: Fold in 1/2 cup of chocolate chips for a deliciously chocolatey twist!
- Tropical Banana Bars: Add shredded coconut and chopped pineapple for a tropical vibe!
- Oatmeal Swirl: Incorporate a 1/2 cup of rolled oats into the batter for wholesome goodness.
- Spicy Banana Bars: Enhance the flavor profile by adding a teaspoon of cinnamon or nutmeg to the dry ingredients for a warm spiciness.
Feel free to experiment and see what delightful combinations you can come up with!
Chef’s Notes
These Ooey Gooey Banana Bars have been a staple in my kitchen for years, and like all good recipes, they’ve evolved over time. I’ve swapped in different nut butters, played around with spices, and even topped them with fresh fruit. Each adaptation has led to some beautiful kitchen memories with friends and family.
And speaking of memories, I once made these for a potluck dinner, completely forgetting to add the egg! I was mortified, but thankfully, everyone loved them just the same, and the "oops!" turned into a great conversation starter! Embrace your imperfections; in the kitchen and in life, it’s those little moments that create the best stories.
FAQs and Troubleshooting
-
Why are my banana bars too dense?
- Overmixing the batter is often the culprit! Mix until just combined to keep them soft and gooey.
-
Can I use frozen bananas?
- Absolutely! Thaw the bananas and drain excess liquid before mashing them, and you’re good to go.
-
What’s the best way to store these bars?
- Store in an airtight container at room temperature for up to three days. For longer storage, you can refrigerate them for up to a week or freeze them individually wrapped for up to 3 months!
-
Can I make this recipe vegan?
- Yes! Substitute the egg for a flax egg or any egg replacement you prefer, and use a vegan butter alternative.
Nutritional Info (if applicable)
While I love indulging in these banana bars, it’s always helpful to know what you’re eating. The estimates below give you an idea of what each bar contains, but keep in mind the figures can vary based on your substitutes:
- Calories: Approximately 180
- Fat: 8g
- Carbohydrates: 26g
- Protein: 3g
- Fiber: 1g
There you have it! Your Ooey Gooey Banana Bars are ready to be enjoyed. Thank you for letting me share this delicious recipe with you. May your cooking adventures be filled with joy, laughter, and sweet memories! Happy baking, friend! 🍌✨
PrintOoey Gooey Banana Bars

These delightful banana bars are sweet, comforting, and the perfect balance of chewy and soft. Easy to make and irresistibly delicious!
- Prep Time: 10 minutes
- Cook Time: 30 minutes
- Total Time: 40 minutes
- Yield: 12 servings 1x
- Category: Dessert
- Method: Baking
- Cuisine: American
- Diet: Vegetarian
Ingredients
- 3 ripe bananas, mashed
- 1/2 cup unsalted butter, melted
- 1 cup brown sugar
- 1 large egg
- 1 teaspoon vanilla extract
- 1 cup all-purpose flour
- 1 teaspoon baking soda
- 1/2 teaspoon salt
- 1/2 cup peanut butter (for drizzling on top)
Instructions
- Preheat the oven to 350°F (175°C).
- Prepare an 8×8 inch baking dish by greasing it or lining it with parchment paper.
- Mash the bananas in a large mixing bowl until mostly smooth.
- Mix in the melted butter, followed by the brown sugar, egg, and vanilla extract.
- Combine the flour, baking soda, and salt in a separate bowl and then fold into the wet ingredients.
- Pour the batter into the prepared baking dish and drizzle with peanut butter.
- Bake for 25-30 minutes until the edges are golden.
- Cool for 10 minutes before cutting into squares.
Notes
For a vegan option, substitute the egg with a flax egg and use plant-based butter. Enjoy warm with ice cream or powdered sugar!
Nutrition
- Serving Size: 1 bar
- Calories: 180
- Sugar: 15g
- Sodium: 200mg
- Fat: 8g
- Saturated Fat: 3g
- Unsaturated Fat: 5g
- Trans Fat: 0g
- Carbohydrates: 26g
- Fiber: 1g
- Protein: 3g
- Cholesterol: 20mg
Keywords: banana bars, dessert, sweet treats, baking, comfort food

Whipped Chocolate Protein Fluff
Whipped Chocolate Protein Fluff: A Light and Luxurious Treat
Hello foodies! Today, I’m thrilled to share with you an incredibly fun and delightful recipe that’s not only a treat for your taste buds but also packed with protein: Whipped Chocolate Protein Fluff! If you’re looking for a guilt-free dessert or a post-workout snack that feels like a celebration, you’ve come to the right place.
I promise you, this fluffy concoction will make your heart sing and your taste buds dance. So, tie on your apron, grab your mixing bowl, and let’s get whipping!
A Sweet Memory
Before we dive into the recipe, let me share a little story that brings this dish to life for me. I remember one summer evening, gathering with friends after a long, fun day outside. We had just returned from a playful hike—tired and a bit sun-kissed. One of my friends, a fitness enthusiast, whipped up a chocolatey dessert that left us all in awe. It was light, airy, and tastefully satisfying without weighing us down.
The way it transformed our energy levels was magical. We slathered it over fresh fruit, inhaled it straight from the bowl, and even challenged each other to create our own versions. That night not only satisfied my sweet tooth but also sparked my love for experimenting with protein-packed desserts. Fast forward a few years, and here we are, creating my version of that enchanting dish.
Ingredients
Ready to whip up some magic? Here’s what you’ll need:
-
1 cup unsweetened almond milk: A great dairy-free alternative that adds a nutty flavor without overpowering the chocolate. If you’re not a fan of almonds, unsweetened coconut or oat milk works wonders too!
-
1 scoop chocolate protein powder: This is where the cozy, chocolaty goodness comes from! You can use your favorite brand—just be sure it’s a flavor you love. If you’re looking for a plant-based option, look for a pea or brown rice protein.
-
1 tablespoon cocoa powder: This adds another layer of richness to your fluff, intensifying that chocolate flavor. If you’re feeling adventurous, try using dark cocoa powder for a deeper taste.
-
1 tablespoon sweetener of choice: Maple syrup, agave, or stevia; the choice is yours! Adjust the sweetness to your liking, keeping in mind that your protein powder might already have some sweeteners.
-
1 teaspoon vanilla extract: This little ingredient adds a warm, aromatic quality that enhances the overall taste. Trust me, even a splash of vanilla makes everything better!
-
1 cup whipped coconut cream or whipped aquafaba: This is what gives the fluff its dreamy consistency. Whipped coconut cream is luscious, while aquafaba is a fantastic vegan option made from chickpea brine—light and fluffy without any coconut flavor!
Step-by-Step Instructions
Now that we’ve gathered our ingredients, let’s get to the fun part—whipping it all together!
-
Prepare Your Whipped Base: If using coconut cream, refrigerate a can of coconut milk overnight. When you’re ready to whip, scoop out the solidified cream into a mixing bowl, discarding the liquid. For aquafaba, pour the chickpea brine into a bowl and whip it until soft peaks form.
Chef’s Tip: To help your whipped cream or aquafaba form soft peaks more easily, make sure your mixing bowl and beaters are cold.
-
Mixing the Chocolate Base: In a separate bowl, combine 1 cup of unsweetened almond milk, 1 scoop of chocolate protein powder, 1 tablespoon of cocoa powder, and 1 tablespoon of your chosen sweetener. Whisk these ingredients together until they’re smooth and well-combined.
Chef’s Hack: If your protein powder clumps together, try sifting it into the bowl to avoid any lumps down the line. Also, you can use a hand mixer for an easier incorporation!
-
Combining the Mixtures: Gently fold the chocolate base into the whipped coconut cream or aquafaba. Use a rubber spatula and take your time to incorporate the ingredients without deflating the fluffiness of the whipped base.
Pro Insight: Be gentle during this step! The goal is to preserve as much air as possible to keep that light and airy texture.
-
Add Vanilla: After the mixtures are combined to your liking, add in the teaspoon of vanilla extract. Fold it gently through the fluff so that it’s evenly distributed.
-
Taste Test: Before serving, take a small taste test. This is where you can adjust sweetness levels if needed! Just remember, the flavors will intensify a bit after chilling.
Chef’s Note: If you find it’s a bit too rich, you can always add a splash more almond milk to lighten it up further.
-
Chill It: Transfer your whipped chocolate protein fluff into a serving bowl or individual dessert cups. Chill it in the fridge for at least 30 minutes to help it firm up a little, making it even more delectable!
Final Touch: While it’s chilling, clean up your kitchen—this will help you unwind and get excited for the final product!
Serving Suggestions
When you’re ready to serve, scoop generous dollops of the whipped chocolate protein fluff into cute dessert cups or bowls. Top it off with a sprinkle of shaved chocolate, crushed nuts, fresh berries, or a drizzle of your favorite syrup for a beautiful presentation that promises to impress.
Remember, our goal here is casual elegance—food that feels special yet approachable!
Recipe Variations
Looking to switch things up? Here are a few fun variations you can try out:
-
Mint Chocolate Protein Fluff: Add a drop of peppermint extract to the mix for a refreshing minty twist!
-
Mocha Delight: Mix in a shot of espresso for that caffeinated kick, turning your fluff into a mocha dream.
-
Peanut Butter Swirl: For those who love peanut butter, fold in a couple of tablespoons into the finished fluff for a nutty taste explosion.
-
Fruit Flavors: Blend in some strawberry or raspberry puree for a fruity take on your fluff—it will be delicious!
-
Chocoholic’s Dream: For the ultimate chocolate experience, fold in mini chocolate chips for added texture.
Chef’s Notes
Honestly, this Whipped Chocolate Protein Fluff has come a long way since my first attempt. I didn’t realize how simple it could be to get such a delightful dessert on the table! It’s become a staple in my household and has seen many variations inspired by seasonal ingredients or cravings.
One time, in a moment of kitchen chaos, I accidentally used sweetened coconut cream instead of the unsweetened version. Let’s just say it turned out extra sweet, but sometimes it’s those messy moments that lead to the tastiest surprises!
FAQs and Troubleshooting
-
Can I use dairy milk instead of almond milk?
Absolutely! Feel free to swap it out with any milk you enjoy. Just keep in mind that it may slightly alter the flavor. -
What if my whipped coconut cream isn’t thickening?
Make sure you’re using chilled coconut cream. If it’s too runny, you can try beating it more vigorously, or even refrigerate it again for a bit. -
How long does the fluff last in the fridge?
It should stay good for about 3-4 days, covered. Just re-whip a bit before serving if it separates. -
Can I make this fluff without a mixer?
Yes! You can absolutely use a whisk and some elbow grease. It will take longer, but it’s definitely doable.
Nutritional Info
While I won’t go into specific numbers here, I can assure you that this fluffy indulgence packs a protein punch, keeping you satisfied without the guilt.
So there you have it! A light and delightful dessert that’s fun to make, easy to customize, and absolutely delicious! I can’t wait to hear how yours turns out. Enjoy whipping up this Whipped Chocolate Protein Fluff, and remember, food is all about sharing joy—so gather those around your table and indulge in the goodness together! Happy cooking! ✨
PrintWhipped Chocolate Protein Fluff

A light and luxurious protein-packed dessert that feels like a celebration with every delightful spoonful.
- Prep Time: 10 minutes
- Cook Time: 0 minutes
- Total Time: 40 minutes
- Yield: 4 servings 1x
- Category: Dessert
- Method: Whipping
- Cuisine: American
- Diet: Vegetarian
Ingredients
- 1 cup unsweetened almond milk
- 1 scoop chocolate protein powder
- 1 tablespoon cocoa powder
- 1 tablespoon sweetener of choice
- 1 teaspoon vanilla extract
- 1 cup whipped coconut cream or whipped aquafaba
Instructions
- Prepare your whipped base: If using coconut cream, refrigerate a can of coconut milk overnight. When you’re ready to whip, scoop out the solidified cream into a mixing bowl, discarding the liquid. For aquafaba, pour the chickpea brine into a bowl and whip it until soft peaks form.
- Mixing the chocolate base: In a separate bowl, combine 1 cup of unsweetened almond milk, 1 scoop of chocolate protein powder, 1 tablespoon of cocoa powder, and 1 tablespoon of your chosen sweetener. Whisk these ingredients together until they’re smooth and well-combined.
- Combining the mixtures: Gently fold the chocolate base into the whipped coconut cream or aquafaba. Use a rubber spatula and take your time to incorporate the ingredients without deflating the fluffiness of the whipped base.
- Add vanilla: After the mixtures are combined to your liking, add in the teaspoon of vanilla extract. Fold it gently through the fluff so that it’s evenly distributed.
- Taste test: Before serving, take a small taste test. Adjust sweetness levels if needed, keeping in mind that flavors will intensify after chilling.
- Chill it: Transfer your whipped chocolate protein fluff into a serving bowl or individual dessert cups. Chill it in the fridge for at least 30 minutes to help it firm up a little.
Notes
Serve with toppings like shaved chocolate, crushed nuts, or fresh berries for an elegant finish.
Nutrition
- Serving Size: 1 serving
- Calories: 200
- Sugar: 6g
- Sodium: 100mg
- Fat: 9g
- Saturated Fat: 8g
- Unsaturated Fat: 1g
- Trans Fat: 0g
- Carbohydrates: 25g
- Fiber: 2g
- Protein: 10g
- Cholesterol: 0mg
Keywords: whipped dessert, protein fluff, chocolate dessert, healthy dessert, guilt-free treat
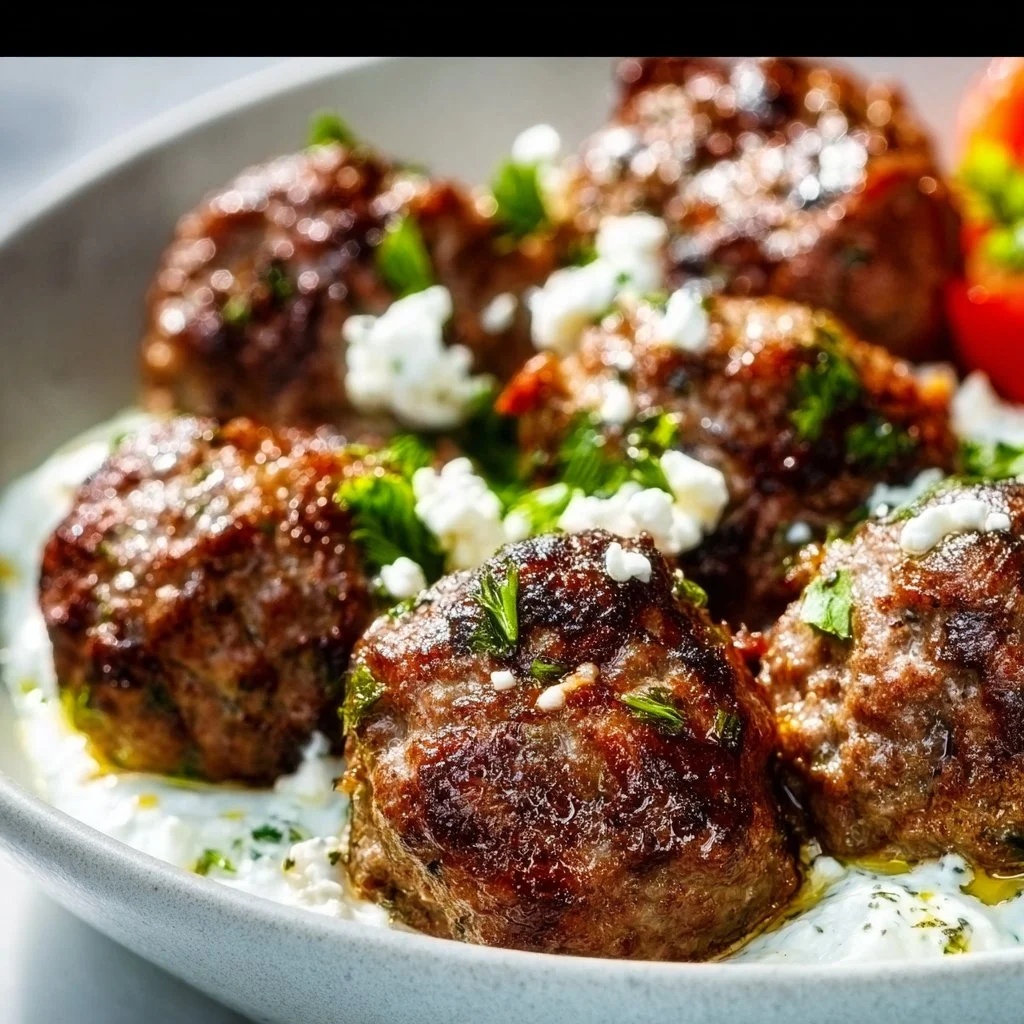
Keto Greek Meatballs (Keftedes)
# Keto Greek Meatballs (Keftedes): A Flavorful Journey to the Mediterranean

Welcome, food lovers! Today, let’s take a delightful trip to Greece right from your kitchen with a keto-friendly twist on a timeless classic — Greek meatballs, or Keftedes. Whether you’re on a low-carb journey or simply want to infuse your meals with refreshing Mediterranean flavors, I’m here to share a recipe that’s adaptable, tasty, and an absolute crowd-pleaser. So, tie on that apron, pour yourself a glass of something bubbly, and let’s dive into the deliciousness!

## A Nostalgic Taste of Greece

Ah, the memories that food brings! I often find myself reminiscing about a memorable evening spent at my aunt’s house, nestled in the heart of the city. The aroma of her Keftedes wafted through the air, mingling with laughter, clinking glasses, and the chatter of family catching up over dinner. Those meatballs, golden brown and succulent, were served alongside tzatziki sauce and fresh Greek salad. Each bite was a balance of spices and herbs, reminding me of summer evenings in Greece, even though I was miles away.

As the evening unfolded, we gathered around the table, with plates loaded with Keftedes, fresh pita, and an abundance of stories shared. It was more than a meal; it was a celebration of love, culture, and togetherness. That’s the magic of these meatballs — they represent warmth and hospitality that goes beyond just food. And today, I’m thrilled to share this keto version of Keftedes that captures that spirit while keeping you in line with your low-carb goals!

## Ingredients

Let’s gather up our ingredients! Here’s what you’ll need for these delicious Keto Greek Meatballs:

- **1 lb Ground Beef or Lamb**: Either works wonders, but lamb adds a unique richness. Feel free to use a blend for a more complex flavor!

- **1/4 cup Almond Flour**: This gluten-free option keeps the meatballs tender while absorbing flavor. Don’t have almond flour? You can substitute with crushed pork rinds for an extra crunch.

- **1/4 cup Grated Parmesan Cheese**: It adds a salty, nutty flavor. If you’re avoiding dairy, nutritional yeast is a fantastic alternative that still brings a cheesy essence.

- **1/4 cup Chopped Fresh Parsley**: Fresh herbs brighten up the dish. You can swap this out for dill or mint if you're feeling adventurous!

- **2 Cloves Garlic, Minced**: Garlic is a must; it adds depth. You can use garlic powder in a pinch, but fresh is always best for that aromatic hit.

- **1 tsp Dried Oregano**: A staple herb in Greek cooking that brings that Mediterranean flair. Try using fresh if you can find it!

- **1 tsp Dried Mint**: This might be unexpected, but mint balances the richness of the meat beautifully. No fresh mint? Just skip this if you don’t have it on hand.

- **1 Egg**: The binding agent! You can replace it with a flax egg (1 tbsp ground flaxseed + 2.5 tbsp water) for a vegan option.

- **Salt and Pepper to Taste**: Seasoning is crucial, so don’t skimp on it!

- **Olive Oil for Frying**: A sleek coating that helps brown the meatballs beautifully. If you’re in a hurry, feel free to bake them instead.

## Step-by-Step Instructions

Alright, let’s roll up those sleeves and get cooking! Here’s how to make these delectable Keftedes:

1. **Prep Your Ingredients**: Gather all your ingredients and give that parsley a good chop. This is where the magic begins, so take your time to enjoy the smells and textures!

2. **Mix the Meatball Mixture**: In a large mixing bowl, combine the ground meat, almond flour, Parmesan cheese, parsley, minced garlic, oregano, mint, and the egg. Add a generous sprinkle of salt and pepper. Get in there with your hands! Mix until just combined. Be gentle; overmixing can lead to dense meatballs.

3. **Shape the Meatballs**: Now comes the fun part! Using your hands, shape the mixture into small balls — about 1 inch in diameter. You can also make them larger if you prefer heartier bites. Place them on a baking sheet lined with parchment paper while you’re shaping.

4. **Heat the Oil**: In a large skillet over medium heat, add enough olive oil to coat the bottom. Let it heat up for a couple of minutes. You know it’s ready when you can see it shimmer!

5. **Fry the Meatballs**: Carefully place the meatballs in the skillet, leaving some space in between to avoid steaming. Cook for about 4-5 minutes on each side, or until they are beautifully browned and cooked through. You might want to do this in batches to avoid crowding the pan — it’ll ensure that nice, caramelized crust we’re after.

6. **Rest Before Serving**: Once they’re cooked, transfer the meatballs to a plate lined with paper towels to absorb any excess oil. Let them rest for a minute; it makes a world of difference in juiciness!

7. **Serve and Enjoy**: These meatballs can be enjoyed immediately or saved for later. They’re great on their own, in a salad, or served with your favorite low-carb dipping sauce like tzatziki or marinara!

## Serving Suggestions

When it comes to serving these Keto Greek Meatballs, presentation can elevate even the simplest meal. Here are my suggestions:

- **Plate them simply**: Arrange the meatballs on a festive platter, garnished with additional parsley or perhaps some lemon wedges for a zesty touch.
- **Dip into Tzatziki**: Serve with a side of rich, creamy tzatziki sauce. The coolness of the yogurt and cucumber pairs wonderfully with the warm flavors of the meatballs.
- **Add a Greek Salad**: Pair with a refreshing Greek salad filled with crisp cucumbers, ripe tomatoes, olives, and feta for a complete Mediterranean feast!

## Recipe Variations

Feel like getting creative? Here are some delicious twists on our Keto Keftedes:

- **Spicy Kick**: Add a pinch of red pepper flakes to the meat mixture for a fiery kick that’ll heat up your dinner!
- **Herb-Infused Delight**: Swap out the parsley for fresh basil for an Italian touch, creating a fusion of flavors.
- **Cheesy Goodness**: Stuff a little mozzarella cheese in the center of each meatball for a melty surprise when you bite in!
- **Vegetarian Option**: Use chickpea flour instead of almond flour and finely chop your favorite veggies to create a plant-based version that's still flavorful and satisfying.
- **BBQ Glaze**: After frying, toss the meatballs in your favorite low-carb barbecue sauce for a smoky, sweet glaze.

## Chef’s Notes

As I reflect on my journey with Keftedes, I remember the first time I made them. I was in my tiny apartment, with an awkward kitchen setup, and a desire to recreate my aunt's famous dish. After a few mishaps — one involving a rather unfortunate explosion of spices — I finally nailed it. Over the years, I’ve adapted the recipe to fit my lifestyle, and I love how easily it can be tailored to suit different palates and dietary needs. Cooking is a learning experience, after all!

If you’ve tinkered with this recipe, I’d love to hear your  kitchen stories and any tweaks you’ve made along the way. Food is meant to be shared, and I truly believe that every dish is an opportunity to make it your own!

## FAQs and Troubleshooting

**Q1: My meatballs fell apart while cooking. What went wrong?**
A: It's essential to mix until just combined and not overwork the meat mixture. The egg and almond flour are your binders, so make sure you’re using the right amounts!

**Q2: Can I bake these instead?**
A: Absolutely! Preheat your oven to 375°F (190°C), place the shaped meatballs on a baking sheet, and bake for about 20-25 minutes, flipping halfway through for even cooking.

**Q3: How do I store leftovers?**
A: Keep any leftovers in an airtight container in the fridge for up to 3-4 days. They also freeze really well, so feel free to portion them out and store them for quick meals later!

**Q4: Can I use ground turkey instead?**
A: Yes! Just keep in mind that turkey tends to be leaner, so you may need to adjust the amount of oil used when frying for optimal flavor.

## Nutritional Info (Per Serving)

- Calories: 250
- Protein: 20g
- Fat: 18g
- Carbohydrates: 4g (Net Carbs: 2g)

*Note: Nutritional values can vary based on specific ingredients used and cooking methods.*

---

As we wrap up this cooking adventure, I hope you’re feeling inspired and ready to bring the flavors of Greece to your table. Let these Keto Greek Meatballs serve as a reminder that cooking doesn’t have to be complicated to be enjoyable. Here’s to delicious meals that spark joy, foster connections, and create enduring memories. Happy cooking!
Keto Greek Meatballs (Keftedes)

Delicious keto-friendly Greek meatballs that are perfect for a low-carb diet, infused with Mediterranean flavors.
- Prep Time: 15 minutes
- Cook Time: 30 minutes
- Total Time: 45 minutes
- Yield: 4 servings 1x
- Category: Main Course
- Method: Frying
- Cuisine: Greek
- Diet: Keto
Ingredients
- 1 lb Ground Beef or Lamb
- 1/4 cup Almond Flour
- 1/4 cup Grated Parmesan Cheese
- 1/4 cup Chopped Fresh Parsley
- 2 Cloves Garlic, Minced
- 1 tsp Dried Oregano
- 1 tsp Dried Mint
- 1 Egg
- Salt and Pepper to Taste
- Olive Oil for Frying
Instructions
- Prep Your Ingredients: Gather all your ingredients and give that parsley a good chop.
- Mix the Meatball Mixture: In a large mixing bowl, combine the ground meat, almond flour, Parmesan cheese, parsley, minced garlic, oregano, mint, and the egg. Add salt and pepper and mix until just combined.
- Shape the Meatballs: Using your hands, shape the mixture into small balls — about 1 inch in diameter.
- Heat the Oil: In a large skillet over medium heat, add enough olive oil to coat the bottom. Let it heat up for a couple of minutes.
- Fry the Meatballs: Carefully place the meatballs in the skillet. Cook for about 4-5 minutes on each side, or until browned and cooked through.
- Rest Before Serving: Once cooked, transfer the meatballs to a plate lined with paper towels and let them rest for a minute.
- Serve and Enjoy: Enjoy immediately, or save for later, great on their own or with your favorite sauces!
Notes
For a vegan option, replace the egg with a flax egg. Adjust the seasoning to taste and try different herbs for variety.
Nutrition
- Serving Size: 1 serving
- Calories: 250
- Sugar: 1g
- Sodium: 350mg
- Fat: 18g
- Saturated Fat: 6g
- Unsaturated Fat: 8g
- Trans Fat: 0g
- Carbohydrates: 4g
- Fiber: 2g
- Protein: 20g
- Cholesterol: 90mg
Keywords: keto meatballs, Greek meatballs, Keftedes, low-carb, Mediterranean

Yogurt Chocolate Chip Cookies
Yogurt Chocolate Chip Cookies: A Delightful Twist on a Classic Treat
Welcome, my lovely food enthusiasts! Today, I’m thrilled to share with you a recipe that combines two of my favorite things: the gooey sweetness of chocolate chip cookies with the lightness of Greek yogurt. Yes, you heard that right—Yogurt Chocolate Chip Cookies are about to become your new baking obsession!
Imagine biting into a cookie that’s both chewy and soft, bursting with pockets of melty chocolate goodness, all while being just a tad healthier thanks to the addition of Greek yogurt. It’s a simple twist that keeps the cookies light without sacrificing that comforting, nostalgic flavor we all know and love.
I still remember the first time I stumbled upon this delightful combination. It was during one of those lazy Sunday afternoons; the sun was shining through my kitchen window, and the scent of baking cookies filled the air like a warm hug. As I mixed Greek yogurt into the dough, I was a little hesitant. “Could yogurt really replace some of the butter?” I pondered. But the moment I pulled those golden-brown beauties from the oven, I was convinced—I had created something marvelous!
Baking cookies is like a warm embrace from the inside out. There’s something incredibly nurturing about measuring out ingredients, mixing them together, and watching them transform into delicious bites of joy. And let’s be honest, who doesn’t need an excuse to indulge in a little cookie-making therapy? Whether you’re baking these for yourself, your family, or a gathering of friends, I assure you—they’re going to become a cherished part of your kitchen repertoire. So tie on your apron, pour a cup of coffee (or tea—it’s your call!), and let’s get baking some scrumptious Yogurt Chocolate Chip Cookies!
Personal Story
A few years back, I was hosting a cozy evening in with some close friends. It was one of those rainy nights where the sound of raindrops outside created the perfect backdrop for laughter and good food. As I flipped through a bunch of old family recipes, dusted off from a long-forgotten recipe box, I came across my grandmother’s famous chocolate chip cookie recipe. The recipe made renowned cookies that my family would gobble up in minutes!
As I began mixing the ingredients, I found myself reminiscing about the holidays spent huddled in her warm kitchen, her apron dusted with flour as she turned out batch after batch of cookies. Inspired by these fond memories, I decided to put a spin on her classic recipe by incorporating Greek yogurt to give it a unique twist. My friends loved the resulting cookies! They were lighter but still chewy and oh-so-delicious. It was a beautiful reminder of how recipes can bring back memories and spark joy, merging the past with the present.
Ingredients
Here’s what you’ll need to whip up these delectable Yogurt Chocolate Chip Cookies:
-
1 cup Greek yogurt
Full-fat or low-fat works well! You can even use plant-based yogurt if you’re going dairy-free. The yogurt adds moisture, helping keep the cookies soft and chewy. -
1/2 cup unsalted butter, softened
Using unsalted butter gives you better control over the saltiness of your cookies. If you’re short on butter, you could substitute it with coconut oil or even a nut butter for a different flavor profile. -
3/4 cup brown sugar
Brown sugar adds a rich, molasses-like flavor and contributes to that chewy texture we all crave in cookies. Use light or dark brown sugar based on your taste preference! -
1/4 cup granulated sugar
This gives a slight crispness on the outside while keeping the inside moist. You could swap this for coconut sugar if you’re looking for a more natural option. -
1 teaspoon vanilla extract
Because who can resist that warm, inviting vanilla flavor? Feel free to experiment with almond extract for a different twist! -
2 cups all-purpose flour
You can use whole wheat flour for a healthier option, or gluten-free flour if you need to accommodate gluten intolerance. -
1 teaspoon baking soda
This is your leavening agent; it helps the cookies spread and rise. Make sure it’s fresh for the best results! -
1/2 teaspoon salt
Just a pinch to bring out all the flavors. You can use sea salt for a touch more depth or skip it altogether if you’re watching your sodium intake. -
1 cup chocolate chips
Semi-sweet chocolate chips are a classic, but feel free to get creative! Dark chocolate or even white chocolate chips can add a lovely twist.
Step-by-Step Instructions
Let’s roll up those sleeves and get to baking! Here’s how to make these wonderful Yogurt Chocolate Chip Cookies in just a few simple steps:
Step 1: Preheat Your Oven
Start by preheating your oven to 350°F (175°C). This is critical because you want your dough to hit that perfect temperature for leveling up your cookies!
Step 2: Cream Butter and Sugars
In a large mixing bowl, combine your softened unsalted butter, brown sugar, and granulated sugar. Using a hand mixer or a wooden spoon, cream them together until it’s light and fluffy. This step is crucial for incorporating air into the dough, which helps keep your cookies chewy. Tip: If your butter is cold, give it a quick zap in the microwave for about 10 seconds to soften.
Step 3: Add Yogurt and Vanilla
Next, add in the Greek yogurt and vanilla extract. Mix until fully combined. The yogurt might make it look a bit curdled at first, but don’t fret! It will come together beautifully as you continue mixing.
Step 4: Combine the Dry Ingredients
In a separate bowl, whisk together the all-purpose flour, baking soda, and salt. This ensures all dry ingredients are evenly distributed, letting your cookies rise perfectly. Once mixed, gradually add this to the yogurt mixture. If you want to avoid flour all over your kitchen, add it in phases, mixing gently until just combined.
Step 5: Fold in the Chocolate Chips
Now for the best part! Gently fold in the chocolate chips using a spatula or spoon. This is where the magic happens—chocolatey goodness everywhere! This is your dough, so make sure to taste it for seasoning; it’s a baker’s privilege!
Step 6: Scoop and Bake
Using a cookie scoop or tablespoon, drop heaping amounts of dough onto a parchment-lined baking sheet, leaving about 2 inches between each cookie. Bake in your preheated oven for 10–12 minutes until the edges are golden brown and the centers are set. Chef’s Hack: For extra fluffiness, chill the dough for 20-30 minutes before baking.
Step 7: Cool
Once baked, remove them from the oven and allow the cookies to cool on the baking sheet for 5 minutes. This will help them firm up a little before transferring them to a wire rack to cool completely. The smell wafting through your kitchen will be heavenly—don’t be surprised if you get a few visitors!
Serving Suggestions
For a delightful presentation, plate your Yogurt Chocolate Chip Cookies on a lovely serving platter. Consider stacking them in a whimsical manner, perhaps even putting some fresh berries or a scoop of vanilla ice cream on the side. Nothing says “I love you” quite like a warm cookie alongside a scoop of ice cream!
Recipe Variations
Feeling creative? Here are a few twists to make this recipe your own:
- Nutty Delight: Add a cup of chopped nuts like walnuts or pecans for a delightful crunch.
- Coconut Crunch: Sprinkle in some shredded coconut for a tropical vibe.
- Spiced Fall: Add a teaspoon of cinnamon or pumpkin spice for a cozy autumn flavor.
- Double Chocolate: Exchange half of the flour for cocoa powder for a rich chocolate cookie.
- Dairy-Free: Swap the Greek yogurt and butter for plant-based alternatives to accommodate vegan diets.
Chef’s Notes
This recipe has evolved over time, and let me tell you—it was born out of experimentation and a bit of necessity! The first batch I whipped up was a tad too sweet, and the texture was not quite right. After playing with the ratios and adding Greek yogurt, I hit the jackpot. The added moisture from the yogurt not only made the cookies softer but gave them a subtle tang that complemented the sweetness beautifully. Make these cookies and share them; they’re sure to become a new family favorite in no time!
FAQs and Troubleshooting
1. Why are my cookies flat?
If your cookies come out flat, it could be that your butter was too warm or that you didn’t use enough flour. Always measure your flour accurately, and ensure your butter is softened but not melted.
2. Can I freeze the dough?
Absolutely! You can freeze the cookie dough balls and bake them fresh whenever the craving strikes. Just thaw for a bit before popping them in the oven.
3. How do I store my cookies?
Store your cooled cookies in an airtight container at room temperature for up to a week. If you want them to last longer, consider freezing them between layers of parchment paper.
4. Can I use a different type of yogurt?
Yes, feel free to use plain yogurt or even flavored varieties. Just remember that it can alter the taste slightly, so choose wisely based on the flavor you want to achieve.
Nutritional Info (Optional)
While I usually focus more on the joy of cooking rather than the nitty-gritty of nutritional facts, here’s a rough estimate per cookie (based on making 24 cookies):
- Calories: 120
- Fat: 6g
- Carbs: 16g
- Protein: 2g
Now that you have your Yogurt Chocolate Chip Cookies recipe, I encourage you to roll up your sleeves and get baking! Share the love and joyful moments these cookies bring, and remember, it’s all about creating those beautiful moments around your table. Happy baking! 🍪✨
PrintYogurt Chocolate Chip Cookies

Delightful cookies combining the gooey sweetness of chocolate chips with the lightness of Greek yogurt.
- Prep Time: 15 minutes
- Cook Time: 12 minutes
- Total Time: 27 minutes
- Yield: 24 cookies 1x
- Category: Dessert
- Method: Baking
- Cuisine: American
- Diet: Vegetarian
Ingredients
- 1 cup Greek yogurt
- 1/2 cup unsalted butter, softened
- 3/4 cup brown sugar
- 1/4 cup granulated sugar
- 1 teaspoon vanilla extract
- 2 cups all-purpose flour
- 1 teaspoon baking soda
- 1/2 teaspoon salt
- 1 cup chocolate chips
Instructions
- Preheat your oven to 350°F (175°C).
- Cream together the softened unsalted butter, brown sugar, and granulated sugar until light and fluffy.
- Add in the Greek yogurt and vanilla extract, mixing until fully combined.
- Combine the all-purpose flour, baking soda, and salt in a separate bowl, then gradually add this to the yogurt mixture.
- Fold in the chocolate chips gently using a spatula or spoon.
- Scoop heaping amounts of dough onto a parchment-lined baking sheet, leaving about 2 inches between each cookie.
- Bake for 10–12 minutes until edges are golden brown and centers are set.
- Cool on the baking sheet for 5 minutes before transferring to a wire rack to cool completely.
Notes
For extra fluffiness, chill the dough for 20-30 minutes before baking. You can freeze the dough balls for a fresh bake later.
Nutrition
- Serving Size: 1 cookie
- Calories: 120
- Sugar: 8g
- Sodium: 50mg
- Fat: 6g
- Saturated Fat: 4g
- Unsaturated Fat: 2g
- Trans Fat: 0g
- Carbohydrates: 16g
- Fiber: 0g
- Protein: 2g
- Cholesterol: 20mg
Keywords: cookies, chocolate chip, yogurt, dessert, baking

Keto Cinnamon Rolls
Keto Cinnamon Rolls: A Sweet Indulgence Without the Guilt
Hello, fellow food lovers! Today, I’m excited to share a recipe that takes your brunch game to a whole new level: Keto Cinnamon Rolls! Whether you’re on a keto journey or just looking for a deliciously low-carb treat, these rolls are sure to bring a smile to your face and a warm, cozy feeling to your kitchen.
Imagine pulling fresh, warm cinnamon rolls out of the oven, the sweet aroma wrapping around you like a soft hug. This recipe is not just any ordinary cinnamon roll; it’s a delightful blend of nutty almond flour and creamy butter, fused with the warm flavors of cinnamon and vanilla. And let’s not forget the sumptuous cream cheese icing that takes it over the top!
The beauty of these Keto Cinnamon Rolls lies in their balance. You get all the indulgent flavors without the carbs weighing you down. Fluffy, gooey, and oh-so-satisfying, this recipe embraces a healthier lifestyle while keeping your taste buds happy. So, take a deep breath, don your apron, and let’s dive into the world of cinnamon-infused goodness that beckons you from the oven!
Personal Story
Every time I make cinnamon rolls, I’m transported back to my grandmother’s kitchen. I remember those weekend mornings filled with laughter and the scent of freshly baked pastries wafting through the air. My grandma would roll out her dough with such precision, her hands dusted with flour, and the warm, buttery goodness would melt in our mouths as we devoured them—just a bite of sugary bliss.
Now that I’m all grown up, I wanted to recreate those nostalgic moments but with a fabulous twist to fit my lifestyle. That’s when these Keto Cinnamon Rolls came into the picture. With the same flavors that I loved as a kid, but crafted into a healthier version, these rolls have become a family favorite in my own home.
You see, baking has always been about more than just food for me; it’s about memories, connection, and the love we share over a meal. These rolls are a bridge connecting my cherished childhood moments and my contemporary culinary approach. So, let’s embrace this journey together and fill our homes with the warmth of baked cinnamon rolls!
Ingredients
Here’s what you’ll need to make these delicious Keto Cinnamon Rolls:
-
2 cups almond flour
This gluten-free flour gives the rolls a lovely nutty flavor and a moist texture. If you need a substitute, you can use sunflower seed flour, but you might need to adjust the moisture levels. -
1/4 cup coconut flour
Coconut flour adds a touch of sweetness and a little density to the dough. It’s highly absorbent, so be careful not to add too much liquid if you choose to substitute it. -
1/4 cup erythritol
This sugar alternative provides the sweetness without the added carbs. If you’re looking for a different sweetener, feel free to experiment with monk fruit or stevia, though the measurements may vary. -
1 tablespoon baking powder
This is essential for leavening your rolls, keeping them fluffy and light. -
1/2 teaspoon salt
Just a pinch of salt elevates the sweetness and balances the flavors beautifully. -
1/2 cup melted butter
Creamy and rich, the melted butter enriches the dough and brings it all together. Substitute with coconut oil for a dairy-free option, but the flavor may slightly differ. -
2 large eggs
Eggs are vital for binding the ingredients together. They create that delicious structure. For a vegan option, try using chia eggs (1 tablespoon chia seeds mixed with 2.5 tablespoons of water for each egg). -
1 tablespoon vanilla extract
Pure vanilla extract enhances the flavor profile, making your cinnamon rolls feel indulgent. -
1 tablespoon cinnamon
This is the star of the show! Use fresh ground cinnamon for the best aroma and flavor. -
1/4 cup cream cheese
Cream cheese in the dough adds creaminess and depth. If you want a dairy-free option, try using a dairy-free cream cheese or vegan alternative. -
1 tablespoon heavy cream
This adds a touch of richness to your icing. Swap it for coconut cream for a dairy-free alternative! -
1/4 cup powdered erythritol (for icing)
A sweet finishing touch that makes everything extra special without the carbs.
As you gather these ingredients, remember that high-quality ones will make all the difference, so choose wisely!
Step-by-Step Instructions
Step 1: Preheat Your Oven
Preheat your oven to 350°F (175°C). A warm oven helps the rolls rise beautifully and bake evenly.
Step 2: Prepare the Dough
In a mixing bowl, combine the almond flour, coconut flour, erythritol, baking powder, and salt. Mix them well with a whisk to ensure there are no clumps. Sifting the dry ingredients together helps achieve that light and fluffy texture, so don’t skip this step if you have a sifter!
Step 3: Add Wet Ingredients
In a separate bowl, whisk together the melted butter, eggs, and vanilla extract. Make sure the butter is warm but not hot; otherwise, it might scramble the eggs! Once well mixed, fold this wet mixture into your dry ingredients until fully combined. The dough might be a little sticky; that’s completely normal!
Step 4: Roll Out the Dough
Place the dough between two sheets of parchment paper and roll it out into a rectangle, about 1/4 inch thick. If the dough feels too sticky, you can dust your rolling pin and surface with a little almond flour to make it manageable.
Step 5: Prepare the Cinnamon Filling
In a small bowl, mix the cinnamon and erythritol. This delightful blend will be slathered over your rolled-out dough! Spread the softened cream cheese evenly over the surface of the dough, followed by the cinnamon sugar mixture. The cream cheese adds moisture and a lovely tang that complements the sweetness.
Step 6: Roll and Cut
Carefully roll up the dough from one side to the other, forming a tight log. Use the parchment paper to help guide you. Once rolled, slice the log into even pieces (about 1-inch thick). If the dough sticks to your knife, you can lightly grease it with butter or coconut oil.
Step 7: Place in the Baking Dish
Arrange the rolled slices, cut side up, in a greased 8×8-inch baking dish. The rolls will expand as they bake, so make sure they’re snugly placed.
Step 8: Bake
Pop the rolls in the preheated oven and bake for 20–25 minutes, or until they are golden brown on top. You want that lovely golden hue to signify their readiness. While they’re baking, take a moment to prepare your icing!
Step 9: Make the Icing
In a small bowl, whisk together the powdered erythritol, cream cheese, and heavy cream until smooth. You can adjust the thickness of the icing by adding more cream if needed. A thicker icing is perfect for drizzling!
Step 10: Drizzle and Serve
Once out of the oven, let the cinnamon rolls cool for a few minutes before drizzling the icing on top. The warmth of the rolls will slightly melt the icing, making it deliciously gooey!
Serving Suggestions
To serve your Keto Cinnamon Rolls, place them on a beautiful platter, dusted with a sprinkle of extra cinnamon or powdered erythritol for an aesthetic touch. You might consider pairing them with a steaming cup of coffee or herbal tea for the ultimate comfort food experience. If you’re feeling fancy, add a dollop of whipped coconut cream on the side for an exquisite touch!
Recipe Variations
-
Chocolate Chip Cinnamon Rolls: Fold in sugar-free chocolate chips into the dough for an exciting twist on the classic.
-
Nutty Swirl: Add chopped walnuts or pecans into the cinnamon filling for a delightful crunch.
-
Pumpkin Spice: Substitute half of the cinnamon with pumpkin pie spice for a fall-inspired treat.
-
Lemon Zest Icing: Add a touch of lemon zest to the icing for a citrusy brightness that balances the sweetness.
-
Frosting it Up: Mix in vanilla protein powder to the icing for added flavor and nutrition.
Chef’s Notes
Creating these Keto Cinnamon Rolls has truly been a journey! I started with an old recipe, reworking it until I found the perfect combination of ingredients. There were plenty of trials (and a few kitchen disasters), but I can assure you the final product is well worth it! I’ve even made these rolls for brunch parties, and they vanish faster than I can plate them.
A little tip I learned along the way: don’t be afraid to experiment! The kitchen should be a place of creativity and joy.
FAQs and Troubleshooting
1. Why are my cinnamon rolls dense?
If your rolls turn out dense, it might be due to overmixing the dough or not measuring the flour correctly. Make sure to use a kitchen scale for accuracy!
2. Can these be made ahead of time?
Absolutely! Prepare the rolls and place them in the baking dish. You can cover them and refrigerate overnight; just add a few minutes to the baking time in the morning.
3. How do I store leftovers?
Keep any leftover rolls in an airtight container in the fridge for up to 3 days. You can gently reheat them in the microwave or oven.
4. What can I use instead of erythritol?
You can use any low-carb sweetener that you prefer. Just make sure to check the conversion ratios, as some are sweeter than others!
Nutritional Info (Optional)
(Based on recipe serving size of approximately 12 rolls)
- Calories: 150 per roll
- Carbohydrates: 5g
- Fiber: 3g
- Protein: 4g
- Fat: 14g
These delicious Keto Cinnamon Rolls are a delightful way to embrace the sweet moments of life without the guilt. I hope you enjoy making and sharing these rolls as much as I do. Remember, it’s not just about making food; it’s about creating memories around your table where love and laughter abound. Happy baking! 🍽️✨
PrintKeto Cinnamon Rolls

Deliciously low-carb cinnamon rolls with a delightful blend of almond flour and creamy butter, topped with a rich cream cheese icing.
- Prep Time: 15 minutes
- Cook Time: 25 minutes
- Total Time: 40 minutes
- Yield: 12 servings 1x
- Category: Dessert
- Method: Baking
- Cuisine: American
- Diet: Keto
Ingredients
- 2 cups almond flour
- 1/4 cup coconut flour
- 1/4 cup erythritol
- 1 tablespoon baking powder
- 1/2 teaspoon salt
- 1/2 cup melted butter
- 2 large eggs
- 1 tablespoon vanilla extract
- 1 tablespoon cinnamon
- 1/4 cup cream cheese
- 1 tablespoon heavy cream
- 1/4 cup powdered erythritol (for icing)
Instructions
- Preheat your oven to 350°F (175°C).
- Combine almond flour, coconut flour, erythritol, baking powder, and salt in a mixing bowl.
- Whisk together melted butter, eggs, and vanilla extract in a separate bowl. Fold this mixture into the dry ingredients.
- Roll out the dough between two sheets of parchment paper into a rectangle, about 1/4 inch thick.
- Mix cinnamon and erythritol in a small bowl and prepare the cinnamon filling.
- Spread softened cream cheese over the dough and sprinkle the cinnamon sugar mixture on top.
- Roll up the dough tightly and slice into rolls.
- Arrange rolls in a greased 8×8-inch baking dish, cut side up.
- Bake for 20-25 minutes, or until golden brown.
- Whisk powdered erythritol, cream cheese, and heavy cream for the icing.
- Drizzle icing over warm rolls before serving.
Notes
Using high-quality ingredients will enhance your cinnamon rolls. Feel free to experiment with flavors and toppings.
Nutrition
- Serving Size: 1 roll
- Calories: 150
- Sugar: 1g
- Sodium: 100mg
- Fat: 14g
- Saturated Fat: 8g
- Unsaturated Fat: 6g
- Trans Fat: 0g
- Carbohydrates: 5g
- Fiber: 3g
- Protein: 4g
- Cholesterol: 70mg
Keywords: keto, cinnamon rolls, low-carb dessert, gluten-free baking, sweet treats
Sugar Free Low Carb Cookie Bars
# Delightful Sugar-Free Low Carb Cookie Bars

## Introduction

Hey, friend! Have you ever experienced that moment when you’re just craving something deliciously sweet, but you want it to be a little kinder to your waistline? Today, I’m thrilled to share my go-to recipe for Sugar-Free Low Carb Cookie Bars that will satisfy those sweet cravings without the guilt.

These little gems are not only simple to make but also pack all the flavor you would expect from a traditional cookie. As a recipe creator, I firmly believe that you shouldn’t have to sacrifice taste for health—or vice versa! With just a few quality ingredients, you’ll whip up a batch of these bars that may very well become your new favorite treat.

And trust me, whether you’re watching your sugar intake or simply looking for a deliciously healthy snack option, these cookie bars are bound to impress—even your non-dieting friends will be clamoring for a second bite!

So, tie on your apron, grab your mixing bowl, and let’s dive into this delightful, low-carb adventure together!

## Personal Story

I have to take you back to my college days—a time filled with late-night study sessions, laughter, and of course, super questionable snack choices. As finals rolled around, my best friends and I would gather in the kitchen, trying to fuel our brains with whatever we could find. It was during those frantic nights of studying that I first started to experiment with healthier desserts.

One evening, with a few ingredients left in the pantry, I decided to whip up a batch of cookie bars using almond flour and peanut butter. It was an instant hit among my friends! The energy boost from these cookie bars kept us fueled through the most stressful study sessions. Every bite reminded us that healthy doesn’t have to mean boring, and these bars became our go-to snack during finals week.

Fast forward to today, and I’ve refined that original recipe into these Sugar-Free Low Carb Cookie Bars. They’re just as delicious as those late-night creations but packed with all the good stuff. Now, whenever I make these bars, I’m taken back to those cherished memories of friendship and study sessions that went into the wee hours of the night.

## Ingredients

Let’s break down the ingredients you’ll need to make these delectable cookie bars. Each ingredient plays an important role in flavor and texture:

- **1 cup almond flour**
  Perfect for those low-carb diets, almond flour adds a subtly sweet flavor along with fiber and healthy fats. Looking for a substitute? You might try sunflower seed flour for a nut-free option, though it may alter the flavor slightly.

- **1/2 cup peanut butter or almond butter**
  This ingredient is your creamy base. Peanut butter lends a rich flavor; however, almond butter is a great alternative for those watching their cholesterol or who prefer a gentler taste.

- **1/4 cup sugar-free sweetener**
  Whether you use erythritol, monk fruit, or stevia, this sweetener will give your bars that delightful sweetness without the sugar crash! If you prefer natural sweeteners, consider using mashed ripe banana, but keep in mind that it will increase the carb count.

- **1/4 cup coconut oil, melted**
  Coconut oil not only helps bind the ingredients but also adds a subtle flavor and healthy fats. Unsalted butter or any mild-flavored oil can serve as a substitute.

- **1 tsp vanilla extract**
  This brings depth and warmth to your bars. Always use pure vanilla extract if you can for the best taste. In a pinch, vanilla essence will do, but the flavor might be less robust.

- **1/4 tsp salt**
  A touch of salt heightens flavors and balances the sweetness. You can use sea salt or Himalayan salt, both work well.

- **1/2 cup dark chocolate chips (sugar-free, optional)**
  For those who love a chocolaty kick, sugar-free dark chocolate chips can add that indulgent feeling without the sugar. If you’d rather skip the chocolate, feel free to leave it out for classic cookie bars.

## Step-by-Step Instructions

Now, let’s get into the fun part: making these cookie bars! Just follow these simple steps, and you’ll be on your way to cookie heaven.

1. **Preheat Your Oven**
   Preheat your oven to 350°F (175°C). This ensures your bars cook evenly and gives you that warm, inviting aroma wafting through the kitchen.

2. **Prepare Your Baking Dish**
   Line an 8x8 inch baking dish with parchment paper, leaving some overhang on the sides. This will make it super easy to lift the bars out later and slice them into pretty squares. No one wants sticky bars stuck to the pan!

3. **Mix the Wet Ingredients**
   In a mixing bowl, combine your peanut butter (or almond butter) and melted coconut oil. Use a rubber spatula or spoon to blend until smooth. Then, stir in the sweetener and vanilla extract until thoroughly mixed. It should look creamy and inviting—just like a good hug!

4. **Into the Dry Ingredients**
   Next, add your almond flour and salt to the wet mixture. Stir until just combined. You don’t want to overmix; a few lumps are perfectly fine! If you're incorporating dark chocolate chips, fold them in now to distribute the chocolate goodness throughout the dough.

5. **Spread Into the Dish**
   Transfer the dough into your prepared baking dish. Use the back of a spatula or your fingers to gently press the mixture into an even layer. Remember, it doesn’t have to look perfect; we're going for rustic charm here!

6. **Bake**
   Place your dish in the oven and let those cookie bars bake for about 15-20 minutes, or until they're golden brown around the edges. Keep an eye on them, though—we want them chewy in the middle, not crunchy!

7. **Cool**
   Once baked, remove the dish from the oven and let it cool in the pan for about 10 minutes. Then, lift the bars out using the parchment paper and allow them to cool completely on a wire rack. This step is crucial because it helps the bars set properly.

8. **Slice and Serve**
   Once they’re cool, slice them into squares or bars—and finally, dig in! The moment you taste that first bite, you’ll appreciate the harmonious blend of flavors and textures.

## Serving Suggestions

What’s the perfect way to serve these delightful cookie bars? Simple! Arrange them on a beautiful platter, maybe dust them with a sprinkle of powdered erythritol for that café-style finish. Pairing them with a hot cup of coffee or a glass of almond milk makes for a fabulous afternoon treat. Feeling fancy? Add a dollop of whipped coconut cream on top for an extra touch of sweetness!

## Recipe Variations

There’s so much versatility in this recipe! Here are a few delicious variations to try:

1. **Nutty Bliss**: Swap half the almond flour for chopped nuts like walnuts or pecans for added crunch.

2. **Fruity Twist**: Mix in 1/4 cup of unsweetened coconut flakes or dried unsweetened cranberries for a chewy texture and natural sweetness.

3. **Spiced Up**: Add a teaspoon of cinnamon or pumpkin spice to give these bars a delightful warmth—perfect for cozy evenings!

4. **Cocoa Delight**: Replace 1/4 cup of almond flour with unsweetened cocoa powder for a chocolatey version that will satisfy any chocolate lover.

5. **Protein Boost**: Stir in a scoop of low-carb protein powder for a nutritional punch.

## Chef’s Notes

These Sugar-Free Low Carb Cookie Bars started as an experimental late-night snack, and it warms my heart to see them evolve into a beloved recipe. I can’t tell you how many times I’ve come back to this treat when craving something sweet without the sugar.

One time while prepping for a dinner party, I let my best friend take the lead on the baking while I prepped other dishes. Let’s just say we forgot the salt—oops! But you know what? They still turned out amazing. It just shows that when using quality ingredients, even little mistakes can lead to delightful surprises in the kitchen!

## FAQs and Troubleshooting

**Q: My cookie bars turned out too crumbly. What happened?**
A: This can happen if there’s too much dry ingredient or if they didn’t bake long enough. Make sure to measure accurately and give them enough time to set.

**Q: Can I make these bars vegan?**
A: Absolutely! Substitute the egg with a chia egg (1 tablespoon chia seeds + 2.5 tablespoons water, let sit for 5 mins), and try using a plant-based butter instead of coconut oil.

**Q: How long do these cookie bars last?**
A: In an airtight container at room temperature, they should last about a week. If you want to keep them longer, pop them in the fridge, where they can last about 2 weeks.

**Q: Can I freeze these cookie bars?**
A: Yes! Slice and wrap them individually in plastic wrap, then place them in a freezer-safe bag. They can last up to 3 months in the freezer. Just thaw a slice when those sweet cravings hit!

## Nutritional Info

While I can't provide exact nutritional values, each serving (based on a total of 16 bars) is packed with protein and healthy fats while remaining low in carbs. This makes them a delightful option in your snacking rotation.

---

There you have it—delicious and simple Sugar-Free Low Carb Cookie Bars that anyone can whip up! I hope you enjoyed this little kitchen adventure with me and found inspiration to create your own magical memories, just like I did. Let’s keep the conversation going—let me know how your cookie bars turn out!
Sugar-Free Low Carb Cookie Bars

Delicious and guilt-free cookie bars that satisfy sweet cravings without the carbs.
- Prep Time: 10 minutes
- Cook Time: 20 minutes
- Total Time: 30 minutes
- Yield: 16 bars 1x
- Category: Dessert
- Method: Baking
- Cuisine: American
- Diet: Gluten-Free, Low Carb
Ingredients
- 1 cup almond flour
- 1/2 cup peanut butter or almond butter
- 1/4 cup sugar-free sweetener
- 1/4 cup coconut oil, melted
- 1 tsp vanilla extract
- 1/4 tsp salt
- 1/2 cup dark chocolate chips (sugar-free, optional)
Instructions
- Preheat your oven to 350°F (175°C).
- Prepare an 8×8 inch baking dish by lining it with parchment paper.
- Mix the peanut butter (or almond butter) and melted coconut oil until smooth; stir in the sweetener and vanilla extract.
- Add almond flour and salt to the wet mixture and stir until just combined; fold in chocolate chips if using.
- Transfer the dough into the prepared baking dish, pressing it into an even layer.
- Bake for 15-20 minutes, or until golden brown around the edges.
- Cool for about 10 minutes in the pan, then lift out using parchment and cool completely on a wire rack.
- Slice into squares and enjoy!
Notes
These cookie bars can be customized with various mix-ins and are great paired with coffee or almond milk.
Nutrition
- Serving Size: 1 bar
- Calories: 180
- Sugar: 1g
- Sodium: 200mg
- Fat: 14g
- Saturated Fat: 5g
- Unsaturated Fat: 7g
- Trans Fat: 0g
- Carbohydrates: 6g
- Fiber: 2g
- Protein: 6g
- Cholesterol: 0mg
Keywords: sugar-free, low carb, cookies, dessert, healthy snacks

Keto Pizza Roll Ups
Keto Pizza Roll-Ups: An Easy, Delicious Twist on a Classic Favorite
Hey there, fellow foodies! If you’re like me, pizza is one of those comfort foods that instantly brightens your day. But if you’re following a keto lifestyle or just looking to shake things up a bit, I’ve got an irresistible treat for you: Keto Pizza Roll-Ups! Yes, you’re reading that right—these little bundles of joy pack all the savory flavors of your favorite pizza but are low in carbs and totally perfect for any occasion.
Picture this: a cozy night in, the aroma of melting cheese filling the air, and those fluffy pepperoni slices waiting for you to take a bite. The best part? You can do it all without feeling guilty about straying from your low-carb diet. These roll-ups are remarkably easy to whip up and are perfect for game days, movie nights, or as an easy snack throughout the week. Plus, they can be made in under 30 minutes, making them the ultimate quick-fix deliciousness!
What I love about these Keto Pizza Roll-Ups is how they remind me of my childhood days, when sneaking a slice of pizza meant instant happiness. Now, as an adult, these roll-ups bring that nostalgia right back while keeping my health goals in check! So, grab your apron, pour yourself a bubbly treat, and let’s roll into this delicious adventure together!
Personal Story
Ah, memories of ordering pizza on a Friday night instantly warm my heart. Growing up, pizza was a weekly tradition in my household. My family and I would crowd around our tiny kitchen table, each slice competing to be everyone’s favorite. What made those nights extra special was my dad’s attempt to recreate the pizza we loved—with a twist. He would whip up his own dough, seasoned and sprinkled with love, but let’s just say it wasn’t always a hit!
Fast forward to the present—after years of cooking and experimenting, I’ve learned to embrace my inner chef and make this magic happen with much simpler techniques. Enter Keto Pizza Roll-Ups! They allow me to relive those special moments without sacrificing my lifestyle. It’s this blend of nostalgia, creativity, and celebration that inspires me to keep sharing these recipes with you. So join me as we take a journey back to the kitchen where every day can feel like a pizza night!
Ingredients
Let’s dive straight into the ingredients you need to create these delightful Keto Pizza Roll-Ups. Each one is chosen with love and can be swapped or modified to match your preferred taste. Here you go:
-
Mozzarella Cheese: The star of the roll-up! Use shredded mozzarella for a quick melt, or you can try fresh mozzarella for a creamy texture. Both are rich in flavor and low in carbs. If you’re dairy-free, go for a vegan cheese alternative that melts well.
-
Pepperoni Slices: A classic topping! These little rounds are packed with flavor, sizzling as they cook. If you prefer something leaner, opt for turkey or chicken pepperoni. You can also substitute with veggies like bell peppers for a pizza roll-up packed with greens.
-
Italian Seasoning: A blend of dried herbs—think basil, oregano, and thyme. It brings all the pizza vibes to our roll-ups. Make sure to use a quality brand or fresh herbs if you have them. If you’re feeling adventurous, add a touch of red pepper flakes for some heat!
-
Cream Cheese (optional): Cream cheese adds a richness and helps bind everything together. If you’re trying to cut back, you can skip it. But trust me, when whipped up, it adds an incredible creaminess that elevates your roll-ups.
-
Almond Flour (optional): For those who love a thicker roll, almond flour can add texture. You can also use coconut flour for a different flavor twist. If you’re looking for a nut-free option, consider using ground flaxseed or even more cheese.
Step-by-Step Instructions
Ready to roll? Let’s walk through making these Keto Pizza Roll-Ups step by step! Don’t worry; I’ll sprinkle in some tips and tricks along the way.
-
Preheat the Oven: Start by preheating your oven to 400°F (200°C). This step is crucial because we want our roll-ups to be perfectly golden and cooked through.
-
Melt the Cheese: In a microwave-safe bowl, combine about 1 ½ cups of shredded mozzarella and the optional cream cheese. Microwave in 30-second increments, stirring in between, until melted and smooth. Be patient—the cheese will come together beautifully!
-
Mix in the Seasoning: Once your cheese mixture is smooth, stir in 1 tsp of Italian seasoning (or more, if you like it herby!). This step infuses your roll-ups with that irresistible oregano and basil aroma typical of a classic pizza.
-
Add the Almond Flour: If you’re using almond flour, add it at this stage—1/4 cup should do the trick! This will give your roll-ups a thicker consistency. Mix until well combined; it will start to take on a dough-like texture.
-
Shape the Dough: Line a baking sheet with parchment paper. With clean hands or a spatula, spread the cheesy mixture out into a rectangle about 1/4 inch thick. Make sure it’s evenly spread to ensure even cooking.
-
Layer the Fillings: Now for the fun part! Sprinkle the remaining pepperoni slices evenly over your cheese base. You can layer them as densely as you like—after all, more pepperoni equals more flavor, right?
-
Roll It Up!: Gently lift one edge of the parchment paper to start rolling the cheese mixture into a cylinder shape, tucking it in as you go. Roll tightly but be careful not to tear the dough. It should look like a giant pizza log!
-
Slice: Transfer the roll to a cutting board and slice it into 1-inch pieces. Each slice should reveal a beautiful swirl of cheesy goodness and savory pepperoni.
-
Bake: Place your roll-ups back on the parchment-lined baking sheet, leaving some space between each piece. Pop them in your preheated oven and bake for about 15-20 minutes or until they’re golden brown and the cheese is bubbling.
-
Cool & Serve: Once out of the oven, let them cool for just a moment (you don’t want to burn your mouth!). These roll-ups can be served as is or with your favorite dipping sauce, like marinara or ranch.
Serving Suggestions
Plating these Keto Pizza Roll-Ups is as easy as pie—well, in this case, pizza! Arrange them on a beautiful platter for a stunning display. I love serving them with a side of marinara for dipping; honestly, it feels like a mini pizza party! A sprinkle of fresh basil or a drizzle of balsamic glaze on top adds a lovely touch of color and flair.
Recipe Variations
Want to get creative? Here are a few fun twists you can try with these Keto Pizza Roll-Ups:
-
Vegetarian Delight: Swap the pepperoni for roasted veggies like bell peppers, mushrooms, or olives. Throw in some spinach for a pop of color and nutrients!
-
Spicy Kick: Add jalapeños or banana peppers for a zesty flavor twist. Just be careful not to overdo it unless you love the heat!
-
BBQ Chicken: Replace pepperoni with shredded cooked chicken and a light brush of sugar-free BBQ sauce. You’ll get a smoky, sweet flavor that’s hard to resist.
-
Caprese Style: Add slices of fresh mozzarella, tomatoes, and basil for a fresh take. Drizzle with balsamic glaze before munching for that classic Caprese taste.
-
Cheesy Garlic Bread: Incorporate garlic powder into the cheese mixture and serve with herb-infused olive oil for a divine garlic bread version.
Chef’s Notes
Oh, the memories I have of trial and error in my kitchen! The first time I experimented with these roll-ups, I ended up with a melty mess instead of a neat bite-sized treat. But that’s all part of the process! Over time, through countless attempts (and a few delicious disasters), I perfected the technique to achieve that desirable roll without falling apart.
One funny story? I once invited a few friends over to taste the final product, and we ended up devouring more roll-ups than I had prepared. We laughed as we polished off the entire tray, and it turned into an impromptu dinner party!
I cherish moments like these because I truly believe cooking is about building memories and connections with those we care about. Remember, every roll-up you create is just a little more love served on a plate!
FAQs and Troubleshooting
1. Why did my roll-ups fall apart when I sliced them?
- It’s important to let the roll-ups cool slightly before cutting. If they’re too hot, the cheese can melt and become gooey, making it harder to maintain shape.
2. Can I freeze the roll-ups?
- Absolutely! Freeze the assembled but uncooked slices on a baking sheet, then transfer them to a freezer bag once frozen. Bake directly from frozen; just increase your baking time by a few minutes.
3. What’s the best way to store leftovers?
- Place any uneaten roll-ups in an airtight container in the fridge. They’ll keep well for about 3-4 days. Reheat in the oven to restore that crispy texture!
4. Can I make these ahead of time?
- Yes! You can prepare the roll-ups and keep them in the fridge before baking. They’ll be fresh and ready to pop in the oven whenever you need a quick, tasty snack or appetizer.
Nutritional Info
(Note: Adjust according to specific brands used)
- Calories: 150 per roll-up (without cream cheese)
- Carbohydrates: 2g
- Protein: 10g
- Fat: 12g
Now you’re ready to enjoy Keto Pizza Roll-Ups that’ll have your taste buds dancing! Remember, it’s all about balance and having a good time in the kitchen. So, roll on, friends, and create something magical today! 🍕✨
PrintKeto Pizza Roll-Ups

A delicious low-carb twist on classic pizza that’s easy to make and perfect for any occasion.
- Prep Time: 10 minutes
- Cook Time: 20 minutes
- Total Time: 30 minutes
- Yield: 4 servings 1x
- Category: Snack
- Method: Baking
- Cuisine: American
- Diet: Keto
Ingredients
- 1 ½ cups shredded mozzarella cheese
- 1 tsp Italian seasoning
- Optional: 1/4 cup almond flour
- Optional: 2 oz cream cheese
- Pepperoni slices (or preferred toppings)
Instructions
- Preheat the oven to 400°F (200°C).
- Melt the mozzarella and cream cheese in a microwave-safe bowl, stirring until smooth.
- Mix in the Italian seasoning.
- Add almond flour if using, and combine until a dough-like texture forms.
- Shape the mixture into a rectangle on parchment paper.
- Layer pepperoni slices on top of the cheese base.
- Roll the cheese mixture into a cylinder using the parchment paper for support.
- Slice the roll into 1-inch pieces.
- Bake for 15-20 minutes until golden brown.
- Cool slightly before serving with your favorite dipping sauce.
Notes
For a vegetarian option, swap pepperoni for roasted veggies. Serve with marinara for dipping.
Nutrition
- Serving Size: 1 roll-up
- Calories: 150
- Sugar: 1g
- Sodium: 400mg
- Fat: 12g
- Saturated Fat: 5g
- Unsaturated Fat: 6g
- Trans Fat: 0g
- Carbohydrates: 2g
- Fiber: 1g
- Protein: 10g
- Cholesterol: 30mg
Keywords: keto, pizza, low-carb, roll-ups, snack
Mango Avocado Salad
Tropical Delight: Mango Avocado Salad Recipe
Hey there, fellow food lovers! Today, we’re diving into a refreshing and vibrant dish that screams sunshine: Mango Avocado Salad. Regardless of the season, this salad brings a little tropical magic right to your table. Trust me, the first bite will transport you to a sun-kissed beach, the sea breeze kissing your skin, and the sound of laughter filling the air.
What I absolutely adore about this dish is how simple yet impactful it is. This salad combines sweet, juicy mangoes with creamy avocados, crunchy cucumbers, and crisp red onions, all dressed together in a zesty lime vinaigrette. It’s a celebration of flavors and textures, and it comes together in a matter of minutes—perfect for busy weeknights or casual gatherings with friends.
Now, before we jump into the chopping and mixing, I want you to feel the same excitement I have for this salad. It’s the perfect side dish for grilled meats, or it can be enjoyed on its own as a light lunch. And let’s not forget: it’s an absolute showstopper at any potluck or barbecue! To make it even better, the vibrant colors of this salad will have your guests oohing and aahing as soon as you set it down on the table.
So roll up your sleeves, grab your cutting board, and let’s embark on this delicious journey together. By the end of this post, you’ll not only master the perfect Mango Avocado Salad, but you’ll also have a few fun stories and tips to bring your culinary skills to the next level!
Personal Story
Ah, mangoes and avocados—the perfect duo. I still remember the first time I tried this salad many years ago at my aunt’s summer barbecue. The sun was shining high, and the scent of grilled chicken wafted through the air. My aunt, the queen of gatherings, called everyone to the table, and there it was—a vibrant bowl of Mango Avocado Salad.
As I scooped some onto my plate, the aroma of fresh lime and cilantro filled the air. One bite, and I was hooked! The sweetness of the mango paired with the rich, creaminess of the avocado danced in my mouth. My aunt shared her secrets, and little did I know, this dish would become a staple in my own home. It often makes an appearance at birthday parties, family dinners, or even quiet evenings when I want to treat myself to something special.
Over the years, I’ve tweaked the recipe here and there—adding a pinch of spice or experimenting with herbs—but that first bite always brings back cherished memories. I hope that this salad brings you as much joy as it has brought me and my family!
Ingredients
Here’s what you’ll need to create your Mango Avocado Salad:
-
Mango:
- Choose ripe, sweet mangoes for the best flavor. Look for fruit that gives slightly to the touch. If you’re in a pinch, you can substitute with peaches or nectarines for a similar sweetness!
-
Avocado:
- The creamy crowd-pleaser of this salad! Choose avocados that are ripe but still firm. If you’re not a fan of avocados, try using chopped cooked sweet potatoes for a softer texture!
-
Red Capsicum Peppers:
- These add a sweet crunch! If you prefer something spicier, you can use jalapeño or switch to yellow or green bell peppers for mildness.
-
Red Onions:
- Their sharp flavor mellows when combined with other ingredients. While red onions are recommended for their color and taste, scallions or shallots can also work in a pinch!
-
Cucumber:
- Use English cucumbers for their crisp texture and lower seeds. If cucumbers aren’t your thing, try Zucchini for a unique twist.
-
Coriander (Cilantro):
- Fresh cilantro adds an aromatic touch. If you’re not a fan, swap it with fresh parsley or mint for a refreshing change.
-
Lime:
- Fresh lime juice brightens the whole salad up! If limes are hard to get, lemon juice can be a zesty substitute, though it will slightly change the flavor profile.
-
Salt:
- A pinch is essential to enhance flavor! Use sea salt or Himalayan pink salt for a gourmet finish.
-
Red Chilli Flakes:
- Add some heat to the salad with these flakes. Feel free to adjust the amount to suit your spice tolerance or omit them entirely for a milder version.
-
Olive Oil:
- A drizzle of good quality extra virgin olive oil brings richness to the dish. If you want to switch it up, avocado oil or grapeseed oil can be used.
Step-by-Step Instructions
Now let’s get into the nitty-gritty of making this divine salad. Don’t worry, it’s incredibly straightforward!
1. Gather Your Ingredients
Start by assembling all the ingredients on your countertop. This not only keeps you organized but allows you to have everything within reach as you cook. Pro tip: Wash your fruits and veggies thoroughly to remove any residual pesticides and dirt.
2. Chop the Veggies
Begin by dicing the mango. Use a sharp knife to slice around the pit and then cube the flesh. Remember, a ripe mango is easier to cut! If you’re unsure about your knife skills, go slow and steady; practice makes perfect!
3. Prepare the Avocado
Cut the avocado in half, remove the pit (be careful here!), and use a spoon to scoop out the flesh. Dice it just like your mango but try to keep pieces a bit larger, as it adds nice texture. If avocados are not perfectly ripe, don’t worry—just make sure they are not too hard.
4. Dice the Red Capsicum, Cucumbers, and Red Onions
Chop the red capsicum and cucumber into bite-sized pieces, almost the same size as the mango and avocado. For the red onion, the finer you chop, the mellower the flavor (so go slow if you want less onion punch!).
5. Mix Everything Together
In a large bowl, gently toss in the mango, avocado, red capsicum, cucumber, and red onion. This is where the visual magic happens! Take a moment to admire the vibrant colors before we dress it!
6. Prepare the Dressing
In a small bowl, whisk together the olive oil, lime juice, salt, and red chili flakes. Taste it to ensure it’s just how you like it. Adjust with more lime, salt, or chili if needed. This dressing is what will pull the whole salad together!
7. Dress the Salad
Drizzle the dressing over the salad. Gently toss everything together, being careful not to mash the avocado. Pro tip: use a rubber spatula for soft and gentle mixing—it allows you to incorporate everything without losing that luscious avocado texture.
8. Let It Rest
Allow the salad to sit for about 10-15 minutes before serving. This will let the flavors meld beautifully. If you’re prepping ahead, keep the avocado separate until just before serving to avoid browning.
9. Final Touches
Before serving, give the salad another gentle toss and add additional salt, lime, or chili flakes to taste. A sprinkle of fresh cilantro on top can also be a gorgeous finishing touch!
Serving Suggestions
To serve your Mango Avocado Salad, consider a beautiful bowl or platter that lets the vibrant colors shine through. You can ladle generous portions onto individual plates or keep it communal for guests to serve themselves. For a touch of elegance, use a fork to create a slight swirl in the salad before serving. It adds a little flair without requiring any extra effort!
Recipe Variations
Want to switch things up? Here are a few ideas:
- Add Protein: Toss in some grilled shrimp, chicken, or chickpeas to make this salad a complete meal.
- Tropical Twist: Add diced pineapple or papaya for a double dose of tropical goodness.
- Cheese Please: Crumbled feta or goat cheese can offer creaminess and a lovely salty bite.
- Nuts for Crunch: Sprinkle some toasted almonds or cashews on top for an additional crunch factor.
- Dressing Variations: Try adding honey or agave syrup for some sweetness, or swap the lime for orange juice for a different citrus zest.
Chef’s Notes
This recipe has become a cherished tradition in my home, and I’ve loved watching it evolve over time. One summer, after attending a zesty salsa-making class, I decided to substitute the salad dressing with a homemade mango salsa mix—what a hit that was!
Sometimes, I’ll even throw in whatever fresh herbs I have on hand—basil one day, mint another; it’s all about what inspires me at the moment. And let’s be honest; the calm chatter around the table as everyone digs into this colorful salad makes every effort worthwhile.
FAQs and Troubleshooting
1. Why did my avocado turn brown?
It’s all about the air! Avocados oxidize quickly, so if you want to keep them fresh, add the lime juice right before serving, or keep the pit in the leftover salad.
2. My mango isn’t sweet enough; what can I do?
If your mango isn’t ripe, try adding a teaspoon of honey or agave to the salad for a touch of sweetness, or let it sit at room temperature for another day until it ripens.
3. How can I prepare this salad ahead of time?
You can chop the mango, cucumber, and capsicum up to a day in advance. Keep the avocado separate until serving. Enjoy the delicious simplicity!
4. Can I make this a meal prep dish?
Absolutely! Just portion it out in airtight containers, and it’s perfect for a week of lunches. Just remember to add the avocado just before eating to keep everything fresh.
Nutritional Info (Optional)
While the focus here is on flavor, it’s worth noting that this Mango Avocado Salad is packed with nutrients! The healthy fats from the avocado, vitamin C from the mango, and dietary fiber from the vegetables make it not only delightful but nutritious as well.
And there you have it—a delightful Mango Avocado Salad that’s as colorful as it is delicious! I hope you enjoy making this dish as much as I do. So grab your apron, get those ingredients chopped, and let the tropical flavors whisk you away! Happy cooking!
PrintMango Avocado Salad

A refreshing Mango Avocado Salad that combines sweet mangoes, creamy avocados, crunchy cucumbers, and zesty lime vinaigrette.
- Prep Time: 15 minutes
- Cook Time: 0 minutes
- Total Time: 15 minutes
- Yield: 4 servings 1x
- Category: Salad
- Method: No Cooking
- Cuisine: Tropical
- Diet: Vegetarian
Ingredients
- 2 ripe mangoes
- 2 ripe avocados
- 1 red capsicum pepper
- 1/2 red onion
- 1 cucumber
- 1/4 cup fresh coriander (cilantro)
- Juice of 2 limes
- 1/2 teaspoon salt
- 1/4 teaspoon red chilli flakes
- 2 tablespoons olive oil
Instructions
- Gather your ingredients.
- Chop the mango.
- Prepare the avocado.
- Dice the red capsicum, cucumbers, and red onions.
- Mix everything together in a bowl.
- Prepare the dressing by whisking the olive oil, lime juice, salt, and red chilli flakes.
- Dress the salad.
- Let it rest for 10-15 minutes.
- Final touches before serving.
Notes
To prevent browning, add the avocado just before serving.
Nutrition
- Serving Size: 1 serving
- Calories: 250
- Sugar: 15g
- Sodium: 150mg
- Fat: 16g
- Saturated Fat: 2g
- Unsaturated Fat: 14g
- Trans Fat: 0g
- Carbohydrates: 30g
- Fiber: 7g
- Protein: 3g
- Cholesterol: 0mg
Keywords: mango, avocado, salad, tropical, healthy, vegetarian