
Indulgent Reese’s Chocolate Peanut Butter Cup Earthquake Cake
Indulgent Reese’s Chocolate Peanut Butter Cup Earthquake Cake
Welcome back to the delightful world of indulgent baking! Today, we’re diving into a true celebration of flavor and texture with a show-stopping dessert: the Reese’s Chocolate Peanut Butter Cup Earthquake Cake. If you’ve ever dreamed of sinking your teeth into a chocolate cake that’s bursting with peanut butter goodness, then you’re in for a treat!
Introduction
There’s something magical about the combination of chocolate and peanut butter. It’s a flavor pairing that leaves taste buds dancing and hearts swooning. And trust me, there’s no better way to experience this delightful duo than with an Earthquake Cake! This cake isn’t just a typical chocolate dessert; it’s an awe-inspiring masterpiece that comes with the promise of gooey, fudgy goodness balanced by the creamy richness of peanut butter cups.
Imagine this: a moist chocolate cake, a layer of rich chocolate pudding adding decadence, and chunks of Reese’s Peanut Butter Cups melted throughout, creating a satisfyingly messy ‘earthquake’ effect as it bakes. Sounds dreamy, right? And the best part? It’s surprisingly easy to whip up! Whether you’re planning a major celebration, a cozy dinner party, or just a casual family night in, this cake will steal the show and have everyone reaching for seconds (and thirds!).
So, tie on your apron and let’s walk through this joyous journey of flavors. Together, we’ll create a dessert that feels special yet approachable—just like the spirit of Ivory Apron!
Personal Story
Let me take you back to one of my earliest baking adventures in the kitchen. I was about ten years old, and I remember being captivated by the powerful aromas swirling around our home as my mom baked. One day, she decided to get creative with chocolate and peanut butter—a combination I loved but mostly found in simple sandwiches at lunch. She pulled out her recipe book and introduced me to the world of cakes, and we baked a chocolate-peanut butter cake together.
My little kid heart was filled with anticipation as I carefully measured out the cocoa powder and stirred the ingredients. The best moment was when we added chunks of peanut butter cups right into the batter! That first bite of gooey cake mingling with creamy peanut butter was pure bliss. That experience ignited my passion for baking, and I can still feel the warmth that enveloped me then. To this day, the combination of chocolate and peanut butter speaks to me, and it’s the foundation of this Earthquake Cake recipe. It’s not just food; it’s a nostalgic reminder of joyful moments spent in the kitchen.
Ingredients
Here’s what you’ll need for our delightful cake:
-
1 standard chocolate cake mix
Use your favorite brand; this is the base of our cake. If you’re feeling adventurous, you can opt for a dark chocolate cake mix for a richer flavor. -
3 large eggs
Eggs help bind everything together and add moisture. If you’re by chance out of eggs, you can substitute each egg with 1/4 cup of unsweetened applesauce or a mashed banana for a subtle twist. -
Water (or brewed coffee for richer flavor)
Using brewed coffee enhances the chocolate flavor beautifully. But if coffee isn’t your thing, plain old water works just fine! -
1 package instant chocolate pudding mix
This is where we elevate our cake’s creaminess. It adds a rich texture and indulgent taste! You can switch it up with vanilla pudding for a different flavor profile. -
6-8 Reese’s Peanut Butter Cups, chopped
The star of the show! These candy pieces add bursts of peanut butter bliss throughout the cake. You can substitute with any other peanut butter cup brand, or use a mix of chocolate and peanut butter candies. -
Creamy peanut butter (or crunchy for texture)
This will be swirled into the batter and gives it that signature peanut buttery flavor. If you prefer a little crunch, go for crunchy peanut butter; it brings delightful texture! -
Powdered sugar
For a light, sweet finishing touch! This isn’t strictly necessary, but it adds a lovely touch if you plan to dust the cake for presentation.
Step-by-Step Instructions
Ready to create some mouthwatering magic? Here’s how to make your Earthquake Cake!
-
Preheat and Prepare Your Pan
Preheat your oven to 350°F (175°C). Grease a 9×13-inch baking dish with cooking spray or butter. This will help our cake slide right out when it’s baked—nobody wants to face the cake catastrophe of a stuck dessert! -
Mix the Cake Batter
In a large mixing bowl, combine the chocolate cake mix, eggs, and water (or brewed coffee). Now, grab a whisk or electric mixer and beat the mixture on low for about 30 seconds. Then, bump it up to medium speed and mix for an additional 2 minutes. This helps aerate the cake, creating a lovely, fluffy texture. -
Add the Pudding Mix
Gently fold the chocolate pudding mix into your batter. Yes, it’s going to get ridiculously rich and delicious! Just make sure it’s well incorporated. -
Prepare the Peanut Butter Swirl
Before we dive in with the candy, let’s create that yum-factor! In a small bowl, mix together creamy peanut butter and a couple tablespoons of water (or milk) until it’s spreadable. This helps create the beautiful and creamy ripple effect throughout the cake. -
Combine Ingredients
Fold in the chopped Reese’s Peanut Butter Cups into the cake batter. This is where the magic starts to happen—those glistening chocolate and peanut butter pieces begin to dance throughout the batter! -
Transfer to the Baking Pan
Pour the cake batter into your prepared baking dish, spreading it into an even layer with a spatula. Now it’s time for that dreamy peanut butter swirl! Using a spoon, drop dollops of the prepared peanut butter mix on top and gently swirl it through the batter. Don’t worry about making it perfect; the chaos is what makes it an Earthquake Cake! -
Bake the Cake
Place the baking dish into the preheated oven and let it bake for about 30-35 minutes. Check doneness by inserting a toothpick in the center; it should come out clean, with a few moist crumbs attached. Don’t bake it too long or it can dry out—the last thing we want is a dry cake! -
Cool and Serve
Once baked, take it out of the oven and let it cool in the pan for about 10-15 minutes. After that, carefully flip it onto a wire rack or a serving platter. It’s hard to resist cutting into it straight away, but letting it cool slightly allows the flavors to deepen. -
Dust with Powdered Sugar
If you’re feeling fancy, dust some powdered sugar on top of the cake right before serving. It adds an elegant touch—perfect for impressing your guests!
Serving Suggestions
When it’s time to serve, cut yourself a generous slice—you’ll want to showcase the gooey layers and pockets of peanut butter cups in every piece! Pair it with a scoop of vanilla ice cream to create a heavenly contrast that chills the warm cake. Serving it with an extra drizzle of melted chocolate or a dollop of whipped cream would also be a delightful touch. Trust me, everyone will be requesting the recipe!
Recipe Variations
-
Minty Twist: Add a handful of crushed mint candies or peppermint extract into the cake batter for a refreshing surprise.
-
Nutty Surprise: Add a sprinkle of chopped nuts (like pecans or walnuts) to give your cake an irresistible crunch.
-
Swapping Flour: If you want a gluten-free option, use a gluten-free chocolate cake mix in place of the standard one.
-
Different Candies: Experiment with various types of chocolate candies, such as Milky Way or Snickers, for your own unique flavor experience.
-
Healthier Option: Use a reduced-fat cake mix and replace the peanut butter with a natural nut butter. You could also serve it with a fresh fruit salad on the side for a lighter touch.
Chef’s Notes
Baking this cake is always a delightful experience, but it also comes with its fair share of baking mishaps! I remember one time, in my excitement, I mistakenly grabbed the salt instead of the sugar. The resulting cake was a hilarious lesson in “don’t bake when tired.” As I shared bites of this “salty surprise” with friends, laughter filled the kitchen. This cake has truly evolved over time, from a simple chocolate cake to the rich and indulgent Earthquake Cake we’re whipping up today. It’s these little kitchen moments, both hilarious and heartwarming, that make baking such a joy.
FAQs and Troubleshooting
1. My cake didn’t rise. What happened?
Ensure your baking powder or cake mix isn’t expired, and double-check that you followed the recipe correctly. Sometimes, if the batter is over-mixed, it can also affect rising.
2. Why did my cake get hard?
This might happen if the cake is overbaked. Keep an eye on the time and always test with a toothpick.
3. Can I freeze the cake?
Yes! If you have leftovers (which is rare!), you can wrap individual slices in plastic wrap and store them in an airtight container in the freezer for up to 2 months.
4. How do I store leftovers?
Keep any leftover cake in an airtight container at room temperature for a day or two or in the fridge for up to a week. Just know that the sooner you eat it, the better!
Nutritional Info
(Note: Nutritional information can vary based on specific ingredients and portion sizes. It’s always a good idea to check labels for the most accurate details.)
- Serving size: 1 slice
- Calories: Approximately 400
- Carbohydrates: 60g
- Fat: 20g
- Protein: 6g
- Sugar: 30g
There you have it—a luscious, indulgent Reese’s Chocolate Peanut Butter Cup Earthquake Cake that’s bound to be the star of any event! Remember, it’s all about the joy of cooking together, creating beautiful moments around the table, and celebrating life’s sweetest moments (and desserts!). So gather your loved ones, pour a little something sparkling, and enjoy this deliciously rich creation! Happy baking!
PrintReese’s Chocolate Peanut Butter Cup Earthquake Cake

A rich and indulgent chocolate cake bursting with peanut butter goodness and chunks of Reese’s Peanut Butter Cups.
- Prep Time: 15 minutes
- Cook Time: 35 minutes
- Total Time: 50 minutes
- Yield: 12 servings 1x
- Category: Dessert
- Method: Baking
- Cuisine: American
- Diet: Vegetarian
Ingredients
- 1 standard chocolate cake mix
- 3 large eggs
- 1 cup water or brewed coffee
- 1 package instant chocolate pudding mix
- 6–8 Reese’s Peanut Butter Cups, chopped
- Creamy or crunchy peanut butter
- Powdered sugar (optional, for dusting)
Instructions
- Preheat your oven to 350°F (175°C) and grease a 9×13-inch baking dish.
- Mix the chocolate cake mix, eggs, and water (or brewed coffee) in a large bowl until well combined.
- Add the chocolate pudding mix and fold it into the batter.
- Prepare the peanut butter by mixing it with a few tablespoons of water or milk until spreadable.
- Combine the chopped Reese’s Peanut Butter Cups into the cake batter.
- Transfer the batter into the prepared baking dish and swirl in the peanut butter mix.
- Bake for about 30-35 minutes, or until a toothpick comes out clean.
- Cool for 10-15 minutes in the pan before transferring to a wire rack.
- Dust with powdered sugar before serving, if desired.
Notes
Pair with a scoop of vanilla ice cream or a drizzle of hot chocolate for an extra indulgent experience.
Nutrition
- Serving Size: 1 slice
- Calories: 400
- Sugar: 30g
- Sodium: 400mg
- Fat: 20g
- Saturated Fat: 8g
- Unsaturated Fat: 10g
- Trans Fat: 0g
- Carbohydrates: 60g
- Fiber: 2g
- Protein: 6g
- Cholesterol: 50mg
Keywords: chocolate cake, peanut butter, dessert, Reese's, indulgent
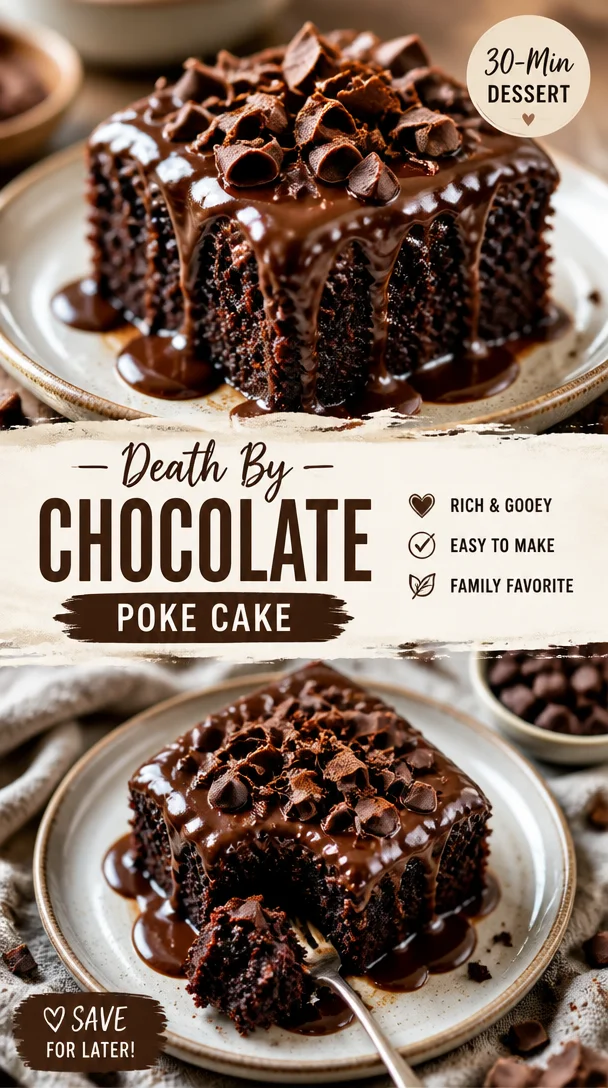
Death By Chocolate Poke Cake
Death By Chocolate Poke Cake: A Decadent Delight
Hello, my fellow food lovers! Today, we’re diving into a dessert that will make your heart sing and your taste buds dance – the Death By Chocolate Poke Cake. Imagine sinking your fork into a rich, moist chocolate cake that’s generously soaked in chocolate pudding, layered with whipped topping, and studded with chocolate chips. Sounds heavenly, right? Well, it is!
A Chocolate Lover’s Dream
Growing up, one of my fondest memories is of my family gatherings around the holidays. The chatter, the laughter, and of course, the dessert table! There was always one dish that stole the spotlight every time – my mom’s Chocolate Poke Cake. It was the ultimate indulgence, a cake that beckoned you in with its chocolatey allure.
I remember the first time I helped my mom make it. I was probably around 10 years old, standing on a chair to reach the mixing bowl, my tiny hands covered in flour and cocoa powder. As we poured the warm pudding over the baked cake, the excitement was palpable. I couldn’t wait to dig in! That cake always brought our family together, and it remains a cherished memory close to my heart. Now, I carry that tradition forward, and I can’t wait for you to experience the joy of creating your own Death By Chocolate Poke Cake.
Ingredients
For this delicious cake, you will need:
-
1 box chocolate cake mix: This is the backbone of our poke cake. If you’re feeling adventurous, you could use homemade chocolate cake for a richer flavor, but the box mix makes it super easy!
-
Ingredients required to prepare the cake (usually eggs, water, and oil): Always check the back of your cake mix box for specifics. If you’re out of eggs, you can substitute each egg with 1/4 cup of unsweetened applesauce for a rich, moist cake!
-
1 cup chocolate pudding mix: Instant pudding works best for this recipe. It provides a creamy consistency. If you fancy a different flavor, vanilla pudding works, but then you’d lose that rich chocolate kick.
-
2 cups milk: Whole milk adds richness, but you can swap it with almond milk or oat milk for a dairy-free option. Just ensure you’re using an unsweetened version for the right flavor profile.
-
1 cup whipped topping: This is what keeps the cake light and fluffy. If you’re feeling extra, homemade whipped cream is a fantastic, indulgent substitute!
-
1 cup chocolate chips: Mini chocolate chips are great for even distribution, or use dark chocolate chips for an intense hit of chocolate.
-
Chocolate syrup for drizzling: This delightful drizzle elevates the cake visually and adds extra sweetness. If you’re looking for a healthier alternative, try a homemade chocolate sauce with less sugar.
Step-by-Step Instructions
Ready to get baking? Let’s dive into the steps of making this chocolate masterpiece!
-
Preheat your Oven: Start by preheating your oven to 350°F (175°C). This ensures an even bake — nobody wants a gooey cake where it shouldn’t be!
-
Prepare the Cake Mix: In a large mixing bowl, combine the chocolate cake mix with the water, eggs, and oil as directed on the box. Mix on medium speed for about 2 minutes until the batter is smooth. Here’s where you can let loose and really whip up some air into that batter!
-
Bake the Cake: Pour the batter into a greased 9×13 inch baking dish. Bake it in the preheated oven for 30-35 minutes, or until a toothpick inserted into the center comes out clean. (Pro Tip: Don’t open the oven door too soon; this can cause your cake to sink!)
-
Cool the Cake: Once baked, remove the cake from the oven and let it cool in the pan for about 15 minutes. This allows it to set properly and makes it easier to poke!
-
Poke the Cake: Now for the fun part! Use the handle of a wooden spoon or a large fork to poke holes all over the surface of the cake. Aim for a pattern, but random works too! The more holes, the more pudding can seep in!
-
Mix the Pudding: While the cake cools, whisk together the chocolate pudding mix and milk in a separate bowl. Make sure there are no lumps! Once combined, let it rest for a few minutes until it thickens up slightly.
-
Pour the Pudding: Gently pour the chocolate pudding over the poked cake, making sure it seeps into all the holes. This is what makes the cake ultra moist and decadently chocolatey!
-
Chill the Cake: Cover the cake with plastic wrap and let it chill in the refrigerator for at least 2 hours (or overnight if you can resist!). This allows the pudding to set fully and brings all the flavors together.
-
Add the Topping: Before serving, spread the whipped topping evenly over the pudding layer. Add your chocolate chips on top for that delightful crunch!
-
Drizzle with Chocolate Syrup: Last but not least, drizzle chocolate syrup artfully over the top. Don’t be shy – the more, the merrier!
Serving Suggestions
Slice your Death By Chocolate Poke Cake into generous squares and serve with an extra dollop of whipped topping on the side. It’s perfect for potlucks, birthdays, or a casual weeknight dessert. Consider serving with a scoop of vanilla ice cream for that wonderful contrast of flavors!
Recipe Variations
Ready to get creative? Here are some variations to try:
-
Nutty Surprise: Fold in chopped nuts like walnuts or hazelnuts into the chocolate pudding before pouring it over the cake for an added crunch.
-
Mint Chocolate: Add a few drops of mint extract to the pudding mixture for a refreshing twist that pairs beautifully with chocolate.
-
Peanut Butter Delight: Swirl in some creamy peanut butter into the whipped topping or sprinkle crushed peanut butter cups on top for a Reese’s-inspired version!
-
Coffee Infusion: Replace a portion of the milk with brewed coffee for a mocha-style cake that’s simply irresistible.
-
Sprinkles Galore: For a fun celebratory touch, add colorful sprinkles to the topping for festive flair.
Chef’s Notes
This recipe has been a staple in my home for years and has undergone some delightful transformations. When I first tried making it vegan, I swapped the eggs for applesauce and used coconut whipped cream instead of regular whipped topping. It was a hit with both my vegan friends and non-vegan guests alike!
Another funny memory I have is the time I attempted to make a "healthier" version (I know, what was I thinking?) by reducing the sugar and using whole wheat cake mix. Let’s just say, while it was still edible, lush and moist it was not! Lesson learned: sometimes you just need to indulge – and this cake is the perfect excuse!
FAQs and Troubleshooting
Q: My cake sank in the middle. What went wrong?
A: This could be due to underbaking or opening the oven door too early. Make sure to bake it fully until a toothpick comes out clean!
Q: Can I use homemade pudding instead of instant?
A: Absolutely! Just pour the warm pudding over the poked cake and let it soak in. Be mindful to chill the cake longer since homemade pudding may have a different consistency.
Q: How long will this cake stay fresh?
A: In the refrigerator, it should last for about 3-4 days, though trust me, it won’t last long once you share it!
Q: Can I freeze this cake?
A: Yes! Just cover it well with plastic wrap and foil. To serve, thaw it in the refrigerator overnight and enjoy. However, note that the whipped topping may not be as fresh as when originally made.
Nutritional Info
(Optional)
For those conscious of their nutritional intake, a slice of Death By Chocolate Poke Cake typically contains:
- Calories: Approximately 400
- Total Fat: 20g
- Saturated Fat: 10g
- Sugar: 30g
- Protein: 5g
(Note: Nutritional values will vary depending on ingredients used.)
And there you have it! The perfect dessert to welcome chocolate lovers into your home. I hope you enjoy making and sharing this Death By Chocolate Poke Cake as much as I have. Tie on your apron, get ready to indulge, and may your kitchen be filled with laughter and delicious aromas! Happy baking!
PrintDeath By Chocolate Poke Cake

A rich, moist chocolate cake soaked in chocolate pudding, layered with whipped topping, and topped with chocolate chips.
- Prep Time: 15 minutes
- Cook Time: 35 minutes
- Total Time: 50 minutes
- Yield: 12 servings 1x
- Category: Dessert
- Method: Baking
- Cuisine: American
- Diet: Vegetarian
Ingredients
- 1 box chocolate cake mix
- Ingredients required to prepare the cake (usually eggs, water, and oil)
- 1 cup chocolate pudding mix
- 2 cups milk
- 1 cup whipped topping
- 1 cup chocolate chips
- Chocolate syrup for drizzling
Instructions
- Preheat your Oven to 350°F (175°C).
- Prepare the Cake Mix by combining the chocolate cake mix with the required ingredients.
- Bake the Cake in a greased 9×13 inch baking dish for 30-35 minutes.
- Cool the Cake in the pan for about 15 minutes.
- Poke the Cake using the handle of a wooden spoon.
- Mix the Pudding by whisking together the chocolate pudding mix and milk.
- Pour the Pudding over the poked Cake.
- Chill the Cake in the refrigerator for at least 2 hours.
- Add the Topping by spreading the whipped topping over the pudding layer.
- Drizzle with Chocolate Syrup before serving.
Notes
Consider serving with a scoop of vanilla ice cream for contrast.
Nutrition
- Serving Size: 1 serving
- Calories: 400
- Sugar: 30g
- Sodium: 300mg
- Fat: 20g
- Saturated Fat: 10g
- Unsaturated Fat: 6g
- Trans Fat: 0g
- Carbohydrates: 52g
- Fiber: 2g
- Protein: 5g
- Cholesterol: 50mg
Keywords: chocolate cake, poke cake, dessert, chocolate dessert