
Indulgent Reese’s Chocolate Peanut Butter Cup Earthquake Cake
Indulgent Reese’s Chocolate Peanut Butter Cup Earthquake Cake
Welcome back to the delightful world of indulgent baking! Today, we’re diving into a true celebration of flavor and texture with a show-stopping dessert: the Reese’s Chocolate Peanut Butter Cup Earthquake Cake. If you’ve ever dreamed of sinking your teeth into a chocolate cake that’s bursting with peanut butter goodness, then you’re in for a treat!
Introduction
There’s something magical about the combination of chocolate and peanut butter. It’s a flavor pairing that leaves taste buds dancing and hearts swooning. And trust me, there’s no better way to experience this delightful duo than with an Earthquake Cake! This cake isn’t just a typical chocolate dessert; it’s an awe-inspiring masterpiece that comes with the promise of gooey, fudgy goodness balanced by the creamy richness of peanut butter cups.
Imagine this: a moist chocolate cake, a layer of rich chocolate pudding adding decadence, and chunks of Reese’s Peanut Butter Cups melted throughout, creating a satisfyingly messy ‘earthquake’ effect as it bakes. Sounds dreamy, right? And the best part? It’s surprisingly easy to whip up! Whether you’re planning a major celebration, a cozy dinner party, or just a casual family night in, this cake will steal the show and have everyone reaching for seconds (and thirds!).
So, tie on your apron and let’s walk through this joyous journey of flavors. Together, we’ll create a dessert that feels special yet approachable—just like the spirit of Ivory Apron!
Personal Story
Let me take you back to one of my earliest baking adventures in the kitchen. I was about ten years old, and I remember being captivated by the powerful aromas swirling around our home as my mom baked. One day, she decided to get creative with chocolate and peanut butter—a combination I loved but mostly found in simple sandwiches at lunch. She pulled out her recipe book and introduced me to the world of cakes, and we baked a chocolate-peanut butter cake together.
My little kid heart was filled with anticipation as I carefully measured out the cocoa powder and stirred the ingredients. The best moment was when we added chunks of peanut butter cups right into the batter! That first bite of gooey cake mingling with creamy peanut butter was pure bliss. That experience ignited my passion for baking, and I can still feel the warmth that enveloped me then. To this day, the combination of chocolate and peanut butter speaks to me, and it’s the foundation of this Earthquake Cake recipe. It’s not just food; it’s a nostalgic reminder of joyful moments spent in the kitchen.
Ingredients
Here’s what you’ll need for our delightful cake:
-
1 standard chocolate cake mix
Use your favorite brand; this is the base of our cake. If you’re feeling adventurous, you can opt for a dark chocolate cake mix for a richer flavor. -
3 large eggs
Eggs help bind everything together and add moisture. If you’re by chance out of eggs, you can substitute each egg with 1/4 cup of unsweetened applesauce or a mashed banana for a subtle twist. -
Water (or brewed coffee for richer flavor)
Using brewed coffee enhances the chocolate flavor beautifully. But if coffee isn’t your thing, plain old water works just fine! -
1 package instant chocolate pudding mix
This is where we elevate our cake’s creaminess. It adds a rich texture and indulgent taste! You can switch it up with vanilla pudding for a different flavor profile. -
6-8 Reese’s Peanut Butter Cups, chopped
The star of the show! These candy pieces add bursts of peanut butter bliss throughout the cake. You can substitute with any other peanut butter cup brand, or use a mix of chocolate and peanut butter candies. -
Creamy peanut butter (or crunchy for texture)
This will be swirled into the batter and gives it that signature peanut buttery flavor. If you prefer a little crunch, go for crunchy peanut butter; it brings delightful texture! -
Powdered sugar
For a light, sweet finishing touch! This isn’t strictly necessary, but it adds a lovely touch if you plan to dust the cake for presentation.
Step-by-Step Instructions
Ready to create some mouthwatering magic? Here’s how to make your Earthquake Cake!
-
Preheat and Prepare Your Pan
Preheat your oven to 350°F (175°C). Grease a 9×13-inch baking dish with cooking spray or butter. This will help our cake slide right out when it’s baked—nobody wants to face the cake catastrophe of a stuck dessert! -
Mix the Cake Batter
In a large mixing bowl, combine the chocolate cake mix, eggs, and water (or brewed coffee). Now, grab a whisk or electric mixer and beat the mixture on low for about 30 seconds. Then, bump it up to medium speed and mix for an additional 2 minutes. This helps aerate the cake, creating a lovely, fluffy texture. -
Add the Pudding Mix
Gently fold the chocolate pudding mix into your batter. Yes, it’s going to get ridiculously rich and delicious! Just make sure it’s well incorporated. -
Prepare the Peanut Butter Swirl
Before we dive in with the candy, let’s create that yum-factor! In a small bowl, mix together creamy peanut butter and a couple tablespoons of water (or milk) until it’s spreadable. This helps create the beautiful and creamy ripple effect throughout the cake. -
Combine Ingredients
Fold in the chopped Reese’s Peanut Butter Cups into the cake batter. This is where the magic starts to happen—those glistening chocolate and peanut butter pieces begin to dance throughout the batter! -
Transfer to the Baking Pan
Pour the cake batter into your prepared baking dish, spreading it into an even layer with a spatula. Now it’s time for that dreamy peanut butter swirl! Using a spoon, drop dollops of the prepared peanut butter mix on top and gently swirl it through the batter. Don’t worry about making it perfect; the chaos is what makes it an Earthquake Cake! -
Bake the Cake
Place the baking dish into the preheated oven and let it bake for about 30-35 minutes. Check doneness by inserting a toothpick in the center; it should come out clean, with a few moist crumbs attached. Don’t bake it too long or it can dry out—the last thing we want is a dry cake! -
Cool and Serve
Once baked, take it out of the oven and let it cool in the pan for about 10-15 minutes. After that, carefully flip it onto a wire rack or a serving platter. It’s hard to resist cutting into it straight away, but letting it cool slightly allows the flavors to deepen. -
Dust with Powdered Sugar
If you’re feeling fancy, dust some powdered sugar on top of the cake right before serving. It adds an elegant touch—perfect for impressing your guests!
Serving Suggestions
When it’s time to serve, cut yourself a generous slice—you’ll want to showcase the gooey layers and pockets of peanut butter cups in every piece! Pair it with a scoop of vanilla ice cream to create a heavenly contrast that chills the warm cake. Serving it with an extra drizzle of melted chocolate or a dollop of whipped cream would also be a delightful touch. Trust me, everyone will be requesting the recipe!
Recipe Variations
-
Minty Twist: Add a handful of crushed mint candies or peppermint extract into the cake batter for a refreshing surprise.
-
Nutty Surprise: Add a sprinkle of chopped nuts (like pecans or walnuts) to give your cake an irresistible crunch.
-
Swapping Flour: If you want a gluten-free option, use a gluten-free chocolate cake mix in place of the standard one.
-
Different Candies: Experiment with various types of chocolate candies, such as Milky Way or Snickers, for your own unique flavor experience.
-
Healthier Option: Use a reduced-fat cake mix and replace the peanut butter with a natural nut butter. You could also serve it with a fresh fruit salad on the side for a lighter touch.
Chef’s Notes
Baking this cake is always a delightful experience, but it also comes with its fair share of baking mishaps! I remember one time, in my excitement, I mistakenly grabbed the salt instead of the sugar. The resulting cake was a hilarious lesson in “don’t bake when tired.” As I shared bites of this “salty surprise” with friends, laughter filled the kitchen. This cake has truly evolved over time, from a simple chocolate cake to the rich and indulgent Earthquake Cake we’re whipping up today. It’s these little kitchen moments, both hilarious and heartwarming, that make baking such a joy.
FAQs and Troubleshooting
1. My cake didn’t rise. What happened?
Ensure your baking powder or cake mix isn’t expired, and double-check that you followed the recipe correctly. Sometimes, if the batter is over-mixed, it can also affect rising.
2. Why did my cake get hard?
This might happen if the cake is overbaked. Keep an eye on the time and always test with a toothpick.
3. Can I freeze the cake?
Yes! If you have leftovers (which is rare!), you can wrap individual slices in plastic wrap and store them in an airtight container in the freezer for up to 2 months.
4. How do I store leftovers?
Keep any leftover cake in an airtight container at room temperature for a day or two or in the fridge for up to a week. Just know that the sooner you eat it, the better!
Nutritional Info
(Note: Nutritional information can vary based on specific ingredients and portion sizes. It’s always a good idea to check labels for the most accurate details.)
- Serving size: 1 slice
- Calories: Approximately 400
- Carbohydrates: 60g
- Fat: 20g
- Protein: 6g
- Sugar: 30g
There you have it—a luscious, indulgent Reese’s Chocolate Peanut Butter Cup Earthquake Cake that’s bound to be the star of any event! Remember, it’s all about the joy of cooking together, creating beautiful moments around the table, and celebrating life’s sweetest moments (and desserts!). So gather your loved ones, pour a little something sparkling, and enjoy this deliciously rich creation! Happy baking!
PrintReese’s Chocolate Peanut Butter Cup Earthquake Cake

A rich and indulgent chocolate cake bursting with peanut butter goodness and chunks of Reese’s Peanut Butter Cups.
- Prep Time: 15 minutes
- Cook Time: 35 minutes
- Total Time: 50 minutes
- Yield: 12 servings 1x
- Category: Dessert
- Method: Baking
- Cuisine: American
- Diet: Vegetarian
Ingredients
- 1 standard chocolate cake mix
- 3 large eggs
- 1 cup water or brewed coffee
- 1 package instant chocolate pudding mix
- 6–8 Reese’s Peanut Butter Cups, chopped
- Creamy or crunchy peanut butter
- Powdered sugar (optional, for dusting)
Instructions
- Preheat your oven to 350°F (175°C) and grease a 9×13-inch baking dish.
- Mix the chocolate cake mix, eggs, and water (or brewed coffee) in a large bowl until well combined.
- Add the chocolate pudding mix and fold it into the batter.
- Prepare the peanut butter by mixing it with a few tablespoons of water or milk until spreadable.
- Combine the chopped Reese’s Peanut Butter Cups into the cake batter.
- Transfer the batter into the prepared baking dish and swirl in the peanut butter mix.
- Bake for about 30-35 minutes, or until a toothpick comes out clean.
- Cool for 10-15 minutes in the pan before transferring to a wire rack.
- Dust with powdered sugar before serving, if desired.
Notes
Pair with a scoop of vanilla ice cream or a drizzle of hot chocolate for an extra indulgent experience.
Nutrition
- Serving Size: 1 slice
- Calories: 400
- Sugar: 30g
- Sodium: 400mg
- Fat: 20g
- Saturated Fat: 8g
- Unsaturated Fat: 10g
- Trans Fat: 0g
- Carbohydrates: 60g
- Fiber: 2g
- Protein: 6g
- Cholesterol: 50mg
Keywords: chocolate cake, peanut butter, dessert, Reese's, indulgent
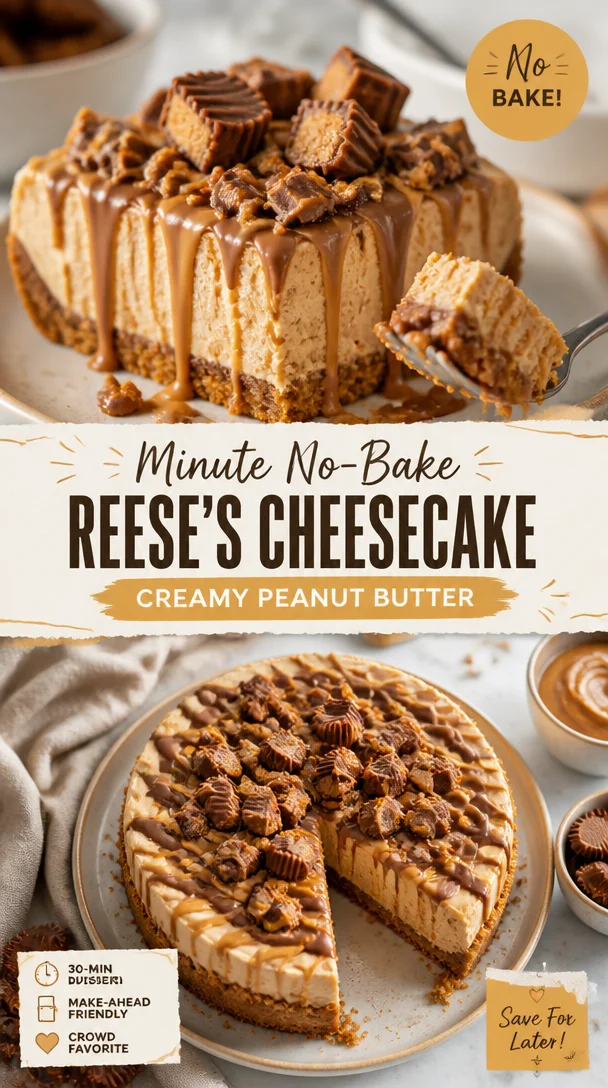
Minute No-Bake Reese’s Cheesecake: Creamy Peanut Butter
Indulge in a Slice of Heaven: Reese’s Cheesecake Recipe
Hello, fellow food lovers! Today, I’m bringing to your kitchen a scrumptious treat that’s bound to sweeten your day—Reese’s Cheesecake. Imagine the velvety creaminess of traditional cheesecake mingling with the rich, nutty flavor of peanut butter and the comforting crunch of Oreo crust. If you’re a peanut butter fan (like I am), this is the dessert for you! So, grab your apron, and let’s dive into this delightful baking adventure together!
A Slice of Nostalgia
Growing up, my family had a tradition of “treat Fridays.” Each week was a culinary surprise: brownies one week, cookies another, and sometimes—even cheesecake. I still remember the excitement of arriving home from school, greeted by a heavenly scent wafting through the house. But it was one Friday that I discovered the magic of peanut butter: my mom whipped up a cheesecake inspired by a recipe she found tucked away in an old cookbook. It featured a chocolate crust and a peanut buttery filling that seemed to have a personality all its own.
We devoured that cheesecake as a family, and the laughter, stories, and crumbs that followed are etched in my heart forever. Since then, I have been on a mission to recreate that moment of joy—with my own twist. So, let’s channel our inner peanut butter lovers and create a masterpiece that’ll evoke those sweet memories while adding a deliciously modern flair.
Ingredients
Gather these ingredients for a cheesecake that will impress everyone at your table:
-
2 3/4 cups (369g) Oreo crumbs (about 31 Oreos)
These provide a rich, chocolatey base. No Oreos? Substitute with graham cracker crumbs mixed with cocoa powder for a similar flavor. -
5 tbsp (70g) unsalted butter, melted
This helps bind the crust. You can swap for coconut oil if you want a different layer of flavor—just ensure it’s melted. -
24 oz (678g) cream cheese, room temperature
Essential for creaminess. Don’t have cream cheese? Mascarpone can be a lovely alternative, yielding a slightly different—but equally delicious—taste! -
1 cup (207g) sugar
Sweetness personified. For a less sweet option, consider using coconut sugar or a sugar substitute if desired. -
3 tbsp (24g) all-purpose flour
This stabilizes the filling. If gluten-free, use almond flour or a gluten-free blend. -
3/4 cup (173g) sour cream, room temperature
The tang balances the sweetness. Greek yogurt works as a great substitute while keeping that creamy texture. -
3/4 cup (210g) creamy peanut butter
The star of the show! For a crunchy touch, use crunchy peanut butter—literally adding that extra crunch. -
2 tsp vanilla extract
Vanilla amplifies flavor. If you’re in a pinch, try almond extract for a different but delightful twist. -
4 large eggs, room temperature
Eggs provide structure. If you prefer a vegan option, you can use flax eggs (1 tbsp ground flaxseed mixed with 2.5 tbsp water = 1 egg) or silken tofu blended until smooth. -
34 (297g) mini Reese’s peanut butter cups, unwrapped, chopped
The little treasures that make every bite feel decadent. You can also use other chocolate candies if you wish to mix it up! -
4 oz (113g) semi-sweet chocolate chips
For a rich topping. Dark chocolate chips or milk chocolate can be substituted based on your preference! -
6 tbsp (90ml) heavy whipping cream
This adds a luscious element to the topping. If needed, coconut cream is a fantastic dairy-free option. -
3/4 cup (180ml) heavy whipping cream, cold
Ensure it’s cold for the best whipped cream! Again, coconut cream can do wonders here. -
1/2 cup (58g) powdered sugar
Sweetens the whipped cream beautifully. You might find success with powdered erythritol if looking for a sugar alternative. -
3 tbsp (48g) creamy peanut butter
You know it—more peanut butter goodness! -
1/2 tsp vanilla extract
A dab here enhances the whipped cream flavor. -
7 full-size Reese’s peanut butter cups, unwrapped and cut in half
These glorious halves crown our cheesecake—an irresistible touch!
Step-by-Step Instructions
Alright, folks, it’s time to bring this beautiful cake to life! Follow these steps, and I’ll sprinkle in some of my favorite tips along the way:
-
Preheat your oven to 325°F (163°C). A warm oven will help the cheesecake bake evenly, creating that perfect texture we crave.
-
Make the Oreo crust: In a mixing bowl, combine the Oreo crumbs and melted butter. Use a fork to mix until the crumbs are well-coated. It should resemble wet sand! Press the mixture firmly into the bottom of a 9-inch springform pan, ensuring it’s evenly distributed. This step is key—don’t skip it! Use the back of a measuring cup for an even, firm crust.
-
Bake the crust: Place your crust in the preheated oven and bake for about 10 minutes. This helps set the crust while adding a subtle toasty flavor. Once done, let it cool while you whip up the filling.
-
Beat the cream cheese: In a large mixing bowl, beat the room-temperature cream cheese until creamy. Ensure there are no lumps—nobody wants a lumpy cheesecake!
-
Add sugar and flour: Gradually add in the sugar and flour, mixing until well combined. This step is crucial for achieving that smooth texture.
-
Incorporate the sour cream and peanut butter: Mix in the sour cream and peanut butter until fully blended. Here’s a tip: feel free to sneak a taste of the filling—it’s divine!
-
Add vanilla and eggs: Next, mix in the vanilla extract, and then add the eggs, one at a time. Be sure to scrape down the sides of the bowl in between—nobody wants missed pockets of cream cheese!
-
Fold in the Reese’s cups: Gently fold in the chopped mini Reese’s cups. This adds bursts of chocolate and peanut butter that’ll make every bite memorable.
-
Pour into the crust: Carefully pour the cheesecake filling onto your prepared Oreo crust, smoothing the top with a spatula.
-
Bake the cheesecake: Bake in the oven for about 50-60 minutes, or until the edges are set but the center still jiggles slightly. This step ensures a creamy texture without overcooking.
-
Let it cool and refrigerate: Once baked, turn off the oven and crack the oven door. Let the cheesecake cool in the oven for about an hour—this helps prevent cracking! Next, refrigerate for at least 4 hours, but ideally overnight.
-
Prepare the chocolate ganache: For the topping, heat the 6 tbsp of heavy cream in a small saucepan until it’s just about to simmer. Pour it over the chocolate chips in a bowl, and let it sit for a couple of minutes. Then, stir until smooth and glossy—oh la la!
-
Make the whipped cream: In a chilled bowl, whip the cold heavy cream until soft peaks form. Gradually add in the powdered sugar, vanilla extract, and peanut butter until your whipped cream is fluffy and light. We want it to hold shape, but not be too stiff.
-
Assemble: After chilling the cheesecake, pour the ganache on top and spread it evenly. Then top generously with whipped cream. Finally, place the halved Reese’s cups around the edge like little crowns on a delicious cake!
Serving Suggestions
Now, it’s time to serve your masterpiece. Slice this beauty into generous pieces, allowing everyone to admire those gooey, chocolatey layers. I recommend serving it on a beautiful platter topped with fresh raspberries or a drizzle of chocolate sauce for a touch of elegance. Let each guest embellish their slice with extra whipped cream or nuts if they’re feeling adventurous!
Recipe Variations
Want to mix things up a little? Here are some creative variations you can try:
-
Nutty Twist: Add crushed nuts like walnuts or pecans to your Oreo crust for extra crunch and flavor.
-
Chocolate Lover’s Delight: Replace half of the peanut butter with melted chocolate for a chocolate-peanut butter cheesecake hybrid.
-
Cookie Dough Swirl: Add dollops of cookie dough throughout the cheesecake before baking for indulgent bites.
-
Banana Lovers: For a fruity touch, mix in mashed ripe bananas into the filling, leaving you with a sweet and creamy banana-peanut butter cheesecake.
-
Vegan Version: Use vegan cream cheese, almond milk yogurt, and plant-based whipped cream for a soulful dessert that everyone can enjoy!
Chef’s Notes
This recipe has had quite the journey! I’ve tweaked it over the years, adjusting the balance of flavors and the textures to make it just right. One of my dear friends once decided to make this cake but forgot the eggs—can you imagine? It turned out more like a mousse! While her creation was still delicious, we all had a hearty laugh, and it became an inside joke. Remember, every little mishap is an opportunity for your kitchen adventure!
FAQs and Troubleshooting
Here are some common questions and tips to make sure your cheesecakes turn out perfectly:
Q: Why did my cheesecake crack?
A: Cracks often happen due to rapid temperature changes. Let your cheesecake cool gradually in the oven with the door slightly ajar.
Q: How can I tell if my cheesecake is done?
A: The edges will be set while the center should still jiggle slightly when you move it. It will continue to set while it cools.
Q: Can I make this cheesecake ahead of time?
A: Absolutely! In fact, I recommend it. Cheesecake tastes even better the next day after all the flavors have had time to mingle.
Q: How do I store leftovers?
A: Store your cheesecake in the refrigerator for up to a week. Simply cover it tightly with plastic wrap or place it in an airtight container.
Nutritional Info
Here’s a basic breakdown (per slice, making about 16):
- Calories: Approximately 400
- Total Fat: 25g
- Saturated Fat: 12g
- Carbohydrates: 42g
- Fiber: 2g
- Sugar: 30g
- Protein: 6g
There you have it—your go-to Reese’s Cheesecake recipe that’s sure to impress and delight. Gather your loved ones, share some laughter, and let the feasting begin! Let’s make memorable moments around the table, one slice at a time. Happy baking, friends! 🍰❤️
PrintReese’s Cheesecake

Indulge in the rich, creamy delight of Reese’s Cheesecake, featuring a decadent Oreo crust and a peanut butter filling, perfect for peanut butter lovers.
- Prep Time: 30 minutes
- Cook Time: 60 minutes
- Total Time: 390 minutes
- Yield: 16 servings 1x
- Category: Dessert
- Method: Baking
- Cuisine: American
- Diet: Vegetarian
Ingredients
- 2 3/4 cups (369g) Oreo crumbs
- 5 tbsp (70g) unsalted butter, melted
- 24 oz (678g) cream cheese, room temperature
- 1 cup (207g) sugar
- 3 tbsp (24g) all-purpose flour
- 3/4 cup (173g) sour cream, room temperature
- 3/4 cup (210g) creamy peanut butter
- 2 tsp vanilla extract
- 4 large eggs, room temperature
- 34 (297g) mini Reese’s peanut butter cups, unwrapped, chopped
- 4 oz (113g) semi-sweet chocolate chips
- 6 tbsp (90ml) heavy whipping cream
- 3/4 cup (180ml) heavy whipping cream, cold
- 1/2 cup (58g) powdered sugar
- 3 tbsp (48g) creamy peanut butter
- 1/2 tsp vanilla extract
- 7 full-size Reese’s peanut butter cups, unwrapped and cut in half
Instructions
- Preheat your oven to 325°F (163°C).
- Make the Oreo crust by mixing Oreo crumbs and melted butter until well-coated. Press firmly into the bottom of a 9-inch springform pan.
- Bake the crust for about 10 minutes, then let it cool.
- Beat the cream cheese until creamy with no lumps.
- Add sugar and flour, mixing until well combined.
- Incorporate sour cream and peanut butter until fully blended.
- Add vanilla extract and then eggs, one at a time, mixing well.
- Fold in chopped mini Reese’s cups.
- Pour the cheesecake filling onto the prepared crust, smoothing the top.
- Bake for about 50-60 minutes, until the edges are set but the center jiggles slightly.
- Let the cheesecake cool in the oven for about an hour, then refrigerate for at least 4 hours.
- Prepare the chocolate ganache by heating heavy cream and pouring it over chocolate chips, stirring until smooth.
- Make the whipped cream by whipping cold heavy cream until soft peaks form; add powdered sugar, vanilla extract, and peanut butter.
- Assemble the cheesecake by pouring ganache on top, spreading whipped cream, and garnishing with halved Reese’s cups.
Notes
Store leftovers in the refrigerator for up to a week.
Nutrition
- Serving Size: 1 slice
- Calories: 400
- Sugar: 30g
- Sodium: 300mg
- Fat: 25g
- Saturated Fat: 12g
- Unsaturated Fat: 8g
- Trans Fat: 0g
- Carbohydrates: 42g
- Fiber: 2g
- Protein: 6g
- Cholesterol: 70mg
Keywords: cheesecake, peanut butter, dessert, chocolate, Oreos
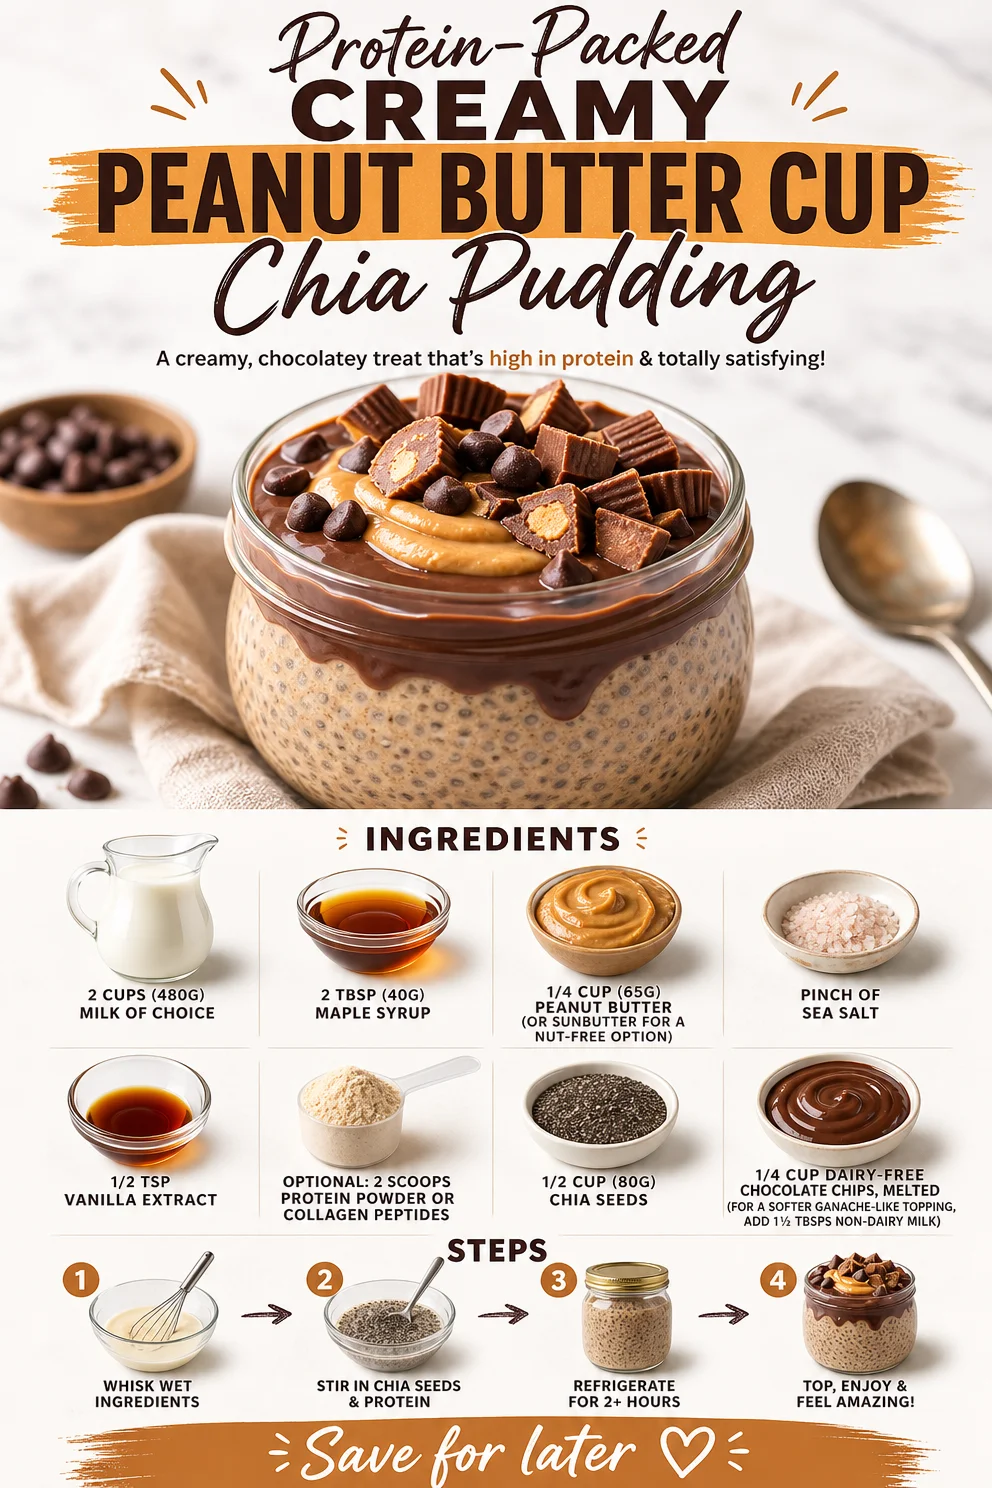
Protein-Packed Creamy Peanut Butter Cup Chia Pudding
Creamy Peanut Butter Cup Chia Pudding: A Decadent Delight
Imagine this: It’s a late afternoon, the sunlight is filtering through your kitchen window, and you can smell the rich aroma of peanut butter wafting through the air. You’re craving something sweet but want to keep it healthy, too. Enter Creamy Peanut Butter Cup Chia Pudding! It’s the perfect blend of indulgence and nourishment, with a nutty twist that satisfies your sweet tooth without the guilt.
This pudding is a fantastic option for breakfast, a snack, or even dessert. Packed with omega-3 fatty acids, protein, and healthy fats, it’s as delightful for your body as it is for your taste buds. Plus, it’ll impress anyone you serve it to with its creamy texture and rich flavor, making it a fantastic addition to your hosting repertoire.
Now, let’s dive into why this dish holds such a special place in my heart and my kitchen!
A Nostalgic Taste of Home
Growing up, peanut butter was a staple in our household. My siblings and I would slather it on everything from fresh bananas to those classic white bread sandwiches, eagerly anticipating our next sweet fix. One of my fondest memories is from a summer afternoon when we concocted our first peanut butter dessert with mom—a no-bake pie that included layers of rich chocolate and creamy peanut butter.
That day sparked a love affair with the pairing, and since then, I’ve dedicated myself to finding ways to incorporate the flavors I adored into healthier options. When I stumbled upon chia seeds, I knew I had to create a pudding that could capture the essence of that nostalgic dessert while packing in plenty of nourishment. And voilà! The Creamy Peanut Butter Cup Chia Pudding was born.
Ingredients
Let’s talk about what you’ll need for this delicious treat! Here’s your shopping list:
- 2 cups (480g) milk of choice: Use almond, coconut, soy, or dairy milk depending on your preference. Each will give a slightly different flavor and texture.
- 2 tbsp (40g) maple syrup: This adds a beautiful sweetness. If you’re looking for a lower-glycemic option, try using agave syrup or even stevia!
- 1/4 cup (65g) peanut butter: For the classic taste! If there are nut allergies or you prefer a different twist, feel free to use SunButter or almond butter.
- Pinch of sea salt: Enhances the flavor and balances the sweetness. Trust me; it makes a difference!
- 1/2 tsp vanilla extract: This adds warmth and depth to the pudding. For a different flavor profile, consider using almond extract.
- Optional: 2 scoops protein powder or collagen peptides: Perfect for adding an extra boost if you’re enjoying this as a post-workout treat.
- 1/2 cup (80g) chia seeds: Packed with fiber and omega-3s, these little guys are what give our pudding that delightful, creamy texture.
- 1/4 cup dairy-free chocolate chips, melted: For a chocolatey topping reminiscent of a peanut butter cup! For a softer consistency, add 1 ½ tbsp of non-dairy milk when melting.
Step-by-Step Instructions
Ready to make this decadent treat? Follow these easy steps to whip up your Creamy Peanut Butter Cup Chia Pudding.
-
Combine the Base Ingredients
In a medium bowl, combine your milk of choice, maple syrup, and peanut butter. Using a whisk, mix until the peanut butter is fully incorporated and there are no lumps. Pro tip: For easier mixing, you can warm the peanut butter slightly—this helps it blend smoothly! -
Add Flavor Enhancers
Sprinkle in the pinch of sea salt, vanilla extract, and protein powder (if using). Stir until everything is well combined. Taste! Adjust sweetness if needed by adding more maple syrup. -
Mix in the Chia Seeds
Add in those chia seeds! Stir well to ensure they’re evenly distributed throughout the mixture. Chia seeds are magical—they’ll swell and create that creamy pudding texture as they absorb the liquid. -
Let it Set
Cover the bowl with plastic wrap or a lid and place it in the fridge for at least 2 hours or overnight if you can wait. This is the patience-testing part, but trust me, it’s worth it! -
Melt the Chocolate
Once your pudding has set, it’s time to melt those chocolate chips. You can do this in a microwave-safe bowl in 30-second intervals, stirring in between, or use a double boiler. If you’re adding the option of non-dairy milk for a softer consistency, mix that in while you melt. -
Assemble and Serve
To serve, spoon the chia pudding into individual cups or small bowls. Drizzle the melted chocolate over the top like a beautiful finishing touch. You can even sprinkle a few extra chocolate chips for added indulgence!
Serving Suggestions
For an extra layer of delight, consider garnishing your pudding with a dollop of coconut whipped cream or a few slices of banana. Set it alongside a warm cup of coffee or tea, and you’ve created a lovely little indulgence that’s perfect for breakfast or dessert!
Recipe Variations
- Nut-Free Option: Swap peanut butter for sunflower seed butter (SunButter) to keep it nut-free.
- Chocolate Overload: Add cocoa powder to the base mix for a richer chocolate flavor.
- Fruity Twist: Mix in some mashed bananas or pureed berries to the base recipe for added sweetness and flavor.
- Spiced Up Pudding: Add a pinch of cinnamon or nutmeg to warm up the flavors.
- Vegan Delight: Ensure all ingredients are plant-based, like opting for coconut yogurt instead of milk.
Chef’s Notes
This recipe has evolved over time through experimentation! I’ve played around with different nut butters, variations of sweeteners, and even added mashed bananas for a fruitier take! The beauty of this pudding lies in its flexibility—it’s truly a canvas for your creativity. And if you’re anything like me, you may end up devouring a bowl (or two) before it even makes it to the fridge!
FAQs and Troubleshooting
-
Why did my chia pudding not thicken?
If your pudding didn’t thicken up, it could be that it didn’t have enough time to set. Chia seeds need enough time to absorb liquid (at least a couple of hours). If it’s too thin after setting, try mixing in a few more chia seeds and letting it sit longer. -
Can I use regular yogurt instead of milk?
Absolutely! You can replace milk with your favorite yogurt to create a thicker texture, but be aware that this may alter the pudding’s flavor slightly. -
What if the pudding is too sweet for me?
Each sweetener has a different level of intensity, so if you find it too sweet, cut back on the maple syrup, or add more milk and chia seeds to balance it out. -
How long will this pudding last?
Store the pudding in an airtight container in the refrigerator for up to 5 days. The flavors will continue to deepen and meld together as it sits!
Nutritional Info
This is an approximate estimate, varies by ingredient choices:
- Calories: 270
- Protein: 10g
- Carbs: 30g
- Fats: 15g
- Fiber: 10g
And there you have it! Your journey to making Creamy Peanut Butter Cup Chia Pudding is complete. This delectable dessert not only pleases the palate but allows you to reminisce about those simple joys of childhood. So, tie on that apron, gather your ingredients, and let’s create this timeless treat together! Enjoy every creamy, dreamy bite—because good food is all about the moments we share at the table. Happy cooking!
PrintCreamy Peanut Butter Cup Chia Pudding
A decadent yet healthy pudding combining peanut butter, chia seeds, and a touch of sweetness for a delightful treat.
- Prep Time: 10 minutes
- Cook Time: 0 minutes
- Total Time: 120 minutes
- Yield: 4 servings 1x
- Category: Dessert
- Method: Refrigeration
- Cuisine: American
- Diet: Vegetarian
Ingredients
- 2 cups (480g) milk of choice
- 2 tbsp (40g) maple syrup
- 1/4 cup (65g) peanut butter
- Pinch of sea salt
- 1/2 tsp vanilla extract
- Optional: 2 scoops protein powder or collagen peptides
- 1/2 cup (80g) chia seeds
- 1/4 cup dairy-free chocolate chips, melted
Instructions
- Combine the milk of choice, maple syrup, and peanut butter in a medium bowl. Whisk until smooth.
- Add the pinch of sea salt, vanilla extract, and protein powder (if using), and stir well.
- Mix in the chia seeds, ensuring they are evenly distributed throughout.
- Cover with plastic wrap and refrigerate for at least 2 hours or overnight.
- Melt the chocolate chips in a microwave or double boiler.
- Assemble by spooning the chia pudding into servings and drizzling melted chocolate over the top.
Notes
For a nut-free option, use sunflower seed butter instead of peanut butter. You can also add cocoa powder or fruits for variations.
Nutrition
- Serving Size: 1 serving
- Calories: 270
- Sugar: 8g
- Sodium: 170mg
- Fat: 15g
- Saturated Fat: 3g
- Unsaturated Fat: 10g
- Trans Fat: 0g
- Carbohydrates: 30g
- Fiber: 10g
- Protein: 10g
- Cholesterol: 0mg
Keywords: chia pudding, healthy dessert, peanut butter, vegan pudding
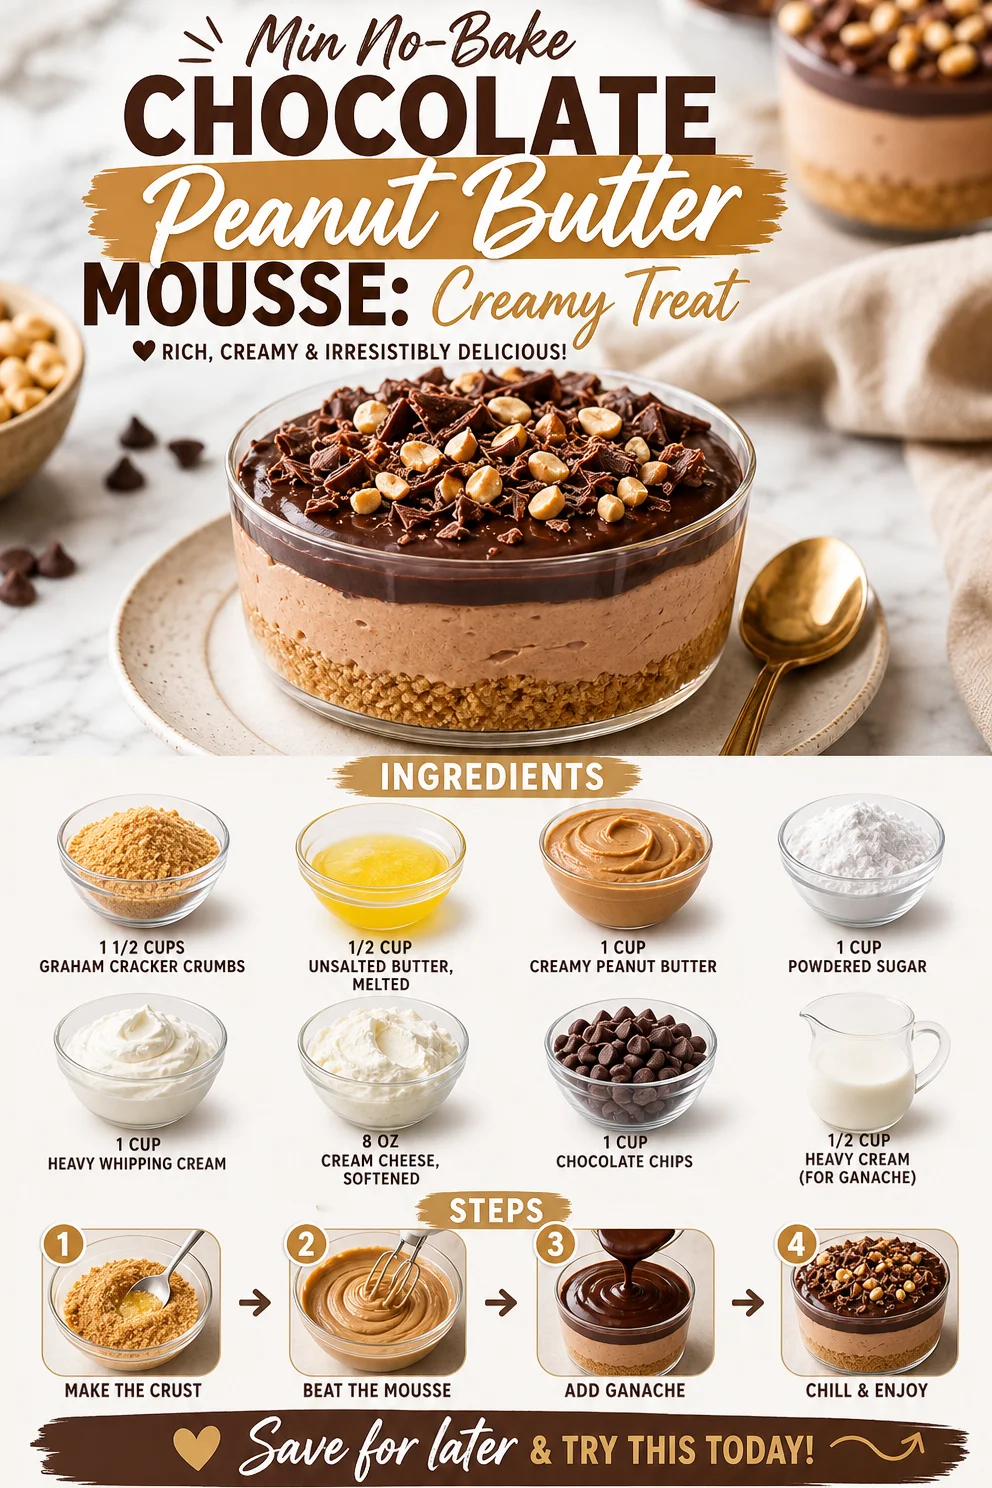
Min No-Bake Chocolate Peanut Butter Mousse: Creamy Treat
Indulge in Decadence: No-Bake Chocolate Peanut Butter Mousse Dessert
Hello, dessert lovers! Have you ever had that delightful moment when a simple combination of ingredients takes you back to your childhood, to warm kitchens filled with giggles and the sweet aroma of treats wafting through the air? That feeling? The one that makes you want to create delicious memories around your table? Well, today we’re diving into a dreamy No-Bake Chocolate Peanut Butter Mousse Dessert that will have you reminiscing and indulging in nostalgia all at once.
I mean, who can resist that velvety layer of chocolate paired with the rich, creamy taste of peanut butter? Seriously, it’s like a flavor celebration right in your mouth. Picture this: a rich chocolate mousse layered atop a buttery graham cracker crust, finished with a luscious peanut butter cream. It’s not just a dessert; it’s an experience! Let’s get those taste buds tingling and prepare our hearts (and stomachs) for something special.
This dessert not only satisfies your sweet cravings, but it also spreads joy and simple joys of life. Each bite is a little reminder to slow down and enjoy the beautiful moments — whether you’re planning a cozy dinner for two, a lively gathering with friends, or just a special treat for yourself. Trust me, you’ll want to keep this recipe close at hand. Ready to get started? Let’s whip up this deliciousness together!
A Taste of Nostalgia
Growing up, my kitchen was a hub of creativity and laughter, especially when it came to dessert time. I can vividly remember those lazy summer days when my mom and I would invent things in the kitchen, armed with nothing but a list of ingredients and a whole lot of enthusiasm. One such day, we decided to experiment with peanut butter, chocolate, and whatever else we could get our hands on from the pantry. As we stirred and tasted, we became engrossed in creating the “perfect” dessert.
Of course, our concoction didn’t always look perfect, but oh, the flavors! We made a mess, dropped chocolate chips, and definitely had some spilled peanut butter along the way, but we were having the best time. Fast forward all these years, and that childhood love for sweet creations hasn’t changed a bit. The No-Bake Chocolate Peanut Butter Mousse Dessert we’re making today captures those joyous moments perfectly. So, roll up your sleeves, and let’s create a sweet memory together!
Ingredients
Here’s what you’ll need to whip up this amazing dessert:
-
1 1/2 cups graham cracker crumbs
These create the perfect buttery base. For a gluten-free version, swap them out for gluten-free graham crackers or even almond flour. -
1/2 cup unsalted butter, melted
The melted butter helps bind the crumbs together. You can use coconut oil for a non-dairy option. -
1 cup creamy peanut butter
The star of our show! Opt for natural peanut butter for a healthier twist. If you prefer almond or cashew butter, they’ll work wonderfully too. -
1 cup powdered sugar
Sweetness brings everything together. If you’re watching your sugar intake, you can use powdered erythritol as a substitute. -
1 cup heavy whipping cream
This will be whipped to create that light, fluffy mousse texture. If you need a dairy-free version, try canned coconut cream. -
8 oz cream cheese, softened
It adds richness and stability to the mousse. For a healthier variation, consider using Greek yogurt. -
1 cup chocolate chips
Semi-sweet or dark, chocolate chips melt beautifully for our mousse. You could also use dairy-free chocolate chips for a vegan option. -
1/2 cup heavy cream (for ganache)
This will make a rich ganache to pour over. Again, feel free to substitute with coconut cream for a non-dairy version.
Step-by-Step Instructions
Now, let’s dive into the magic of cooking! Here’s how to bring it all together:
-
Prepare the crust:
- In a mixing bowl, combine the graham cracker crumbs with the melted butter. Mix until all crumbs are moistened. This is your first crust layer, and don’t skimp on the butter! It’s what gives it that delicious “sticky” texture that holds everything together.
- Press the mixture firmly into the bottom of a 9-inch pie dish (or dessert dish of your choice). Make sure to create an even layer using the back of a measuring cup or your fingers. The more evenly you press it, the better the base will hold its shape!
-
Make the mousse:
- In another bowl, beat the softened cream cheese and peanut butter together until smooth and creamy. You can’t skip this step! Properly mixing these two will ensure a luscious mousse without any lumps.
- Gradually add in the powdered sugar while continuing to beat until combined. Oh, that sweetness is heavenly!
- In a separate bowl, whip the heavy whipping cream until soft peaks form. This is where the magic happens—fluffiness is key for the perfect mousse. Use a hand mixer or a whisk, whichever you fancy. If using a whisk, just make sure to add plenty of love and elbow grease!
-
Fold everything together:
- Gently fold the whipped cream into the peanut butter mixture, using a rubber spatula. Be careful not to deflate that fluffy whipped cream. You want to maintain all that delicious airiness for ultimate indulgence!
- Once fully combined, pour the mousse over the prepared crust. Use a spatula to smooth it out evenly. Utter bliss is happening!
-
Chill:
- Place the pie dish in the refrigerator for at least 2 hours to let the mousse set. Trust me; the wait will be worth it! Nothing beats a cold slice of dessert on a warm day.
-
Prepare the ganache:
- While you wait, let’s make that luscious ganache! In a small saucepan, heat the remaining heavy cream over medium heat until it begins to simmer. Remove from heat and stir in the chocolate chips until melted and glossy. This simple trick will give you the best ganache. If it’s a bit thick, you can always add a splash more cream until it reaches your desired consistency.
-
Top it off:
- Once the mousse is set, pour the chocolate ganache over the top. Spread it gently to make sure every inch is covered in chocolaty goodness. For a little flair, you can sprinkle some extra crushed graham crackers on top for a delightful crunch.
-
Chill again:
- Return the dessert to the fridge for at least another 30 minutes to firm up the ganache. This extra time will allow everything to meld beautifully.
-
Serve and enjoy:
- Slice it up—don’t forget to use a warm knife for cleaner cuts! Serve chilled, and watch everyone’s eyes light up as they take their first bite!
Serving Suggestions
To plate this No-Bake Chocolate Peanut Butter Mousse Dessert, gently slice generous pieces and place them on dessert plates. A dollop of whipped cream and a sprinkle of crushed peanuts on top always makes for a gorgeous finish. Garnish with chocolate shavings for that extra touch of elegance. Let the beauty speak for itself!
Recipe Variations
- Nut-Free Version: Use sunflower seed butter in place of peanut butter and check for nut-free graham crackers.
- Dairy-Free Delight: Substitute cream cheese and heavy cream with vegan options like cashew cream or silken tofu to achieve a creamy texture.
- Extra Chocolate: Add melted chocolate directly to the mousse for a more intensive chocolate flavor.
- Fruit Layer: Incorporate fresh banana or raspberry layers to add a fruity twist between the mousse layers.
- Spicy Kick: A sprinkle of cayenne pepper or chili powder in the chocolate ganache can create a delightful surprise!
Chef’s Notes
You know, this dessert has become one of those go-to recipes for me. Anytime someone asks for a quick and impressive treat, this is my answer! I love how adaptable it is; you can play around with flavors and textures endlessly. Each time I make it, I remember that day in the kitchen with my mom, a reminder that sometimes the best recipes come from spontaneous moments. Plus, there’s always something special about a no-bake dessert—fewer dishes and quicker mess clean-up!
FAQs and Troubleshooting
1. Why is my mousse not setting?
If your mousse hasn’t set, it may need a bit more chilling time. Just be patient; sometimes, it needs a few extra hours!
2. Can I make this ahead of time?
Absolutely! This dessert stores beautifully in the fridge for up to two days. It’s perfect for prepping ahead for gatherings.
3. How can I prevent my cream from deflating?
When folding in whipped cream, use a gentle hand and spatula, making sure not to stir too vigorously. You want to keep that airy texture intact!
4. What’s the best way to slice the dessert?
Run a knife under warm water, dry it off, and slice. This technique gives you crisp, clean edges with each piece!
With this No-Bake Chocolate Peanut Butter Mousse Dessert, you’re not just cooking; you’re creating memories—one delicious bite at a time. So gather your ingredients, bring some friends over, and let’s get to creating something magical. Until next time, happy cooking and sweet indulgences!
PrintNo-Bake Chocolate Peanut Butter Mousse Dessert
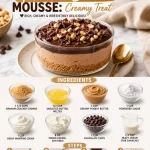
A rich and creamy no-bake dessert that combines layers of chocolate mousse and peanut butter cream over a buttery graham cracker crust.
- Prep Time: 15 minutes
- Cook Time: 0 minutes
- Total Time: 150 minutes
- Yield: 8 servings 1x
- Category: Dessert
- Method: No-Bake
- Cuisine: American
- Diet: Nut-Free, Gluten-Free Option
Ingredients
- 1 1/2 cups graham cracker crumbs
- 1/2 cup unsalted butter, melted
- 1 cup creamy peanut butter
- 1 cup powdered sugar
- 1 cup heavy whipping cream
- 8 oz cream cheese, softened
- 1 cup chocolate chips
- 1/2 cup heavy cream (for ganache)
Instructions
- Prepare the crust: In a mixing bowl, combine the graham cracker crumbs with the melted butter. Mix until all crumbs are moistened. Press the mixture firmly into the bottom of a 9-inch pie dish.
- Make the mousse: In another bowl, beat the softened cream cheese and peanut butter together until smooth. Gradually add in the powdered sugar while continuing to beat until combined. In a separate bowl, whip the heavy whipping cream until soft peaks form.
- Fold everything together: Gently fold the whipped cream into the peanut butter mixture. Once fully combined, pour the mousse over the prepared crust.
- Chill: Place the pie dish in the refrigerator for at least 120 minutes to let the mousse set.
- Prepare the ganache: In a saucepan, heat the remaining heavy cream until it begins to simmer. Remove from heat and stir in the chocolate chips until melted.
- Top it off: Once the mousse is set, pour the chocolate ganache over the top and spread it out evenly.
- Chill again: Return the dessert to the fridge for at least another 30 minutes.
- Serve and enjoy: Slice it up and serve chilled with whipped cream and crushed peanuts.
Notes
For a gluten-free version, use gluten-free graham crackers. For a dairy-free version, substitute cream cheese and heavy cream with vegan options.
Nutrition
- Serving Size: 1 slice
- Calories: 400
- Sugar: 20g
- Sodium: 250mg
- Fat: 24g
- Saturated Fat: 10g
- Unsaturated Fat: 12g
- Trans Fat: 0g
- Carbohydrates: 40g
- Fiber: 2g
- Protein: 6g
- Cholesterol: 35mg
Keywords: no-bake dessert, chocolate mousse, peanut butter, easy dessert, gluten-free