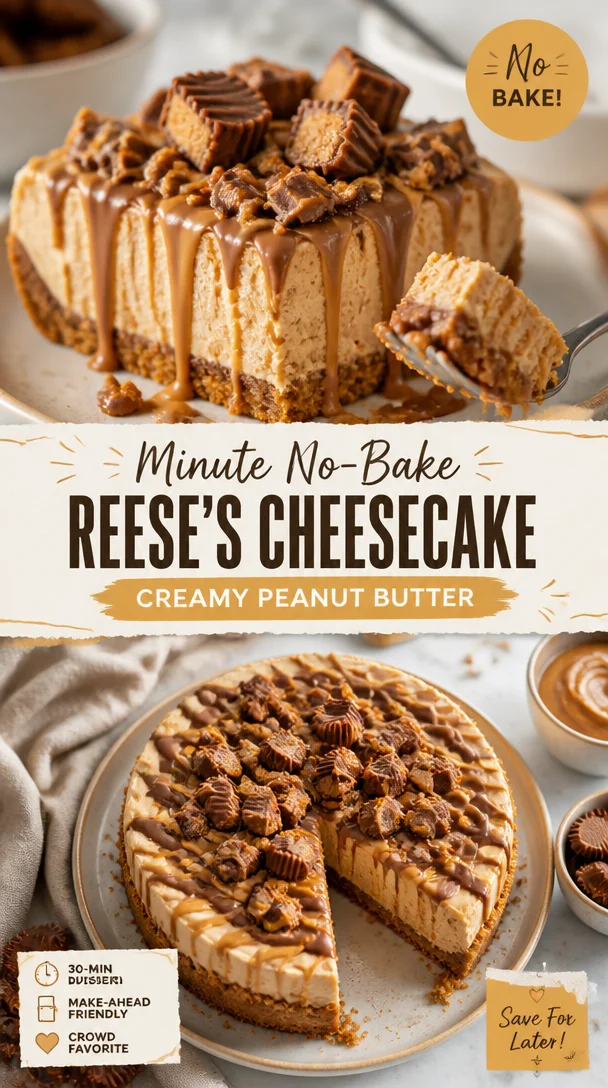
Minute No-Bake Reese’s Cheesecake: Creamy Peanut Butter
Indulge in a Slice of Heaven: Reese’s Cheesecake Recipe
Hello, fellow food lovers! Today, I’m bringing to your kitchen a scrumptious treat that’s bound to sweeten your day—Reese’s Cheesecake. Imagine the velvety creaminess of traditional cheesecake mingling with the rich, nutty flavor of peanut butter and the comforting crunch of Oreo crust. If you’re a peanut butter fan (like I am), this is the dessert for you! So, grab your apron, and let’s dive into this delightful baking adventure together!
A Slice of Nostalgia
Growing up, my family had a tradition of “treat Fridays.” Each week was a culinary surprise: brownies one week, cookies another, and sometimes—even cheesecake. I still remember the excitement of arriving home from school, greeted by a heavenly scent wafting through the house. But it was one Friday that I discovered the magic of peanut butter: my mom whipped up a cheesecake inspired by a recipe she found tucked away in an old cookbook. It featured a chocolate crust and a peanut buttery filling that seemed to have a personality all its own.
We devoured that cheesecake as a family, and the laughter, stories, and crumbs that followed are etched in my heart forever. Since then, I have been on a mission to recreate that moment of joy—with my own twist. So, let’s channel our inner peanut butter lovers and create a masterpiece that’ll evoke those sweet memories while adding a deliciously modern flair.
Ingredients
Gather these ingredients for a cheesecake that will impress everyone at your table:
-
2 3/4 cups (369g) Oreo crumbs (about 31 Oreos)
These provide a rich, chocolatey base. No Oreos? Substitute with graham cracker crumbs mixed with cocoa powder for a similar flavor. -
5 tbsp (70g) unsalted butter, melted
This helps bind the crust. You can swap for coconut oil if you want a different layer of flavor—just ensure it’s melted. -
24 oz (678g) cream cheese, room temperature
Essential for creaminess. Don’t have cream cheese? Mascarpone can be a lovely alternative, yielding a slightly different—but equally delicious—taste! -
1 cup (207g) sugar
Sweetness personified. For a less sweet option, consider using coconut sugar or a sugar substitute if desired. -
3 tbsp (24g) all-purpose flour
This stabilizes the filling. If gluten-free, use almond flour or a gluten-free blend. -
3/4 cup (173g) sour cream, room temperature
The tang balances the sweetness. Greek yogurt works as a great substitute while keeping that creamy texture. -
3/4 cup (210g) creamy peanut butter
The star of the show! For a crunchy touch, use crunchy peanut butter—literally adding that extra crunch. -
2 tsp vanilla extract
Vanilla amplifies flavor. If you’re in a pinch, try almond extract for a different but delightful twist. -
4 large eggs, room temperature
Eggs provide structure. If you prefer a vegan option, you can use flax eggs (1 tbsp ground flaxseed mixed with 2.5 tbsp water = 1 egg) or silken tofu blended until smooth. -
34 (297g) mini Reese’s peanut butter cups, unwrapped, chopped
The little treasures that make every bite feel decadent. You can also use other chocolate candies if you wish to mix it up! -
4 oz (113g) semi-sweet chocolate chips
For a rich topping. Dark chocolate chips or milk chocolate can be substituted based on your preference! -
6 tbsp (90ml) heavy whipping cream
This adds a luscious element to the topping. If needed, coconut cream is a fantastic dairy-free option. -
3/4 cup (180ml) heavy whipping cream, cold
Ensure it’s cold for the best whipped cream! Again, coconut cream can do wonders here. -
1/2 cup (58g) powdered sugar
Sweetens the whipped cream beautifully. You might find success with powdered erythritol if looking for a sugar alternative. -
3 tbsp (48g) creamy peanut butter
You know it—more peanut butter goodness! -
1/2 tsp vanilla extract
A dab here enhances the whipped cream flavor. -
7 full-size Reese’s peanut butter cups, unwrapped and cut in half
These glorious halves crown our cheesecake—an irresistible touch!
Step-by-Step Instructions
Alright, folks, it’s time to bring this beautiful cake to life! Follow these steps, and I’ll sprinkle in some of my favorite tips along the way:
-
Preheat your oven to 325°F (163°C). A warm oven will help the cheesecake bake evenly, creating that perfect texture we crave.
-
Make the Oreo crust: In a mixing bowl, combine the Oreo crumbs and melted butter. Use a fork to mix until the crumbs are well-coated. It should resemble wet sand! Press the mixture firmly into the bottom of a 9-inch springform pan, ensuring it’s evenly distributed. This step is key—don’t skip it! Use the back of a measuring cup for an even, firm crust.
-
Bake the crust: Place your crust in the preheated oven and bake for about 10 minutes. This helps set the crust while adding a subtle toasty flavor. Once done, let it cool while you whip up the filling.
-
Beat the cream cheese: In a large mixing bowl, beat the room-temperature cream cheese until creamy. Ensure there are no lumps—nobody wants a lumpy cheesecake!
-
Add sugar and flour: Gradually add in the sugar and flour, mixing until well combined. This step is crucial for achieving that smooth texture.
-
Incorporate the sour cream and peanut butter: Mix in the sour cream and peanut butter until fully blended. Here’s a tip: feel free to sneak a taste of the filling—it’s divine!
-
Add vanilla and eggs: Next, mix in the vanilla extract, and then add the eggs, one at a time. Be sure to scrape down the sides of the bowl in between—nobody wants missed pockets of cream cheese!
-
Fold in the Reese’s cups: Gently fold in the chopped mini Reese’s cups. This adds bursts of chocolate and peanut butter that’ll make every bite memorable.
-
Pour into the crust: Carefully pour the cheesecake filling onto your prepared Oreo crust, smoothing the top with a spatula.
-
Bake the cheesecake: Bake in the oven for about 50-60 minutes, or until the edges are set but the center still jiggles slightly. This step ensures a creamy texture without overcooking.
-
Let it cool and refrigerate: Once baked, turn off the oven and crack the oven door. Let the cheesecake cool in the oven for about an hour—this helps prevent cracking! Next, refrigerate for at least 4 hours, but ideally overnight.
-
Prepare the chocolate ganache: For the topping, heat the 6 tbsp of heavy cream in a small saucepan until it’s just about to simmer. Pour it over the chocolate chips in a bowl, and let it sit for a couple of minutes. Then, stir until smooth and glossy—oh la la!
-
Make the whipped cream: In a chilled bowl, whip the cold heavy cream until soft peaks form. Gradually add in the powdered sugar, vanilla extract, and peanut butter until your whipped cream is fluffy and light. We want it to hold shape, but not be too stiff.
-
Assemble: After chilling the cheesecake, pour the ganache on top and spread it evenly. Then top generously with whipped cream. Finally, place the halved Reese’s cups around the edge like little crowns on a delicious cake!
Serving Suggestions
Now, it’s time to serve your masterpiece. Slice this beauty into generous pieces, allowing everyone to admire those gooey, chocolatey layers. I recommend serving it on a beautiful platter topped with fresh raspberries or a drizzle of chocolate sauce for a touch of elegance. Let each guest embellish their slice with extra whipped cream or nuts if they’re feeling adventurous!
Recipe Variations
Want to mix things up a little? Here are some creative variations you can try:
-
Nutty Twist: Add crushed nuts like walnuts or pecans to your Oreo crust for extra crunch and flavor.
-
Chocolate Lover’s Delight: Replace half of the peanut butter with melted chocolate for a chocolate-peanut butter cheesecake hybrid.
-
Cookie Dough Swirl: Add dollops of cookie dough throughout the cheesecake before baking for indulgent bites.
-
Banana Lovers: For a fruity touch, mix in mashed ripe bananas into the filling, leaving you with a sweet and creamy banana-peanut butter cheesecake.
-
Vegan Version: Use vegan cream cheese, almond milk yogurt, and plant-based whipped cream for a soulful dessert that everyone can enjoy!
Chef’s Notes
This recipe has had quite the journey! I’ve tweaked it over the years, adjusting the balance of flavors and the textures to make it just right. One of my dear friends once decided to make this cake but forgot the eggs—can you imagine? It turned out more like a mousse! While her creation was still delicious, we all had a hearty laugh, and it became an inside joke. Remember, every little mishap is an opportunity for your kitchen adventure!
FAQs and Troubleshooting
Here are some common questions and tips to make sure your cheesecakes turn out perfectly:
Q: Why did my cheesecake crack?
A: Cracks often happen due to rapid temperature changes. Let your cheesecake cool gradually in the oven with the door slightly ajar.
Q: How can I tell if my cheesecake is done?
A: The edges will be set while the center should still jiggle slightly when you move it. It will continue to set while it cools.
Q: Can I make this cheesecake ahead of time?
A: Absolutely! In fact, I recommend it. Cheesecake tastes even better the next day after all the flavors have had time to mingle.
Q: How do I store leftovers?
A: Store your cheesecake in the refrigerator for up to a week. Simply cover it tightly with plastic wrap or place it in an airtight container.
Nutritional Info
Here’s a basic breakdown (per slice, making about 16):
- Calories: Approximately 400
- Total Fat: 25g
- Saturated Fat: 12g
- Carbohydrates: 42g
- Fiber: 2g
- Sugar: 30g
- Protein: 6g
There you have it—your go-to Reese’s Cheesecake recipe that’s sure to impress and delight. Gather your loved ones, share some laughter, and let the feasting begin! Let’s make memorable moments around the table, one slice at a time. Happy baking, friends! 🍰❤️
PrintReese’s Cheesecake

Indulge in the rich, creamy delight of Reese’s Cheesecake, featuring a decadent Oreo crust and a peanut butter filling, perfect for peanut butter lovers.
- Prep Time: 30 minutes
- Cook Time: 60 minutes
- Total Time: 390 minutes
- Yield: 16 servings 1x
- Category: Dessert
- Method: Baking
- Cuisine: American
- Diet: Vegetarian
Ingredients
- 2 3/4 cups (369g) Oreo crumbs
- 5 tbsp (70g) unsalted butter, melted
- 24 oz (678g) cream cheese, room temperature
- 1 cup (207g) sugar
- 3 tbsp (24g) all-purpose flour
- 3/4 cup (173g) sour cream, room temperature
- 3/4 cup (210g) creamy peanut butter
- 2 tsp vanilla extract
- 4 large eggs, room temperature
- 34 (297g) mini Reese’s peanut butter cups, unwrapped, chopped
- 4 oz (113g) semi-sweet chocolate chips
- 6 tbsp (90ml) heavy whipping cream
- 3/4 cup (180ml) heavy whipping cream, cold
- 1/2 cup (58g) powdered sugar
- 3 tbsp (48g) creamy peanut butter
- 1/2 tsp vanilla extract
- 7 full-size Reese’s peanut butter cups, unwrapped and cut in half
Instructions
- Preheat your oven to 325°F (163°C).
- Make the Oreo crust by mixing Oreo crumbs and melted butter until well-coated. Press firmly into the bottom of a 9-inch springform pan.
- Bake the crust for about 10 minutes, then let it cool.
- Beat the cream cheese until creamy with no lumps.
- Add sugar and flour, mixing until well combined.
- Incorporate sour cream and peanut butter until fully blended.
- Add vanilla extract and then eggs, one at a time, mixing well.
- Fold in chopped mini Reese’s cups.
- Pour the cheesecake filling onto the prepared crust, smoothing the top.
- Bake for about 50-60 minutes, until the edges are set but the center jiggles slightly.
- Let the cheesecake cool in the oven for about an hour, then refrigerate for at least 4 hours.
- Prepare the chocolate ganache by heating heavy cream and pouring it over chocolate chips, stirring until smooth.
- Make the whipped cream by whipping cold heavy cream until soft peaks form; add powdered sugar, vanilla extract, and peanut butter.
- Assemble the cheesecake by pouring ganache on top, spreading whipped cream, and garnishing with halved Reese’s cups.
Notes
Store leftovers in the refrigerator for up to a week.
Nutrition
- Serving Size: 1 slice
- Calories: 400
- Sugar: 30g
- Sodium: 300mg
- Fat: 25g
- Saturated Fat: 12g
- Unsaturated Fat: 8g
- Trans Fat: 0g
- Carbohydrates: 42g
- Fiber: 2g
- Protein: 6g
- Cholesterol: 70mg
Keywords: cheesecake, peanut butter, dessert, chocolate, Oreos
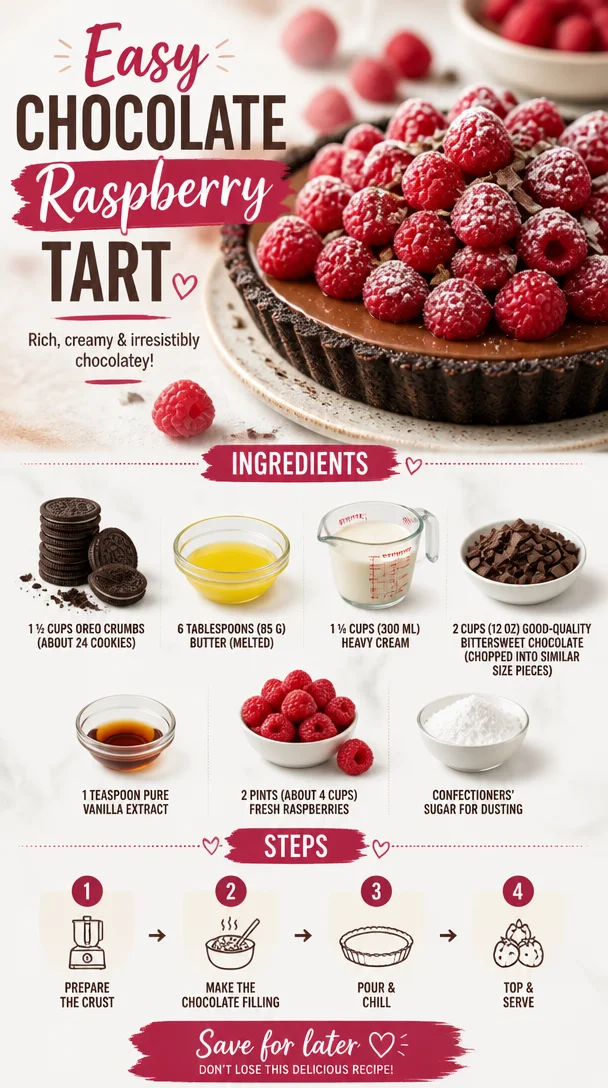
Easy Chocolate Raspberry Tart
Decadent Delight: Easy Chocolate Raspberry Tart
Hello and welcome, fellow foodies! If you’re in the mood for something indulgent, delicious, and oh-so-chic, then let’s talk about one of my all-time favorite desserts — the Easy Chocolate Raspberry Tart. Simple to whip up yet impressively elegant, this tart is a showstopper for any gathering, whether you’re hosting a chic soirée or a cozy dinner with loved ones. So grab your apron, and let’s dive into this delightful chocolatey creation!
Introduction
There’s something magical about dessert, isn’t there? It’s the sweet ending to a beautiful meal, the special treat that brings a smile to our faces, and let’s be honest, the perfect excuse to indulge a little bit. When it comes to desserts that capture elegance without the fuss, this Easy Chocolate Raspberry Tart reigns supreme.
Imagine a velvety chocolate filling cradled in a buttery Oreo crust, topped with vibrant, fresh raspberries that pop in both flavor and color. Together, they create a beautiful harmony of taste — rich yet refreshing, decadent yet light. Each slice tells a story of indulgence that feels just right, no matter the occasion.
What I adore about this tart is how effortlessly it comes together. You don’t need any advanced culinary skills to pull it off; just a bit of love, attention to detail, and maybe a glass of wine to sip on as you create this edible masterpiece. It’s the perfect balance of sophistication and simplicity, making it a must-have recipe in your collection.
Now, let’s talk about the heartwarming personal memory I have with this dish that adds a sprinkle of nostalgia to every bite.
Personal Story
I vividly remember the first time I made this Easy Chocolate Raspberry Tart for my best friend’s birthday. We were both in college, broke but brimming with enthusiasm and dreams of becoming gourmet chefs. On that warm summer afternoon, I laid out the ingredients on our tiny kitchen counter, excitedly chatting with her about our plans while the sun streamed through the windows. As I crushed the Oreos into crumbs, we shared laughter and memories. It felt like a scene from a movie — two aspiring chefs concocting a delicious creation that would bring smiles and joy.
When the tart was finally ready, and we saw the rich chocolate filling juxtaposed with the vibrant raspberries, we couldn’t contain our excitement. We plated it up, dusting it with confectioners’ sugar like true chefs, and sat down to enjoy it together. The combination of smooth chocolate and tart raspberries was heavenly! It was a special moment filled with friendship and the joys of cooking that shaped my passion for sharing food with loved ones.
Now, let’s get into the details of creating this unforgettable dessert so you can make your own delicious memories!
Ingredients
Here’s what you’ll need for this heavenly Easy Chocolate Raspberry Tart. I’ve added some chef insights and substitution tips to guide you along the way.
-
1 ½ cups Oreo crumbs (about 24 cookies)
These provide a rich, chocolatey crust that’s super easy to make. If you’re not a fan of Oreos, feel free to use a homemade chocolate cookie or even graham cracker crumbs mixed with cocoa powder for an alternate twist. -
6 Tablespoons (85 g) butter (melted)
The melted butter brings everything together, adding richness and moisture. You can substitute it with coconut oil for a dairy-free option, but be mindful of the flavor it might impart. -
1 ¼ cups (300 ml) heavy cream
The heavy cream is the backbone of the chocolate filling, making it smooth and rich. If you’re looking for a lighter option, you can use full-fat coconut milk, but the texture will be slightly different. -
2 cups (12 oz) good-quality bittersweet chocolate (chopped into similar size pieces)
I recommend a chocolate with at least 60% cacao for a well-balanced flavor. If you prefer milk chocolate, feel free to use that, but reduce the sugar in the recipe slightly since it’ll be sweeter. -
1 teaspoon pure vanilla extract
This enhances the chocolate flavor and adds warmth. Don’t skip it! However, if you’re out, almond extract can work in a pinch for an intriguing twist. -
2 pints (about 4 cups) fresh raspberries
The fresh raspberries not only add a beautiful pop of color but also a fabulous tartness that cuts through the richness of the chocolate. If fresh berries are out of season, frozen raspberries can work; just thaw and drain any excess moisture. -
Confectioners’ sugar for dusting
This is optional but adds a lovely final touch. You can also use cocoa powder for a deeper chocolate flavor.
Step-by-Step Instructions
Ready to get baking? Here’s a detailed walkthrough for making your Easy Chocolate Raspberry Tart!
-
Prepare the Oreo Crust
Start by preheating your oven to 350°F (175°C). While it heats, combine the Oreo crumbs and melted butter in a mixing bowl. Use a fork or your hands to mix until the crumbs are evenly moistened.Chef Insight: Make sure that the consistency resembles wet sand. You want it to hold together when pressed. Once mixed, firmly press the crumb mixture into the bottom and up the sides of a 9-inch tart pan to create an even layer. Bake for about 10 minutes until set, then let it cool completely while you prepare the filling.
-
Make the Chocolate Ganache
In a medium saucepan, heat the heavy cream over medium heat until it just begins to simmer — you’ll see bubbles forming around the edges. Remove it from the heat and pour it over the chopped bittersweet chocolate in a heatproof bowl. Let it sit for a minute to soften the chocolate.Tip: This is the perfect time to check the texture of your chocolate. If you’re using chocolate chips, they will melt easily, but chopped chocolate bars create a smoother ganache.
-
Stir in Vanilla
After a minute, stir gently until the chocolate is completely melted and the mixture is smooth. Add the vanilla extract and stir to incorporate.Hack: If your ganache has lumps, you can give it a quick blitz with an immersion blender to smooth it out!
-
Pour the Mixture into the Cool Crust
Pour the luscious chocolate ganache into the cooled Oreo crust, spreading it into an even layer. Allow it to set at room temperature for a bit before transferring it to the refrigerator to chill for at least 2 hours, or until firm to the touch.Chef Tip: For an easier release from the tart pan, gently run a knife around the edges before slicing. It makes for a clean cut!
-
Add the Fresh Raspberries
Just before serving, take the tart out of the refrigerator and decorate the top with fresh raspberries. Dust with confectioners’ sugar for that extra wow factor. -
Slice and Serve
Use a sharp knife to slice the tart into wedges, serving it alongside extra raspberries if desired.Pro Tip: If the chocolate gets too solid in the fridge, let it sit at room temperature for a few minutes before slicing for cleaner cuts.
Serving Suggestions
When you serve this tart, think of the presentation! Place a slice on a dessert plate and garnish it with a few fresh raspberries on the side for a pop of color. A dollop of whipped cream or a scoop of vanilla ice cream also pairs splendidly with the tart — the creamy elements balance the rich chocolate beautifully.
Recipe Variations
-
Nutty Crust Variation
Swap out half the Oreo crumbs for finely ground almonds or walnuts for a nutty twist! -
Mint Chocolate Version
Add a drop or two of peppermint extract to the ganache mixture for a refreshing mint chocolate experience. -
Dairy-Free Delight
Use dairy-free chocolate and coconut cream instead of heavy cream to create a vegan-friendly version that doesn’t skimp on flavor. -
Fruit Medley Topping
Mix it up with different fruits! Strawberries or blueberries can provide a delightful change and add a fresh twist to the tart. -
Espresso Infusion
Add a teaspoon of instant espresso powder to the ganache to enhance the chocolate flavor for coffee lovers.
Chef’s Notes
This Easy Chocolate Raspberry Tart has a special place in my heart, and it’s evolved over time. Initially, I used to struggle with cooling the chocolate too quickly, which led to a lumpy ganache. But as I learned to gently heat the cream and give the ganache time to meld, I found that patience truly makes for a richer and smoother filling. Plus, this recipe has become a beloved favorite among friends and family, often making an appearance at birthdays and holiday gatherings. That’s what I cherish about cooking — sharing food that carries love and intention.
FAQs and Troubleshooting
-
Why did my ganache turn out grainy?
This can happen if the chocolate gets too hot or if it’s not stirred enough. Always heat the cream gently and let the chocolate sit to soften before stirring. -
Can I make this tart ahead of time?
Absolutely! You can prepare the tart a day in advance. Just keep it covered in the refrigerator until you’re ready to serve. -
What if my crust crumbled when I tried to slice it?
If the crust crumbles, it may be due to not enough butter binding it together. Next time, consider adding an extra tablespoon of melted butter to the crust mixture. -
How do I store leftovers?
Store any leftovers in the refrigerator in an airtight container for up to four days. However, I doubt it’ll last that long — it’s hard to resist!
Nutritional Info
While this tart is undoubtedly rich and indulgent, it’s all about balance in the kitchen. Each slice contains a delightful mix of flavors with quality ingredients that elevate your sweet indulgence.
So there you have it, my sweet friends! The Easy Chocolate Raspberry Tart is more than just a dessert; it’s a memory maker, a show-stopper, and an absolute treat that you’ll confidently serve time and again. Whether it’s a special occasion or just a Tuesday, let’s gather around the table and enjoy the beautiful moments that good food can create. Happy baking!
PrintEasy Chocolate Raspberry Tart
A simple yet elegant dessert featuring a rich chocolate filling in a buttery Oreo crust, topped with fresh raspberries.
- Prep Time: 20 minutes
- Cook Time: 10 minutes
- Total Time: 130 minutes
- Yield: 8 servings 1x
- Category: Dessert
- Method: Baking
- Cuisine: American
- Diet: Vegetarian
Ingredients
- 1 ½ cups Oreo crumbs (about 24 cookies)
- 6 Tablespoons (85 g) butter (melted)
- 1 ¼ cups (300 ml) heavy cream
- 2 cups (12 oz) good-quality bittersweet chocolate (chopped into similar size pieces)
- 1 teaspoon pure vanilla extract
- 2 pints (about 4 cups) fresh raspberries
- Confectioners’ sugar for dusting (optional)
Instructions
- Preheat your oven to 350°F (175°C). Combine the Oreo crumbs and melted butter in a mixing bowl. Mix until evenly moistened.
- Press the crumb mixture into the bottom and sides of a 9-inch tart pan. Bake for about 10 minutes until set, then let it cool.
- Heat the heavy cream over medium heat until it simmers, then pour it over the chopped bittersweet chocolate. Let it sit for a minute.
- Stir gently until the chocolate is completely melted and smooth. Add the vanilla extract and stir to incorporate.
- Pour the ganache into the cooled Oreo crust. Let it set at room temperature, then refrigerate for at least 2 hours.
- Decorate the tart with fresh raspberries just before serving. Dust with confectioners’ sugar if desired.
- Slice the tart into wedges and serve alongside extra raspberries or whipped cream.
Notes
This tart can be made a day ahead of time. Store in the refrigerator and cover to keep it fresh.
Nutrition
- Serving Size: 1 slice
- Calories: 350
- Sugar: 20g
- Sodium: 250mg
- Fat: 18g
- Saturated Fat: 10g
- Unsaturated Fat: 6g
- Trans Fat: 0g
- Carbohydrates: 45g
- Fiber: 2g
- Protein: 4g
- Cholesterol: 30mg
Keywords: chocolate tart, raspberry dessert, easy dessert, chocolate raspberry tart