
Minute No-Bake Strawberry Cheesecake (Creamy & Fresh)
A Slice of Heaven: Indulging in Homemade Strawberry Cheesecake
Hello, fellow foodies! Today, we’re diving into a dessert that speaks of summer days, sweetness, and pure bliss — Strawberry Cheesecake. Not only is this dessert a showstopper, but it’s also surprisingly simple to make! If you’ve ever been intimidated by cheesecakes, trust me, you’re in for a delightful surprise. This recipe is not only approachable but guaranteed to impress every guest at your table. So, grab your apron, and let’s get cooking!
Personal Story
Let me take you back to my childhood, where summer meant two things: endless sunshine and strawberry picking with my family. There was a quaint little farm just a short drive from our house, and every June, we’d pile into the car with baskets and high hopes. After an afternoon of picking, we would return home, our faces sticky with strawberry juice, ready to create something magical.
One particular summer, I remember deciding to surprise my mom with a homemade dessert. Inspired by our bounty, I attempted to craft my very first strawberry cheesecake. As the mixture baked, the sweet aroma wafted through our kitchen, coaxing my family into the dining room. When that cheesecake came out of the oven, I felt like a superstar! The best part? Watching my mom’s eyes light up as she took that first bite. That memory is what drives my passion today, and I can’t wait to share this piece of nostalgia with you!
Ingredients
For this heavenly Strawberry Cheesecake, let’s gather the following ingredients:
-
1 cup graham cracker crumbs
The backbone of our cheesecake crust! You can use store-bought crumbs or crush your own. Note: If you prefer a healthier option, try substituting with almond flour. -
2 ½ tablespoons butter (melted)
A little fat for flavor and binding! Unsalted is the best choice to control the saltiness. Shortcut: Use a spray butter if you’re in a pinch! -
1 ½ tablespoons sugar
A small amount adds just the right sweetness to the crust. You can swap this for coconut sugar if you’re looking for a less refined option. -
Pinch of salt
Enhances the sweetness in the crust and filling. Flaky sea salt works beautifully here! -
2 (8 oz) packages cream cheese (softened)
The creamy star of our show! Softening it ensures a smooth texture. Tip: Leave it out for about an hour before starting, or microwave it for 10-15 seconds if you’re rushed! -
2 eggs
Provide structure and help the cheesecake set. If you want a dairy-free option, consider using flax eggs (1 tablespoon ground flaxseed mixed with 2.5 tablespoons of water per egg). -
⅔ cup sugar
Sweetens the cream cheese mixture. You can use granulated, brown, or even honey, depending on your sugar preference. -
⅔ cup sour cream
Adds tanginess and richness. Tip: Greek yogurt can be used for a healthier twist! -
1 teaspoon vanilla extract
A staple for flavor enhancement! Homemade vanilla extract truly elevates this dish if you have it. -
¼ teaspoon salt
Balances the sweetness and adds depth to the cream cheese filling. -
1 ½ lbs strawberries
Fresh is best! Tip: If strawberries aren’t in season, you can use frozen berries — just thaw and drain them first! -
1 ½ teaspoons cornstarch
Helps thicken the strawberry topping. If you’re avoiding cornstarch, try arrowroot powder instead. -
3 to 6 tablespoons sugar (adjust as needed)
To sweeten the strawberry topping to your liking; taste as you go! -
1 ½ tablespoons lemon juice
Brings brightness to the strawberries and balances out the sweetness. Freshly squeezed is always the best!
Step-by-Step Instructions
Now that we have our ingredients prepped, let’s jump into the fun part — making the cheesecake!
-
Preheat Your Oven
Preheat your oven to 325°F (160°C). This step ensures an even bake, which is crucial for a perfect cheesecake. -
Prepare the Crust
In a mixing bowl, combine the graham cracker crumbs, melted butter, sugar, and a pinch of salt. Mix until the crumbs resemble wet sand. Chef tip: If you prefer a thicker crust, use a bit more crumbs and butter! -
Press Into the Pan
Firmly press the crumb mixture into the bottom of a 9-inch springform pan. Make sure it’s even and tightly packed. Pro tip: Use the bottom of a measuring cup to help with this! -
Bake the Crust
Place the pan in the preheated oven and bake for about 8-10 minutes until lightly golden. Let it cool while you make the filling. -
Mix the Cream Cheese Filling
In a large bowl, beat the softened cream cheese with an electric mixer until smooth and creamy. Add the sugar, sour cream, vanilla extract, and salt, mixing until combined. Then add the eggs one at a time, mixing just until incorporated. Note: Don’t overmix at this point; you want to maintain a fluffy texture! -
Pour Filling Into the Crust
Carefully pour the cream cheese mixture over your cooled crust, smoothing the top with a spatula. Fun fact: Using a water bath can help achieve a smoother top without cracks! -
Bake the Cheesecake
Bake for 50-60 minutes or until the edges are set, and the center still has a slight jiggle. It will firm up as it cools. Chef’s secret: Turn off the oven, crack the door, and let the cheesecake cool in there for about an hour. This helps prevent cracks! -
Cool Down
Remove the cheesecake from the oven and let it cool to room temperature. Then, refrigerate for at least four hours or overnight for the best results. -
Make the Strawberry Topping
While the cheesecake chills, wash and slice your strawberries. In a saucepan over medium heat, combine the strawberries, cornstarch, and sugar. Stir gently until the strawberries release their juices and the mixture thickens. Tip: Adjust the sweetness based on your taste! -
Chill the Strawberry Mix
Allow the strawberry mixture to cool completely before topping the cheesecake. -
Add Topping and Serve
Once your cheesecake is set, pour the cooled strawberry mixture over the top. Slice and serve chilled, garnished with extra strawberries or whipped cream if desired.
Serving Suggestions
For an elegant presentation, serve your cheesecake on a beautiful platter. Consider adding a dollop of whipped cream on the side or sprinkle fresh mint leaves for a pop of color. To really elevate the experience, pair each slice with a glass of sparkling wine — because dessert is always more fun with a little fizz!
Recipe Variations
- Berry Bliss: Mix in raspberries or blueberries with the strawberry topping for a colorful berry medley.
- Chocolate Swirl: Melt some dark chocolate and swirl it into the cheesecake batter for a chocolate-strawberry twist.
- Nutty Crust: Replace half of the graham cracker crumbs with crushed nuts like almonds or walnuts for added texture.
- Lemon Cheesecake: Add a few extra tablespoons of lemon juice into the cream cheese mixture for a refreshing citrus flavor.
- Vegan Version: Substitute the cream cheese with a plant-based alternative and use coconut cream in place of sour cream.
Chef’s Notes
As with any recipe, my strawberry cheesecake has seen its evolution over the years. In my early baking days, I struggled with the dreaded cracks on the surface. But through experimentation and patience, I learned the art of gentle mixing and proper cooling techniques. Every crack has a story, and now, I embrace those little imperfections! It reminds me that cooking, like life, is about the journey, not just the destination.
FAQs and Troubleshooting
Q1: Why did my cheesecake crack?
A: Cracking usually occurs due to overmixing or rapid temperature changes. Bake slowly and allow it to cool gradually in the oven with the door ajar.
Q2: How do I store leftover cheesecake?
A: Wrap the cheesecake tightly with plastic wrap or store it in an airtight container in the fridge. It should last for about 4-5 days.
Q3: Can I freeze the cheesecake?
A: Yes! You can freeze the cheesecake before adding the topping. Wrap it well and store it for about 2 months. Let it thaw in the fridge overnight before serving.
Q4: What if my cheesecake doesn’t set?
A: If your cheesecake isn’t setting, it may need more time in the oven. Remember, it should be slightly jiggly in the center when you take it out. If it’s too soft after chilling, it might need to be baked a bit longer next time.
Nutritional Info
While we’re focusing on enjoyment here, it’s good to know the nutrition behind this delightful dessert. A slice of strawberry cheesecake typically contains around 350 calories, depending on portion size and ingredients used. It’s a treat, so enjoy it in moderation!
And there you have it! A creamy, dreamy Strawberry Cheesecake that’s sure to become a regular on your dessert menu. Remember, cooking should be as delightful as the food itself, so embrace the process, share the love, and savor every delicious bite. Happy baking, friends! 🍓
PrintHomemade Strawberry Cheesecake

A creamy, dreamy strawberry cheesecake that’s perfect for summer gatherings and guaranteed to impress your guests.
- Prep Time: 15 minutes
- Cook Time: 60 minutes
- Total Time: 75 minutes
- Yield: 8 servings 1x
- Category: Dessert
- Method: Baking
- Cuisine: American
- Diet: Vegetarian
Ingredients
- 1 cup graham cracker crumbs
- 2 ½ tablespoons butter, melted
- 1 ½ tablespoons sugar
- Pinch of salt
- 2 (8 oz) packages cream cheese, softened
- 2 eggs
- ⅔ cup sugar
- ⅔ cup sour cream
- 1 teaspoon vanilla extract
- ¼ teaspoon salt
- 1 ½ lbs strawberries
- 1 ½ teaspoons cornstarch
- 3 to 6 tablespoons sugar (adjust as needed)
- 1 ½ tablespoons lemon juice
Instructions
- Preheat your oven to 325°F (160°C).
- Combine the graham cracker crumbs, melted butter, sugar, and a pinch of salt in a mixing bowl. Mix until the crumbs resemble wet sand.
- Press the crumb mixture into the bottom of a 9-inch springform pan.
- Bake the crust for about 8-10 minutes until lightly golden. Let it cool.
- Beat the softened cream cheese with an electric mixer until smooth and creamy. Add sugar, sour cream, vanilla extract, and salt; mix until combined. Then add eggs one at a time, mixing just until incorporated.
- Pour the cream cheese mixture over the cooled crust.
- Bake for 50-60 minutes or until the edges are set with a slightly jiggly center.
- Cool down by removing from the oven and letting it cool to room temperature, then refrigerate for at least four hours or overnight.
- Wash and slice strawberries. In a saucepan over medium heat, combine strawberries, cornstarch, and sugar, stirring until thickened.
- Allow the strawberry mixture to cool completely before topping the cheesecake.
- Add the cooled strawberry mixture over the cheesecake and serve chilled.
Notes
For a richer flavor, consider adding a dollop of whipped cream on the side.
Nutrition
- Serving Size: 1 slice
- Calories: 350
- Sugar: 25g
- Sodium: 400mg
- Fat: 20g
- Saturated Fat: 10g
- Unsaturated Fat: 8g
- Trans Fat: 0g
- Carbohydrates: 40g
- Fiber: 2g
- Protein: 5g
- Cholesterol: 80mg
Keywords: cheesecake, strawberry, dessert, summer, baking
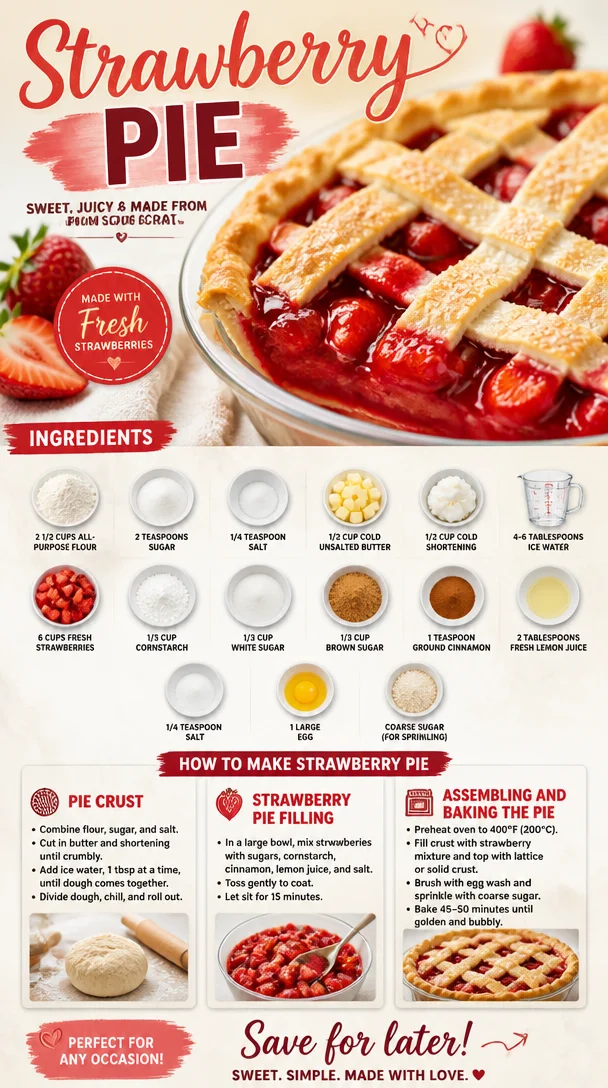
Strawberry Pie
Delightful Strawberry Pie: A Sweet Slice of Summer
Welcome to the world of vibrant flavors and joyous gatherings! If you’re anything like me, there’s something magical about biting into a slice of homemade strawberry pie—especially when the berries are at their juicy peak. This delightful dessert is not just a treat but a joyful experience that brings back memories of sun-soaked days spent under the warm sun, surrounded by friends and family.
Strawberry pie is one of those desserts that feels like a hug in a slice. It’s light yet rich with natural sweetness, a perfect expression of summer that servers can appreciate whether they are at a cozy picnic or a festive dinner gathering. Plus, its brilliant red hue makes it a showstopper on any dessert table!
Join me as we embark on a journey to create a luscious strawberry pie that captivates your tastebuds and warms your heart. So, dust off your apron, gather the ingredients, and let’s make some memories together in the kitchen!
A Nostalgic Slice of Life
Let me take you back to a summer afternoon at my grandmother’s house, when the air was fragrant with blooming flowers and ripe strawberries. She had this incredible garden, brimming with juicy berries that glistened in the sun. Each year, when it was time to harvest, I’d be her little helper, gathering baskets filled with the freshest strawberries.
One day, after a particularly bountiful harvest, we rolled up our sleeves and made our famous strawberry pie. The kitchen filled with laughter as we mixed the juicy strawberries with sugar and cinnamon, and I remember my grandma’s secret ingredient—love, of course! Little did I know that those moments would shape my love for cooking and for bringing people together around the table.
As the pie baked, the sweet aroma wafted through the house, making the anticipation all the more delightful. I could hardly wait for it to cool, but my grandma taught me the importance of patience. Finally, we enjoyed our treat—each bite bursting with goodness and nostalgia. That, my friends, is the magic of a homemade strawberry pie. Let’s recreate that same magic in your kitchen today!
Ingredients
Here’s what you’ll need to whip up your own stunning strawberry pie:
-
2 1/2 cups all-purpose flour: This will be the base for your pie crust. For a healthier option, you can substitute with whole wheat flour, but the texture will change a bit.
-
2 teaspoons sugar: This adds a little sweetness to the crust itself. You can use coconut sugar for a slightly deeper flavor.
-
1/4 teaspoon salt: A must-have for enhancing flavors and balancing the sweetness.
-
1/2 cup cold unsalted butter: Butter gives the crust its flaky texture. If you want a dairy-free option, use 1/2 cup of cold coconut oil instead.
-
1/2 cup cold shortening: Helps achieve that wonderful flaky quality. You can use lard for a more traditional flavor or stick to butter for a completely butter-based crust.
-
4–6 tablespoons ice water: Essential to bring the dough together without melting the butter.
-
6 cups fresh strawberries: Haul ’em and slice ’em! The star of the show. Frozen strawberries can work too, but fresh is always better for this pie.
-
1/3 cup cornstarch: This will help thicken your filling. You may substitute it with arrowroot for a gluten-free version.
-
1/3 cup white sugar: This gives sweetness to your filling without altering the color. Feel free to reduce this if your berries are super sweet.
-
1/3 cup brown sugar: Adds a rich, caramel-like flavor. If you don’t have brown sugar, a light drizzle of honey can work too!
-
1 teaspoon ground cinnamon: Just a hint of spice to complement the strawberries. You can also experiment with nutmeg for a different flavor.
-
2 tablespoons fresh lemon juice: Brightens up the flavors of the filling and keeps those strawberries fresh. Lime juice works in a pinch!
-
1/4 teaspoon salt: Enhances the overall flavor of the filling, balancing the sweetness.
-
1 large egg: This will help bind the crust together. For a vegan version, substitute it with a flaxseed egg (1 tablespoon ground flaxseed mixed with 2.5 tablespoons water).
-
Coarse sugar: For sprinkling on top of the pie, giving it a delightful crunch! You can use sparkling sugar for extra flair.
Step-by-Step Instructions
Now that we have our ingredients, let’s dive into the magic of making this pie!
Step 1: Making the Crust
-
Prep your workspace: Start by cleaning the countertop (or your kitchen table). You want a clean, organized area to create your pie magic!
-
Mix the dry ingredients: In a large bowl, whisk together the flour, sugar, and salt until fully blended.
-
Cut in the butter and shortening: Add the cold butter and shortening to the bowl, and using a pastry cutter or your fingers, work the fats into the flour mixture. You want a crumbly texture with some pea-sized pieces remaining. This is the secret to a flaky crust!
-
Add ice water: Slowly drizzle in the ice water, one tablespoon at a time, mixing until the dough just comes together. Be careful not to overwork it—want that tenderness!
-
Chill the dough: Form the dough into a disc, wrap it in plastic wrap, and refrigerate for at least 30 minutes. This is crucial for those flavors to meld and for the butter to firm up again.
Step 2: Prepare the Filling
-
Slice the strawberries: While the dough chills, haul and slice your strawberries. Place them in a large mixing bowl.
-
Mix the filling ingredients: In another bowl, combine the cornstarch, white sugar, brown sugar, cinnamon, lemon juice, and salt. Pour this over the strawberries and gently toss to coat. Let this mixture sit for about 15-20 minutes to allow the juices to start mixing with the sugars.
Step 3: Roll Out the Crust
-
Preheat your oven: Turn on your oven to 425°F (220°C) so it’s hot and ready when your pie is prepared.
-
Roll out the dough: After the dough has chilled, lightly flour your surface. Roll out your dough to about 1/8 inch thickness with a rolling pin, ensuring it’s big enough to fit your pie dish.
-
Transfer to the pie dish: Gently place the rolled-out dough into your pie dish. Trim the excess dough hanging over the edges and press it down gently into place. Poking holes in the crust helps prevent bubbling.
Step 4: Assemble the Pie
-
Add the filling: Pour the strawberry mixture into the prepared crust, spreading it out evenly. Make sure every bit of that sweet goodness is distributed!
-
Top the pie: Roll out any remaining dough for a lattice top or simply use additional dough to cover the pie. Create slits in the top crust if you’re making it solid to allow the steam to escape. Brush the top with a beaten egg for that beautiful golden sheen.
Step 5: Bake
-
Sprinkle with coarse sugar: Before placing it in the oven, sprinkle some coarse sugar over the top for that enticing crunch.
-
Bake: Pop the pie into your preheated oven and bake for about 40-45 minutes or until the crust is golden brown and the filling is bubbly. Keep an eye on it; if the edges brown too quickly, cover them with foil!
Step 6: Cool and Serve
- Cool: Once out of the oven, let the pie cool for at least 2 hours before slicing. This allows the filling to set up so that first slice is picture-perfect!
Serving Suggestions
When it’s finally time to serve, slice your strawberry pie and plate it with a scoop of vanilla ice cream or a dollop of whipped cream on the side. Drizzle with a bit of strawberry sauce for extra flair, and don’t forget a sprig of mint for color!
Recipe Variations
Here are some fun twists you can try with the classic strawberry pie:
-
Mixed Berry Pie: Instead of just strawberries, try combining raspberries, blueberries, and blackberries for a delightful mixed berry pie!
-
Chocolate Drizzle: Add a rich chocolate drizzle over the top of each slice for a decadent addition.
-
Lemon Basil Pie: Incorporate fresh basil with the strawberries for a surprising twist of flavor. It gives the pie an herby freshness that’s out of this world!
-
Portable Strawberry Hand Pies: Use the same filling, but make small hand-held pies by folding the dough over the filling and sealing the edges.
-
Gluten-Free Version: Use a gluten-free flour blend to make the crust. It works beautifully!
Chef’s Notes
As I look back on my love for strawberry pie, it’s evolved over the years. There are so many moments tied to this simple dish—family gatherings, summer barbecues, or cozy evenings under the stars. Each iteration teaches me something new in the kitchen, like mastering the balance between sweetness and tartness or the art of the perfect crust.
I’ll let you in on a little secret: I always keep a stash of frozen berries in my freezer. Life gets busy, and sometimes you just want that pie-decadence without a long prep time. No one has to know, right?
FAQs and Troubleshooting
Q: Why is my pie crust soggy?
A: This can occur if your filling is too watery or if the crust isn’t pre-baked. Make sure to bake the crust until it’s firm before adding the filling, and consider draining some of those strawberry juices before pouring them in!
Q: How can I prevent my pie from burning?
A: If the crust edges start to brown too fast, cover them with strips of aluminum foil for the remainder of baking.
Q: Can I make this pie ahead of time?
A: Absolutely! You can prep the filling a day ahead and store it in the fridge. Just assemble and bake the pie when you’re ready!
Q: What if I don’t have fresh strawberries?
A: Frozen strawberries can be used, but you may need to adjust the sugar and cook the filling for a few minutes on the stovetop to thicken it properly.
Nutritional Info
While I believe in enjoying dessert in moderation, here’s a basic breakdown of nutritional values per slice of strawberry pie (assuming 8 slices):
- Calories: 250
- Total Fat: 12g
- Saturated Fat: 5g
- Carbohydrates: 34g
- Fiber: 2g
- Sugar: 15g
- Protein: 3g
Enjoy this delightful strawberry pie, and remember, it’s not just about the food; it’s about gathering together, sharing stories, and creating moments that matter. So, let’s celebrate the sweetness of life, one slice at a time—happy baking!
PrintDelightful Strawberry Pie

A sweet and nostalgic homemade strawberry pie that celebrates summer with its burst of flavors and vibrant colors.
- Prep Time: 30 minutes
- Cook Time: 45 minutes
- Total Time: 75 minutes
- Yield: 8 servings 1x
- Category: Dessert
- Method: Baking
- Cuisine: American
- Diet: Vegetarian
Ingredients
- 2 1/2 cups all-purpose flour
- 2 teaspoons sugar
- 1/4 teaspoon salt
- 1/2 cup cold unsalted butter
- 1/2 cup cold shortening
- 4–6 tablespoons ice water
- 6 cups fresh strawberries
- 1/3 cup cornstarch
- 1/3 cup white sugar
- 1/3 cup brown sugar
- 1 teaspoon ground cinnamon
- 2 tablespoons fresh lemon juice
- 1/4 teaspoon salt
- 1 large egg
- Coarse sugar for sprinkling
Instructions
- Prep your workspace: Start by cleaning the countertop.
- Mix the dry ingredients: In a large bowl, whisk together the flour, sugar, and salt until blended.
- Cut in the butter and shortening: Work the fats into the flour mixture until crumbly.
- Add ice water: Slowly drizzle in the ice water, mixing until the dough just comes together.
- Chill the dough: Form into a disc, wrap, and refrigerate for at least 30 minutes.
- Slice the strawberries: After the dough chills, slice your strawberries and place in a large bowl.
- Mix the filling ingredients: Combine cornstarch, white sugar, brown sugar, cinnamon, lemon juice, and salt; pour over strawberries and toss.
- Preheat your oven: Turn on to 425°F (220°C).
- Roll out the dough: On a floured surface, roll out the dough to about 1/8 inch thickness.
- Transfer to the pie dish: Place the rolled-out dough into the pie dish, trimming edges.
- Add the filling: Pour the strawberry mixture into the prepared crust.
- Top the pie: Create a lattice top or cover the pie, making slits in the top crust.
- Sprinkle with coarse sugar: Before baking, sprinkle sugar on top.
- Bake: Bake for about 40-45 minutes until the crust is golden and filling is bubbly.
- Cool and serve: Let cool for at least 2 hours before slicing.
Notes
Serve with vanilla ice cream or whipped cream. You can create variations by adding different berries or flavors.
Nutrition
- Serving Size: 1 slice
- Calories: 250
- Sugar: 15g
- Sodium: 200mg
- Fat: 12g
- Saturated Fat: 5g
- Unsaturated Fat: 5g
- Trans Fat: 0g
- Carbohydrates: 34g
- Fiber: 2g
- Protein: 3g
- Cholesterol: 30mg
Keywords: strawberry pie, summer dessert, homemade pie

Minute No-Bake Strawberry Mousse (Fresh & Creamy)
Easy Fresh Strawberry Mousse: A Delightful Dessert for Any Occasion
Hello food lovers! If you’re here, it means you’re probably ready to whip up something delightful in the kitchen that’s both impressive and incredibly easy. Well, you’re in for a treat! Today, we’ll be crafting a luscious Easy Fresh Strawberry Mousse that’s light, fluffy, and bursting with the sweet taste of summer. This dessert is perfect for any occasion—whether you’re hosting a dinner party, celebrating a birthday, or simply treating yourself after a long week.
Picture this: a light, airy mousse with a beautiful pink hue, topped off with fresh strawberries and a dash of mint. It’s like a hug in dessert form! I can’t wait to share the process with you, complete with my personal touches and lots of tips to ensure your mousse turns out perfect every time. So, let’s dive in!
A Sweet Slice of Nostalgia
One of my fondest memories involves a summer spent at my grandma’s house. Every year, we’d visit, and amidst all the adventures—catching fireflies, gardening, and late-night card games—there was always a special treat waiting for us: Grandma’s signature strawberry mousse. She would send us out to the garden to pick the ripest strawberries, and we’d laugh as we tried to find the biggest, juiciest ones to bring back to the kitchen.
Once we returned, we’d gather around her old wooden table, sharing stories while she mixed up her ingredients with love and a sprinkle of humor. I can still hear her saying, “The secret ingredient is always a bit of joy!” I realized later that cooking with her wasn’t just about making a delicious dessert; it was about the connections we forged around the table.
Now, whenever I make this Easy Fresh Strawberry Mousse, it’s like I’m transported back to that sunlit kitchen, surrounded by love and laughter. I hope this recipe brings as much joy to you as it does to me!
Ingredients
Here’s what you’ll need to create your very own strawberry mousse:
-
2 cups fresh strawberries, hulled
Fresh strawberries are the star of this dessert! Use ripe, juicy strawberries for the best flavor. If you’re in a pinch, you can substitute with frozen strawberries (thawed), but fresh ones have that unbeatable sweetness. -
1/4 cup powdered sugar
This sweetens the mousse while keeping it smooth and creamy. You can adjust the sweetness based on your preference—feel free to start with less and add more if needed! -
1 tablespoon fresh lemon juice
Brightens up the flavor and balances the sweetness. You can also use lime juice for a fun twist! -
1 teaspoon vanilla extract
Because, let’s be honest, everything’s better with vanilla. For a different flavor profile, try using almond extract or a splash of orange zest! -
1 1/2 cups heavy cream, cold
This is what gives the mousse its rich texture. Make sure it’s very cold before whipping! If you need a lighter alternative, opt for coconut cream, but the texture will differ a bit.
Step-by-Step Instructions
Now that we have everything prepared, let’s get to work! Follow these steps to create your strawberry masterpiece:
-
Prep the Strawberries
Start by washing your strawberries thoroughly. Hull them (remove the green tops) and slice them in half. This will help release their juices when blended. Place them in a medium bowl and sprinkle them with 2 tablespoons of powdered sugar. Toss gently and let them sit for about 10 minutes. This will create a natural syrup that really enhances the flavor! -
Blend the Strawberries
After the strawberries have macerated, use a blender or food processor to puree them until smooth. You can leave a few small chunks if you like a bit of texture—just make sure it’s not too chunky! -
Strain the Puree (Optional)
If you prefer a super smooth mousse, strain the puree through a fine-mesh sieve to remove any seeds. This step is optional, but it does yield that lovely, velvety texture. -
Combine Ingredients
In a separate bowl, whisk together the strawberry puree, remaining powdered sugar, lemon juice, and vanilla extract until well combined. It should taste fresh and sweet—don’t be afraid to give it a little taste! -
Whip the Cream
In a large mixing bowl (preferably chilled), pour the heavy cream. Using an electric mixer, whip the cream on medium speed until soft peaks form. This means when you lift the whisk or beaters, the cream should hold its shape but still be light and fluffy. Be careful not to overwhip; it can turn grainy. -
Fold the Cream into the Strawberry Mixture
Take a couple of spoonfuls of whipped cream and mix it into the strawberry puree to lighten it up. Then gently fold in the rest of the whipped cream using a spatula. This technique helps maintain the airiness of the mousse, giving it that light texture we’re after. -
Chill
Once combined, divide the mousse into serving dishes or glasses. Cover with plastic wrap and place them in the fridge for at least 2-4 hours, or until they’re fully set. This chilling time allows the flavors to meld beautifully together and gives the mousse that perfect, airy consistency.
Serving Suggestions
When it’s time to serve your gorgeous strawberry mousse, consider a few simple yet elegant touches. Add a dollop of whipped cream on top, toss on some fresh strawberry slices, and maybe a sprig of mint for color! For a fancy touch, serve the mousse in elegant glassware or chilled dessert cups. It adds an element of richness and makes your guests feel special—even if it’s just a Tuesday!
Recipe Variations
If you want to get a little creative, here are some fun twists to try with your Easy Fresh Strawberry Mousse:
- Chocolate Strawberry Mousse: Drizzle melted chocolate into the mousse before chilling for an indulgent treat.
- Balsamic Strawberry Mousse: Add a splash of balsamic vinegar to the strawberry puree for a unique, sophisticated flavor.
- Coconut Strawberry Mousse: Substitute half of the heavy cream with coconut cream for a tropical flair.
- Vegan Strawberry Mousse: Use coconut whipped cream and agave syrup for a dairy-free option. You can blend in silken tofu for added creaminess!
Chef’s Notes
I’ll let you in on a little secret: the first time I attempted to make this mousse, it was a hilarious disaster! I accidentally whipped the cream too long and ended up with butter. Let’s just say, my friends were equally impressed and confused! From that day on, I learned the art of gentle whipping and the importance of patience in cooking. This mousse has evolved since then, becoming a beloved staple in my kitchen, and I’m thrilled to pass it on to you with all my little lessons learned!
FAQs and Troubleshooting
1. Can I use frozen strawberries?
Yes! Thaw and drain the strawberries before using them, but keep in mind fresh strawberries have the best flavor.
2. What if my mousse is too runny?
If your mousse doesn’t set, try adding a bit more whipped cream to stabilize it. Also, ensure you chilled it for the appropriate amount of time.
3. Can I make this ahead of time?
Absolutely! It’s perfect for prepping a day ahead. Just cover it well and keep it in the fridge.
4. How long does this mousse last?
It’s best enjoyed within 2-3 days of making it, but it can last up to five days in the fridge. Just be sure to cover it tightly!
Whether it’s for a special gathering or a cozy night at home, this Easy Fresh Strawberry Mousse is sure to delight and bring smiles to your table. So go ahead, tie on your apron, pour yourself a little bubbly, and create something joyful. Because in the end, food is about more than just the taste; it’s about the connections we make and the memories we share.
Welcome to the Ivory Apron family—happy cooking!
PrintEasy Fresh Strawberry Mousse

A light and fluffy strawberry mousse bursting with fresh flavors, perfect for any occasion.
- Prep Time: 10 minutes
- Cook Time: 0 minutes
- Total Time: 240 minutes
- Yield: 4 servings 1x
- Category: Dessert
- Method: Chilling
- Cuisine: American
- Diet: Vegetarian
Ingredients
- 2 cups fresh strawberries, hulled
- 1/4 cup powdered sugar
- 1 tablespoon fresh lemon juice
- 1 teaspoon vanilla extract
- 1 1/2 cups heavy cream, cold
Instructions
- Prep the strawberries by washing them thoroughly, hulling them, and slicing in half. Sprinkle with 2 tablespoons of powdered sugar and let sit for 10 minutes.
- Blend the strawberries until smooth using a blender or food processor.
- Strain the puree through a fine-mesh sieve if a super smooth mousse is desired (optional).
- Combine the strawberry puree, remaining powdered sugar, lemon juice, and vanilla extract in a separate bowl.
- Whip the cold heavy cream in a large mixing bowl until soft peaks form.
- Fold the whipped cream into the strawberry mixture until well combined.
- Chill in the fridge for at least 2-4 hours until set before serving.
Notes
For added flavor, consider variations like chocolate drizzle or balsamic vinegar. Serve in elegant glassware with fresh strawberries and mint.
Nutrition
- Serving Size: 1 serving
- Calories: 250
- Sugar: 22g
- Sodium: 30mg
- Fat: 18g
- Saturated Fat: 11g
- Unsaturated Fat: 7g
- Trans Fat: 0g
- Carbohydrates: 24g
- Fiber: 2g
- Protein: 2g
- Cholesterol: 60mg
Keywords: strawberry mousse, easy dessert, summer dessert, fruit dessert