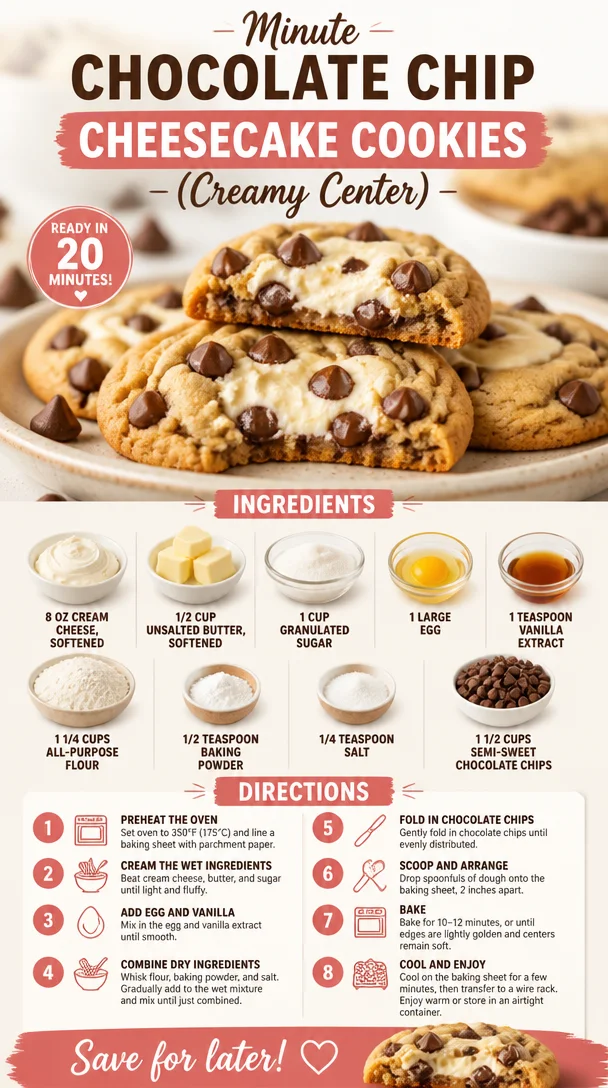
Minute Chocolate Chip Cheesecake Cookies (Creamy Center)
Indulge in Delight: Chocolate Chip Cheesecake Cookies
Hello there, fellow food lover! Are you ready to embark on a delicious journey that brings together the creamy perfection of cheesecake with the comforting charm of cookies? Yes, you heard me right! Today, we’re diving into the world of Chocolate Chip Cheesecake Cookies. This delightful treat combines the best of both worlds and is sure to make your taste buds dance!
Creating these cookies is not just about baking; it’s a walk down memory lane, full of laughter, love, and a sprinkle of culinary magic. So, let’s roll up our sleeves, tie on our aprons, and whip up a batch of these irresistible cookies that’ll have your friends and family coming back for seconds—if not thirds!
My Culinary Journey with Cookies
Let me take you back to one of my fondest childhood memories. It was a sunny Saturday afternoon, and my mom and I were in the kitchen, surrounded by a colorful array of ingredients. I can still picture the kitchen filled with the sweet aroma of vanilla and melting chocolate. We were on a mission to create something spectacular for that night’s family gathering.
Mom had her old, trusty recipe book out, flipping through the yellowed pages, when she suddenly exclaimed, “What do you think about combining cheesecake with cookies?” My eyes lit up! I had always loved cookie dough straight from the bowl, and cheesecake was my ultimate weakness. To my delight, we started mixing, measuring, and laughing our way to a delightful concoction.
After a few experimental batches and some epic kitchen fails (like the time we forgot the baking powder), we finally perfected it: the Chocolate Chip Cheesecake Cookie. My family raved about them, claiming they were the best cookies they had ever tasted! This recipe became a staple in our household, and every time I make them, I’m reminded of those joyful moments spent in the kitchen with my mom.
Ingredients You’ll Need
Let’s gather our ingredients for these scrumptious cookies! Here’s what you’ll need:
-
8 oz cream cheese (softened)
This rich and creamy base adds the cheesecake element to our cookies. If you’re looking for a lighter version, try using Neufchâtel cheese. It offers a similar taste with less fat! -
1/2 cup unsalted butter (softened)
Butter brings flavor and creates that delightful melt-in-your-mouth texture. You can substitute with coconut oil for a dairy-free option! -
1 cup granulated sugar
Sweetness is key! This helps to balance the tanginess of the cream cheese. You could swap it with brown sugar for a hint of molasses flavor or use coconut sugar for a healthier alternative. -
1 large egg
The egg binds everything together beautifully. If you need an egg substitute, a flax egg (1 tablespoon ground flaxseed mixed with 2.5 tablespoons water) works well! -
1 teaspoon vanilla extract
Vanilla adds depth and warmth to the cookies. If you want to change it up, almond extract can add a lovely twist! -
1 1/4 cups all-purpose flour
This is the backbone of our cookie. For a gluten-free option, try using a 1:1 gluten-free baking mix. -
1/2 teaspoon baking powder
This helps our cookies rise and gives them that perfect fluffiness. For a bit of a twist, consider using baking soda for a different texture! -
1/4 teaspoon salt
A pinch of salt enhances all the flavors in the cookies. You can use sea salt for a touch of gourmet! -
1 1/2 cups semi-sweet chocolate chips
These beauties are the cherry on top! Feel free to swap for dark chocolate chips, white chocolate, or even butterscotch for a fun variation.
Baking Up a Storm: Step-by-Step Instructions
Now, let’s bake these beauties! Follow these steps, and you’ll have perfectly decadent Chocolate Chip Cheesecake Cookies in no time.
-
Preheat your oven
Let’s get the oven warmed up to 350°F (175°C). Preheating is critical because it ensures your cookies bake evenly and develop that amazing texture! -
Cream the butter and cream cheese
In a large mixing bowl, beat together the softened butter and cream cheese until smooth and creamy. This will take about 2-3 minutes. Make sure to scrape down the sides so everything is mixed evenly. Pro tip: Use a hand mixer or a stand mixer for a perfectly fluffy texture. -
Add sugar and egg
Gradually add the granulated sugar to the creamed mixture, continuing to beat until it’s light and fluffy. Then, add in the egg and vanilla extract. Mix until well combined. Your batter should have a silky smooth consistency now! -
Combine the dry ingredients
In a separate bowl, whisk together the flour, baking powder, and salt. This step ensures that the baking powder is evenly distributed and prevents any bitter bites in your cookies. -
Gradually add dry to wet
Slowly mix the dry ingredients into the wet mixture, stirring until just combined. Be careful not to overmix; a few floury pockets are okay! This will keep your cookies tender. -
Fold in the chocolate chips
Now comes the fun part! Gently fold in the chocolate chips until they’re evenly distributed throughout the dough. Do taste the dough! That’s a must! -
Scoop and bake
Using a cookie scoop or tablespoon, drop rounded balls of dough onto a lined baking sheet, spacing them about 2 inches apart. Bake in your preheated oven for about 12-15 minutes, or until the edges are lightly golden. They might look slightly underbaked, but trust me—this is where the magic happens! They’ll continue to cook as they cool. -
Cool and enjoy
Let the cookies cool on the baking sheet for about 5 minutes before transferring them to a wire rack to cool completely. This waiting period allows them to set up just right!
Serving Suggestions
When it comes to serving, these cookies are delightful on their own, but why not elevate the moment? Serve them warm with a scoop of vanilla ice cream on top for the ultimate dessert experience! Drizzle with a bit of chocolate sauce or even a dusting of powdered sugar to make them even more charming.
If you’re presenting them at a dinner party, stack them on a beautiful platter and watch the compliments roll in. Trust me; they’ll be the centerpiece of your dessert table!
Recipe Variations
Here are a few fun twists to keep things exciting:
- Nutty Delight: Stir in some chopped walnuts or pecans for an added crunch.
- Spiced Twist: Add a dash of cinnamon or pumpkin spice to the dough for a seasonal touch.
- Fragrant Citrus: Stir in some lemon or orange zest for a bright, citrusy flavor that cuts through the richness.
- Decadent Fudge: For an ultra-rich treat, swap half of the chocolate chips for brownie bits!
- Gluten-Free: Use a gluten-free flour blend in place of all-purpose flour, and you’re all set!
Chef’s Notes
Every time I whip up these Chocolate Chip Cheesecake Cookies, I’m reminded of the laughter-filled afternoons with my mom. It’s amazing how a simple recipe can hold such heartwarming memories! Over the years, I’ve played around with different flavors and textures, but the classic version remains unbeatable.
Once, I even tried incorporating espresso powder for a mocha twist, and they vanished within minutes! I have to say, sharing these cookies with loved ones and seeing their faces light up is the real joy of cooking.
FAQs and Troubleshooting
Q1: My cookies flattened out too much! What went wrong?
A: Flattening can happen for a few reasons! Make sure your butter and cream cheese are at room temperature, not overly melted. Additionally, ensure you’re measuring your flour correctly—too little flour can lead to flat cookies.
Q2: Can I store these cookies?
A: Absolutely! Store your cookies in an airtight container at room temperature for up to a week. They also freeze well for up to three months. Just thaw them at room temperature when you’re ready to enjoy!
Q3: Why are my cookies doughy in the middle?
A: If your cookies are doughy in the center, they may not have baked long enough. Always keep an eye on them in the last few minutes of baking; they should be slightly golden around the edges but soft in the middle.
Q4: Can I use lower-fat cream cheese?
A: Yes, you can! Just keep in mind that the texture may be slightly different, but the flavor will still shine through.
Indulging in Goodness
These Chocolate Chip Cheesecake Cookies are more than just cookies; they’re a celebration of flavors and memories. Whether you’re whipping them up for family, friends, or simply indulging by yourself (no judgment here!), I hope you find joy in every bite.
So, let’s get to baking! Just remember, it’s not just about the final product; it’s about the experience. Grab your apron, have fun, and create some lovely moments in your kitchen.
Happy baking, and let’s make some delicious memories!
PrintChocolate Chip Cheesecake Cookies
Delightful cookies combining the creamy essence of cheesecake with the classic charm of chocolate chip cookies.
- Prep Time: 15 minutes
- Cook Time: 15 minutes
- Total Time: 30 minutes
- Yield: 24 cookies 1x
- Category: Dessert
- Method: Baking
- Cuisine: American
- Diet: Vegetarian
Ingredients
- 8 oz cream cheese (softened)
- 1/2 cup unsalted butter (softened)
- 1 cup granulated sugar
- 1 large egg
- 1 teaspoon vanilla extract
- 1 1/4 cups all-purpose flour
- 1/2 teaspoon baking powder
- 1/4 teaspoon salt
- 1 1/2 cups semi-sweet chocolate chips
Instructions
- Preheat your oven to 350°F (175°C).
- Cream the butter and cream cheese in a large mixing bowl until smooth and creamy.
- Add sugar and egg, mixing until light and fluffy.
- Combine the dry ingredients in a separate bowl.
- Gradually add the dry mixture to the wet mixture, stirring until just combined.
- Fold in the chocolate chips until evenly distributed.
- Scoop rounded balls of dough onto a lined baking sheet, spacing them about 2 inches apart.
- Bake for 12-15 minutes, or until edges are lightly golden.
- Cool on the baking sheet for 5 minutes, then transfer to a wire rack.
Notes
Serve warm with vanilla ice cream or a drizzle of chocolate sauce for an extra treat.
Nutrition
- Serving Size: 1 cookie
- Calories: 170
- Sugar: 10g
- Sodium: 150mg
- Fat: 8g
- Saturated Fat: 4g
- Unsaturated Fat: 3g
- Trans Fat: 0g
- Carbohydrates: 21g
- Fiber: 1g
- Protein: 2g
- Cholesterol: 25mg
Keywords: chocolate chip cookies, cheesecake cookies, dessert recipes
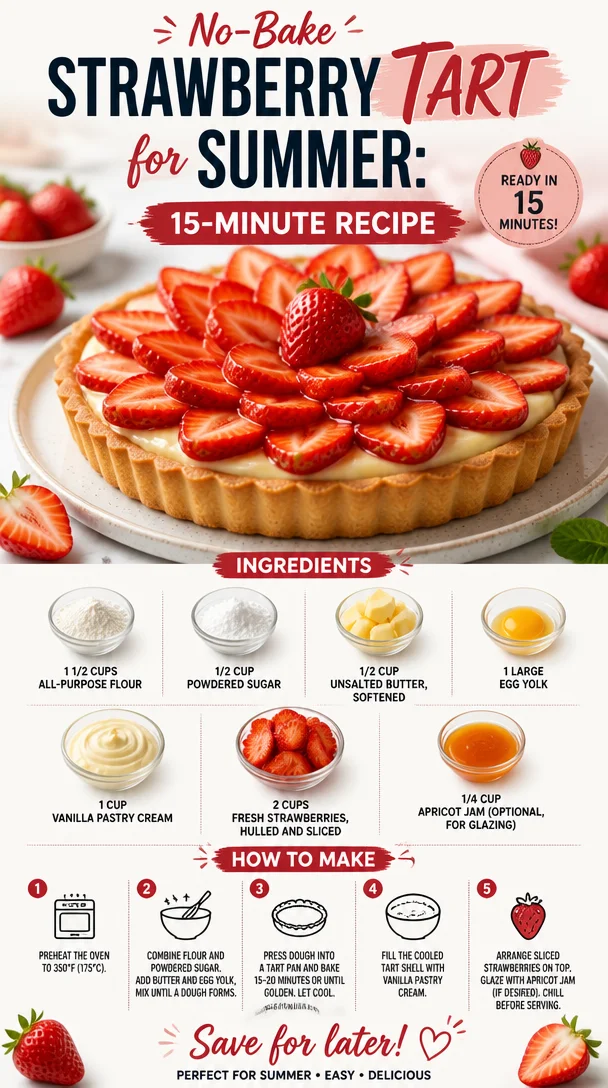
No-Bake Strawberry Tart for Summer: 15-Minute Recipe
A Love Letter to Tarte aux Fraises: The Quintessential Summer Dessert
Hello, fellow food lovers! Savannah here, and today, I’m excited to share with you a recipe that is as vibrant as a summer’s day – Tarte aux Fraises. If you’ve never tried this classic French strawberry tart, you’re in for a treat! This dessert isn’t just a feast for the eyes; it’s equally delightful for your taste buds. So, tie on your apron, and let’s dive into this elegant yet approachable recipe that is sure to impress anyone gathering around your table.
The Allure of Tarte aux Fraises
Growing up, I have vivid memories of summer days spent at my grandmother’s house. Her garden was a wonderland of vibrant colors, with strawberries spilling over the edges like little rubies beneath the sun. Every time those berries were ripe, so came the anticipation of my grandmother whipping up her famous Tarte aux Fraises. She would invite my cousins and me to help – washing strawberries, rolling out dough, and, of course, sneaking a few berries along the way. Sharing those moments, laughter ringing through the air as we worked together, is how I learned that food is more than just what’s on the plate; it’s about connection and joy.
Now, every time I make Tarte aux Fraises, I’m transported back to those sun-drenched afternoons. This recipe carries not just ingredients, but love, memories, and a bit of whimsy.
Ingredients
Let’s gather our supplies! Here’s what you’ll need for your Tarte aux Fraises:
-
1 1/2 cups all-purpose flour
The foundation of our tart crust. You can substitute with gluten-free flour for a gluten-free version, but ensure it’s a good blend that includes xanthan gum for proper texture. -
1/2 cup powdered sugar
Adds sweetness to our crust without the graininess. Don’t have any? Blend granulated sugar in a blender to make your own! -
1/2 cup unsalted butter, softened
The key player in bringing that rich flavor and tender texture to the crust. If you’re dairy-free, feel free to swap with coconut oil for a unique flavor that works surprisingly well! -
1 large egg yolk
This helps bind the dough together and adds richness. If you’re avoiding eggs, you can use a flax egg (1 tablespoon ground flaxseed mixed with 2.5 tablespoons water) as a substitute. -
1 cup vanilla pastry cream
The velvety filling that’s a real game changer for flavor! You can make your own or use a store-bought custard or pudding if you’re short on time. -
2 cups fresh strawberries, hulled and sliced
The star of our dessert! Fresh berries are essential, but frozen strawberries can work in a pinch—just thaw and drain excess liquid. -
1/4 cup apricot jam (optional, for glazing)
This adds a lovely shiny finish and extra flavor. If you prefer, try raspberry or strawberry jam for a different twist!
Step-by-Step Instructions
Now that we have our ingredients, let’s embark on creating this delightful Tarte aux Fraises. Don’t worry; I’ll guide you every step of the way!
-
Make the Tart Crust
In a mixing bowl, combine the all-purpose flour and powdered sugar. Mix well to incorporate them together. Now, add the softened butter. Use your fingers or a pastry cutter to rub the butter into the flour mixture until it resembles coarse crumbs. It’s okay to use a little muscle – channel your inner chef! -
Add the Egg Yolk
Next, add the egg yolk to the bowl. Stir until the mixture begins to clump together. Instead of kneading, lightly press it together into a ball. If it feels too dry, a teaspoon of ice water can push it into a knead-free dough. -
Chill the Dough
Wrap the dough in plastic wrap and refrigerate for at least 30 minutes. This step is crucial; it not only firms the dough but allows it to relax, which helps prevent shrinkage while baking. -
Preheat the Oven
Preheat your oven to 350°F (175°C) so it’s hot and ready for our tart. This helps create a lovely golden crust that’s both firm and flaky. -
Roll Out the Dough
Lightly flour your work surface and roll out the chilled dough to about 1/8 inch thick. Don’t stress about making it perfectly round – rustic charm is encouraged! Gently lift and place it into your tart pan. -
Blind Bake the Crust
Use a fork to prick holes in the bottom of the crust. This allows steam to escape, preventing puffing. Line the crust with parchment paper and fill with pie weights (or dried beans). Bake for 15 minutes, then remove the weights and bake for another 10-12 minutes or until lightly golden. Let it cool completely. -
Prepare the Vanilla Pastry Cream
While the crust cools, it’s time to make the pastry cream. If you’re going the homemade route, whisk together milk, sugar, and vanilla over medium heat until steaming. In a separate bowl, whisk egg yolks and cornstarch, then slowly add the warm milk mixture to temper the eggs. Return to the heat, cooking until thickened. Cool completely before assembling. -
Assemble the Tart
Once the crust and pastry cream are cooled, spread the cream evenly over the base. Arrange the sliced strawberries on top in an artful manner – this is your chance to showcase your creativity! -
Glaze with Apricot Jam
If you’re using apricot jam, warm it slightly in a saucepan until it becomes runny. Brush it generously over the strawberries for a shiny finish. -
Chill Before Serving
Allow your Tarte aux Fraises to chill in the refrigerator for about an hour. This helps set everything beautifully.
Serving Suggestions
When it’s time to serve, present your Tarte aux Fraises on a lovely cake stand. A light dusting of powdered sugar can add an elegant touch. Pair it with a dollop of whipped cream on the side for that extra indulgence. This dessert works wonderfully at dinner parties or summer gatherings, bringing smiles to the faces of everyone indulging in it.
Recipe Variations
Feeling adventurous? Here are some fun variations to mix things up:
- Berry Medley Tarte: Swap the strawberries for a mix of berries – blueberries, raspberries, and blackberries create a colorful twist.
- Chocolate Hazelnut Spread Base: Spread a thin layer of Nutella or chocolate ganache under the pastry cream for a decadent touch.
- Lemon Infusion: Add lemon zest to the pastry cream for a bright, zesty flavor that compliments the sweetness of the strawberries.
- Herbal Touch: Infuse fresh basil or mint into your pastry cream for an unexpected herbaceous note.
- Dairy-free Option: Use coconut cream instead of pastry cream for a delightful tropical twist.
Chef’s Notes
Tarte aux Fraises has evolved for me over the years. As my skills grew, so did my confidence in manipulating flavors and presentations. I remember my first attempt ended in a collapsed crust and a pastry cream that just refused to thicken. But that’s the beauty of cooking—the journey is part of the fun! I learned to embrace those kitchen mishaps as part of the learning process.
Now, my Tarte aux Fraises represents not just my culinary skills, but the warmth of those sun-soaked summers with my grandmother. It reminds me that cooking is ultimately about nurturing, both ourselves and those we love.
FAQs and Troubleshooting
-
Why did my crust shrink during baking?
Ensure your dough is well-chilled before baking, as warm dough tends to shrink. Always prick holes in the crust before baking! -
My pastry cream is too thin—what went wrong?
If the cream didn’t thicken, it may not have been heated long enough. Ensure to whisk continuously once you return it to the heat. -
Can I use frozen strawberries instead of fresh?
Yes, but be sure to thaw and drain them properly to prevent excess moisture. -
How do I store leftovers?
Tarte aux Fraises is best enjoyed fresh but can be stored in an airtight container in the fridge for up to two days. Just note the crust may lose some of its crisp texture.
Nutritional Info
While indulging in a slice of Tarte aux Fraises, consider that it’s packed with fresh strawberries, giving you a boost of vitamin C and antioxidants. Just remember to enjoy it in moderation as part of a well-balanced diet.
There you have it—my recipe for a stunning Tarte aux Fraises. May it become a staple in your kitchen, just as it has in mine. Here’s to cooking with intention, creating beautiful memories, and always remembering that good food is about showing up for one another. Happy baking, everyone!
PrintTarte aux Fraises
A classic French strawberry tart, perfect for summer gatherings, combining a crisp crust with vanilla pastry cream and fresh strawberries.
- Prep Time: 45 minutes
- Cook Time: 30 minutes
- Total Time: 75 minutes
- Yield: 8 servings 1x
- Category: Dessert
- Method: Baking
- Cuisine: French
- Diet: Vegetarian
Ingredients
- 1 1/2 cups all-purpose flour
- 1/2 cup powdered sugar
- 1/2 cup unsalted butter, softened
- 1 large egg yolk
- 1 cup vanilla pastry cream
- 2 cups fresh strawberries, hulled and sliced
- 1/4 cup apricot jam (optional, for glazing)
Instructions
- Make the Tart Crust: In a mixing bowl, combine the flour and powdered sugar. Mix well, then add the softened butter and rub it in until it resembles coarse crumbs.
- Add the Egg Yolk: Add the egg yolk and stir until the mixture clumps together. Press into a ball, adding ice water if too dry.
- Chill the Dough: Wrap in plastic wrap and refrigerate for at least 30 minutes.
- Preheat the Oven: Preheat your oven to 350°F (175°C).
- Roll Out the Dough: Lightly flour your surface and roll the dough to about 1/8 inch thick, then transfer it to the tart pan.
- Blind Bake the Crust: Prick holes in the crust, line with parchment and weights, and bake for 15 minutes. Remove weights and bake for an additional 10-12 minutes until golden.
- Prepare the Vanilla Pastry Cream: Whisk milk, sugar, and vanilla over medium heat until steaming. Temper egg yolks with cornstarch, then cook until thickened.
- Assemble the Tart: Spread pastry cream over the cooled crust and layer the strawberries on top.
- Glaze with Apricot Jam: Warm the jam and brush it over the strawberries.
- Chill Before Serving: Refrigerate for about an hour before serving.
Notes
Serve with a dusting of powdered sugar and a dollop of whipped cream.
Nutrition
- Serving Size: 1 slice
- Calories: 280
- Sugar: 15g
- Sodium: 200mg
- Fat: 16g
- Saturated Fat: 10g
- Unsaturated Fat: 4g
- Trans Fat: 0g
- Carbohydrates: 35g
- Fiber: 2g
- Protein: 3g
- Cholesterol: 40mg
Keywords: tarte aux fraises, strawberry tart, French dessert, summer dessert, classic recipes

Skillet Plum Cobbler: 25-Minute One-Pan Weeknight Dessert
Easy Skillet Plum Cobbler: A Sweet Slice of Summer
Hello, fellow food lovers! Today, we’re diving into one of my favorite desserts that never fails to chase the blues away—an Easy Skillet Plum Cobbler. I’ll be sharing all the sweet details of this irresistibly warm, fruity dish that’s perfect for gatherings, quiet family dinners, or simply indulging after a long day. Get ready to impress your loved ones with a dessert that feels fancy but is totally approachable!
Imagine this: it’s a sunny afternoon, and the farmers’ market is bursting at the seams with fresh, ripe plums. The vibrant purples and reds draw you in, and you can’t resist picking up a few pounds. Those juicy beauties scream of summer sweetness and remind you of your childhood spent picking fruit from grandma’s garden. This cobbler is my homage to those cherished memories, and I can’t wait to recreate that nostalgia with you in the kitchen.
A Sweet Memory
I remember the first time I made this Easy Skillet Plum Cobbler. It was a warm Sunday afternoon, and I had just returned home from a family gathering filled with laughter and stories. My grandma used to always whip up something sweet when we visited, but for some reason, that day, I felt inspired to take a leap and create my own version. I gathered my plums, rummaged through the pantry, and started tossing ingredients together, singing along to my favorite tunes while the oven preheated.
With every slice of that sweet, juicy plum and sprinkle of sugar, I felt an echo of my summer days in grandma’s kitchen—baking adventures filled with creativity, flour fights, and, of course, the wonderful aroma of baked fruit wafting through the air. As the cobbler baked, my family gathered around the kitchen island, intrigued by the smell that wrapped around us like a warm hug. Once I pulled it from the skillet, the bubbling juices and golden crust drew everyone in. It was a hit! And in that moment, I realized that food is more than just sustenance; it’s memory-making, and that’s what my cooking journey is all about.
Ingredients
Now, let’s chat about the star players in this scrumptious dish. Here’s what you’ll need:
-
6 cups fresh plums (pitted and sliced): Plums are juicy and tangy, making them perfect for cobbler. If plums are out of season, feel free to substitute with peaches, cherries, or apricots.
-
3/4 cup granulated sugar: This sweetens the fruit and the batter. You can use brown sugar for a richer flavor or coconut sugar for a healthier alternative.
-
1 tablespoon lemon juice: The acidity enhances the flavor of the plums. If you’re out of lemons, a splash of vinegar will work in a pinch.
-
1 teaspoon vanilla extract: This adds depth to the dish. Always opt for pure vanilla extract—it makes a noticeable difference!
-
1 tablespoon cornstarch: Helps thicken the juices from the fruit. If you’re out of cornstarch, you can use arrowroot or even all-purpose flour as a substitute, but cornstarch is the best option for a clear, glossy finish.
-
1 cup all-purpose flour: This is the base for the cobbler batter. For gluten-free options, you can use a gluten-free all-purpose blend.
-
1 cup granulated sugar: This will sweeten the batter. Just like the first sugar measurement, feel free to experiment with different sugars.
-
1 teaspoon baking powder: This helps the cobbler rise and gives it that fluffy texture we crave.
-
1/2 teaspoon salt: Just a pinch enhances all the flavors.
-
1/2 cup (1 stick) unsalted butter, melted: This rich ingredient gives the cobbler its luxurious texture. You can substitute with coconut oil for a dairy-free version.
-
1/2 cup whole milk: This adds moisture. You can swap it out for almond milk or any non-dairy milk if you’re keeping it plant-based.
-
1/2 teaspoon vanilla extract: Extra vanilla means extra flavor—always a good thing!
Step-by-Step Instructions
Now, let’s get cooking! Grab your apron, and let’s dive in.
Step 1: Prepare the Plums
Start by washing your plums thoroughly. Next, cut them in half and remove the pits. Slice the halves into wedges. Toss the sliced plums in a large mixing bowl with 3/4 cup granulated sugar, 1 tablespoon lemon juice, and 1 tablespoon cornstarch. This will create the most gorgeous syrupy base as they marinate while we prepare the batter. Let them sit for about 15-20 minutes, allowing those juicy flavors to meld together.
Step 2: Preheat the Oven and Prepare the Skillet
While the plums are mingling, preheat your oven to 350°F (175°C). Get your skillet ready! I love using a cast iron skillet. It’s not only great for cooking even heat but also looks fantastic when serving. If you don’t have one, any oven-safe skillet or baking dish will do. For extra flavor, add 2 tablespoons of butter to the skillet and place it in the oven to melt. This buttery base adds richness and helps create a beautiful crust.
Step 3: Whisk Together Dry Ingredients
In another bowl, combine 1 cup of flour, 1 cup of granulated sugar, 1 teaspoon of baking powder, and 1/2 teaspoon of salt. Whisk these dry ingredients together until well mixed. This ensures the baking powder is evenly distributed.
Step 4: Combine with Wet Ingredients
In a separate bowl, mix together the 1/2 cup of melted unsalted butter, 1/2 cup of whole milk, and 1/2 teaspoon of vanilla extract. Stir until combined. Then, pour the wet mixture into the bowl with your dry ingredients. Gently stir until just combined—do not overmix! A few lumps are perfectly fine; they will bake out.
Step 5: Assemble the Cobbler
Remove the hot skillet from the oven—careful, it’s hot! Pour the marinated plum mixture into the skillet, spreading them evenly. Now, dollop the batter over the plums. Don’t worry about covering every inch; it’s nice when the fruit peeks through. Use a spatula to gently spread the batter but remember, rustic is the name of the game here!
Step 6: Bake to Perfection
Return the skillet to the oven and bake for 30-35 minutes or until the top is golden brown and a toothpick inserted into the center comes out clean. The plums will bubble around the edges, creating a beautiful, messy presentation that invites everyone to dig in.
Serving Suggestions
Once your Skillet Plum Cobbler is out of the oven and cooled slightly, it’s time to serve! For a touch of elegance, I love to dust it lightly with powdered sugar. Serve it warm with a scoop of vanilla ice cream melting atop the cobbler. The contrast of the warm dessert and the cold ice cream is heavenly!
Recipe Variations
Here are a few fun twists to consider:
- Berry Twist: Mix in a cup of blueberries or raspberries with your plums for a burst of berry flavor!
- Almond Flour Variation: Substitute half the all-purpose flour with almond flour for a nutty flavor and a gluten-free option.
- Spices Galore: Sprinkle in some cinnamon and nutmeg for added warmth—perfect for cozy gatherings.
- Zesty Upgrade: Add a teaspoon of orange zest to the fruit mixture for a citrusy kick.
- Nutty Streusel Topping: Mix together oats, brown sugar, and chopped nuts to create a streusel topping for added texture.
Chef’s Notes
This recipe has evolved in my kitchen over the years. Initially, it was a haphazard assembly of what I had on hand, but each iteration led to this refined yet simple treat. It’s become a staple for summer gatherings and always brings back fond memories of time spent in the kitchen.
A funny story: the first time I brought this dish to a friends’ potluck, I forgot to let it cool slightly. As I served it, the ice cream melted immediately into a delicious but sloppy mixture. Everyone loved it anyway and jokingly called it “cobbler soup!” Sometimes, unexpected mishaps lead to the best laughs, doesn’t it?
FAQs and Troubleshooting
Q: My cobbler turned out gummy. What went wrong?
A: This can happen if the batter is overmixed or if it didn’t bake long enough. Make sure to mix gently and check for doneness with a toothpick.
Q: Can I use frozen plums?
A: Absolutely! Just make sure to thaw and drain excess moisture before using them. They can be a little more watery than fresh fruit.
Q: What if I don’t have a skillet?
A: No worries! You can use any oven-safe baking dish. Just adjust the baking times as needed since it may cook differently.
Q: How can I store leftovers?
A: Store any leftovers in an airtight container in the fridge for up to three days. Reheat in the oven or microwave, making sure to warm it gently so it stays delicious.
Nutritional Info
Though I don’t have precise nutritional information for this recipe at hand, homemade desserts are often best enjoyed in moderation and shared with those you love! You can experiment with healthier substitutes to make it a bit lighter if you’re trying to keep it wholesome.
So there you have it, my friends—a fantastic Easy Skillet Plum Cobbler recipe to brighten your day and dazzle your dinner guests! Be sure to grab your favorite plums and try this delightful dish. I can’t wait to hear how it turns out! Let’s cook with intention and make our tables a little sweeter. Happy baking!
PrintEasy Skillet Plum Cobbler

A warm, fruity dessert that captures the essence of summer, perfect for gatherings or quiet family dinners.
- Prep Time: 20 minutes
- Cook Time: 35 minutes
- Total Time: 55 minutes
- Yield: 8 servings 1x
- Category: Dessert
- Method: Baking
- Cuisine: American
- Diet: Vegetarian
Ingredients
- 6 cups fresh plums (pitted and sliced)
- 3/4 cup granulated sugar
- 1 tablespoon lemon juice
- 1 teaspoon vanilla extract
- 1 tablespoon cornstarch
- 1 cup all-purpose flour
- 1 cup granulated sugar
- 1 teaspoon baking powder
- 1/2 teaspoon salt
- 1/2 cup (1 stick) unsalted butter, melted
- 1/2 cup whole milk
- 1/2 teaspoon vanilla extract
Instructions
- Prepare the plums: Wash, pit, and slice the plums and toss with sugar, lemon juice, and cornstarch.
- Preheat the oven to 350°F (175°C) and prepare the skillet with butter.
- Whisk together the flour, sugar, baking powder, and salt in a bowl.
- Combine the wet ingredients in another bowl and mix into the dry ingredients until just combined.
- Assemble the cobbler in the skillet, spreading the plum mixture and dolloping the batter on top.
- Bake for 30-35 minutes until golden brown and a toothpick comes out clean.
Notes
Serve warm with powdered sugar and a scoop of vanilla ice cream for a heavenly treat.
Nutrition
- Serving Size: 1 serving
- Calories: 350
- Sugar: 24g
- Sodium: 150mg
- Fat: 15g
- Saturated Fat: 9g
- Unsaturated Fat: 5g
- Trans Fat: 0g
- Carbohydrates: 54g
- Fiber: 3g
- Protein: 4g
- Cholesterol: 30mg
Keywords: plum cobbler, summer dessert, easy dessert, fruit cobbler, skillet dessert

Seasonal Summer Berry Poke Cake: 5-Ingredient Quick Dessert
The Ultimate Summer Berry Poke Cake: A Burst of Flavor and Nostalgia
Hello, fellow food lovers! I can’t tell you how excited I am to share one of my all-time favorite summer desserts with you — the delightful Summer Berry Poke Cake. Think of sunshine, fresh-picked berries, and the joy of gatherings with loved ones. This lovely dessert doesn’t just taste amazing; it also has a special place in my heart, and I can’t wait to dive into the details of how it all came together.
The Memory That Inspired It All
Growing up, my grandmother was the queen of summer desserts. There was always something sweet and fruity wafting through her kitchen — from cobblers to pies, but her poke cake was the one that stole my heart. I vividly remember the sweet aroma of yellow cake baking, mingling with that fresh berry scent wafting through the air. Every summer, we would gather for family picnics, and she would proudly unveil her signature poke cake drenched in red raspberry Jell-O, topped with whipped cream and the freshest berries.
Eating that cake was always a delight, but the best memories revolved around us sitting around the picnic table, laughing and sharing stories while enjoying the splendid flavors that only summer can bring. When I created my version of her poke cake, it brought back all those warm and fuzzy feelings. I made it a little more vibrant with an extra punch of colorful berries. So, roll up your sleeves and let’s channel that summer nostalgia into the kitchen!
Ingredients
Here’s what you’ll need to create this mouthwatering cake:
-
1 box yellow cake mix
This is your base! You could switch it up with a gluten-free cake mix or even a lemon cake mix if you want to add a citrusy twist. -
1 cup water
Perfect for mixing the cake. Use cold or room temperature water; both work well, though cold water keeps the batter smooth. -
1/3 cup vegetable oil
This adds moisture and richness. If you’re looking to be a bit healthier, you could substitute with unsweetened applesauce! -
3 large eggs
Eggs provide structure. If you have egg allergies, you can use flax eggs as a binder (1 tablespoon ground flaxseed mixed with 2.5 tablespoons water equals 1 egg). -
1 cup fresh strawberries, chopped
These sweet gems are essential for that summery flavor. If strawberries are out of season, feel free to swap them for blackberries or your berry of choice! -
1 cup fresh blueberries
Antioxidant-rich and bursting with flavor, they add a delightful joy to the cake! They can also be substituted with diced peaches for a tropical flair. -
1 cup raspberry Jell-O mix
Essential for infusing flavor and color, this is what makes the cake “poke”! You could also use another flavor, like strawberry or cherry. -
1 cup boiling water
This is what dissolves the Jell-O mix, allowing it to soak beautifully into the cake. -
1 cup whipped topping
For that luscious frosting! You can use homemade whipped cream if you prefer, which will elevate the texture. -
1/2 cup fresh berries for garnish
Choose whatever berries you love — a rainbow of colors makes for an Instagram-worthy dessert!
Step-by-Step Instructions
Now that we’ve rounded up our ingredients, let’s embark on our sweet journey:
-
Preheat your Oven:
Start by preheating your oven to 350°F (175°C). This will ensure your cake bakes evenly and comes out perfectly golden. -
Mix Your Batter:
In a large mixing bowl, combine the yellow cake mix, water, vegetable oil, and eggs. Whisk until smooth. This is the fun part — get your family involved and let everyone take turns mixing. It’s a great way to create lasting memories (and get everyone a bit messy!). -
Pour and Bake:
Grease a 9×13-inch baking pan and pour in the cake batter. Bake it in the preheated oven for 25-30 minutes or until a toothpick inserted into the center comes out clean. While it’s baking, you’ll have the perfect opportunity to let the delicious aroma fill your home. -
Cool the Cake:
Once baked, allow the cake to cool in the pan for about 10-15 minutes. You want it to be warm, but not hot, before you start poking holes in it. -
Poke the Holes:
Using the handle of a wooden spoon or a straw, gently poke holes all over the top of the cake, about 1 inch apart. This is what allows that delicious Jell-O mixture to seep into the cake — trust me, it’s worth it. -
Prepare the Jell-O Mixture:
In a separate bowl, dissolve the raspberry Jell-O in 1 cup of boiling water, stirring until fully dissolved. This is where the magic begins! -
Pour the Jell-O Over the Cake:
Carefully pour the Jell-O mixture over the cake evenly, ensuring it fills in all the holes. You’ll see it start to seep into the cake, creating irresistible pockets of fruity goodness. -
Let It Chill:
Next, let the cake cool in the refrigerator for at least 2-3 hours (or overnight if you can wait that long!). This helps the flavors mingle and makes it easier to cut clean slices. -
Top It Off:
Once chilled, remove the cake from the fridge and spread the whipped topping over the top. Decorate with the fresh berries for a stunning finish. -
Slice and Serve:
You’re ready to slice into this summer delight. Serve it in generous squares and watch as your guests smile with delight!
Serving Suggestions
To elevate your serving experience, plate the slices on colorful dessert plates, and add a sprig of mint on top for a lovely pop of color. Pair slices with a scoop of vanilla ice cream or a dollop of extra whipped cream — because who can ever say no to ice cream, right?
Recipe Variations
The beauty of the Summer Berry Poke Cake is its versatility. Consider these fun variations:
- Tropical Twist: Replace berries with diced pineapple and mango for a tropical version.
- Lemon Burst: Swap out the yellow cake for lemon cake and use lemon Jell-O for a zesty kick.
- Chocolate Lover’s Dream: Use chocolate cake mix and raspberry Jell-O for a delicious chocolate-berry fusion.
- Vegan Version: Replace eggs with flax eggs, and use plant-based whipped cream.
Chef’s Notes
You know what’s great about this recipe? It’s not just a cake; it’s an experience! Each summer’s gathering and celebration becomes intertwined with this beloved poke cake. I’ll never forget the year I accidentally forgot to poke holes in the cake. My friends loved it anyway, but I resolved never to make that mistake again!
Over time, I’ve played around with flavors — from peach to lemon — but I always circle back to my original love for a strawberry-blueberry-raspberry combination. Each version reminds me of those warm summer afternoons spent with family.
FAQs and Troubleshooting
Q1: What if my cake comes out too dense?
Sometimes, if you overmix your batter, it can result in a dense cake. Just mix until the ingredients are incorporated!
Q2: Can I use frozen berries?
Absolutely! Fresh berries are great, but frozen will work too. Just ensure they’re thawed and drained before you use them to avoid excess moisture.
Q3: How do I store leftover cake?
Cover any leftover cake with plastic wrap or aluminum foil and keep it in the refrigerator for up to 3 days. Although, let’s be honest — it rarely lasts that long!
Q4: How can I tell when the cake is fully baked?
A toothpick inserted into the center of the cake should come out clean or with just a few moist crumbs. If there’s wet batter clinging to it, bake for a few more minutes and check again.
Nutritional Info
(Disclaimer: Nutritional information will vary depending on brands and ingredients used, but here’s a general ballpark per slice):
- Calories: approx. 260
- Fat: 10g
- Carbohydrates: 40g
- Protein: 2g
- Sugars: 15g
There you have it, my lovely friends! A cheerful Summer Berry Poke Cake that brings back memories of warm afternoons and joyful gatherings. So, tie on your apron and get baking! Let’s make some sweet memories this summer — one poke cake at a time!
PrintUltimate Summer Berry Poke Cake

A delightful summer dessert bursting with fresh berries and nostalgic flavors, perfect for gatherings.
- Prep Time: 15 minutes
- Cook Time: 30 minutes
- Total Time: 180 minutes
- Yield: 12 servings 1x
- Category: Dessert
- Method: Baking
- Cuisine: American
- Diet: Vegetarian
Ingredients
- 1 box yellow cake mix
- 1 cup water
- 1/3 cup vegetable oil
- 3 large eggs
- 1 cup fresh strawberries, chopped
- 1 cup fresh blueberries
- 1 cup raspberry Jell-O mix
- 1 cup boiling water
- 1 cup whipped topping
- 1/2 cup fresh berries for garnish
Instructions
- Preheat your oven to 350°F (175°C).
- Mix the yellow cake mix, water, vegetable oil, and eggs in a large mixing bowl until smooth.
- Pour the cake batter into a greased 9×13-inch baking pan and bake for 25-30 minutes.
- Cool the cake in the pan for about 10-15 minutes.
- Poke holes in the cake using a wooden spoon handle.
- Prepare the Jell-O mixture by dissolving it in 1 cup of boiling water.
- Pour the Jell-O mixture over the cake, ensuring it seeps into the holes.
- Let the cake cool in the refrigerator for at least 2-3 hours.
- Top the chilled cake with whipped topping and decorate with fresh berries.
- Slice and serve!
Notes
For additional variations, consider using diced pineapple and mango for a tropical twist, or lemon cake with lemon Jell-O for a zesty kick.
Nutrition
- Serving Size: 1 slice
- Calories: 260
- Sugar: 15g
- Sodium: 200mg
- Fat: 10g
- Saturated Fat: 1.5g
- Unsaturated Fat: 8g
- Trans Fat: 0g
- Carbohydrates: 40g
- Fiber: 1g
- Protein: 3g
- Cholesterol: 50mg
Keywords: Summer, Berry, Poke Cake, Dessert, Refreshing, Nostalgic

Strawberry Heaven: 15-Minute Recipe for Fresh Summer Flavor
Strawberry Heaven: The Amazing Ultimate Recipe You Need in Your Life
Welcome to the delightful world of Strawberry Heaven! If you’re looking to elevate your dessert game and impress your guests or simply indulge in a slice of joy yourself, this recipe is about to become your new kitchen staple. Imagine a dessert that embodies the essence of summer—sweet, vibrant, and oh-so-satisfying. Whether you’re hosting a dinner party, celebrating a birthday, or just seeking a sweet escape after a long day, this Strawberry Heaven recipe will make your heart sing.
Let me take you on a little journey. Picture this: It’s a bright Sunday afternoon, the sun is shining, and my kitchen is filled with the delicious aroma of fresh strawberries. I can still hear my grandmother’s laughter echoing through the air as she whipped up her famous strawberry shortcake. Every bite was a burst of summer that transported me right back to those beautiful days spent in her backyard, surrounded by family and friends, food and joy.
For years, I have cherished that memory, and today I’m sharing a modern take on that classic moment: Strawberry Heaven! This delightful dessert is a combination of creamy mascarpone, rich whipped cream, and fresh strawberries, all layered on a buttery crust that creates a symphony of flavor and texture. It’s not just a treat; it’s an experience that brings people together.
So, grab your apron, and let’s dive into this heavenly creation that will make your taste buds dance and your heart flutter.
Ingredients
For Strawberry Heaven, gather these delightful ingredients:
-
4 cups fresh strawberries, hulled and sliced
Fresh strawberries are the star of the show! Look for berries that are plump, vibrant red, and fragrant. If fresh strawberries aren’t available, you can use frozen strawberries, but be sure to thaw and drain them well. -
1 cup granulated sugar, divided
A classic sweetener that brings out the natural sweetness of the strawberries. You can also swap a portion with brown sugar for a hint of caramel flavor. -
1 teaspoon vanilla extract
This adds a warm, comforting note to the cream mixture. Opt for pure vanilla extract for the best flavor, but if you’re in a pinch, imitation vanilla can work, too. -
1 cup heavy cream
Heavy cream is key for achieving that light and fluffy texture. You can substitute with coconut cream for a dairy-free option, but it will impart a different flavor. -
1 cup mascarpone cheese
This luscious cheese adds a rich creaminess that takes the dessert to the next level. If you can’t find mascarpone, cream cheese is a good substitute, though it will be tangier. -
1/2 cup powdered sugar
This helps sweeten the whipped cream without grittiness. If you’re looking to cut down on sugar, you can use a sugar substitute made for baking. -
1 cup crushed graham crackers or shortbread cookies (for crust)
These provide a crunchy base with a sweet aroma. You can swap them out for gluten-free cookies or even oats for a healthier option. -
4 tablespoons unsalted butter, melted
Rich and necessary for binding the crust. If you’re looking for a dairy-free option, coconut oil can work well here.
Step-by-Step Instructions
Now that we’ve gathered our ingredients, let’s dive into the fun part—making Strawberry Heaven!
-
Prepare the Strawberries
Start by hulling and slicing your fresh strawberries. It’s like prepping for a party; you want them to look beautiful and vibrant. Place them in a bowl and sprinkle about 1/2 cup of granulated sugar over them. Gently toss to coat and let them sit for about 20–30 minutes. This step helps the strawberries release their juices, creating a wonderfully sweet syrup! -
Make the Crust
While the strawberries are mingling with the sugar, let’s whip up the crust. In a mixing bowl, combine the crushed graham crackers (or shortbread cookies) and melted butter, mixing until the crumbs are well-coated. The texture should resemble wet sand. Press this mixture into the bottom of a 9-inch springform pan evenly. Don’t rush through this; a well-packed crust ensures a sturdy base! Bake it in a preheated oven at 350°F (175°C) for about 8–10 minutes until golden and fragrant. Allow it to cool completely before moving on. -
Prepare the Cream Mixture
In a large mixing bowl, add the heavy cream, mascarpone cheese, powdered sugar, and vanilla extract. Now it’s time to whip! Using a hand mixer or a stand mixer, beat the mixture on medium-high speed. It’s crucial to keep an eye on it—stop once soft peaks form. You want it to be airy but avoid overbeating, which will turn it grainy. -
Combine Strawberries and Cream
Once your strawberries have released their juices, gently fold them into the whipped cream mixture. Use a spatula and be careful not to deflate the cream. You want those luscious strawberry slices dotted throughout, making every bite a perfect blend of sweetness and creaminess. -
Assemble the Dessert
Pour the strawberry-cream mixture onto your cooled crust, smoothing the top gently. Cover and place it in the refrigerator for at least 3 hours, or even overnight if time permits. The longer it chills, the more the flavors will meld together. -
Serve and Enjoy!
When you’re ready to serve, carefully release the sides of the springform pan. You can garnish the top with additional strawberry slices or a drizzle of chocolate for a touch of elegance. Slice into it, and watch the layers reveal their beauty—each piece as inviting as the last.
Serving Suggestions
Plate your Strawberry Heaven by presenting it on a beautiful cake stand, allowing the layers to shine. Consider adding a sprig of fresh mint on top for a pop of color and a refreshing hint. Pair each slice with a dollop of leftover whipped cream, maybe even a sprinkle of crushed graham crackers for that added crunch. This will not only enhance the visual appeal but also make every bite unforgettable!
Recipe Variations
- Chocolate Lovers: Add cocoa powder into the cream mixture for a chocolate twist.
- Berry Medley: Mix in blueberries or raspberries for a delightful berry assortment.
- Nutty Crunch: Incorporate crushed nuts into the crust for an added layer of flavor.
- Lemon Zest: A hint of freshly grated lemon zest can brighten the flavors beautifully.
- Vegan Twist: Use coconut cream for whipping, and swap mascarpone for a cashew-based cream for a dairy-free version.
Chef’s Notes
One of my favorite kitchen memories involves a slight mishap while preparing this recipe the first time. I had excitedly whipped my cream until it reached that silky perfection, only to realize that I had forgotten to add the mascarpone! I chuckled as I adjusted my steps to incorporate it afterward, and while it wasn’t what I had initially intended, it turned out to be a delightful flavor that I still use to this day! It’s stories like these that remind me—cooking is about exploration and having fun. Don’t be afraid to make your own adjustments; that’s where the magic happens!
FAQs and Troubleshooting
-
What if my whipped cream deflates?
If your whipped cream deflates, it could mean you overmixed it. Be sure to whip it only until soft peaks form. If you do overbeat, you can salvage it by folding in some fresh cream gently. -
How can I make the crust gluten-free?
You can easily swap out the graham crackers for gluten-free cookies or almond flour for a deliciously crumbly crust. -
Can I make this in advance?
Absolutely! Strawberry Heaven actually tastes better the longer it has to set. Just cover it tightly and store it in the refrigerator for up to 2 days before serving. -
How do I store leftovers?
Store any leftover Strawberry Heaven in an airtight container in the refrigerator for up to 3 days.
Nutritional Info (optional)
This section can be tailored with estimated nutritional values if applicable based on the ingredients used.
Now that you’re armed with this delightful recipe, prepare to dazzle your guests! With its simple yet elegant layers, Strawberry Heaven is perfect for any occasion, or just an indulgent weeknight treat. Happy cooking, my fellow food lovers—let’s get to creating those small, beautiful moments around our tables. 🍓✨
PrintStrawberry Heaven

A delightful dessert featuring layers of creamy mascarpone, whipped cream, and fresh strawberries on a buttery crust.
- Prep Time: 20 minutes
- Cook Time: 10 minutes
- Total Time: 210 minutes
- Yield: 8 servings 1x
- Category: Dessert
- Method: Baking
- Cuisine: American
- Diet: Vegetarian
Ingredients
- 4 cups fresh strawberries, hulled and sliced
- 1 cup granulated sugar, divided
- 1 teaspoon vanilla extract
- 1 cup heavy cream
- 1 cup mascarpone cheese
- 1/2 cup powdered sugar
- 1 cup crushed graham crackers or shortbread cookies (for crust)
- 4 tablespoons unsalted butter, melted
Instructions
- Prepare the Strawberries: Hull and slice the fresh strawberries, place them in a bowl and sprinkle with 1/2 cup of granulated sugar. Toss gently and let sit for 20–30 minutes.
- Make the Crust: Combine crushed graham crackers and melted butter in a mixing bowl. Press into the bottom of a 9-inch springform pan and bake at 350°F (175°C) for 8–10 minutes. Allow to cool completely.
- Prepare the Cream Mixture: In a large bowl, combine the heavy cream, mascarpone cheese, powdered sugar, and vanilla. Beat on medium-high speed until soft peaks form.
- Combine Strawberries and Cream: Fold the strawberries into the whipped cream mixture gently.
- Assemble the Dessert: Pour the mixture onto the cooled crust and smooth the top. Refrigerate for at least 3 hours, or overnight.
- Serve and Enjoy: Release the sides of the springform pan and garnish with additional strawberry slices or chocolate drizzle.
Notes
For a chocolate twist, add cocoa powder to the cream mixture. This dessert is best enjoyed chilled and can be made in advance.
Nutrition
- Serving Size: 1 slice
- Calories: 400
- Sugar: 35g
- Sodium: 150mg
- Fat: 24g
- Saturated Fat: 12g
- Unsaturated Fat: 10g
- Trans Fat: 0g
- Carbohydrates: 45g
- Fiber: 2g
- Protein: 5g
- Cholesterol: 60mg
Keywords: strawberry dessert, summer dessert, no-bake dessert

Ingredient Banana Chia Honey Milk Pudding in 15 Minutes
Indulge in the Creamy Delight of Banana Chia Honey Milk Pudding
Hello, fellow food lovers! Today, I’m beyond excited to take you into the kitchen for a delightful treat that’s both dreamy and nutritious: Banana Chia Honey Milk Pudding. This dish is an indulgent combination of creamy coconut milk, ripe bananas, and nutrient-packed chia seeds, topped with a touch of honey for that perfect sweet finish. It’s a recipe that anyone can whip up, no culinary experience necessary — and I promise, it’ll have your taste buds dancing with joy!
The Sweetness of Nostalgia
Before we dive into the delicious details, let’s take a moment to reminisce. I remember a sunny afternoon in my favorite childhood kitchen, where my mom introduced me to the magic of puddings. She would let me mash bananas with a fork while she whisked away in a flurry of coconut milk and honey. The warm fragrance of vanilla lingered in the air, promising a sweet treat ahead. Using simple ingredients, we would create a dish that felt special, even though it was crafted with love and spontaneity.
Whether we served it as a whimsical dessert after a weeknight dinner or an energizing breakfast on lazy weekends, that pudding always held a special place in my heart. It was simple yet complex, comforting yet elegant, just like this Banana Chia Honey Milk Pudding we’re making today. Let’s recreate that sweet memory, shall we?
Ingredients: A Symphony of Flavors
Gather these lovely ingredients and get ready for a joyful cooking experience!
-
2 cups coconut milk: This creamy delight serves as a base for our pudding. It’s vegan, rich, and adds a luxurious texture. If you’re looking for substitutes, almond milk or soy milk are great alternatives, though they may alter the flavor slightly.
-
2 medium ripe bananas: The stars of our pudding! Choose bananas that are well-ripened with plenty of spots; they’ll sweeten the dish naturally. If you’re out of bananas, you can try using applesauce or even a fruit puree!
-
2 teaspoons local honey: This sweet touch elevates the dish with a gentle floral note. Feel free to swap it out for maple syrup if you prefer a vegan option.
-
1 teaspoon vanilla extract: Adds a warm, aromatic quality. If you want to elevate the flavor even more, consider using vanilla bean paste instead.
-
1/2 teaspoon ground cinnamon: This spice contributes warmth and depth to the pudding. You can experiment with nutmeg or cardamom if you’re feeling adventurous!
-
6 teaspoons chia seeds: These little superheroes are essential for thickening our pudding. If you have a chia allergy (rare but possible), you can replace them with flaxseeds, though the texture might differ slightly.
Step-by-Step Instructions: Your Cooking Adventure
-
Prepare the Bananas: Start by peeling the two medium ripe bananas and slicing them into smaller pieces for easier blending. Place them in a mixing bowl and mash them up using a fork or potato masher until they reach your desired level of smoothness. Pro tip: a few lumps are perfectly fine; they add a delightful texture!
-
Combine Wet Ingredients: In a mixing bowl, add the mashed bananas, 2 cups of coconut milk, 2 teaspoons of local honey, 1 teaspoon of vanilla extract, and 1/2 teaspoon of ground cinnamon. Using a whisk, combine until everything is well incorporated. It shouldn’t take more than a minute or two!
-
Stir in Chia Seeds: Once your mixture is smooth, gently fold in 6 teaspoons of chia seeds. Cheerful little spoons of nutrition! Ensure they’re evenly distributed, as they will swell and thicken your pudding as it sets.
-
Let It Set: Transfer your banana-chia mixture into individual servings or one large bowl (get creative!). Cover with plastic wrap or a lid and pop it in the fridge for at least 2–4 hours, or ideally overnight. This is where the magic happens—our chia seeds will absorb the coconut milk and thicken into a dreamy pudding texture.
-
Serve and Enjoy: When you’re ready to dig in, take it out of the fridge and give it a good stir. If it looks too thick, you can always stir in a splash of coconut milk to loosen it up. Taste it — maybe it needs a dash more honey? Scoop it into pretty bowls, and you’re set for an elegant yet cozy treat!
Plating Perfection
To serve this delicious pudding, consider layering it in glass jars for a beautiful presentation. Top it with sliced bananas, a drizzle of honey, and a sprinkle of cinnamon. You could even add fresh berries or a dollop of whipped coconut cream for extra flair. The layered look is sure to impress anyone you gather around your table!
Recipe Variations: Get Creative
-
Tropical Twist: Add a spoonful of shredded coconut or diced mango to bring a burst of sunshine into every bite.
-
Chocolate Lovers: Stir in 1-2 tablespoons of cocoa powder or melted dark chocolate into the mixture for a rich, chocolatey version.
-
Nutty Crunch: Serve with a sprinkling of your favorite nuts like chopped almonds or walnuts on top for added crunch.
-
Berry Bliss: Mix in some chopped strawberries or blueberries to add a pop of color and additional nutrients.
-
Spicy Kick: For a more exotic flavor, try adding a pinch of cayenne or ginger for a surprising twist!
Chef’s Notes: A Touch of History
Over the years, this pudding recipe has transformed right alongside my cooking style. What once was made with just a dash of this and a pinch of that now thrives on a foundation of perfected ratios and flavorful enhancements. I’ve played with coconut blends, infusions of tea, and other spices along the way — but I keep coming back to this simple, nostalgic recipe.
I often think of how food creates bridges through generations. My childhood experiments with my mother were the initial spark, but now I feel like I’m continuing a legacy of delicious simplicity through this pudding. Each time you dive into it, I hope it feels like a cozy hug!
FAQs and Troubleshooting
1. Why isn’t my pudding thickening?
If your pudding isn’t setting up, it could be that the chia seeds didn’t absorb enough moisture. Make sure you’re allowing enough time in the fridge for them to soak up the liquid. Next time, ensure your mixture is well-combined!
2. Can I use other sweeteners instead of honey?
Absolutely! Feel free to swap honey with maple syrup, agave nectar, or even sugar. Just keep in mind that the flavor might shift a little depending on the sweetness and type you choose.
3. What can I do if my pudding is too thick?
No problem at all! Stir in a little more coconut milk until you reach your desired consistency. This pudding is wonderfully adaptable.
4. How long does this pudding last?
Stored in an airtight container in the fridge, your pudding will stay fresh for about 3-5 days. Just give it a good stir before serving again!
Nutritional Info
This Banana Chia Honey Milk Pudding is not only delicious but also packed with nutrients. Each serving provides a source of healthy fats, fiber, and potassium, making it a wholesome option for breakfast, dessert, or a snack.
I hope you’ve enjoyed making this Banana Chia Honey Milk Pudding as much as I’ve enjoyed sharing the recipe with you! Remember, cooking should feel fun and delightful, so gather your ingredients, tie on that apron, and let your creativity shine in the kitchen. Happy cooking, friends!
PrintBanana Chia Honey Milk Pudding

A delightful and nutritious pudding made with coconut milk, ripe bananas, and chia seeds, sweetened with honey.
- Prep Time: 15 minutes
- Cook Time: 0 minutes
- Total Time: 240 minutes
- Yield: 4 servings 1x
- Category: Dessert
- Method: Refrigerating
- Cuisine: Vegan
- Diet: Vegan
Ingredients
- 2 cups coconut milk
- 2 medium ripe bananas
- 2 teaspoons local honey
- 1 teaspoon vanilla extract
- 1/2 teaspoon ground cinnamon
- 6 teaspoons chia seeds
Instructions
- Prepare the bananas: Peel and slice the bananas, then mash them in a bowl until desired smoothness.
- Combine wet ingredients: In a bowl, mix mashed bananas, coconut milk, honey, vanilla, and cinnamon until well combined.
- Stir in chia seeds: Fold in chia seeds until evenly distributed.
- Let it set: Transfer to individual servings or a large bowl, cover, and refrigerate for 2-4 hours or overnight.
- Serve and enjoy: Stir before serving, adding more coconut milk if needed. Serve in bowls with toppings as desired.
Notes
Consider layering in glass jars for a beautiful presentation and top with fresh fruits or nuts.
Nutrition
- Serving Size: 1 serving
- Calories: 250
- Sugar: 12g
- Sodium: 60mg
- Fat: 14g
- Saturated Fat: 12g
- Unsaturated Fat: 2g
- Trans Fat: 0g
- Carbohydrates: 28g
- Fiber: 5g
- Protein: 4g
- Cholesterol: 0mg
Keywords: banana pudding, chia pudding, vegan dessert, healthy pudding, coconut milk pudding
Lemon Blueberry Cheesecake Dump Cake
A Sweet Slice of Nostalgia: Lemon Blueberry Cheesecake Dump Cake
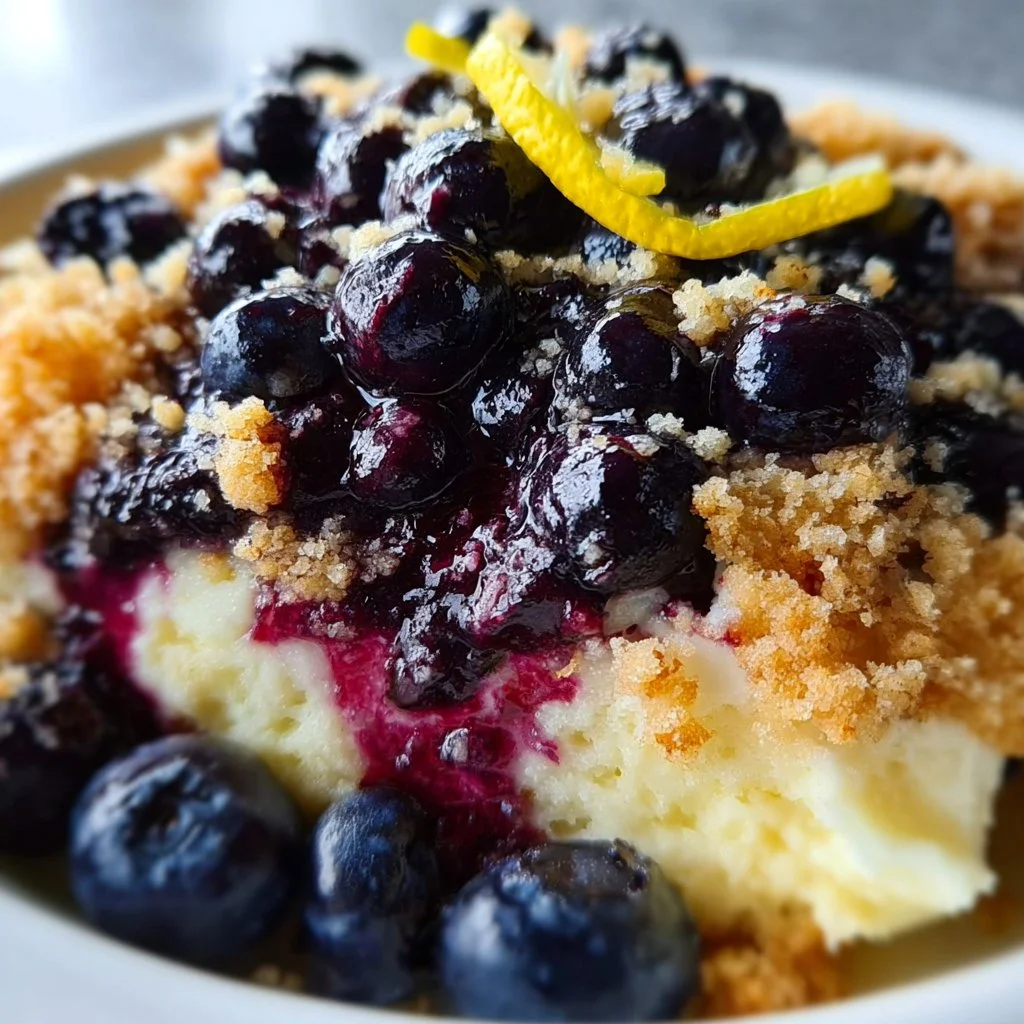
Hello, fellow foodies! Savannah Pierce here, and today we’re diving into a delightful dessert that brings together the bright, zesty flavors of lemon and the sweet-tart goodness of blueberries—introducing the Lemon Blueberry Cheesecake Dump Cake! This easy-to-make treat is sure to tickle your taste buds and warm your heart, reminding you of sunny days and cherished memories spent gathered around the table with loved ones.
A Slice of Childhood
Let me take you back to my childhood kitchen, where my love for baking blossomed. My grandmother, with her silver hair pulled back in a loose bun, was the queen of quick desserts. I remember watching her whip up cakes without fuss, and one day, she introduced me to her ‘throw-it-all-in’ cake method. “Savannah," she’d say, “the best cakes happen without too much thinking.”
I can still hear her laughter as she added a splash of this and a dash of that, her hands dusted with flour, her apron splattered with evidence of our culinary adventures. Her Lemon Blueberry Cheesecake Dump Cake was a favorite. It was the cake people would ask for at family gatherings, and I knew I wanted to create something equally special to honor her legacy.
So, today, as we flip through the pages of this recipe together, I invite you to create your own memories. Let’s bake with joy and share the fruits of our labor (and a sprinkle of love) with those we cherish!
Ingredients
Here’s what you’ll need to create this scrumptious Lemon Blueberry Cheesecake Dump Cake:
-
1 Box Yellow Cake Mix
A convenient base that brings a sweet, buttery flavor. You can substitute with gluten-free cake mix to suit dietary needs. -
1 Can of Lemon Pie Filling
This is where the magic happens! It adds rich lemon flavor. If you’re feeling adventurous, you can use homemade lemon curd instead. -
2 Cups Fresh Blueberries
Sweet and juicy, these little gems are the star of our show! If fresh blueberries aren’t available, frozen ones work just as well—just don’t worry about thawing them first. -
8 Ounces Cream Cheese, Softened
Creamy perfection! It adds richness to the cake. Feel free to use Neufchâtel cheese for a lower-fat option. -
1/2 Cup Sugar
A touch of sweetness to balance the tartness of the lemon. You can reduce it by a couple of tablespoons if you prefer less sweetness. -
1 Teaspoon Vanilla Extract
This adds warmth and depth to the flavor. Always use pure vanilla for the best taste, but artificial will work in a pinch. -
1/4 Cup Butter, Melted
Adds moisture and richness. If you’re going dairy-free, coconut oil could be a great substitute!
Step-by-Step Instructions
Now let’s get our hands a little messy and make this decadent dessert! Follow these steps closely, but don’t forget to have fun!
-
Preheat the Oven
Preheat your oven to 350°F (175°C). This is important as it ensures even baking. While that’s heating, take a moment to inhale the aroma of anticipation! -
Prepare the Baking Dish
Grab a 9×13 inch baking dish and grease it lightly. You want the cake to slide out easily. If you prefer, line it with parchment paper for an even smoother release. -
Mix the Cream Cheese Mixture
In a mixing bowl, beat the softened cream cheese with the sugar and vanilla extract until smooth and creamy. A hand mixer or a stand mixer works best here, but a whisk will also do the job if you’re feeling strong! -
Layer the Lemon Pie Filling
Spread the lemon pie filling on the bottom of the prepared baking dish. This tart layer will act as a base for your cake. Make sure to cover the entire surface evenly—the lemon flavor will seep into the cake. -
Add the Blueberries
Sprinkle your fresh blueberries over the lemon layer. You can add them neatly or scatter them for a more rustic look—no judgment here! -
Sprinkle the Cake Mix
Now for the dump part! Sprinkle the dry yellow cake mix evenly over the blueberries. No need to mix; just let the magic happen in the oven! -
Drizzle with Butter
Finally, drizzle the melted butter over the cake mix. This will create a golden, delicious crust as it bakes. Don’t worry about covering it completely; those little gaps will crisp up beautifully. -
Bake
Place the dish in the oven and bake for 35-40 minutes or until the top is golden and bubbling. Your kitchen will soon be filled with an intoxicating aroma that brings both comfort and excitement. -
Cool and Serve
Once baked, allow the cake to cool for about 15 minutes. This will make it easier to serve while still being warm and gooey!
Serving Suggestions
Plating this beauty is a breeze! Serve warm, either directly from the baking dish (because who has time for fancy dishes during a sweet craving?) or transfer it to a serving platter. A dollop of whipped cream or a scoop of vanilla ice cream on top makes for a stunning finish! Add a sprinkle of fresh blueberries or lemon zest for that aesthetic touch—it’ll feel like a slice of heaven on a plate!
Recipe Variations
- Berry Delight: Swap blueberries for a mix of berries! Raspberries and blackberries go splendidly well with lemon.
- Peachy Keen: Use canned or diced fresh peaches instead of lemon pie filling for a peach cheesecake dump cake.
- Coconut Cream: Replace the cream cheese with coconut cream for a tropical twist.
- Lemon Blueberry Muffin: Transform this into muffins by pouring the batter into muffin tins and adjusting bake time to about 20-25 minutes.
Chef’s Notes
My goodness, every time I whip up this Lemon Blueberry Cheesecake Dump Cake, I’m transported back to my grandmother’s kitchen! It’s been a hit at every family gathering, and the best part? It’s so easy that even the newest home cooks can impress their friends. Over the years, I’ve tweaked the recipe to enhance the lemon flavor or to add in whatever juicy fruit is in season. No matter how it’s made, I always encourage a big scoop of ice cream on top—it makes every forkful feel like a celebration!
FAQs and Troubleshooting
Q: Can I make this cake ahead of time?
A: Absolutely! You can prepare the components and layer them in the dish ahead of time, then store it in the fridge. Just pop it in the oven when you’re ready to bake!
Q: What if my cake mix clumps?
A: If you notice clumps, simply use a whisk to break them up before you sprinkle it over the fruit. It’ll bake up just fine!
Q: How do I know when the cake is done?
A: The top should be golden brown, and a toothpick inserted into the center should come out mostly clean with a few moist crumbs.
Q: Can I freeze leftovers?
A: You can! Just be sure to let the leftover cake cool completely, then cover tightly to prevent freezer burn. It’s best enjoyed within a few months.
Nutritional Info (Optional)
While every dessert should be enjoyed in moderation, here’s a rough breakdown per serving (based on 12 servings):
- Calories: 250
- Total Fat: 10g
- Saturated Fat: 5g
- Carbohydrates: 35g
- Sugars: 15g
- Protein: 3g
There you have it, my sweet friends—a Lemon Blueberry Cheesecake Dump Cake that’s sure to become a favorite in your home! As you tie on your apron and dive into this delightful recipe, remember that cooking is about sharing love and joy. I can’t wait to hear about the memories you create around your table! Happy baking!
PrintLemon Blueberry Cheesecake Dump Cake

A delightful dessert that combines zesty lemon and sweet blueberries in an easy-to-make dump cake.
- Prep Time: 15 minutes
- Cook Time: 40 minutes
- Total Time: 55 minutes
- Yield: 12 servings 1x
- Category: Dessert
- Method: Baking
- Cuisine: American
- Diet: Vegetarian
Ingredients
- 1 Box Yellow Cake Mix
- 1 Can of Lemon Pie Filling
- 2 Cups Fresh Blueberries
- 8 Ounces Cream Cheese, Softened
- 1/2 Cup Sugar
- 1 Teaspoon Vanilla Extract
- 1/4 Cup Butter, Melted
Instructions
- Preheat the oven to 350°F (175°C).
- Prepare a 9×13 inch baking dish by greasing it lightly.
- Mix the softened cream cheese with the sugar and vanilla extract until smooth and creamy.
- Layer the lemon pie filling on the bottom of the prepared baking dish.
- Add the fresh blueberries over the lemon layer.
- Sprinkle the dry yellow cake mix evenly over the blueberries.
- Drizzle the melted butter over the cake mix.
- Bake for 35-40 minutes until the top is golden and bubbling.
- Cool for about 15 minutes before serving.
Notes
Serve warm with whipped cream or ice cream for a stunning finish. Feel free to experiment with different fruits!
Nutrition
- Serving Size: 1 serving
- Calories: 250
- Sugar: 15g
- Sodium: 150mg
- Fat: 10g
- Saturated Fat: 5g
- Unsaturated Fat: 3g
- Trans Fat: 0g
- Carbohydrates: 35g
- Fiber: 1g
- Protein: 3g
- Cholesterol: 25mg
Keywords: dump cake, cheesecake, lemon blueberry, dessert, easy dessert