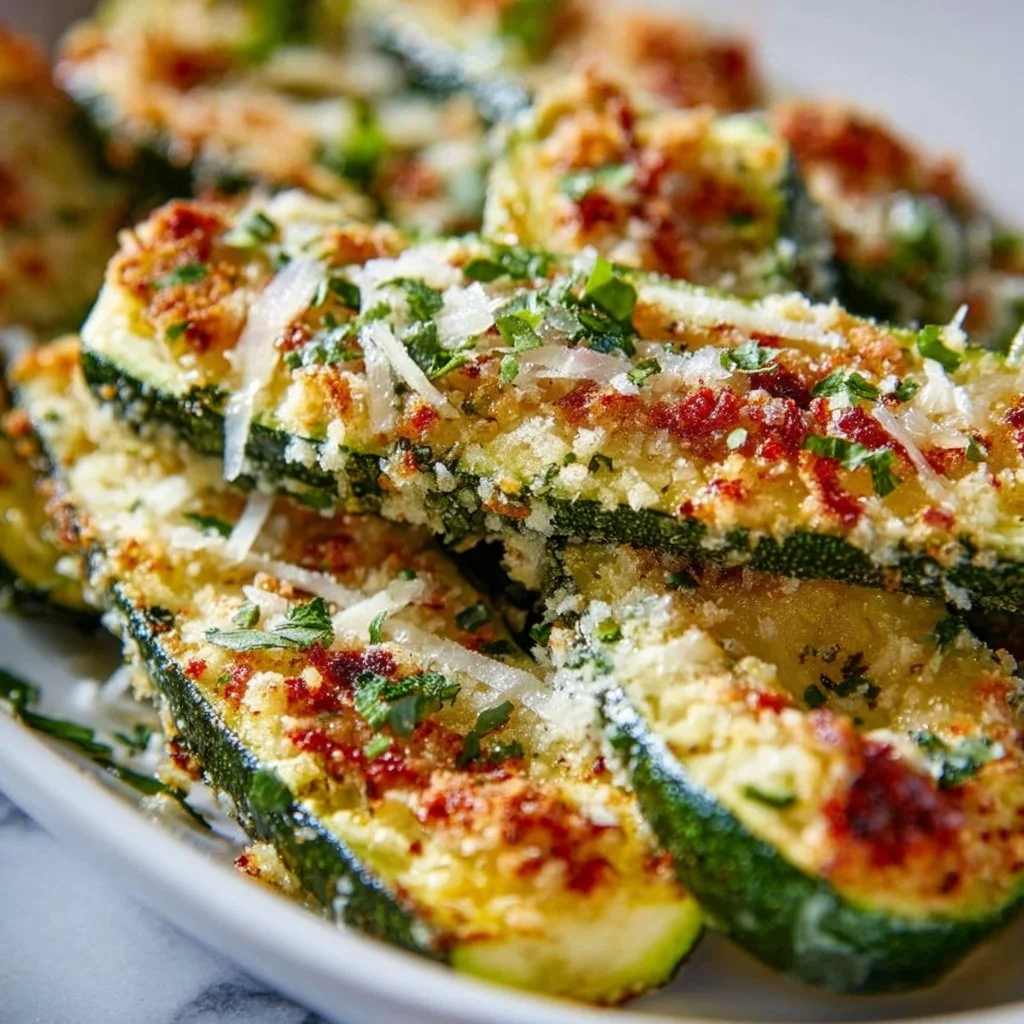
Baked Parmesan Zucchini
Baked Parmesan Zucchini: A Delightfully Easy Side Dish
When it comes to the kitchen, we all have that one dish that brings back extraordinary memories, right? For me, one of those cherished recipes is Baked Parmesan Zucchini. There’s something so satisfying about transforming simple zucchini into an impressive side dish that delights friends and family alike, all while embracing the essence of easy and elegant cooking.
Just picture this: It’s a warm summer evening, and I find myself at my parents’ house, the scent of fresh basil filling the air as our family gathers around the table. My mom is in the kitchen, expertly slicing zucchini from the garden. She hands me a bowl and offers a few of her kitchen tips about herbs and seasoning, and soon we are laughing and preparing a hearty meal together. Baked Parmesan Zucchini quickly became an essential part of those gatherings, effortlessly bridging the gap between effortless and delicious. It’s a dish that I’ve evolved over time—adding my own flair and discovering little tips and tricks to make it even more delightful.
This Baked Parmesan Zucchini is not just a side dish; it’s an invitation to gather around the dinner table and reminisce about cherished moments. Let’s dive into how to recreate this classic that’s bursting with flavor without overwhelming your kitchen workflow!
Ingredients
Here’s a rundown of what you’ll need—simple, accessible, and oh-so-delicious.
-
2 Medium Zucchinis, Sliced
Zucchini is the star of the show here! Choose firm zucchinis with vibrant skin. If you can find squash from a local farmer’s market, even better. You can also substitute yellow squash if that’s what you have on hand. -
1 Cup Parmesan Cheese, Grated
This ingredient adds richness and a delightful crunch. Opt for freshly grated Parm for maximum flavor. You can substitute with Pecorino Romano for a sharper bite or a dairy-free alternative if you’re going plant-based. -
1 Teaspoon Garlic Powder
Garlic powder packs a punch of flavor without the hassle of chopping fresh garlic. However, if you prefer a fresher taste, feel free to use 1-2 cloves of minced garlic instead. -
1 Teaspoon Italian Seasoning
This herb blend adds a lovely depth. You can always make your own blend using dried oregano, basil, and thyme for a personalized touch. -
Salt and Pepper to Taste
Essential for enhancing flavors. Remember, seasoning is key to making everything sing, so don’t skimp here! -
Olive Oil Spray
A light spritz of olive oil helps crisp up the zucchinis perfectly while keeping the dish elegant and healthy. If you don’t have an oil spray, just drizzle with a little olive oil, but make sure to toss the zucchini so it’s evenly coated.
Step-by-Step Instructions
Time to roll up those sleeves and get cooking! Follow these easy steps to create your Baked Parmesan Zucchini:
-
Preheat Your Oven
Preheat your oven to 400°F (200°C). This ensures that your zucchinis will bake evenly, giving you that delightful golden-brown finish. -
Prepare the Zucchini
Slice the zucchinis into ¼-inch thick rounds. Too thin, and they can get mushy; too thick, and they may not cook through. Aim for a nice, uniform cut for even cooking. -
Season the Zucchini
Place your zucchini slices on a parchment-lined baking sheet for easy cleanup (thank me later!). Spray them lightly with olive oil, then sprinkle with garlic powder, Italian seasoning, salt, and pepper. Toss them around with your hands to ensure they’re well-seasoned and coated with oil. -
Add the Parmesan
This is where the magic happens. Sprinkle the grated Parmesan cheese generously over the seasoned zucchini. If you’re feeling a little fancy, you can add a sprinkle of smoked paprika or red pepper flakes for an extra kick! -
Bake
Place the baking sheet in the oven and bake for about 20-25 minutes. Keep an eye on them! You want the zucchinis to be tender and the cheese to be bubbling and golden—not burnt. Give them a gentle shake halfway through to ensure even browning. -
Serve Warm
Once done, remove from the oven and let them cool for a couple of minutes. They’ll be scorching hot, so don’t rush to dig in! Serve them warm, and bask in the glory of your culinary triumph.
Serving Suggestions
To plate your Baked Parmesan Zucchini, simply transfer the slices thoughtfully onto a serving platter. Pair them with a drizzle of balsamic reduction for a sophisticated touch or get creative with a sprinkle of chopped fresh herbs like parsley or basil for that vibrant freshness. Not only do they taste divine, but they also look beautiful on your table. Bonus points for presentation!
Recipe Variations
Baked Parmesan Zucchini is wildly adaptable! Here are a few fun twists you can play with:
- Mediterranean Flair: Add some diced tomatoes and black olives before baking for a Mediterranean vibe.
- Zesty Lemon Zucchini: Squeeze some fresh lemon juice over the zucchinis just before serving for a bright, zesty kick.
- Cheesy Spinach Zucchini: Mix in some fresh spinach or other greens before adding the cheese for a nutrient boost.
- Herb-Infused: Swap in fresh garden herbs like thyme, rosemary, or oregano for a fresh twist.
- Spicy Zucchini: Toss in a pinch of cayenne pepper or crushed red pepper flakes if you’re feeling adventurous.
Chef’s Notes
Baked Parmesan Zucchini has been a staple in my kitchen for years, evolving each season as new ingredients become available. There was a phase where I experimented with adding breadcrumbs for crunch, but I found that the simple combination of cheese and zucchini really holds its own—sometimes, less is more! My favorite part about this recipe is how easily it invites conversation and enjoyment at the table, leading to laughter and camaraderie. I remember that one time I accidentally over salted them, and we all burst into laughter while trying to figure out how to save the dish—good times!
FAQs and Troubleshooting
Q: My zucchini came out soggy, what did I do wrong?
A: Soggy zucchini usually indicates they were too thickly sliced or overbaked. Make sure to slice them evenly and watch the baking time closely.
Q: Can I make this ahead of time?
A: While best enjoyed fresh, you can prep the zucchini and season it. Just bake it right before serving for the best texture.
Q: What should I do if I have leftovers?
A: Store them in an airtight container in the fridge for up to 3 days. Reheat them in the oven to restore their crispiness rather than the microwave.
Q: Can I freeze the Baked Parmesan Zucchini?
A: It’s not ideal, as freezing can impact texture, but if you must, freeze them after they’ve cooled completely. Reheat in the oven straight from the freezer, but they may not be as crisp.
Nutritional Information (Optional)
Per Serving (based on 4 servings):
- Calories: 150
- Protein: 9g
- Carbohydrates: 5g
- Fat: 10g
- Fiber: 1g
(Note: Nutritional values may vary based on specific ingredient brands used.)
Creating meals that spark joy and connection is the heart of what we do in the kitchen. This Baked Parmesan Zucchini is not just a recipe, but a beautiful way to bring a touch of warmth and elegance to your everyday table. So tie on your apron, invite a few friends over, and let’s make this simple-yet-delightful dish together. Happy cooking!
PrintBaked Parmesan Zucchini

A delightfully easy side dish transforming simple zucchini into an impressive dish that delights friends and family.
- Prep Time: 10 minutes
- Cook Time: 25 minutes
- Total Time: 35 minutes
- Yield: 4 servings 1x
- Category: Side Dish
- Method: Baking
- Cuisine: Italian
- Diet: Vegetarian
Ingredients
- 2 Medium Zucchinis, Sliced
- 1 Cup Parmesan Cheese, Grated
- 1 Teaspoon Garlic Powder
- 1 Teaspoon Italian Seasoning
- Salt and Pepper to Taste
- Olive Oil Spray
Instructions
- Preheat your oven to 400°F (200°C).
- Prepare the zucchinis by slicing them into ¼-inch thick rounds.
- Season the zucchini slices on a parchment-lined baking sheet, spraying them with olive oil and sprinkling with garlic powder, Italian seasoning, salt, and pepper.
- Add the grated Parmesan cheese generously over the seasoned zucchini.
- Bake for 20-25 minutes until tender and the cheese is bubbling and golden.
- Serve warm, optionally drizzling with balsamic reduction or garnishing with fresh herbs.
Notes
Best enjoyed fresh, but can be prepped ahead of time and baked right before serving.
Nutrition
- Serving Size: 1 serving
- Calories: 150
- Sugar: 2g
- Sodium: 300mg
- Fat: 10g
- Saturated Fat: 4g
- Unsaturated Fat: 5g
- Trans Fat: 0g
- Carbohydrates: 5g
- Fiber: 1g
- Protein: 9g
- Cholesterol: 20mg
Keywords: zucchini, parmesan, side dish, vegetarian, baked

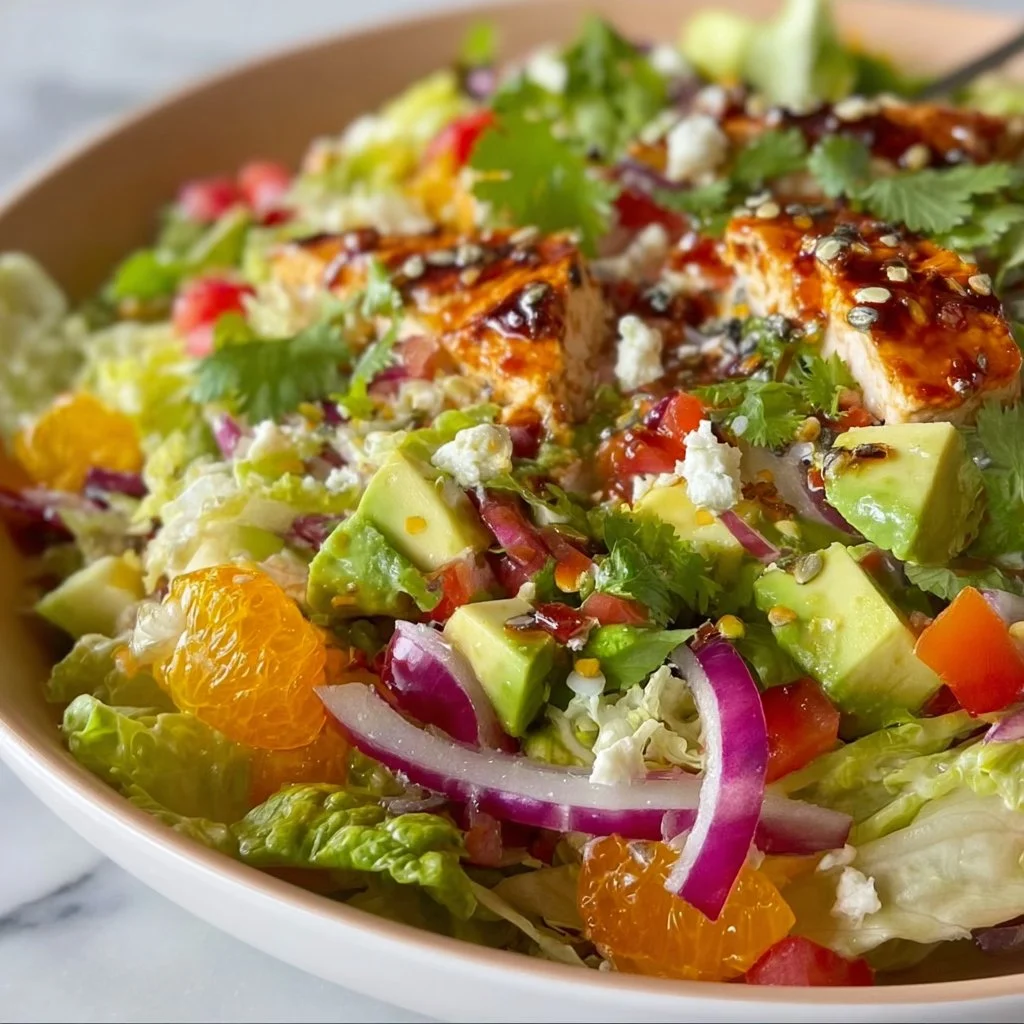
Mexican Chopped Salad
The Ultimate Mexican Chopped Salad: A Delightful Bowl of Freshness
Hello, wonderful foodies! Today, I’m excited to share a dish that captures the vibrant essence of Mexican cuisine—a refreshing and colorful Mexican Chopped Salad. If there’s one thing I love about this salad, it’s how effortlessly it brings life to your table. Imagine a bowl brimming with fresh ingredients, all mingling together in a harmonious symphony of flavors—sounds delightful, right?
This isn’t just any salad; it’s a celebration of simplicity and fresh ingredients, perfect for summer barbecues, weeknight dinners, or even as a stunning side for your next dinner party. With bright cherry tomatoes, zesty lime juice, creamy avocado, and crunchy bell peppers, every bite speaks to the beauty of wholesome cooking. Plus, it’s incredibly easy to whip up, making it a go-to recipe in my kitchen.
Whether you’re hosting a gathering or simply treating yourself to a solo dinner, this salad is here to elevate your meal. Not only will it impress your guests, but it will also inspire you to embrace the joy of cooking without the stress. So, let’s dive into this vibrant dish and get ready to chop our way to something truly scrumptious!
Personal Story
Every time I make Mexican Chopped Salad, it takes me back to a sun-drenched afternoon spent in my grandmother’s backyard. She would gather our family around her colorful table, adorned with hand-painted pottery and blooming flowers. It wasn’t a special occasion; it was just a Tuesday, but to us, every meal was a reason to celebrate. I can still hear the laughter and the clattering of forks as we dug into her fresh salads, which she would toss together with whatever was in season.
One day, she shared her secret: layering flavors and colors while keeping it simple. It was a revolutionary lesson that I still carry with me today. Food, she said, is best when it feels personal and warm. That’s exactly how I want you to feel with this salad. It’s not just about the ingredients; it’s about the experience, the connection, and the joy of gathering around the table, savoring each bite with loved ones.
Ingredients
Here’s what you’ll need for our vibrant Mexican Chopped Salad, along with some useful insights to help you make the most of each ingredient:
-
1 head of romaine lettuce, chopped
Crunchy and refreshing, romaine is the classic base for salads. You can substitute with kale or spinach if you want a bit more nutritional punch or a different texture. -
1 cup cherry tomatoes, halved
Sweet and juicy, cherry tomatoes add a burst of color and flavor. If they’re out of season, you can swap for diced regular tomatoes or even sun-dried tomatoes for a different twist. -
1 cup corn, canned or grilled
Corn adds sweetness and crunch. Fresh corn on the cob gives the best flavor, but canned corn works too—just rinse well to remove excess sodium. -
1 cup black beans, rinsed and drained
Black beans are protein-packed and hearty. If you’re looking for variety, kidney beans or chickpeas can be fun alternatives. -
1 avocado, diced
Creamy and satisfying, avocado brings a luscious texture. If you’re in a pinch, you can use diced mango for a burst of sweetness. -
1/2 red onion, diced
Red onion gives a lovely bite and color. Soaking it in cold water for 10 minutes will mellow its sharpness nicely. -
1 bell pepper, diced
Sweet and crunchy, bell peppers add visual appeal and freshness. Feel free to mix colors—a medley of red, yellow, and green looks stunning! -
1/2 cup cilantro, chopped
Cilantro is a classic herb that elevates this salad with its distinct flavor. If cilantro isn’t your thing, try fresh parsley or basil. -
Juice of 2 limes
The zesty lime juice acts as the dressing, brightening the salad beautifully. If you don’t have limes, lemon juice makes a great substitute! -
2 tablespoons olive oil
Rich and fruity, good-quality olive oil adds depth to the salad. For a different flavor profile, try avocado oil or a flavored oil like lime-infused. -
Salt and pepper to taste
Always essential! Freshly cracked pepper and sea salt can dramatically enhance the flavors, so don’t skip this step.
Step-by-Step Instructions
Now that we have our vibrant ingredients ready, let’s get into the cooking action! I promise these steps are simple, and I’ll share some helpful chef hacks along the way.
Step 1: Chop the Lettuce
Begin by taking your head of romaine lettuce, rinsing it under cold water to remove any dirt or grit, and then pat it dry. Chop it into bite-sized pieces. Tip: Using a sharp knife ensures clean cuts, maintaining the crispness of the lettuce.
Step 2: Prep the Veggies
Next up, halve those gorgeous cherry tomatoes, dice the red onion and bell pepper, and chop the cilantro. Chef’s insight: Try to maintain uniform sizes for even cooking and enjoying. A few minutes of careful chopping will elevate the look of your salad!
Step 3: Drain and Rinse the Beans and Corn
If you’re using canned black beans and corn, it’s time to rinse them under cool water to wash away excess sodium. I like to use a fine mesh strainer for this. Note: The fresher the ingredients, the better!
Step 4: Dice the Avocado
Carefully slice your avocado in half, remove the pit, and scoop it out using a spoon. Dice it into cubes. Tip: To avoid browning, sprinkle a little lime juice on your avocado after dicing—it keeps it vibrant!
Step 5: Combine Everything in a Large Bowl
In a large mixing bowl, combine the chopped lettuce, tomatoes, corn, black beans, avocado, red onion, bell pepper, and cilantro. Fun fact: A brightly colored bowl will make your salad pop visually—presentation matters!
Step 6: Dress it Up
Squeeze the juice of your limes over the salad, drizzle with olive oil, and sprinkle with salt and pepper. Hack: When dressing your salad, start with less salt and lime, and adjust to taste—it’s easier to add than to take away!
Step 7: Toss and Serve!
Gently toss all the ingredients together until well combined. Chef’s tip: For the most reduce bruising to delicate ingredients, use a folding motion rather than stirring aggressively. The vibrant colors should be beautifully mixed, but not mushy!
Serving Suggestions
When it comes to serving your Mexican Chopped Salad, think beyond the bowl! A rustic wooden board or a large white serving platter makes for an inviting presentation. For extra flair, garnish with extra cilantro leaves and serve alongside lime wedges. If you want to make it heartier, add some grilled chicken or shrimp right on top. Your guests will be wowed!
Recipe Variations
This salad is incredibly versatile—here are some fun twists you can try:
-
Add Protein: Toss in grilled chicken, shrimp, or tofu for a heartier meal.
-
Spice it Up: Add diced jalapeños or a sprinkle of chili powder for a kick.
-
Cheesy Goodness: Crumble feta or cotija cheese on top before serving for added creaminess.
-
Grainy Twist: Mix in cooked quinoa or brown rice for more texture and nutrition.
-
Dressing Alternatives: Experiment with a balsamic vinaigrette or avocado dressing to change it up!
Chef’s Notes
As I’ve made this salad over the years, it’s evolved just like my cooking style. I remember a time when I’d throw everything together without much thought. Now, I take extra care in choosing seasonal ingredients and presenting them beautifully. Cooking should always be about joy and connection, so this salad is a reflection of both—a reminder that food can be simple yet extraordinary. And if you ever spill a few ingredients in the kitchen, laugh it off! It’s all part of the experience.
FAQs and Troubleshooting
1. How do I keep my salad fresh for leftovers?
Keep the dressing separate from the salad until you’re ready to eat it. Store any leftover salad in an airtight container, and it will last for 1-2 days.
2. Can I make this salad ahead of time?
Absolutely! You can prep all your ingredients (except for the diced avocado, which should be added at serving) and mix them in advance. Just dress it before serving.
3. My salad tastes bland. What happened?
Don’t shy away from seasoning! Taste your salad before serving, and don’t forget to add salt, lime juice, or even a sprinkle of paprika or cumin for extra flavor.
4. What are good sides to serve with this salad?
This salad pairs beautifully with grilled meats, tacos, or a zesty fish dish. You can also serve it with tortilla chips for added crunch!
Nutritional Info
While I typically focus on the joy of cooking and sharing delicious moments rather than counting calories, it’s worth noting that this Mexican Chopped Salad is a powerhouse of nutrients! It’s packed with veggies, fiber, healthy fats from the avocado, and protein from the black beans, making it a balanced choice that’s as satisfying as it is nourishing.
So there you have it—my take on a beautiful Mexican Chopped Salad that will not only delight your taste buds but also elevate your gatherings. I can’t wait for you to try this recipe! As you tie on your apron, remember that every meal is an opportunity to create connections and share joy. Let’s keep bringing grace to our tables, one delicious dish at a time! Happy cooking!
PrintUltimate Mexican Chopped Salad

A refreshing and colorful Mexican Chopped Salad filled with fresh ingredients and vibrant flavors.
- Prep Time: 15 minutes
- Cook Time: 0 minutes
- Total Time: 15 minutes
- Yield: 4 servings 1x
- Category: Salad
- Method: No Cooking Required
- Cuisine: Mexican
- Diet: Vegetarian
Ingredients
- 1 head of romaine lettuce, chopped
- 1 cup cherry tomatoes, halved
- 1 cup corn, canned or grilled
- 1 cup black beans, rinsed and drained
- 1 avocado, diced
- 1/2 red onion, diced
- 1 bell pepper, diced
- 1/2 cup cilantro, chopped
- Juice of 2 limes
- 2 tablespoons olive oil
- Salt and pepper to taste
Instructions
- Chop the lettuce and pat it dry. Cut it into bite-sized pieces.
- Prep the veggies: halve the tomatoes, dice the onion and bell pepper, and chop the cilantro.
- Drain and rinse the beans and corn to reduce sodium.
- Dice the avocado carefully; sprinkle with lime juice to prevent browning.
- Combine all ingredients in a large bowl.
- Dress it with lime juice, olive oil, salt, and pepper.
- Toss gently to mix all the ingredients together.
Notes
Serve with lime wedges and garnish with extra cilantro. Add proteins like grilled chicken or shrimp for a heartier meal.
Nutrition
- Serving Size: 1 serving
- Calories: 250
- Sugar: 5g
- Sodium: 230mg
- Fat: 15g
- Saturated Fat: 2g
- Unsaturated Fat: 10g
- Trans Fat: 0g
- Carbohydrates: 30g
- Fiber: 9g
- Protein: 10g
- Cholesterol: 0mg
Keywords: Mexican salad, healthy salad, vegetarian recipe, fresh ingredients, quick salad
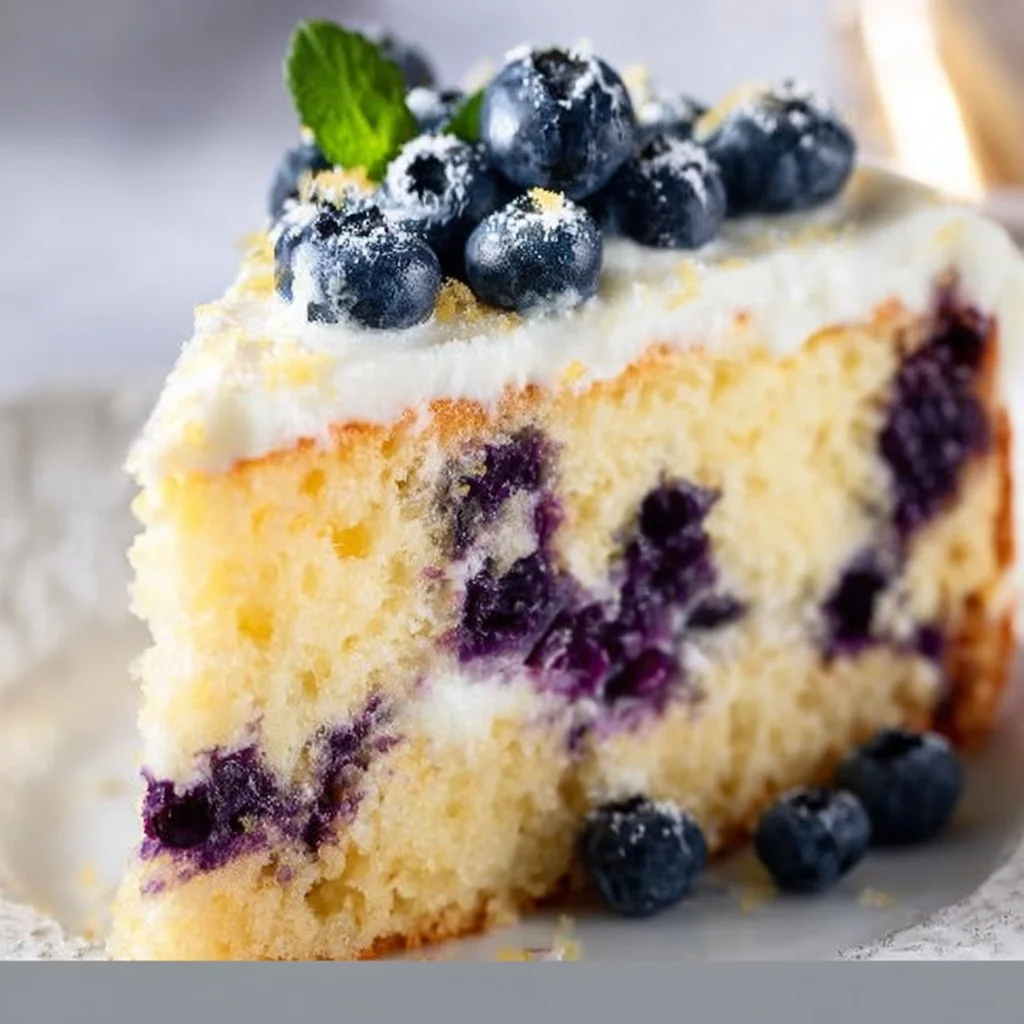
Lemon Blueberry Cake
Lemon Blueberry Cake: A Bright Slice of Happiness
Hello, fellow food lovers! It’s Savannah here, and I’m thrilled to share a recipe that brings a sunny burst of flavor right to your table: Lemon Blueberry Cake. This delightful dessert combines the refreshing tang of lemons with the sweetness of juicy blueberries, creating a treat that feels like summer sunshine in every bite. Whether you’re celebrating a special occasion or just treating yourself to something special, this cake is the perfect choice. So, tie on your apron, and let’s get baking!
A Slice of Nostalgia: My Lemon Blueberry Memory
The first time I had lemon blueberry cake was at a friend’s backyard party on a warm summer afternoon. The sun was shining, and the laughter of friends filled the air as we gathered around the table, decorated with blooming flowers and colorful plates. My friend’s mom had baked this cake, and as soon as I took my first bite, I was transported. The cake was incredibly moist, with bursts of blueberries and a zesty lemon flavor that felt refreshing and uplifting.
I remember asking for the recipe, and my friend’s mom happily shared, explaining her little secrets. Since then, I’ve made this cake countless times, tweaking it and making it my own. Each time I bake it, I’m reminded of that beautiful summer day—a reminder that food not only nourishes but also shares memories and brings people together.
Ingredients: The Building Blocks of Flavor
Here’s what you’ll need to create this luscious Lemon Blueberry Cake, along with some tips to ensure your baking experience is seamless:
For the Cake
-
3 cups cake flour (360 grams)
Soft and delicate, cake flour helps create that light, fluffy texture. If you don’t have cake flour, you can substitute it with all-purpose flour, but for a lighter cake, consider adding a tablespoon of cornstarch for each cup. -
2 teaspoons baking powder
This is your leavening agent, making the cake rise beautifully. Be sure it’s fresh for the best results! -
1/2 teaspoon baking soda
Works with the acidity of the lemon juice to give the cake some lift. -
1/2 teaspoon salt
A little salt enhances all the flavors, balancing the sweetness. -
3/4 cup buttermilk (180 ml) (room temperature)
Buttermilk adds moisture and tang. If you don’t have any, you can substitute with regular milk by adding a teaspoon of lemon juice or vinegar to sour it slightly. -
1/3 cup lemon juice (80 ml) (freshly squeezed)
Freshly squeezed is key here! Bottled lemon juice lacks the vibrant flavor that makes this cake shine. -
1 cup unsalted butter (226 grams) (softened to room temperature)
Softened butter helps to cream easily and gives the cake a rich flavor. If you forget to take it out, pop it in the microwave for a few seconds but be careful not to melt it! -
1 3/4 cups granulated sugar (350 grams)
Sweetness is essential! This helps create a nice crunchy crust while keeping the inside moist. -
2 tablespoons lemon zest
This adds intense lemon flavor. Make sure to zest only the yellow part of the lemon for the best taste. -
2 teaspoons vanilla extract
A touch of vanilla rounds out the cake’s flavor beautifully. -
4 large eggs (room temperature)
Eggs help bind everything together. Take them out of the fridge ahead of time so they can mix in smoothly. -
2 cups blueberries (fresh)
I highly recommend using fresh blueberries for a juicy burst of flavor. If using frozen, make sure to thaw and dry them to avoid excess moisture in the batter. -
2 teaspoons cake flour (or all-purpose flour)
Tossing the blueberries in a little flour prevents them from sinking to the bottom of the cake.
For the Cream Cheese Frosting
-
1/2 cup unsalted butter (112 grams) (softened)
Adds creaminess and helps the frosting whip up nice and fluffy. -
8 oz brick-style cream cheese (226 grams)
Full-fat cream cheese gives the best texture and taste. Avoid "light" versions for frosting. -
1 teaspoon lemon juice (freshly squeezed)
Just a hint of lemon to brighten up the cream cheese filling! -
3 – 4 cups powdered sugar (330-440 grams) (sifted)
Sweetness and body! Start with 3 cups, and you can add more to achieve your desired thickness. -
1 tablespoon whipping cream (as needed)
If your frosting is too thick, a splash of whipping cream can help smooth it out.
For the Topping
-
3/4 cup unsalted butter (168 grams) (softened)
Another layer of butter for richness. -
12 ounces brick-style cream cheese (340 grams) (full fat)
Same as above, make sure it’s at room temperature for smooth frosting. -
1 1/2 teaspoons lemon juice (freshly squeezed)
Enhancing the lemon flavor once again! -
4 1/2 – 5 1/2 cups powdered sugar (495 – 605 grams) (sifted)
Depending on how sweet you love your frosting! -
1-2 tablespoons whipping cream (as needed)
For a smooth consistency in your topping.
With all your ingredients ready, let’s make some magic in the kitchen!
Step-by-Step Instructions: Let’s Bake!
Step 1: Preheat and Prep
Start by preheating your oven to 350°F (175°C). Grease and flour two 9-inch round cake pans. You want to make sure your cakes come out cleanly, and greasing them is key! I like to line the bottoms with parchment paper for extra insurance.
Step 2: Combine Dry Ingredients
In a medium bowl, whisk together the cake flour, baking powder, baking soda, and salt. This helps to evenly distribute the leavening agents throughout the flour, ensuring your cake rises nicely.
Step 3: Blend Butter and Sugar
In a large bowl, cream together the softened butter and granulated sugar until the mixture is light and fluffy. This should take about 3–5 minutes. The incorporation of air is important for a light cake. Tip: Use a stand mixer if you have one! It saves your arms from a workout.
Step 4: Add in the Eggs and Zest
One by one, add the eggs, mixing well after each addition. Then, mix in the lemon zest and vanilla extract. You’ll start to notice the aromatic zest mingling with the butter—pure bliss!
Step 5: Mix Liquid Ingredients
Once combined, gradulally add the buttermilk and lemon juice. Mix until just combined. Be careful not to overmix at this stage; we want our cake light and airy!
Step 6: Combine Dry and Wet Ingredients
Now, it’s time to incorporate the dry mixture! Slowly add the flour mixture to the wet ingredients in three parts. Make sure to mix until just combined to keep the cake from becoming dense.
Step 7: Prepare the Blueberries
Before you put the blueberries in the batter, toss them gently in 2 teaspoons of flour. This helps keep them from sinking while baking. Gently fold the blueberries into the batter, taking care not to smash them.
Step 8: Bake
Divide the batter evenly between the prepared cake pans and smooth the tops with a spatula. Bake in the preheated oven for 25-30 minutes or until a toothpick inserted into the center comes out clean. Lower the temperature to 325°F (160°C) if your oven runs hot; you want a nice golden edge without burning.
Step 9: Cool
After the cakes are baked, remove them from the oven and cool in the pans for about 10 minutes. Then, carefully transfer them to a wire rack to cool completely. Cooling is crucial for a frosting-ready surface!
Step 10: Make the Cream Cheese Frosting
While the cakes cool, let’s whip up that delicious frosting. In a large bowl, beat the softened butter and cream cheese together until it’s smooth and creamy. Gradually add the sifted powdered sugar, along with the lemon juice. If it feels too thick, add the whipping cream until the desired consistency is reached.
Step 11: Frost the Cake
Once the cakes are completely cool, place one layer on your serving platter. Spread a good layer of cream cheese frosting on top. Gently place the second layer on top and frost the top and sides of the cake. Chef hack: For a clean cut, run your knife under hot water before slicing the cake!
Serving Suggestions: Presentation Matters
When it’s time to serve, slice the cake into generous pieces and use a spatula to serve. A light dusting of powdered sugar over the top can add a beautiful finishing touch. For an extra pop, garnish with fresh blueberries and a few lemon zest curls! Serve it with a scoop of vanilla ice cream or a dollop of whipped cream for a little extra indulgence.
Recipe Variations: Switch it Up!
Love the flavor but want to add your own twist? Here are a few easy variations:
- Nutty Crunch: Add 1 cup of chopped nuts (like walnuts or pecans) for crunch.
- Lemon-Lime Twist: Replace half of the lemon juice with lime juice for a unique twist!
- Berry Medley: Swap out some blueberries for raspberries or blackberries for a mixed berry delight.
- Gluten-Free Option: Swap the cake flour for a gluten-free baking blend, and make sure your baking powder is certified gluten-free.
- Less Sugar: Reduce the sugar by a third and use an equal amount of honey or maple syrup for a healthier cake.
Chef’s Notes: It’s All About Experience
Over the years, this recipe has transformed in many kitchens, from my friend’s backyard to my own table. The first time I made it, I got a little overenthusiastic with the flour while mixing in the blueberries, and they ended up a little squished! The result was a “marbled” effect that still tasted heavenly. The lesson? Baking is forgiving, and sometimes the mistakes make the best stories!
FAQs and Troubleshooting
1. My cake didn’t rise—what went wrong?
This can happen if your baking powder or baking soda is old or expired. Double-check their freshness! Remember, proper mixing at each stage is also key to incorporating air.
2. Can I use frozen blueberries?
Absolutely! Just be sure to thaw them and pat dry before tossing them in flour to avoid excess moisture in the batter.
3. Why is my frosting too runny?
If your frosting is too runny, simply add more sifted powdered sugar until it thickens up to your desired consistency.
4. How do I store my cake?
Store any leftover cake in an airtight container in the refrigerator for up to 3-5 days. You can also freeze it for up to 3 months. Just thaw it in the fridge overnight before serving!
Nutritional Info
(Note: Nutritional values are estimates and can vary. Always check with a nutritionist for specific dietary needs.)
- Calories: Approximately 400-450 per slice (depending on size and frosting)
- Fat: 20-25g
- Carbohydrates: 50g
- Protein: 5g
- Sugar: 30g
So, there you have it! Your guide to creating this beautiful Lemon Blueberry Cake that’s sure to be a hit every time. Remember, cooking is all about joy and connection. So, gather your loved ones, enjoy the process, and let’s make some delicious memories together. Happy baking! 🍰✨
PrintLemon Blueberry Cake

A delightful dessert that combines the refreshing tang of lemons with the sweetness of juicy blueberries, creating a treat reminiscent of summer sunshine.
- Prep Time: 20 minutes
- Cook Time: 30 minutes
- Total Time: 50 minutes
- Yield: 12 servings 1x
- Category: Dessert
- Method: Baking
- Cuisine: American
- Diet: Vegetarian
Ingredients
- 3 cups cake flour (360 grams)
- 2 teaspoons baking powder
- 1/2 teaspoon baking soda
- 1/2 teaspoon salt
- 3/4 cup buttermilk (180 ml)
- 1/3 cup lemon juice (80 ml)
- 1 cup unsalted butter (226 grams)
- 1 3/4 cups granulated sugar (350 grams)
- 2 tablespoons lemon zest
- 2 teaspoons vanilla extract
- 4 large eggs
- 2 cups blueberries (fresh)
- 2 teaspoons cake flour (or all-purpose flour)
- 1/2 cup unsalted butter (112 grams)
- 8 oz brick-style cream cheese (226 grams)
- 1 teaspoon lemon juice (freshly squeezed)
- 3 – 4 cups powdered sugar (330–440 grams)
- 1 tablespoon whipping cream (as needed)
- 3/4 cup unsalted butter (168 grams)
- 12 ounces brick-style cream cheese (340 grams)
- 1 1/2 teaspoons lemon juice (freshly squeezed)
- 4 1/2 – 5 1/2 cups powdered sugar (495 – 605 grams)
- 1–2 tablespoons whipping cream (as needed)
Instructions
- Preheat your oven to 350°F (175°C) and grease two 9-inch round cake pans.
- Combine the cake flour, baking powder, baking soda, and salt in a medium bowl.
- Blend the softened butter and granulated sugar until light and fluffy.
- Add the eggs one by one, mixing well after each addition, then mix in the lemon zest and vanilla extract.
- Mix the buttermilk and lemon juice gradually into the wet ingredients.
- Combine the dry ingredients with the wet mixture in three parts, mixing until just combined.
- Prepare the blueberries by tossing them in 2 teaspoons of flour before folding them into the batter.
- Bake for 25-30 minutes or until a toothpick comes out clean.
- Cool the cakes in the pans for about 10 minutes before transferring to a wire rack to cool completely.
- Make the cream cheese frosting by beating the softened butter and cream cheese until smooth, adding powdered sugar and lemon juice until the desired consistency is reached.
- Frost the cooled cakes, layering with frosting in between and on top.
Notes
For a beautiful presentation, dust with powdered sugar and garnish with fresh blueberries.
Nutrition
- Serving Size: 1 slice
- Calories: 400
- Sugar: 30g
- Sodium: 350mg
- Fat: 25g
- Saturated Fat: 10g
- Unsaturated Fat: 9g
- Trans Fat: 0g
- Carbohydrates: 50g
- Fiber: 1g
- Protein: 5g
- Cholesterol: 105mg
Keywords: lemon blueberry cake, dessert, summer, baking, cream cheese frosting

Lemon Crinkle Cookies
# Whisking Up Sunshine: Lemon Crinkle Cookies Recipe

## Introduction

Hello, cookie lovers! Today, we’re diving into a delightful and zesty treat that's sure to brighten up your day: Lemon Crinkle Cookies! Imagine biting into a soft, chewy cookie that bursts with bright lemon flavor and is adorned with a light dusting of powdered sugar. That’s the magic we’re creating here!

At Ivory Apron, I believe that cooking (and baking!) should be a joyful experience, filled with the aroma of fresh ingredients and a sprinkle of laughter. These Lemon Crinkle Cookies embody everything I love about baking: they’re sweet, a little tangy, and could not be more simple to prepare. You don’t need fancy equipment or complicated techniques—just a pinch of love, a step into the kitchen, and a whisk!

Whether you’re planning a picnic, looking for a delightful dessert to impress guests, or simply craving a little something sweet while lounging at home, these cookies are your answer. Lemon Crinkle Cookies are like a burst of sunshine on a cloudy day; they're light, refreshing, and provide that perfect contrast between sweetness and tartness. Plus, the crinkle texture gives you that delightful bite and a hint of excitement during every nibble.

So grab your apron, preheat the oven, and let’s make some Lemon Crinkle Cookies that will have everyone asking for the recipe!

## Personal Story

Growing up, my family had a special tradition during the summer months: we would gather at my grandmother's house for lemon-themed tea parties. My grandmother, an incredible baker, would whip up a storm in her cozy kitchen, filling the air with the irresistible scent of lemon. I remember the excitement as she pulled out her famous Lemon Crinkle Cookies, wearing that majestic golden hue and dusted with powdered sugar like fresh snow. They were sweet and tangy, with that crinkle that made them look as magical as they tasted.

What I cherish most about those sunny afternoons is the laughter that filled the air, the warm cups of tea, and the way we would all come together around the table with cookies in hand, sharing stories and making memories. It was in those moments I learned that baking isn't just about the final product—it’s about the experience and the love shared among family and friends.

Now, every time I bake these Lemon Crinkle Cookies, I’m reminded of those magical moments at my grandmother’s table, and I hope to create a similar joy for you and yours!

## Ingredients

Let’s gather the essentials for our Lemon Crinkle Cookies! Here’s what you’ll need:

- **1 cup granulated sugar**
  *Sweetness is essential! You can use coconut sugar for a slightly different flavor, but it may change the cookie's color.*

- **1/2 cup butter, softened**
  *Butter adds richness. If you're in a pinch, feel free to substitute with margarine. For a dairy-free option, try coconut oil!*

- **2 eggs**
  *Eggs contribute to the cookies’ texture. You can substitute with 1/4 cup of applesauce for a vegan version.*

- **1 cup all-purpose flour**
  *The backbone of the cookie! Whole wheat flour can be used for a heartier texture, but you might need a bit more liquid.*

- **1/4 teaspoon baking soda**
  *This is our leavening agent, ensuring the cookies don't end up flat. Baking powder can work in a pinch, but modify the amount slightly.*

- **1/4 teaspoon salt**
  *Salt enhances flavor, allowing the lemon to shine. Don’t skip it!*

- **1/2 teaspoon lemon zest**
  *Zest packs a punch! This is where the concentrated lemon flavor comes from. Use a microplane for the best results.*

- **1/4 cup fresh lemon juice**
  *The star ingredient! Fresh is best—bottled lemon juice doesn’t compare.*

- **Powdered sugar for dusting**
  *This adds a lovely sweetness and visual appeal. Sift it for an elegant touch!*

## Step-by-Step Instructions

Now that we have our ingredients ready, let’s roll up our sleeves and get baking! Follow these steps for the perfect Lemon Crinkle Cookies.

1. **Preheat Your Oven**
   Begin by preheating your oven to 350°F (175°C). This golden temperature is perfect for baking and ensures your cookies will be chewy with beautiful edges.

2. **Cream the Butter and Sugar**
   In a large mixing bowl, use a hand mixer or stand mixer to cream together the softened butter and granulated sugar until light and fluffy (about 2-3 minutes). This step is crucial—the air we whip into the mix helps create a nice rise in our cookies.

3. **Add the Eggs**
   Next, crack in the eggs, one at a time, mixing well after each addition. This helps to maintain that lovely fluffiness. Don’t forget to scrape down the sides of the bowl every so often—don’t let any of that buttery goodness get left behind!

4. **Incorporate Lemon Juice and Zest**
   Now, add in your fresh lemon juice and lemon zest. Oh, the aroma will be heavenly! Mix until just combined; we want all that citrus flavor to meld beautifully with the butter and sugar.

5. **Sift the Dry Ingredients**
   In a separate bowl, sift together the all-purpose flour, baking soda, and salt. Sifting not only reduces lumps but also adds more air into our dry mix, creating lighter cookies.

6. **Combine Wet and Dry Ingredients**
   Gradually add the flour mixture into the wet ingredients, mixing until just combined. Be careful not to overmix—this helps keep our cookies soft.

7. **Chill the Dough**
   For that ooey-gooey texture, cover the dough with plastic wrap and let it chill in the refrigerator for at least 30 minutes. Chilling helps prevent spreading and promotes that fabulous crinkle texture.

8. **Scoop and Roll**
   Once chilled, retrieve the dough and use a cookie scoop (or a tablespoon) to portion out the dough. Roll each piece into a ball, then roll it in powdered sugar until the cookies are fully coated. This is where the signature "crinkle" effect will come from when they bake!

9. **Bake**
   Place the cookies on a lined baking sheet, evenly spaced apart. Bake in your preheated oven for 10-12 minutes, or until the edges are just set and the tops are slightly cracked.

10. **Cool and Dust Again**
    After baking, allow the cookies to cool on the baking sheet for about 5 minutes before transferring them to a wire rack. Once cooled, feel free to dust them with a bit more powdered sugar for that restaurant-worthy look!

## Serving Suggestions

Plate your Lemon Crinkle Cookies on a lovely dessert stand or a colorful plate. They pair beautifully with a cup of tea or lemonade for that extra citrus zing. Consider garnishing the plate with additional lemon slices or fresh mint leaves to add a pop of color!

## Recipe Variations

Get creative with these Lemon Crinkle Cookies! Here are some fun twists to try:

- **Blueberry Lemon Crinkles**: Fold in a handful of fresh or freeze-dried blueberries for an added burst of flavor.
- **Lemon Lavender Crinkles**: Infuse the dough with 1/2 teaspoon of culinary lavender for a floral touch.
- **Gluten-Free Option**: Substitute all-purpose flour with a gluten-free blend made for baking to cater to dietary restrictions.

## Chef’s Notes

I’ve been making these Lemon Crinkle Cookies for years, and they never disappoint! One time, I accidentally added twice the amount of lemon zest—I thought I had ruined the cookies! Instead, they turned out to be an even brighter version than before! Now I love experimenting with how much brightness comes through in each batch. It’s a powerful reminder that sometimes, a happy accident leads to the best flavors.

## FAQs and Troubleshooting

### 1. *Why are my cookies flat?*

If your cookies spread too much, it could be due to the butter being too warm. Ensure your butter is softened, not melted. Chilling the dough is also key—don’t skip that step!

### 2. *Can I use bottled lemon juice?*

While you can use bottled lemon juice in a pinch, fresh lemon juice is recommended for the best flavor and aroma. Trust me; your cookies will taste so much better with the fresh stuff!

### 3. *How do I store the cookies?*

Keep your Lemon Crinkle Cookies in an airtight container at room temperature for up to a week. If they last that long! You can also freeze the unbaked dough for up to three months. Just roll the dough into balls, freeze them, and then bake them fresh whenever you need a treat!

### 4. *What if I want to reduce the sugar?*

If you’d like to cut back on sugar, you can reduce the granulated sugar by a quarter, but keep in mind that it may alter the texture slightly. The powdered sugar on top will still offer that sweet contrast.

## Nutritional Info

While I hesitate to focus too much on numbers (food should be about joy!), a single Lemon Crinkle Cookie has approximately 120 calories, depending on the size you make. They’re a sweet indulgence worth every bite!

---

And there you have it, my lovely foodies! These Lemon Crinkle Cookies are an incredible treat that can bring a touch of sunshine to any occasion. Remember, the kitchen is a place for relaxation and fun, so enjoy the process! Happy baking!
Lemon Crinkle Cookies

Delightful and zesty Lemon Crinkle Cookies that burst with bright lemon flavor and are dusted with powdered sugar.
- Prep Time: 15 minutes
- Cook Time: 12 minutes
- Total Time: 45 minutes
- Yield: 24 servings 1x
- Category: Dessert
- Method: Baking
- Cuisine: American
- Diet: Vegetarian
Ingredients
- 1 cup granulated sugar
- 1/2 cup butter, softened
- 2 eggs
- 1 cup all-purpose flour
- 1/4 teaspoon baking soda
- 1/4 teaspoon salt
- 1/2 teaspoon lemon zest
- 1/4 cup fresh lemon juice
- Powdered sugar for dusting
Instructions
- Preheat your oven to 350°F (175°C).
- Cream together the softened butter and granulated sugar until light and fluffy.
- Add the eggs, one at a time, mixing well after each addition.
- Incorporate the fresh lemon juice and lemon zest into the mixture.
- Sift together the all-purpose flour, baking soda, and salt in a separate bowl.
- Combine the wet and dry ingredients, mixing until just combined.
- Chill the dough in the refrigerator for at least 30 minutes.
- Scoop the dough into balls and roll them in powdered sugar.
- Bake in the preheated oven for 10-12 minutes.
- Cool on baking sheet for 5 minutes before transferring to a wire rack.
Notes
Chill the dough for a better texture. Use fresh lemon juice for the best flavor.
Nutrition
- Serving Size: 1 cookie
- Calories: 120
- Sugar: 9g
- Sodium: 80mg
- Fat: 7g
- Saturated Fat: 4g
- Unsaturated Fat: 3g
- Trans Fat: 0g
- Carbohydrates: 15g
- Fiber: 0g
- Protein: 1g
- Cholesterol: 25mg
Keywords: lemon cookies, crinkle cookies, dessert, baking
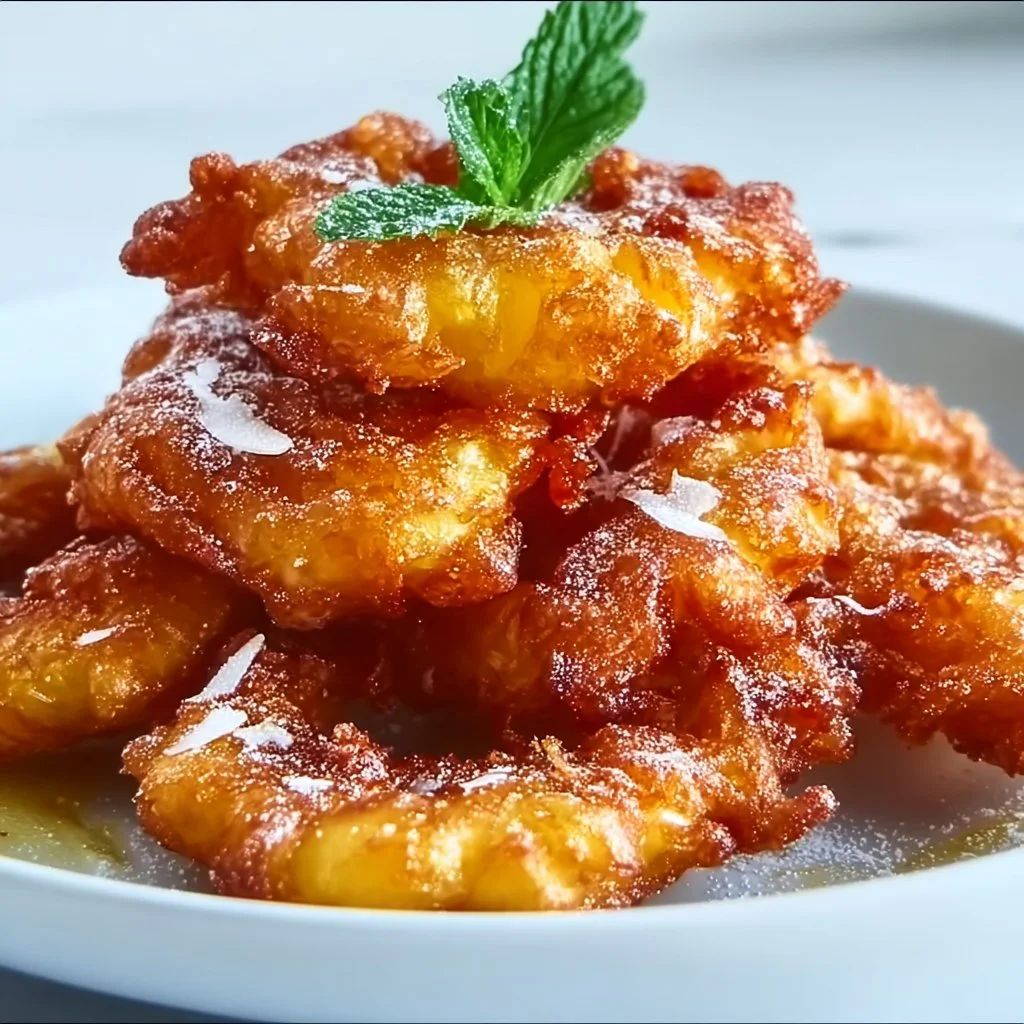
Heavenly Pineapple Fritters That Bring Tropical Joy
# Heavenly Pineapple Fritters That Bring Tropical Joy

## Introduction

Hello, my fellow food enthusiasts! Gather around because today we’re whisking you away to a sun-soaked paradise with one of my absolute favorite recipes — **Heavenly Pineapple Fritters**! These little bites of sweetness are not only a nod to tropical vibes but also remind us of carefree childhood days spent lounging by the pool, savoring each mouthful, and perhaps even a bit of sunshine on our skin.

Imagine it: the first bite of a warm, crispy fritter, giving way to the juicy sweetness of pineapple, all wrapped in a light, fluffy batter that's just the right amount of crispy. Does it get any better? I think not! Whether you're planning a tropical-themed brunch, looking for a delicious weekend treat, or just seeking a flavor explosion to brighten your day, these fritters are sure to bring a smile to your face.

They're incredibly easy to whip up and will fill your kitchen with a delightful aroma that mimics dining in a beachside café. Plus, you’ll love how versatile this recipe is — it welcomes both unique twists and dietary swaps effortlessly, making it a hit for everyone around the table. So, tie on your apron and get ready to dive into this tropical adventure!

## Personal Story

Let me take you back to a balmy summer afternoon when I was a child. My family and I hosted our annual summer gather where laughter floated effortlessly in the warm breeze and delicious aromas filled the air. We were in our backyard, surrounded by luscious greenery and colorful flowers, and, of course, a massive table laden with food.

That year, my aunt decided to showcase her newly discovered recipe for pineapple fritters. Much like a magician revealing a trick, she showed us how to perfectly batter and fry fresh pineapple rings until they were golden and crisp. That memory has since etched itself into my heart, from the way my cousins and I eagerly dipped the warm fritters into creamy coconut yogurt to the sheer delight everyone felt with each bite. **Those fritters were a highlight** of our gathering, and the joy they brought us reminded me of the magic food can create. Fast forward to today, and here I am, ready to share my twist on that beloved family recipe with you!

## Ingredients

To embark on this culinary adventure, you’ll need the following ingredients:

- **1 cup All-purpose flour**
  This serves as the base for the batter. If you’re looking for a gluten-free option, you can easily substitute it with a 1:1 gluten-free flour blend!

- **1/4 cup Granulated sugar**
  This adds just the right amount of sweetness. If you're feeling adventurous, try using coconut sugar instead for a touch of caramel flavor and a less refined option.

- **1 tablespoon Baking powder**
  This gives our fritters that airy fluffiness. Avoid substituting it with baking soda directly as it may lead to overly dense fritters.

- **1/4 teaspoon Salt**
  A pinch of salt enhances the flavors. Don’t skip it; even sweet recipes need that little kick!

- **1 teaspoon Ground cinnamon**
  For that warm, cozy flavor that feels like a hug in each bite. If you have it on hand, a dash of nutmeg can elevate the warm spices even more.

- **1 large Egg**
  This helps bind the mixture together. If you’re going for a vegan option, a flax egg will work perfectly!

- **1/2 cup Milk**
  It creates the desired consistency in the batter. Feel free to swap this out for dairy-free milk like almond or coconut milk if that suits your dietary needs.

- **1 whole Fresh pineapple**
  The star of the recipe! Sliced into rings, these juicy gems will offer bursts of flavor in every bite. If fresh pineapple isn’t available, canned pineapple (in juice, not syrup) may work as a last resort.

- **2 cups Vegetable oil**
  For frying; you can use canola or coconut oil, depending on your preference and what you have on hand. Coconut oil will give a slight tropical essence!

- **1 tablespoon Additional cinnamon and sugar**
  This is for dusting the finished fritters. Adjust to your liking, adding more or less according to your sweet tooth!

## Step-by-Step Instructions

Now, let’s get to the fun part — cooking these luscious fritters!

1. **Prep the Pineapple:**
   First, slice your fresh pineapple into rings, about 1/2 inch thick. If you have a core remover, this makes it breeze! If not, a knife will do just fine. And hey, no pressure! If some slices are not perfect circles, that's what makes home cooking homely!

2. **Make the Batter:**
   In a large mixing bowl, whisk together the all-purpose flour, granulated sugar, baking powder, salt, and ground cinnamon. Give it a little whirl until everything is nicely combined. This is where the magic begins!

3. **Incorporate Wet Ingredients:**
   In a separate bowl, beat the egg and then combine it with the milk. Pour this mixture into the dry ingredients, and stir until just incorporated. Do not overmix! It's okay if it’s a little lumpy — those lumps will dissolve while cooking, resulting in fluffy fritters.

4. **Heat the Oil:**
   In a deep skillet or heavy-bottomed pot, heat the vegetable oil over medium-high heat. You want enough oil to submerge at least half of the fritters. To test if the oil is ready, drop a small spoonful of batter into it. If it bubbles all around and rises to the surface, you’re good to go!

5. **Fry the Fritters:**
   Carefully dip each pineapple ring into the batter, allowing any excess to drip off, and gently place it into the hot oil. Don’t overcrowd the pan — work in batches if you need to! Fry each side for about 2-3 minutes until they turn golden brown.

6. **Drain and Dust:**
   Once fried, remove the fritters from the oil and place them on a paper towel-lined plate to absorb any excess oil. While they’re still warm, sprinkle them generously with your cinnamon and sugar mix. Watch how that sugar sparkles in the light — isn’t it beautiful?

And just like that, your heavenly pineapple fritters are ready to shine!

## Serving Suggestions

These fritters are best served warm, and the toppings are endless! I love plating them with a scoop of creamy coconut yogurt on the side for dipping or drizzling a little honey over them. If you’re feeling fancy, a dust of powdered sugar or even a sprinkle of toasted coconut can take the presentation up a notch. Serve them on a rustic wooden board or a beautiful platter, and let everyone dive in together!

## Recipe Variations

Feel free to have fun with these fritters! Here are some creative variations to keep things fresh:

1. **Coconut Fritters:** Mix shredded coconut into your batter for a tropical twist that'll send your tastebuds straight to a beach vacation!

2. **Chocolate-Dipped:** After frying, dip the fritters in melted dark chocolate and roll them in chopped nuts for an irresistible treat.

3. **Spiced Version:** Add a pinch of cayenne or chili powder to the batter for a sweet-savory experience that'll tickle your fancy. A little heat lifts the sweetness beautifully!

4. **Vegan Option:** Swap the egg for a flax egg and use unsweetened almond milk or coconut milk for a completely plant-based treat.

5. **Fruit Medley:** Mix in other fruits like banana or blueberries to the batter. The possibilities are endless — it’s all about what you love!

## Chef’s Notes

Oh, the stories these fritters have brought to my kitchen! I remember the very first time I made them for a brunch gathering. The moment I pulled the first batch out of the oil, a sense of anticipation filled the air, and you could hear the ooohs and aaahs as everyone bit into them. I even added a playful coconut sauce to the mix, which became an instant fan favorite!

Through experimentation, I learned that the key to perfect fritters is precision in the oil temperature; too cool, and they’ll be greasy, while too hot will burn them. It’s all about that magic sweet spot.

## FAQs and Troubleshooting

1. **Why are my fritters soggy?**
   This usually means your oil wasn’t hot enough. Make sure to keep the oil at a consistent temperature — a good thermometer can help here!

2. **Can I prepare the batter ahead of time?**
   It’s best served fresh, but you can prep the dry ingredients in advance. Just mix them with wet ingredients right before frying to maintain that fluffy texture.

3. **What if I don't have fresh pineapple?**
   Canned pineapple can work in a pinch! Just make sure to pat it dry to reduce excess moisture, which can make your batter soggy.

4. **How do I store leftover fritters?**
   Store them in an airtight container in the fridge for up to 2 days. Reheat them in the oven or an air fryer for that crispy finish!

## Nutritional Info

*Note: Nutritional values may vary based on specific ingredient brands and types used.*

- Calories per fritter (without additional toppings): approximately 150-200
- Total fat: 9g
- Saturated fat: 2g
- Carbohydrates: 18g
- Protein: 2g
- Fiber: 1g
- Sugar: 6g

There you have it, dear friends! **Heavenly Pineapple Fritters** that not only tantalize the tongue but also tug at the heartstrings, serving up nostalgia and flavor in every bite. Whether you're hosting friends or enjoying a little indulgence on your own, these fritters are sure to bring a slice of tropical joy to your kitchen. Happy cooking!
Heavenly Pineapple Fritters

Delicious, crispy fritters made with fresh pineapple, perfect for any tropical-themed brunch or treat.
- Prep Time: 15 minutes
- Cook Time: 15 minutes
- Total Time: 30 minutes
- Yield: 4 servings 1x
- Category: Dessert
- Method: Frying
- Cuisine: Tropical
- Diet: Vegetarian
Ingredients
- 1 cup All-purpose flour
- 1/4 cup Granulated sugar
- 1 tablespoon Baking powder
- 1/4 teaspoon Salt
- 1 teaspoon Ground cinnamon
- 1 large Egg
- 1/2 cup Milk
- 1 whole Fresh pineapple, sliced into rings
- 2 cups Vegetable oil, for frying
- 1 tablespoon Additional cinnamon and sugar for dusting
Instructions
- Prep the Pineapple: Slice your fresh pineapple into rings, about 1/2 inch thick.
- Make the Batter: In a large mixing bowl, whisk together the all-purpose flour, granulated sugar, baking powder, salt, and ground cinnamon.
- Incorporate Wet Ingredients: In a separate bowl, beat the egg and then combine it with the milk. Pour this mixture into the dry ingredients.
- Heat the Oil: In a deep skillet or heavy-bottomed pot, heat the vegetable oil over medium-high heat.
- Fry the Fritters: Carefully dip each pineapple ring into the batter and gently place it into the hot oil.
- Drain and Dust: Remove the fritters from the oil and place them on a paper towel-lined plate to absorb any excess oil, then sprinkle with cinnamon and sugar.
Notes
Serve warm with coconut yogurt or honey. Experiment with toppings like powdered sugar or toasted coconut for extra flair.
Nutrition
- Serving Size: 1 fritter
- Calories: 180
- Sugar: 6g
- Sodium: 150mg
- Fat: 9g
- Saturated Fat: 2g
- Unsaturated Fat: 5g
- Trans Fat: 0g
- Carbohydrates: 22g
- Fiber: 1g
- Protein: 2g
- Cholesterol: 30mg
Keywords: fritters, pineapple, dessert, tropical, brunch
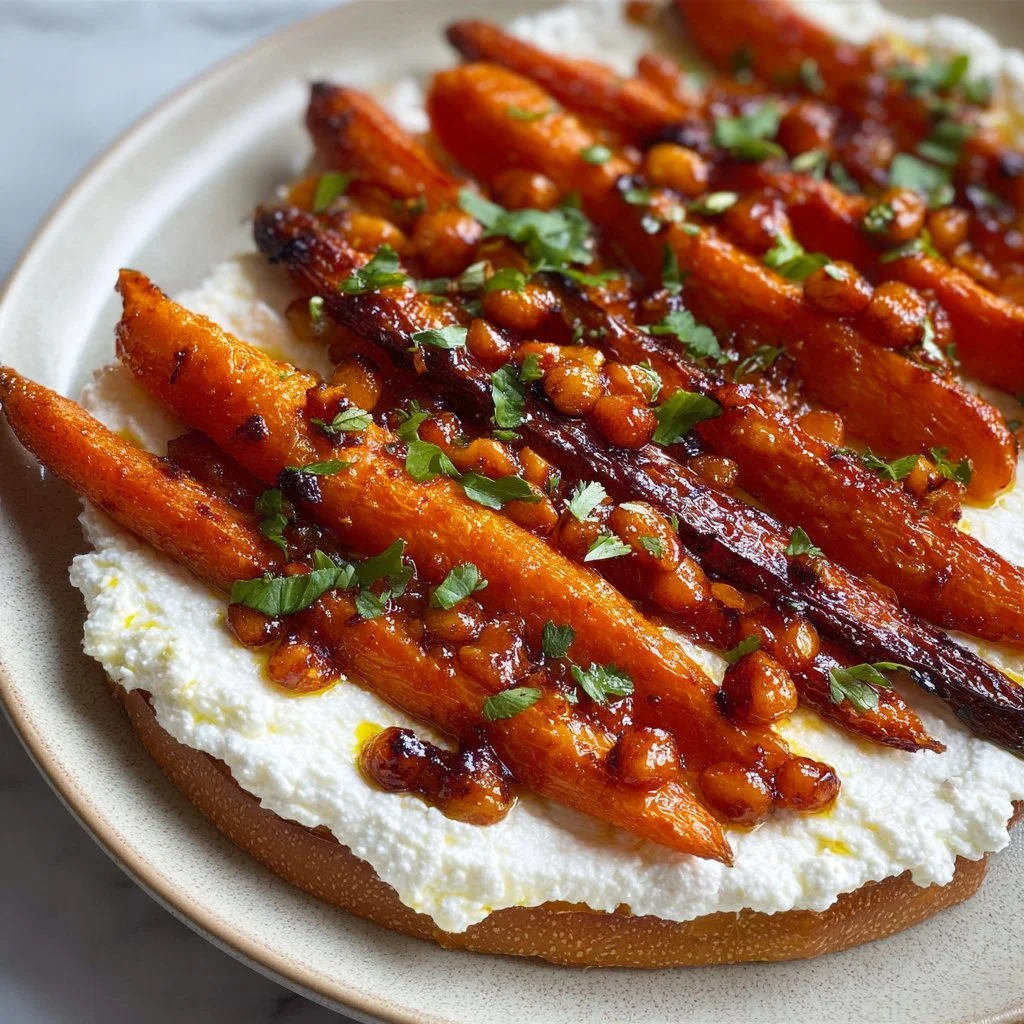
Spicy Sweet Carrots with Whipped Feta
Spicy Sweet Carrots with Whipped Feta: Elevate Your Everyday Meal
Introduction
Welcome to the enchanting world of cooking with me, Savannah Pierce! Today, we’re diving into a delightful dish that perfectly balances sweetness and heat: Spicy Sweet Carrots with Whipped Feta. This recipe embodies everything I love about cooking—elegance without the fuss, stunning flavors that surprise, and simplicity that allows good food to shine.
Picture this: you’ve just returned home after a long day, and the last thing you want to do is spend hours in the kitchen. But instead of reaching for takeout, you can whip up these tasty carrots in no time, transforming an ordinary evening into something special.
These Spicy Sweet Carrots are not just a side dish; they’re a conversation starter, a centerpiece of color, flavor, and texture on your table. With vibrant, caramelized carrots drizzled with honey or maple syrup, a good kick of cayenne pepper, and the creamy cloud of whipped feta to elevate each bite, you’ll find yourself going back for seconds—and maybe even thirds!
I’ll guide you step-by-step, sharing little nuggets of wisdom and tips I’ve gathered over the years in the kitchen. So, tie on your apron, pour a glass of something bubbly, and let’s set the table together with this vibrant, delicious dish that’s all about celebrating the season’s bounty.
Personal Story
The first time I tasted a dish similar to this Spicy Sweet Carrots with Whipped Feta was during a cozy dinner party at my dear friend Sarah’s house. Sarah was known for her radiant spirit and incredible knack for transforming the simplest of ingredients into extraordinary meals.
I remember arriving and being greeted by the tantalizing aroma of roasted carrots wafting through her kitchen. As I approached the dining room, I was captivated by the stunning presentation—each carrot glistening with a sweet glaze, garnished with feta and fresh herbs.
That night, as we dug in, I marveled at how the sweetness of the carrots contrasted perfectly with the tangy feta and a touch of heat. It was an unforgettable moment, surrounded by good friends, laughter, and the warmth of a beautifully set table. Ever since, those roasted carrots have been a staple in my repertoire, reminding me that cooking is not just about the food—it’s about the memories we create around it.
Ingredients
Let’s gather our ingredients to get started!
-
Carrots: The star of our dish! Choose fresh, organic carrots if possible. You can use rainbow carrots for a pop of color or stick to classic orange. If you’re in a pinch, baby carrots work too—just be sure to cut them in half so they roast evenly.
-
Olive oil: A must-have for roasting! It imparts rich flavor while helping to caramelize the carrots. If you’re looking for a substitution, avocado oil or melted coconut oil would work beautifully too.
-
Honey or maple syrup: This adds that lovely sweetness we crave. Honey works wonders, but if you want a vegan option, pure maple syrup is a fantastic alternative.
-
Cayenne pepper: For that kick! Adjust according to your spice tolerance. If you prefer milder heat, try paprika or omit it altogether.
-
Salt and black pepper: Essential for bringing out the flavors in our dish. Use sea salt or kosher salt for the best results!
-
Feta cheese: The creamy, tangy element that balances the sweetness and spice. If you’re not a feta fan, goat cheese or ricotta makes an excellent substitute.
-
Cream: To whip our feta into a luxurious topping. You can use heavy cream or, for a lighter version, opt for Greek yogurt.
-
Flatbreads: To serve alongside! These provide a great base for scooping up those delicious carrots and creamy feta. You can use store-bought or make your own for added flair.
Step-by-Step Instructions
Now that we have everything prepped, let’s jump into cooking!
-
Preheat the Oven: Preheat your oven to 425°F (220°C). Getting that oven nice and hot is crucial for caramelizing our carrots to perfection!
-
Prepare the Carrots: Wash and peel your carrots. If they’re large, cut them into uniform pieces—about 2 inches in length. This ensures an even roast. Smaller, baby carrots can stay whole!
Pro tip: Cutting the carrots at an angle not only adds visual interest but also increases their surface area, leading to more caramelization!
-
Season the Carrots: In a large mixing bowl, toss the carrots with a generous drizzle of olive oil, about 2 tablespoons. Add in around 1-2 tablespoons of honey or maple syrup (adjust to taste), a dash of cayenne pepper, salt, and black pepper.
Chef’s insight: Taste and adjust the seasoning before roasting. You want that balance of sweet and spicy to shine through!
-
Roast the Carrots: Spread the seasoned carrots on a baking sheet in a single layer. Pop them in the preheated oven and roast for about 20-25 minutes, turning them halfway through, until they’re tender and caramelized.
-
Make the Whipped Feta: While the carrots are roasting, it’s time to whip up our feta! In a food processor, combine about 1 cup of feta and ¼ cup of cream (or Greek yogurt). Blend until it reaches a smooth, creamy texture. Taste and adjust with a pinch of salt if needed.
Chef Hack: For an extra layer of flavor, add in fresh herbs like dill or parsley for a burst of freshness.
-
Serve it Up: Once your carrots are perfectly roasted and have that beautiful golden color, it’s time to plate. Spoon the whipped feta onto a serving dish, then artfully arrange the hot carrots over the top. Drizzle with a little extra honey and a sprinkle of freshly cracked pepper for garnish.
Serving Suggestions
When it comes to serving your Spicy Sweet Carrots with Whipped Feta, I recommend pairing them with warm, cozy flatbreads. You can either place the flatbreads on the side or serve them topped with some of that creamy feta mixture.
For an elegant touch, sprinkle some fresh herbs like dill or cilantro over the whole dish. This adds color and elevates the visual appeal while enhancing flavor.
Recipe Variations
Get creative with these options to customize your dish:
-
Add Nuts: Toasted walnuts or pistachios add a delightful crunch and depth of flavor. Just sprinkle them on top before serving!
-
Herbs Galore: Experiment with different herbs in your whipped feta—think basil or chives for a fresh twist.
-
Spice Mix Swap: Instead of cayenne pepper, try adding a pinch of smoked paprika or chili flakes for a hint of smokiness.
-
Carrot Alternative: Feel free to swap out carrots for other root vegetables like sweet potatoes or parsnips for a different flavor profile.
-
Lemon Zest: Adding a zest of lemon to the whipped feta can brighten up the dish and enhance the overall flavors.
Chef’s Notes
Every recipe evolve over time! I started with a basic roasted carrot dish but found that adding the whipped feta gave it that wow factor. Plus, I love how the creamy feta cools down the spicy kick of the carrots—it’s like a perfect harmony in every bite!
Oh, and let me tell you a funny story: I once confidently brought this dish to a potluck, thinking I’d wow my friends. But in my haste, I forgot the key ingredient—cayenne pepper! They were delicious, but everyone was asking for the “spicy” version next time. Lesson learned: always double-check the ingredient list!
FAQs and Troubleshooting
-
Why are my carrots not caramelizing?
Make sure your oven is preheated and that the carrots aren’t too crowded on the baking sheet. A single layer is key for that crispy, caramelized effect! -
What if my whipped feta is too thick?
Just add a splash more cream or a bit of milk to thin it out to your desired consistency. Blend again until smooth! -
Can I make this dish ahead of time?
The roasted carrots can be made ahead and reheated. The whipped feta is best made fresh, though—you want that creamy cloudiness! -
How do I store leftovers?
Store any leftovers in an airtight container in the fridge for up to 3 days. Just reheat gently in the oven and make fresh whipped feta when you’re ready to enjoy it again!
Nutritional Info
While I always encourage enjoying food without worry, here’s a rough nutritional breakdown per serving (not including flatbreads):
- Calories: 180
- Fat: 10g
- Protein: 5g
- Carbohydrates: 20g
- Fiber: 5g
- Sugar: 6g
But remember, the beauty of cooking lies in the joy it brings you, not just the numbers!
So there you have it, my dear food lover! This Spicy Sweet Carrots with Whipped Feta will make your next dinner extraordinary, bringing warmth and love to your table. Go ahead, give it a try, and remember: cooking is all about sharing moments and creating memories. Happy cooking!
PrintSpicy Sweet Carrots with Whipped Feta

A vibrant dish that balances sweetness and heat with caramelized carrots and creamy whipped feta.
- Prep Time: 10 minutes
- Cook Time: 25 minutes
- Total Time: 35 minutes
- Yield: 4 servings 1x
- Category: Side Dish
- Method: Roasting
- Cuisine: Mediterranean
- Diet: Vegetarian
Ingredients
- 2 lbs fresh carrots (organic or rainbow recommended)
- 2 tbsp olive oil
- 1–2 tbsp honey or maple syrup
- 1/2 tsp cayenne pepper (adjust to taste)
- Salt and black pepper to taste
- 1 cup feta cheese
- 1/4 cup cream or Greek yogurt
- Flatbreads for serving
Instructions
- Preheat the oven to 425°F (220°C).
- Prepare the carrots by washing and peeling them. Cut into uniform pieces if large.
- Season the carrots with olive oil, honey or maple syrup, cayenne pepper, salt, and black pepper.
- Roast the carrots on a baking sheet for 20-25 minutes until tender and caramelized.
- Make the whipped feta in a food processor, blending feta and cream until smooth.
- Serve by plating the whipped feta and arranging the roasted carrots on top.
Notes
For added flavor, garnish with fresh herbs and drizzle with extra honey.
Nutrition
- Serving Size: 1 serving
- Calories: 180
- Sugar: 6g
- Sodium: 300mg
- Fat: 10g
- Saturated Fat: 5g
- Unsaturated Fat: 5g
- Trans Fat: 0g
- Carbohydrates: 20g
- Fiber: 5g
- Protein: 5g
- Cholesterol: 30mg
Keywords: carrots, feta, roasted, side dish, vegetarian
Santa Fe Salad
Santa Fe Salad: A Celebration of Freshness and Flavor
Hello, fellow food lovers! Today, we’re diving into a vibrant dish that perfectly captures the spirit of summer—refreshing, colorful, and packed with flavors that dance on your palate. Meet the Santa Fe Salad! This isn’t just any salad; it’s a hearty bowl of goodness that celebrates the sunny, laid-back vibes of the Southwest. Whether you’re hosting a casual dinner party, prepping your lunch for the week, or simply craving something light and bright, this salad is here to impress.
What I truly love about the Santa Fe Salad is how it brings together a medley of textures and tastes—from the crunchy mixed greens to the creamy avocado, and those bursts of sweetness from the cherry tomatoes. Each bite is a celebration. And the best part? You don’t need a culinary degree or Michelin-starred kitchen equipment to whip it up! Just grab your apron and let’s create a dish that feels both elevated and approachable, just like my philosophy at Ivory Apron.
As we journey through this recipe, you’ll notice that it’s not only about satisfying your hunger; it’s also about putting love and intention into your food. So, gather your ingredients, invite a friend, and let me share all the secrets behind this beautiful bowl of Santa Fe magic.
Personal Story
Every time I whip up a Santa Fe Salad, I’m transported back to my childhood, where summer BBQs were a way of life. My family would gather in the backyard, the sun hanging low in the sky, casting a golden hue over laughter and good food. We’d feast on grilled chicken, salsa with a kick, and, of course, my aunt’s famous Santa Fe Salad.
I remember the excitement of picking fresh tomatoes from the garden, and the sweet scent of cilantro filling the air as we prepped for our feast. My aunt would expertly toss everything together, adding a squeeze of lime at the end for that signature zing. We would eagerly grab our plates, scooping the colorful salad alongside the main dishes. I’d sneak in an extra helping, knowing that this salad was more than just a side; it was the heart of our gathering.
Years later, as I learned to cook and host my gatherings, I found myself recreating that same feeling through food. The Santa Fe Salad became one of my go-to dishes—a nostalgic nod to those carefree summer days and a testament to the joy of coming together over a shared meal.
Ingredients
Let’s gather our vibrant cast of ingredients for this Santa Fe Salad. Each one plays a critical role in creating that perfect balance of flavor and texture!
-
Mixed Greens: A blend of baby spinach, arugula, or spring mix works wonderfully here. For a heartier option, you can go for romaine or kale. Good greens provide a base that adds crunch and nutrition.
-
Cherry Tomatoes: Sweet, juicy, and bursting with flavor, cherry tomatoes make every bite delightful. If you can’t find any, grape tomatoes are a great substitute, or you can use regular tomatoes—just chop them into bite-sized pieces.
-
Black Beans: Packed with protein and fiber, black beans are a hearty addition. If you’re looking to mix it up, try pinto beans or chickpeas for a different flavor profile.
-
Corn: Sweet corn adds a nice crunch and sweetness. Fresh corn on the cob is amazing in summer, but you can use canned or frozen corn off-season—just be sure to drain and rinse if using canned!
-
Red Onion: A hint of sharpness from red onion adds depth to the salad. If red onion is too pungent for your taste, you can substitute it with green onions for a milder flavor.
-
Avocado: Creamy avocado brings richness and balances the flavors perfectly. If avocados are out of season, you can use a sprinkle of feta cheese for creaminess.
-
Cilantro: Fresh cilantro adds a bright, herbaceous note that lifts the dish. If you’re not a fan of cilantro, try fresh parsley or basil instead.
-
Lime Juice: For that zesty kick, fresh lime juice is unbeatable. If you’re in a pinch, lemon juice can work, though it has a slightly different flavor.
-
Olive Oil: A good quality olive oil ties all the flavors together. If you want to switch things up, avocado oil offers a neutral flavor and is great for drizzling.
-
Chili Powder: A sprinkle of chili powder offers just enough warmth to enhance the overall flavor. If you prefer a spicier kick, you can use cayenne pepper or smoked paprika for a smoky twist.
-
Salt and Pepper: Essential seasoning to bring all the flavors to life. Don’t be shy—season to taste!
Step-by-Step Instructions
Now that we’ve gathered our ingredients, it’s time to transform them into a gorgeous salad that promises to impress. With my step-by-step guide, you’ll be a salad-making whiz in no time!
-
Prep the Greens: Start by washing your mixed greens thoroughly under cold water to remove any grit. Spin them dry in a salad spinner or gently pat them with a clean kitchen towel. This step ensures your salad isn’t soggy—nobody likes a watery salad!
-
Chop the Veggies: Slice the cherry tomatoes in half. Chop the red onion finely, so it blends seamlessly into the salad without overpowering other flavors. I love using a sharp chef’s knife for this—just think of the tomato slices as little jewels waiting to brighten your salad.
-
Rinse the Beans: If you’re using canned black beans, make sure to drain and rinse them under cold water. This helps remove excess sodium and improves their flavor. If you have dried beans, you’ll want to soak and cook them beforehand for that home-cooked taste.
-
Prepare the Corn: If you’re using fresh corn, hold the cob upright in a bowl and cut the kernels off, letting them fall into the bowl to catch every morsel. If you’re using frozen corn, just toss it in and allow it to thaw slightly before mixing.
-
Dressing Time: It’s time to whip up a zesty dressing! In a small bowl, whisk together 3 tablespoons of olive oil, the juice of one lime, and 1 teaspoon of chili powder. Season with salt and pepper to taste. This dressing is where the magic happens—don’t skip it!
-
Mix It All Together: In a large mixing bowl, combine your greens, cherry tomatoes, black beans, corn, avocado chunks, and chopped cilantro. Pour the dressing over the top and gently toss everything together until well coated. Remember, the goal is to coat, not crush your beautiful ingredients!
-
Taste and Adjust: Give your salad a taste! This is the best part. If you want more zing, a splash more lime juice works wonders. Feel free to add more salt or pepper to suit your palate.
-
Plate It Up: Use a large serving bowl or individual plates—your choice! I love using beautiful bowls to showcase the vibrant colors of the salad. Don’t be afraid to layer it a bit for a visually stunning presentation!
-
Final Touches: If you have extra cilantro or some lime wedges, don’t hesitate to garnish with them. A little sprinkle of seasoning here can elevate the appearance and flavor.
Serving Suggestions
When it comes to serving, the Santa Fe Salad shines brightest when it’s colorful and inviting. For an elevated dining experience, serve it in a beautiful wooden bowl or on crisp white plates to contrast the vibrant colors. You can pair it with grilled chicken or shrimp for a complete meal, or serve it alongside fresh crusty bread for a light lunch. Don’t forget to add a few lime wedges on the side—there’s nothing quite like that fresh squeeze right before digging in!
Recipe Variations
Let’s get creative! Here are a few variations to keep things exciting:
-
Taco Twist: Add cooked ground turkey or beef, seasoned with taco spices, to turn this salad into a taco bowl! You could also swap out the black beans for refried beans.
-
Grilled Veggies: Throw in some grilled zucchini, bell peppers, or corn for a smoky, charred flavor that pairs perfectly with the fresh ingredients.
-
Quinoa Power: Boost the protein by adding cooked quinoa into the mix. It makes the salad heartier and even more filling.
-
Swap the Dressing: Try a creamy dressing such as avocado or cilantro dressing for a lush twist that’s still vibrant and delicious.
-
Make It Vegan: Simply omit any cheese or animal product. It’s already packed with delicious plant-based goodness!
Chef’s Notes
This salad recipe has been a staple for me for years. I love how it adapts with the seasons—using whatever fresh produce is on hand. I remember one time I had a bounty of fresh peppers, so I threw them in, and the salad was a hit with everyone!
Another fond memory was a picnic at the park where I made individual salad cups. Everyone loved having their portions ready to go—perfect for enjoying in the sun!
Cooking should be fun and spontaneous—so please feel free to add your touch to this Santa Fe Salad. Over time, you’ll develop your signature twist that friends will remember!
FAQs and Troubleshooting
Q: Can I make this salad ahead of time?
A: Absolutely! You can prep all the ingredients and store them separately in the fridge for a day or two. However, when ready to serve, avoid dressing it too early, as the greens can become wilted.
Q: What if I can’t find fresh cilantro?
A: No worries! You can use parsley or basil as a substitute, but if you want that specific cilantro flavor, look for it dried. The fresh taste won’t be there, but it’ll add some herb complexity.
Q: Is it okay to use frozen corn instead of fresh?
A: Yes! Just thaw it out and give it a quick rinse to freshen it up a bit. It holds just as much flavor and is convenient when fresh corn isn’t available.
Q: How can I store leftovers?
A: Store any leftovers in an airtight container in the refrigerator for up to 2 days. However, keep in mind that the texture will change as ingredients begin to release moisture.
Nutritional Info
While Santa Fe Salad’s nutritional profile can vary based on specific ingredients used, here’s a rough estimate for a serving of this glorious salad:
- Calories: Approximately 250
- Protein: 10g
- Carbohydrates: 30g
- Fat: 12g (mostly healthy fats from avocado and olive oil)
- Fiber: 8g
This salad is filled with vitamins, minerals, and plenty of fiber, making it an excellent choice for a nutritious meal or side dish.
And that’s how you create a Santa Fe Salad that not only delights the eyes but also warms the heart. I hope you found this journey through flavor and memory as enjoyable to read as it is to make! Cooking is a reflection of our experiences, and every dish tells a story. Ready to tie on that apron and share your own culinary adventures? Go ahead and make this salad your own! Happy cooking! 🥗✨
PrintSanta Fe Salad

A vibrant and refreshing salad featuring mixed greens, black beans, and a zesty lime dressing, perfect for summer gatherings.
- Prep Time: 15
- Total Time: 15
- Yield: 4 servings
- Category: Salad
- Method: Mixing
- Cuisine: Southwestern
- Diet: Vegetarian
Ingredients
- Mixed Greens (baby spinach, arugula, or spring mix)
- Cherry Tomatoes
- Black Beans
- Corn
- Red Onion
- Avocado
- Cilantro
- Lime Juice
- Olive Oil
- Chili Powder
- Salt and Pepper
Instructions
- Prep the greens by washing and drying them thoroughly.
- Chop the cherry tomatoes in half and finely chop the red onion.
- Rinse the black beans under cold water.
- Prepare the corn by cutting kernels off the cob if using fresh.
- Whisk together olive oil, lime juice, and chili powder for the dressing.
- Mix greens, tomatoes, beans, corn, avocado, and cilantro in a bowl.
- Pour the dressing over the salad and toss gently.
- Taste and adjust seasoning with more lime juice, salt, or pepper.
- Plate in a serving bowl or individual plates, garnishing with extra cilantro and lime wedges.
Notes
Feel free to add grilled chicken or shrimp for a complete meal. This salad adapts well to seasonal ingredients.
Nutrition
- Serving Size: 1 serving
- Calories: 250
- Sugar: 3g
- Sodium: 370mg
- Fat: 12g
- Saturated Fat: 2g
- Unsaturated Fat: 8g
- Trans Fat: 0g
- Carbohydrates: 30g
- Fiber: 8g
- Protein: 10g
- Cholesterol: 0mg
Keywords: salad, healthy, vegetarian, summer, fresh, Santa Fe salad
Strawberry Shortcake Easter Egg Bombs
# Strawberry Shortcake Easter Egg Bombs: A Sweet Spring Surprise!

## Introduction

Spring is in the air, and with it comes a sense of renewal, colorful blooms, and a delightful array of seasonal flavors. There’s something magical about this time of year. The warm sunshine beckons us outdoors, family gatherings become more frequent, and the delicious promise of vibrant strawberries fills the markets. Those sweet, juicy gems inspire me every year, especially when I think about one of my all-time favorite desserts: strawberry shortcake.

What if I told you that you could take that classic dessert and give it a fun, whimsical twist? Enter: **Strawberry Shortcake Easter Egg Bombs!** These charming treats are not only a showstopper for your Easter brunch or spring gatherings, but they also merge the beloved flavors of strawberry shortcake with the playful spirit of Easter. They’re perfect for kids (and kids at heart), adding a hint of surprise and a touch of nostalgia to your dessert table.

I want to bring you into my kitchen as I whip up these tasty delights! We’re going to melt, blend, mold, and most importantly, have fun while creating something that brings smiles to everyone who bites into them. Ready to dive in and create a memorable treat that combines the creamy goodness of strawberries, the rich sweetness of white chocolate, and the playful crunch of shortcake? Let’s get started!

## Personal Story

Growing up, Easter was always a big deal in our family. My grandmother would go all out with an extravagant spread, replete with colorful decorations, an Easter egg hunt, and of course, dessert! Strawberry shortcake was her pièce de résistance. I remember standing in the kitchen, watching her slice through those fluffy layers of cake as the sweet aroma of freshly whipped cream filled the air.

I still see her, apron tied neatly around her waist, expertly blending strawberries and cream, her laughter echoing as we would scoop up the leftover filling with spoons — it was a family tradition that bonded us through the simple joys of food. A few years back, I wanted to recreate that experience and add a playful twist to the traditional dessert for my niece and nephew who were coming for Easter. We decided to make **Strawberry Shortcake Easter Egg Bombs!** They loved the surprise inside and the playful presentation, and I knew I had struck gold. Thus, my very own Easter tradition was born!

## Ingredients

To make these delightful treats, you’ll need the following ingredients:

- **2 cups white chocolate chips**
  Smooth and creamy, white chocolate adds sweetness and acts as the perfect shell for our Easter egg bombs. If you’re looking for a dairy-free option, try using vegan white chocolate instead!

- **1 cup strawberries, pureed**
  Fresh strawberries bring that bright, fruity flavor. If strawberries aren’t in season, feel free to use frozen strawberries — just thaw them and drain the excess liquid.

- **1/2 cup heavy cream**
  This will be whipped into fluffy goodness that adds richness to our filling. For a lighter option, you can substitute with coconut cream or a whipped topping.

- **1/2 cup shortcake crumbs**
  These bits of deliciousness add the classic shortcake texture. You can easily make your own shortcakes or use store-bought for convenience. Gluten-free options are also available with almond flour shortcakes!

- **1 teaspoon vanilla extract**
  This aromatic essence enhances the flavors, making everything taste more amazing! You can also use almond extract for a twist.

- **Easter egg chocolate molds**
  These are vital for shaping your bombs. You can find them in any craft or baking supply store. If you don’t have egg molds, you can use small cups or even muffin tins to shape them.

## Step-by-Step Instructions

Ready to bring your Strawberry Shortcake Easter Egg Bombs to life? Let’s break it down:

1. **Melt the white chocolate.**
   Begin by placing the white chocolate chips in a microwave-safe bowl. Heat them in the microwave in 30-second increments, stirring between each interval, until smooth. This gentle melting process prevents seizing, so don’t rush it! Alternatively, you can use a double boiler for this step.

2. **Prepare the molds.**
   Using a pastry brush or the back of a spoon, carefully coat the inside of your Easter egg molds with a layer of melted white chocolate. Aim for about 1/8 inch thick. Be sure to cover all areas to avoid gaps. Pop the molds in the refrigerator for 10 minutes to let the chocolate set.

3. **Mix the filling.**
   In a separate bowl, whip the heavy cream until soft peaks form. Gently fold in the strawberry puree, shortcake crumbs, and vanilla extract until everything is combined. You want a luscious, fluffy filling that will be bursting with flavor!

4. **Fill the molds.**
   Once the chocolate in your molds is set, spoon in a dollop of the strawberry shortcake filling, filling each half about 3/4 full. You’ll have some room left for the top chocolate layer.

5. **Seal with chocolate.**
   Take the remaining melted white chocolate and cover each filled mold, ensuring that the egg is completely sealed. This prevents any filling from leaking out once you pop them out later. Be generous — you want a lovely, thick shell!

6. **Chill again.**
   Pop the molds back into the refrigerator for at least 30 minutes or until the white chocolate is firm and set. This is the perfect time to tidy up the kitchen or sip on a refreshing beverage 😄!

7. **Unmold your creations.**
   Once fully set, gently pop each egg out of the molds. If you find them stubborn, gently tap them against a countertop or warm the outside of the mold slightly with your hands.

8. **Decorate and delight!**
   Feel free to dust the eggs with some edible glitter, drizzle more melted chocolate on top, or even sprinkle crushed shortcake crumbs for an elegant finishing touch. Arrange them on a platter and watch everyone’s eyes light up at the colorful presentation!

## Serving Suggestions

To serve these delightful Strawberry Shortcake Easter Egg Bombs, go for a charming presentation! Arrange them on a beautiful platter surrounded by Spring flowers or colorful shredded paper for that extra festive touch. You can also serve them alongside fresh strawberry slices and a dollop of whipped cream for an indulgent dessert experience. Get creative with the garnishes — fresh mint leaves make a lovely addition!

## Recipe Variations

- **Chocolate Strawberry Delight:** Swap out the white chocolate for milk or dark chocolate for a richer flavor.
- **Fruit Fusion:** Mix in pureed raspberries or blueberries with your strawberries for a burst of different fruit flavors.
- **Nutty Crunch:** Add crushed nuts to your shortcake crumbs for added texture; almonds or pistachios work beautifully!
- **Dairy-Free Option:** Use almond milk chocolate, coconut cream, and vegan shortcakes for a delightful dairy-free rendition.
- **Churro Style:** Roll your chocolate-covered eggs in cinnamon sugar for a fun churro twist!

## Chef’s Notes

As I developed this recipe, I couldn’t help but reminisce about those family gatherings where laughter echoed and delicious food filled the air. This recipe evolved to become a staple in my kitchen, where I could watch the little ones’ eyes light up as they discovered each surprise. The whimsical nature of these Strawberry Shortcake Easter Egg Bombs brings joy not only to them but to me as well.

Food has a special way of connecting us, doesn’t it? As we blend flavors and create delicious memories, we cultivate a space of belonging and love. And isn’t that what it’s all about?

## FAQs and Troubleshooting

- **Why is my chocolate not setting properly?**
  If your chocolate seems too soft, it might need more time in the refrigerator. Make sure to let it chill well until it’s fully set.

- **Can I assemble these in advance?**
  Absolutely! You can prepare these Easter egg bombs a day in advance. Just store them in an airtight container in the fridge until you're ready to serve.

- **How do I fix chocolate that’s seized?**
  If your chocolate seized while melting, try adding a small amount of vegetable oil (1 teaspoon at a time) to help restore its consistency.

- **I can’t find Easter egg molds; what can I use instead?**
  No problem! Small muffin tins or even paper cups will work just fine. Just make sure to adjust the filling amount so they don't overflow.

## Nutritional Info

While indulgent treats often hold a high caloric content, you can savor the joy in moderation. Each egg bomb offers a burst of flavor without compromising on taste!

---

Let this guide inspire your next culinary adventure, dear friends — ready your aprons, gather the family, and create some magical memories around your table with these Strawberry Shortcake Easter Egg Bombs. Happy cooking, and I can’t wait to see how yours turn out!
Strawberry Shortcake Easter Egg Bombs

Delightful treats combining strawberry shortcake flavors with the fun of Easter egg surprises.
- Prep Time: 30 minutes
- Cook Time: 10 minutes
- Total Time: 40 minutes
- Yield: 12 servings 1x
- Category: Dessert
- Method: No-Bake
- Cuisine: American
- Diet: Vegetarian
Ingredients
- 2 cups white chocolate chips
- 1 cup strawberries, pureed
- 1/2 cup heavy cream
- 1/2 cup shortcake crumbs
- 1 teaspoon vanilla extract
- Easter egg chocolate molds
Instructions
- Melt the white chocolate.
- Prepare the molds.
- Mix the filling.
- Fill the molds.
- Seal with chocolate.
- Chill again.
- Unmold your creations.
- Decorate and delight!
Notes
You can prepare these in advance and store them in an airtight container. If you can’t find Easter egg molds, muffin tins or paper cups will work as alternatives.
Nutrition
- Serving Size: 1 egg bomb
- Calories: 250
- Sugar: 20g
- Sodium: 50mg
- Fat: 15g
- Saturated Fat: 9g
- Unsaturated Fat: 4g
- Trans Fat: 0g
- Carbohydrates: 30g
- Fiber: 1g
- Protein: 3g
- Cholesterol: 15mg
Keywords: strawberry shortcake, Easter dessert, chocolate molds, spring recipes, festive treats
Fried Potato Salad
Fried Potato Salad: A Nostalgic Twist on a Classic Dish
Welcome to my cozy corner of the culinary world, my friends! Today, we’re diving into a dish that’s sure to tickle your taste buds and bring back memories of carefree summer days spent with family and friends. I’m talking about the glorious Fried Potato Salad—a warm, crispy, and vibrant take on the classic potato salad we all know and love. It’s like your favorite childhood memories served up on a plate, and trust me, it’s every bit as delicious as it sounds!
Picture this: golden-brown potatoes sizzling in the pan, the aroma of sautéed vegetables wafting through the air, and that irresistible tang from the vinegar cutting through the richness. As we prepare this delightful side dish, you’ll find that every bite offers the perfect combination of crunchy exteriors and creamy interiors, making it a true standout at any gathering.
What I love about Fried Potato Salad is not just the flavors but the stories and connections it brings to the table. Whether it’s enjoyed at a backyard barbecue, a picnic in the park, or as a comforting side during a winter gathering, this dish has a way of bringing people together. So, grab your apron, and let’s create some unforgettable memories with this delicious recipe!
Personal Story
As I think of Fried Potato Salad, I’m transported back to my grandmother’s kitchen, where laughter mingled with the savory scent of cooking. Every summer, we would gather for family reunions, with long tables overflowing with dishes, but none captured my heart quite like her potato salad.
Grandma always had a flair for the dramatic when it came to flavor. Her potato salad was never just a simple cold version; it was an explosion of flavor and textures that had us all coming back for seconds. One summer, she decided to take it up a notch by frying the potatoes before mixing them with colorful veggies and her signature tangy dressing. Let me tell you, it changed everything. The crispy potatoes hugged the vibrant vegetables, and every mouthful felt like a celebration. I remember how the warm dish brought everyone together, sparking laughter and stories as we shared our lives and loved ones. It was more than a side— it was the heart of our gathering!
Ingredients
For the Fried Potato Salad
-
Potatoes
Choose starchy varieties like Yukon Gold or Russet for that fluffy interior and crisp exterior. If you’re in a pinch, any waxy potato can work, but texture might vary. -
Vegetables (e.g., bell peppers, onions, celery)
These add color and crunch! Get creative—zucchini, cherry tomatoes, or even pickles can be delightful additions. You can also swap fresh veggies for roasted ones for a smoky flavor. -
Olive Oil or Butter
A classic kitchen staple! I recommend using a mix—olive oil for flavor and butter for richness. If you’re vegan, stick to olive oil or coconut oil. -
Vinegar (e.g., apple cider or white vinegar)
This ingredient brings that essential tang! Apple cider vinegar adds sweetness, while white vinegar provides a sharper kick. Lemon juice is a brilliant alternative for a fresh twist! -
Salt
Essential for elevating flavors. Use sea salt for a subtle minerality or kosher salt, which is easier to control while cooking. -
Pepper
Black pepper gives your dish the spice it deserves. For something different, try adding a pinch of smoked paprika for a hint of warmth. -
Mustard
Dijon is my go-to for that smooth tang, but feel free to switch it up with yellow mustard for a more classic take or spicy brown mustard for heat. -
Fresh Herbs (e.g., parsley or dill)
Herbs add freshness! Dried herbs work too, but fresh makes a noticeable difference. Basil or chives can also be considered for a lovely twist.
Step-by-Step Instructions
Let’s get frying! Here’s how to whip up this delightful Fried Potato Salad:
Step 1: Prep the Potatoes
- Chop the Potatoes: Start by washing and peeling your potatoes, then cut them into 1-inch cubes for even cooking.
- Soak Them: If you have a little extra time, soak them in cold water for about 30 minutes. This removes excess starch and helps them crisp up beautifully!
Step 2: Boil the Potatoes
- Boil: Place the chopped potatoes in a pot of salted water and bring it to a boil. Cook until just tender but not mushy—around 10-15 minutes should do the trick.
- Drain and Cool: Drain the potatoes and allow them to cool slightly, giving them time to steam dry; this will help achieve that glorious crisp later on!
Step 3: Fry the Potatoes
- Heat the Oil: In a large skillet over medium heat, add olive oil and a tablespoon of butter. Once hot, add the potatoes in a single layer.
- Fry: Let them cook undisturbed for about 5-7 minutes until golden brown and crispy on the bottom. Flip them gently with a spatula to brown the other side. You want them crispy and nicely seasoned, with a lovely golden hue!
Step 4: Sauté the Vegetables
- Add the Veggies: Once the potatoes are crispy, add chopped onions, bell peppers, and celery. Sauté for another 5-7 minutes until they’re tender and fragrant, adding more oil if needed. This adds layers of flavor that harmonize beautifully with the potatoes.
Step 5: Mix the Dressing
- Whisk Together: In a small bowl, whisk together vinegar, mustard, salt, pepper, and fresh herbs. Adjust the seasoning to suit your taste.
Step 6: Combine
- Toss with Dressing: Pour the dressing over the warm potatoes and vegetables. Gently toss to coat evenly. You want that warm dressing to embrace every piece!
Step 7: Let It Sit
- Rest for Flavor: Allow your Fried Potato Salad to sit for a few minutes so the flavors can meld. Herbs release their essence, and everything becomes even tastier!
Serving Suggestions
To serve up that gorgeous Fried Potato Salad, scoop a generous helping onto a wide platter and garnish with chopped fresh herbs for a pop of color. A drizzle of olive oil or a sprinkle of flaky sea salt will take it up another notch. Pair it with grilled meats, or serve alongside a fresh green salad for a complete meal. This dish shines at any gathering, so don’t hesitate to showcase your beautiful culinary creation!
Recipe Variations
- Spicy Fried Potato Salad: Add diced jalapeños or a dash of hot sauce to give your dish a kick.
- Mediterranean Style: Toss in olives, sun-dried tomatoes, and feta cheese for an irresistible flavor twist.
- Bacon Lover’s: Add crispy bacon bits for an extra crunch and savory element.
- Healthier Option: Use Greek yogurt instead of mayo in the dressing for a creamy but lighter version.
- Vegan Delight: Replace butter with vegan butter and use agave syrup for a subtle sweetness.
Chef’s Notes
Creating this Fried Potato Salad has been a staple in my kitchen over the years. I remember the first time I made it for a potluck—there weren’t any leftovers! It’s truly a showstopper that never fails to impress. The beauty of this recipe is how adaptable it is. I’ve seen it evolve with seasonal ingredients, and every variation tells its own story, just like every meal shared around the table does.
Don’t be afraid to get creative; cooking is about making it your own. And if something goes awry, just remember—it’s all part of the journey!
FAQs and Troubleshooting
1. Why are my potatoes mushy?
Mushy potatoes usually indicate they were boiled for too long. Aim for tender but firm potatoes that hold their shape.
2. Can I make this salad ahead of time?
Absolutely! Prepare the fried potatoes and dressing ahead of time, then toss them together just before serving. This helps retain that crispy texture.
3. How do I store leftovers?
Store leftovers in an airtight container in the fridge for up to three days. Re-crisp in the skillet with a little oil to revive that perfect crunch!
4. Can I use pre-cooked potatoes?
Definitely! If you have leftover baked or steamed potatoes, just slice them up and fry them in the skillet for a quicker process.
Nutritional Info
While I encourage you to savor every bite of this Fried Potato Salad, keeping a close eye on your nutritional intake can be beneficial. Each serving roughly contains:
- Calories: 290
- Fat: 15g
- Carbohydrates: 40g
- Protein: 5g
- Fiber: 4g
Note: These values can vary based on ingredient choices, so feel free to adjust them according to your dietary needs!
There you have it—a delightful journey into the world of Fried Potato Salad, filled with memories, flavor, and joy! I hope you feel inspired to create this dish in your kitchen, where every forkful can spark laughter and add a sprinkle of warmth to your gatherings. Happy cooking, my friends!
PrintFried Potato Salad

A warm and crispy twist on classic potato salad, featuring golden-brown potatoes and vibrant vegetables.
- Prep Time: 30 minutes
- Cook Time: 25 minutes
- Total Time: 55 minutes
- Yield: 4 servings
- Category: Side Dish
- Method: Frying
- Cuisine: American
- Diet: Vegetarian
Ingredients
- Potatoes (Yukon Gold or Russet)
- Vegetables (bell peppers, onions, celery)
- Olive Oil or Butter
- Vinegar (apple cider or white vinegar)
- Salt
- Pepper
- Dijon Mustard
- Fresh Herbs (parsley or dill)
Instructions
- Chop the potatoes, wash and peel them before cutting into 1-inch cubes.
- Soak the chopped potatoes in cold water for about 30 minutes.
- Boil the potatoes in salted water until just tender (10-15 minutes).
- Drain the potatoes and allow them to cool slightly.
- Heat olive oil and butter in a skillet over medium heat.
- Fry the potatoes until golden brown and crispy, about 5-7 minutes.
- Add chopped onions, bell peppers, and celery, sautéing for another 5-7 minutes.
- Whisk together vinegar, mustard, salt, pepper, and fresh herbs in a small bowl.
- Toss the warm potatoes and vegetables with the dressing.
- Allow the salad to sit for a few minutes to meld flavors.
Notes
Can be made ahead, just toss ingredients together before serving to maintain crispiness.
Nutrition
- Serving Size: 1 serving
- Calories: 290
- Sugar: 2g
- Sodium: 500mg
- Fat: 15g
- Saturated Fat: 5g
- Unsaturated Fat: 8g
- Trans Fat: 0g
- Carbohydrates: 40g
- Fiber: 4g
- Protein: 5g
- Cholesterol: 15mg
Keywords: potato salad, fried potato salad, side dish

Peach Pie Cruffins
Peach Pie Cruffins: A Delightful Twist on a Classic
Hello, fellow food lovers! I’m beyond excited to share one of my favorite indulgences with you today: Peach Pie Cruffins. You might be wondering what in the world a “cruffin” is. Well, picture this: the delightful layers of a croissant meet the comforting goodness of a muffin, and sprinkle it with a burst of juicy peaches, sweet sugar, and warm spices. It’s a match made in dessert heaven and it’s as delightful as it sounds.
Now, let me take you on a little journey before we dive into the recipe. Many of my fondest memories revolve around the kitchen—gathering with family, the aroma of baked goods wafting through the air, and the heartwarming sounds of laughter at the table. I remember helping my grandmother make her famous peach pies during the hot summer months, the wooden counter dusted with flour, rolling out that flaky dough, and watching in awe as she transformed simple ingredients into golden, luscious pies. Each slice served brought an explosion of flavor, and even now, I can still hear her enchanting tales of picking those peaches right from the orchard.
Inspired by those sweet moments and the joy of offering something wonderful, I created these Peach Pie Cruffins—a clever homage to the classic pie that embodies summertime bliss. Not only are they incredibly delicious, but they also offer a fun, unique way to experience the essence of a peach pie. So gather your baking gear, and let’s get started!
Personal Story
I have to confess; one of the best summer memories I cherish is picking peaches with my family at a local orchard. We’d spend hours under the sun, carefully plucking the ripest peaches from the trees, their sweet scent filling the air. We’d indulge in the juiciest ones before even making it home, with peach juice running down our arms and giggles erupting from the sheer delight of it all.
Once home, my grandmother would whip out her trusted mixer and start prepping for her famous peach pie. I was her sidekick, rolling out the dough with my tiny hands, trying to mimic her skilled movements. The way she converted fresh, ripe peaches into a cozy masterpiece was pure magic to me—one of those moments when you just know you’re part of something special.
Creating this Peach Pie Cruffin is like taking a bite out of that memory, offering the same warmth and heart in a delightful pastry form. Plus, it’s easier to make than my grandmother’s classic pie, and can be shared among friends in a fun way—hampered by no one’s oven or rolling skills!
Ingredients
Let’s gather everything we need to create these heavenly Peach Pie Cruffins! Here’s what you’ll need:
-
1 package of puff pastry: This is the perfect base for our cruffins. A wonderful, flaky texture that holds up well to our peach filling. If you’d like a whole wheat version, look for whole wheat puff pastry in your grocery store or try using phyllo dough for a lighter option.
-
2 cups fresh peaches, diced: The star of our show! Sweet, juicy peaches add a beautiful flavor and texture. If peaches aren’t in season, you can substitute with ripe nectarines, or even canned peaches—just be sure to drain them well!
-
1/2 cup sugar: This sweetens the peach filling just right. You can use coconut sugar or brown sugar for a more caramel-like flavor if you prefer.
-
1 tablespoon cornstarch: This is our secret ingredient for thickening the peach filling so it doesn’t get too runny. You can substitute it with tapioca starch or arrowroot if you’re avoiding corn.
-
1 teaspoon vanilla extract: Adding depth and warmth to our peach mixture. You could try using almond extract for a unique twist that complements the peaches beautifully.
-
1/2 teaspoon cinnamon: Because you can’t have a peach pie without a dash of cinnamon! If you want to switch things up, nutmeg also works wonderfully here.
-
1 egg (for egg wash): This gives our cruffins a lovely golden-brown color. If you need an egg substitute, a tablespoon of milk or a non-dairy milk brushed on will do the trick.
-
Powdered sugar for dusting (optional): A floral finish to our cruffins! Feeling extra? Why not make a simple glaze with powdered sugar and a splash of milk for drizzling.
Step-by-Step Instructions
Alright, it’s time to roll up our sleeves and get baking! Here’s how you can whip up these Peach Pie Cruffins step-by-step:
Step 1: Preheat the Oven
First things first! Preheat your oven to 375°F (190°C). This ensures that your cruffins will bake evenly, giving you that perfect flaky texture.
Step 2: Prepare the Peach Filling
In a medium bowl, combine your diced peaches, sugar, cornstarch, vanilla extract, and cinnamon. Mix gently to coat the peaches. Let this sit for about 10-15 minutes to allow the peaches to release their juices and combine the flavors. This is a crucial step—don’t skip it! The cornstarch works its magic as it absorbs excess moisture, keeping your cruffins from getting soggy.
Step 3: Roll Out the Puff Pastry
Unroll your thawed puff pastry sheet on a lightly floured surface. Using a rolling pin, gently roll it out to smooth out any creases. We want to make sure it’s nice and uniform, about 1/8 inch thick.
Step 4: Cut the Pastry
Now, let’s cut the pastry into rectangles—about 4 inches by 6 inches. You should aim for about 6 rectangles from a standard puff pastry sheet. If you’re feeling bold, you can even cut them into squares or triangles for a fun variation!
Step 5: Assemble the Cruffins
Take your peach mixture and spoon a generous amount into the center of each rectangle, leaving space around the edges. Now, here’s where the magic happens: fold the pastry around the filling. If you have excess dough, crimp it together at the top to create a little pocket. Place the cruffins in a muffin tin (sprayed with cooking spray) to help them hold their shape.
Step 6: Brush the Egg Wash
In a small bowl, whisk your egg and brush the egg wash generously on top of each cruffin. This will give them that glorious, golden color that’ll have everyone drooling in anticipation.
Step 7: Bake Until Golden Brown
Pop your muffin tin in the preheated oven and bake for about 20-25 minutes or until the tops are beautifully golden and puffed up. Keep an eye on them during the last few minutes—the puff pastry will be rising dramatically, and you’ll want to catch them before they overbake.
Step 8: Cool and Dust
Once they’re out of the oven, allow your cruffins to cool for about 5-10 minutes in the tin. Carefully transfer them to a wire rack and let them cool a bit longer. Just before serving, dust them with powdered sugar or drizzle with glaze, if you’re feeling indulgent.
Serving Suggestions
For the best presentation, serve your Peach Pie Cruffins on a lovely platter, perhaps alongside some fresh whipped cream or a scoop of vanilla ice cream. You could even pair them with a warm cup of tea or coffee for a delightful afternoon treat. Enjoy them warm, fresh from the oven, or at room temperature—they’re delicious either way!
Recipe Variations
Want to experiment with your Peach Pie Cruffins? Here are a few fun twists:
-
Berry Mix: Swap half the peaches for fresh blueberries or raspberries. The sweet-tart berries complement the peaches beautifully!
-
Spice It Up: Add a hint of nutmeg or some grated fresh ginger for a spicy kick that balances the sweetness of the peaches.
-
Chocolate Drizzle: Drizzle melted dark chocolate over your baked cruffins for a decadent touch that is sure to impress.
-
Nutty Crunch: Sprinkle some chopped pecans or almonds over the filling before folding to add a delightful crunch.
-
Vegan Alternative: Use vegan puff pastry and substitute the egg wash with almond milk or a plant-based egg option for a delicious vegan treat.
Chef’s Notes
I can’t help but smile every time I pull out my muffin tin at the thought of how this recipe has evolved. The concept of cruffins is a fun one—first pioneered in a bakery many years ago, I was immediately inspired to embrace the idea and adapt it into my own style. They’ve become a favorite little indulgence in our home! I love finding new flavors to fill them with, ranging from fruity to savory, and they never disappoint at gatherings or picnics.
One time, I decided to experiment and didn’t quite seal the edges properly; the filling overflowed, creating a sweet, sticky mess! But instead of a disaster, it turned into a deliciously messy moment that we all laughed about. Sometimes the best moments in the kitchen are the unplanned ones.
FAQs and Troubleshooting
1. Why are my cruffins not rising?
- Make sure your puff pastry is well-chilled before baking and has been rolled out to the right thickness. If it’s too warm, it may not puff up as expected. And remember, a busy oven can lead to uneven cooking, so give them space to rise!
2. My filling leaked during baking; what went wrong?
- This can happen if the filling is too watery. Make sure you allow the peach mixture to sit long enough for the cornstarch to absorb the juices. Additionally, sealing the pastry well should help prevent leakage!
3. Can I use frozen peaches?
- Absolutely! If using frozen peaches, thaw and drain them thoroughly before mixing with other ingredients. This helps to keep the filling from becoming too watery.
4. How long will these last?
- These cruffins are best enjoyed fresh, but you can store leftovers in an airtight container at room temperature for up to 2 days. To reheat, warm them slightly in the oven to retain that beautiful flakiness.
Nutritional Info (Optional)
Note: Nutritional information will vary based on brands and specific ingredients used. Here’s a general estimate per cruffin:
- Calories: 180
- Total Fat: 10g
- Saturated Fat: 3g
- Cholesterol: 35mg
- Sodium: 45mg
- Total Carbohydrates: 22g
- Dietary Fiber: 1g
- Sugars: 6g
- Protein: 2g
And there you have it, my friends—a delicious recipe for Peach Pie Cruffins that’s sure to become a treasured addition to your baking roster. Let the love of summer peaches light up your kitchen, and enjoy creating beautiful moments around your table. Remember, cooking is all about sharing joy, so don’t forget to invite some friends over to share these indulgent treats! Happy baking! 🥳✨
PrintPeach Pie Cruffins

A delightful twist on classic peach pie, combining croissant layers with juicy peach filling in a fun cruffin form.
- Prep Time: 15 minutes
- Cook Time: 25 minutes
- Total Time: 40 minutes
- Yield: 6 servings 1x
- Category: Dessert
- Method: Baking
- Cuisine: American
- Diet: Vegetarian
Ingredients
- 1 package of puff pastry
- 2 cups fresh peaches, diced
- 1/2 cup sugar
- 1 tablespoon cornstarch
- 1 teaspoon vanilla extract
- 1/2 teaspoon cinnamon
- 1 egg (for egg wash)
- Powdered sugar for dusting (optional)
Instructions
- Preheat the oven to 375°F (190°C).
- Combine peaches, sugar, cornstarch, vanilla, and cinnamon in a bowl.
- Let the mixture sit for 10-15 minutes.
- Unroll the puff pastry sheet on a lightly floured surface.
- Cut the pastry into rectangles, aiming for about 6.
- Spoon the peach mixture into the center of each rectangle.
- Fold the pastry around the filling and crimp the edges.
- Brush the tops with the egg wash.
- Bake for about 20-25 minutes until golden brown.
- Cool for 5-10 minutes before dusting with powdered sugar.
Notes
Serve warm or at room temperature, optionally with whipped cream or ice cream.
Nutrition
- Serving Size: 1 cruffin
- Calories: 180
- Sugar: 6g
- Sodium: 45mg
- Fat: 10g
- Saturated Fat: 3g
- Unsaturated Fat: 4g
- Trans Fat: 0g
- Carbohydrates: 22g
- Fiber: 1g
- Protein: 2g
- Cholesterol: 35mg
Keywords: Peach, Dessert, Cruffin, Baking, Summer