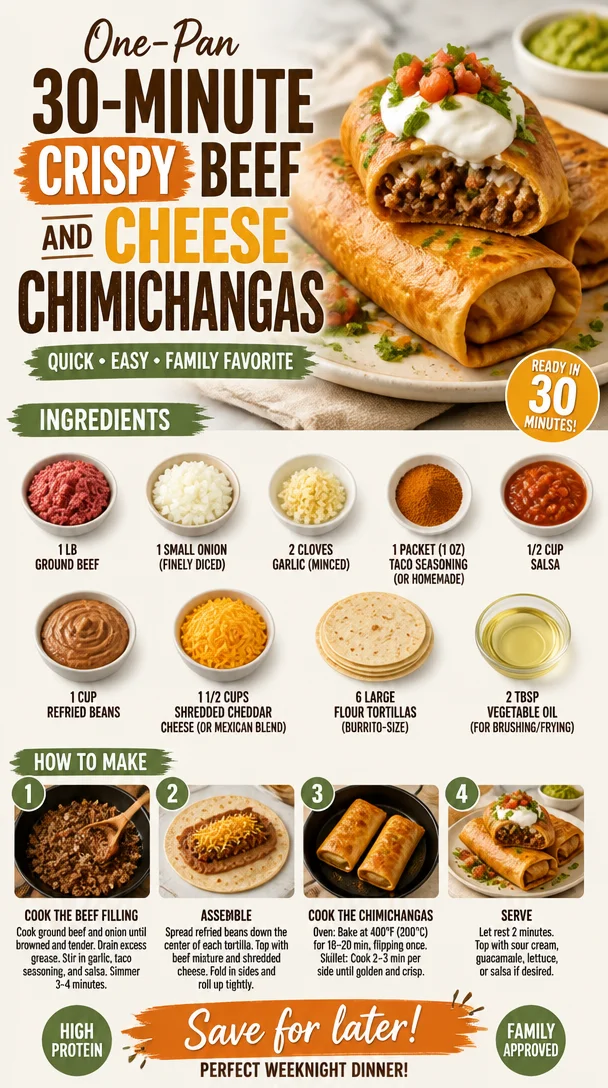
One-Pan 30-Minute Crispy Beef and Cheese Chimichangas
Beef and Cheese Chimichangas: A Family Favorite
Hey there, fellow food enthusiasts! Welcome back to Ivory Apron, your happy kitchen oasis where cooking feels elegant but never intimidating. Today, we’re diving into a dish that’s not just delicious—it’s packed with personal memories and a whole lot of flavor. Get ready to learn how to make the ultimate Beef and Cheese Chimichangas that will have everyone at your table asking for seconds.
Introduction
Chimichangas may have originated in the Southwestern United States, but in my kitchen, they feel like a warm embrace from the family. This dish is not just a recipe; it’s a celebration of flavors, people, and unforgettable moments. When you take a bite of a perfectly crispy chimichanga filled with seasoned beef, gooey cheese, and warm flavors, it’s a party in your mouth, and trust me, you’ll want to host this fiesta again and again!
Picture this: it’s Friday night, and my family gathers around the table, laughter bouncing off the walls, as I plate up golden, crispy chimichangas, fresh from the skillet. I’ve made a big batch, and each one is filled with ground beef, onions, cheese, and just the right amount of salsa to make things interesting. I remember my mom teaching me how to roll them just right, so the filling stays inside—that was the secret!
You can serve these beauties with a side of guacamole, a drizzle of sour cream, or even a fresh pico de gallo. They’re versatile, they’re comforting, and they turn any weeknight dinner into an occasion worth celebrating. Let’s not waste any time; grab your apron and let’s cook!
Personal Story
One of my fondest memories growing up involves my mom’s chimichangas. Every Sunday, she would pull out her trusty cast-iron skillet and set the mood with some tangy salsa and fresh guacamole ready to go. I remember standing on a tiny stool, my hands eagerly hovering around as I watched her expertly brown the tortillas, then filling them with seasoned beef and cheese before rolling them up like little warm presents.
My favorite part? The sizzle that filled the kitchen as they fried to a perfect golden brown! The best part was not just the eating (though that was certainly a highlight) but the stories shared around the table—stories of her childhood and mine, laughter and connection that lasted long after the plates were clean. These chimichangas weren’t just food; they were a symbol of home, comfort, and love. Now, I’m excited to share this joyful recipe with you so you can create those same happy memories in your kitchen!
Ingredients
Here’s what you’ll need to make these irresistible Beef and Cheese Chimichangas:
-
1 lb ground beef
A classic filling that’s both hearty and satisfying. You can substitute with ground turkey or chicken for a lighter option. -
1 small onion (finely diced)
Onion adds great flavor and sweetness to the filling. If you’re in a pinch, you can use shallots or even onion powder. -
2 cloves garlic (minced)
Fresh garlic gives a beautiful aromatic touch. In a hurry? Garlic powder can serve in a pinch—just use about ½ teaspoon. -
1 packet (1 oz) taco seasoning (or homemade)
Taco seasoning brings a punch of flavor! You can either buy a packet or make your own with spices like cumin, chili powder, and paprika. -
½ cup salsa
Salsa adds moisture and tanginess. Feel free to use your favorite store-bought brand or homemade salsa for freshness! -
1 cup refried beans
These provide a creamy texture and a little protein boost! For a vegetarian option, you can substitute with black beans or additional veggies. -
1½ cups shredded cheddar cheese (or Mexican blend)
Cheese makes everything better! Feel free to experiment with other cheeses like Monterey Jack or even queso blanco. -
6 large flour tortillas (burrito-size)
A sturdy tortilla holds your fillings well. You can also opt for whole grain tortillas or corn tortillas if gluten is a concern. -
2 tbsp vegetable oil (for brushing/frying)
Oil creates that crispy texture we all crave. If you’re looking for healthier options, try using avocado oil or even baking them instead of frying!
Step-by-Step Instructions
Let’s get cooking! Follow these steps, and you’ll be enjoying delightful chimichangas in no time:
-
Cook the Beef Mixture
In a large skillet, heat a drizzle of oil over medium heat. Add the finely diced onion and sauté until soft and translucent (about 3-4 minutes). Then, add the minced garlic and cook for another minute until fragrant. -
Add the Ground Beef
Next, add your ground beef, breaking it apart with a spatula. Cook until browned and no longer pink (about 6-8 minutes). Don’t forget to drain any excess fat—nobody likes greasy chimichangas! -
Season the Beef
Once the beef is cooked, sprinkle your taco seasoning over it and mix well. Pour in the salsa and refried beans. Stir until combined and heated through. Let this savory mixture simmer for a couple of minutes, allowing the flavors to meld together beautifully. -
Add Cheese
Remove the skillet from heat and fold in 1 cup of the shredded cheese until it gets melty and gooey. This is where the magic happens! -
Prepare the Tortillas
Lay out your flour tortillas on a clean surface, and place about 1/3 cup of the beef mixture in the center of each one. Fold in the sides and then roll it up like a burrito, making sure it’s nice and snug—no one likes a leaky chimichanga! -
Fry or Bake?
Now, here comes the fun part! If you’re frying, heat vegetable oil in a large skillet over medium-high heat. Once hot, add the chimichangas seam side down and cook for about 3-4 minutes per side until they turn golden brown and crispy. If you prefer baking, brush them with a little oil and place them seam side down on a baking sheet in a preheated oven at 425°F (220°C) for 20-25 minutes, flipping halfway. -
Garnish and Serve
Once they’re perfectly golden, remove the chimichangas from the oil (or oven) and let them drain on a paper towel. Sprinkle any remaining cheese over the top while they’re still hot, and serve with your favorite sides!
Serving Suggestions
Now that you’ve made these crispy delights, it’s time to show them off! Place your chimichangas on a large, colorful platter and add toppings of your choice—think diced avocado, fresh cilantro, or a drizzle of sour cream. If you’re feeling fancy, a sprinkle of queso fresco or a squeeze of lime can elevate them even further. Enjoy them with a side of fresh salsa and chips, or serve them alongside a light salad for a balanced meal!
Recipe Variations
Don’t hesitate to get creative! Here are some fun twists you can try on these chimichangas:
- Vegetarian version: Swap the ground beef for a mixture of beans, lentils, and veggies such as bell peppers and zucchini for a hearty vegetarian option.
- Spicy kick: Add diced jalapeños or a splash of hot sauce to the filling for that extra heat!
- Cheesy delights: Mix in different cheeses like pepper jack for a bit of spice.
- Breakfast chimichangas: Fill them with scrambled eggs, spicy sausage, and cheese for a delicious breakfast treat!
- Sweet twist: Try a dessert version! Fill tortillas with nut butter, bananas, and chocolate chips, then fry and sprinkle with powdered sugar.
Chef’s Notes
Making chimichangas has always been a fun family affair in my kitchen. Sometimes I’ll invite friends over, and we’ll all take turns rolling them up, laughing and sharing stories about our cooking mishaps. Just the other day, I was trying a new folding technique I’d seen online, and it went all wrong—think of a comical kitchen disaster! But you know what? Even the mishaps lead to delicious outcomes. That’s the beauty of cooking!
As I’ve perfected this recipe over the years, I’ve learned that it’s all about having fun in the kitchen. Whether you’re making them for a special occasion or just a cozy weeknight dinner, know that the laughter and love you put into these chimichangas are the secret ingredients!
FAQs and Troubleshooting
1. My chimichangas fell apart while frying, what went wrong?
Make sure to roll them tightly and tuck in the sides as you roll to prevent leaks. If they’re not sealed well, they may break apart in the oil.
2. Can I make these ahead of time?
Absolutely! You can prepare the filling a day in advance and just roll and fry them when you’re ready. You could also freeze them after assembling—just fry directly from frozen, adding a couple of extra minutes to the cooking time.
3. Why are my chimichangas not crispy?
Ensure the oil is hot enough when you add the chimichangas—if it’s not, they tend to absorb the oil and become soggy. A proper frying temperature is key!
4. Can I bake chimichangas instead of frying?
Definitely! Baking is a healthier alternative. Just brush them with a little oil before placing them in the oven for that golden color.
Nutritional Info (if applicable)
These Beef and Cheese Chimichangas are hearty and fulfilling, making them a satisfying dinner option! On average, one chimichanga contains around 350–400 calories, depending on specific ingredient choices and portion sizes. Pair with veggies or a side salad to enhance your meal’s nutritional content.
So there you have it—everything you need to make your time in the kitchen unforgettable while enjoying every bite! I hope this Beef and Cheese Chimichanga recipe becomes a favorite in your own home, just like it is in mine. Happy cooking, and don’t forget to gather around your beautiful table with the people you love. Until next time, keep chasing those flavors!
PrintBeef and Cheese Chimichangas
Deliciously crispy chimichangas filled with seasoned ground beef and gooey cheese, perfect for family gatherings.
- Prep Time: 15 minutes
- Cook Time: 30 minutes
- Total Time: 45 minutes
- Yield: 6 servings 1x
- Category: Main Course
- Method: Frying or Baking
- Cuisine: Mexican
- Diet: None specified
Ingredients
- 1 lb ground beef
- 1 small onion (finely diced)
- 2 cloves garlic (minced)
- 1 packet (1 oz) taco seasoning
- ½ cup salsa
- 1 cup refried beans
- 1½ cups shredded cheddar cheese
- 6 large flour tortillas (burrito-size)
- 2 tbsp vegetable oil (for brushing/frying)
Instructions
- Cook the Beef Mixture: In a large skillet, heat a drizzle of oil over medium heat. Add the finely diced onion and sauté until soft and translucent (about 3-4 minutes). Then, add the minced garlic and cook for another minute until fragrant.
- Add the Ground Beef: Next, add your ground beef, breaking it apart with a spatula. Cook until browned and no longer pink (about 6-8 minutes). Don’t forget to drain any excess fat.
- Season the Beef: Once the beef is cooked, sprinkle taco seasoning over it and mix well. Pour in salsa and refried beans. Stir until combined and heated through.
- Add Cheese: Remove the skillet from heat and fold in 1 cup of the shredded cheese until it gets melty and gooey.
- Prepare the Tortillas: Lay out tortillas on a clean surface, and place about 1/3 cup of the beef mixture in the center of each. Fold in the sides and roll it up like a burrito.
- Fry or Bake: If frying, heat vegetable oil over medium-high heat and add chimichangas seam side down, cooking for about 3-4 minutes per side until golden brown. To bake, brush with oil and place seam side down on a baking sheet in a preheated oven at 425°F (220°C) for 20-25 minutes.
- Garnish and Serve: Once golden, remove chimichangas from the oil (or oven) and let drain on a paper towel. Sprinkle remaining cheese on top while hot and serve with your favorite sides.
Notes
Feel free to customize the filling with other ingredients or spices to suit your taste.
Nutrition
- Serving Size: 1 chimichanga
- Calories: 375
- Sugar: 3g
- Sodium: 500mg
- Fat: 20g
- Saturated Fat: 8g
- Unsaturated Fat: 7g
- Trans Fat: 0g
- Carbohydrates: 30g
- Fiber: 3g
- Protein: 20g
- Cholesterol: 60mg
Keywords: chimichangas, beef, cheese, Mexican cuisine, comfort food
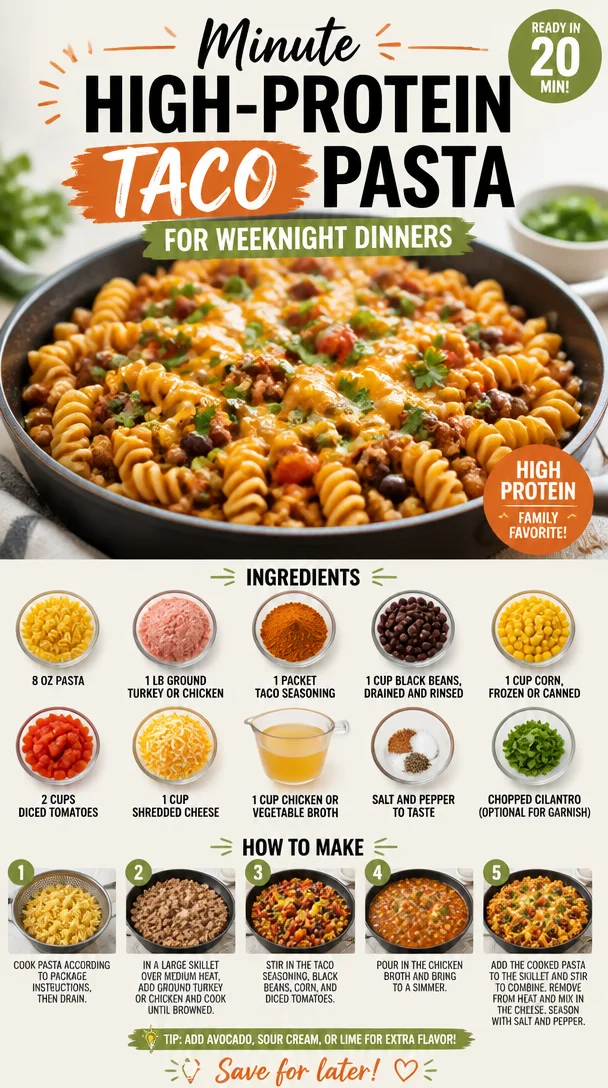
Minute High-Protein Taco Pasta for Weeknight Dinners
High Protein Taco Pasta: A Flavorful, Comforting Bowl of Joy
Hello, food lovers! Today, I’m thrilled to share a recipe that brings together the joy of tacos and the comforting heart of pasta. Yes, you guessed it right—I’m talking about High Protein Taco Pasta! This dish is not only packed with flavor, but it’s also a fantastic way to sneak in some extra protein. Let’s dive in and create a bowl of goodness that’s bound to impress.
A Little Story to Set the Mood
Let me take you back to my childhood, where food wasn’t just about sustenance but also about experiences. Every Friday night was taco night at my house, and my mom was the reigning queen of the taco. We’d gather around the table, ingredients spread out like a colorful canvas—crunchy tortillas, seasoned meat, loads of toppings, and always a story or two that went along with them. That’s where my love for mixing flavors and creating something new began, leading me to concoct this amazing taco pasta dish.
One night, in a moment of creativity (or maybe it was just hunger), I decided to swap tortillas for pasta! The result was a flavor explosion that combined my love for both. My friends and family were skeptical at first, but once they tried it, it was love at first bite. This dish quickly became a staple in my home, reminding me that food is always more than just ingredients—it’s about gathering, sharing, and creating memories.
Now, it’s your turn to create your own taco night twist, and I promise—this bowl of High Protein Taco Pasta will be the star of your table!
The Ingredients You’ll Need
Here’s what you’ll need to whip up this magical dish:
- 8 oz pasta: Any type you love works well! Whole wheat or protein-enriched pasta can boost the health benefits.
- 1 lb ground turkey or chicken: Lean and high in protein; you can also use plant-based options like lentils for a vegetarian version.
- 1 packet taco seasoning: Store-bought is convenient, but you can make your own with chili powder, cumin, garlic powder, and a pinch of salt.
- 1 cup black beans: Rinsed and drained for a tasty protein punch. Feel free to swap them for kidney beans if you prefer.
- 1 cup corn: Frozen, canned, or fresh—just make sure it’s sweet and delicious!
- 2 cups diced tomatoes: Fresh is great, but canned works too. Opt for fire-roasted tomatoes for extra flavor!
- 1 cup shredded cheese: I recommend cheddar or Mexican blend. Use a dairy-free cheese for a lactose-free twist.
- 1 cup chicken or vegetable broth: This elevates the dish’s base. Homemade broth makes all the difference, but store-bought is super convenient.
- Salt and pepper to taste: Don’t be shy! Seasoning is key to bringing flavors alive.
- Chopped cilantro (optional for garnish): A fresh touch that livens up the flavors. Skip it if you’re not a fan!
With these beautiful ingredients on your counter, let’s get ready to cook!
Step-by-Step Instructions
-
Boil the Pasta: Begin by bringing a pot of salted water to a rolling boil. Once it’s bubbling, add your choice of pasta and cook according to package instructions until al dente (usually 7-9 minutes). Remember to stir occasionally to prevent sticking. Chef’s tip: save about half a cup of pasta water before draining! It’ll help bring everything together later.
-
Cook the Meat: In a large skillet, heat a drizzle of olive oil over medium heat. Add the ground turkey or chicken, and break it apart with a wooden spoon. Sauté until browned and no longer pink, about 5-7 minutes. Hot tip: Add a pinch of salt while cooking to enhance the meat’s flavor right from the start!
-
Taco Seasoning Time: After the meat is browned, sprinkle in the taco seasoning and mix well. Cook for another 1-2 minutes to let the spices bloom. A little secret: If you have some extra heat-loving friends, add a dash of cayenne pepper for some spice!
-
Add The Goodies: Toss in the black beans, corn, and diced tomatoes into the skillet. Pour in the broth and stir everything together. Cheesy hack: If you want creaminess, you can add a bit of cream cheese or sour cream at this point for a richer dish!
-
Combine the Pasta: Now, add that glorious pasta you cooked earlier to the skillet. Toss everything together gently, and if it looks a bit dry, add some of that reserved pasta water. The goal is a deliciously cohesive mixture that clings to the noodles. Chef’s note: don’t be afraid to mix it up! Use a pair of tongs or even your hands for the best combination!
-
Cheesy Finish: Before serving, sprinkle the shredded cheese on top, cover with a lid, and let it sit for a few minutes on low heat until the cheese is melted and gooey. This takes the dish to the next level.
Serving Suggestions
To plate, spoon the cheesy taco pasta into vibrant bowls and garnish with the optional chopped cilantro. A little sprinkle of extra cheese on top never hurts! Serve it alongside a simple salad or some tortilla chips for a crunchy contrast. Don’t forget to pour yourself a refreshing drink to accompany this delightful dish. Cheers!
Recipe Variations
Here are some fun twists you can try with this recipe:
- Spicy Taco Pasta: Add jalapeños or diced green chilies for an extra kick!
- Vegetarian Version: Swap the meat for textured vegetable protein (TVP) or chickpeas for a delicious plant-based option.
- Creamy Taco Pasta: Mix in a cup of cream cheese or Greek yogurt before serving for a creamy texture.
- Mexican Street Corn Style: Stir in some crumbled feta, lime juice, and cilantro for a fun take on Elote (Mexican street corn).
- Zucchini Noodles: Replace pasta with spiralized zucchini for a low-carb alternative that’s equally delicious.
Chef’s Notes
This recipe has traveled with me through many occasions—family dinners, gatherings with friends, and even second-day lunches where it tastes even better! I often switch up the beans and add whatever veggies I have lying around, which makes this recipe versatile and adaptable to what’s in your pantry. I once used leftover roasted chicken, and it turned out fabulous!
Remember, cooking is all about experimenting, and something delicious often comes from what might seem like an accident. The kitchen is your playground—don’t be afraid to get a little messy and creative!
FAQs and Troubleshooting
Q: Can I use gluten-free pasta?
Absolutely! Gluten-free pasta works well in this recipe. Just pay attention to the cooking times, as they can vary.
Q: What if I don’t have taco seasoning?
No worries! You can make your own using chili powder, cumin, garlic powder, onion powder, and a bit of salt. Adjust to taste!
Q: How can I store leftovers?
Keep any leftovers in an airtight container in the fridge for up to 4 days. Just reheat gently when you’re ready to enjoy.
Q: My pasta turned out too mushy, what happened?
This can happen if the pasta is overcooked or if you didn’t reserve enough cooking water. Make sure to keep an eye on it during cooking and remember to save that starchy water for sauce consistency.
Nutritional Info
(Basic nutritional info per serving, based on the recipe as written:)
- Calories: 450
- Protein: 35g
- Carbohydrates: 45g
- Fat: 15g
Remember to adjust based on your specific ingredients!
Conclusion
There you have it—the perfect High Protein Taco Pasta that combines the rich flavors of taco night with the heartiness of pasta. I hope you enjoyed cooking along with me! Remember, as you gather around your table with friends and family, that love and intention are the secret ingredients in every meal. Until next time, happy cooking!
Let’s tie on our aprons and continue to create moments that bring us together. Cheers! 🍽️
PrintHigh Protein Taco Pasta
A flavorful twist combining the joys of tacos and pasta, packed with protein.
- Prep Time: 15 minutes
- Cook Time: 20 minutes
- Total Time: 35 minutes
- Yield: 4 servings 1x
- Category: Main Course
- Method: Cooking
- Cuisine: Mexican
- Diet: High Protein
Ingredients
- 8 oz pasta (whole wheat or protein-enriched recommended)
- 1 lb ground turkey or chicken (or lentils for vegetarian)
- 1 packet taco seasoning
- 1 cup black beans (rinsed and drained)
- 1 cup corn (frozen, canned, or fresh)
- 2 cups diced tomatoes (fresh or canned)
- 1 cup shredded cheese (cheddar or Mexican blend)
- 1 cup chicken or vegetable broth
- Salt and pepper to taste
- Chopped cilantro (optional for garnish)
Instructions
- Boil the pasta in salted water according to package instructions until al dente.
- Cook the meat in a skillet with olive oil until browned.
- Sprinkle in taco seasoning and cook for an additional 1-2 minutes.
- Add black beans, corn, diced tomatoes, and broth to the skillet, stirring together.
- Combine the cooked pasta with the mixture, adding reserved pasta water as needed.
- Sprinkle shredded cheese on top, cover, and let melt.
Notes
This dish is versatile and can be customized with ingredient swaps or additions like cream cheese for a creamy version.
Nutrition
- Serving Size: 1 serving
- Calories: 450
- Sugar: 5g
- Sodium: 600mg
- Fat: 15g
- Saturated Fat: 7g
- Unsaturated Fat: 5g
- Trans Fat: 0g
- Carbohydrates: 45g
- Fiber: 10g
- Protein: 35g
- Cholesterol: 70mg
Keywords: pasta, taco, high protein, comfort food, quick recipe
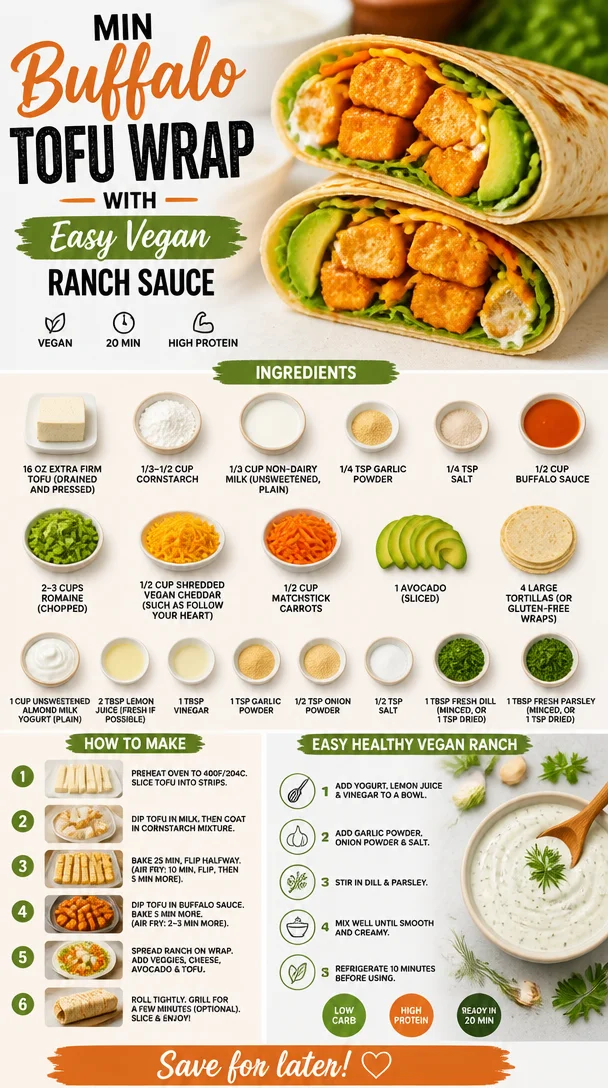
Min Buffalo Tofu Wrap with Easy Vegan Ranch Sauce
Buffalo Tofu Wraps with Easy Vegan Ranch
Introduction
Hey there, my food-loving friends! Today, I’m so excited to share a recipe that has become a staple in my kitchen: Buffalo Tofu Wraps with Easy Vegan Ranch. This dish is a glorious celebration of bold flavors and vibrant colors, perfect for those busy weeknights or when you want something delightful yet stress-free. It’s also a fantastic choice for gatherings, impressing both vegans and non-vegans alike.
I remember the first time I tried buffalo tofu wings at a local vegan cafe. I was skeptical at first; tofu wings? Really? But one bite changed everything. The crispy coating, the tangy heat of the buffalo sauce, and the cool creaminess of ranch dressing created a flavor explosion that had me craving more. It struck me that these components could easily transition into a wrap to make it even more filling and shareable! So, armed with the idea, I rushed home to create my own version of this dish. Spoiler alert: it was a huge hit, and I still make it regularly for get-togethers and casual dinners alike.
You’re going to love how straightforward this recipe is, with steps that lead you to quickly pop these wraps on the table. Let’s roll up our sleeves, tie on our aprons, and get cooking!
Personal Story
Let me take you back to a crisp fall evening a few years ago. I had invited over friends for a casual movie night, and I wanted to whip up something both satisfying and a bit different. Inspired by my newfound love for buffalo tofu, I decided to create these wraps. As the scent of frying tofu filled my kitchen, it brought back memories of my childhood, when my family would gather around the dinner table, sharing stories and laughter.
As I prepared, I laughed at how my kitchen was a delightful mess—spices scattered, veggie peels on the counter, and the sound of laughter escaping the living room where my friends waited in anticipation. The first wrap came together beautifully, and as I took my first satisfying bite, it felt like I was elevating not only my cooking but also the joy of gathering together. These wraps quickly became a beloved dish in my recipe repertoire, and they’ll surely find a special place in yours too!
Ingredients
Here’s what you’ll need to whip up these scrumptious Buffalo Tofu Wraps, along with a few insights to keep in mind:
-
16 oz block extra firm tofu (drained and pressed)
Tofu is a fantastic protein source and perfect for absorbing flavors. Extra firm is essential for that crispy texture. If you can’t find extra firm, you can use firm—just be careful to press it well to remove excess moisture. -
1/3–1/2 cup cornstarch
This is the magic ingredient for achieving a crispy coating. If you prefer a different texture, you can substitute with arrowroot powder or tapioca starch. -
1/3 cup non-dairy milk (unsweetened, plain)
This helps create a light batter. Almond milk, soy milk, or oat milk work like a charm! Choose whatever fits your dietary preference. -
1/4 tsp garlic powder
A must-have for flavor! If you adore garlic, feel free to double this. -
1/4 tsp salt
Essential for enhancing flavors. Adjust according to your taste! -
1/2 cup buffalo sauce
Choose your favorite brand! Want less heat? Pick a milder buffalo sauce or mix in a bit of ketchup. -
2-3 cups romaine (chopped)
Fresh, crunchy greens add a refreshing touch to the wraps. Feel free to swap with spinach or kale if you prefer. -
1/2 cup shredded vegan cheddar (such as Follow Your Heart)
This gives a cheesy flavor without the dairy. You can skip this if you want a lighter wrap or use nutritional yeast as a flavor enhancer. -
1/2 cup matchstick carrots
These add a beautiful crunch! If you’re short on time, buy pre-packaged matchstick carrots. -
1 avocado (sliced)
Creamy and rich, avocados elevate the meal. For a little zing, add a squeeze of lime over the slices! -
4 large tortillas (or gluten-free wraps)
Whole wheat or gluten-free, both work beautifully. A thicker wrap ensures everything holds together well. -
1 cup unsweetened almond milk yogurt (plain)
This is the base for your ranch dressing. Plain coconut yogurt or soy yogurt would work here too. -
2 tbsp lemon juice (fresh if possible)
A fresh-squeezed lemon gives brightness to your dressing. If you don’t have lemon, vinegar is a solid substitute. -
1 tbsp vinegar
This adds a tangy depth; apple cider vinegar is an excellent option. -
1 tsp garlic powder
More garlic goodness! Add more if you’re a fan. -
1/2 tsp onion powder
For a savory punch! Feel free to use fresh diced onion instead. -
1/2 tsp salt
To taste; you can also use garlic salt for added flavor. -
1 tbsp fresh dill (minced, or 1 tsp dried)
Fresh dill brings brightness; you can switch it out for fresh chives or parsley. -
1 tbsp fresh parsley (minced, or 1 tsp dried)
A touch of freshness that completes the ranch. Use any herbs that excite you!
Step-by-Step Instructions
Let’s dive into the cooking process! Follow along, and I promise, it’ll be a breeze.
-
Prepare Your Tofu
Start by draining your tofu and pressing it to remove excess moisture. The longer you press, the firmer the tofu will be! I usually wrap it in a clean kitchen towel or paper towels, place it on a plate, and set something heavy on top for about 15-20 minutes. -
Cut the Tofu
Once pressed, slice the tofu into bite-sized cubes or sticks. A sharp knife is your best friend here! -
Make the Tofu Coating
In a medium bowl, combine the cornstarch, garlic powder, and salt. Add the non-dairy milk and mix until smooth. Your batter should be thick enough to coat the tofu, so adjust your cornstarch and milk ratio accordingly if needed! -
Coat the Tofu
Toss the tofu pieces in this batter until well-coated. This step is crucial for that amazing crispiness; make sure each piece gets its fair share! -
Heat the Oil
In a large non-stick skillet, pour in a tablespoon of oil and heat it over medium heat. You want it hot enough that when you drop a small piece of tofu in, it sizzles! -
Fry the Tofu
Carefully add the battered tofu to the hot skillet in a single layer. Cook for about 3-4 minutes on each side until golden and crispy. Avoid overcrowding the pan; you want that lovely sear! -
Coat with Buffalo Sauce
Once your tofu is golden, remove it from the skillet and place it in a bowl. Pour the buffalo sauce over the tofu, tossing gently to coat each piece. This is where the magic happens! -
Prepare the Vegan Ranch
In a small bowl, mix the almond yogurt, lemon juice, vinegar, garlic powder, onion powder, salt, dill, and parsley. Whisk until combined and creamy. Take a moment to taste it and adjust the seasoning to your liking—this ranch is all about personalization! -
Assemble the Wraps
Take one tortilla and layer it with a handful of romaine, a big scoop of your buffalo tofu, a sprinkle of carrots, a slice of avocado, and a drizzle of your vegan ranch. Don’t be shy—fill it up! -
Wrap It Up
Fold the sides of the tortilla in toward the center, then roll it up from the bottom. Voila! Your wrap is ready to enjoy. If you’re feeling fancy, you can toast it in the skillet for an extra crispy touch.
Serving Suggestions
To serve these tasty wraps, cut them in half on a diagonal and display them on a colorful platter. You could accompany them with extra vegan ranch for dipping, sliced veggies, or even a simple green salad. It’s all about creating your own little spread that makes your gathering feel special!
Recipe Variations
Feeling adventurous? Here are a few exciting twists to keep your wraps fresh and flavorful:
- Spicy Buffalo Ranch: Add a few drops of hot sauce to your vegan ranch for an extra kick!
- Mediterranean Twist: Swap the buffalo sauce for a garlic tahini sauce and add roasted red peppers and olives for a fresh twist.
- BBQ Tofu Wrap: Change it up by using BBQ sauce instead of buffalo for a sweeter, smoky flavor.
- Add More Greens: Throw in some spinach, arugula, or even some sprouts for added freshness and nutrition.
- Stuff more veggies: Sautéed bell peppers or onions are a fantastic addition!
Chef’s Notes
Each time I make these Buffalo Tofu Wraps, I’m reminded of how versatile they are. I love to experiment with whatever’s in my fridge! Sometimes I’ll throw in roasted zucchini or even some quinoa for an added texture. Oh! And back to the frying—my first attempts were a little messy, with oil spattering everywhere. I learned to keep my calm (and my splatter guard handy!). The journey in this cooking adventure is what makes it fun—embrace those kitchen oops moments!
FAQs and Troubleshooting
Q: My tofu didn’t get crispy—what went wrong?
A: This could be from moisture left in the tofu—make sure you press out as much water as possible and try to fry it in a single layer in the pan.
Q: Can I bake the tofu instead of frying it?
A: Absolutely! Preheat your oven to 400°F (200°C), place the coated tofu on a baking sheet lined with parchment paper, and bake for about 25-30 minutes, flipping halfway through.
Q: Is there a gluten-free option for the wraps?
A: Yes! Just use gluten-free tortillas or wraps, and you’re all set!
Q: Can I make the ranch dressing ahead of time?
A: Yes! The vegan ranch can be made a day in advance; it’ll actually develop even more flavor as it sits. Just keep it in an airtight container in the fridge.
Nutritional Info
Per wrap (without additional veggies):
- Calories: Approximately 350
- Protein: 15g
- Carbohydrates: 38g
- Fat: 15g
- Fiber: 6g
These Buffalo Tofu Wraps are not only delicious but offer a satisfying balance of protein, healthy fats, and lots of fresh vegetables.
So there you have it, folks! Buffalo Tofu Wraps with Easy Vegan Ranch—easy to make, a joy to serve, and oh-so-delicious. Tie on that apron, gather your ingredients, and create some culinary magic! Happy cooking!
PrintBuffalo Tofu Wraps with Easy Vegan Ranch
Delicious and healthy Buffalo Tofu Wraps filled with crispy tofu, fresh veggies, and creamy vegan ranch dressing.
- Prep Time: 20 minutes
- Cook Time: 20 minutes
- Total Time: 40 minutes
- Yield: 4 servings 1x
- Category: Main Course
- Method: Frying
- Cuisine: American
- Diet: Vegan
Ingredients
- 16 oz block extra firm tofu (drained and pressed)
- 1/3–1/2 cup cornstarch
- 1/3 cup non-dairy milk (unsweetened, plain)
- 1/4 tsp garlic powder
- 1/4 tsp salt
- 1/2 cup buffalo sauce
- 2–3 cups romaine (chopped)
- 1/2 cup shredded vegan cheddar
- 1/2 cup matchstick carrots
- 1 avocado (sliced)
- 4 large tortillas (or gluten-free wraps)
- 1 cup unsweetened almond milk yogurt (plain)
- 2 tbsp lemon juice (fresh if possible)
- 1 tbsp vinegar
- 1 tsp garlic powder
- 1/2 tsp onion powder
- 1/2 tsp salt
- 1 tbsp fresh dill (minced, or 1 tsp dried)
- 1 tbsp fresh parsley (minced, or 1 tsp dried)
Instructions
- Prepare Your Tofu: Start by draining your tofu and pressing it to remove excess moisture for about 15-20 minutes.
- Cut the Tofu: Slice the tofu into bite-sized cubes or sticks.
- Make the Tofu Coating: In a bowl, combine cornstarch, garlic powder, and salt. Add non-dairy milk and mix until smooth.
- Coat the Tofu: Toss tofu pieces in the batter until well-coated.
- Heat the Oil: In a non-stick skillet, heat a tablespoon of oil over medium heat until hot.
- Fry the Tofu: Cook the battered tofu for about 3-4 minutes on each side until golden and crispy.
- Coat with Buffalo Sauce: Toss the cooked tofu in a bowl with buffalo sauce until well-coated.
- Prepare the Vegan Ranch: Mix almond yogurt, lemon juice, vinegar, garlic powder, onion powder, salt, dill, and parsley in a bowl until creamy.
- Assemble the Wraps: Layer romaine, buffalo tofu, carrots, avocado, and ranch on a tortilla.
- Wrap It Up: Fold the sides in and roll from the bottom. Optionally, toast in the skillet for extra crispiness.
Notes
Feel free to customize the wraps with additional veggies or sauces!
Nutrition
- Serving Size: 1 wrap
- Calories: 350
- Sugar: 5g
- Sodium: 400mg
- Fat: 15g
- Saturated Fat: 2g
- Unsaturated Fat: 10g
- Trans Fat: 0g
- Carbohydrates: 38g
- Fiber: 6g
- Protein: 15g
- Cholesterol: 0mg
Keywords: tofu wraps, buffalo tofu, vegan ranch, easy recipe
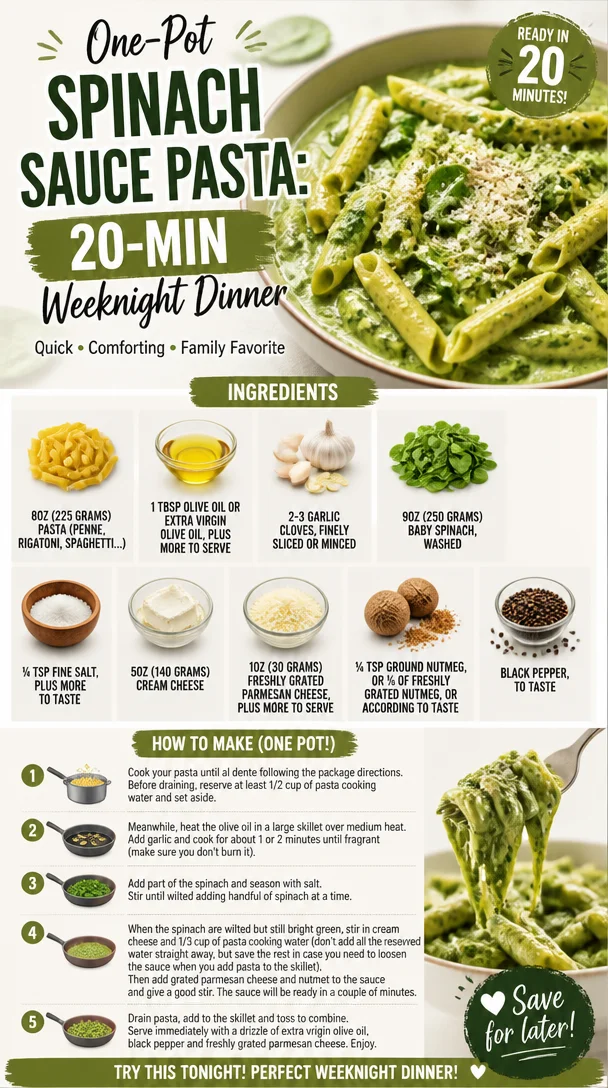
One-Pot Spinach Sauce Pasta: 20-Min Weeknight Dinner
Creamy Spinach Sauce Pasta: Elegant, Easy, and Effortlessly Delicious
Hey there, fellow foodies! Welcome back to my cozy corner of the kitchen, where we’re all about creating meals that feel luxurious but are oh-so-simple to whip up. Today, I’m excited to share one of my favorite recipes that captures the essence of elegance and comfort: Pasta with Spinach Sauce. This dish is deliciously creamy, green, and ready to impress your guests or make your weeknight dinner feel a little more special. Ready to dive in? Let’s set the table!
A Taste of Nostalgia
Let me take you back to a sunny afternoon spent at my grandmother’s house. I was about eight years old, standing on a stool, peering over the kitchen counter where she was deftly moving about, preparing one of her famous pasta dishes. The air was filled with the fragrant scent of sautéed garlic, and I remember the vibrant green of the spinach as she tossed it into the pan.
"Cooking is like magic," she said, with a twinkle in her eye, "You take a few simple ingredients and turn them into something extraordinary." Watching her toss the spinach into a glorious sauce and combine it with the freshly cooked pasta was nothing short of spellbinding.
That memory stuck with me, not just for the culinary skills my grandmother imparted but for the love and warmth that filled her kitchen. Today, when I cook this Creamy Spinach Sauce Pasta, I channel that same joy and sparkle. It’s not just about the food; it’s about creating beautiful moments around the table, just like Grandma used to do.
Ingredients
Here’s what you’ll need for this delightful pasta dish:
-
8oz (225 grams) pasta (penne, rigatoni, spaghetti, or your favorite)
- Use any pasta shape you love! Just keep an eye on the cooking time as different shapes can vary.
-
1 Tbsp olive oil or extra virgin olive oil
- A drizzle of high-quality olive oil adds richness. Don’t have olive oil? Any light oil will do in a pinch, but it’s worth the upgrade!
-
2-3 garlic cloves, finely sliced or minced
- Garlic is our aromatic superstar here! Want a milder flavor? Try roasting the garlic first for a sweeter profile.
-
9oz (250 grams) baby spinach, washed
- Fresh spinach is best for this recipe, but frozen spinach can work too; just make sure it’s thawed and drained.
-
¼ tsp fine salt, plus more to taste
- Seasoning is key! Start with less and add to your preference as you taste.
-
5oz (140 grams) cream cheese
- This creates that luscious creaminess! Don’t have cream cheese? You could use mascarpone or ricotta as alternatives.
-
1oz (30 grams) freshly grated parmesan cheese, plus more to serve
- Fresh cheese enhances flavor! If you’re in a pinch, pre-grated can work but won’t melt as beautifully.
-
¼ tsp ground nutmeg, or ⅓ of freshly grated nutmeg, or according to taste
- A tiny pinch of nutmeg warms up the flavors. Not a fan? Leave it out or switch it up with a dash of smoked paprika for a different vibe.
-
Black pepper, to taste
- Freshly cracked pepper adds a lovely kick! For a spicier twist, try red pepper flakes.
Step-by-Step Instructions
-
Cook the Pasta
Bring a large pot of salted water to a boil. Add your pasta and cook according to package instructions until al dente. Make sure to reserve about 1 cup of pasta water before draining! This starchy goodness will help you create a beautiful sauce. -
Sauté the Garlic
In a large skillet, heat the olive oil over medium heat. Once shimmering, add the minced garlic. Sauté for about 1-2 minutes, or until fragrant and golden. Be careful not to burn it—it can turn bitter! -
Add the Spinach
Toss in the baby spinach and sprinkle with salt. Cook, stirring occasionally, until the spinach wilts down, about 3-4 minutes. The vibrant color will remind you of sun-soaked days! -
Create the Sauce
Reduce the heat to low. Stir in the cream cheese until it melts and forms a creamy mixture. Add the reserved pasta water a little at a time until you reach your desired sauce consistency. This is where the magic happens! -
Flavor it Up
Add the grated parmesan and nutmeg. Stir until everything is well combined. Taste the sauce and adjust salt and pepper as needed. A good chef always tastes! -
Combine Pasta and Sauce
Add the drained pasta directly to the skillet. Toss gently to coat the pasta evenly with the spinach sauce. If the sauce is too thick, add more reserved pasta water, a tablespoon at a time. -
Serve
Plate your pasta, adding more parmesan and a drizzle of olive oil on top for that finishing touch. A sprinkle of pepper or a few fresh herbs could also brighten the plate.
Serving Suggestions
For an elegant presentation, twirl the pasta into a nest using a fork and spoon and place it in the center of your favorite plate. Add a light drizzle of olive oil and a sprinkle of fresh parmesan for a polished look. You can also toss in some toasted pine nuts or a squeeze of fresh lemon juice to brighten the flavors and make it pop!
Recipe Variations
Here are a few fun twists you can take with this dish:
-
Add Protein: Toss in some grilled chicken or shrimp for a heartier meal. You could also stir in some cannellini beans for a veggie-packed option!
-
Go Vegan: Substitute cream cheese with cashew cream (soaked blended cashews with a little water) and nutritional yeast instead of parmesan for a creamy sauce.
-
Pack a Punch: Incorporate sun-dried tomatoes or roasted red peppers for a burst of flavor and color.
-
Herb it Up: Fresh or dried herbs like basil or thyme can add an aromatic layer to your sauce. Sprinkle some in while cooking for a fragrant finish!
-
Extra Greens: Mix in other greens like kale or arugula for a nutritional boost and a flavor twist.
Chef’s Notes
This recipe has come a long way since my grandmother taught me the basics of cooking! Over time, I’ve learned the importance of balance in flavors and the joy of using fresh ingredients. I remember the first time I made this dish for a dinner party. I was nervous, but when my friends took their first bites, the compliments poured in. That moment solidified my belief that food is a love language, and a simple pasta can bring people together. Every time I make this dish, I reminisce about those early days in the kitchen with Grandma—her laughter echoing with each turn of the spatula.
FAQs and Troubleshooting
Q: My sauce seems too thick; how can I fix it?
A: No worries! Just add in a couple of tablespoons of reserved pasta water until it reaches your desired consistency.
Q: I ran out of garlic! Can I skip it?
A: While garlic adds tons of flavor, you can substitute with shallots or even a pinch of garlic powder in a pinch for a hint of that beloved garlic taste.
Q: Is it possible to make the sauce ahead of time?
A: Absolutely! You can make the sauce ahead and store it in the fridge. Just warm it up gently before adding the pasta and adjust the consistency with pasta water as needed.
Q: Can I freeze leftovers?
A: It’s best to consume this dish fresh; however, if you have leftovers, you can freeze the sauce separately. Just know that the texture may change a bit when thawed.
Nutritional Info (Optional)
For a single serving of this creamy spinach pasta:
- Calories: Approximately 450
- Protein: 14g
- Carbs: 55g
- Fat: 20g
- Fiber: 3g
This could vary based on the pasta choice and additional ingredients, of course!
And there you have it, my delightful Pasta with Spinach Sauce! I hope it brings as much joy to your kitchen as it does to mine. Remember, cooking is about having fun in the kitchen and enjoying the company of loved ones. So, grab your apron, gather around the table, and let’s keep those beautiful kitchen moments alive together. Happy cooking!
PrintCreamy Spinach Sauce Pasta
An elegant and easy pasta dish featuring a creamy spinach sauce that is perfect for impressing guests or enjoying a cozy dinner at home.
- Prep Time: 15 minutes
- Cook Time: 20 minutes
- Total Time: 35 minutes
- Yield: 4 servings 1x
- Category: Main Course
- Method: Baking
- Cuisine: Italian
- Diet: Vegetarian
Ingredients
- 8oz (225 grams) pasta (penne, rigatoni, spaghetti, or your favorite)
- 1 Tbsp olive oil or extra virgin olive oil
- 2–3 garlic cloves, finely sliced or minced
- 9oz (250 grams) baby spinach, washed
- ¼ tsp fine salt, plus more to taste
- 5oz (140 grams) cream cheese
- 1oz (30 grams) freshly grated parmesan cheese, plus more to serve
- ¼ tsp ground nutmeg, or according to taste
- Black pepper, to taste
Instructions
- Cook the Pasta: Bring a large pot of salted water to a boil. Add your pasta and cook according to package instructions until al dente. Reserve about 1 cup of pasta water before draining.
- Sauté the Garlic: In a large skillet, heat the olive oil over medium heat. Add the minced garlic and sauté for about 1-2 minutes until fragrant and golden.
- Add the Spinach: Toss in the baby spinach and sprinkle with salt. Cook, stirring occasionally, until the spinach wilts down, about 3-4 minutes.
- Create the Sauce: Reduce the heat to low. Stir in the cream cheese until it melts and forms a creamy mixture. Add the reserved pasta water gradually until reaching your desired consistency.
- Flavor it Up: Add the grated parmesan and nutmeg. Stir until well combined and adjust seasoning as needed.
- Combine Pasta and Sauce: Add the drained pasta directly to the skillet. Toss gently to coat the pasta evenly with the sauce.
- Serve: Plate your pasta, adding more parmesan and a drizzle of olive oil on top. Optionally, sprinkle with pepper or fresh herbs.
Notes
For an elegant presentation, twirl the pasta into a nest and top with additional parmesan and a drizzle of olive oil. You can also add toasted pine nuts or a squeeze of fresh lemon juice.
Nutrition
- Serving Size: 1 serving
- Calories: 450
- Sugar: 5g
- Sodium: 400mg
- Fat: 20g
- Saturated Fat: 10g
- Unsaturated Fat: 8g
- Trans Fat: 0g
- Carbohydrates: 55g
- Fiber: 3g
- Protein: 14g
- Cholesterol: 35mg
Keywords: Creamy, Spinach, Pasta, Easy Dinner, Vegetarian Recipe
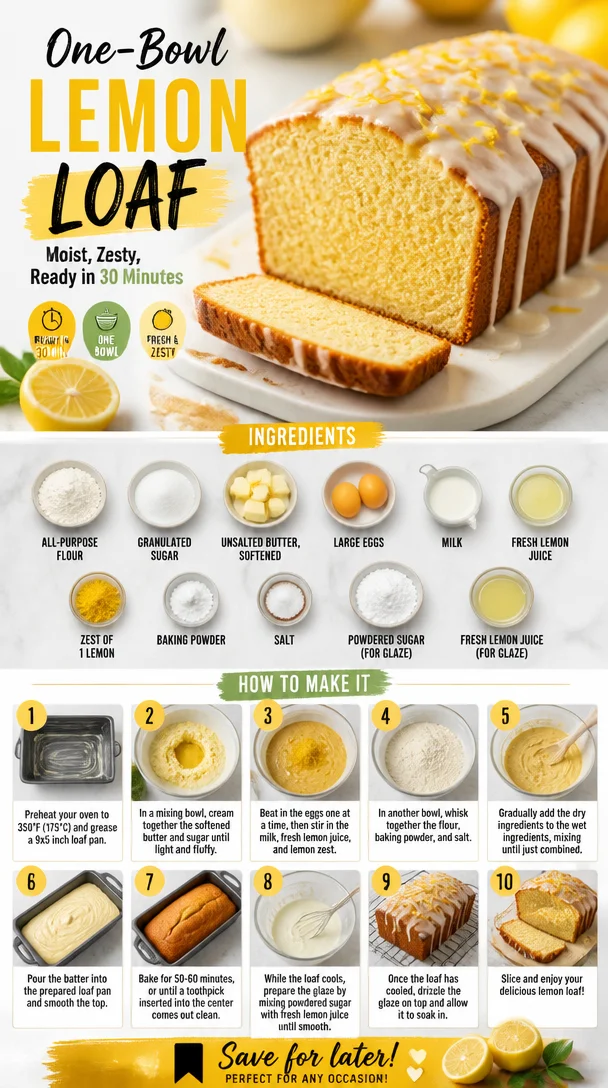
One-Bowl Lemon Loaf: Moist, Zesty, Ready in 30 Minutes
The Ultimate Easy Moist Lemon Loaf: Brighten Your Day with This Delightful Treat
Hello, lovely people! If you’re anything like me, there’s something undeniably uplifting about the aroma of fresh lemons wafting through the kitchen. Today, I’m thrilled to share with you the secret to creating an easy, moist Lemon Loaf that’s sure to brighten any day. Whether it’s a gray afternoon, a weekend brunch, or an unexpected visit from friends, this lemon loaf offers the perfect balance of sweetness and citrus tang, turning any moment into a celebration. So, let’s roll up our sleeves and dive in!
Personal Story: A Zesty Memory
Before I delve into the nitty-gritty of this delightful recipe, let me share a special memory that ties me to lemon loaf. Growing up, my grandmother had a knack for creating comfort with her baking—a warm loaf of lemony goodness was often on the kitchen counter when I visited. There was one summer when my cousins and I would race back from the pool, eager to see if that zesty scent was indeed wafting through the air. The moment we spotted the golden crust, we’d practically tackle each other in our quest for the first slice.
One sunny afternoon, I decided to surprise her and bake my own lemon loaf, using her trusty old recipe. With flour dust flying and laughter echoing throughout the kitchen, I learned not just about the ingredients but about joy, connection, and sharing good food with the people we love. Once the loaf slid out of the oven, its irresistible aroma brought everyone running, just like in the good old days. In that moment, I discovered my passion for baking—and the magic of lemons.
Ingredients
Now, let’s gather our ingredients for this beautifully simple Lemon Loaf:
- 1 1/2 cups all-purpose flour: This is the foundation of your cake. You can substitute it with gluten-free flour for a gluten-free option, just make sure to use a blend designed for baking.
- 1 cup granulated sugar: Provides just the right sweetness. For a healthier take, feel free to swap in coconut sugar or use a sweetener like stevia.
- 1/2 cup unsalted butter, softened: Adds moisture and rich flavor. If you’re looking for a dairy-free option, substitute with coconut oil or vegan butter.
- 2 large eggs: They bring structure and leavening to the loaf. For an egg-free option, use flax eggs (1 tablespoon ground flaxseed mixed with 3 tablespoons water per egg).
- 1/2 cup milk: This adds tenderness. You can use any milk of your choice — almond, oat, or soy — for a non-dairy alternative.
- 1/4 cup fresh lemon juice: This is where the magic happens! For the best flavor, always use fresh lemon juice instead of bottled.
- Zest of 1 lemon: The zest enhances the lemon flavor and gives a lovely fragrance. If you can’t find fresh lemons, try using lemon extract, but use it sparingly.
- 1 1/2 teaspoons baking powder: This helps the loaf rise. If you’re in a pinch, baking soda can work too—just adjust the acidity by adding a little vinegar or yogurt.
- 1/2 teaspoon salt: Balances the sweetness and enhances flavor.
- 1 cup powdered sugar (for glaze): Smooth and sweet, this glaze takes the loaf over the top. Don’t worry, you can reduce the amount if you prefer less sweetness.
- 2-3 tablespoons fresh lemon juice (for glaze): This tangy addition to the glaze is what makes it so irresistible!
Step-by-Step Instructions
Let’s get into the fun part! Follow these steps to whip up your Easy Moist Lemon Loaf:
-
Preheat the oven to 350°F (175°C). This ensures your oven is hot enough to create that lovely crust on the loaf.
-
Prepare your pan: Grease a 9×5 inch loaf pan with some butter or cooking spray, and then line the bottom with parchment paper for easy removal later.
-
Mix the dry ingredients: In a medium bowl, whisk together the flour, baking powder, and salt. This step helps distribute the baking powder evenly, which is key for even rising throughout your loaf.
-
Cream the butter and sugar: In a large bowl, beat the softened butter and granulated sugar together using a mixer on medium speed until the mixture is light and fluffy. This usually takes around 3-5 minutes. The air you incorporate here will create a light texture in the loaf.
-
Add eggs one at a time: Beat in the eggs one at a time, making sure to mix well after each addition. Your batter should be smooth and creamy at this stage. Don’t forget to scrape down the sides of the bowl to include all the buttery goodness!
-
Incorporate the lemon juice and zest: Pour in the fresh lemon juice and lemon zest. Trust me, the aroma will be heavenly! Mix just until everything is combined.
-
Alternate dry ingredients and milk: Gradually add the flour mixture in three additions, alternating with the milk. Start and finish with the flour. Mix until just incorporated—overmixing can lead to a dense loaf.
-
Pour the batter into the prepared pan: Use a spatula to spread the batter evenly. Don’t worry if it doesn’t look perfect; it’ll spread out as it bakes.
-
Bake: Pop it in the preheated oven and bake for about 50-60 minutes, or until a toothpick inserted into the center comes out clean. Your kitchen will fill with a delightful lemony scent as it bakes!
-
Cool: Once baked, let it cool in the pan for about 10 minutes before transferring it to a wire rack to cool completely. This helps maintain the moisture—trust me, it’s worth the wait!
-
Make the glaze: While the loaf is cooling, whisk together the powdered sugar and fresh lemon juice in a small bowl until smooth. You may adjust the consistency by adding more sugar or lemon juice as needed.
-
Glaze the cooled loaf: Once the loaf has cooled, drizzle the glaze over the top, allowing it to cascade down the edges. Lovely, right? Let it sit for a few minutes before slicing for the best presentation.
Serving Suggestions
When serving your Lemon Loaf, a simple plating style works wonders. Cut into generous slices and arrange them on a beautiful serving platter. To elevate the presentation, sprinkle a bit of grated lemon zest on top and add some fresh berries or a sprig of mint for that extra touch of elegance. Serve with a hot cup of tea or a refreshing glass of lemon-infused water to complement the flavors perfectly.
Recipe Variations
Looking to switch it up? Here are a few creative twists you can try:
- Blueberry Lemon Loaf: Fold in 1 cup of fresh or frozen blueberries into the batter for a burst of berry goodness.
- Lemon Poppy Seed Loaf: Add 2 tablespoons of poppy seeds to the batter for that classic combination.
- Lemon Raspberry Swirl: Layer fresh raspberries into your batter for a stunning red and yellow swirl.
- Lemon Parmesan Savory Loaf: Replace some of the sugar with grated Parmesan and add fresh herbs for a savory take on the loaf.
- Gluten-free Lemon Loaf: Substitute the all-purpose flour with a 1:1 gluten-free baking blend for a gluten-free version.
Chef’s Notes
Over the years, my lemon loaf has evolved, and you know what? Each iteration came with a new funny kitchen story! Once, I completely miscalculated and added salt instead of sugar. The shocked look on my family’s faces at the first bite is something I’ll never forget! But from that mistake, I learned how oversights can lead to new recipes, and if you can laugh at the kitchen mishaps, you’re halfway to becoming a culinary pro.
FAQs and Troubleshooting
-
Why did my lemon loaf not rise?
This can happen if your baking powder is expired. Always check the expiration date before using; fresh leavening agents are key! -
My lemon loaf is too dense, what went wrong?
Overmixing can lead to a dense texture. Be gentle when combining the ingredients, especially after adding the flour. -
How do I store leftovers?
Wrap your lemon loaf tightly in plastic wrap or foil and store it in an airtight container at room temperature for up to 3 days. For longer preservation, freeze individual slices! -
Can I make this vegan?
Absolutely! Substitute the eggs with flax eggs and use plant-based milk and butter for a vegan-friendly loaf.
Nutritional Info
While it varies based on substitutions, here’s a rough estimate per slice (based on 12 servings):
- Calories: 220
- Total Fat: 9g
- Saturated Fat: 5g
- Carbohydrates: 32g
- Fiber: 1g
- Sugars: 16g
- Protein: 3g
There you have it—a delightful Easy Moist Lemon Loaf that’s bound to become a cherished recipe in your kitchen! I hope you enjoy this labor of love, and don’t forget to gather your loved ones around the table to share this scrumptious treat. Happy baking, and always remember: good food isn’t just about the dishes you create—it’s about the memories you make. Cheers!
PrintEasy Moist Lemon Loaf
A delightful lemon loaf that balances sweetness and citrus tang, perfect for any occasion.
- Prep Time: 15 minutes
- Cook Time: 60 minutes
- Total Time: 75 minutes
- Yield: 12 servings 1x
- Category: Dessert
- Method: Baking
- Cuisine: American
- Diet: Vegetarian
Ingredients
- 1 1/2 cups all-purpose flour
- 1 cup granulated sugar
- 1/2 cup unsalted butter, softened
- 2 large eggs
- 1/2 cup milk
- 1/4 cup fresh lemon juice
- Zest of 1 lemon
- 1 1/2 teaspoons baking powder
- 1/2 teaspoon salt
- 1 cup powdered sugar (for glaze)
- 2–3 tablespoons fresh lemon juice (for glaze)
Instructions
- Preheat the oven to 350°F (175°C).
- Prepare your pan by greasing a 9×5 inch loaf pan and lining the bottom with parchment paper.
- Mix the dry ingredients in a medium bowl: whisk together the flour, baking powder, and salt.
- Cream the butter and sugar in a large bowl using a mixer until light and fluffy, for about 3-5 minutes.
- Add eggs one at a time, mixing well after each addition.
- Incorporate the lemon juice and zest into the mixture.
- Alternate adding the flour mixture and milk in three additions, starting and finishing with the flour.
- Pour the batter into the prepared pan.
- Bake for about 50-60 minutes, or until a toothpick comes out clean.
- Cool in the pan for about 10 minutes before transferring to a wire rack.
- Make the glaze by whisking together powdered sugar and lemon juice until smooth.
- Glaze the cooled loaf and let it sit for a few minutes before slicing.
Notes
Store leftovers wrapped in plastic wrap or foil for up to 3 days at room temperature.
Nutrition
- Serving Size: 1 slice
- Calories: 220
- Sugar: 16g
- Sodium: 150mg
- Fat: 9g
- Saturated Fat: 5g
- Unsaturated Fat: 3g
- Trans Fat: 0g
- Carbohydrates: 32g
- Fiber: 1g
- Protein: 3g
- Cholesterol: 30mg
Keywords: lemon loaf, quick bread, citrus dessert
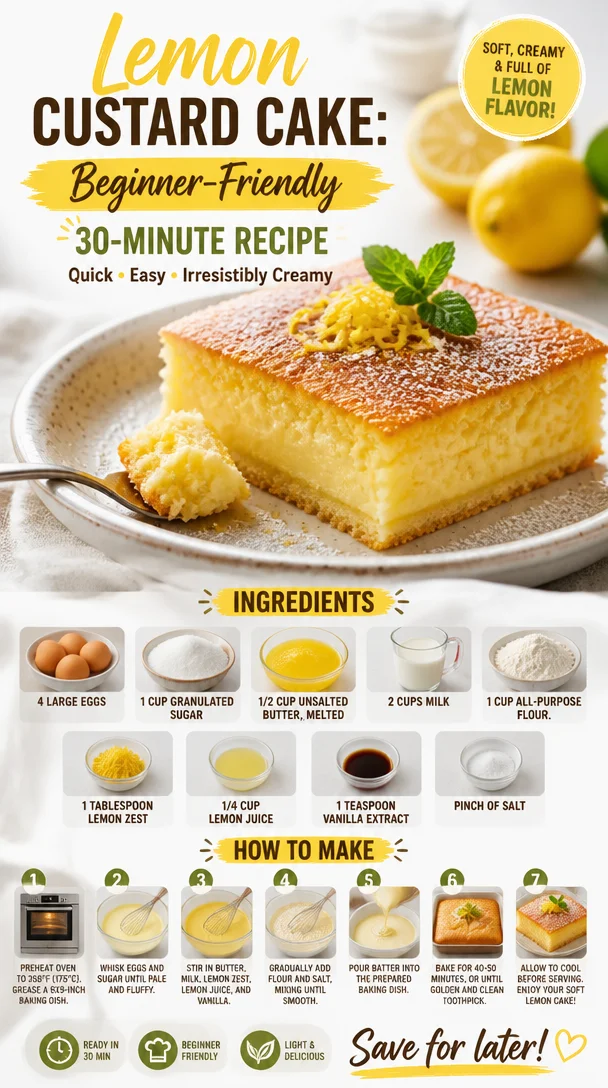
Lemon Custard Cake: Beginner-Friendly 30-Minute Recipe
The Magic Lemon Custard Cake: A Sweet Slice of Happiness
Hello, lovely foodies! I’m thrilled to have you here, ready to embark on a culinary adventure that will tantalize your taste buds and brighten your day. Today, we’re diving into the sunshine-filled world of my Magic Lemon Custard Cake. This delightful treat harmoniously blends the zesty brightness of lemons with the comforting textures of creamy custard and airy cake, making it a showstopper for any occasion.
Now, you might wonder, what’s so magical about this cake? Well, let me tell you—a whimsical phenomenon occurs as this dessert bakes. All it takes is a few simple ingredients that come together to create a cake on top with a luscious custard layer beneath. Sounds dreamy? It is! Plus, it’s easy enough for weeknight baking and elegant enough to wow your dinner guests. So, let’s get started on this delightful journey together!
A Nostalgic Slice of My Childhood
This recipe has a special place in my heart, reminiscent of warm summer afternoons spent in my grandmother’s kitchen. Every year, as lemons ripened on the tree in her backyard, she would whip up her special lemon custard dessert that filled the house with a fragrant, zesty aroma. I can still picture her, apron tied, grating fresh lemon zest and squeezing juice, while I anxiously perched on a stool, eager to help.
"Cooking is love made visible," she would say with a twinkle in her eye. That sentiment has stuck with me over the years and inspired my journey into the kitchen. The love, laughter, and deliciousness shared around her kitchen table became my foundation for hosting and creating memorable meals. Whenever I make this Magic Lemon Custard Cake, I feel like I’m channeling my grandma’s spirit, filling my own home with warmth and sweetness.
Ingredients
To whip up this delightful cake, you’ll need the following ingredients:
-
4 large eggs
Eggs provide structure and richness. If you’re looking to make a vegan version, aquafaba (the liquid from canned chickpeas) can work wonders! -
1 cup granulated sugar
Sweetness is key! You can substitute with coconut sugar or a sugar alternative like erythritol for a lower-calorie option. -
1/2 cup unsalted butter, melted
Unsalted butter lends a rich flavor. If you prefer a dairy-free version, coconut oil or vegan butter would do the trick. -
2 cups milk
Regular dairy milk is my go-to, but almond or oat milk are excellent dairy-free alternatives. Just ensure they’re unsweetened! -
1 cup all-purpose flour
This forms the base of the cake. For a gluten-free version, you can swap it out for a 1:1 gluten-free flour blend. -
1 tablespoon lemon zest
Zesty and fragrant, lemon zest brightens the flavor. Always use organic lemons to avoid pesticides. -
1/4 cup lemon juice
Fresh lemon juice is a must for that signature citrus kick. Bottled lemon juice lacks the bright freshness! -
1 teaspoon vanilla extract
Adds depth and a warm flavor. Always opt for pure vanilla extract over artificial for the best results. -
Pinch of salt
Just a little salt balances the sweetness and enhances overall flavor. Don’t skip it!
With these ingredients, you’re on your way to creating something magical!
Step-by-Step Instructions
Now, let’s get into the nitty-gritty of baking this beautiful cake. Follow these simple steps for a dessert that will impress!
-
Preheat Your Oven:
Start by preheating your oven to 350°F (175°C). This ensures that your cake will bake evenly and rise beautifully. -
Prepare the Baking Dish:
Grease an 8×8-inch baking dish with butter or non-stick spray. For an extra touch, consider lining the bottom with parchment paper for easy removal later. -
Whisk the Eggs and Sugar:
In a large mixing bowl, combine the eggs and granulated sugar. Use a whisk to mix them until you see a pale and frothy mixture. This step is crucial for creating a light texture! -
Add Melted Butter:
Slowly drizzle the melted butter into your egg-sugar mixture while whisking. This combines the rich flavors without cooking the eggs. Make sure the butter is not too hot; otherwise, it’ll scramble your eggs! -
Incorporate Milk:
Pour in the milk, followed by the lemon juice and zest, and vanilla extract. Stir gently until combined. The mixture should smell incredible at this point—tangy and sweet! -
Sift in the Flour and Salt:
Gradually sift in the flour and the pinch of salt. Use a spatula to fold everything together gently. Don’t overmix; a few flour streaks are okay. -
Pour the Batter into Your Dish:
Gently pour the batter into your prepared baking dish. The batter might look thin, but don’t worry; it will bake into the magical layers we’re aiming for! -
Bake Your Cake:
Place your dish in the center of the preheated oven and bake for about 45–50 minutes. The top should be a lovely golden brown, while the center is set but still a bit wobbly. The magic happens as it cools! -
Cool and Chill:
Once baked, allow your cake to cool at room temperature for around 15 minutes. Then, refrigerate for at least 2 hours (or overnight) to let it set. Patience is key here, trust me! -
Serve with Flair:
Once chilled, cut into squares and serve! You can dust powdered sugar on top or add some whipped cream for an extra touch of indulgence.
Serving Suggestions
When it comes to serving your Magic Lemon Custard Cake, presentation is key. Place a square on a pretty dessert plate and dust it with powdered sugar for a classic look. Add a dollop of freshly whipped cream or a scoop of vanilla ice cream alongside it.
For a sprinkle of color and freshness, garnish with a few fresh berries or mint leaves. Not only does this elevate the look, but the acidity of the berries complements the cake beautifully. Trust me; your guests will rave about this delightful treat!
Recipe Variations
To add a twist to the traditional Magic Lemon Custard Cake, here are some fun variations to consider:
- Lime Custard Cake: Swap lemons for limes for a zesty twist that’s equally delicious.
- Berry Swirl: Fold in a handful of fresh berries (like blueberries or raspberries) into the batter before baking for added sweetness and flavor.
- Coconut Custard Cake: Add shredded coconut to the batter for a tropical flair!
- Herbal Infusion: Infuse the milk with fresh thyme or rosemary for an unexpected herbal note that elevates the citrus flavor.
- Chocolate Drizzle: For chocolate lovers, a drizzle of melted dark chocolate on top is heavenly.
Each variation brings its special touch to this beloved cake—feel free to get creative and make it your own!
Chef’s Notes
I have to tell you, this Magic Lemon Custard Cake has evolved quite delightfully over the years. Initially, my grandma made it with just a few ingredients and without much fuss, but I’ve had a blast experimenting with it! The first time I tried to add lavender, I ended up overdoing it and the cake smelled more like soap than dessert—what a learning experience that was!
Over time, I’ve embraced its simplicity while finding ways to layer in flavors and textures. It’s an incredibly forgiving recipe, which is what I love about it. Even when I have kitchen mishaps (and I definitely do!), this cake always manages to turn out beautifully—proving that magic happens in the kitchen!
FAQs and Troubleshooting
1. Why did my cake not set properly?
If your cake is still too wobbly after baking, it might need more time in the oven. Every oven is different, so keep an eye on it toward the end of the baking time.
2. Can I make this cake ahead of time?
Absolutely! This cake actually gets better as it sits. I recommend making it a day in advance and letting it chill in the refrigerator overnight.
3. How do I know when the cake is done?
Your cake is ready when the edges are set, and the center has a bit of a jiggle. A toothpick inserted into the center should have moist crumbs, not raw batter.
4. What if I don’t have enough lemons?
No worries! If you’re short on lemons, consider using a mix of lemon and lime juice or even adding a splash of orange juice for a unique twist.
Nutritional Info
If you’re keeping an eye on nutrition, keep in mind that each slice of this Magic Lemon Custard Cake contains approximately:
- Calories: 250
- Fat: 12g
- Carbohydrates: 35g
- Protein: 5g
These values may vary depending on your substitutions and serving sizes, but it’s still a delightful treat worth indulging in!
And there you have it! A delightful journey into the world of Magic Lemon Custard Cake. It’s a recipe that embodies my philosophy of cooking—beautiful, approachable, and full of love. So go ahead, tie on that apron, and let’s create delicious memories together! Happy baking!
PrintMagic Lemon Custard Cake

A delightful cake that combines a zesty lemon flavor with the comforting textures of custard and cake, perfect for any occasion.
- Prep Time: 15 minutes
- Cook Time: 50 minutes
- Total Time: 65 minutes
- Yield: 8 servings 1x
- Category: Dessert
- Method: Baking
- Cuisine: American
- Diet: Vegetarian
Ingredients
- 4 large eggs
- 1 cup granulated sugar
- 1/2 cup unsalted butter, melted
- 2 cups milk
- 1 cup all-purpose flour
- 1 tablespoon lemon zest
- 1/4 cup lemon juice
- 1 teaspoon vanilla extract
- Pinch of salt
Instructions
- Preheat your oven to 350°F (175°C).
- Prepare an 8×8-inch baking dish with butter or non-stick spray.
- Whisk the eggs and sugar until pale and frothy.
- Add the melted butter slowly while whisking.
- Incorporate the milk, lemon juice, zest, and vanilla extract.
- Sift in the flour and salt, folding gently.
- Pour the batter into the prepared baking dish.
- Bake for about 45–50 minutes until golden brown.
- Cool at room temperature for 15 minutes, then refrigerate for at least 2 hours.
- Serve chilled, dusting with powdered sugar if desired.
Notes
Better when made a day in advance. This cake improves as it sits.
Nutrition
- Serving Size: 1 serving
- Calories: 250
- Sugar: 18g
- Sodium: 150mg
- Fat: 12g
- Saturated Fat: 7g
- Unsaturated Fat: 3g
- Trans Fat: 0g
- Carbohydrates: 35g
- Fiber: 1g
- Protein: 5g
- Cholesterol: 150mg
Keywords: lemon cake, dessert, custard, baking, summer dessert, sweet treats
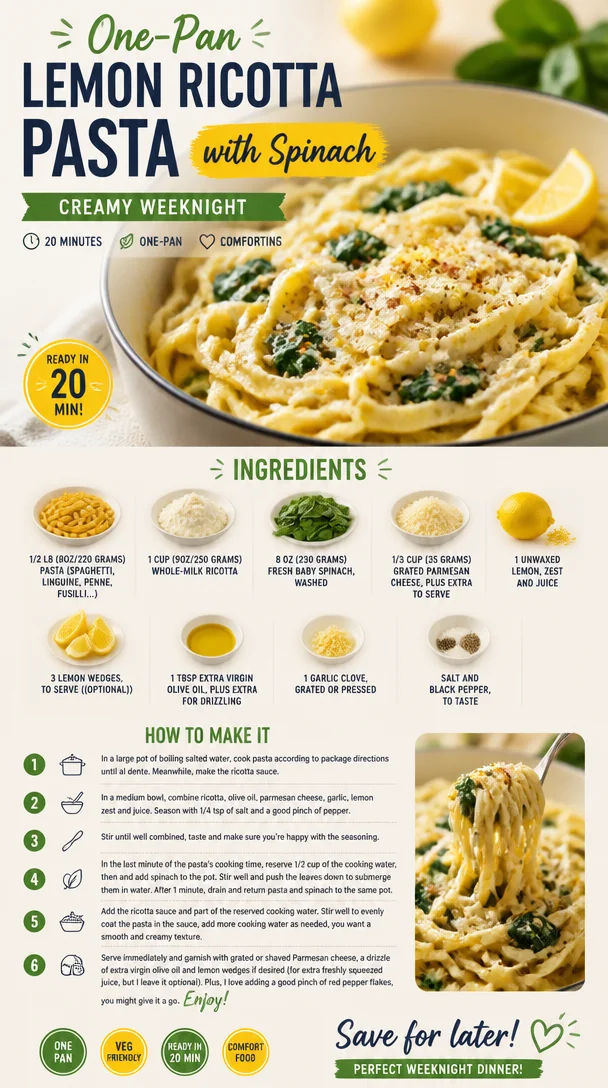
One-Pan Lemon Ricotta Pasta with Spinach (Creamy Weeknight)
Lemon Ricotta Pasta with Spinach: A Delightful Comfort Dish
Welcome to your new favorite weeknight dinner! Today, we’re diving into a light yet oh-so-satisfying recipe that will make you feel like a culinary superstar without breaking a sweat. Picture this: creamy lemon ricotta pasta beautifully intertwined with fresh spinach, topped off with a sprinkle of Parmesan cheese, and drizzled with a hint of olive oil. It’s elegant, it’s delicious, and it’s ready in no time!
As life gets busier, we all crave meals that strike the perfect balance between comfort and convenience. That’s exactly what this dish brings to the table—literally! This Lemon Ricotta Pasta with Spinach is not just a meal; it’s a celebration of simplicity. The flavors are fresh and vibrant, showcasing the best of what the season has to offer. And let’s be honest, who doesn’t love a creamy, dreamy pasta that practically cooks itself while you sip on a glass of wine?
Let’s set the stage: imagine gathering your friends or family, clinking glasses, and making toasts around a table practically bursting with love and flavor. A dish like this will have everyone asking for seconds—and maybe even thirds—while you revel in the compliments. Ready to get started? Grab your apron, and let’s cook something truly delightful together!
Personal Story
Whenever I whip up this Lemon Ricotta Pasta, I’m transported back to those lazy summer evenings spent in my grandmother’s kitchen. She had an unbelievable talent for turning everyday ingredients into gourmet meals that brought everyone together. I remember her teaching me about the virtues of simplicity in cooking, emphasizing that the best dishes often come from fresh ingredients and love, rather than complicated recipes.
One particular memory stands out: we were making a simple pasta dish similar to this one, just as the sun began to set. She had a big bowl of ripe lemons and a bunch of vibrant spinach, and I can still hear her saying, "Savannah, always use fresh ingredients—they make the magic happen." Those were the evenings that forged my love for cooking, and every time I prepare this dish, I feel like she’s there with me, guiding me. So, let’s honor the spirit of those cherished moments as we dive into this beautiful recipe!
Ingredients
Here’s what you’ll need for this zesty Lemon Ricotta Pasta with Spinach:
-
1/2 lb (8oz/220 grams) pasta: Choose any variety you love—spaghetti, linguine, penne, or fusilli all work wonderfully. For extra heartiness, consider using whole wheat or chickpea pasta for a touch of nutty flavor and added nutrition.
-
1 cup (9oz/250 grams) whole-milk ricotta: This is the creamy star of the dish. If you’re looking for a lighter alternative, you can substitute with part-skim ricotta or even goat cheese for a tangy twist.
-
8 oz (230 grams) fresh baby spinach: Packed with nutrients and a delightful pop of color, spinach is the perfect green to toss in. If you’re not a spinach fan, feel free to swap it for other greens like kale or arugula.
-
1/3 cup (35 grams) grated Parmesan cheese: To bring that delicious umami flavor! Pecorino Romano is a great substitute if you like a sharper taste.
-
1 unwaxed lemon: Zest and juice for that refreshing burst of flavor. An unwaxed lemon ensures you can safely use the zest, releasing those fragrant oils. If you can’t find unwaxed, just scrub the lemon thoroughly.
-
3 lemon wedges, to serve (optional): These add a wonderful zest as a garnish for those who crave a little extra lemony goodness.
-
1 Tbsp extra virgin olive oil: A drizzle enhances the flavor and adds a touch of richness. You can use flavored oils, like garlic-infused, for an extra kick.
-
1 garlic clove: Grated or pressed; this will give our dish a lovely aromatic base. If you’re not a fan of raw garlic, roasted garlic would be a wonderful alternative.
-
Salt and black pepper, to taste: Essential for bringing out the flavors. I also love a sprinkle of red pepper flakes if you want to kick it up a notch.
Step-by-Step Instructions
Alright, let’s get cooking! Follow these simple steps to whip up this delightful dish:
Step 1: Cook the Pasta
Start by bringing a large pot of salted water to a boil. You’ll want to make sure it’s salty—think of it like the ocean; it enhances the flavor of the pasta! Once boiling, add your choice of pasta and cook according to package instructions until al dente. It should have a slight bite—perfect for holding onto that creamy sauce!
Chef Tip: Reserve about 1 cup of pasta cooking water before draining. It’s liquid gold for adjusting the sauce later.
Step 2: Prepare the Ricotta Mixture
While your pasta is cooking, grab a large mixing bowl and warmly embrace your ricotta cheese. Add in the zest and juice of the unwaxed lemon, a generous pinch of salt, and freshly cracked black pepper. Stir everything together until you have a beautifully creamy, zesty mixture. Set this aside, as we’ll be incorporating it into the pasta soon.
Chef Hack: For an extra creamy texture, you can blend the ricotta using a hand mixer or food processor. It elevates the dish and makes it even smoother!
Step 3: Sauté the Spinach and Garlic
In a large skillet, heat a tablespoon of extra virgin olive oil over medium heat. Once the oil is shimmering, add the grated garlic. I love the aroma of garlic cooking—it’s like a warm hug in the kitchen! Sauté for about 30 seconds, being careful not to let it brown.
Next, toss in the baby spinach and cook until it wilts, which should only take a couple of minutes. This step is quick, but it intensifies the flavor and keeps the greens vibrant and fresh.
Chef Insight: If you want to add some excitement, try adding sun-dried tomatoes or your favorite sautéed vegetables to this step!
Step 4: Combine Everything in One Bowl
Once the pasta is cooked, drain it (remember to save that reserved pasta water!) and add it directly to the skillet with the sautéed spinach and garlic. Now, it’s time to mix in the ricotta mixture. Stir everything together until every strand of pasta is well-coated, adding a bit of the reserved pasta water, a splash at a time, until you reach your desired creaminess.
Cooking Note: Don’t overdo it with the water; just a little at a time will help create a luscious sauce that clings to the pasta without being soupy.
Step 5: Final Seasoning and Serving
Give your pasta a final taste, ensuring it’s perfectly seasoned. If you like a little more lemony brightness, feel free to squeeze in some more lemon juice, or add an extra pinch of salt and cracked pepper.
Serve the pasta immediately, garnishing each plate with a sprinkle of grated Parmesan and drizzling a bit of high-quality olive oil over the top. If you’re feeling fancy, add a couple of lemon wedges on the side for an extra pop of color and flavor!
Serving Suggestions
Presentation is key! Serve your Lemon Ricotta Pasta in shallow bowls with a twirl of pasta at the center or in a large communal bowl, inviting guests to serve themselves. For an elegant touch, add a sprig of fresh basil or parsley on top. Pair it with a light green salad or some crusty bread to complete the meal. Don’t forget that chilled glass of white wine—perfect for elevating any dinner!
Recipe Variations
Here are some creative twists to elevate your Lemon Ricotta Pasta even further:
-
Lemon Chicken Ricotta Pasta: Add grilled or sautéed chicken for extra protein and a heartier meal.
-
Mushroom Medley: Toss in some sautéed mushrooms for an earthy flavor. Portobello or shiitake work beautifully!
-
Nutty Spinach: Add some toasted pine nuts or walnuts for a delightful crunch and extra nutrition.
-
Herb-Infused: Mix in fresh herbs like basil, dill, or parsley for added freshness and flavor complexity.
-
Vegan Option: Substitute ricotta with a plant-based alternative like cashew cream or a store-bought vegan ricotta for a dairy-free delight.
Chef’s Notes
As much as I adore this Lemon Ricotta Pasta, I have to share a funny story. One evening, I was hosting a dinner party and got so distracted by chatting that I accidentally added way too much lemon zest. Let me tell you, that was an experience! I ended up with a pasta that was a lemon explosion—delicious, but zesty enough to tickle even the boldest taste buds. Now, I always remind myself to taste as I go!
Over time, I’ve made countless iterations of this dish. It has evolved from a simple pasta with cream to this delightful, bright, and flavorful version we enjoy today. Cooking should evolve with us, just like our taste buds!
FAQs and Troubleshooting
-
What if my sauce is too thick?: No problem! Just add a splash of your reserved pasta water gradually until you reach the desired creaminess.
-
Can I make this dish ahead of time?: Absolutely! You can prepare the ricotta mixture and sauté the spinach in advance. Just cook the pasta when you’re ready to serve. Combine everything, and it’ll still be fabulous!
-
What if I accidentally overcooked the pasta?: If it’s a bit mushy, don’t worry too much. Use it in a baked pasta dish, and it’ll still taste great! Just don’t forget to reduce the cooking time next time.
-
Can I use frozen spinach instead of fresh?: Yes! Just thaw and drain the frozen spinach thoroughly before adding it into the dish. The flavor may be slightly different, but it can still work.
Nutritional Info
(For one serving)
- Calories: Approximately 450
- Protein: 15g
- Carbohydrates: 50g
- Fat: 20g
- Fiber: 3g
With a good dose of protein from the ricotta and plenty of vitamins from the spinach, this pasta dish is both satisfying and nourishing!
So there you have it—your guide to whipping up a stunning Lemon Ricotta Pasta with Spinach that’s as approachable as it is elegant! Remember, the beauty of cooking lies in the joy you bring to the table, so don’t hesitate to add your flair. Happy cooking, and may your kitchen always be filled with warmth, laughter, and delicious aromas!
PrintLemon Ricotta Pasta with Spinach
A light and creamy pasta dish that combines lemon ricotta with fresh spinach for a delightful weeknight dinner.
- Prep Time: 10 minutes
- Cook Time: 15 minutes
- Total Time: 25 minutes
- Yield: 4 servings 1x
- Category: Main Course
- Method: Boiling, Sautéing
- Cuisine: Italian
- Diet: Vegetarian
Ingredients
- 1/2 lb (8oz/220 grams) pasta (spaghetti, linguine, penne, or fusilli)
- 1 cup (9oz/250 grams) whole-milk ricotta
- 8 oz (230 grams) fresh baby spinach
- 1/3 cup (35 grams) grated Parmesan cheese
- 1 unwaxed lemon (zest and juice)
- 3 lemon wedges (optional, for serving)
- 1 Tbsp extra virgin olive oil
- 1 garlic clove (grated or pressed)
- Salt and black pepper, to taste
Instructions
- Cook the pasta in a large pot of salted boiling water according to package instructions until al dente.
- Prepare the ricotta mixture by combining ricotta, lemon zest and juice, salt, and pepper in a bowl.
- Heat olive oil in a skillet over medium heat and sauté garlic for about 30 seconds.
- Add the spinach and cook until wilted, then combine it with the drained pasta in the skillet.
- Mix in the ricotta mixture, adding reserved pasta water as needed until creamy.
- Season to taste before serving, garnishing with Parmesan and lemon wedges.
Notes
For extra creaminess, use a hand mixer to blend the ricotta. Reserve pasta water to adjust sauce consistency.
Nutrition
- Serving Size: 1 serving
- Calories: 450
- Sugar: 2g
- Sodium: 300mg
- Fat: 20g
- Saturated Fat: 8g
- Unsaturated Fat: 10g
- Trans Fat: 0g
- Carbohydrates: 50g
- Fiber: 3g
- Protein: 15g
- Cholesterol: 50mg
Keywords: lemon ricotta pasta, spinach pasta, Italian dinner
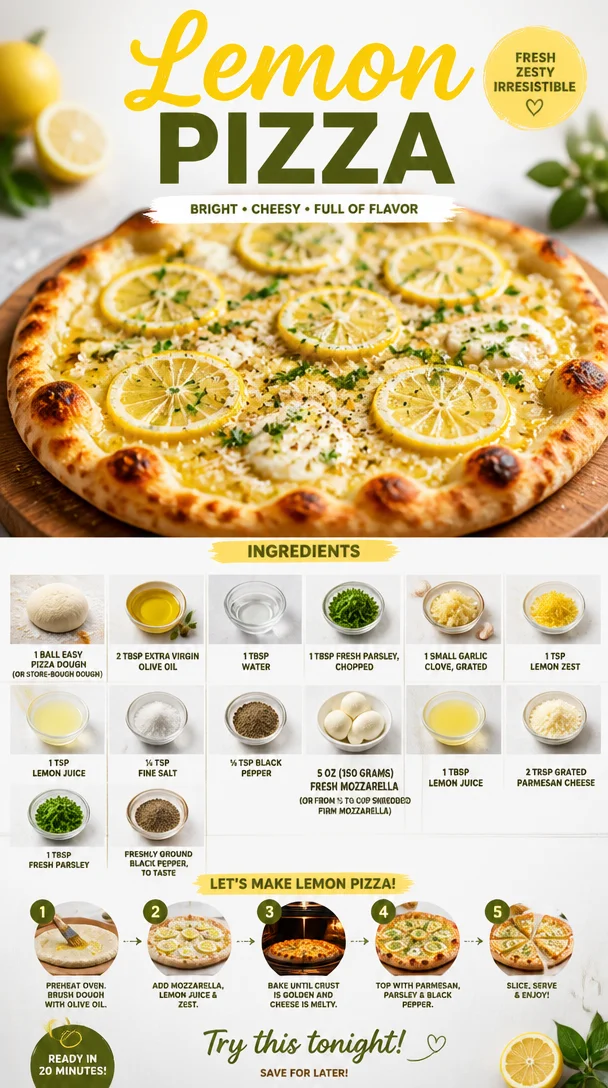
Lemon Pizza
Lemon Pizza: A Zesty Twist on a Classic Favorite
Hello, fellow culinary adventurers! Today, we’re diving into the vibrant world of flavor with a dish that’s bound to become a favorite at your dinner table: Lemon Pizza. Yes, you heard that right! This isn’t just any pizza; it’s a delightful marriage of zesty lemon, creamy cheese, and a hint of herbal freshness that will have everyone raving. If you’re ready to spice up your pizza night, let’s get rolling (pun totally intended).
A Slice of My Past: The Origin of My Love for Lemon Pizza
So, let me take you back to one of my most cherished memories in the kitchen. It was a sunny afternoon at my grandma’s house, a place where the air always smelled like freshly baked bread and herbs. She was known for her extravagant summery dinners that often featured all sorts of creative dishes. One day, she whisked me into the kitchen and said, “Savannah, let’s make something a little different today!” She introduced me to this quirky concept of lemon pizza, and my taste buds were forever changed.
We rolled out the dough on her checkered tablecloth, her hands moving expertly as she explained her philosophy of cooking: “It’s all about balance, my dear. Sweet, sour, creamy, and crunchy.” We topped that pizza with bright lemon zest and fresh cheese, popping it in the oven to bake. The rush of aromas filled the kitchen, instantly transporting me to sunny Mediterranean shores. When it was finally ready, that first bite was a revelation. The burst of lemon paired with gooey mozzarella was unlike anything I had ever tasted, and I knew from that moment forward—lemon pizza would always hold a special place in my heart (and my recipe collection).
Ingredients
Let’s gather our ingredients to bring this zesty masterpiece to life! Here’s what you’ll need:
-
1 ball Easy pizza dough (or store-bought dough): Whether homemade or bought, having a good base is key. If you’re making it from scratch, don’t hesitate to experiment with whole wheat or gluten-free versions for a twist!
-
2 tablespoons extra virgin olive oil: This will add depth and flavor to your crust. Embrace the richness!
-
1 tablespoon water: A touch of water helps to create the perfect dough texture. Too much can make the dough sticky, so add little by little.
-
1 tablespoon fresh parsley, chopped: Fresh herbs are the secret to elevating your dish. Feel free to substitute with basil or oregano for a different flavor note!
-
1 small garlic clove, grated: This adds a delightful aromatic warmth to the pizza. If you’re looking to keep it milder, use roasted garlic instead.
-
1 teaspoon lemon zest: The zest packs a flavor punch; it’s like sprinkling sunshine on your pizza! If you’re in a pinch, lime zest can also work wonders.
-
1 teaspoon lemon juice: A splash of acidity to tie all the flavors together.
-
¼ teaspoon fine salt: Essential for balancing flavors. Just remember to sprinkle lightly as cheeses can also be salty!
-
¼ teaspoon black pepper: A dash of pepper adds a subtle warmth. For more kick, try red pepper flakes.
-
5 oz (150 grams) fresh mozzarella (or from ½ to ⅓ cup shredded firm mozzarella): The creaminess of fresh mozzarella is divine. If you’re in a hurry, shredded mozzarella will do just fine!
-
1 tablespoon lemon juice: Adding this once again enhances the zesty flavor on top of the cheese.
-
2 tablespoons grated Parmesan cheese: Adding this will give that beautiful umami depth we all crave.
-
1 tablespoon fresh parsley, for garnish: A fresh sprinkle brings everything together, and who doesn’t love a pop of green?
-
Freshly ground black pepper, to taste: Always finish with a touch of ground pepper for that added depth.
Step-by-Step Instructions
Alright, my culinary companions, let’s get down to the nitty-gritty of making this Lemon Pizza. Follow along, and I promise you’ll come out feeling like a kitchen superstar!
-
Preheat Your Oven: First things first! Preheat your oven to 475°F (245°C). A hot oven means a crispy base, and nobody wants a soggy pizza!
-
Prep Your Dough: If you’re using store-bought dough, let it sit at room temperature for about 20-30 minutes to make it easier to stretch. If you’re working with homemade dough, make sure it has risen properly. Dust your working surface with flour, and roll out the dough into your desired shape—round or square, it’s all good! Just make sure it’s about ¼ inch thick for a nice chew.
-
Brush with Olive Oil: Transfer your rolled-out dough onto a baking sheet or pizza stone. Brush it generously with extra virgin olive oil using a pastry brush. This not only keeps the dough moist while baking but also adds flavor. Don’t skimp on this step, my friends!
-
Mix the Flavor Bomb: In a small bowl, combine the grated garlic, lemon zest, lemon juice, chopped parsley, salt, and black pepper. This flavorful blend will act as a base for the pizza. Spread this mixture evenly across the dough, leaving a small border around the edges.
-
Add the Cheese: Tear the fresh mozzarella into pieces and distribute it evenly on top of the dough. If you’re using shredded mozzarella, sprinkle it generously. The more cheese, the merrier, right?
-
Sprinkle with Parmesan: Now that your mozzarella is on like a cozy blanket, top it all off with a sprinkle of grated Parmesan cheese. This adds just that extra bit of flavor and richness that will knock your socks off!
-
Time to Bake!: Slide that magnificent creation into the oven. Bake for about 10-12 minutes, or until the cheese is bubbly and golden, and the crust is nice and crispy. Keep an eye on it—the last thing you want is a burnt edge!
-
Finishing Touches: Once out of the oven, drizzle the pizza with a little more lemon juice for an added zing, and a sprinkle of fresh parsley to really elevate that presentation.
-
Slice and Serve: Let the pizza sit for a minute (if you can resist!), then slice it up, serve, and watch it disappear!
Serving Suggestions
When it comes to serving your Lemon Pizza, presentation is everything! Consider a rustic wooden board or a beautiful marble platter to showcase your creation. Dust with extra parsley and serve alongside a light salad drizzled with a lemon vinaigrette. For a refreshing feel, pair it with a chilled white wine or sparkling water with a slice of lemon. This dish is not just a meal; it’s an experience!
Recipe Variations
Feeling adventurous? Try out some of these delightful twists on the classic Lemon Pizza:
-
Herbed Chicken Lemon Pizza: Add sliced, cooked chicken breast for a protein boost. Marinate it with lemon juice, salt, and herbs before adding it to the pizza. Yum!
-
Artichoke and Spinach Lemon Pizza: Toss in some sautéed artichokes and fresh spinach for a more complex flavor profile!
-
Lemon and Prosciutto: Top your pizza with a few slices of crispy prosciutto after it comes out of the oven for a salty complement to the lemon.
-
Vegan Version: Use vegan cheese for a creamy, dairy-free option and sprinkle with nutritional yeast for a cheesy flavor.
-
Spicy Lemon Pizza: Add a few jalapeño slices on top before baking for a spicy kick!
Chef’s Notes
Oh, the memories and moments that arise from experimenting in the kitchen! I remember the first time I made this pizza for my friends. I was a nervous wreck, fiddling with the toppings and hoping they would enjoy it. Much to my surprise, they went nuts about it! Since then, I’ve played with different toppings and preparations, adapting it to the seasons, and each time it brings a little joy to my heart.
I also love how this recipe has evolved over time. It started as a simple family dish and turned into a crowd-pleaser, proving that even in the kitchen, sometimes the simplest things are the most delightful.
FAQs and Troubleshooting
1. My crust turned out soggy. What did I do wrong?
More than likely, your oven wasn’t hot enough, or the pizza may have had too many wet ingredients. Make sure to preheat your oven fully and drain any watery toppings before adding them to your pizza.
2. Can I use pita bread instead of pizza dough?
Absolutely! Pita bread can make a great alternative for a quick and easy flatbread pizza. Just follow the same steps but bake for a shorter time—about 5-7 minutes.
3. How do I store leftovers?
If you have any leftovers (which is unlikely because it’s so delicious), place them in an airtight container in the fridge. To reheat, pop them back in the oven at 350°F (175°C) for a few minutes to get that crust crispy again.
4. What if I’m allergic to gluten?
You can easily swap for a gluten-free pizza crust! Many brands offer excellent options that you can find at your local grocery store.
Nutritional Info
(Optional, pending your exact preparation and portion sizes)
- Calories: 300 (per slice)
- Protein: 12g
- Fat: 15g
- Carbohydrates: 30g
So there you have it—your guide to making a delightful Lemon Pizza that’s sure to impress! I hope you gather your friends and family around the table to share a beautiful moment over this tasty dish. Remember, cooking is about creating and sharing joy. So tie on your apron, smile, and get ready to serve up the yum. Happy cooking!
PrintLemon Pizza
A delightful marriage of zesty lemon, creamy cheese, and fresh herbs that will elevate your pizza night.
- Prep Time: 15 minutes
- Cook Time: 12 minutes
- Total Time: 27 minutes
- Yield: 4 servings 1x
- Category: Main Course
- Method: Baking
- Cuisine: Italian
- Diet: Vegetarian
Ingredients
- 1 ball Easy pizza dough (or store-bought)
- 2 tablespoons extra virgin olive oil
- 1 tablespoon water
- 1 tablespoon fresh parsley, chopped
- 1 small garlic clove, grated
- 1 teaspoon lemon zest
- 1 teaspoon lemon juice
- ¼ teaspoon fine salt
- ¼ teaspoon black pepper
- 5 oz fresh mozzarella, torn
- 2 tablespoons grated Parmesan cheese
- 1 tablespoon fresh parsley, for garnish
- Freshly ground black pepper, to taste
Instructions
- Preheat your oven to 475°F (245°C).
- Prep your dough by letting store-bought sit at room temperature or rolling out homemade dough.
- Brush the rolled-out dough generously with olive oil.
- Mix together grated garlic, lemon zest, lemon juice, parsley, salt, and black pepper, and spread on the dough.
- Add pieces of fresh mozzarella evenly on top.
- Sprinkle with grated Parmesan cheese.
- Bake for about 10-12 minutes until cheese is bubbly and golden.
- Finish with a drizzle of lemon juice and a sprinkle of fresh parsley.
- Slice and serve immediately!
Notes
This pizza pairs well with a light salad and a chilled white wine.
Nutrition
- Serving Size: 1 slice
- Calories: 300
- Sugar: 2g
- Sodium: 200mg
- Fat: 15g
- Saturated Fat: 7g
- Unsaturated Fat: 6g
- Trans Fat: 0g
- Carbohydrates: 30g
- Fiber: 1g
- Protein: 12g
- Cholesterol: 30mg
Keywords: Lemon Pizza, Zesty Pizza, Vegetarian Pizza, Homemade Pizza, Easy Recipes
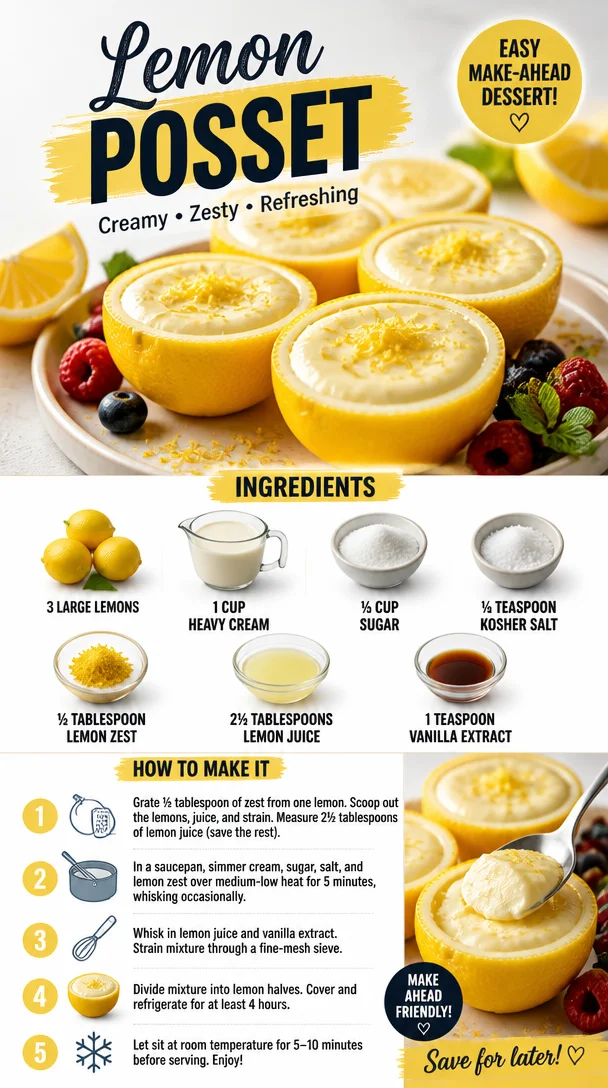
Lemon Posset
Indulge in Elegance: Whip Up a Delightful Lemon Posset
Hello, lovely foodies! Today, I’m thrilled to share one of my absolute favorite treats that embodies simplicity and sophistication: Lemon Posset. This creamy, luscious dessert feels like a warm hug on a plate, and the best part? It’s so easy to make that you’ll wonder why you haven’t been whipping it up all along!
If you’re new to the world of possets, you’re in for a delightful surprise. Imagine velvety cream infused with refreshing lemon zest and juice, all perfectly balanced with a touch of sweetness. Seriously, each bite is like a sunny day in dessert form!
A Slice of Nostalgia: My First Lemon Posset
Let me take you back to a warm summer’s evening. Picture this: I was a young culinary enthusiast, eager to impress my friends with a homemade dessert for our casual gathering. I wanted something that would put smiles on their faces without sending me into a tornado of chaos in the kitchen. That’s when I stumbled upon the wonderful world of lemon posset.
With just a handful of ingredients, I felt like a culinary magician turning basic elements into something truly spectacular. The moment I served it, I watched as everyone took their first spoonful. As they savored the sweet-tart flavors, the room filled with laughter and compliments. I was hooked! That night solidified my love for desserts that were both simple and elegant. Since then, lemon posset has become a staple not only on my table but in my heart as well.
Ingredients You’ll Need
Gather these simple yet essential ingredients to make your lemon posset shine:
- 3 Large Lemons: The star of the show, lemons provide that zesty brightness we adore. Opt for organic if you can, as they tend to have more flavor and less wax on the skin.
- 1 Cup Heavy Cream: This luscious cream is what gives the posset its rich texture. If you must, you can substitute with full-fat coconut milk for a dairy-free version.
- ⅓ Cup Sugar: Sweetness is key! I recommend granulated sugar, but feel free to experiment with honey or agave for a more natural option.
- ¼ Teaspoon Kosher Salt: Just a pinch! It brings out the flavors and balances the sweetness.
- ½ Tablespoon Lemon Zest: Zest is where the lemon’s essential oils shine. Use a microplane for the best results. You can substitute with lime zest for a fun twist!
- 2½ Tablespoons Lemon Juice: Freshly squeezed is always best. Use the juicer to ensure you get every drop!
- 1 Teaspoon Vanilla Extract: This adds a warm undertone to the posset. If you want to keep it more citrusy, you can skip this.
Step-by-Step Instructions
Let’s make this gorgeous Lemon Posset together!
-
Zest and Juice the Lemons: Start by zesting your lemons, then cut them in half and juice them. Pro Tip: Roll the lemons on the countertop before cutting to release more juice!
-
Combine the Cream and Sugar: In a saucepan, combine the heavy cream and sugar over medium heat. Stir gently until the sugar is dissolved. There’s no need to bring it to a boil; just warm it until the sugar is fully incorporated. This step will keep the creamy texture while ensuring the flavors marry beautifully.
-
Add Salt and Zest: Once your cream mixture is warm and sugared, add the kosher salt and lemon zest. Stir to combine and let it simmer for another minute. The zest will infuse your cream with a lovely lemony aroma—it’s heavenly!
-
Incorporate the Lemon Juice: Now, remove the saucepan from heat and stir in the freshly squeezed lemon juice. This is where the magic happens. Watch as the cream thickens slightly; this is the sign of a successful posset!
-
Strain the Mixture: To ensure a silky-smooth consistency, strain the mixture through a fine-mesh sieve into a measuring cup or bowl. This step removes the zest, leaving you with pure, luscious cream.
-
Chill the Posset: Pour the strained posset into your serving cups or bowls. Let them cool to room temperature before refrigerating for at least 4 hours, or until set. Note this is a great make-ahead dessert—wonderful for hosting!
-
Serve and Enjoy: When you’re ready to serve, garnish with a little extra zest, fresh berries, or whipped cream. Delightful!
Serving Suggestions
For presentation, consider serving your posset in delicate glass cups to showcase its creamy texture and zesty hue. A sprinkle of lemon zest or a handful of fresh berries on top not only adds color but also a burst of freshness that complements the dish beautifully.
Recipe Variations
Feeling inspired to shake things up? Here are a few fun variations to try:
- Berry Twists: Add a fruit puree (like raspberry or blueberry) at the bottom of your cups for a delightful layer of flavor.
- Herb Infusion: Infuse your heavy cream with a sprig of rosemary or mint while warming it for an aromatic twist.
- Lime Posset: Swap out the lemons for limes for a refreshing and tropical take.
- Chocolate Drizzle: For a decadent treat, drizzle melted dark chocolate over the top before serving.
- Spiced Citrus: Add a pinch of ground cardamom or ginger when warming the cream for a warm, spiced flavor.
Chef’s Notes
This lemon posset recipe has been with me through thick and thin in my culinary journey! Over the years, I’ve perfected my technique and learned the importance of patience while letting it chill. I still giggle at the time I forgot to strain the mixture, resulting in a zestier dessert than intended—my friends loved it, but I learned my lesson! Long story short? Sometimes a little unexpected twist can make food all the more memorable.
FAQs and Troubleshooting
-
Why didn’t my posset set? If your posset didn’t set, it may be due to insufficient chilling time. It needs to cool completely in the fridge. Also, ensure you used enough fat in your cream—heavy cream is essential for that firm consistency.
-
Can I use low-fat cream? I highly recommend sticking with heavy cream for the best texture and flavor. Low-fat alternatives can end up too runny.
-
How long can I store leftovers? Your lemon posset will keep in the fridge for up to 3 days. Just cover it with plastic wrap to keep it fresh!
-
Can I double or halve the recipe? Absolutely! You can adjust the ingredients as desired. Just make sure to maintain the same ratios for the best results!
Nutritional Info
While I always recommend indulging in treats with mindfulness, here’s a rough estimate per serving of lemon posset:
- Calories: 220
- Total Fat: 21g
- Saturated Fat: 13g
- Sugar: 10g
- Protein: 1g
Whether you savor it alone or share it with loved ones, this lemon posset is a testament to effortless elegance in the kitchen. Remember, cooking is not just about the food but the stories we create around it. So tie on that apron, gather those ingredients, and let’s whip up something beautiful together! Enjoy every delicious bite, my friends!
PrintLemon Posset

A creamy and luscious dessert infused with refreshing lemon zest and juice, simple to make and delightfully elegant.
- Prep Time: 15 minutes
- Cook Time: 10 minutes
- Total Time: 240 minutes
- Yield: 4 servings 1x
- Category: Dessert
- Method: Chilling
- Cuisine: French
- Diet: Vegetarian
Ingredients
- 3 Large Lemons
- 1 Cup Heavy Cream
- ⅓ Cup Sugar
- ¼ Teaspoon Kosher Salt
- ½ Tablespoon Lemon Zest
- 2½ Tablespoons Lemon Juice
- 1 Teaspoon Vanilla Extract
Instructions
- Zest and juice the lemons.
- Combine the heavy cream and sugar in a saucepan over medium heat.
- Add salt and zest to the warm cream mixture.
- Incorporate the lemon juice after removing from heat.
- Strain the mixture through a fine-mesh sieve.
- Chill the posset in serving cups for at least 4 hours.
- Serve with garnish of lemon zest or berries.
Notes
For variations, add fruit purees, herbs, or chocolate drizzles. This dessert can be made ahead of time.
Nutrition
- Serving Size: 1 serving
- Calories: 220
- Sugar: 10g
- Sodium: 50mg
- Fat: 21g
- Saturated Fat: 13g
- Unsaturated Fat: 5g
- Trans Fat: 0g
- Carbohydrates: 24g
- Fiber: 0g
- Protein: 1g
- Cholesterol: 80mg
Keywords: lemon posset, dessert, easy recipe, creamy dessert, summer dessert
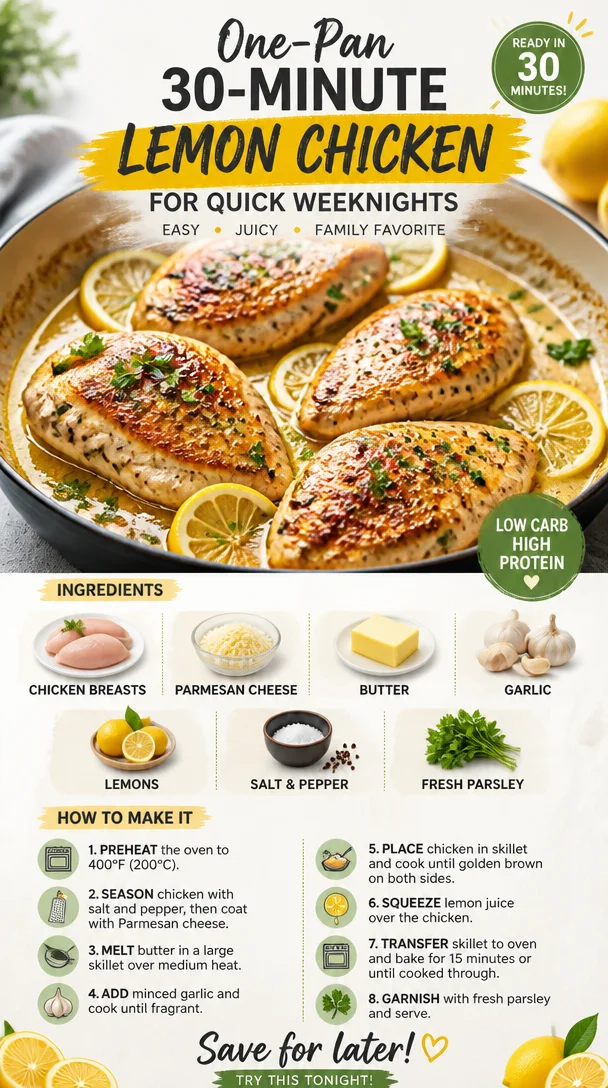
One-Pan 30-Minute Lemon Chicken for Quick Weeknights
30-Minute Lemon Chicken: A Flavorful Feast in No Time
Hello, fellow food lovers! Today, I’m thrilled to share one of my favorite go-to dishes: 30-Minute Lemon Chicken. This recipe is like a warm hug on a plate—simple, zesty, and bursting with flavor! Whether you’re entertaining guests or just whipping up a delightful weeknight dinner, this dish fits the bill perfectly.
Lemon Chicken has a special place in my heart and my kitchen. It’s the kind of dish that invites memories; memories of family gatherings, laughter around the dining table, and the intoxicating aroma of garlic sizzling in butter. Trust me, as you follow along, you’ll not only create a meal but also moments that linger long after the plates are cleared.
Now, let’s be honest. We live in a fast-paced world, where time is often not on our side. But that doesn’t mean we have to sacrifice taste for speed. This recipe marries the two beautifully. With tender chicken breasts coated in gooey butter, minced garlic, and the bright zing of lemons, you’ll have a dish that tastes like it took hours but came together in just 30 minutes! So, grab your apron, and let’s make some culinary magic!
Personal Story
I remember the first time I made Lemon Chicken for my friends. It was one of those spontaneous gatherings—everyone was busy, but I threw out the invite, and miraculously, they all showed up! It was just me in my small kitchen, surrounded by laughter and the clanking of wine glasses. I wasn’t quite sure what I would serve, but I had some chicken and fresh lemons, so I decided to wing it.
As I cooked, the tangy scent of lemons and garlic filled the air. When I set the table, I felt a nervous thrill as everyone dug in. The first bite—oh, what a delight! The chicken was tender and flavorful, the sauce luscious and bright. Laughter and compliments filled the room, and I knew I had found a beloved crowd-pleaser. Nothing beats the feeling of bringing people together through food, and this dish has become a staple for my dinner parties ever since. Let me guide you to a similar success in your kitchen!
Ingredients
-
4 chicken breasts
The star of the show! Look for boneless, skinless chicken breasts for ease. You can substitute with thighs for a juicier option or use tofu for a vegetarian twist. -
1/2 cup grated Parmesan cheese
This brings a savory depth to the dish. If you’re out of Parmesan, try Pecorino Romano. For a dairy-free option, nutritional yeast works wonders! -
1/4 cup butter
Butter adds richness; you can replace it with olive oil or a dairy-free spread if you’re looking for a healthier choice. -
4 cloves garlic, minced
Garlic is my favorite flavor booster! Fresh garlic packs the most flavor, but if you’re in a pinch, feel free to substitute with garlic powder—1 clove equals about 1/8 teaspoon of garlic powder. -
Juice of 2 lemons
Fresh lemon juice brightens everything. If you don’t have fresh lemons, bottled juice works in a pinch—just make sure it’s 100% juice for the best flavor! -
Salt and pepper to taste
These pantry staples elevate each flavor. Always taste as you go to find that perfect balance! -
Fresh parsley for garnish
A sprinkle of parsley adds a pop of color and flavor. If you’re not a parsley fan, fresh basil or thyme can also bring an aromatic touch!
Step-by-Step Instructions
Step 1: Prepare Your Ingredients
First things first, gather all your ingredients. This makes for a smoother cooking process. Preheat your skillet over medium heat with half the butter. While that’s warming up, pat your chicken breasts dry with a paper towel. This step is crucial; it helps achieve that golden, crispy crust. Season both sides with salt and pepper.
Step 2: Brown the Chicken
Once your skillet is hot, add your chicken breasts. Here’s a little kitchen secret: don’t overcrowd the pan. If your skillet is too full, the chicken will steam instead of brown. Let them sear for about 4–5 minutes on each side until golden brown and cooked through (165°F internal temperature!). If they’re really thick, you may need a few extra minutes.
Step 3: Add the Garlic
When your chicken is perfectly browned, pull it to one side of the pan. In the empty space, add the minced garlic, letting it sauté for about 30 seconds until fragrant—be careful not to burn it! If you notice it getting too brown, lower the heat a bit. We want flavor, not bitterness!
Step 4: Create the Sauce
Now, add the remaining butter to the garlic. Once it melts, pour in the lemon juice and sprinkle the Parmesan cheese over the entire mixture. You want that buttery, cheesy goodness to coat your chicken evenly. Carefully flip the chicken to ensure it’s covered in this luscious sauce. Let everything cook for an additional 2–3 minutes, allowing the flavors to meld beautifully.
Step 5: Plate and Garnish
Once done, take your chicken out of the pan and place it on a warmed serving platter. Spoon that delightful lemon sauce from the skillet over the top and finish with a sprinkle of freshly chopped parsley. It looks beautiful, right?
Step 6: Serve Warm
Serve it warm, maybe with a side of roasted veggies or a light salad. Just imagine your family and friends gathering around the table, the scent wafting through the air while everyone swoons over your culinary prowess!
Serving Suggestions
To elevate your presentation, plate each chicken breast individually and drizzle the lemon-garlic sauce on top. A sprinkling of fresh parsley will provide a stunning contrast and a dash of freshness. Serve alongside a side of steamed asparagus or a fluffy rice pilaf. If you have a zesty salad, place that on the table for a colorful, well-rounded meal!
Recipe Variations
- Herb-Enhanced: Add chopped herbs like rosemary, thyme, or dill for an extra layer of flavor.
- Spicy Twist: A dash of red pepper flakes will give you that delightful spicy kick to contrast with the lemony goodness.
- Mushroom Lovers: Toss in some sautéed mushrooms when you add the garlic for an earthy flavor boost.
- Creamy Version: Stir in a tablespoon of heavy cream or Greek yogurt to the sauce for a creamy lemon sauce!
- Zesty Citrus: Combine lemon juice with lime or orange juice for a citrus medley that’s refreshingly bold!
Chef’s Notes
When I first created my version of Lemon Chicken, it was born out of necessity—using what I had at home. The dish has evolved into a favorite among friends and family, each iteration a delightful surprise. My husband even jokes that we should rename our dinner table “Lemon Chicken Central”! Cooking is all about experimentation, so don’t hesitate to adjust the recipe to fit your taste. Embrace the process and share those kitchen stories with love!
FAQs and Troubleshooting
1. What if my chicken isn’t browning?
Ensure your skillet is sufficiently preheated before adding the chicken. Patting the chicken dry helps it sear rather than steam.
2. Can I use frozen chicken?
While it’s best to use thawed chicken for even cooking, you can certainly cook from frozen. Just increase the cooking time by 5-10 minutes, ensuring the internal temperature reaches 165°F.
3. My sauce turned out too salty. What do I do?
Add a splash of cream or a bit more lemon juice to balance the flavor. If you added too much cheese, consider a side of plain rice to balance the saltiness.
4. Can I make this ahead of time?
Absolutely! Cook and store the chicken in an airtight container for up to 3 days in the fridge. Reheat gently in a skillet with a splash of water or broth to avoid drying it out.
Nutritional Info
While the specific nutritional details can vary based on ingredient brands, here’s a rough estimate for one serving of Lemon Chicken (one chicken breast with sauce):
- Calories: 382
- Protein: 38g
- Fat: 22g
- Carbohydrates: 3g
- Fiber: 0g
Feel free to adjust portions to suit your dietary needs!
Now it’s your turn to make this 30-Minute Lemon Chicken an unforgettable part of your mealtime repertoire. Cooking can be a joyful journey, bursting with creativity and flavor, and I’m here cheering you on every step of the way. So tie on that apron, turn up your favorite playlist, and let’s create something scrumptious together! Happy cooking!
Print30-Minute Lemon Chicken

A quick, zesty, and flavorful dish featuring tender chicken breasts cooked in a buttery lemon garlic sauce.
- Prep Time: 10 minutes
- Cook Time: 20 minutes
- Total Time: 30 minutes
- Yield: 4 servings 1x
- Category: Main Course
- Method: Pan-Frying
- Cuisine: Italian
- Diet: Gluten-Free
Ingredients
- 4 chicken breasts
- 1/2 cup grated Parmesan cheese
- 1/4 cup butter
- 4 cloves garlic, minced
- Juice of 2 lemons
- Salt and pepper to taste
- Fresh parsley for garnish
Instructions
- Prepare your ingredients by gathering all items and preheating your skillet over medium heat with half the butter. Pat your chicken breasts dry and season both sides with salt and pepper.
- Brown the chicken by adding it to the hot skillet and searing for about 4–5 minutes on each side until cooked through (165°F internal temperature).
- Add the minced garlic to the empty space in the skillet and sauté for about 30 seconds until fragrant.
- Create the sauce by adding the remaining butter and lemon juice, then sprinkle the Parmesan cheese over the mixture. Flip the chicken to coat it in the sauce and cook for an additional 2–3 minutes.
- Plate the chicken on a serving platter, then spoon the lemon sauce over the top and garnish with freshly chopped parsley.
- Serve it warm alongside your favorite sides.
Notes
Feel free to experiment with herbs or spices for added flavor.
Nutrition
- Serving Size: 1 serving
- Calories: 382
- Sugar: 1g
- Sodium: 500mg
- Fat: 22g
- Saturated Fat: 11g
- Unsaturated Fat: 9g
- Trans Fat: 0g
- Carbohydrates: 3g
- Fiber: 0g
- Protein: 38g
- Cholesterol: 85mg
Keywords: lemon chicken, quick dinner, easy recipe, chicken recipe