
Minute No-Bake Strawberry Mousse (Fresh & Creamy)
Easy Fresh Strawberry Mousse: A Delightful Dessert for Any Occasion
Hello food lovers! If you’re here, it means you’re probably ready to whip up something delightful in the kitchen that’s both impressive and incredibly easy. Well, you’re in for a treat! Today, we’ll be crafting a luscious Easy Fresh Strawberry Mousse that’s light, fluffy, and bursting with the sweet taste of summer. This dessert is perfect for any occasion—whether you’re hosting a dinner party, celebrating a birthday, or simply treating yourself after a long week.
Picture this: a light, airy mousse with a beautiful pink hue, topped off with fresh strawberries and a dash of mint. It’s like a hug in dessert form! I can’t wait to share the process with you, complete with my personal touches and lots of tips to ensure your mousse turns out perfect every time. So, let’s dive in!
A Sweet Slice of Nostalgia
One of my fondest memories involves a summer spent at my grandma’s house. Every year, we’d visit, and amidst all the adventures—catching fireflies, gardening, and late-night card games—there was always a special treat waiting for us: Grandma’s signature strawberry mousse. She would send us out to the garden to pick the ripest strawberries, and we’d laugh as we tried to find the biggest, juiciest ones to bring back to the kitchen.
Once we returned, we’d gather around her old wooden table, sharing stories while she mixed up her ingredients with love and a sprinkle of humor. I can still hear her saying, “The secret ingredient is always a bit of joy!” I realized later that cooking with her wasn’t just about making a delicious dessert; it was about the connections we forged around the table.
Now, whenever I make this Easy Fresh Strawberry Mousse, it’s like I’m transported back to that sunlit kitchen, surrounded by love and laughter. I hope this recipe brings as much joy to you as it does to me!
Ingredients
Here’s what you’ll need to create your very own strawberry mousse:
-
2 cups fresh strawberries, hulled
Fresh strawberries are the star of this dessert! Use ripe, juicy strawberries for the best flavor. If you’re in a pinch, you can substitute with frozen strawberries (thawed), but fresh ones have that unbeatable sweetness. -
1/4 cup powdered sugar
This sweetens the mousse while keeping it smooth and creamy. You can adjust the sweetness based on your preference—feel free to start with less and add more if needed! -
1 tablespoon fresh lemon juice
Brightens up the flavor and balances the sweetness. You can also use lime juice for a fun twist! -
1 teaspoon vanilla extract
Because, let’s be honest, everything’s better with vanilla. For a different flavor profile, try using almond extract or a splash of orange zest! -
1 1/2 cups heavy cream, cold
This is what gives the mousse its rich texture. Make sure it’s very cold before whipping! If you need a lighter alternative, opt for coconut cream, but the texture will differ a bit.
Step-by-Step Instructions
Now that we have everything prepared, let’s get to work! Follow these steps to create your strawberry masterpiece:
-
Prep the Strawberries
Start by washing your strawberries thoroughly. Hull them (remove the green tops) and slice them in half. This will help release their juices when blended. Place them in a medium bowl and sprinkle them with 2 tablespoons of powdered sugar. Toss gently and let them sit for about 10 minutes. This will create a natural syrup that really enhances the flavor! -
Blend the Strawberries
After the strawberries have macerated, use a blender or food processor to puree them until smooth. You can leave a few small chunks if you like a bit of texture—just make sure it’s not too chunky! -
Strain the Puree (Optional)
If you prefer a super smooth mousse, strain the puree through a fine-mesh sieve to remove any seeds. This step is optional, but it does yield that lovely, velvety texture. -
Combine Ingredients
In a separate bowl, whisk together the strawberry puree, remaining powdered sugar, lemon juice, and vanilla extract until well combined. It should taste fresh and sweet—don’t be afraid to give it a little taste! -
Whip the Cream
In a large mixing bowl (preferably chilled), pour the heavy cream. Using an electric mixer, whip the cream on medium speed until soft peaks form. This means when you lift the whisk or beaters, the cream should hold its shape but still be light and fluffy. Be careful not to overwhip; it can turn grainy. -
Fold the Cream into the Strawberry Mixture
Take a couple of spoonfuls of whipped cream and mix it into the strawberry puree to lighten it up. Then gently fold in the rest of the whipped cream using a spatula. This technique helps maintain the airiness of the mousse, giving it that light texture we’re after. -
Chill
Once combined, divide the mousse into serving dishes or glasses. Cover with plastic wrap and place them in the fridge for at least 2-4 hours, or until they’re fully set. This chilling time allows the flavors to meld beautifully together and gives the mousse that perfect, airy consistency.
Serving Suggestions
When it’s time to serve your gorgeous strawberry mousse, consider a few simple yet elegant touches. Add a dollop of whipped cream on top, toss on some fresh strawberry slices, and maybe a sprig of mint for color! For a fancy touch, serve the mousse in elegant glassware or chilled dessert cups. It adds an element of richness and makes your guests feel special—even if it’s just a Tuesday!
Recipe Variations
If you want to get a little creative, here are some fun twists to try with your Easy Fresh Strawberry Mousse:
- Chocolate Strawberry Mousse: Drizzle melted chocolate into the mousse before chilling for an indulgent treat.
- Balsamic Strawberry Mousse: Add a splash of balsamic vinegar to the strawberry puree for a unique, sophisticated flavor.
- Coconut Strawberry Mousse: Substitute half of the heavy cream with coconut cream for a tropical flair.
- Vegan Strawberry Mousse: Use coconut whipped cream and agave syrup for a dairy-free option. You can blend in silken tofu for added creaminess!
Chef’s Notes
I’ll let you in on a little secret: the first time I attempted to make this mousse, it was a hilarious disaster! I accidentally whipped the cream too long and ended up with butter. Let’s just say, my friends were equally impressed and confused! From that day on, I learned the art of gentle whipping and the importance of patience in cooking. This mousse has evolved since then, becoming a beloved staple in my kitchen, and I’m thrilled to pass it on to you with all my little lessons learned!
FAQs and Troubleshooting
1. Can I use frozen strawberries?
Yes! Thaw and drain the strawberries before using them, but keep in mind fresh strawberries have the best flavor.
2. What if my mousse is too runny?
If your mousse doesn’t set, try adding a bit more whipped cream to stabilize it. Also, ensure you chilled it for the appropriate amount of time.
3. Can I make this ahead of time?
Absolutely! It’s perfect for prepping a day ahead. Just cover it well and keep it in the fridge.
4. How long does this mousse last?
It’s best enjoyed within 2-3 days of making it, but it can last up to five days in the fridge. Just be sure to cover it tightly!
Whether it’s for a special gathering or a cozy night at home, this Easy Fresh Strawberry Mousse is sure to delight and bring smiles to your table. So go ahead, tie on your apron, pour yourself a little bubbly, and create something joyful. Because in the end, food is about more than just the taste; it’s about the connections we make and the memories we share.
Welcome to the Ivory Apron family—happy cooking!
PrintEasy Fresh Strawberry Mousse

A light and fluffy strawberry mousse bursting with fresh flavors, perfect for any occasion.
- Prep Time: 10 minutes
- Cook Time: 0 minutes
- Total Time: 240 minutes
- Yield: 4 servings 1x
- Category: Dessert
- Method: Chilling
- Cuisine: American
- Diet: Vegetarian
Ingredients
- 2 cups fresh strawberries, hulled
- 1/4 cup powdered sugar
- 1 tablespoon fresh lemon juice
- 1 teaspoon vanilla extract
- 1 1/2 cups heavy cream, cold
Instructions
- Prep the strawberries by washing them thoroughly, hulling them, and slicing in half. Sprinkle with 2 tablespoons of powdered sugar and let sit for 10 minutes.
- Blend the strawberries until smooth using a blender or food processor.
- Strain the puree through a fine-mesh sieve if a super smooth mousse is desired (optional).
- Combine the strawberry puree, remaining powdered sugar, lemon juice, and vanilla extract in a separate bowl.
- Whip the cold heavy cream in a large mixing bowl until soft peaks form.
- Fold the whipped cream into the strawberry mixture until well combined.
- Chill in the fridge for at least 2-4 hours until set before serving.
Notes
For added flavor, consider variations like chocolate drizzle or balsamic vinegar. Serve in elegant glassware with fresh strawberries and mint.
Nutrition
- Serving Size: 1 serving
- Calories: 250
- Sugar: 22g
- Sodium: 30mg
- Fat: 18g
- Saturated Fat: 11g
- Unsaturated Fat: 7g
- Trans Fat: 0g
- Carbohydrates: 24g
- Fiber: 2g
- Protein: 2g
- Cholesterol: 60mg
Keywords: strawberry mousse, easy dessert, summer dessert, fruit dessert
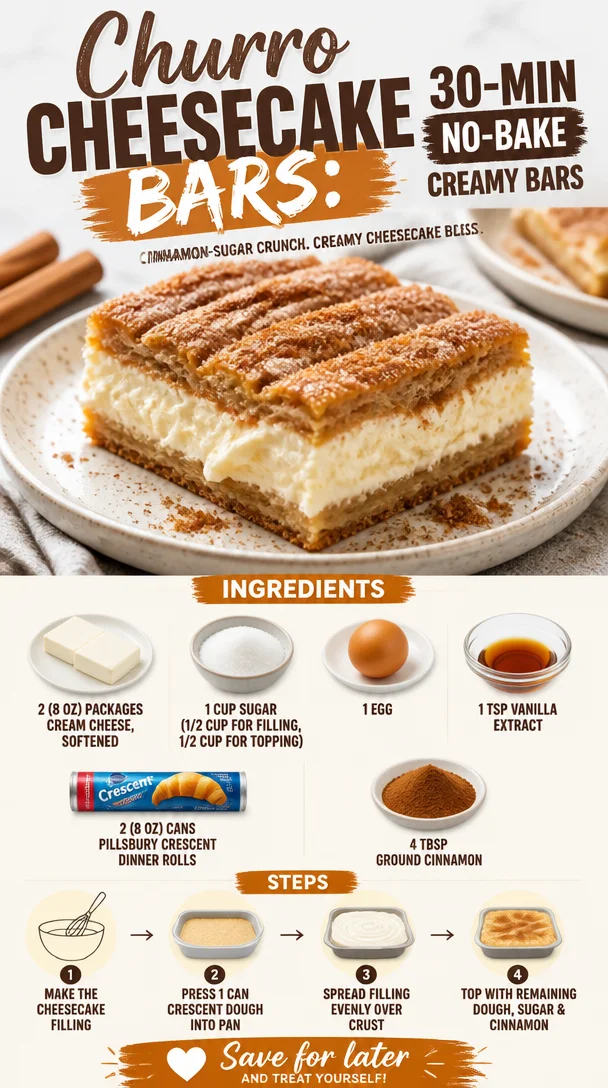
Churro Cheesecake Bars: 30-Min No-Bake Creamy Bars
Churro Cheesecake Bars: A Sweet Delight to Share
Hello, my culinary friends! Today, I’m excited to share a dessert that you won’t just want to make once—you’ll want to whip it up time and again: Churro Cheesecake Bars! These delightful little squares combine the creamy goodness of cheesecake with the cinnamon-sugar magic of churros, and trust me, they are a game-changer for your dessert table. Whether you’re hosting a dinner party or simply indulging for a cozy night in, these bars are sure to impress and delight.
Now, before we dive into the recipe, let’s talk a little about what inspired this creation.
Personal Story
It was a crisp autumn afternoon, and I was in my childhood kitchen, the air filled with sweet aromas wafting from my mother’s oven. She’d always have something magical baking. On this particular day, it was her famous churros. The warm scent of cinnamon and sugar enveloped the room as we gathered around the table, waiting eagerly for those warm, crispy bites.
As I bit into a crunchy churro, the idea sparked in my mind: Why not take the essence of that beloved treat and blend it into a cheesecake? I could almost hear my mom’s laughter and encouragement as I tinkered with recipes in my head. Fast forward a few years, and voilà! Churro Cheesecake Bars were born, each bite unearthing those delicious memories of laughter and love from my childhood. Let’s bring that warmth into your kitchen now!
Ingredients
Now, let’s gather our ingredients. Here’s what you’ll need to create these scrumptious Churro Cheesecake Bars:
-
2 (8 oz) packages cream cheese, softened
Cream cheese is the heart of our cheesecake. Make sure it’s softened to room temperature for a smooth filling. If you’re in a pinch, you can substitute with mascarpone for a slightly different flavor profile. -
1 cup sugar (1/2 cup for filling, 1/2 cup for topping)
Sugar adds sweetness and balances the cream cheese’s tanginess. Use coconut sugar for a more caramel-like flavor. -
1 egg
The egg acts as a binding agent, giving structure to the creamy filling. If you want to make this dish vegan, try a flax egg (1 tablespoon ground flaxseed mixed with 3 tablespoons water) instead! -
1 tsp vanilla extract
Vanilla adds depth to our cheesecake filling. For a twist, consider using almond extract or a splash of bourbon for a richer flavor. -
2 (8 oz) cans Pillsbury crescent dinner rolls
These are a convenient way to create a flaky crust reminiscent of churro dough. You can also use puff pastry if you want a flakier base—just adjust the baking time slightly. -
4 Tbsp ground cinnamon
Of course, cinnamon is our star! It adds warmth and that cherished churro flavor. If you’re feeling adventurous, try mixing in a bit of nutmeg for an interesting twist.
Let’s get cooking!
Step-by-Step Instructions
-
Preheat your oven
Preheat your oven to 350°F (175°C). This step is crucial to ensure your bars bake evenly. -
Prepare your baking dish
Grab a 9×13-inch baking dish and lightly grease it or line it with parchment paper. If you’re feeling fancy, you can create a decorative edge with the parchment—this makes for easy lifting later! -
Make the cream cheese filling
In a mixing bowl, combine the softened cream cheese, 1/2 cup of sugar, egg, and vanilla extract. Using a hand mixer or a stand mixer, whip everything together until it’s creamy and smooth. Don’t rush this step—the better you mix, the creamier your filling! -
Roll out the crescent dough
Open one can of crescent rolls and gently unroll it. Place it into the bottom of your prepared baking dish, pressing the seams together to form a crust. If you’re using puff pastry, roll it out to fit the bottom of the dish, making sure there are no holes. -
Spread the cream cheese filling
Pour your luscious cream cheese mixture over the crust and spread it evenly. You might want to lick the spoon—totally acceptable! -
Top it off
Open the second can of crescent rolls and repeat the rolling process, placing it over the cream cheese filling. It doesn’t need to fit perfectly—those little gaps add charm and create lovely crispy parts! -
Mix cinnamon and sugar for sprinkling
In a small bowl, mix the remaining 1/2 cup of sugar with the ground cinnamon. Sprinkle this heavenly mixture generously over the top of your crescent dough. The aroma will be intoxicating as it bakes! -
Bake to perfection
Place your Churro Cheesecake Bars in the preheated oven and let them bake for 30-35 minutes. Keep an eye on them—the top should be golden brown, and a toothpick should come out clean when poked. -
Let them cool
Once baked, remove the bars from the oven and let them cool for at least 30 minutes. It’s hard, I know, but allowing them to set will make cutting them much neater. -
Slice and serve
Once cooled, cut into squares, serve, and prepare for a chorus of "Wow!" as everyone digs in!
Serving Suggestions
For a beautiful presentation, plate your Churro Cheesecake Bars on a lovely serving platter. Dust with a light sprinkle of cinnamon-sugar for that extra touch! Consider serving them with a scoop of vanilla ice cream or a dollop of whipped cream on the side—they make a fabulous pairing!
Recipe Variations
Want to switch things up? Here are a few variations to inspire you:
-
Nutty Churro Bars: Add chopped pecans or walnuts to your cream cheese filling for a delightful crunch.
-
Chocolate Drizzle: Drizzle melted chocolate over the top of your bars once they’re cooled for an indulgent touch!
-
Spicy Churro Bars: Include a pinch of cayenne pepper in your cinnamon-sugar mix for a unique sweet heat twist.
-
Fruit-Inspired: Swirl in some fresh fruit puree—like raspberry or strawberry—into the cream cheese filling for a fruity burst.
-
Dairy-Free Option: Use non-dairy cream cheese and your preferred dairy-free crescent rolls to create a delicious vegan version.
Chef’s Notes
These Churro Cheesecake Bars are incredibly versatile. I originally developed this recipe for a friend’s birthday party, and it quickly became a hit! Since then, I’ve played around with flavors, turning them into seasonal offerings for various events. Every time I make them, I’m transported back to that cozy kitchen where the aroma of churros filled the air.
One tip: if you ever have leftovers (though, let’s be honest, there probably won’t be), they make for a delightful breakfast treat the next day—just reheat them in the oven!
FAQs and Troubleshooting
Q: My bars turned out too gooey! What happened?
A: If your bars are gooey, it’s likely that they need a bit more baking time. Every oven is a little different, so keep an eye on them as they near the 30-minute mark. They should puff up slightly and have a golden-brown crust.
Q: Can I freeze these bars?
A: Absolutely! Once cooled, cut and wrap individual pieces in plastic wrap, then store in an airtight container. They can be frozen for up to three months. Just thaw in the fridge overnight when you’re ready to enjoy them again!
Q: How can I make sure they don’t stick to the pan?
A: Grease your pan well or line it with parchment paper, allowing for some overhang. This makes for easy lifting and clean-cut portions!
Q: Can I use homemade crescent dough instead of store-bought?
A: Of course! If you’re up for a little kitchen adventure, feel free to use your favorite homemade dough. Just ensure it’s rolled thin enough for that delicious flaky texture.
Nutritional Info
While I focus more on taste than nutritional stats, here’s a basic idea per serving (assuming 12 servings):
- Calories: 280
- Fat: 18g
- Carbohydrates: 30g
- Protein: 4g
Keep in mind that indulgence is part of the fun—these bars are meant to be savored!
And there you have it—Churro Cheesecake Bars that’ll transport you straight to a happy place! Now, gather around, tie on your apron, and let’s create some memories together. Happy baking, my friends!
PrintChurro Cheesecake Bars
A delightful dessert combining creamy cheesecake with cinnamon-sugar churros, perfect for sharing.
- Prep Time: 15 minutes
- Cook Time: 35 minutes
- Total Time: 50 minutes
- Yield: 12 servings 1x
- Category: Dessert
- Method: Baking
- Cuisine: Mexican
- Diet: Vegetarian
Ingredients
- 2 (8 oz) packages cream cheese, softened
- 1 cup sugar (1/2 cup for filling, 1/2 cup for topping)
- 1 egg
- 1 tsp vanilla extract
- 2 (8 oz) cans Pillsbury crescent dinner rolls
- 4 Tbsp ground cinnamon
Instructions
- Preheat your oven to 350°F (175°C).
- Prepare a 9×13-inch baking dish by greasing it or lining it with parchment paper.
- In a mixing bowl, combine the softened cream cheese, 1/2 cup of sugar, egg, and vanilla extract and whip until creamy.
- Open one can of crescent rolls and unroll it into the bottom of the prepared baking dish, pressing seams together.
- Pour the cream cheese mixture over the crust and spread it evenly.
- Open the second can of crescent rolls and place it over the cream cheese filling.
- Mix the remaining 1/2 cup of sugar with ground cinnamon and sprinkle generously over the top.
- Place the bars in the preheated oven and bake for 30-35 minutes until golden brown.
- Remove from the oven and let cool for at least 30 minutes before slicing.
- Serve and enjoy!
Notes
For best results, allow the bars to cool before slicing for neater cuts. These bars can also be frozen for up to three months.
Nutrition
- Serving Size: 1 serving
- Calories: 280
- Sugar: 20g
- Sodium: 300mg
- Fat: 18g
- Saturated Fat: 10g
- Unsaturated Fat: 8g
- Trans Fat: 0g
- Carbohydrates: 30g
- Fiber: 1g
- Protein: 4g
- Cholesterol: 50mg
Keywords: churro cheesecake, dessert bars, sweet treat
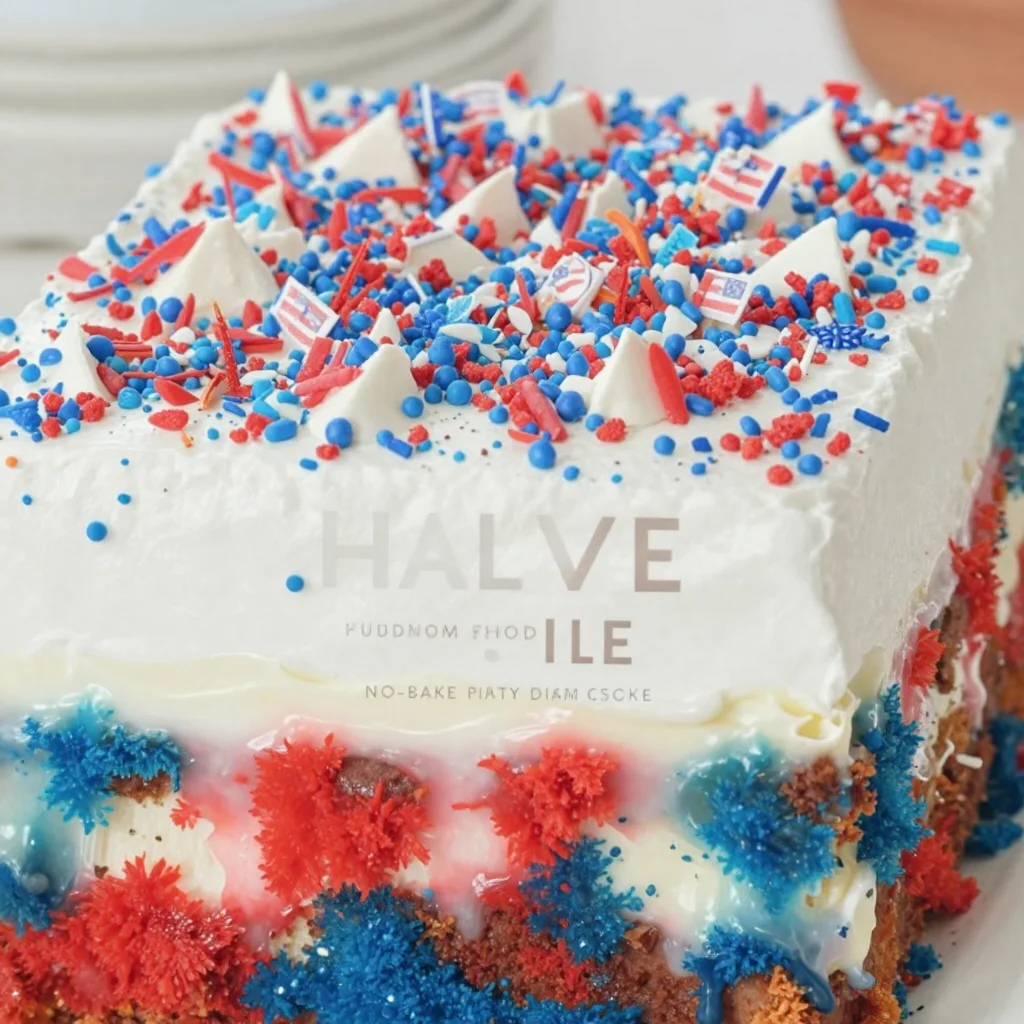
Patriotic Poke Cake: No-Bake Party Dessert for 4th of July
Celebrate with a Patriotic Poke Cake: A Festive Treat for Every Occasion
Hello, darling foodies! Today, we’re diving into a recipe that’s as vibrant as the flag itself — the Patriotic Poke Cake! This delightful dessert is perfect for any summer celebration, whether it’s the Fourth of July, a backyard barbecue, or simply a Sunday dinner that calls for something sweet. The beauty of a poke cake is in its simplicity and approachability. With just a few ingredients, we can create a show-stopper that’ll impress your friends and family, all while bringing a burst of color to the table. So let’s roll up those sleeves, tie on our aprons, and get baking!
A Sweet Slice of Nostalgia
Growing up, many of my fondest memories were shaped around the dinner table during the summer. Our family would gather at my grandmother’s house, where the air was filled with laughter, the sound of sizzling grilled meats, and, of course, the delicious aroma of her famous poke cake. My grandmother had this way of making everything feel special, and her poke cake was a staple for every celebration. I can still see her in her worn apron, gently poking holes into the cake with the end of a wooden spoon, explaining how each hole would capture sweet flavor and moisture.
I love how a poke cake took something simple and let it shine in its own way. The layers of sweetened condensed milk soaking into the delicate cake made it moist and decadent. Topped with fresh strawberries and blueberries, it became a festive masterpiece to celebrate our American spirit. This is a dish that takes me back to those cherished moments, reminding me how good food creates an atmosphere of togetherness.
Ingredients You’ll Need:
Here are your star ingredients for the Patriotic Poke Cake:
-
1 Box of White Cake Mix: The base of our cake. You can use any brand you prefer; just make sure you follow the package instructions for baking.
-
1 Cup Water: Adds moisture to the cake; using room-temperature water helps achieve a fluffy texture.
-
1/3 Cup Vegetable Oil: This keeps the cake tender and moist. If you want a flavor twist, feel free to substitute with melted coconut oil!
-
3 Large Eggs: Eggs help bind the ingredients together and provide a rich flavor. If you’re making it vegan, you can replace each egg with 1/4 cup unsweetened applesauce.
-
1 Cup Sweetened Condensed Milk: The magic ingredient! This rich and creamy milk adds sweetness and moisture. If you prefer a dairy-free option, look for coconut condensed milk.
-
1 Cup Strawberries (sliced): These provide a sweet and fresh flavor — plus, they add a pop of red goodness.
-
1 Cup Blueberries: Another fruit that adds sweetness and provides that beautiful blue hue. Frozen blueberries can be a substitute, just drain them well.
-
1 Cup Whipped Topping: For that final creamy layer, you can use store-bought or homemade whipped cream. If you’re avoiding dairy, a coconut whipped topping works wonderfully.
-
Red and Blue Food Coloring: To enhance those patriotic colors! You can skip this if you prefer the natural look, but a little color never hurts for some festive fun!
Step-By-Step Instructions
Now that we have our ingredients ready, let’s get into the cooking. This cake is a breeze to whip up!
-
Preheat the Oven: Start by preheating your oven to 350°F (175°C). This ensures your cake bakes evenly.
-
Prepare Your Cake Batter: In a large mixing bowl, combine the white cake mix, water, vegetable oil, and eggs. [Chef tip: Mix this on medium speed for about 2 minutes until the batter is smooth and well combined.]
-
Bake the Cake: Pour the batter into a greased 9×13 inch baking dish. [Here’s a little hack: Make sure you spread the batter evenly to avoid uneven baking.] Bake according to the package directions, usually around 30-35 minutes, or until a toothpick comes out clean.
-
Cool the Cake: Once your cake is done baking, let it cool in the pan for about 10-15 minutes. After that, take a skewer or the handle of a wooden spoon and poke holes all over the top of the cake, about an inch apart. This is where all the flavor magic happens!
-
Add the Sweetened Condensed Milk: Carefully pour the sweetened condensed milk over the warm cake, ensuring that it seeps into the holes. [Chef insight: Letting the cake soak while it’s still warm will help it absorb more moisture.]
-
Chill Your Cake: Cover your cake with plastic wrap and pop it in the refrigerator for at least 2 hours, or overnight if you can wait! This step is crucial for flavor development.
-
Top It Off: Once chilled, spread your whipped topping evenly across the cake. Now, here comes the fun part — let’s decorate!
-
Create a Patriotic Design: Arrange the sliced strawberries and blueberries on top of the whipped topping to showcase those red, white, and blue colors. You can create a flag design or any pattern that excites you!
Serving Suggestions
To serve this lovely cake, slice it generously into squares, and plate each piece with a dollop of extra whipped topping and a fresh berry on top for a beautiful presentation. Don’t forget to set the mood! Scented candles, colorful plates, and maybe even some festive napkins will enhance the experience and make your guests feel special.
Recipe Variations
Feel free to get creative with this cake! Here are a few ideas:
-
Layered Poke Cake: Consider making two layers of cake and sandwiching the filling between them for a show-stopping effect.
-
Flavor Twist: Instead of white cake, use lemon or almond cake mix for an unexpected yet delightful flavor.
-
Dietary Swaps: Try a gluten-free cake mix for a gluten-free option or make mini poke cakes in muffin tins for single-serving treats.
-
Fruit Mix-up: Swap the strawberries and blueberries with your favorite seasonal fruits — think peaches or kiwi for a tropical twist!
-
Chocolate Sprinkle: Want to tempt chocolate lovers? Add cocoa powder to the cake mix or use chocolate whipped topping!
Chef’s Notes
I have to tell you, this recipe has evolved beautifully over the years. The first time I made it was quite a spectacle! I forgot to poke holes in the cake, and let me tell you, it turned out like a dense sponge. Lesson learned, but that’s the beauty of cooking — we learn from our moments in the kitchen, and each mistake leads to greater adventures! Now, it’s one of my go-to desserts when I want to impress someone (and, let’s be real, it always gets rave reviews!).
FAQs and Troubleshooting
-
Why did my poke cake turn out dry? Make sure to pour the sweetened condensed milk while the cake is warm. Additionally, letting it chill for at least 2 hours is essential for moistened goodness!
-
Can I freeze my poke cake? Absolutely! Just be sure to wrap it tightly in plastic wrap. It can be frozen for up to three months. Just thaw it in the fridge overnight before serving.
-
My cake fell while baking. What happened? This can happen if you opened the oven door too soon. Always wait for at least the first 20 minutes before peeking!
-
Can I use cool whip instead of whipped topping? Yes! If you’re looking for convenience, Cool Whip is a great alternative, just be sure to defrost it properly before spreading.
Nutritional Info
While nutrition details can vary, a serving of this Patriotic Poke Cake typically contains about 250-300 calories. Remember, it’s all about enjoying the moment around the table!
So, there you have it — a vibrant and delicious Patriotic Poke Cake that will have everyone asking for seconds. Whether it’s for a holiday or a casual gathering, this cake is your ticket to creating wonderful memories. I hope you try it out and make it your own. Happy baking, and let’s raise a slice to all the beautiful moments that food can share!
PrintPatriotic Poke Cake
A festive poke cake topped with strawberries and blueberries, perfect for summer celebrations.
- Prep Time: 15 minutes
- Cook Time: 35 minutes
- Total Time: 50 minutes
- Yield: 12 servings 1x
- Category: Dessert
- Method: Baking
- Cuisine: American
- Diet: Vegetarian
Ingredients
- 1 Box of White Cake Mix
- 1 Cup Water
- 1/3 Cup Vegetable Oil
- 3 Large Eggs
- 1 Cup Sweetened Condensed Milk
- 1 Cup Strawberries (sliced)
- 1 Cup Blueberries
- 1 Cup Whipped Topping
- Red and Blue Food Coloring
Instructions
- Preheat the oven to 350°F (175°C).
- Combine the white cake mix, water, vegetable oil, and eggs in a large mixing bowl, mixing for about 2 minutes until smooth.
- Pour the batter into a greased 9×13 inch baking dish and bake according to package directions for 30-35 minutes.
- Cool the cake in the pan for 10-15 minutes, then poke holes all over the top.
- Pour the sweetened condensed milk over the warm cake.
- Chill the cake covered with plastic wrap in the refrigerator for at least 2 hours.
- Spread whipped topping evenly across the chilled cake.
- Arrange sliced strawberries and blueberries on top in a patriotic design.
Notes
Letting the cake soak while still warm helps absorb more moisture. For different flavors, try lemon or almond cake mix.
Nutrition
- Serving Size: 1 slice
- Calories: 275
- Sugar: 23g
- Sodium: 320mg
- Fat: 9g
- Saturated Fat: 2g
- Unsaturated Fat: 7g
- Trans Fat: 0g
- Carbohydrates: 40g
- Fiber: 1g
- Protein: 4g
- Cholesterol: 50mg
Keywords: poke cake, patriotic dessert, summer cake, festive dessert, easy cake recipe
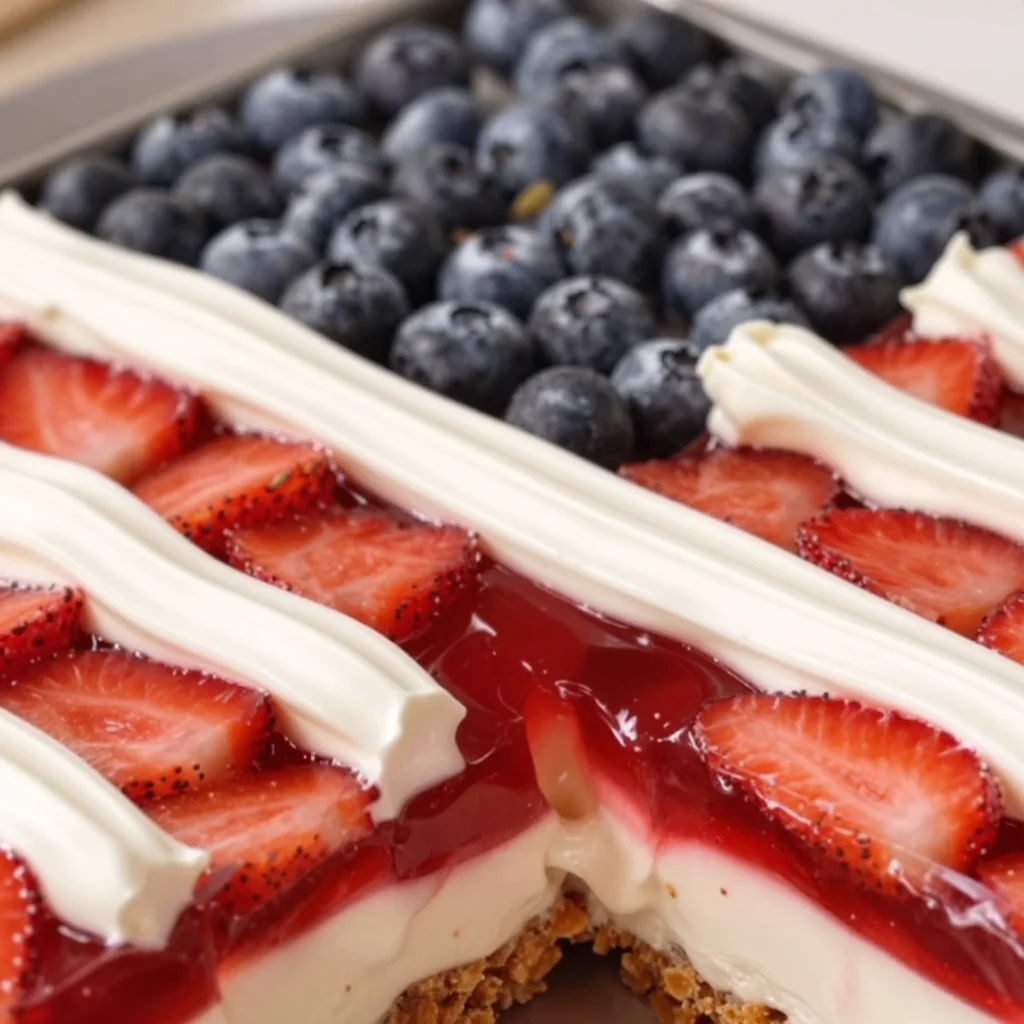
Beginner-Friendly No-Bake Strawberry Pretzel Jello Salad
The Best Strawberry Pretzel Jello Salad Recipe
Hello there, fellow foodies! Today, I’m thrilled to share with you one of the most delightful recipes that holds a treasure trove of memories for me: Strawberry Pretzel Jello Salad. This beautiful dish, with its salty-sweet crunch, luscious creaminess, and vibrant strawberry flavor, is not just a dessert; it’s a nostalgic journey that will transport you back to sunny picnics and family gatherings.
A Sweet Memory
Let me take you back to my childhood, where every summer was marked by family reunions and outdoor barbecues. One particular gathering stands out in my mind. The sun was shining, laughter filled the air, and my Aunt Clara arrived with a vibrant dish that instantly caught everyone’s attention—her famous Strawberry Pretzel Jello Salad.
As kids, we didn’t quite grasp the culinary artistry involved, but we knew one thing: this dish was magic. The combination of the crunchy pretzel crust, silky cream cheese layer, and jello top was simply irresistible. I remember sitting with my cousins, eagerly waiting for Aunt Clara to set down the salad, our eyes wide with anticipation. Once it hit the table, there was hardly a moment to waste before we dove in, savoring every bite.
That memory encapsulates the heart of this recipe—bringing people together over food that is as comforting as it is delicious. Today, I hope to recreate that same joy for you with my favorite Strawberry Pretzel Jello Salad recipe!
Ingredients
Before we get started, here’s what you’ll need to whip up this masterpiece. Don’t worry; each ingredient has its own charm, and I’ve included some fun tips along the way!
-
2 1/2 cups pretzels, coarsely chopped
A classic ingredient that gives this dish its signature salty crunch. Feel free to use any type of pretzel—rods, twists, or even gluten-free pretzels for a dietary swap. Just make sure they’re coarsely chopped to maintain that delightful texture! -
1/4 cup granulated white sugar
This sugar will blend with the pretzels and butter, adding a touch of sweetness to the salty base. If you prefer a healthier alternative, you can swap it out for coconut sugar or a sugar substitute. -
1/2 cup butter, melted
Butter binds the crust together and adds richness. For a lighter option, you can use unsalted margarine or even a plant-based butter. -
16 ounces Tru Whip or Cool Whip
This is the key to keeping your dessert light and fluffy. I personally prefer Cool Whip due to its texture—just keep an eye out for those pesky MSG ingredients. If you want a homemade alternative, you can whip heavy cream with a touch of powdered sugar instead. -
8 ounces cream cheese
The creamy heart of this salad! Make sure it’s softened to room temperature so it blends smoothly. If you’re looking for a lighter version, you can use whipped cream cheese or Neufchâtel. -
1 cup granulated white sugar
This sugar plays a vital role in sweetening the cream cheese layer. If you’re feeling adventurous, feel free to experiment with agave or maple syrup! -
6 ounces instant strawberry jello
The star of the show! This ingredient adds a burst of flavor and that stunning bright red hue. You can easily switch it up with other flavors like raspberry or peach if you’re in the mood for a twist. -
2 cups boiling water
This will dissolve your jello and bring everything together. -
1 quart strawberries, hulled and sliced (fresh or frozen that have been thawed)
Strawberries lend their freshness and bright flavor. If they’re out of season, you can use frozen strawberries, but make sure to thaw and drain them well to avoid excess liquid.
Step-by-Step Instructions
Alright, let’s dive into the fun part! Follow these steps, and I promise you’ll have a show-stopping Strawberry Pretzel Jello Salad ready in no time.
-
Preheat and Prep
Preheat your oven to 350°F (175°C). Grab a 9×13 baking dish and have it ready for your crust. Trust me, the perfect layer of pretzel goodness needs the right home! -
Make the Pretzel Crust
In a mixing bowl, combine the coarsely chopped pretzels, melted butter, and 1/4 cup of granulated sugar. Mix until the pretzels are well coated—your kitchen will start to smell fantastic already! -
Bake the Crust
Pour that crunchy mixture into your baking dish and press it down firmly. You want it to be evenly distributed so every bite has that delicious crunch. Bake for about 10 minutes or until the edges are slightly golden. Keep an eye on it! -
Prepare the Cream Cheese Layer
While the pretzel crust cools, let’s make the cream cheese layer. In a mixing bowl, beat the softened cream cheese and 1 cup of granulated sugar until smooth and creamy. Add in the whipped topping (Cool Whip or Tru Whip) and mix until fully combined. This duo is going to be so creamy and dreamy! -
Spread the Cream Cheese Mixture
Once your pretzel crust has cooled completely, spread the creamy mixture evenly over the pretzel crust. Grab a spatula and work your magic! Make sure it’s smooth, leaving a little space around the edges to keep it looking lovely. -
Prepare the Jello Layer
In a separate bowl, dissolve the instant strawberry jello in 2 cups of boiling water. Stir it well until it’s fully dissolved, then let it cool for a few minutes. -
Add the Strawberries
Once the jello has slightly cooled (but not set!), stir in the hulled and sliced strawberries. This is where the magic happens! The fresh strawberries will shine through, and your jello will shimmer beautifully. -
Pour the Jello Layer
Gently pour the strawberry mixture over the cream cheese layer, ensuring it spreads evenly. This is where patience comes in—allow the jello to settle evenly without mixing it into the cream cheese layer beneath. -
Chill
Cover the dish with plastic wrap or a lid and pop it in the fridge for at least 4 hours, or until the jello is fully set. This step is crucial for achieving that lovely layered effect. -
Slice and Serve
Once set, slice yourself a generous portion, and if you’re feeling extra fancy, top it with a dollop of whipped topping or a sprinkle of crushed pretzels for added crunch.
Serving Suggestions
For plating, use a sharp knife to make clean cuts through the layers, exposing those breathtaking colors. Serve it chilled, and for an added touch of elegance, you can garnish with fresh mint leaves or a dusting of powdered sugar. Trust me, these little touches elevate the experience!
Recipe Variations
Here are a few creative twists you can try to make this dish your own:
- Berry Mixer: Swap in different berries like raspberries or blackberries for a flavor twist. You could even mix them for a delightful blend!
- Change the Jello Flavor: Try peach or blue raspberry jello for an unexpected flavor profile.
- Nutty Pretzel Crust: Add crushed nuts like pecans or almonds to your pretzel crust for an added crunch and flavor.
- Use Yogurt: Replace the cream cheese layer with Greek yogurt for a lighter version, perfect for a warm day.
- Vegan-Friendly: Use dairy-free cream cheese and whipped topping to create a plant-based version that everyone can enjoy.
Chef’s Notes
One of the most fun parts about cooking is how recipes evolve over time. This Strawberry Pretzel Jello Salad has seen countless iterations in my kitchen. From adding fresh herbs to the strawberry layer (yes, basil pairs surprisingly well!) to trying out flavored cream cheeses, every attempt has added a personal touch. And oh, the mishaps! I once forgot to add the boiling water to the jello and ended up with a lovely strawberry-flavored gelatin blob that wouldn’t set! But hey, that’s kitchen life for you; we learn and laugh!
FAQs and Troubleshooting
1. Why did my jello not set properly?
If your jello didn’t set, it might be due to not dissolving it thoroughly in boiling water or using more than the recommended water. Make sure to follow the jello package instructions closely!
2. Can I use fresh strawberries instead of frozen?
Absolutely! Fresh strawberries work beautifully, and as long as they’re in season, you’ll get the best flavor. If using frozen, be sure to thaw and drain them well.
3. How long can I keep this salad?
In the fridge, it can last about 3-5 days, so feel free to make it ahead of time for events. Just make sure it’s covered well to prevent it from absorbing other fridge smells!
4. What can I do if it’s too sweet?
If you find it too sweet, you can balance it out by adding a bit of lemon juice to the cream cheese layer before mixing. This adds brightness and cuts through the sweetness perfectly!
Nutritional Info
While this sweet treat is a crowd favorite, keep in mind it does have its indulgences. One serving (approximately 1/12 of the dish) typically contains about 200 calories, depending on the exact brands and quantities used. It’s best enjoyed in moderation!
There you have it—the BEST Strawberry Pretzel Jello Salad you’ll ever make! I hope this recipe brings as much joy to you and your loved ones as it has to me through the years. So tie on that apron, gather your ingredients, and dive into this delightful dish. Happy cooking!
PrintThe Best Strawberry Pretzel Jello Salad
A nostalgic dessert salad featuring a crunchy pretzel crust, creamy cheese layer, and vibrant strawberry jello topping.
- Prep Time: 15 minutes
- Cook Time: 10 minutes
- Total Time: 240 minutes
- Yield: 12 servings 1x
- Category: Dessert
- Method: Baking
- Cuisine: American
- Diet: Vegetarian
Ingredients
- 2 1/2 cups pretzels, coarsely chopped
- 1/4 cup granulated white sugar
- 1/2 cup butter, melted
- 16 ounces Tru Whip or Cool Whip
- 8 ounces cream cheese, softened
- 1 cup granulated white sugar
- 6 ounces instant strawberry jello
- 2 cups boiling water
- 1 quart strawberries, hulled and sliced
Instructions
- Preheat your oven to 350°F (175°C) and prepare a 9×13 baking dish.
- Combine pretzels, melted butter, and 1/4 cup sugar in a mixing bowl.
- Press the pretzel mixture into the baking dish and bake for about 10 minutes.
- Beat cream cheese and 1 cup of sugar until smooth, then mix in whipped topping.
- Spread the cream cheese mixture over the cooled pretzel crust.
- Dissolve the jello in boiling water and let cool slightly.
- Stir in the sliced strawberries into the cooled jello mixture.
- Pour the strawberry jello mixture over the cream cheese layer.
- Chill in the refrigerator for at least 4 hours.
- Slice and serve with optional toppings of whipped topping or crushed pretzels.
Notes
Can be made ahead of time and stored in the fridge for 3-5 days. Ensure it is covered to avoid absorbing other fridge odors.
Nutrition
- Serving Size: 1 serving
- Calories: 200
- Sugar: 20g
- Sodium: 300mg
- Fat: 10g
- Saturated Fat: 5g
- Unsaturated Fat: 5g
- Trans Fat: 0g
- Carbohydrates: 25g
- Fiber: 1g
- Protein: 3g
- Cholesterol: 30mg
Keywords: strawberry, dessert, jello salad, pretzel salad, summer recipes, picnic food
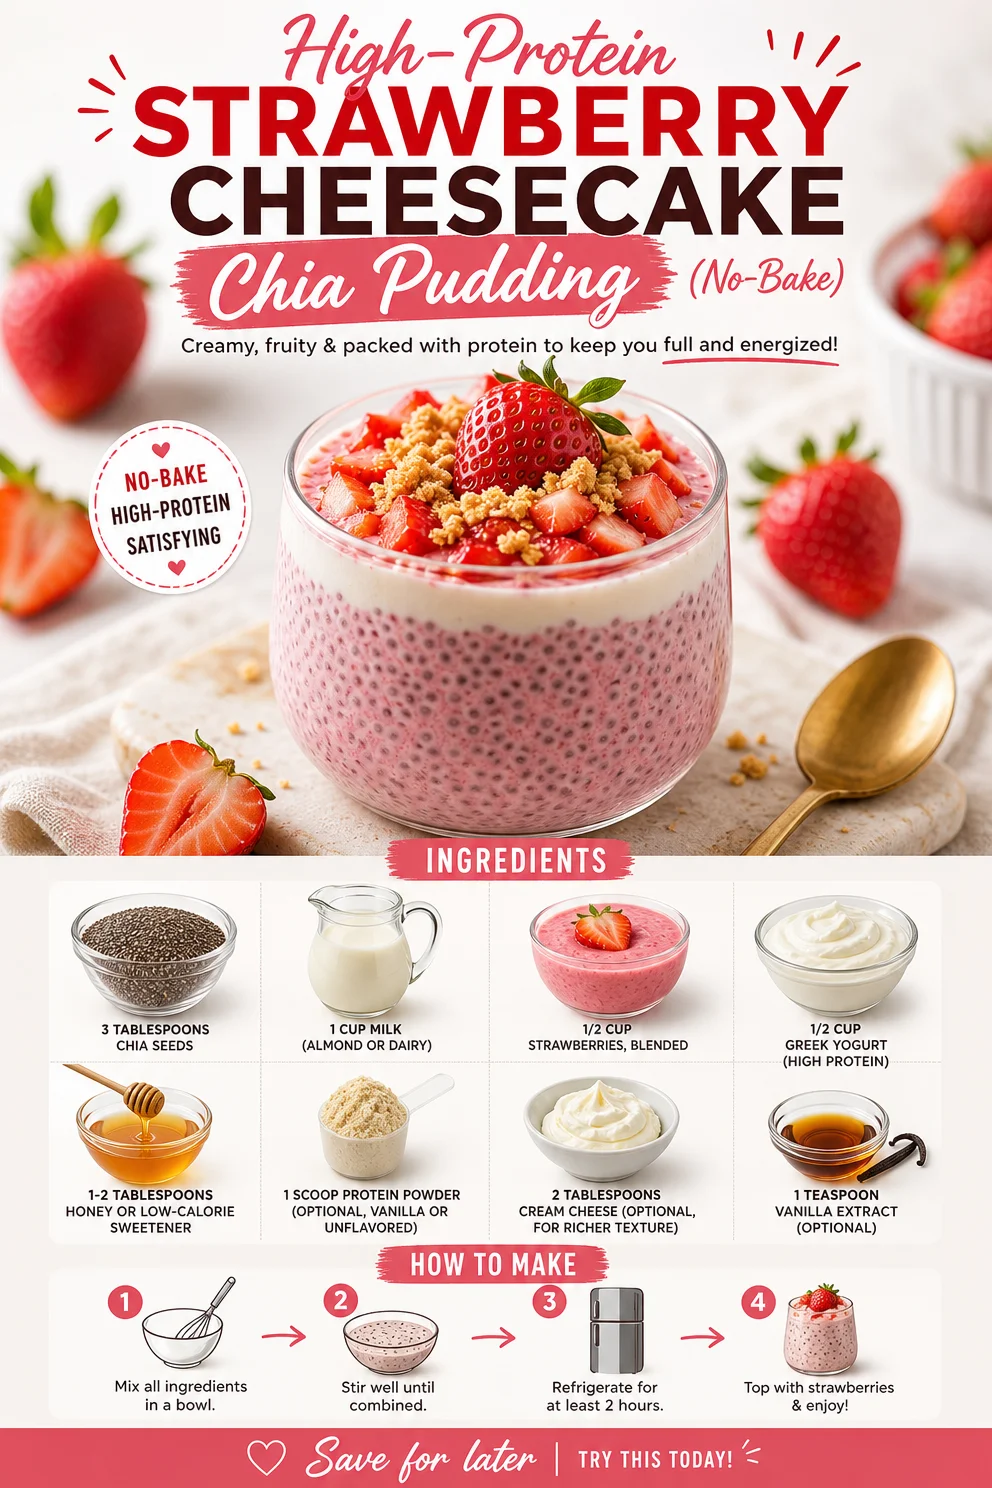
High-Protein Strawberry Cheesecake Chia Pudding (No-Bake)
High Protein Strawberry Cheesecake Chia Seed Pudding: A Delightful Twist on a Classic Treat
Welcome to the delightful world of High Protein Strawberry Cheesecake Chia Seed Pudding! If you’re anything like me, the sight of a creamy, dreamy dessert puts a smile on your face. This pudding isn’t just pretty; it’s packed with nutrition, flavor, and that indulgent cheesecake vibe that keeps you coming back for more. What could be better than enjoying a luscious dessert that doubles as a healthy breakfast or snack? So tie on your apron, grab your favorite mixing bowl, and let’s get cooking!
A Sweet Memory
When I think of dessert, my mind drifts back to long summer afternoons spent in my grandmother’s kitchen. There she was, a whirlwind of flour and sugar, creating swoon-worthy cheesecakes that filled our home with the scent of vanilla and berry goodness. I can still picture the way she’d smile while cracking eggs and mixing those creamy batters. Each delicious bite was a hug from her heart to ours, and I learned that cooking was not just about food—it was about creating connections. With strawberries juicy and sweet in season, we often turned to cheesecake recipes to celebrate every birthday, holiday, and family gathering. While this High Protein Strawberry Cheesecake Chia Seed Pudding is a healthier twist, it carries the same spirit of love and comfort from my childhood. Let’s make some new memories together!
Ingredients
Here’s everything you’ll need to whip up this fabulous dish. Each ingredient is a key player, so let’s break them down:
-
3 tablespoons chia seeds
- Why they’re great: Chia seeds are packed with fiber, omega-3 fatty acids, and protein. They also gel up beautifully, giving our pudding that creamy texture we love.
- Chef’s tip: If you’re in a pinch, flax seeds can be a nice substitute, but know that they won’t produce the same silky consistency.
-
1 cup milk (almond or dairy)
- Why it matters: The milk adds creaminess and flavor. You can go for whole, skim, or even nut milk for a dairy-free version.
- Substitution hint: Try coconut milk for a tropical flair or oat milk for a touch of sweetness.
-
1/2 cup strawberries, blended
- Berry goodness: Strawberries infuse the pudding with natural sweetness and vibrant color. I recommend using fresh, ripe strawberries for the best flavor.
- Chef insight: Frozen strawberries work, too! Just thaw them before blending for an equally delicious dessert.
-
1/2 cup Greek yogurt (high protein)
- Nutritional star: Greek yogurt is a protein powerhouse, making this dessert satisfying and great for muscle recovery.
- Substitution tip: If you’re avoiding dairy, opt for non-dairy yogurt—there are many delicious options available now!
-
1-2 tablespoons honey or low-calorie sweetener
- Taste enhancer: Honey adds a lovely floral sweetness, while your favorite low-calorie sweetener can keep it guilt-free.
- Switch it up: Maple syrup or agave nectar can also be used, each bringing a unique twist.
-
1 scoop protein powder (optional, vanilla or unflavored)
- Optional perk: If you’re looking to boost your protein intake, this is where you can sneak it in without compromising flavor.
-
2 tablespoons cream cheese (optional, for richer texture)
- Cheesecake magic: Cream cheese provides that cheesecake richness we all adore. This optional ingredient transforms pudding to dessert perfection.
-
1 teaspoon vanilla extract (optional)
- Flavor boost: Vanilla extract enhances everything—don’t skip it if you want that warm, comforting taste of homemade goodness.
Step-by-Step Instructions
Now for the fun part—let’s assemble our masterpiece! Follow these steps, and I promise you’ll have a delectable dessert in no time.
-
Prep the Chia Seeds
In a bowl, combine your 3 tablespoons of chia seeds with 1 cup of milk. Stir them well to ensure that all the seeds are submerged. This is the foundation of our pudding! -
Let it Rest
Cover the bowl with plastic wrap or a lid and let it rest in the refrigerator for at least 2 hours, or overnight if you’re planning ahead. The chia seeds will soak up the milk and develop that delightful pudding texture. While you’re waiting, why not catch up on your favorite cooking show? -
Blend Your Strawberries
While the chia seeds are doing their thing, it’s time to prep our strawberries. Toss 1/2 cup of fresh (or thawed) strawberries into a blender. Blend on high until smooth like a dreamy puree. Taste and adjust sweetness if desired! -
Mix in Yogurt and Sweetener
Once your chia seeds have jellied up, add in the blended strawberries, 1/2 cup of Greek yogurt, and 1-2 tablespoons of honey or your preferred sweetener into the chia mixture. Stir well until everything is beautifully combined. You want every spoonful to have that luscious strawberry goodness! -
Add Cream Cheese and Protein Powder (optional)
If you’re using them, mix in 2 tablespoons of cream cheese and 1 scoop of protein powder at this stage. The cream cheese can be softened in the microwave for a few seconds to make blending easier. This step gives the pudding that rich cheesecake vibe we’re aiming for. Stir until everything is fully incorporated. -
Flavor Boost
If you’re feeling fancy, add 1 teaspoon of vanilla extract for that delightful aroma. Mix until well-combined, and taste to adjust any flavors—maybe a touch more honey or an extra scoop of protein powder? -
Chill Again
Cover the bowl again and let your pudding chill in the fridge for at least another hour. This allows the flavors to meld together beautifully. And trust me, it’s worth the wait! -
Serve!
Once it’s all set, give it a good stir. The pudding will be thicker than before, and oh-so-delicious! Scoop it into your best bowls or dessert cups, and top with a few fresh strawberry slices or even a dollop of extra yogurt.
Serving Suggestions
Presentation is everything, even for pudding! Layer the chia seed pudding in clear cups to show off that beautiful color. Add a layer of blended strawberries at the bottom, followed by the chia mixture, and top with a few more whole strawberries or a sprinkle of granola for crunch. A drizzle of honey or a dollop of whipped cream can take it over the top!
Recipe Variations
- Tropical Twist: Swap out the strawberries for mango or pineapple for a refreshing tropical version.
- Chocolate Delight: Add cocoa powder or chocolate protein powder to make a rich chocolate version.
- Nutty Goodness: Stir in a tablespoon of almond or peanut butter for extra flavor and healthy fats.
- Spiced Chai: Add a dash of cinnamon or nutmeg for a cozy, spiced take on this pudding.
- No Sugar Added: Use ripe bananas in place of sweetener for a naturally sweet treat.
Chef’s Notes
This recipe has truly evolved over time. I originally started with standard chia seed pudding, and a few trials later, I found myself experimenting with flavors and textures until I hit on this high-protein cheesecake version. I remember the first time I served it at a breakfast gathering—it vanished faster than I could say “chia”! What I love most about this dish is its adaptability. Whether you want a quick breakfast or a show-stopping dessert, it fits the bill perfectly!
FAQs and Troubleshooting
Q: My pudding didn’t thicken. What went wrong?
A: The chia seeds need time to absorb the liquid and create that gel-like consistency. Make sure you let it chill long enough, preferably overnight. If it’s still runny, you can add a bit more chia seeds and let it sit for another hour.
Q: Can I make this vegan?
A: Absolutely! Use plant-based yogurt and milk, and skip the cream cheese. The pudding will still be delightful!
Q: How long will this keep in the fridge?
A: This pudding can last up to 3 days in the fridge. Be sure to store it in an airtight container.
Q: Can I double the recipe?
A: Yes! This is a fantastic make-ahead dish, so feel free to double it. Just remember the chilling time will remain the same.
Nutritional Info
While I don’t have exact nutritional values here, you can easily calculate them based on your specific ingredients and portion size. Generally, this pudding is low in sugar, high in protein (thanks to the Greek yogurt and optional protein powder), and packed with fiber from chia seeds—making it a guilt-free indulgence.
Let’s raise our spoons to new recipes, cherished memories, and delicious moments around the table! I can’t wait for you to try this High Protein Strawberry Cheesecake Chia Seed Pudding. Happy cooking, and remember—good food isn’t just about taste; it’s about making memories!
PrintHigh Protein Strawberry Cheesecake Chia Seed Pudding
A healthy twist on the classic cheesecake, this pudding is rich in protein and perfect for breakfast or dessert.
- Prep Time: 15 minutes
- Cook Time: 0 minutes
- Total Time: 135 minutes
- Yield: 4 servings 1x
- Category: Dessert
- Method: Chilling
- Cuisine: American
- Diet: Vegetarian
Ingredients
- 3 tablespoons chia seeds
- 1 cup milk (almond or dairy)
- 1/2 cup strawberries, blended
- 1/2 cup Greek yogurt (high protein)
- 1–2 tablespoons honey or low-calorie sweetener
- 1 scoop protein powder (optional, vanilla or unflavored)
- 2 tablespoons cream cheese (optional, for richer texture)
- 1 teaspoon vanilla extract (optional)
Instructions
- Prep the chia seeds: In a bowl, combine your 3 tablespoons of chia seeds with 1 cup of milk. Stir them well to ensure that all the seeds are submerged.
- Let it rest: Cover the bowl with plastic wrap or a lid and let it rest in the refrigerator for at least 120 minutes or overnight.
- Blend your strawberries: Toss 1/2 cup of fresh or thawed strawberries into a blender. Blend on high until smooth.
- Mix in yogurt and sweetener: Once your chia seeds have jellied up, add in the blended strawberries, 1/2 cup of Greek yogurt, and 1-2 tablespoons of honey or your preferred sweetener into the chia mixture. Stir well.
- Add cream cheese and protein powder (optional): If you’re using them, mix in 2 tablespoons of cream cheese and 1 scoop of protein powder.
- Flavor boost: If you’re feeling fancy, add 1 teaspoon of vanilla extract for that delightful aroma.
- Chill again: Cover the bowl again and let it chill in the fridge for at least another 60 minutes.
- Serve! Once it’s all set, give it a good stir and scoop it into bowls or dessert cups.
Notes
Enjoy fresh and vibrant flavors by layering the pudding for presentation.
Nutrition
- Serving Size: 1 serving
- Calories: 250
- Sugar: 8g
- Sodium: 100mg
- Fat: 8g
- Saturated Fat: 3g
- Unsaturated Fat: 5g
- Trans Fat: 0g
- Carbohydrates: 30g
- Fiber: 8g
- Protein: 12g
- Cholesterol: 10mg
Keywords: chia pudding, high protein dessert, healthy cheesecake, strawberry pudding, nutritious snack
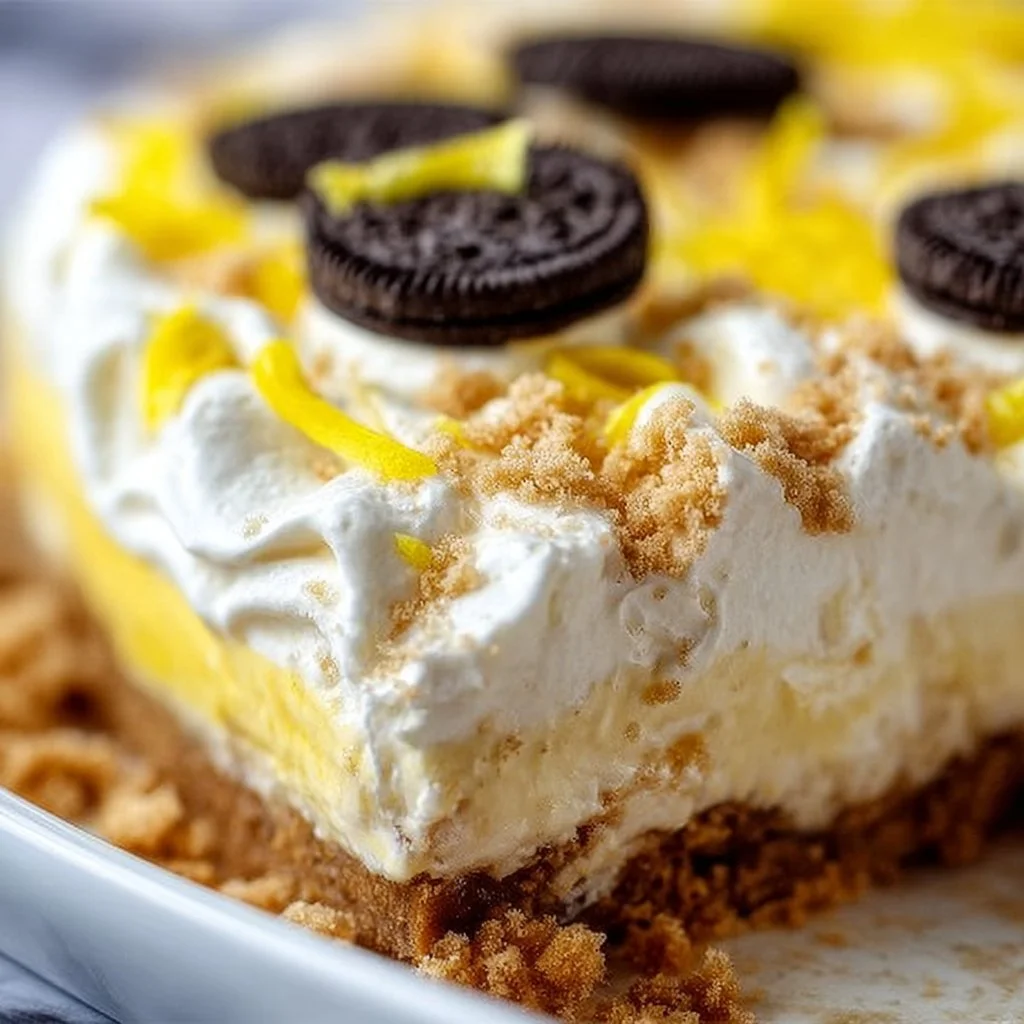
Heavenly Oreo Lemon Dessert
Heavenly Oreo Lemon Dessert: A Delightful Treat to Brighten Your Day
Hello, fellow food enthusiasts! If you’re ready to embark on a culinary journey that harmonizes the rich, chocolatey goodness of Oreos with the zesty, refreshing notes of lemons, then you’ve stumbled upon the perfect recipe! Today, I’m thrilled to share my Heavenly Oreo Lemon Dessert—a sweet indulgence that’s not only super easy to make but also sure to steal the spotlight at your next gathering.
Introduction
Let’s face it—life can sometimes feel a bit heavy, like that feeling when you have too many dishes in the sink or the laundry is piling up. So, what’s a great way to lift your spirits? A beautiful dessert, of course! This Heavenly Oreo Lemon Dessert combines the classic flavors of Oreos with a light, creamy lemon filling that dances on your taste buds. It’s the kind of dessert that brings joy with every bite—perfect for celebrations, picnics, or simply a treat for yourself after a long day.
You know, when I first made this delightful dish, I wasn’t sure how the creamy lemon would pair with the crunchy chocolate crumbs. But after the first taste, I was hooked! The flavors meld so perfectly that they create a blissful medley that’s both indulgent and refreshing. Plus, there’s something unique and playful about using Oreos in a dessert that’s meant to be light and airy. Whether you’re serving it at a dinner party or simply treating yourself on a Tuesday, this dessert will undoubtedly impress!
And here’s the best part: it requires minimal effort and just a few simple ingredients! So, roll up your sleeves and let’s create something extraordinary that’s guaranteed to create beautiful moments around your table.
Personal Story
I remember the first time I rolled out this dessert at a family get-together. My cousin was celebrating her birthday, and I was determined to try a refreshing twist on the traditional chocolate cake. As I whipped together the creamy filling and crushed Oreos, I could hear the cheerful chatter, laughter, and clinking of glasses in the background.
When I brought this dessert out, I was met with curious gazes followed by wide smiles. One bite and everyone was swept away by the refreshing lemon flavor—a perfect complement to the rich, chocolatey crust. That day, my dessert not only stole the show; it also became the highlight of our family gatherings. Now, I can’t make this dessert without thinking of that joyful day filled with love, laughter, and—of course—amazing food. It’s incredible how a simple recipe can create lasting memories!
Ingredients
Here’s what you need for this delightful treat:
-
1 package of Oreo cookies
The star of our crust! You can use regular Oreos or try other varieties like Golden Oreos for a fun twist. -
1/2 cup unsalted butter, melted
This helps bind the crushed Oreos together, creating a deliciously crisp crust. If you’re looking for a dairy-free option, coconut oil works well as a substitute! -
8 oz cream cheese, softened
Adds that rich, creamy texture. For a lighter alternative, consider using Neufchâtel cheese, which has less fat but still delivers on creaminess. -
1/2 cup powdered sugar
Sweetens the filling without adding graininess. If you’re looking for a healthier option, you can substitute it with agave syrup or honey—just adjust the quantity to taste! -
1 cup whipped topping
This gives the dessert a light, fluffy feel. Can’t find ready-made whipped topping? Feel free to whip some heavy cream until soft peaks form—it’ll add an extra luscious touch! -
1 cup lemon juice
The star flavor that brings the zing! Freshly squeezed lemon juice makes a noticeable difference, but you can use bottled juice in a pinch. -
1 tablespoon lemon zest
This enhances the lemon flavor and adds a delightful aroma. Zesting is easy—just make sure to use the outer yellow layer of the lemon without the bitter white pith.
Step-by-Step Instructions
Now that you’ve got your ingredients ready, let’s dive into the cooking process! This dessert is all about simplicity and flavor, so I’ll guide you through each step.
-
Prep the Crust
Start by crushing your Oreo cookies into fine crumbs. You can place them in a zip-top bag and smash them with a rolling pin, or use a food processor—my favorite method! These little beauties will be the foundation of our dessert. Once they’re crushed, transfer them to a mixing bowl. -
Combine with Butter
Pour the melted unsalted butter over the Oreo crumbs. Mix with a fork until the crumbs are evenly coated and resemble wet sand. It’s okay if there are a few larger bits; they’ll add a nice texture! -
Form the Crust
Press the mixture into the bottom of a 9×9-inch square baking pan (or any dish you have on hand). Make sure to pack it firmly; this will help it hold together nicely when you cut into it later. Once done, pop it into the fridge to set while you prepare the filling. -
Make the Filling
In a large mixing bowl, beat the softened cream cheese and powdered sugar together until smooth and creamy. This usually takes about 2-3 minutes. Remember to scrape the sides of the bowl to combine everything thoroughly! -
Add Whipped Topping and Lemon Juice
Gently fold in the whipped topping using a spatula. This helps keep the filling light and airy. Next, add in the lemon juice and zest. Mix until fully combined and oh-so-creamy—this will make your heart sing! -
Spread the Filling
Pour the luscious lemon cream filling over your chilled Oreo crust. Smooth the top with a spatula for a polished finish—you want it to look as good as it tastes! -
Chill to Set
Cover the dish with plastic wrap and chill in the refrigerator for at least 4 hours (or overnight if you can resist!). This allows the filling to firm up and the flavors to meld beautifully. Trust me, the wait will be worth it!
Serving Suggestions
When it’s time to serve, slice this dessert into squares for that perfect bite-sized treat! You can garnish each piece with a sprinkle of extra lemon zest or a dollop of whipped topping for that elegant touch. Pair it with a fresh mint leaf for a pop of color—presentation is key, even for a laid-back dessert!
Recipe Variations
Feeling adventurous? Here are a few delicious twists you can try:
-
Berry Delight: Add a layer of fresh berries (like strawberries or blueberries) on top of your lemon filling before chilling for a fruity burst.
-
Choco-Mint Magic: Mix in a drop of peppermint extract into the filling for a refreshing minty flavor that complements the chocolate crust beautifully.
-
Gluten-Free Option: Use gluten-free Oreo cookies if you want to make this dessert suitable for gluten-sensitive friends or family.
Chef’s Notes
Throughout my culinary journey, I’ve learned that cooking is all about experimentation and fun! The first time I made this dessert, it was just a spontaneous idea after I found a stash of Oreos in my pantry. Now, it’s become a staple in my dessert repertoire! It never fails to evoke fond memories while delighting everyone who takes a bite.
One of my favorite kitchen moments involved me not checking the consistency of the filling before serving it to guests. Let’s just say it turned into an impromptu “scoop your own” dessert night! My friends embraced the sheer chaos and hilarity, turning it into a fun story we still laugh about. Just remember, even if things don’t go as planned, embrace the experience—it’s all part of the journey!
FAQs and Troubleshooting
1. Can I prepare the dessert a day ahead?
Definitely! In fact, doing so allows the flavors to meld and the texture to set perfectly. It’s ideal for parties!
2. Why is my filling too runny?
If your cream cheese wasn’t softened enough, it might not mix well. Make sure to allow it to come to room temperature before starting. If the filling is still too runny, a touch more powdered sugar can help thicken it.
3. How can I store leftovers?
Cover any leftovers (if you’re lucky enough to have some!) tightly in the fridge. They should last for about 3-4 days. Just make sure to enjoy this treat soon—the flavors are best when fresh!
4. Can I freeze this dessert?
Absolutely! Just wrap it tightly in plastic wrap, then foil, and you can freeze it for up to a month. Thaw in the fridge before serving!
Nutritional Info
While focusing on enjoyment and satisfaction when creating this Heavenly Oreo Lemon Dessert, it’s important to acknowledge the nutrition too! Each serving (based on a typical 9×9 dessert) contains approximately:
- Calories: 320
- Total Fat: 18g
- Saturated Fat: 9g
- Carbohydrates: 39g
- Protein: 4g
(Note: These numbers may vary slightly based on specific ingredient brands and amounts used.)
There you have it—an approachable, delightful recipe that celebrates the perfect marriage of chocolate and lemon! I can’t wait for you to try this Heavenly Oreo Lemon Dessert! Each bite is an invitation to savor the moment, whether surrounded by friends or enjoying a quiet evening at home. So tie on your apron, gather your ingredients, and let’s create something beautiful together! Happy cooking! 🍋💕
PrintHeavenly Oreo Lemon Dessert

A delightful dessert that combines the rich chocolatey goodness of Oreos with a zesty lemon filling, perfect for any gathering.
- Prep Time: 15 minutes
- Cook Time: 0 minutes
- Total Time: 240 minutes
- Yield: 9 servings 1x
- Category: Dessert
- Method: Chilling
- Cuisine: American
- Diet: Vegetarian
Ingredients
- 1 package of Oreo cookies
- 1/2 cup unsalted butter, melted
- 8 oz cream cheese, softened
- 1/2 cup powdered sugar
- 1 cup whipped topping
- 1 cup lemon juice
- 1 tablespoon lemon zest
Instructions
- Prep the crust by crushing the Oreo cookies into fine crumbs. Transfer them to a mixing bowl.
- Combine the melted unsalted butter with the Oreo crumbs and mix until evenly coated.
- Form the crust by pressing the mixture into the bottom of a 9×9-inch square baking pan. Chill in the fridge.
- Make the filling by beating the softened cream cheese and powdered sugar until smooth and creamy.
- Add the whipped topping, lemon juice, and lemon zest to the cream cheese mixture and mix until combined.
- Spread the lemon cream filling over the chilled Oreo crust.
- Chill the dessert in the refrigerator for at least 4 hours.
Notes
For a fruity burst, add a layer of fresh berries on top of the lemon filling. Use gluten-free Oreos for a gluten-sensitive option.
Nutrition
- Serving Size: 1 square
- Calories: 320
- Sugar: 19g
- Sodium: 200mg
- Fat: 18g
- Saturated Fat: 9g
- Unsaturated Fat: 6g
- Trans Fat: 0g
- Carbohydrates: 39g
- Fiber: 1g
- Protein: 4g
- Cholesterol: 30mg
Keywords: Oreo dessert, lemon dessert, easy dessert, no-bake dessert, party dessert
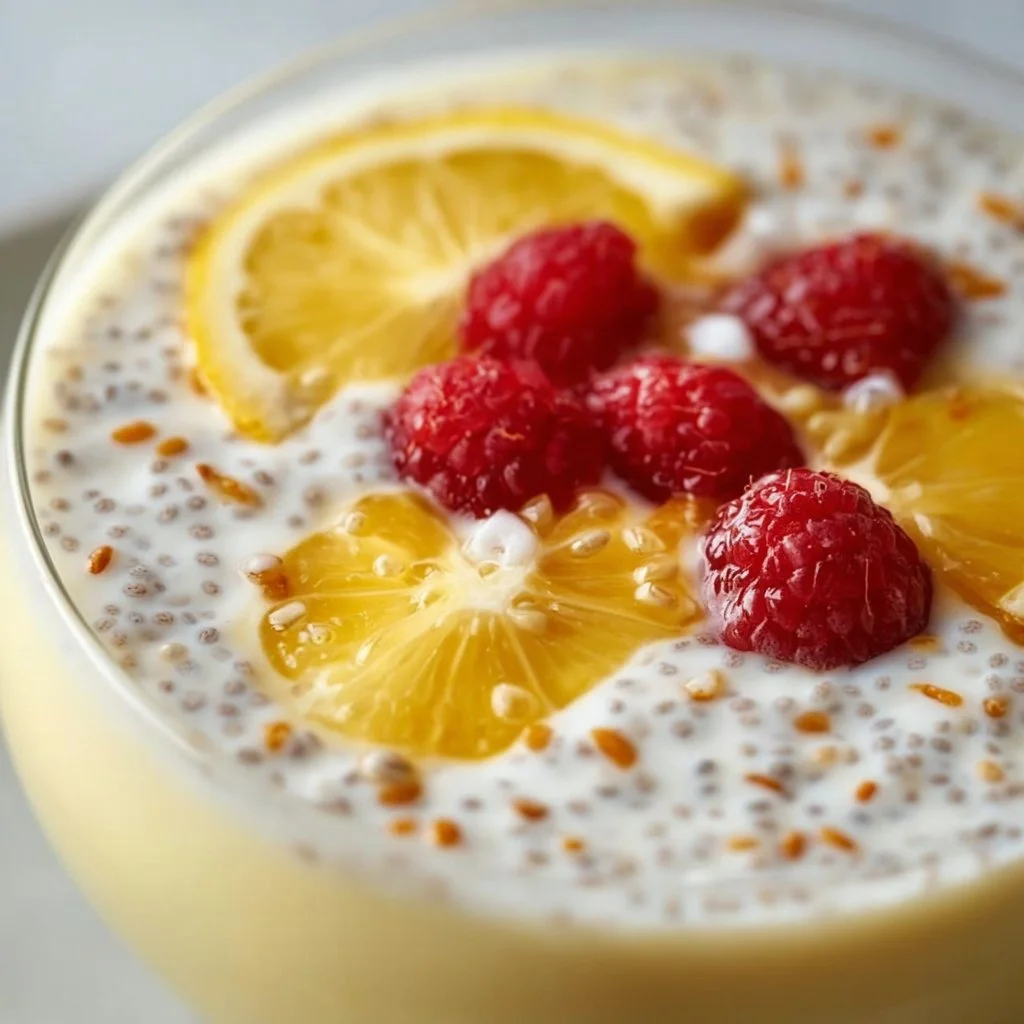
Yummy Lemon Cream Chia Pudding
Yummy Lemon Cream Chia Pudding: A Refreshing Treat for Any Occasion
Hello, my culinary comrades! 🍋 Today, we’re diving into a delightful treat that’s as refreshing as a summer breeze and as simple as can be—the Yummy Lemon Cream Chia Pudding! Now, I know what you might be thinking: “Chia pudding? Really?” But trust me, this dish is anything but ordinary. With its creamy texture, zesty lemon flavor, and eye-catching presentation, it’s sure to win hearts and taste buds alike.
Chia seeds have long been celebrated for their health benefits. They’re packed with omega-3 fatty acids, fiber, and antioxidants, making them a superfood that’s well-deserved of a place on your table. But here’s the best part: when combined with creamy yogurt or coconut milk and zesty lemon, chia seeds transform into a luscious treat that feels indulgent yet is totally good for you. Perfect for breakfast, a snack, or even a light dessert, this recipe is versatile and oh-so-satisfying.
As we whip up this lemon cream chia pudding, I want you to feel inspired and empowered in your kitchen. I’ll share my tips and tricks along the way, so you can create a dish that feels both elegant and approachable. So grab your apron (you know I love an ivory apron moment), and let’s get cooking!
Personal Story
I’ll never forget the first time I tasted chia pudding. It was at a cozy little café tucked away in the heart of the city, and I was on one of those brunch outings with friends that turned into a leisurely affair. As we chatted and sipped on our lattes, someone ordered the chia pudding, and I was immediately intrigued by the smooth, creamy layer topped with bright fruit. One bite, and I was hooked!
I can still picture sitting at that cafe, sunlight pouring through the windows, with the delicious tartness of lemon cutting through the creamy sweetness. After that day, I found myself wanting to recreate that feeling at home. I experimented with various flavors, but it was the zesty lemon that truly stole the show. That nostalgic café experience inspired this very recipe—a bit of sunshine that you can make in your own kitchen anytime you please!
Ingredients
Let’s gather our ingredients! Here’s what you’ll need to whip up this Yummy Lemon Cream Chia Pudding:
-
Chia Seeds (½ cup)
These little powerhouses are packed with fiber and omega-3s. If you’re in a pinch, you can swap them for ground flaxseed, but the texture will be different. -
Coconut Milk or Greek Yogurt (1 cup)
Either option brings a creamy richness to the pudding. Use coconut milk for a dairy-free option or Greek yogurt for a protein boost (plus creaminess!). -
Fresh Lemon Juice (¼ cup)
Freshly squeezed lemon juice is a game-changer! If you’re in a hurry and don’t have fresh lemons, bottled juice works, but the flavor won’t be as vibrant. -
Honey or Maple Syrup (2-3 tablespoons)
Sweeten to your liking! Feel free to adjust the sweetness. For a vegan option, stick with maple syrup. -
Vanilla Extract (1 teaspoon)
This adds a warm note to the pudding, making it feel extra special. If you’re out of vanilla extract, almond extract can be a lovely alternative. -
Pinch of Salt
A touch of salt enhances all the flavors, making the lemon pop! Don’t skip it.
Step-by-Step Instructions
Ready to make some magic? Let’s get cookin’!
-
Prepare the Base:
In a medium-sized bowl, combine the chia seeds, coconut milk (or Greek yogurt), lemon juice, and honey (or maple syrup). Whisk everything together until well blended. Don’t worry if it looks a bit separated at first; the chia seeds will work their magic soon!Tip: If using Greek yogurt, you may want to start with less and adjust the consistency to your liking—once soaked, chia seeds will expand and thicken the mixture!
-
Let It Set:
Cover the bowl with plastic wrap or a lid and let it sit in the refrigerator for at least 4 hours, or preferably overnight. The longer it sits, the creamier and more satisfying it becomes.Chef Hack: For a quick version, let it sit for 20-30 minutes while you clean up!
-
Give It a Stir:
Once set, take the pudding out and give it a good stir. You’ll notice the chia seeds have expanded and created a gel-like consistency. That’s what we want! If it’s too thick for your liking, simply stir in a little more coconut milk or yogurt until you reach your desired consistency. -
Add a Touch of Flavor:
Stir in the vanilla extract and a pinch of salt if you haven’t already. Trust me, it elevates the flavor profiles to a whole new level! -
Serve It Up:
Spoon the creamy pudding into your favorite bowls or glasses. I like using clear containers so you can see those beautiful layers.Presentation Tip: You can layer in some fresh berries or granola (more on that later!) for an eye-catching effect!
Serving Suggestions
Now that your silky pudding is ready, let’s talk presentation. I love layering the pudding in a parfait style. Start with a base of the lemon cream chia pudding, then alternate layers with fresh berries like blueberries or raspberries for a pop of color and flavor. Drizzle a bit of honey on top and sprinkle some toasted coconut flakes or granola for crunch. It’s not just delicious, it’s a feast for the eyes!
Recipe Variations
Feeling adventurous? Here are a few fun twists on this recipe to keep things interesting:
-
Berry Bliss: Add a handful of blended strawberries or raspberries to the pudding for a berry-infused lemon flavor.
-
Tropical Escape: Mix in some pineapple juice along with the lemon for a tropical vibe, or top with sliced kiwi for an exotic twist.
-
Matcha Magic: Add a teaspoon of matcha powder for a green, energizing boost.
-
Lavender Love: Infuse the pudding with a teaspoon of culinary lavender for a fragrant herbal note that complements the lemon beautifully.
-
Nutty Crunch: Top the pudding with roasted nuts or seeds for extra texture and nutrition.
Chef’s Notes
This lemon cream chia pudding has become a staple in my kitchen. It’s incredible how something so simple can evoke such joy! Each time I whip it up, I’m reminded of that sunny café day. I’ve even had friends who were initially hesitant about chia pudding give it a try—and watch their faces transform as they taste it for the first time!
It’s been through a few iterations, too. Initially, I made it with just coconut milk, but adding Greek yogurt took the creaminess over the top. Plus, the versatility of flavors means it never gets boring!
FAQs and Troubleshooting
-
Why is my chia pudding too thick?
This can happen if you let it sit too long or if you added too many chia seeds. If your pudding looks like concrete, just mix in some coconut milk or yogurt to loosen it up. -
Can I make it ahead of time?
Absolutely! This pudding is perfect for meal prepping. Just store it in an airtight container in the refrigerator, and it’ll last for about 3-5 days. -
What if I don’t like the texture of chia pudding?
If you’re not a fan of the texture, try blending the pudding after it’s set for a smoother consistency. -
Can I use other flavors besides lemon?
Yes! Feel free to substitute other fruit juices or purees. Just keep the ratios similar—if it’s a thicker puree, you may need to adjust the liquid.
Nutritional Info (if applicable)
(For a typical serving of this Yummy Lemon Cream Chia Pudding, the nutritional info might roughly look like this: Data will vary based on exact ingredients used)
- Calories: 215
- Protein: 5g
- Carbohydrates: 30g
- Fats: 10g
- Fiber: 12g
There you have it, my lovely foodies! A Yummy Lemon Cream Chia Pudding that’s not only delightful but also simple enough to make any day shine a little brighter. Whether you enjoy it for breakfast, a snack, or dessert, I hope it brings a bit of sunshine into your kitchen. Happy cooking, and remember—good food isn’t just about feeding the body; it’s about nourishing the soul. 💛
PrintYummy Lemon Cream Chia Pudding
A refreshing treat that’s creamy and zesty, perfect for breakfast or dessert.
- Prep Time: 10 minutes
- Cook Time: 0 minutes
- Total Time: 240 minutes
- Yield: 4 servings 1x
- Category: Dessert
- Method: Chilling
- Cuisine: American
- Diet: Vegan
Ingredients
- ½ cup Chia Seeds
- 1 cup Coconut Milk or Greek Yogurt
- ¼ cup Fresh Lemon Juice
- 2–3 tablespoons Honey or Maple Syrup
- 1 teaspoon Vanilla Extract
- Pinch of Salt
Instructions
- In a medium-sized bowl, combine the chia seeds, coconut milk (or Greek yogurt), lemon juice, and honey (or maple syrup). Whisk everything together until well blended.
- Cover the bowl with plastic wrap or a lid and let it sit in the refrigerator for at least 240 minutes, or preferably overnight.
- Once set, take the pudding out and give it a good stir.
- Stir in the vanilla extract and a pinch of salt.
- Spoon the creamy pudding into your favorite bowls or glasses.
Notes
For presentation, layer with fresh berries or granola.
Nutrition
- Serving Size: 1 serving
- Calories: 215
- Sugar: 10g
- Sodium: 25mg
- Fat: 10g
- Saturated Fat: 8g
- Unsaturated Fat: 2g
- Trans Fat: 0g
- Carbohydrates: 30g
- Fiber: 12g
- Protein: 5g
- Cholesterol: 0mg
Keywords: chia pudding, lemon pudding, healthy dessert, vegan dessert, easy recipe