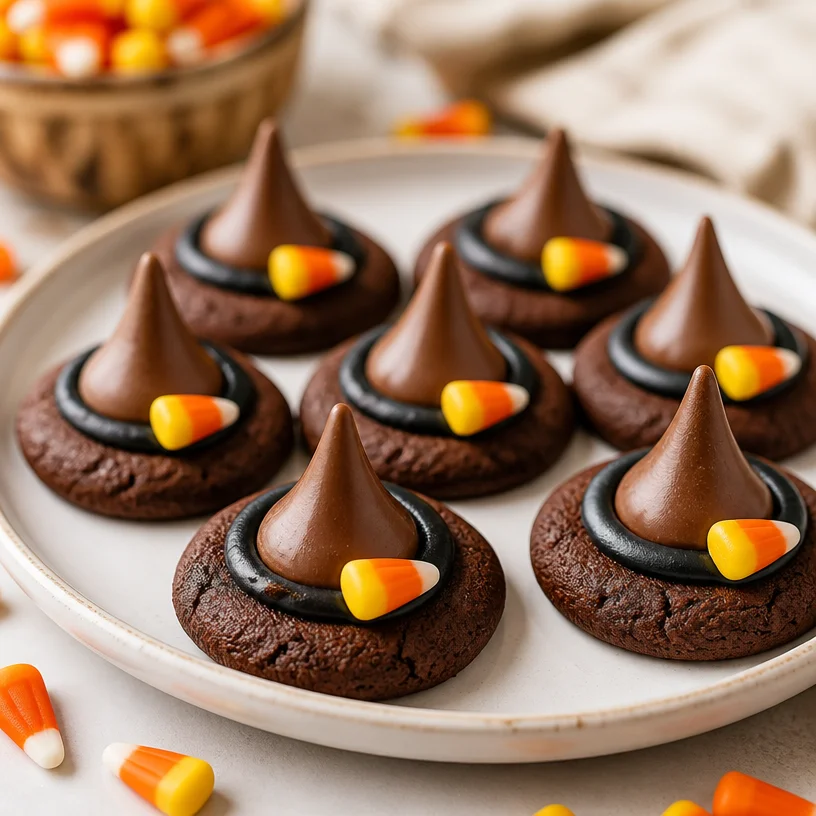
Witch Hat Cookies: 15-Minute Halloween Treats for Busy Moms
Spook-tacular Witch Hat Cookies: A Halloween Treat to Make Magic Happen!
Hello, my fellow food lovers! As Halloween creeps upon us, it’s time to conjure up some deliciously spooky treats. Today, I’m thrilled to share a delightful recipe for Witch Hat Cookies that’s not only fun to make but also a charming addition to any Halloween gathering. Whether you’re hosting a spooky soirée, bringing treats to a classroom party, or simply getting into the spirit of the season, these cookies will put a spell on you and your guests!
As we dive into this recipe, just imagine: crunchy cookies adorned with luscious chocolate kisses and candy corn, creating the perfect witch hat silhouette. It’s like a Halloween costume for your taste buds! Throughout the post, I’ll sprinkle in my personal anecdotes and tips to help you cook like a pro, even if you’re just starting out in the kitchen. So, grab your apron, and let’s brew some magic together!
A Whimsical Memory: The First Batch of Witch Hat Cookies
I still remember the first time I made Witch Hat Cookies with my little niece, Ava. She was just five years old, filled with that irresistible child-like wonder that every Halloween seems to ignite. We spent the afternoon in my cozy kitchen, splattered with flour and sugar, crafting these adorable hats. Her giggles echoed around like a sweet melody as we tried to stack the kisses on top of the cookies without them toppling over!
As we put the finishing touches on our creations, she proudly declared they were "the best witches ever!" The fearless confidence and enthusiasm in her eyes reminded me that the kitchen should always be a place of joy and exploration. Even though they may have been a little wonky—one hat even sported a candy corn that was a bit crooked—we couldn’t stop snacking on our charming little witch hats. Every bite was a reminder that cooking is about more than the food; it’s about the memories we create and the laughter we share.
Ingredients
Here’s what you’ll need to whip up your own batch of Witch Hat Cookies:
-
1 batch of chocolate chip cookie dough (store-bought or homemade)
Using chocolate chip dough gives these cookies a classic flavor. If you prefer, you can use sugar cookie dough for a sweeter base. Just watch the baking time! -
Chocolate kisses (approximately 24)
These will be the tops of our hats. You can substitute with any chocolate candies that are slightly pointed on top—like Rolos or Tootsie Rolls. Just note that you may need to adjust the baking time! -
Black icing (store-bought or homemade)
This icing will add a touch of elegance and detail. If black isn’t your preference, feel free to use purple or orange for a more colorful approach! -
Candy corn (for decoration)
Candy corn adds a fun pop of color, but if you’re not keen on it, consider using mini chocolate chips or even sprinkles as a cute alternative.
Step-by-Step Instructions
Now that we’ve gathered our magical ingredients, let’s get cooking! Follow these steps to create your very own Witch Hat Cookies:
-
Preheat the oven to 350°F (175°C). This is crucial, as starting with a preheated oven helps the cookies bake evenly.
-
Scoop the dough: Using a cookie scoop or a tablespoon, portion out the cookie dough onto ungreased baking sheets, spacing them about two inches apart. This allows room for spreading.
-
Shape the cookies: Lightly flatten each cookie dough ball with your fingers to create a more uniform shape. This step is crucial because the cookies will look more like hats if they’re firmer and thinner.
-
Bake the cookies: Pop those trays into the oven and let them bake for about 10–12 minutes until they’re just golden around the edges. Don’t worry if they seem a little soft; they’ll firm up as they cool!
-
Add the chocolate kisses: Once you take the cookies out, press a chocolate kiss gently into the center of each cookie while they’re still warm. This step allows the chocolates to meld with the cookie, almost gluing them together. Let them cool for about 5–10 minutes on the tray—it’s a crucial resting period to ensure you don’t burn yourself!
-
Decorate with icing: When the cookies have cooled and the chocolate is set, use your black icing to create a little swirl around the base of the chocolate kiss. This mimics the appearance of a witch hat and adds a delightful pop of color!
-
Crown with candy corn: Finally, place a piece of candy corn on top of the chocolate kiss—point downwards—to complete the whimsical witch hat look!
Serving Suggestions
These Witch Hat Cookies can be served on a festive platter, perhaps alongside other Halloween treats like ghost cupcakes or pumpkin-shaped brownies. For an added touch, consider arranging them on a slate board with faux spider webs or little plastic spiders. Just be sure to keep the spooky theme a fun and lighthearted one!
Recipe Variations
Let’s get creative! Here are a few fun variations to consider:
-
Flavor twist: Swap the chocolate chip cookie base for oatmeal cookie dough to ramp up the texture.
-
Nutty cookies: Add chopped nuts or crushed pretzels into the cookie dough for crunch and a deeper flavor.
-
Frosting swap: Use orange frosting instead of black for a seasonal touch that matches the candy corn.
-
Gluten-free option: Substitute regular flour with a gluten-free flour blend to accommodate gluten-sensitive guests.
-
Chocolate overload: Drizzle some melted dark chocolate over the finished cookies for an extra layer of decadence.
Chef’s Notes
Whenever I make these cookies, I can’t help but chuckle over my many attempts to create the perfect witch hat shape. I once accidentally melted the kisses too long, resulting in hats that were pancake flat! Those “pancake witches” didn’t last long. The kids loved them anyway, saying they were “wobble hats” — and that’s the magic of cooking! Remember, it doesn’t have to be perfect; the fun is in the process, and people love treats made with heart.
FAQs and Troubleshooting
What can I do if my cookies spread too much?
If your cookies flatten out too much, it’s usually because the dough is too warm. Make sure to chill the dough for at least 30 minutes before baking, especially on a warm day.
How can I make the icing thicker?
If your black icing is too runny, try adding a little powdered sugar to thicken it. If using store-bought icing, give it a good stir to mix it well before using.
Can I use other candies besides candy corn?
Absolutely! Mini chocolate chips, gummy candies, or other seasonal candies can add creative flair to your witch hats. Let your imagination fly!
How long do these cookies stay fresh?
Stored in an airtight container, these cookies will last about 5 days. You can even freeze the unbaked dough for up to 3 months and bake them fresh whenever you need a spooktacular treat!
Nutritional Info
This part is optional, but if you’d like to know, one cookie is approximately 130 calories. (Note: This may slightly vary depending on your specific ingredients.)
There you have it, folks! An enchanting recipe for Witch Hat Cookies that’s sure to delight. Cooking, much like magic, is all about the journey as much as the destination. So tie on your apron, invite over some friends or family, and celebrate the spirit of Halloween with these whimsical treats. After all, the best memories are made around the table—especially when those tables are filled with delicious, creative food. Happy baking, everyone!
PrintWitch Hat Cookies

Delicious and fun Witch Hat Cookies, perfect for Halloween gatherings.
- Prep Time: 15 minutes
- Cook Time: 12 minutes
- Total Time: 27 minutes
- Yield: 24 cookies 1x
- Category: Dessert
- Method: Baking
- Cuisine: American
- Diet: Vegetarian
Ingredients
- 1 batch of chocolate chip cookie dough (store-bought or homemade)
- Chocolate kisses (approximately 24)
- Black icing (store-bought or homemade)
- Candy corn (for decoration)
Instructions
- Preheat the oven to 350°F (175°C).
- Scoop the dough onto ungreased baking sheets, spacing them about two inches apart.
- Shape the cookies by lightly flattening each dough ball.
- Bake the cookies for about 10–12 minutes until golden around the edges.
- Add a chocolate kiss into the center of each cookie while they’re still warm.
- Decorate the cooled cookies with black icing around the base of the chocolate kiss.
- Crown with candy corn on top of the chocolate kiss, point downwards.
Notes
Chill the dough for at least 30 minutes before baking if it is warm. Decorate creatively with different candies.
Nutrition
- Serving Size: 1 cookie
- Calories: 130
- Sugar: 8g
- Sodium: 100mg
- Fat: 5g
- Saturated Fat: 2g
- Unsaturated Fat: 3g
- Trans Fat: 0g
- Carbohydrates: 18g
- Fiber: 1g
- Protein: 1g
- Cholesterol: 10mg
Keywords: Halloween cookies, Witch Hat Cookies, festive treats
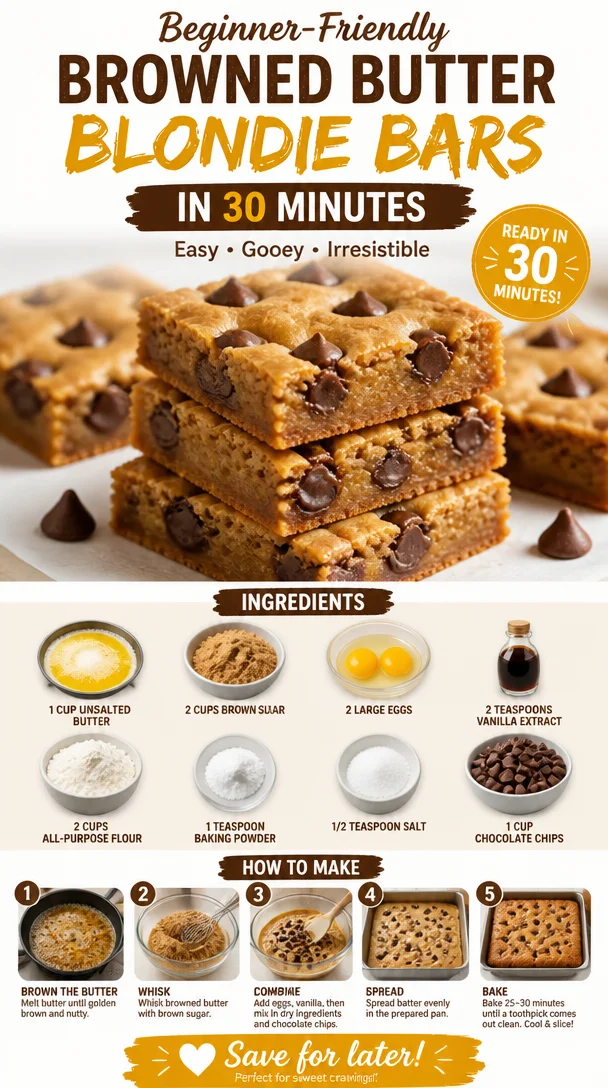
Beginner-Friendly Browned Butter Blondie Bars in 30 Minutes
The Ultimate Browned Butter Blondie Recipe: A Treat for Any Occasion
Hello, fellow food lovers! Today, I’m thrilled to share with you one of my all-time favorite indulgences—the Browned Butter Blondie. If you’ve never experienced the depths of flavor that comes from browning your butter, then buckle up, because we’re about to elevate a simple blondie recipe into something truly magical!
Personal Story
Growing up, my grandmother had a special stash of sweets that she kept hidden in her kitchen cupboard. She would always say, “If you can find the key, you can have a treat.” Well, you can imagine how many afternoons I spent searching for that elusive key! It didn’t matter how long it took; the reward was too tempting. One of my fondest memories is of the day I finally found it. There, nestled between tins of homemade fudge and crispy rice treats, were her heavenly blondies—golden, chewy bars infused with a rich, nutty flavor that made every bite feel like a warm hug. It was then that I realized how much joy food can bring, and my heart has been set on creating those moments for others ever since. So, let’s get started on crafting your own batch of browned butter blondies that will surely evoke similar memories!
Ingredients
Here’s what you’ll need to make these dreamy Browned Butter Blondies:
-
1 cup unsalted butter: The star of our show! Choose high-quality butter for the best flavor, and make sure it’s unsalted so you can control the seasoning. If you’re in a pinch, salted butter can work, but reduce the added salt by a pinch.
-
2 cups brown sugar: This rich, molasses-flavored sugar is what gives blondies their characteristic sweetness and depth. Light brown sugar will give you a milder flavor, while dark brown sugar will add a more pronounced caramel taste. You can use white sugar in a pinch, but you’ll lose that lovely flavor complexity.
-
2 large eggs: They provide moisture and richness to the batter. Make sure your eggs are at room temperature for better emulsification. You can substitute with flax eggs if you’re looking for a vegan option (1 tablespoon ground flaxseed mixed with 2.5 tablespoons water equals one egg).
-
2 teaspoons vanilla extract: Always opt for pure vanilla extract for authentic flavor. Homemade vanilla extract is a wonderful addition if you have it!
-
2 cups all-purpose flour: This gives structure to your blondies. You can substitute part of the all-purpose flour with whole wheat for added fiber, but the texture will change slightly.
-
1 teaspoon baking powder: This leavening agent helps the blondies rise a little, making them soft and tender. If you only have baking soda, you can experiment with that, but you’ll need to tweak the rest of your recipe for acidity.
-
1/2 teaspoon salt: A small amount of salt enhances all the other flavors. Don’t skip it! If you’re using salted butter, you can omit this ingredient entirely.
-
1 cup chocolate chips: Choose your favorite—dark, milk, or even white chocolate chips will work! You can replace them with chopped nuts or dried fruits for a different texture and taste.
Step-by-Step Instructions
Now let’s dive into making these delightful Browned Butter Blondies. Follow along, and I’ll sprinkle in some chef tips to ensure your baking adventure is a success!
-
Brown the Butter: In a medium saucepan, melt the butter over medium heat. Stir it continuously until it turns a beautiful golden brown, and you start to smell that nutty aroma—about 5-7 minutes. Keep an eye on it, as it can go from perfect to burnt quickly! Remove it from heat and let it cool slightly before using. Pro tip: This step is what takes your blondies from good to GREAT!
-
Mix Wet Ingredients: In a large mixing bowl, combine the browned butter (making sure it’s not too hot) with brown sugar. Use a whisk to mix them together until smooth. Then add in the eggs and vanilla extract, whisking until everything is well incorporated. This mix should look thick and shiny—just like liquid gold!
-
Combine Dry Ingredients: In another bowl, whisk together the flour, baking powder, and salt. This will help to evenly distribute the leavening agent and salt throughout the mixture.
-
Bring It All Together: Gradually add the dry ingredients to the wet mixture. Mix until just combined; don’t overmix! It’s okay if there are a few floury bits. This ensures your blondies will stay chewy rather than cake-like.
-
Fold in Chocolate Chips: Here’s where you can get creative! Gently fold in the chocolate chips, ensuring they’re evenly distributed throughout the batter.
-
Prepare the Baking Dish: Preheat your oven to 350°F (175°C). Line a 9×13-inch baking pan with parchment paper, leaving some overhang—this will make removing your blondies so much easier later.
-
Spread the Batter: Pour the batter into the prepared baking pan and use a spatula to spread it evenly. Remember, it doesn’t have to look perfect; rustic is always charming!
-
Bake: Pop it into the preheated oven and bake for 20-25 minutes. You want them to be slightly underbaked in the center for that gooey texture—look for a light golden color around the edges and a slightly set middle.
-
Cool and Serve: Once they’re done, let them cool in the pan for about 10 minutes before transferring to a wire rack to cool completely. Resist the urge to cut them while they’re hot, as this will help them firm up.
Serving Suggestions
When it comes to serving your Browned Butter Blondies, keep it simple and elegant. Cut them into squares and plate them up on a beautiful serving platter. A dusting of powdered sugar on top can add a touch of sophistication, or serve warm with a scoop of vanilla ice cream for an indulgent dessert experience. A drizzle of homemade caramel sauce on top wouldn’t hurt either!
Recipe Variations
Let’s shake things up a bit! Here are a few fun ideas to put your own twist on these Browned Butter Blondies:
-
Nutty Delight: Toss in 1 cup of chopped nuts like pecans or walnuts for that extra crunch.
-
Fruit Fusion: Swap the chocolate chips for dried fruits like cranberries or apricots for a chewy, tangy twist.
-
Spiced Up: Add 1 teaspoon of cinnamon or a pinch of nutmeg for a warm, cozy flavor, perfect for fall.
-
Peanut Butter Swirl: Incorporate a swirl of peanut butter into the batter before baking for a creamy surprise in every bite.
-
Coconut Bliss: Fold in 1 cup of shredded coconut for that tropical twist on your blondies!
Chef’s Notes
These Browned Butter Blondies have been a staple in my kitchen for years. Over time, I’ve experimented with different add-ins and flavor combinations, each time falling deeper in love with how versatile and forgiving this recipe is. I once decided to bake them for a surprise party and accidentally doubled the sugar—but you know what? The extra sweetness was an instant hit! So don’t be afraid to make it your own and embrace those happy accidents.
FAQs and Troubleshooting
-
Why are my blondies cakey?
If your blondies turn out cake-like, it’s likely due to overmixing the batter or baking them too long. Remember—the less you mix, the chewier they’ll be! -
Can I freeze blondies?
Absolutely! Allow them to cool completely, then wrap individually in plastic wrap and store in an airtight container. They’ll keep well in the freezer for up to three months! -
How do I know when they’re done baking?
Look for slight doming in the center and a golden edge. A toothpick inserted should come out with a few moist crumbs, not wet batter. -
What if I don’t have brown sugar?
You can substitute 1 cup of white sugar with 1 tablespoon of molasses mixed in. It might not be the same as the rich flavor from brown sugar, but it will still work!
Nutritional Info
(Include this section only if you want!)
- Serving Size: 1 Blondie
- Calories: Approx. 200
- Total Fat: 10g
- Saturated Fat: 6g
- Cholesterol: 35mg
- Sodium: 60mg
- Total Carbohydrates: 28g
- Dietary Fiber: 1g
- Sugars: 18g
- Protein: 2g
Final Thoughts
And there you have it! Your very own batch of Browned Butter Blondies, bursting with incredible flavor. Grab your apron, tie it on, and invite friends over to share in the creation—because good food is all about connection. Happy baking, and remember, the kitchen is a playground, so never stop experimenting!
Feel free to drop a line in the comments below if you try this recipe or share any tips of your own. Let’s keep this cooking community thriving!
PrintBrowned Butter Blondies
Indulge in these delightful Browned Butter Blondies, rich with nutty flavor and chocolate chips.
- Prep Time: 15
- Cook Time: 25
- Total Time: 40
- Yield: 12 servings 1x
- Category: Dessert
- Method: Baking
- Cuisine: American
- Diet: Vegetarian
Ingredients
- 1 cup unsalted butter
- 2 cups brown sugar
- 2 large eggs
- 2 teaspoons vanilla extract
- 2 cups all-purpose flour
- 1 teaspoon baking powder
- 1/2 teaspoon salt
- 1 cup chocolate chips
Instructions
- Brown the Butter: In a medium saucepan, melt the butter over medium heat. Stir it continuously until it turns a golden brown and you start to smell that nutty aroma—about 5-7 minutes. Remove from heat and let cool slightly before using.
- Mix Wet Ingredients: In a large mixing bowl, combine the browned butter with brown sugar. Whisk until smooth, then add in the eggs and vanilla extract, mixing until well incorporated.
- Combine Dry Ingredients: In another bowl, whisk together the flour, baking powder, and salt.
- Bring It All Together: Gradually add the dry ingredients to the wet mixture and mix until just combined, avoiding overmixing.
- Fold in Chocolate Chips: Gently fold in the chocolate chips until evenly distributed.
- Prepare the Baking Dish: Preheat your oven to 350°F (175°C). Line a 9×13-inch baking pan with parchment paper.
- Spread the Batter: Pour the batter into the prepared baking pan and spread it evenly.
- Bake: Bake for 20-25 minutes, until the edges are light golden and center is slightly underbaked.
- Cool and Serve: Let them cool in the pan for about 10 minutes before transferring to a wire rack to cool completely.
Notes
For an added twist, try mixing in chopped nuts, dried fruits, or even a swirl of peanut butter.
Nutrition
- Serving Size: 1 blondie
- Calories: 200
- Sugar: 18g
- Sodium: 60mg
- Fat: 10g
- Saturated Fat: 6g
- Unsaturated Fat: 4g
- Trans Fat: 0g
- Carbohydrates: 28g
- Fiber: 1g
- Protein: 2g
- Cholesterol: 35mg
Keywords: blondies, dessert, baking, sweet treat, browned butter
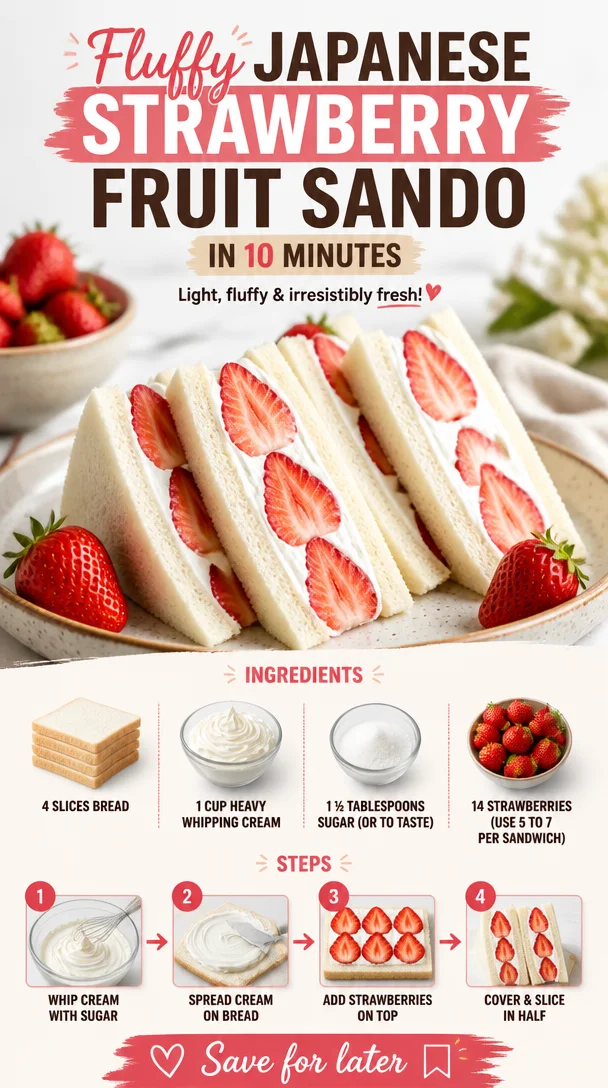
Fluffy Japanese Strawberry Fruit Sando in 10 Minutes
Indulge in Sweet Simplicity: Japanese Fruit Sandwich (フルーツサンド)
Welcome, kitchen adventurers! Today, I’m thrilled to share a delightful treat that’s been winning hearts everywhere — the Japanese Fruit Sandwich, or as it’s affectionately known: フルーツサンド (Furu-tsu Sando). This fluffy masterpiece showcases vibrant strawberries nestled between luscious whipped cream and soft bread, making for a perfect afternoon snack or a whimsical dessert.
Now, I know what you might be thinking: “A sandwich with fruit? Really?” Yes, my friends! This isn’t just any sandwich; it’s a celebration of fresh flavors and textures wrapped in a soft embrace of bread that will make your taste buds dance. Think of it as a rosy cloud of happiness delivered on two slices of happiness! In the busy world of modern life, we all need a little bit of sweetness, and this fruity delight offers that in every glorious bite.
As I recall my first encounter with this Japanese delight, I can’t help but smile. It was during my travels through Japan, where I stumbled across a charming cafe tucked away in a quiet alley. The moment I sank my teeth into that creamy, fruity goodness, I knew I had met my culinary soulmate! The strawberries were perfectly ripe, and the whipped cream was delicately sweetened. It hit all the right notes of nostalgia and comfort. I felt transported back to my childhood, where flavors were simple yet oh-so-satisfying.
Get ready, because I’m going to guide you through making your very own Japanese Fruit Sandwich at home. Dust off that apron and let’s dive into the magic of this sweet treat!
What You’ll Need: Ingredients
To whip up these dreamy fruit sandwiches, gather the following ingredients:
- 4 slices of bread: Choose soft white bread or shokupan (Japanese milk bread) for that pillowy texture. If you’re feeling adventurous, fluffy brioche also works wonderfully!
- 1 cup heavy whipping cream: This is the star of the show! It brings richness and creaminess. If you prefer a lighter option, coconut cream can be a lovely substitute.
- 1 ½ Tablespoons sugar: Sweetening the cream is essential, but taste as you go! You might want to use more or less depending on your sweet tooth.
- 14 strawberries: Fresh and ripe is the name of the game. Aim for sweet, juicy strawberries; you’ll use about 5 to 7 strawberries per sandwich, depending on their size. Alternatively, feel free to swap out strawberries for other fruits like kiwi or mango for fun variations!
Step-by-Step Instructions: Let’s Get Cooking!
Step 1: Prepare the Strawberries
Start by washing and hulling your strawberries. Halve them if they’re large, or leave them whole for a more decadent bite. Remember, it’s all about keeping things visually appetizing! The more colorful, the better.
Chef hack: To enhance the flavor, sprinkle a bit of sugar over the halved strawberries and let them sit for about 10 minutes. This will create a lovely syrup that adds an extra burst of sweetness!
Step 2: Make the Whipped Cream
In a mixing bowl, combine the heavy whipping cream and sugar. Using a hand mixer or a stand mixer, whip the cream until soft peaks form. Be careful not to over-whip it; we want that creamy texture, not butter!
Tip: If you’d like to add flavor to your whipped cream, consider incorporating a splash of vanilla extract or a hint of citrus zest for an interesting twist!
Step 3: Assemble the Sandwiches
Grab your slices of bread and spread a generous layer of the whipped cream on one slice. Arrange your strawberries on top of the cream, making sure to create an aesthetically pleasing pattern.
Now, top it all off with another layer of whipped cream before pressing down with another slice of bread to create a sandwich. Make sure the fillings are aligned for a beautiful presentation!
Step 4: Slice and Serve
Using a sharp knife, slice the sandwiches into quarters or halves, depending on your preference. You can remove the crusts if you want a more traditional look, but I say embrace the crust!
Presentation tip: For a final touch, dust the sandwiches with a sprinkle of powdered sugar for a dreamy finish. You can also arrange them on a pretty plate, adding any leftover strawberries for a pop of color!
Serving Suggestions
When serving these delightful fruit sandwiches, think about creating a serene setting. Pair them with a cup of green tea or a light coffee, and maybe even some delicate pastries. The soft, fluffy nature of the fruit sando makes it perfect for brunch gatherings, picnics, or even as a light dessert after a hearty meal.
Recipe Variations
- Tropical Twist: Swap out the strawberries for ripe mango slices, adding a touch of shredded coconut to the cream for a tropical escape.
- Berry Medley: Mix different berries like blueberries and raspberries with your strawberries for a colorful, berry-burst experience!
- Nutty Delight: Stir in some finely chopped nuts like pistachios or almonds into the whipped cream for added texture and flavor!
- Dairy-Free Option: Substitute heavy cream with coconut cream for a vegan twist. Sweeten with maple syrup if desired.
Chef’s Notes
As I reflect on my journey with this fruit sandwich, I can’t help but giggle at how simple ingredients can create such joy. I remember once trying to impress a friend during a casual get-together, but in my haste, I over-whipped the cream — uh oh! While it didn’t look “perfect,” it made for some great laughs, and we still enjoyed every last morsel.
Over the years, I’ve seen this recipe evolve; some even add a touch of matcha to the whipped cream for a delightful green hint. It’s all about making it your own, so don’t hesitate to get creative!
FAQs and Troubleshooting
Q: Can I use other fruits besides strawberries?
Absolutely! While strawberries are classic, feel free to experiment with other fruits like peaches, kiwi, or even banana.
Q: My whipped cream didn’t hold its shape. What went wrong?
Over-whipping can cause the cream to break down, so be sure to stop as soon as soft peaks form. If it breaks, you can try gently folding in a bit more heavy cream to salvage it.
Q: What’s the best way to store leftover sandwiches?
If you have leftovers (not likely, but just in case!), store them in an airtight container in the fridge for up to a day. Keep in mind the bread might lose its texture, but they’ll still taste great!
Q: Can I make these ahead of time?
While I recommend enjoying them fresh for the best texture, you can prepare the components ahead of time and assemble them just before serving.
Nutritional Info (Optional)
While I don’t usually focus too much on nutrition when sharing these delicious concoctions, it’s always good to be mindful. As a rough estimate, each sandwich (with strawberries) can contain around 300-400 calories, depending on the amounts used. It’s all about balance! Enjoy these sandwiches as part of a delightful experience rather than just a snack.
So, there you have it! A delightful, airy, and oh-so-tempting Japanese Fruit Sandwich that’s sure to charm anyone who takes a bite. Whether you’re enjoying it with friends, on a lazy afternoon, or even as a late-night treat, this recipe is one you’ll come back to time and time again.
Thanks for joining me in this kitchen adventure, and I can’t wait to hear how your fruit sandwiches turn out. Happy cooking, and remember — good food is all about sharing the love! 🍓✨
PrintJapanese Fruit Sandwich (フルーツサンド)
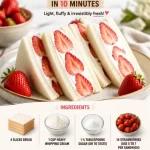
A delightful Japanese treat featuring vibrant strawberries, luscious whipped cream, and soft bread, perfect for a light snack or dessert.
- Prep Time: 15 minutes
- Cook Time: 5 minutes
- Total Time: 20 minutes
- Yield: 2 servings 1x
- Category: Dessert
- Method: No-Cook
- Cuisine: Japanese
- Diet: Vegetarian
Ingredients
- 4 slices of soft white bread or shokupan (Japanese milk bread)
- 1 cup heavy whipping cream
- 1 ½ tablespoons sugar
- 14 strawberries, fresh and ripe
Instructions
- Prepare the strawberries by washing and hulling them. Halve them if large.
- Make the whipped cream by combining heavy whipping cream and sugar, then whipping until soft peaks form.
- Assemble the sandwiches by spreading whipped cream on one slice, adding strawberries, topping with more cream, and placing another slice on top.
- Slice the sandwiches into quarters or halves and serve with a dusting of powdered sugar.
Notes
Consider adding a splash of vanilla extract to the whipped cream for extra flavor. Store leftovers in an airtight container in the fridge for up to a day.
Nutrition
- Serving Size: 1 sandwich
- Calories: 350
- Sugar: 14g
- Sodium: 200mg
- Fat: 25g
- Saturated Fat: 15g
- Unsaturated Fat: 8g
- Trans Fat: 0g
- Carbohydrates: 30g
- Fiber: 2g
- Protein: 3g
- Cholesterol: 75mg
Keywords: fruit sandwich, Japanese dessert, whipped cream, strawberries, soft bread
Summer Nectarine Frozen Yogurt: 5-Minute No-Churn Recipe
Whip Up a Delightful Nectarine Frozen Yogurt: A Sweet Summer Treat
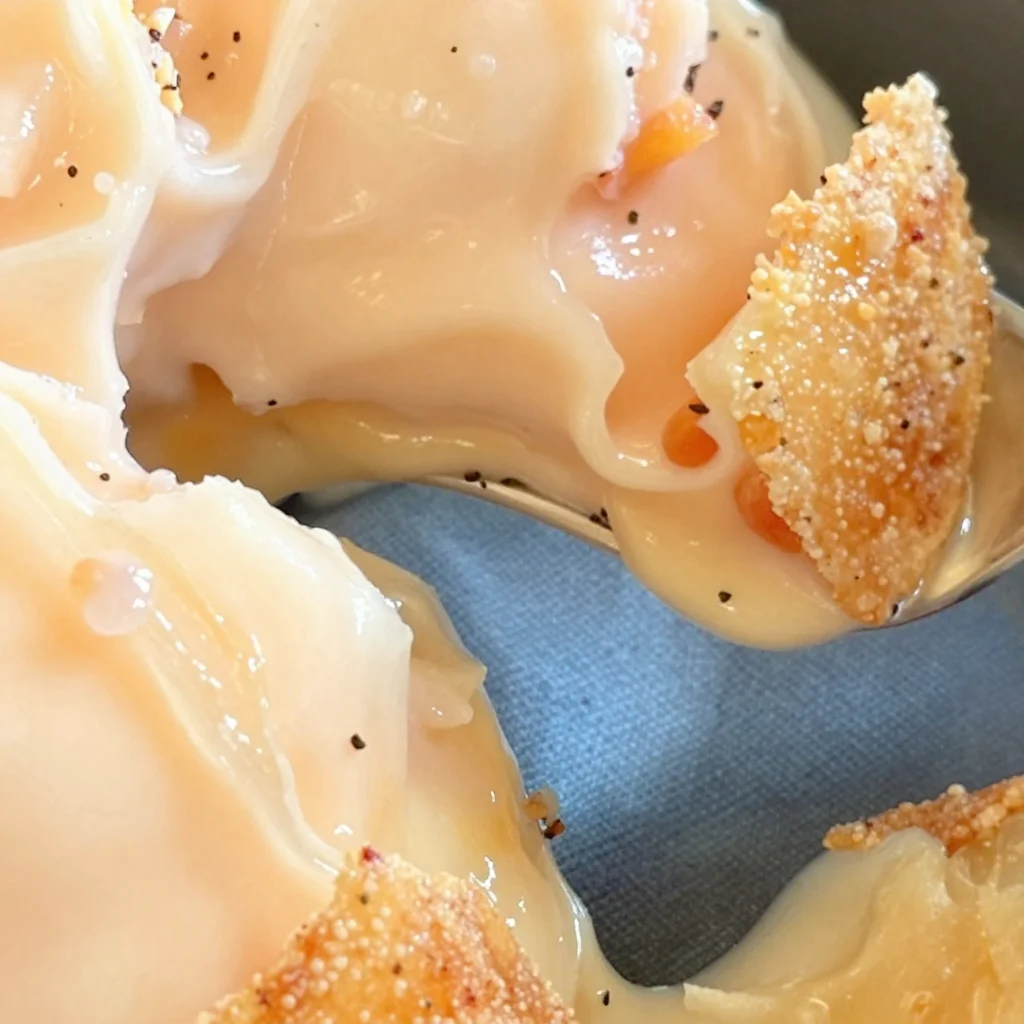
Hello, friend! If you’re craving something cool, creamy, and absolutely delightful, then you’ve stumbled upon the right recipe! Today, we’re diving into the luscious world of Nectarine Frozen Yogurt, a treat that’s as refreshing as a summer breeze and just as bright in flavor. This isn’t just your everyday frozen dessert; it’s a vibrant showcase of fresh nectarines, tangy Greek yogurt, and a touch of sweetness—perfect to beat that summer heat!
Picture this: you’re lounging on your porch, basking in the golden sunshine, and you realize you need a sweet treat to cool you down. That’s where this easy, elegant recipe comes in. With only a handful of ingredients and a little bit of your precious time, you’ll create a frozen yogurt that’s bursting with juicy nectarines and creamy goodness. Trust me; it’s going to be a new favorite in your kitchen!
Time to Get Nostalgic
Let me take you back to a sun-soaked summer day in my childhood. My family had a lovely little orchard we frequented every July, where juicy nectarines hung from the branches like little golden gems waiting to be plucked. The excitement of wandering through those rows, sunlight filtering through the leaves, and tasting the sweet nectarines straight off the tree was indescribable.
One summer afternoon, my mom decided she wanted to try her hand at making a fruity frozen treat. We sliced those nectarines, mixed them with some yogurt, and poured everything into our old-fashioned ice cream maker. Oh, the pure joy of churning it by hand while eagerly anticipating that frozen delight! When we finally indulged, the creamy, fruity goodness melting on our tongues was sheer bliss. That simple, playful memory is the inspiration behind today’s Nectarine Frozen Yogurt.
Ingredients You’ll Need
Here’s what you’ll need for this refreshing treat:
-
Fresh Nectarines:
- The star of the show! Aim for ripe, sweet nectarines—perfectly aromatic and juicy. You can substitute them with peaches or plums if you’d like a little twist.
-
Greek Yogurt:
- For that creamy base! Choose plain, full-fat Greek yogurt for the best flavor and texture. If you prefer a dairy-free option, coconut yogurt works just as well.
-
Honey or Sugar (optional):
- This is to enhance the sweetness. Adjust based on the sweetness of your nectarines. Maple syrup is a great alternative if you want a different flavor profile.
-
Lemon Juice:
- A splash of acidity to balance the sweetness. Freshly squeezed is best. Feel free to use lime juice for a zesty kick!
Step-by-Step Instructions
So, how do we turn these simple ingredients into a creamy, dreamy frozen yogurt? Let’s break it down step by step:
-
Wash and Cut the Nectarines:
- Begin by giving your nectarines a good rinse under cool water. Slice them in half, removing the pit, and then chop them into chunks. The smaller the pieces, the easier they’ll blend up!
-
Blend the Nectarines:
- Toss those chunks into a blender or food processor. Add the lemon juice and, if you’re using it, honey or sugar. Blend until smooth! Don’t be afraid to scrape down the sides to ensure everything is well mixed.
Chef Tip: If your nectarines are a bit firm and not as juicy, try adding a splash of water to help with blending.
-
Incorporate the Greek Yogurt:
- Once your nectarines are pureed to perfection, add the Greek yogurt. Pulse a few times until everything is nicely combined. You want it to be light and fluffy, not over-blended.
-
Taste and Adjust:
- Here’s a chance to be the chef! Taste your mixture and see if it needs a pinch more sweetness. This varies based on how ripe your nectarines are.
-
Chill the Mixture:
- Transfer your mixture into an airtight container, and pop it in the freezer for about an hour. This helps it firm up a bit and makes it easier to churn later.
-
Churn the Frozen Yogurt:
- If you have an ice cream maker, this is where the magic happens! Churn the mixture according to the manufacturer’s instructions until it’s nice and fluffy. If you don’t have an ice cream maker, no worries! Just take the container out of the freezer every 30 minutes and stir vigorously with a fork until it’s smooth and creamy.
Chef Hack: If you skip the ice cream maker, aim to do this for about 2-3 hours to ensure the frozen yogurt stays creamy and doesn’t become a solid block.
-
Freeze until Firm:
- Once you’ve achieved that lovely, soft-serve-like consistency, transfer the yogurt back into your container. Freeze it for another 3-4 hours until it’s fully set.
Serving Suggestions
When you’re ready to serve your fresh Nectarine Frozen Yogurt, scoop it into chilled bowls. For a delightful presentation, you could drizzle a bit of honey on top, sprinkle some chopped nuts, or toss on fresh mint leaves. Pair it with a slice of almond torte or a shortbread cookie for a gourmet dessert experience.
Recipe Variations
Want to jazz things up? Here are some ideas!
- Berry Bliss: Mix in fresh blueberries or strawberries for a vibrant color and flavor change.
- Minty Fresh: Add a handful of fresh mint leaves while blending for an aromatic twist.
- Creamsicle Dream: Combine with a splash of orange juice for a refreshing citrus note.
- Nutty Crunch: Stir in some crushed nuts or granola just before serving for added texture.
Chef’s Notes
This recipe has become a staple in my kitchen, and it’s so versatile! I’ve played with various flavors—adding in spices like cinnamon or even a bit of vanilla always brings a new dimension. I once tried making it at a friend’s gathering, and it turned into a fun taste test with everyone contributing their favorite toppings.
One little story that cracks me up: the first time I made this without proper measuring, I tossed in extra nectarines that actually turned into a delightful nectar intake! Though it didn’t match my original plan, it taught me the beauty of experimenting in the kitchen—sometimes, you discover a gem you never thought you’d create.
FAQs and Troubleshooting
Can I use frozen nectarines instead of fresh?
Absolutely! Just remember to let them thaw a bit before blending for the best results.
My frozen yogurt is too hard; how can I fix it?
If your yogurt is too hard after freezing, let it sit at room temperature for about 10 minutes before scooping, or give it a good stir to break up any icy texture!
Can I make this dairy-free?
Yes! Substitute Greek yogurt with coconut yogurt or another plant-based yogurt. Adjust the sweetness as some plant-based yogurts can vary in taste.
How long does it keep in the freezer?
For optimal freshness, consume your Nectarine Frozen Yogurt within a week or two, but it can last longer in the freezer (though it may lose some creaminess).
Nutritional Info
If you’re counting calories or looking to maintain a healthy balance, this delightful frozen yogurt boasts a load of nutrients! Greek yogurt provides protein and probiotics, while nectarines are rich in vitamins A and C. You can tweak the sweetness depending on your diet—using less or no sweetener will keep it light and refreshing.
So there you have it! A beautiful, creamy bowl of Nectarine Frozen Yogurt, perfect for cooling down on a warm day or impressing friends at your next gathering. It’s simple, stunning, and packed with nostalgia. I can’t wait for you to give it a try. Tie on your apron, blend those flavors, and let’s create some delicious memories together! Enjoy every bite!
PrintNectarine Frozen Yogurt
Refreshing Nectarine Frozen Yogurt made with ripe nectarines and creamy Greek yogurt—a perfect summer treat!
- Prep Time: 15 minutes
- Cook Time: 120 minutes
- Total Time: 135 minutes
- Yield: 4 servings 1x
- Category: Dessert
- Method: Freezing
- Cuisine: American
- Diet: Vegetarian
Ingredients
- 4 ripe Fresh Nectarines
- 2 cups Greek Yogurt (plain, full-fat)
- 2 tablespoons Honey or Sugar (optional)
- 2 tablespoons Lemon Juice (freshly squeezed)
Instructions
- Wash and cut the nectarines into chunks.
- Blend the nectarines with lemon juice and honey or sugar until smooth.
- Incorporate Greek yogurt into the mixture and pulse until combined.
- Taste the mixture and adjust the sweetness if necessary.
- Chill the mixture in an airtight container for about 1 hour.
- Churn the mixture in an ice cream maker according to instructions or stir every 30 minutes if using a container.
- Freeze for another 3-4 hours until firm.
Notes
Drizzle with honey and top with nuts or mint leaves before serving. Various flavor additions like berries or spices can enhance it further.
Nutrition
- Serving Size: 1 serving
- Calories: 220
- Sugar: 12g
- Sodium: 40mg
- Fat: 8g
- Saturated Fat: 4g
- Unsaturated Fat: 4g
- Trans Fat: 0g
- Carbohydrates: 30g
- Fiber: 2g
- Protein: 8g
- Cholesterol: 20mg
Keywords: nectarine, frozen yogurt, summer dessert, healthy dessert, easy recipes
Minute Grilled Cinnamon Peaches: Quick Summer Treat
Grilled Peaches with Cinnamon: A Sweet Summer Delight
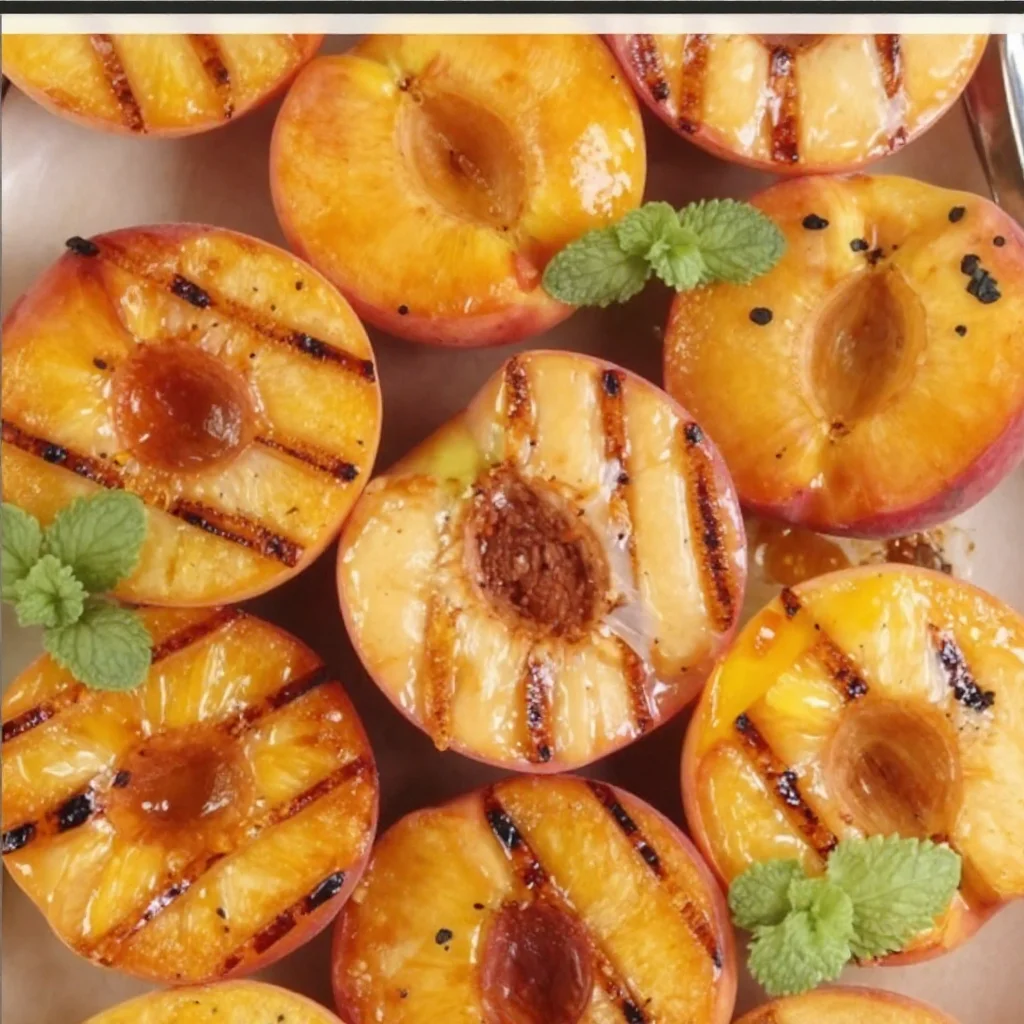
Hello and welcome back, foodie friends! Today, we’re stepping into a world of sweet indulgence with a delightful recipe that embodies the essence of summer: Grilled Peaches with Cinnamon. If you’re a fan of simple, delicious desserts that look like you’ve embraced your inner gourmet chef, you’re in for a treat!
Imagine this: the sun is shining, you’re outside enjoying a leisurely afternoon, and the smell of peaches caramelizing on the grill fills the air. This isn’t just a recipe; it’s a celebration of summer flavors that will transform how you enjoy one of nature’s sweetest offerings. Grilling brings out the natural sugars in the fruit, creating little bites of heaven that are juicy and tender, with a touch of warmth and spice from the cinnamon. A scoop of vanilla ice cream on top, or a drizzle of caramel sauce, takes this dish over the top!
Not only is this recipe incredibly easy to whip up, but it also allows you to share a beautiful dish that looks like you put in hours of effort — and trust me, nobody needs to know just how simple it really is! So grab your apron, and let’s get cooking!
A Memory of Peaches
Let me take you back to a summer evening spent at my grandparents’ house in the countryside. The air was fragrant with blooming jasmine, and the sun was dipping below the horizon, painting the sky in shades of pink and orange. My grandmother would gather all of us kids around her little charcoal grill in the backyard, and we’d line up as she skewered fresh fruits. That’s when I first tasted grilled peaches.
She would coat them lightly with olive oil and sprinkle on cinnamon, placing them directly on the hot grill. As the peaches cooked, we could hardly contain our anticipation, the sweet aroma wafting through the air, mingling with the sounds of laughter and summer insects. When those peaches came off the grill, they were soft and slightly charred, and we’d scoop them up with vanilla ice cream. Every bite was pure bliss, a moment of pure summer joy.
That memory has always stayed with me, a reminder that the simplest ingredients can create the most meaningful experiences. So, let’s recreate that magic and make our own grilled peach memories!
Ingredients
Here’s what you’ll need to bring this sweet summer creation to life:
-
4 ripe peaches
Choose peaches that give slightly when pressed; they should be ripe but not overly soft. If you can’t find peaches, nectarines make a great substitute too! -
2 tablespoons olive oil
A high-quality extra virgin olive oil adds richness and enhances the fruit’s natural sweetness. You can also use melted coconut oil for a unique flavor twist. -
1 teaspoon ground cinnamon
This spice adds warmth and a cozy aroma to your peaches. If you want to get adventurous, consider trying cardamom or nutmeg for a different flavor profile. -
2 tablespoons brown sugar
The brown sugar caramelizes beautifully on the grill, enhancing the sweetness of the peaches. If you’re looking for a lighter option, you can replace it with honey or maple syrup. -
Optional: ice cream or caramel sauce for serving
A scoop of creamy vanilla ice cream or a drizzle of rich caramel sauce elevates this dish to pure indulgence. Go for dairy-free ice cream if you want to keep it vegan!
Step-by-Step Instructions
Now, let’s dive into the cooking! Follow these steps for perfectly grilled peaches:
-
Prepare the Peaches
Start by washing the peaches under cold water. Dry them gently, then cut each peach in half, removing the pit. If you’re using particularly ripe peaches, be careful with your knife; they should yield easily but still hold their shape. -
Preheat the Grill
Heat your grill to medium-high heat. If you’re using a charcoal grill, let the coals settle until they’re glowing red-hot. A well-prepped grill is crucial for achieving those perfect grill marks and caramelized flavors. -
Create the Mixture
In a small bowl, whisk together the olive oil, cinnamon, and brown sugar. This mixture should form a paste that lightly coats the peach halves. It’s a flavor bomb and will enhance the caramelization process. -
Brush the Peaches
Take a pastry brush and generously brush the olive oil mixture onto the cut sides of each peach half. Make sure to coat them well, as this step is key to flavor and caramelization. -
Grill Time
Place the peaches cut side down on the grill. Grill for about 3-4 minutes until you see those lovely grill marks start to form. Keep an eye on them; you want them to soften without falling apart! -
Flip and Grill Again
Carefully flip the peaches over using tongs or a spatula. Grill for another 2-3 minutes. This allows the olive oil and sugar mixture to caramelize beautifully. You’ll know they’re ready when they’re fragrant and slightly soft to the touch. -
Remove and Let Cool
Once done, remove the peaches from the grill and place them on a plate. Give them a few moments to cool slightly; they’ll be steaming hot! -
Serve
If you’ve chosen to use ice cream or caramel sauce, go ahead and serve the grilled peaches warm alongside a scoop of ice cream or drizzle caramel over the top. You can also sprinkle some extra cinnamon if you feel like it.
Tip: Make sure to gather your friends or family around. This dish is all about sharing joy and creating memories!
Serving Suggestions
When it comes to plating, simplicity is key. You want to showcase the gorgeous golden-brown grill marks and the lusciousness of the peaches. Place the warm grilled halves on a vibrant plate, allowing the juices to pool slightly. Add a generous scoop of ice cream right in the center, and a drizzle of caramel sauce over it all. A sprig of mint or a dusting of additional cinnamon elevates the presentation, making it feel extra special — all without too much fuss.
Recipe Variations
Want to mix things up a bit? Here are some fun variations to try:
-
Balsamic Grilled Peaches: Drizzle some balsamic glaze over the peaches before grilling for a tangy contrast.
-
Spiced Pecans or Walnuts: Add chopped and toasted nuts on top for a delicious crunch. It adds texture and complements the sweetness beautifully.
-
Honey Drizzle: Replace sugar with a drizzle of honey if you want a more natural sweetener.
-
Minty Twist: Add finely chopped mint leaves as a topping for a refreshing flavor boost that brightens the dish.
-
Flavored Ice Cream: Experiment with different ice cream flavors like cinnamon, caramel, or coconut for a unique taste experience!
Chef’s Notes
This recipe is truly a reflection of the beauty of seasonal cooking. My own grilling adventure with peaches has evolved over the years, from just dessert to becoming a centerpiece at summer cookouts. I often find myself experimenting with spices and toppings, and it never ceases to amaze me how versatile grilled peaches can be.
I once made this dish for a backyard barbecue, and unexpectedly, a close friend ended up at the hospital that day! It was a wild adventure, and I ended up serving grilled peaches as a dessert to all our other friends while regularly checking my phone for updates about our friend. It brought laughter and lightness to the situation, reminding me that good food can create joy even in challenging moments.
FAQs and Troubleshooting
1. What’s the best way to tell if peaches are ripe?
Look for peaches that give slightly to pressure. They should be fragrant and have a nice golden hue. If they’re hard, let them sit at room temperature until they soften.
2. My peaches fell apart while grilling! Tips?
Overripe peaches can be tricky! Next time, choose slightly firmer peaches, and handle them gently when flipping to keep the halves intact.
3. Can I make this recipe ahead of time?
While grilled peaches are best served fresh, you can prep them ahead of time by cutting and coating them, then grilling just before serving.
4. How do I store leftovers?
If you have leftovers, store them in the refrigerator in an airtight container for up to 2 days. Gently reheat them in a microwave or on the grill to enjoy again!
Nutritional Info
While I don’t usually add nutritional info, here’s a little insight: Peaches are rich in vitamins A and C, and fiber, making them a healthy dessert option. Paired with ice cream, you get an indulgent treat, so enjoy every bite mindfully!
With every grilled peach you make, you’re not just serving dessert — you’re sharing a piece of summer and creating warm memories. Let’s gather around the table and make moments that matter, one delicious bite at a time. Happy grilling, friends! 🍑✨
PrintGrilled Peaches with Cinnamon

A simple and delicious dessert featuring grilled peaches caramelized with cinnamon and served warm, perfect for summer indulgence.
- Prep Time: 10 minutes
- Cook Time: 10 minutes
- Total Time: 20 minutes
- Yield: 4 servings 1x
- Category: Dessert
- Method: Grilling
- Cuisine: American
- Diet: Vegetarian
Ingredients
- 4 ripe peaches
- 2 tablespoons olive oil
- 1 teaspoon ground cinnamon
- 2 tablespoons brown sugar
- Optional: ice cream or caramel sauce for serving
Instructions
- Prepare the peaches by washing them and cutting in half, removing the pit.
- Preheat the grill to medium-high heat, ensuring coals are glowing if using charcoal.
- Create the mixture by whisking together olive oil, cinnamon, and brown sugar in a small bowl.
- Brush the mixture onto the cut sides of the peach halves with a pastry brush.
- Grill the peaches cut side down for about 3-4 minutes until grill marks form.
- Flip the peaches and grill for another 2-3 minutes until fragrant and soft.
- Remove the peaches from the grill and let cool slightly on a plate.
- Serve warm with ice cream or caramel sauce and enjoy!
Notes
Make sure to gather friends and family around to share this delightful dessert!
Nutrition
- Serving Size: 1 peach half
- Calories: 180
- Sugar: 15g
- Sodium: 0mg
- Fat: 8g
- Saturated Fat: 1g
- Unsaturated Fat: 7g
- Trans Fat: 0g
- Carbohydrates: 24g
- Fiber: 2g
- Protein: 2g
- Cholesterol: 0mg
Keywords: grilled peaches, summer dessert, cinnamon peaches, easy dessert