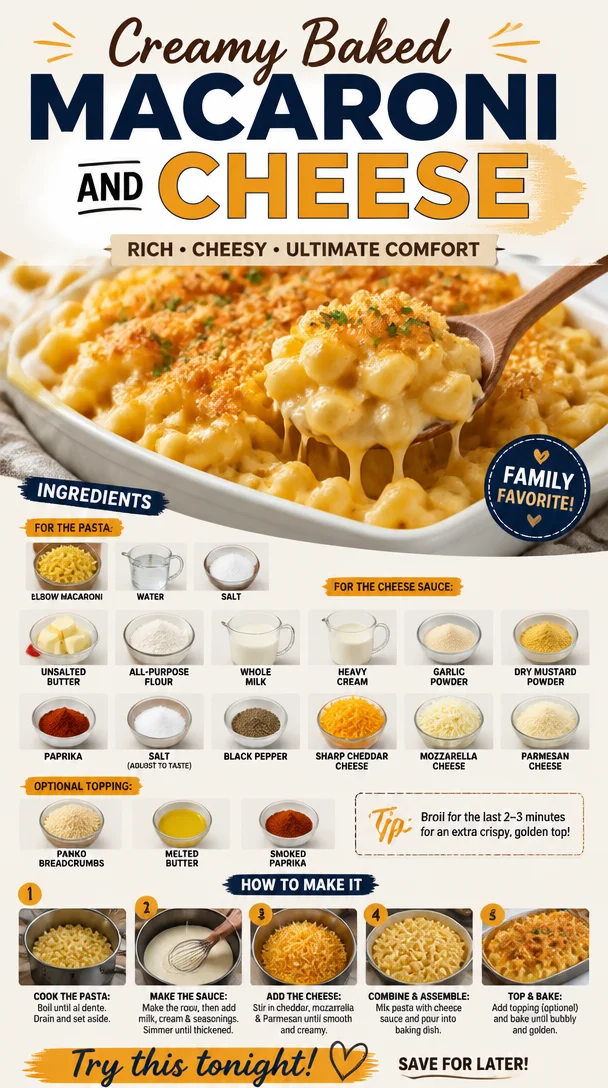
Creamy Baked Macaroni and Cheese
The Creamy Baked Macaroni and Cheese That Warms the Soul
Hello, my fellow food enthusiasts! Today, I’m so excited to dive into one of my all-time comfort food classics: Creamy Baked Macaroni and Cheese. Let me tell you, there’s something truly magical about a bubbling pan of cheesy goodness that evokes warm memories and brings people together. So grab your apron, turn on that oven, and let’s cook up some love!
A Cheesy Nostalgia
Growing up, Sundays were sacred in our household. After a day of play and laughter, we’d all gather around the table, and my mom would whip up her famous baked macaroni and cheese. It wasn’t just any mac and cheese—it was a gooey, creamy dish that had a way of making every member of the family feel loved. I can still recall the smell wafting through the air, inviting us like a warm hug.
I remember one particular Sunday when my little brother tried to sneak a spoonful while it was still bubbling. In a comedic flop, he burned his tongue and dramatically declared how he’d never eat mac and cheese again—only to devour two heaping servings just minutes later when it had cooled down. Moments like that highlighted just how special a dish like this can be, transforming a simple meal into cherished family memories filled with laughter.
Ingredient Checklist
Let’s gather our ingredients for this creamy dream. Here’s what you’ll need:
For the Pasta:
- 1 lb elbow macaroni: The star of our show! Elbow macaroni is not only classic, but its shape holds the cheese sauce beautifully. If you want to experiment, shells or cavatappi will work too!
- Water for boiling: Enough to cover the pasta in the pot.
- Salt for pasta water: Not just for seasoning; it helps infuse flavor into the pasta itself.
For the Cheese Sauce:
- 4 tablespoons unsalted butter: This adds richness and flavor. Do keep it unsalted—this way, you can control the salt in your dish.
- 1/4 cup all-purpose flour: Our thickening agent for the sauce. You can swap this out for gluten-free flour if desired.
- 3 cups whole milk: Creamy and rich, it’s the base of our sauce. If you’re looking for a lighter option, you can use 2% milk, but just know it won’t be quite as silky.
- 1 cup heavy cream: For that luxurious texture. You can use half-and-half in a pinch, but I highly recommend sticking with cream!
- 1 teaspoon garlic powder: Just a touch of savory depth.
- 1 teaspoon dry mustard powder: This adds a sharpness that complements the cheese beautifully. If you don’t have it, a bit of Dijon mustard can work too!
- 1/2 teaspoon paprika: For a subtle smokiness and color.
- 1/2 teaspoon salt (adjust to taste): Always taste as you go; you can always add more!
- 1/2 teaspoon black pepper: A little spiciness is essential.
- 3 cups sharp cheddar cheese, shredded: Go for sharp cheddar for a tangy kick! You can mix in some medium cheddar if you prefer a milder flavor.
- 1 cup mozzarella cheese, shredded: This gives it that gooey texture. Feel free to swap in fontina for a twist!
- 1/2 cup grated Parmesan cheese: Adds a nutty flavor; absolutely essential!
Optional Topping:
- 1 cup panko breadcrumbs: For that perfect crispy topping.
- 2 tablespoons melted butter: This helps the breadcrumbs crisp up beautifully.
- 1/4 teaspoon smoked paprika: Just a dash to elevate the topping with extra flavor!
Step-by-Step Cooking Instructions
Now that we have everything assembled, let’s dive into the cooking process!
-
Boil the Pasta:
- In a large pot, bring a generous amount of salted water to a rolling boil. Add the elbow macaroni and cook it according to package instructions, usually about 8-10 minutes. We want it al dente, which means it should still have a little bite as it will bake later. Drain and set aside, but don’t rinse; that starch helps the sauce stick!
-
Make the Roux:
- In another large pot over medium heat, melt the unsalted butter. Once it’s foamy and fully melted, whisk in the flour. Cook this roux for about 1-2 minutes until it’s golden and fragrant. This step is crucial as it forms the base for your cheese sauce.
-
Add the Creamy Goodness:
- Gradually whisk in the whole milk and heavy cream. It’s essential to do this slowly to avoid lumps. Keep stirring—this is where the magic begins! Continue to cook until it thickens and bubbles start to form, about 5-7 minutes.
-
Flavor it Up:
- Stir in the garlic powder, dry mustard, paprika, salt, and pepper. Take a moment to taste it—this is where you can adjust the seasoning to your palate. Oh, that smell is already heavenly!
-
Cheesy Mix:
- Lower the heat and slowly add your shredded sharp cheddar, mozzarella, and Parmesan, stirring until each cheese is fully melted and incorporated. You’re going for a luxurious, gooey consistency. If it feels too thick, add a splash more milk, and remember to keep tasting—don’t skimp on that deliciousness!
-
Combine Pasta and Sauce:
- Fold in the cooked macaroni until it’s generously coated with that cheesy sauce. Bring it all together—this is the moment we’ve been waiting for!
-
Prepare for Baking:
- Preheat your oven to 350°F (175°C). Pour the macaroni and cheese into a lightly buttered 3-quart baking dish. Spread it out evenly so every bite gets that cheesy goodness.
-
Add the Topping:
- In a small bowl, mix the panko breadcrumbs with the melted butter and smoked paprika. Sprinkle this mixture evenly over the macaroni and cheese. Baking is what really takes this dish over the top—a beautiful, cheesy baking glory awaits!
-
Bake:
- Bake in the preheated oven for 20-25 minutes or until the top is golden brown and crispy. Keep an eye on it during the last few minutes to avoid over-browning. As soon as you pull that dish out, everyone will be gathered around, ready to devour it!
Serving Suggestions
When it comes to plating your Creamy Baked Macaroni and Cheese, let simplicity reign. Use a large spoon to transfer generous portions to plates or bowls. A sprinkle of chopped parsley or chives on top adds a splash of color and freshness that’s both inviting and lively. Serve it with a simple side salad to balance the richness, and watch everyone dive in!
Recipe Variations
The beauty of mac and cheese is its versatility! Here are a few variations to consider:
- Buffalo Chicken Mac & Cheese: Stir in some shredded cooked chicken and hot sauce for a spicy twist.
- Veggie Lover’s Mac: Add steamed broccoli, spinach, or roasted cherry tomatoes into the cheese sauce for a pop of color and added nutrition.
- Truffle Mac & Cheese: Drizzle some truffle oil into the cheese mix for an earthy, upscale touch.
- Bacon Lovers: Cook up some bacon, crumble it, and fold it into the pasta before baking for that savory crunch.
- Vegan Mac & Cheese: Use cashew cream, nutritional yeast, and a blend of dairy-free cheeses for a plant-based option that’s just as creamy!
Chef’s Notes
Over the years, this mac and cheese has become a staple in my home. Initially, I would stick with the basics, but each dinner party or family gathering would spark creativity. Now, it evolves with every season and every group of friends. Just the other day, I tried adding grilled vegetables into the mix and was blown away by the freshness it brought!
A funny incident to share—during one particularly bold experiment, I decided to add jalapeños and spicy sausage. As I served it, I watched as my sister took a big bite, her eyes grew wide from the unexpected heat, and we all erupted in laughter. It’s moments like these that remind me of the joy cooking brings—not just the food itself, but the community and stories shared around the table.
FAQs and Troubleshooting
1. Why is my mac and cheese grainy?
A grainy texture typically results from the cheese not melting properly or using pre-shredded cheese that contains anti-caking agents. To avoid this, use freshly shredded cheese and ensure your sauce is creamy before adding it in.
2. Can I make mac and cheese ahead of time?
Absolutely! Prepare the dish up to the baking step, cover it tightly, and refrigerate for up to 24 hours. When you’re ready to enjoy it, just pop it in the oven to bake, adding a few extra minutes to the cooking time.
3. How do I reheat leftover mac and cheese?
For the creamiest results, reheat in the oven at 350°F (175°C) until warmed through, adding a splash of milk if it appears dry. Alternatively, you can microwave it in short intervals, stirring in between.
4. What can I do if my sauce is too thick?
If your cheese sauce becomes too thick, simply incorporate a bit more milk over low heat while stirring to loosen it up. It’s all about adjusting to get that perfect sauce.
Nutritional Info (Optional)
If you’re curious, a single serving of this creamy baked macaroni and cheese (without a topping) generally contains approximately 450 calories, with fat primarily from cheese and cream. Adjustments to the recipe (like using less cheese or adding veggies) can modify the nutritional profile to suit your needs better.
And there you have it, my friends! A heartfelt recipe that captures the essence of comfort and connection. I hope this Creamy Baked Macaroni and Cheese becomes a go-to in your kitchen, just as it has for me. Remember, cooking is about enjoying the process as much as the result. What’s your favorite take on mac and cheese? Share your stories or variations with me—let’s keep the conversation going! Happy cooking! 🍽️✨
PrintCreamy Baked Macaroni and Cheese

A gooey and creamy baked macaroni and cheese that evokes warm memories and is perfect for family gatherings.
- Prep Time: 15 minutes
- Cook Time: 30 minutes
- Total Time: 45 minutes
- Yield: 4 servings 1x
- Category: Main Course
- Method: Baking
- Cuisine: American
- Diet: Vegetarian
Ingredients
- 1 lb elbow macaroni
- Water for boiling
- Salt for pasta water
- 4 tablespoons unsalted butter
- 1/4 cup all-purpose flour
- 3 cups whole milk
- 1 cup heavy cream
- 1 teaspoon garlic powder
- 1 teaspoon dry mustard powder
- 1/2 teaspoon paprika
- 1/2 teaspoon salt (adjust to taste)
- 1/2 teaspoon black pepper
- 3 cups sharp cheddar cheese, shredded
- 1 cup mozzarella cheese, shredded
- 1/2 cup grated Parmesan cheese
- 1 cup panko breadcrumbs (optional)
- 2 tablespoons melted butter (optional)
- 1/4 teaspoon smoked paprika (optional)
Instructions
- Boil the Pasta: In a large pot, bring salted water to a boil. Add the elbow macaroni and cook until al dente, about 8-10 minutes. Drain and set aside.
- Make the Roux: In another pot, melt the unsalted butter over medium heat. Whisk in the flour and cook until golden, about 1-2 minutes.
- Add the Creamy Goodness: Gradually whisk in the whole milk and heavy cream. Cook until thickened, about 5-7 minutes.
- Flavor it Up: Stir in garlic powder, dry mustard, paprika, salt, and pepper. Adjust seasoning to taste.
- Cheesy Mix: Lower the heat and add the shredded cheeses. Stir until melted and incorporated.
- Combine Pasta and Sauce: Fold in the cooked macaroni until coated with the cheese sauce.
- Prepare for Baking: Preheat your oven to 350°F (175°C). Pour the mixture into a buttered baking dish.
- Add the Topping: Mix panko with melted butter and smoked paprika, then sprinkle over the macaroni.
- Bake: Bake for 20-25 minutes, until the top is golden brown.
Notes
For variations, consider adding shredded chicken for a Buffalo twist, or veggies like broccoli for added nutrition.
Nutrition
- Serving Size: 1 serving
- Calories: 450
- Sugar: 5g
- Sodium: 600mg
- Fat: 25g
- Saturated Fat: 15g
- Unsaturated Fat: 8g
- Trans Fat: 0g
- Carbohydrates: 45g
- Fiber: 2g
- Protein: 15g
- Cholesterol: 75mg
Keywords: macaroni and cheese, comfort food, baked pasta, cheesy recipe
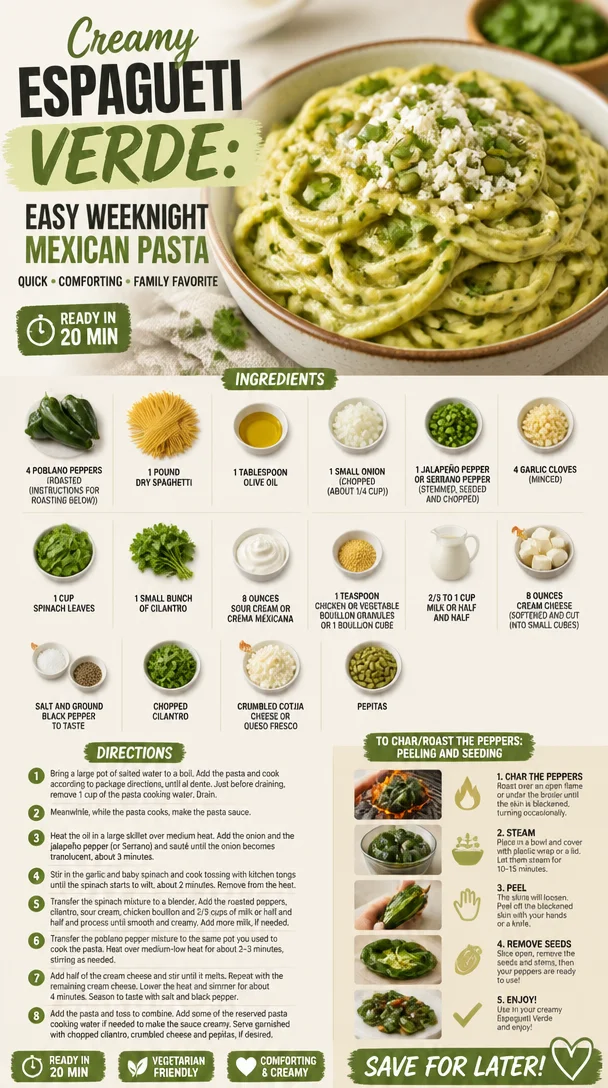
Creamy Espagueti Verde: Easy Weeknight Mexican Pasta
The Creamy Mexican Green Spaghetti You Never Knew You Needed!
Hello, my foodie friends! Today, I want to take you on a delicious journey to a dish that brings me immense joy: Creamy Mexican Green Spaghetti, or Espagueti Verde! If you’re thinking, “Spaghetti in a creamy green sauce? Really?” then you’re in for a delightful surprise.
This dish is not just a recipe; it’s a celebration of flavors coming together in a harmonious embrace! Picture this: rich poblano peppers, fresh herbs, and smooth, creamy goodness coating al dente spaghetti. It’s comfort food with a twist, perfect for weekdays or when you want to impress your friends at a dinner party without losing your flair. Ready to dive in? Let’s get cooking!
A Taste of Memory: My Love Affair with Espagueti Verde
Let me take you back to my childhood in a cozy kitchen filled with laughter, sizzling sounds, and the irresistible aroma of roasted peppers. My abuela had a magical way of transforming simple ingredients into a symphony of flavors. One dish that always captivated us was her Espagueti Verde.
I remember sitting at the kitchen table, crayons scattered around, while my abuela skillfully roasted the poblano peppers. She’d give me little tasks, like washing the cilantro or stirring the pot, ensuring I felt like a part of the cooking magic. Those moments were not just about making food; they were about creating connections, sharing stories, and embracing the warmth of family.
Fast forward to today, I’ve put my own twist on her classic recipe. While I may not use her secret spices, I’ve managed to bottle up that same love into this Creamy Mexican Green Spaghetti. So, let’s recreate some of those timeless memories together, shall we?
Ingredients You’ll Need
Before we dive into cooking, let’s gather our ingredients. Here’s what you’ll need for this fabulous dish:
-
4 Poblano Peppers (Roasted): These mild, smoky peppers add depth and flavor. If you can’t find poblanos, try using green bell peppers for a sweeter option.
-
1 pound Dry Spaghetti: The classic choice! Whole wheat spaghetti works too for a healthier twist.
-
1 tablespoon Olive Oil: For sautéing the onion and adding richness. Feel free to swap it out for avocado oil for a unique flavor.
-
1 Small Onion (Chopped, about 1/4 cup): Adds a delicate sweetness to the sauce. A shallot can also work in a pinch!
-
1 Jalapeño Pepper or Serrano Pepper (Stemmed, seeded, and chopped): For a gentle heat. If you prefer mild, just skip it altogether.
-
4 Garlic Cloves (Minced): The more garlic, the better! Fresh garlic gives a fantastic aroma.
-
1 cup Spinach Leaves: Packed with nutrients and a vibrant green color. Substitute with kale if you prefer.
-
1 Small Bunch of Cilantro: For that fresh, zesty note. If you’re not a cilantro fan, parsley is a great alternative.
-
8 ounces Sour Cream or Crema Mexicana: This provides creaminess. You can use Greek yogurt for a lighter option.
-
1 teaspoon Chicken or Vegetable Bouillon Granules or 1 Bouillon Cube: Enhances the savory flavor. You can also skip this if you want a vegetarian dish.
-
2/3 to 1 cup Milk or Half and Half: Adjust for your preferred creaminess level. A dairy-free milk like almond or oat can work too!
-
8 ounces Cream Cheese (Softened and cut into small cubes): Creates a luscious sauce. Neufchâtel cheese can be a lighter alternative.
-
Salt and Ground Black Pepper to Taste: Essential seasonings.
-
Chopped Cilantro, Crumbled Cotija Cheese or Queso Fresco, and Pepitas: For garnishing! These add that final touch of elegance and flavor.
Step-by-Step Instructions
Now that we have our ingredients gathered, let’s roll up our sleeves and create some culinary magic!
-
Roast the Poblano Peppers:
- Preheat your oven to 425°F (220°C). Place the poblano peppers on a baking sheet and roast them for about 25-30 minutes, turning occasionally until the skin is charred and blistered. Feel free to pop them under the broiler for the last 5 minutes for an extra char! Once roasted, cover them with a clean kitchen towel to steam for about 10 minutes. This makes peeling easier.
-
Cook the Spaghetti:
- While the peppers are roasting, bring a large pot of salted water to a boil. Add the spaghetti and cook until al dente, following package instructions. Reserve about 1 cup of pasta water before draining. This starchy water is a game-changer for adjusting the sauce consistency!
-
Sauté the Aromatics:
- In a large skillet, heat the olive oil over medium heat. Add the chopped onion and sauté for about 3-4 minutes until softened. Add the minced garlic and jalapeño, cooking for an additional minute until fragrant.
-
Blend the Green Sauce:
- Once the poblanos have cooled, peel off the charred skin and remove the seeds. Toss the roasted poblanos into a blender with the spinach, cilantro, sour cream (or crema), bouillon, and milk or half and half. Blend until smooth and creamy! If your blender is struggling, add a splash more milk.
-
Combine and Cook:
- Pour the creamy green sauce into the skillet with the sautéed onions and jalapeño. Add the cream cheese cubes and let it simmer over low heat for about 5 minutes, stirring until everything is well combined and creamy. If the sauce feels too thick, add some reserved pasta water to loosen it a bit!
-
Mix in the Pasta:
- Add the drained spaghetti to the skillet, tossing everything together to ensure all the noodles are coated with that luscious green goodness! Season with salt and pepper to taste.
Serving Suggestions
Serving this dish is where the fun begins! Plate your creamy green spaghetti in shallow bowls, and don’t be shy with the presentation. A sprinkle of chopped cilantro, a generous handful of crumbled cotija cheese or queso fresco, and a few toasted pepitas on top will give your dish a delightful crunch and visual appeal. You might even want to drizzle a little extra crema over the top for that finishing touch!
Recipe Variations
Want to switch things up? Here are a few fun variations to consider:
- Veggie Lovers: Toss in some sautéed zucchini or bell peppers for an extra veggie boost!
- Protein-Packed: Add grilled chicken or shrimp for a heartier meal.
- Spicy Kick: Drop in a pinch of cayenne or red pepper flakes for more heat.
- Herb Swap: Replace cilantro with basil for an Italian-inspired version.
- Cheesy Goodness: Add some shredded cheese to the sauce for a cheesier vibe.
Chef’s Notes
This recipe has become a staple in my home, and it continually evolves with every batch I make. I’ve had hilarious kitchen mishaps—like the time I couldn’t find my blender, and I ended up using a whisk (spoiler: it didn’t work too well). But that’s the joy of cooking! Each time you make this dish, it brings the opportunity to experiment, laugh, and create wonderful memories in the kitchen.
FAQs and Troubleshooting
Q: My sauce turned out too thick. What can I do?
A: No worries! Just gradually add your reserved pasta water until you reach the desired creaminess.
Q: Can I use a different type of pasta?
A: Absolutely! Penne or fettuccine would be delightful alternatives. Just adjust the cooking time accordingly!
Q: How can I make this dish vegan?
A: You can use vegan cream cheese, dairy-free yogurt, and vegetable bouillon. Substitutes for all the dairy ingredients work wonders here!
Q: What if I don’t have fresh herbs?
A: Dried herbs could work in a pinch! Use about a third of the amount you would with fresh, but remember fresh herbs give the best flavor.
Nutritional Info
(most details are optional; if you want to include them, consider offering a breakdown of calories, serving size, and key nutrients).
And there you have it, a delightful and creamy Mexican Green Spaghetti. I hope this fills your kitchen with laughter, warmth, and sumptuous flavors. Grab your apron, say goodbye to boring meals, and let’s dive into a bowl of this delightful dish. Remember, good food isn’t just about what’s on the plate, but the love and connection we create through it! Happy cooking!
PrintCreamy Mexican Green Spaghetti
A delightful and creamy take on traditional spaghetti featuring poblano peppers and fresh herbs, perfect for impressing friends or enjoying during the week.
- Prep Time: 15 minutes
- Cook Time: 30 minutes
- Total Time: 45 minutes
- Yield: 4 servings 1x
- Category: Main Course
- Method: Baking
- Cuisine: Mexican
- Diet: Vegetarian
Ingredients
- 4 Poblano Peppers (Roasted)
- 1 pound Dry Spaghetti
- 1 tablespoon Olive Oil
- 1 Small Onion (Chopped, about 1/4 cup)
- 1 Jalapeño Pepper or Serrano Pepper (Stemmed, seeded, and chopped)
- 4 Garlic Cloves (Minced)
- 1 cup Spinach Leaves
- 1 Small Bunch of Cilantro
- 8 ounces Sour Cream or Crema Mexicana
- 1 teaspoon Chicken or Vegetable Bouillon Granules or 1 Bouillon Cube
- 2/3 to 1 cup Milk or Half and Half
- 8 ounces Cream Cheese (Softened and cut into small cubes)
- Salt and Ground Black Pepper to Taste
- Chopped Cilantro, Crumbled Cotija Cheese or Queso Fresco, and Pepitas for garnish
Instructions
- Roast the Poblano Peppers: Preheat your oven to 425°F (220°C). Place the poblano peppers on a baking sheet and roast them for about 25-30 minutes, turning occasionally until the skin is charred and blistered. Cover them with a kitchen towel to steam for about 10 minutes.
- Cook the Spaghetti: While the peppers are roasting, bring a large pot of salted water to a boil. Add the spaghetti and cook until al dente, reserving 1 cup of pasta water before draining.
- Sauté the Aromatics: In a large skillet, heat the olive oil over medium heat. Add the chopped onion and sauté for about 3-4 minutes until softened. Add the minced garlic and jalapeño, cooking for an additional minute until fragrant.
- Blend the Green Sauce: Peel the roasted poblanos and remove the seeds. Blend the roasted poblanos with spinach, cilantro, sour cream, bouillon, and milk until smooth.
- Combine and Cook: Pour the green sauce into the skillet, add cream cheese cubes, and let it simmer for about 5 minutes, stirring until combined and creamy.
- Mix in the Pasta: Add the drained spaghetti to the skillet, tossing to coat all the noodles with the sauce. Season with salt and pepper to taste.
Notes
Garnish with chopped cilantro, crumbled cotija cheese or queso fresco, and toasted pepitas for added flavor and presentation.
Nutrition
- Serving Size: 1 serving
- Calories: 350
- Sugar: 5g
- Sodium: 400mg
- Fat: 12g
- Saturated Fat: 4g
- Unsaturated Fat: 6g
- Trans Fat: 0g
- Carbohydrates: 45g
- Fiber: 3g
- Protein: 15g
- Cholesterol: 30mg
Keywords: spaghetti, creamy sauce, vegetarian pasta, Mexican cuisine, comfort food
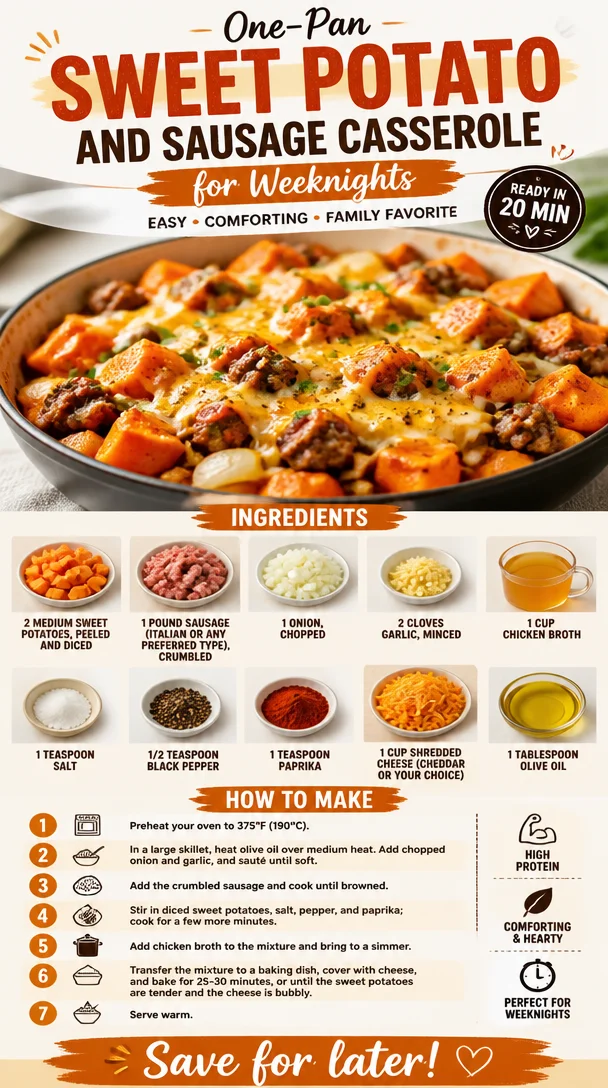
One-Pan Sweet Potato and Sausage Casserole for Weeknights
Sweet Potato and Sausage Casserole: A Heartwarming Delight
Hello, my lovely foodies! Today, we’re diving into a recipe that’s not just a meal but a cozy hug in a dish: Sweet Potato and Sausage Casserole. If you’re looking for comfort food that is both hearty and comforting, you’ve struck gold! This recipe takes simple ingredients and spins them into magic, perfect for any night of the week.
The Warmth of Family Gatherings
Let me take you back for a moment. It was a chilly autumn evening at my family’s home, and the comforting scent of sweet potatoes roasting filled the air. My mom was busy in the kitchen, and I sat perched on a stool, watching her like a hawk. The kitchen was warm, laughter echoed as my siblings ran around, and the calming tunes of our favorite playlist set the mood. This is where my love for home-cooked meals was born — in the warmth of those cherished moments.
One dish that stood out was a savory casserole that combined the earthiness of sweet potatoes with the savory zing of sausage. It has since become one of my go-to meals for family gatherings and casual weeknight dinners alike. This type of food brings people together, and every bite carries a hint of nostalgia. So, grab your apron and let’s whip up this delightful dish together!
Ingredients
Here’s what you’ll need for our Sweet Potato and Sausage Casserole:
-
2 medium sweet potatoes, peeled and diced
Sweet potatoes provide a natural sweetness and are a great source of vitamins. You can swap them for white potatoes if you’re in a pinch, but the flavor will be different. -
1 pound sausage (Italian or any preferred type), crumbled
Italian sausage adds a delightful spice and depth to the dish. Need a lighter option? Chicken or turkey sausage works like a charm! -
1 onion, chopped
Onions are the base of so many wonderful flavors. Don’t have onion? Leeks or shallots can step in for a milder taste. -
2 cloves garlic, minced
Garlic is essential for that aromatic punch. If you’re not a fan of fresh garlic, try garlic powder — just remember, it’s not quite the same! -
1 cup chicken broth
Broth infuses the casserole with moisture and richness. Vegetable broth will do the trick if you want a vegetarian option. -
1 teaspoon salt
Salt enhances all the flavors in your dish. Always taste to adjust — you know your palate best! -
1/2 teaspoon black pepper
Black pepper adds a mild kick. Feel adventurous? Try a sprinkle of cayenne for extra heat! -
1 teaspoon paprika
This adds a subtle smokiness that’s simply sublime. Smoked paprika? Even better! -
1 cup shredded cheese (cheddar or your choice)
Cheese makes everything better! Cheddar is classic, but feel free to swap in Monterey Jack or even a dairy-free option. -
1 tablespoon olive oil
Olive oil is great for sautéing and provides healthy fats. Avocado oil can be a lovely alternative!
Step-by-Step Instructions
Ready to get cooking? Let’s break this down into easy-to-follow steps:
-
Preheat your oven to 375°F (190°C). A warm oven is essential for a perfectly baked casserole.
-
Sauté the sausage: In a large skillet, heat the olive oil over medium heat. Once hot, add the crumbled sausage. Break it apart with a spatula and cook for about 6-8 minutes until golden and cooked through. You want those caramelized bits of flavor!
Chef’s Tip: If you prefer, you can cook the sausage ahead of time. This can save you a few minutes on a busy weeknight.
-
Add the onions: Toss in the chopped onion once the sausage is browned. Cook for about 3-4 minutes until they soften and turn translucent.
Chef Hack: To avoid tears, try chilling the onion in the fridge for about 10 minutes before chopping!
-
Introduce the garlic: Add minced garlic to the mix and sauté for another 1-2 minutes until fragrant. Your kitchen will start to smell divine!
-
Mix in the sweet potatoes: Next, add your diced sweet potatoes, salt, black pepper, and paprika. Pour in the chicken broth and give everything a gentle stir to combine.
Note: If you like a little more texture, consider adding chopped bell peppers at this stage for a colorful twist.
-
Simmer and soften: Cover the skillet with a lid and allow it to simmer for about 10 minutes, or until the sweet potatoes begin to soften. This step helps to create a cozy, melded flavor in your casserole.
-
Transfer to a baking dish: Pour the sausage and vegetable mixture into a greased 9×13 inch baking dish.
Pro Tip: A little cooking spray or a light brush of olive oil on the dish will ensure an easy release when serving!
-
Sprinkle the cheese: Top the mixture generously with your shredded cheese. Who doesn’t love melted cheese?
-
Bake: Pop it in the oven and bake for about 25-30 minutes, until the sweet potatoes are tender and the cheese is golden and bubbly.
Serving Suggestions
Once out of the oven, let your Sweet Potato and Sausage Casserole cool for a few minutes. It’s so tempting to dive right in, but allowing it to rest will help it set—and make for easier serving! For an elevated touch, serve it with a fresh green salad or some crusty bread on the side. It creates a lovely contrast with the warm, savory casserole.
Recipe Variations
Now, the beauty of this recipe is its versatility! Here are a few delectable twists to keep things exciting:
- Spicy Variation: Add in some diced jalapeños for a spicy kick!
- Cheesy Delight: Mix in some cream cheese for a creamier casserole.
- Herbaceous Touch: Stir in fresh herbs like thyme or rosemary for an aromatic lift.
- Veggie-Loaded: Toss in some spinach or kale right before baking for a pop of color and nutrition.
- Gluten-Free: Substitute regular sausage with gluten-free sausage and ensure your broth is certified gluten-free.
Chef’s Notes
This casserole is the kind of dish that can either be prepared ahead of time or assembled in a rush, making it a fantastic option for busy evenings or spontaneous guests. I once had a friend drop by unexpectedly, and a quick turn in the kitchen transformed simple ingredients into a feast! Over the years, I’ve played around with this recipe—sometimes adding a sprinkle of nuts for crunch or even a drizzle of maple syrup for some added sweetness. This dish constantly evolves, and I love that it’s as flexible as my schedule!
FAQs and Troubleshooting
1. What if my sweet potatoes are still hard after baking?
No worries! If they’re not as soft as you’d like, cover the dish with foil and bake for another 10-15 minutes.
2. Can I use frozen sweet potatoes?
Absolutely! Just be sure to thaw them and drain any excess water before adding them to the dish.
3. How can I store leftovers?
Store any leftovers in an airtight container in the refrigerator for up to 4 days. Reheat in the microwave or oven.
4. Can I make this dish vegetarian?
Definitely! Swap the sausage with plant-based sausage or make a veggie-only version, adding lots of colorful vegetables.
Nutritional Info
While I don’t typically dive into numbers, this casserole is packed with nutrients! Sweet potatoes are high in fiber, vitamins A and C, and the sausage provides protein. Add a salad, and you’ve got a well-rounded meal!
There you have it, my dear friends! Your very own Sweet Potato and Sausage Casserole, crafted with love and perfect for sharing. Remember, cooking is all about joy. I hope this dish becomes a part of your kitchen repertoire, just like it has in mine. Let’s gather around that table, create memories, and continue to enjoy the beautiful art of cooking together. Happy cooking! 🍽️
PrintSweet Potato and Sausage Casserole
A heartwarming Sweet Potato and Sausage Casserole that’s perfect for family gatherings and cozy dinners.
- Prep Time: 15 minutes
- Cook Time: 30 minutes
- Total Time: 45 minutes
- Yield: 4 servings 1x
- Category: Main Course
- Method: Baking
- Cuisine: American
- Diet: Gluten-Free
Ingredients
- 2 medium sweet potatoes, peeled and diced
- 1 pound sausage (Italian or any preferred type), crumbled
- 1 onion, chopped
- 2 cloves garlic, minced
- 1 cup chicken broth
- 1 teaspoon salt
- 1/2 teaspoon black pepper
- 1 teaspoon paprika
- 1 cup shredded cheese (cheddar or your choice)
- 1 tablespoon olive oil
Instructions
- Preheat your oven to 375°F (190°C).
- Sauté the sausage: In a large skillet, heat the olive oil over medium heat. Once hot, add the crumbled sausage. Break it apart with a spatula and cook for about 6-8 minutes until golden and cooked through.
- Add the onions: Toss in the chopped onion and cook for about 3-4 minutes until they soften and turn translucent.
- Introduce the garlic: Add minced garlic to the mix and sauté for another 1-2 minutes until fragrant.
- Mix in the sweet potatoes: Add diced sweet potatoes, salt, black pepper, and paprika. Pour in the chicken broth and give everything a gentle stir to combine.
- Simmer and soften: Cover the skillet and allow it to simmer for about 10 minutes, or until the sweet potatoes begin to soften.
- Transfer to a baking dish: Pour the sausage and vegetable mixture into a greased 9×13 inch baking dish.
- Sprinkle the cheese: Top the mixture generously with shredded cheese.
- Bake: Pop it in the oven and bake for about 25-30 minutes, until the sweet potatoes are tender and the cheese is golden and bubbly.
Notes
This casserole can be prepared ahead of time or assembled quickly. It’s versatile; try adding nuts for crunch or a drizzle of maple syrup for sweetness.
Nutrition
- Serving Size: 1 serving
- Calories: 400
- Sugar: 6g
- Sodium: 700mg
- Fat: 20g
- Saturated Fat: 7g
- Unsaturated Fat: 10g
- Trans Fat: 0g
- Carbohydrates: 35g
- Fiber: 6g
- Protein: 25g
- Cholesterol: 60mg
Keywords: sweet potato, casserole, sausage, comfort food, family recipe
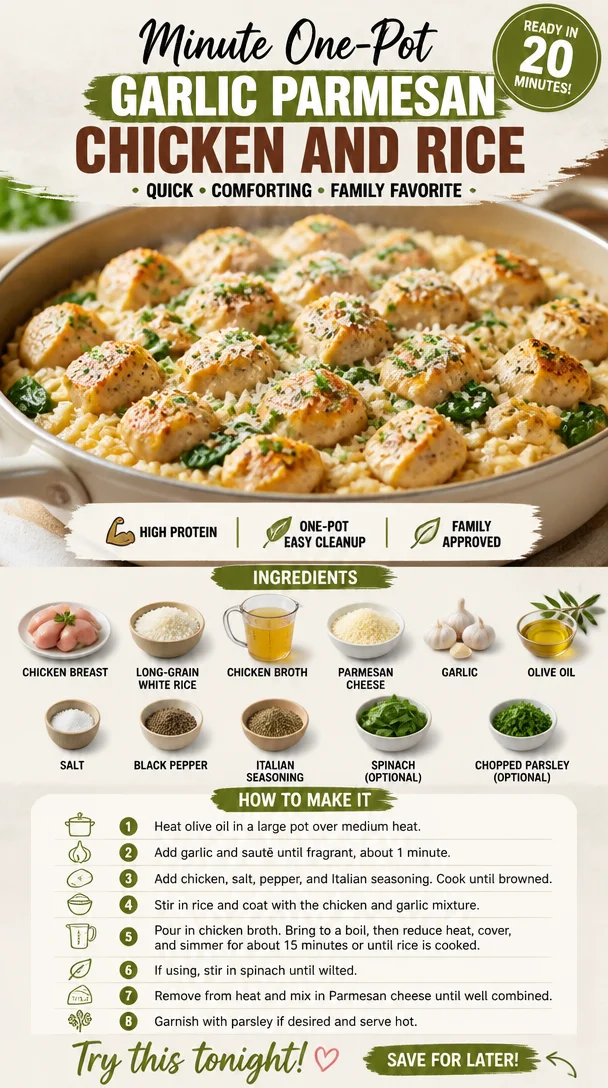
Minute One-Pot Garlic Parmesan Chicken and Rice
One-Pot Garlic Parmesan Chicken and Rice: An Effortless Delight
Hello, fellow food lovers! Today, I’m excited to share with you one of my go-to dishes: One-Pot Garlic Parmesan Chicken and Rice. It’s a recipe that checks all the boxes for a hearty, comforting meal without the fuss of a complicated kitchen endeavor. Picture this: juicy chicken pieces simmered alongside fluffy rice, all brought together by the inviting flavors of garlic and rich Parmesan. And the best part? You only need one pot to create this masterpiece!
Why do I love this dish? Because it embodies everything I stand for at Ivory Apron: elegance without intimidation. It’s about serving up something that not only looks beautiful on the plate but also warms the heart and gathers everyone around the table. Whether you’re hosting friends, cooking for family, or simply treating yourself to a delightful dinner, this dish is here to make the experience joyful and stress-free.
Let me take you on a little culinary journey. We’ll explore a memorable personal story connected to this dish, dive into the ingredients you’ll need, and walk through the cooking process step by step. And don’t worry—I’ll sprinkle in plenty of tips and tricks to ensure your dinner turns out stunning. Ready? Let’s tie our aprons and get cooking!
A Flavorful Memory
I still vividly remember the first time I made this dish. It was a rainy Saturday afternoon, and I’d invited a few close friends over for an impromptu dinner. The kind of gathering where there’s something magical in the air, everyone’s cozy, and laughter mingles with the aromas wafting from the kitchen. I wanted to create something simple yet delicious, something that would allow me to enjoy my guests rather than be glued to the stove.
As I sautéed garlic and chicken in the pot, the fragrant aroma filled the kitchen and seemed to weave its way into our conversation. The chatter flowed, and before long, my friends were diving in, their faces lighting up at the first bites of creamy rice and tender chicken. It was that moment I realized the true power of food—not just as nourishment, but as a connector of hearts and memories. This dish has been a staple ever since, a reminder that the best meals don’t have to be complicated. All we need is love, quality ingredients, and a little bit of inspiration.
Ingredients You’ll Need
Before we jump into cooking, let’s gather our ingredients. Here’s what you’ll need for this delicious One-Pot Garlic Parmesan Chicken and Rice:
-
1 pound chicken breast, cut into cubes
I recommend using boneless, skinless chicken for ease of cooking. If you prefer, you could substitute with chicken thighs for a richer flavor. -
1 cup long-grain white rice
This type of rice cooks beautifully and absorbs all the flavor from the broth and spices. If you want a healthier swap, try brown rice, but be sure to adjust the cooking time as it takes longer to cook. -
2 cups chicken broth
Using homemade broth elevates the dish! However, store-bought works wonders too—just check for low-sodium options to control salt levels. -
1 cup grated Parmesan cheese
Freshly grated cheese melts better and adds a creamier texture compared to the pre-grated kind—definitely worth the extra effort! -
4 cloves garlic, minced
You can never have too much garlic, right? If you’re in a pinch, garlic powder can work as a substitute, but fresh is always best for that robust flavor! -
1 tablespoon olive oil
A drizzle of olive oil not only adds flavor but helps in sautéing. You could use butter for a richer taste or even avocado oil for a higher smoke point. -
1 teaspoon salt
Adjustable based on your palate—don’t go overboard if you’re using salted broth! -
1/2 teaspoon black pepper
Freshly cracked black pepper adds a lovely warmth. Feel free to add a pinch of red pepper flakes if you like a bit of heat! -
1 teaspoon Italian seasoning
This blend of herbs enhances the dish beautifully. If you want to customize, consider fresh thyme or rosemary instead! -
2 cups spinach (optional)
A great way to sneak in some greens! You can replace it with kale or even omit it if greens aren’t your thing. -
Chopped parsley for garnish (optional)
A sprinkle of fresh parsley brightens up the dish visually and adds a hint of freshness—so inviting!
With our ingredients prepped and ready to go, it’s time to fire up that stove!
Step-by-Step Cooking Instructions
Step 1: Sauté the Chicken
Start by heating that lovely tablespoon of olive oil in a large pot over medium heat. Once it’s hot, add your cubed chicken. Cook for about 5-7 minutes, turning occasionally until it’s nicely browned on all sides and cooked through. Chef Tip: Don’t overcrowd the pot—this helps to ensure you get a beautiful sear on the chicken.
Step 2: Add Garlic
Once the chicken has reached that golden perfection, toss in the minced garlic. Cook it for about 1 minute or until that intoxicating aroma seeps into the air. Pro tip: Keep an eye on the garlic! It can go from perfectly fragrant to burnt in a flash!
Step 3: Combine Rice and Broth
Next, stir in the cup of long-grain white rice, allowing it to mingle with the chicken and garlic for another minute. Just imagine that gorgeous flavor building up! Now, pour in 2 cups of chicken broth and bring the mixture to a gentle boil. Chef Hack: You can increase the flavor further by adding a splash of white wine along with the broth!
Step 4: Season It Up
Once it hits a boil, season with salt, black pepper, and Italian seasoning. Then lower the heat to a simmer and cover the pot. Let it cook for about 15-20 minutes, or until the rice is tender and has absorbed all that delicious broth. Quick tip: Resist the urge to lift the lid too often—this lets precious steam escape!
Step 5: Incorporate the Parmesan and Greens
Once it’s done, remove the pot from heat. Stir in that luxurious cup of grated Parmesan cheese until melted and creamy. If you’re adding spinach, fold it in now, allowing it to wilt into the warm dish. Little insider secret: Reserve a little Parmesan for serving—it’s a nice touch!
Step 6: Fluff and Serve
Use a fork to fluff the rice for a light and airy texture. You’re almost there! Chef’s tip: At this point, a squeeze of lemon or some lemon zest can elevate those flavors further—just a thought!
Serving Suggestions
Now that we’ve concocted this creamy, dreamy dish, it’s time to serve it up. I love plating it in deep bowls, giving a generous scoop of the chicken and rice, then garnishing with that chopped parsley we set aside. A sprinkle of extra Parmesan on top never hurts either! Pair it with a crispy green salad or some roasted veggies for a delightful meal that’s as beautiful as it is delicious.
Recipe Variations
Feeling adventurous? Here are some fun flavor variations to keep things fresh:
- Lemon Herb Chicken and Rice: Add lemon juice and zest during the cooking process for a vibrant, zesty twist.
- Spicy Cajun Chicken and Rice: Mix in some Cajun seasoning for a kick that will dance on your taste buds!
- Mushroom and Chicken Risotto: Swap the rice for arborio rice and stir constantly while gradually adding broth for a creamy, risotto-style dish.
- Mediterranean Twist: Add sun-dried tomatoes and olives for an extra layer of flavor, plus some feta cheese as a garnish for that tangy touch.
Chef’s Notes
This recipe has been a staple in my kitchen for years, evolving along the way with my ever-changing whims and tastes. I remember the first time I forgot to add the cheese at the end, thinking I’d ruined dinner. But surprise! With a drizzle of olive oil and a sprinkle of herbs, it was still a hit! That experience taught me that cooking is about experimentation and good vibes—perfection isn’t the goal; enjoyment is.
FAQs and Troubleshooting
Q: My rice didn’t cook all the way. What went wrong?
A: Make sure you’re using the right ratio of liquid to rice, and check if your heat was too high. If your rice is still hard when the liquid is gone, add a little more broth or water and cover it for a few more minutes.
Q: Can I use brown rice instead?
A: Absolutely! Just extend the cooking time by about 10-15 minutes, as brown rice takes longer to cook. You may also need to increase the liquid a tad.
Q: Will this dish freeze well?
A: Yes, it freezes well! Just cool it completely before transferring it to an airtight container. It’s perfect for a quick meal later—just reheat it over low heat with a splash of broth!
Q: How do I make this dish vegetarian?
A: Swap chicken for your favorite plant-based protein, like chickpeas or tofu, and use vegetable broth instead of chicken broth. The recipe will still shine with all those amazing flavors!
This One-Pot Garlic Parmesan Chicken and Rice is more than just a meal; it’s an experience that brings warmth and joy to any table. So, go ahead and recreate those cozy vibes in your kitchen. Remember, good food is about connection, laughter, and moments spent together. Happy cooking, and enjoy every bite!
PrintOne-Pot Garlic Parmesan Chicken and Rice

A hearty and comforting one-pot dish featuring juicy chicken, fluffy rice, and rich flavors of garlic and Parmesan.
- Prep Time: 10 minutes
- Cook Time: 30 minutes
- Total Time: 40 minutes
- Yield: 4 servings 1x
- Category: Main Course
- Method: Stovetop
- Cuisine: Italian
- Diet: Healthy
Ingredients
- 1 pound chicken breast, cut into cubes
- 1 cup long-grain white rice
- 2 cups chicken broth
- 1 cup grated Parmesan cheese
- 4 cloves garlic, minced
- 1 tablespoon olive oil
- 1 teaspoon salt
- 1/2 teaspoon black pepper
- 1 teaspoon Italian seasoning
- 2 cups spinach (optional)
- Chopped parsley for garnish (optional)
Instructions
- Sauté the Chicken: Heat olive oil in a large pot over medium heat. Add cubed chicken and cook for about 5-7 minutes until browned and cooked through.
- Add Garlic: Toss in the minced garlic and cook for 1 minute until fragrant.
- Combine Rice and Broth: Stir in white rice, then pour in chicken broth and bring to a gentle boil.
- Season It Up: Once boiling, season with salt, black pepper, and Italian seasoning. Lower the heat to a simmer, cover, and cook for 15-20 minutes.
- Incorporate the Parmesan and Greens: Remove from heat and stir in Parmesan cheese until melted. Add spinach if using.
- Fluff and Serve: Fluff the rice with a fork and garnish with parsley and extra Parmesan if desired.
Notes
Optional variations include adding lemon juice for freshness or replacing chicken with chickpeas for a vegetarian version.
Nutrition
- Serving Size: 1 serving
- Calories: 450
- Sugar: 2g
- Sodium: 800mg
- Fat: 15g
- Saturated Fat: 6g
- Unsaturated Fat: 7g
- Trans Fat: 0g
- Carbohydrates: 50g
- Fiber: 2g
- Protein: 30g
- Cholesterol: 75mg
Keywords: Garlic Chicken, Parmesan Rice, Comfort Food, One-Pot Meal, Easy Dinner
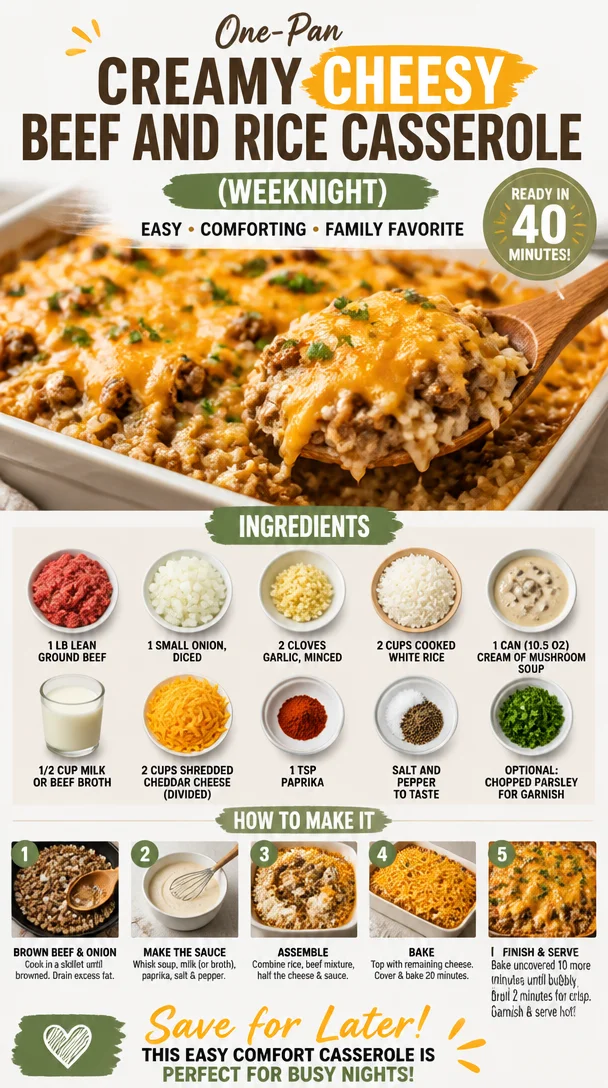
One-Pan Creamy Cheesy Beef and Rice Casserole (Weeknight)
Cheesy Ground Beef and Rice Casserole: The Ultimate Comfort Dish
Hello, fellow foodies! Are you ready to dive into one of my all-time favorite comfort dishes that brings a little nostalgia to my kitchen? Let’s talk about Cheesy Ground Beef and Rice Casserole! This dish is like a warm hug on a plate and is perfect for gathering with family or friends. It’s hearty, cheesy, and oh-so-delicious, and it proves that simple ingredients can come together to create something truly special.
Ever since I was young, I have memories of my mom whipping this casserole up on chilly evenings. The aroma of ground beef, garlic, and melted cheese wafting through the house had a magical way of luring us all into the kitchen, ready to dig in. I still vividly remember the excitement of scraping the casserole dish clean, eyes widening at the gooey, cheesy goodness, and the satisfaction of a completely devoured meal. Plus, the best part? It was a one-pot wonder that made cleanup a breeze!
Now, as I navigate through adulthood, I’ve put my twist on this beloved classic, making it even easier and more flavorful. When I create recipes, my goal is to keep them approachable yet impressive—you know, the kind of dishes that make you the kitchen superstar without requiring a degree from culinary school. So grab your favorite apron, roll up your sleeves, and let’s create a dish that’s going to make your dinner table shine!
Personal Story
Growing up, I remember the playful chaos of weeknight dinners. My siblings and I were convinced that we could be declared world-class taste testers for the delicious concoctions coming from our mom’s kitchen. One dish that topped our charts was her Cheesy Ground Beef and Rice Casserole. Every bite was a delightful mix of flavors, and I still cherish those moments, gathered around our table, clinking forks, and sharing stories.
Fast forward to today, and I’ve found ways to make this meal align with my culinary style. I’ve dabbled and experimented with various ingredients over the years, celebrating its roots but adding my flair. The nostalgia remains, but now it feels modern and accessible to even the busiest of home cooks. I want you to experience that warmth and togetherness, much like I did growing up.
Ingredients
Here’s what you’ll need to whip up this delightful casserole. Each ingredient holds a special place in this comforting dish, and I’ve added some notes and substitute tips to keep your creative juices flowing:
-
1 lb lean ground beef
This is the star of our show! Use ground turkey or chicken for a leaner option, or even plant-based ground meat for a vegetarian twist. -
1 small onion, diced
Onion adds a savory depth. Shallots are a fantastic substitute if you want a sweeter essence. -
2 cloves garlic, minced
Because really, who doesn’t love garlic? You can also use garlic powder in a pinch—about a teaspoon of it will do. -
2 cups cooked white rice
Leftover rice is perfect for this! Brown rice or quinoa can be used for a nuttier flavor and healthier vibe. -
1 can (10.5 oz) cream of mushroom soup (or cream of chicken)
Adds creamy richness! If you want to make it from scratch, sauté some mushrooms, add cream, and blend it together. You could also opt for a dairy-free version. -
1/2 cup milk or beef broth
Whichever you have on hand will work! Vegetable broth can be a wonderful substitute for added flavor. -
2 cups shredded cheddar cheese (divided)
Cheese means everything in this dish! Mix it up with Monterey Jack or even a spicy pepper jack if you’re feeling adventurous. -
1 tsp paprika
A subtle warmth that complements the cheese. Smoked paprika adds a lovely smoky touch—highly recommended! -
Salt and pepper to taste
Always essential! Don’t shy away—season as you go to enhance those flavors. -
Optional: chopped parsley for garnish
For that pop of color! You can also use green onions or cilantro for a fresher vibe.
Step-by-Step Instructions
Now that we’ve got our ingredients ready, let’s jump into the kitchen and start cooking! Follow these easy and fun steps to create your casserole masterpiece.
-
Preheat the Oven: Start by preheating your oven to 350°F (175°C). We want it nice and toasty for our casserole.
-
Brown the Beef: In a large skillet over medium heat, add the ground beef and cook until it’s browned, breaking it apart with a spatula (about 7-8 minutes). The key here is to render the fat without overcooking. You want a slightly golden hue; trust me, that flavor is essential!
-
Add Onion and Garlic: Toss in the diced onion and minced garlic. Sauté for another 3-4 minutes, or until the onions are soft and translucent. This is where the kitchen aromas start to dance! Stir occasionally, too.
-
Combine Other Ingredients: Reduce the heat to low and stir in the cooked rice, cream of mushroom soup, milk (or broth), half of the cheddar cheese (saving the other half for the top), and paprika. Season with salt and pepper to taste. Mix it all together until everything is well incorporated—you want to see that creamy goodness around every morsel.
-
Transfer to Baking Dish: Now, grab a 9×13-inch baking dish and lightly grease it (non-stick spray works wonders!). Pour the beef and rice mixture into the dish, spreading it evenly.
-
Cheese Galore: Sprinkle the remaining cheddar cheese generously on top of the mixture—this is where the magic happens! The golden, bubbly crust will be the crown jewel of our dish.
-
Bake: Place the casserole in the preheated oven and bake for about 25-30 minutes or until the cheese is melted and bubbly. I like to keep an eye on it to ensure it doesn’t overcook (nobody wants burnt edges on a cheesy casserole!).
-
Cool and Serve: Once it’s baked to perfection, remove it from the oven and let it cool for about 5-10 minutes before digging in. This is essential for the flavors to settle and for slicing purposes.
Serving Suggestions
To plate this delightful casserole, scoop out generous portions onto plates and sprinkle with chopped parsley for that touch of elegance. Add a crisp green salad or some roasted vegetables on the side to balance out the meal. And if you’re feeling extra fancy, serve it with a glass of chilled white wine or sparkling water with a slice of lemon. Perfect!
Recipe Variations
Now, let’s unleash our creativity! Here are some fun twists and variations to take your casserole up a notch:
-
Mexican Fiesta: Add black beans, corn, and diced tomatoes with green chilies for a Mexican-inspired take. Spice it up with some cumin and top with tortilla chips for crunch!
-
Italian Flavor Bomb: Swap the cheddar for mozzarella and stir in Italian seasoning. Top with marinara sauce and bake until bubbly. Instant comfort with an Italian flair!
-
Vegetarian Delight: Substitute the ground beef with lentils or chickpeas and use veggie broth. Toss in your favorite chopped veggies, like bell peppers and zucchini, for color and nutrition.
-
Cheesy Broccoli: Mix steamed broccoli florets into the casserole for extra nutrients and a pop of color. You can even swap out half of the cheese for a cheese sauce for extra creaminess.
Chef’s Notes
Cheesy Ground Beef and Rice Casserole has been a staple in my kitchen for years, evolving every time I whip it up. I remember one rainy day I had friends over, and I decided to experiment by introducing some Italian spices and marinara sauce. Let’s just say they devoured every last bite, and that night turned into an impromptu cooking party! Who knew a humble casserole could bring so much joy and laughter?
Also, don’t be afraid to make this dish your mantra in the kitchen! It’s forgiving and versatile, letting you play with flavors as you wish. Mixing things up is part of the fun!
FAQs and Troubleshooting
Here are a few questions I often get about this recipe—let’s clear up any confusion!
Q: Can I use brown rice instead of white?
A: Absolutely! Just be sure to adjust your cooking time, as brown rice takes longer to cook. If you’re using leftover brown rice, it fits perfectly into this recipe.
Q: My casserole turned out too runny. What happened?
A: This can happen if too much liquid was added. Next time, reduce the milk or broth slightly. If it’s still too runny, bake it a bit longer to help it set.
Q: Can I freeze leftovers?
A: Yes! This casserole freezes beautifully. Just make sure it’s cooled completely before transferring to an airtight container. Reheat in the oven or microwave, adding a splash of milk or broth if needed.
Q: How do I store leftovers?
A: Place any leftovers in an airtight container and store them in the refrigerator for up to 3 days. Reheat gently to maintain the cheese’s creaminess.
Nutritional Info (Optional)
For a healthier plate, keep in mind that this recipe serves about 6 people and each serving has approximately:
- Calories: 400
- Protein: 25g
- Carbohydrates: 40g
- Fat: 20g
Remember that actual values can vary based on specific ingredients used.
So, there you have it! A delightful, comforting dish that will become a favorite in your home, just as it has in mine. I hope this journey through Cheesy Ground Beef and Rice Casserole has inspired you to don your apron and get cooking. Enjoy the laughter, the memories, and of course, the delicious food. Cheers to many gatherings around your table!
PrintCheesy Ground Beef and Rice Casserole
A comforting and cheesy casserole that combines ground beef, rice, and delicious ingredients for the perfect family meal.
- Prep Time: 15 minutes
- Cook Time: 30 minutes
- Total Time: 45 minutes
- Yield: 4-6 servings 1x
- Category: Main Course
- Method: Baking
- Cuisine: American
- Diet: Omnivore
Ingredients
- 1 lb lean ground beef
- 1 small onion, diced
- 2 cloves garlic, minced
- 2 cups cooked white rice
- 1 can (10.5 oz) cream of mushroom soup (or cream of chicken)
- 1/2 cup milk or beef broth
- 2 cups shredded cheddar cheese (divided)
- 1 tsp paprika
- Salt and pepper to taste
- Optional: chopped parsley for garnish
Instructions
- Preheat the oven to 350°F (175°C).
- Brown the beef in a large skillet over medium heat for about 7-8 minutes.
- Add the diced onion and minced garlic; sauté for another 3-4 minutes.
- Combine the cooked rice, cream of mushroom soup, milk (or broth), half of the cheddar cheese, and paprika; season with salt and pepper.
- Transfer the mixture to a lightly greased 9×13-inch baking dish.
- Sprinkle the remaining cheddar cheese on top.
- Bake for 25-30 minutes or until the cheese is melted and bubbly.
- Cool for 5-10 minutes before serving.
Notes
Serve with a side salad or roasted vegetables for a complete meal. Leftovers can be frozen for later enjoyment.
Nutrition
- Serving Size: 1 serving
- Calories: 400
- Sugar: 3g
- Sodium: 800mg
- Fat: 20g
- Saturated Fat: 10g
- Unsaturated Fat: 8g
- Trans Fat: 0g
- Carbohydrates: 40g
- Fiber: 2g
- Protein: 25g
- Cholesterol: 70mg
Keywords: casserole, ground beef, comfort food, cheese, rice
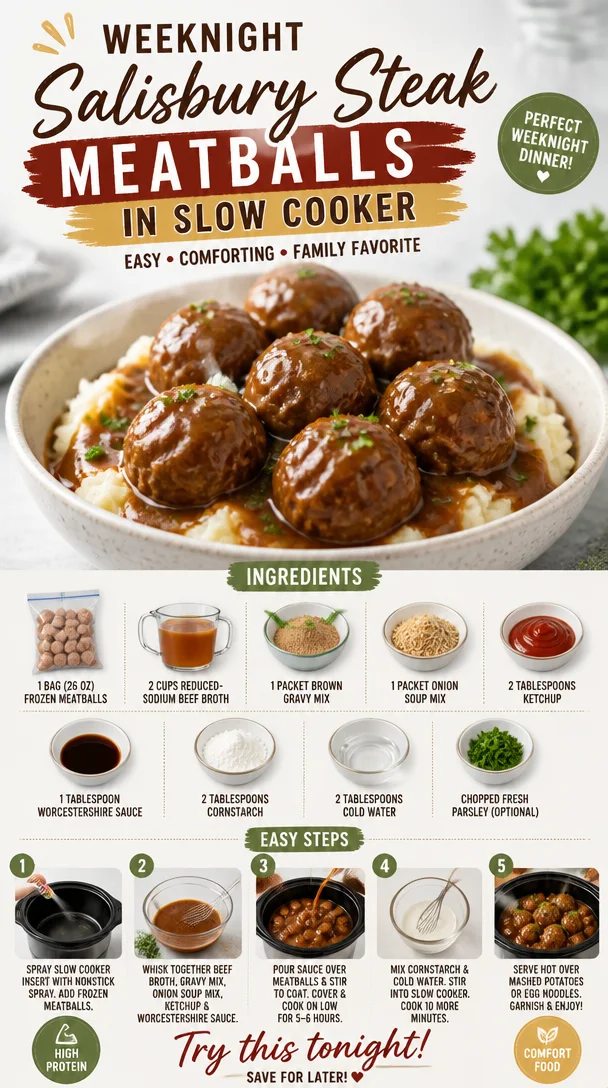
Weeknight Salisbury Steak Meatballs in Slow Cooker
Slow Cooker Salisbury Steak Meatballs: Family-Friendly Comfort
Introduction
Hello, my lovely foodies! Today, we’re diving into the cozy, hearty world of Slow Cooker Salisbury Steak Meatballs! Imagine your kitchen filled with the mouthwatering aroma of savory beef simmering gently, melding with rich gravy, and the anticipation of warmth and comfort that fills the air. This dish is the epitome of family-friendly comfort food; it’s easy to prep, warmly nostalgic, and utterly delicious.
What I adore about this recipe is how effortlessly it allows me to gather loved ones around the table. It’s one of those dishes everyone can enjoy, whether you have picky eaters or those who appreciate flavorful, hearty meals. Plus, there’s something magical about cooking in a slow cooker. You toss in the ingredients, set it, and let it work its wonders. And trust me, there will be no leftovers!
So, let’s roll up our sleeves and get started. I’ll be sharing a story that takes me back to my childhood, the essential ingredients we need, and step-by-step instructions so you can whip this up in no time. Ready to elevate your weeknight dinners? Let’s go!
Personal Story
Ah, Salisbury steak! Just hearing the name takes me back to my childhood dinners at Grandma’s house. She adored hosting family meals, and her dining table was like a cozy haven, complete with flickering candles and laughter filling the room. One of her staples was Salisbury steak, and it was always accompanied by a mound of creamy mashed potatoes and buttery corn.
I remember one particular evening, as the winter winds howled outside, Grandma’s kitchen was filled with warmth and savory smells. She had me help her shape the meat, and I loved the process of rolling tiny meatballs in my hands. The fun part? Sneaking bites of the raw meat (don’t worry—food safety is always a top priority now!). Once Grandma caught me, she’d laugh, reminding me, “You’ll ruin your appetite!”
After dinner, we’d gather around the table, sharing stories and feasting on her heavenly food. Those moments were simple yet so rich, igniting my passion for cooking and gatherings. Today, I aim to recreate that warmth in my own kitchen with these Slow Cooker Salisbury Steak Meatballs.
Ingredients
Here’s what you’ll need to craft this comforting dish:
-
1 bag (26 oz) frozen meatballs (about 30–35 meatballs)
Using frozen meatballs saves time, but feel free to make your own! If homemade, use a mix of beef and pork for extra flavor. -
2 cups reduced-sodium beef broth
Opting for reduced-sodium helps control the saltiness, allowing you to adjust flavors as needed. You could also use homemade broth for a deeper flavor! -
1 packet brown gravy mix
This is the secret to that rich, silky gravy. You can substitute with a homemade version using flour and beef stock if you prefer. -
1 packet onion soup mix
If you’re feeling adventurous, try making your own with dried onions, garlic powder, and a dash of seasoning. -
2 tablespoons ketchup
A little sweetness and tang! You can use BBQ sauce or even a splash of hoisin sauce for a fun twist. -
1 tablespoon Worcestershire sauce
This adds a lovely depth of flavor to the gravy. Don’t skip it! You can swap with soy sauce for a different kick. -
2 tablespoons cornstarch
This is our secret weapon for thickening the gravy. If you’re gluten-free, you can use arrowroot powder instead. -
2 tablespoons cold water
To mix with the cornstarch and create that beautifully thick gravy. -
Chopped fresh parsley for garnish (optional)
A sprinkle of green adds freshness and color. Feel free to swap with chives or thyme if you prefer!
Step-by-Step Instructions
Now, let’s bring these flavors together step by step!
-
Prepare Your Slow Cooker:
Start by plugging in your slow cooker and setting it to low heat. Slow cooking is about patience, so let’s keep those flavors developing slowly! -
Mix the Gravy Base:
In a medium bowl, combine the beef broth, brown gravy mix, onion soup mix, ketchup, and Worcestershire sauce. Whisk them together until you have a smooth mixture. It’ll smell fantastic—trust me, this is the essence of comfort in a bowl! -
Add the Meatballs:
Toss your frozen meatballs directly into the slow cooker. They don’t require thawing, as they’ll cook wonderfully in that savory broth. (Chef tip: Scattering them makes sure every meatball gets good flavor!) -
Pour Over the Gravy Mixture:
Pour your beautifully mixed gravy over the meatballs. Ensure all those tasty morsels are coated (yes, a gentle stir here and there wouldn’t hurt!). -
Set and Forget:
Cover the slow cooker and let it work its magic on low for about 4-6 hours. If you’re in a pinch, you can set it to high for 2-3 hours, but I do love how the flavors bloom over a longer cook. -
Thicken the Gravy:
About 30 minutes before serving, mix the cornstarch with cold water in a small bowl to create a slurry. Stir this into the slow cooker to thicken the gravy. This step is key for creating that luscious, creamy texture we love! -
Garnish and Serve:
Before serving, give the meatballs a gentle stir. Taste a meatball to ensure the seasoning is just right, then sprinkle with fresh parsley.
Serving Suggestions
To serve your Slow Cooker Salisbury Steak Meatballs, I recommend dishing them out into shallow bowls or plate them with a heap of mashed potatoes or egg noodles underneath. Make sure to drizzle that luscious gravy all over! A fresh salad or some steamed veggies on the side adds a nice pop of color and freshness.
Recipe Variations
-
Spicy Kick: Add a teaspoon of cayenne pepper or some red pepper flakes into the gravy for a little heat!
-
Herb Infusion: Toss in a few sprigs of fresh thyme or rosemary before cooking for an aromatic twist.
-
Vegetable Boost: Mix in some frozen peas or diced carrots right at the start for added nutrition and color.
-
Gluten-Free: Swap gravy mix with a gluten-free version or make your own with gluten-free flour.
-
Serving Options: Instead of serving with mashed potatoes, try it over creamy polenta or buttered egg noodles for a different texture and flavor profile.
Chef’s Notes
This recipe has evolved quite over the years. I used to make it with ground beef and shape them into patties, but let’s be real — sometimes you just want that simplicity! One of my funniest memories was when my sweet toddler tried to help by adding too much Worcestershire sauce. Let’s just say it turned into a savory explosion!
Now, I cherish those moments in the kitchen, encouraging my kids to help and modify recipes to their liking. Cooking should be a joyful experience; don’t hesitate to experiment!
FAQs and Troubleshooting
1. Can I use fresh meatballs?
Of course! Just adjust your cooking time. Fresh meatballs may take a little less time to cook, around 2-3 hours on high or 4-5 hours on low.
2. My gravy is too thin; what can I do?
If you find your gravy isn’t quite thickening to your liking, mix an additional tablespoon of cornstarch with cold water and add that to your slow cooker, then allow it to cook for another 15-30 minutes.
3. What can I serve with this dish?
You can serve it with mashed potatoes, rice, or egg noodles, or even spoon it over crusty bread for a delightful twist.
4. Can I meal prep this?
Absolutely! You can prepare everything in advance, pop it in the fridge, and toss it in the slow cooker when you’re ready. Just add an extra 30 minutes to the cook time if your meatballs are cold.
Nutritional Info
(Estimated values per serving, based on 6 servings)
- Calories: 275
- Protein: 18g
- Fat: 15g
- Carbohydrates: 20g
- Fiber: 2g
- Sodium: 660mg
And there you have it! Embrace the art of simple, beautiful cooking and make Slow Cooker Salisbury Steak Meatballs a staple in your home. Happy cooking, my friends! I can’t wait to hear how your family enjoys it!
PrintSlow Cooker Salisbury Steak Meatballs
A cozy, hearty dish perfect for family dinners, featuring savory beef meatballs simmered in a rich gravy.
- Prep Time: 15 minutes
- Cook Time: 360 minutes
- Total Time: 375 minutes
- Yield: 6 servings 1x
- Category: Main Course
- Method: Slow Cooking
- Cuisine: American
- Diet: Gluten-Free Option Available
Ingredients
- 1 bag (26 oz) frozen meatballs (about 30–35 meatballs)
- 2 cups reduced-sodium beef broth
- 1 packet brown gravy mix
- 1 packet onion soup mix
- 2 tablespoons ketchup
- 1 tablespoon Worcestershire sauce
- 2 tablespoons cornstarch
- 2 tablespoons cold water
- Chopped fresh parsley for garnish (optional)
Instructions
- Prepare your slow cooker: Plug in and set to low heat.
- Mix the gravy base: In a medium bowl, combine beef broth, brown gravy mix, onion soup mix, ketchup, and Worcestershire sauce.
- Add the meatballs: Toss frozen meatballs directly into the slow cooker.
- Pour over the gravy mixture: Ensure all meatballs are coated.
- Set and forget: Cover and let it cook on low for 4-6 hours.
- Thicken the gravy: Mix cornstarch with cold water and stir into the slow cooker 30 minutes before serving.
- Garnish and serve: Give meatballs a gentle stir, taste for seasoning, and sprinkle with parsley.
Notes
For a spicy kick, add cayenne pepper or red pepper flakes to the gravy. You can also mix in frozen peas or diced carrots for added nutrition.
Nutrition
- Serving Size: 1 serving
- Calories: 275
- Sugar: 4g
- Sodium: 660mg
- Fat: 15g
- Saturated Fat: 5g
- Unsaturated Fat: 7g
- Trans Fat: 0g
- Carbohydrates: 20g
- Fiber: 2g
- Protein: 18g
- Cholesterol: 45mg
Keywords: slow cooker, Salisbury steak, meatballs, comfort food, family-friendly, easy recipes
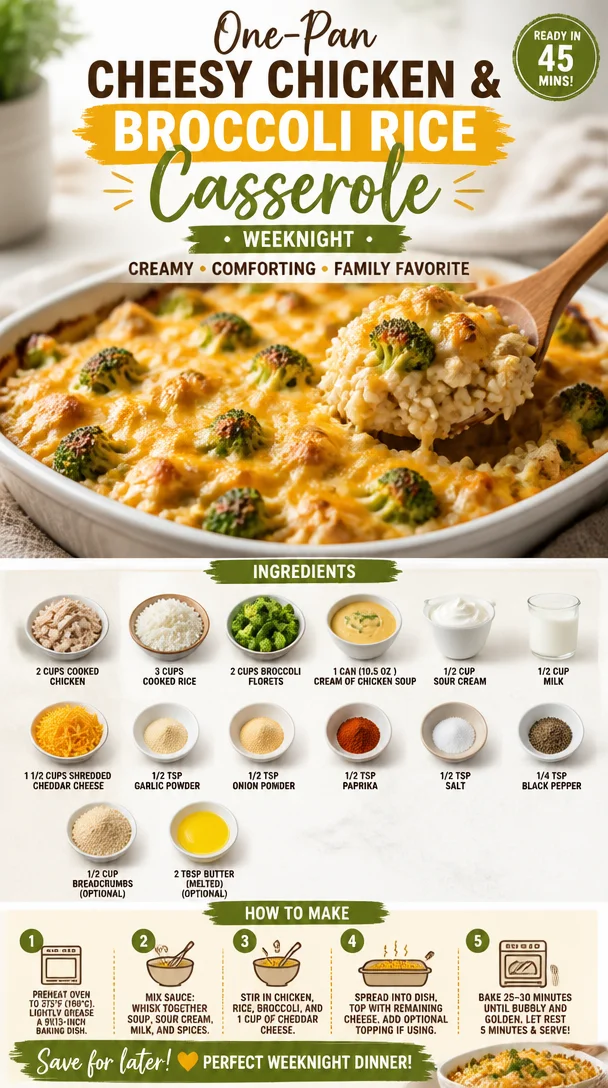
One-Pan Cheesy Chicken & Broccoli Rice Casserole (Weeknight)
Cheesy Broccoli Chicken and Rice Casserole: A Comforting Classic
Hello, my fellow food lovers! If you’ve ever had those long, busy days where cooking can feel like a daunting task, I have just the dish for you—a warm, cheesy, and oh-so-comforting Cheesy Broccoli Chicken and Rice Casserole. Not only will this recipe soothe your soul, but it also marries together some of the most beloved ingredients into one delightful dish that your family will beg for time and again.
I can still remember the first time I tasted this casserole. Picture it: a snug winter evening after school, the air filled with the scent of something baking in the oven that instantly warms your heart. As a kid, I used to dash home from school, my stomach growling in anticipation. My mom would often whip up this cheesy casserole; her variation always left a place of comfort and joy on our dinner table. As soon as that hot dish emerged, we would scoop generous servings onto our plates, the gooey cheese stretching like silly putty and filling the air with aromatic delight. We gathered around the table, laughter mingling with the delightful sounds of forks clattering against plates—those were the moments that made everything feel right in the world.
As I grew older and began hosting my own dinner parties, I realized that this classic dish held the same power of connection. It brought everyone together—the way good food does—and allowed for laughter and love to fill the room. With simple, quality ingredients and a sprinkle of intention, you too can create this delicious dish that not only tastes heavenly but is also easy enough for a weeknight meal or a weekend gathering.
Ingredients
Let’s gather our ingredients so that we can get this party started! Here’s what you’ll need to put together your Cheesy Broccoli Chicken and Rice Casserole:
-
2 cups cooked chicken (shredded or cubed)
This is the heart of our casserole! You can use leftover rotisserie chicken or even poach some chicken breast for maximum tenderness. If you’re vegetarian, you can substitute with chickpeas or a plant-based meat substitute. -
3 cups cooked rice (white or brown)
White rice provides a fluffy base, while brown rice gives a nuttier flavor and additional nutrients. Use whatever you have on hand—quinoa could also work great here if you’re feeling adventurous! -
2 cups broccoli florets (fresh or frozen, lightly steamed)
I recommend fresh broccoli for its vibrant color and flavor, but frozen works just as well—just make sure to thaw and drain it beforehand to avoid excess water. -
1 can (10.5 oz / ~300 g) cream of chicken soup
This creamy goodness acts as the magical glue for our casserole. Use a homemade version for a fresher taste, or swap it out for cream of mushroom soup for a different flavor profile. -
1/2 cup sour cream (or plain Greek yogurt)
This adds creaminess and tang. For a lighter option, you can even use low-fat versions or substitute with cottage cheese for added protein. -
1/2 cup milk
Whole, skim, or even plant-based milk can be used here. The choice is yours! Milk adds moisture; adjust to reach your preferred creaminess. -
1 1/2 cups shredded cheddar cheese (divided)
Cheddar is the classic choice for this casserole—sharp, mild, or even a blend works beautifully. Feel free to substitute with your favorite melting cheese, like Monterey Jack or Gruyère! -
1/2 teaspoon garlic powder
This lovely seasoning adds a punch of flavor without the fuss of fresh garlic. You can opt for fresh minced garlic too if you’re feeling bold! -
1/2 teaspoon onion powder
This subtle seasoning rounds out the flavor beautifully, contributing to the aromatic essence of the dish. -
1/2 teaspoon paprika
Just a hint of warmth and color; feel free to increase if you love that smoky flavor! -
1/2 teaspoon salt (adjust to taste)
Essential for enhancing all those wonderful flavors. Keep tasting as you go along! -
1/4 teaspoon black pepper
Adds just the right amount of heat without overpowering the dish. -
1/2 cup breadcrumbs (optional, for topping)
For those crunch lovers out there! Panko breadcrumbs or homemade breadcrumbs can give a wonderful texture contrast. -
2 tablespoons butter (melted, optional, for topping)
A drizzle of melted butter on top of the breadcrumbs adds richness and helps them crisp up beautifully.
Step-by-Step Instructions
Now that we’ve got our ingredients, let’s roll up our sleeves and get to work! Here’s how to whip up your Cheesy Broccoli Chicken and Rice Casserole in no time.
-
Preheat Your Oven: Preheat your oven to 350°F (175°C). This allows your casserole to cook evenly and ensures a lovely golden top. A hot oven is your best friend when baking!
-
Prep Your Baking Dish: Grab a 9×13-inch baking dish (or similar). You can lightly grease it with cooking spray or a dab of butter, which makes for an easy clean-up later.
-
Combine the Ingredients: In a large mixing bowl, combine your cooked chicken, rice, broccoli, cream of chicken soup, sour cream, milk, 1 cup of cheddar cheese, garlic powder, onion powder, paprika, salt, and pepper. Use a spatula or spoon to gently fold everything together, making sure all the ingredients are well combined without breaking up the broccoli too much.
-
Transfer to Baking Dish: Pour the mixture into your prepared baking dish and spread it evenly using the spatula. This is where the magic begins, as you start to see the flavors blend together.
-
Add Toppings: If you’re using breadcrumbs, mix them with the melted butter in a small bowl to coat evenly. Sprinkle the crumbs over the casserole for a crispy finish. For added allure, top it off with the remaining 1/2 cup of cheddar cheese—yes, please!
-
Bake: Place the casserole in your preheated oven and bake for about 30–35 minutes or until it’s bubbly and golden on top. Keep an eye on it towards the end—perfectly gooey cheese and a crispy topping can be the light at the end of the tunnel!
-
Let It Rest: Once out of the oven, let your casserole sit for about 5–10 minutes before serving. This helps it settle and makes for neater portions.
Serving Suggestions
When it comes to serving your Cheesy Broccoli Chicken and Rice Casserole, presentation can give it an extra touch of love. Use a large serving spoon to scoop out generous portions into individual plates. A sprinkle of fresh herbs like parsley or chives can elevate the look even further. Pair it with a side salad or some roasted veggies for a colorful, balanced meal that pleases the eye as much as it satisfies the belly!
Recipe Variations
You know I’m all about putting my own spin on things. Here are a few fun variations to try:
-
Add a Crunch: Stir in some crushed potato chips or panko breadcrumbs before baking for an added crunch, or use tortilla chips for a Tex-Mex flair!
-
Spice it Up: Feel free to add a bit of heat! Jalapeños, diced green chilies, or a dash of hot sauce can bring a kick to your casserole.
-
Veggie Lovers: Swap the broccoli for your favorite steamed veggies—cauliflower, carrots, or peas work beautifully!
-
Zesty Twist: Add a squeeze of lemon juice or zest for a fresh citrusy aroma that tones down the richness.
-
Make it Vegan: Substitute chicken with chickpeas, use cashew cream for the creaminess, and plant-based cheese to create a comforting vegan option.
Chef’s Notes
Many moons ago, I tried this casserole with leftover Thanksgiving turkey and a medley of holiday veggies! It turned out to be the perfect way to repurpose those festive flavors. The dish has evolved over time—substitutions and tweaks have become part of the magic in making it my own. It’s wonderful how a single recipe can turn into countless variations, making it feel fresh when you whip it up again and again.
FAQs and Troubleshooting
-
Can I use uncooked chicken in this dish?
Yes! Just ensure the dish bakes for an additional 15-20 minutes to ensure the chicken cooks through. -
Why is my casserole watery?
This can happen if excess moisture from the broccoli or cooked rice isn’t drained. Make sure to thoroughly steam or thaw your broccoli beforehand. -
Can I freeze this casserole?
Absolutely! Assemble it without baking it, cover tightly, and freeze for up to three months. When ready to eat, thaw overnight in the refrigerator and pop it in the oven. -
What can I do if I don’t have cream of chicken soup?
A simple homemade combination of chicken broth, flour, and cream can be a perfect substitute. You can also use cream of mushroom soup or a homemade white sauce.
Nutritional Info
(Per serving, assuming 8 servings total)
- Calories: 450
- Protein: 30g
- Fat: 22g
- Carbohydrates: 36g
- Fiber: 2g
- Sodium: 600mg
With all these tips and insights, you’re well-prepared to create this delightful Cheesy Broccoli Chicken and Rice Casserole. Happy cooking, and remember—good food is about sharing joy at your table. Enjoy every bite and every moment. Let’s get this casserole going!
PrintCheesy Broccoli Chicken and Rice Casserole

A warm, cheesy, and comforting casserole that combines chicken, broccoli, and rice for a delightful family meal.
- Prep Time: 15 minutes
- Cook Time: 35 minutes
- Total Time: 50 minutes
- Yield: 8 servings 1x
- Category: Main Course
- Method: Baking
- Cuisine: American
- Diet: None
Ingredients
- 2 cups cooked chicken (shredded or cubed)
- 3 cups cooked rice (white or brown)
- 2 cups broccoli florets (fresh or frozen, lightly steamed)
- 1 can (10.5 oz / ~300 g) cream of chicken soup
- 1/2 cup sour cream (or plain Greek yogurt)
- 1/2 cup milk
- 1 1/2 cups shredded cheddar cheese (divided)
- 1/2 teaspoon garlic powder
- 1/2 teaspoon onion powder
- 1/2 teaspoon paprika
- 1/2 teaspoon salt (adjust to taste)
- 1/4 teaspoon black pepper
- 1/2 cup breadcrumbs (optional, for topping)
- 2 tablespoons butter (melted, optional, for topping)
Instructions
- Preheat your oven to 350°F (175°C).
- Prep your baking dish by greasing it with cooking spray or a dab of butter.
- Combine your cooked chicken, rice, broccoli, cream of chicken soup, sour cream, milk, 1 cup of cheddar cheese, garlic powder, onion powder, paprika, salt, and pepper in a large mixing bowl.
- Transfer the mixture into your prepared baking dish and spread it evenly.
- Add breadcrumbs mixed with melted butter on top, and sprinkle the remaining 1/2 cup of cheddar cheese.
- Bake for about 30–35 minutes or until bubbly and golden on top.
- Let the casserole rest for about 5–10 minutes before serving.
Notes
Feel free to add your favorite toppings or spices to customize your casserole.
Nutrition
- Serving Size: 1 serving
- Calories: 450
- Sugar: 3g
- Sodium: 600mg
- Fat: 22g
- Saturated Fat: 10g
- Unsaturated Fat: 12g
- Trans Fat: 0g
- Carbohydrates: 36g
- Fiber: 2g
- Protein: 30g
- Cholesterol: 70mg
Keywords: casserole, chicken, broccoli, cheesy, comfort food
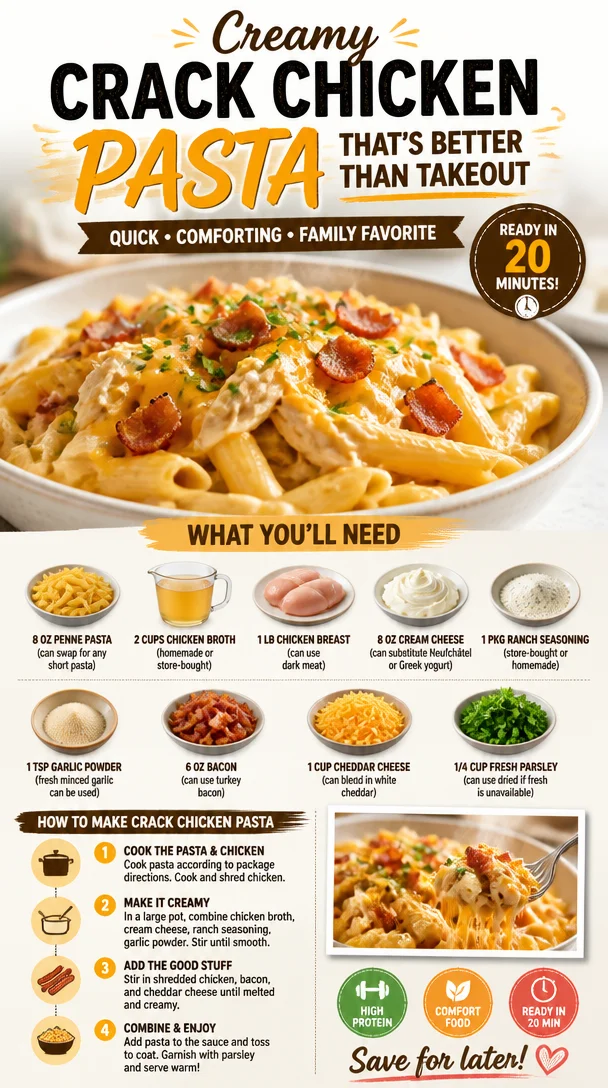
Creamy Crack Chicken Pasta That’s Better Than Takeout
Creamy Crack Chicken Pasta That’s Better Than Takeout
Hello, fellow food lovers! Today, I’m thrilled to share with you a dish that embodies everything sumptuous and comforting about weeknight dinners—Creamy Crack Chicken Pasta. Not only is it better than takeout, but it’s also so straightforward that you’ll wonder why you ever considered ordering in again.
Introduction
Imagine this: it’s a chilly evening, the kind that makes you want to curl up with a cozy blanket and a show, but your stomach is growling for something hearty. Enter this Creamy Crack Chicken Pasta! It’s indulgent, creamy, and loaded with flavor, making every mouthful a little hug from the inside.
What’s even better? You probably have most of the ingredients in your kitchen already. This dish is a culmination of my favorite things—chicken, cheese, and a kick of ranch seasoning that takes the flavor profile to a delightful new level. With just a few pantry staples and some love, you’ll whip up a meal that will have your family flocking to the table. And if they start to linger just a little bit longer than usual, I won’t blame them!
The concept of “Crack Chicken”—a creamy, ranch-infused dish that’s been making waves on social media—gets a pasta twist here. Each bite is creamy and full of savory goodness, thanks to the cream cheese and cheddar, while the bacon adds that oh-so-delicious crunch. Perfect for a cozy night in or a casual gathering with friends, this dish is versatile, comforting, and unapologetically delicious. So, grab your apron, and let’s get cooking!
Personal Story
There’s something magical about the combination of chicken and cheese that always takes me back to family dinners growing up. I remember my mom making her infamous creamy chicken bake on special occasions, where chicken was cooked to juicy perfection and wrapped in a velvety cheese sauce. I would hover around the kitchen, impatiently waiting for her to serve it up. It became a signature dish that everyone anticipated, not just for its flavor, but also for the love and laughter that filled the room.
When I first tried a version of Crack Chicken on social media, I couldn’t help but feel nostalgic. As I experimented with its flavors, I realized I could elevate it with pasta! The idea of adding penne to this creamy concoction brought back fond memories and tied everything together. Now, every time I make this dish, I feel like I’m serving up a little slice of my childhood while simultaneously creating new memories with friends and family.
Ingredients
Here’s what you’ll need:
-
8 oz Penne Pasta
This is the star of the show! Short pasta shapes like penne hold onto the creamy sauce beautifully. You can easily substitute it with any short pasta, such as rigatoni or rotini, depending on what you have on hand. -
2 cups Chicken Broth
Using homemade chicken broth adds a depth of flavor, but store-bought works perfectly fine too! Look for low-sodium options to control the salt content. -
1 lb Chicken Breast
Chicken breast is lean and cooks quickly, but feel free to use darker cuts like thighs for a richer flavor. -
8 oz Cream Cheese
A key player in making the pasta oh-so-creamy! If you’re looking for a lighter option, Neufchâtel cheese or even Greek yogurt can work as substitutes without compromising the texture too much. -
1 pkg Ranch Seasoning
You can purchase this from the store, or if you’re feeling adventurous, whip up a homemade blend with dill, garlic, onion powder, and a pinch of salt. -
1 tsp Garlic Powder
If you prefer fresh flavors, one to two cloves of minced garlic will work wonders here. -
6 oz Bacon
Because bacon makes everything better! For a healthier twist, turkey bacon will still give you the crispy goodness without the added fat. -
1 cup Cheddar Cheese
Sharp cheddar works really well, but blending in some white cheddar or even pepper jack can add an exciting twist to the dish. -
1/4 cup Fresh Parsley
A sprinkle of fresh parsley not only adds color but also a refreshing brightness! Dried parsley is a fantastic substitute if fresh isn’t available.
Step-by-Step Instructions
Let’s roll up our sleeves and dive into this easy cooking process. Follow these steps for a creamy and delicious dish that you can whip up in no time:
-
Cook the Pasta:
Start by boiling a large pot of salted water. Once boiling, add the penne pasta and cook according to the package instructions until al dente. Remember, we’re going to combine it with the creamy sauce later, so it’s okay if it’s a tad undercooked. Drain the pasta and set it aside. -
Cook the Chicken:
In a large skillet, heat a drizzle of olive oil over medium heat. Season the chicken breast with salt and pepper, and add it to the skillet. Cook for about 6-7 minutes per side, or until the chicken reaches an internal temperature of 165°F. A quick tip: Let the chicken sit for a minute before slicing so that the juices redistribute and keep the meat moist. Once cooked, shred it with two forks (or go ahead and chop it for a chunkier style). -
Sauté the Bacon:
In the same skillet (because why dirty more dishes?), cook the bacon until crispy. This will allow the drippings to flavor the subsequent steps. Remove the bacon, crumble it, and set it aside. Don’t wipe the skillet clean; all those lovely bits will add flavor! -
Create the Sauce:
Now, in the same skillet, reduce the heat to low. Pour in the chicken broth, followed by the cream cheese, ranch seasoning, and garlic powder. Stir until the cream cheese is completely melted and everything is well-combined. This is where the magic happens, so take your time and appreciate the aromas! -
Combine Everything:
Add the shredded chicken and cooked pasta to the creamy sauce. Give a good stir until everything is beautifully coated in richness. If you find the mixture is too thick, don’t be shy to add a splash more chicken broth until you get your desired consistency! -
Cheesy Goodness:
Sprinkle in the cheddar cheese, stirring until it melts into the sauce. You’ll see it become gooey and irresistible. Don’t forget to taste it now—this is when you can adjust seasonings if you wish! -
Add the Bacon and Parsley:
Finally, fold in the crumbled bacon and chopped parsley. This adds that crunchy texture and fresh flavor we’re after!
Serving Suggestions
Plate your Creamy Crack Chicken Pasta with a generous sprinkle of fresh parsley on top. You can also add additional cheese or a sprinkle of crushed red pepper flakes for some extra heat. Serve it with a side of crusty garlic bread to scoop up every last bit of creamy goodness—trust me, you won’t want to waste any leftovers!
Recipe Variations
Feeling adventurous? Here are some creative twists you can try on this delicious dish:
- Vegetarian Version: Replace the chicken with sautéed mushrooms and spinach for a delicious veggie option.
- Spicy Kick: Add a teaspoon of crushed red pepper flakes or some chopped jalapeños for a zesty boost.
- Creamy One-Pot Dish: Skip the extra pot. Add the uncooked pasta directly to the skillet with the sauce ingredients, then stir in additional broth for cooking as needed.
- Herbaceous Touch: Experiment with dried herbs like thyme or rosemary for added depth in flavor.
- Cheesy Twist: Try blending in cream cheese flavored with herbs or spicy cheeses for a unique flavor profile.
Chef’s Notes
I’ll let you in on a fun kitchen story: The first time I ever attempted making a variation of this creamy dish, I miscalculated how much cream cheese I needed—not once, but twice! The first result turned out too thick, and the second too soupy! Eventually, I found that sweet spot that balanced creaminess perfectly. Now, it’s one of my go-to recipes, not just for its flavor, but for the laughs I’ve had in the kitchen while perfecting it. Cooking, after all, is a journey!
FAQs and Troubleshooting
-
Should I let the pasta cool down before mixing it with the sauce?
No need! Add the pasta directly after cooking as it helps the sauce cling beautifully and absorb flavor. -
What if my pasta gets too mushy?
Try cooking it for a minute or two less than the package instructs. It’ll soften more when mixed with the creamy sauce. -
Can I freeze the leftovers?
Yes, but note that the texture might change a bit when reheated. Just store it in an airtight container for up to 2 months and reheat slowly on the stove while adding a splash of chicken broth. -
What if I don’t have ranch seasoning?
No problem! You can whip up your own version by combining dried dill, garlic powder, onion powder, and salt.
Nutritional Info
For those curious about the nutritional breakdown, each serving (based on 4 servings per recipe) approximately contains:
- Calories: 540
- Protein: 35g
- Carbohydrates: 40g
- Fat: 28g
Remember that these values can vary based on ingredients used!
Conclusion
There you have it—Creamy Crack Chicken Pasta that’s bound to be a crowd-pleaser! It’s creamy, comforting, and packed with flavors that will make even the pickiest eaters feel right at home. Next time you’re torn between cooking at home or grabbing takeout, remember this delightful recipe!
So, tie on that apron, invite a few friends over (or keep it just for yourself), and enjoy this scrumptious dish that’s sure to become a household favorite. Happy cooking!
PrintCreamy Crack Chicken Pasta

Indulgent and creamy pasta dish with chicken, cheese, and ranch seasoning that’s better than takeout.
- Prep Time: 15 minutes
- Cook Time: 30 minutes
- Total Time: 45 minutes
- Yield: 4 servings 1x
- Category: Main Course
- Method: Stovetop
- Cuisine: American
- Diet: None
Ingredients
- 8 oz Penne Pasta
- 2 cups Chicken Broth
- 1 lb Chicken Breast
- 8 oz Cream Cheese
- 1 pkg Ranch Seasoning
- 1 tsp Garlic Powder
- 6 oz Bacon
- 1 cup Cheddar Cheese
- 1/4 cup Fresh Parsley
Instructions
- Cook the Pasta: Boil a large pot of salted water, add penne pasta, and cook until al dente. Drain and set aside.
- Cook the Chicken: Heat olive oil in a skillet over medium heat, season chicken breast, and cook until an internal temperature of 165°F. Shred the chicken.
- Sauté the Bacon: In the same skillet, cook the bacon until crispy, crumble it, and set aside.
- Create the Sauce: In the skillet, reduce heat to low, add chicken broth, cream cheese, ranch seasoning, and garlic powder. Stir until melted.
- Combine Everything: Add shredded chicken and cooked pasta to the sauce, stir to coat. Adjust consistency with additional broth if needed.
- Cheesy Goodness: Add cheddar cheese and stir until melted.
- Add the Bacon and Parsley: Fold in crumbled bacon and chopped parsley.
Notes
Serve with a sprinkle of parsley and additional cheese or red pepper flakes for extra flavor. Pair with garlic bread.
Nutrition
- Serving Size: 1 serving
- Calories: 540
- Sugar: 3g
- Sodium: 800mg
- Fat: 28g
- Saturated Fat: 12g
- Unsaturated Fat: 9g
- Trans Fat: 0g
- Carbohydrates: 40g
- Fiber: 2g
- Protein: 35g
- Cholesterol: 90mg
Keywords: pasta, chicken, creamy, comfort food, quick dinner, weeknight meal
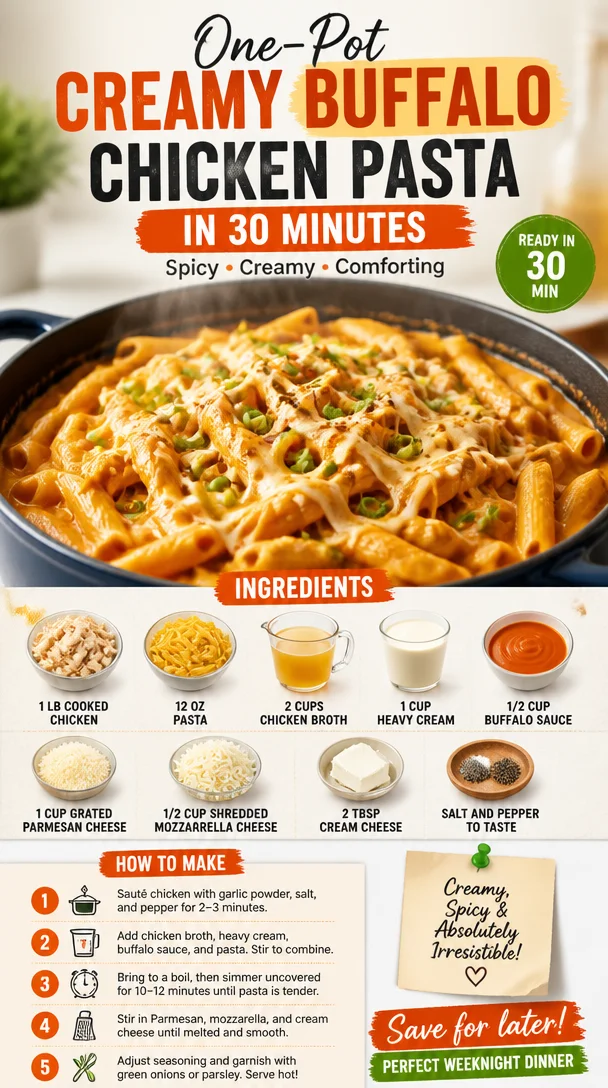
One-Pot Creamy Buffalo Chicken Pasta in 30 Minutes
One-Pot Creamy Spicy Buffalo Chicken Pasta: A Flavorful Feast
Introduction
Hey there, fellow cooking enthusiasts! Today, I’m thrilled to share with you one of my all-time favorite comfort food recipes: One-Pot Creamy Spicy Buffalo Chicken Pasta. If you love the bold flavors of buffalo sauce combined with the comforting creaminess of a rich pasta dish, then this recipe is sure to tickle your taste buds!
Imagine it’s a chilly evening, and the sun is setting, casting a warm glow through your kitchen window. You’ve had a long day, and you’re ready to unwind with something delicious yet simple to make. This dish is perfect for those cozy nights when you want to gather friends or family around the table without spending hours in the kitchen.
What I adore about this recipe is its versatility — you can add your favorite veggies, adjust the spice level, or even switch up the kinds of cheese you use. It’s all about creating something beautiful and tasty that feels approachable, gorgeous, and just a bit indulgent. So, tie on your apron and let’s dive into this delightful recipe that marries rustic charm with a bit of heat!
Personal Story
I’ll never forget the first time I made a spicy buffalo chicken dish from scratch. It was a rainy afternoon, and I was craving the zing of buffalo sauce but also the coziness of pasta. I rummaged through my pantry, pulling together leftover chicken from last night’s dinner, some pasta, and of course, that ever-present bottle of buffalo sauce. A few trial and errors later, I landed on a one-pot creation that blew my mind — and my taste buds!
That first batch was bubbling on the stove, filling the air with a glorious aroma that made my stomach growl. As I plated it up, the golden cheese melted into the creamy sauce, and the vibrant orange buffalo notes peeked through. It was a comforting explosion of flavor, and I remember serving it to my friends that night. One bite, and there were gasps of delight followed by requests for the recipe. That’s when I knew I had stumbled upon something special, something I wanted to share on my journey with Ivory Apron.
Ingredients
Let’s gather our ingredients for this creamy spicy delight! Here’s what you’ll need:
-
1 lb cooked chicken (shredded or diced): You can use rotisserie chicken for the ultimate convenience or leftovers from a previous roast. Feel free to swap it with shredded tofu or chickpeas for a vegetarian twist!
-
12 oz fettuccine or penne pasta: Either shape works wonders here. Go for whole grain or gluten-free pasta if that’s more your style!
-
2 cups chicken broth: Store-bought is perfectly fine, but homemade broth can elevate the flavor. If you’re looking to go vegetarian, vegetable broth works too!
-
1 cup heavy cream: This is what gives the dish a luscious creaminess. For a lighter option, replace it with half-and-half or even coconut cream for a dairy-free version.
-
1/2 cup buffalo sauce: Choose your favorite brand or make your own! If you’re sensitive to spice, feel free to reduce this amount or use a milder hot sauce.
-
1 cup grated Parmesan cheese: A classic choice that adds depth and richness. Nutritional yeast can be a great dairy-free substitute!
-
1/2 cup shredded mozzarella cheese: This adds that beautiful melty texture. Use any melty cheese of your choice — cheddar works wonderfully, too!
-
2 tbsp cream cheese: This helps to thicken the sauce and gives it a delightful tang. If you’re dairy-free, replace it with a non-dairy cream cheese.
-
Salt and pepper to taste: A little seasoning can go a long way, so adjust according to your preference!
Step-by-Step Instructions
Now, let’s get cooking! Follow these easy steps to make this one-pot sensation:
-
Prep your ingredients: Start by gathering and measuring all your ingredients. You want everything close by so that cooking goes seamlessly. This also gives you a moment to appreciate the colors and textures of your food — it’s part of the joy of cooking!
-
Cook the pasta: In a large pot or deep skillet, bring 2 cups of chicken broth to a simmer over medium-high heat. Add in the fettuccine or penne and cook according to package instructions, stirring occasionally. This will allow the pasta to absorb the flavorful broth as it cooks — yum!
-
Incorporate the chicken: Once the pasta is nearly al dente (about 1-2 minutes before it’s done), add the cooked chicken into the pot. Let it mingle for a minute until it’s heated through. This is the moment when all those wonderful smells will start wafting around your kitchen!
-
Stir in the cream: Lower the heat to medium-low and pour in the heavy cream, stirring gently to combine. This creates that luscious sauce that’s going to envelop everything in creaminess. If you want to have some fun, taste it at this stage for seasoning!
-
Buffalo time!: Add the buffalo sauce, cream cheese, and grated Parmesan cheese to the pot. Stir everything together until the cheese is melted and the sauce is creamy and spicy. Keep your eye on it — you want it to be just warmed through, not boiling.
-
Cheesy goodness: Finally, sprinkle the mozzarella on top, cover the pot, and let it sit for a minute to allow the cheese to melt beautifully. It’s hard to resist peeking, but I promise the surprise will be worth it!
-
Season: Taste your pasta and adjust the seasoning with salt and pepper. The final taste should be a delightful balance of creamy, spicy, and cheesy.
And voila! Your One-Pot Creamy Spicy Buffalo Chicken Pasta is ready to astonish!
Serving Suggestions
For serving, I love to plate this dish in deep bowls, allowing the creamy pasta to take center stage. A sprinkle of extra Parmesan on top and a few sprigs of fresh parsley or chives for a pop of green makes for a beautiful presentation! Don’t forget a drizzle of extra buffalo sauce if you like it spicy. Pair it with a side salad for a refreshing crunch, or some crusty bread to soak up all that delicious sauce. Trust me, your guests will be raving!
Recipe Variations
Feel like getting a little adventurous? Here are some fun variations to try:
-
Veggie-Loaded: Toss in some sautéed broccoli, bell peppers, or spinach during the cooking process for a colorful and nutritious addition!
-
Spicy Add-Ins: If you want more heat, consider adding sliced jalapeños or a dash of cayenne pepper while cooking.
-
Herbed Twist: Fresh herbs like basil or cilantro can add a fresh note. Sprinkle some on top before serving for a beautiful finish!
-
Cheeseburger Pasta: Swap the buffalo sauce for your favorite BBQ sauce and add in some cooked ground beef or turkey for a BBQ twist!
-
Low-Carb Option: Use zoodles (zucchini noodles) instead of pasta for a lower-carb version that still delivers on flavor.
Chef’s Notes
It’s funny how a simple dish can tell a story, isn’t it? This pasta has evolved over the years as I’ve experimented with different flavors and ingredients. The first time I made it, I used a store-bought sauce and served it to friends who turned it into a game of “guess the ingredients.” Now, I love that I can make it from scratch with quality ingredients, but those early days remind me of the joy of cooking and sharing with others!
And let me tell you, I’ve made my fair share of messes in the kitchen — but each one has led me to something special, just like this dish. It’s a celebration of flavors that keeps getting better every time I make it!
FAQs and Troubleshooting
-
What if my sauce is too thick?
If your sauce has thickened too much, simply add a little more chicken broth or cream to reach your desired consistency. -
How can I reheat leftover pasta?
Reheat in a pot on low heat, adding a splash of broth or cream to revive the sauce. Stir frequently to heat evenly. -
Can I freeze leftover pasta?
Yes, you can! Just make sure to store it in an airtight container. When you’re ready to enjoy it again, thaw overnight in the fridge before reheating. -
What if I don’t have chicken broth?
If you’re in a pinch, water can substitute the broth, though you’ll lose some depth of flavor. Consider adding your favorite seasoning to boost the taste!
Nutritional Info
While this recipe is definitely indulgent, it also offers protein and comfort! If you’re looking for specific nutritional information, consider using a nutrition calculator to keep track of your servings and adjust based on your ingredients!
Conclusion
There you have it! A delightful journey through my One-Pot Creamy Spicy Buffalo Chicken Pasta that’s sure to impress. Remember, cooking is all about enjoying the process, learning, and, most importantly, gathering around the table with loved ones.
So next time you’re craving something cozy yet exciting, pull out those ingredients and let your culinary creativity flow. I can’t wait to hear how it turns out for you, and I hope it brings as much joy to your table as it has to mine. Happy cooking, friends!
PrintOne-Pot Creamy Spicy Buffalo Chicken Pasta
A comforting yet exciting pasta dish featuring the bold flavors of buffalo sauce and creamy cheese, all cooked in one pot for convenience.
- Prep Time: 10 minutes
- Cook Time: 20 minutes
- Total Time: 30 minutes
- Yield: 4 servings 1x
- Category: Main Course
- Method: Stovetop
- Cuisine: American
- Diet: Non-Vegetarian
Ingredients
- 1 lb cooked chicken (shredded or diced)
- 12 oz fettuccine or penne pasta
- 2 cups chicken broth
- 1 cup heavy cream
- 1/2 cup buffalo sauce
- 1 cup grated Parmesan cheese
- 1/2 cup shredded mozzarella cheese
- 2 tbsp cream cheese
- Salt and pepper to taste
Instructions
- Prep your ingredients by gathering and measuring them.
- Cook the pasta in a large pot with 2 cups of chicken broth, simmering over medium-high heat.
- Incorporate the cooked chicken once the pasta is nearly al dente.
- Stir in the heavy cream, mixing gently.
- Add buffalo sauce, cream cheese, and Parmesan cheese to the pot.
- Sprinkle mozzarella cheese on top and cover the pot.
- Season with salt and pepper to taste before serving.
Notes
To customize, add your favorite vegetables or adjust the spice level by modifying the amount of buffalo sauce used.
Nutrition
- Serving Size: 1 serving
- Calories: 600
- Sugar: 6g
- Sodium: 950mg
- Fat: 30g
- Saturated Fat: 15g
- Unsaturated Fat: 10g
- Trans Fat: 0g
- Carbohydrates: 55g
- Fiber: 3g
- Protein: 40g
- Cholesterol: 100mg
Keywords: one-pot pasta, buffalo chicken, creamy pasta, comfort food
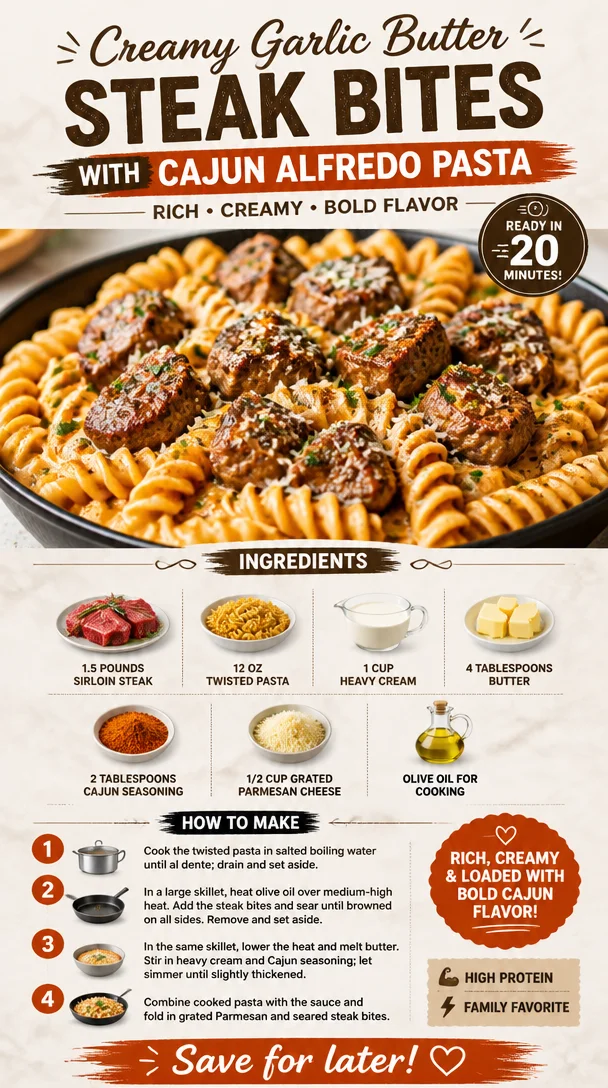
Creamy Garlic Butter Steak Bites with Cajun Alfredo Pasta
Creamy Garlic Butter Steak Bites with Spicy Cajun Alfredo Twisted Pasta
Welcome back to the kitchen, friends! Today, I’m super excited to invite you on a culinary adventure that’s all about indulgence and flavor-packed goodness. We’re diving into a dish that combines the rich, savory flavors of perfectly cooked steak bites with a creamy, spicy Alfredo sauce tossed with twisted pasta. Trust me, this recipe will have your taste buds dancing with joy!
Let’s set the scene: Imagine a cozy evening with friends gathered around the table, laughter filling the air, and the tantalizing aroma of garlic and butter wafting through the room. That’s the magic we’re aiming for with these creamy garlic butter steak bites and spicy Cajun Alfredo twisted pasta. Whether you’re hosting an intimate dinner party or just looking to elevate your weeknight meal, this dish is a guaranteed crowd-pleaser. So, roll up your sleeves, and let’s get cooking!
Personal Story
This recipe actually takes me back to my college days when I would gather my friends in my tiny apartment for “Pasta Night.” We’d crank up some tunes, pour ourselves a little wine, and whip up whatever pasta dishes we could dream up with the ingredients we had on hand. I remember one particular night when I decided to spice things up (quite literally) by adding Cajun seasoning to my Alfredo sauce. The moment those creamy garlic butter steak bites hit the dining table, it was like a flavor explosion! We all laughed, enjoyed every bite, and even debated our favorite pasta shapes (like how can you resist those cute spirals of fusilli?). Those carefree evenings made me realize how cooking can create memories that stay with us forever. That’s what I want to share with you today: a dish that inspires connection and joy.
Ingredients
Here’s what you’ll need for this rich and creamy delight:
-
1.5 pounds sirloin steak (or chicken/turkey): Sirloin is my go-to for this dish due to its tenderness and flavor. If you prefer chicken or turkey, both work beautifully, though you may need to adjust the cooking time slightly. Look for cuts that are well-marbled for extra juiciness.
-
12 oz twisted pasta (rotini or fusilli): Twisted pasta is perfect for grabbing that creamy Alfredo sauce! If you’re feeling adventurous, use whole wheat or gluten-free pasta to mix things up.
-
1 cup heavy cream: This is where the magic happens! Heavy cream gives the sauce its luxurious texture. You can substitute with half-and-half for a lighter option, but the sauce will be slightly less decadent.
-
4 tablespoons butter: Because butter makes everything better! Unsalted butter is my choice, but feel free to use salted if that’s what you have on hand.
-
2 tablespoons Cajun seasoning: This is the secret ingredient for some exciting flavor! If you prefer a milder taste, reduce the amount, or try using Italian seasoning if you want to skip the spice.
-
1/2 cup grated Parmesan cheese: Parmesan adds a lovely umami flavor to the sauce. Make sure to use freshly grated if you can; it melts beautifully and enhances the dish.
-
Olive oil for cooking: A drizzle for the pan; it helps to sear the steak to perfection.
Step-by-Step Instructions
Ready to bring this dreamy dish to life? Here’s how to do it!
-
Prep Your Ingredients: Start by gathering all your ingredients. Wash and dry your steak (or chicken/turkey), then cut it into bite-sized pieces. If you are using chicken or turkey, make sure to cut it into uniform pieces for even cooking.
-
Cook the Pasta: Bring a large pot of salted water to a boil. Add your twisted pasta and cook according to package instructions until al dente (about 8-10 minutes usually). Save about a cup of the pasta cooking water before draining it—this starchy water helps create a creamy sauce later!
-
Sear the Steak: While your pasta is cooking, heat a large skillet over medium-high heat. Add a drizzle of olive oil to the pan. Once it’s shimmering, carefully add your steak bites (or chicken/turkey). Sear for about 3-4 minutes until they’re beautifully browned on the outside. If you’re cooking chicken or turkey, make sure they’re cooked through before moving to the next step. Don’t overcrowd the pan; work in batches if needed!
-
Add Garlic and Butter: Lower the heat to medium and add the butter to the skillet. Let it melt, then add minced garlic (2-3 cloves should do the trick). Stir for about a minute until it’s fragrant and heavenly. This is the moment when your kitchen starts smelling amazing!
-
Combine the Sauce: Pour in the heavy cream and add the Cajun seasoning. Stir gently and let it simmer for a few minutes until the sauce thickens slightly. You may want to add a splash of the reserved pasta water to help create that smooth, creamy consistency.
-
Finish with Cheese: Toss in the grated Parmesan cheese and stir until it’s completely melted and you have a luscious sauce. Go ahead and taste—this is your chance to adjust the seasoning if needed!
-
Mix in the Pasta: Add the cooked twisted pasta to the skillet and toss everything together until the pasta is coated in that dreamy sauce. If it’s too thick, add a touch more reserved pasta water until you achieve your desired consistency.
-
Serve It Up: Transfer to a large serving dish or individual bowls. It’s all about how you present it—garnish with a sprinkle of chopped parsley or extra Parmesan cheese for that restaurant-worthy finish!
Serving Suggestions
For a stunning presentation, I love to serve this dish in wide, shallow bowls with a sprinkle of fresh herbs (like parsley or basil) on top and a twist of black pepper. Pair it with a crisp side salad and some warm, crusty bread to soak up any leftover sauce. And don’t forget a little something sparkling to drink—perhaps a nice white wine or a homemade sparkling lemonade!
Recipe Variations
- Spicy: For those who crave heat, try adding sliced jalapeños or a pinch of red pepper flakes to the sauce!
- Veggie Lovers: Toss in some sautéed mushrooms, bell peppers, or spinach for added color and nutrition.
- Low Carb: Swap the twisted pasta for zucchini noodles (zoodles) for a gluten-free, low-carb alternative.
- Herbaceous Twist: Infuse the sauce with fresh herbs like thyme or oregano for a fragrant boost!
- Cheesy Delight: Mix in a different cheese, like mozzarella or cheddar, for a gooey texture that’ll make your heart sing.
Chef’s Notes
Over the years, this dish has evolved from a spontaneous pasta night favorite to a staple I keep coming back to. Every time I make it, I try to add something new—like smuggling in some seasonal veggies or playing with the spices. I still remember that night in college when my friends proclaimed it ‘the best pasta ever!’ It’s the kind of recipe that’s perfect for making memories, whether you’re serving it to a few close friends or a larger gathering. Plus, the leftovers (if there are any!) are amazing for lunch the next day!
FAQs and Troubleshooting
Q: My sauce turned out too thick! What can I do?
A: No worries! Just add a bit more of the reserved pasta water while stirring until you reach your desired consistency. This starchy water is your best friend for adjusting the sauce.
Q: Can I prep this dish ahead of time?
A: Absolutely! You can prepare the steak bites and sauce in advance, then combine everything just before serving. Just reheat gently on the stovetop, adding a bit of reserved pasta water as needed.
Q: What’s the best way to store leftovers?
A: Store any leftovers in an airtight container in the fridge for up to 3 days. When reheating, add a splash of cream or pasta water to get that creamy texture back!
Q: Can I use a different type of meat?
A: Yes! Chicken or turkey works wonderfully. Just adjust the cooking time, making sure it’s cooked through before adding it to the sauce.
Nutritional Info
While I believe in enjoying good food without too much worry about the numbers, if you’re curious, this dish is a hearty meal packed full of protein from the steak and creaminess from the butter and cheeses. Just be mindful of portion sizes if you’re keeping an eye on your dietary needs!
There you have it, my friends! I hope you feel inspired to create a little magic in your kitchen with these creamy garlic butter steak bites and spicy Cajun Alfredo twisted pasta. No matter the occasion, it’s all about enjoying good food and good company. So, let’s tie on those ivory aprons, pour ourselves a lovely drink, and celebrate the art of cooking together. Bon appétit!
PrintCreamy Garlic Butter Steak Bites with Spicy Cajun Alfredo Twisted Pasta
Indulge in the rich flavors of garlic butter steak bites paired with creamy, spicy Cajun Alfredo twisted pasta—a perfect dish for special gatherings or an elevated weeknight meal.
- Prep Time: 15 minutes
- Cook Time: 30 minutes
- Total Time: 45 minutes
- Yield: 4 servings 1x
- Category: Main Course
- Method: Searing and Simmering
- Cuisine: Italian
- Diet: None
Ingredients
- 1.5 pounds sirloin steak (or chicken/turkey)
- 12 oz twisted pasta (rotini or fusilli)
- 1 cup heavy cream
- 4 tablespoons butter
- 2 tablespoons Cajun seasoning
- 1/2 cup grated Parmesan cheese
- Olive oil for cooking
Instructions
- Prep Your Ingredients: Start by gathering all your ingredients. Wash and dry your steak (or chicken/turkey), then cut it into bite-sized pieces.
- Cook the Pasta: Bring a large pot of salted water to a boil. Add your twisted pasta and cook according to package instructions until al dente (about 8-10 minutes). Save about a cup of the pasta cooking water before draining it.
- Sear the Steak: While your pasta is cooking, heat a large skillet over medium-high heat. Add a drizzle of olive oil to the pan. Once it’s shimmering, add your steak bites (or chicken/turkey). Sear for about 3-4 minutes until they’re browned.
- Add Garlic and Butter: Lower the heat to medium and add the butter. Let it melt, then add minced garlic and stir for about a minute until it’s fragrant.
- Combine the Sauce: Pour in the heavy cream and add the Cajun seasoning. Let it simmer for a few minutes until the sauce thickens slightly.
- Finish with Cheese: Toss in the grated Parmesan cheese and stir until it’s melted and the sauce is luscious.
- Mix in the Pasta: Add the cooked twisted pasta and toss everything together until the pasta is coated. Adjust with reserved pasta water for consistency.
- Serve It Up: Transfer to a serving dish and garnish with chopped parsley or extra Parmesan cheese.
Notes
For a stunning presentation, serve in wide bowls and pair with a crisp side salad and warm, crusty bread.
Nutrition
- Serving Size: 1 serving
- Calories: 600
- Sugar: 5g
- Sodium: 600mg
- Fat: 40g
- Saturated Fat: 20g
- Unsaturated Fat: 15g
- Trans Fat: 0g
- Carbohydrates: 45g
- Fiber: 3g
- Protein: 30g
- Cholesterol: 80mg
Keywords: steak bites, Cajun alfredo, creamy pasta, comfort food, dinner party