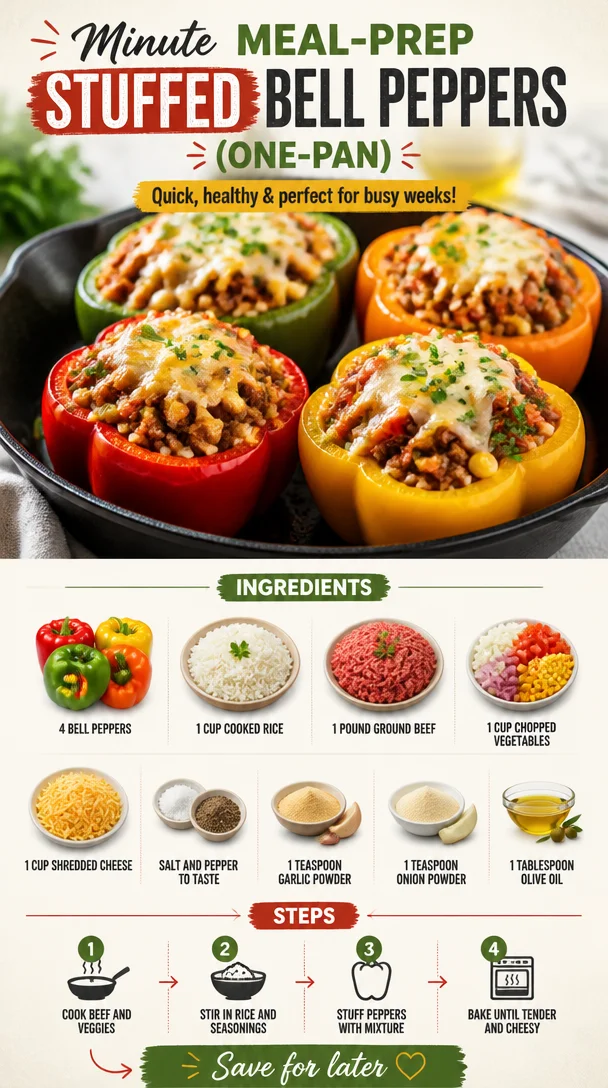
Minute Meal-Prep Stuffed Bell Peppers (One-Pan)
Stuffed Bell Peppers: An Elegant Comfort Food for Every Table
Hello, fellow foodies! Today, we’re diving into a dish that’s not just a staple of cozy family dinners but also a canvas for creativity in the kitchen: Stuffed Bell Peppers. These vibrant vegetables, when filled with a delicious medley of ingredients, transform into a feast for the eyes and the stomach! Plus, they’re as fun to make as they are to eat. So roll up your sleeves, tie on your apron, and let’s create something wonderful together.
Introduction
Have you ever had that moment in the kitchen where you create something so delicious that the entire family gathered around the table falls silent in awe? That’s the magic of cooking, my friends. Stuffed bell peppers are reminiscent of my early kitchen adventures, where I learned that cooking isn’t merely about following a recipe—it’s about storytelling and connection.
These beauties are not only colorful and appetizing but also incredibly versatile. You can stuff them with whatever your heart desires! Classic beef and rice, zesty chicken and quinoa, or even a hearty vegetarian mix. They’re essentially blank canvases ready for you to paint your culinary masterpiece.
When you serve stuffed bell peppers, the world seems a little brighter. Their joyful colors contrast beautifully on any table, inviting guests to dig in and enjoy. It’s a beautiful small act of hospitality, transforming a simple meal into a memorable experience.
So, let’s get cooking! You’ll find a delightful combination of flavors and textures in this stuffed peppers recipe, and I promise it’s easy enough for any level of cook.
Personal Story
I remember the first time I made stuffed bell peppers. It was a rainy Saturday afternoon when my mom casually mentioned she could use some help in the kitchen. I was only about ten years old, and even though I had spent time observing her culinary skills, I wasn’t quite ready for the spotlight. But how could I resist the warm aroma of onions sizzling away?
We decided to turn those beautiful, shiny bell peppers into stuffed marvels. I was so excited! With it being an impromptu cooking class, my mom taught me how to cut the peppers with care, ensuring I didn’t slice my fingers (thanks, mom!). The best part was stuffing them with passion and laughter, sneaking bites of the flavorful filling as we prepared.
Fast forward to now, and I still make these peppers, perhaps with a few more culinary skills under my belt. Each time I whip them up, I’m reminded of those carefree afternoons filled with love and laughter. And now it’s my pleasure to share this beloved recipe so you can create your own memories around the table!
Ingredients
To create these delicious stuffed bell peppers, gather the following ingredients:
-
4 bell peppers: Choose your favorite colors—red, yellow, or green. Each adds its own unique flavor. If you’re short on bell peppers, zucchini or eggplant can be a fun alternative!
-
1 cup cooked rice: It acts as the base of our filling. You can use white, brown, or even cauliflower rice for a low-carb option.
-
1 pound ground beef: This gives a hearty texture. If you prefer leaner meat, turkey or chicken works beautifully too!
-
1 cup chopped vegetables: Think onions, diced tomatoes, or corn. Fresh veggies add crunch and nutrition. Got leftover veggies? Chop them up and toss them in!
-
1 cup shredded cheese: Cheddar, mozzarella, or pepper jack for a kick! Cheese makes everything better, but you can omit it for a dairy-free option.
-
Salt and pepper to taste: Always important for balancing flavors!
-
1 teaspoon garlic powder: A quick and easy way to add mouthwatering flavor.
-
1 teaspoon onion powder: It complements the fresh onions or can stand in if you’re out.
-
1 tablespoon olive oil: For sautéing the vegetables, adding a healthy touch!
Step-by-Step Instructions
Ready to stuff some peppers? Here’s a simple step-by-step guide that’ll have you looking like a pro in no time!
-
Preheat Your Oven: Start by preheating your oven to 375°F (190°C). This is key for getting those peppers nice and tender while the filling gets melty and magical.
-
Prepare the Peppers: Cut the tops off your bell peppers and scoop out the seeds. Don’t toss those tops! Finely chop them and add to your filling later. (Tip: If your peppers won’t stand upright, don’t be afraid to trim a bit off the bottom—just be careful not to create a hole!)
-
Sauté the Vegetables: In a skillet, heat the olive oil over medium heat. Add the chopped peppers, onions (if you’re using them), garlic powder, and onion powder. Sauté for about 5-7 minutes until they soften. This will bring out their natural sweetness.
-
Add the Meat: Crumble in the ground beef, seasoning it with salt and pepper. Cook until it’s browned and no longer pink. (Chef’s hack: Use a wooden spoon to break up the meat for even cooking!)
-
Combine the Filling: Once the meat is nicely browned, turn off the heat and stir in the cooked rice and any additional chopped veggies. If you’re feeling extra saucy, this is when you could mix in some salsa or diced tomatoes for added moisture.
-
Cheese It Up: Fold in half of your shredded cheese into the filling mix. This gives it that creamy texture and helps bind everything together.
-
Stuff Those Peppers: Generously spoon the filling into each bell pepper, pressing it down gently to pack it in. Don’t be shy—overfilling is encouraged!
-
Top with Cheese: Place the stuffed peppers upright in a baking dish and sprinkle the remaining cheese on top (the more cheese, the better!).
-
Bake Them: Cover the dish with foil and bake at 375°F for about 25 minutes. Then, remove the foil and bake for another 10-15 minutes until the peppers are tender and the cheese is bubbly and golden.
-
Rest and Serve: Let them cool for a few minutes before serving. This helps the flavors settle and makes them easier to handle.
Serving Suggestions
For an inviting presentation, arrange the stuffed peppers on a large plate or a wooden serving board. Serve alongside a fresh green salad or some garlic bread. Drizzle with a little olive oil or balsamic glaze for added sparkle. And don’t forget those little touches—a sprinkle of fresh herbs like parsley or cilantro for color and vibrance!
Recipe Variations
-
Mexican Style: Swap the rice for quinoa and add spices like cumin and chili powder. Top with avocado and fresh cilantro for a twist!
-
Mediterranean Delight: Use feta cheese, olives, and cooked couscous for a Mediterranean spin. Finish with a squeeze of lemon juice for brightness.
-
Vegetarian Version: Replace the beef with black beans or lentils. Add in extra veggies like mushrooms, spinach, or zucchini.
-
Spicy Kick: Mix in jalapeños or spicy sausage for those who love a little heat!
-
Comfort Food Classic: Stir in a can of tomato soup into the stuffing for a creamy, comforting surprise.
Chef’s Notes
Ah, stuffed peppers have come a long way since my mom and I first whipped them up! Initially, I was all about the classic beef and rice method. However, over the years, I began exploring different combinations, opening up a world of possibilities. Whether you decide to use leftovers, create a vegetarian option, or even play with spices, this recipe is truly foolproof!
Remember, don’t stress about perfection; cooking should be fun! There are days when the stuffing spills out of the peppers while baking, and that’s OK! It just adds more flavor to the pan. And if a few bits fall onto the plate, that just means more for tasting!
FAQs and Troubleshooting
-
What if my peppers are too firm after baking?
If you prefer softer peppers, simply extend the baking time by 10 minutes. You can also steam the peppers in the microwave for a couple of minutes before stuffing them. -
Can I prepare these ahead of time?
Absolutely! You can prepare the stuffed peppers and store them in the fridge for up to 24 hours before baking. Just add a few extra minutes to the cooking time. -
What’s the best way to reheat leftovers?
Place the peppers in a baking dish with a little splash of water to keep them moist and cover with foil. Heat at 350°F for about 15-20 minutes, or until warmed through. -
How do I choose the right bell peppers?
Look for firm, unblemished peppers with shiny skin—these are the freshest. Heavier peppers usually have thicker walls and more flesh for stuffing!
Nutritional Info
For a rough estimate: Each stuffed pepper contains approximately 350 calories, 20g of protein, and 15g of fat (depending on the chosen ingredients). They are a hearty meal packed with vegetables!
And there you have it—your ultimate guide to making stunning stuffed bell peppers! With this recipe, not only do you get to enjoy a beautiful meal, but you also get to create cherished moments with those around your table. Remember, each dish is an opportunity for love and laughter. So gather those you care about, and let’s make something magical together. Cheers to cooking with the heart!
PrintStuffed Bell Peppers
Colorful and hearty stuffed bell peppers made with a delicious filling of beef, rice, and fresh vegetables, perfect for family dinners!
- Prep Time: 15 minutes
- Cook Time: 30 minutes
- Total Time: 45 minutes
- Yield: 4 servings 1x
- Category: Main Course
- Method: Baking
- Cuisine: American
- Diet: Mixed
Ingredients
- 4 bell peppers (any color)
- 1 cup cooked rice
- 1 pound ground beef
- 1 cup chopped vegetables (onions, diced tomatoes, corn)
- 1 cup shredded cheese (cheddar, mozzarella, or pepper jack)
- Salt and pepper to taste
- 1 teaspoon garlic powder
- 1 teaspoon onion powder
- 1 tablespoon olive oil
Instructions
- Preheat your oven to 375°F (190°C).
- Prepare the peppers by cutting off the tops and scooping out the seeds, saving the tops for later.
- Sauté the vegetables in a skillet with olive oil over medium heat for 5-7 minutes.
- Add the ground beef and season with salt and pepper, cooking until browned.
- Combine the cooked rice and any additional vegetables into the skillet, mixing well.
- Cheese it up by folding in half of the shredded cheese into the filling.
- Stuff the mixture into the peppers, pressing down gently.
- Top the peppers with the remaining cheese.
- Bake for 25 minutes covered with foil, then uncover and bake for an additional 10-15 minutes.
- Rest for a few minutes, then serve warm.
Notes
Feel free to customize the filling with whatever leftover vegetables you have or try different spices for a unique flavor!
Nutrition
- Serving Size: 1 stuffed pepper
- Calories: 350
- Sugar: 5g
- Sodium: 400mg
- Fat: 15g
- Saturated Fat: 6g
- Unsaturated Fat: 8g
- Trans Fat: 0g
- Carbohydrates: 40g
- Fiber: 4g
- Protein: 20g
- Cholesterol: 60mg
Keywords: stuffed peppers, comfort food, family dinner, bell peppers, easy recipes
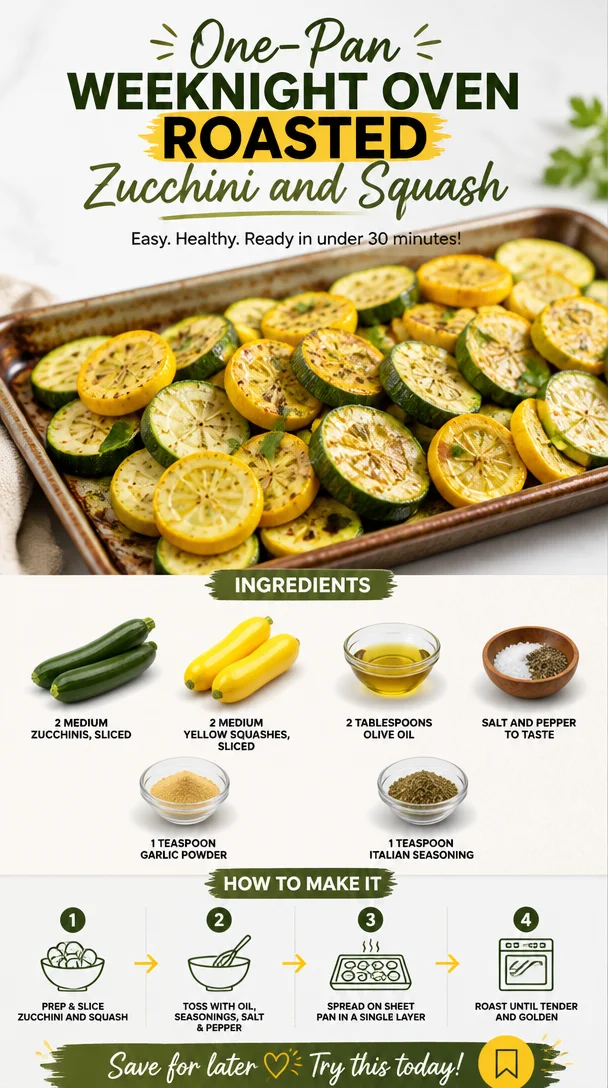
One-Pan Weeknight Oven Roasted Zucchini and Squash
Oven Roasted Zucchini and Squash: A Summer Classic
Hello, fellow foodies! Today, we’re diving into a delightful side dish that highlights the natural sweetness and creaminess of seasonal vegetables. I’m excited to share my recipe for Oven Roasted Zucchini and Squash! This dish is vibrant, flavorful, and pairs beautifully with practically any main course. Plus, it’s the perfect accompaniment for summer gatherings, backyard barbecues, or even a cozy weeknight dinner.
The Magic of Roasting
Roasting veggies is an absolute game changer! When you pop them into the oven, they caramelize beautifully, bringing out all those delicious flavors while adding a delightful texture. A sprinkle of olive oil, a dash of seasoning, and you’ve got yourself a dish that feels fancy yet is incredibly easy to prepare. Think of it as culinary alchemy—turning simple ingredients into pure gold!
So, let’s roll up those sleeves and unlock the full potential of zucchini and squash, two of summer’s unsung heroes.
My Personal Story: A Summer Family Gathering
One of my fondest food memories involves my grandmother’s garden. Every summer, I’d eagerly await the moment she announced it was time to pick fresh zucchinis and squash. Armed with a small basket, I’d head out to her vibrant garden, feeling the warmth of the sun on my back and the earthy scent of the soil underfoot.
After our harvest, we’d return to her kitchen, exchanging stories and laughter while my grandma washed and sliced the vegetables. I loved how she made the simplest ingredients feel special, often roasting them with her signature blend of herbs and spices. It wasn’t just about the food; it was about bringing the family together, sharing memories, and creating moments that would last a lifetime.
Those afternoons instilled in me a love for cooking and a desire to share the joy of delicious food with others. And now, I invite you to embrace that same warmth at your table with this scrumptious oven-roasted zucchini and squash recipe!
Ingredients
Here’s what you’ll need to create this vibrant side dish:
-
2 medium zucchinis, sliced
Zucchini is a versatile summer squash that adds moisture and a mild flavor to dishes. If you can’t find zucchini, yellow squash works just as well! -
2 medium yellow squashes, sliced
Yellow squash packs a slightly sweeter taste and adds a lovely color. Feel free to mix in any other summer squashes you have on hand. -
2 tablespoons olive oil
Olive oil not only helps the veggies crisp up beautifully but also adds rich flavor. For a twist, consider using flavored oils like garlic or herbed oil. -
Salt and pepper to taste
Basic seasonings that elevate the dish. Always start with less, as you can add more if needed later. -
1 teaspoon garlic powder
Garlic powder lends a warm, savory depth to the roasted vegetables. Fresh minced garlic is also a fantastic alternative if you want a punchier flavor. -
1 teaspoon Italian seasoning
A blend of herbs like oregano, basil, and thyme, this seasoning brings a beautiful, fragrant touch. You can easily swap it for fresh herbs, adjusting to your taste.
Step-by-Step Instructions
-
Preheat the Oven
Start by preheating your oven to 425°F (220°C). A hot oven is key to roasting vegetables perfectly and achieving that lovely caramelization we’re after. -
Prep the Veggies
Slice your zucchinis and yellow squashes into even rounds or half-moons (about ½ inch thick). Even size ensures they cook uniformly. If you’re feeling adventurous, try cutting them into fun shapes! -
Season the Veggies
In a large mixing bowl, toss the sliced zucchini and squash with olive oil, garlic powder, Italian seasoning, salt, and pepper. Make sure every slice is generously coated—I recommend using your hands for this step. It’s all about love and attention! -
Spread Evenly on a Baking Sheet
Line a baking sheet with parchment paper for easy cleanup. Spread the seasoned veggies in a single layer, ensuring they’re not overcrowded. If they’re piled on top of each other, they’ll steam rather than roast, so spread them out like you’re placing the perfect arrangement of flowers. -
Roast Away
Pop that baking sheet into your preheated oven and roast for about 20-25 minutes. Halfway through, take a fork and give the veggies a gentle toss to ensure even cooking. You want them to be tender with golden edges. -
Check for Doneness
Keep an eye on your zucchini and squash as they roast. Once they’re fork-tender and beautifully browned, take them out and let them cool slightly. -
Taste and Adjust
Give them a little taste! You can add more salt, pepper, or even a squeeze of lemon juice for brightness if you feel it needs a little extra zing.
Serving Suggestions
To plate your oven-roasted zucchini and squash, gather them in a pretty serving dish, allowing their vibrant colors to shine. For a touch of elegance, you can sprinkle some freshly grated Parmesan or crumbled feta cheese on top right before serving. Garnish with a few sprigs of fresh basil or parsley for a touch of green and extra flavor.
Recipe Variations
-
Mediterranean Twist
Add some sliced cherry tomatoes and Kalamata olives to the veggies before roasting. The tomatoes bring sweetness, and the olives offer a savory punch. -
Spicy Kick
Mix in some red pepper flakes for a bit of heat! Just a pinch can elevate the flavor profile and wake up your taste buds. -
Cheesy Goodness
Toss the veggies with shredded mozzarella or gouda before roasting, turning them into a delightfully cheesy dish. -
Herbed Lemon Roasted
Add lemon zest and fresh thyme or rosemary for a refreshing, herbaceous note that brightens up the dish. -
Balsamic Glaze Drizzle
After you’ve taken your roasted veggies out of the oven, drizzle them with balsamic glaze for a tangy-sweet finish.
Chef’s Notes
This oven-roasted zucchini and squash dish has become a staple in my kitchen, and I love how it can adapt to whatever I have on hand. I can remember once when I mistakenly dropped the entire baking sheet onto the floor—it was a disaster! However, my kitchen was filled with laughter as we scooped up the roasted goodness off the floor to salvage what we could. Cooking is about enjoying the process, and that little mishap became a cherished memory.
Over the years, this recipe has evolved—what started as just simple salt and pepper now showcases a list of lovely spices and twists. I encourage you to make this dish your own!
FAQs and Troubleshooting
Q: Why are my veggies mushy instead of crispy?
A: This could be due to overcrowding the baking sheet. Make sure the veggies are in a single layer and give them room to breathe—instead of steaming, they should roast for that delightful caramelization!
Q: Can I prepare this dish in advance?
A: While it’s best fresh, you can slice the veggies and toss them in oil/seasoning a few hours ahead. Just cover and refrigerate until you’re ready to roast.
Q: What can I do with leftovers?
A: These roasted veggies are perfect to toss into salads, pasta, or even stir-fries. They also make a fantastic omelet filling!
Q: Can I cook other vegetables this way?
A: Absolutely! Carrots, bell peppers, and eggplant can roast beautifully, providing you mix up the cooking times accordingly.
Nutritional Info
(Adjust based on actual recipe servings)
- Servings: 4
- Calories: Approximately 115 per serving
- Fat: 8g
- Carbohydrates: 10g
- Fiber: 3g
- Protein: 2g
So, there you have it—Oven Roasted Zucchini and Squash! I hope this recipe becomes a delightful addition to your dinner table, just as it has in mine. Tie on that apron, pour a drink for yourself, and let’s create some culinary magic together. Happy cooking!
PrintOven Roasted Zucchini and Squash
A vibrant and flavorful summer side dish that highlights the natural sweetness of zucchini and squash, perfect for gatherings or weeknight dinners.
- Prep Time: 10 minutes
- Cook Time: 25 minutes
- Total Time: 35 minutes
- Yield: 4 servings 1x
- Category: Side Dish
- Method: Roasting
- Cuisine: American
- Diet: Vegetarian
Ingredients
- 2 medium zucchinis, sliced
- 2 medium yellow squashes, sliced
- 2 tablespoons olive oil
- Salt and pepper to taste
- 1 teaspoon garlic powder
- 1 teaspoon Italian seasoning
Instructions
- Preheat the oven to 425°F (220°C).
- Slice the zucchinis and yellow squashes into even rounds or half-moons (about ½ inch thick).
- Toss the sliced zucchini and squash with olive oil, garlic powder, Italian seasoning, salt, and pepper in a large mixing bowl.
- Line a baking sheet with parchment paper and spread the seasoned veggies in a single layer.
- Roast in the preheated oven for about 20-25 minutes, tossing halfway through.
- Check the veggies for doneness; they should be fork-tender and browned.
- Taste and adjust seasoning if needed, possibly adding a squeeze of lemon juice.
Notes
Feel free to customize this dish with additional ingredients like cherry tomatoes, balsamic glaze, or cheese.
Nutrition
- Serving Size: 1 serving
- Calories: 115
- Sugar: 3g
- Sodium: 200mg
- Fat: 8g
- Saturated Fat: 1g
- Unsaturated Fat: 7g
- Trans Fat: 0g
- Carbohydrates: 10g
- Fiber: 3g
- Protein: 2g
- Cholesterol: 0mg
Keywords: zucchini, squash, roasted vegetables, summer side dish, vegetarian
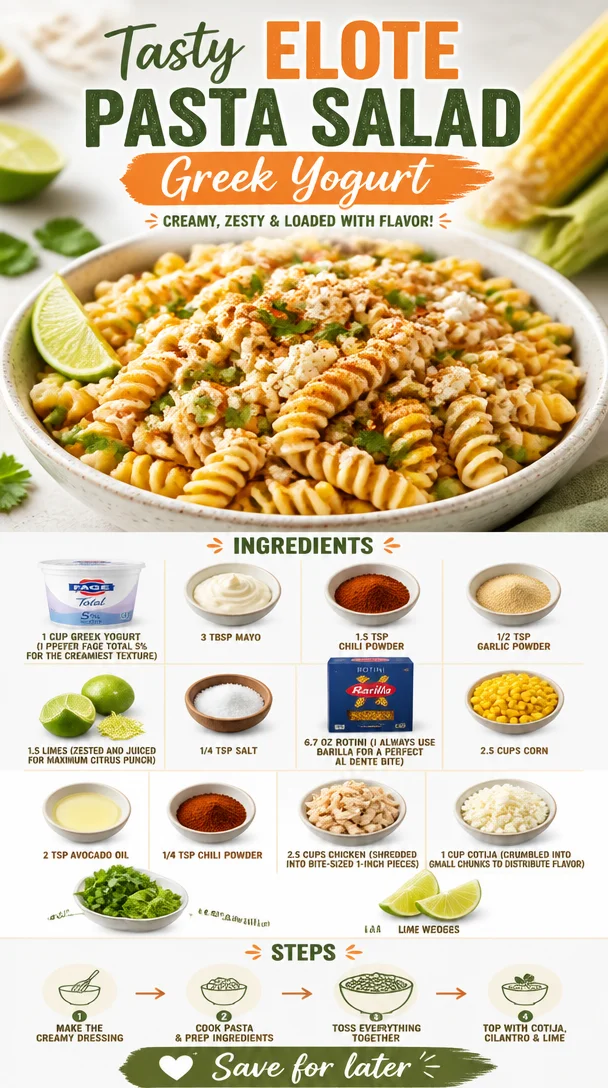
Tasty Elote Pasta Salad Greek Yogurt – moanaskitchen
Tasty Elote Pasta Salad with Greek Yogurt: A Flavorful Adventure
Hello, fellow food enthusiasts! Today, we’re stepping into the culinary world with a delightful recipe that brings a touch of summer to your table year-round: Tasty Elote Pasta Salad with Greek Yogurt. Picture this: vibrant corn, creamy Greek yogurt, a punch of lime, and just the right kick of chili powder all mixed together to create a salad that’s not only delicious but also packed with flavor. This dish is perfect for gatherings, potlucks, or even just a cozy dinner on a weeknight. Are you ready to dive in? Let’s do this!
Personal Story
I won’t forget the first time I tasted elote. It was at a local food festival, the sun shining bright, and the air filled with the enticing smell of grilled corn. The vendor was serving roasted corn on the cob slathered in creamy sauce, sprinkled with cheese, and generously dusted with chili powder. Every bite was a burst of flavor that instantly transported me to summer barbecues and sunny gatherings with friends. I was inspired to incorporate those vibrant flavors into a dish that could be enjoyed all year long — and that’s how the Elote Pasta Salad was born! This salad evokes those warm, sun-soaked memories, making it a perfect recipe to share and recreate with loved ones.
Ingredients
Before we dive into the cooking process, let’s make sure we have everything ready to go. Here’s what you’ll need:
-
1 cup Greek yogurt (I prefer Fage Total 5%): A creamy base that adds richness without overwhelming the flavors. If you’re looking for a lighter alternative, you could use low-fat Greek yogurt or even sour cream.
-
3 tbsp mayo: This adds an extra layer of creaminess that balances the yogurt. Not a mayo fan? You can omit it, but consider adding an extra splash of lime juice for acidity.
-
1.5 tsp chili powder: This brings a warm, smoky flavor to the dish. Feel free to adjust the spice level to your liking—smoked paprika makes a great substitute!
-
1/2 tsp garlic powder: Offering a subtle aromatic touch, garlic powder complements the flavors and gives it a little extra oomph. Fresh minced garlic works well too, but use less (about a clove) since it’s more potent.
-
1/4 tsp salt: Enhances the flavors of all the ingredients. If you’re on a low-sodium diet, consider reducing it or using a salt substitute.
-
1.5 limes (zested and juiced): The zesty flavor of lime adds a fresh, citrusy punch that brightens up the entire dish. If you only have one lime, that will work, but you’ll miss out on that extra zest!
-
6.7 oz rotini (I always use Barilla): These corkscrew-shaped pasta are perfect for holding onto the creamy dressing. If you prefer a gluten-free option, try brown rice pasta or quinoa pasta.
-
2.5 cups corn: Whether it’s sweet corn off the cob or frozen corn, it’s the star of this dish! Roast or grill fresh corn for a smokier flavor or use canned corn in a pinch (just drain and rinse).
-
2 tsp avocado oil: Used for sautéing your corn until it’s beautifully charred. Olive oil or melted butter can be a delightful swap here too.
-
1/4 tsp chili powder (for corn): This adds extra flavor to the corn itself. You can skip this if you’d like a milder profile!
-
2.5 cups chicken (shredded): I recommend rotisserie chicken for an easy shortcut, but you can use grilled chicken breast or even canned chicken if you’re in a rush.
-
1 cup cotija cheese: This crumbly cheese adds a salty, tangy bite that’s essential to elote. If you can’t find cotija, feta cheese is an excellent substitute!
-
1/2 cup cilantro: Fresh herbs make everything better! If you’re not a fan, you can replace it with chopped green onions or parsley for a different flavor.
-
Lime wedges: Perfect for serving! A squeeze of lime just before eating brightens the dish even further.
Step-by-Step Instructions
Now that we have all our ingredients prepped, let’s jump into making this delicious Tasty Elote Pasta Salad!
-
Cook the Pasta: Bring a large pot of salted water to a boil. Add the rotini pasta and cook according to package instructions until al dente. You want it to be perfectly tender but still have a slight bite to it. This usually takes about 8-10 minutes. Remember, undercooking just a tad is always a good strategy! Drain the pasta and rinse under cold water to stop the cooking process. This will keep your pasta from getting mushy. Set aside.
-
Sauté the Corn: In a large skillet over medium heat, add the avocado oil and allow it to warm up. Toss in the corn and sprinkle with 1/4 teaspoon of chili powder. Sauté for about 5-7 minutes, stirring occasionally, until the corn is slightly charred. Getting that nice caramelization will add tons of flavor! If using frozen corn, a few additional minutes may be needed to cook completely.
-
Whisk the Dressing: In a mixing bowl, combine the Greek yogurt, mayo, 1.5 teaspoons of chili powder, garlic powder, salt, lime zest, and lime juice. Whisk until smooth and creamy. This dressing should be luscious yet light, and the lime juice should bring a zesty freshness that livens everything up. Taste and adjust seasoning as you see fit!
-
Combine Ingredients: In a large bowl, add the cooked pasta, sautéed corn, shredded chicken, cotija, and chopped cilantro. Pour the dressing over the top and gently toss everything together until properly coated. This is where the magic happens, folks! The pasta should be looking wonderfully creamy and well-mixed.
-
Chill the Salad: For best results, cover the salad and let it chill in the fridge for at least 30 minutes. This allows the flavors to meld together beautifully. Trust me, it’s worth the wait! If you’re in a hurry, you can serve it immediately, just know the flavors will develop even more if you let it sit.
-
Serve It Up: Once it’s time to serve, give it one last gentle stir. I like to plate it in a big beautiful bowl, perhaps garnishing with additional cotija and cilantro. Serve with lime wedges on the side. A little squeeze of lime elevates each bite to a whole new level!
Serving Suggestions
To serve this Tasty Elote Pasta Salad, I recommend using a large, shallow bowl where all your vibrant colors can shine through. You can create a beautiful layer of the salad and sprinkle any remaining cotija on top for that wow factor. Consider pairing it with grilled chicken, tacos, or even as a side dish for your next barbecue. Oh, and don’t forget the lime wedges — they add a spritz of freshness that brings everything together!
Recipe Variations
Want to make this salad your own? Here are a few creative twists you can try:
-
Spicy Kick: Add diced jalapeños or a dash of hot sauce to the dressing for some serious heat.
-
Vegetarian Delight: Skip the chicken entirely and bulk it up with more corn, or add black beans for a protein-packed vegetarian version.
-
Herb Swap: If you’re not a fan of cilantro, try using fresh dill or basil instead. Each herb brings a unique twist to the flavor profile.
-
Cheesy Goodness: Mix in other cheeses like Monterey Jack or pepper jack for an extra creamy and tangy treat.
-
Pasta Choice: Change it up by using whole wheat pasta for a nutty flavor or even a spiralized zucchini for a low-carb option.
Chef’s Notes
This recipe has a special place in my heart as it evolved over countless summers spent grilling corn and creating delicious memories with friends and family. Each time I share this dish, I’m reminded of those joyful gatherings and how food has the power to bring us together. I also love that it’s a make-ahead meal — perfect for busy weeknights or weekend brunches. The leftovers (if there are any!) hold up beautifully in the fridge, making them a great lunch option the next day.
FAQs and Troubleshooting
1. Can I make this salad without chicken?
Absolutely! You can skip the chicken for a refreshing vegetarian option. You might want to add more corn or even some black beans for added protein.
2. What if I can’t find cotija cheese?
No worries! Feta cheese works as a fantastic substitute because it shares a similar creamy texture and salty flavor. It’s readily available at most grocery stores too!
3. Is this salad gluten-free?
To make this dish gluten-free, simply substitute the rotini pasta with gluten-free pasta like brown rice or quinoa pasta. Both options are delicious and work well with the salad.
4. How long will the leftovers last?
Stored in an airtight container in the fridge, your salad will be good for about 3 days. However, the flavors are best enjoyed within the first couple of days when the pasta is still perfectly firm!
Nutritional Info
While I won’t get too bogged down in numbers, this Tasty Elote Pasta Salad is packed with protein thanks to the chicken and Greek yogurt, and it’s also rich in fiber from the pasta and corn. With those fresh herbs and zesty lime, you’re not only treating your taste buds but nourishing your body too!
There you have it! Tasty Elote Pasta Salad with Greek Yogurt, a dish that brims with life, joy, and a bit of summer nostalgia no matter the season. Give it a try, gather your loved ones, and celebrate the magic of cooking together. Let’s set the table and create some beautiful moments! Happy cooking!
PrintTasty Elote Pasta Salad with Greek Yogurt
A vibrant pasta salad featuring creamy Greek yogurt, charred corn, and zesty lime for a refreshing twist on traditional elote.
- Prep Time: 15 minutes
- Cook Time: 15 minutes
- Total Time: 30 minutes
- Yield: 8 servings 1x
- Category: Salad
- Method: Chilling
- Cuisine: Mexican
- Diet: Vegetarian
Ingredients
- 1 cup Greek yogurt
- 3 tbsp mayo
- 1.5 tsp chili powder
- 1/2 tsp garlic powder
- 1/4 tsp salt
- 1.5 limes (zested and juiced)
- 6.7 oz rotini pasta
- 2.5 cups corn
- 2 tsp avocado oil
- 1/4 tsp chili powder (for corn)
- 2.5 cups shredded chicken
- 1 cup cotija cheese
- 1/2 cup cilantro
- Lime wedges (for serving)
Instructions
- Cook the pasta: Bring a large pot of salted water to a boil. Add the rotini pasta and cook according to package instructions until al dente, about 8-10 minutes. Drain and rinse under cold water. Set aside.
- Sauté the corn: In a large skillet over medium heat, add the avocado oil and warm up. Toss in the corn and sprinkle with 1/4 teaspoon of chili powder. Sauté for about 5-7 minutes until slightly charred.
- Whisk the dressing: In a mixing bowl, combine Greek yogurt, mayo, 1.5 teaspoons of chili powder, garlic powder, salt, lime zest, and lime juice. Whisk until smooth.
- Combine ingredients: In a large bowl, add cooked pasta, sautéed corn, shredded chicken, cotija, and chopped cilantro. Pour the dressing over the top and toss until everything is properly coated.
- Chill the salad: Cover the salad and let it chill in the fridge for at least 30 minutes.
- Serve it up: Stir the salad again, plate in a bowl, and garnish with additional cotija and cilantro. Serve with lime wedges on the side.
Notes
Can be made vegetarian by omitting chicken and adding more corn or black beans.
Nutrition
- Serving Size: 1 serving
- Calories: 295
- Sugar: 4g
- Sodium: 350mg
- Fat: 13g
- Saturated Fat: 4g
- Unsaturated Fat: 7g
- Trans Fat: 0g
- Carbohydrates: 35g
- Fiber: 4g
- Protein: 12g
- Cholesterol: 30mg
Keywords: pasta salad, elote, corn, Greek yogurt, summer salad, potluck
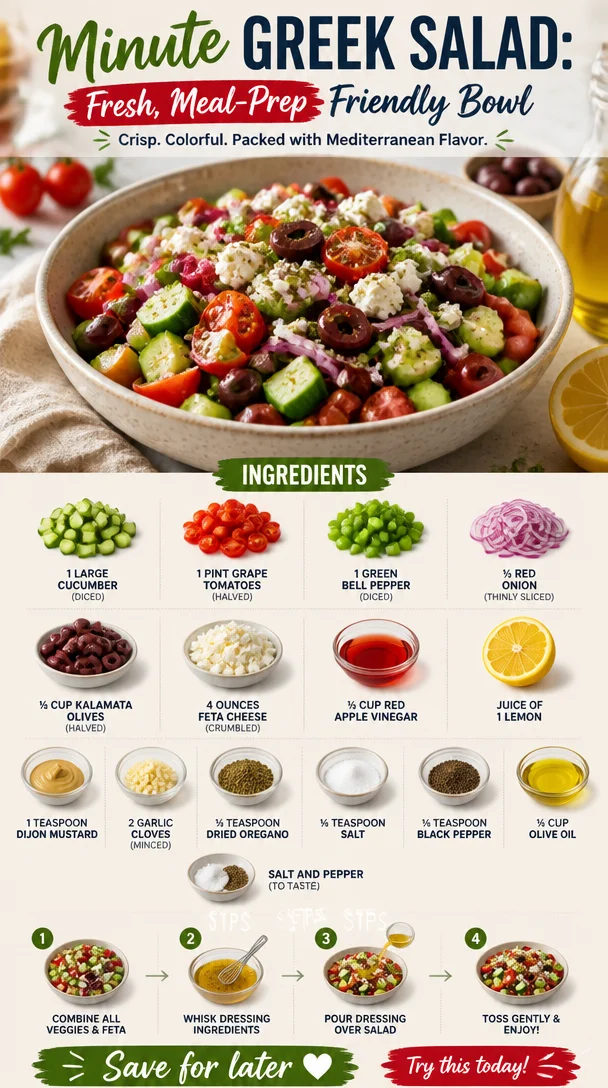
Minute Greek Salad: Fresh, Meal-Prep Friendly Bowl
The Best Greek Salad Recipe
Hello, my fellow food lovers! Today, we’re diving into a dish that perfectly embodies sunny days, vibrant flavors, and the essence of Mediterranean dining: the luscious Greek salad! Whether you’re enjoying a leisurely lunch on the patio or hosting a lively dinner party, this refreshing salad adds a splendid touch to any meal. So grab your apron, and let’s create something truly appetizing together!
A Journey to the Heart of Greece
I can’t help but be transported back to a small rustic taverna in Greece every time I think of Greek salad. Picture it: the sun-drenched terrace, the aroma of grilled seafood wafting through the air, and the sound of laughter around the table. I remember being served a glorious bowl brimming with fresh, colorful ingredients. The vibrant hues of the tomatoes, the deep greens of the cucumbers, and the bright white of the feta were a feast for both the eyes and the palate. It was there that I learned the beauty of simplicity in cooking—fresh ingredients elevated with a drizzle of olive oil and a squeeze of lemon.
Flipping through the pages of my travel journal, I stumbled on notes about every mouthwatering bite I savored. Inspired by that experience, I’m eager to recreate that magic in your kitchen. Greek salad is not just a side dish; it’s a celebration of fresh produce and regional flavors, making it a staple in my home.
Ingredients
Let’s gather our ingredients for this stunning Greek salad! Each component adds a unique flavor, and I’ll share some insights along the way.
-
1 large cucumber (diced): A refreshing crunch! Feel free to peel it if you prefer a smoother texture. English cucumbers are a sweet substitute.
-
1 pint grape tomatoes (halved): These bite-sized gems are juicy and sweet. Cherry tomatoes work just as well for a little burst of flavor.
-
1 green bell pepper (diced): Adds a nice crispness and a pop of color. You can switch it out for a red or yellow bell pepper for a sweeter taste.
-
½ red onion (thinly sliced): Provides a lovely sharpness, balancing the flavors. Soak the slices in warm water for about 10 minutes to mellow the taste.
-
½ cup Kalamata olives (halved): These bold, briny olives are a must! If you’re unable to find them, black olives can serve as a less intense alternative.
-
4 ounces feta cheese (crumbled): The star of the show! For a dairy-free option, try marinated tofu or a nut-based cheese.
-
⅓ cup red apple vinegar: This will bring zest to the salad. White wine vinegar or red wine vinegar are excellent substitutes.
-
Juice of 1 lemon: Fresh lemon juice brightens up the flavors and adds a citrusy zing. Lime juice is a fun alternative.
-
1 teaspoon Dijon mustard: This adds creaminess and depth. You can omit it for a lighter dressing or try whole grain mustard for a twist.
-
2 garlic cloves (minced): For flavor lovers, garlic is essential! Use garlic powder if fresh isn’t available.
-
½ teaspoon dried oregano: This herb is classic in Greek cuisine. Fresh oregano can also impart a wonderful fragrance.
-
¼ teaspoon salt: Essential for enhancing all the flavors! Adjust based on your taste.
-
¼ teaspoon black pepper: Freshly cracked is best for maximum flavor.
-
½ cup olive oil: A drizzle of good-quality olive oil pulls the salad together—don’t skimp here! Avocado oil can serve as a neutral substitute.
-
Salt and pepper (to taste): Always adjust to make sure your salad sings with flavor!
Step-by-Step Instructions
Now that we’re all prepped, let’s get cooking! Here’s how to assemble your Greek salad to perfection:
-
Prep the Ingredients: Start by washing your vegetables thoroughly. We want them clean and ready to shine! Dice the cucumber, halve the grape tomatoes, and dice the green bell pepper. Thinly slice the red onion, and don’t forget to pit and halve your Kalamata olives.
-
Create the Dressing: In a small bowl, whisk together the red apple vinegar, lemon juice, Dijon mustard, minced garlic, dried oregano, salt, and pepper. This simple dressing packs a punch and will marry the flavors beautifully. Chef’s Tip: Make this ahead of time and let it sit; the flavors will intensify!
-
Combine the Vegetables: In a large salad bowl, toss together the diced cucumber, grape tomatoes, green bell pepper, and red onion. You should see an explosion of color already! Get your hands in there—mixing by hand ensures that your ingredients are evenly distributed.
-
Add in Olives and Feta: Gently fold in the Kalamata olives and crumbled feta cheese. The feta adds creaminess, while the olives give a briny depth—such a delightful contrast!
-
Dress the Salad: Drizzle your tangy dressing over the tossed salad. Give it a gentle toss to coat each ingredient, ensuring every bite is flavorful. Chef’s Hack: If you’re serving later, keep the dressing separate until just before enjoying to maintain that crispness.
-
Final Touches: Taste the salad, adjusting your salt and pepper as needed. A sprinkle of freshly cracked black pepper on top adds a lovely finishing touch.
Serving Suggestions
For a delightful presentation, serve your Greek salad in a large, colorful bowl, garnished with extra feta crumbles and a sprinkle of oregano. Pair it with warm pita bread, tzatziki, or even grilled chicken for a full Mediterranean experience!
Recipe Variations
Want to mix things up? Try these creative twists on the classic Greek salad:
-
Mediterranean Grain Bowl: Add cooked quinoa or farro for added texture and nutrition.
-
Seafood Lover’s Delight: Toss in some grilled shrimp or calamari for a seafood twist.
-
Herb-Infused: Experiment with fresh herbs like dill or mint for an added layer of flavor.
-
Spicy Kick: Chop in some jalapeños or sprinkle with red pepper flakes for a spicy kick.
-
Vegan Version: Substitute feta with a nut-based cheese or omit it altogether for a lighter vibe.
Chef’s Notes
Every recipe tells a story, and this Greek salad is no different! I’ve adapted my version many times over the years, tweaking it based on my travels and favorite ingredients. I once made it for a picnic, only to discover I had mistakenly added a tablespoon of sugar instead of salt (oops!). Surprisingly, the sweetness brought out an interesting flavor. That day, I learned that cooking is often about embracing the unexpected!
FAQs and Troubleshooting
-
Can I make this salad in advance? Absolutely! It keeps well in the fridge for about 2 days. Just add dressing just before serving to maintain that fresh crunch.
-
What if I don’t have Kalamata olives? No worries! Any brined olives will do, though they’ll impart a slightly different flavor.
-
How do I store leftovers? Transfer any leftovers to an airtight container. Keep in the refrigerator and consume within 2 days for optimal freshness.
-
My salad is too salty! What can I do? If it’s too salty, consider adding more diced cucumber and tomatoes to balance the saltiness. A drizzle of olive oil can also help mellow the flavors.
Nutritional Info (Optional)
Note: Nutritional values will vary based on specific ingredients, quantities, and brands used.
With roughly 150 calories per serving, this Greek salad is full of vitamins and healthy fats and can be a great addition to your meals.
There you have it! A delightful Greek salad that brings the vibrant tastes of the Mediterranean right into your kitchen. Cooking is a joyous journey, and I’m thrilled to have you join me on this culinary adventure. So, let’s enjoy the process, savor each bite, and create beautiful moments around the table. Happy cooking, friends!
PrintThe Best Greek Salad Recipe
A refreshing Greek salad celebrating fresh produce and Mediterranean flavors, perfect for any meal.
- Prep Time: 15 minutes
- Cook Time: 0 minutes
- Total Time: 15 minutes
- Yield: 4 servings 1x
- Category: Salad
- Method: No Cook
- Cuisine: Mediterranean
- Diet: Vegetarian
Ingredients
- 1 large cucumber (diced)
- 1 pint grape tomatoes (halved)
- 1 green bell pepper (diced)
- ½ red onion (thinly sliced)
- ½ cup Kalamata olives (halved)
- 4 ounces feta cheese (crumbled)
- ⅓ cup red apple vinegar
- Juice of 1 lemon
- 1 teaspoon Dijon mustard
- 2 garlic cloves (minced)
- ½ teaspoon dried oregano
- ¼ teaspoon salt
- ¼ teaspoon black pepper
- ½ cup olive oil
- Salt and pepper (to taste)
Instructions
- Prep the Ingredients: Wash your vegetables thoroughly. Dice the cucumber, halve the grape tomatoes, and dice the green bell pepper. Thinly slice the red onion, and pit and halve the Kalamata olives.
- Create the Dressing: In a small bowl, whisk together the red apple vinegar, lemon juice, Dijon mustard, minced garlic, dried oregano, salt, and pepper.
- Combine the Vegetables: In a large salad bowl, toss together the diced cucumber, grape tomatoes, green bell pepper, and red onion.
- Add in Olives and Feta: Gently fold in the Kalamata olives and crumbled feta cheese.
- Dress the Salad: Drizzle your dressing over the tossed salad and gently toss to coat.
- Taste the salad and adjust your salt and pepper as needed.
Notes
Serve with warm pita bread or grilled chicken for a complete meal. Can be made in advance, just keep the dressing separate until serving.
Nutrition
- Serving Size: 1 serving
- Calories: 150
- Sugar: 3g
- Sodium: 350mg
- Fat: 10g
- Saturated Fat: 2g
- Unsaturated Fat: 7g
- Trans Fat: 0g
- Carbohydrates: 12g
- Fiber: 3g
- Protein: 5g
- Cholesterol: 10mg
Keywords: Greek salad, Mediterranean, healthy salad, fresh vegetables, summer recipe
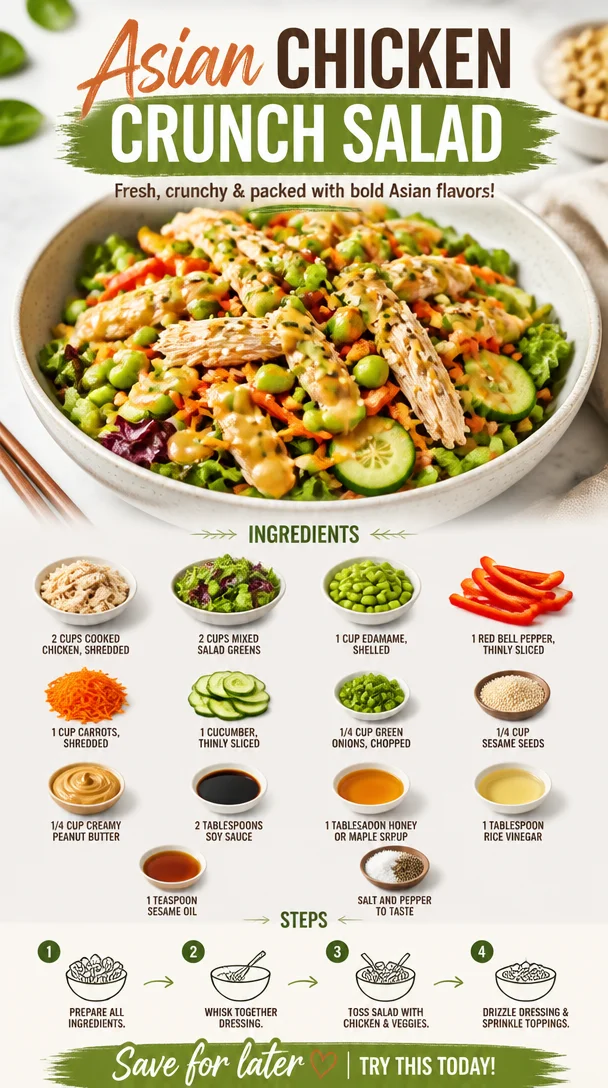
Asian Chicken Crunch Salad
Asian Chicken Crunch Salad: A Fresh Take on a Flavorful Classic
Hello, culinary friends! Today, I’m thrilled to share with you a recipe that perfectly embodies that balance between effortless elegance and delicious satisfaction—my Asian Chicken Crunch Salad. Whether you’re preparing lunch for yourself or whipping up something impressive for a dinner party, this dish will shine on your table.
The beauty of an Asian Chicken Crunch Salad lies not just in its vibrant colors and textures but also in the way it celebrates fresh ingredients and bold flavors. This salad is a little bit of everything I love about cooking: it’s quick, healthy, and packed with layers of flavor that tantalize the taste buds.
A Personal Slice of Nostalgia
I still remember the first time I made an Asian-inspired salad. It was during one of those long summer evenings, and I had a few friends over for a casual cookout. It was the kind of gathering filled with laughter, stories, and, of course, an abundance of delicious food. I wanted to make something refreshing but substantial, and the memory of crunching into crisp veggies and juicy chicken still lingers sweetly in my mind.
As I tossed together the vibrant ingredients, I couldn’t help but feel the warmth of friendship surrounding me. Watching everyone enjoy that salad, diving in for seconds and thirds, was a joy that solidified my love for both cooking and sharing meals. It’s moments like these that inspire me to create recipes where people can gather around the table, savoring every bite. And this Asian Chicken Crunch Salad? It’s an invitation to experience those moments!
Ingredients You’ll Need
Here’s what you’ll need for a salad that’s as delightful to prepare as it is to eat—along with some chef insights and substitution tips!
-
2 cups cooked chicken, shredded
Any type of cooked chicken works—grilled, roasted, or even a rotisserie chicken from your local market. Feeling ambitious? Press some chicken breast in a pan for extra flavor! -
2 cups mixed salad greens
I love a mixture of leafy greens like spinach, arugula, and romaine for varied textures. Don’t have mixed greens? Any fresh lettuce will do—just avoid iceberg for more flavor. -
1 cup edamame, shelled
These little green gems are packed with protein and a slightly sweet taste. If you can’t find edamame, chickpeas make a great substitute. -
1 red bell pepper, thinly sliced
Sweet and crisp, they add beautiful color. You can swap it with yellow or orange bell peppers for a sweeter flavor or even throw in some spicy jalapeños if you’re feeling adventurous. -
1 cup carrots, shredded
Shredded carrots add crunch and sweetness. Pre-packaged shredded carrots save you time, but feel free to use a vegetable peeler for longer ribbons. -
1 cucumber, thinly sliced
For a refreshing crunch! Persian cucumbers are great for this salad, but any cucumber will do—just ensure you remove the seeds for less wateriness. -
1/4 cup green onions, chopped
They contribute a mild onion flavor. If you’re not a fan, chives are a nice swap! -
1/4 cup sesame seeds
These provide a delightful nutty flavor. If you don’t have sesame seeds on hand, slivered almonds or sunflower seeds work wonderfully as well.
Dressing Ingredients:
-
1/4 cup creamy peanut butter
A must for that creamy texture! Allergic to peanuts? Try almond butter or sunflower seed butter. -
2 tablespoons soy sauce
This adds that signature umami flavor to the dressing. Low-sodium soy sauce is great if you’re watching your salt intake. -
1 tablespoon honey or maple syrup
This adds a touch of sweetness. For a vegan option, opt for maple syrup. -
1 tablespoon rice vinegar
Brightening up the dressing, rice vinegar is a staple in many kitchens! Apple cider vinegar works well in a pinch. -
1 teaspoon sesame oil
Adds a deep, toasty flavor. If you’re out, a little olive oil works as a great alternative. -
Salt and pepper to taste
Flavor is key! Adjust seasoning according to your preference.
Step-by-Step Instructions
Ready to get cooking? Let’s dive into the process of creating this colorful and crunchy masterpiece!
-
Prepare Your Chicken
- If you’re using leftover chicken, great! Just shred it to bite-sized pieces. New to shredding? Simply place the cooked chicken on a cutting board and pull apart with two forks—it’s as easy as that!
-
Make the Dressing
- In a medium bowl, whisk together the creamy peanut butter, soy sauce, honey (or maple syrup), rice vinegar, sesame oil, and a pinch of salt and pepper.
- Tip: If your peanut butter is too thick, consider adding a splash of warm water to loosen it. Aim for a consistency that’s pourable and creamy. Don’t be afraid to taste and adjust—it’s all about finding that sweet, savory balance!
-
Prep Your Veggies
- Wash and dry all your greens and veggies. Thinly slice the red bell pepper and cucumber, and shred those carrots.
- Chef Hack: Use a box grater for shredding carrots quickly; it can be a lot faster than using a knife.
-
Assemble the Salad
- In a large bowl, add the mixed greens, shredded chicken, edamame, bell pepper, carrots, cucumber, and green onions. Toss those beautiful ingredients together gently.
- This is where you can think about portion sizes—adjust the ingredients based on your crowd to make sure everyone gets enough of those flavors!
-
Dress the Salad
- Drizzle the dressing over the tossed salad and sprinkle with sesame seeds, giving it another gentle toss to coat all the ingredients evenly.
- Fun Tip: You can serve the dressing on the side if you prefer just a hint of flavor rather than a full mix.
-
Plate and Serve
- Serve this salad in large bowls for a family-style meal or plated individually for a classy touch.
- Chef Note: Add extra sesame seeds or sliced almonds as a topping for a little flair!
Serving Suggestions
This salad is not only visually stunning, but it also packs a ton of flavors, making it perfect for any occasion. Consider pairing it with grilled shrimp or serving it alongside spring rolls for a full Asian-inspired feast. Don’t forget to hydrate with a refreshing iced tea or a crisp white wine—it’s the little touches that elevate the meal!
Recipe Variations
The beauty of this Asian Chicken Crunch Salad is its versatility. Here are a few creative twists to consider:
- Spicy Twist: Add sliced jalapeños or drizzle with sriracha for an extra kick.
- Fruit Infusion: Toss in some mandarin oranges or mango slices for a sweet tropical vibe.
- Veggie Power: Amp up the nutrition by adding sliced radishes or chopped kale to the mix.
- Grain Goodness: Want to turn this salad into a heartier meal? Add cooked quinoa or brown rice for some extra sustenance.
- Vegan Option: Swap chicken for tofu or chickpeas, and use plant-based peanut butter to keep it vegan-friendly!
Chef’s Notes
When I first started making my Asian Chicken Crunch Salad, I had a friend who was reluctant about salads in general. She spent years believing they were boring or limited in flavor. But when I finally convinced her to give this one a shot, her eyes lit up with every bite. She declared, “This isn’t just a salad; it’s a celebration!” Moments like those remind me why I cook: to elevate simple ingredients into something that creates unforgettable experiences.
Over time, this recipe has evolved, changing with the seasons and the ingredients available to me. I love playing around with textures and flavors, so feel free to be adventurous!
FAQs and Troubleshooting
Q: Can I prepare the salad in advance?
A: While you can prep the components ahead of time, I recommend adding the dressing right before serving to keep the greens crisp. Store the dressing separately in the fridge.
Q: What if my dressing is too thick?
A: Just whisk in a little warm water until you reach the desired consistency. Remember, you want it pourable!
Q: How can I make this salad gluten-free?
A: Easy! Use tamari instead of soy sauce, and double-check other ingredients for gluten content.
Q: My salad is too salty. What do I do?
A: Balance it out by adding a dash more honey (or maple syrup) or incorporating additional veggies to dilute the salty flavor.
Conclusion
So there you have it, my friends! An Asian Chicken Crunch Salad that not only looks gorgeous but also brings a burst of flavor into your kitchen and your life. I hope you’re as excited to make this dish as I am to share it with you. Remember, it’s all about creating those small, beautiful moments around your table—so grab your apron, invite some friends, and let’s make some delicious memories together!
Happy cooking, and welcome to the Ivory Apron family!
PrintAsian Chicken Crunch Salad
A vibrant and healthy salad featuring shredded chicken, mixed greens, edamame, and a creamy peanut dressing.
- Prep Time: 15 minutes
- Cook Time: 10 minutes
- Total Time: 25 minutes
- Yield: 4 servings 1x
- Category: Salad
- Method: Mixing
- Cuisine: Asian
- Diet: Gluten-Free, Dairy-Free
Ingredients
- 2 cups cooked chicken, shredded
- 2 cups mixed salad greens
- 1 cup edamame, shelled
- 1 red bell pepper, thinly sliced
- 1 cup carrots, shredded
- 1 cucumber, thinly sliced
- 1/4 cup green onions, chopped
- 1/4 cup sesame seeds
- 1/4 cup creamy peanut butter
- 2 tablespoons soy sauce
- 1 tablespoon honey or maple syrup
- 1 tablespoon rice vinegar
- 1 teaspoon sesame oil
- Salt and pepper to taste
Instructions
- Prepare your chicken by shredding it into bite-sized pieces.
- Make the dressing by whisking together peanut butter, soy sauce, honey, rice vinegar, sesame oil, and a pinch of salt and pepper.
- Prep your veggies by washing and slicing them accordingly.
- Assemble the salad in a large bowl with all the ingredients and toss gently.
- Dress the salad with the prepared dressing and toss to coat evenly.
- Serve in large bowls or plated individually for a classy presentation.
Notes
Add extra sesame seeds or sliced almonds on top for garnish. Serve with grilled shrimp or spring rolls for a complete meal.
Nutrition
- Serving Size: 1 serving
- Calories: 400
- Sugar: 7g
- Sodium: 500mg
- Fat: 18g
- Saturated Fat: 3g
- Unsaturated Fat: 11g
- Trans Fat: 0g
- Carbohydrates: 35g
- Fiber: 6g
- Protein: 22g
- Cholesterol: 50mg
Keywords: Asian salad, chicken salad, healthy recipe, crunchy salad, peanut dressing
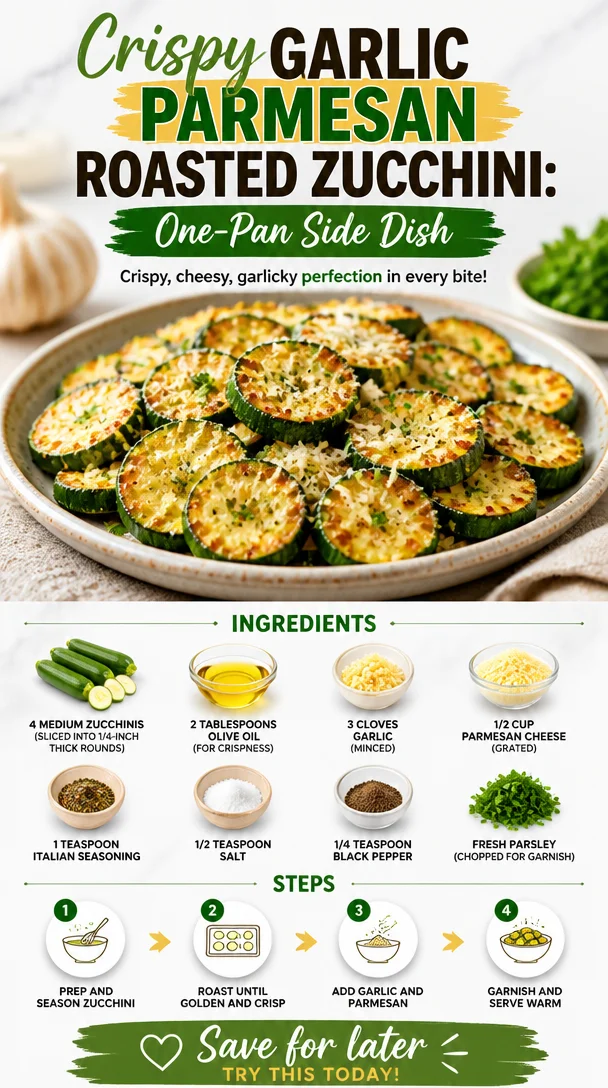
Crispy Garlic Parmesan Roasted Zucchini: One-Pan Side Dish
Irresistibly Crunchy Garlic Parmesan Roasted Zucchini
Hello and welcome back to Ivory Apron! Today, we’re diving into a dish that’s bursting with flavor, texture, and goodness: Irresistibly Crunchy Garlic Parmesan Roasted Zucchini. This dish is not just another side—it’s a celebration of one of summer’s most versatile vegetables, zucchini! If you’ve ever wondered how to make your veggies a showstopper, you’re in the right place.
So, put on your apron, grab your knife, and let’s get ready to make zucchini the star of your dinner table!
A Little Personal Story: Zucchini Memories
Zucchini has always held a special place in my heart. Growing up, summer vacations meant visiting my grandmother’s house, where her garden was a treasure trove of fresh vegetables. She had a particular knack for transforming modest veggies into mouthwatering dishes. I remember picking zucchini from her garden, gleaming in the sun, and she would say, “Savannah, zucchini is like a blank canvas—let’s paint it delicious!”
One memorable afternoon, we crafted a dish much like today’s. We roasted zucchini infused with garlic and Parmesan, and the kitchen filled with the most heavenly aroma. It was a simple moment, yet it taught me that even the humblest of ingredients could bring joy. It’s this spirit that inspires me to share my recipes with you!
Let’s make those memories together with this crispy, cheesy, and utterly delightful dish.
Ingredients
Gather these fresh ingredients to get started on our garlic Parmesan roasted zucchini:
-
4 medium zucchinis: Sliced into 1/4-inch thick rounds. Look for firm, shiny zucchinis for the best texture. You can also use yellow squash for a pop of color!
-
2 tablespoons olive oil: This not only helps in crisping up the zucchini but also adds a lovely flavor. For a different twist, you can use avocado oil, which has a high smoke point and a mild taste.
-
3 cloves garlic: Minced. Fresh garlic delivers the best flavor! In a pinch, you can use garlic powder—just adjust to taste.
-
1/2 cup Parmesan cheese: Grated. The sharper the cheese, the more flavor it’ll impart. If you’re feeling adventurous, try Pecorino Romano for a salty kick.
-
1 teaspoon Italian seasoning: A blend of herbs that captures the essence of Italian cooking. Feel free to customize it with your favorite herbs—thyme and rosemary work beautifully here!
-
1/2 teaspoon salt: To enhance all the flavors in your dish. Always taste and adjust!
-
1/4 teaspoon black pepper: Freshly cracked offers the best heat. If you want an extra kick, try a sprinkle of red pepper flakes.
-
Fresh parsley: Chopped for garnish. This adds a vibrant color and fresh flavor, making your dish pop!
Step-by-Step Instructions
Now that we’ve gathered our ingredients, it’s time to get cooking! Follow these steps to create your crispy zucchini masterpiece.
-
Preheat the Oven: Start by preheating your oven to 425°F (220°C). A hotter oven will give us that nice roasted color and crunch we’re after.
-
Prepare the Baking Sheet: Line a rimmed baking sheet with parchment paper for easy cleanup and to prevent sticking. This little hack can save you time and hassle later!
-
Slice the Zucchini: Wash the zucchinis under cold water, then slice them into 1/4-inch thick rounds. Consistency is key here, so try to keep them uniform for even cooking. Using a mandoline slicer can speed this up if you have one!
-
Toss with Olive Oil: In a large mixing bowl, combine the sliced zucchini with olive oil. Use your hands to toss and coat the zucchini evenly. This helps crisp them up in the oven!
-
Add Garlic and Seasonings: Next, add in the minced garlic, Italian seasoning, salt, and black pepper. Toss everything together again until the zucchini is thoroughly coated. Don’t skip on the garlic—it’s what really brings the flavor!
-
Layer on the Baking Sheet: Spread the seasoned zucchini rounds in a single layer on your prepared baking sheet. Overcrowding will lead to steaming instead of roasting, so give them some space to breathe.
-
Sprinkle with Parmesan: Now, it’s time for the pièce de résistance! Generously sprinkle the grated Parmesan cheese over the top of the zucchini. If you’re feeling cheesy, don’t hold back!
-
Roast Away: Pop the baking sheet into your preheated oven and roast for about 20-25 minutes. Halfway through, give them a stir to ensure even cooking and that all that beautiful cheese gets nice and golden.
-
Check for Crispiness: Trust your nose here—they should smell incredible and be slightly browned. The edges will get crispy, while the middle retains a bit of tenderness.
-
Garnish and Serve: Once they’re out of the oven, give them a final sprinkle of fresh parsley for that beautiful pop of color. And there you have it—Irresistibly Crunchy Garlic Parmesan Roasted Zucchini!
Serving Suggestions
For plating, layer the crispy zucchini on a beautiful serving dish. Consider drizzling a little extra balsamic glaze or a squeeze of fresh lemon juice over the top for that added zing. Serve alongside grilled chicken or fish, or enjoy them just as they are! You’ll find they impress guests without overshadowing your main dish.
Recipe Variations
Feeling adventurous? Here are some fun variations to give your zucchini dish a personal twist:
- Spicy Garlic Zucchini: Add a pinch of red pepper flakes or cayenne pepper to the seasoning for a kick!
- Herb-Infused: Swap Italian seasoning for fresh herbs like dill or basil for a refreshing take.
- Vegan Version: Substitute nutritional yeast for the Parmesan and use a vegan olive oil substitute.
- Mediterranean Delight: Toss in halved cherry tomatoes and olives with the zucchini for a colorful Mediterranean flair.
- Balsamic Glazed: Drizzle some balsamic reduction over the zucchini just before serving for a sweet and tangy finish.
Chef’s Notes
Zucchini has come a long way since my grandmother’s garden days. I’ve experimented with this recipe over the years, tweaking the seasoning and methods until it reached perfection. One funny memory involves a dinner party where I accidentally confused the salt for sugar while seasoning! Let me tell you, people are less enthusiastic about zucchini when it’s a sweet surprise!
But that’s the beauty of cooking—mistakes often lead to delightful discoveries. Always taste as you go and let your creativity shine!
FAQs and Troubleshooting
How do I make sure my zucchini isn’t soggy?
Great question! One key is to slice your zucchini evenly and not overcrowd the baking sheet. And don’t forget to preheat your oven well!
Can I make this dish ahead of time?
Absolutely! You can prep the zucchini and seasonings a few hours ahead, and store them in the fridge until you’re ready to roast. Just double-check your cook time—cold zucchini may require a bit longer.
What if I don’t have Parmesan cheese?
No problem! You can use any hard cheese you have on hand, like aged Gouda or Pecorino. If dairy is an issue, try using a vegan alternative or nutritional yeast.
Why is my zucchini mushy?
If your zucchini is mushy, it may be overcooked or the zucchinis were too large or too ripe. Aim for firm, fresh zucchinis, and always keep an eye on them as they roast.
Nutritional Info
While I always encourage enjoying food in moderation, here’s a rough estimate for a serving of our Irresistibly Crunchy Garlic Parmesan Roasted Zucchini (based on 4 servings):
- Calories: 150
- Protein: 5g
- Fat: 10g
- Carbohydrates: 8g
- Fiber: 2g
Remember, nutritional values can vary based on ingredient brands and preparation methods!
Conclusion
There you have it—Irresistibly Crunchy Garlic Parmesan Roasted Zucchini that will make you a veggie lover for life! Remember, cooking is about enjoying the journey as much as it is about the destination. Share this dish with your friends and family, and let the flavors tell your kitchen’s story.
I hope this recipe brings you joy, flavor, and some lovely kitchen memories. Now, get your hands dirty, savor every moment, and let’s celebrate the art of cooking together!
Happy cooking, and see you next time at Ivory Apron!
PrintIrresistibly Crunchy Garlic Parmesan Roasted Zucchini
Crispy, cheesy, and utterly delightful roasted zucchini infused with garlic and Parmesan.
- Prep Time: 10 minutes
- Cook Time: 25 minutes
- Total Time: 35 minutes
- Yield: 4 servings 1x
- Category: Side Dish
- Method: Roasting
- Cuisine: Italian
- Diet: Vegetarian
Ingredients
- 4 medium zucchinis, sliced into 1/4-inch thick rounds
- 2 tablespoons olive oil
- 3 cloves garlic, minced
- 1/2 cup Parmesan cheese, grated
- 1 teaspoon Italian seasoning
- 1/2 teaspoon salt
- 1/4 teaspoon black pepper
- Fresh parsley, chopped for garnish
Instructions
- Preheat the oven to 425°F (220°C).
- Prepare a rimmed baking sheet lined with parchment paper.
- Wash the zucchinis under cold water, then slice them into 1/4-inch thick rounds.
- Toss the sliced zucchini with olive oil in a large mixing bowl.
- Add minced garlic, Italian seasoning, salt, and black pepper to the zucchini and toss again.
- Spread the seasoned zucchini rounds in a single layer on the baking sheet.
- Sprinkle grated Parmesan cheese generously over the top.
- Roast in the preheated oven for about 20-25 minutes, stirring halfway.
- Check for crispiness and a slight browning.
- Garnish with fresh parsley before serving.
Notes
For added flavor, drizzle with balsamic glaze or lemon juice before serving. Avoid overcrowding the baking sheet to prevent steaming.
Nutrition
- Serving Size: 1 serving
- Calories: 150
- Sugar: 2g
- Sodium: 400mg
- Fat: 10g
- Saturated Fat: 3g
- Unsaturated Fat: 7g
- Trans Fat: 0g
- Carbohydrates: 8g
- Fiber: 2g
- Protein: 5g
- Cholesterol: 15mg
Keywords: zucchini, roasted vegetables, garlic parmesan, side dish
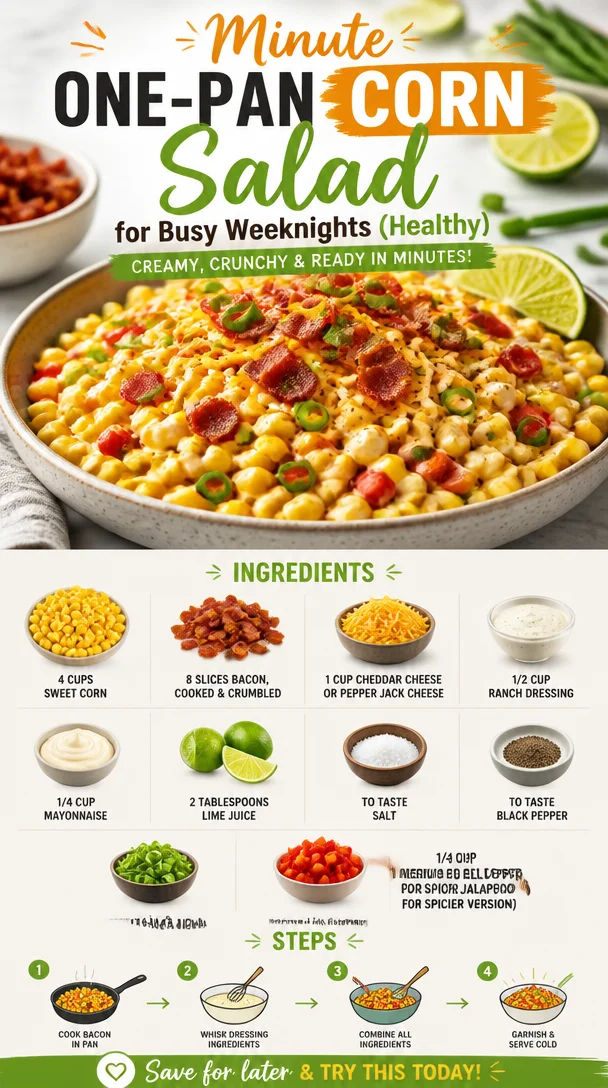
Minute One-Pan Corn Salad for Busy Weeknights (Healthy)
Crack Corn Salad: A Celebration of Summer Flavors
Every summer brings its own set of memories, a tapestry of laughter, sunshine, and the delightful scent of grilling meat wafting through the air. One dish that always manages to steal my heart (and the spotlight at potlucks) is the ever-so-vibrant Crack Corn Salad. It’s colorful, creamy, and absolutely bursting with flavor, which makes it perfect for gatherings or simple family dinners. But what I love most is the story behind it—one that resonates with warm gatherings and good friends.
A Nostalgic Journey
As a child, summers at my grandmother’s house were magical. Her backyard was a verdant paradise with tall corn stalks swaying gently in the breeze. I can still visualize the joyful chaos of family coming together with pots and pans, music playing softly in the background, and laughter echoing from every corner. Among the seemingly endless array of dishes was my grandmother’s famous corn salad — creamy, crunchy, and oh-so-delicious.
This Crack Corn Salad, as we dubbed it, was an essential part of our summer BBQs. I remember sneaking bites while the adults were busy chatting, a little bit of bacon falling over my fingers and cheese sticking to my lips as I savored each spoonful. Every bite transported me back to those carefree days. Today, as I share this recipe with you, I hope it brings a sprinkle of nostalgia and joy to your own table.
Ingredients
Let’s dive into the ingredients! Here’s what you’ll need to create this delightful dish, along with some chef insights to help you personalize it:
-
4 cups sweet corn (fresh, frozen, or canned)
Whether you’re using fresh, sweet corn cut straight off the cob or grabbing frozen during off-seasons, the key here is to ensure it’s dried well if frozen or canned. Sweet corn is the star of this salad, bringing sweetness and crunch! -
8 slices bacon, cooked and crumbled
Bacon adds a delightful smokiness and crisp texture. You can substitute with turkey bacon or crispy chickpeas for a healthier or vegetarian option. -
1 cup cheddar cheese or pepper jack cheese, shredded
Cheese adds a creamy richness; cheddar offers a classic taste while pepper jack brings a lovely hint of spice. Feel free to experiment with your favorite! -
1/2 cup ranch dressing
I recommend store-bought for convenience and consistency, but homemade ranch is always a hit! Plus, you can control the flavors to suit your preference. -
1/4 cup mayonnaise
Adds extra creaminess! Swap it out for Greek yogurt if you’re looking to lighten things up—a great source of protein too! -
2 tablespoons lime juice
Freshly squeezed is highly recommended; it brightens up the salad and enhances all those gorgeous flavors. -
To taste salt
Start with a pinch, and adjust based on the saltiness of your cheese and bacon. -
To taste black pepper
Start light and adjust based on your palate. A bit of pepper can really elevate the dish! -
1/4 cup green onions, sliced
They bring a fresh crunch, but feel free to omit them if you’re not a fan—scallions or chopped chives are also great. -
1 medium red bell pepper, diced
For a pop of color and sweetness. If you’re in the mood for heat, swap this with a jalapeño!
Step-by-Step Instructions
Now, let’s get cooking! Follow these steps to whip up your own Crack Corn Salad:
-
Prep the Ingredients: Whether you’re using fresh corn, bacon, or veggies, the first step is to prepare everything. If you’re using fresh corn, grill or boil it for a few minutes until tender. If frozen or canned, just make sure it’s dried well.
-
Cook the Bacon: In a skillet over medium heat, cook the bacon until crispy. This should take about 5-7 minutes, depending on the thickness. Once done, transfer it to a paper towel-lined plate to drain. Save a bit for garnish!
-
Combine the Core Ingredients: In a large bowl, mix the corn, crumbled bacon, shredded cheese, and diced red bell pepper.
-
Make the Dressing: In a separate bowl, whisk together the ranch dressing, mayonnaise, and lime juice until smooth. This creamy dressing is what ties everything together—don’t skip it!
-
Add Seasonings: Pour the dressing over the corn mixture and sprinkle in salt and pepper. Mix gently until everything is well coated. Remember, you can always add more seasoning later, so start small!
-
Fold in the Greens: It’s time to add the sliced green onions. Gently fold them in, ensuring they’re evenly distributed throughout the salad.
-
Chill & Serve: Cover the salad and let it chill in the fridge for at least 30 minutes. This will allow all those lovely flavors to mingle and develop.
-
Plate It Up: When you’re ready to serve, scoop the salad into a beautiful bowl or a platter, sprinkle a little reserved bacon on top for garnish, and voilà! You’ve got a showstopper on your hands ready to impress.
Serving Suggestions
Crack Corn Salad is best served cold or at room temperature. For a stunning presentation, consider serving it in a beautiful, wide bowl. Garnish it with a sprinkle of fresh herbs or edible flowers if you’re feeling fancy. This dish pairs beautifully with grilled meats, burgers, or as a refreshing side for a picnic.
Recipe Variations
- Southwestern Twist: Add black beans and corn chips for a bit of crunch.
- Mediterranean Style: Swap out the ranch for a yogurt-based dressing and add kalamata olives and minced garlic.
- Fruit Addition: Throw in some diced avocado or fresh diced tomatoes to add sweetness and creaminess—a fantastic summer addition!
- Vegan Version: Replace bacon with smoked tempeh and use dairy-free cheese and yogurt!
Chef’s Notes
Over the years, my Crack Corn Salad has become a canvas for creativity. What started as my grandmother’s simplest recipe evolved into a fan-favorite that I now love to personalize for every gathering. One time, I decided on a whim to add chopped jalapeños for a spicy kick, and it instantly became a hit with my friends! Remember, cooking is all about experimenting. Don’t be afraid to throw in your own flair!
FAQs and Troubleshooting
1. Can I make this salad ahead of time?
Absolutely! It tastes even better the next day as the flavors meld together. Just be sure to give it a good stir before serving.
2. What should I do if the salad seems too dry?
If you find your salad lacking moisture, simply mix in a bit more ranch dressing or a splash of lime juice until you get the desired consistency.
3. Is there a gluten-free version?
Yes! Just ensure that your dressing is gluten-free, and you’re good to go. Most ranch dressings available on the market are naturally gluten-free, but it doesn’t hurt to check.
4. How do I store leftovers?
Store any leftovers in an airtight container in the fridge. Enjoy them within a couple of days for the best flavor.
Creating dishes that bring people together is what I love most about cooking. This Crack Corn Salad is not just a crowd-pleaser; it’s a reminder of those sunny days and shared moments spent around the table. So why not gather your loved ones, whip up this delightful dish, and recreate those memories in your own kitchen? Tie on your apron, pour yourself a sparkling drink, and let the joy of cooking lead the way! Enjoy every bite!
PrintCrack Corn Salad

A colorful and creamy salad bursting with summer flavors, perfect for potlucks and family gatherings.
- Prep Time: 15 minutes
- Cook Time: 10 minutes
- Total Time: 45 minutes
- Yield: 8 servings 1x
- Category: Salad
- Method: Chilling
- Cuisine: American
- Diet: Pescatarian
Ingredients
- 4 cups sweet corn (fresh, frozen, or canned)
- 8 slices bacon, cooked and crumbled
- 1 cup cheddar cheese or pepper jack cheese, shredded
- 1/2 cup ranch dressing
- 1/4 cup mayonnaise
- 2 tablespoons lime juice
- To taste salt
- To taste black pepper
- 1/4 cup green onions, sliced
- 1 medium red bell pepper, diced
Instructions
- Prep the ingredients: Whether using fresh corn, bacon, or veggies, prepare everything. Grill or boil fresh corn for a few minutes until tender.
- Cook the bacon: In a skillet over medium heat, cook the bacon until crispy, about 5-7 minutes. Transfer to a paper towel-lined plate.
- Combine the core ingredients: In a large bowl, mix the corn, crumbled bacon, shredded cheese, and diced red bell pepper.
- Make the dressing: In a separate bowl, whisk together the ranch dressing, mayonnaise, and lime juice until smooth.
- Add seasonings: Pour the dressing over the corn mixture and sprinkle in salt and pepper. Mix gently until well coated.
- Fold in the greens: Add the sliced green onions and gently fold them into the salad.
- Chill & serve: Cover the salad and let it chill in the fridge for at least 30 minutes.
- Plate it up: Serve in a beautiful bowl or platter, garnished with a little reserved bacon.
Notes
Tastes even better the next day as flavors meld together. Feel free to personalize with additional ingredients.
Nutrition
- Serving Size: 1 serving
- Calories: 320
- Sugar: 4g
- Sodium: 600mg
- Fat: 22g
- Saturated Fat: 7g
- Unsaturated Fat: 12g
- Trans Fat: 0g
- Carbohydrates: 28g
- Fiber: 4g
- Protein: 8g
- Cholesterol: 20mg
Keywords: corn salad, summer salad, BBQ side dish, potluck dish
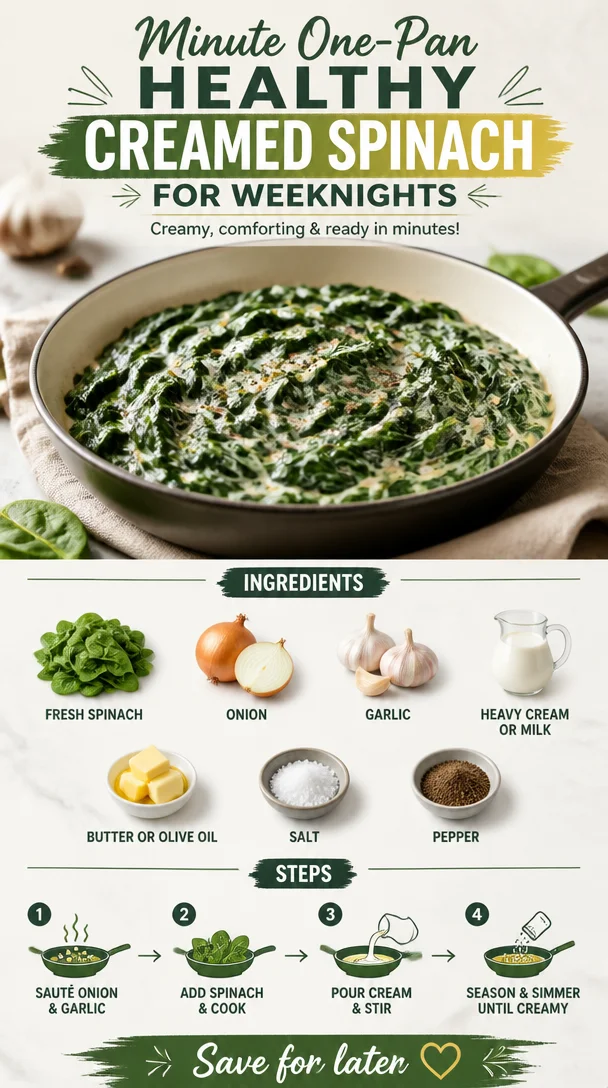
Minute One-Pan Healthy Creamed Spinach for Weeknights
Indulge in Healthy Creamed Spinach: A Comforting Classic with a Twist
Hello fellow foodies! Today, we’re diving into a dish that warms the heart and nourishes the soul — healthy creamed spinach! This dish is a delightful blend of creamy goodness and vibrant greens that will leave your taste buds dancing. Whether you’re looking for a side dish to complement a hearty meal or a way to add more leafy greens to your diet, this recipe is both indulgent and guilt-free.
Now, as someone who firmly believes that cooking should feel elegant yet never intimidating, I want to take you on a journey through my favorite way to prepare creamed spinach. Not only is it easy to whip up, but it also brings a touch of sophistication to your table. So, grab your apron, and let’s get cooking!
A Wholesome Memory: My First Dinner Party
Let me take you back to a chilly evening a few years ago. I was nervously preparing for my very first dinner party, and I wanted everything to be perfect. The table was set, the candles lit, and I decided that creamed spinach would be the star side dish alongside a beautiful roast chicken.
As I stood by the stove, sautéing the onions and garlic, the aroma filled my kitchen and my heart with nostalgia. It reminded me of family gatherings where my grandmother would whip up her creamy version of spinach. She always said that the secret was in the sautéing — it enhances the flavors and brings everyone together.
Well, my dinner party was a smashing success! Everyone raved about the creamed spinach, asking for the recipe, and I felt such a sense of pride in sharing a dish that means so much to me. That night, I realized that food isn’t just about the ingredients; it’s about the love and stories that come along with it.
Ingredients: Crafting Your Creamy Delight
Now, let’s gather our ingredients! For this healthy creamed spinach, you’ll need:
-
Fresh Spinach: The star of our dish! Spinach is packed with nutrients and gives that vibrant green color. If you can’t find fresh spinach, frozen spinach can work too—just make sure to thaw and drain it well.
-
Onion: Sweet and aromatic, onions give a wonderful depth of flavor. Yellow or white onions work best here, but if you prefer a milder taste, shallots are a fabulous substitute.
-
Garlic: Adds that punchy flavor we all love. Fresh garlic is a must, but if you’re in a pinch, you can use garlic powder. Just remember that garlic powder is more concentrated, so use it sparingly!
-
Heavy Cream or Milk: To achieve that luscious creaminess. If you’re looking to make it lighter, opt for whole milk or even a dairy-free milk like almond or oat.
-
Butter or Olive Oil: For sautéing, these fats help to enhance the flavors. Butter will give a rich taste, while olive oil adds a hint of earthiness.
-
Salt and Pepper: Simple seasonings but essential for bringing out the flavors! You can also add a pinch of nutmeg if you want that classic creamed spinach flavor.
Step-by-Step Instructions: Let’s Make Magic!
-
Prep Your Spinach: Rinse your fresh spinach under cold water to remove any dirt. Pat it dry with a clean kitchen towel or spin it in a salad spinner. This helps avoid excess moisture in our dish.
-
Sauté the Aromatics: In a large skillet over medium heat, melt 1 tablespoon of butter or heat a drizzle of olive oil. Add half of a finely chopped onion and sauté until it’s translucent, about 3-4 minutes. The goal here is to soften the onions and develop their sweet flavor.
-
Add Garlic: Toss in 2-3 minced garlic cloves and continue cooking for another 30 seconds to a minute until fragrant. Make sure not to burn the garlic; we want it to be golden, not brown.
-
Incorporate the Spinach: Now, add the fresh spinach in batches, allowing it to wilt down before adding more. This will make it easier to manage in the pan. Stir occasionally until all the spinach is nicely wilted — it should take about 3-5 minutes.
-
Make It Creamy: Once the spinach has wilted, pour in about ½ cup of heavy cream (or your choice of milk). Stir well to combine and let it bubble gently for a couple of minutes until the mixture thickens slightly.
-
Season It Right: Season your creamed spinach with salt and pepper. Keep tasting as you go, adjusting the seasoning to your preference. If you’re feeling adventurous, now is the time to sprinkle in a touch of nutmeg for that classic flavor punch!
-
Finish and Serve: Once everything is creamy and delicious, remove it from the heat. If desired, you can stir in a tablespoon of grated Parmesan cheese for extra richness. Transfer it to a serving dish, and voila! Your healthy creamed spinach is ready to impress!
Serving Suggestions: Elevate Your Presentation
To make your healthy creamed spinach even more visually appealing, consider serving it in a beautiful bowl or dish. A sprig of fresh parsley or a sprinkle of red pepper flakes on top adds the perfect finishing touch. Pair it with your favorite protein, whether it’s grilled chicken, roasted fish, or a hearty vegetarian dish. And remember to encourage your guests to dig in — good food is meant to be shared and savored!
Recipe Variations: Get Creative!
Feeling adventurous? Here are a few delicious twists on this classic dish:
-
Add Nuts: For some crunch, toss in toasted pine nuts or chopped walnuts towards the end of cooking for an added texture contrast.
-
Cheesy Goodness: Swap out some of the cream for a blend of cream cheese and some grated cheddar or gouda for a richer, cheesy flavor.
-
Spicy Kick: Add a pinch of red pepper flakes or a dash of hot sauce for a touch of heat that pairs beautifully with the creamy spinach.
-
Herbed Delight: Stir in some fresh herbs like dill or thyme for an aromatic twist. This brings a refreshing contrast to the richness of the dish.
-
Zesty Citrus: A squeeze of lemon juice or zest added at the end can brighten up the flavors and give it a fresh finish.
Chef’s Notes: Embracing the Journey
I have to admit, my journey with creamed spinach has evolved over the years. There was a time when I used heavy cream and no spinach! But once I realized how flavorful fresh spinach is when cooked properly, I never looked back. I also discovered that the key to a smooth and creamy texture is all in the timing — if you overcook your spinach, it can turn mushy. So treat your greens kindly!
And on a lighter note, there was that one time I accidentally grabbed powdered sugar instead of flour while baking with my niece. Let’s just say our “cream” spinach turned into a sweet spinach disaster! Food adventures are all part of the fun, right?
FAQs and Troubleshooting
Here are a few common questions you might have while making your delicious creamed spinach:
1. Can I make this dish ahead of time?
Absolutely! You can make the creamed spinach ahead and reheat it gently on the stovetop before serving. Just be cautious not to overcook it again!
2. What if I don’t have fresh spinach?
Frozen spinach works perfectly! Just remember to thaw it and drain it thoroughly to avoid excess moisture.
3. How can I make it vegan?
Substitute the heavy cream with coconut milk or unsweetened almond milk, and use olive oil instead of butter. Skip the cheese if you want to keep it completely dairy-free!
4. My spinach is too watery!
Make sure to thoroughly drain any excess moisture from the spinach after cooking it. You can also cook it a bit longer to evaporate any excess liquid.
Nutritional Information (per serving)
While I focus on the joy of cooking and eating, it’s often helpful to know the benefits of the foods we love. Here’s a rough nutritional overview for one serving of healthy creamed spinach:
- Calories: Approximately 150
- Protein: 4g
- Carbohydrates: 6g
- Fiber: 2g
- Fat: 12g
So, there you have it! A beautiful, healthy creamed spinach that’s perfect for any occasion. I can’t wait for you to try this recipe and add your personal touches. Cooking should be about joy, exploration, and a bit of fun — let’s keep that spirit alive in our kitchens! Tie on your apron and get cooking — I’ll be here cheering you on!
PrintHealthy Creamed Spinach
A delightful blend of creamy goodness and vibrant greens, this healthy creamed spinach is both indulgent and guilt-free.
- Prep Time: 15 minutes
- Cook Time: 15 minutes
- Total Time: 30 minutes
- Yield: 4 servings 1x
- Category: Side Dish
- Method: Sautéing
- Cuisine: American
- Diet: Vegetarian
Ingredients
- 1 lb Fresh Spinach
- 1/2 Onion, finely chopped
- 2–3 cloves Garlic, minced
- 1/2 cup Heavy Cream (or milk)
- 1 tablespoon Butter (or Olive Oil)
- Salt, to taste
- Pepper, to taste
- Pinch of Nutmeg (optional)
- Grated Parmesan cheese (optional)
Instructions
- Rinse your fresh spinach under cold water to remove any dirt. Pat it dry with a clean kitchen towel or spin it in a salad spinner.
- In a large skillet over medium heat, melt 1 tablespoon of butter or heat a drizzle of olive oil. Add half of a finely chopped onion and sauté until it’s translucent, about 3-4 minutes.
- Toss in 2-3 minced garlic cloves and continue cooking for another 30 seconds to a minute until fragrant.
- Add the fresh spinach in batches, allowing it to wilt down before adding more.
- Pour in about ½ cup of heavy cream (or your choice of milk), stir well to combine and let it bubble gently for a couple of minutes.
- Season your creamed spinach with salt and pepper and sprinkle in a touch of nutmeg if desired.
- Remove it from the heat. Stir in a tablespoon of grated Parmesan cheese if desired. Transfer it to a serving dish.
Notes
Serve in a beautiful dish with a sprig of parsley for garnish. Try adding nuts or cheese for variations.
Nutrition
- Serving Size: 1 serving
- Calories: 150
- Sugar: 1g
- Sodium: 300mg
- Fat: 12g
- Saturated Fat: 7g
- Unsaturated Fat: 5g
- Trans Fat: 0g
- Carbohydrates: 6g
- Fiber: 2g
- Protein: 4g
- Cholesterol: 30mg
Keywords: creamed spinach, healthy side dish, vegetarian recipe
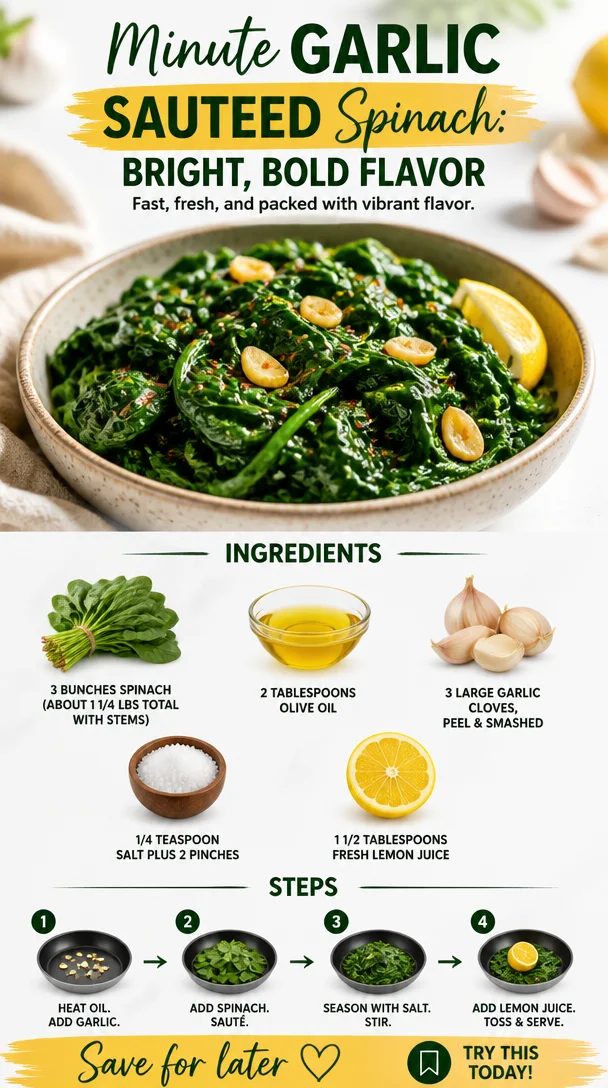
Minute Garlic Sauteed Spinach: Bright, Bold Flavor
Sautéed Spinach That Tastes Amazing: A Simple Green Delight
Welcome to the vibrant world of sautéed spinach! If you’re anything like me, you’ve often found yourself peering into the produce aisle, searching for inspiration, or perhaps just a side dish that doesn’t involve too much fuss. Believe me when I say this: sautéed spinach is where flavor and simplicity mesh beautifully, making it one of those underappreciated superstars in the culinary world.
Why sautéed spinach, you ask? Well, not only is this dish a powerhouse of nutrients, but it’s also incredibly versatile and comes together in a snap. One minute you’re stressed out from a long day, and the next, you’ve whipped up a dish that tastes amazing and feels equally impressive. Here’s a secret sauce to help you realize that even the simplest of ingredients can lead to gourmet-level results.
Growing up, my family always had a deep appreciation for greens. I remember the aroma of garlic sizzling in olive oil filling our kitchen as my mom prepared a quick sauté of fresh spinach. It was one of those magical moments that made the mundane feel spectacular. She would toss in a splash of lemon juice and serve it alongside roasted chicken or fish, and instantly, dinner felt like a celebration.
So grab your apron! This sautéed spinach recipe is about to transform your approach to greens—from an afterthought to a must-have on your table.
My Spinach Story
One of my favorite memories growing up was working alongside my mom in the kitchen. Every Saturday morning, she would pick out fresh ingredients from our local farmers’ market. I can still hear her sing-songy voice saying, “A little garlic, a splash of lemon, and we’re in for a treat!”
Spinach was her go-to side dish more often than not. In those moments under the warm glow of the kitchen lights, we’d laugh and chat as we cooked, and I’d learn how to let simple ingredients shine. I still chuckle thinking how I used to indulge in the spinach while sneaking pieces of bread dipped in olive oil. Oh, the joys of childhood!
As I grew older, those moments turned into motivating sparks that lit my culinary journey. Today, I’m excited to share this sautéed spinach recipe that holds a special place in my heart, bringing all those cherished memories flooding back. Are you ready to create some of your own?
Ingredients
Before we dive into cooking, let me introduce you to your ingredients. Below is everything you need, along with some tips to elevate your sautéed spinach experience:
-
3 bunches of spinach (about 1 1/4 pounds total with stems) or 10 ounces baby spinach leaves
Spinach is a nutrient powerhouse packed with vitamins A, C, and K. If you opt for baby spinach, it has a milder taste and no stems to contend with. Feel free to mix in other greens like kale or Swiss chard for a twist! -
2 tablespoons olive oil
A smooth, high-quality olive oil not only adds flavor but also enhances the health benefits. You could swap it for avocado oil for a nuttier taste if desired. -
3 large garlic cloves, peeled & smashed
Garlic gives the dish its aromatic flair. Crushing the garlic brings out more flavor—definitely don’t skip this step! For a milder flavor, try using roasted garlic instead. -
1/4 teaspoon salt plus 2 pinches
Salt is essential to bring out the flavor of spinach. You can substitute with Himalayan salt for a different nuance or even reduce it for a low-sodium option. -
1 1/2 tablespoons fresh lemon juice
The brightness of lemon juice balances the earthy flavors of the spinach. Lime can take the flavor in a fun direction, too!
These ingredients work harmoniously to create a vibrant dish that feels far more indulgent than the sum of its parts. Now that you’re all set to cook, let’s get to it!
Step-by-Step Instructions
Creating sautéed spinach is super straightforward and doesn’t take more than a few minutes. Here’s how to do it:
-
Prep the Spinach:
If you’re using regular spinach, rinse it thoroughly under cold water to remove any grit. You’ll want to dry it well, but a little moisture is okay; it helps the spinach steam slightly once added to the hot pan. For baby spinach, just give it a quick rinse. -
Heat the Olive Oil:
In a large sauté pan, heat the olive oil over medium heat. You want it hot enough to gently sizzle but not so hot that it smokes. A good rule of thumb is that if you can see the oil shimmering, you’re in the sweet spot. -
Add the Garlic:
Toss your smashed garlic cloves into the pan. Sauté the garlic for about 30 seconds or until it’s fragrant—be careful not to let it burn, as burnt garlic can leave a bitter flavor. -
Add the Spinach:
Working quickly, add your cleaned spinach to the pan. You may need to do this in batches if your pan is small, but no worries; it wilts down remarkably fast! Use tongs to toss the spinach, making sure it gets coated in that delicious garlicky olive oil. -
Season with Salt:
Sprinkle in your salt and toss again. The salt will help sweat out the moisture from the spinach, making it tender and flavorful. -
Introduce the Lemon Juice:
As the spinach wilts down (about 2-3 minutes), drizzle in the fresh lemon juice. Toss and allow it to cook for another minute for that zesty punch. -
Test the Texture:
You want the spinach tender but still vibrant in color. If it looks too soggy, pull it off the heat immediately—you want those nutrients intact!
And voilà! You’ve just created a stunning side dish loaded with flavor in under 10 minutes. Just remember, keeping the cooking time brief helps retain the nutrients, and you want the spinach to look bright and inviting.
Serving Suggestions
Plating is simple, yet it can turn your sautéed spinach into something visually appealing. Use a nice white plate to make that vibrant green pop, or consider laying out your spinach next to a beautifully plated piece of protein, such as pan-seared chicken or roasted salmon. Drizzle a bit of extra virgin olive oil over the top for a shiny finish, and sprinkle some lemon zest to really brighten it up. You can even sprinkle some toasted pine nuts or slivered almonds for added texture—who says greens can’t be fancy?
Recipe Variations
Let’s mix things up! Here are a few creative twists on the classic sautéed spinach that can turn it into an entirely new experience:
- Add Nuts: Toss in some toasted walnuts or pecans for a crunchy texture.
- Cheesy Goodness: For a rich twist, toss in some grated Parmesan or feta cheese right at the end.
- Spiced Up: Add a sprinkle of red pepper flakes for a spicy kick, or incorporate ground cumin for an earthy depth.
- Herb-Infused: Fresh herbs like basil or oregano can be added for a fresh flavor profile.
- Creamy Spinach: For those who love cream, add a splash of heavy cream or coconut milk before serving.
Chef’s Notes
Like all great recipes, my sautéed spinach has evolved over time. I’ve tried numerous variations from friends and family without finding that single perfect version—until I settled on this. One time, I accidentally added too much salt while chatting and laughing, and while it wasn’t my finest moment, I learned the importance of tasting as you go!
Next time you find yourself with a bunch of spinach, I hope you’ll think of this recipe. Not only is it a tribute to my kitchen memories with my mom, but it’s a reminder that in cooking, every mistake can turn into a new discovery.
FAQs and Troubleshooting
-
Why is my spinach mushy?
Overcooking is often to blame! Keep a close eye on your spinach as it wilts. Remove it from the heat as soon as it’s bright and tender. -
Can I use frozen spinach instead?
Absolutely! Thaw and drain it well. Sauté as usual, but you may want to reduce the cooking time slightly since it’s already cooked. -
How do I store leftovers?
You can store leftover sautéed spinach in an airtight container in the fridge for up to three days. Just expect it to lose some texture. -
Can I reheat?
Yes! To reheat, simply toss it back in a pan on low heat or microwave for a quick fix. Add a splash of water to refresh it!
Nutritional Info (Optional)
- Calories: Approximately 100 calories per serving (based on 2 servings)
- Protein: 2g
- Fat: 7g (mainly from olive oil)
- Carbohydrates: 4g
- Fiber: 2g
Though it’s low in calories, sautéed spinach is high in nutrients. It’s packed with vitamins and minerals that contribute to a balanced diet.
And there you have it! A delicious sautéed spinach that’s both simple and elegant, perfect for elevating any meal. Remember, good food is about sharing moments, not just ingredients. So, tie on that apron and let this sautéed spinach take center stage at your next gathering or cozy dinner. Happy cooking!
PrintSautéed Spinach That Tastes Amazing
A quick and flavorful sautéed spinach recipe that elevates any meal with its simplicity and vibrant taste.
- Prep Time: 5 minutes
- Cook Time: 5 minutes
- Total Time: 10 minutes
- Yield: 4 servings 1x
- Category: Side Dish
- Method: Sautéing
- Cuisine: American
- Diet: Vegetarian
Ingredients
- 3 bunches of spinach (about 1 1/4 pounds total with stems) or 10 ounces baby spinach leaves
- 2 tablespoons olive oil
- 3 large garlic cloves, peeled & smashed
- 1/4 teaspoon salt plus 2 pinches
- 1 1/2 tablespoons fresh lemon juice
Instructions
- Prep the Spinach: Rinse thoroughly under cold water and dry well.
- Heat the Olive Oil: In a large sauté pan, heat olive oil over medium heat.
- Add the Garlic: Toss in the smashed garlic cloves and sauté for about 30 seconds until fragrant.
- Add the Spinach: Quickly add cleaned spinach to the pan, tossing to coat in oil.
- Season with Salt: Sprinkle salt and toss again to sweat moisture from the spinach.
- Introduce the Lemon Juice: As the spinach wilts, drizzle in the lemon juice and cook for another minute.
- Test the Texture: Remove from heat once tender but still vibrant in color.
Notes
For added flavor, consider tossing in toasted nuts, cheese, or fresh herbs.
Nutrition
- Serving Size: 1 serving
- Calories: 100
- Sugar: 1g
- Sodium: 200mg
- Fat: 7g
- Saturated Fat: 1g
- Unsaturated Fat: 6g
- Trans Fat: 0g
- Carbohydrates: 4g
- Fiber: 2g
- Protein: 2g
- Cholesterol: 0mg
Keywords: sautéed spinach, healthy side, quick recipe, vegetarian dish, garlic spinach
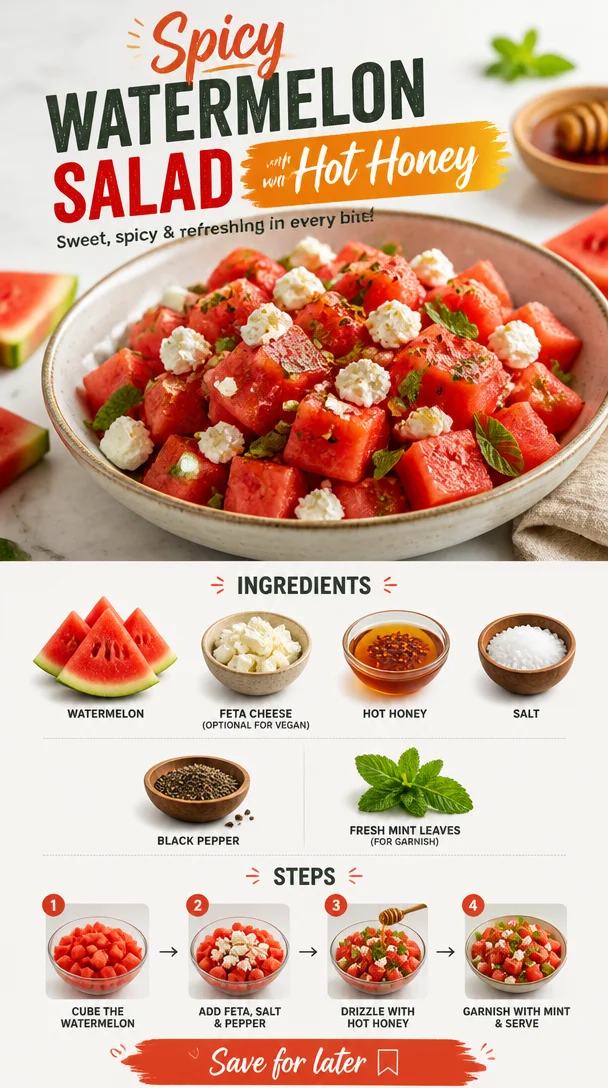
Spicy Watermelon Salad with Hot Honey
Spicy Watermelon Salad with Hot Honey: A Cool & Refreshing Twist
Hello, fellow food lovers! If you’re anything like me, summertime is when you start craving all those fresh, vibrant flavors that make every meal feel like a celebration. Picture this: A bright, juicy watermelon kissed by the sun, tossed with spicy hot honey, and finished with a sprinkle of feta and vibrant mint leaves. Yes, I’m talking about my Spicy Watermelon Salad with Hot Honey! This dish is a perfect centerpiece for your summer gatherings or just a delightful solo treat on a sunny afternoon.
In today’s blog post, we’ll dive into the juicy details of this delicious recipe, reminisce about its inspiration, and share some twists to make this salad your own. So, grab your apron, and let’s get cooking!
Personal Story: A Sweet Summer Memory
Growing up, summer for me was all about long, lazy afternoons spent at my grandparents’ house. They had this sprawling garden bursting with fruits and veggies that felt like a summer paradise. Watermelons were always the highlight of the garden! My granddad would pick the ripest ones, and we would cut them open right there, letting the cold, sweet juice drip down our chins while we laughed and reminisced about old family stories.
One hot July day, as we indulged in those juicy watermelons, my grandmother had a genius idea. She drizzled a homemade hot honey over the watermelon and sprinkled it with a little salt. Oh my goodness, that kick of heat with the sweet, crisp watermelon? It was a flavor revelation! Ever since that day, I’ve been on a quest to recreate and refine that childhood memory, and this Spicy Watermelon Salad is my delicious homage to those sunny days spent surrounded by laughter and love.
Ingredients
To whip up this stunning salad, you’ll need the following ingredients:
-
Watermelon: Choose a ripe, seedless watermelon to get the best flavor and texture. Look for a symmetrical, firm melon with a dull, yellow spot where it rested on the ground.
-
Feta Cheese (optional): For the non-vegan version, crumbled feta adds a creamy, tangy bite that pairs beautifully with the sweetness of the watermelon. If you prefer vegan options, try using crumbled avocado or coconut feta for a similar creaminess.
-
Hot Honey: This is the star of the show! You can buy hot honey from many grocery stores or make your own by infusing honey with chili flakes or fresh sliced chilies. It adds a delightful spicy kick that transforms the dish.
-
Salt: Just a sprinkle elevates flavors. Kosher salt is my go-to as it dissolves easily and balances sweetness without overpowering.
-
Black Pepper: Freshly cracked black pepper adds an aromatic warmth that rounds out the dish perfectly.
-
Fresh Mint Leaves: These fragrant leaves bring a burst of freshness and color to the salad. Feel free to rinse and tear them or use basil for a fun twist.
Step-by-Step Instructions
Now let’s get down to the nitty-gritty of preparing this refreshingly spicy salad!
-
Prepare Your Watermelon: Start by cutting your watermelon in half. I find it easiest to slice it into quarters, then cut each quarter into bite-sized cubes. Use a sharp knife for a clean cut and to avoid any mess. Remember, a ripe watermelon is sweet and juicy, but overripe can be mushy, so choose wisely!
-
Make a Flavorful Base: In a large bowl, toss your watermelon cubes gently with a pinch of salt and a few cracks of black pepper. This first step may seem simple, but it’s where the magic begins! The salt draws out the watermelon’s natural juices, enhancing its sweetness and creating a deliciously fresh base for your salad.
-
Drizzle in Hot Honey: Now for the fun part! Drizzle hot honey over the watermelon. I recommend starting with about 2 tablespoons and adjusting to taste. Keep in mind that the amount of heat can vary based on the type of hot honey you’re using, so you might want to add more or less accordingly. Give it a gentle toss to ensure every piece gets coated!
-
Add Feta: If you’re using feta cheese, sprinkle the crumbled feta over the salad. Aim for an even distribution to get that delicious creaminess in every bite. If you’re going vegan, skip this step and go for your alternative like avocado.
-
Final Touches: Tear fresh mint leaves and sprinkle them over the top. This will give the salad an aromatic finish that is so inviting! Serve immediately for the best texture, or you can chill it in the fridge for about 30 minutes if you prefer it extra cold.
-
Get Creative with Presentation: Grab a beautiful serving platter or individual bowls. Layer the salad, making sure to display those vibrant colors. A little extra drizzle of hot honey and some mint leaves on the top for flair won’t hurt either! Remember, presentation is key, but don’t stress about perfection — just make it look inviting.
Serving Suggestions
This Spicy Watermelon Salad pairs wonderfully with grilled meats, making it the perfect side dish for summer barbecues or picnics. You can also serve it as a refreshing appetizer on a blazing summer day. A light white wine or a sparkling water garnished with a slice of lime complements the meal beautifully.
Recipe Variations
Feel free to play around with this recipe! Here are some fun twists:
-
Add Cucumber: Diced cucumber adds a refreshing crunch and balances the sweetness of the watermelon beautifully.
-
Use Grilled Watermelon: For an added depth of flavor, grill your watermelon for a few minutes before adding the other ingredients. This caramelizes the natural sugars and gives the salad a smoky sweetness.
-
Substitute with Goat Cheese: Try crumbled goat cheese instead of feta for a tangy flavor profile.
-
Go Nuts: Consider adding toasted walnuts or almonds for a delightful crunch and healthy fats.
-
Herb Variations: If you’re not a mint fan, basil or even cilantro could add a lovely twist!
Chef’s Notes
I’ve tinkered with this recipe over time — making it more refined or simplified and adapting it based on what’s available in my kitchen. One of my favorite stories? I once accidentally added way too much hot honey when I was distracted by a friend’s hilarious joke. I served it anyway, and to my surprise, everyone loved the extra kick! It became a running joke among friends for our summer gatherings.
Cooking is all about experimentation, and mistakes often lead to delightful discoveries! I encourage you to tweak this recipe based on your palate and what you have on hand. Remember, good cooking is about feeling at ease in your space, and a kitchen with love is sure to produce magic.
FAQs and Troubleshooting
1. What if my watermelon isn’t sweet enough?
If you find yourself with a bland watermelon, sprinkle a little extra hot honey over it. You can also try adding a splash of lime juice for some acidity that boosts overall flavor.
2. Can this salad be made ahead of time?
While it’s best when fresh, you can prepare the watermelon and store it in an airtight container for a day or two before adding the other ingredients. Just keep the hot honey and herbs separate until you serve for the best texture.
3. How can I tone down the heat?
If you find it gets too spicy, mix in a dollop of yogurt or a soft cheese. It’ll beautifully mellow out the flavors without overpowering the juicy freshness of the watermelon.
4. What should I do with leftover salad?
Though it’s best fresh, if you have leftovers, try tossing it with some cooked quinoa or adding it to a summer wrap for a nutritious lunch the next day!
Nutritional Info
While this salad is a colorful addition to your summer menu, it’s also packed with hydration, vitamins, and a balanced sweetness—thanks to that lovely watermelon. It’s naturally low in calories but high in flavor, making it a healthy choice for your celebrations!
And there you have it, friends! The Spicy Watermelon Salad with Hot Honey is not just a recipe, but an invitation to enjoy good food, good company, and sunny days. Tie on that apron and embrace the beauty of cooking —it doesn’t need to be complicated to be fabulous. Each bite is a reminder of warm summer memories and the joy of sharing food with loved ones. Now, go make some delicious memories in your kitchen!
PrintSpicy Watermelon Salad with Hot Honey
A refreshing salad featuring ripe watermelon drizzled with spicy hot honey and topped with feta and mint leaves.
- Prep Time: 15 minutes
- Cook Time: 0 minutes
- Total Time: 15 minutes
- Yield: 4 servings 1x
- Category: Side Dish
- Method: No-Cook
- Cuisine: American
- Diet: Vegetarian
Ingredients
- 1 ripe, seedless watermelon
- 1/2 cup crumbled feta cheese (optional)
- 2 tablespoons hot honey
- 1/2 teaspoon salt
- 1/4 teaspoon black pepper
- 1/4 cup fresh mint leaves, torn
Instructions
- Prepare your watermelon: Cut in half, slice into quarters, then into bite-sized cubes.
- Toss watermelon cubes with salt and black pepper in a large bowl.
- Drizzle hot honey over the watermelon and toss gently.
- Add feta cheese if using, sprinkling evenly over the salad.
- Sprinkle torn mint leaves on top and serve immediately or chill for 30 minutes.
Notes
For added texture, consider adding toasted nuts or grilled watermelon for a smoky flavor.
Nutrition
- Serving Size: 1 serving
- Calories: 150
- Sugar: 10g
- Sodium: 300mg
- Fat: 8g
- Saturated Fat: 4g
- Unsaturated Fat: 4g
- Trans Fat: 0g
- Carbohydrates: 18g
- Fiber: 1g
- Protein: 2g
- Cholesterol: 10mg
Keywords: watermelon salad, summer salad, spicy salad, healthy recipe, refreshing dish