
Minute One-Pan Chicken Fajitas Casserole for Weeknights
Chicken Fajitas Casserole: Easy and Cheesy!
Hello there, fellow food lovers! If you’re anything like me, you know there’s nothing quite like the hearty, comforting embrace of a delicious casserole. And when it comes to effortless meals that please a crowd, my Chicken Fajitas Casserole is a go-to. It’s cheesy, loaded with flavor, and takes the classic fajitas to a whole new level! So, grab your apron, and let’s dive into this journey of nostalgia and flavor.
A Flavorful Journey Down Memory Lane
I remember the first time I made chicken fajitas from scratch. I was in college, living in a tiny apartment with my friends. We would host these “Taco Tuesdays” that turned into a spectacular, flavor-filled fiesta. One week, I decided to experiment and turned everything into a casserole. I shoved all the vibrant bell peppers, tender chicken, and cheesy goodness into a single dish, baked it until it was bubbly golden, and lo and behold, a star was born! My friends couldn’t stop raving about it, and that night turned into a tradition.
It became our weekly ritual—gathering around that simple, cheesy casserole, reminiscing and making memories. There’s just something magical about sharing food that brings people together, right? So let’s get cooking and create your own memories with this easy Chicken Fajitas Casserole!
Ingredients
Here’s what you’ll need to make this delectable Chicken Fajitas Casserole:
-
1 tablespoon olive oil
A heart-healthy choice that brings flavor and moisture to the chicken. If you’re out of olive oil, feel free to use avocado oil or even melted butter. -
6 boneless skinless chicken thighs or breasts (4 to 6 ounces each, cut into bite-sized pieces)
Chicken thighs add tenderness and moisture, but you can swap them for chicken breasts or even cooked, shredded rotisserie chicken to save time! -
4 bell peppers (sliced; vary the colors for a vibrant presentation)
The more colors, the better! Red, yellow, green, and orange peppers add sweetness and a pop of color. Can’t find fresh peppers? Use frozen bell pepper strips instead. -
1 small onion (sliced)
An essential aromatic that adds depth to your casserole. You can also use shallots or green onions for a different flavor profile. -
1 recipe or package fajita seasoning mix
The key to delightful flavor! You can make your own spice mix with chili powder, cumin, paprika, garlic powder, and salt, or grab a pre-packaged version for convenience. -
1 cup sour cream
This adds creaminess and tang. Greek yogurt can be a lighter alternative if you prefer. -
4 ounces cream cheese (softened)
It contributes to that luscious texture. Neufchâtel cheese or even ricotta can be interesting substitutes! -
2 cups grated cheddar cheese
The ultimate melty topping! Feel free to mix it up with Monterey Jack, pepper jack, or even a Mexican blend for added flair. -
Optional for serving:
- Avocado
Creamy and nutritious, adds a stunning finish to the dish. - Guacamole
Easy and oh-so-yummy! - Additional sour cream
Because why not? - Salsa
Adds a zesty kick!
- Avocado
Step-by-Step Instructions
Now that you have your ingredients lined up, let’s embark on the cooking adventure!
-
Preheat Your Oven:
Start by preheating your oven to 375°F (190°C). This is essential for that perfect, golden-brown topping! -
Sauté the Chicken:
In a large skillet, heat the olive oil over medium heat. Once hot, toss in the bite-sized pieces of chicken. Season with half the fajita seasoning mix. Cook the chicken for about 5-7 minutes, stirring occasionally, until it’s browned and almost cooked through. Chef’s Tip: Don’t overcrowd the pan; you want each piece to get that lovely sear! -
Add the Veggies:
Toss in the sliced onion and colorful bell peppers. Cook for an additional 5 minutes, allowing the veggies to soften. They should just begin to wilt, keeping some crunch. Hacks: If you like a smoky flavor, add a sprinkle of smoked paprika at this point! -
Mix the Creamy Base:
In a bowl, combine the softened cream cheese and sour cream with the remaining fajita seasoning. Mix until smooth. This is where the magic happens—creating that creamy, cheesy layer. Tip: If you’re in a hurry, you can microwave the cream cheese for about 15-20 seconds to make it easier to mix. -
Combine Everything:
Once the chicken and veggies are ready, remove them from the heat. In a greased 9×13-inch baking dish, layer the chicken and veggies evenly. Spread the creamy mixture over the top, followed by the grated cheddar cheese. Pro Tip: Reserve a bit of cheddar cheese to sprinkle on top for an eye-catching finish! -
Bake to Perfection:
Cover the dish with foil and bake for 20 minutes. Remove the foil, sprinkle the remaining cheese on top, and bake for an additional 10-15 minutes until the cheese is bubbling and golden. The anticipation will be killer, but trust me; it’s worth the wait!
Serving Suggestions
When it’s finally out of the oven, let it cool for a few minutes—if you can resist! Garnish with freshly sliced avocado, a scoop of guacamole, or a dollop of sour cream. A sprinkling of chopped cilantro or parsley elevates it further both in taste and presentation. Serve it straight from the dish for a cozy, family-style vibe!
Recipe Variations
Want to mix it up? Here are some fun variations:
-
Tex-Mex Twist: Add black beans or corn for extra flavor and texture!
-
Spicy Kick: Toss in some sliced jalapeños or drizzle with hot sauce when serving.
-
Vegetarian Delight: Swap the chicken for chickpeas or additional colorful veggies like zucchini and mushrooms.
-
Gluten-Free Adaptation: Double-check your seasoning packet and use gluten-free wraps if serving with tortillas on the side.
-
Low-Carb Option: Make this casserole keto-friendly by using cauliflower rice instead of bell peppers.
Chef’s Notes
One of the things I love most about this Chicken Fajitas Casserole is how effortlessly it adapts over time. As you settle into your own cooking ways, you’ll find that this dish is perfect for using up leftovers—think of it as a "clean out the fridge" casserole!
Plus, every time I make it, I’m reminded of those carefree college days filled with laughter and good times. Cooking has this incredible way of transcending time, doesn’t it?
FAQs and Troubleshooting
-
Can I prep this casserole in advance?
Absolutely! Assemble the casserole a day ahead and refrigerate it. Just pop it in the oven when you’re ready to serve; you may need to add a few extra minutes to the baking time if it’s cold. -
What if my casserole ends up too dry?
If you find that your casserole is a bit dry, there are a couple of fixes. First, ensure you have enough cream cheese and sour cream, as they provide moisture. You can also drizzle a small amount of chicken broth over the dish before serving for extra moisture. -
Can I freeze leftovers?
Yes! This casserole freezes well. Just cool it completely, wrap it tightly in plastic wrap, and store it in a freezer-safe dish. When you’re ready to enjoy it, reheat it in the oven from frozen or thaw overnight in the fridge. -
Why doesn’t my chicken look browned?
Browning is all about technique! Ensure your pan is hot enough before adding the chicken pieces and avoid overcrowding the pan. This will give you that beautiful golden crust!
Nutritional Info (Optional)
Not including specifics here as it can vary based on ingredients; however, if you want to get a ballpark figure, consider a balanced approach with proteins, healthy fats, and colorful veggies to create a fulfilling meal.
The warmth of this Chicken Fajitas Casserole goes beyond just its cheesy goodness; it’s about the stories you create, the people you share it with, and the love that fills the room. So whip out those aprons, get cooking, invite your friends over, and let this dish be a centerpiece for laughter and joy! Happy cooking, my friends!
PrintChicken Fajitas Casserole

This Chicken Fajitas Casserole is cheesy, loaded with flavor, and elevates classic fajitas into a hearty comfort dish.
- Prep Time: 15 minutes
- Cook Time: 30 minutes
- Total Time: 45 minutes
- Yield: 4 servings 1x
- Category: Main Course
- Method: Baking
- Cuisine: Tex-Mex
- Diet: Gluten-Free
Ingredients
- 1 tablespoon olive oil
- 6 boneless skinless chicken thighs or breasts (cut into bite-sized pieces)
- 4 bell peppers (sliced)
- 1 small onion (sliced)
- 1 package fajita seasoning mix
- 1 cup sour cream
- 4 ounces cream cheese (softened)
- 2 cups grated cheddar cheese
Instructions
- Preheat your oven to 375°F (190°C).
- Sauté the chicken in a skillet with olive oil and half the fajita seasoning for about 5-7 minutes until browned.
- Add the sliced onion and bell peppers, cooking for an additional 5 minutes.
- Mix the softened cream cheese and sour cream with the remaining fajita seasoning in a bowl.
- Combine the chicken and veggies in a greased baking dish, layer the creamy mixture on top, and sprinkle with cheddar cheese.
- Bake covered with foil for 20 minutes, then remove the foil and bake for another 10-15 minutes until golden.
Notes
You can make this casserole in advance and store it in the fridge before baking. Add extras like black beans or jalapeños for a twist.
Nutrition
- Serving Size: 1 serving
- Calories: 400
- Sugar: 6g
- Sodium: 600mg
- Fat: 20g
- Saturated Fat: 10g
- Unsaturated Fat: 8g
- Trans Fat: 0g
- Carbohydrates: 30g
- Fiber: 4g
- Protein: 25g
- Cholesterol: 85mg
Keywords: casserole, chicken fajitas, easy recipes, comfort food
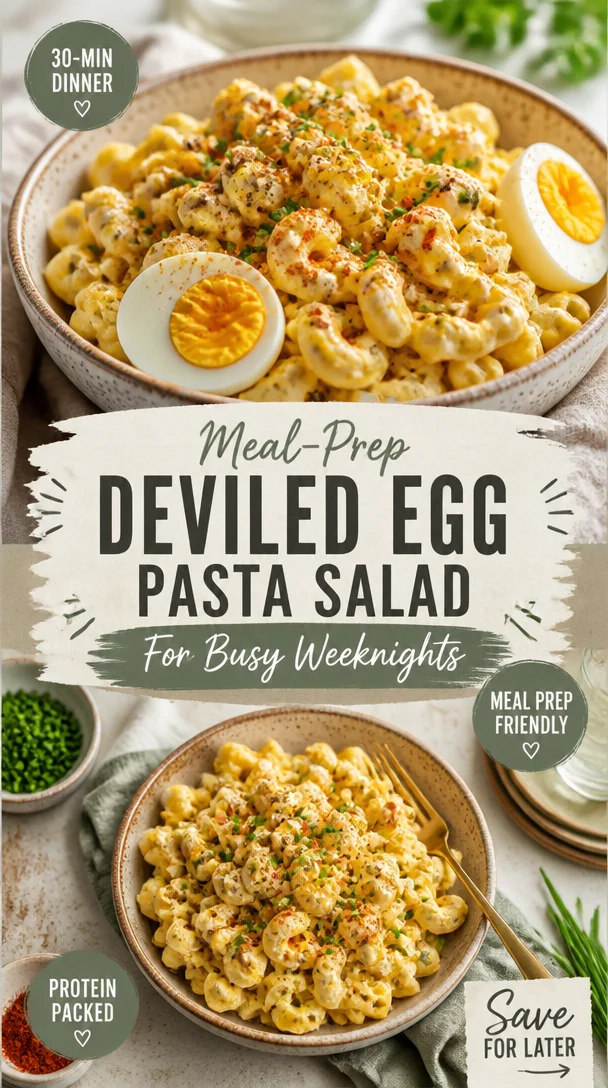
Meal-Prep Deviled Egg Pasta Salad for Busy Weeknights
Deviled Egg Pasta Salad: A Recipe with Heart and Flavor
Hello, food lovers! Today we’re diving into a recipe that’s both nostalgic and oh-so-delicious: Deviled Egg Pasta Salad. Picture this: it’s a sunny afternoon, the kitchen is filled with laughter, and the table is set for a gathering of friends and family. With every bite of this creamy, tangy pasta salad, you’ll be reminded of picnics in the park, summer barbecues, and the joy of simply being together. Ready to whip up something that brings back all those warm memories? Let’s get cooking!
Personal Story
Growing up, my family had a tradition: every summer, we’d host a neighborhood cookout where everyone brought their favorite dish. There was always a beautiful array of food—grilled burgers, charred veggies, and of course, my mom’s famous deviled eggs. She’d whip them up with a dash of pickle juice and a sprinkle of paprika. But one year, she decided to transform these beloved egg bites into something even more spectacular—a pasta salad that combined all the goodness of her deviled eggs with the comforting heartiness of pasta.
That day, the sun was shining bright, and as we gathered around the picnic table adorned with checkered tablecloths, I remember the laughter erupting with every forkful of that pasta salad. It was a serious culinary breakthrough that brought everyone together, both in the kitchen and at the table. Since then, this Deviled Egg Pasta Salad has become my go-to dish for parties, potlucks, and every gathering where I want to spread a little love and a lot of flavor.
Ingredients
Here’s what you’ll need to whip up this delightful dish:
-
8 ounces small pasta (like elbows or ditalini): Choose any shape you love! Small pasta is great for holding onto the creamy dressing. If you’re gluten-free, feel free to substitute with a gluten-free pasta version.
-
3/4 cup mayonnaise: The creamy base that brings it all together! If you prefer a lighter option, substitute half of it with Greek yogurt for a delicious twist.
-
1 tablespoon pickle juice: This adds that tangy kick you find in traditional deviled eggs. Don’t have pickle juice? Lemon juice works just as well.
-
1 tablespoon Dijon mustard: For that perfect balance of tanginess. If you want to swap it out, yellow mustard works in a pinch.
-
6 hard-boiled eggs, peeled and diced: The heart of our dish! You can use store-bought hard-boiled eggs or boil them yourself. Just remember, the fresher, the better!
-
1/2 cup red onion, finely diced: This adds a sweet crunch. If you prefer a milder flavor, try using green onions or scallions.
-
1/3 cup chopped pickles: Dill or sweet, whichever you fancy! If you don’t like pickles, try chopped olives or capers for a briny flavor.
-
1 teaspoon garlic powder: For that subtle depth. Fresh garlic can work too, but go with half a clove minced for the same flavor punch.
-
1/2 teaspoon paprika: This adds flavor and a lovely color. Don’t skip this—it’s a deviled egg staple!
-
Salt and pepper: Essential for enhancing all the flavors. Season to taste!
-
Green onions, sliced, for serving: Fresh and vibrant, these add a finishing touch!
Step-by-Step Instructions
Now that we’ve gathered our ingredients, let’s get to the fun part—cooking!
-
Cook the Pasta: Bring a large pot of salted water to a boil. Add in your pasta and cook according to package instructions until al dente, usually about 8-10 minutes. Remember, we want that perfect bite—not too mushy! Once it’s done, drain it and give it a quick rinse under cold water to stop the cooking process. This also helps the pasta to cool down for our salad.
-
Prepare the Eggs: If you’re making your hard-boiled eggs, place them in a pot and cover them with cold water. Bring the water to a boil, then remove from heat, cover, and let them sit for about 12 minutes. Afterward, cool them under cold running water and peel! For our salad, we want them diced into hearty pieces.
-
Mix the Dressing: In a large mixing bowl, combine the mayonnaise, pickle juice, and Dijon mustard. Use a whisk to blend well—this is where all that creamy goodness starts to come together. Season with salt, pepper, and the garlic powder. Give it a taste—if you love more tang, sprinkle in extra pickle juice!
-
Toss in the Ingredients: Once the pasta is cooled, add it to the bowl with your creamy dressing. Then, gently fold in the diced hard-boiled eggs, red onion, and chopped pickles. Be gentle here, as we don’t want to mash the eggs—mix the salad until everything is coated in that lovely dressing.
-
Season and Chill: Now, sprinkle in your paprika and mix again. Taste the pasta salad and adjust the seasoning if needed. If it seems a bit dry, adding a splash more mayo or pickle juice can work wonders! Cover the bowl with plastic wrap and let it chill in the refrigerator for at least 30 minutes. This allows all those flavors to meld together beautifully.
-
Garnish and Serve: Before serving, give it a good stir and taste once more. Adjust the seasoning and add any additional green onions for a vibrant pop! You can serve it chilled or at room temperature—both are delicious!
Serving Suggestions
When it comes to plating your Deviled Egg Pasta Salad, simplicity is key. A large, shallow bowl showcases its creamy, pastel tones beautifully. You can sprinkle extra paprika on top for a pop of color, or lay a few sliced green onions over the salad for a fresh touch. Pair it with crusty bread or a fresh green salad for an extra layer of delight.
Recipe Variations
Let’s get a little creative with this base recipe! Here are some fun variations to consider:
-
Bacon Deviled Egg Pasta Salad: Add crispy bacon bits for a smoky flavor. Who doesn’t love the combo of bacon and eggs?
-
Spicy Deviled Egg Pasta Salad: Mix in some chopped jalapeños or a dash of hot sauce for a kick that’ll wake up your taste buds.
-
Herbed Deviled Egg Pasta Salad: Fold in fresh herbs like dill, chives, or parsley to brighten the flavors. It’ll feel like summer in every bite!
-
Mediterranean Twist: Swap out pickles for chopped sun-dried tomatoes and add olives for a different flavor profile entirely.
-
Vegan Deviled Egg Pasta Salad: Use vegan mayo and substitute the eggs with diced avocado or chickpeas for the creamy element—goodness knows you won’t miss the eggs!
Chef’s Notes
Over the years, I’ve played around with this recipe and made it a staple in my kitchen. I’ll never forget the first time I made it for a big family gathering. I underestimated how quickly it would disappear! Everyone came back for seconds—or even thirds! The beauty of this pasta salad is how it’s traveled with me through different phases of life. Each gathering, every cookout, and every picnic has allowed it to evolve, always bringing a smile to faces. And that’s what cooking is all about—creating memories, one dish at a time!
FAQs and Troubleshooting
1. Can I make this recipe ahead of time?
Absolutely! In fact, it’s best to let it chill for a bit before serving. You can make it up to a day in advance, just remember to keep it chilled in the refrigerator.
2. What can I substitute if I don’t like mayonnaise?
No worries! You can use Greek yogurt, sour cream, or a dairy-free mayo if you prefer. Just mix with the other ingredients to maintain that creamy texture.
3. How can I store leftovers?
Keep any leftovers in an airtight container in your refrigerator for up to 3 days. The salad may thicken as it sits, so feel free to add a bit more mayo or pickle juice when serving again.
4. What if my pasta is sticky?
If your pasta clumps together after cooking, be sure to rinse it well with cold water before mixing it with the other ingredients. Adding a small drizzle of olive oil can also keep it from sticking together.
Creating Deviled Egg Pasta Salad is more than just a recipe; it’s about inviting people into your home, sharing flavors, and making memories. So tie on that apron, crank up some music, and don’t forget—cooking is supposed to be fun! I can’t wait to hear how your pasta salad turns out. Happy cooking!
PrintDeviled Egg Pasta Salad

A creamy and tangy pasta salad that combines the flavors of deviled eggs with comforting pasta for a delightful dish perfect for gatherings.
- Prep Time: 15 minutes
- Cook Time: 20 minutes
- Total Time: 35 minutes
- Yield: 6 servings 1x
- Category: Salad
- Method: Mixing
- Cuisine: American
- Diet: Vegetarian
Ingredients
- 8 ounces small pasta (like elbows or ditalini)
- 3/4 cup mayonnaise
- 1 tablespoon pickle juice
- 1 tablespoon Dijon mustard
- 6 hard-boiled eggs, peeled and diced
- 1/2 cup red onion, finely diced
- 1/3 cup chopped pickles
- 1 teaspoon garlic powder
- 1/2 teaspoon paprika
- Salt and pepper to taste
- Green onions, sliced, for serving
Instructions
- Cook the pasta: Bring a large pot of salted water to a boil. Add in your pasta and cook according to package instructions until al dente, usually about 8-10 minutes. Drain and rinse under cold water.
- Prepare the eggs: If making your hard-boiled eggs, place them in a pot, cover with cold water, boil, cover, and let sit for about 12 minutes. Cool under cold running water and peel. Dice into hearty pieces.
- Mix the dressing: In a large mixing bowl, combine mayonnaise, pickle juice, and Dijon mustard. Whisk well. Season with salt, pepper, and garlic powder.
- Toss in the ingredients: Add cooled pasta into the dressing bowl, fold in diced hard-boiled eggs, red onion, and chopped pickles.
- Season and chill: Sprinkle in paprika, adjust seasoning if needed, and let chill in the refrigerator for at least 30 minutes.
- Garnish and serve: Stir, taste, and adjust seasoning if needed before serving chilled or at room temperature.
Notes
Best served chilled, can be made a day in advance. Remember to keep chilled in the refrigerator.
Nutrition
- Serving Size: 1 serving
- Calories: 450
- Sugar: 3g
- Sodium: 300mg
- Fat: 30g
- Saturated Fat: 5g
- Unsaturated Fat: 20g
- Trans Fat: 0g
- Carbohydrates: 45g
- Fiber: 2g
- Protein: 12g
- Cholesterol: 170mg
Keywords: deviled eggs, pasta salad, picnic salad, creamy salad, side dish
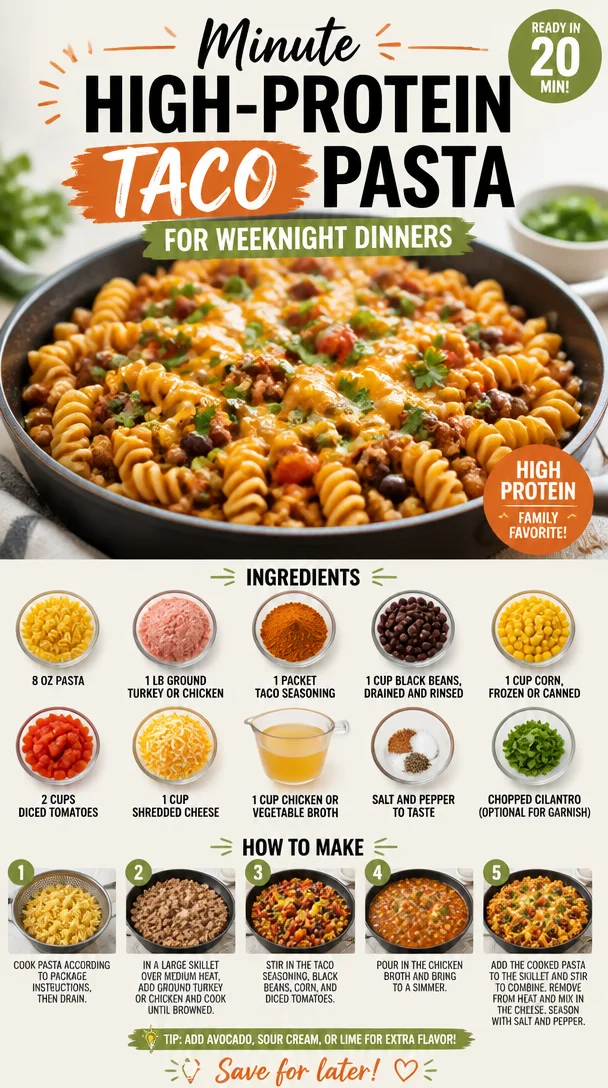
Minute High-Protein Taco Pasta for Weeknight Dinners
High Protein Taco Pasta: A Flavorful, Comforting Bowl of Joy
Hello, food lovers! Today, I’m thrilled to share a recipe that brings together the joy of tacos and the comforting heart of pasta. Yes, you guessed it right—I’m talking about High Protein Taco Pasta! This dish is not only packed with flavor, but it’s also a fantastic way to sneak in some extra protein. Let’s dive in and create a bowl of goodness that’s bound to impress.
A Little Story to Set the Mood
Let me take you back to my childhood, where food wasn’t just about sustenance but also about experiences. Every Friday night was taco night at my house, and my mom was the reigning queen of the taco. We’d gather around the table, ingredients spread out like a colorful canvas—crunchy tortillas, seasoned meat, loads of toppings, and always a story or two that went along with them. That’s where my love for mixing flavors and creating something new began, leading me to concoct this amazing taco pasta dish.
One night, in a moment of creativity (or maybe it was just hunger), I decided to swap tortillas for pasta! The result was a flavor explosion that combined my love for both. My friends and family were skeptical at first, but once they tried it, it was love at first bite. This dish quickly became a staple in my home, reminding me that food is always more than just ingredients—it’s about gathering, sharing, and creating memories.
Now, it’s your turn to create your own taco night twist, and I promise—this bowl of High Protein Taco Pasta will be the star of your table!
The Ingredients You’ll Need
Here’s what you’ll need to whip up this magical dish:
- 8 oz pasta: Any type you love works well! Whole wheat or protein-enriched pasta can boost the health benefits.
- 1 lb ground turkey or chicken: Lean and high in protein; you can also use plant-based options like lentils for a vegetarian version.
- 1 packet taco seasoning: Store-bought is convenient, but you can make your own with chili powder, cumin, garlic powder, and a pinch of salt.
- 1 cup black beans: Rinsed and drained for a tasty protein punch. Feel free to swap them for kidney beans if you prefer.
- 1 cup corn: Frozen, canned, or fresh—just make sure it’s sweet and delicious!
- 2 cups diced tomatoes: Fresh is great, but canned works too. Opt for fire-roasted tomatoes for extra flavor!
- 1 cup shredded cheese: I recommend cheddar or Mexican blend. Use a dairy-free cheese for a lactose-free twist.
- 1 cup chicken or vegetable broth: This elevates the dish’s base. Homemade broth makes all the difference, but store-bought is super convenient.
- Salt and pepper to taste: Don’t be shy! Seasoning is key to bringing flavors alive.
- Chopped cilantro (optional for garnish): A fresh touch that livens up the flavors. Skip it if you’re not a fan!
With these beautiful ingredients on your counter, let’s get ready to cook!
Step-by-Step Instructions
-
Boil the Pasta: Begin by bringing a pot of salted water to a rolling boil. Once it’s bubbling, add your choice of pasta and cook according to package instructions until al dente (usually 7-9 minutes). Remember to stir occasionally to prevent sticking. Chef’s tip: save about half a cup of pasta water before draining! It’ll help bring everything together later.
-
Cook the Meat: In a large skillet, heat a drizzle of olive oil over medium heat. Add the ground turkey or chicken, and break it apart with a wooden spoon. Sauté until browned and no longer pink, about 5-7 minutes. Hot tip: Add a pinch of salt while cooking to enhance the meat’s flavor right from the start!
-
Taco Seasoning Time: After the meat is browned, sprinkle in the taco seasoning and mix well. Cook for another 1-2 minutes to let the spices bloom. A little secret: If you have some extra heat-loving friends, add a dash of cayenne pepper for some spice!
-
Add The Goodies: Toss in the black beans, corn, and diced tomatoes into the skillet. Pour in the broth and stir everything together. Cheesy hack: If you want creaminess, you can add a bit of cream cheese or sour cream at this point for a richer dish!
-
Combine the Pasta: Now, add that glorious pasta you cooked earlier to the skillet. Toss everything together gently, and if it looks a bit dry, add some of that reserved pasta water. The goal is a deliciously cohesive mixture that clings to the noodles. Chef’s note: don’t be afraid to mix it up! Use a pair of tongs or even your hands for the best combination!
-
Cheesy Finish: Before serving, sprinkle the shredded cheese on top, cover with a lid, and let it sit for a few minutes on low heat until the cheese is melted and gooey. This takes the dish to the next level.
Serving Suggestions
To plate, spoon the cheesy taco pasta into vibrant bowls and garnish with the optional chopped cilantro. A little sprinkle of extra cheese on top never hurts! Serve it alongside a simple salad or some tortilla chips for a crunchy contrast. Don’t forget to pour yourself a refreshing drink to accompany this delightful dish. Cheers!
Recipe Variations
Here are some fun twists you can try with this recipe:
- Spicy Taco Pasta: Add jalapeños or diced green chilies for an extra kick!
- Vegetarian Version: Swap the meat for textured vegetable protein (TVP) or chickpeas for a delicious plant-based option.
- Creamy Taco Pasta: Mix in a cup of cream cheese or Greek yogurt before serving for a creamy texture.
- Mexican Street Corn Style: Stir in some crumbled feta, lime juice, and cilantro for a fun take on Elote (Mexican street corn).
- Zucchini Noodles: Replace pasta with spiralized zucchini for a low-carb alternative that’s equally delicious.
Chef’s Notes
This recipe has traveled with me through many occasions—family dinners, gatherings with friends, and even second-day lunches where it tastes even better! I often switch up the beans and add whatever veggies I have lying around, which makes this recipe versatile and adaptable to what’s in your pantry. I once used leftover roasted chicken, and it turned out fabulous!
Remember, cooking is all about experimenting, and something delicious often comes from what might seem like an accident. The kitchen is your playground—don’t be afraid to get a little messy and creative!
FAQs and Troubleshooting
Q: Can I use gluten-free pasta?
Absolutely! Gluten-free pasta works well in this recipe. Just pay attention to the cooking times, as they can vary.
Q: What if I don’t have taco seasoning?
No worries! You can make your own using chili powder, cumin, garlic powder, onion powder, and a bit of salt. Adjust to taste!
Q: How can I store leftovers?
Keep any leftovers in an airtight container in the fridge for up to 4 days. Just reheat gently when you’re ready to enjoy.
Q: My pasta turned out too mushy, what happened?
This can happen if the pasta is overcooked or if you didn’t reserve enough cooking water. Make sure to keep an eye on it during cooking and remember to save that starchy water for sauce consistency.
Nutritional Info
(Basic nutritional info per serving, based on the recipe as written:)
- Calories: 450
- Protein: 35g
- Carbohydrates: 45g
- Fat: 15g
Remember to adjust based on your specific ingredients!
Conclusion
There you have it—the perfect High Protein Taco Pasta that combines the rich flavors of taco night with the heartiness of pasta. I hope you enjoyed cooking along with me! Remember, as you gather around your table with friends and family, that love and intention are the secret ingredients in every meal. Until next time, happy cooking!
Let’s tie on our aprons and continue to create moments that bring us together. Cheers! 🍽️
PrintHigh Protein Taco Pasta
A flavorful twist combining the joys of tacos and pasta, packed with protein.
- Prep Time: 15 minutes
- Cook Time: 20 minutes
- Total Time: 35 minutes
- Yield: 4 servings 1x
- Category: Main Course
- Method: Cooking
- Cuisine: Mexican
- Diet: High Protein
Ingredients
- 8 oz pasta (whole wheat or protein-enriched recommended)
- 1 lb ground turkey or chicken (or lentils for vegetarian)
- 1 packet taco seasoning
- 1 cup black beans (rinsed and drained)
- 1 cup corn (frozen, canned, or fresh)
- 2 cups diced tomatoes (fresh or canned)
- 1 cup shredded cheese (cheddar or Mexican blend)
- 1 cup chicken or vegetable broth
- Salt and pepper to taste
- Chopped cilantro (optional for garnish)
Instructions
- Boil the pasta in salted water according to package instructions until al dente.
- Cook the meat in a skillet with olive oil until browned.
- Sprinkle in taco seasoning and cook for an additional 1-2 minutes.
- Add black beans, corn, diced tomatoes, and broth to the skillet, stirring together.
- Combine the cooked pasta with the mixture, adding reserved pasta water as needed.
- Sprinkle shredded cheese on top, cover, and let melt.
Notes
This dish is versatile and can be customized with ingredient swaps or additions like cream cheese for a creamy version.
Nutrition
- Serving Size: 1 serving
- Calories: 450
- Sugar: 5g
- Sodium: 600mg
- Fat: 15g
- Saturated Fat: 7g
- Unsaturated Fat: 5g
- Trans Fat: 0g
- Carbohydrates: 45g
- Fiber: 10g
- Protein: 35g
- Cholesterol: 70mg
Keywords: pasta, taco, high protein, comfort food, quick recipe
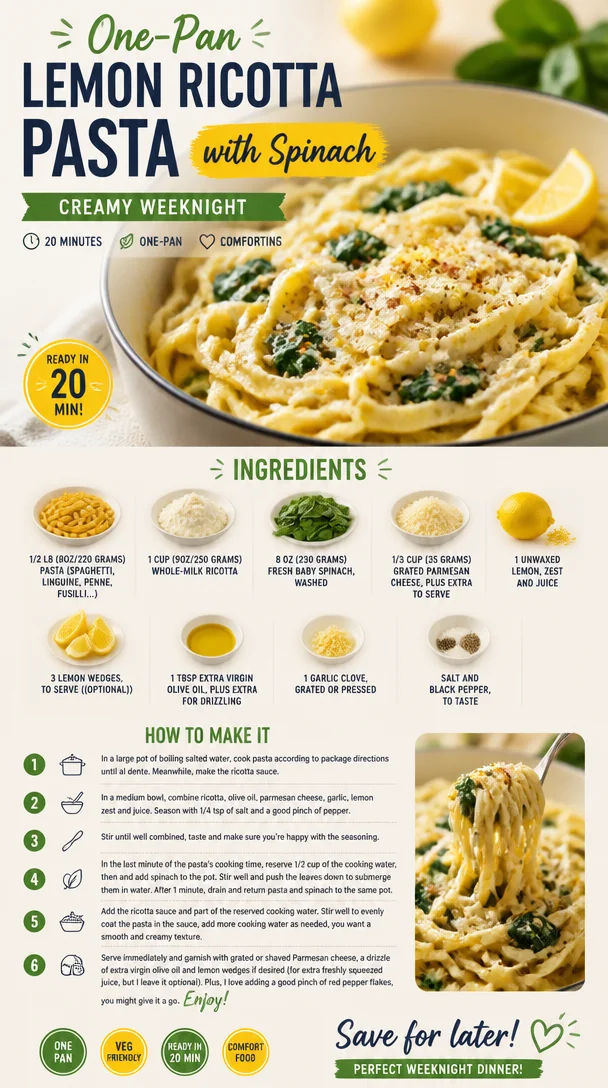
One-Pan Lemon Ricotta Pasta with Spinach (Creamy Weeknight)
Lemon Ricotta Pasta with Spinach: A Delightful Comfort Dish
Welcome to your new favorite weeknight dinner! Today, we’re diving into a light yet oh-so-satisfying recipe that will make you feel like a culinary superstar without breaking a sweat. Picture this: creamy lemon ricotta pasta beautifully intertwined with fresh spinach, topped off with a sprinkle of Parmesan cheese, and drizzled with a hint of olive oil. It’s elegant, it’s delicious, and it’s ready in no time!
As life gets busier, we all crave meals that strike the perfect balance between comfort and convenience. That’s exactly what this dish brings to the table—literally! This Lemon Ricotta Pasta with Spinach is not just a meal; it’s a celebration of simplicity. The flavors are fresh and vibrant, showcasing the best of what the season has to offer. And let’s be honest, who doesn’t love a creamy, dreamy pasta that practically cooks itself while you sip on a glass of wine?
Let’s set the stage: imagine gathering your friends or family, clinking glasses, and making toasts around a table practically bursting with love and flavor. A dish like this will have everyone asking for seconds—and maybe even thirds—while you revel in the compliments. Ready to get started? Grab your apron, and let’s cook something truly delightful together!
Personal Story
Whenever I whip up this Lemon Ricotta Pasta, I’m transported back to those lazy summer evenings spent in my grandmother’s kitchen. She had an unbelievable talent for turning everyday ingredients into gourmet meals that brought everyone together. I remember her teaching me about the virtues of simplicity in cooking, emphasizing that the best dishes often come from fresh ingredients and love, rather than complicated recipes.
One particular memory stands out: we were making a simple pasta dish similar to this one, just as the sun began to set. She had a big bowl of ripe lemons and a bunch of vibrant spinach, and I can still hear her saying, "Savannah, always use fresh ingredients—they make the magic happen." Those were the evenings that forged my love for cooking, and every time I prepare this dish, I feel like she’s there with me, guiding me. So, let’s honor the spirit of those cherished moments as we dive into this beautiful recipe!
Ingredients
Here’s what you’ll need for this zesty Lemon Ricotta Pasta with Spinach:
-
1/2 lb (8oz/220 grams) pasta: Choose any variety you love—spaghetti, linguine, penne, or fusilli all work wonderfully. For extra heartiness, consider using whole wheat or chickpea pasta for a touch of nutty flavor and added nutrition.
-
1 cup (9oz/250 grams) whole-milk ricotta: This is the creamy star of the dish. If you’re looking for a lighter alternative, you can substitute with part-skim ricotta or even goat cheese for a tangy twist.
-
8 oz (230 grams) fresh baby spinach: Packed with nutrients and a delightful pop of color, spinach is the perfect green to toss in. If you’re not a spinach fan, feel free to swap it for other greens like kale or arugula.
-
1/3 cup (35 grams) grated Parmesan cheese: To bring that delicious umami flavor! Pecorino Romano is a great substitute if you like a sharper taste.
-
1 unwaxed lemon: Zest and juice for that refreshing burst of flavor. An unwaxed lemon ensures you can safely use the zest, releasing those fragrant oils. If you can’t find unwaxed, just scrub the lemon thoroughly.
-
3 lemon wedges, to serve (optional): These add a wonderful zest as a garnish for those who crave a little extra lemony goodness.
-
1 Tbsp extra virgin olive oil: A drizzle enhances the flavor and adds a touch of richness. You can use flavored oils, like garlic-infused, for an extra kick.
-
1 garlic clove: Grated or pressed; this will give our dish a lovely aromatic base. If you’re not a fan of raw garlic, roasted garlic would be a wonderful alternative.
-
Salt and black pepper, to taste: Essential for bringing out the flavors. I also love a sprinkle of red pepper flakes if you want to kick it up a notch.
Step-by-Step Instructions
Alright, let’s get cooking! Follow these simple steps to whip up this delightful dish:
Step 1: Cook the Pasta
Start by bringing a large pot of salted water to a boil. You’ll want to make sure it’s salty—think of it like the ocean; it enhances the flavor of the pasta! Once boiling, add your choice of pasta and cook according to package instructions until al dente. It should have a slight bite—perfect for holding onto that creamy sauce!
Chef Tip: Reserve about 1 cup of pasta cooking water before draining. It’s liquid gold for adjusting the sauce later.
Step 2: Prepare the Ricotta Mixture
While your pasta is cooking, grab a large mixing bowl and warmly embrace your ricotta cheese. Add in the zest and juice of the unwaxed lemon, a generous pinch of salt, and freshly cracked black pepper. Stir everything together until you have a beautifully creamy, zesty mixture. Set this aside, as we’ll be incorporating it into the pasta soon.
Chef Hack: For an extra creamy texture, you can blend the ricotta using a hand mixer or food processor. It elevates the dish and makes it even smoother!
Step 3: Sauté the Spinach and Garlic
In a large skillet, heat a tablespoon of extra virgin olive oil over medium heat. Once the oil is shimmering, add the grated garlic. I love the aroma of garlic cooking—it’s like a warm hug in the kitchen! Sauté for about 30 seconds, being careful not to let it brown.
Next, toss in the baby spinach and cook until it wilts, which should only take a couple of minutes. This step is quick, but it intensifies the flavor and keeps the greens vibrant and fresh.
Chef Insight: If you want to add some excitement, try adding sun-dried tomatoes or your favorite sautéed vegetables to this step!
Step 4: Combine Everything in One Bowl
Once the pasta is cooked, drain it (remember to save that reserved pasta water!) and add it directly to the skillet with the sautéed spinach and garlic. Now, it’s time to mix in the ricotta mixture. Stir everything together until every strand of pasta is well-coated, adding a bit of the reserved pasta water, a splash at a time, until you reach your desired creaminess.
Cooking Note: Don’t overdo it with the water; just a little at a time will help create a luscious sauce that clings to the pasta without being soupy.
Step 5: Final Seasoning and Serving
Give your pasta a final taste, ensuring it’s perfectly seasoned. If you like a little more lemony brightness, feel free to squeeze in some more lemon juice, or add an extra pinch of salt and cracked pepper.
Serve the pasta immediately, garnishing each plate with a sprinkle of grated Parmesan and drizzling a bit of high-quality olive oil over the top. If you’re feeling fancy, add a couple of lemon wedges on the side for an extra pop of color and flavor!
Serving Suggestions
Presentation is key! Serve your Lemon Ricotta Pasta in shallow bowls with a twirl of pasta at the center or in a large communal bowl, inviting guests to serve themselves. For an elegant touch, add a sprig of fresh basil or parsley on top. Pair it with a light green salad or some crusty bread to complete the meal. Don’t forget that chilled glass of white wine—perfect for elevating any dinner!
Recipe Variations
Here are some creative twists to elevate your Lemon Ricotta Pasta even further:
-
Lemon Chicken Ricotta Pasta: Add grilled or sautéed chicken for extra protein and a heartier meal.
-
Mushroom Medley: Toss in some sautéed mushrooms for an earthy flavor. Portobello or shiitake work beautifully!
-
Nutty Spinach: Add some toasted pine nuts or walnuts for a delightful crunch and extra nutrition.
-
Herb-Infused: Mix in fresh herbs like basil, dill, or parsley for added freshness and flavor complexity.
-
Vegan Option: Substitute ricotta with a plant-based alternative like cashew cream or a store-bought vegan ricotta for a dairy-free delight.
Chef’s Notes
As much as I adore this Lemon Ricotta Pasta, I have to share a funny story. One evening, I was hosting a dinner party and got so distracted by chatting that I accidentally added way too much lemon zest. Let me tell you, that was an experience! I ended up with a pasta that was a lemon explosion—delicious, but zesty enough to tickle even the boldest taste buds. Now, I always remind myself to taste as I go!
Over time, I’ve made countless iterations of this dish. It has evolved from a simple pasta with cream to this delightful, bright, and flavorful version we enjoy today. Cooking should evolve with us, just like our taste buds!
FAQs and Troubleshooting
-
What if my sauce is too thick?: No problem! Just add a splash of your reserved pasta water gradually until you reach the desired creaminess.
-
Can I make this dish ahead of time?: Absolutely! You can prepare the ricotta mixture and sauté the spinach in advance. Just cook the pasta when you’re ready to serve. Combine everything, and it’ll still be fabulous!
-
What if I accidentally overcooked the pasta?: If it’s a bit mushy, don’t worry too much. Use it in a baked pasta dish, and it’ll still taste great! Just don’t forget to reduce the cooking time next time.
-
Can I use frozen spinach instead of fresh?: Yes! Just thaw and drain the frozen spinach thoroughly before adding it into the dish. The flavor may be slightly different, but it can still work.
Nutritional Info
(For one serving)
- Calories: Approximately 450
- Protein: 15g
- Carbohydrates: 50g
- Fat: 20g
- Fiber: 3g
With a good dose of protein from the ricotta and plenty of vitamins from the spinach, this pasta dish is both satisfying and nourishing!
So there you have it—your guide to whipping up a stunning Lemon Ricotta Pasta with Spinach that’s as approachable as it is elegant! Remember, the beauty of cooking lies in the joy you bring to the table, so don’t hesitate to add your flair. Happy cooking, and may your kitchen always be filled with warmth, laughter, and delicious aromas!
PrintLemon Ricotta Pasta with Spinach
A light and creamy pasta dish that combines lemon ricotta with fresh spinach for a delightful weeknight dinner.
- Prep Time: 10 minutes
- Cook Time: 15 minutes
- Total Time: 25 minutes
- Yield: 4 servings 1x
- Category: Main Course
- Method: Boiling, Sautéing
- Cuisine: Italian
- Diet: Vegetarian
Ingredients
- 1/2 lb (8oz/220 grams) pasta (spaghetti, linguine, penne, or fusilli)
- 1 cup (9oz/250 grams) whole-milk ricotta
- 8 oz (230 grams) fresh baby spinach
- 1/3 cup (35 grams) grated Parmesan cheese
- 1 unwaxed lemon (zest and juice)
- 3 lemon wedges (optional, for serving)
- 1 Tbsp extra virgin olive oil
- 1 garlic clove (grated or pressed)
- Salt and black pepper, to taste
Instructions
- Cook the pasta in a large pot of salted boiling water according to package instructions until al dente.
- Prepare the ricotta mixture by combining ricotta, lemon zest and juice, salt, and pepper in a bowl.
- Heat olive oil in a skillet over medium heat and sauté garlic for about 30 seconds.
- Add the spinach and cook until wilted, then combine it with the drained pasta in the skillet.
- Mix in the ricotta mixture, adding reserved pasta water as needed until creamy.
- Season to taste before serving, garnishing with Parmesan and lemon wedges.
Notes
For extra creaminess, use a hand mixer to blend the ricotta. Reserve pasta water to adjust sauce consistency.
Nutrition
- Serving Size: 1 serving
- Calories: 450
- Sugar: 2g
- Sodium: 300mg
- Fat: 20g
- Saturated Fat: 8g
- Unsaturated Fat: 10g
- Trans Fat: 0g
- Carbohydrates: 50g
- Fiber: 3g
- Protein: 15g
- Cholesterol: 50mg
Keywords: lemon ricotta pasta, spinach pasta, Italian dinner
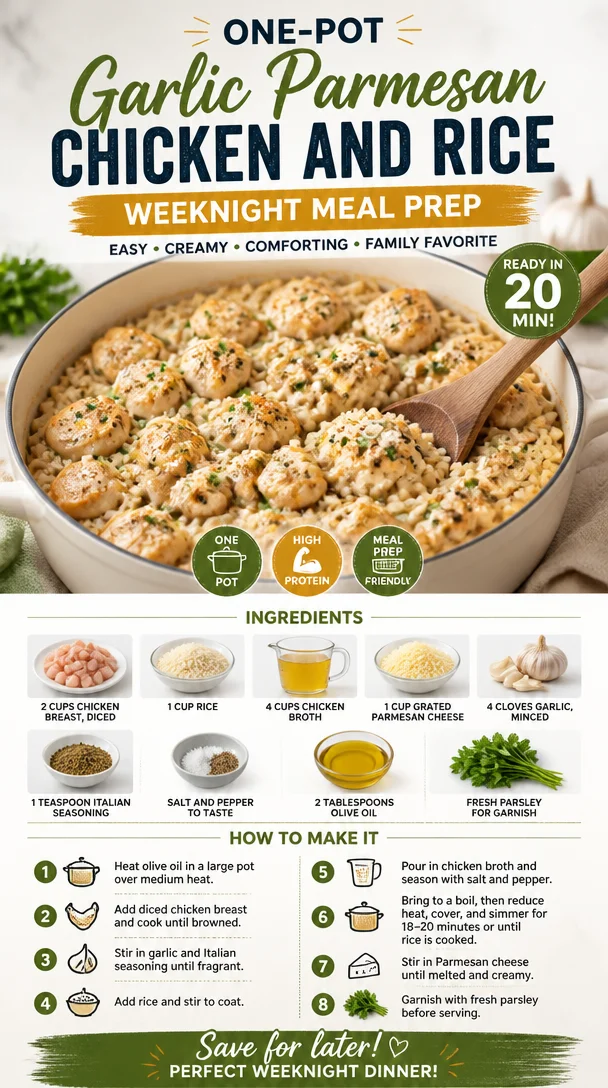
One-Pot Garlic Parmesan Chicken and Rice Weeknight Meal Prep
One-Pot Garlic Parmesan Chicken and Rice: A Cozy Classic
Hello, fellow food lovers! Today, we’re diving into a dish that perfectly embodies comfort, simplicity, and deliciousness: One-Pot Garlic Parmesan Chicken and Rice. This recipe has become a staple in my home, not only for its rich, creamy flavor but also for how easy it is to whip up. It’s the kind of meal that wraps you in a warm hug, and you’ll find yourself reaching for it time and time again.
Imagine this: a busy weeknight, and you’ve had a long day. You want something hearty, satisfying, and—most importantly—easy. That’s where this one-pot wonder shines! It allows for minimal cleanup while delivering maximum flavor. Plus, who can resist that savory aroma of garlic mingling with creamy Parmesan? It’s like a mini celebration every time you make it.
Cooking should always feel approachable, fun, and rewarding. That’s why I’m so excited to share this recipe with you! Grab your apron, and let’s get cooking!
Personal Story: The Dinner Party that Sparked a Love
Let me take you back to a dinner party I hosted a few summers ago. My friends and I had gathered for what was supposed to be a casual evening. I had originally planned to serve some fancy pasta dish, but as the sun dipped below the horizon, life threw me a curveball—I realized I had forgotten the essential ingredients!
With a little panic and a lot of creativity, I rummaged through my pantry and my fridge and pulled together chicken, rice, and, you guessed it—garlic and Parmesan. This dish wasn’t part of my original plan, but the moment the wonderful aromas began to swirl through my home, I felt that familiar rush of joy that only comes from sharing good food.
As we sat around the table, some with curious plates and others with eager forks, it became an instant hit! The laughter that filled the room, paired with those comforting flavors, made me realize how much I love cooking for friends and family. It truly turned a scrappy situation into a memorable feast, and that’s the beauty of home cooking!
Ingredients: What You’ll Need
Let’s get to the good stuff! Here’s what you’ll need to create your own One-Pot Garlic Parmesan Chicken and Rice:
-
2 cups chicken breast, diced
Fresh and lean, chicken breast is your protein-packed star here. If you’re short on chicken, shredded rotisserie chicken works beautifully! -
1 cup rice
I prefer long-grain white rice for its fluffy texture. Brown rice can be used, but remember it takes longer to cook—about 45 minutes. -
4 cups chicken broth
This is your flavor base! You can use homemade broth for the best taste, but low-sodium store-bought work just fine. Vegetable broth is a great substitute for a vegetarian twist. -
1 cup grated Parmesan cheese
Rich, nutty, and creamy, Parmesan takes this dish to the next level. Feel free to use Pecorino Romano for a sharper flavor or nutritional yeast for a vegan option. -
4 cloves garlic, minced
Fresh garlic brings that irresistible aroma and taste. You can use jarred minced garlic in a pinch, but fresh is always best. -
1 teaspoon Italian seasoning
A mix of herbs like basil, oregano, and rosemary. If you don’t have it, try dried herbs individually or even fresh. -
Salt and pepper to taste
Essential for enhancing flavors. Always taste your dish as you go! -
2 tablespoons olive oil
This will help brown the chicken and add richness. Avocado oil is a wonderful alternative and has a high smoke point. -
Fresh parsley for garnish
Not just for decoration! Fresh herbs add a pop of color and brightness. You can substitute with basil or even some zingy lemon zest.
Step-by-Step Instructions: Bring It All Together
Now that we’ve gathered our ingredients, let’s make magic happen in the kitchen!
-
Heat the Olive Oil
Start by heating your olive oil in a large pot or Dutch oven over medium heat. We want that lovely shimmer! This is your base, so let it warm up just a few moments.Chef Tip: Instead of adding cold oil, warming it first enhances the flavor of the dish and helps prevent sticking.
-
Sear the Chicken
Add your diced chicken breast to the pot. Season generously with salt and pepper. Cook until the chicken is browned and cooked through—about 5-7 minutes.Chef Insight: Avoid overcrowding the pot; working in batches if needed allows for even cooking and browning.
-
Add the Garlic
Once the chicken is beautifully golden, toss in the minced garlic and Italian seasoning. Cook for about 1 minute until fragrant; your kitchen will start to smell amazing! -
Stir in the Rice
Next, add the rice and stir to coat it in all those glorious flavors. It’s crucial to toast the rice slightly—it enhances the nuttiness. -
Pour in the Broth
Now, it’s time for the chicken broth! Add it all in, scraping up any bits stuck to the bottom of the pan. This is where all the flavor lies. Bring it to a gentle simmer.Chef Hack: If you have wine on hand, a splash (about 1/4 cup) added here takes the flavor to another level!
-
Cook It Down
Cover the pot and let it simmer for about 20 minutes or until the rice is tender and has absorbed the liquid. Give it a gentle stir halfway through to prevent sticking. -
Incorporate the Cheese
Once the rice is tender, turn off the heat and stir in the grated Parmesan cheese. The cheese will melt nicely into the dish, creating that risotto-like creaminess.Chef Tip: For an even creamier texture, you can add a splash of milk or cream at this stage.
-
Garnish and Serve
Finally, garnish with fresh parsley and an extra sprinkle of Parmesan. Serve it directly from the pot for that cozy, family-style feel!
Serving Suggestions: The Perfect Plate
To serve your One-Pot Garlic Parmesan Chicken and Rice, scoop generous portions into wide, shallow bowls. This allows for that delicious cheesy goodness to shine. Pair it with a simple arugula salad dressed with lemon vinaigrette or crusty bread for that homey touch. Both options complement the dish beautifully!
Recipe Variations: Twist It Up
Feeling adventurous? Here are some fun variations to keep your cooking exciting:
-
Add Veggies
Toss in some frozen peas, chopped spinach, or diced bell peppers during the last few minutes of cooking to amp up the nutrition and color. -
Spice It Up
For a kick, add red pepper flakes or sauté sliced jalapeños with the garlic. -
Lemon Garlic Chicken Rice
Add the zest and juice of 1 lemon right before serving for a bright and zesty twist. -
Creamy Mushroom Addition
Sauté some sliced mushrooms with the chicken for that earthy flavor. The mushrooms pair wonderfully with the creamy sauce. -
Vegan Twist
Substitute chicken for chickpeas and use vegetable broth, alongside a plant-based cheese for a creamy vegan version.
Chef’s Notes: A Journey Through Cooking
As a chef, I’ve learned that every recipe is usually a work in progress. This dish has evolved over the years based on seasons, availability of ingredients, and of course, my family’s preferences. The first time I made it, it was a bit haphazard, but with every iteration, I found ways to simplify and enhance those bold flavors.
One of my favorite kitchen memories happened when my niece asked me if we could make it together. She was just learning to cook, and her excitement reminded me of how I felt in the kitchen as a child. We laughed, spilled a little rice, and made a delightful mess, but we created a dish that tasted even better than usual because it was made with love and enthusiasm.
FAQs and Troubleshooting
-
Can I use brown rice instead of white rice?
Yes! Just keep in mind that brown rice takes longer to cook. You’ll want to increase the broth to 4.5 cups and simmer for about 45-50 minutes. -
Why is the rice sticking to the bottom of my pot?
This can happen if the heat is too high. Always start with medium heat, and make sure to stir occasionally for the best results. -
How do I reheat leftovers without drying them out?
To reheat, add a splash of broth or water to the pot before warming it over low heat. Cover it to create steam which helps retain moisture. -
Can this dish be frozen?
Absolutely! It freezes well in an airtight container for up to 3 months. Just remember to thaw it in the refrigerator before reheating.
Nutritional Info (Optional)
If you’re curious about the nutritional breakdown, here it is for one serving of this delightful dish:
- Calories: 450
- Protein: 30g
- Carbs: 50g
- Fat: 15g
- Fiber: 2g
Let that tempting aroma fill your kitchen as you enjoy creating this One-Pot Garlic Parmesan Chicken and Rice! Whether for a casual weeknight or a special gathering, it’s bound to become a cherished favorite in your home. So go ahead, tie on that apron, and let’s make cooking fun and approachable—like it should be! Happy cooking, and bon appétit!
PrintOne-Pot Garlic Parmesan Chicken and Rice

A comforting and easy one-pot meal featuring chicken, rice, garlic, and Parmesan cheese.
- Prep Time: 10 minutes
- Cook Time: 30 minutes
- Total Time: 40 minutes
- Yield: 4 servings 1x
- Category: Main Course
- Method: Cooking
- Cuisine: Italian
- Diet: None
Ingredients
- 2 cups chicken breast, diced
- 1 cup rice
- 4 cups chicken broth
- 1 cup grated Parmesan cheese
- 4 cloves garlic, minced
- 1 teaspoon Italian seasoning
- Salt and pepper to taste
- 2 tablespoons olive oil
- Fresh parsley for garnish
Instructions
- Heat the olive oil in a large pot or Dutch oven over medium heat.
- Sear the diced chicken breast, seasoning with salt and pepper, until browned and cooked through—about 5-7 minutes.
- Add the minced garlic and Italian seasoning; cook for about 1 minute until fragrant.
- Stir in the rice to coat it with the flavors.
- Pour in the chicken broth, scraping up any bits from the bottom of the pan, and bring to a simmer.
- Cover and let simmer for about 20 minutes until the rice is tender.
- Incorporate the grated Parmesan cheese, stirring until melted and creamy.
- Garnish with fresh parsley and serve.
Notes
For an extra creamy texture, consider adding a splash of milk or cream. Optional variations include adding vegetables or spices.
Nutrition
- Serving Size: 1 serving
- Calories: 450
- Sugar: 1g
- Sodium: 600mg
- Fat: 15g
- Saturated Fat: 5g
- Unsaturated Fat: 8g
- Trans Fat: 0g
- Carbohydrates: 50g
- Fiber: 2g
- Protein: 30g
- Cholesterol: 80mg
Keywords: One-Pot, Garlic, Parmesan, Chicken, Rice, Easy Dinner
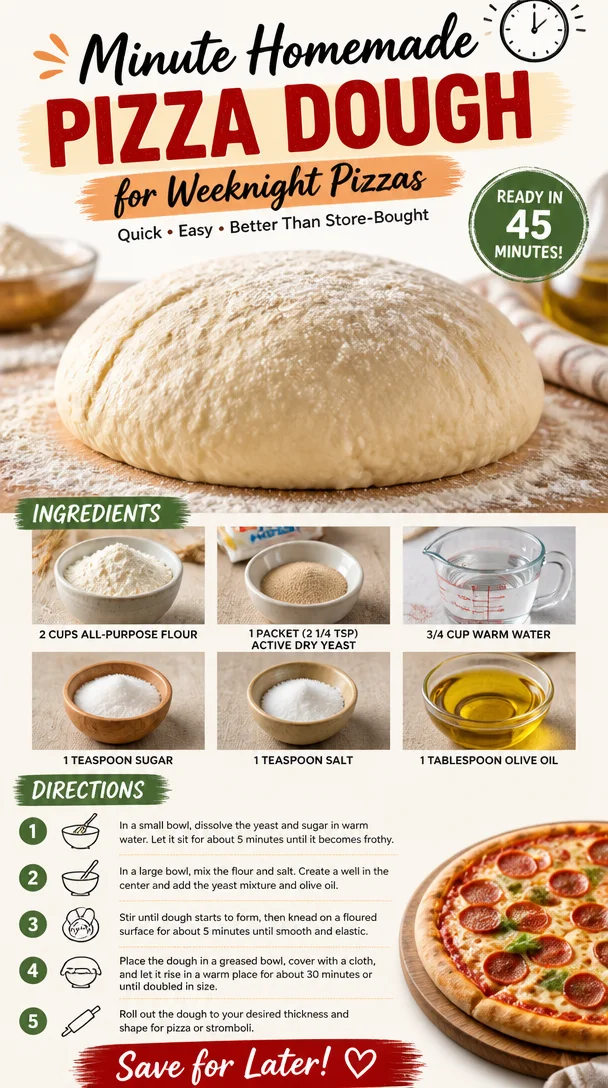
Minute Homemade Pizza Dough for Weeknight Pizzas
The Joy of Homemade: A Simple Guide to Easy Pizza Dough
Hello, kitchen adventurers! Today, we’re diving into something that makes hearts (and stomachs) sing: homemade pizza dough! There’s something so magical about the smell of fresh dough resting on your countertop and the thought of transforming it into your favorite pizza masterpiece. With this easy pizza dough recipe, you’ll be hosting pizza nights that your friends and family will talk about for weeks. So, roll up your sleeves, tie on your ivory apron, and let’s get started!
A Slice of Nostalgia
When I think of pizza, my mind takes me back to childhood, sitting in my grandmother’s dimly lit kitchen surrounded by family. The air was filled with the aroma of melting cheese, bubbling tomato sauce, and the earthy scent of fresh basil. I remember her flour-dusted apron and the twinkle in her eye as she rolled out the dough. We used to gather around the table to shape our own pizzas, each of us crafting our own delicious work of art. It was messy, it was chaotic, but most importantly, it was filled with laughter and togetherness.
One evening, after a bit too much flour had made its way onto the floor, we came up with an “official” title for our creations—“pizza masterpieces.” Each was so unique, from the toppings we chose to the shapes we made. That joyful spirit of creativity and connection is what I want to capture in today’s recipe. Making your own pizza dough might seem a little labor-intensive, but trust me—it’s worth every second when you see your loved ones gathered around the table, ready to enjoy what you’ve created together.
What You’ll Need: Ingredients
Before we jump into the process, let’s gather our ingredients.
-
2 cups all-purpose flour
A versatile choice for creating that perfect base. You can substitute with whole wheat flour for a nuttier flavor or gluten-free flour if you’re avoiding gluten. Just keep in mind that it may affect the texture slightly. -
1 packet (2 1/4 tsp) active dry yeast
This little magic granule helps the dough rise! If you don’t have active dry yeast, you can use instant yeast, which doesn’t require proofing. Just toss it in with the flour! -
3/4 cup warm water
The warmth is crucial for activating the yeast. Make sure it’s not too hot (aim for around 110°F) or it can kill the yeast. If you’re unsure, let it cool for a few moments after boiling. -
1 teaspoon sugar
Just a touch to feed the yeast! It helps the dough rise and adds a hint of sweetness. For a sugar substitute, agave syrup or honey can work too! -
1 teaspoon salt
Essential for flavor! Don’t skip it; it balances the dough. If you’re cutting back on sodium, you can reduce it to 1/2 teaspoon. -
1 tablespoon olive oil
This adds richness and flavor. You can swap it with melted butter or any neutral oil like vegetable or canola oil if you prefer.
Step-by-Step Instructions
Now let’s get to the fun part! Here’s how to make your easy pizza dough step by step:
-
Activate the Yeast: In a mixing bowl, combine the warm water, yeast, and sugar. Stir lightly and let it sit for about 5–10 minutes until it becomes frothy. This shows the yeast is alive and ready to work its magic!
-
Mix the Dry Ingredients: In a large bowl, whisk together the flour and salt. Ensure they’re well combined. Whisking helps to aerate the flour, which makes for a lighter dough.
-
Combine Wet and Dry: Create a well in the center of the flour mixture and pour in the activated yeast mixture and olive oil. Use a fork to mix until a shaggy dough begins to form. It will be quite sticky at this point—don’t worry, that’s perfect!
-
Knead the Dough: Dust your countertop with a little flour and transfer the dough onto it. Knead for about 5–7 minutes until it’s smooth and elastic. If the dough is too sticky, sprinkle a little extra flour as you knead. Proudly channel your inner chef here!
-
Let It Rise: Once kneaded, shape the dough into a ball and place it into a lightly greased bowl. Cover with a damp cloth or plastic wrap. Let it rise in a warm place for about 1 hour, or until it has doubled in size. This is the perfect time to clean up or prepare your toppings!
-
Preheat Your Oven: About 30 minutes before you’re ready to bake, preheat your oven to 475°F (245°C). If you’re using a pizza stone, place it in the oven while it’s heating to ensure it’s hot enough to create a crispy crust.
-
Shape Your Pizza: Once the dough has risen, punch it down to release the air and turn it out onto a floured surface. Divide it into two halves if you want to make two pizzas (or save half for later!). Roll it out with a rolling pin or stretch it by hand to your desired thickness.
-
Top and Bake: Now comes the fun part! Add your favorite sauce, cheese, and toppings. Slide your pizza onto the hot pizza stone or a baking sheet. Bake for 10-12 minutes, or until the cheese is bubbling and the crust is golden brown.
Serving Suggestions
Once your pizza is out of the oven, it’s time to serve! Let it cool for a couple of minutes, then slice it up with a sharp pizza cutter. For an extra touch, drizzle a little olive oil or sprinkle fresh herbs over the top. Presenting your creation on a wooden board with some fresh arugula or a side salad makes it feel extra special. Enjoy with a fresh glass of sparkling water or your favorite beverage!
Recipe Variations
Here are a few fun twists to try with your pizza dough:
-
Herbed Dough: Add 1 tablespoon of Italian seasoning or fresh herbs like rosemary or basil into the flour for extra flavor.
-
Whole Wheat Dough: Swap half of the all-purpose flour with whole wheat for a nutty taste and added nutrition.
-
Cheese-Stuffed Crust: Roll the edges of the dough around some mozzarella sticks before baking for a cheesy surprise!
-
Calzone Variation: Use half the dough to create a delicious calzone stuffed with your favorite fillings.
Chef’s Notes
Over the years, this pizza dough recipe has grown alongside my love for hosting. I started off with a very basic formula and tweaked it as I discovered different flavors and techniques. The best part? I’ve hosted various pizza parties where guests create their own masterpieces, just like I did with my grandmother. There’s magic in that shared experience—the laughter, the taste of crispy crust, and the delight of cooking together.
And don’t get me started on the joy of leftovers! Cold pizza for breakfast? Yes, please! Sometimes I reinvent the dough too, using toppings from the previous night’s meal.
FAQs and Troubleshooting
Q: My dough isn’t rising. What went wrong?
A: It could be that your yeast is expired or the water was too hot. Make sure your water is warm, not boiling! If it’s your first time, double-check the expiration on the yeast packet.
Q: Can I freeze the dough?
A: Absolutely! After the first rise, you can wrap the dough tightly in plastic wrap and store it in the freezer for up to three months. Just defrost in the fridge overnight when you’re ready to use it.
Q: My pizza crust is too thick and doughy. How can I make it thinner?
A: When shaping the pizza, be sure to stretch it out evenly. If you prefer a thinner crust, roll it out to about 1/4 inch thick instead of 1/2 inch.
Q: How can I make the crust crispier?
A: Preheating your oven and pizza stone is crucial! Also, using a baking sheet directly on the oven rack can help. For an even crisper crust, you can also bake the pizza on a perforated pizza pan.
Nutritional Info (optional)
While I focus more on deliciousness than nutritional details, here’s a rough estimation for one serving of this pizza dough (based on the entire recipe divided into 4 servings):
- Calories: 150
- Protein: 4g
- Fat: 3g
- Carbohydrates: 26g
Remember, toppings will vary, so be sure to factor those in as well!
And there you have it! Your easy pizza dough recipe is ready to inspire countless culinary creations. Remember, cooking is all about joy and connection, so gather your friends and family, and let’s make some pizza memories! Bon appétit!
PrintHomemade Pizza Dough
An easy and versatile recipe for making homemade pizza dough, perfect for family pizza nights.
- Prep Time: 15 minutes
- Cook Time: 12 minutes
- Total Time: 1 hour 27 minutes
- Yield: 4 servings 1x
- Category: Main Course
- Method: Baking
- Cuisine: Italian
- Diet: Vegetarian
Ingredients
- 2 cups all-purpose flour
- 1 packet (2 1/4 tsp) active dry yeast
- 3/4 cup warm water
- 1 teaspoon sugar
- 1 teaspoon salt
- 1 tablespoon olive oil
Instructions
- Activate the yeast: In a mixing bowl, combine the warm water, yeast, and sugar. Stir lightly and let it sit for about 5–10 minutes until it becomes frothy.
- Mix the dry ingredients: In a large bowl, whisk together the flour and salt.
- Combine wet and dry: Create a well in the center of the flour mixture and pour in the activated yeast mixture and olive oil.
- Knead the dough: Dust your countertop and transfer the dough. Knead for about 5–7 minutes until smooth and elastic.
- Let it rise: Shape the dough into a ball and place it in a greased bowl. Cover and let it rise for about 1 hour.
- Preheat your oven: About 30 minutes before baking, preheat your oven to 475°F (245°C).
- Shape your pizza: Punch down the risen dough and divide if making two pizzas. Roll out to desired thickness.
- Top and bake: Add your favorite toppings and bake for 10-12 minutes, or until golden brown.
Notes
For a unique flavor, try adding Italian seasoning or using whole wheat flour. Leftover dough can be frozen for later use.
Nutrition
- Serving Size: 1 serving
- Calories: 150
- Sugar: 1g
- Sodium: 400mg
- Fat: 3g
- Saturated Fat: 0.5g
- Unsaturated Fat: 2g
- Trans Fat: 0g
- Carbohydrates: 26g
- Fiber: 1g
- Protein: 4g
- Cholesterol: 0mg
Keywords: pizza, dough, homemade, Italian, family recipe

Minute Mango Chutney: Simple Weeknight Pairings
The Best Mango Chutney: A Flavorful Companion for Every Table
Welcome back to Ivory Apron, food lovers! Today, we’re diving into the colorful and aromatic world of Mango Chutney. This delightful condiment is not just a burst of flavor; it’s a bridge between cultures, a celebration of fresh ingredients, and a way to spice up your everyday meals. Whether you’re slathering it on grilled meats or using it to brighten up a simple cheese platter, mango chutney is the sticky-sweet nectar that adds a splash of personality to your dishes.
As you prepare to embark on this culinary adventure, I want you to know that this is more than just a recipe; it’s a chance to gather your loved ones and create beautiful moments around your table. So, let’s roll up our sleeves, tie on our aprons, and get ready to make the best mango chutney you’ll ever taste!
A Personal Story
Ah, mangoes! They hold a special place in my heart. Growing up, my grandmother had a mango tree that seemed to bear fruit all summer long. I remember spending lazy afternoons under that tree, the air thick with sweet, tropical scents. Grandpa would climb up to pluck the ripe mangoes, handing them down to us with a grin. Some would end up in our bellies, while others would be transformed into her famous chutney.
The kitchen was a symphony of sounds: the rhythmic chopping of mangoes, the sizzling of spices, and the occasional giggle as we tasted and adjusted flavors. That chutney was a staple at every family gathering, the perfect accompaniment to curries and grilled meats. As I learned to replicate her recipe, I treasured every bite of nostalgia. Now, it’s time to share that joy with you!
Ingredients
Here’s everything you’ll need to create this vibrant and delicious mango chutney:
-
1 tablespoon cooking oil (neutral-tasting): A light oil like canola or sunflower allows the spices to shine without overwhelming the other flavors.
-
2 teaspoons fresh ginger (finely minced): Ginger adds a warm heat and lots of depth. If you don’t have fresh, you can use ground ginger, but it won’t have the same freshness.
-
2 cloves garlic (finely minced): Garlic brings a savory richness that complements the sweetness of the mango.
-
1 red chili (sliced): For those who crave a bit of spice! Removing the seeds and membrane will tone down the heat, making it milder.
-
2 teaspoons whole nigella seeds: These little black seeds add a unique, slightly onion-like flavor. If you can’t find them, cumin seeds will make a good substitute.
-
1 teaspoon ground coriander: Adds herbal undertones. Ground cumin can replace this if you’re out.
-
1/2 teaspoon ground cumin: Earthy and warm, it pairs perfectly with the sweetness of mango.
-
1/4 teaspoon turmeric: Adds beautiful color and a hint of bitterness, balancing out the sweetness.
-
1/4 teaspoon ground cardamom: This fragrant spice will elevate your mango chutney with a touch of elegance.
-
1/4 teaspoon ground cloves: Strong in flavor, so a little goes a long way here.
-
1/4 teaspoon ground cinnamon: Sweet and warm—this is what gives your chutney that cozy, comforting essence.
-
1/4 teaspoon salt: Don’t skip this; it’ll enhance all those beautiful flavors!
-
5 large mangoes (about 300 grams each, peeled and diced): Ripe, juicy mangoes are the star of this show! If fresh mangoes are out of season, feel free to substitute them with around 1500 grams of frozen mango.
-
2 cups white granulated sugar: This balances the tanginess and adds the classic chutney sweetness. Brown sugar can also work if you want a deeper flavor.
-
1 cup white vinegar: Provides the necessary acidity to balance the sweetness and acts as a preserving agent—essential for keeping your chutney fresh.
Step-by-Step Instructions
Now let’s get cooking! Here’s how to make this mouthwatering mango chutney:
-
Prep Your Ingredients:
Start by gathering all your ingredients. Dice the mangoes and set them aside. Mince your ginger and garlic, and slice your red chili (remember to remove seeds for less heat!). -
Heat the Oil:
In a large saucepan, heat 1 tablespoon of cooking oil over medium heat. You’ll want that oil just hot enough to sizzle when you add your ginger and garlic. -
Sauté the Aromatics:
Once the oil is hot, throw in the minced ginger and garlic. Sauté them for about 1-2 minutes until fragrant. Keep an eye on them; you want them golden, not burnt! -
Add the Spices:
Toss in the red chili, nigella seeds, ground coriander, cumin, turmeric, cardamom, cloves, cinnamon, and salt. Stir everything together for about 30 seconds. This step blooms the spices, releasing their natural oils and enhancing their flavors. -
Incorporate the Mangoes:
Now, it’s time to add your diced mangoes to the pan. Stir gently to coat the mango pieces with the spice mixture. Allow them to cook for about 5 minutes on medium heat until they start to break down. -
Sweeten the Pot:
Pour in the sugar and vinegar. Stir until the sugar has completely dissolved, and the mixture becomes syrupy. Let this cook for another 15-20 minutes on low heat. Stir occasionally to prevent sticking while watching the mangoes transform into a tantalizing chutney. -
Check Your Consistency:
After about 20 minutes, you want your chutney to be thick and glossy. If it’s not there yet, simmer for a few extra minutes, stirring gently. -
Cool and Store:
Once your chutney has reached the desired consistency, remove it from the heat and let it cool. Transfer to a clean, sterilized jar. It will keep well in the fridge for up to a month (although I doubt it’ll last that long!).
Serving Suggestions
Mango chutney is incredibly versatile! Serve it alongside grilled chicken or fish for a tropical twist, or pair it with cheese and charcuterie for a vibrant appetizer spread. A dollop on top of a savory curry can elevate it to new heights. If you have leftovers, try mixing some chutney into a yogurt dip for a refreshing sidekick!
Recipe Variations
-
Spicy Mango Chutney: If you like it hot, be brave! Add a few more red chilies or include a splash of hot sauce for an extra kick.
-
Herbed Chutney: Stir in fresh herbs like cilantro or mint after cooking to add a refreshing element.
-
Peach-Mango Fusion: Swap out half the mangoes for peaches when they’re in season. It makes for a fantastic summer chutney!
-
Apple-Mango Chutney: Try adding diced apples for a crunchy texture and a hint of tartness.
-
Curry-Infused Chutney: Add a teaspoon of curry powder to the spice mix for a unique twist that amplifies the flavors.
Chef’s Notes
You know, every time I whip up a batch of this mango chutney, I can’t help but think of that sunny summer day under my grandmother’s tree. Each preparation feels like a step back in time—a playful mix of nostalgia and innovation. Over the years, I’ve experimented with different spices and fruit combinations, and it has been a thrilling journey.
One funny mishap happened when I accidentally over-sweetened a batch while trying to use up leftover holiday sugar. A quick pinch of salt and a dash of vinegar transformed my gooey mess into a sweet-and-savory masterpiece—sometimes our kitchen “oops” can lead to delightful surprises!
FAQs and Troubleshooting
-
Why is my chutney too sweet?
If your chutney tastes overly sweet, add a splash more vinegar to balance it out. Remember, a little salt can also enhance the flavors. -
Can I use frozen mangoes?
Absolutely! Frozen mango works great, but make sure to let them thaw a bit and drain any excess liquid before cooking. -
How thick should the chutney be?
The chutney will thicken as it cools. Ideally, it should be thick enough to dollop on a plate but still somewhat pourable. -
How should I store the chutney?
Store your chutney in a clean, airtight jar in the refrigerator. It can last for up to a month, but trust me, it won’t last long with how delicious it is!
Nutritional Info
While I believe in enjoying food without guilt, it’s always handy to know what you’re serving. Here’s a simple breakdown per tablespoon of chutney:
- Calories: 70 kcal
- Fat: 0.5g
- Carbohydrates: 17g
- Sugar: 14g
- Fiber: 1g
So there you have it! A lush, delectable mango chutney that’s bound to bring joy to your gatherings and family dinners. This recipe is not just about feeding the stomach; it’s about nourishing the soul and creating memories that will last long after the meal is finished. Until next time, happy cooking, and may your table be filled with love and laughter!
Let’s keep those aprons tied on tight while we create and celebrate together!
PrintThe Best Mango Chutney

A vibrant and flavorful mango chutney that adds a splash of personality to any dish.
- Prep Time: 15 minutes
- Cook Time: 45 minutes
- Total Time: 60 minutes
- Yield: 10 servings 1x
- Category: Condiment
- Method: Cooking
- Cuisine: Indian
- Diet: Vegetarian
Ingredients
- 1 tablespoon cooking oil (neutral-tasting)
- 2 teaspoons fresh ginger (finely minced)
- 2 cloves garlic (finely minced)
- 1 red chili (sliced)
- 2 teaspoons whole nigella seeds
- 1 teaspoon ground coriander
- 1/2 teaspoon ground cumin
- 1/4 teaspoon turmeric
- 1/4 teaspoon ground cardamom
- 1/4 teaspoon ground cloves
- 1/4 teaspoon ground cinnamon
- 1/4 teaspoon salt
- 5 large mangoes (about 300 grams each, peeled and diced)
- 2 cups white granulated sugar
- 1 cup white vinegar
Instructions
- Prep Your Ingredients: Gather all your ingredients. Dice the mangoes and set them aside. Mince your ginger and garlic, and slice your red chili (remove seeds for less heat).
- Heat the Oil: In a large saucepan, heat 1 tablespoon of cooking oil over medium heat until sizzles when you add ginger and garlic.
- Sauté the Aromatics: Add minced ginger and garlic, sauté for 1-2 minutes until fragrant.
- Add the Spices: Toss in red chili, nigella seeds, ground coriander, cumin, turmeric, cardamom, cloves, cinnamon, and salt. Stir for 30 seconds to bloom the spices.
- Incorporate the Mangoes: Add diced mangoes and stir to coat with the spices. Cook for about 5 minutes on medium heat until they start to break down.
- Sweeten the Pot: Pour in sugar and vinegar, stir until sugar dissolves, then cook for another 15-20 minutes on low heat until syrupy.
- Check Your Consistency: Ensure chutney is thick and glossy, simmering longer if needed.
- Cool and Store: Once thickened, remove from heat, let cool, and store in a sterilized jar in the fridge for up to a month.
Notes
Consider adding fresh herbs or spices for variations. Store in a clean, airtight jar for freshness.
Nutrition
- Serving Size: 1 tablespoon
- Calories: 70
- Sugar: 14g
- Sodium: 240mg
- Fat: 0.5g
- Saturated Fat: 0g
- Unsaturated Fat: 0.5g
- Trans Fat: 0g
- Carbohydrates: 17g
- Fiber: 1g
- Protein: 0g
- Cholesterol: 0mg
Keywords: mango chutney, condiment, sweet and spicy, Indian recipes, mango recipes

One-Pan Crispy Garlic Dill Potatoes for Weeknight Dinners
Garlicky Potatoes with Dill: A Comfort Food Delight
Hello, fellow food lovers! Today, I’m thrilled to share a dish that’s close to my heart and a staple in my kitchen: Garlicky Potatoes with Dill. If you’re looking for a side dish that perfectly marries earthy flavors and fresh herbs, you’re in for a treat. This recipe is not only easy to whip up but it’s also impressively versatile—perfect for both casual family dinners and fancy soirées.
Introduction
There’s something enchanting about a simple potato dish that warms the soul and brings a smile to your face. At Ivory Apron, we believe that good food doesn’t have to be complicated. This dish is the epitome of elegance meeting ease, with drag-you-in aromas of garlic and the refreshing zest of dill. Whether you’re a seasoned cook or just starting out, this recipe empowers you to create something divine without the stress.
Garlicky Potatoes with Dill finds its roots in my childhood memories of family gatherings. Picture this: a long table adorned with colorful dishes, laughter echoing, and the air thick with the delightful scent of garlic wafting from the kitchen. As a little girl, I remember hopping onto a stool to help my mom peel the potatoes. I would sneak little bites, savoring the creamy texture and the warm garlic-infused flavors. It was in those moments that my love for cooking blossomed—a passion that I’ve since transformed into my cherished recipe collection.
This dish embodies the joy of cooking together, sharing stories, and creating lasting memories. So, let’s tie on our aprons, gather our ingredients, and get started on this comforting journey!
Personal Story
Growing up, my family had a tradition of gathering every Sunday for what we called “Family Feast Day.” It was an opportunity to catch up, share laughs, and, of course, enjoy a hearty meal together. My grandmother was the kitchen queen, and her version of Garlicky Potatoes would steal the show every time. They weren’t just delicious; they were a symbol of love and the heart of our gatherings.
One particular Sunday, I remember trying to impress my grandmother by making the potatoes myself. But, as fate would have it, I accidentally grabbed the wrong spice jar, sprinkling cinnamon instead of salt! The look on my grandmother’s face was priceless. Instead of disappointment, she chuckled and turned it into a learning moment. We spent the afternoon perfecting the dish together, and I’ll never forget that lesson in kitchen resilience. It taught me that even the smallest mistakes could lead to the biggest memories—and that’s what this recipe is all about.
Ingredients
Let’s gather our stars for this delectable dish:
-
4 Medium Potatoes: I love using Yukon Gold or Russet potatoes for their creamy texture. Both are excellent choices! If you’re looking for a lower-carb option, try using cauliflower instead.
-
2 Cloves Garlic: These little wonders bring depth and flavor. If you adore garlic, feel free to add more! For a milder taste, you can roast the garlic first before adding it to the potatoes.
-
2 Tablespoons Fresh Dill: This herb adds a bright and fresh note that pairs beautifully with the potatoes. If you can’t find dill, fresh parsley or chives work well as substitutes.
-
Salt to Taste: Salt is essential for enhancing flavor. Always start with a little and adjust according to your preference.
Step-by-Step Instructions
Now that we have all our ingredients ready, let’s dive into the preparation! Here’s how to make Garlicky Potatoes with Dill:
-
Prep the Potatoes: Start by washing the potatoes thoroughly to remove any dirt. Then, peel them if you prefer; I usually keep the skins on for added texture and nutrition. Cut them into even-sized chunks (about 1-inch) to ensure they cook evenly.
-
Boil the Potatoes: Place the diced potatoes in a large pot filled with cold, salted water. This is important! Starting with cold water helps the potatoes cook evenly. Bring to a boil over high heat. Once boiling, reduce the heat to a simmer for about 15-20 minutes or until fork-tender. You want them soft but not mushy—consider this your first chef hack!
-
Sauté the Garlic: While the potatoes are cooking, peel and finely mince your garlic cloves. In a skillet, heat a tablespoon of olive oil over medium heat. Add the minced garlic and sauté for about 1-2 minutes, just until it becomes fragrant. Be careful not to let it burn (trust me, burnt garlic is a kitchen sin!)—you want that lovely golden hue.
-
Drain and Toss: Once the potatoes are cooked, drain them in a colander and return them to the pot while they’re still hot. This helps them absorb some moisture and flavor. Quickly pour the sautéed garlic and olive oil over the warm potatoes.
-
Add Dill and Season: Now comes the magic moment! Add the fresh dill and salt to the potatoes. Toss everything gently to combine, making sure not to mash them. You want all those delightful flavors to embrace each other without losing the integrity of the potato.
-
Taste and Adjust: Here’s where you get to play the chef! Take a small bite and see if it needs more salt or dill. Adjust to your liking, and don’t hesitate to sprinkle a bit more garlic if you love that bold flavor.
Serving Suggestions
When it comes to plating, think simple yet inviting. Transfer your Garlicky Potatoes to a beautiful serving dish, perhaps a rustic wooden bowl or a vibrant ceramic plate. Garnish with a few extra sprigs of dill for a pop of color. You can also drizzle a little olive oil on top for that finishing touch. Serve them alongside your favorite protein—grilled chicken, roasted fish, or a hearty vegetable stew—and watch them disappear!
Recipe Variations
Now, let’s get creative! Here are a few variations to take your Garlicky Potatoes to the next level:
-
Lemon Zest: Add the zest of one lemon for a bright, zingy flavor that complements the garlic beautifully.
-
Cheesy Delight: Sprinkle some grated parmesan or feta cheese on top before serving for a creamy, savory twist.
-
Spicy Kick: Toss in a pinch of red pepper flakes with the garlic for a delightful heat.
-
Herbed Mashed Potatoes: If you’re in the mood for mash, simply mash the cooked potatoes with some heavy cream and whip in fresh dill for a creamy side dish.
-
Smoky Flavor: Add a hint of smoked paprika to the garlic while sautéing for a subtle smokiness in every bite.
Chef’s Notes
This recipe is definitely a labor of love in my kitchen. I’ve played around with it over the years, adjusting flavors and ingredients until it felt just right. One of my favorite kitchen memories is when I made this for a group of friends who had no idea how easy it was to make. Their surprised expressions when they tasted them for the first time was priceless!
I’d love to hear what your version of Garlicky Potatoes turns out like! The beauty of cooking is making each recipe uniquely yours. Embrace the process, and don’t hesitate to experiment. The kitchen should be your playground!
FAQs and Troubleshooting
Here are a few common questions and potential pitfalls when making Garlicky Potatoes:
-
Q: My potatoes turned mushy. What happened?
A: This typically happens if they are boiled too long. Be sure to test regularly with a fork for doneness and drain them as soon as they’re tender. -
Q: What if I don’t have fresh dill?
A: No worries! Dried dill can be used as a substitute, but use less—about 1 teaspoon should do. You can also try fresh parsley or chives for a different flavor profile. -
Q: Can I make these potatoes ahead of time?
A: Absolutely! You can prepare the potatoes and toss them in garlic and dill up to a day in advance. Just reheat them gently before serving to retain their texture. -
Q: How can I prevent my garlic from burning?
A: Always sauté garlic over medium heat and keep an eye on it. If you notice it browning too quickly, lower the heat. Another trick is to add a splash of broth or water to the pan if you’re worried about it cooking too fast.
Nutritional Info (Optional)
While I love indulging in delightful flavors, I also keep an eye on nutrition. Each serving of Garlicky Potatoes contains a fair amount of fiber and vitamins from the potatoes, and the olive oil adds heart-healthy fats. Overall, it’s a balanced and wholesome side dish!
Thank you for joining me today at Ivory Apron! I hope you feel inspired to try these Garlicky Potatoes with Dill in your own kitchen. Remember, the essence of cooking is to enjoy the process and share love with others through food. Happy cooking, friends!
PrintGarlicky Potatoes with Dill

A simple and comforting dish featuring creamy potatoes infused with garlic and fresh dill.
- Prep Time: 15 minutes
- Cook Time: 20 minutes
- Total Time: 35 minutes
- Yield: 4 servings 1x
- Category: Side Dish
- Method: Boiling and Sautéing
- Cuisine: American
- Diet: Vegetarian
Ingredients
- 4 Medium Potatoes (Yukon Gold or Russet)
- 2 Cloves Garlic (minced)
- 2 Tablespoons Fresh Dill (chopped)
- Salt to Taste
- 1 Tablespoon Olive Oil
Instructions
- Prep the potatoes by washing and peeling them if desired, then cut into 1-inch chunks.
- Boil the potatoes in a large pot of cold, salted water, bringing to a boil and then simmer for 15-20 minutes until fork-tender.
- Sauté the minced garlic in olive oil over medium heat for 1-2 minutes until fragrant.
- Drain the cooked potatoes and return them to the pot while hot.
- Add the sautéed garlic and olive oil over the potatoes, then toss gently.
- Mix in the fresh dill and salt, adjusting to taste.
Notes
For variations, consider adding lemon zest, cheese, or spices like red pepper flakes.
Nutrition
- Serving Size: 1 serving
- Calories: 220
- Sugar: 1g
- Sodium: 300mg
- Fat: 10g
- Saturated Fat: 1g
- Unsaturated Fat: 8g
- Trans Fat: 0g
- Carbohydrates: 30g
- Fiber: 3g
- Protein: 4g
- Cholesterol: 0mg
Keywords: potatoes, garlic, dill, side dish, comfort food
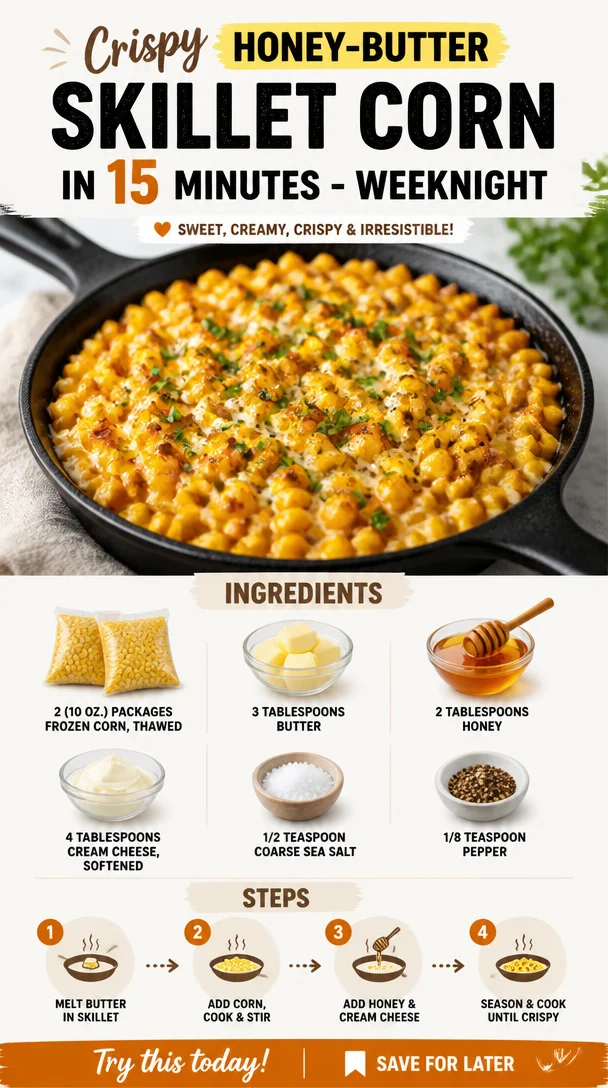
Crispy Honey-Butter Skillet Corn in 15 Minutes – Weeknight
Honey Butter Skillet Corn: A Sweet and Savory Side Dish
Hello there, fellow food enthusiasts! I’m Savannah Pierce, and I’m delighted to have you join me in the kitchen today. This blog post is dedicated to a show-stopping side dish that is bound to steal the spotlight at your next gathering: Honey Butter Skillet Corn! If you’ve never had the pleasure of savouring this sweet and savory blend, you’re in for a treat. Let me take you on a delightful culinary journey that brings together the warm flavors of butter and honey with the crisp essence of corn—perfectly simple yet incredibly satisfying!
So, ready your skillet, and let’s dive into the recipe together!
A Memory with Corn
Let me whisk you back in time to a hot summer day when I was a little girl—my loved ones gathered in my grandmother’s kitchen, laughter bouncing off the walls. The smells of garlic and butter filled the air as we prepared dinner together. My grandma always adored serving corn made fresh from her garden. But what set her corn apart from any other dish was the sweet secret ingredient she added: honey! That unique twist was my introduction to the simplicity of combining sweet and savory, forever changing how I viewed flavors. Whenever I reminisce about those warm summer nights, I can almost hear the clinking of forks and see the smiles around the table. Today, I channel that nostalgic energy into my Honey Butter Skillet Corn recipe, which is a delightful homage to those precious memories.
Ingredients
Let’s gather everything you need to whip up this tantalizing dish:
-
2 (10 oz.) packages frozen corn, thawed: Frozen corn is not only convenient but also retains its sweetness. Don’t have frozen corn? Fresh corn works perfectly too—just make sure to cut it from the cob!
-
3 tablespoons butter: Butter brings that rich, creamy texture. If you’re looking for a healthier alternative, feel free to use olive oil or coconut oil for sautéing.
-
2 tablespoons honey: Honey adds that irresistible sweetness. You can substitute agave syrup or maple syrup if you’re looking for a vegan option.
-
4 tablespoons cream cheese, softened: Cream cheese lends a delectable creaminess to the dish. For a lighter version, you can opt for Greek yogurt instead (but it will have a tangier flavor).
-
1/2 teaspoon coarse sea salt: Salt enhances the sweetness of the corn beautifully. You can use regular table salt if that’s all you have, but the texture of sea salt adds an extra layer of depth.
-
1/8 teaspoon pepper: Freshly ground pepper complements the sweetness of the corn—feel free to adjust it according to your taste!
Step-by-Step Instructions
Now that we have our ingredients, let’s create this magical dish together! Follow along with me for a fun cooking experience.
-
Get Your Skillet Hot: Heat a large skillet over medium heat. Love that sizzle! Adding your ingredients to a properly heated pan ensures a nice sautée without the corn getting watery.
-
Melt the Butter: Add the 3 tablespoons of butter once your skillet is hot. Let it melt completely, swirling the pan to coat its surface evenly. This is where the magic starts! The golden, nutty aroma of melted butter sets the stage for our star ingredient.
-
Sauté the Corn: Add the thawed corn to the skillet. Spread it out evenly to ensure maximum contact with the pan. It should sizzle nostalgically! Stir it frequently for about 5-7 minutes until the corn is heated through and slightly caramelized. That’s how you amp up the flavors and add depth.
-
Incorporate Honey: Drizzle your 2 tablespoons of honey over the corn. Stir gently to combine, allowing the honey to coat each kernel. Feel free to adjust the amount according to your sweet tooth—honey-loving friends will thank you!
-
Add Cream Cheese: Now, drop in the softened cream cheese in dollops. Stir to mix until the cream cheese has melted into the corn and created a luscious, creamy coating. It should feel like a warm hug! Be gentle at this stage—you want everything to blend beautifully.
-
Season It Up: Sprinkle the coarse sea salt and pepper, stirring to combine. Taste and adjust. If you like a bit more sweetness, add a touch more honey. Want more zest? A squeeze of fresh lime juice can brighten it right up!
-
Cook and Tray It Up: Allow everything to simmer together for an additional minute, ensuring all flavors meld. Then, remove it from the heat. It’s time to plate your delicious Honey Butter Skillet Corn!
Serving Suggestions
When it comes to serving, presentation is key! Transfer your Honey Butter Skillet Corn to a beautiful serving bowl, garnishing with fresh herbs like parsley or basil for pops of color. You can also sprinkle some crumbled feta cheese on top for an extra layer of flavor—talk about impressive!
Recipe Variations
The beauty of this Honey Butter Skillet Corn recipe is its versatility! Here are a few fun options to give this dish a twist:
-
Add Fresh Herbs: Toss in some fresh basil or cilantro towards the end of cooking for a burst of freshness.
-
Spicy Kick: Mix in a pinch of cayenne pepper or red pepper flakes for a savory kick to balance the sweetness.
-
Lime-Infused: Add zest and juice from a lime for a citrusy flair.
-
Cheesy Delight: Fold in shredded cheese like cheddar or pepper jack to enhance creaminess and flavor complexity.
-
Bacon Lovers Unite: Sauté chopped bacon before adding your corn for a smoky flavor that pairs beautifully with the honey!
Chef’s Notes
I can’t help but share that this recipe has evolved throughout the years. Early on, I made it for my friends during our summer BBQs, and it quickly became a staple. Over time, I experimented with new ingredients based on what was in season or what I had on hand, leading to the vibrant and luscious version you see today. One never knows when inspiration for a new twist will strike—it could be the random herb in your fridge or a spicy condiment waiting on your shelf. Embrace your creativity, and don’t shy away from making this recipe your own!
FAQs and Troubleshooting
Let’s troubleshoot some common questions you might have as you embark on this culinary adventure!
-
Why is my corn watery? Make sure to sauté it long enough to remove excess moisture! Frozen corn can sometimes retain water, so a few extra minutes cooking will help.
-
Can I make this recipe ahead of time? Absolutely! You can prepare the dish in advance and warm it up gently on the stove before serving. Just be cautious not to overcook it—keep that vibrant corn texture!
-
What can I do with leftovers? This dish makes a fantastic omelet filling or a topping for nachos. Get creative!
-
Can I use canned corn? Yes, but be sure to drain and rinse thoroughly! Sautéing canned corn typically requires less time since it’s already cooked.
Nutritional Info
Though I focus on enjoyment over counting calories, if you’re curious, this Honey Butter Skillet Corn can serve as a delightful addition to any meal. It’s a great source of fiber, thanks to the corn, and provides a touch of healthy fats from the butter and cream cheese.
And there you have it—a delightful journey through the art of Honey Butter Skillet Corn! I hope this dish fills your home with warmth and laughter, just like it does for me. Don’t hesitate to share your own variations and stories in the comments below. Until next time, happy cooking, and remember—good food is about showing up, not showing off!
Let’s get cooking! 🍽️✨
PrintHoney Butter Skillet Corn

A delightful side dish combining the sweet and savory flavors of corn, butter, and honey.
- Prep Time: 10 minutes
- Cook Time: 15 minutes
- Total Time: 25 minutes
- Yield: 4 servings 1x
- Category: Side Dish
- Method: Sautéing
- Cuisine: American
- Diet: Vegetarian
Ingredients
- 2 (10 oz.) packages frozen corn, thawed
- 3 tablespoons butter
- 2 tablespoons honey
- 4 tablespoons cream cheese, softened
- 1/2 teaspoon coarse sea salt
- 1/8 teaspoon pepper
Instructions
- Get Your Skillet Hot: Heat a large skillet over medium heat.
- Melt the Butter: Add the 3 tablespoons of butter once your skillet is hot.
- Sauté the Corn: Add the thawed corn to the skillet and stir it frequently for about 5-7 minutes until heated through.
- Incorporate Honey: Drizzle your 2 tablespoons of honey over the corn and stir gently.
- Add Cream Cheese: Drop in the softened cream cheese in dollops and mix until melted.
- Season It Up: Sprinkle the coarse sea salt and pepper, stirring to combine.
- Cook and Tray It Up: Allow everything to simmer together for an additional minute before plating.
Notes
This recipe can be made ahead of time and reheated before serving. Feel free to add fresh herbs or other variations.
Nutrition
- Serving Size: 1 serving
- Calories: 250
- Sugar: 10g
- Sodium: 300mg
- Fat: 10g
- Saturated Fat: 5g
- Unsaturated Fat: 5g
- Trans Fat: 0g
- Carbohydrates: 35g
- Fiber: 4g
- Protein: 6g
- Cholesterol: 25mg
Keywords: corn, sides, honey butter, easy recipe, summer dish
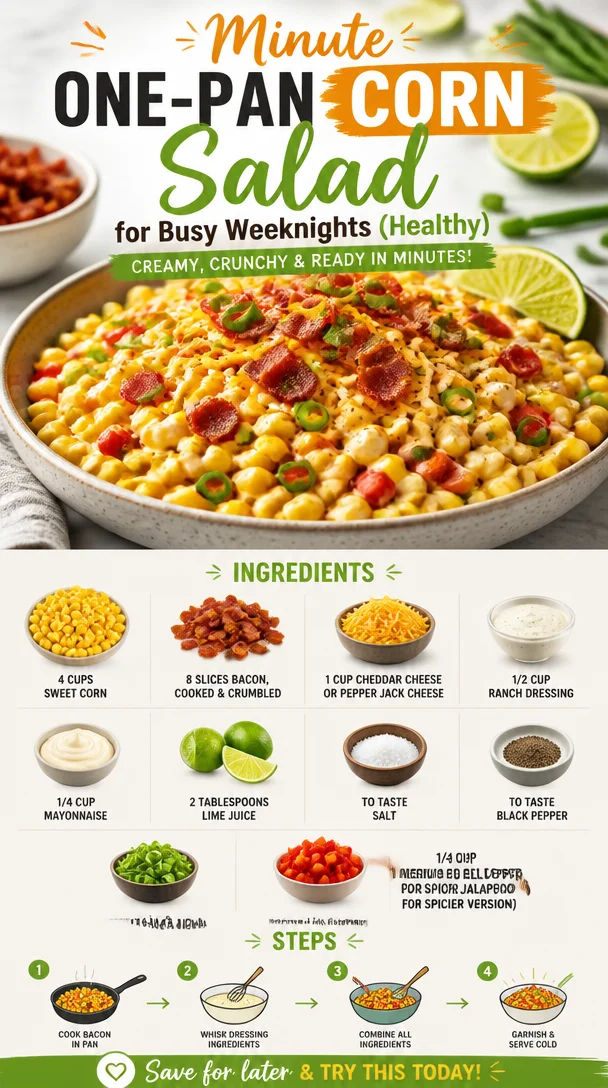
Minute One-Pan Corn Salad for Busy Weeknights (Healthy)
Crack Corn Salad: A Celebration of Summer Flavors
Every summer brings its own set of memories, a tapestry of laughter, sunshine, and the delightful scent of grilling meat wafting through the air. One dish that always manages to steal my heart (and the spotlight at potlucks) is the ever-so-vibrant Crack Corn Salad. It’s colorful, creamy, and absolutely bursting with flavor, which makes it perfect for gatherings or simple family dinners. But what I love most is the story behind it—one that resonates with warm gatherings and good friends.
A Nostalgic Journey
As a child, summers at my grandmother’s house were magical. Her backyard was a verdant paradise with tall corn stalks swaying gently in the breeze. I can still visualize the joyful chaos of family coming together with pots and pans, music playing softly in the background, and laughter echoing from every corner. Among the seemingly endless array of dishes was my grandmother’s famous corn salad — creamy, crunchy, and oh-so-delicious.
This Crack Corn Salad, as we dubbed it, was an essential part of our summer BBQs. I remember sneaking bites while the adults were busy chatting, a little bit of bacon falling over my fingers and cheese sticking to my lips as I savored each spoonful. Every bite transported me back to those carefree days. Today, as I share this recipe with you, I hope it brings a sprinkle of nostalgia and joy to your own table.
Ingredients
Let’s dive into the ingredients! Here’s what you’ll need to create this delightful dish, along with some chef insights to help you personalize it:
-
4 cups sweet corn (fresh, frozen, or canned)
Whether you’re using fresh, sweet corn cut straight off the cob or grabbing frozen during off-seasons, the key here is to ensure it’s dried well if frozen or canned. Sweet corn is the star of this salad, bringing sweetness and crunch! -
8 slices bacon, cooked and crumbled
Bacon adds a delightful smokiness and crisp texture. You can substitute with turkey bacon or crispy chickpeas for a healthier or vegetarian option. -
1 cup cheddar cheese or pepper jack cheese, shredded
Cheese adds a creamy richness; cheddar offers a classic taste while pepper jack brings a lovely hint of spice. Feel free to experiment with your favorite! -
1/2 cup ranch dressing
I recommend store-bought for convenience and consistency, but homemade ranch is always a hit! Plus, you can control the flavors to suit your preference. -
1/4 cup mayonnaise
Adds extra creaminess! Swap it out for Greek yogurt if you’re looking to lighten things up—a great source of protein too! -
2 tablespoons lime juice
Freshly squeezed is highly recommended; it brightens up the salad and enhances all those gorgeous flavors. -
To taste salt
Start with a pinch, and adjust based on the saltiness of your cheese and bacon. -
To taste black pepper
Start light and adjust based on your palate. A bit of pepper can really elevate the dish! -
1/4 cup green onions, sliced
They bring a fresh crunch, but feel free to omit them if you’re not a fan—scallions or chopped chives are also great. -
1 medium red bell pepper, diced
For a pop of color and sweetness. If you’re in the mood for heat, swap this with a jalapeño!
Step-by-Step Instructions
Now, let’s get cooking! Follow these steps to whip up your own Crack Corn Salad:
-
Prep the Ingredients: Whether you’re using fresh corn, bacon, or veggies, the first step is to prepare everything. If you’re using fresh corn, grill or boil it for a few minutes until tender. If frozen or canned, just make sure it’s dried well.
-
Cook the Bacon: In a skillet over medium heat, cook the bacon until crispy. This should take about 5-7 minutes, depending on the thickness. Once done, transfer it to a paper towel-lined plate to drain. Save a bit for garnish!
-
Combine the Core Ingredients: In a large bowl, mix the corn, crumbled bacon, shredded cheese, and diced red bell pepper.
-
Make the Dressing: In a separate bowl, whisk together the ranch dressing, mayonnaise, and lime juice until smooth. This creamy dressing is what ties everything together—don’t skip it!
-
Add Seasonings: Pour the dressing over the corn mixture and sprinkle in salt and pepper. Mix gently until everything is well coated. Remember, you can always add more seasoning later, so start small!
-
Fold in the Greens: It’s time to add the sliced green onions. Gently fold them in, ensuring they’re evenly distributed throughout the salad.
-
Chill & Serve: Cover the salad and let it chill in the fridge for at least 30 minutes. This will allow all those lovely flavors to mingle and develop.
-
Plate It Up: When you’re ready to serve, scoop the salad into a beautiful bowl or a platter, sprinkle a little reserved bacon on top for garnish, and voilà! You’ve got a showstopper on your hands ready to impress.
Serving Suggestions
Crack Corn Salad is best served cold or at room temperature. For a stunning presentation, consider serving it in a beautiful, wide bowl. Garnish it with a sprinkle of fresh herbs or edible flowers if you’re feeling fancy. This dish pairs beautifully with grilled meats, burgers, or as a refreshing side for a picnic.
Recipe Variations
- Southwestern Twist: Add black beans and corn chips for a bit of crunch.
- Mediterranean Style: Swap out the ranch for a yogurt-based dressing and add kalamata olives and minced garlic.
- Fruit Addition: Throw in some diced avocado or fresh diced tomatoes to add sweetness and creaminess—a fantastic summer addition!
- Vegan Version: Replace bacon with smoked tempeh and use dairy-free cheese and yogurt!
Chef’s Notes
Over the years, my Crack Corn Salad has become a canvas for creativity. What started as my grandmother’s simplest recipe evolved into a fan-favorite that I now love to personalize for every gathering. One time, I decided on a whim to add chopped jalapeños for a spicy kick, and it instantly became a hit with my friends! Remember, cooking is all about experimenting. Don’t be afraid to throw in your own flair!
FAQs and Troubleshooting
1. Can I make this salad ahead of time?
Absolutely! It tastes even better the next day as the flavors meld together. Just be sure to give it a good stir before serving.
2. What should I do if the salad seems too dry?
If you find your salad lacking moisture, simply mix in a bit more ranch dressing or a splash of lime juice until you get the desired consistency.
3. Is there a gluten-free version?
Yes! Just ensure that your dressing is gluten-free, and you’re good to go. Most ranch dressings available on the market are naturally gluten-free, but it doesn’t hurt to check.
4. How do I store leftovers?
Store any leftovers in an airtight container in the fridge. Enjoy them within a couple of days for the best flavor.
Creating dishes that bring people together is what I love most about cooking. This Crack Corn Salad is not just a crowd-pleaser; it’s a reminder of those sunny days and shared moments spent around the table. So why not gather your loved ones, whip up this delightful dish, and recreate those memories in your own kitchen? Tie on your apron, pour yourself a sparkling drink, and let the joy of cooking lead the way! Enjoy every bite!
PrintCrack Corn Salad

A colorful and creamy salad bursting with summer flavors, perfect for potlucks and family gatherings.
- Prep Time: 15 minutes
- Cook Time: 10 minutes
- Total Time: 45 minutes
- Yield: 8 servings 1x
- Category: Salad
- Method: Chilling
- Cuisine: American
- Diet: Pescatarian
Ingredients
- 4 cups sweet corn (fresh, frozen, or canned)
- 8 slices bacon, cooked and crumbled
- 1 cup cheddar cheese or pepper jack cheese, shredded
- 1/2 cup ranch dressing
- 1/4 cup mayonnaise
- 2 tablespoons lime juice
- To taste salt
- To taste black pepper
- 1/4 cup green onions, sliced
- 1 medium red bell pepper, diced
Instructions
- Prep the ingredients: Whether using fresh corn, bacon, or veggies, prepare everything. Grill or boil fresh corn for a few minutes until tender.
- Cook the bacon: In a skillet over medium heat, cook the bacon until crispy, about 5-7 minutes. Transfer to a paper towel-lined plate.
- Combine the core ingredients: In a large bowl, mix the corn, crumbled bacon, shredded cheese, and diced red bell pepper.
- Make the dressing: In a separate bowl, whisk together the ranch dressing, mayonnaise, and lime juice until smooth.
- Add seasonings: Pour the dressing over the corn mixture and sprinkle in salt and pepper. Mix gently until well coated.
- Fold in the greens: Add the sliced green onions and gently fold them into the salad.
- Chill & serve: Cover the salad and let it chill in the fridge for at least 30 minutes.
- Plate it up: Serve in a beautiful bowl or platter, garnished with a little reserved bacon.
Notes
Tastes even better the next day as flavors meld together. Feel free to personalize with additional ingredients.
Nutrition
- Serving Size: 1 serving
- Calories: 320
- Sugar: 4g
- Sodium: 600mg
- Fat: 22g
- Saturated Fat: 7g
- Unsaturated Fat: 12g
- Trans Fat: 0g
- Carbohydrates: 28g
- Fiber: 4g
- Protein: 8g
- Cholesterol: 20mg
Keywords: corn salad, summer salad, BBQ side dish, potluck dish