
Fast Spinach Cottage Cheese Flat Bagels for Busy Mornings
Easy Spinach Cottage Cheese Flat Bagels
Welcome, fellow food lovers! Today, we’re diving into a delightful recipe that’s as easy to make as it is delicious: Easy Spinach Cottage Cheese Flat Bagels. If you’re anything like me, you’re always on the lookout for simple yet satisfying recipes that can be whipped up in no time—and this one is just that! So, grab your apron and let’s get started on creating a dish that not only tastes amazing but also brings a touch of elegance to your table.
A Personal Slice of Nostalgia
Let me take you back to one of those beautiful, sun-kissed Saturday mornings. I was a young chef in the making, perched at my family kitchen’s counter, where the aroma of freshly baked bagels wafted through the air. My mom was busy preparing breakfast, and I could hardly wait to dive into what was always my favorite meal of the week. As she rolled out the dough, she’d chat about the different toppings we could add—cream cheese, smoked salmon, or even some herbed olive oil.
One morning, she decided to get creative. She incorporated fresh spinach and cottage cheese into the mix, and oh boy, was my taste bud’s world rocked! The creamy cottage cheese paired perfectly with the bright, slightly peppery flavor of the spinach, and I was hooked. Fast forward to today, and I’m bringing that nostalgic twist back in a convenient flat bagel form. You don’t have to be a culinary whiz to enjoy these, and they’ll quickly become a staple in your kitchen.
Ingredients
Let’s talk about the ingredients you’ll need for these Easy Spinach Cottage Cheese Flat Bagels. Each element comes together to create a symphony of flavors that will make your taste buds sing!
-
Gluten-Free Bagels: These bagels are the base of your dish. You can find gluten-free varieties at most grocery stores, or if you’re feeling adventurous, make your own! If you’re not gluten-sensitive, feel free to use regular bagels.
-
Fresh Spinach: Packed with nutrients and flavor, fresh spinach offers a beautiful color and subtle earthy flavor. If fresh is hard to come by, frozen spinach works too—just thaw and squeeze out excess water!
-
Cottage Cheese: This creamy goodness is not only delicious but also loaded with protein. It can be replaced with ricotta or Greek yogurt for a different texture and taste.
-
Salt: A pinch of salt enhances the flavors of all the ingredients, bringing them together. Swap sea salt or kosher salt based on your preference.
-
Pepper: Freshly cracked black pepper adds just the right amount of bite. If you like a little heat, try using cayenne pepper instead!
-
Garlic Powder: This is where things get flavorful! Garlic powder provides a subtle, aromatic kick. You can use fresh minced garlic if you prefer a stronger flavor.
-
Onion Powder: Sweet and savory, onion powder rounds out the flavor profile. Substitute with diced onions if you want a more pronounced onion flavor.
Step-by-Step Instructions
Now, let’s get our hands dirty! Here’s a step-by-step guide to crafting these delightful flat bagels, packed with more than just flavor; they carry a story in every bite.
-
Prepare Your Oven: Preheat your oven to 375°F (190°C). This helps ensure a perfectly baked bagel from the get-go.
-
Sauté the Spinach: In a medium skillet, add a touch of olive oil over medium heat. Toss in your fresh spinach and sauté for about 2-3 minutes until it wilts down. This brings out the flavor. Let it cool for a minute before proceeding—nobody wants to end up with scrambled eggs in this mix!
-
Mix the Filling: In a medium bowl, combine your cottage cheese, sautéed spinach, a pinch of salt, pepper, garlic powder, and onion powder. Stir well until everything is evenly mixed. Take a moment to taste it; you can always adjust the seasonings to your liking.
-
Prepare the Bagels: If you’re using store-bought gluten-free bagels, slice them in half and place them on a baking sheet—cut side up. If you decide to make your own, roll them into flat discs and follow your recipe’s baking instructions.
-
Add the Spinach Mixture: Generously spoon the spinach-cottage cheese mixture onto each bagel half. Don’t be shy; pile it on! Use a spatula to spread it out evenly.
-
Bake: Slide your baking sheet into the preheated oven and bake for 15-20 minutes, or until the tops are golden and slightly crispy. Keep an eye on them—oven times can vary!
-
Cool & Serve: Once they’re out of the oven, let your gorgeous flat bagels cool for a few minutes. This will help set the filling.
And voilà! You’ve just created a dish that’s not only visually stunning but also bursting with flavor.
Serving Suggestions
To serve these delicious bagels, place them on a rustic wooden platter or a beautiful ceramic plate. Garnish with extra fresh spinach or a sprinkle of herbs for a pop of color. They make an excellent centerpiece for brunch or a casual get-together. Pair them with a light salad or some fresh fruit for a well-rounded meal.
Recipe Variations
Feel free to get creative with your Easy Spinach Cottage Cheese Flat Bagels! Here are a few twists you might enjoy:
-
Herbed Varieties: Add chopped fresh herbs like dill, basil, or chives to the cheese mixture for an explosion of flavor.
-
Veggie Lovers: Toss in some diced bell peppers or mushrooms once the spinach has wilted. They’ll add extra texture and flavor.
-
Cheesy Delight: Mix in some shredded mozzarella or feta cheese for a gooey, cheesy experience.
-
Protein-Packed: Stir in some cooked and crumbled bacon or sausage for a heartier bite.
Chef’s Notes
Throughout my culinary journey, this recipe has evolved with me. I’ve played around with different herbs and spices, but the spinach and cottage cheese combo remains a classic! I remember one time making these for a potluck, and they vanished like magic. People were guessing the recipe all night. That’s the beauty of this dish—it’s comforting and sophisticated without all the fuss.
FAQs and Troubleshooting
-
What if my filling is too watery?
- If your spinach releases too much water, squeeze out the excess before mixing it with the cottage cheese.
-
Can I freeze these bagels?
- Absolutely! Bake them, let them cool completely, and freeze them in a single layer. Reheat in the oven when ready to serve.
-
My bagels didn’t crisp up. What happened?
- Ensure your oven is properly preheated, and consider toasting them under the broiler for the last few minutes for extra crispiness.
-
Can I use different types of cheese?
- Yes! Feel free to experiment with your favorite cheese. Just remember that softer cheeses can affect the texture.
Nutritional Info
If you’re conscious about nutrition (and who isn’t these days?), these Spinach Cottage Cheese Flat Bagels are loaded with protein and nutrients from the spinach. They can serve as a wholesome breakfast option or midday snack, depending on how you choose to serve them!
And there you have it! A charming journey into the world of Easy Spinach Cottage Cheese Flat Bagels that combines nostalgia, creativity, and flavor. I hope you feel inspired to get into the kitchen and whip up a batch—or two! Remember, cooking is about joy and sharing, and I can’t wait for you to share these delicious creations with your loved ones. Happy cooking!
PrintEasy Spinach Cottage Cheese Flat Bagels

Delicious and easy-to-make flat bagels, filled with creamy cottage cheese and fresh spinach, perfect for brunch or a light meal.
- Prep Time: 10 minutes
- Cook Time: 20 minutes
- Total Time: 30 minutes
- Yield: 4 servings
- Category: Main Course
- Method: Baking
- Cuisine: American
- Diet: Vegetarian
Ingredients
- Gluten-Free Bagels
- Fresh Spinach
- Cottage Cheese
- Salt
- Pepper
- Garlic Powder
- Onion Powder
Instructions
- Prepare your oven: Preheat your oven to 375°F (190°C).
- Sauté the spinach: In a medium skillet, add a touch of olive oil over medium heat. Toss in your fresh spinach and sauté for about 2-3 minutes until it wilts down.
- Mix the filling: In a medium bowl, combine your cottage cheese, sautéed spinach, a pinch of salt, pepper, garlic powder, and onion powder. Stir well until everything is evenly mixed.
- Prepare the bagels: If using store-bought gluten-free bagels, slice them in half and place them on a baking sheet—cut side up.
- Add the spinach mixture: Generously spoon the spinach-cottage cheese mixture onto each bagel half.
- Bake: Slide your baking sheet into the preheated oven and bake for 15-20 minutes, or until the tops are golden and slightly crispy.
- Cool & serve: Once they’re out of the oven, let your gorgeous flat bagels cool for a few minutes before serving.
Notes
Feel free to add herbs or other vegetables to the filling for more flavor. Great for brunch or as a snack!
Nutrition
- Serving Size: 1 bagel half
- Calories: 250
- Sugar: 3g
- Sodium: 350mg
- Fat: 7g
- Saturated Fat: 3g
- Unsaturated Fat: 4g
- Trans Fat: 0g
- Carbohydrates: 35g
- Fiber: 2g
- Protein: 12g
- Cholesterol: 15mg
Keywords: spinach bagels, cottage cheese, easy recipes, vegetarian brunch

One-Pot Ghanaian Spinach Stew: 30-Minute Weeknight Meal
Discovering the Heart of Home Cooking: Ghanaian Spinach Stew
Hello, food enthusiasts! Today, we’re embarking on a culinary journey to Ghana, where we’ll whip up a vivid and aromatic dish that brings together the essence of comfort and nourishment. Ghanaian Spinach Stew is a symphony of flavors—rich, spicy, and absolutely satisfying. Whether you’re hosting a cozy dinner or simply wanting to spice up your weekly meal routine, this stew will transport you and your loved ones to the vibrant streets of Accra with every bite!
Growing up, my kitchen was the heart of our home, filled with laughter, stories, and the tantalizing aroma of aromatic spices. As a child, I often found myself standing on a stool, curious eyes watching my mother as she transformed simple ingredients into something magical. One memory that stands out is the first time I tasted spinach stew. It was a rainy Sunday afternoon, and my mother was concocting her version while chatting with a neighbor. The smell wafted through the house—garlic, ginger, and those fiery Scotch bonnets mingling to create a melody only the heart could recognize. My mouth watered, and as I savored that first spoonful, I felt a canopy of warmth and love enveloping me. Instant comfort! That’s the soul of cooking.
Today, I want to share with you how to create your very own Ghanaian Spinach Stew, with all the nuances that make it special, while ensuring it remains approachable and fun. Let’s dive into the ingredients and what makes this dish so unique!
Ingredients
Before you start cooking, let’s gather the essentials:
-
1 tbsp of Vegetable Oil
A great base for sautéing! You can use olive oil or coconut oil as substitutes if you prefer a different flavor. -
4 Garlic Cloves
Freshly minced garlic is a game-changer. If you’re in a pinch, garlic powder can be used, but fresh garlic is always best! -
1 tbsp of Fresh Ginger Root, grated
Ginger adds a wonderful warmth. If you don’t have fresh ginger, ground ginger can be a last resort, but the flavor won’t be quite the same. -
1 Medium Red Onion
Offers sweetness and depth. Shallots or white onions can work as substitutes in this dish. -
2 Scotch Bonnets or Habanero Chillies
The heat level! Adjust according to your spice tolerance—jalapeños can be a milder substitute if needed. -
2 tbsp of Tomato Paste
This helps intensify the tomato flavor. You can swap it with canned tomato puree in a pinch. -
2 tsp of Smoked Paprika
It gives a beautiful smokiness. Regular paprika or chili powder can be substituted, though the flavor will differ slightly. -
400 g of Canned Plum Tomatoes
These provide a rich base. If you have fresh tomatoes, about 5 medium-sized, diced, will work too! -
400 g of Fresh Spinach
The star of the show! If you can’t find fresh spinach, frozen will work, just make sure to thaw and drain it well before use.
Step-by-Step Instructions
Now that we have everything prepped and ready, let’s roll up our sleeves and bring that pot to life!
1. Heat the Oil:
In a large pot or deep pan over medium heat, pour in the vegetable oil. Let it heat until it shimmers. This is the stage where all the magic begins!
2. Sauté the Aromatics:
Toss in the minced garlic, grated ginger, and chopped red onion. The moment they hit the oil, you’ll be enveloped in a symphony of fantastic aromas. Sauté for about 3-4 minutes until the onions become translucent—this is where flavor builds.
3. Spice It Up:
Now, add the Scotch bonnets (or your choice of chili). Cook for another minute—let those spicy notes infuse with the other aromas. Be careful with the heat; feel free to adjust based on your spice preference.
4. Tomato Magic:
Stir in the tomato paste and smoked paprika, allowing them to mix thoroughly for another minute or so. This step is essential for building layers of flavor. Then, pour in the canned plum tomatoes and season with a little salt and pepper. Bring it to a gentle simmer, allowing the glorious hues of red to dance about!
5. Spinach Time:
It’s time to elevate this dish! Add the fresh spinach, stirring it in until it wilts down. This usually takes about 3-5 minutes. Trust me, you’ll love watching the pile of greens disappear into the lovely stew.
6. Let It Simmer:
Allow the stew to simmer on low heat for about 20 minutes, stirring occasionally. This lets all the flavors meld beautifully. If it seems too thick, don’t hesitate to splash in a bit of water or vegetable broth to reach your desired consistency.
7. Taste and Adjust:
This is where your chef instincts kick in! Give it a taste and adjust seasonings as needed. More salt? A pinch of sugar to balance? Extra spice? You got this!
Serving Suggestions
Now that your Ghanaian Spinach Stew is bubbling and smelling divine, it’s time to serve! Ladle hearty portions into shallow bowls or over a bed of fluffy rice. For that gorgeous finishing touch, sprinkle with fresh herbs like chopped cilantro or parsley. You could also pair it with a side of crusty bread to mop up all that delicious goodness!
Recipe Variations
Want to switch things up a bit? Here are a few creative ideas to make this stew your own:
- Protein-Packed Spinach Stew: Add shredded cooked chicken or chickpeas for additional protein.
- Creamy Spinach Twist: Stir in a splash of coconut milk towards the end for a creamier texture.
- Hearty Greens: Swap out some of the spinach for kale or Swiss chard for a different texture and flavor.
- Herbaceous Delight: Add a handful of fresh basil or dill to elevate the herby freshness.
- Nutty Flavor: Toss in some crushed peanuts or cashews for a delightful crunch and nutty richness.
Chef’s Notes
Cooking this stew brings me such joy! Over the years, I’ve adjusted the heat level depending on my guests. I remember a time when I underestimated the spice and nearly scorched my taste buds! Lesson learned: always taste as you go! Cooking is an evolving art, and each version of this dish adds a new layer to its history in my kitchen. I encourage you to dive in and make it your own!
FAQs and Troubleshooting
1. My stew turned out too spicy! What can I do?
If you find your stew is too fiery, try adding a pinch of sugar or some additional canned tomatoes to help mellow the heat. Creamy yogurt on the side can also help balance things out!
2. Can I use frozen spinach?
Absolutely! Just ensure you thaw it first and squeeze out any excess moisture before adding it to the stew.
3. What if I don’t have fresh tomatoes?
No worries! Canned tomatoes work wonderfully, but if you want to use fresh, about five ripe tomatoes, diced and cooked down will work well too.
4. How long can I store leftovers?
This stew keeps well in the fridge for about 3-4 days. Just reheat gently on the stove. You can also freeze portions for later enjoyment—perfect for meal prepping!
Nutritional Info
While I haven’t provided specific nutritional info, this Ghanaian Spinach Stew is packed with vitamins from the fresh spinach, healthy fats from the oil, and proteins if you choose to add them. It’s a hearty, nourishing dish perfect for sharing with family and friends!
Cooking brings us together. Whether it’s the warmth of a familiar recipe or the bringing of flavors from different cultures, food is a universal language of love. So, tie on that apron, bring your wonderful energy into the kitchen, and let’s create amazing meals filled with heart and soul. Happy cooking!
PrintGhanaian Spinach Stew

Experience the vibrant flavors of Ghana with this aromatic and comforting Spinach Stew, perfect for nourishing and satisfying meals.
- Prep Time: 15 minutes
- Cook Time: 30 minutes
- Total Time: 45 minutes
- Yield: 4 servings 1x
- Category: Main Course
- Method: Stovetop
- Cuisine: Ghanaian
- Diet: Vegetarian
Ingredients
- 1 tbsp of Vegetable Oil
- 4 Garlic Cloves, minced
- 1 tbsp of Fresh Ginger Root, grated
- 1 Medium Red Onion, chopped
- 2 Scotch Bonnets or Habanero Chillies
- 2 tbsp of Tomato Paste
- 2 tsp of Smoked Paprika
- 400 g of Canned Plum Tomatoes
- 400 g of Fresh Spinach
Instructions
- Heat the oil in a large pot or deep pan over medium heat until shimmering.
- Toss in the minced garlic, grated ginger, and chopped red onion, sautéing for 3-4 minutes until the onions become translucent.
- Add the Scotch bonnets (or your choice of chili) and cook for another minute.
- Stir in the tomato paste and smoked paprika, mixing thoroughly for another minute.
- Pour in the canned plum tomatoes and season with a little salt and pepper, bringing to a gentle simmer.
- Add the fresh spinach, stirring until it wilts down, about 3-5 minutes.
- Simmer the stew on low heat for about 20 minutes, stirring occasionally.
- Taste and adjust seasonings as needed.
Notes
This stew can be served over rice or with crusty bread. It is versatile; consider adding proteins or cream for variation.
Nutrition
- Serving Size: 1 serving
- Calories: 300
- Sugar: 6g
- Sodium: 450mg
- Fat: 10g
- Saturated Fat: 1g
- Unsaturated Fat: 8g
- Trans Fat: 0g
- Carbohydrates: 40g
- Fiber: 6g
- Protein: 8g
- Cholesterol: 0mg
Keywords: Ghanaian, Spinach Stew, Vegetarian, Comfort Food, Spicy Dish
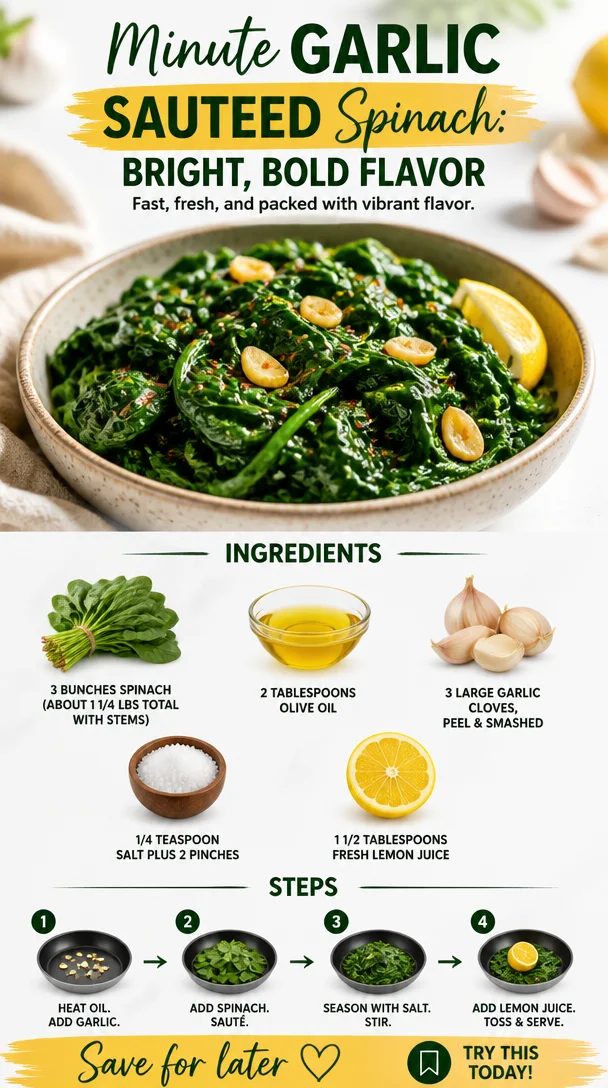
Minute Garlic Sauteed Spinach: Bright, Bold Flavor
Sautéed Spinach That Tastes Amazing: A Simple Green Delight
Welcome to the vibrant world of sautéed spinach! If you’re anything like me, you’ve often found yourself peering into the produce aisle, searching for inspiration, or perhaps just a side dish that doesn’t involve too much fuss. Believe me when I say this: sautéed spinach is where flavor and simplicity mesh beautifully, making it one of those underappreciated superstars in the culinary world.
Why sautéed spinach, you ask? Well, not only is this dish a powerhouse of nutrients, but it’s also incredibly versatile and comes together in a snap. One minute you’re stressed out from a long day, and the next, you’ve whipped up a dish that tastes amazing and feels equally impressive. Here’s a secret sauce to help you realize that even the simplest of ingredients can lead to gourmet-level results.
Growing up, my family always had a deep appreciation for greens. I remember the aroma of garlic sizzling in olive oil filling our kitchen as my mom prepared a quick sauté of fresh spinach. It was one of those magical moments that made the mundane feel spectacular. She would toss in a splash of lemon juice and serve it alongside roasted chicken or fish, and instantly, dinner felt like a celebration.
So grab your apron! This sautéed spinach recipe is about to transform your approach to greens—from an afterthought to a must-have on your table.
My Spinach Story
One of my favorite memories growing up was working alongside my mom in the kitchen. Every Saturday morning, she would pick out fresh ingredients from our local farmers’ market. I can still hear her sing-songy voice saying, “A little garlic, a splash of lemon, and we’re in for a treat!”
Spinach was her go-to side dish more often than not. In those moments under the warm glow of the kitchen lights, we’d laugh and chat as we cooked, and I’d learn how to let simple ingredients shine. I still chuckle thinking how I used to indulge in the spinach while sneaking pieces of bread dipped in olive oil. Oh, the joys of childhood!
As I grew older, those moments turned into motivating sparks that lit my culinary journey. Today, I’m excited to share this sautéed spinach recipe that holds a special place in my heart, bringing all those cherished memories flooding back. Are you ready to create some of your own?
Ingredients
Before we dive into cooking, let me introduce you to your ingredients. Below is everything you need, along with some tips to elevate your sautéed spinach experience:
-
3 bunches of spinach (about 1 1/4 pounds total with stems) or 10 ounces baby spinach leaves
Spinach is a nutrient powerhouse packed with vitamins A, C, and K. If you opt for baby spinach, it has a milder taste and no stems to contend with. Feel free to mix in other greens like kale or Swiss chard for a twist! -
2 tablespoons olive oil
A smooth, high-quality olive oil not only adds flavor but also enhances the health benefits. You could swap it for avocado oil for a nuttier taste if desired. -
3 large garlic cloves, peeled & smashed
Garlic gives the dish its aromatic flair. Crushing the garlic brings out more flavor—definitely don’t skip this step! For a milder flavor, try using roasted garlic instead. -
1/4 teaspoon salt plus 2 pinches
Salt is essential to bring out the flavor of spinach. You can substitute with Himalayan salt for a different nuance or even reduce it for a low-sodium option. -
1 1/2 tablespoons fresh lemon juice
The brightness of lemon juice balances the earthy flavors of the spinach. Lime can take the flavor in a fun direction, too!
These ingredients work harmoniously to create a vibrant dish that feels far more indulgent than the sum of its parts. Now that you’re all set to cook, let’s get to it!
Step-by-Step Instructions
Creating sautéed spinach is super straightforward and doesn’t take more than a few minutes. Here’s how to do it:
-
Prep the Spinach:
If you’re using regular spinach, rinse it thoroughly under cold water to remove any grit. You’ll want to dry it well, but a little moisture is okay; it helps the spinach steam slightly once added to the hot pan. For baby spinach, just give it a quick rinse. -
Heat the Olive Oil:
In a large sauté pan, heat the olive oil over medium heat. You want it hot enough to gently sizzle but not so hot that it smokes. A good rule of thumb is that if you can see the oil shimmering, you’re in the sweet spot. -
Add the Garlic:
Toss your smashed garlic cloves into the pan. Sauté the garlic for about 30 seconds or until it’s fragrant—be careful not to let it burn, as burnt garlic can leave a bitter flavor. -
Add the Spinach:
Working quickly, add your cleaned spinach to the pan. You may need to do this in batches if your pan is small, but no worries; it wilts down remarkably fast! Use tongs to toss the spinach, making sure it gets coated in that delicious garlicky olive oil. -
Season with Salt:
Sprinkle in your salt and toss again. The salt will help sweat out the moisture from the spinach, making it tender and flavorful. -
Introduce the Lemon Juice:
As the spinach wilts down (about 2-3 minutes), drizzle in the fresh lemon juice. Toss and allow it to cook for another minute for that zesty punch. -
Test the Texture:
You want the spinach tender but still vibrant in color. If it looks too soggy, pull it off the heat immediately—you want those nutrients intact!
And voilà! You’ve just created a stunning side dish loaded with flavor in under 10 minutes. Just remember, keeping the cooking time brief helps retain the nutrients, and you want the spinach to look bright and inviting.
Serving Suggestions
Plating is simple, yet it can turn your sautéed spinach into something visually appealing. Use a nice white plate to make that vibrant green pop, or consider laying out your spinach next to a beautifully plated piece of protein, such as pan-seared chicken or roasted salmon. Drizzle a bit of extra virgin olive oil over the top for a shiny finish, and sprinkle some lemon zest to really brighten it up. You can even sprinkle some toasted pine nuts or slivered almonds for added texture—who says greens can’t be fancy?
Recipe Variations
Let’s mix things up! Here are a few creative twists on the classic sautéed spinach that can turn it into an entirely new experience:
- Add Nuts: Toss in some toasted walnuts or pecans for a crunchy texture.
- Cheesy Goodness: For a rich twist, toss in some grated Parmesan or feta cheese right at the end.
- Spiced Up: Add a sprinkle of red pepper flakes for a spicy kick, or incorporate ground cumin for an earthy depth.
- Herb-Infused: Fresh herbs like basil or oregano can be added for a fresh flavor profile.
- Creamy Spinach: For those who love cream, add a splash of heavy cream or coconut milk before serving.
Chef’s Notes
Like all great recipes, my sautéed spinach has evolved over time. I’ve tried numerous variations from friends and family without finding that single perfect version—until I settled on this. One time, I accidentally added too much salt while chatting and laughing, and while it wasn’t my finest moment, I learned the importance of tasting as you go!
Next time you find yourself with a bunch of spinach, I hope you’ll think of this recipe. Not only is it a tribute to my kitchen memories with my mom, but it’s a reminder that in cooking, every mistake can turn into a new discovery.
FAQs and Troubleshooting
-
Why is my spinach mushy?
Overcooking is often to blame! Keep a close eye on your spinach as it wilts. Remove it from the heat as soon as it’s bright and tender. -
Can I use frozen spinach instead?
Absolutely! Thaw and drain it well. Sauté as usual, but you may want to reduce the cooking time slightly since it’s already cooked. -
How do I store leftovers?
You can store leftover sautéed spinach in an airtight container in the fridge for up to three days. Just expect it to lose some texture. -
Can I reheat?
Yes! To reheat, simply toss it back in a pan on low heat or microwave for a quick fix. Add a splash of water to refresh it!
Nutritional Info (Optional)
- Calories: Approximately 100 calories per serving (based on 2 servings)
- Protein: 2g
- Fat: 7g (mainly from olive oil)
- Carbohydrates: 4g
- Fiber: 2g
Though it’s low in calories, sautéed spinach is high in nutrients. It’s packed with vitamins and minerals that contribute to a balanced diet.
And there you have it! A delicious sautéed spinach that’s both simple and elegant, perfect for elevating any meal. Remember, good food is about sharing moments, not just ingredients. So, tie on that apron and let this sautéed spinach take center stage at your next gathering or cozy dinner. Happy cooking!
PrintSautéed Spinach That Tastes Amazing
A quick and flavorful sautéed spinach recipe that elevates any meal with its simplicity and vibrant taste.
- Prep Time: 5 minutes
- Cook Time: 5 minutes
- Total Time: 10 minutes
- Yield: 4 servings 1x
- Category: Side Dish
- Method: Sautéing
- Cuisine: American
- Diet: Vegetarian
Ingredients
- 3 bunches of spinach (about 1 1/4 pounds total with stems) or 10 ounces baby spinach leaves
- 2 tablespoons olive oil
- 3 large garlic cloves, peeled & smashed
- 1/4 teaspoon salt plus 2 pinches
- 1 1/2 tablespoons fresh lemon juice
Instructions
- Prep the Spinach: Rinse thoroughly under cold water and dry well.
- Heat the Olive Oil: In a large sauté pan, heat olive oil over medium heat.
- Add the Garlic: Toss in the smashed garlic cloves and sauté for about 30 seconds until fragrant.
- Add the Spinach: Quickly add cleaned spinach to the pan, tossing to coat in oil.
- Season with Salt: Sprinkle salt and toss again to sweat moisture from the spinach.
- Introduce the Lemon Juice: As the spinach wilts, drizzle in the lemon juice and cook for another minute.
- Test the Texture: Remove from heat once tender but still vibrant in color.
Notes
For added flavor, consider tossing in toasted nuts, cheese, or fresh herbs.
Nutrition
- Serving Size: 1 serving
- Calories: 100
- Sugar: 1g
- Sodium: 200mg
- Fat: 7g
- Saturated Fat: 1g
- Unsaturated Fat: 6g
- Trans Fat: 0g
- Carbohydrates: 4g
- Fiber: 2g
- Protein: 2g
- Cholesterol: 0mg
Keywords: sautéed spinach, healthy side, quick recipe, vegetarian dish, garlic spinach

Minute Korean Spinach Namul: Fresh, Light Side Dish
Discover the Joy of Sigeumchi Namul: Korean Spinach Salad
Hello and welcome back, food enthusiasts! Today, I’m thrilled to share a dish that’s as vibrant in flavor as it is in color—Sigeumchi Namul, or Korean Spinach Salad. This delightful side dish is a staple in Korean cuisine, embodying the harmony of simple ingredients coming together to create something extraordinary.
Spinach is often perceived as a boring green, but trust me—once dressed in a rich combination of soy sauce, sesame oil, and garlic, you’ll see it in a whole new light. So, let’s roll up our sleeves, tie on our aprons, and dive into the world of Korean flavors that will make your taste buds sing!
A Nostalgic Kitchen Memory
As much as I adore experimenting in the kitchen, my culinary roots often tie me back to my grandmother’s kitchen, which felt like magic at times. I remember visiting her during summer breaks, where the air was filled with the sumptuous smells of her cooking. On one of those warm afternoons, amidst the clattering of dishes and laughter, she taught me how to prepare Sigeumchi Namul.
Armed with fresh spinach from her garden, she would transform it into something breathtakingly simple yet incredibly flavorful. She used to say, "Food is love." It was her way of connecting, of nurturing, and of creating lasting memories. The crunch of sesame seeds and the vivid green of the spinach would always ignite my appetite. I can still recall watching in awe as she mixed the ingredients, her hands moving gracefully, making something so tender and beautiful. It’s that spirited love of food and fellowship that I channel when I cook this salad today.
Ingredients
Let’s talk ingredients! This salad is wonderfully accessible—most likely, you already have several of these tasty staples in your pantry. Here’s what you’ll need:
-
1.5 lbs Fresh Spinach (with stems on)
- Why? Fresh spinach is vibrant and packed with nutrients. Look for heavy, dark green leaves for the best flavor.
- Tip: If you can’t find fresh spinach, baby spinach or even other leafy greens like kale will work as substitutes.
-
4 cloves Garlic (minced)
- Why? Garlic adds a lovely aromatic punch, enhancing the dish’s flavor profile.
- Tip: Use fresh garlic for the best taste, but you can substitute it with garlic powder in a pinch.
-
4 tbsp Soy Sauce
- Why? This brings the umami and a touch of saltiness.
- Tip: For a gluten-free option, use tamari or coconut aminos.
-
4 tbsp Sesame Oil
- Why? The nutty flavor of sesame oil is a game-changer and key in Korean dishes.
- Tip: If you want a lighter taste, opt for a light sesame oil instead of toasted.
-
1 Green Onion (chopped)
- Why? Green onions lend a hint of freshness and mildness to the dish.
- Tip: If you’re short on green onions, finely chopped chives or shallots can work as substitutes.
-
2 tbsp Sesame Seeds (crushed)
- Why? These add a delicious crunch and a boost of nuttiness.
- Tip: Toast the seeds for an even richer flavor!
-
1 tsp Sugar
- Why? A pinch of sugar balances out the salty and savory aspects.
- Tip: If avoiding sugar, a stevia-based sweetener can also do the trick!
-
0.5 tbsp Korean Red Chili Flakes (Gochugaru)
- Why? Adds a lovely pop of heat and color without overpowering the dish.
- Tip: If you’re sensitive to spice, you can reduce the amount!
-
0.5 tbsp Korean Chili Paste (Gochujang)
- Why? For a touch of sweetness and deep flavor.
- Tip: You can mix it with a little water if you want to reduce its thickness!
With this stellar lineup, we’re ready to create something delicious.
Step-by-Step Instructions
Ready to cook? Let’s get started! Follow these steps for a sensational Sigeumchi Namul.
-
Wash the Spinach:
- Start by rinsing your spinach under cold water to remove any grit or dirt. Give it a slight shake to remove excess moisture. It’s essential not to skip this step!
-
Blanch the Spinach:
-
Bring a large pot of salted water to a boil and add the spinach. Blanch for about 30 seconds, just until the leaves are wilted but still vibrantly green. This step helps retain the nutrients and keeps the spinach looking fresh.
-
Chef Tip: Don’t overcook! Remove it promptly to retain that beautiful green color.
-
-
Ice Bath:
- After blanching, immediately transfer the spinach to a bowl filled with ice water to stop the cooking process. This technique is known as shocking and ensures the spinach remains bright and crisp.
-
Drain and Squeeze:
-
Once cooled, drain the spinach and squeeze it gently to remove excess moisture. This step is crucial; too much water can dilute the flavors of your dressing.
-
Fun Chef Hack: You can use a clean kitchen towel for this step! Just wrap the spinach into the towel and twist it to get the moisture out.
-
-
Prepare the Dressing:
- In a mixing bowl, combine the minced garlic, soy sauce, sesame oil, sugar, gochugaru, and gochujang. Stir until well combined. This dressing is like a hug for your spinach; it’s going to add depth and flavor!
-
Mix Spinach and Dressing:
- Toss the drained spinach in the mixing bowl with the dressing. Make sure every leaf is coated beautifully. Use your hands for this step; it’s therapeutic and helps you connect with your food!
-
Add Toppings:
- Finally, sprinkle on the chopped green onions and sesame seeds. Give it a gentle toss again just to distribute the toppings evenly.
-
Taste Test:
- Always taste and adjust! If you want more saltiness, add a splash more of soy sauce; if you prefer a little sweetness, more sugar can round it out.
-
Serve and Enjoy:
- Transfer your gorgeous Sigeumchi Namul into a serving bowl, and allow it to sit for about 10 minutes—this lets the flavors meld beautifully.
Serving Suggestions
Presentation is key! For a lovely plating, you can gently mound the spinach salad in the center of a beautiful serving platter. Add a few extra sesame seeds and a sprig of green onion on top for visual appeal. Enjoy your Sigeumchi Namul as a delightful side during dinner or as part of a Korean feast. It pairs excellently with grilled meats or fried rice!
Recipe Variations
Let’s talk creativity! Here are some fun twists to make this dish uniquely yours:
-
Spicy Sesame Spinach:
- Add more chili flakes or even some sliced chili peppers for an extra kick.
-
Nutty Spinach:
- Mix in crushed peanuts or walnuts for added crunch and flavor.
-
Sesame-ginger variation:
- Incorporate some minced fresh ginger for a zingy twist.
-
Soy-free option:
- Substitute soy sauce with coconut aminos for a delicious soy-free version.
-
Add Protein:
- Toss in some edamame or pan-seared tofu to make it a full meal.
Chef’s Notes
Over the years, this dish has become a family favorite at gatherings. What I love most is how it evolves with each serving; sometimes I add a sprinkle of nuts or even bring in other veggies like carrots for color. Once, while cooking with my children, we made a "Sigeumchi Namul" competition to see who could create their own unique version. It turned into a full-blown art project—who knew a salad could spark that kind of creativity!
FAQs and Troubleshooting
1. My spinach looks limp. What did I do wrong?
Don’t despair! Spinach wilts quickly when blanched. Ensure you’re not leaving it in the boiling water for more than 30 seconds, and promptly transfer it to an ice bath to stop the cooking.
2. Can I prepare this salad in advance?
Absolutely! You can blanch and dress the spinach up to a day in advance. Just keep it in an airtight container in the fridge. The flavors will even deepen, making it even tastier.
3. My dressing is too salty. How can I fix it?
If you find the dressing too salty, adding a touch more sugar can help balance it out. You could also adjust it by adding more spinach; that will dilute the saltiness.
4. Can I use frozen spinach?
While fresh is best for this salad, you can use frozen spinach if that’s what you have. Just ensure it’s well-drained to get rid of the excess water before mixing with the dressing.
Conclusion
There you have it—a delightful journey through the vibrant world of Sigeumchi Namul. This Korean Spinach Salad is a beautiful way to demonstrate the art of simplicity in the kitchen. Remember, cooking is all about love, care, and connecting over shared moments. So, tie on your apron, gather your ingredients, and create a plate that brings joy to yourself and those around you.
At Ivory Apron, we believe in making elevated cooking accessible for everyone. Thank you for joining me today, and I can’t wait to hear how your Sigeumchi Namul turns out! Happy cooking!
PrintSigeumchi Namul: Korean Spinach Salad
A vibrant and flavorful Korean spinach salad, dressed with soy sauce, sesame oil, and garlic for an irresistible side dish.
- Prep Time: 10 minutes
- Cook Time: 5 minutes
- Total Time: 15 minutes
- Yield: 4 servings 1x
- Category: Side Dish
- Method: Blanching
- Cuisine: Korean
- Diet: Vegetarian
Ingredients
- 1.5 lbs Fresh Spinach (with stems on)
- 4 cloves Garlic (minced)
- 4 tbsp Soy Sauce
- 4 tbsp Sesame Oil
- 1 Green Onion (chopped)
- 2 tbsp Sesame Seeds (crushed)
- 1 tsp Sugar
- 0.5 tbsp Korean Red Chili Flakes (Gochugaru)
- 0.5 tbsp Korean Chili Paste (Gochujang)
Instructions
- Wash the Spinach: Rinse spinach under cold water to remove grit or dirt.
- Blanch the Spinach: Bring salted water to a boil, add spinach and blanch for about 30 seconds.
- Ice Bath: Transfer the blanched spinach to a bowl filled with ice water to stop cooking.
- Drain and Squeeze: Drain spinach and gently squeeze to remove excess moisture.
- Prepare the Dressing: In a bowl, combine minced garlic, soy sauce, sesame oil, sugar, gochugaru, and gochujang.
- Mix Spinach and Dressing: Toss drained spinach in the bowl with the dressing.
- Add Toppings: Sprinkle chopped green onions and sesame seeds over the salad.
- Taste Test: Adjust seasoning to taste with more soy sauce or sugar.
- Serve and Enjoy: Transfer to a serving bowl and allow to sit for about 10 minutes before serving.
Notes
Pair the salad with grilled meats or fried rice for a complete meal. This dish can be prepared in advance and stored in an airtight container in the fridge.
Nutrition
- Serving Size: 1 serving
- Calories: 200
- Sugar: 1g
- Sodium: 800mg
- Fat: 15g
- Saturated Fat: 2g
- Unsaturated Fat: 12g
- Trans Fat: 0g
- Carbohydrates: 10g
- Fiber: 4g
- Protein: 5g
- Cholesterol: 0mg
Keywords: Korean salad, spinach recipe, healthy side dish
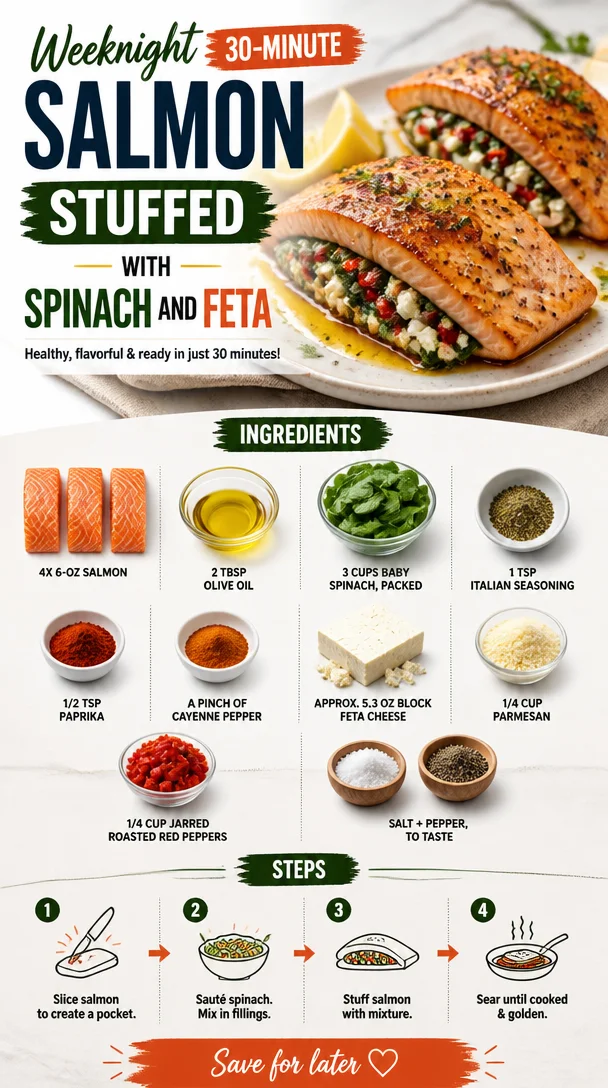
Weeknight 30-Minute Salmon Stuffed with Spinach and Feta
Stuffed Salmon With Spinach & Feta: A Delightful 30-Minute Meal
Hello, culinary adventurers! Today, I’m thrilled to share a recipe that’s become a favorite in my kitchen: Stuffed Salmon with Spinach and Feta. This dish is not only visually stunning but also packed with flavor and nutrients. It’s the perfect meal for those busy weeknights when you want something special without spending hours in the kitchen. So, grab your apron, and let’s dive into cooking magic that will impress your family or friends.
Personal Story
Growing up, my family had a tradition of Friday night dinners, where everyone was encouraged to share their favorite dishes. Salmon was a regular on our table, but it wasn’t until my mom discovered the combination of spinach and feta that things really started to get exciting. I still remember the savory aroma filling the house as she prepped the filling while we set the table, lighting candles and putting out our favorite plates. What I loved most was the way the colors would pop against the pink of the salmon — a truly beautiful sight! This recipe captures that nostalgic flavor, evoking those cherished memories while adding my personal touch. It’s a wonderful meal to make any day feel like a special occasion.
Ingredients
Here’s what you’ll need for this delightful dish:
-
4 x 6-ounce pieces of salmon
(approx. 170 grams each; I find longer pieces of salmon work best)
Tip: Fresh salmon is always best, but you can use frozen if you’re in a pinch. Just be sure to thaw it completely before cooking! -
2 Tbsp olive oil
(divided)
Chef’s insight: Extra virgin olive oil gives a lovely flavor, but feel free to use any oil you prefer; avocado oil works great too. -
3 cups baby spinach, packed
Spinach wilts down significantly, so packing it in gives you the right amount for stuffing.
Substitution: Kale can be used instead if you prefer a heartier green. -
1 tsp Italian seasoning
A blend of dried herbs that enhances the dish’s flavor; you can even make your own mix!
Want a little kick? Add some crushed red pepper flakes for a spicy twist! -
1/2 tsp paprika
(regular or smoked)
Chef hack: Smoked paprika adds a wonderful depth, giving the salmon even more complexity. -
A pinch of cayenne pepper
Balance is key; this adds a bit of heat without overwhelming the dish. -
Approx. 5.3-ounce block of feta cheese
(approx. 150 grams)
Feta’s sharpness complements the rich salmon beautifully. For a twist, try goat cheese for a creamier texture. -
1/4 cup parmesan, freshly grated
(I recommend parmigiano-reggiano)
Freshly grated cheese melts better and offers a richer flavor than pre-grated. -
1/4 cup jarred roasted red peppers
(chopped into small, 1/4-inch pieces)
These add a lovely sweetness and color to the stuffing! Feel free to use fresh roasted peppers if you have them on hand. -
Salt + pepper, to taste
Always season to your liking; the flavors build as you cook!
Step-by-Step Instructions
Step 1: Preheat and Prepare
First things first, let’s preheat your oven to 375°F (190°C). While that’s warming up, grab a baking dish and lightly coat it with a drizzle of olive oil to prevent sticking and to enhance flavor.
Step 2: Sauté the Spinach
In a medium skillet, heat 1 tablespoon of olive oil over medium heat. Toss in the packed spinach and sauté for about 2-3 minutes, just until it wilts down — it’ll shrink significantly, so don’t be alarmed! This is where the magic begins, and those vibrant greens turn into a delightful filling.
Tip: If you want to get fancy, add minced garlic to the oil before adding the spinach. It enhances the flavor beautifully!
Step 3: Mix the Filling
Once the spinach is wilted, remove it from heat and let it cool for a minute. In a mixing bowl, combine the sautéed spinach, crumbled feta, grated parmesan, Italian seasoning, paprika, cayenne pepper, and chopped roasted red peppers. Mix thoroughly and season with salt and pepper to taste. The colors in this filling are so gorgeous, and the aroma? Divine!
Step 4: Prepare the Salmon
Now, let’s get to that beautiful salmon! Place your salmon fillets skin-side down on a clean cutting board. Carefully use a sharp knife to create a pocket in each fillet — you want to slice it horizontally almost all the way through, leaving the other side intact.
Chef Tip: If you find it tricky to cut the pocket, you can use a food processor to blend the filling ingredients before stuffing!
Step 5: Stuff and Sear
Generously stuff each salmon fillet with the delightful spinach and feta mixture. Press gently to ensure it’s packed in there! Now, drizzle a little olive oil over the top of each stuffed fillet and season with salt and pepper.
In that same skillet you used for the spinach, heat the remaining tablespoon of olive oil over medium-high heat. Carefully place the stuffed salmon in the skillet, skin-side down, and sear for about 2-3 minutes until the skin is crispy and golden. This step enhances both texture and flavor.
Step 6: Bake to Perfection
Transfer the seared salmon to your preheated baking dish — skin-side down — and pop it into the oven. Bake for about 12-15 minutes, depending on the thickness of the fillets. You want the salmon to be tender and just cooked through, with an internal temperature of 145°F (63°C). The cheese filling will melt and bubble, creating a heavenly experience!
Serving Suggestions
When your Stuffed Salmon is ready, it’s time to plate! Transfer the salmon to a platter, and serve it with a fresh squeeze of lemon juice on top for brightness. Add a side of quinoa or roasted vegetables to round out the meal — those colors will make your plate pop!
Recipe Variations
Looking to spice things up? Here are some tasty variations and ideas to personalize your stuffed salmon dish:
-
Mediterranean Twist: Substitute the roasted red peppers with sun-dried tomatoes and add olives to the filling for a Mediterranean flair.
-
Creamy Goodness: Mix in a spoonful of cream cheese with the filling for a richer flavor and creamier texture.
-
Herbal Infusion: Swap the spinach for arugula for a peppery bite, or add chopped fresh dill for a refreshing flavor boost.
-
Nutty Delight: Toss in some toasted pine nuts or walnuts for added crunch and depth.
-
Dairy-Free Option: Use a vegan feta cheese and a dairy-free cheese blend for a delicious dairy-free meal!
Chef’s Notes
When I first started making this dish, I experimented a lot with the stuffing. One time, I incorporated some sun-dried tomatoes, and it was a game-changer! The key to making it your own is to taste the filling as you go — it should sing with flavor!
Don’t be afraid to experiment with seasonings. One of my favorite memories was inviting friends over to taste-test a batch of these stuffed salmon fillets and watching their eyes widen in delight with every bite. That joy is why I cook!
FAQs and Troubleshooting
1. What if my salmon is overcooked?
If it turns out a bit dry, don’t despair! Pair it with a flavorful sauce, like a lemon dill sauce, to add moisture.
2. Can I make the stuffing ahead of time?
Absolutely! You can prepare the filling a day ahead and store it in the fridge. Just stuff the salmon right before cooking.
3. What should I serve with stuffed salmon?
Roasted vegetables, a fresh salad, or whole grains like quinoa or rice make excellent accompaniments.
4. Can I freeze the stuffed salmon?
Yes, you can! Just assemble the salmon without baking it, wrap it tightly, and freeze. When you’re ready to enjoy, bake it straight from the freezer — just add a few minutes to the cooking time.
Nutritional Info (Optional)
- Calories: Approximately 380 per serving
- Fat: 24g
- Protein: 36g
- Carbohydrates: 5g
With every bite of this Stuffed Salmon with Spinach and Feta, you’re not just enjoying a delicious meal; you’re creating memories around the table. I hope this recipe inspires you to gather your loved ones and fill your kitchen with laughter and warmth. Remember, good food isn’t just about ingredients; it’s about the moments we share. So, tie on that apron and let’s get cooking!
PrintStuffed Salmon With Spinach & Feta

A visually stunning and flavor-packed meal perfect for busy weeknights.
- Prep Time: 15 minutes
- Cook Time: 30 minutes
- Total Time: 45 minutes
- Yield: 4 servings 1x
- Category: Main Course
- Method: Baking
- Cuisine: Mediterranean
- Diet: Pescatarian
Ingredients
- 4 x 6-ounce pieces of salmon
- 2 Tbsp olive oil
- 3 cups baby spinach, packed
- 1 tsp Italian seasoning
- 1/2 tsp paprika
- A pinch of cayenne pepper
- Approx. 5.3-ounce block of feta cheese
- 1/4 cup parmesan, freshly grated
- 1/4 cup jarred roasted red peppers, chopped
- Salt + pepper, to taste
Instructions
- Preheat your oven to 375°F (190°C) and lightly coat a baking dish with olive oil.
- Sauté the spinach in a medium skillet with 1 tablespoon of olive oil for 2-3 minutes until wilted.
- Mix the sautéed spinach, crumbled feta, grated parmesan, Italian seasoning, paprika, cayenne pepper, and chopped roasted red peppers in a bowl. Season with salt and pepper.
- Prepare the salmon fillets by creating a pocket in each fillet.
- Stuff each salmon fillet with the spinach and feta mixture, then drizzle with olive oil and season.
- Sear the stuffed salmon skin-side down in the skillet for 2-3 minutes until crispy.
- Bake the salmon in the preheated oven for 12-15 minutes until cooked through.
Notes
Serve with a fresh squeeze of lemon juice and sides like quinoa or roasted vegetables.
Nutrition
- Serving Size: 1 serving
- Calories: 380
- Sugar: 3g
- Sodium: 500mg
- Fat: 24g
- Saturated Fat: 10g
- Unsaturated Fat: 10g
- Trans Fat: 0g
- Carbohydrates: 5g
- Fiber: 1g
- Protein: 36g
- Cholesterol: 70mg
Keywords: Stuffed Salmon, Spinach and Feta, Mediterranean, Easy Dinner, Healthy Recipe
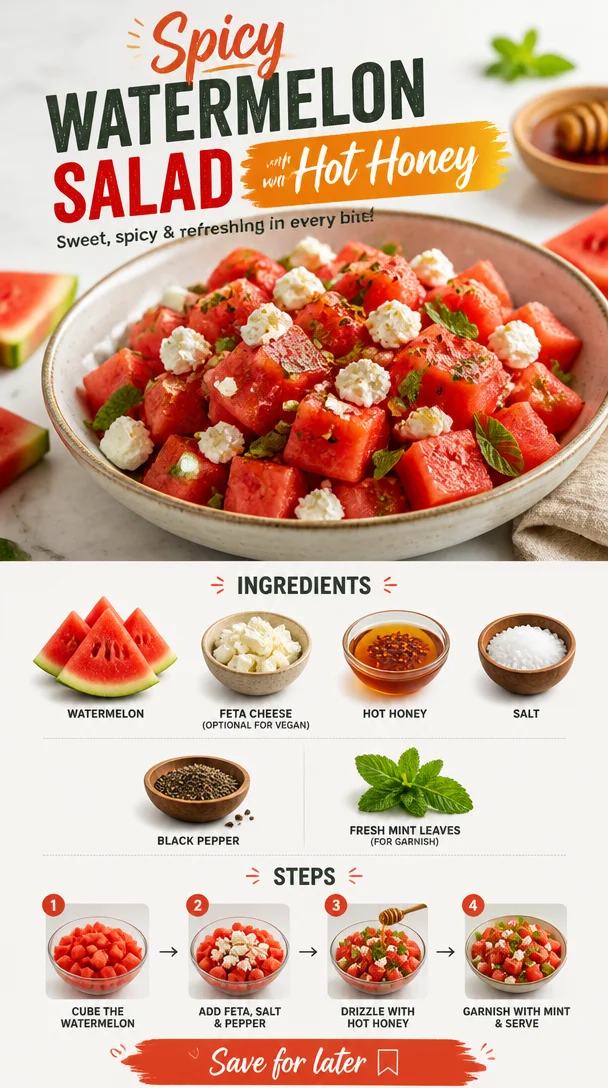
Spicy Watermelon Salad with Hot Honey
Spicy Watermelon Salad with Hot Honey: A Cool & Refreshing Twist
Hello, fellow food lovers! If you’re anything like me, summertime is when you start craving all those fresh, vibrant flavors that make every meal feel like a celebration. Picture this: A bright, juicy watermelon kissed by the sun, tossed with spicy hot honey, and finished with a sprinkle of feta and vibrant mint leaves. Yes, I’m talking about my Spicy Watermelon Salad with Hot Honey! This dish is a perfect centerpiece for your summer gatherings or just a delightful solo treat on a sunny afternoon.
In today’s blog post, we’ll dive into the juicy details of this delicious recipe, reminisce about its inspiration, and share some twists to make this salad your own. So, grab your apron, and let’s get cooking!
Personal Story: A Sweet Summer Memory
Growing up, summer for me was all about long, lazy afternoons spent at my grandparents’ house. They had this sprawling garden bursting with fruits and veggies that felt like a summer paradise. Watermelons were always the highlight of the garden! My granddad would pick the ripest ones, and we would cut them open right there, letting the cold, sweet juice drip down our chins while we laughed and reminisced about old family stories.
One hot July day, as we indulged in those juicy watermelons, my grandmother had a genius idea. She drizzled a homemade hot honey over the watermelon and sprinkled it with a little salt. Oh my goodness, that kick of heat with the sweet, crisp watermelon? It was a flavor revelation! Ever since that day, I’ve been on a quest to recreate and refine that childhood memory, and this Spicy Watermelon Salad is my delicious homage to those sunny days spent surrounded by laughter and love.
Ingredients
To whip up this stunning salad, you’ll need the following ingredients:
-
Watermelon: Choose a ripe, seedless watermelon to get the best flavor and texture. Look for a symmetrical, firm melon with a dull, yellow spot where it rested on the ground.
-
Feta Cheese (optional): For the non-vegan version, crumbled feta adds a creamy, tangy bite that pairs beautifully with the sweetness of the watermelon. If you prefer vegan options, try using crumbled avocado or coconut feta for a similar creaminess.
-
Hot Honey: This is the star of the show! You can buy hot honey from many grocery stores or make your own by infusing honey with chili flakes or fresh sliced chilies. It adds a delightful spicy kick that transforms the dish.
-
Salt: Just a sprinkle elevates flavors. Kosher salt is my go-to as it dissolves easily and balances sweetness without overpowering.
-
Black Pepper: Freshly cracked black pepper adds an aromatic warmth that rounds out the dish perfectly.
-
Fresh Mint Leaves: These fragrant leaves bring a burst of freshness and color to the salad. Feel free to rinse and tear them or use basil for a fun twist.
Step-by-Step Instructions
Now let’s get down to the nitty-gritty of preparing this refreshingly spicy salad!
-
Prepare Your Watermelon: Start by cutting your watermelon in half. I find it easiest to slice it into quarters, then cut each quarter into bite-sized cubes. Use a sharp knife for a clean cut and to avoid any mess. Remember, a ripe watermelon is sweet and juicy, but overripe can be mushy, so choose wisely!
-
Make a Flavorful Base: In a large bowl, toss your watermelon cubes gently with a pinch of salt and a few cracks of black pepper. This first step may seem simple, but it’s where the magic begins! The salt draws out the watermelon’s natural juices, enhancing its sweetness and creating a deliciously fresh base for your salad.
-
Drizzle in Hot Honey: Now for the fun part! Drizzle hot honey over the watermelon. I recommend starting with about 2 tablespoons and adjusting to taste. Keep in mind that the amount of heat can vary based on the type of hot honey you’re using, so you might want to add more or less accordingly. Give it a gentle toss to ensure every piece gets coated!
-
Add Feta: If you’re using feta cheese, sprinkle the crumbled feta over the salad. Aim for an even distribution to get that delicious creaminess in every bite. If you’re going vegan, skip this step and go for your alternative like avocado.
-
Final Touches: Tear fresh mint leaves and sprinkle them over the top. This will give the salad an aromatic finish that is so inviting! Serve immediately for the best texture, or you can chill it in the fridge for about 30 minutes if you prefer it extra cold.
-
Get Creative with Presentation: Grab a beautiful serving platter or individual bowls. Layer the salad, making sure to display those vibrant colors. A little extra drizzle of hot honey and some mint leaves on the top for flair won’t hurt either! Remember, presentation is key, but don’t stress about perfection — just make it look inviting.
Serving Suggestions
This Spicy Watermelon Salad pairs wonderfully with grilled meats, making it the perfect side dish for summer barbecues or picnics. You can also serve it as a refreshing appetizer on a blazing summer day. A light white wine or a sparkling water garnished with a slice of lime complements the meal beautifully.
Recipe Variations
Feel free to play around with this recipe! Here are some fun twists:
-
Add Cucumber: Diced cucumber adds a refreshing crunch and balances the sweetness of the watermelon beautifully.
-
Use Grilled Watermelon: For an added depth of flavor, grill your watermelon for a few minutes before adding the other ingredients. This caramelizes the natural sugars and gives the salad a smoky sweetness.
-
Substitute with Goat Cheese: Try crumbled goat cheese instead of feta for a tangy flavor profile.
-
Go Nuts: Consider adding toasted walnuts or almonds for a delightful crunch and healthy fats.
-
Herb Variations: If you’re not a mint fan, basil or even cilantro could add a lovely twist!
Chef’s Notes
I’ve tinkered with this recipe over time — making it more refined or simplified and adapting it based on what’s available in my kitchen. One of my favorite stories? I once accidentally added way too much hot honey when I was distracted by a friend’s hilarious joke. I served it anyway, and to my surprise, everyone loved the extra kick! It became a running joke among friends for our summer gatherings.
Cooking is all about experimentation, and mistakes often lead to delightful discoveries! I encourage you to tweak this recipe based on your palate and what you have on hand. Remember, good cooking is about feeling at ease in your space, and a kitchen with love is sure to produce magic.
FAQs and Troubleshooting
1. What if my watermelon isn’t sweet enough?
If you find yourself with a bland watermelon, sprinkle a little extra hot honey over it. You can also try adding a splash of lime juice for some acidity that boosts overall flavor.
2. Can this salad be made ahead of time?
While it’s best when fresh, you can prepare the watermelon and store it in an airtight container for a day or two before adding the other ingredients. Just keep the hot honey and herbs separate until you serve for the best texture.
3. How can I tone down the heat?
If you find it gets too spicy, mix in a dollop of yogurt or a soft cheese. It’ll beautifully mellow out the flavors without overpowering the juicy freshness of the watermelon.
4. What should I do with leftover salad?
Though it’s best fresh, if you have leftovers, try tossing it with some cooked quinoa or adding it to a summer wrap for a nutritious lunch the next day!
Nutritional Info
While this salad is a colorful addition to your summer menu, it’s also packed with hydration, vitamins, and a balanced sweetness—thanks to that lovely watermelon. It’s naturally low in calories but high in flavor, making it a healthy choice for your celebrations!
And there you have it, friends! The Spicy Watermelon Salad with Hot Honey is not just a recipe, but an invitation to enjoy good food, good company, and sunny days. Tie on that apron and embrace the beauty of cooking —it doesn’t need to be complicated to be fabulous. Each bite is a reminder of warm summer memories and the joy of sharing food with loved ones. Now, go make some delicious memories in your kitchen!
PrintSpicy Watermelon Salad with Hot Honey
A refreshing salad featuring ripe watermelon drizzled with spicy hot honey and topped with feta and mint leaves.
- Prep Time: 15 minutes
- Cook Time: 0 minutes
- Total Time: 15 minutes
- Yield: 4 servings 1x
- Category: Side Dish
- Method: No-Cook
- Cuisine: American
- Diet: Vegetarian
Ingredients
- 1 ripe, seedless watermelon
- 1/2 cup crumbled feta cheese (optional)
- 2 tablespoons hot honey
- 1/2 teaspoon salt
- 1/4 teaspoon black pepper
- 1/4 cup fresh mint leaves, torn
Instructions
- Prepare your watermelon: Cut in half, slice into quarters, then into bite-sized cubes.
- Toss watermelon cubes with salt and black pepper in a large bowl.
- Drizzle hot honey over the watermelon and toss gently.
- Add feta cheese if using, sprinkling evenly over the salad.
- Sprinkle torn mint leaves on top and serve immediately or chill for 30 minutes.
Notes
For added texture, consider adding toasted nuts or grilled watermelon for a smoky flavor.
Nutrition
- Serving Size: 1 serving
- Calories: 150
- Sugar: 10g
- Sodium: 300mg
- Fat: 8g
- Saturated Fat: 4g
- Unsaturated Fat: 4g
- Trans Fat: 0g
- Carbohydrates: 18g
- Fiber: 1g
- Protein: 2g
- Cholesterol: 10mg
Keywords: watermelon salad, summer salad, spicy salad, healthy recipe, refreshing dish
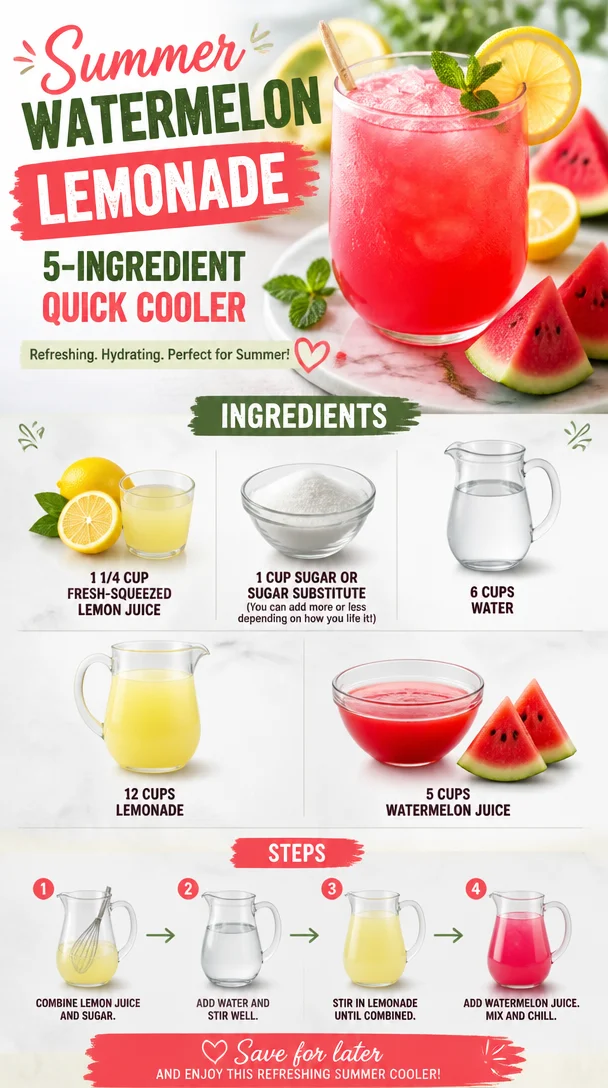
Summer Watermelon Lemonade: 5-Ingredient Quick Cooler
Refreshing Watermelon Lemonade: A Summer Favorite
Hello there! If you’re looking for a drink that embodies summer vibes, look no further than this refreshing Watermelon Lemonade. There’s something truly magical about sipping on a glass of sweet, tangy lemonade on a warm afternoon, especially when it’s made with fresh watermelon. Today, I’m excited to share this delightful recipe with you, along with some stories, cooking tips, and creative variations that will make you the hero of your next barbecue or casual get-together!
A Slice of Nostalgia
This Watermelon Lemonade recipe takes me back to my childhood summers spent at my grandmother’s house. She had a pristine garden with a sprawling watermelon patch, and nothing could compare to those juicy, sun-ripened fruits we devoured on hot afternoons. After a long day of playing outside, the first sip of her homemade lemonade with freshly squeezed lemons and the sweetest watermelon was pure bliss. She would blend it all together and pour it over ice, topping it off with mint leaves for that extra flair.
Every family gathering somehow ended up in her kitchen, reminiscent of the good old days, with laughter and love filling the air like the sweet aroma of fresh fruit. Now, as I recreate that cherished drink in my own kitchen for friends and family, I’m reminded of those sun-soaked afternoons. Follow along, and let’s create our own watermelon lemonade memories!
Ingredients
Here’s what you’ll need to whip up this delicious lemonade:
-
1 1/4 cups fresh-squeezed lemon juice: Fresh is key here! You can substitute with bottled lemon juice in a pinch, but nothing beats the vibrant flavor of freshly squeezed lemons.
-
1 cup sugar or sugar substitute: Adjust according to your taste. If you prefer a healthier version, honey or agave syrup works wonderfully.
-
6 cups water: This will help dilute your drink, making it refreshing without being overly sweet. If you’re feeling adventurous, try sparkling water for a fizzy twist!
-
5 cups watermelon juice: Fresh watermelon juiced right from the fruit is the best. If you’re short on time, you can use store-bought watermelon juice, but ensure it’s 100% pure juice without added sugars.
-
Optional garnish: Fresh mint leaves, lemon slices, or watermelon wedges for a beautiful presentation!
Step-by-Step Instructions
Now for the fun part! Here’s how to make the best Watermelon Lemonade:
-
Juice the Watermelon: Start by cutting a medium-sized, ripe watermelon into chunks. Toss them into your blender and blend until smooth. If you want a pulp-free drink, strain the juice through a fine mesh sieve into a bowl. NOTE: Reserve a few small watermelon cubes for later – they make an adorable garnish!
-
Squeeze Those Lemons: While your watermelon is blending, grab about 8-10 juicy lemons (ideally organic for fewer pesticides) and cut them in half. Using a citrus juicer, extract the juice until you have at least 1 1/4 cups. Don’t forget to catch those pesky seeds!
-
Mix the Sweetness: In a large pitcher, combine your fresh lemon juice and sugar (or sugar substitute). Stir well until fully dissolved. If you’re using sugar, warm a little water (~1 cup) can help dissolve it quickly – it’s a simple sugar syrup!
-
Combine Water and Watermelon Juice: Gradually pour in the 6 cups of water and the 5 cups of watermelon juice, mixing gently. Make sure to taste your mixture at this stage; adjust sweetness by adding more sugar or lemon juice if desired.
-
Chill Time: Refrigerate the lemonade for at least 2 hours. This helps meld those flavors beautifully, and it’s perfect for serving icy cold on warm days.
-
Serve with Style: When you’re ready to serve, fill glasses with ice, top off with the bright watermelon lemonade, and garnish with mint leaves, lemon slices, or the reserved watermelon cubes.
Serving Suggestions
Presentation matters, but let’s keep it simple! Pour your beautifully chilled Watermelon Lemonade into clear glasses to showcase that stunning color. Add a sprig of mint or a lemon wedge on the rim to make it visually pop. For those long summer nights, serve it in a large pitcher so guests can help themselves. Trust me, watching the ice slowly melt as the sun sets is a slice of summer heaven.
Recipe Variations
Want to switch things up? Here are a few creative twists on this classic recipe:
-
Spicy Touch: Add fresh jalapeños to the watermelon mixture for a refreshing and spicy kick!
-
Herbal Infusion: Experiment with other fresh herbs like basil or rosemary for a unique twist.
-
Sparkling Delight: Substitute sparkling water for still water for a bubbly lemonade that’s extra refreshing.
-
Lavender Lemonade: Steep dried lavender in the sugar syrup for a floral twist—perfect for high tea!
-
Berry Medley: Blend in strawberries or raspberries for a colorful, mixed-berry version of this watermelon lemonade.
Chef’s Notes
One of the joys of cooking is experimentation! This Watermelon Lemonade has evolved in my kitchen over the years. Initially, I stuck strictly to the lemon and watermelon combo, but as I learned to play with flavors, I discovered exciting layers to this classic drink. I even turned it into a cocktail by adding a splash of vodka or rum for those adult summer gatherings!
Remember, cooking is all about personal expression. Don’t hesitate to make the recipe your own and enjoy the process.
FAQs and Troubleshooting
Q: Why is my watermelon lemonade too sweet?
A: If it’s overly sweet, add a bit more lemon juice to balance out the flavors; it’ll help cut through the sweetness.
Q: How long will this lemonade last in the fridge?
A: It’s best consumed within 2-3 days. Lemons can become bitter if left too long and watermelon juice can start to ferment.
Q: Can I make this recipe ahead of time?
A: Absolutely! You can prepare the watermelon and lemon juices ahead and mix everything together on the day you plan to serve it.
Q: Can I freeze watermelon lemonade?
A: Yes! This lemonade freezes wonderfully. Pour it into ice cube trays for a refreshing addition to future drinks.
Nutritional Info
While I won’t overload you with numbers, just know that Watermelon Lemonade is generally low in calories, especially if you choose a sugar substitute. Watermelon is hydrating and packed with vitamins A and C, making this drink a healthful option compared to sugary sodas!
So there you have it—a bright, refreshing Watermelon Lemonade that bursts with summer’s best flavors! I hope you enjoy making it as much as I enjoy sharing it with you. So grab your juicer, tie on that apron, and let the summer sipping begin! Cheers!
PrintRefreshing Watermelon Lemonade

A delightful, refreshing drink made with fresh watermelon and lemons, perfect for summer gatherings.
- Prep Time: 15 minutes
- Cook Time: 0 minutes
- Total Time: 120 minutes
- Yield: 8 servings 1x
- Category: Beverage
- Method: Juicing
- Cuisine: American
- Diet: Vegetarian
Ingredients
- 1 1/4 cups fresh-squeezed lemon juice
- 1 cup sugar or sugar substitute
- 6 cups water
- 5 cups watermelon juice
- Optional garnish: Fresh mint leaves, lemon slices, or watermelon wedges
Instructions
- Juice the Watermelon: Start by cutting a medium-sized, ripe watermelon into chunks and blend until smooth. Strain the juice if desired and reserve some watermelon cubes for garnish.
- Squeeze Those Lemons: Cut about 8-10 juicy lemons in half and extract juice until you gather 1 1/4 cups.
- Mix the Sweetness: In a large pitcher, combine the lemon juice and sugar, stirring until dissolved. Warm water may help dissolve the sugar.
- Combine Water and Watermelon Juice: Gradually pour in the 6 cups of water and 5 cups of watermelon juice, mix gently, and adjust sweetness as needed.
- Chill Time: Refrigerate the lemonade for at least 2 hours to meld flavors.
- Serve with Style: Fill glasses with ice and pour the lemonade, garnish with mint, lemon slices, or reserved watermelon cubes.
Notes
Experiment with flavors by adding jalapeños for spice, or using sparkling water for a bubbly twist.
Nutrition
- Serving Size: 1 serving
- Calories: 100
- Sugar: 20g
- Sodium: 10mg
- Fat: 0g
- Saturated Fat: 0g
- Unsaturated Fat: 0g
- Trans Fat: 0g
- Carbohydrates: 25g
- Fiber: 1g
- Protein: 1g
- Cholesterol: 0mg
Keywords: watermelon, lemonade, summer drink, refreshing, non-alcoholic
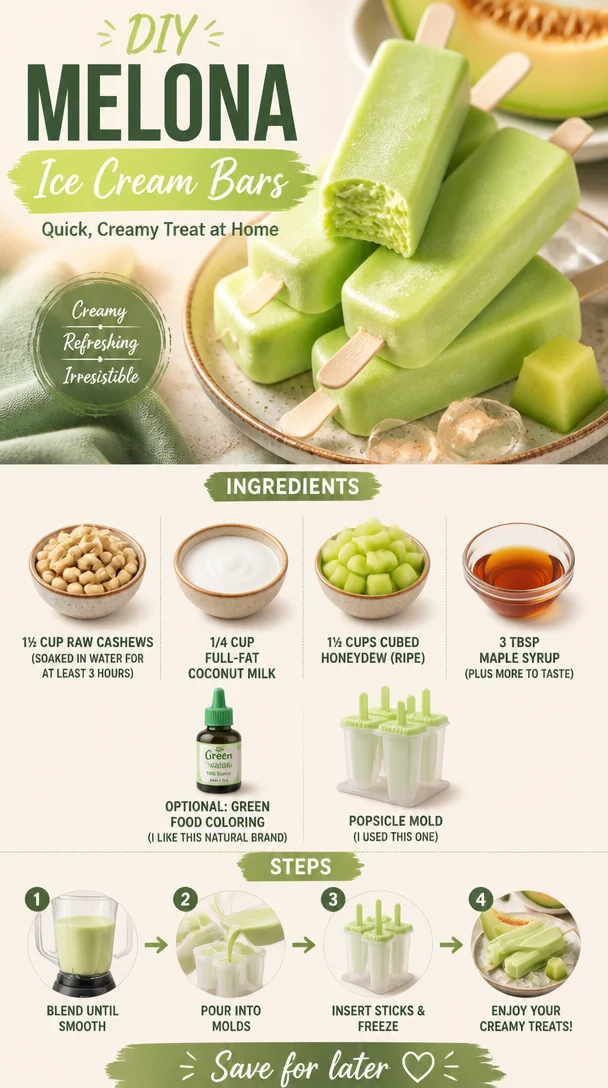
DIY Melona Ice Cream Bars: Quick, Creamy Treat at Home
Homemade Melona Ice Cream Bars: A Cool Treat to Beat the Heat
Hello, ice cream lovers! If you’re anything like me, the mere thought of warm sunshine, lazy afternoons, and the sound of kids laughing can only mean one thing: it’s ice cream season! Nothing quite hits the spot during those long, sunny days like a creamy, sweet homemade ice cream bar. Today, I’m excited to share with you my version of the delightful Melona Ice Cream Bar, a frozen treat inspired by the beloved South Korean dessert.
Imagine biting into a cold, refreshing honeydew ice cream bar—sweet, creamy, and oh-so-satisfying! But the best part? We’re making it completely dairy-free and using wholesome ingredients that will have your taste buds dancing. Trust me; you won’t need to head to the grocery store for those pre-packaged bars again after you whip these up in your kitchen. With just a few simple ingredients and a little bit of patience, you’ll create something that’s indulgent yet guilt-free. Ready to dive in? Let’s get started!
My Sweet Memory with Melona
Growing up, summers meant family road trips and roadside snack stops. One of my favorite treats was pausing at a little convenience store where we’d discover all sorts of goodies, including the iconic Melona bars. The first time I took a bite of that vibrant green ice cream wrapped in shiny packaging, it was pure magic! The coolness quenched my thirst while the sweet, fruity flavor almost felt like summer in every lick.
Each bite was a reminder of those carefree summer days and the joy of sharing simple pleasures with loved ones. Fast forward to today, and I’m thrilled to bring that nostalgic flavor to my kitchen in a way that feels fresh, fun, and completely healthy! Get ready to recreate those cherished memories and create new ones around your own table!
Ingredients
Here are the ingredients you’ll need to create these dreamy Melona ice cream bars:
-
1½ cup raw cashews (soaked in water for at least 3 hours): Cashews provide the creamy base for your ice cream, creating that rich texture we love while being dairy-free. Don’t have cashews? You can swap them for blanched almonds or macadamia nuts for a different flavor profile!
-
1/4 cup full-fat coconut milk: This luscious coconut cream sweetens and enriches the mixture, giving it a tropical feel. If you’re not a fan of coconut, you can use almond or oat milk for a lighter option.
-
1½ cups cubed honeydew (ripe): Honeydew is the star of the show here, and it adds that refreshing sweetness we cherished in those Melona bars. If honeydew is out of season, cantaloupe or ripe watermelon can serve as creative substitutes.
-
3 tbsp maple syrup (plus more to taste): Maple syrup sweetens the mixture naturally, making it light and flavorful. Agave syrup or date syrup can be fantastic substitutes too!
-
Optional: Green food coloring: For that iconic vibrant green color reminiscent of traditional Melona bars. I like a natural brand, but feel free to skip this if you prefer the natural hue.
-
Popsicle mold: This is where the magic happens! I used a silicone mold for easy release, but feel free to use whatever you have on hand.
Step-by-Step Instructions
Now that we have our ingredients ready, let’s get down to the delicious business of making these Melona ice cream bars!
-
Soak the Cashews: Start by soaking your raw cashews in water for at least three hours, or overnight if you can. This process softens the nuts, making them blend beautifully into the creamy base. Don’t skip this step—your ice cream’s texture will thank you!
-
Blend the Base: Once your cashews are nice and soft, drain and rinse them well. Toss them into a high-speed blender with the full-fat coconut milk, 1½ cups of cubed honeydew, and 3 tablespoons of maple syrup. Blend until smooth and creamy, scraping down the sides as needed. The consistency should be incredibly velvety, so take your time on this step for the best result. If you need a sweeter kick, taste the mixture and add more maple syrup as desired!
-
Add Color: If you’re feeling fancy and want that green hue to pop, add a few drops of green food coloring at this point. Blend again until you achieve your desired shade. Remember, natural color can be beautiful too—embrace the honeydew’s own soft tones!
-
Pour Into Molds: Carefully pour the creamy mixture into your popsicle molds. Leave a bit of space at the top for expansion when they freeze. If you have room, feel free to sprinkle in a few small pieces of fresh honeydew for added texture and surprise!
-
Insert Sticks: Follow the instructions for your molds to insert sticks. If they don’t hold up, you can freeze them for about an hour till the ice cream is slightly set before inserting the sticks.
-
Freeze: Pop the molds into the freezer for about 4-6 hours, or until fully frozen. It’s hard to wait, I know, but trust me—the anticipation will be worth it!
-
Unmold and Enjoy!: Once frozen, take the molds out and let them sit for a couple of minutes at room temperature for easy release. Gently wiggle the sticks to dislodge the bars, and they should slide right out! Now it’s time to enjoy!
Serving Suggestions
To serve, simply place your Melona ice cream bars on a cute plate or a popsicle stick holder for a fun, summery presentation. Drizzle them with a bit of melted dark chocolate or sprinkle some crushed nuts over the top for added texture. And if you’re feeling extra indulgent, serve them alongside some fresh fruit slices for a gorgeous spread!
Recipe Variations
Here are a few fun twists to make this recipe your own:
-
Tropical Melona: Add some crushed pineapple or mango instead of honeydew for a tropical vibe. You can also blend in a splash of coconut extract!
-
Minty Fresh: Toss in a handful of fresh mint before blending for a refreshing peppermint flavor.
-
Chocolate Dive: Make a chocolate version by swapping out part of the honeydew for cocoa powder or melted dark chocolate. Yum!
-
Raspberry Ripple: Before pouring the mixture into molds, fold in some homemade raspberry sauce for a fruity swirl!
-
Nut-Free Version: Replace the cashews with silken tofu for a soy-based alternative that’s rich and creamy without nuts.
Chef’s Notes
These Melona ice cream bars have been a fun addition to our family traditions. I love experimenting with flavors and colors, especially when kids get involved. My daughter is a pro at adding ingredients to the blender—though sometimes we end up with unexpected surprises! Like that one time I was aiming for chocolate mint and ended up with a green kale monstrosity! (Let’s just say we didn’t serve those at the dinner party!)
In any case, these bars are versatile! Over the years, I’ve transformed the original recipe countless times, always with delicious results! So don’t be shy—make them your own and share the love!
FAQs and Troubleshooting
1. My ice cream bars aren’t freezing properly. What did I do wrong?
This can happen if the mixture is too watery. Ensure that your cashews are well-soaked and blend until completely smooth. Also, check your freezer temperature—if it’s not cold enough, they may take longer to freeze.
2. Can I make these without a blender?
While I highly recommend a blender for the smoothest texture, you can mash the ingredients by hand if necessary, but the result will be chunkier. A food processor can also work if you have one!
3. How long can I store these ice cream bars?
They can be stored in an airtight container in the freezer for up to one month. However, they’re best enjoyed within a week for optimal flavor and texture!
4. What if I don’t have popsicle molds?
No popsicle molds? No problem! You can use small paper cups filled with the mixture and stick a toothpick in the center for a makeshift popsicle. Just freeze until solid!
Nutritional Info
Here’s a quick breakdown of the nutritional content for each Melona ice cream bar (approximation based on using cashews and honeydew):
- Calories: 150
- Protein: 3g
- Fat: 9g
- Carbohydrates: 14g
- Fiber: 1g
- Sugar: 7g
(Note: Nutritional values may vary based on exact ingredients and amounts used.)
Thank you for joining me on this cooling journey of Homemade Melona Ice Cream Bars! I hope this recipe inspires you to create beautiful, sweet moments in your kitchen. If you give it a try, be sure to share your creations with me—I’d love to see your delicious results! Cheers to summer and indulging (in moderation, of course) in this delightful frozen treat!
PrintHomemade Melona Ice Cream Bars

Refreshing homemade Melona ice cream bars made with wholesome, dairy-free ingredients that capture the iconic Korean dessert’s flavor.
- Prep Time: 15 minutes
- Cook Time: 0 minutes
- Total Time: 360 minutes
- Yield: 6 servings 1x
- Category: Dessert
- Method: Freezing
- Cuisine: Korean
- Diet: Vegan
Ingredients
- 1½ cup raw cashews (soaked in water for at least 3 hours)
- 1/4 cup full-fat coconut milk
- 1½ cups cubed honeydew (ripe)
- 3 tbsp maple syrup (plus more to taste)
- Optional: Green food coloring
- Popsicle mold
Instructions
- Soak the cashews in water for at least three hours, or overnight.
- Blend the soaked cashews, coconut milk, honeydew, and maple syrup until smooth and creamy.
- Add green food coloring if desired and blend again.
- Pour the mixture into popsicle molds, leaving space for expansion.
- Insert sticks into the molds as per the instructions, freezing slightly if needed.
- Freeze the molds for about 4-6 hours until fully frozen.
- Unmold the bars and enjoy!
Notes
For serving, drizzle melted dark chocolate or sprinkle crushed nuts on top. Enjoy these bars with fresh fruit slices for a delightful treat!
Nutrition
- Serving Size: 1 bar
- Calories: 150
- Sugar: 7g
- Sodium: 5mg
- Fat: 9g
- Saturated Fat: 7g
- Unsaturated Fat: 2g
- Trans Fat: 0g
- Carbohydrates: 14g
- Fiber: 1g
- Protein: 3g
- Cholesterol: 0mg
Keywords: Melona, ice cream, dairy-free, vegan, dessert, summer treats, popsicles
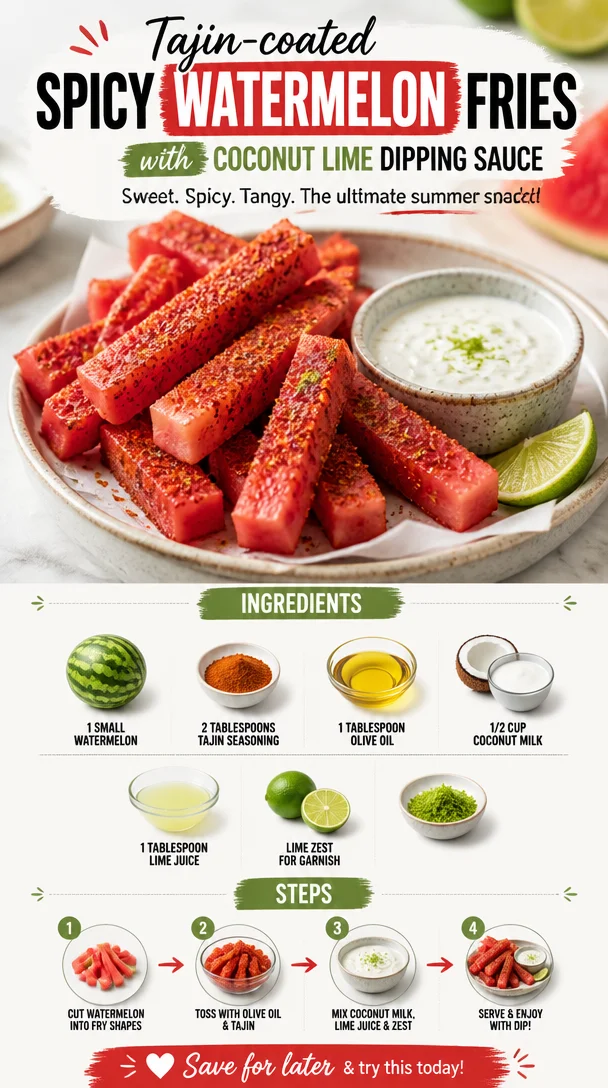
Tajin-coated Spicy Watermelon Fries with Coconut Lime Dipping Sauce
Tajin-Coated Spicy Watermelon Fries with Coconut Lime Dipping Sauce
Hello, my fabulous food lovers! I’m so excited to share a refreshing recipe that brings a burst of flavors to your table: Tajin-coated Spicy Watermelon Fries with Coconut Lime Dipping Sauce! This dish is the perfect companion for those summer nights, picnics in the park, or whenever you’re in need of a fun, easy, and slightly spicy snack. Trust me, this combination is going to make your taste buds sing!
Watermelon fries? Yes, you read that right! We’re taking the juicy goodness of watermelon and transforming it into crispy, flavorful fries that are both sweet and spicy. When you coat them in Tajin seasoning—made from chili, lime, and salt—you’ll find a tangy kick that dances on your palate like a fiesta! And to top it all off, we’re drenching these delightful bites in a creamy, coconut lime sauce that’s simply irresistible.
A Personal Story
Growing up, my family had a tradition of grilling on warm summer evenings. After a day of playing outside, we would gather around the patio table, enjoying the food and each other’s company as the sun dipped below the horizon. One year, my aunt introduced us to the idea of spicing up our favorite seasonal fruits. She created a version of spicy watermelon slices that melted in your mouth and sparked a competition to see who could create the most delicious twist. It was during one of those evenings that I realized how layering spices can elevate something as simple as a fresh fruit.
Fast forward to this day, and I’m channeling that nostalgia into these Tajin-coated Watermelon Fries. Every bite transports me back to those joyful summer nights with laughter and love swirling around the table. Now, I can’t wait for you to experience it too!
Ingredients
For this vibrant and delicious dish, here’s what you’ll need:
-
1 small watermelon
Select a firm, ripe watermelon for the best flavor. If you can, choose one that feels heavy for its size—this usually means it’s packed with juicy goodness! -
2 tablespoons Tajin seasoning
This is the star of the show! Tajin is a Mexican spice blend of dried chilies, lime, and salt, and it adds a zesty kick to any fruit. If you can’t find Tajin, a pinch of chili powder, lime zest, and a little salt works as a decent substitute. -
1 tablespoon olive oil
Olive oil helps the Tajin adhere to the watermelon instead of falling off. If you prefer a different flavor profile, avocado oil or coconut oil can also work splendidly here. -
1/2 cup coconut milk
Rich and creamy, coconut milk creates a luscious dip. Opt for full-fat coconut milk for a richer flavor, but light coconut milk can work in a pinch. -
1 tablespoon lime juice
Freshly squeezed lime juice brightens up the dip and balances the sweetness of the watermelon. Bottled lime juice is fine, but fresh is always best! -
Lime zest for garnish
This adds a pop of color and additional citrusy aroma. Be sure to zest from an unwaxed lime for the best flavor!
Step-by-Step Instructions
-
Prep the Watermelon
Begin by slicing your watermelon into fries. Cut the watermelon into thick slices, then cut those slices into wedges resembling fries. Aim for uniform sizes to help them cook evenly! Don’t worry about being too precise—this is a fun dish! -
Season the Watermelon
In a mixing bowl, gently toss the watermelon fries with the olive oil until they’re lightly coated. This step is crucial, as it helps the Tajin seasoning stick. Once coated, sprinkle the Tajin seasoning over the fries. Start with 2 tablespoons, but feel free to adjust based on your spice preference! -
Preheat Your Grill or Oven
If you’re heading to the grill, fire it up on medium heat. If you’re opting for the oven, preheat it to 400°F (200°C). If you have a grill pan, that’s a fantastic option too! -
Grill or Bake the Watermelon Fries
Place the seasoned watermelon fries directly on the grill or a baking sheet lined with parchment paper. Grill them for about 2-3 minutes per side or bake for 10-12 minutes. You want them to get a touch of caramelization on the outside while staying juicy inside. Just keep a watchful eye—overcooked watermelon can become mushy! -
Make the Coconut Lime Dipping Sauce
While your fries are cooking, it’s time for the star sauce! Combine the coconut milk, lime juice, and a pinch of salt in a small bowl. Whisk until it’s all smooth and creamy. For added flair, you can mix in a touch of lime zest to enhance the flavor. -
Plate the Dish
Once the watermelon fries are beautifully grilled and slightly charred, remove them from the heat and let them cool for a minute. Then, plate them up like a masterpiece, drizzling some of that luscious coconut lime sauce over the fries. Finish with a sprinkle of fresh lime zest for that extra zing!
Serving Suggestions
I love serving these Tajin-coated Spicy Watermelon Fries with a side of that creamy Coconut Lime Dipping Sauce—it’s a match made in culinary heaven! You can present them in a rustic bowl, garnished with fresh herbs like mint or cilantro for a pop of color and freshness. Pair this dish with a refreshing cocktail or a sparkling water garnish with a wedge of lime for a vibrant summer experience!
Recipe Variations
-
Grilled Pineapple Fries: Swap the watermelon for fresh pineapple and coat it with Tajin instead for a tropical twist!
-
Honey Drizzle: For an extra layer of sweetness, drizzle some honey over the fries before serving.
-
Herb-Infused Dipping Sauce: Add a handful of chopped fresh mint or cilantro into the coconut lime sauce for a fresh herbal note.
-
Cucumber Fries: Try this with cucumber sticks for a refreshing crunch and a different flavor profile.
-
Balsamic Glaze: Instead of coconut sauce, drizzle a traditional balsamic glaze over the grilled watermelon for a savory take.
Chef’s Notes
This recipe has evolved over time, and I love how versatile it is! I originally started playing with just straight watermelon and salt, but then came the discovery of Tajin. Once that happened, my cooking life changed forever; I found myself adding it to everything from corn to fruits! It’s become a staple in my kitchen.
One funny kitchen memory I have related to this dish is when I invited friends over for a casual summer BBQ and forgot that watermelon slices can be slippery. As I was tossing them on the grill, my neighbor heard a loud “splat” and found me on my knees scooping up the mess. The best part? My friends laughed and said that even the disaster watermelon still tasted great thanks to the spices!
FAQs and Troubleshooting
-
What if my watermelon fries fall apart?
If your fries are too thin, they might lose their shape. Aim for thicker fries to ensure they hold together during cooking. -
Can I prepare the sauce in advance?
Absolutely! You can make the coconut lime sauce a few hours ahead. Just store it in an airtight container in the fridge, and give it a good stir before serving! -
How do I know when the watermelon fries are done?
Look for light grill marks and a slight caramelization around the edges. They should still feel firm when you pick them up. -
What if I don’t have a grill?
No worries! You can also bake these in the oven or use a grill pan on the stovetop to achieve a similar effect without any hassle.
Nutritional Info
Please note that nutritional values may vary based on specific ingredients used and portion sizes. Typically, this recipe is low in calories and saturated fats, making it a healthy choice for a snack or appetizer!
With this recipe in your culinary repertoire, you’re sure to bring smiles to the faces of everyone around your table. Don’t forget to share your creations with me on social media—tag @IvoryApron, and let’s gather over good food, beautiful moments, and great company! Happy cooking, friends! 🍉✨
PrintTajin-Coated Spicy Watermelon Fries with Coconut Lime Dipping Sauce

A refreshing twist on summer snacks, these Tajin-coated watermelon fries are spicy, sweet, and paired with a creamy coconut lime dipping sauce.
- Prep Time: 10 minutes
- Cook Time: 10 minutes
- Total Time: 20 minutes
- Yield: 4 servings 1x
- Category: Snack
- Method: Grilling
- Cuisine: Mexican
- Diet: Vegan
Ingredients
- 1 small watermelon
- 2 tablespoons Tajin seasoning
- 1 tablespoon olive oil
- 1/2 cup coconut milk
- 1 tablespoon lime juice
- Lime zest for garnish
Instructions
- Begin by slicing your watermelon into fries.
- In a mixing bowl, gently toss the watermelon fries with the olive oil.
- Once coated, sprinkle the Tajin seasoning over the fries.
- If you’re heading to the grill, fire it up on medium heat.
- Place the seasoned watermelon fries directly on the grill or a baking sheet lined with parchment paper.
- Grill them for about 2-3 minutes per side or bake for 10-12 minutes.
- Combine the coconut milk, lime juice, and a pinch of salt in a small bowl.
- Whisk until it’s all smooth and creamy.
- Once the watermelon fries are beautifully grilled, remove them from the heat.
- Plate them up, drizzling some coconut lime sauce over the fries.
Notes
Make sure to choose a firm, ripe watermelon for the best flavor. The coconut lime sauce can be prepared in advance.
Nutrition
- Serving Size: 1 serving
- Calories: 120
- Sugar: 8g
- Sodium: 250mg
- Fat: 9g
- Saturated Fat: 7g
- Unsaturated Fat: 2g
- Trans Fat: 0g
- Carbohydrates: 14g
- Fiber: 1g
- Protein: 1g
- Cholesterol: 0mg
Keywords: watermelon fries, spicy snack, summer recipe, tacos, vegan snack
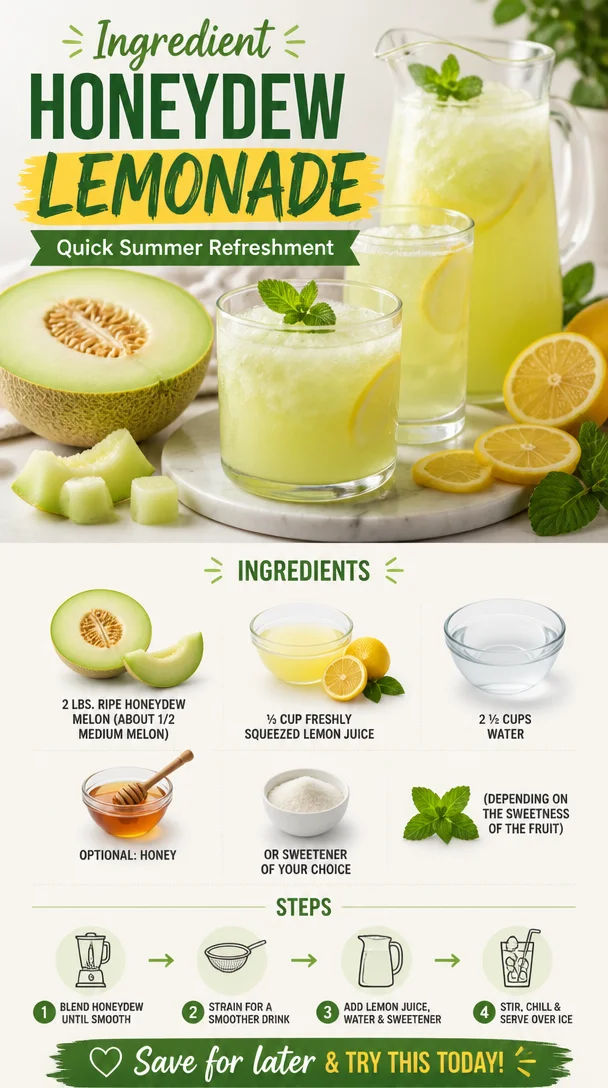
Ingredient Honeydew Lemonade: Quick Summer Refreshment
Refreshing Honeydew Lemonade: A Sweet Sip for Any Occasion
Hello, dear friends! If you’re anything like me, summer brings a special kind of magic, filled with warm sun-soaked days and the joy of sipping refreshing drinks with loved ones. Today, I’m thrilled to share a recipe close to my heart: Honeydew Lemonade. This zesty and sweet beverage is perfect for hot days, backyard gatherings, or simply when you want to transport yourself to a sun-drenched paradise. Let’s dive into the world of honeydew and lemon, where flavors dance together to create a thirst-quenching delight!
A Sip of Nostalgia
Ah, lemonade! It takes me back to lazy afternoons spent in my childhood backyard, with my mom mixing up refreshing drinks while I ran through the sprinklers, laughter filling the air. The first time I attempted to create my fruity twist on lemonade was during an impromptu summer get-together. Friends gathered in my kitchen, and I had a bright, ripe honeydew melon just waiting to be transformed. With just a handful of ingredients, we whipped up a batch of honeydew lemonade that swept everyone off their feet. The crisp, cool flavors complemented by the bright acidity of lemons made it a hit! With each sip, we reminisced about lazy summer days, and I knew I had stumbled upon something special.
Ingredients
Let’s gather our ingredients! Here’s what you will need for this lovely honeydew lemonade:
-
2 lbs. ripe honeydew melon (about ½ medium melon): The star of our show! Honeydew adds a gentle sweetness and a splash of color. Look for a ripe one with a light yellow to slightly golden hue. If you can’t find honeydew, feel free to substitute with cantaloupe or even watermelon for a fun twist!
-
½ cup freshly squeezed lemon juice: The zing that’ll bring our lemonade to life. Freshly squeezed is key here — the bottled stuff just doesn’t cut it! If lemons aren’t available, try using limes for a tart-bursting alternative.
-
2 ½ cups water: The foundation for our lemonade. You can use sparkling water if you’re feeling fancy — it adds a delightful fizz!
-
Optional: honey or sweetener of your choice: Depending on how sweet your honeydew is, you might want to add a touch of honey, agave, or even simple syrup for extra sweetness.
Step-by-Step Instructions
Now that we have everything lined up, let’s get to creating this refreshing honeydew lemonade! Follow these steps carefully, and I promise you’ll be rewarded with a pitcher full of summer happiness!
-
Prep the Honeydew: Start with your honeydew melon. Cut it in half, scoop out the seeds (which can be a messy but fun job!), and slice it into manageable chunks. The smaller they are, the easier they’ll blend!
-
Blend the Melon: Toss the honeydew chunks into a blender. Add about 1 cup of the water to help things along. Blend on high until smooth and frothy. You might need to stop and scrape down the sides a bit if your blender struggles.
-
Strain (Optional): If you prefer your lemonade pulp-free, use a fine-mesh strainer and pour the blended honeydew mixture through. Gently press down with a spatula or spoon to extract all that precious juice. Don’t forget to save the leftover pulp for smoothies or even baking — nothing goes to waste in my kitchen!
-
Combine with Lemon Juice: In a large pitcher, mix the strained honeydew juice with the freshly squeezed lemon juice. Stir well to combine, and take a moment to savor the vibrant colors and scents.
-
Dilute and Sweeten: Add the remaining 1 ½ cups of water to your pitcher. If you’d like a bit more sweetness, now is the time to add honey or your sweetener of choice. Stir until it’s fully incorporated. Taste and adjust — you’re the chef, after all!
-
Chill and Serve: Cover your pitcher and let it chill in the refrigerator for a couple of hours. Not only will this help the flavors meld, but it’ll also ensure a refreshingly cold drink.
-
Garnish and Enjoy!: When you’re ready to serve, pour the honeydew lemonade into glasses filled with ice. A sprig of fresh mint or a slice of lemon on the rim adds a beautiful touch that will impress your guests.
Serving Suggestions
For an absolutely stunning presentation, consider serving in clear glasses that showcase the beautiful pale green hue of the honeydew lemonade. Add an ice cube or two and garnish with fresh mint leaves or a lemon slice for a pop of color. If you’re feeling particularly festive, rim the glasses with sugar or a blend of coarse salt and lime zest for an extra flavor surprise.
Recipe Variations
Now, let’s talk about fun twists you can put on this delightful beverage:
-
Minty Melon: For a refreshing herbal kick, blend in a handful of fresh mint leaves during the blending process.
-
Spicy Ginger Lemonade: Add a bit of zing by incorporating a small piece of fresh ginger while blending the honeydew, giving your drink a warming spice.
-
Fruity Fusion: Combine different melons! Watermelon or cantaloupe can be blended with the honeydew for a beautiful summer-silhouette cocktail.
-
Sparkling Delight: Use sparkling water instead of still for a fizzy honeydew lemonade that’s perfect for summer parties.
-
Frozen Treats: Pour the honeydew lemonade mixture into ice cube trays for fruity ice cubes, or blend it with ice for a slushy treat!
Chef’s Notes
Honeydew lemonade is one of those recipes that evolves beautifully as the seasons change. In the summer, we love adding in fresh fruit, while in the fall, a splash of apple juice can turn this into a cozy autumn drink. I remember one dinner party where I served this alongside some fresh shrimp tacos, and the pairing was divine! A little sweet, a little salty — it’s all about balance.
FAQs and Troubleshooting
1. My lemonade is too sweet! What can I do?
If your lemonade is sweeter than you’d like, simply add more lemon juice or even a splash of water to balance out the flavors!
2. Can I make this ahead of time?
Absolutely! In fact, chilling overnight enhances the flavors. Just give it a good stir before serving!
3. How do I store leftovers?
Keep any leftover honeydew lemonade in a sealed container in the fridge for up to three days. Just remember, it’s best enjoyed fresh!
4. My honeydew wasn’t ripe enough; can I salvage it?
If your honeydew lacks sweetness, feel free to boost the flavor with honey, maple syrup, or even a splash of lemonade concentrate.
Nutritional Info
While I didn’t calculate nutrition exactly, this honeydew lemonade is quite refreshing and light! Packed with vitamins from the fruits, it’s a healthier alternative to sugar-laden drinks.
So there you have it – a delicious, refreshing honeydew lemonade that’s not only simple to make but brings a splash of summer energy to your table. Whether it’s an everyday sip or a special gathering, this delightful drink is sure to impress! So tie on your apron, gather your ingredients, and let’s whip up some magic in the kitchen. Cheers!
PrintRefreshing Honeydew Lemonade

A sweet and zesty honeydew lemonade perfect for summer gatherings.
- Prep Time: 15 minutes
- Cook Time: 0 minutes
- Total Time: 15 minutes
- Yield: 4 servings 1x
- Category: Beverage
- Method: Blending
- Cuisine: American
- Diet: Vegan
Ingredients
- 2 lbs. ripe honeydew melon (about ½ medium melon)
- ½ cup freshly squeezed lemon juice
- 2 ½ cups water
- Optional: honey or sweetener of your choice
Instructions
- Prep the honeydew: Cut it in half, scoop out the seeds, and slice it into manageable chunks.
- Blend the melon: Toss the chunks into a blender with about 1 cup of water and blend until smooth.
- Strain (optional): Use a fine-mesh strainer to pour the blended mixture through for a pulp-free juice.
- Combine with lemon juice: Mix the strained honeydew juice with lemon juice in a large pitcher.
- Dilute and sweeten: Add the remaining 1 ½ cups of water and sweetener if desired; stir until incorporated.
- Chill and serve: Cover the pitcher and chill in the refrigerator for a couple of hours.
- Garnish and enjoy!: Serve in glasses filled with ice and garnished with mint or lemon slices.
Notes
Delicious with various fruit combinations or sparkling water for a fizzy twist.
Nutrition
- Serving Size: 1 serving
- Calories: 120
- Sugar: 15g
- Sodium: 5mg
- Fat: 0g
- Saturated Fat: 0g
- Unsaturated Fat: 0g
- Trans Fat: 0g
- Carbohydrates: 30g
- Fiber: 1g
- Protein: 1g
- Cholesterol: 0mg
Keywords: lemonade, honeydew, summer drink, refreshing beverage, fruity