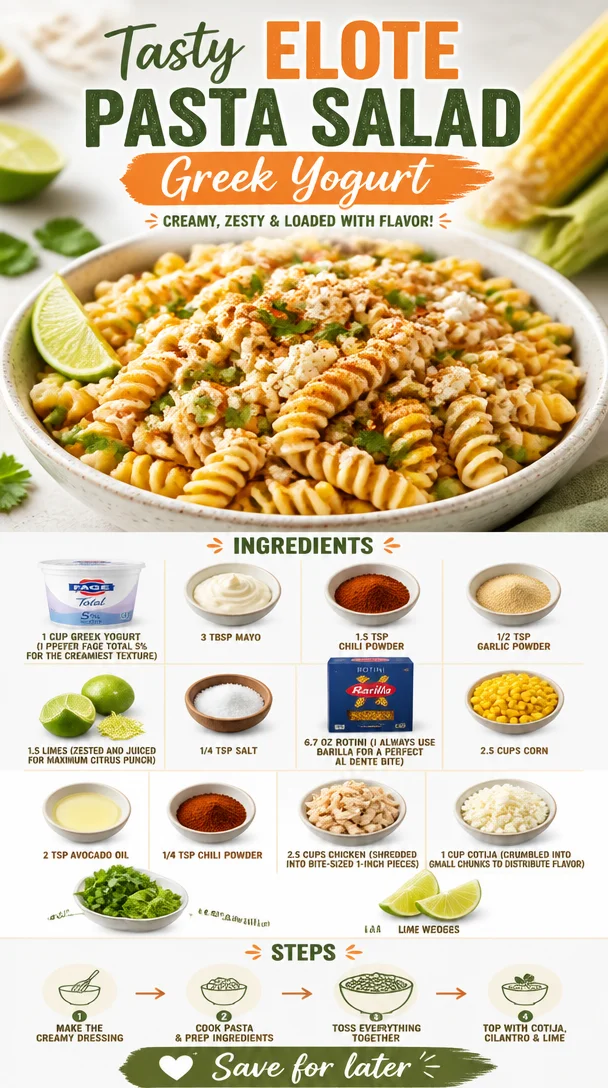
Tasty Elote Pasta Salad Greek Yogurt – moanaskitchen
Tasty Elote Pasta Salad with Greek Yogurt: A Flavorful Adventure
Hello, fellow food enthusiasts! Today, we’re stepping into the culinary world with a delightful recipe that brings a touch of summer to your table year-round: Tasty Elote Pasta Salad with Greek Yogurt. Picture this: vibrant corn, creamy Greek yogurt, a punch of lime, and just the right kick of chili powder all mixed together to create a salad that’s not only delicious but also packed with flavor. This dish is perfect for gatherings, potlucks, or even just a cozy dinner on a weeknight. Are you ready to dive in? Let’s do this!
Personal Story
I won’t forget the first time I tasted elote. It was at a local food festival, the sun shining bright, and the air filled with the enticing smell of grilled corn. The vendor was serving roasted corn on the cob slathered in creamy sauce, sprinkled with cheese, and generously dusted with chili powder. Every bite was a burst of flavor that instantly transported me to summer barbecues and sunny gatherings with friends. I was inspired to incorporate those vibrant flavors into a dish that could be enjoyed all year long — and that’s how the Elote Pasta Salad was born! This salad evokes those warm, sun-soaked memories, making it a perfect recipe to share and recreate with loved ones.
Ingredients
Before we dive into the cooking process, let’s make sure we have everything ready to go. Here’s what you’ll need:
-
1 cup Greek yogurt (I prefer Fage Total 5%): A creamy base that adds richness without overwhelming the flavors. If you’re looking for a lighter alternative, you could use low-fat Greek yogurt or even sour cream.
-
3 tbsp mayo: This adds an extra layer of creaminess that balances the yogurt. Not a mayo fan? You can omit it, but consider adding an extra splash of lime juice for acidity.
-
1.5 tsp chili powder: This brings a warm, smoky flavor to the dish. Feel free to adjust the spice level to your liking—smoked paprika makes a great substitute!
-
1/2 tsp garlic powder: Offering a subtle aromatic touch, garlic powder complements the flavors and gives it a little extra oomph. Fresh minced garlic works well too, but use less (about a clove) since it’s more potent.
-
1/4 tsp salt: Enhances the flavors of all the ingredients. If you’re on a low-sodium diet, consider reducing it or using a salt substitute.
-
1.5 limes (zested and juiced): The zesty flavor of lime adds a fresh, citrusy punch that brightens up the entire dish. If you only have one lime, that will work, but you’ll miss out on that extra zest!
-
6.7 oz rotini (I always use Barilla): These corkscrew-shaped pasta are perfect for holding onto the creamy dressing. If you prefer a gluten-free option, try brown rice pasta or quinoa pasta.
-
2.5 cups corn: Whether it’s sweet corn off the cob or frozen corn, it’s the star of this dish! Roast or grill fresh corn for a smokier flavor or use canned corn in a pinch (just drain and rinse).
-
2 tsp avocado oil: Used for sautéing your corn until it’s beautifully charred. Olive oil or melted butter can be a delightful swap here too.
-
1/4 tsp chili powder (for corn): This adds extra flavor to the corn itself. You can skip this if you’d like a milder profile!
-
2.5 cups chicken (shredded): I recommend rotisserie chicken for an easy shortcut, but you can use grilled chicken breast or even canned chicken if you’re in a rush.
-
1 cup cotija cheese: This crumbly cheese adds a salty, tangy bite that’s essential to elote. If you can’t find cotija, feta cheese is an excellent substitute!
-
1/2 cup cilantro: Fresh herbs make everything better! If you’re not a fan, you can replace it with chopped green onions or parsley for a different flavor.
-
Lime wedges: Perfect for serving! A squeeze of lime just before eating brightens the dish even further.
Step-by-Step Instructions
Now that we have all our ingredients prepped, let’s jump into making this delicious Tasty Elote Pasta Salad!
-
Cook the Pasta: Bring a large pot of salted water to a boil. Add the rotini pasta and cook according to package instructions until al dente. You want it to be perfectly tender but still have a slight bite to it. This usually takes about 8-10 minutes. Remember, undercooking just a tad is always a good strategy! Drain the pasta and rinse under cold water to stop the cooking process. This will keep your pasta from getting mushy. Set aside.
-
Sauté the Corn: In a large skillet over medium heat, add the avocado oil and allow it to warm up. Toss in the corn and sprinkle with 1/4 teaspoon of chili powder. Sauté for about 5-7 minutes, stirring occasionally, until the corn is slightly charred. Getting that nice caramelization will add tons of flavor! If using frozen corn, a few additional minutes may be needed to cook completely.
-
Whisk the Dressing: In a mixing bowl, combine the Greek yogurt, mayo, 1.5 teaspoons of chili powder, garlic powder, salt, lime zest, and lime juice. Whisk until smooth and creamy. This dressing should be luscious yet light, and the lime juice should bring a zesty freshness that livens everything up. Taste and adjust seasoning as you see fit!
-
Combine Ingredients: In a large bowl, add the cooked pasta, sautéed corn, shredded chicken, cotija, and chopped cilantro. Pour the dressing over the top and gently toss everything together until properly coated. This is where the magic happens, folks! The pasta should be looking wonderfully creamy and well-mixed.
-
Chill the Salad: For best results, cover the salad and let it chill in the fridge for at least 30 minutes. This allows the flavors to meld together beautifully. Trust me, it’s worth the wait! If you’re in a hurry, you can serve it immediately, just know the flavors will develop even more if you let it sit.
-
Serve It Up: Once it’s time to serve, give it one last gentle stir. I like to plate it in a big beautiful bowl, perhaps garnishing with additional cotija and cilantro. Serve with lime wedges on the side. A little squeeze of lime elevates each bite to a whole new level!
Serving Suggestions
To serve this Tasty Elote Pasta Salad, I recommend using a large, shallow bowl where all your vibrant colors can shine through. You can create a beautiful layer of the salad and sprinkle any remaining cotija on top for that wow factor. Consider pairing it with grilled chicken, tacos, or even as a side dish for your next barbecue. Oh, and don’t forget the lime wedges — they add a spritz of freshness that brings everything together!
Recipe Variations
Want to make this salad your own? Here are a few creative twists you can try:
-
Spicy Kick: Add diced jalapeños or a dash of hot sauce to the dressing for some serious heat.
-
Vegetarian Delight: Skip the chicken entirely and bulk it up with more corn, or add black beans for a protein-packed vegetarian version.
-
Herb Swap: If you’re not a fan of cilantro, try using fresh dill or basil instead. Each herb brings a unique twist to the flavor profile.
-
Cheesy Goodness: Mix in other cheeses like Monterey Jack or pepper jack for an extra creamy and tangy treat.
-
Pasta Choice: Change it up by using whole wheat pasta for a nutty flavor or even a spiralized zucchini for a low-carb option.
Chef’s Notes
This recipe has a special place in my heart as it evolved over countless summers spent grilling corn and creating delicious memories with friends and family. Each time I share this dish, I’m reminded of those joyful gatherings and how food has the power to bring us together. I also love that it’s a make-ahead meal — perfect for busy weeknights or weekend brunches. The leftovers (if there are any!) hold up beautifully in the fridge, making them a great lunch option the next day.
FAQs and Troubleshooting
1. Can I make this salad without chicken?
Absolutely! You can skip the chicken for a refreshing vegetarian option. You might want to add more corn or even some black beans for added protein.
2. What if I can’t find cotija cheese?
No worries! Feta cheese works as a fantastic substitute because it shares a similar creamy texture and salty flavor. It’s readily available at most grocery stores too!
3. Is this salad gluten-free?
To make this dish gluten-free, simply substitute the rotini pasta with gluten-free pasta like brown rice or quinoa pasta. Both options are delicious and work well with the salad.
4. How long will the leftovers last?
Stored in an airtight container in the fridge, your salad will be good for about 3 days. However, the flavors are best enjoyed within the first couple of days when the pasta is still perfectly firm!
Nutritional Info
While I won’t get too bogged down in numbers, this Tasty Elote Pasta Salad is packed with protein thanks to the chicken and Greek yogurt, and it’s also rich in fiber from the pasta and corn. With those fresh herbs and zesty lime, you’re not only treating your taste buds but nourishing your body too!
There you have it! Tasty Elote Pasta Salad with Greek Yogurt, a dish that brims with life, joy, and a bit of summer nostalgia no matter the season. Give it a try, gather your loved ones, and celebrate the magic of cooking together. Let’s set the table and create some beautiful moments! Happy cooking!
PrintTasty Elote Pasta Salad with Greek Yogurt
A vibrant pasta salad featuring creamy Greek yogurt, charred corn, and zesty lime for a refreshing twist on traditional elote.
- Prep Time: 15 minutes
- Cook Time: 15 minutes
- Total Time: 30 minutes
- Yield: 8 servings 1x
- Category: Salad
- Method: Chilling
- Cuisine: Mexican
- Diet: Vegetarian
Ingredients
- 1 cup Greek yogurt
- 3 tbsp mayo
- 1.5 tsp chili powder
- 1/2 tsp garlic powder
- 1/4 tsp salt
- 1.5 limes (zested and juiced)
- 6.7 oz rotini pasta
- 2.5 cups corn
- 2 tsp avocado oil
- 1/4 tsp chili powder (for corn)
- 2.5 cups shredded chicken
- 1 cup cotija cheese
- 1/2 cup cilantro
- Lime wedges (for serving)
Instructions
- Cook the pasta: Bring a large pot of salted water to a boil. Add the rotini pasta and cook according to package instructions until al dente, about 8-10 minutes. Drain and rinse under cold water. Set aside.
- Sauté the corn: In a large skillet over medium heat, add the avocado oil and warm up. Toss in the corn and sprinkle with 1/4 teaspoon of chili powder. Sauté for about 5-7 minutes until slightly charred.
- Whisk the dressing: In a mixing bowl, combine Greek yogurt, mayo, 1.5 teaspoons of chili powder, garlic powder, salt, lime zest, and lime juice. Whisk until smooth.
- Combine ingredients: In a large bowl, add cooked pasta, sautéed corn, shredded chicken, cotija, and chopped cilantro. Pour the dressing over the top and toss until everything is properly coated.
- Chill the salad: Cover the salad and let it chill in the fridge for at least 30 minutes.
- Serve it up: Stir the salad again, plate in a bowl, and garnish with additional cotija and cilantro. Serve with lime wedges on the side.
Notes
Can be made vegetarian by omitting chicken and adding more corn or black beans.
Nutrition
- Serving Size: 1 serving
- Calories: 295
- Sugar: 4g
- Sodium: 350mg
- Fat: 13g
- Saturated Fat: 4g
- Unsaturated Fat: 7g
- Trans Fat: 0g
- Carbohydrates: 35g
- Fiber: 4g
- Protein: 12g
- Cholesterol: 30mg
Keywords: pasta salad, elote, corn, Greek yogurt, summer salad, potluck

Minute Greek Salad: Fresh, Meal-Prep Friendly Bowl
The Best Greek Salad Recipe
Hello, my fellow food lovers! Today, we’re diving into a dish that perfectly embodies sunny days, vibrant flavors, and the essence of Mediterranean dining: the luscious Greek salad! Whether you’re enjoying a leisurely lunch on the patio or hosting a lively dinner party, this refreshing salad adds a splendid touch to any meal. So grab your apron, and let’s create something truly appetizing together!
A Journey to the Heart of Greece
I can’t help but be transported back to a small rustic taverna in Greece every time I think of Greek salad. Picture it: the sun-drenched terrace, the aroma of grilled seafood wafting through the air, and the sound of laughter around the table. I remember being served a glorious bowl brimming with fresh, colorful ingredients. The vibrant hues of the tomatoes, the deep greens of the cucumbers, and the bright white of the feta were a feast for both the eyes and the palate. It was there that I learned the beauty of simplicity in cooking—fresh ingredients elevated with a drizzle of olive oil and a squeeze of lemon.
Flipping through the pages of my travel journal, I stumbled on notes about every mouthwatering bite I savored. Inspired by that experience, I’m eager to recreate that magic in your kitchen. Greek salad is not just a side dish; it’s a celebration of fresh produce and regional flavors, making it a staple in my home.
Ingredients
Let’s gather our ingredients for this stunning Greek salad! Each component adds a unique flavor, and I’ll share some insights along the way.
-
1 large cucumber (diced): A refreshing crunch! Feel free to peel it if you prefer a smoother texture. English cucumbers are a sweet substitute.
-
1 pint grape tomatoes (halved): These bite-sized gems are juicy and sweet. Cherry tomatoes work just as well for a little burst of flavor.
-
1 green bell pepper (diced): Adds a nice crispness and a pop of color. You can switch it out for a red or yellow bell pepper for a sweeter taste.
-
½ red onion (thinly sliced): Provides a lovely sharpness, balancing the flavors. Soak the slices in warm water for about 10 minutes to mellow the taste.
-
½ cup Kalamata olives (halved): These bold, briny olives are a must! If you’re unable to find them, black olives can serve as a less intense alternative.
-
4 ounces feta cheese (crumbled): The star of the show! For a dairy-free option, try marinated tofu or a nut-based cheese.
-
⅓ cup red apple vinegar: This will bring zest to the salad. White wine vinegar or red wine vinegar are excellent substitutes.
-
Juice of 1 lemon: Fresh lemon juice brightens up the flavors and adds a citrusy zing. Lime juice is a fun alternative.
-
1 teaspoon Dijon mustard: This adds creaminess and depth. You can omit it for a lighter dressing or try whole grain mustard for a twist.
-
2 garlic cloves (minced): For flavor lovers, garlic is essential! Use garlic powder if fresh isn’t available.
-
½ teaspoon dried oregano: This herb is classic in Greek cuisine. Fresh oregano can also impart a wonderful fragrance.
-
¼ teaspoon salt: Essential for enhancing all the flavors! Adjust based on your taste.
-
¼ teaspoon black pepper: Freshly cracked is best for maximum flavor.
-
½ cup olive oil: A drizzle of good-quality olive oil pulls the salad together—don’t skimp here! Avocado oil can serve as a neutral substitute.
-
Salt and pepper (to taste): Always adjust to make sure your salad sings with flavor!
Step-by-Step Instructions
Now that we’re all prepped, let’s get cooking! Here’s how to assemble your Greek salad to perfection:
-
Prep the Ingredients: Start by washing your vegetables thoroughly. We want them clean and ready to shine! Dice the cucumber, halve the grape tomatoes, and dice the green bell pepper. Thinly slice the red onion, and don’t forget to pit and halve your Kalamata olives.
-
Create the Dressing: In a small bowl, whisk together the red apple vinegar, lemon juice, Dijon mustard, minced garlic, dried oregano, salt, and pepper. This simple dressing packs a punch and will marry the flavors beautifully. Chef’s Tip: Make this ahead of time and let it sit; the flavors will intensify!
-
Combine the Vegetables: In a large salad bowl, toss together the diced cucumber, grape tomatoes, green bell pepper, and red onion. You should see an explosion of color already! Get your hands in there—mixing by hand ensures that your ingredients are evenly distributed.
-
Add in Olives and Feta: Gently fold in the Kalamata olives and crumbled feta cheese. The feta adds creaminess, while the olives give a briny depth—such a delightful contrast!
-
Dress the Salad: Drizzle your tangy dressing over the tossed salad. Give it a gentle toss to coat each ingredient, ensuring every bite is flavorful. Chef’s Hack: If you’re serving later, keep the dressing separate until just before enjoying to maintain that crispness.
-
Final Touches: Taste the salad, adjusting your salt and pepper as needed. A sprinkle of freshly cracked black pepper on top adds a lovely finishing touch.
Serving Suggestions
For a delightful presentation, serve your Greek salad in a large, colorful bowl, garnished with extra feta crumbles and a sprinkle of oregano. Pair it with warm pita bread, tzatziki, or even grilled chicken for a full Mediterranean experience!
Recipe Variations
Want to mix things up? Try these creative twists on the classic Greek salad:
-
Mediterranean Grain Bowl: Add cooked quinoa or farro for added texture and nutrition.
-
Seafood Lover’s Delight: Toss in some grilled shrimp or calamari for a seafood twist.
-
Herb-Infused: Experiment with fresh herbs like dill or mint for an added layer of flavor.
-
Spicy Kick: Chop in some jalapeños or sprinkle with red pepper flakes for a spicy kick.
-
Vegan Version: Substitute feta with a nut-based cheese or omit it altogether for a lighter vibe.
Chef’s Notes
Every recipe tells a story, and this Greek salad is no different! I’ve adapted my version many times over the years, tweaking it based on my travels and favorite ingredients. I once made it for a picnic, only to discover I had mistakenly added a tablespoon of sugar instead of salt (oops!). Surprisingly, the sweetness brought out an interesting flavor. That day, I learned that cooking is often about embracing the unexpected!
FAQs and Troubleshooting
-
Can I make this salad in advance? Absolutely! It keeps well in the fridge for about 2 days. Just add dressing just before serving to maintain that fresh crunch.
-
What if I don’t have Kalamata olives? No worries! Any brined olives will do, though they’ll impart a slightly different flavor.
-
How do I store leftovers? Transfer any leftovers to an airtight container. Keep in the refrigerator and consume within 2 days for optimal freshness.
-
My salad is too salty! What can I do? If it’s too salty, consider adding more diced cucumber and tomatoes to balance the saltiness. A drizzle of olive oil can also help mellow the flavors.
Nutritional Info (Optional)
Note: Nutritional values will vary based on specific ingredients, quantities, and brands used.
With roughly 150 calories per serving, this Greek salad is full of vitamins and healthy fats and can be a great addition to your meals.
There you have it! A delightful Greek salad that brings the vibrant tastes of the Mediterranean right into your kitchen. Cooking is a joyous journey, and I’m thrilled to have you join me on this culinary adventure. So, let’s enjoy the process, savor each bite, and create beautiful moments around the table. Happy cooking, friends!
PrintThe Best Greek Salad Recipe
A refreshing Greek salad celebrating fresh produce and Mediterranean flavors, perfect for any meal.
- Prep Time: 15 minutes
- Cook Time: 0 minutes
- Total Time: 15 minutes
- Yield: 4 servings 1x
- Category: Salad
- Method: No Cook
- Cuisine: Mediterranean
- Diet: Vegetarian
Ingredients
- 1 large cucumber (diced)
- 1 pint grape tomatoes (halved)
- 1 green bell pepper (diced)
- ½ red onion (thinly sliced)
- ½ cup Kalamata olives (halved)
- 4 ounces feta cheese (crumbled)
- ⅓ cup red apple vinegar
- Juice of 1 lemon
- 1 teaspoon Dijon mustard
- 2 garlic cloves (minced)
- ½ teaspoon dried oregano
- ¼ teaspoon salt
- ¼ teaspoon black pepper
- ½ cup olive oil
- Salt and pepper (to taste)
Instructions
- Prep the Ingredients: Wash your vegetables thoroughly. Dice the cucumber, halve the grape tomatoes, and dice the green bell pepper. Thinly slice the red onion, and pit and halve the Kalamata olives.
- Create the Dressing: In a small bowl, whisk together the red apple vinegar, lemon juice, Dijon mustard, minced garlic, dried oregano, salt, and pepper.
- Combine the Vegetables: In a large salad bowl, toss together the diced cucumber, grape tomatoes, green bell pepper, and red onion.
- Add in Olives and Feta: Gently fold in the Kalamata olives and crumbled feta cheese.
- Dress the Salad: Drizzle your dressing over the tossed salad and gently toss to coat.
- Taste the salad and adjust your salt and pepper as needed.
Notes
Serve with warm pita bread or grilled chicken for a complete meal. Can be made in advance, just keep the dressing separate until serving.
Nutrition
- Serving Size: 1 serving
- Calories: 150
- Sugar: 3g
- Sodium: 350mg
- Fat: 10g
- Saturated Fat: 2g
- Unsaturated Fat: 7g
- Trans Fat: 0g
- Carbohydrates: 12g
- Fiber: 3g
- Protein: 5g
- Cholesterol: 10mg
Keywords: Greek salad, Mediterranean, healthy salad, fresh vegetables, summer recipe
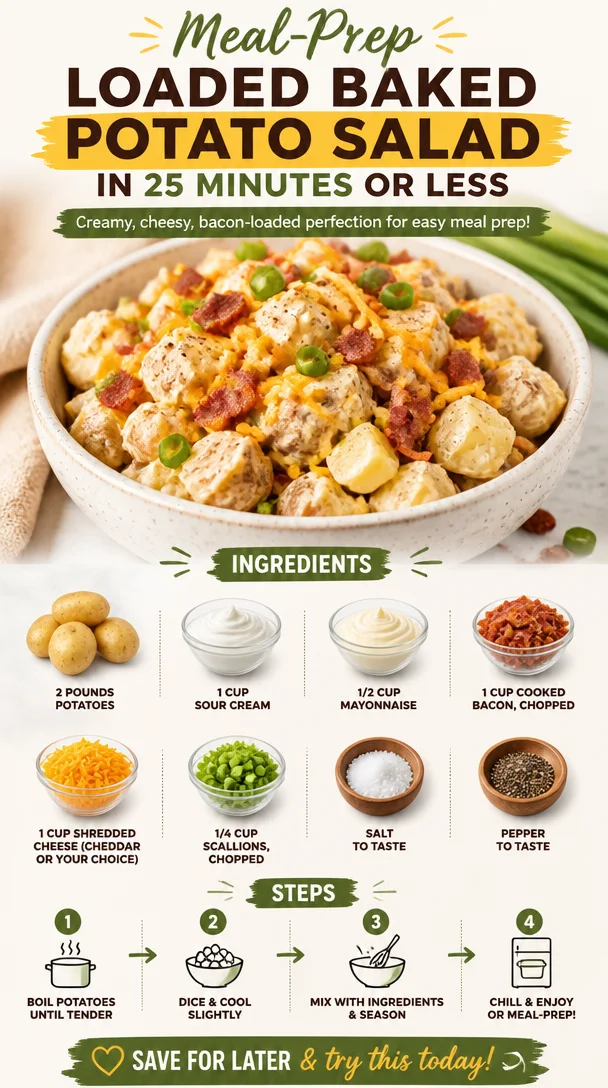
Meal-Prep Loaded Baked Potato Salad in 25 Minutes or Less
Loaded Baked Potato Salad: The Perfect Blend of Comfort and Flavor
Welcome, foodies! Today, we’re diving into one of the most heavenly combinations of flavors and textures: loaded baked potato salad. Yes, you heard that right—this dish merges the classic warmth of baked potatoes with the charm of potato salad, creating a unique and delicious experience that’s impossible to resist.
Picture this: a sunny afternoon, your friends gathered around the backyard table, laughter mingling with the aroma of grilled burgers wafting through the air. You reach for a bowl of this loaded potato salad, and suddenly, everything feels a little more celebratory. It’s that kind of dish that doesn’t just fill you up; it makes you feel connected, joyful, and deeply satisfied. Whether it’s a summer BBQ or a winter potluck, this loaded baked potato salad is the ultimate crowd-pleaser.
A Bite of Nostalgia
I can’t help but reminisce about the first time I made a version of this dish for a family gathering. My mom had always been the queen of summer picnics and potlucks—her coleslaw was legendary, and her mashed potatoes were sought after. One warm Saturday, we decided to get creative and whip up a salad that combined our love for her classic potato salad with the toppings of a loaded baked potato. Picture us, giggling, mixing ingredients, and sneaking bites of crispy bacon straight from the pan when we thought no one was looking! That day sparked a kitchen experiment that has become a staple in my repertoire.
Fast forward to today, and I’ve refined that childhood creation into the loaded baked potato salad I’m thrilled to share with you. It may evoke nostalgia for family gatherings and picnics, but it’s also a dish that feels fresh and exciting, inviting everyone to dig in and enjoy. Let’s roll up our sleeves and make some magic happen in your kitchen!
Ingredients
Here’s what you’ll need to create this incredible dish:
-
2 pounds potatoes
A good, starchy potato like Russets or Yukon Golds works best. They’re fluffy once cooked and hold up to mixing without turning mushy. If you’re looking to cut carbs, try using cauliflower instead! -
1 cup sour cream
This creamy base is essential for flavor and texture. If you want a lighter option, Greek yogurt can be a fantastic substitute—it adds tanginess and creaminess without all the calories. -
1/2 cup mayonnaise
Adds a bit more creaminess to the mix. For a lighter alternative, use a vegan mayo, or for extra zing, try adding a tablespoon of Dijon mustard. -
1 cup cooked bacon, chopped
You can use turkey bacon for a leaner option or even crispy shallots for a vegetarian version. The smokiness of bacon is hard to beat, though! -
1 cup shredded cheese (cheddar or your choice)
Cheddar is a classic choice here, but feel free to experiment! Pepper jack will add a nice kick, or a sharp gouda can provide a rich, buttery depth. -
1/4 cup scallions, chopped
These add a fresh, onion-y crunch, but you could easily swap them for chives or even red onions for a more robust flavor. -
Salt and pepper to taste
Essential seasoning that will enhance every bite. Don’t skip this step—season to your palate, my friends!
Step-by-Step Instructions
Ready to create this masterpiece? Let’s get cooking!
Step 1: Boil the Potatoes
Start by washing and peeling (if desired) your potatoes. Cut them into uniform chunks—about 1-inch pieces work well. Place them in a large pot and cover them with cold, salted water. It’s essential to use cold water, as this helps cook the potatoes evenly.
Chef Tip: Use a generous amount of salt in the water. It helps season the potatoes from the inside out, making every bite flavorful!
Bring the pot to a boil over high heat, then reduce the heat and allow the potatoes to simmer. Cook them until fork-tender, which typically takes about 12-15 minutes. Drain and let them cool slightly before handling them.
Step 2: Mix the Creamy Base
While the potatoes are cooling, in a large mixing bowl, combine the sour cream and mayonnaise. Stir until smooth, and add a sprinkle of salt and pepper.
Little Chef Hack: If you want an extra layer of flavor, toss in a teaspoon of garlic powder or a splash of hot sauce—trust me, it elevates the whole dish!
Step 3: Combine Ingredients
Once the potatoes are cool enough to handle, gently fold them into your creamy mixture. You want to be gentle here so you don’t mush the potatoes. Carefully incorporate the cooked bacon, shredded cheese, and chopped scallions.
Chef’s Insight: If you want to prep this dish ahead of time, consider doing this step a few hours before your gathering. It allows the flavors to meld beautifully in the fridge!
Step 4: Taste and Adjust
Give your salad a final seasoning check by tasting it and adjusting the salt and pepper as needed.
Step 5: Chill and Serve
Cover the bowl with plastic wrap and let it chill in the fridge for at least an hour. This time lets the flavors marry, and trust me, the waiting is worth it.
Serving Suggestions
When serving, opt for a beautiful bowl that highlights the hearty, colorful ingredients. Consider a sprinkle of fresh scallions or additional cheese on top for that extra touch of elegance. This potato salad pairs wonderfully with grilled meats, burgers, or on its own at a picnic. Enjoy it garnished with a few fresh herbs like parsley or chives for a lovely pop of color.
Recipe Variations
Feeling adventurous? Try these exciting twists on the classic loaded baked potato salad:
-
Southwestern Flair: Add black beans, corn, and diced jalapeños for a zesty, southwestern spin. Toss in a bit of lime juice for brightness!
-
Herby Delight: Swap out the cheddar for feta and add fresh herbs like dill or basil for a herbaceous version.
-
Smoky BBQ: Mix in some BBQ sauce for an extra smoky kick. You can also top with crispy fried onions for crunch!
-
Mediterranean Medley: Incorporate olives, sun-dried tomatoes, and a sprinkle of za’atar for a unique twist.
-
Vegan Style: Use plant-based sour cream and mayo, add extra veggies like cucumber, and you’ve got a gorgeous vegan option!
Chef’s Notes
Over the years, this recipe has evolved from a sweet memory of cooking with my mother into my own celebrated dish. I love how adaptable it is—there’s always room for experimentation! I remember one time at a family reunion, I made a huge batch, and it vanished in minutes! I guess it became the star of the show. Plus, seeing my family dig in and enjoy something I made fills my heart with joy.
FAQs and Troubleshooting
1. Can I make this potato salad ahead of time?
Absolutely! This salad actually tastes better after sitting in the fridge for a few hours. Just cover it tightly to keep it fresh.
2. What type of potatoes should I use?
Russets are ideal for creamy mashed textures, but Yukon Golds also work great if you prefer a slightly richer flavor.
3. How do I prevent the potatoes from turning mushy?
Make sure to keep an eye on the potatoes as they boil, testing them with a fork for doneness. Once they’re fork-tender, drain them immediately!
4. Can I add more vegetables?
Definitely! Chopped bell peppers, celery, or even pickles can add a fresh crunch and vibrant flavor to your salad.
Conclusion
There you have it, my fellow kitchen adventurers! This loaded baked potato salad is destined to be a staple in your culinary repertoire. It beautifully blends comfort with elegance, making any gathering or dinner feel special and inviting. Remember, cooking is about connection, joy, and creativity. Each bite tells a story, allowing you to share a slice of your culinary journey with others. So grab your apron, get your friends involved, and let’s make some delicious memories together! Happy cooking!
PrintLoaded Baked Potato Salad

A delicious blend of classic baked potatoes and potato salad, perfect for any gathering.
- Prep Time: 15 minutes
- Cook Time: 15 minutes
- Total Time: 30 minutes
- Yield: 6 servings 1x
- Category: Side Dish
- Method: Boiling
- Cuisine: American
- Diet: Vegetarian
Ingredients
- 2 pounds potatoes (Russets or Yukon Golds)
- 1 cup sour cream
- 1/2 cup mayonnaise
- 1 cup cooked bacon, chopped
- 1 cup shredded cheese (cheddar or your choice)
- 1/4 cup scallions, chopped
- Salt and pepper to taste
Instructions
- Boil the potatoes: Wash and peel the potatoes if desired. Cut them into uniform chunks, about 1 inch. Place them in a large pot with cold, salted water. Bring to a boil and then simmer until fork-tender, about 12-15 minutes. Drain and cool.
- Mix the creamy base: In a large bowl, combine sour cream and mayonnaise. Stir until smooth, then add salt and pepper.
- Combine ingredients: Once potatoes are cool, fold them gently into the creamy mixture along with the bacon, cheese, and scallions.
- Taste and adjust: Check the seasoning and add more salt and pepper if needed.
- Chill and serve: Cover the bowl and chill in the fridge for at least 1 hour before serving.
Notes
This potato salad tastes even better after sitting in the fridge for a few hours.
Nutrition
- Serving Size: 1 serving
- Calories: 350
- Sugar: 3g
- Sodium: 450mg
- Fat: 20g
- Saturated Fat: 7g
- Unsaturated Fat: 10g
- Trans Fat: 0g
- Carbohydrates: 40g
- Fiber: 3g
- Protein: 9g
- Cholesterol: 30mg
Keywords: potato salad, loaded baked potato, summer BBQ, picnic, comfort food
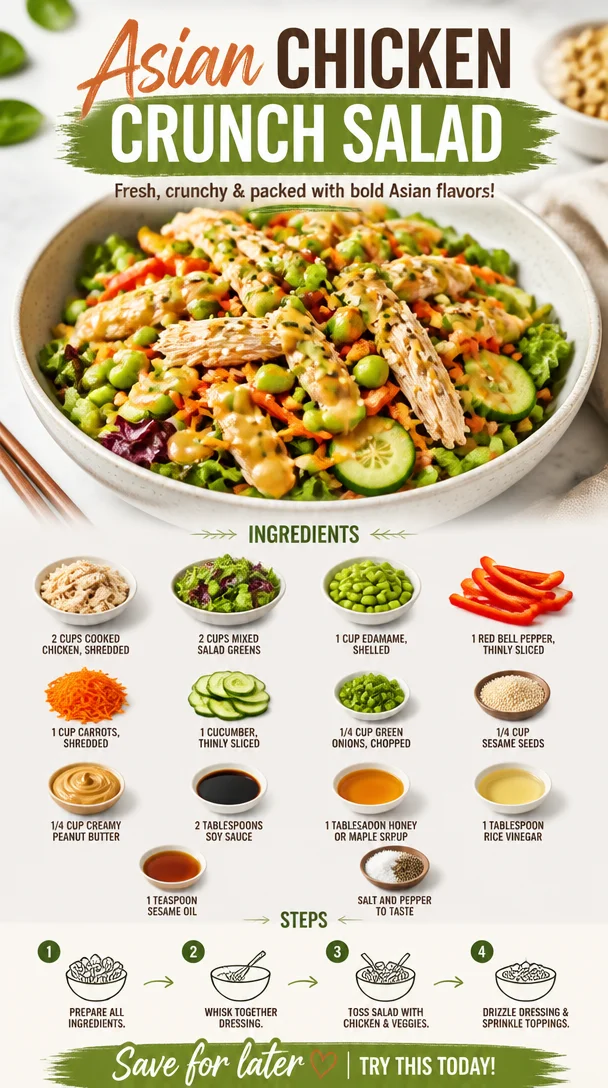
Asian Chicken Crunch Salad
Asian Chicken Crunch Salad: A Fresh Take on a Flavorful Classic
Hello, culinary friends! Today, I’m thrilled to share with you a recipe that perfectly embodies that balance between effortless elegance and delicious satisfaction—my Asian Chicken Crunch Salad. Whether you’re preparing lunch for yourself or whipping up something impressive for a dinner party, this dish will shine on your table.
The beauty of an Asian Chicken Crunch Salad lies not just in its vibrant colors and textures but also in the way it celebrates fresh ingredients and bold flavors. This salad is a little bit of everything I love about cooking: it’s quick, healthy, and packed with layers of flavor that tantalize the taste buds.
A Personal Slice of Nostalgia
I still remember the first time I made an Asian-inspired salad. It was during one of those long summer evenings, and I had a few friends over for a casual cookout. It was the kind of gathering filled with laughter, stories, and, of course, an abundance of delicious food. I wanted to make something refreshing but substantial, and the memory of crunching into crisp veggies and juicy chicken still lingers sweetly in my mind.
As I tossed together the vibrant ingredients, I couldn’t help but feel the warmth of friendship surrounding me. Watching everyone enjoy that salad, diving in for seconds and thirds, was a joy that solidified my love for both cooking and sharing meals. It’s moments like these that inspire me to create recipes where people can gather around the table, savoring every bite. And this Asian Chicken Crunch Salad? It’s an invitation to experience those moments!
Ingredients You’ll Need
Here’s what you’ll need for a salad that’s as delightful to prepare as it is to eat—along with some chef insights and substitution tips!
-
2 cups cooked chicken, shredded
Any type of cooked chicken works—grilled, roasted, or even a rotisserie chicken from your local market. Feeling ambitious? Press some chicken breast in a pan for extra flavor! -
2 cups mixed salad greens
I love a mixture of leafy greens like spinach, arugula, and romaine for varied textures. Don’t have mixed greens? Any fresh lettuce will do—just avoid iceberg for more flavor. -
1 cup edamame, shelled
These little green gems are packed with protein and a slightly sweet taste. If you can’t find edamame, chickpeas make a great substitute. -
1 red bell pepper, thinly sliced
Sweet and crisp, they add beautiful color. You can swap it with yellow or orange bell peppers for a sweeter flavor or even throw in some spicy jalapeños if you’re feeling adventurous. -
1 cup carrots, shredded
Shredded carrots add crunch and sweetness. Pre-packaged shredded carrots save you time, but feel free to use a vegetable peeler for longer ribbons. -
1 cucumber, thinly sliced
For a refreshing crunch! Persian cucumbers are great for this salad, but any cucumber will do—just ensure you remove the seeds for less wateriness. -
1/4 cup green onions, chopped
They contribute a mild onion flavor. If you’re not a fan, chives are a nice swap! -
1/4 cup sesame seeds
These provide a delightful nutty flavor. If you don’t have sesame seeds on hand, slivered almonds or sunflower seeds work wonderfully as well.
Dressing Ingredients:
-
1/4 cup creamy peanut butter
A must for that creamy texture! Allergic to peanuts? Try almond butter or sunflower seed butter. -
2 tablespoons soy sauce
This adds that signature umami flavor to the dressing. Low-sodium soy sauce is great if you’re watching your salt intake. -
1 tablespoon honey or maple syrup
This adds a touch of sweetness. For a vegan option, opt for maple syrup. -
1 tablespoon rice vinegar
Brightening up the dressing, rice vinegar is a staple in many kitchens! Apple cider vinegar works well in a pinch. -
1 teaspoon sesame oil
Adds a deep, toasty flavor. If you’re out, a little olive oil works as a great alternative. -
Salt and pepper to taste
Flavor is key! Adjust seasoning according to your preference.
Step-by-Step Instructions
Ready to get cooking? Let’s dive into the process of creating this colorful and crunchy masterpiece!
-
Prepare Your Chicken
- If you’re using leftover chicken, great! Just shred it to bite-sized pieces. New to shredding? Simply place the cooked chicken on a cutting board and pull apart with two forks—it’s as easy as that!
-
Make the Dressing
- In a medium bowl, whisk together the creamy peanut butter, soy sauce, honey (or maple syrup), rice vinegar, sesame oil, and a pinch of salt and pepper.
- Tip: If your peanut butter is too thick, consider adding a splash of warm water to loosen it. Aim for a consistency that’s pourable and creamy. Don’t be afraid to taste and adjust—it’s all about finding that sweet, savory balance!
-
Prep Your Veggies
- Wash and dry all your greens and veggies. Thinly slice the red bell pepper and cucumber, and shred those carrots.
- Chef Hack: Use a box grater for shredding carrots quickly; it can be a lot faster than using a knife.
-
Assemble the Salad
- In a large bowl, add the mixed greens, shredded chicken, edamame, bell pepper, carrots, cucumber, and green onions. Toss those beautiful ingredients together gently.
- This is where you can think about portion sizes—adjust the ingredients based on your crowd to make sure everyone gets enough of those flavors!
-
Dress the Salad
- Drizzle the dressing over the tossed salad and sprinkle with sesame seeds, giving it another gentle toss to coat all the ingredients evenly.
- Fun Tip: You can serve the dressing on the side if you prefer just a hint of flavor rather than a full mix.
-
Plate and Serve
- Serve this salad in large bowls for a family-style meal or plated individually for a classy touch.
- Chef Note: Add extra sesame seeds or sliced almonds as a topping for a little flair!
Serving Suggestions
This salad is not only visually stunning, but it also packs a ton of flavors, making it perfect for any occasion. Consider pairing it with grilled shrimp or serving it alongside spring rolls for a full Asian-inspired feast. Don’t forget to hydrate with a refreshing iced tea or a crisp white wine—it’s the little touches that elevate the meal!
Recipe Variations
The beauty of this Asian Chicken Crunch Salad is its versatility. Here are a few creative twists to consider:
- Spicy Twist: Add sliced jalapeños or drizzle with sriracha for an extra kick.
- Fruit Infusion: Toss in some mandarin oranges or mango slices for a sweet tropical vibe.
- Veggie Power: Amp up the nutrition by adding sliced radishes or chopped kale to the mix.
- Grain Goodness: Want to turn this salad into a heartier meal? Add cooked quinoa or brown rice for some extra sustenance.
- Vegan Option: Swap chicken for tofu or chickpeas, and use plant-based peanut butter to keep it vegan-friendly!
Chef’s Notes
When I first started making my Asian Chicken Crunch Salad, I had a friend who was reluctant about salads in general. She spent years believing they were boring or limited in flavor. But when I finally convinced her to give this one a shot, her eyes lit up with every bite. She declared, “This isn’t just a salad; it’s a celebration!” Moments like those remind me why I cook: to elevate simple ingredients into something that creates unforgettable experiences.
Over time, this recipe has evolved, changing with the seasons and the ingredients available to me. I love playing around with textures and flavors, so feel free to be adventurous!
FAQs and Troubleshooting
Q: Can I prepare the salad in advance?
A: While you can prep the components ahead of time, I recommend adding the dressing right before serving to keep the greens crisp. Store the dressing separately in the fridge.
Q: What if my dressing is too thick?
A: Just whisk in a little warm water until you reach the desired consistency. Remember, you want it pourable!
Q: How can I make this salad gluten-free?
A: Easy! Use tamari instead of soy sauce, and double-check other ingredients for gluten content.
Q: My salad is too salty. What do I do?
A: Balance it out by adding a dash more honey (or maple syrup) or incorporating additional veggies to dilute the salty flavor.
Conclusion
So there you have it, my friends! An Asian Chicken Crunch Salad that not only looks gorgeous but also brings a burst of flavor into your kitchen and your life. I hope you’re as excited to make this dish as I am to share it with you. Remember, it’s all about creating those small, beautiful moments around your table—so grab your apron, invite some friends, and let’s make some delicious memories together!
Happy cooking, and welcome to the Ivory Apron family!
PrintAsian Chicken Crunch Salad
A vibrant and healthy salad featuring shredded chicken, mixed greens, edamame, and a creamy peanut dressing.
- Prep Time: 15 minutes
- Cook Time: 10 minutes
- Total Time: 25 minutes
- Yield: 4 servings 1x
- Category: Salad
- Method: Mixing
- Cuisine: Asian
- Diet: Gluten-Free, Dairy-Free
Ingredients
- 2 cups cooked chicken, shredded
- 2 cups mixed salad greens
- 1 cup edamame, shelled
- 1 red bell pepper, thinly sliced
- 1 cup carrots, shredded
- 1 cucumber, thinly sliced
- 1/4 cup green onions, chopped
- 1/4 cup sesame seeds
- 1/4 cup creamy peanut butter
- 2 tablespoons soy sauce
- 1 tablespoon honey or maple syrup
- 1 tablespoon rice vinegar
- 1 teaspoon sesame oil
- Salt and pepper to taste
Instructions
- Prepare your chicken by shredding it into bite-sized pieces.
- Make the dressing by whisking together peanut butter, soy sauce, honey, rice vinegar, sesame oil, and a pinch of salt and pepper.
- Prep your veggies by washing and slicing them accordingly.
- Assemble the salad in a large bowl with all the ingredients and toss gently.
- Dress the salad with the prepared dressing and toss to coat evenly.
- Serve in large bowls or plated individually for a classy presentation.
Notes
Add extra sesame seeds or sliced almonds on top for garnish. Serve with grilled shrimp or spring rolls for a complete meal.
Nutrition
- Serving Size: 1 serving
- Calories: 400
- Sugar: 7g
- Sodium: 500mg
- Fat: 18g
- Saturated Fat: 3g
- Unsaturated Fat: 11g
- Trans Fat: 0g
- Carbohydrates: 35g
- Fiber: 6g
- Protein: 22g
- Cholesterol: 50mg
Keywords: Asian salad, chicken salad, healthy recipe, crunchy salad, peanut dressing
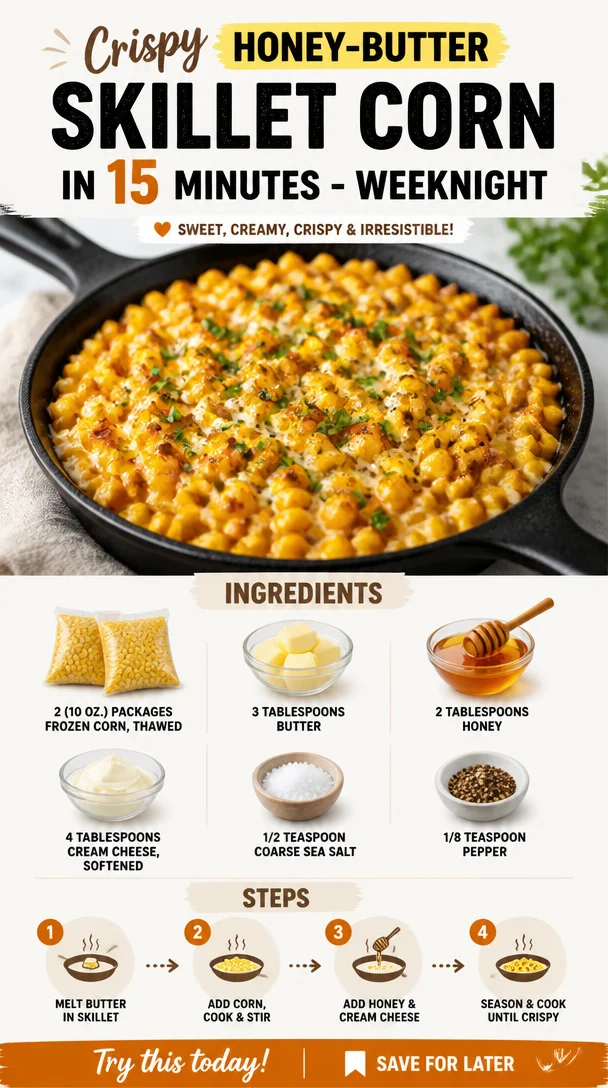
Crispy Honey-Butter Skillet Corn in 15 Minutes – Weeknight
Honey Butter Skillet Corn: A Sweet and Savory Side Dish
Hello there, fellow food enthusiasts! I’m Savannah Pierce, and I’m delighted to have you join me in the kitchen today. This blog post is dedicated to a show-stopping side dish that is bound to steal the spotlight at your next gathering: Honey Butter Skillet Corn! If you’ve never had the pleasure of savouring this sweet and savory blend, you’re in for a treat. Let me take you on a delightful culinary journey that brings together the warm flavors of butter and honey with the crisp essence of corn—perfectly simple yet incredibly satisfying!
So, ready your skillet, and let’s dive into the recipe together!
A Memory with Corn
Let me whisk you back in time to a hot summer day when I was a little girl—my loved ones gathered in my grandmother’s kitchen, laughter bouncing off the walls. The smells of garlic and butter filled the air as we prepared dinner together. My grandma always adored serving corn made fresh from her garden. But what set her corn apart from any other dish was the sweet secret ingredient she added: honey! That unique twist was my introduction to the simplicity of combining sweet and savory, forever changing how I viewed flavors. Whenever I reminisce about those warm summer nights, I can almost hear the clinking of forks and see the smiles around the table. Today, I channel that nostalgic energy into my Honey Butter Skillet Corn recipe, which is a delightful homage to those precious memories.
Ingredients
Let’s gather everything you need to whip up this tantalizing dish:
-
2 (10 oz.) packages frozen corn, thawed: Frozen corn is not only convenient but also retains its sweetness. Don’t have frozen corn? Fresh corn works perfectly too—just make sure to cut it from the cob!
-
3 tablespoons butter: Butter brings that rich, creamy texture. If you’re looking for a healthier alternative, feel free to use olive oil or coconut oil for sautéing.
-
2 tablespoons honey: Honey adds that irresistible sweetness. You can substitute agave syrup or maple syrup if you’re looking for a vegan option.
-
4 tablespoons cream cheese, softened: Cream cheese lends a delectable creaminess to the dish. For a lighter version, you can opt for Greek yogurt instead (but it will have a tangier flavor).
-
1/2 teaspoon coarse sea salt: Salt enhances the sweetness of the corn beautifully. You can use regular table salt if that’s all you have, but the texture of sea salt adds an extra layer of depth.
-
1/8 teaspoon pepper: Freshly ground pepper complements the sweetness of the corn—feel free to adjust it according to your taste!
Step-by-Step Instructions
Now that we have our ingredients, let’s create this magical dish together! Follow along with me for a fun cooking experience.
-
Get Your Skillet Hot: Heat a large skillet over medium heat. Love that sizzle! Adding your ingredients to a properly heated pan ensures a nice sautée without the corn getting watery.
-
Melt the Butter: Add the 3 tablespoons of butter once your skillet is hot. Let it melt completely, swirling the pan to coat its surface evenly. This is where the magic starts! The golden, nutty aroma of melted butter sets the stage for our star ingredient.
-
Sauté the Corn: Add the thawed corn to the skillet. Spread it out evenly to ensure maximum contact with the pan. It should sizzle nostalgically! Stir it frequently for about 5-7 minutes until the corn is heated through and slightly caramelized. That’s how you amp up the flavors and add depth.
-
Incorporate Honey: Drizzle your 2 tablespoons of honey over the corn. Stir gently to combine, allowing the honey to coat each kernel. Feel free to adjust the amount according to your sweet tooth—honey-loving friends will thank you!
-
Add Cream Cheese: Now, drop in the softened cream cheese in dollops. Stir to mix until the cream cheese has melted into the corn and created a luscious, creamy coating. It should feel like a warm hug! Be gentle at this stage—you want everything to blend beautifully.
-
Season It Up: Sprinkle the coarse sea salt and pepper, stirring to combine. Taste and adjust. If you like a bit more sweetness, add a touch more honey. Want more zest? A squeeze of fresh lime juice can brighten it right up!
-
Cook and Tray It Up: Allow everything to simmer together for an additional minute, ensuring all flavors meld. Then, remove it from the heat. It’s time to plate your delicious Honey Butter Skillet Corn!
Serving Suggestions
When it comes to serving, presentation is key! Transfer your Honey Butter Skillet Corn to a beautiful serving bowl, garnishing with fresh herbs like parsley or basil for pops of color. You can also sprinkle some crumbled feta cheese on top for an extra layer of flavor—talk about impressive!
Recipe Variations
The beauty of this Honey Butter Skillet Corn recipe is its versatility! Here are a few fun options to give this dish a twist:
-
Add Fresh Herbs: Toss in some fresh basil or cilantro towards the end of cooking for a burst of freshness.
-
Spicy Kick: Mix in a pinch of cayenne pepper or red pepper flakes for a savory kick to balance the sweetness.
-
Lime-Infused: Add zest and juice from a lime for a citrusy flair.
-
Cheesy Delight: Fold in shredded cheese like cheddar or pepper jack to enhance creaminess and flavor complexity.
-
Bacon Lovers Unite: Sauté chopped bacon before adding your corn for a smoky flavor that pairs beautifully with the honey!
Chef’s Notes
I can’t help but share that this recipe has evolved throughout the years. Early on, I made it for my friends during our summer BBQs, and it quickly became a staple. Over time, I experimented with new ingredients based on what was in season or what I had on hand, leading to the vibrant and luscious version you see today. One never knows when inspiration for a new twist will strike—it could be the random herb in your fridge or a spicy condiment waiting on your shelf. Embrace your creativity, and don’t shy away from making this recipe your own!
FAQs and Troubleshooting
Let’s troubleshoot some common questions you might have as you embark on this culinary adventure!
-
Why is my corn watery? Make sure to sauté it long enough to remove excess moisture! Frozen corn can sometimes retain water, so a few extra minutes cooking will help.
-
Can I make this recipe ahead of time? Absolutely! You can prepare the dish in advance and warm it up gently on the stove before serving. Just be cautious not to overcook it—keep that vibrant corn texture!
-
What can I do with leftovers? This dish makes a fantastic omelet filling or a topping for nachos. Get creative!
-
Can I use canned corn? Yes, but be sure to drain and rinse thoroughly! Sautéing canned corn typically requires less time since it’s already cooked.
Nutritional Info
Though I focus on enjoyment over counting calories, if you’re curious, this Honey Butter Skillet Corn can serve as a delightful addition to any meal. It’s a great source of fiber, thanks to the corn, and provides a touch of healthy fats from the butter and cream cheese.
And there you have it—a delightful journey through the art of Honey Butter Skillet Corn! I hope this dish fills your home with warmth and laughter, just like it does for me. Don’t hesitate to share your own variations and stories in the comments below. Until next time, happy cooking, and remember—good food is about showing up, not showing off!
Let’s get cooking! 🍽️✨
PrintHoney Butter Skillet Corn

A delightful side dish combining the sweet and savory flavors of corn, butter, and honey.
- Prep Time: 10 minutes
- Cook Time: 15 minutes
- Total Time: 25 minutes
- Yield: 4 servings 1x
- Category: Side Dish
- Method: Sautéing
- Cuisine: American
- Diet: Vegetarian
Ingredients
- 2 (10 oz.) packages frozen corn, thawed
- 3 tablespoons butter
- 2 tablespoons honey
- 4 tablespoons cream cheese, softened
- 1/2 teaspoon coarse sea salt
- 1/8 teaspoon pepper
Instructions
- Get Your Skillet Hot: Heat a large skillet over medium heat.
- Melt the Butter: Add the 3 tablespoons of butter once your skillet is hot.
- Sauté the Corn: Add the thawed corn to the skillet and stir it frequently for about 5-7 minutes until heated through.
- Incorporate Honey: Drizzle your 2 tablespoons of honey over the corn and stir gently.
- Add Cream Cheese: Drop in the softened cream cheese in dollops and mix until melted.
- Season It Up: Sprinkle the coarse sea salt and pepper, stirring to combine.
- Cook and Tray It Up: Allow everything to simmer together for an additional minute before plating.
Notes
This recipe can be made ahead of time and reheated before serving. Feel free to add fresh herbs or other variations.
Nutrition
- Serving Size: 1 serving
- Calories: 250
- Sugar: 10g
- Sodium: 300mg
- Fat: 10g
- Saturated Fat: 5g
- Unsaturated Fat: 5g
- Trans Fat: 0g
- Carbohydrates: 35g
- Fiber: 4g
- Protein: 6g
- Cholesterol: 25mg
Keywords: corn, sides, honey butter, easy recipe, summer dish
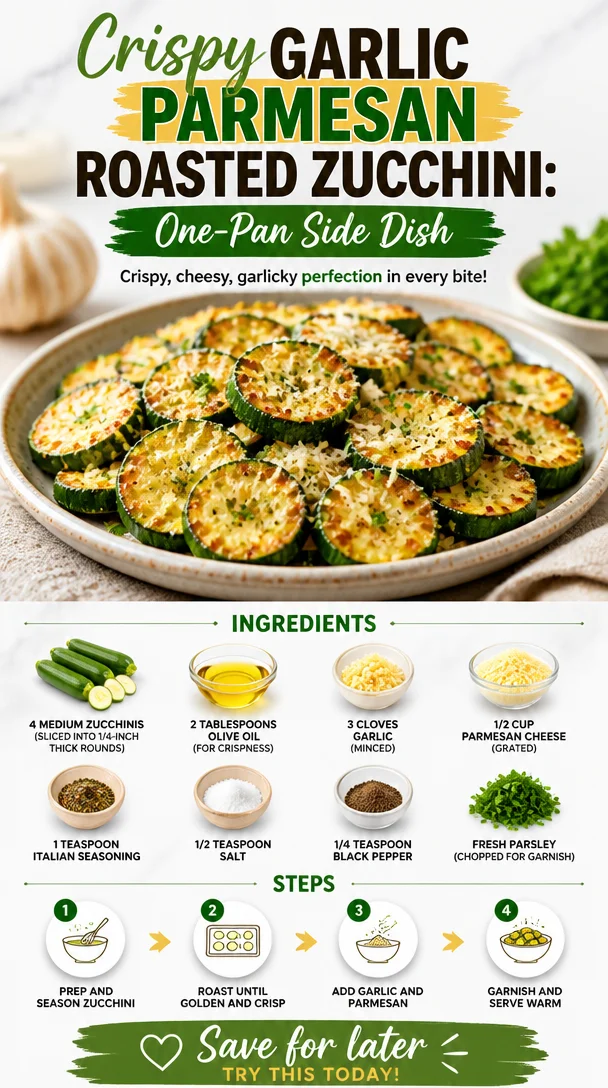
Crispy Garlic Parmesan Roasted Zucchini: One-Pan Side Dish
Irresistibly Crunchy Garlic Parmesan Roasted Zucchini
Hello and welcome back to Ivory Apron! Today, we’re diving into a dish that’s bursting with flavor, texture, and goodness: Irresistibly Crunchy Garlic Parmesan Roasted Zucchini. This dish is not just another side—it’s a celebration of one of summer’s most versatile vegetables, zucchini! If you’ve ever wondered how to make your veggies a showstopper, you’re in the right place.
So, put on your apron, grab your knife, and let’s get ready to make zucchini the star of your dinner table!
A Little Personal Story: Zucchini Memories
Zucchini has always held a special place in my heart. Growing up, summer vacations meant visiting my grandmother’s house, where her garden was a treasure trove of fresh vegetables. She had a particular knack for transforming modest veggies into mouthwatering dishes. I remember picking zucchini from her garden, gleaming in the sun, and she would say, “Savannah, zucchini is like a blank canvas—let’s paint it delicious!”
One memorable afternoon, we crafted a dish much like today’s. We roasted zucchini infused with garlic and Parmesan, and the kitchen filled with the most heavenly aroma. It was a simple moment, yet it taught me that even the humblest of ingredients could bring joy. It’s this spirit that inspires me to share my recipes with you!
Let’s make those memories together with this crispy, cheesy, and utterly delightful dish.
Ingredients
Gather these fresh ingredients to get started on our garlic Parmesan roasted zucchini:
-
4 medium zucchinis: Sliced into 1/4-inch thick rounds. Look for firm, shiny zucchinis for the best texture. You can also use yellow squash for a pop of color!
-
2 tablespoons olive oil: This not only helps in crisping up the zucchini but also adds a lovely flavor. For a different twist, you can use avocado oil, which has a high smoke point and a mild taste.
-
3 cloves garlic: Minced. Fresh garlic delivers the best flavor! In a pinch, you can use garlic powder—just adjust to taste.
-
1/2 cup Parmesan cheese: Grated. The sharper the cheese, the more flavor it’ll impart. If you’re feeling adventurous, try Pecorino Romano for a salty kick.
-
1 teaspoon Italian seasoning: A blend of herbs that captures the essence of Italian cooking. Feel free to customize it with your favorite herbs—thyme and rosemary work beautifully here!
-
1/2 teaspoon salt: To enhance all the flavors in your dish. Always taste and adjust!
-
1/4 teaspoon black pepper: Freshly cracked offers the best heat. If you want an extra kick, try a sprinkle of red pepper flakes.
-
Fresh parsley: Chopped for garnish. This adds a vibrant color and fresh flavor, making your dish pop!
Step-by-Step Instructions
Now that we’ve gathered our ingredients, it’s time to get cooking! Follow these steps to create your crispy zucchini masterpiece.
-
Preheat the Oven: Start by preheating your oven to 425°F (220°C). A hotter oven will give us that nice roasted color and crunch we’re after.
-
Prepare the Baking Sheet: Line a rimmed baking sheet with parchment paper for easy cleanup and to prevent sticking. This little hack can save you time and hassle later!
-
Slice the Zucchini: Wash the zucchinis under cold water, then slice them into 1/4-inch thick rounds. Consistency is key here, so try to keep them uniform for even cooking. Using a mandoline slicer can speed this up if you have one!
-
Toss with Olive Oil: In a large mixing bowl, combine the sliced zucchini with olive oil. Use your hands to toss and coat the zucchini evenly. This helps crisp them up in the oven!
-
Add Garlic and Seasonings: Next, add in the minced garlic, Italian seasoning, salt, and black pepper. Toss everything together again until the zucchini is thoroughly coated. Don’t skip on the garlic—it’s what really brings the flavor!
-
Layer on the Baking Sheet: Spread the seasoned zucchini rounds in a single layer on your prepared baking sheet. Overcrowding will lead to steaming instead of roasting, so give them some space to breathe.
-
Sprinkle with Parmesan: Now, it’s time for the pièce de résistance! Generously sprinkle the grated Parmesan cheese over the top of the zucchini. If you’re feeling cheesy, don’t hold back!
-
Roast Away: Pop the baking sheet into your preheated oven and roast for about 20-25 minutes. Halfway through, give them a stir to ensure even cooking and that all that beautiful cheese gets nice and golden.
-
Check for Crispiness: Trust your nose here—they should smell incredible and be slightly browned. The edges will get crispy, while the middle retains a bit of tenderness.
-
Garnish and Serve: Once they’re out of the oven, give them a final sprinkle of fresh parsley for that beautiful pop of color. And there you have it—Irresistibly Crunchy Garlic Parmesan Roasted Zucchini!
Serving Suggestions
For plating, layer the crispy zucchini on a beautiful serving dish. Consider drizzling a little extra balsamic glaze or a squeeze of fresh lemon juice over the top for that added zing. Serve alongside grilled chicken or fish, or enjoy them just as they are! You’ll find they impress guests without overshadowing your main dish.
Recipe Variations
Feeling adventurous? Here are some fun variations to give your zucchini dish a personal twist:
- Spicy Garlic Zucchini: Add a pinch of red pepper flakes or cayenne pepper to the seasoning for a kick!
- Herb-Infused: Swap Italian seasoning for fresh herbs like dill or basil for a refreshing take.
- Vegan Version: Substitute nutritional yeast for the Parmesan and use a vegan olive oil substitute.
- Mediterranean Delight: Toss in halved cherry tomatoes and olives with the zucchini for a colorful Mediterranean flair.
- Balsamic Glazed: Drizzle some balsamic reduction over the zucchini just before serving for a sweet and tangy finish.
Chef’s Notes
Zucchini has come a long way since my grandmother’s garden days. I’ve experimented with this recipe over the years, tweaking the seasoning and methods until it reached perfection. One funny memory involves a dinner party where I accidentally confused the salt for sugar while seasoning! Let me tell you, people are less enthusiastic about zucchini when it’s a sweet surprise!
But that’s the beauty of cooking—mistakes often lead to delightful discoveries. Always taste as you go and let your creativity shine!
FAQs and Troubleshooting
How do I make sure my zucchini isn’t soggy?
Great question! One key is to slice your zucchini evenly and not overcrowd the baking sheet. And don’t forget to preheat your oven well!
Can I make this dish ahead of time?
Absolutely! You can prep the zucchini and seasonings a few hours ahead, and store them in the fridge until you’re ready to roast. Just double-check your cook time—cold zucchini may require a bit longer.
What if I don’t have Parmesan cheese?
No problem! You can use any hard cheese you have on hand, like aged Gouda or Pecorino. If dairy is an issue, try using a vegan alternative or nutritional yeast.
Why is my zucchini mushy?
If your zucchini is mushy, it may be overcooked or the zucchinis were too large or too ripe. Aim for firm, fresh zucchinis, and always keep an eye on them as they roast.
Nutritional Info
While I always encourage enjoying food in moderation, here’s a rough estimate for a serving of our Irresistibly Crunchy Garlic Parmesan Roasted Zucchini (based on 4 servings):
- Calories: 150
- Protein: 5g
- Fat: 10g
- Carbohydrates: 8g
- Fiber: 2g
Remember, nutritional values can vary based on ingredient brands and preparation methods!
Conclusion
There you have it—Irresistibly Crunchy Garlic Parmesan Roasted Zucchini that will make you a veggie lover for life! Remember, cooking is about enjoying the journey as much as it is about the destination. Share this dish with your friends and family, and let the flavors tell your kitchen’s story.
I hope this recipe brings you joy, flavor, and some lovely kitchen memories. Now, get your hands dirty, savor every moment, and let’s celebrate the art of cooking together!
Happy cooking, and see you next time at Ivory Apron!
PrintIrresistibly Crunchy Garlic Parmesan Roasted Zucchini

Crispy, cheesy, and utterly delightful roasted zucchini infused with garlic and Parmesan.
- Prep Time: 10 minutes
- Cook Time: 25 minutes
- Total Time: 35 minutes
- Yield: 4 servings 1x
- Category: Side Dish
- Method: Roasting
- Cuisine: Italian
- Diet: Vegetarian
Ingredients
- 4 medium zucchinis, sliced into 1/4-inch thick rounds
- 2 tablespoons olive oil
- 3 cloves garlic, minced
- 1/2 cup Parmesan cheese, grated
- 1 teaspoon Italian seasoning
- 1/2 teaspoon salt
- 1/4 teaspoon black pepper
- Fresh parsley, chopped for garnish
Instructions
- Preheat the oven to 425°F (220°C).
- Prepare a rimmed baking sheet lined with parchment paper.
- Wash the zucchinis under cold water, then slice them into 1/4-inch thick rounds.
- Toss the sliced zucchini with olive oil in a large mixing bowl.
- Add minced garlic, Italian seasoning, salt, and black pepper to the zucchini and toss again.
- Spread the seasoned zucchini rounds in a single layer on the baking sheet.
- Sprinkle grated Parmesan cheese generously over the top.
- Roast in the preheated oven for about 20-25 minutes, stirring halfway.
- Check for crispiness and a slight browning.
- Garnish with fresh parsley before serving.
Notes
For added flavor, drizzle with balsamic glaze or lemon juice before serving. Avoid overcrowding the baking sheet to prevent steaming.
Nutrition
- Serving Size: 1 serving
- Calories: 150
- Sugar: 2g
- Sodium: 400mg
- Fat: 10g
- Saturated Fat: 3g
- Unsaturated Fat: 7g
- Trans Fat: 0g
- Carbohydrates: 8g
- Fiber: 2g
- Protein: 5g
- Cholesterol: 15mg
Keywords: zucchini, roasted vegetables, garlic parmesan, side dish
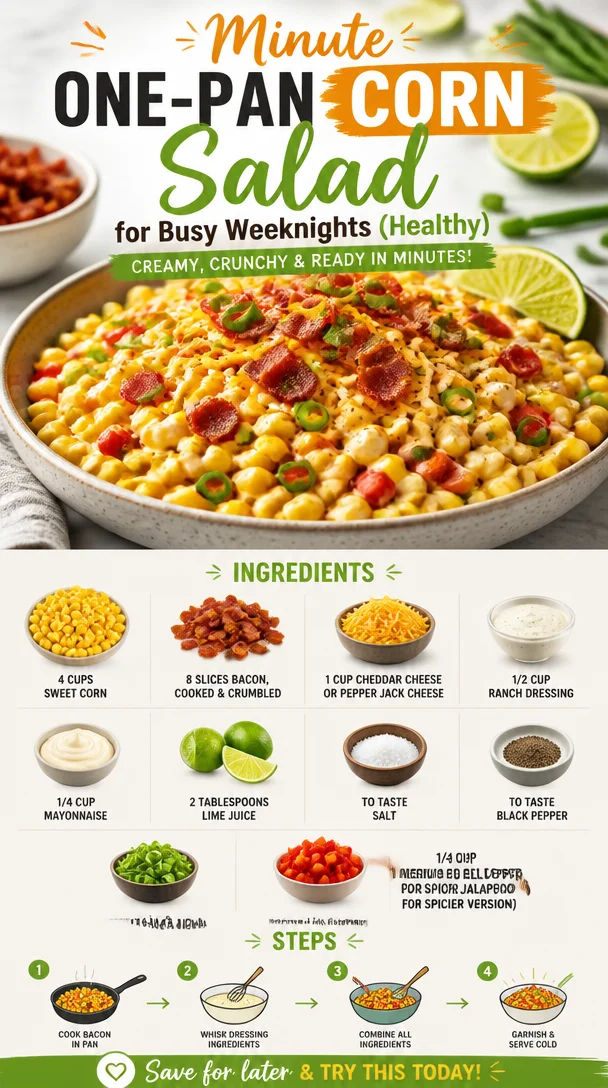
Minute One-Pan Corn Salad for Busy Weeknights (Healthy)
Crack Corn Salad: A Celebration of Summer Flavors
Every summer brings its own set of memories, a tapestry of laughter, sunshine, and the delightful scent of grilling meat wafting through the air. One dish that always manages to steal my heart (and the spotlight at potlucks) is the ever-so-vibrant Crack Corn Salad. It’s colorful, creamy, and absolutely bursting with flavor, which makes it perfect for gatherings or simple family dinners. But what I love most is the story behind it—one that resonates with warm gatherings and good friends.
A Nostalgic Journey
As a child, summers at my grandmother’s house were magical. Her backyard was a verdant paradise with tall corn stalks swaying gently in the breeze. I can still visualize the joyful chaos of family coming together with pots and pans, music playing softly in the background, and laughter echoing from every corner. Among the seemingly endless array of dishes was my grandmother’s famous corn salad — creamy, crunchy, and oh-so-delicious.
This Crack Corn Salad, as we dubbed it, was an essential part of our summer BBQs. I remember sneaking bites while the adults were busy chatting, a little bit of bacon falling over my fingers and cheese sticking to my lips as I savored each spoonful. Every bite transported me back to those carefree days. Today, as I share this recipe with you, I hope it brings a sprinkle of nostalgia and joy to your own table.
Ingredients
Let’s dive into the ingredients! Here’s what you’ll need to create this delightful dish, along with some chef insights to help you personalize it:
-
4 cups sweet corn (fresh, frozen, or canned)
Whether you’re using fresh, sweet corn cut straight off the cob or grabbing frozen during off-seasons, the key here is to ensure it’s dried well if frozen or canned. Sweet corn is the star of this salad, bringing sweetness and crunch! -
8 slices bacon, cooked and crumbled
Bacon adds a delightful smokiness and crisp texture. You can substitute with turkey bacon or crispy chickpeas for a healthier or vegetarian option. -
1 cup cheddar cheese or pepper jack cheese, shredded
Cheese adds a creamy richness; cheddar offers a classic taste while pepper jack brings a lovely hint of spice. Feel free to experiment with your favorite! -
1/2 cup ranch dressing
I recommend store-bought for convenience and consistency, but homemade ranch is always a hit! Plus, you can control the flavors to suit your preference. -
1/4 cup mayonnaise
Adds extra creaminess! Swap it out for Greek yogurt if you’re looking to lighten things up—a great source of protein too! -
2 tablespoons lime juice
Freshly squeezed is highly recommended; it brightens up the salad and enhances all those gorgeous flavors. -
To taste salt
Start with a pinch, and adjust based on the saltiness of your cheese and bacon. -
To taste black pepper
Start light and adjust based on your palate. A bit of pepper can really elevate the dish! -
1/4 cup green onions, sliced
They bring a fresh crunch, but feel free to omit them if you’re not a fan—scallions or chopped chives are also great. -
1 medium red bell pepper, diced
For a pop of color and sweetness. If you’re in the mood for heat, swap this with a jalapeño!
Step-by-Step Instructions
Now, let’s get cooking! Follow these steps to whip up your own Crack Corn Salad:
-
Prep the Ingredients: Whether you’re using fresh corn, bacon, or veggies, the first step is to prepare everything. If you’re using fresh corn, grill or boil it for a few minutes until tender. If frozen or canned, just make sure it’s dried well.
-
Cook the Bacon: In a skillet over medium heat, cook the bacon until crispy. This should take about 5-7 minutes, depending on the thickness. Once done, transfer it to a paper towel-lined plate to drain. Save a bit for garnish!
-
Combine the Core Ingredients: In a large bowl, mix the corn, crumbled bacon, shredded cheese, and diced red bell pepper.
-
Make the Dressing: In a separate bowl, whisk together the ranch dressing, mayonnaise, and lime juice until smooth. This creamy dressing is what ties everything together—don’t skip it!
-
Add Seasonings: Pour the dressing over the corn mixture and sprinkle in salt and pepper. Mix gently until everything is well coated. Remember, you can always add more seasoning later, so start small!
-
Fold in the Greens: It’s time to add the sliced green onions. Gently fold them in, ensuring they’re evenly distributed throughout the salad.
-
Chill & Serve: Cover the salad and let it chill in the fridge for at least 30 minutes. This will allow all those lovely flavors to mingle and develop.
-
Plate It Up: When you’re ready to serve, scoop the salad into a beautiful bowl or a platter, sprinkle a little reserved bacon on top for garnish, and voilà! You’ve got a showstopper on your hands ready to impress.
Serving Suggestions
Crack Corn Salad is best served cold or at room temperature. For a stunning presentation, consider serving it in a beautiful, wide bowl. Garnish it with a sprinkle of fresh herbs or edible flowers if you’re feeling fancy. This dish pairs beautifully with grilled meats, burgers, or as a refreshing side for a picnic.
Recipe Variations
- Southwestern Twist: Add black beans and corn chips for a bit of crunch.
- Mediterranean Style: Swap out the ranch for a yogurt-based dressing and add kalamata olives and minced garlic.
- Fruit Addition: Throw in some diced avocado or fresh diced tomatoes to add sweetness and creaminess—a fantastic summer addition!
- Vegan Version: Replace bacon with smoked tempeh and use dairy-free cheese and yogurt!
Chef’s Notes
Over the years, my Crack Corn Salad has become a canvas for creativity. What started as my grandmother’s simplest recipe evolved into a fan-favorite that I now love to personalize for every gathering. One time, I decided on a whim to add chopped jalapeños for a spicy kick, and it instantly became a hit with my friends! Remember, cooking is all about experimenting. Don’t be afraid to throw in your own flair!
FAQs and Troubleshooting
1. Can I make this salad ahead of time?
Absolutely! It tastes even better the next day as the flavors meld together. Just be sure to give it a good stir before serving.
2. What should I do if the salad seems too dry?
If you find your salad lacking moisture, simply mix in a bit more ranch dressing or a splash of lime juice until you get the desired consistency.
3. Is there a gluten-free version?
Yes! Just ensure that your dressing is gluten-free, and you’re good to go. Most ranch dressings available on the market are naturally gluten-free, but it doesn’t hurt to check.
4. How do I store leftovers?
Store any leftovers in an airtight container in the fridge. Enjoy them within a couple of days for the best flavor.
Creating dishes that bring people together is what I love most about cooking. This Crack Corn Salad is not just a crowd-pleaser; it’s a reminder of those sunny days and shared moments spent around the table. So why not gather your loved ones, whip up this delightful dish, and recreate those memories in your own kitchen? Tie on your apron, pour yourself a sparkling drink, and let the joy of cooking lead the way! Enjoy every bite!
PrintCrack Corn Salad

A colorful and creamy salad bursting with summer flavors, perfect for potlucks and family gatherings.
- Prep Time: 15 minutes
- Cook Time: 10 minutes
- Total Time: 45 minutes
- Yield: 8 servings 1x
- Category: Salad
- Method: Chilling
- Cuisine: American
- Diet: Pescatarian
Ingredients
- 4 cups sweet corn (fresh, frozen, or canned)
- 8 slices bacon, cooked and crumbled
- 1 cup cheddar cheese or pepper jack cheese, shredded
- 1/2 cup ranch dressing
- 1/4 cup mayonnaise
- 2 tablespoons lime juice
- To taste salt
- To taste black pepper
- 1/4 cup green onions, sliced
- 1 medium red bell pepper, diced
Instructions
- Prep the ingredients: Whether using fresh corn, bacon, or veggies, prepare everything. Grill or boil fresh corn for a few minutes until tender.
- Cook the bacon: In a skillet over medium heat, cook the bacon until crispy, about 5-7 minutes. Transfer to a paper towel-lined plate.
- Combine the core ingredients: In a large bowl, mix the corn, crumbled bacon, shredded cheese, and diced red bell pepper.
- Make the dressing: In a separate bowl, whisk together the ranch dressing, mayonnaise, and lime juice until smooth.
- Add seasonings: Pour the dressing over the corn mixture and sprinkle in salt and pepper. Mix gently until well coated.
- Fold in the greens: Add the sliced green onions and gently fold them into the salad.
- Chill & serve: Cover the salad and let it chill in the fridge for at least 30 minutes.
- Plate it up: Serve in a beautiful bowl or platter, garnished with a little reserved bacon.
Notes
Tastes even better the next day as flavors meld together. Feel free to personalize with additional ingredients.
Nutrition
- Serving Size: 1 serving
- Calories: 320
- Sugar: 4g
- Sodium: 600mg
- Fat: 22g
- Saturated Fat: 7g
- Unsaturated Fat: 12g
- Trans Fat: 0g
- Carbohydrates: 28g
- Fiber: 4g
- Protein: 8g
- Cholesterol: 20mg
Keywords: corn salad, summer salad, BBQ side dish, potluck dish
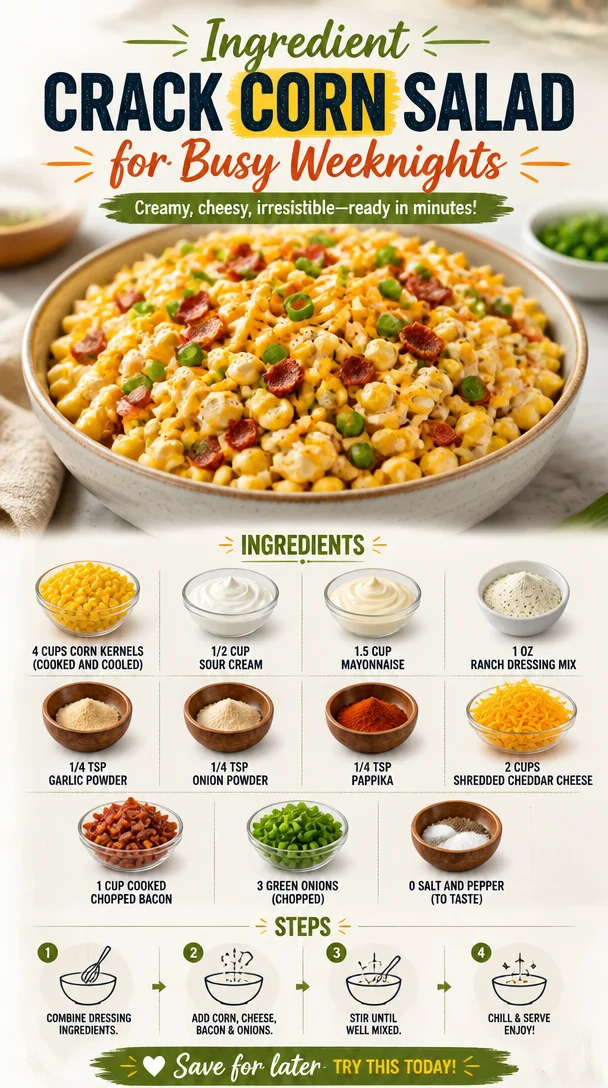
Ingredient Crack Corn Salad for Busy Weeknights
Embrace Summer with Delicious Crack Corn Salad
When the summer sun graces us with its warmth, there’s nothing quite like enjoying a deliciously refreshing salad that makes you feel like you’re dining al fresco, even when you’re just in your backyard. Today, we’re diving into a staple that never fails to please a crowd: Crack Corn Salad. This vibrant dish is bursting with flavors and textures, making it the ideal companion for summer barbecues, picnics in the park, or just a simple weeknight dinner.
Why do I call it “Crack Corn Salad”? Well, it’s because it’s just that addictive! Once you take a bite, you’ll find it hard to stop. It’s creamy, it’s crunchy, and the blend of fresh ingredients makes it a standout dish. Let’s explore how to make this creamy, indulgent salad that feels indulgently luxurious yet is surprisingly simple.
A Taste of Nostalgia
As I sit here sharing this recipe, I can’t help but to recall my first experience with this vibrant dish. It was one of those sunlit afternoons at my grandparents’ house, where family gathered around the picnic table. I remember my grandmother, a culinary icon in my young eyes, tossing together different ingredients with her cheerful laugh, every bit of her effort infused with love.
The moment she placed a heaping bowl of Crack Corn Salad on the table, I was hooked. It was a medley of golden corn, creamy textures, and crispy bits that pooled joy in every bite. Watching everyone dig in, exchanging compliments and stories, instilled in me the magic of food – it wasn’t merely about nourishment; it was about bringing people together. That memory is woven into every bite I take of this salad, and I hope it becomes a beloved dish in your gatherings too!
Ingredients
To create this irresistible Crack Corn Salad, you’ll need the following ingredients:
-
4 cups corn kernels (cooked and cooled): Fresh corn is fabulous, but I often use frozen corn for convenience. Just steam or boil it, letting it cool before using.
-
1/2 cup sour cream: Adds creaminess to the salad. You can substitute with Greek yogurt for a healthier option!
-
1.5 cups mayonnaise: Essential for that creamy base; feel free to use light mayo if you’re looking to cut down on calories.
-
1 oz ranch dressing mix: This is the magic ingredient that ties everything together. Keep it simple with a store-bought mix, or make a homemade version if you’re feeling adventurous.
-
1/4 tsp garlic powder: A must for a little zing! Fresh minced garlic will work too; you might want to reduce the amount to taste.
-
1/4 tsp onion powder: Just like garlic, it elevates the flavor profile without overwhelming it.
-
1/4 tsp paprika: It adds a subtle smokiness that’s just delightful. You can use smoked paprika for an extra kick!
-
2 cups shredded cheddar cheese: Choose sharp cheddar for flavor, or swap it for pepper jack if you like a bit of heat.
-
1 cup cooked chopped bacon: Who can resist bacon? You can switch it for turkey bacon or even crispy chickpeas for a vegetarian version.
-
3 green onions (chopped): These add a refreshing crunch; scallions work too!
-
Salt and pepper (to taste): Always important to season your salad to perfection!
Step-by-Step Instructions
-
Prep Your Ingredients: Start off by gathering all your ingredients. This helps streamline the cooking process. It’s also a great way to ensure you have everything you need!
-
Cook Corn: If you’re using fresh corn, cook your corn kernels by boiling them in salted water for about 4-5 minutes. If you’re using frozen corn, just cook it according to the package instructions, then let it cool in a bowl. Remember, the goal is to have perfectly cooked corn that’s sweet and crunchy.
-
Mix the Dressing: In a separate bowl, combine the sour cream, mayonnaise, and ranch dressing mix. This is where the flavor magic happens. Give it a good whisking until you have a smooth mixture. Taste and adjust the seasoning if needed.
-
Combine the Ingredients: In a large mixing bowl, toss together the cooled corn, chopped bacon, shredded cheese, and the green onions. Pour that luscious dressing over the top and gently fold everything together until well combined. Be gentle so you don’t mash the corn too much!
-
Season to Taste: Always taste as you go! Add salt, pepper, or any additional spices according to your preference. Remember, the dressing already has seasoning, so adjust carefully.
-
Chill: Cover your salad and let it chill in the fridge for at least 30 minutes. This helps blend the flavors and allows the dressing to seep into every morsel.
-
Serve!: When you’re ready to impress your guests, give the salad one last gentle fold before serving. It’s cool, creamy, and delicious!
Serving Suggestions
Presentation elevates your dish immensely. For serving, I love using a large, vibrant bowl to showcase all the delightful colors and textures of the salad. You can even garnish it with extra green onions or a sprinkle of additional paprika for a pop of color! This salad is vibrant enough to stand alone, but it plays beautifully alongside grilled chicken, burgers, or even as a filling side for tacos.
Recipe Variations
-
Southwestern Twist: Add diced bell peppers, black beans, and a squeeze of lime for a southwestern flair.
-
Herbed Delight: Mix in fresh herbs like cilantro or dill to give your salad a fresh, aromatic boost.
-
Spicy Kick: For spice lovers, toss in some diced jalapeños or a dash of hot sauce for that extra zing.
-
Quinoa & Corn Medley: For a heartier dish, mix in some cooked quinoa. This balances the flavors and adds some protein!
-
Creamy Avocado Addition: Diced ripe avocados not only add creaminess but also a nutritious twist. Just add them right before serving to prevent browning!
Chef’s Notes
Oh, how this recipe has evolved over time! I’ll let you in on a little secret. Initially, I tried to make it “healthier” by skimping on the mayo and sour cream, which, let’s be honest, didn’t quite work. The salad felt off, lacking that creamy comfort I, and everyone else, had come to love. I realized that food isn’t just about the calories—it’s about experience and joy. So, I went back to the original creamy goodness, and boy, am I glad I did!
Oh, and a funny kitchen story: I once tried to impress a date with this dish, and when I tossed the salad, it ended up splattering sauce all over my kitchen wall! We both laughed so hard, and let’s just say my date left more enamored with my sense of humor than the salad itself. Cooking is as much about the fun and laughter as it is about great flavors!
FAQs and Troubleshooting
Q1: Can I make this salad ahead of time?
Absolutely! In fact, it tastes even better after sitting in the fridge, allowing the flavors to meld together. Just remember to stir it gently before serving!
Q2: What if I hate mayonnaise?
You can omit the mayo entirely and substitute it with more sour cream or a yogurt-based dressing. It won’t have the exact same flavor, but it will still be delicious!
Q3: How can I store leftovers?
Store any leftovers in an airtight container in the fridge. Enjoy within 3-4 days for the best quality. Just note that if you’ve included avocado, it may brown slightly.
Q4: Can I customize the ingredients?
Of course! This salad is versatile. You can add or remove ingredients based on your taste preferences—just make sure to keep the basic components for its signature flavor.
Nutritional Info
While I’m not one to obsess over numbers, if you’re curious, I recommend checking a detailed nutrition calculator based on your ingredient choices. Generally, this salad offers a good balance of protein from the cheese and bacon, healthy fats, and, of course, a wealth of flavor!
Digging into this delicious Crack Corn Salad recipe not only warms my heart from nostalgia but also reminds me of the joy of sharing good food with good company. The next time you gather around the table, embrace the art of cooking with this delightful dish, and remember: good food isn’t just about the presentation—it’s about the memories you create and share. Bon appétit!
PrintCrack Corn Salad

A vibrant and addictive salad that combines sweet corn, creamy textures, and crispy bits, perfect for summer gatherings.
- Prep Time: 15 minutes
- Cook Time: 5 minutes
- Total Time: 50 minutes
- Yield: 8 servings 1x
- Category: Side Dish
- Method: Mixing
- Cuisine: American
- Diet: Gluten-Free
Ingredients
- 4 cups corn kernels (cooked and cooled)
- 1/2 cup sour cream
- 1.5 cups mayonnaise
- 1 oz ranch dressing mix
- 1/4 tsp garlic powder
- 1/4 tsp onion powder
- 1/4 tsp paprika
- 2 cups shredded cheddar cheese
- 1 cup cooked chopped bacon
- 3 green onions (chopped)
- Salt and pepper (to taste)
Instructions
- Prep your ingredients by gathering everything for easy access.
- Cook corn by boiling fresh kernels in salted water for 4-5 minutes or cooking frozen according to package instructions. Let cool.
- Mix the dressing by combining sour cream, mayonnaise, and ranch dressing mix in a bowl; whisk until smooth.
- Combine the cooled corn, chopped bacon, shredded cheese, and green onions in a large bowl. Pour the dressing over and fold gently.
- Season to taste with salt and pepper, adjusting as necessary.
- Chill the salad covered in the fridge for at least 30 minutes.
- Serve the salad, giving it a gentle mix before presenting it to guests.
Notes
For added flavor, garnish with extra green onions or paprika. Pairs well with grilled meats or as a side for tacos.
Nutrition
- Serving Size: 1 serving
- Calories: 320
- Sugar: 3g
- Sodium: 450mg
- Fat: 25g
- Saturated Fat: 8g
- Unsaturated Fat: 13g
- Trans Fat: 0g
- Carbohydrates: 22g
- Fiber: 3g
- Protein: 8g
- Cholesterol: 30mg
Keywords: salad, corn salad, creamy salad, summer recipes
Beginner-Friendly Strawberry Earthquake Cake: Quick Dessert
Strawberry Earthquake Cake: A Deliciously Unique Dessert
Hello, fellow food lovers! I’m so excited to share a delightful treat that’s just bursting with flavors and memories—my delicious Strawberry Earthquake Cake! This cake is a delightful mix of melt-in-your-mouth chocolate, creamy filling, and fresh strawberries, creating a dessert that’s truly unforgettable.
But before we dive into the recipe, let me take you on a little journey down memory lane, back to a time when flavors were bold, and desserts were the pièce de résistance of every gathering.
Personal Story
One of my favorite childhood memories revolves around summer BBQs at my grandparents’ house. The backyard was filled with the smell of grilled vegetables, and laughter echoed around as family and friends came together. But what truly brought everyone together at the end of the meal was my grandma’s famous cake. She had a special recipe that combined chocolate and fresh strawberries, and it was always the star of the show.
I still remember the anticipation as the cake cooled down on the counter, the aroma wafting through the air, making our mouths water. When Grandma sliced into that cake, it was like an earthquake—rich chocolate and creamy layers would ooze out, making everyone gasp. That moment of delight has stuck with me, and it inspired this Strawberry Earthquake Cake. Let’s create that same magic together in your kitchen!
Ingredients
To get started on your Strawberry Earthquake Cake, here’s what you’ll need:
For the Cake:
-
1 box of chocolate cake mix (or homemade chocolate cake)
You can use any chocolate cake mix you love or make your chocolate cake from scratch for an enhanced flavor. -
1 cup of water
Just tap water will do the trick. You could also use milk for a richer flavor. -
1/2 cup of vegetable oil
Vegetable oil keeps the cake moist. Olive oil adds a delicious twist, but it may alter the flavor slightly. -
3 large eggs
Room temperature eggs blend better and help the cake rise higher.
For the Filling:
-
8 oz cream cheese, softened
Gives a wonderfully creamy texture. For a dairy-free option, choose vegan cream cheese. -
1/2 cup powdered sugar
Sweetens the filling without the graininess of granulated sugar. You can use coconut sugar for a more natural alternative. -
1 tsp vanilla extract
Enhances the flavor beautifully. A splash of almond extract adds a unique twist too! -
1 cup fresh strawberries, hulled and chopped
Fresh strawberries give the filling a juicy, fruity burst. You can substitute with other berries if you prefer.
For the Topping:
-
1 cup chocolate chips (semi-sweet or dark)
Chocolate chips add that gooey chocolatey goodness. Swap with butterscotch chips for a different flavor profile! -
1/2 cup chopped nuts (optional)
Nuts give a delightful crunch. Walnuts or pecans work wonderfully, but leave them out if you have nut allergies. -
Additional strawberries for garnish
Always a classic touch to decorate your dessert and add a pop of color!
Step-by-Step Instructions
Now that you’ve gathered your ingredients, let’s get down to the nitty-gritty of making this showstopper!
-
Preheat Your Oven
Set your oven to 350°F (175°C). This is always the key first step—your oven needs to be nice and hot when your cake is ready to go in! -
Prepare Your Baking Pan
Grease a 9×13 inch baking dish with butter or non-stick spray. This will prevent any sticky situations later on! -
Mix the Cake Batter
In a large mixing bowl, combine the chocolate cake mix with 1 cup of water, 1/2 cup of vegetable oil, and 3 large eggs. Whisk until everything is combined and smooth. You can use an electric mixer for a fluffier texture, but a hand whisk works just fine too. A little elbow grease never hurt anybody! -
Pour and Bake
Pour half of the cake batter into your prepared baking dish and smooth it out evenly. Now comes the fun part—set it aside and let’s make the filling. -
Prepare the Cream Cheese Filling
In a separate bowl, mix the softened cream cheese, powdered sugar, and vanilla extract until creamy and combined. You can use a fork or an electric mixer—whichever you have handy works. -
Layer It Up
Spoon dollops of the cream cheese mixture over the cake batter, followed by the chopped fresh strawberries. You want to create pockets of sweetness that will erupt like an earthquake when the cake bakes! -
Top with Remaining Batter
Carefully pour the remaining cake batter over the cream cheese and strawberries. It doesn’t need to cover completely—some filling peeking through is just what we want. -
Sprinkle on Chocolate Chips and Nuts
Now sprinkle those chocolate chips and nuts over the top. Those chocolate morsels are going to melt down into the cake, creating delicious pockets of gooeyness. -
Bake
Pop your cake into the oven and let it bake for about 30-35 minutes, or until a toothpick inserted in the center comes out clean. The tops should be slightly cracked (hence the ‘earthquake’ effect!). -
Cool
Let the cake cool in the pan for at least 10-15 minutes. It’ll be hot and bubbly, full of delicious flavors waiting to meld together.
Serving Suggestions
When it comes time to serve, here’s a tip: Slice your Strawberry Earthquake Cake into generous squares and plate each piece with a sprinkle of powdered sugar on top. Add a fresh strawberry or two for garnish, and if you’re feeling fancy, a scoop of vanilla ice cream on the side will elevate your presentation and taste to new heights.
Recipe Variations
Looking to switch things up? Here are some fun variations to try:
-
Chocolate Lovers Delight: Swap out the vanilla extract in the filling for a bit of chocolate extract, giving you a double chocolate punch!
-
Add a Zesty Twist: Mix in a little zest from an orange or lemon into the cream cheese filling for a zesty, refreshing flavor.
-
Berry Bonanza: Replace the strawberries with a mix of your favorite berries (like blueberries, raspberries, or blackberries) for a burst of color and flavor.
-
Nutty for Nuts: If you love nuts, try adding some pecans or walnuts to your filling, too—they’ll add a delightful crunch against the creaminess.
-
Gluten-Free Goodness: Use a gluten-free chocolate cake mix to make this delightful dessert gluten-free — trust me, no one will be able to tell the difference!
Chef’s Notes
Over the years, this Strawberry Earthquake Cake has evolved from my grandmother’s original recipe into my very own creation. Each time I make it, I find myself reminiscing about those warm summer nights filled with family laughter and delicious desserts. It’s become a staple in my home, and my friends can’t get enough of it.
Don’t worry if it isn’t perfect – remember, it’s all about the journey in the kitchen and the memories you create along the way. I once accidentally added double the amount of strawberries to the filling, and while it didn’t look quite right, the taste was phenomenal! That’s the beauty of cooking: you’re always learning and adjusting.
FAQs and Troubleshooting
1. Why is my cake too dense?
If the cake feels dense, it’s possible you overmixed the batter. Mixing just until everything is incorporated helps keep it light and fluffy.
2. Can I make this ahead of time?
Absolutely! You can bake the cake a day ahead and store it covered in the refrigerator. Just let it come to room temperature before serving.
3. How do I store leftovers?
Keep any leftover cake covered at room temperature for a day or two or in the refrigerator for longer storage. Just remember to enjoy it within a week!
4. My chocolate chips sank to the bottom; what happened?
This happens sometimes when the batter is too thin. Next time, consider chilling the chocolate chips in the fridge before sprinkling them on. It helps them stay suspended in the batter!
Nutritional Info
While I believe in enjoying dessert in moderation, if you’re curious, here’s a quick overview of the nutritional benefits of this delightful cake—especially when made with fresh strawberries! They provide Vitamin C, antioxidants, and have relatively low calories. Pair that with the rich chocolate cake, and you find both comfort and joy in every delicious bite.
And there you have it! Your very own Strawberry Earthquake Cake awaits. I’m thrilled you joined me on this tasty adventure, and I can’t wait to hear how your baking turns out. So, tie on that ivory apron, pour a glass of something bubbly, and let’s create more magical moments around our tables! Happy baking!
PrintStrawberry Earthquake Cake
A delightful mix of melt-in-your-mouth chocolate, creamy filling, and fresh strawberries that creates a dessert truly unforgettable.
- Prep Time: 15 minutes
- Cook Time: 35 minutes
- Total Time: 50 minutes
- Yield: 12 servings 1x
- Category: Dessert
- Method: Baking
- Cuisine: American
- Diet: Vegetarian
Ingredients
- 1 box chocolate cake mix
- 1 cup water
- 1/2 cup vegetable oil
- 3 large eggs
- 8 oz cream cheese, softened
- 1/2 cup powdered sugar
- 1 tsp vanilla extract
- 1 cup fresh strawberries, hulled and chopped
- 1 cup chocolate chips (semi-sweet or dark)
- 1/2 cup chopped nuts (optional)
- Additional strawberries for garnish
Instructions
- Preheat your oven to 350°F (175°C).
- Prepare a 9×13 inch baking dish by greasing it with butter or non-stick spray.
- Mix the chocolate cake mix with 1 cup of water, 1/2 cup of vegetable oil, and 3 large eggs in a large mixing bowl until smooth.
- Pour half of the cake batter into the prepared baking dish and smooth it out evenly.
- Prepare the cream cheese filling by mixing softened cream cheese, powdered sugar, and vanilla extract until creamy.
- Layer dollops of the cream cheese mixture over the cake batter, followed by the chopped fresh strawberries.
- Top with the remaining cake batter over the cream cheese and strawberries.
- Sprinkle chocolate chips and nuts over the top.
- Bake for 30-35 minutes, or until a toothpick comes out clean.
- Cool the cake in the pan for at least 10-15 minutes before serving.
Notes
For variations, consider adding a zesty twist with citrus zest or using a gluten-free chocolate cake mix.
Nutrition
- Serving Size: 1 slice
- Calories: 350
- Sugar: 20g
- Sodium: 450mg
- Fat: 15g
- Saturated Fat: 6g
- Unsaturated Fat: 7g
- Trans Fat: 0g
- Carbohydrates: 45g
- Fiber: 2g
- Protein: 6g
- Cholesterol: 70mg
Keywords: cake, dessert, chocolate, strawberries, family recipe, baking
Churro Cheesecake Bars: 30-Min No-Bake Creamy Bars
Churro Cheesecake Bars: A Sweet Delight to Share
Hello, my culinary friends! Today, I’m excited to share a dessert that you won’t just want to make once—you’ll want to whip it up time and again: Churro Cheesecake Bars! These delightful little squares combine the creamy goodness of cheesecake with the cinnamon-sugar magic of churros, and trust me, they are a game-changer for your dessert table. Whether you’re hosting a dinner party or simply indulging for a cozy night in, these bars are sure to impress and delight.
Now, before we dive into the recipe, let’s talk a little about what inspired this creation.
Personal Story
It was a crisp autumn afternoon, and I was in my childhood kitchen, the air filled with sweet aromas wafting from my mother’s oven. She’d always have something magical baking. On this particular day, it was her famous churros. The warm scent of cinnamon and sugar enveloped the room as we gathered around the table, waiting eagerly for those warm, crispy bites.
As I bit into a crunchy churro, the idea sparked in my mind: Why not take the essence of that beloved treat and blend it into a cheesecake? I could almost hear my mom’s laughter and encouragement as I tinkered with recipes in my head. Fast forward a few years, and voilà! Churro Cheesecake Bars were born, each bite unearthing those delicious memories of laughter and love from my childhood. Let’s bring that warmth into your kitchen now!
Ingredients
Now, let’s gather our ingredients. Here’s what you’ll need to create these scrumptious Churro Cheesecake Bars:
-
2 (8 oz) packages cream cheese, softened
Cream cheese is the heart of our cheesecake. Make sure it’s softened to room temperature for a smooth filling. If you’re in a pinch, you can substitute with mascarpone for a slightly different flavor profile. -
1 cup sugar (1/2 cup for filling, 1/2 cup for topping)
Sugar adds sweetness and balances the cream cheese’s tanginess. Use coconut sugar for a more caramel-like flavor. -
1 egg
The egg acts as a binding agent, giving structure to the creamy filling. If you want to make this dish vegan, try a flax egg (1 tablespoon ground flaxseed mixed with 3 tablespoons water) instead! -
1 tsp vanilla extract
Vanilla adds depth to our cheesecake filling. For a twist, consider using almond extract or a splash of bourbon for a richer flavor. -
2 (8 oz) cans Pillsbury crescent dinner rolls
These are a convenient way to create a flaky crust reminiscent of churro dough. You can also use puff pastry if you want a flakier base—just adjust the baking time slightly. -
4 Tbsp ground cinnamon
Of course, cinnamon is our star! It adds warmth and that cherished churro flavor. If you’re feeling adventurous, try mixing in a bit of nutmeg for an interesting twist.
Let’s get cooking!
Step-by-Step Instructions
-
Preheat your oven
Preheat your oven to 350°F (175°C). This step is crucial to ensure your bars bake evenly. -
Prepare your baking dish
Grab a 9×13-inch baking dish and lightly grease it or line it with parchment paper. If you’re feeling fancy, you can create a decorative edge with the parchment—this makes for easy lifting later! -
Make the cream cheese filling
In a mixing bowl, combine the softened cream cheese, 1/2 cup of sugar, egg, and vanilla extract. Using a hand mixer or a stand mixer, whip everything together until it’s creamy and smooth. Don’t rush this step—the better you mix, the creamier your filling! -
Roll out the crescent dough
Open one can of crescent rolls and gently unroll it. Place it into the bottom of your prepared baking dish, pressing the seams together to form a crust. If you’re using puff pastry, roll it out to fit the bottom of the dish, making sure there are no holes. -
Spread the cream cheese filling
Pour your luscious cream cheese mixture over the crust and spread it evenly. You might want to lick the spoon—totally acceptable! -
Top it off
Open the second can of crescent rolls and repeat the rolling process, placing it over the cream cheese filling. It doesn’t need to fit perfectly—those little gaps add charm and create lovely crispy parts! -
Mix cinnamon and sugar for sprinkling
In a small bowl, mix the remaining 1/2 cup of sugar with the ground cinnamon. Sprinkle this heavenly mixture generously over the top of your crescent dough. The aroma will be intoxicating as it bakes! -
Bake to perfection
Place your Churro Cheesecake Bars in the preheated oven and let them bake for 30-35 minutes. Keep an eye on them—the top should be golden brown, and a toothpick should come out clean when poked. -
Let them cool
Once baked, remove the bars from the oven and let them cool for at least 30 minutes. It’s hard, I know, but allowing them to set will make cutting them much neater. -
Slice and serve
Once cooled, cut into squares, serve, and prepare for a chorus of "Wow!" as everyone digs in!
Serving Suggestions
For a beautiful presentation, plate your Churro Cheesecake Bars on a lovely serving platter. Dust with a light sprinkle of cinnamon-sugar for that extra touch! Consider serving them with a scoop of vanilla ice cream or a dollop of whipped cream on the side—they make a fabulous pairing!
Recipe Variations
Want to switch things up? Here are a few variations to inspire you:
-
Nutty Churro Bars: Add chopped pecans or walnuts to your cream cheese filling for a delightful crunch.
-
Chocolate Drizzle: Drizzle melted chocolate over the top of your bars once they’re cooled for an indulgent touch!
-
Spicy Churro Bars: Include a pinch of cayenne pepper in your cinnamon-sugar mix for a unique sweet heat twist.
-
Fruit-Inspired: Swirl in some fresh fruit puree—like raspberry or strawberry—into the cream cheese filling for a fruity burst.
-
Dairy-Free Option: Use non-dairy cream cheese and your preferred dairy-free crescent rolls to create a delicious vegan version.
Chef’s Notes
These Churro Cheesecake Bars are incredibly versatile. I originally developed this recipe for a friend’s birthday party, and it quickly became a hit! Since then, I’ve played around with flavors, turning them into seasonal offerings for various events. Every time I make them, I’m transported back to that cozy kitchen where the aroma of churros filled the air.
One tip: if you ever have leftovers (though, let’s be honest, there probably won’t be), they make for a delightful breakfast treat the next day—just reheat them in the oven!
FAQs and Troubleshooting
Q: My bars turned out too gooey! What happened?
A: If your bars are gooey, it’s likely that they need a bit more baking time. Every oven is a little different, so keep an eye on them as they near the 30-minute mark. They should puff up slightly and have a golden-brown crust.
Q: Can I freeze these bars?
A: Absolutely! Once cooled, cut and wrap individual pieces in plastic wrap, then store in an airtight container. They can be frozen for up to three months. Just thaw in the fridge overnight when you’re ready to enjoy them again!
Q: How can I make sure they don’t stick to the pan?
A: Grease your pan well or line it with parchment paper, allowing for some overhang. This makes for easy lifting and clean-cut portions!
Q: Can I use homemade crescent dough instead of store-bought?
A: Of course! If you’re up for a little kitchen adventure, feel free to use your favorite homemade dough. Just ensure it’s rolled thin enough for that delicious flaky texture.
Nutritional Info
While I focus more on taste than nutritional stats, here’s a basic idea per serving (assuming 12 servings):
- Calories: 280
- Fat: 18g
- Carbohydrates: 30g
- Protein: 4g
Keep in mind that indulgence is part of the fun—these bars are meant to be savored!
And there you have it—Churro Cheesecake Bars that’ll transport you straight to a happy place! Now, gather around, tie on your apron, and let’s create some memories together. Happy baking, my friends!
PrintChurro Cheesecake Bars
A delightful dessert combining creamy cheesecake with cinnamon-sugar churros, perfect for sharing.
- Prep Time: 15 minutes
- Cook Time: 35 minutes
- Total Time: 50 minutes
- Yield: 12 servings 1x
- Category: Dessert
- Method: Baking
- Cuisine: Mexican
- Diet: Vegetarian
Ingredients
- 2 (8 oz) packages cream cheese, softened
- 1 cup sugar (1/2 cup for filling, 1/2 cup for topping)
- 1 egg
- 1 tsp vanilla extract
- 2 (8 oz) cans Pillsbury crescent dinner rolls
- 4 Tbsp ground cinnamon
Instructions
- Preheat your oven to 350°F (175°C).
- Prepare a 9×13-inch baking dish by greasing it or lining it with parchment paper.
- In a mixing bowl, combine the softened cream cheese, 1/2 cup of sugar, egg, and vanilla extract and whip until creamy.
- Open one can of crescent rolls and unroll it into the bottom of the prepared baking dish, pressing seams together.
- Pour the cream cheese mixture over the crust and spread it evenly.
- Open the second can of crescent rolls and place it over the cream cheese filling.
- Mix the remaining 1/2 cup of sugar with ground cinnamon and sprinkle generously over the top.
- Place the bars in the preheated oven and bake for 30-35 minutes until golden brown.
- Remove from the oven and let cool for at least 30 minutes before slicing.
- Serve and enjoy!
Notes
For best results, allow the bars to cool before slicing for neater cuts. These bars can also be frozen for up to three months.
Nutrition
- Serving Size: 1 serving
- Calories: 280
- Sugar: 20g
- Sodium: 300mg
- Fat: 18g
- Saturated Fat: 10g
- Unsaturated Fat: 8g
- Trans Fat: 0g
- Carbohydrates: 30g
- Fiber: 1g
- Protein: 4g
- Cholesterol: 50mg
Keywords: churro cheesecake, dessert bars, sweet treat