
Red Velvet Cinnamon Rolls
Red Velvet Cinnamon Rolls: A Taste of Comfort and Joy
Hello, food lovers! Today, I am bubbling with excitement to share with you a recipe that combines two of life’s greatest delights: the velvety richness of red velvet cake and the warm, comforting nature of cinnamon rolls. Yes, you guessed it—it’s time for Red Velvet Cinnamon Rolls!
These beauties are not just a treat for the taste buds but also a feast for the eyes. Their deep crimson hue, swirled with creamy tang and topped with luscious frosting, makes them a show-stopper no matter where they’re served. Whether you’re prepping for a cozy brunch with friends, surprising your loved ones on a lazy Sunday morning, or brightening a weekday afternoon, these cinnamon rolls are guaranteed to elevate your day.
I know what you might be thinking: “Savannah, isn’t making cinnamon rolls a daunting task?” Well, my friends, I’m happy to report that these rolls are surprisingly simple. With a few key ingredients and just a bit of love (and some dough kneading), you can have these delightful gems ready to impress in no time!
So, grab your apron, pour yourself a warm cup of coffee, and let’s dive into this delicious adventure together. I promise, you’ll be glad you did!
Personal Story
As a kid, I fondly remember baking with my grandma on those chilly winter afternoons. The air would be filled with the smells of spices and sweets, and I’d eagerly await our creations to emerge golden and warm from the oven. One of her favorite recipes was that of her famous cinnamon rolls—but we would always jazz them up with a festive twist around the holidays.
One snowy December, we decided to dabble in the vibrant world of food coloring, and red velvet became our muse. The beautiful, rich color of the dough captured my imagination. Watching my grandma expertly blend the ingredients and swirl the cinnamon mixture was pure magic. When we took our rolls out of the oven, I could hardly wait to slather them with the cream cheese frosting! That day, I learned that food is more than just sustenance; it’s a way to weave memories, share love, and bring people together. That’s the spirit I’ve poured into these Red Velvet Cinnamon Rolls—a dish that embodies warmth, love, and a sprinkle of nostalgia.
Ingredients
Let’s gather our ingredients! Here’s what you’ll need for this colorful treat:
Ingredients List
-
2 cups all-purpose flour
A staple ingredient for so many recipes—this is the base for your rolls. If you want a gluten-free version, feel free to substitute with a gluten-free 1-to-1 flour blend. -
1 cup sugar
This sweetness makes all the difference. For a less sugary twist, you can cut the sugar down to ¾ cup or use coconut sugar for a hint of caramel flavor. -
1 teaspoon baking powder
This helps the dough rise. A must-have for all baked goods! -
1 teaspoon baking soda
Another leavening agent that gives the rolls their fluffiness. They work hand in hand with the acidic components (like buttermilk) to create the perfect lift. -
1/2 teaspoon salt
Balances the sweetness and brings out the flavors. Don’t skip it! -
1/2 cup buttermilk
This adds moisture and tenderness. If you don’t have buttermilk, make a substitute by adding 1/2 tablespoon of vinegar or lemon juice to 1/2 cup of milk and let it sit for 5 minutes. -
1/4 cup unsalted butter, melted
Adds richness. Melted butter helps the rolls maintain their soft texture. For a dairy-free version, coconut oil works great here! -
1 large egg
Binds everything together and gives structure. You can use a flax egg (1 tablespoon ground flaxseed mixed with 2.5 tablespoons water) for a vegan alternative. -
2 tablespoons red food coloring
The star of the show! This gives the roll its iconic color. Use natural beet juice or powder as an alternative for a more natural dye option. -
1 teaspoon vanilla extract
Adds an aromatic depth of flavor. Trust me, it’s worth the splash! -
1 tablespoon ground cinnamon
Adds warmth and coziness! You can use pumpkin pie spice for a delicious twist. -
1/2 cup brown sugar
Sweet and granulated with caramel notes. To keep it lower in sugar, try reducing the amount to 1/3 cup or substituting with a granulated sugar alternative. -
1/2 cup cream cheese, softened
This creamy goodness is key for the filling. For a non-dairy version, use a vegan cream cheese alternative. -
1/4 cup powdered sugar
To sweeten the frosting. This creates a lovely consistency for drizzling. -
1 teaspoon vanilla extract (for frosting)
More vanilla for more flavor! You can leave it out if you want a more minimalist approach.
Step-by-Step Instructions
Alright, let’s get into the fun part—making your Red Velvet Cinnamon Rolls! Here’s how to whip these up:
Step 1: Prepare Your Dough
-
Mix Dry Ingredients
In a large mixing bowl, combine 2 cups of all-purpose flour, 1 cup of sugar, 1 teaspoon of baking powder, 1 teaspoon of baking soda, and ½ teaspoon of salt. Whisk them together until they’re all blended nicely. This ensures that the leaveners are evenly distributed—no one wants a lumpy roll! -
Combine Wet Ingredients
In another bowl, whisk together ½ cup of buttermilk, ¼ cup of melted unsalted butter, 1 large egg, 2 tablespoons of red food coloring, and 1 teaspoon of vanilla extract. Make sure the butter isn’t too hot, or it might cook the egg! -
Create the Dough
Slowly pour the wet mixture into the dry ingredients. Use a spatula to marry the two until no dry flour is visible. It’s okay if it’s a little sticky—this means it’s gonna be super soft!
Step 2: Knead and Rise
-
Knead the Dough
On a floured surface, knead your dough for about 3-5 minutes until it’s smooth and elastic. If it’s too sticky, sprinkle a little more flour while kneading. -
Let It Rest
Place your dough into a greased bowl, cover it with a kitchen towel, and let it rise in a warm place for about 1 hour or until it doubles in size. Grab a cup of coffee and relax—you deserve this!
Step 3: Create the Filling
- Make Your Cinnamon Mix
While your dough rises, let’s work on the filling. In a small bowl, mix together ½ cup of brown sugar, 1 tablespoon of ground cinnamon, and a dash of vanilla extract. This will create that warm, sweet filling we all love.
Step 4: Roll It Out
-
Flour Your Surface Again
After resting, punch down the dough and place it on a lightly floured surface. Roll it out into a rectangle about 1/4 inch thick. Keep it even so the rolls cook up uniformly. -
Spread the Filling
Using a spatula, spread the softened cream cheese (½ cup) over the dough, then top it with your cinnamon mixture. Just go wild and spread it all out to the edges!
Step 5: Form the Rolls
-
Rolling It Up
Starting from one of the long edges, carefully roll the dough into a tight log. The tighter you roll, the nicer your swirls will be! -
Slice and Dice
Using a sharp knife or kitchen string, slice the log into 12 equal pieces. Place them cut side up in a greased baking dish, and cover with a kitchen towel to rise again for about 30 minutes.
Step 6: Bake Away
-
Preheat Your Oven
Preheat your oven to 350°F (175°C). They’ll bake faster if the oven is ready when you are! -
Bake
Pop your rolls into the oven and bake for about 25-30 minutes until they’re nicely golden. You’re gonna want to keep an eye on them to prevent burning.
Step 7: Frost and Serve
-
Make the Frosting
While your rolls are baking, mix ½ cup of softened cream cheese, ¼ cup of powdered sugar, and 1 teaspoon of vanilla extract in a bowl until smooth and creamy. -
Glaze the Rolls
Once your rolls come out of the oven, resist the urge to dig in immediately! Let them cool for about 10 minutes—then spread the frosting generously on top.
Serving Suggestions
Presentation can elevate any dish! For these Red Velvet Cinnamon Rolls, serve them warm on a rustic wooden platter. Dust a touch of powdered sugar on top for that charming café vibe. Pair them with a hot cup of coffee or spiced chai, and don’t hesitate to add some fresh berries on the side for a pop of color and freshness. Your table will look stunning!
Recipe Variations
- Nutty Delight: Add chopped pecans or walnuts to the filling for a delightful crunch.
- Chocolate Lovers: Incorporate chocolate chips into the filling for a rich twist.
- Spiced Twist: Swap out the ground cinnamon for pumpkin pie spice for a seasonal flair.
- Vegan Version: Use almond milk, vegan butter, and a flax egg to make these plant-based!
- Cream Cheese Swirl: Instead of just spreading the cream cheese, swirl it into the rolls for a marbled effect.
Chef’s Notes
Ah, where do I begin! These Red Velvet Cinnamon Rolls are a new favorite in my kitchen. When I first tried this recipe, I accidentally added too much food coloring—let’s just say my kitchen looked like a Valentine’s Day card exploded! But what came out of that kitchen mishap was a lesson in being creative and experimental in the kitchen.
These rolls have evolved over time, reflecting my love for simple yet elegant food. And guess what? They freeze beautifully! So make a double batch, frost them before they’re completely cool, put them in an airtight container, and enjoy later.
FAQs and Troubleshooting
1. Why are my cinnamon rolls not rising?
Make sure your yeast (in the form of baking powder and soda) is fresh! It’s also vital to keep the dough in a warm, draft-free place while it rises.
2. How do I prevent my rolls from drying out?
Keep them covered with a kitchen towel while they rise and store leftover rolls in an airtight container once they’re cooled.
3. Can I make these a day in advance?
Absolutely! Prepare the rolls, place them in the baking dish, cover tightly with plastic wrap, and refrigerate overnight. Bake them in the morning straight from the fridge, just add a few extra minutes to the baking time.
4. How can I make them less sweet?
Feel free to reduce the sugar in both the dough and the filling. You can also omit the frosting for a more minimalist approach.
Nutritional Info
(Optional, could be based on preferences)
- Serving Size: 1 roll
- Calories: Approximately 320
- Fat: 12g
- Carbohydrates: 47g
- Protein: 4g
- Sugar: 20g
There you have it, friends! Your guide to making mouthwatering Red Velvet Cinnamon Rolls at home. I hope you enjoy making them as much as I do. Remember, the kitchen is all about experimenting, so let your creativity shine. Happy baking! Let’s gather around that table soon.
PrintRed Velvet Cinnamon Rolls

Delicious red velvet cinnamon rolls swirled with cream cheese filling and topped with luscious frosting, perfect for any occasion.
- Prep Time: 30 minutes
- Cook Time: 30 minutes
- Total Time: 60 minutes
- Yield: 12 servings 1x
- Category: Dessert
- Method: Baking
- Cuisine: American
- Diet: Vegetarian
Ingredients
- 2 cups all-purpose flour
- 1 cup sugar
- 1 teaspoon baking powder
- 1 teaspoon baking soda
- 1/2 teaspoon salt
- 1/2 cup buttermilk
- 1/4 cup unsalted butter, melted
- 1 large egg
- 2 tablespoons red food coloring
- 1 teaspoon vanilla extract
- 1 tablespoon ground cinnamon
- 1/2 cup brown sugar
- 1/2 cup cream cheese, softened
- 1/4 cup powdered sugar
- 1 teaspoon vanilla extract (for frosting)
Instructions
- Mix Dry Ingredients: In a large mixing bowl, combine flour, sugar, baking powder, baking soda, and salt. Whisk until blended.
- Combine Wet Ingredients: In another bowl, whisk together buttermilk, melted butter, egg, red food coloring, and vanilla extract.
- Create the Dough: Pour the wet mixture into the dry ingredients and combine until just mixed.
- Knead the Dough: On a floured surface, knead the dough for 3-5 minutes until smooth and elastic.
- Let It Rest: Place dough in a greased bowl, cover, and let rise for about 1 hour.
- Make Your Cinnamon Mix: Mix brown sugar, cinnamon, and a dash of vanilla in a small bowl.
- Flour Your Surface: Roll out the dough into a rectangle about 1/4 inch thick.
- Spread the Filling: Spread softened cream cheese over the dough and sprinkle with cinnamon mixture.
- Rolling It Up: Roll the dough from one edge into a tight log.
- Slice and Dice: Cut the log into 12 equal pieces and place in a greased baking dish.
- Preheat Your Oven: Preheat oven to 350°F (175°C).
- Bake: Bake for 25-30 minutes until golden.
- Make the Frosting: Mix cream cheese, powdered sugar, and vanilla until smooth.
- Glaze the Rolls: Spread frosting over rolls once they have cooled for about 10 minutes.
Notes
These cinnamon rolls freeze well, so make a double batch and enjoy later!
Nutrition
- Serving Size: 1 roll
- Calories: 320
- Sugar: 20g
- Sodium: 400mg
- Fat: 12g
- Saturated Fat: 6g
- Unsaturated Fat: 3g
- Trans Fat: 0g
- Carbohydrates: 47g
- Fiber: 1g
- Protein: 4g
- Cholesterol: 30mg
Keywords: cinnamon rolls, red velvet, dessert, sweet rolls, baking
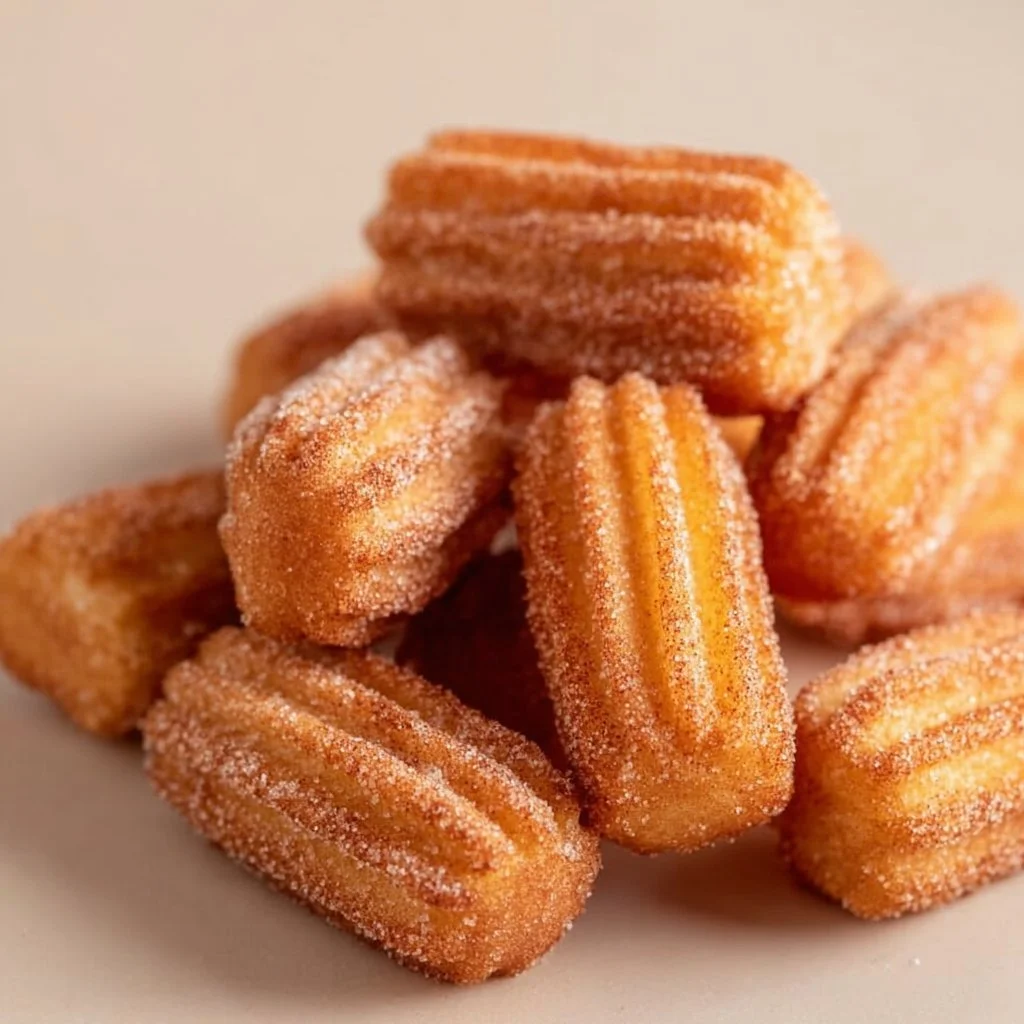
Healthy Baked Churro Bites
Healthy Baked Churro Bites: A Sweet Twist on a Classic Treat
Hello, fellow food lovers! Today, we’re diving into a delightful treat that marries nostalgia with a healthier twist: Healthy Baked Churro Bites! If you’ve ever indulged in the warm, cinnamon-sugar-dusted goodness of traditional churros, you’re in for a treat. These baked bites capture all that bliss without the guilt—because who doesn’t love a tasty dessert that’s also a little wholesome?
Let’s Get Cozy with a Story
Before we jump into the recipe, let me share a little story that holds a special place in my heart. I remember the first time I had churros; I was visiting a local fair with my family, giggling under the colorful lights and the scent of popcorn wafting in the air. We stumbled upon a cute little stand selling churros, and my mom, with that signature twinkle in her eye, insisted we get a few to share.
As we savored each cinnamon-sugar-dusted bite, the world seemed to melt away. It was moments like those—sweaty palms, sticky fingers, and an abundance of laughter—that made me realize food isn’t just about nourishment; it’s about connection, joy, and shared experiences. Fast forward to today, and I wanted to recreate that magic but with a healthier twist!
So, roll up your sleeves and let’s make some Healthy Baked Churro Bites that will transport you right back to those carefree days!
The Ingredients: Your Sweet Ensemble!
Here’s what you’ll need to create these scrumptious bites:
-
1 cup whole wheat flour: This is your base for the churro bites. Whole wheat flour adds fiber and nutrients compared to refined flour. You can easily swap it with a gluten-free flour blend if you prefer gluten-free churros!
-
1 teaspoon baking powder: This is your little secret for achieving that light and airy texture. Baking powder is essential for helping the dough rise; don’t skip it!
-
1/4 teaspoon salt: Just a pinch enhances the flavors and balances out the sweetness.
-
1/2 teaspoon cinnamon: Cinnamon is what makes churros so inviting. It brings warmth and an aromatic touch. Feel free to add more if you love that cinnamon kick!
-
1/4 cup unsweetened applesauce: This not only adds moisture but also acts as a natural sweetener. Plus, it helps reduce the amount of fat needed. If applesauce isn’t on hand, pureed banana or pumpkin works wonderfully!
-
1/4 cup honey or maple syrup: This is your sweet touch! Honey offers a lovely flavor, while maple syrup provides a subtle warmth. Choose whichever you prefer, or adjust to your taste!
-
1/4 cup almond milk: We need a little liquid to bring it all together. Almond milk is great for a lighter option, but feel free to use any milk you have on hand.
-
1 teaspoon vanilla extract: A splash of vanilla always elevates the dish. It adds a fragrant note that pairs perfectly with cinnamon.
-
2 tablespoons coconut oil, melted: This gives the churro bites a delightful richness. You could substitute this with melted butter or any other favorite oil, but coconut oil adds a lovely tropical flavor.
-
Cinnamon sugar (for coating): This glorious mixture is what transforms your baked bites into churro magic! Combine equal parts sugar and cinnamon for the perfect dusting.
Step-by-Step Instructions: Let’s Get Cooking!
Now that we have our ingredients ready, let’s roll up our sleeves and start making these lovely bites!
Step 1: Preheat Your Oven
Preheat your oven to 350°F (175°C). This ensures that your churro bites bake evenly and achieve that perfect golden-brown crust we crave.
Step 2: Prepare Your Muffin Tin
Lightly grease a mini muffin tin or line it with muffin liners. This will ensure that your scrumptious bites pop out effortlessly. You could also use a regular muffin tin if you prefer larger churro bites!
Step 3: Mix the Dry Ingredients
In one bowl, whisk together the whole wheat flour, baking powder, salt, cinnamon, and set it aside. This helps distribute the baking powder and salt thoroughly, creating a balanced batter.
Step 4: Combine Wet Ingredients
In another bowl, mix the unsweetened applesauce, honey (or maple syrup), almond milk, vanilla extract, and melted coconut oil. Stir until well combined. You’ll love the comforting aroma wafting through your kitchen!
Step 5: Combine Wet and Dry Ingredients
Gradually add the dry mixture to your wet ingredients. Stir until just combined; be careful not to overmix! A few lumps are perfectly fine. If the batter seems a bit too thick, just add a splash more almond milk.
Step 6: Fill the Muffin Tin
Using a spoon or a cookie scoop, fill each muffin cup about two-thirds full. This allows enough space for the churros to rise without overflowing.
Step 7: Bake to Perfection
Pop your muffin tin in the preheated oven for about 12-15 minutes, or until the tops are golden brown and a toothpick inserted comes out clean. Time may vary slightly depending on your oven!
Step 8: Cinnamon Sugar Coating
While those beauties are baking, mix together your cinnamon sugar in a shallow bowl. Once the churro bites are done, allow them to cool for a few minutes before tossing them into the cinnamon sugar. This will create that irresistible coating everyone loves!
Step 9: Let’s Serve!
Once coated, you can present your churro bites in a charming dish or basket. Get creative with the presentation — a sprinkle of extra cinnamon sugar on top adds a lovely touch!
Serving Suggestions: Making It Special
Now that your Healthy Baked Churro Bites are ready to shine, consider serving them warm with a side of dark chocolate or fruit sauce for dipping. You can even pile them high on a platter for a visually stunning dessert display. Your guests will feel like they’re in a trendy café, and you’ll bask in the joy of serving something delicious and nutritious!
Recipe Variations: Unleash Your Creativity
The beauty of cooking is exploring different flavors and combinations! Here are a few variations you might enjoy:
-
Spiced Chocolate Churro Bites: Add a teaspoon of cocoa powder to the dry ingredients for a chocolaty twist.
-
Almond Joy Bites: Incorporate a handful of chopped dark chocolate and shredded coconut into the batter for a tropical treat!
-
Pumpkin Spice Churro Bites: Substitute the applesauce with pumpkin puree and add an extra dash of nutmeg for a fall-inspired version.
-
Nutty Churro Bites: Toss in chopped nuts like walnuts or pecans for a satisfying crunch.
-
Vegan Delight: To make this completely vegan, use maple syrup and coconut oil instead of honey and adjust any dairy to plant-based alternatives.
Chef’s Notes: From My Kitchen to Yours
The evolution of this recipe is a heartfelt journey! Initially, I tried to recreate those classic fried churros, but the mess and the oil overwhelmed me, not to mention the extra calories! So I leaned into baking as a healthier option, and after some experimentation, these little bites burst onto the scene.
As a side note, I always keep a batch in my freezer. They make for a quick snack or an easy dessert when unexpected guests drop by. Just pop them in the oven for a few minutes, and they’re as good as fresh!
FAQs and Troubleshooting: Your Questions Answered
-
Can I use regular all-purpose flour instead of whole wheat flour?
- Absolutely! All-purpose flour will work just fine; however, you’ll lose some fiber that whole wheat flour offers.
-
Why did my churro bites come out too dry?
- This could happen if they were overbaked or if the batter was too dry. Make sure to check them a few minutes early and adjust liquid components if needed.
-
Can I freeze these churro bites?
- Yes! They freeze beautifully. Just let them cool completely, then store them in an airtight container or freezer bag for up to three months. Reheat in the oven when cravings strike!
-
What can I use instead of applesauce?
- You can swap it with any fruit puree, like mashed banana or even yogurt, for added creaminess.
Nutritional Info (Optional)
While specific nutritional info may vary based on brands and substitutions, here’s a general overview per bite:
- Calories: 60
- Carbohydrates: 11g
- Protein: 1g
- Fat: 2g
- Fiber: 1g
- Sugar: 2g
And there you have it! A delightful, heartwarming recipe for Healthy Baked Churro Bites that’s brimming with flavor and nostalgia. Perfect for sharing with family and friends—or keeping all to yourself (I won’t judge!). Happy cooking, and remember: It’s all about bringing love and joy to your table. Enjoy every bite!
PrintHealthy Baked Churro Bites

A delightful and healthier twist on the classic churros, these baked churro bites are sweet, cinnamon-sugar-dusted, and perfect for sharing.
- Prep Time: 15 minutes
- Cook Time: 15 minutes
- Total Time: 30 minutes
- Yield: 12 servings 1x
- Category: Dessert
- Method: Baking
- Cuisine: Mexican
- Diet: Vegetarian
Ingredients
- 1 cup whole wheat flour
- 1 teaspoon baking powder
- 1/4 teaspoon salt
- 1/2 teaspoon cinnamon
- 1/4 cup unsweetened applesauce
- 1/4 cup honey or maple syrup
- 1/4 cup almond milk
- 1 teaspoon vanilla extract
- 2 tablespoons coconut oil, melted
- Cinnamon sugar (for coating)
Instructions
- Preheat your oven to 350°F (175°C).
- Prepare a mini muffin tin by greasing it or lining it with muffin liners.
- Mix the dry ingredients: whisk together the whole wheat flour, baking powder, salt, and cinnamon.
- Combine the wet ingredients: mix the applesauce, honey (or maple syrup), almond milk, vanilla extract, and melted coconut oil.
- Add the dry mixture to the wet ingredients and stir until just combined.
- Fill each muffin cup about two-thirds full with the batter.
- Bake for 12-15 minutes or until golden brown and a toothpick comes out clean.
- Mix the cinnamon sugar in a shallow bowl and coat the churro bites after they cool slightly.
- Serve them warm with a dusting of extra cinnamon sugar if desired.
Notes
These churro bites freeze beautifully! Store in an airtight container and reheat in the oven when needed.
Nutrition
- Serving Size: 1 bite
- Calories: 60
- Sugar: 2g
- Sodium: 40mg
- Fat: 2g
- Saturated Fat: 1g
- Unsaturated Fat: 1g
- Trans Fat: 0g
- Carbohydrates: 11g
- Fiber: 1g
- Protein: 1g
- Cholesterol: 0mg
Keywords: Churros, Healthy Dessert, Baked Churro Bites, Cinnamon Sugar Treats, Wholesome Snacks
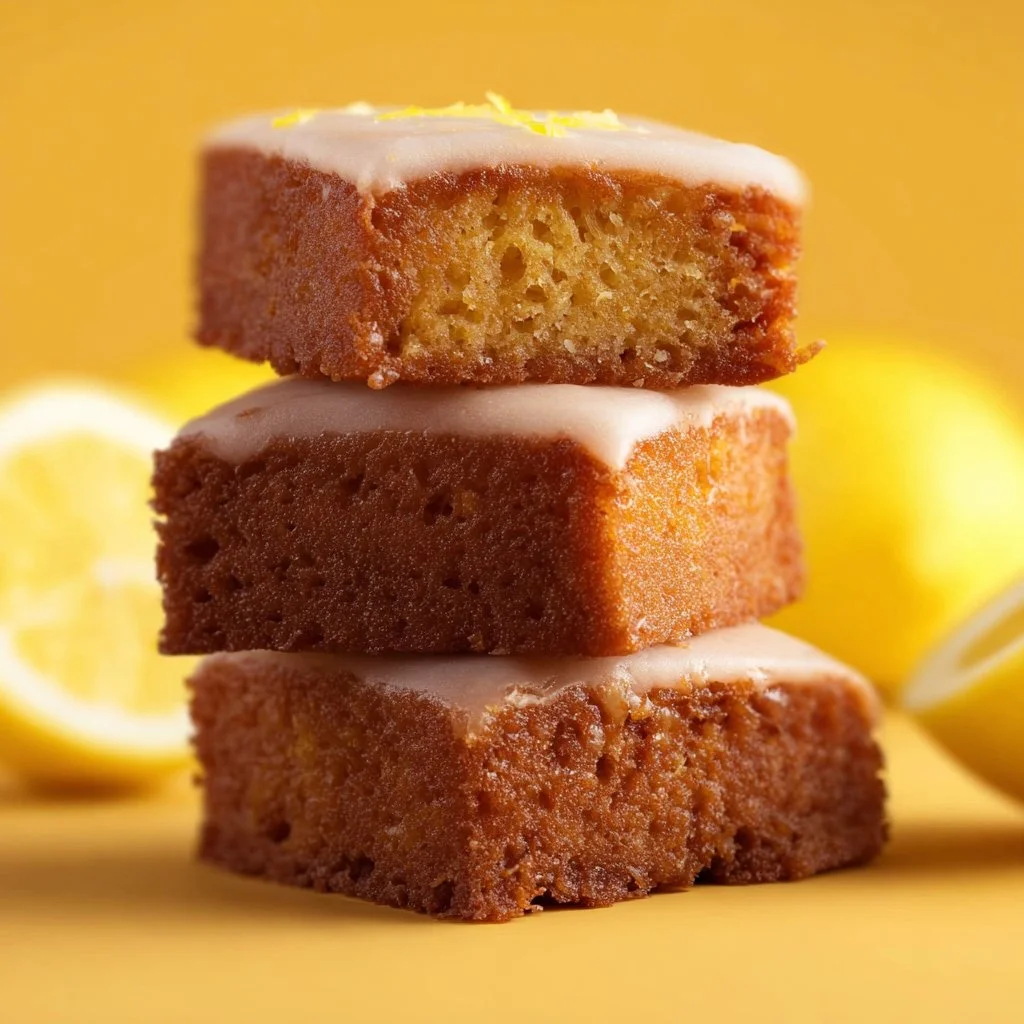
Lemon Brownies
# The Zesty Magic of Lemon Brownies: A Slice of Sunshine

Hello, my fellow food enthusiasts! Today, we’re diving into the delightful, sunshiny world of Lemon Brownies. If you’ve never tasted these treats, you’re in for a real treat. Picture this: a dense, fudgy brownie meets the bright, zesty goodness of fresh lemons. Yes, my friends, these are not your typical brownies. They are a refreshing twist that’ll make your taste buds dance and your friends beg for the recipe.

So, why lemon brownies, you ask? Well, there’s something about the tangy sweetness of lemons that lifts the spirits and brightens any gathering. Plus, they’re versatile enough to be enjoyed year-round, whether you’re hosting a summer picnic, celebrating a birthday, or simply indulging your sweet tooth on a quiet evening at home.

Let’s set the table for a delicious adventure that’s effortless yet elegant. Grab your apron, and let’s get this fusion of richness and citrus going!

## My Lemon Brownie Story

Every time I make lemon brownies, I’m transported back to a sun-drenched afternoon in my grandmother's kitchen. She was the queen of desserts, and her approach was always simple: use the freshest ingredients, add a dash of love, and sprinkle in some joy. It was one such afternoon that she introduced me to her secret lemon brownie recipe, which she had perfected over the years.

Sitting on a stool, watching her work magic in the kitchen, my hands would impatiently lick the remnants of the bowl. The blend of sugar, butter, and lemon zest filled the air with a sweet citrus aroma that made my heart sing. After what felt like an eternity, she pulled a golden batch from the oven, the tops lightly glistening like little sunbursts. We sat at her kitchen table, devouring them warm, the bright lemon flavor brightening up the whole meal.

That memorable experience instilled in me not just a love for lemon desserts but also a passion for sharing food with family and friends, a tradition I carry on today with each bite of these delicious lemon brownies. Let’s recreate that magic in our kitchens!

## Ingredients

Let’s gather our star ingredients for these Lemon Brownies:

- **1 cup unsalted butter, melted**: The base of any good brownie! Unsalted butter allows you to control the saltiness of the recipe. If you're in a pinch, you can substitute with coconut oil or margarine for a dairy-free version.

- **2 cups granulated sugar**: This core ingredient gives the brownies their sweetness. You could use coconut sugar or honey for a slightly different flavor profile, but keep in mind that you may need to adjust the quantity.

- **4 large eggs**: Eggs bring richness and help bind everything together. For a vegan alternative, you can replace each egg with a flax egg (1 tablespoon ground flaxseed mixed with 2.5 tablespoons water).

- **1 tablespoon vanilla extract**: Vanilla is the unsung hero in many desserts, adding depth and warmth. Feel free to experiment with almond extract for a unique spin!

- **2 cups all-purpose flour**: This provides the structure we want in our brownies. If gluten is a concern, a 1:1 gluten-free flour blend will work well here.

- **1 teaspoon baking powder**: This helps the brownies rise slightly, creating a light texture. If you run out, you can use baking soda, but reduce the quantity to 1/3 teaspoon.

- **1/2 teaspoon salt**: A touch of salt enhances sweetness. If using salted butter, you can skip this!

- **1/4 cup lemon juice**: Bright, tart, and essential for flavor. Use fresh lemon juice for the best results; bottled does not compare.

- **Zest of 2 lemons**: The zest is where much of the lemon flavor resides; it brings vibrancy. If you're in a bind, lime zest can also provide a pleasant twist!

#### For the glaze:
- **1 cup powdered sugar**: This gives the glaze its sweetness and smooth texture. You can substitute with maple powder for a different flavor.

- **2 tablespoons lemon juice**: The key to achieving that tangy glaze!

- **Zest of 1 lemon**: Extra lemon goodness that deepens the flavor.

## Step-by-Step Instructions

Now that we have our ingredients ready, let’s embark on our baking adventure.

1. **Preheat Your Oven**: Start by preheating your oven to 350°F (175°C). This is crucial—it ensures even baking. While your oven warms up, you can prepare your pan!

2. **Prepare Your Pan**: Grease a 9x13-inch baking dish with a touch of butter or line it with parchment paper for easy removal. This little step ensures your glorious brownies won’t stick around after baking!

3. **Mix the Wet Ingredients**: In a large mixing bowl, whisk together the melted unsalted butter and granulated sugar until combined. It should be shiny and smooth. This is where flavor starts blossoming! Add in the eggs, one at a time, stirring well after each addition. Then, stir in the vanilla extract.

4. **Add the Dry Ingredients**: In a separate bowl, whisk together the flour, baking powder, and salt. This step is essential to evenly distribute the baking powder, ensuring our brownies rise perfectly. Gradually fold the dry ingredients into the butter mixture, being careful not to overmix; otherwise, they could be tough.

5. **Incorporate the Lemon**: Fold in the fresh lemon juice and lemon zest until just combined. The batter will be creamy and slightly thick, which is just what we want! Take a moment to appreciate that beautiful citrus aroma swirling around you.

6. **Pour into the Pan**: Spread the batter evenly into your prepared baking dish and smooth the top with a spatula. You can tap the pan gently to remove any air bubbles.

7. **Bake**: Slide your pan into the preheated oven and let those babies bake for about 25–30 minutes. Keep an eye on them; you want the edges to be set while the center remains slightly gooey.

8. **Cool and Glaze**: Once baked, allow the brownies to cool in the pan for about 10 minutes before transferring them to a wire rack to cool completely. Meanwhile, whisk together the powdered sugar, lemon juice, and lemon zest for the glaze. Once cooled, drizzle it over your brownies like a beautiful sunny glaze.

9. **Slice and Serve**: Use a sharp knife to cut the brownies into squares or rectangles. Feel free to dust with a sprinkle of extra powdered sugar for that extra touch of refinement.

## Serving Suggestions

For serving, I love to arrange the brownies on a beautiful platter, garnished with fresh mint leaves or thin lemon slices for an extra pop of color. You can serve them warm with a scoop of vanilla ice cream on the side for a delightful contrast or enjoy them chilled as a refreshing treat on a hot day. The presentation can be simple yet elegant, and don’t forget to add a cheerful napkin to complete the experience!

## Recipe Variations

Want to switch things up a bit? Here are some delightful variations for your lemon brownies:

1. **Blueberry Lemon Brownies**: Toss in a cup of fresh blueberries for a burst of color and flavor.

2. **Coconut Lemon Brownies**: Add shredded coconut to the batter for a tropical twist.

3. **Lemon Poppy Seed Brownies**: Incorporate a tablespoon of poppy seeds for an interesting texture.

4. **Cream Cheese Swirl**: Add dollops of cream cheese frosting to the batter before baking and swirl it in for added richness.

5. **Gluten-Free Option**: Use a gluten-free flour blend to make these delightful brownies accessible for everyone!

## Chef’s Notes

These Lemon Brownies are a recipe near and dear to my heart that has evolved over the years. I played around with the ratios, finding the perfect balance of sweet and tart. Originally, I used a simpler approach, but after experimenting, I realized that the layers of flavor truly shine with the addition of zest and vanilla. Every time I tweak it, I’m reminded of that sunny afternoon in Grandma's kitchen, which adds an extra layer of joy to each batch I make. Also, just a little heads-up—don't forget to save some lemon zest for garnishing. It’s the finishing touch that transforms your dessert from good to show-stopping!

## FAQs and Troubleshooting

### 1. **Why are my lemon brownies too dense?**
If your brownies are coming out dense, it could be due to over-mixing the batter or the flour being packed too tightly. Be gentle when folding in your dry ingredients!

### 2. **How do I tell when they are done baking?**
You’re looking for a light golden color on top! Insert a toothpick into the center; if it comes out clean or with a few moist crumbs, they’re ready!

### 3. **Can I make these in advance?**
Absolutely! These brownies actually taste better the next day once they get a chance to set. Store them in an airtight container in the fridge to keep them fresh.

### 4. **What if I don’t have fresh lemons?**
While fresh lemons yield the best flavor, if you must, bottled lemon juice can work in a pinch, but the zest will be missed!

## Nutritional Info (Optional)

*(This section can be tailored as you see fit.)*

Warm lemon brownies, a delightful mix of sweet and tart goodness, deliver a dessert experience like no other. With comforting fudginess and vibrant lemon flavor, they evoke joy, nostalgia, and a sense of togetherness. So, gather your loved ones, tie on your apron, and prepare to indulge in a treat that’s as refreshing as a bright summer day.

Cheers to good food and great company!
Lemon Brownies

Delicious lemon brownies that blend rich brownie texture with zesty lemon flavor, perfect for any gathering.
- Prep Time: 15 minutes
- Cook Time: 30 minutes
- Total Time: 45 minutes
- Yield: 12 servings 1x
- Category: Dessert
- Method: Baking
- Cuisine: American
- Diet: Vegetarian
Ingredients
- 1 cup unsalted butter, melted
- 2 cups granulated sugar
- 4 large eggs
- 1 tablespoon vanilla extract
- 2 cups all-purpose flour
- 1 teaspoon baking powder
- 1/2 teaspoon salt
- 1/4 cup lemon juice
- Zest of 2 lemons
- 1 cup powdered sugar (for glaze)
- 2 tablespoons lemon juice (for glaze)
- Zest of 1 lemon (for glaze)
Instructions
- Preheat your oven to 350°F (175°C).
- Prepare a 9×13-inch baking dish by greasing it or lining with parchment paper.
- Mix the melted unsalted butter and granulated sugar until shiny and smooth. Add in the eggs one at a time, stirring well after each.
- Add the flour, baking powder, and salt in a separate bowl, then fold into the butter mixture without overmixing.
- Incorporate the lemon juice and zest until just combined.
- Pour the batter into the prepared pan and smooth the top.
- Bake for about 25–30 minutes until edges are set and the center is slightly gooey.
- Cool in the pan for 10 minutes before transferring to a wire rack to cool completely.
- Whisk together powdered sugar, lemon juice, and zest for the glaze, then drizzle over the cooled brownies.
- Slice into squares and serve.
Notes
Serve warm with ice cream, or enjoy chilled. Garnish with fresh mint or lemon slices for a pop of color.
Nutrition
- Serving Size: 1 brownie
- Calories: 200
- Sugar: 18g
- Sodium: 150mg
- Fat: 8g
- Saturated Fat: 5g
- Unsaturated Fat: 2g
- Trans Fat: 0g
- Carbohydrates: 27g
- Fiber: 0g
- Protein: 2g
- Cholesterol: 45mg
Keywords: lemon brownies, dessert, sweet treat, summer dessert, lemon recipes

Caramel Apple Cheesecake Bars
Caramel Apple Cheesecake Bars: A Sweet Slice of Nostalgia
Welcome to my kitchen, fellow foodies! Today, we’re diving into a recipe that perfectly captures the essence of cozy autumn afternoons, family gatherings, and sweet nostalgia—Caramel Apple Cheesecake Bars. If you’re anything like me, you appreciate a dessert that feels both indulgent and comforting, a slice of something exquisite that can brighten an ordinary day. Well, grab your aprons, because we’re about to whip up a delightful treat that’s bound to become a family favorite.
Imagine this: it’s a crisp fall day, the leaves are turning brilliant shades of gold and crimson, and the air is filled with the sweet scent of cinnamon and baked apples. That’s the moment I want to recreate with these cheesecake bars. As a child, I would often help my grandma in the kitchen, and one of the recipes that we made together was her famous apple pie. The combination of tart apples, warm spices, and silky creaminess of cheesecake always made my heart flutter. That special connection to my grandma and those priceless moments inspired me to create this recipe—merging that classic apple pie charm with the creamy comfort of cheesecake!
These Caramel Apple Cheesecake Bars are not only easy to make, but they also pack a flavor punch that will have your friends and family clamoring for seconds. Each bar features a buttery graham cracker crust topped with a smooth cream cheese mixture, fresh apples, a hint of cinnamon, and a luscious caramel drizzle. It’s the perfect balance of creamy, crunchy, sweet, and spiced—making it the ultimate crowd-pleaser for any occasion.
Let’s get cooking and create a dessert that you can serve proudly at your next gathering (or just enjoy all to yourself).
Personal Story
Growing up in a bustling household, our kitchen was always the heart of our home. My fondest memories revolve around baking with family, especially during the fall. One autumn, my grandmother decided to surprise us with an apple dessert that would leave a lasting imprint on my heart: her incredible apple cheesecake—much like what we are making today.
She passed down not just her recipe but also her incredible spirit of hospitality. I remember watching her dance around in the kitchen, the leaves fluttering outside the window as she hummed softly while she worked. The moment she pulled that creamy cheesecake out of the oven, the sweet aroma wafted through the house. We gathered around the table, beaming with delight and anticipation, ready to dive into a slice of warm comfort.
Those moments crafted not only delicious memories but also instilled in me a deep passion for creating meals that pull loved ones together. Now, every time I make these Caramel Apple Cheesecake Bars, I remember my grandma and the love she poured into her cooking. It’s not just about the food; it’s about nurturing connections and celebrating life’s sweet moments, one slice at a time.
Ingredients
Before we jump into the cooking, let’s gather our ingredients. Here’s what you’ll need:
-
2 cups of graham cracker crumbs
These crumbs form the sturdy base of our cheesecake bars. If you don’t have graham crackers, you can substitute with crushed vanilla wafers or even chocolate cookie crumbs for a unique twist! -
1/2 cup of unsalted butter, melted
The butter adds richness and helps bind the graham cracker crumbs together. Make sure it’s unsalted; otherwise, you might tip the flavor balance! -
1/4 cup of granulated sugar
Just a bit of sugar helps sweeten the crust. If you’d like an alternative, coconut sugar works nicely to retain that sweet element with a slight caramel flavor. -
2 (8-ounce) packages of cream cheese, softened
Cream cheese is the star of the cheesecake mix, giving it that rich, velvety texture. Soften it up by leaving it out for about an hour before you start. -
1/2 cup of granulated sugar
This sugar sweetens our filling. Again, if you’re watching your sugar intake, feel free to use a sugar substitute like erythritol. -
1 teaspoon of vanilla extract
Vanilla adds depth of flavor and enhances the sweetness. Always opt for pure vanilla extract if possible; it makes a world of difference! -
2 large eggs
The eggs provide structure to your cheesecake. If you are vegan or allergic, a substitute can include 1/4 cup of unsweetened applesauce per egg. -
2 cups of peeled, diced apples
Apples give this dessert its signature flavor! Granny Smith apples work great for their tartness, but feel free to mix and match your favorites. -
1 teaspoon of cinnamon
Cinnamon adds warmth and that cozy, fall-like essence. Ground nutmeg can make a delightful addition for extra spice! -
1/2 cup of caramel sauce
A decadent finish! You can purchase caramel sauce from the store or make your own if you’re feeling adventurous (it’s easier than it sounds!).
Step-by-Step Instructions
Ready to make some magic in the kitchen? Let’s roll up our sleeves and get started on these Caramel Apple Cheesecake Bars!
Step 1: Preheat the Oven
Preheat your oven to 325°F (163°C). This is an essential step so that your cheesecake will bake evenly and turn out just right—nothing worse than a soggy bottom!
Step 2: Prepare the Graham Cracker Crust
- In a mixing bowl, combine the graham cracker crumbs, melted butter, and 1/4 cup of sugar. Mix until the crumbs are well-coated and the mixture resembles wet sand.
- Chefs Tip: If the mixture feels too dry and crumbly, add a splash more melted butter. You want it to hold together when pressed!
Step 3: Press the Crust Into the Pan
- Grab a 9×13 inch baking dish and line it with parchment paper. This will help you remove the bars easily after they’re baked.
- Press the mixture evenly into the bottom of the prepared pan. Use the back of a measuring cup to pack it down firmly.
- Pop it in the oven for about 10 minutes. We want the crust to set and become a bit golden.
Step 4: Prepare the Cheesecake Filling
- While the crust is baking, let’s whip up that luscious filling! In a large mixing bowl, add the softened cream cheese and 1/2 cup of granulated sugar.
- Use an electric mixer on medium speed until it’s smooth and creamy. This is not the time for lumps!
- Next, add in the vanilla extract and eggs, one at a time, mixing after each addition until combined.
- Chefs Insight: Avoid overmixing the batter to keep your bars from cracking – we want a smooth finish, not an earthquake!
Step 5: Mix in the Apples and Cinnamon
- Add in the diced apples and cinnamon, stirring gently until everything is just combined. Your kitchen is going to start smelling divine right about now!
Step 6: Pour the Batter Over the Crust
- Once the crust is done par-baking, remove it from the oven and pour the cream cheese and apple mixture over the crust. Spread it evenly with a spatula.
- Chef Hack: Tap the pan on the counter a few times to release any air bubbles that might have formed!
Step 7: Bake the Cheesecake Bars
- Return the pan to the oven and bake for 30-35 minutes. The edges should look set, but the center will still have a slight jiggle (it will firm up as it cools!).
- Important Note: If you notice the tops browning too much, place a piece of foil gently over the top for the final few minutes of baking.
Step 8: Cool and Chill
- Remove the bars from the oven and let them cool at room temperature for about 30 minutes. Transfer them to the fridge for at least 2 hours (or overnight) to chill fully. Patience is key here!
Step 9: Drizzle with Caramel
- Once they’re set, take them out of the fridge and use the parchment paper to lift them out. Cut them into squares and drizzle with caramel sauce before serving.
- Serving Tip: You can warm up the caramel slightly for an ooey-gooey drizzle that everyone will love!
Serving Suggestions
To elevate your presentation, place the caramel apple cheesecake bars on a beautiful platter. You can garnish each square with extra diced apples, a sprinkle of cinnamon, or even some chopped nuts for texture. If you’re feeling extra fancy, serve them alongside a scoop of vanilla ice cream or a dollop of whipped cream! Trust me, this will make your dessert even more irresistible.
Recipe Variations
Looking to switch things up? Here are a few fun variations you can try with these Caramel Apple Cheesecake Bars:
- Nutty Pecan Crust: Replace graham cracker crumbs with ground pecans for a nutty twist.
- Mixed Fruit Filling: Substitute half of the apples with pears or pears for an interesting flavor profile.
- Caramel Swirl: Drizzle caramel sauce straight into the cheesecake batter before baking for a delightful caramel ribbon effect.
- Spiced Apples: Add a pinch of nutmeg or ginger to the apple mixture for an extra layer of warmth.
- Sugar-Free Option: Use a sugar substitute in the crust and filling to create a guilt-free treat!
Chef’s Notes
Every time I make these Caramel Apple Cheesecake Bars, I think about how food serves as a love language. It brings people together, creates memories, and nourishes our souls. Plus, I can’t help but laugh every time I remember my first attempt at making a cheesecake—it was a glorious failure! The crust crumbled, the opening was a disaster! But it taught me valuable lessons about patience and practice. So don’t worry if your first attempt isn’t perfect; just keep at it!
Over the years, this recipe has evolved from my grandma’s apple pie into these bars. I like to think she’d be proud of this scrumptious homage to our shared kitchen adventures.
FAQs and Troubleshooting
1. Why did my cheesecake bars crack?
Cracking can happen for a few reasons: overmixing the eggs or baking at too high a temperature. Always keep your mixer on medium speed and ensure you don’t bake them too long!
2. My crust is too crumbly; what should I do?
If your crust won’t hold together, it likely needs more butter. Add a tablespoon at a time until it reaches the right consistency.
3. Can I freeze these bars?
Absolutely! Cut them into squares and then freeze them in an airtight container for up to 2 months. Thaw in the fridge before serving.
4. What if I can’t find caramel sauce?
No problem! You can make your own caramel sauce by melting sugar over low heat until it’s golden, then whisking in heavy cream until smooth. It’s simpler than you think!
Nutritional Info (Optional)
A quick note for those interested in the nutritional aspect: Each serving of Caramel Apple Cheesecake Bars (based on 12 servings) contains approximately:
- Calories: 320
- Protein: 4g
- Carbohydrates: 34g
- Fat: 20g
- Sugar: 18g
(Note: These numbers can vary based on ingredient choices and portion size.)
There you have it, a delicious journey into the world of Caramel Apple Cheesecake Bars! I hope you’re inspired to create this warm, comforting dessert that spreads joy and connection. As you gather around the table with loved ones, sharing stories and laughter, remember that cooking is not just about the food itself; it’s the love and intention behind it that makes it truly special. Happy baking, and until next time—let’s keep the good food flowing!
PrintCaramel Apple Cheesecake Bars
Indulge in these creamy Caramel Apple Cheesecake Bars, perfect for autumn gatherings, featuring a buttery graham cracker crust, smooth cream cheese filling, fresh apples, and a luscious caramel drizzle.
- Prep Time: 15 minutes
- Cook Time: 40 minutes
- Total Time: 55 minutes
- Yield: 12 servings 1x
- Category: Dessert
- Method: Baking
- Cuisine: American
- Diet: Vegetarian
Ingredients
- 2 cups of graham cracker crumbs
- 1/2 cup of unsalted butter, melted
- 1/4 cup of granulated sugar
- 2 (8-ounce) packages of cream cheese, softened
- 1/2 cup of granulated sugar
- 1 teaspoon of vanilla extract
- 2 large eggs
- 2 cups of peeled, diced apples
- 1 teaspoon of cinnamon
- 1/2 cup of caramel sauce
Instructions
- Preheat your oven to 325°F (163°C).
- Combine the graham cracker crumbs, melted butter, and sugar in a bowl.
- Press the mixture into a 9×13 inch baking dish and bake for 10 minutes.
- Add softened cream cheese and sugar in a bowl and mix until smooth.
- Add vanilla extract and eggs, mixing after each addition.
- Mix in diced apples and cinnamon gently.
- Pour the mixture over the crust and spread it evenly.
- Bake for 30-35 minutes until the edges are set.
- Cool at room temperature for 30 minutes, then refrigerate for at least 2 hours.
- Drizzle with caramel sauce before serving.
Notes
For added richness, you can warm the caramel slightly before drizzling. Try adding chopped nuts as a garnish for extra texture.
Nutrition
- Serving Size: 1 piece
- Calories: 320
- Sugar: 18g
- Sodium: 200mg
- Fat: 20g
- Saturated Fat: 12g
- Unsaturated Fat: 8g
- Trans Fat: 0g
- Carbohydrates: 34g
- Fiber: 1g
- Protein: 4g
- Cholesterol: 100mg
Keywords: cheesecake, apple dessert, caramel, fall recipes, autumn desserts, family gatherings

Easy Street Corn Chicken Bowl
Easy Street Corn Chicken Bowl: A Flavorful Adventure
Hey there, foodie friend! If you’re anything like me, you probably have a few go-to recipes that never fail to bring joy to your dinner table. Today, I’m thrilled to share one of those delightful creations: the Easy Street Corn Chicken Bowl! This dish is a vibrant medley of flavors and textures — tender chicken, sweet corn, colorful veggies, and creamy avocado, all drizzled with zesty lime juice. Sounds delicious, right?
As we embark on this culinary journey together, I’ll share not only the recipe but also a sprinkle of personal stories and kitchen wisdom I’ve gathered over the years. This bowl is perfect for those busy weeknights when you need something quick yet elegant. Plus, it’s versatile enough for entertaining or just a cozy night in! So, let’s take a step into the kitchen and whip up something wonderful.
Personal Story
One of my fondest memories involving corn goes back to a family gathering in late summer when the corn was at its peak. We gathered at my grandparents’ home, a charming farmhouse surrounded by fields of golden corn swaying in the breeze. My grandmother would always bring out her famous street corn salad, a vibrant mix of grilled corn, fresh lime, and crumbled cheese.
I remember sneaking into the kitchen, practically salivating, as she mixed everything in an oversized bowl. If only you could smell the aroma! That memory still ignites a nostalgic warmth in my heart, and today, as I create my own twist on this classic element with the Easy Street Corn Chicken Bowl, I’m reminded of that love and care that goes into every meal. It’s those small moments around the table that turn into lifelong memories. Now, let’s dive into this bowl of goodness!
Ingredients
Here’s what you’ll need to create your own Easy Street Corn Chicken Bowl:
-
2 cups cooked chicken, shredded
Perfect for using up leftover rotisserie chicken! You can substitute it with grilled chicken or any protein you prefer, like turkey or chickpeas for a vegetarian option. -
1 can corn, drained
Sweet, juicy corn adds a pop of flavor. Fresh corn on the cob works wonderfully, too—just grill or roast it and then cut it off the cob! -
1 cup cooked rice
I love using brown rice for extra nutrients, but white rice or quinoa can also be excellent choices. -
1 bell pepper, diced
Grab any color you like—red, yellow, or green! Each adds a unique flavor and color to the dish, making it visually appealing. -
1/2 cup red onion, diced
For a zesty bite! If red onion is a bit too sharp for your taste, yellow onion or green onions can make a nice substitute. -
1 avocado, sliced
Creamy and dreamy! Not only does avocado add richness, but it also brings healthy fats. If you’re in a pinch, you can replace it with a dollop of Greek yogurt. -
1/4 cup cilantro, chopped
Fresh herbs elevate the dish. If cilantro doesn’t tickle your taste buds, fresh parsley or basil can give a different, yet equally delightful flair. -
1 tablespoon lime juice
Citrus is key here! Fresh lime juice brightens everything up. Lemon juice works too, but I must say, lime has that authentic zing. -
Salt and pepper to taste
Essential for balancing those flavors, so season to your liking. -
1 tablespoon olive oil
A little drizzle adds richness. You can swap it with avocado oil or even skip it entirely if you’re keeping it light!
Step-by-Step Instructions
Ready to start cooking? Here’s how to assemble your Easy Street Corn Chicken Bowl step by step:
-
Prepare the Base: Start by reheating your cooked rice. You can do this in a pot on low heat or in the microwave for a quick fix. If you’re using freshly cooked rice, savor that warm, fluffy goodness!
-
Sauté the Veggies: In a large skillet, heat the olive oil over medium heat. Once hot, add the diced red onion and bell pepper. Sauté for about 3-5 minutes, or until they soften. This little step adds depth and sweetness—the aroma will make your kitchen smell absolutely divine!
-
Add the Corn: Toss in the drained corn after your peppers and onions are soft. Give it a good stir and let it cook for another 2 minutes. The warmth will bring out the sweet flavor and that beautiful golden color will start to shine.
-
Mix in the Chicken: Stir in your shredded chicken. This is where the magic happens, my friends. Mix thoroughly, and allow everything to heat through—about 3-4 minutes. If you want to spice things up a bit, this is the perfect time to sprinkle in some cumin or chili powder!
-
Season to Perfection: Once everything is in the skillet, add salt, pepper, and lime juice. It’s your chance to taste! Adjust as needed—maybe a little more lime for that refreshing zing or a pinch more salt to balance it all out.
-
Assemble the Bowl: Time for the fun part! In a large serving bowl, spoon a generous layer of your warm rice at the bottom. Top it with the chicken, corn, and veggie mixture, then elegantly pile on slices of avocado. Isn’t that a beautiful sight?
-
Finish It Off: Garnish with the chopped cilantro. It’s like confetti for your bowl! Serve it warm, and don’t forget to squeeze a little extra lime juice on top just before digging in. Trust me, it makes all the difference.
Serving Suggestions
Plating can be as simple or elegant as you desire! For a casual touch, serve this bowl family-style, straight from the skillet, allowing everyone to make their own perfect portions. You can offer additional toppings on the side—think shredded cheese, extra lime, or a dollop of sour cream. If you’re aiming for a more refined presentation, layer the components in a clear glass bowl for a beautiful, take-your-breath-away display!
Recipe Variations
-
Spicy Twist: Add some jalapeños or a sprinkle of red pepper flakes to the skillet for those who crave heat!
-
Southwest Flavor: Incorporate black beans and serve with a creamy chipotle dressing to take it to the next level.
-
Taco Bowl: Serve the mixture over crushed tortilla chips for a fun, taco-inspired twist; don’t forget the salsa!
-
Vegetarian Delight: Substitute chicken with roasted butternut squash or add more beans for a satisfying, meat-free alternative.
-
Herb Variations: Experiment with different herbs like dill or tarragon for a flavor bump that takes it in new directions.
Chef’s Notes
Every recipe tells a story, and this one is no different! The Easy Street Corn Chicken Bowl began as a quick weeknight meal where I had a random assortment of odds and ends in my fridge. Over the years, I’ve refined it to strike a balance between comfort and elegance. Just remember that cooking is an adventure—don’t be afraid to make it your own! And trust me, if you overcook the rice or misjudge the lime juice, it’s not the end of the world—just a chance to learn and grow in the kitchen!
FAQs and Troubleshooting
-
What can I use instead of cooked chicken?
You can try roasted veggies, canned chickpeas, or even tofu. Just ensure they’re well-seasoned to taste amazing! -
How can I store leftovers?
Store any leftovers in an airtight container in the refrigerator for up to 3 days. Just keep your avocado separate to prevent browning! -
Can I prep this dish in advance?
Absolutely! You can prepare the chicken and corn mixture ahead of time. Reheat it when ready to serve, then layer it over freshly cooked rice. -
What if my dish turns out bland?
It happens, even to the best of us! Taste it as you cook and add salt, pepper, or a splash of lime juice until it sings!
Nutritional Info
While I like to focus on flavor, I also care about nutrition. Here’s a quick estimate for a serving of this bowl:
- Calories: Approximately 450
- Protein: 30g
- Carbohydrates: 45g
- Fats: 15g
- Fiber: 7g
Remember, each ingredient can alter these numbers, but it shows that you’re on the right path to a balanced meal!
There you have it! The Easy Street Corn Chicken Bowl brings comfort, color, and flavor to your table. I hope this recipe brings a smile to your face and warmth to your heart as you gather around the table with those you love. Happy cooking! 🌟
PrintEasy Street Corn Chicken Bowl

A vibrant medley of flavors and textures featuring tender chicken, sweet corn, colorful veggies, and creamy avocado, drizzled with zesty lime juice.
- Prep Time: 15 minutes
- Cook Time: 15 minutes
- Total Time: 30 minutes
- Yield: 4 servings 1x
- Category: Main Course
- Method: Stovetop
- Cuisine: Mexican
- Diet: Gluten-Free, Dairy-Free
Ingredients
- 2 cups cooked chicken, shredded
- 1 can corn, drained
- 1 cup cooked rice
- 1 bell pepper, diced
- 1/2 cup red onion, diced
- 1 avocado, sliced
- 1/4 cup cilantro, chopped
- 1 tablespoon lime juice
- Salt and pepper to taste
- 1 tablespoon olive oil
Instructions
- Prepare the base: Start by reheating your cooked rice.
- Sauté the veggies: In a large skillet, heat the olive oil over medium heat. Add the diced red onion and bell pepper. Sauté for about 3-5 minutes.
- Add the corn: Toss in the drained corn after your peppers and onions are soft and cook for another 2 minutes.
- Mix in the chicken: Stir in your shredded chicken and heat through for about 3-4 minutes.
- Season to perfection: Add salt, pepper, and lime juice to taste.
- Assemble the bowl: Spoon a layer of warm rice, then top with the chicken, corn, and veggie mixture, and slices of avocado.
- Finish it off: Garnish with chopped cilantro and serve warm with extra lime juice.
Notes
Serve this bowl family-style or in elegant presentations. Add toppings like shredded cheese or sour cream for extra flavor.
Nutrition
- Serving Size: 1 serving
- Calories: 450
- Sugar: 5g
- Sodium: 500mg
- Fat: 15g
- Saturated Fat: 2g
- Unsaturated Fat: 10g
- Trans Fat: 0g
- Carbohydrates: 45g
- Fiber: 7g
- Protein: 30g
- Cholesterol: 75mg
Keywords: chicken, corn, bowl, healthy meal, quick dinner, easy recipe

Crockpot French Dip Sandwiches
Savory Slow-Cooked Delight: Crockpot French Dip Sandwiches
Hello, fellow home chefs and food enthusiasts! I’m so excited to share one of my absolute favorite comfort food recipes with you today—Crockpot French Dip Sandwiches. Imagine coming home after a busy day to the irresistible aroma of tender beef, aromatic onions, and savory broth wafting through your house. It’s like being wrapped in a warm culinary hug!
Not only are French Dip Sandwiches one of the most satisfying meals, but they’re also surprisingly simple to make, thanks to our trusty Crockpot. You can let it do the heavy lifting while you tackle your to-do list—or just kick your feet up and catch up on some Netflix binge-watching!
These sandwiches are the quintessential comfort food—perfect for game day gatherings, casual family dinners, or even a cozy date night at home. With every bite, you’ll experience the joy of slow-cooked beef, perfectly soaked bread, and all the flavor that simmers in the pot. And the best part? You don’t have to be a culinary wizard to pull it off!
So, grab your apron and let’s dive into the delightful world of Crockpot French Dip Sandwiches. Trust me, your taste buds will thank you!
Personal Story
Growing up, Sundays were sacred in our household. No matter what was happening during the week, Sunday was the day my family gathered around the table, ready to share stories over a delicious meal. My dad loved trying new recipes, and one year, he decided we’d dive into a classic French Dip Sandwich.
He marinated the beef overnight, and I was in charge of slicing the onions—let me tell you, those tear-filled moments are now some of my fondest kitchen memories! The slow cooker chugged away in the corner, and by midday, the house smelled so good that even the neighbors must have been curious.
That first bite was pure magic—flavorful beef, soft bread, and a dipping sauce that packed a punch. Ever since that day, I’ve made it my mission to perfect the French Dip. Now, every time I make this dish, I’m reminded of those wonderful Sundays shared with family, laughter, and love around the table.
Ingredients
Here’s what you’ll need for this deliciously comforting recipe:
-
3 pounds beef chuck roast
- Perfect for slow cooking, it breaks down beautifully, becoming tender and juicy after hours of simmering.
-
1 onion, sliced
- Adds sweetness and aroma. If you prefer, you can substitute it with shallots for a milder flavor.
-
4 cloves garlic, minced
- Garlic is a game-changer! If you’re feeling adventurous, use roasted garlic for a sweeter, richer flavor.
-
2 cups beef broth
- The base of your dipping sauce. You can use low-sodium broth or homemade, if you have it. Chicken broth can be a good alternative, too, though it will slightly alter the taste.
-
1 tablespoon Worcestershire sauce
- This adds depth and savory umami flavor. If you’re out, soy sauce or balsamic vinegar can make a decent substitute.
-
1 teaspoon dried thyme
- Fresh thyme is a fantastic substitute! I love the hint of earthiness it brings to the dish.
-
Salt and pepper to taste
- Essential for seasoning! Don’t forget to taste as you go to achieve your desired flavor.
-
Hero rolls or French baguette
- A sturdy roll will hold up to the juicy beef. Opt for crusty baguettes if you want an extra crunch.
-
Sliced cheese (optional)
- Provolone or Swiss work wonderfully for those cheesy cravings! You can always skip it or use a dairy-free alternative for dietary needs.
Step-by-Step Instructions
Now let’s get cooking! Follow these steps, and you’ll have a mouthwatering meal in no time.
Step 1: Prepare the Meat
Start by giving your beef chuck roast a little love! Generously season it with salt and pepper on all sides. This step is key for building flavor as it cooks. Heat a skillet over medium-high heat and sear the beef for about 3-4 minutes on each side, just until it gets that lovely brown crust. This creates depth in flavor and elevates the entire dish!
Step 2: Load Your Crockpot
Once seared, place the beef in the Crockpot. It should fit nicely, like a cozy little blanket. Next, dump those beautifully sliced onions and minced garlic over the top. Don’t skimp on the garlic—it’s what will make the flavors sing!
Step 3: Add the Liquid Gold
Pour in the beef broth followed by the Worcestershire sauce. Sprinkle the dried thyme over everything and give it a gentle stir to combine. The liquid will create a luscious broth that becomes your dipping sauce later. Yum!
Step 4: Set It and Forget It
Now comes the easy part! Cover the Crockpot and set it on low for 8-10 hours. Let the magic happen while you enjoy your day. This is the perfect time for a long walk or a catch-up with that book you’ve been meaning to read. Pro tip: if you’re in a rush, cook on high for 4-6 hours, but trust me, slow cooking brings out the best flavors!
Step 5: Shred and Serve
When the time is up and your kitchen smells divine, it’s time to shred that beef! Using two forks, pull the meat apart gently. It should fall apart easily. As it’s shredding, stir it into the juices to soak in all that flavor. You want every bite to be delicious!
Step 6: Toast the Rolls
Preheat your oven to 350°F (175°C). Slice your hero rolls or baguette and place them in a baking dish. Toast them for about 5 minutes, just until they’re warm and slightly crispy. This step helps prevent sogginess when you dip!
Step 7: Assemble the Sandwiches
Now, it’s time for the grand assembly! Scoop that tender beef onto the toasted rolls, top with cheese if desired, and serve with a small bowl of the flavorful broth on the side for dipping. Trust me, the dripping broth makes for the tastiest bite!
Serving Suggestions
When it comes to plating, simplicity is key. Arrange your sandwiches on a large platter, accompanied by small bowls of the savory broth for dipping. A sprinkle of fresh herbs like parsley can add a pop of color! And for an extra flair, consider serving alongside crispy potato chips or a fresh garden salad to round out the meal. Voilà!
Recipe Variations
Here are a few creative twists to make this recipe your own:
-
Spicy French Dip: Add sliced jalapeños or a splash of hot sauce to the broth for a kick.
-
Mushroom and Swiss Variation: Sauté mushrooms and add them to the sandwich for a delightful earthy flavor.
-
Herb-Infused: Use fresh herbs like rosemary and thyme for a more aromatic experience. Just tie them together for easy removal later!
-
BBQ Twist: Mix barbecue sauce with the beef broth for a sweet and tangy barbecue French dip.
-
Vegetarian Option: Swap the beef roast with a hearty portobello mushroom or jackfruit and adjust the broth for a satisfyingly meaty alternative.
Chef’s Notes
There’s something magical about the simplicity of this recipe. It has evolved over the years, from those exciting Sunday afternoons with my family to cozy weeknight dinners with friends. Each time I make it, I find new ways to tweak and personalize the recipe.
One of my favorite funny kitchen moments happened when I forgot to buy beef broth and instead used an experimental mushroom stock. As the family dug into the sandwiches, they were baffled by the delightful umami bomb in every bite! Sometimes kitchen mistakes lead to delicious surprises, and that’s what makes cooking so fun!
FAQs and Troubleshooting
Q1: Why is my beef tough?
If your beef isn’t tender, it probably needs more time in the slow cooker. The beauty of slow cooking is that some cuts of meat need that extra time to break down fully.
Q2: How do I prevent soggy bread?
To avoid sogginess, toast your rolls before assembling the sandwiches. Also, serve the dipping broth on the side instead of soaking the bread in it.
Q3: Can I freeze leftovers?
Absolutely! Gather any leftover beef and broth in a freezer-safe container. When you’re ready to enjoy it again, thaw it out in the fridge and reheat on the stove or microwave.
Q4: What if I don’t have a Crockpot?
No problem! You can make French Dip Sandwiches in a heavy-duty pot on the stovetop. Just cover it, simmer on low for about 3-4 hours, and stir occasionally.
Nutritional Info (Optional)
If you’re curious about the nutritional side of this recipe, here’s a rough overview (per sandwich, without cheese):
- Calories: 450
- Protein: 35g
- Carbohydrates: 45g
- Fat: 15g
(Note: Nutritional values may vary based on specific ingredients used.)
I hope you enjoy making these Crockpot French Dip Sandwiches as much as I do. Remember, cooking is all about joy, creativity, and making delicious memories around the table. So, tie on that apron, pour yourself a glass of something sparkling, and let’s create something beautiful together! Happy cooking!
PrintCrockpot French Dip Sandwiches
A comforting and delicious Crockpot French Dip Sandwich recipe featuring tender beef, aromatic onions, and savory broth, perfect for any occasion.
- Prep Time: 15 minutes
- Cook Time: 600 minutes
- Total Time: 615 minutes
- Yield: 4 servings 1x
- Category: Main Course
- Method: Slow Cooking
- Cuisine: American
- Diet: None
Ingredients
- 3 pounds beef chuck roast
- 1 onion, sliced
- 4 cloves garlic, minced
- 2 cups beef broth
- 1 tablespoon Worcestershire sauce
- 1 teaspoon dried thyme
- Salt and pepper to taste
- Hero rolls or French baguette
- Sliced cheese (optional)
Instructions
- Prepare the Meat: Generously season the beef chuck roast with salt and pepper on all sides. Heat a skillet over medium-high heat and sear the beef for about 3-4 minutes on each side, until browned.
- Load Your Crockpot: Place the seared beef in the Crockpot. Add sliced onions and minced garlic over the top.
- Add the Liquid Gold: Pour in the beef broth and Worcestershire sauce, sprinkle with dried thyme, and stir to combine.
- Set It and Forget It: Cover the Crockpot and set it on low for 8-10 hours.
- Shred and Serve: Once done, shred the beef using two forks and mix it into the broth.
- Toast the Rolls: Preheat oven to 350°F, slice rolls, toast for about 5 minutes.
- Assemble the Sandwiches: Place beef on toasted rolls, top with cheese if desired, and serve with broth on the side.
Notes
To prevent sogginess, toast your rolls before assembling the sandwiches and serve the broth on the side.
Nutrition
- Serving Size: 1 sandwich
- Calories: 450
- Sugar: 2g
- Sodium: 800mg
- Fat: 15g
- Saturated Fat: 5g
- Unsaturated Fat: 7g
- Trans Fat: 0g
- Carbohydrates: 45g
- Fiber: 2g
- Protein: 35g
- Cholesterol: 100mg
Keywords: French Dip, Sandwich, Comfort Food, Crockpot, Slow Cooker
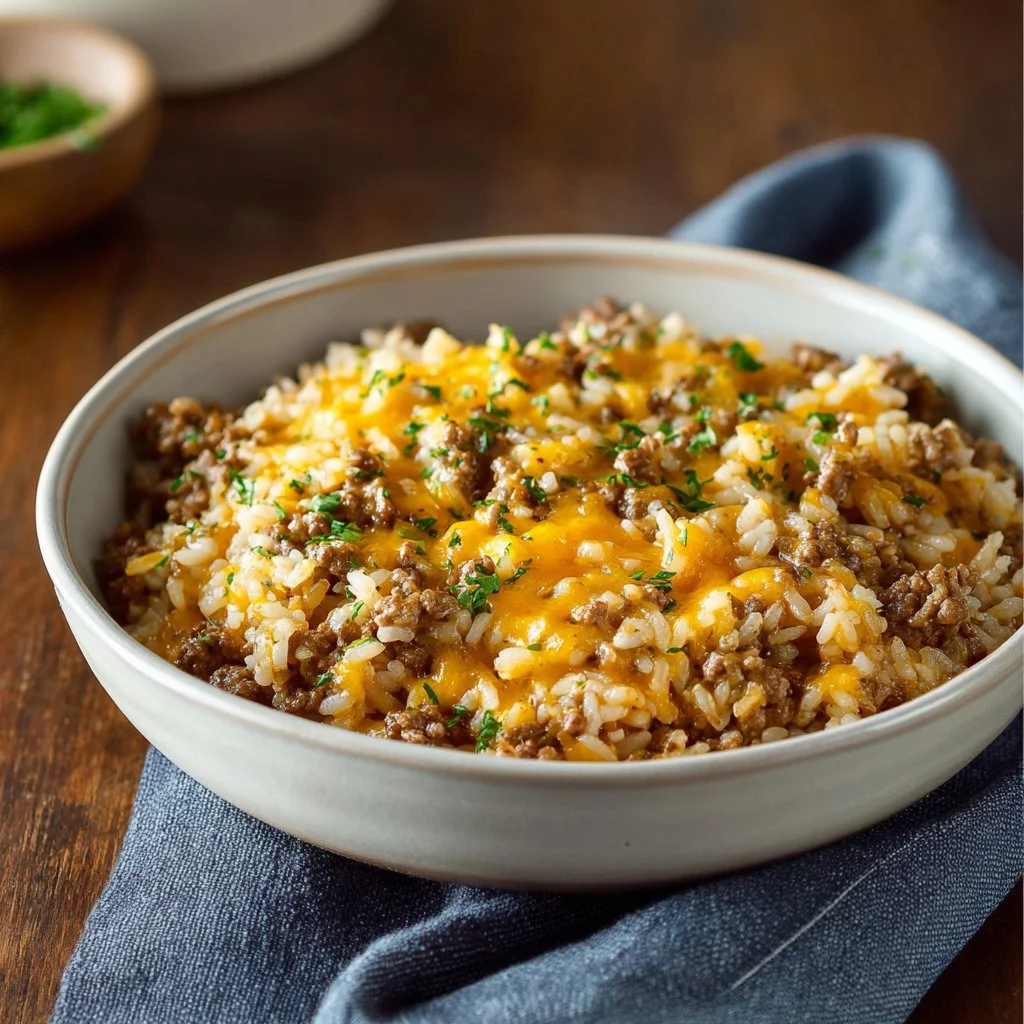
Cheesy Ground Beef and Rice Casserole
Comfort in a Casserole: Cheesy Ground Beef and Rice Casserole Recipe
Hello, fellow food lovers! Today, I’m inviting you on a delicious journey to one of those cozy dishes that brings pure comfort to your table — Cheesy Ground Beef and Rice Casserole. If you’ve ever walked into a friend’s house on a chilly evening and been greeted by the rich, warming aroma of something bubbling away in the oven, then you know the pure joy that a casserole can bring. It’s like a warm hug after a long day!
This dish is a nostalgic favorite of mine, hailing from those busy weeknights when dinner needed to be not just quick but also satisfying. Cheesy Ground Beef and Rice Casserole is one of those recipes that effortlessly combines heartiness with cheesiness in a balanced blend that is as delicious as it is uncomplicated. Plus, it’s all made in one dish, which means fewer dishes to wash—a win-win at any time!
Imagine your kitchen filled with enticing aromas as you create this dish. The satisfaction doesn’t just come from the meal but from the memories being made around your table. Whether you’re feeding a hungry family, hosting a friend, or simply wanting to treat yourself, this casserole hits the spot every time.
So, grab your apron, preheat that oven, and let’s dive into creating this comforting treasure together.
Personal Story
There is something so deeply nostalgic about casseroles for me. Growing up, my family had a tradition of “casserole night” every Thursday. My mom would whip up different variations, but one night, she made a cheesy ground beef and rice casserole that forever etched itself into my memory. My younger self was mesmerized as she stirred the mixture of beef, fluffy rice, and melted cheese together, and each bite transported me into a delicious dream world.
I remember setting the table with mismatched dinner plates and the warmth of our kitchen filled with laughter. My siblings and I would compete for the last scoop, and it didn’t take long for us to dub it "the famous cheesy pile." Those moments were more than just about the food; they were about gathering, sharing, and love.
Now, as an adult, whenever I make this dish, it brings back waves of those cherished memories. It reminds me to slow down, savor the flavors, and prioritize the beautiful connections that food fosters. So let’s recreate that sense of warmth and togetherness right in your own home!
Ingredients
Here’s what you’ll need to make this delicious Cheesy Ground Beef and Rice Casserole:
-
1 lb lean ground beef
The star of our dish! Lean beef keeps it hearty but doesn’t add unnecessary grease. Looking for a substitute? Ground turkey or chicken works well if you prefer lighter meat. -
1 small onion, diced
This adds a sweet depth to our dish. If you’re not a fan of onions, leeks or shallots can offer similar flavor. You can also skip this entirely if you’d like a milder taste! -
2 cloves garlic, minced
Garlic is a must for flavor! If you’re in a pinch, garlic powder can be used instead; just 1/2 teaspoon will do. -
2 cups cooked white rice
Feel free to use leftover rice or even try brown rice for a nuttier flavor! Just make sure it’s fully cooked before adding. -
1 can (10.5 oz) cream of mushroom soup (or cream of chicken)
This creamy goodness acts as the binding agent that brings everything together. If you’re looking for a healthier alternative, try making your own cream of mushroom soup from scratch. -
1/2 cup milk or beef broth
This adds additional moisture to the casserole. Vegetable broth is a great option for vegetarians, while heavy cream can lend an even richer texture. -
2 cups shredded cheddar cheese (divided)
Because, let’s be honest, the more cheese, the better! Try swapping with Monterey Jack or a mix of your favorites. -
1 tsp paprika
Paprika adds a subtle smokiness to the dish. You can substitute with smoked paprika for more depth or even cayenne for a kick! -
Salt and pepper to taste
Don’t forget these essentials! Freshly cracked black pepper delivers the best flavor. -
Optional: chopped parsley for garnish
A sprinkle of fresh parsley adds color and a touch of brightness to your dish before serving.
Step-by-Step Instructions
Step 1: Preheat the Oven
Preheat your oven to 350°F (175°C). This step is crucial for ensuring your casserole bakes evenly, allowing all those delicious flavors to meld together perfectly.
Step 2: Cook the Beef
In a large skillet over medium heat, add the ground beef and diced onion. Season with salt and pepper. Cook until the beef is browned and the onions are translucent, around 5-7 minutes. Use a spatula to break the beef into small crumbles. Here’s a handy chef tip: if you’re using lean beef, cooking it in a non-stick pan can help it brown beautifully without sticking!
Step 3: Add Garlic and Rice
Stir in the minced garlic and cook for another minute until fragrant. This makes the whole kitchen smell divine! Next, add in your cooked rice. Mix gently to combine. Pro tip: using leftover rice makes this step quicker — just ensure it’s cold and fluffy to avoid mushiness.
Step 4: Create the Sauce
In a separate bowl, combine the cream of mushroom soup and milk (or beef broth). Whisk until smooth, then pour this mixture over the beef and rice in the skillet. Stir well to blend everything together. This creates a creamy, flavorful base for our casserole.
Step 5: Add Cheese and Seasonings
Add in 1½ cups of shredded cheddar cheese and the paprika, mixing well until everything is coated in cheesy goodness. Don’t be shy about tasting at this point—just a little bit to ensure the seasoning is right!
Step 6: Transfer to Casserole Dish
Grease a 9×13-inch casserole dish with a bit of cooking spray or butter. Pour the mixture into the prepared dish and spread it out evenly. Don’t worry about it looking perfect; it will all blend and bubble together beautifully in the oven!
Step 7: Top It Off
Sprinkle the remaining ½ cup of cheddar cheese on top. This will create a golden, bubbly crust that you’ll look forward to digging into!
Step 8: Bake
Pop the casserole into your preheated oven and bake for about 30-35 minutes, or until the cheese is bubbly and golden. Enjoy the aromas wafting through your home during this time! It’s like an olfactory hug that brings everyone together.
Step 9: Chill and Serve
Once ready, remove the casserole from the oven, and let it sit for about 5-10 minutes before serving. This gives it a chance to set and makes serving a whole lot easier. Trust me, your friends and family will want to dive in right away, but it’s worth the wait!
Serving Suggestions
When it comes to serving, remember that presentation can elevate any dish. Scoop generous portions onto plates, letting the gooey cheese stretch tantalizingly. Add a sprinkle of chopped parsley for a pop of color. Serve with a side salad or some crusty bread for a complete meal. Trust me, the sight of cheesy goodness is enough to keep your guests coming back for seconds!
Recipe Variations
Feeling adventurous? Here are a few fun twists and variations you can try with this casserole:
-
Vegetable-Packed Casserole: Throw in cooked vegetables like spinach, bell peppers, or peas for added nutrition and color.
-
Mexican-Inspired: Add taco seasoning, black beans, and corn for a Mexican flair. Top with jalapeños or avocado before serving.
-
Sautéed Mushrooms: For those mushroom lovers, sauté some fresh mushrooms along with the beef for an extra layer of flavor.
-
Different Cheeses: Experiment with different cheese combinations like gouda or pepper jack for a flavor twist.
-
Gluten-Free Alternative: Use gluten-free cream of mushroom soup or create a homemade version from scratch without flour.
Chef’s Notes
Ah, the evolution of this recipe! It has been a staple in my house and has transformed over the years, from using whatever I had in the fridge to being a full-on crowd-pleaser at gatherings. I once accidentally added too much garlic (is there such a thing?) and discovered it resulted in a surprisingly delightful flavor!
I often reminisce about my "Casserole Night" and how this dish fits perfectly as comfort food. It’s one of those meals that not only satisfies the stomach but also warms the heart.
FAQs and Troubleshooting
Q: Can I make this casserole ahead of time?
A: Absolutely! You can assemble the casserole and keep it covered in the refrigerator for up to 24 hours. Just pop it in the oven when you’re ready to bake!
Q: How do I store leftovers?
A: Store any leftovers in an airtight container in the fridge for up to 3 days. You can reheat portions in the microwave or pop it back in the oven.
Q: My casserole seems dry; what did I do wrong?
A: Casseroles can dry out if they’re baked too long or if there’s insufficient moisture. Ensure you’re not overcooking it and double-check the liquid ratio before baking.
Q: Can I freeze this casserole?
A: Definitely! This casserole freezes well. Just cool it completely before cutting leftovers into portions and storing in an airtight container. Thaw overnight in the fridge before reheating!
Nutritional Info
While the exact nutritional content will vary based on specific ingredient choices and serving sizes, a serving of Cheesy Ground Beef and Rice Casserole generally contains:
- Calories: ~400-450
- Protein: ~25g
- Carbohydrates: ~45g
- Fat: ~20g
(Nutritional info calculated based on standard ingredients; always check labels for accuracy!)
Now that you have all the tips and tricks for crafting this delectable Cheesy Ground Beef and Rice Casserole, I’m excited to hear how it turns out! Remember, this dish is not just about food; it’s about community, joy, and those moments that linger long after the last bite. Happy cooking, my friends! 🍽️
PrintCheesy Ground Beef and Rice Casserole

A comforting and hearty casserole combining ground beef, rice, and cheese, perfect for cozy dinners.
- Prep Time: 15 minutes
- Cook Time: 35 minutes
- Total Time: 50 minutes
- Yield: 4 servings 1x
- Category: Main Course
- Method: Baking
- Cuisine: American
- Diet: Carnivore
Ingredients
- 1 lb lean ground beef
- 1 small onion, diced
- 2 cloves garlic, minced
- 2 cups cooked white rice
- 1 can (10.5 oz) cream of mushroom soup
- 1/2 cup milk or beef broth
- 2 cups shredded cheddar cheese (divided)
- 1 tsp paprika
- Salt and pepper to taste
- Optional: chopped parsley for garnish
Instructions
- Preheat your oven to 350°F (175°C).
- Cook the ground beef and diced onion in a skillet until the beef is browned.
- Add the minced garlic and cook for another minute.
- Combine the cream of mushroom soup and milk (or beef broth) in a separate bowl.
- Add 1½ cups of shredded cheddar cheese and paprika to the beef mixture.
- Transfer the mixture to a greased casserole dish.
- Top it off with the remaining ½ cup of cheddar cheese.
- Bake for about 30-35 minutes until bubbly and golden.
- Chill for 5-10 minutes before serving.
Notes
Feel free to modify the ingredients or add in your favorite veggies for a twist.
Nutrition
- Serving Size: 1 serving
- Calories: 400
- Sugar: 3g
- Sodium: 750mg
- Fat: 20g
- Saturated Fat: 10g
- Unsaturated Fat: 8g
- Trans Fat: 0g
- Carbohydrates: 45g
- Fiber: 2g
- Protein: 25g
- Cholesterol: 70mg
Keywords: casserole, beef, cheese, comfort food, easy dinner

Hawaiian Chicken Sheet Pan
Aloha to Flavor: Hawaiian Chicken Sheet Pan Recipe
Introduction
Aloha and welcome to my kitchen, where the sun is always shining, and flavors are as vibrant as a Hawaiian sunset! Today, we’re diving into a dish that perfectly captures the spirit of the islands — Hawaiian Chicken Sheet Pan. This recipe is your ticket to a tropical paradise, one bite at a time, and trust me, it’s just as effortless as it is delicious!
Picture this: you’re at a luau, the warm breeze softly rustling your hair, the aroma of grilled chicken and sweet pineapple wafting through the air, and the sound of laughter echoing all around you. That’s the essence I wanted to bottle up with this recipe. It’s a dish that evokes nostalgia and happiness, making it perfect for weeknights or gatherings with friends.
Cooking should be an experience, a delightful journey filled with color, laughter, and, of course, great food. The best part? This Hawaiian Chicken Sheet Pan is not only a feast for the senses but also incredibly easy to whip up. It’s all about bringing together perfectly seasoned chicken, fresh veggies, and juicy pineapple, roasted to perfection on one pan. Let’s roll up our sleeves and get cooking, shall we?
Personal Story
I remember the first time I tried a similar dish at a summer BBQ in my friend’s backyard. The sun was setting behind the palm trees, and my heart was as leaping as the flames on the grill. The sweet and tangy pineapple mixed with perfectly grilled chicken made every bite an instant favorite. I could hardly wait for the next BBQ, and that dish became my absolute go-to request for summer parties.
Years later, as I found my way into the world of recipe creation at Ivory Apron, I knew I wanted to bring that very same joy to your kitchens. So, I crafted this sheet pan version, making it accessible for every home chef. The charm of Hawaiian Chicken Sheet Pan is not just in the flavors, but also in the shared memories it creates around the table. Cooking should always feel like a celebration, and I hope this recipe helps you make many beautiful moments!
Ingredients
Here’s what you need to gather for your Hawaiian Chicken Sheet Pan:
-
1 ½ lbs (700 g) boneless skinless chicken breasts, cut into 1-inch pieces
- The star of our dish! Boneless, skinless chicken breasts are super versatile and cook evenly. Feel free to substitute with thighs for a richer flavor or even tofu for a plant-based take.
-
1 red bell pepper (chopped)
- Sweet and crunchy, this pepper adds color and nutrition. You can swap it with orange or green bell peppers according to your taste!
-
1 yellow bell pepper (chopped)
- Bringing in a burst of sunshine! Yellow bell peppers are also sweeter than their green cousins. Use any color you prefer, just keep the sweetness in mind.
-
1 small red onion (cut into wedges)
- Onions are essential for depth of flavor. If you’re not a fan, try shallots or even spring onions for a milder taste.
-
1 ½ cups fresh pineapple chunks (or canned, drained)
- Pineapple is the tropical superstar! Fresh is great, but canned works too—just ensure it’s well-drained. You can also use mango for a spin on flavors.
-
2 tbsp olive oil
- Great for flavor and ensuring even cooking. You can substitute it with avocado oil if you want a higher smoke point.
-
2 cloves garlic (minced)
- Garlic brings everything together! If you’re short on fresh garlic, garlic powder works in a pinch—about ½ teaspoon should do it.
-
½ tsp salt
- Essential for flavor enhancement! Adjust based on your dietary needs or preference.
-
½ tsp black pepper
- A dash of black pepper adds subtle heat; feel free to increase this for more kick.
-
½ tsp paprika
- This adds a lovely smokiness! Smoked paprika would give an additional depth of flavor.
-
¼ tsp chili flakes (optional)
- If you like it spicy, add these! Otherwise, you can leave them out for a milder dish.
Sauce (for tossing & drizzling)
-
⅓ cup low-sodium soy sauce
- A salty, umami-rich base. You can substitute with tamari for gluten-free or coconut aminos for a sweeter profile.
-
¼ cup pineapple juice (from the can or fresh)
- The sweet and tangy element that balances flavors.
-
3 tbsp honey (or brown sugar)
- For that touch of sweetness which caramelizes beautifully in the oven! Use maple syrup for a vegan alternative.
-
2 tbsp rice vinegar (or apple cider vinegar)
- Adds a zesty kick! You can also try white vinegar or even lemon juice.
-
1 tbsp cornstarch + 2 tbsp water (slurry, optional for thickening)
- Cornstarch will help thicken the sauce if you prefer a glaze. It’s totally optional; just mix it with water until smooth before adding to the sauce.
Step-by-Step Instructions
Now that we’ve got everything prepped and ready, let’s get cooking! Here’s how to whip up this delightful dish in just a few simple steps:
-
Preheat Your Oven:
- Start by preheating your oven to 400°F (200°C). This will ensure everything bakes evenly.
-
Prepare the Chicken:
- In a large mixing bowl, toss the cut chicken pieces with olive oil, minced garlic, salt, black pepper, paprika, and chili flakes (if using). Make sure every piece of chicken is coated well. This seasoning is key to infusing glorious flavor; use your hands and get in there!
-
Chop Your Veggies:
- While the chicken is getting cozy with those spices, chop your bell peppers and onion. The goal is to have them in bite-sized pieces so they mix beautifully with the chicken and roast uniformly. Think of colorful confetti — it makes a happy dish!
-
Mix Everything on a Sheet Pan:
- Line a large baking sheet with parchment paper or aluminum foil for easy cleanup — kitchen happiness starts with less mess! Spread the seasoned chicken across the pan, followed by the chopped veggies and pineapple. Try to arrange them in a single layer for even cooking.
-
Make the Sauce:
- In a bowl, whisk together the soy sauce, pineapple juice, honey, and rice vinegar. If you’re using the cornstarch, mix it with water until smooth and add it to the sauce. This is your flavor enhancer! Drizzle most of this delightful mixture evenly over the chicken and veggies but save a bit for drizzling before serving!
-
Bake Away!
- Slide your beautiful sheet pan into the oven and let everything bake for about 20-25 minutes, or until the chicken reaches an internal temperature of 165°F (74°C) and is cooked through! Keep an eye after 20 minutes — you want everything to be golden and slightly caramelized.
-
Drizzle and Serve:
- Just before serving, drizzle your reserved sauce over the dish for an extra splash of flavor. It’ll make the whole meal sing!
-
Watch as Everyone Flocks to the Table:
- Pull it out of the oven, let that warm, inviting aroma fill your kitchen, and watch your friends and family flock to your table. The colorful, exuberant display will have everyone excited.
Serving Suggestions
Plating is an art, but remember, perfection isn’t the goal – joy is! Serve your Hawaiian Chicken straight from the pan for a rustic, family-style meal, or plate it individually with a scoop of rice or quinoa and garnish with sliced green onions or sesame seeds for that extra flair. A lime wedge on the side adds a nice pop of freshness!
Recipe Variations
Feel free to play around with this dish! Here are a few delightful variations you can try:
- Tropical Twist: Add mango slices for an added layer of sweetness and flavor.
- Spicy Hawaiian Chicken: Incorporate jalapeños for that extra kick!
- Veggie Boost: Throw in some snap peas, zucchini, or broccoli for a nutrition-packed update.
- Grain-Free Darling: Serve over cauliflower rice for a lighter, veggie-based option.
- Meal Prep Hero: Double the recipe and save half for later! It keeps beautifully in the fridge for a couple of days and makes for an easy lunch.
Chef’s Notes
I adore how flexible this Hawaiian Chicken Sheet Pan dish is! Over the years, I’ve swapped out ingredients based on what I had on hand and it’s always turned out fantastic. One memorable experiment was using roasted veggies that were still in my fridge — talk about “zero waste” cooking! And speaking of stories, I once had an impromptu dinner party where I confidently threw everything onto the pan, and it was a smashing success! That’s the magic of this recipe: it welcomes your creativity and turns quick meals into memorable feasts.
FAQs and Troubleshooting
-
Can I use frozen chicken?
- While fresh is best for uniform cooking, you can use frozen chicken! Just make sure to thaw it correctly before cooking to avoid uneven cooking.
-
My chicken is not cooking evenly.
- Ensure that you’re cutting your chicken and veggies into similar-sized pieces. This allows for even cooking time.
-
What if my veggies are overcooked?
- If they’re starting to char too much, simply take them out of the oven while the chicken continues cooking. You can also add them halfway through for more steaming.
-
How do I store leftovers?
- Store them in an airtight container in the fridge for up to 4 days. Reheat in the oven or microwave, adding a splash of water to keep it moist.
Nutritional Info (optional)
(Nutritional values may vary; the following estimation provides a general idea.)
- Servings: 4
- Calories: 350
- Protein: 30g
- Carbs: 28g
- Fat: 15g
Cooking should be fun and filled with flavor and laughter! This Hawaiian Chicken Sheet Pan recipe is the perfect way to bring a piece of the islands to your home without the fuss. With fresh ingredients, vibrant flavors, and the joy of sharing it with loved ones, you are well on your way to becoming everyone’s go-to chef.
So tie on that apron, grab a drink, and let’s get cooking! Welcome to your kitchen adventure. 🍍🥥🌺
PrintHawaiian Chicken Sheet Pan

A vibrant and flavorful Hawaiian Chicken Sheet Pan recipe, combining chicken, fresh veggies, and sweet pineapple, roasted to perfection.
- Prep Time: 15 minutes
- Cook Time: 25 minutes
- Total Time: 40 minutes
- Yield: 4 servings 1x
- Category: Main Course
- Method: Baking
- Cuisine: Hawaiian
- Diet: Gluten-Free, Dairy-Free
Ingredients
- 1 ½ lbs (700 g) boneless skinless chicken breasts, cut into 1-inch pieces
- 1 red bell pepper, chopped
- 1 yellow bell pepper, chopped
- 1 small red onion, cut into wedges
- 1 ½ cups fresh pineapple chunks (or canned, drained)
- 2 tbsp olive oil
- 2 cloves garlic, minced
- ½ tsp salt
- ½ tsp black pepper
- ½ tsp paprika
- ¼ tsp chili flakes (optional)
- ⅓ cup low-sodium soy sauce
- ¼ cup pineapple juice
- 3 tbsp honey (or brown sugar)
- 2 tbsp rice vinegar (or apple cider vinegar)
- 1 tbsp cornstarch + 2 tbsp water (slurry, optional for thickening)
Instructions
- Preheat your oven to 400°F (200°C).
- Toss the cut chicken pieces with olive oil, minced garlic, salt, black pepper, paprika, and chili flakes in a large mixing bowl.
- Chop your bell peppers and onion into bite-sized pieces.
- Line a large baking sheet with parchment paper or aluminum foil. Spread the seasoned chicken, chopped veggies, and pineapple on the pan.
- Whisk together the soy sauce, pineapple juice, honey, and rice vinegar in a bowl, adding cornstarch slurry if desired.
- Drizzle most of the sauce evenly over the chicken and veggies, reserving some for serving.
- Bake for about 20-25 minutes, or until the chicken reaches an internal temperature of 165°F (74°C).
- Drizzle the reserved sauce over the dish just before serving.
- Serve warm and enjoy with family and friends!
Notes
This dish is flexible; feel free to substitute ingredients or add more veggies. It pairs beautifully with rice or quinoa.
Nutrition
- Serving Size: 1 serving
- Calories: 350
- Sugar: 12g
- Sodium: 600mg
- Fat: 15g
- Saturated Fat: 2g
- Unsaturated Fat: 10g
- Trans Fat: 0g
- Carbohydrates: 28g
- Fiber: 3g
- Protein: 30g
- Cholesterol: 70mg
Keywords: Hawaiian Chicken, Sheet Pan Dinner, Easy Chicken Recipe, Tropical Cuisine, Quick Meal
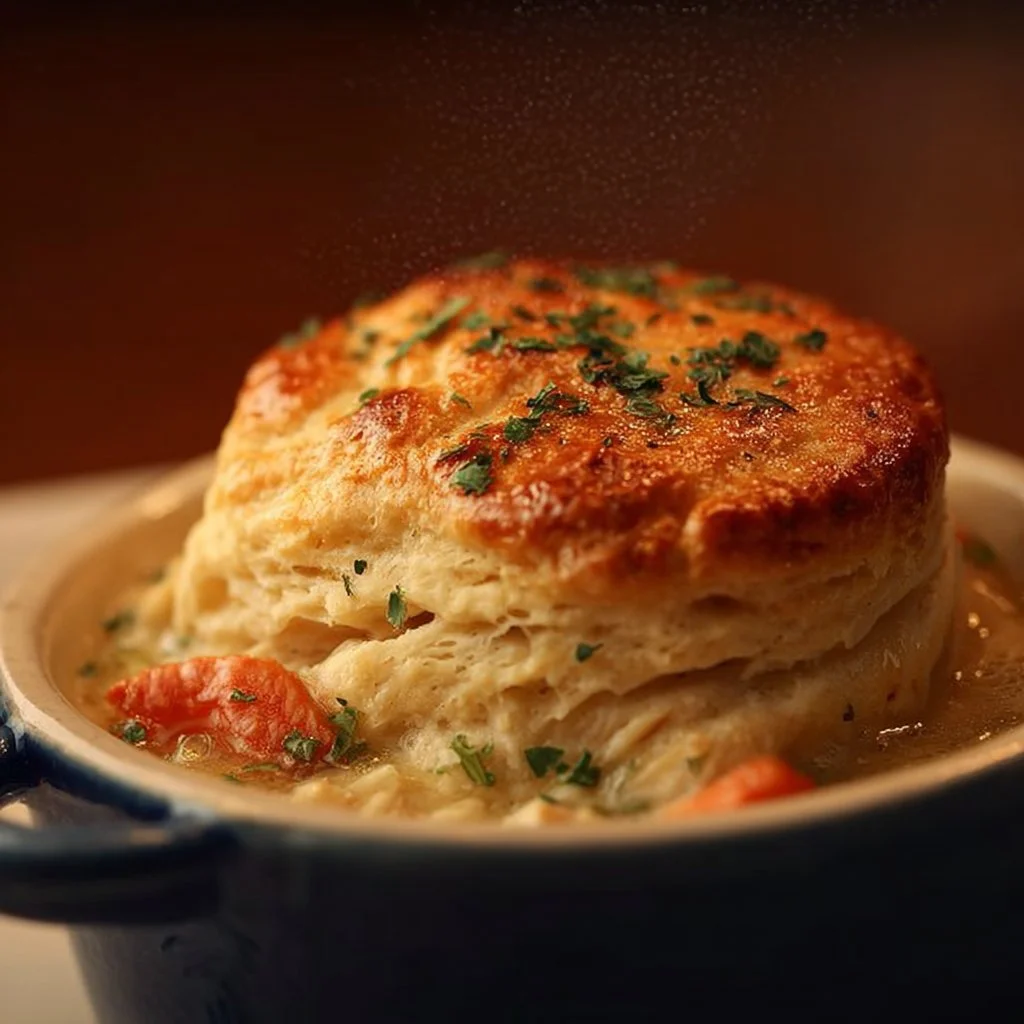
Red Lobster Biscuit Chicken Pot Pie
Red Lobster Biscuit Chicken Pot Pie: A Cozy Culinary Adventure
Ah, comfort food! There’s nothing quite like curling up with a hearty dish that wraps you in warmth and familiarity. If there’s one dish that embodies both comfort and culinary delight, it’s the Red Lobster Biscuit Chicken Pot Pie. This dish takes comfort food to the next level, combining tender, savory chicken, vibrant veggies, and the fluffy, iconic Red Lobster cheddar biscuits you know and love. It’s like a warm hug on a chilly evening or a reminder of cozy family dinners from your past.
Let’s embark on this culinary journey together! Imagine the rich aroma wafting through your kitchen as you whip up this tantalizing dish. As you prepare, you’ll blend the satisfying textures and flavors that make eating a delightful experience. Best of all? I’ll guide you step by step, making it easy for you to replicate this exceptional meal right in your kitchen. So grab your apron and let’s get started—you’re going to impress yourself.
Personal Story: A Lesson from My Grandma
I fondly remember sitting under my grandma’s kitchen table as she whipped up her famous chicken pot pie. The scent of her flaky pastry was something I would dream about. I can still see her rolling out the dough, her face lit up with joy. She often involved me in the cooking, teaching me how to knead the dough just right while sharing tales of family dinners and the importance of gathering around the table.
One day, she introduced me to her secret: a sprinkle of garlic powder added to the filling that elevated the entire dish. That little touch brought a burst of flavor and transformed an ordinary meal into something spectacular. This Red Lobster Biscuit Chicken Pot Pie pays homage to those cherished memories and combines it with the irresistible cheddar biscuits that I was always jealous of while trying to sneak bites from her leftover batch. Let’s create that kind of flavorful magic in your kitchen!
Ingredients
To make this delightful Red Lobster Biscuit Chicken Pot Pie, gather the following ingredients:
-
3 cups cooked chicken, diced
(You can use rotisserie chicken to save time—just shred it off the bone; it’s easy and delicious.) -
1 cup frozen mixed vegetables
(This typically includes peas, carrots, and corn, but feel free to substitute your favorites!) -
1 cup cream of chicken soup
(This adds creaminess and boasts lovely flavor; you can also use homemade soup for a fresher taste.) -
1 teaspoon garlic powder
(This will be used both for flavoring the filling and the biscuit topping. Adjust according to your taste!) -
1 teaspoon onion powder
(This brings a subtle sweetness and depth of flavor to the dish; it’s an unsung hero!) -
Salt and pepper to taste
(Always taste as you go; seasoning makes all the difference!) -
1/2 cup chicken broth
(Essential for keeping your filling moist and flavorful; low-sodium options work well here.) -
2 1/2 cups all-purpose flour
(A necessary base for those luscious biscuits; you can replace with gluten-free flour if needed.) -
1 tablespoon baking powder
(This is the leavening agent that will give your biscuits that delightful rise!) -
1 teaspoon salt
(For the biscuits; it balances the flavors beautifully.) -
1/2 cup unsalted butter, cold and cubed
(Cold butter is the key to flaky biscuits; don’t skimp on this part!) -
1 cup shredded cheddar cheese
(The star ingredient—use sharp cheddar for an extra oomph of flavor!) -
3/4 cup milk
(This hydrates the biscuit dough; you can also use a plant-based milk for a dairy-free version.) -
1 tablespoon garlic powder (for the Red Lobster touch)
(A hallmark of those beloved biscuits; it brings nostalgia in every bite.)
Step-by-Step Instructions
Now that we’ve prepped our ingredients, it’s time to dive into the cooking! Follow these steps for your Red Lobster Biscuit Chicken Pot Pie:
-
Preheat Your Oven
Preheat your oven to 375°F (190°C). A hot oven is crucial for a perfectly baked biscuit crust and a nicely bubbling filling! -
Prepare the Filling
In a large mixing bowl, combine your cooked chicken, frozen mixed vegetables, cream of chicken soup, garlic powder, onion powder, salt, pepper, and chicken broth. Mix well until everything is evenly coated. Don’t be shy with the seasonings; good food is tastily seasoned food!Chef Tip: Taste your filling before pouring it into the baking dish to ensure the flavors are just right. You might want to add a pinch of extra salt or perhaps a splash more chicken broth for moisture.
-
Pour into Baking Dish
Transfer that luscious filling into a greased casserole or baking dish. Spread it out evenly to set the base for the biscuit topping. -
Make the Cheddar Biscuits
In a large bowl, whisk together the all-purpose flour, baking powder, and salt. Next, add the cold, cubed unsalted butter. Using a pastry cutter or your fingers, work the butter into the flour until it resembles coarse crumbs. This step is crucial for that flaky texture—don’t rush it! -
Add Cheese and Milk
Gently fold in the shredded cheddar cheese, followed by the milk. Stir until just combined; the dough might be a bit sticky, but that’s okay! -
Drop the Biscuit Topping
Using a spoon or a cookie scoop, drop spoonfuls of the biscuit dough over the chicken filling. It doesn’t have to be perfect, so let the tangling tendrils of dough create a rustic look—those golden peaks will ooze the charm. -
Sprinkle with Garlic Powder
For that famous Red Lobster touch, light sprinkle about 1 tablespoon of garlic powder over the biscuit topping before popping it into the oven. -
Bake to Perfection
Place the dish in the oven and bake for about 30-35 minutes, or until the biscuits are golden brown and the filling is bubbling up. Your kitchen will smell like pure bliss; prepare for some serious culinary praises! -
Let It Rest
Once out of the oven, let your dish rest for about 10 minutes. This is tough, I know, but it helps the filling set a bit more and makes serving less messy.
Serving Suggestions
When serving your Red Lobster Biscuit Chicken Pot Pie, consider a simple but elegant plating. Use a large serving spoon to scoop out a generous portion, showing off the delicious filling and flaky biscuit. Pair it with a light side salad dressed with a tangy vinaigrette to balance the richness of the dish. Finish it off with a sprinkle of some fresh parsley or chives for a splash of color!
Recipe Variations
Feeling adventurous? Here are some delightful creative twists or dietary swaps to consider:
- Spicy Twist: Add a dash of cayenne pepper or diced jalapeños for a kick.
- Herb Infusion: Include fresh herbs like thyme or rosemary in the filling for added aroma and complexity.
- Vegetarian Option: Swap the chicken for hearty vegetables like mushrooms, zucchini, and bell peppers. Use vegetable broth for the filling.
- Biscuits on the Side: If you want a different experience, serve your filling and homemade cheddar biscuits separately, allowing guests to customize their portions.
- Cheesy Dream: Add more cheese! Mix in some cream cheese for an extra creamy filling.
Chef’s Notes
This recipe has evolved over the years, influenced by family gatherings, friends at dinner parties, and the need to create something special without too much fuss. I remember once trying to impress some friends with this dish but accidentally added too much garlic powder to the filling! It turned into a favorite mishap after a few laughs—we now jokingly call it "Garlic Galore Pot Pie." Cooking is about having fun and being imperfectly perfect, after all!
FAQs and Troubleshooting
Q1: My biscuits didn’t rise! What happened?
A: This could be due to either the butter being too soft or not enough baking powder. Ensure your butter is cool and check the freshness of your baking powder, so it packs a punch.
Q2: Can I freeze the pot pie?
A: Absolutely! Assemble the pot pie but avoid baking it until you’re ready to enjoy. You can freeze it before cooking for up to 3 months. Just add additional baking time when you bake it from frozen.
Q3: How do I store leftovers?
A: Store leftover pot pie in an airtight container in the refrigerator for up to 3 days. To reheat, pop it back in the oven for a bit to help restore the biscuit’s lovely texture.
Q4: What’s the best way to make the biscuits?
A: Remember, minimal handling is key! Mix until just combined and not a second longer for those beautifully soft, flaky biscuits.
Nutritional Info
While I like to keep things flexible around here, you could estimate that a serving of the Red Lobster Biscuit Chicken Pot Pie has about 450-500 calories, depending on the exact ingredients and portion size. It’s wholesome comfort food—you’ll savor every bite!
So, gather your loved ones, set the table, and dive into this cozy, nostalgic Red Lobster Biscuit Chicken Pot Pie. Here’s to creating small, beautiful moments around your dining table, no matter what day of the week it is. Happy cooking! 🌟
PrintRed Lobster Biscuit Chicken Pot Pie

A hearty dish combining tender chicken, vibrant veggies, and fluffy Red Lobster cheddar biscuits, perfect for a cozy meal.
- Prep Time: 15 minutes
- Cook Time: 35 minutes
- Total Time: 50 minutes
- Yield: 6 servings 1x
- Category: Main Course
- Method: Baking
- Cuisine: American
- Diet: Gluten-Free Option Available
Ingredients
- 3 cups cooked chicken, diced
- 1 cup frozen mixed vegetables
- 1 cup cream of chicken soup
- 1 teaspoon garlic powder
- 1 teaspoon onion powder
- Salt and pepper to taste
- 1/2 cup chicken broth
- 2 1/2 cups all-purpose flour
- 1 tablespoon baking powder
- 1 teaspoon salt
- 1/2 cup unsalted butter, cold and cubed
- 1 cup shredded cheddar cheese
- 3/4 cup milk
- 1 tablespoon garlic powder (for the Red Lobster touch)
Instructions
- Preheat your oven to 375°F (190°C).
- Combine cooked chicken, frozen mixed vegetables, cream of chicken soup, garlic powder, onion powder, salt, pepper, and chicken broth in a large mixing bowl.
- Transfer the filling into a greased casserole or baking dish.
- Whisk together flour, baking powder, and salt in a large bowl.
- Add cold, cubed unsalted butter and work into the flour until it resembles coarse crumbs.
- Fold in shredded cheddar cheese and then add milk, stirring until just combined.
- Drop spoonfuls of the biscuit dough over the chicken filling.
- Sprinkle garlic powder over the biscuit topping.
- Bake for about 30-35 minutes, or until biscuits are golden brown.
- Let the dish rest for about 10 minutes before serving.
Notes
Taste the filling before baking to ensure the flavors are just right.
Nutrition
- Serving Size: 1 serving
- Calories: 450
- Sugar: 5g
- Sodium: 600mg
- Fat: 22g
- Saturated Fat: 12g
- Unsaturated Fat: 8g
- Trans Fat: 0g
- Carbohydrates: 40g
- Fiber: 3g
- Protein: 25g
- Cholesterol: 80mg
Keywords: chicken pot pie, comfort food, Red Lobster biscuits, cozy meal, dinner recipe

Creamy Garlic Chicken Ramen
Creamy Garlic Chicken Ramen – A Deliciously Cozy Bowl of Comfort
Welcome, foodies! Today, we’re diving into the world of creamy, savory goodness with a delightful dish that’s sure to warm your heart and fill your stomach — Creamy Garlic Chicken Ramen. Perfect for a cozy night in or impressing friends at your next gathering, this dish is the epitome of indulgence and comfort. Plus, I promise it’s easier than you might think!
Why Ramen, You Ask?
Oh boy, where do I even start? Ramen is the ultimate comfort food! It’s the dish you turn to when you’re in need of a warm hug in a bowl. The perfect balance of garlic aroma, creamy texture, and hearty flavors make this ramen a staple in my kitchen, especially when the weather turns chilly or when life just needs a sprinkle of something special.
Don’t let the eye-catching presentation fool you; it’s a recipe designed for real life. Seriously — if you’ve got a few ingredients and a little time, you’re on your way to crafting a meal that feels elegant but tastes like a warm and satisfying embrace.
My Personal Story
Ah, ramen! It brings back such warm memories. I remember my college days, hunched over a steaming bowl of instant ramen, feeling completely derailed by exams and late-night study sessions. Those days were simple, and they taught me the beauty of good food — even if it came from a plastic packet! But my love for ramen really blossomed during a winter gathering at a friend’s house. We had a ramen bar set up, complete with broth, proteins, and an array of toppings. I was charmed by the creative ways we could customize our bowls! From crunchy veggies to soft-boiled eggs, the options seemed endless.
When I returned home, I couldn’t stop thinking about how to elevate that basic concept into something a bit more indulgent — cue the creamy garlic chicken ramen! The delicate balance of flavors and textures, paired with the nostalgia of those simpler days, makes this dish a go-to favorite in my household!
Ingredients
Gathering quality ingredients makes all the difference. To create your creamy garlic chicken ramen, here’s what you’ll need:
-
2 chicken breasts, sliced
This lean protein is your star! Feel free to substitute with boneless thigh meat for extra flavor or use tofu for a vegetarian option. -
4 cups chicken broth
Homemade or store-bought, chicken broth adds depth to the ramen. Vegetarian broth works beautifully if you’re looking for a plant-based delight. -
2 packs of ramen noodles
You can use instant ramen, but consider upgrading to fresh or artisanal noodles for a restaurant-like experience. Just remember to cook them al dente! -
1 cup heavy cream
This is the secret to that luscious, creamy texture. If you want a lighter version, try half-and-half or coconut milk for a dairy-free twist. -
4 cloves garlic, minced
Garlic is the hero! Fresh garlic elevates the flavor to another level. For a milder taste, try roasted garlic instead. -
1 cup fresh vegetables (like spinach, carrots, and bell peppers)
Fresh veggies add not only nutrition but also vibrant colors. You can swap them with whatever you have on hand, like broccoli or snap peas. -
2 tablespoons soy sauce
This salty umami booster gives depth to the broth. Tamari or coconut aminos can replace traditional soy sauce for a gluten-free option. -
1 tablespoon olive oil
Extra virgin olive oil has that fruity character. Feel free to use sesame oil for a more pronounced flavor. -
Salt and pepper to taste
Always the essentials! Just remember to season gradually — you can always add more, but you can’t take it away. -
Chopped green onions for garnish
These tasty little notes bring brightness and a pop of color to your bowl!
Step-by-Step Instructions
Let’s get cooking! Here’s how to whip up this delicious creamy garlic chicken ramen, step by step.
-
Prep Your Ingredients
Before you hit the stove, take a moment to slice your chicken, mince your garlic, and chop those vibrant veggies. Always have everything prepped so you can move quickly! -
Sear the Chicken
In a large pot or Dutch oven, heat the olive oil over medium-high heat. Add the sliced chicken breasts, seasoning lightly with salt and pepper. Sear them for about 5-7 minutes, or until they are cooked through and have a lovely golden color. This adds a beautiful depth of flavor to your broth!Tip: Don’t overcrowd the pan. Work in batches if necessary to get that perfect sear!
-
Add Garlic and Veggies
Toss in the minced garlic right after the chicken is cooked. Sauté for about 30 seconds until it becomes aromatic. Add your fresh vegetables immediately and stir them together. The key is to heat the veggies just enough to make them tender yet vibrant!Chef Hack: If you want a sweet and savory touch, add a sprinkle of sugar to the veggies as they cook.
-
Pour in the Broth
Now, bring on that glorious chicken broth! Carefully pour it into the pot, scraping up any delightful brown bits stuck to the bottom from the chicken (that’s pure flavor!).Pro Tip: Taste your broth at this point. If it needs it, add a bit more soy sauce or seasoning.
-
Add the Ramen Noodles
Add the ramen noodles directly into the pot.Note: If you’re using fresh ramen, they may require just a couple of minutes to cook. Instant noodles will take just a couple of minutes, typically 3-4 minutes.
-
Incorporate the Cream
Once the noodles are cooked, it’s time to create that creamy goodness. Slowly and gently stir in the heavy cream and allow everything to simmer for an additional minute. The beautiful creamy texture will transform your broth into a delightful sauce!Chef Insight: If the sauce is too thick, you can always add a splash of more broth or water to reach your desired consistency.
-
Final Seasoning
Taste your ramen one last time before serving. Adjust the flavors as necessary — a little more soy sauce, salt, or pepper goes a long way! -
Serve
Ladle the ramen into bowls and top generously with chopped green onions. Optional: sprinkle with sesame seeds or chili flakes for added flair.
Serving Suggestions
Ramen is all about presentation. Serve each bowl with a few extra greens on top, perhaps a drizzle of sesame oil, and don’t forget to place your chopsticks stylishly on the side. Light a candle, play some soothing music, and you just might forget you’re dining at home!
Recipe Variations
Want to mix things up? Here are some creative spins on this creamy garlic chicken ramen:
-
Add a Soft-Boiled Egg: A perfectly-runny soft-boiled egg on top adds richness and a lovely texture contrast.
-
Spice It Up: Toss in some sriracha or chili oil to give your bowl a spicy kick!
-
Herb It Up!: Try adding fresh basil or cilantro for a lovely herbal note against the creaminess.
-
Ultimate Vegan Ramen: Replace the chicken with tofu or tempeh, use vegetable broth, and switch heavy cream for coconut cream.
-
Brothy Version: If you prefer a lighter dish, skip the cream altogether and enjoy a clear broth with tons of garlic and veggies!
Chef’s Notes
This creamy garlic chicken ramen has become a staple in my home. It has evolved since its inception; the more I cooked it, the more I played around with flavors and textures. I once accidentally added too much garlic, making it an instant hit for unexpected guests. They loved the warmth of its flavor and mouthed each modulated bite like poetry!
Remember, cooking is as much about experimentation as it is about following a recipe. Don’t shy away from making this dish your own!
FAQs and Troubleshooting
-
Can I make this ramen ahead of time?
Absolutely! Just store the broth and ingredients separately. The flavors will only get better with time! -
What if my broth is too salty?
Adding a bit of water or unsalted broth helps dilute the saltiness. Alternatively, you can toss in a chunk of raw potato for 10-15 minutes, which will absorb excess salt. -
How can I store leftovers?
Store the ramen in an airtight container in the refrigerator for up to 3 days. Reheat gently on the stovetop, adding a splash of broth to restore creaminess. -
Is it normal for ramen to get thick when stored?
Yes! Ramen noodles absorb the broth as they sit, thickening the dish. Always add a bit of broth or water while reheating to loosen it up.
Nutritional Info
(Optional; include if relevant)
- Calories: 450 per serving
- Protein: 30g
- Carbohydrates: 30g
- Fat: 20g
(Note: Nutritional values may vary based on specific ingredients used.)
Thank you for joining me on this creamy chicken ramen adventure! I hope you discover the joy of creating this cozy bowl of comfort and serve it with love to those around your table. Be sure to tag me (@IvoryApron.com) when you give it a try — I can’t wait to see your delicious creations! Happy cooking! 🥢
PrintCreamy Garlic Chicken Ramen

A deliciously cozy bowl of creamy garlic chicken ramen, perfect for warming your heart and filling your stomach.
- Prep Time: 15 minutes
- Cook Time: 30 minutes
- Total Time: 45 minutes
- Yield: 4 servings 1x
- Category: Main Course
- Method: Stovetop
- Cuisine: Japanese
- Diet: Non-Vegetarian
Ingredients
- 2 chicken breasts, sliced
- 4 cups chicken broth
- 2 packs of ramen noodles
- 1 cup heavy cream
- 4 cloves garlic, minced
- 1 cup fresh vegetables (like spinach, carrots, and bell peppers)
- 2 tablespoons soy sauce
- 1 tablespoon olive oil
- Salt and pepper to taste
- Chopped green onions for garnish
Instructions
- Prep your ingredients: Slice your chicken, mince your garlic, and chop the vegetables.
- Sear the chicken: Heat olive oil in a large pot and sear the chicken for 5-7 minutes.
- Add garlic and veggies: Sauté minced garlic and fresh vegetables for about 30 seconds.
- Pour in the broth: Add chicken broth and scrape up any bits from the pot.
- Add the ramen noodles: Stir noodles into the pot and cook according to package instructions.
- Incorporate the cream: Stir in heavy cream and simmer for an additional minute.
- Final seasoning: Adjust flavors with soy sauce, salt, or pepper as needed.
- Serve: Ladle ramen into bowls and top with chopped green onions.
Notes
This ramen can be customized with toppings like a soft-boiled egg, sriracha, or fresh herbs to elevate its flavor.
Nutrition
- Serving Size: 1 serving
- Calories: 450
- Sugar: 3g
- Sodium: 800mg
- Fat: 20g
- Saturated Fat: 10g
- Unsaturated Fat: 8g
- Trans Fat: 0g
- Carbohydrates: 30g
- Fiber: 3g
- Protein: 30g
- Cholesterol: 90mg
Keywords: ramen, creamy pasta, chicken ramen, comfort food, cozy meals