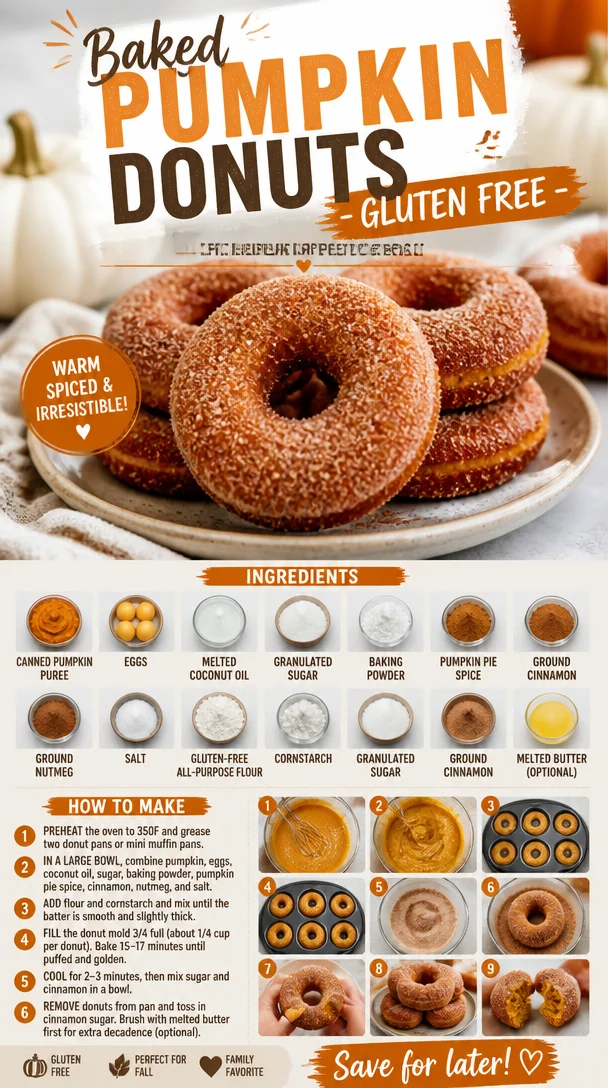
Baked Pumpkin Donuts – Gluten Free
Heavenly Baked Pumpkin Donuts: A Gluten-Free Delight
Hello, fellow food lovers! Today, we’re diving into a delicious recipe that perfectly captures the essence of fall: Baked Pumpkin Donuts. But I promise, these aren’t just any donuts. They’re light, airy, and downright delightful, all while being gluten-free! Grab your favorite mug of spiced cider, and let’s get to it.
Embracing the Season: My Love for Pumpkin Donuts
Ah, pumpkin, a humble gourd that transforms into something magical when baked. I still remember the first time I made pumpkin donuts. It was a crisp autumn morning, and the leaves were turning shades of gold and crimson. I invited a few close friends over for brunch, eager to impress them with my newfound culinary skills. The kitchen was filled with the warm aroma of cinnamon, nutmeg, and that rich, comforting scent of pumpkin baking.
As I pulled those gorgeous donuts from the oven, a sense of joy washed over me. Watching friends take that first bite was pure bliss—the smiles, the laughter, the “wow, you made these?!” comments—it was a moment I’ll forever cherish. They were a hit! From that day forward, these baked pumpkin donuts have become a staple in my kitchen repertoire. And the best part? They’re incredibly easy to make and surprisingly healthy, all while maintaining that comforting, indulgent flavor we crave during the fall!
Ingredients: Let’s Gather Our Goodies
Before we start mixing and blending, let’s take a moment to gather our ingredients. Here’s what you’ll need for our scrumptious baked pumpkin donuts:
-
1.5 cups canned pumpkin puree: Make sure it’s pure pumpkin and not pumpkin pie filling. Canned pumpkin gives you that perfect, smooth consistency. If you’re feeling adventurous, you can use homemade pumpkin puree!
-
4 large eggs (at room temperature): Eggs help provide structure and moisture. You can substitute with flax eggs (1 tablespoon ground flaxseed mixed with 2.5 tablespoons of water per egg) for a vegan option.
-
1/4 cup melted coconut oil: This adds moisture and a slight coconut flavor. If you don’t have coconut oil, melted butter or vegetable oil works too.
-
1.5 cups granulated sugar: For that perfect amount of sweetness. Coconut sugar or maple sugar can be great substitutes if you’re looking for a lower glycemic index.
-
1.5 teaspoons baking powder: Our leavening agent that gives the donuts that lovely lift.
-
1.5 teaspoons pumpkin pie spice: An aromatic blend of warm spices that scream fall! If you don’t have pumpkin pie spice, use equal parts cinnamon, nutmeg, and ginger.
-
1/2 teaspoon ground cinnamon, 1/4 teaspoon ground nutmeg: Extra spice adds depth to the flavor profile.
-
1/4 teaspoon salt: A pinch of salt enhances all flavors; don’t skip this!
-
1 + 3/4 cup gluten-free all-purpose flour: This is where we keep it gluten-free! Make sure it’s a blend that contains xanthan gum. If not, add 1/2 teaspoon of xanthan gum for structure.
-
1/2 teaspoon cornstarch: This helps achieve the perfect crumb texture. You can use arrowroot powder as a substitute.
-
1 cup granulated sugar (for coating): We’ll use this to give the donuts a sweet finish.
-
1/4 cup ground cinnamon (for coating): This sweet-scented spice will make our donuts irresistible.
-
Melted butter (optional): Brush the donuts after baking for a little extra flavor before coating!
Step-by-Step Instructions: Let’s Get Cooking!
Now that we have all our ingredients lined up, it’s time to roll up our sleeves and get to work! Here’s how to whip up these fabulous baked pumpkin donuts step by step:
-
Preheat Your Oven: Preheat your oven to 350°F (175°C). Preheating helps the donuts bake evenly, giving you that perfect texture.
-
Prepare Your Donut Pan: Lightly grease a silicone or metal donut pan. If you’re using a metal pan, consider dusting it with a bit of gluten-free flour to ensure easy removal.
-
Mix Wet Ingredients: In a large mixing bowl, combine the canned pumpkin puree, eggs, melted coconut oil, and granulated sugar. Whisk until everything is well combined and smooth. The mixture should look glossy and vibrant—just like fall!
-
Combine Dry Ingredients Separately: In another bowl, whisk together the gluten-free all-purpose flour, cornstarch, baking powder, pumpkin pie spice, cinnamon, nutmeg, and salt. This ensures that all those lovely spices are evenly distributed throughout your donuts.
-
Combine Wet and Dry: Slowly add the dry mixture to the wet mixture, folding gently with a spatula. Don’t overmix! A few lumps are perfectly fine. This keeps the donuts tender and fluffy.
-
Fill the Donut Pan: Using a piping bag or a zip-lock bag with the corner cut off, fill each donut cavity about 3/4 of the way full. This will give your donuts room to rise without overflowing.
-
Bake: Place your filled donut pan in the oven and bake for 15-20 minutes. You’ll know they’re ready when you can poke a toothpick in the center and it comes out clean.
-
Cool in the Pan: Allow the donuts to cool in the pan for 5-10 minutes before carefully transferring them to a wire rack. This helps them set while keeping their shape.
-
Coat in Cinnamon Sugar: For that irresistible finish, mix the granulated sugar and ground cinnamon in a small bowl. If you opted for melted butter, brush the warm donuts with it before rolling them in the cinnamon sugar.
-
Serve and Enjoy: Arrange on a pretty platter, and serve warm! Trust me; this is the moment when everyone’s going to be flocking to your table!
Serving Suggestions: Create a Cozy Atmosphere
When it comes to plating your delicious baked pumpkin donuts, keep it simple and cozy. A rustic wooden board or an elegant cake stand can elevate your presentation. Dust a little extra cinnamon-sugar around the base for a pretty touch. Serve these donuts with a side of dipping sauce—think maple glaze or even a spiced cream cheese dip for a delightful pairing.
Recipe Variations: Get Creative!
-
Chocolate Chip Pumpkin Donuts: Fold in half a cup of chocolate chips into the batter for a decadent treat.
-
Maple Glazed: Instead of rolling in cinnamon sugar, drizzle a maple glaze made from powdered sugar and maple syrup over the warm donuts.
-
Spicy Pumpkin Donuts: Add a dash of cayenne pepper or ginger for an unexpected kick!
-
Nutty: Fold in chopped nuts like walnuts or pecans for added crunch.
-
Vegan Option: Substitute the eggs with flax eggs and ensure the coconut oil is replaced with a plant-based butter or oil.
Chef’s Notes: Kitchen Stories and Recipe Evolutions
As with any recipe, these baked pumpkin donuts have taken a few twists and turns over the years in my kitchen. Originally, I made them with regular flour, but I quickly learned that gluten-free doesn’t mean compromising on flavor or texture. My friends were always left guessing what made them so special! One particularly funny time, I accidentally swapped the sugar with salt and didn’t realize until a few bites in—oops! Let’s just say that batch became a memorable kitchen story!
FAQs and Troubleshooting
1. Why are my donuts dense?
If your donuts turned out dense, it may be due to overmixing the batter or not using enough leavening agent. Remember, mix just until the dry ingredients are incorporated!
2. How can I tell when my donuts are done?
A toothpick inserted into the center should come out clean or with just a few moist crumbs. Ovens can vary, so start checking at the 15-minute mark.
3. Can I freeze these donuts?
Absolutely! Once cooled, store them in an airtight container. They’ll keep well in the freezer for up to a month. Warm them in the microwave or oven when you’re ready to enjoy again.
4. My donuts stuck to the pan! What did I do wrong?
Make sure your pan is well-greased and that you’re allowing them to cool for a few minutes before trying to remove them. Silicone pans tend to work best for easy removal!
Nutritional Info (optional)
If you’re interested, here’s a quick breakdown of what these delightful donuts offer (per donut, based on the recipe):
- Calories: ~150
- Protein: 2g
- Carbohydrates: 24g
- Fat: 5g
- Fiber: 1g
There you have it—your guide to baking scrumptious gluten-free pumpkin donuts! I hope you enjoy making them as much as I do. Every donut is not only a tasty treat but a way to gather loved ones and create memories. Tie on that apron, turn on your favorite tunes, and let’s fill your kitchen with the warmth of pumpkin spice and everything nice. Happy baking!
PrintHeavenly Baked Pumpkin Donuts

Delightful gluten-free baked pumpkin donuts, perfect for fall gatherings.
- Prep Time: 15 minutes
- Cook Time: 20 minutes
- Total Time: 35 minutes
- Yield: 12 servings 1x
- Category: Dessert
- Method: Baking
- Cuisine: American
- Diet: Gluten-Free
Ingredients
- 1.5 cups canned pumpkin puree
- 4 large eggs (at room temperature)
- 1/4 cup melted coconut oil
- 1.5 cups granulated sugar
- 1.5 teaspoons baking powder
- 1.5 teaspoons pumpkin pie spice
- 1/2 teaspoon ground cinnamon
- 1/4 teaspoon ground nutmeg
- 1/4 teaspoon salt
- 1 + 3/4 cup gluten-free all-purpose flour
- 1/2 teaspoon cornstarch
- 1 cup granulated sugar (for coating)
- 1/4 cup ground cinnamon (for coating)
- Melted butter (optional)
Instructions
- Preheat your oven to 350°F (175°C).
- Prepare your donut pan by lightly greasing it.
- Mix the canned pumpkin puree, eggs, melted coconut oil, and granulated sugar until well combined.
- Combine the dry ingredients in another bowl.
- Add the dry mixture to the wet mixture, folding gently.
- Fill each donut cavity about 3/4 of the way full.
- Bake for 15-20 minutes until a toothpick comes out clean.
- Cool the donuts in the pan for 5-10 minutes before transferring them to a wire rack.
- Coat the warm donuts in cinnamon sugar.
- Serve warm and enjoy!
Notes
Optional: Brush with melted butter before coating in cinnamon sugar for extra flavor.
Nutrition
- Serving Size: 1 donut
- Calories: 150
- Sugar: 23g
- Sodium: 100mg
- Fat: 5g
- Saturated Fat: 4g
- Unsaturated Fat: 1g
- Trans Fat: 0g
- Carbohydrates: 24g
- Fiber: 1g
- Protein: 2g
- Cholesterol: 30mg
Keywords: pumpkin donuts, gluten-free, fall recipes, baked donuts, dessert
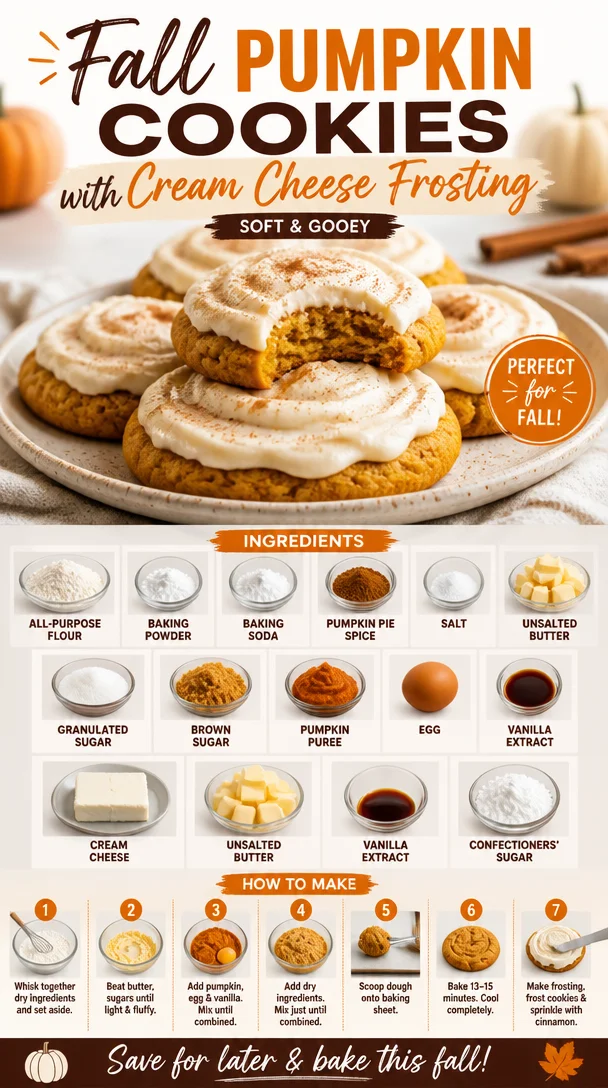
Fall Pumpkin Cookies with Cream Cheese Frosting (Soft Gooey)
Pumpkin Cookies with Cream Cheese Frosting: An Autumn Delight
Hello, fellow food enthusiasts! As the leaves turn golden and the air grows crisp, there’s something truly magical about the warm, inviting scent of freshly baked pumpkin cookies wafting through the kitchen. Today, I’m thrilled to share with you one of my all-time favorite recipes: Pumpkin Cookies with Cream Cheese Frosting. These cookies are the perfect blend of soft, spicy sweetness topped with the tangy richness of cream cheese frosting — a delightful treat for all fall gatherings!
A Cozy Memory
Growing up, fall was a season filled with warmth and aroma as my family embraced the harvest time. I fondly remember the first batch of pumpkin cookies I made all on my own. I was around ten, standing on a small stool just to reach the countertop. My mom had just handed me the mixing bowl, and as I sunk my hands into the buttery dough mixed with fragrant pumpkin and spices, I felt like a true chef! My little kitchen turned into a bakery, and the anticipation of sharing those cookies with my family was priceless. As the cookies baked, we curled up on the couch, sipping apple cider and enjoying the cozy autumn vibes. Those sweet moments spent in the kitchen ignited my love for baking, and now, years later, I can’t wait to recreate those joyful feelings with you through this recipe!
Ingredients
Let’s gather our ingredients! Here’s everything you’ll need for these lovely pumpkin cookies:
-
2 1/2 cups (312 g) all-purpose flour
This is the base of our cookies! For a wholesome twist, you can substitute half with whole wheat flour for added nutrition. -
1 teaspoon baking powder
This will provide the lift we need for soft and fluffy cookies. -
1 teaspoon baking soda
Works in tandem with the baking powder for an extra rise. -
1 tablespoon pumpkin pie spice
A fragrant mix of cinnamon, nutmeg, and ginger that captures the essence of fall. You can make your own blend or simply use more cinnamon if you’re out of pumpkin spice. -
1/2 teaspoon salt
A pinch of salt enhances the sweetness of the cookies. -
3/4 cup (170 g) unsalted butter (room temperature)
Buttery goodness brings richness to our cookie dough. Make sure it’s soft to the touch to cream perfectly. -
3/4 cup (150 g) granulated sugar
This adds sweetness and creates that satisfying crisp when baked. -
1/2 cup (100 g) packed light brown sugar
Brown sugar brings moisture and a hint of caramel flavor to the cookies. -
1 1/4 cups (305 g) canned pumpkin puree
The star of our show! Make sure to use pure pumpkin puree and not pumpkin pie filling for the best flavor. -
1 large egg (room temperature)
Eggs add moisture and help bind our ingredients together. -
1 teaspoon pure vanilla extract
A touch of vanilla enhances all the flavors beautifully. -
8 ounces (1 brick or 226 g) block-style cream cheese (softened but still cool)
Cream cheese creates a velvety frosting to top our cookies. -
¼ cup (56 g) unsalted butter (softened but still cool)
Just like before, this will help achieve the luscious texture of the frosting. -
1 teaspoon pure vanilla extract
Yes, we’re using it again! It really uplifts that cream cheese flavor. -
1 3/4 cups (210 g) confectioners’ sugar (sifted)
This will sweeten our frosting to perfection while ensuring a smooth texture.
Step-by-Step Instructions
Ready to bake? Let’s dive into the delicious process of making these pumpkin cookies:
-
Preheat your oven: Set your oven to 350°F (175°C) and line your baking sheets with parchment paper. This will prevent sticking and make cleanup a breeze!
-
Mix the dry ingredients: In a medium bowl, whisk together the all-purpose flour, baking powder, baking soda, pumpkin pie spice, and salt. This step is essential to evenly distribute the leaveners and spices; it will prevent clumps in your dough.
-
Cream the butter and sugars: In a large mixing bowl, beat the softened unsalted butter, granulated sugar, and brown sugar together using an electric mixer on medium speed until light and fluffy — about 2-3 minutes. This will incorporate air into the mixture, which helps to create a lighter cookie.
-
Incorporate the wet ingredients: Add in the pumpkin puree, egg, and vanilla extract to the buttery mixture. Beat until well combined. It’s okay if the mixture appears slightly chunky; the pumpkin makes it wonderfully moist!
-
Add the dry mix: Gradually add the dry ingredients, mixing on low speed until just combined. Do not overmix! We want our cookies to remain soft and chewy.
-
Scoop the dough: Using a cookie scoop or a spoon, drop rounded tablespoons of dough onto the prepared baking sheets, spaced about 2 inches apart (these cookies will spread a little).
-
Sprinkle with extra pumpkin spice: For that extra flair, sprinkle a bit of pumpkin pie spice atop each dough ball before baking.
-
Bake: Pop them in the preheated oven and bake for about 12-15 minutes, or until the edges are lightly golden. The centers will look slightly underbaked — trust me! They’ll firm up as they cool.
-
Cool completely: Allow the cookies to cool on the baking sheets for about 5 minutes before transferring them to a wire rack to cool completely. This keeps them soft and prevents any sticking!
-
Make the cream cheese frosting: In a mixing bowl, beat the softened cream cheese and butter together until smooth. Gradually add the sifted confectioners’ sugar while continuing to mix, then finish it off with vanilla extract. Mix until creamy and heavenly!
-
Frost the cookies: Once the cookies are completely cool, frost each cookie generously with the cream cheese frosting.
Serving Suggestions
To serve these delightful cookies, plate them on a beautiful serving tray, dust with a pinch of pumpkin pie spice, or drizzle a little extra cream cheese frosting on top for added flair. These cookies are perfect for cozy gatherings, festive celebrations, or just indulging during a quiet evening at home with a warm cup of tea or coffee!
Recipe Variations
Feeling adventurous? Here are a few creative twists you can try:
-
Chocolate Chip Pumpkin Cookies: Mix in a cup of semi-sweet or dark chocolate chips for a delightful sweet-and-spicy combo.
-
Nuts and Seeds: Add chopped pecans or walnuts for a crunchy texture that contrasts beautifully with the soft cookie.
-
Gluten-Free Option: Substitute the all-purpose flour with a 1:1 gluten-free baking blend. Just make sure it contains xanthan gum!
-
Add Citrus: A teaspoon of orange or lemon zest in the cookie dough brightens up the flavor profile wonderfully.
-
Frosting Flavor Variations: Swap traditional vanilla extract for maple syrup in your frosting to enhance the fall flavors even more!
Chef’s Notes
These pumpkin cookies have become a staple in my home! Over the years, I’ve tweaked the recipe to include my favorite add-ins and flavors while keeping the essence of the original dish intact. Each bite takes me back to that cozy fall memory with my family. Cooking is all about those warm moments, isn’t it? And trust me, if you can resist the temptation of snacking on the cookie dough, you’re a stronger soul than I! But hey, if you do sneak a bite, no judgment here — doughy goodness is part of the experience!
FAQs and Troubleshooting
Q: Why are my cookies spreading too much?
A: This can happen if your butter is too warm, or if you didn’t chill the dough long enough before baking.
Q: How can I make sure my cookies are soft and chewy?
A: Be careful not to overbake! They should look slightly underdone when you take them out of the oven. They’ll continue to cook while cooling.
Q: Can I freeze the cookies?
A: Absolutely! Allow them to cool completely and freeze them in an airtight container. For the best texture, frost them after thawing!
Q: My frosting turned out too runny; what did I do wrong?
A: If the frosting is too runny, it may be because the cream cheese and butter were too warm. Pop the frosting in the fridge for a few minutes to firm it up, then mix it again.
Nutritional Info (Optional)
While I typically don’t focus on nutrition too much as I believe in enjoying every bite, here’s a quick breakdown per cookie to keep you informed:
- Calories: Approximately 180
- Total Fat: 8g
- Saturated Fat: 5g
- Carbohydrates: 24g
- Sugar: 10g
- Protein: 2g
There you have it, my dear friends! These Pumpkin Cookies with Cream Cheese Frosting are not just a treat; they’re a celebration of the season, a means of connection, and a delicious way to remind us of the warmth that comes from sharing food. I hope you enjoy creating beautiful moments around your table with this simple yet elegant recipe. So tie on that ivory apron, grab your favorite whisk, and let’s get baking! 🍂
PrintPumpkin Cookies with Cream Cheese Frosting

Delightful pumpkin cookies topped with cream cheese frosting, perfect for fall gatherings.
- Prep Time: 20 minutes
- Cook Time: 15 minutes
- Total Time: 35 minutes
- Yield: 24 servings 1x
- Category: Dessert
- Method: Baking
- Cuisine: American
- Diet: Vegetarian
Ingredients
- 2 1/2 cups (312 g) all-purpose flour
- 1 teaspoon baking powder
- 1 teaspoon baking soda
- 1 tablespoon pumpkin pie spice
- 1/2 teaspoon salt
- 3/4 cup (170 g) unsalted butter (room temperature)
- 3/4 cup (150 g) granulated sugar
- 1/2 cup (100 g) packed light brown sugar
- 1 1/4 cups (305 g) canned pumpkin puree
- 1 large egg (room temperature)
- 1 teaspoon pure vanilla extract
- 8 ounces (226 g) cream cheese (softened but still cool)
- ¼ cup (56 g) unsalted butter (softened but still cool)
- 1 teaspoon pure vanilla extract
- 1 3/4 cups (210 g) confectioners’ sugar (sifted)
Instructions
- Preheat your oven: Set your oven to 350°F (175°C) and line your baking sheets with parchment paper.
- Mix the dry ingredients: In a medium bowl, whisk together the all-purpose flour, baking powder, baking soda, pumpkin pie spice, and salt.
- Cream the butter and sugars: In a large mixing bowl, beat the softened unsalted butter, granulated sugar, and brown sugar together using an electric mixer on medium speed until light and fluffy.
- Incorporate the wet ingredients: Add in the pumpkin puree, egg, and vanilla extract to the buttery mixture. Beat until well combined.
- Add the dry mix: Gradually add the dry ingredients, mixing on low speed until just combined.
- Scoop the dough: Using a cookie scoop or a spoon, drop rounded tablespoons of dough onto the prepared baking sheets, spaced about 2 inches apart.
- Sprinkle with extra pumpkin spice: For that extra flair, sprinkle a bit of pumpkin pie spice atop each dough ball before baking.
- Bake: Pop them in the preheated oven and bake for about 12-15 minutes, or until the edges are lightly golden.
- Cool completely: Allow the cookies to cool on the baking sheets for about 5 minutes before transferring them to a wire rack to cool completely.
- Make the cream cheese frosting: In a mixing bowl, beat the softened cream cheese and butter together until smooth. Gradually add the sifted confectioners’ sugar and vanilla extract, mixing until creamy.
- Frost the cookies: Once the cookies are completely cool, frost each cookie generously with the cream cheese frosting.
Notes
For variations, consider adding chocolate chips or nuts for a twist! You can freeze the cookies for later enjoyment.
Nutrition
- Serving Size: 1 cookie
- Calories: 180
- Sugar: 10g
- Sodium: 150mg
- Fat: 8g
- Saturated Fat: 5g
- Unsaturated Fat: 3g
- Trans Fat: 0g
- Carbohydrates: 24g
- Fiber: 1g
- Protein: 2g
- Cholesterol: 30mg
Keywords: pumpkin cookies, fall recipes, cream cheese frosting, autumn desserts
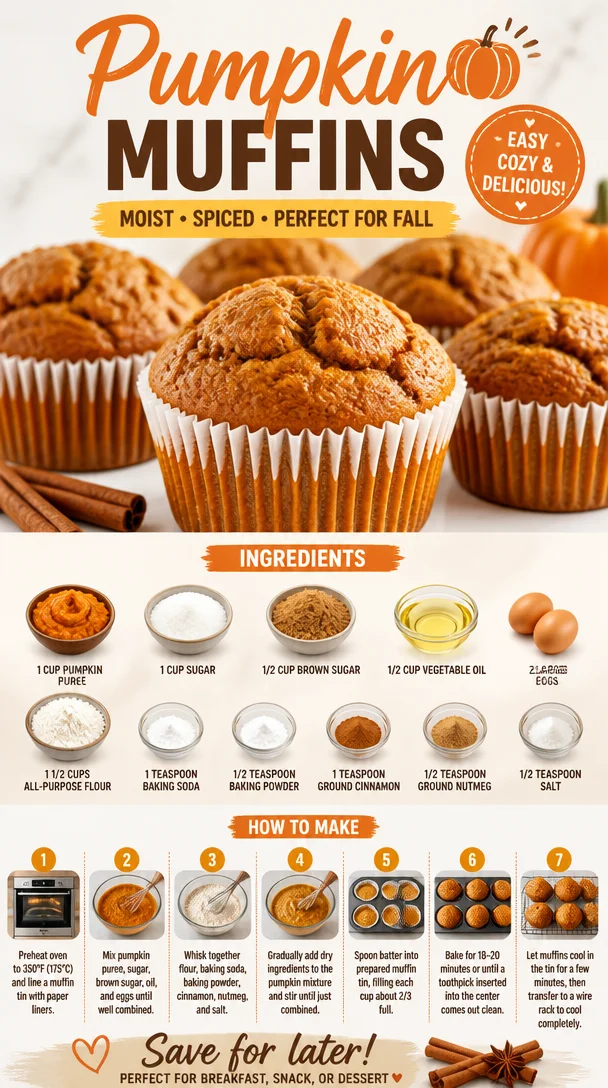
Pumpkin Muffins
The Perfect Pumpkin Muffins: A Cozy Fall Delight
Oh, fall! The time when the leaves turn golden, warm sweaters come out of storage, and the rich aroma of pumpkin spice fills the air. It’s the season of gathering, apple picking, and of course, indulging in all things pumpkin—my absolute favorite! Today, I want to share with you my go-to recipe for the most delicious pumpkin muffins that will make your kitchen feel like a warm hug during those crisp autumn mornings. They are fluffy, slightly sweet, and have just the right amount of spice to tantalize your taste buds. Let’s dive into this delightful baking adventure together!
My Pumpkin Memories
Let me take you back to a sweet memory that fills my heart with warmth every fall. Picture this: I’m about ten years old, standing on a stool in my grandmother’s kitchen, surrounded by the rich scents of cinnamon and nutmeg wafting through the air. My grandma, with her twinkling eyes and flour-dusted apron, would invite me to help her make her famous pumpkin muffins every October.
We would start by mixing the ingredients in her big, cheerful mixing bowl, which was stained with the memories of countless recipes. I remember the way she would let me crack the eggs, and how the golden yolks would splash into the mixture, painting our collaboration with cheer. In between spoonfuls of batter, she would tell me stories about her childhood and how pumpkin was a family tradition.
As the muffins baked, the house would fill with a warm embrace of scents that drew everyone in. It became our ritual—a simple yet intimate moment that transitioned us from summertime picnics to cozy, candlelit dinners. With every muffin we pulled from the oven, I not only learned how to bake but also how to cherish these fleeting moments with loved ones.
Ingredients
Let’s gather our ingredients for these marvelous pumpkin muffins. Here’s what you’ll need:
-
1 cup pumpkin puree
You can use canned pumpkin puree for convenience, but if you’re feeling adventurous, try making your own! Roast a sugar pumpkin, scoop out the flesh, and blend it until smooth. It adds a lovely depth of flavor. -
1 cup sugar
Classic granulated sugar provides sweetness, but you could also experiment with coconut sugar for a deeper taste with fewer refined sugars. -
1/2 cup brown sugar
The molasses content in brown sugar gives these muffins a delightful caramel-like taste. If you’re out of brown sugar, you can substitute it with more granulated sugar mixed with a tablespoon of molasses. -
1/2 cup vegetable oil
This keeps the muffins moist, but feel free to use melted coconut oil or unsweetened applesauce for a healthier option. -
2 large eggs
Eggs provide structure and moisture. If you need an egg substitute, try using a flaxseed meal (2 tablespoons of ground flaxseed mixed with 6 tablespoons of water, let it sit for a few minutes until it thickens). -
1 1/2 cups all-purpose flour
This gives our muffins their rise and texture. For a gluten-free option, substitute with almond flour or a 1:1 gluten-free flour mix. -
1 teaspoon baking soda
A must for leavening and that lovely rise! -
1/2 teaspoon baking powder
Just a little extra lift! -
1 teaspoon ground cinnamon
This warm spice is a fall favorite! You can add more if you love a spicier bite or switch it up with chai spice mix for a different vibe. -
1/2 teaspoon ground nutmeg
Nutmeg has a sharp, earthy scent that complements pumpkin beautifully. If you don’t have nutmeg, you can use allspice or simply omit it. -
1/2 teaspoon salt
A pinch of salt enhances all the flavors, making each muffin truly scrumptious.
Step-by-Step Instructions
-
Preheat Your Oven: Preheat your oven to 350°F (175°C). This step is essential to ensure an even bake!
-
Mix Your Wet Ingredients: In a large bowl, whisk together the pumpkin puree, granulated sugar, brown sugar, and vegetable oil until the mixture is smooth and well combined. This is the base of your muffins, and trust me—the sweeter it is at this stage, the more delicious your muffins will be!
-
Add the Eggs: Crack in the two eggs and whisk until they’re fully incorporated into the mixture. This is where your muffins will get their lift and moisture.
-
Combine Dry Ingredients: In another bowl, mix the flour, baking soda, baking powder, cinnamon, nutmeg, and salt. Stir them together until they’re well combined. This helps to distribute the leavening agents evenly.
-
Mix Dry and Wet Ingredients: Gradually add your dry mixture to the wet mixture, stirring gently. Be careful not to overmix—just mix until you see no more flour streaks. A few lumps are totally okay! Overmixing can make your muffins dense instead of light and fluffy.
-
Spray or Line Your Muffin Tin: Grease a muffin tin or line it with muffin liners. If you’re feeling fancy, you can use colorful liners that match your kitchen!
-
Fill the Muffin Cups: Spoon the batter into each muffin cup, filling them about 2/3rds full. This gives them room to rise without overflowing.
-
Bake Away: Place your muffin tray in the preheated oven and bake for about 18-20 minutes, or until a toothpick inserted into the center comes out clean. The scent wafting through your kitchen during this time is absolutely heavenly!
-
Cool and Enjoy: Once baked, let the muffins cool in the pan for a few minutes before transferring them to a wire rack to cool completely. (If you can wait that long!)
Serving Suggestions
These pumpkin muffins pair beautifully with a dollop of whipped cream cheese or simply a pat of butter melted on top. Plate them on a lovely serving platter dusted with a sprinkle of powdered sugar for an elegant touch. For a fancy brunch idea, serve them alongside a warm latte or apple cider.
Recipe Variations
-
Add Chocolate Chips: Mix in a handful of semi-sweet or dark chocolate chips to the batter for a sweet surprise!
-
Nutty Crunch: Throw in some chopped walnuts or pecans for a satisfying crunch and extra nutrients.
-
Dried Fruit: Consider adding dried cranberries or raisins for a little chewiness and extra flavor.
-
Spice it Up: Substitute the spices with pumpkin pie spice for a more intense flavor profile.
-
Vegan Option: Replace the eggs with flaxseed meal and the vegetable oil with applesauce for a tasty vegan twist!
Chef’s Notes
Every time I make these pumpkin muffins, I’m transported back to my grandmother’s kitchen. They’ve evolved over the years; I’ve experimented with whole wheat flour, different sweeteners, and all sorts of spices. It’s a reminder that recipes can grow, just like our memories. And remember, no matter how they turn out, your kitchen will always be filled with joy and love.
FAQs and Troubleshooting
-
Why are my muffins dense?
Overmixing can often lead to dense muffins. Remember, mix until just combined! -
Can I freeze the muffins?
Absolutely! Just wrap them individually in plastic wrap and then place them in an airtight container. They’ll last up to 3 months in the freezer. Reheat in the microwave for a cozy treat! -
How do I store leftovers?
Keep them in an airtight container at room temperature for about 3 days, or in the fridge for up to a week. -
What should I do if I don’t have pumpkin puree?
You can substitute with unsweetened applesauce, though the flavor and texture will differ slightly.
Nutritional Info (Optional)
Each muffin holds about 180 calories, with 4 grams of protein, 7 grams of fat, and 28 grams of carbohydrates. It’s a comforting treat that’s not too indulgent!
As you embark on your pumpkin muffin-making adventure, remember that cooking is a journey filled with exploration and creativity. Don’t hesitate to add your personal flair and make this recipe your own. Happy baking, my friends! 🍂
PrintThe Perfect Pumpkin Muffins
Indulge in the cozy flavors of fall with these fluffy pumpkin muffins, perfectly spiced and slightly sweet.
- Prep Time: 10 minutes
- Cook Time: 20 minutes
- Total Time: 30 minutes
- Yield: 12 servings 1x
- Category: Baked Goods
- Method: Baking
- Cuisine: American
- Diet: Vegetarian
Ingredients
- 1 cup pumpkin puree
- 1 cup granulated sugar
- 1/2 cup brown sugar
- 1/2 cup vegetable oil
- 2 large eggs
- 1 1/2 cups all-purpose flour
- 1 teaspoon baking soda
- 1/2 teaspoon baking powder
- 1 teaspoon ground cinnamon
- 1/2 teaspoon ground nutmeg
- 1/2 teaspoon salt
Instructions
- Preheat your oven to 350°F (175°C).
- Mix your wet ingredients: whisk together the pumpkin puree, granulated sugar, brown sugar, and vegetable oil.
- Add the eggs and whisk until fully incorporated.
- Combine dry ingredients in another bowl: flour, baking soda, baking powder, cinnamon, nutmeg, and salt.
- Mix dry and wet ingredients gently until no flour streaks remain.
- Spray or line your muffin tin with liners.
- Fill the muffin cups about 2/3rds full with batter.
- Bake for 18-20 minutes, or until a toothpick comes out clean.
- Cool in the pan for a few minutes before transferring to a wire rack.
Notes
These muffins can be frozen for up to 3 months. Store leftovers in an airtight container at room temperature for about 3 days or in the fridge for up to a week.
Nutrition
- Serving Size: 1 muffin
- Calories: 180
- Sugar: 19g
- Sodium: 200mg
- Fat: 7g
- Saturated Fat: 1g
- Unsaturated Fat: 6g
- Trans Fat: 0g
- Carbohydrates: 28g
- Fiber: 1g
- Protein: 4g
- Cholesterol: 30mg
Keywords: pumpkin muffins, fall baking, cozy treats, pumpkin spice, autumn recipes
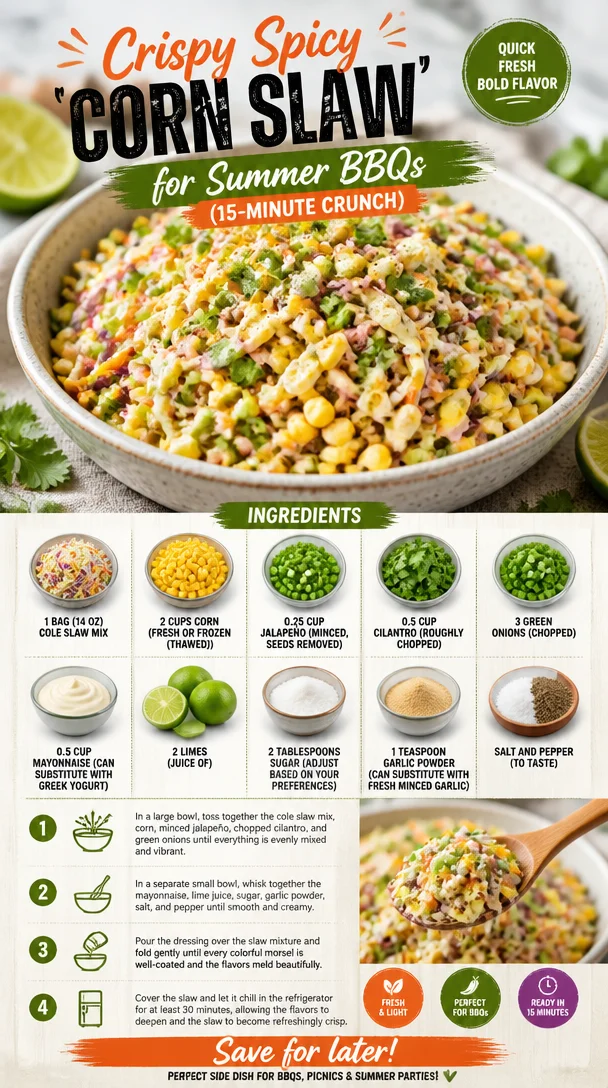
Crispy Spicy Corn Slaw for Summer BBQs (15-Minute Crunch)
Spicy Corn Slaw: The Ultimate Summer Crunch That Delights
Welcome, friends! If you’re anything like me, summer means endless opportunities to gather around the grill, enjoy the sunshine, and serve up dishes that are as vibrant as the season itself. One of my favorite go-to recipes that perfectly captures the essence of summer is Spicy Corn Slaw. It’s the ideal blend of crunch, zest, and just the right amount of heat! This dish is not just food; it’s a celebration of flavors that jazz up any meal or picnic spread.
Picture this: You’ve got family and friends gathered in your backyard, laughter ringing in the air, and the smell of grilled delights wafting around you. You’re ready to indulge in some delicious food that brings everyone together. This Spicy Corn Slaw is not only quick and easy to make, but it also adds a burst of freshness to your table. And trust me, once you try it, you’ll find yourself making it again and again!
When I think of slaw, I’m transported back to those summer barbecues my family hosted when I was a kid. My grandmother would whip up a massive bowl of chilled slaw, often experimenting with different veggies and dressings. It was her way of bringing everyone together, and she made sure we each contributed something to the meal. Some would bring main dishes, while others, like me, would rush to create the “perfect” side. That summer flavor always reminded me of the laughter and joy shared over a table decked out with delicious dishes and family favorites.
Now, let’s create a dish that makes every barbecue or casual dinner feel a little more festive!
Ingredients
Here’s what you’ll need to whip up this delightful Spicy Corn Slaw:
-
1 bag (14 oz) coleslaw mix
A perfect base for a crunchy texture. If you can’t find coleslaw mix, you can use shredded cabbage and carrots instead. -
2 cups corn (fresh or frozen, thawed)
Fresh corn off the cob is ideal during the summer, bringing natural sweetness. If using frozen, just make sure to thaw and drain well. -
0.25 cup jalapeño (minced, seeds removed)
This ingredient adds a spicy kick! Adjust the amount based on your heat preference. For milder flavors, try a bell pepper instead. -
0.5 cup cilantro (roughly chopped)
Fresh cilantro brings a vibrant herbal flavor. If you’re not a fan, you can substitute with basil or even parsley. -
3 green onions (chopped)
These add subtle onion flavor and a nice crunch. Yellow or red onion can work in a pinch, but use them sparingly to avoid overpowering the dish. -
0.5 cup mayonnaise
This acts as the creamy dressing base. If you’re looking for a lighter option, Greek yogurt is an excellent substitute that offers protein and tanginess. -
2 limes (juice of)
Lime juice brightens the flavors and balances the richness of the mayo. Freshly squeezed lime is always best, but bottled lime juice works too if you’re in a hurry. -
2 tablespoons sugar
This may seem surprising, but a little sugar enhances the flavors. Start small and adjust based on your personal taste. -
1 teaspoon garlic powder
For a punch of flavor. If you prefer fresh, go ahead and use minced garlic, but keep an eye on the quantity to avoid overpowering your slaw. -
Salt and pepper (to taste)
Essential for seasoning. Remember, you can always add more, but you can’t take away!
Step-by-Step Instructions
Now that we have our delightful ingredients lined up, let’s get down to business and create this Spicy Corn Slaw!
-
Prep Your Ingredients
Start by gathering everything you need on your counter. Cut the corn off the cob if using fresh, and chop your jalapeños, green onions, and cilantro. Get your lime juiced too! Prepping everything at once makes the cooking process feel easier and much more enjoyable. -
Combine the Vegetables
In a large mixing bowl, combine the coleslaw mix, corn, minced jalapeño, chopped cilantro, and green onions. Mix everything together gently but thoroughly, so each ingredient is well-distributed. Chef’s tip: If you’re a cilantro lover, feel free to go wild with the portion here! -
Create the Dressing
In a separate bowl, whisk together the mayonnaise, lime juice, sugar, garlic powder, and a pinch of salt and pepper. Adjust the flavor as you go, ensuring it’s bright and tangy but still creamy. Remember, this dressing is what brings everything together. -
Mix It All Up
Pour your dressing over the vegetable medley in the larger bowl. Toss gently but thoroughly to coat all the ingredients evenly. You want every shred of cabbage and corn nugget to have a taste of that luscious dressing! Chefs often ask me how to avoid soggy slaw; coating the veggies lightly helps. -
Taste and Adjust
This is the fun part! Taste your slaw and adjust the seasoning. If you want more heat, add extra jalapeño or even a dash of hot sauce! If it’s too spicy, a touch more sugar can help balance things out. A little flavor dance with your ingredients always brings out the best in your dish! -
Chill and Serve
Cover your bowl with plastic wrap or a lid and let it chill in the fridge for at least 30 minutes to allow the flavors to meld. This slaw is best enjoyed cold! It also allows the dressing to soften the cabbage just the right amount.
Serving Suggestions
For an eye-catching presentation, serve your Spicy Corn Slaw in a large glass bowl to show off its vibrant colors. Garnish with a sprinkle of extra cilantro or slice a jalapeño on top for a fun finishing touch. Pair it with grilled chicken or BBQ ribs for a classic summer feast! And if you’re feeling fancy, serve a spoonful atop tacos for added crunch!
Recipe Variations
Feel free to mix things up with these variations:
- Southwestern Twist: Add black beans and diced red pepper for a heartier version.
- Tropical Vibe: Incorporate diced mango or pineapple for a sweet touch.
- Creamy Avocado: Fold in some mashed avocado for a rich, creamy texture!
- No Mayo: Swap out the mayo for a vinaigrette if you’re looking for a lighter option.
- Herb Blend: Mix in fresh parsley or mint for a different herbal profile!
Chef’s Notes
As the years have gone by, I’ve loved tweaking this slaw based on seasonal ingredients. When the produce section bursts with colors in summer, it’s hard not to experiment! Occasionally, I’ve even added diced apples for a sweet crunch. The classic flavors never fail to impress, but remember: cooking is about creativity, so feel free to unleash your inner chef!
FAQs and Troubleshooting
-
Why is my slaw soggy?
Make sure to drain any excess moisture from your veggies before mixing them with the dressing. A quick spin in a salad spinner helps if you rinse your veggies! -
Can I make this ahead?
Absolutely! Just keep in mind that the slaw might lose some crunch after a day. Fresh is ideal, but it’s still tasty for a couple of days in the fridge. -
How can I adjust the heat?
If you’re afraid of the heat, start with half of the jalapeño and taste-test as you go. You can always add more! -
What if I don’t have coleslaw mix?
Not a problem! Use shredded cabbage and carrots. You might think about adding other crunchy vegetables like radishes or bell peppers for extra flavor and texture.
Conclusion
There you have it—the delightful Spicy Corn Slaw that’s sure to become your summer staple! It’s fresh, crunchy, vibrant, and oh-so-delicious. Just like those family barbecues from my childhood, this dish evokes warmth and connection. It holds a special place in my heart, and I hope it will for you too!
So, tie on that apron, gather your ingredients, and let’s create something beautiful together. Your summer gatherings just got an upgrade, my friend! Happy cooking!
PrintSpicy Corn Slaw
A vibrant and crunchy slaw that adds zest and heat to your summer meals.
- Prep Time: 15 minutes
- Cook Time: 0 minutes
- Total Time: 45 minutes
- Yield: 6 servings 1x
- Category: Side Dish
- Method: Mixing
- Cuisine: American
- Diet: Vegetarian
Ingredients
- 1 bag (14 oz) coleslaw mix
- 2 cups corn (fresh or frozen, thawed)
- 0.25 cup jalapeño (minced, seeds removed)
- 0.5 cup cilantro (roughly chopped)
- 3 green onions (chopped)
- 0.5 cup mayonnaise
- 2 limes (juice of)
- 2 tablespoons sugar
- 1 teaspoon garlic powder
- Salt and pepper (to taste)
Instructions
- Prep Your Ingredients: Start by gathering everything you need on your counter. Cut the corn off the cob if using fresh, and chop your jalapeños, green onions, and cilantro. Get your lime juiced too!
- Combine the Vegetables: In a large mixing bowl, combine the coleslaw mix, corn, minced jalapeño, chopped cilantro, and green onions. Mix gently but thoroughly.
- Create the Dressing: In a separate bowl, whisk together the mayonnaise, lime juice, sugar, garlic powder, and seasoning.
- Mix It All Up: Pour the dressing over the vegetable medley in the larger bowl. Toss gently to coat all the ingredients evenly.
- Taste and Adjust: Taste your slaw and adjust the seasoning as needed.
- Chill and Serve: Cover your bowl and let it chill in the fridge for at least 30 minutes before serving.
Notes
For an eye-catching presentation, garnish with extra cilantro or jalapeño slices.
Nutrition
- Serving Size: 1 serving
- Calories: 180
- Sugar: 3g
- Sodium: 350mg
- Fat: 12g
- Saturated Fat: 2g
- Unsaturated Fat: 8g
- Trans Fat: 0g
- Carbohydrates: 17g
- Fiber: 3g
- Protein: 3g
- Cholesterol: 10mg
Keywords: corn slaw, summer salad, spicy slaw, BBQ side dish
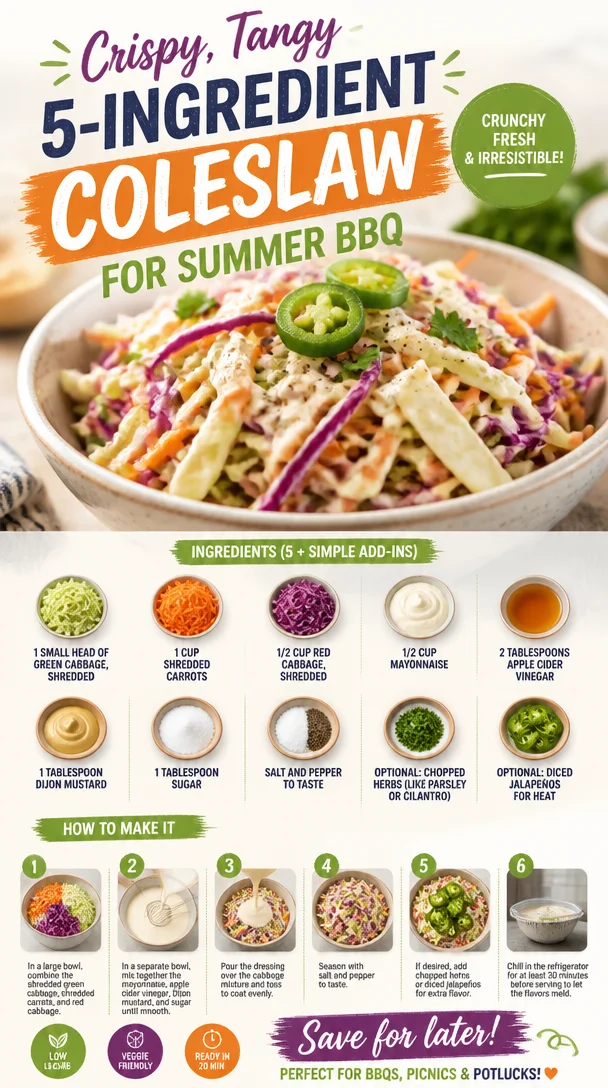
Crispy, Tangy 5-Ingredient Coleslaw for Summer BBQ
A Crunchy Symphony: Bold Flavor-Packed Coleslaw
Welcome back, fellow food enthusiasts! Today, we’re diving into the crunchy, vibrant world of coleslaw—a dish that’s often overlooked but absolutely deserves the spotlight. This isn’t just your typical side dish; we’re talking about a bold flavor-packed coleslaw that’s refreshing, zesty, and completely customizable. It’s perfect for summer barbecues, family gatherings, or even a cozy weeknight dinner. So grab your apron, and let’s create something delicious together!
A Trip Down Memory Lane
When I think about coleslaw, I can’t help but recall the summer picnics at my grandparents’ house. Every year, they hosted a neighborhood barbecue where the vibrant colors of freshly grilled meats mingled with the laughter of friends and family. Coleslaw was always a staple at those gatherings. My grandmother made it from scratch, pouring her heart into the dressing, which I’ve since learned was the secret to her beloved recipe.
I remember sneaking spoonfuls of that creamy goodness while she prepared the food—sometimes, I would sneak an extra dollop when no one was watching! It was that perfect balance of crunch and cream that made it irresistible. This experience taught me how food could hold so much nostalgia and joy. It’s not just what’s on the plate; it’s about the memories we create while we share a meal with those we love. Now, as I put my own spin on coleslaw, I hope to capture that same delight and share it with all of you.
Ingredients
Let’s gather our fresh ingredients! Here’s what you’ll need for this flavor-packed coleslaw:
-
1 small head of green cabbage, shredded
The heart of our coleslaw! Green cabbage adds crunch and a subtle sweetness. If you prefer a lighter version, Napa cabbage is a great alternative. -
1 cup shredded carrots
Carrots not only add color but also a natural sweetness. You can use pre-shredded carrots for convenience, or even swap with shredded radishes for a peppery kick! -
1/2 cup red cabbage, shredded
This gives a beautiful pop of color and a slightly more robust flavor compared to green cabbage. If you’re avoiding red cabbage, you can stick with all green cabbage for simplicity. -
1/2 cup mayonnaise
The creamy base that ties everything together! For a healthier twist, you can use Greek yogurt instead; it’ll give you that creamy texture with a protein boost. -
2 tablespoons apple cider vinegar
This adds a tangy zing that brightens up the whole dish. If you’re out of apple cider vinegar, white wine vinegar or rice vinegar can work as substitutes. -
1 tablespoon Dijon mustard
A touch of zesty flavor! You can swap it for yellow mustard if that’s what you have, but Dijon adds a sophisticated note. -
1 tablespoon sugar
Just a hint of sweetness! Feel free to adjust the amount based on your taste or use honey for a natural alternative. -
Salt and pepper to taste
Essential for enhancing all the flavors. Don’t skip on the seasoning! -
Optional: chopped herbs, like parsley or cilantro, for garnish
Fresh herbs add a burst of color and freshness. Use whatever you have on hand, or totally skip it if you’re not a fan. -
Optional: diced jalapeños for heat
For those who like a little kick, adding jalapeños can elevate your coleslaw to the next level!
Step-by-Step Instructions
Now that we have our ingredients ready, let’s get cooking! This coleslaw is quick to whip up, making it a perfect last-minute side dish. Follow these steps:
-
Shred the Cabbage
Start by carefully shredding the green cabbage and red cabbage. You can use a sharp knife, a box grater, or a food processor. If using a processor, be sure to pulse gently to avoid over-processing. You want that perfect crunch!Chef Tip: For an even more delicate texture, sprinkle some salt on the cabbage after shredding and let it sit for 10 minutes. This process will draw out excess moisture and enhance the crunch.
-
Prepare the Carrots
If you’re shredding fresh carrots, get them on the coarse grater side for maximum crunch. Mix them into your mound of shredded cabbage.Little Hack: You can also julienne the carrots for a more sophisticated look. Just remember, the goal is a balance of colors and textures!
-
Make the Dressing
In a separate bowl, whisk together the mayonnaise, apple cider vinegar, Dijon mustard, and sugar until fully combined. This is where the magic happens! Taste the dressing and adjust the seasoning with salt and pepper.Chef Insight: If you like a creamier coleslaw, feel free to add a tad more mayo. But remember, too much can overpower the lovely crunch of the veggies!
-
Combine the Mixture
Pour the dressing over the shredded veggies. With clean hands or a spatula, mix everything together gently. You want to ensure every piece of cabbage and carrot gets coated without crushing them.Tip on Mixing: If you let the mixture sit in the fridge for about 30 minutes before serving, the flavors will meld beautifully, and the cabbage will soften slightly without losing its crunch.
-
Final Touches
If you’re using optional ingredients like chopped herbs or jalapeños, fold them in at this stage. It will add that extra flair to your coleslaw!
Serving Suggestions
Now that your coleslaw is perfectly mixed and flavorful, it’s time to serve! You can plate it in a large, beautiful bowl for family-style sharing or serve individual portions on crisp lettuce leaves for a fresh presentation. A sprinkle of fresh herbs on top adds a touch of elegance and color.
Recipe Variations
This coleslaw is versatile, and there are plenty of ways to give it your unique twist! Here are a few ideas:
-
Tropical Twist: Add diced pineapple or mango for a fruity, summery flavor. You can also swap half the mayo for coconut yogurt for a tropical vibe.
-
Spicy Kick: Toss in some thinly sliced jalapeños or a dash of hot sauce for those spice lovers in your life.
-
Asian-Inspired: Substitute the mayo with sesame oil and add thinly sliced bell peppers, snow peas, and a drizzle of soy sauce for an Asian coleslaw.
-
Crunchy Additions: Throw in some sunflower seeds, pumpkin seeds, or toasted almonds for an extra crunch and a delightful nutty flavor.
-
Vegan Option: Use vegan mayo and add a splash of plant-based milk to keep it creamy and satisfying without any animal products.
Chef’s Notes
This coleslaw recipe has evolved over the years, just like my cooking skills. I once made a colossal mistake by forgetting to season the dressing, and let me tell you, a bland coleslaw is a sad story! Learning from my failures, I now emphasize how crucial it is to taste and adjust along the way. Let those flavors shine!
As I experiment more with my recipes, I often find new inspiration in the vegetables I have waiting for me. Coleslaw is forgiving and adaptable, which is what makes it so fun to make. And honestly, the more you make it, the easier it gets to play around with flavors!
FAQs and Troubleshooting
1. My coleslaw turned out too watery. What went wrong?
This could be due to sweat from the cabbage. Remember my tip about salting the shredded cabbage? This helps prevent excess water release. If it happens, just drain the excess liquid before serving.
2. Can I make coleslaw in advance?
Absolutely! Making it a day ahead can deepen the flavors. Just give it a good stir before serving. However, if you add herbs or other greens, wait to mix them in until right before serving to keep everything fresh.
3. What can I serve coleslaw with?
Coleslaw pairs beautifully with grilled meats, sandwiches, or as a topping for tacos! It’s a versatile companion that can elevate almost any dish.
4. How can I store leftover coleslaw?
Keep it in an airtight container in the fridge. It should last for about 3 days. Just note that the longer it sits, the softer it becomes! Sometimes I like to turn leftovers into a vibrant wrap by adding it to a tortilla with some grilled chicken or roasted vegetables.
Nutritional Info
While I won’t dive into specific numbers, it’s worth noting that coleslaw can be a healthy addition to your meals, packed with vitamins from the veggies. Using Greek yogurt instead of mayo can lower the calories while adding protein.
There you have it—your very own recipe for bold flavor-packed coleslaw! This dish isn’t just about ingredients on a list; it’s about creating moments around the table, just like my grandmother did. I hope this recipe brings you as much joy as it brings me. Remember, cooking is all about creativity and connection. So tie on that apron, have some fun, and let’s make memories together at the kitchen table!
PrintCrunchy Symphony: Bold Flavor-Packed Coleslaw
A refreshing, zesty coleslaw that’s perfect for summer gatherings, featuring green and red cabbage, shredded carrots, and a creamy dressing.
- Prep Time: 15 minutes
- Cook Time: 0 minutes
- Total Time: 15 minutes
- Yield: 4 servings 1x
- Category: Side Dish
- Method: Mixing
- Cuisine: American
- Diet: Vegetarian
Ingredients
- 1 small head of green cabbage, shredded
- 1 cup shredded carrots
- 1/2 cup red cabbage, shredded
- 1/2 cup mayonnaise
- 2 tablespoons apple cider vinegar
- 1 tablespoon Dijon mustard
- 1 tablespoon sugar
- Salt and pepper to taste
- Optional: chopped herbs, like parsley or cilantro, for garnish
- Optional: diced jalapeños for heat
Instructions
- Shred the cabbage: Start by carefully shredding the green cabbage and red cabbage.
- Prepare the carrots: If you’re shredding fresh carrots, get them on the coarse grater side for maximum crunch.
- Make the dressing: In a separate bowl, whisk together the mayonnaise, apple cider vinegar, Dijon mustard, and sugar until fully combined.
- Combine the mixture: Pour the dressing over the shredded veggies and mix everything together gently.
- Final touches: If you’re using optional ingredients like chopped herbs or jalapeños, fold them in at this stage.
- Serve: Plate it in a large bowl or serve individual portions on crisp lettuce leaves.
Notes
For a creamier coleslaw, feel free to add a tad more mayo. If you want a healthier twist, substitute Greek yogurt for mayonnaise.
Nutrition
- Serving Size: 1 serving
- Calories: 150
- Sugar: 3g
- Sodium: 200mg
- Fat: 10g
- Saturated Fat: 1.5g
- Unsaturated Fat: 8g
- Trans Fat: 0g
- Carbohydrates: 15g
- Fiber: 2g
- Protein: 2g
- Cholesterol: 5mg
Keywords: coleslaw, side dish, summer salad, crunchy, vegetarian, barbecue, homemade
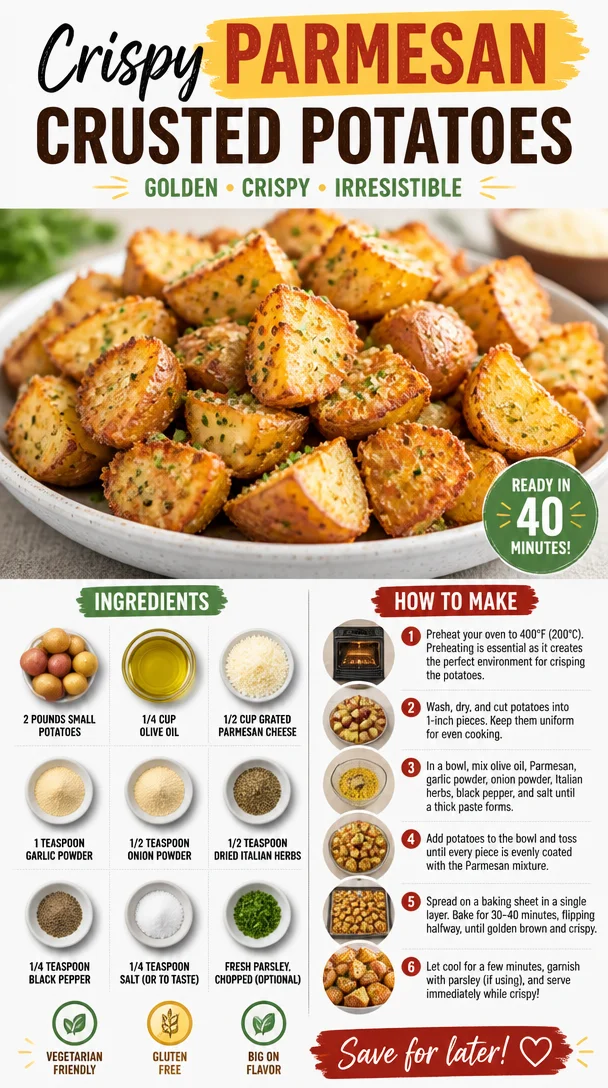
Crispy Parmesan Crusted Potatoes
Crispy Parmesan Crusted Potatoes: A Recipe to Make Your Taste Buds Dance!
Hello, fellow foodies! I’m Savannah Pierce, and today we’re diving into a dish that’s not just a sidekick for your main course but a star in its own right. Yes, I’m talking about Crispy Parmesan Crusted Potatoes! These little gems are bursting with flavor and texture, and I can’t wait to share the magic of making them with you. Whether you’re hosting a dinner party or just want to make your weeknight dinner feel a bit more special, this recipe will elevate your table and impress your guests.
In today’s busy world, it’s essential that cooking is easy and joyful — and that’s exactly what we’ll achieve with these delightful potatoes. They’re simple to prepare and look stunning when plated, all while being utterly delicious. So, grab your apron, and let’s get started on this crispy, cheesy adventure!
My Love for Potatoes
Let me take you on a little stroll down memory lane. Growing up, my family had a tradition of potato night every Friday. My mom would whip up her signature roasted potatoes seasoned simply with salt, pepper, and a hint of rosemary. Those potatoes would fill the house with an aroma that made my stomach rumble with excitement.
But it was one evening, during a particularly chilly winter, when my mom decided to shake things up. She coated the potatoes in Parmesan cheese before roasting them. As they came out of the oven, the crispiness and golden hue were a revelation! From that moment on, potatoes were forever changed in our household. Eating those cheesy, crunchy delights became a shared experience filled with laughter, stories, and, of course, plenty of seconds!
Looking back, it’s not just about the food; it’s about the warmth of those moments around the dining table, the spark of creativity my mom inspired in the kitchen, and the family connections that were fueled by a simple dish. That’s the spirit I want to bring to you with my Crispy Parmesan Crusted Potatoes!
Ingredients
Here’s what you’ll need to get started on these crispy, cheesy delectables. Let’s keep it straightforward and easy!
-
2 pounds small potatoes (such as baby Yukon Gold or red potatoes)
- Why this ingredient? Small potatoes are perfect because they cook quickly and evenly. Yukon Golds have a buttery flavor, while reds are waxy and creamy.
- Substitution tip: If you can’t find small potatoes, feel free to cut larger ones into bite-sized chunks.
-
1/4 cup olive oil
- Why this ingredient? Olive oil adds a lovely flavor and helps achieve that golden-brown crispiness.
- Chef Insight: For a twist, try using garlic-infused olive oil for an extra kick.
-
1/2 cup grated Parmesan cheese
- Why this ingredient? Parmesan lends a nutty, savory flavor that complements the potatoes beautifully.
- Substitution tip: Can’t find Parmesan? Pecorino Romano or a dairy-free cheese alternative can also work!
-
1 teaspoon garlic powder
- Why this ingredient? Garlic powder provides a wonderful depth of flavor.
- Substitution tip: Fresh minced garlic can be used; just reduce the amount to avoid overpowering the dish.
-
1/2 teaspoon onion powder
- Why this ingredient? This rounds out the flavor profile and adds a sweet, mild onion taste.
- Chef Insight: If onions are your jam, a sprinkle of finely diced shallots can add an incredible freshness!
-
1/2 teaspoon dried Italian herbs
- Why this ingredient? This blend adds a nice herbal accent.
- Substitution tip: Use your favorite herbs like thyme, rosemary, or oregano if Italian herbs aren’t on hand.
-
1/4 teaspoon black pepper
- Why this ingredient? Black pepper adds just the right amount of heat.
- Chef Insight: Freshly ground pepper enhances the dish, so I always recommend grinding your own.
-
1/4 teaspoon salt (or to taste)
- Why this ingredient? Salt is essential for bringing out the natural flavors of the ingredients.
- Substitution tip: If you need to reduce sodium, consider flavored salts like garlic or herb-infused varieties.
-
Fresh parsley, chopped (for garnish, optional)
- Why this ingredient? A sprinkle of fresh parsley not only adds a pop of color but also brightens the dish.
- Chef Insight: Don’t skip this step! It’s the finishing touch that makes everything feel complete.
Step-by-Step Instructions
Alright, let’s roll up those sleeves and get cooking! Follow these steps to create your Crispy Parmesan Crusted Potatoes.
-
Preheat Your Oven
- Preheat your oven to 425°F (220°C). Trust me, this is crucial for achieving that perfect crispy crust. A hot oven is your best friend here!
-
Prepare the Potatoes
- Wash and scrub the potatoes under running water to remove any dirt. There’s no need to peel them, as the skins add texture and nutrients.
- If you’re using larger potatoes, cut them into bite-sized pieces so they cook evenly. You want these to be bite-sized friends!
-
Seasoning the Potatoes
- In a large bowl, toss the potatoes with olive oil, garlic powder, onion powder, dried Italian herbs, black pepper, and salt. Ensure every potato is coated nicely — this is where flavor magic happens!
-
Add the Parmesan
- Gradually add the grated Parmesan cheese to the potatoes, tossing as you go. The goal is to have the cheese stick to the potatoes, creating that glorious crust as they roast.
-
Spread on a Baking Sheet
- Line a baking sheet with parchment paper or lightly grease it to prevent sticking. Spread the potatoes evenly on the sheet, ensuring they’re not overcrowded; this allows them to crisp up beautifully.
-
Roast Until Golden
- Pop the baking sheet in the preheated oven and roast for about 25-30 minutes. Halfway through, give them a good toss with a spatula to ensure even browning. You want them golden and crispy — the more color, the more flavor!
-
Garnish and Serve
- Once they’re beautifully browned and tender, remove them from the oven and garnish with fresh parsley. The aroma will be heavenly! Serve them hot along with your favorite protein or as a satisfying snack all on their own.
Serving Suggestions
Plating is where we can have a little fun! Arrange your Crispy Parmesan Crusted Potatoes in a shallow bowl or directly on a platter. Sprinkle a bit more parsley on top for that vibrant touch. To elevate the experience, consider pairing them with a homemade dipping sauce like garlic aioli or a zesty lemon herb dressing. Presentation matters, but remember: the intention behind your meal is what truly counts!
Recipe Variations
Now, let’s play with some creative twists to keep things fresh! Here are a few delicious variations of this recipe:
- Spicy Kick: Add a sprinkle of cayenne or red pepper flakes to the seasoning mix for a spicy crunch.
- Herbaceous Delight: Mix in fresh herbs such as rosemary, thyme, or basil instead of dried herbs for an aromatic twist.
- Cheesy Goodness: Blend in a mix of cheeses such as cheddar, Gruyère, or even crumbled feta for an extra cheesy indulgence.
- Balsamic Glaze Finish: Drizzle with balsamic glaze once they’re out of the oven for a sweet and tangy touch.
- Vegan Style: Use nutritional yeast instead of Parmesan and opt for avocado oil to create a creamy vegan version!
Chef’s Notes
Every recipe tells a story, and so does this one! I’ve been making various versions of Parmesan crusted potatoes for years, but the process keeps evolving. I remember one time, I got a little ambitious and added diced bacon to the mix — oh, the heavenly aroma! But as I evolved as a home chef, I realized that simplicity often reigns supreme. The balance of crispy exterior with the tender interior is what really makes these potatoes shine. And if you happen to have leftovers (which is rare in my house!), they make a fantastic breakfast hash the next day with some eggs!
FAQs and Troubleshooting
Here are some common questions I’ve received about this recipe along with tips to troubleshoot when needed:
-
Why didn’t my potatoes get crispy?
- Make sure they are spread out on the baking sheet without overcrowding. Steam creates sogginess, so space them out for better airflow!
-
Can I prepare these potatoes ahead of time?
- Absolutely! Prep them and toss them in the seasoning mix beforehand. Just store them in the refrigerator and pop them in the oven when you’re ready to serve!
-
How can I tell when they’re done?
- They should be golden brown and fork-tender. If you’re unsure, poke one with a fork — it should slide in easily.
-
Can I use other types of cheese?
- Yes! While Parmesan is classic, feel free to experiment with other grated cheeses. Just keep in mind that different cheeses melt and flavor differently, so adjust your expectations accordingly!
Nutritional Info
While I don’t always include this, it’s worth mentioning that these Crispy Parmesan Crusted Potatoes can be part of a balanced diet. They provide carbohydrates for energy, a bit of protein from the cheese, and fiber from the potatoes. As with everything, moderation is key to enjoying delicious food without compromise!
And there you have it! Your journey to create Crispy Parmesan Crusted Potatoes is now complete! I hope these little bites of goodness bring warmth to your table and even more joy to your gatherings. Thank you for joining me in the kitchen today—now, let’s make cooking feel joyful and celebrated, one recipe at a time! Happy cooking!
PrintCrispy Parmesan Crusted Potatoes
These Crispy Parmesan Crusted Potatoes are bursting with flavor and texture, perfect for impressing guests or elevating your weeknight dinner.
- Prep Time: 15 minutes
- Cook Time: 30 minutes
- Total Time: 45 minutes
- Yield: 4 servings 1x
- Category: Side Dish
- Method: Roasting
- Cuisine: American
- Diet: Vegetarian
Ingredients
- 2 pounds small potatoes (such as baby Yukon Gold or red potatoes)
- 1/4 cup olive oil
- 1/2 cup grated Parmesan cheese
- 1 teaspoon garlic powder
- 1/2 teaspoon onion powder
- 1/2 teaspoon dried Italian herbs
- 1/4 teaspoon black pepper
- 1/4 teaspoon salt (or to taste)
- Fresh parsley, chopped (for garnish, optional)
Instructions
- Preheat your oven to 425°F (220°C).
- Wash and scrub the potatoes under running water to remove any dirt.
- In a large bowl, toss the potatoes with olive oil, garlic powder, onion powder, dried Italian herbs, black pepper, and salt.
- Gradually add the grated Parmesan cheese to the potatoes, tossing as you go.
- Line a baking sheet with parchment paper or lightly grease it.
- Pop the baking sheet in the preheated oven and roast for about 25-30 minutes.
- Once they’re beautifully browned and tender, remove them from the oven and garnish with fresh parsley.
Notes
For a twist, try using garlic-infused olive oil or mix in fresh herbs instead of dried.
Nutrition
- Serving Size: 1 serving
- Calories: 350
- Sugar: 2g
- Sodium: 400mg
- Fat: 20g
- Saturated Fat: 5g
- Unsaturated Fat: 15g
- Trans Fat: 0g
- Carbohydrates: 40g
- Fiber: 5g
- Protein: 7g
- Cholesterol: 15mg
Keywords: crispy potatoes, parmesan potatoes, easy side dish, homemade potatoes
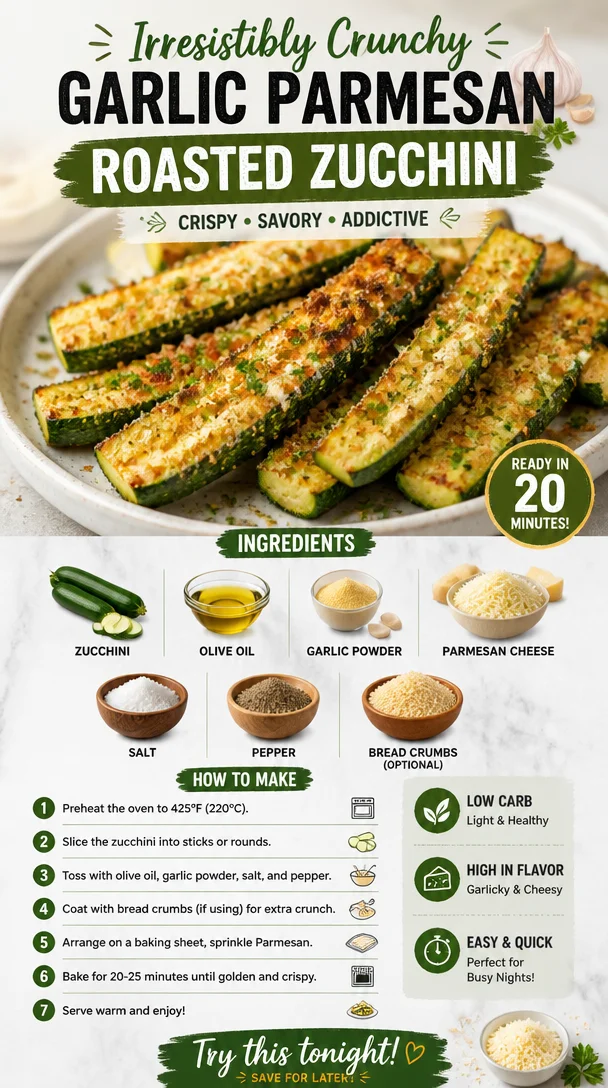
Irresistibly Crunchy Garlic Parmesan Roasted Zucchini
Irresistibly Crunchy Garlic Parmesan Roasted Zucchini
Hello dear friends! If you’re like me and love to whip up simple yet extraordinary dishes, then today’s recipe for Irresistibly Crunchy Garlic Parmesan Roasted Zucchini is just what you need. This delightful vegetable side dish is not only easy to prepare, but it also packs a punch of flavor that elevates any meal. Zucchini, with its tender crunch, is transformed into golden bites of goodness that are perfectly seasoned and absolutely satisfying!
Introduction
Zucchini often gets a bad rap for being bland or unexciting, but I’m here to tell you that, with the right approach, it can be a showstopper at your dinner table! Imagine this: it’s a beautiful summer evening, and you’ve got friends gathered around, possibly with a glass of Chardonnay in hand. You bring out a dish of perfectly roasted zucchini, golden and crunchy, with that irresistible garlic and Parmesan aroma wafting through the air. The first bite is met with gasps of delight. What once was a humble vegetable is now a star of the show!
When preparing this dish, I want you to feel the joy and ease of cooking in your own kitchen. The best part? It’s all about transforming something simple into something fabulous! You’ll shock your guests and impress your family with just a handful of ingredients and… dare I say it? minimal effort. So, let’s get started and make some culinary magic happen with this utterly scrumptious recipe.
Personal Story
I fondly remember the summer evenings of my childhood, running through our backyard with my siblings while the sun dipped low and the air filled with the scent of freshly mowed grass and grilled food. My mom often cooked zucchini, slicing it up and tossing it on the grill with her signature garlic seasoning. It was that perfect balance of charred on the outside, yet tender on the inside, and I couldn’t get enough! Although I may have preferred dessert at the time, those roasted zucchini pieces linger in my mind as a staple of warmth and togetherness around the dinner table.
As I grew older, my love for cooking blossomed, and I rediscovered how versatile zucchini could be. I began experimenting with various seasonings and techniques, and that’s when I created this restaurant-quality dish right in my kitchen. Trust me, friends, these roasted zucchini bites will become a staple at your table just as they did at mine.
Ingredients
Here’s what you’ll need to create these delectable bites:
-
Zucchini: Opt for firm and shiny zucchini. They should be medium-sized; too big can mean a watery texture. If you’re in a pinch, yellow squash works beautifully as a substitute!
-
Olive Oil: This is your essential fat for roasting. Its fruity flavor enhances the dish while helping achieve a lovely golden color. If you’re looking for a lighter option, avocado oil is a great choice!
-
Garlic Powder: For that unmistakable garlicky flavor. If desired, fresh minced garlic can also do the trick—just use about a clove or two.
-
Parmesan Cheese: Aged and sharper in flavor, Parmesan adds a nutty richness. If you’re dairy-free, try nutritional yeast for a similar cheesy flavor without the lactose.
-
Salt: Essential for bringing out all the flavors. Feel free to experiment with flavored salts, such as garlic salt or herb-infused salts.
-
Pepper: A dash of freshly cracked black pepper adds that extra bit of warmth. Have fun with it! Try using chili flakes for a spicy kick!
-
Bread Crumbs (optional): Want extra crunch? Toss in some breadcrumbs! Use panko for a lighter, airier texture, or go for seasoned breadcrumbs for added flavor!
Step-by-Step Instructions
Now that we have our ingredients lined up, let’s get cooking! Follow these simple steps, and I promise you’ll end up with zucchini that will have everyone asking for seconds.
-
Preheat Your Oven: Set that oven to 425°F (220°C). A hot oven is essential for achieving that crispy texture we’re all after.
-
Prep the Zucchini:
- Wash your zucchini, then slice it into rounds about ½ inch thick. If you’re feeling fancy, cut them into batons for a more elegant presentation!
- Think about using slightly bigger pieces to maximize that crunchy edge!
-
Toss with Olive Oil:
- In a large mixing bowl, drizzle about 2 tablespoons of olive oil over your zucchini slices.
- Give them a good toss, ensuring every piece is coated. A quick chef’s tip: If you’re using your hands, take this moment to get a little messy! Feel that olive oil coating each slice.
-
Season Generously:
- Now, sprinkle in about 1 teaspoon of garlic powder, and season with salt and pepper to taste. Toss it again, adding more olive oil if needed to ensure everything is evenly coated.
- Pro tip: When you season, go light at first; you can always add more later!
-
Add the Parmesan:
- This is the moment you’ve been waiting for! Grab that grated Parmesan and sprinkle it generously over the zucchini. Toss to evenly coat.
- If you want that crunchy topping, add your breadcrumbs here too!
-
Spread on a Baking Sheet:
- Line a baking sheet with parchment paper for easy cleanup (and to keep those zucchini from sticking). Spread the zucchini out in a single layer—you don’t want them to steam; you want them to roast!
-
Roast to Perfection:
- Pop them in the oven and roast for about 20-25 minutes, turning them halfway through. You’re looking for a golden-brown color and a crispy texture—heavenly!
- Keep an eye on them; the last few minutes matter! Once they look deliciously crispy, they’re ready to shine.
-
Final Touches:
- Once out of the oven, let them sit for a minute or two. Feel free to sprinkle a bit more Parmesan or fresh herbs like parsley or basil over them before serving for that finishing touch!
Serving Suggestions
Serving these roasted zucchini pieces is a breeze—place them right in the center of the table! Arrange them on a beautiful platter. For an extra touch, garnish with fresh herbs and a light drizzle of olive oil or balsamic glaze for added sophistication. They make an excellent side dish to grilled meats, pasta, or even tucked into a warm pita.
Recipe Variations
Feel free to play around with this recipe! Here are a few tasty twists you can try:
-
Italian Herb Zucchini: Add Italian seasoning or fresh rosemary to the olive oil mix for an extra layer of flavor.
-
Spicy Zucchini: Toss in a pinch of cayenne pepper or chili flakes for a bit of heat.
-
Cheesy Zucchini Bake: Layer the zucchini in a baking dish with marinara sauce and mozzarella cheese for a hearty twist on baked zucchini.
-
Vegan Version: Skip the cheese and add a sprinkle of nutritional yeast for a cheesy flavor without the dairy.
-
Mediterranean Zucchini: Incorporate sundried tomatoes, olives, and feta cheese for a Mediterranean flair.
Chef’s Notes
You know, it’s funny how recipes evolve over time. This one started as a simple roasted zucchini with basic seasonings, but I couldn’t resist the allure of making it crispy and cheesy! I also had a couple of mishaps along the way—like that one time I accidentally loaded too much garlic! Let me tell you, the aroma! It was heavenly but left me with slightly vampire-repelling vibes!
Always keep experimenting and improvising; cooking is as much about creativity as it is about following a recipe. You’ll find your unique sparkle in the kitchen, just like I did!
FAQs and Troubleshooting
-
Why are my zucchini slices mushy?
Make sure to slice them evenly and don’t overcrowd the baking sheet. Roasting too many together can result in steaming rather than crispy roasting. Always give them space! -
How can I ensure even cooking?
Turn your zucchini halfway through roasting. Keeping an eye on them during the last few minutes is vital for ensuring they do not overcook! -
My zucchini didn’t crisp up, what happened?
If they didn’t brown, it could be due to too much liquid in the zucchini. Always dry your slices well after washing them and consider salting them before roasting to draw out excess moisture! -
Can I prepare zucchini ahead of time?
Absolutely! Prep your zucchini and toss it in the olive oil and seasonings a few hours in advance, storing it in the fridge. Roasting right before serving will keep them crispy!
Nutritional Info
While nutrition may vary based on specific ingredients, here’s a general breakdown per serving (not including any optional toppings):
- Calories: 120
- Protein: 6g
- Carbohydrates: 7g
- Fat: 9g
Now that you’re armed with this delicious recipe, I can’t wait for you to dive in and start creating your own culinary moments! Remember, cooking should always be fun, approachable, and above all, a way to connect with those you love around the table. Happy cooking!
PrintIrresistibly Crunchy Garlic Parmesan Roasted Zucchini
A delightful vegetable side dish featuring zucchini that is roasted to golden perfection with garlic and Parmesan.
- Prep Time: 10 minutes
- Cook Time: 25 minutes
- Total Time: 35 minutes
- Yield: 4 servings 1x
- Category: Side Dish
- Method: Roasting
- Cuisine: Italian
- Diet: Vegetarian
Ingredients
- 2 medium Zucchini, sliced into ½ inch rounds
- 2 tablespoons Olive Oil
- 1 teaspoon Garlic Powder
- ½ teaspoon Salt
- ¼ teaspoon Pepper
- ¼ cup Parmesan Cheese, grated
- ¼ cup Bread Crumbs (optional)
Instructions
- Preheat your oven to 425°F (220°C).
- Prep the zucchini by washing and slicing it into rounds.
- Toss the zucchini with olive oil in a large mixing bowl.
- Season generously with garlic powder, salt, and pepper.
- Add the grated Parmesan and breadcrumbs, if using, and toss to coat.
- Spread the zucchini on a lined baking sheet in a single layer.
- Roast for 20-25 minutes, turning halfway through, until golden brown and crispy.
- Let sit for a minute before serving, optionally garnishing with more Parmesan or fresh herbs.
Notes
For extra flavor, try adding Italian herbs or chili flakes to the seasoning.
Nutrition
- Serving Size: 1 serving
- Calories: 120
- Sugar: 2g
- Sodium: 300mg
- Fat: 9g
- Saturated Fat: 3g
- Unsaturated Fat: 5g
- Trans Fat: 0g
- Carbohydrates: 7g
- Fiber: 2g
- Protein: 6g
- Cholesterol: 10mg
Keywords: garlic, zucchini, parmesan, roasted vegetables, side dish
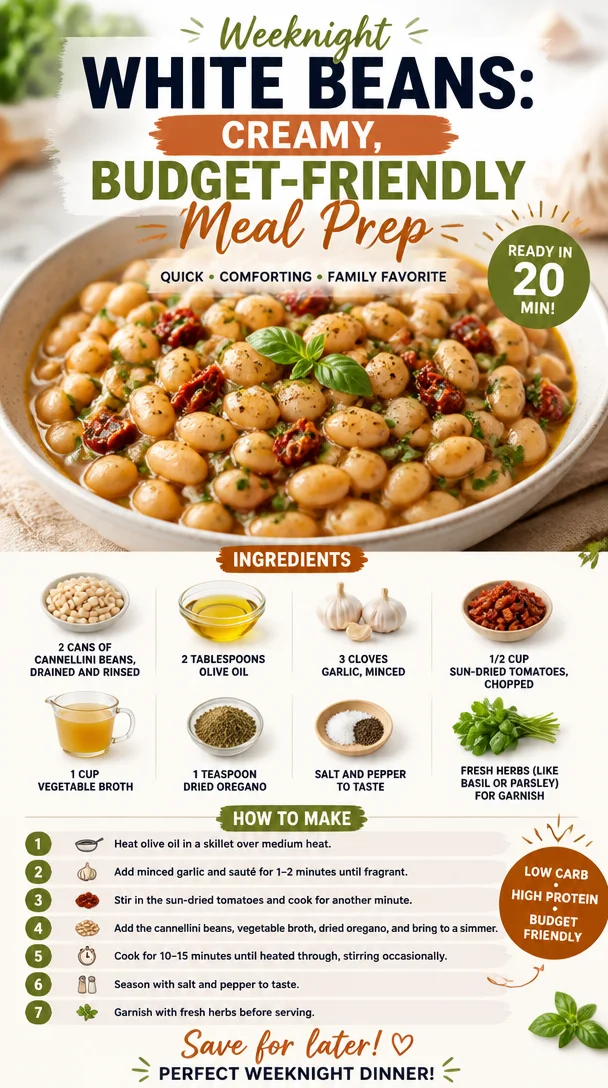
Weeknight White Beans: Creamy, Budget-Friendly Meal Prep
Marry Me White Beans: A Recipe Worth a Proposal
Welcome back, fellow food lovers! Today I am excited to share a dish that not only warms the heart but also has a way of creeping its way into conversations about love and commitment. Yes, you guessed it—today we’re diving into the irresistible, luscious world of Marry Me White Beans. This dish is inspired by my own kitchen adventures, and I promise it’s a game changer, whether you’re trying to impress a date or just craving a comforting bowl of goodness on a chilly afternoon.
A Cozy Love Story in a Bowl
Let me take you back to a summer night, a time filled with laughter, twinkling fairy lights, and the intoxicating scent of garlic wafting through the air. It was one of those dinner parties where friends turned into family, and we all gathered around the table, sharing stories, bold flavors, and a dash of whimsy.
That evening, I decided to experiment with what I had on hand—cannellini beans, sun-dried tomatoes, and an assortment of fresh herbs from my patio garden. Little did I know that this haphazard concoction would spark a culinary love story that would soon spread beyond my kitchen. Each bite was met with “Mmm”s and “Oh wow!”s, and by the end of the meal, a dear friend declared, “If food could propose, these white beans would marry me!”
From that night forward, Marry Me White Beans officially entered the culinary hall of fame in my circle—a dish that not only satisfies the palate but also makes memories that linger long after the plates are cleared. Now it’s time for you to create your own love affair with this dish!
Ingredients
Let’s gather the stars of our flavorful show:
-
2 cans of cannellini beans, drained and rinsed
These creamy beans are buttery and delicate—perfect for soaking up all the lovely flavors we’ll create. If you’re looking for a substitution, navy beans or great northern beans work wonderfully as well! -
2 tablespoons olive oil
A staple in any kitchen, olive oil adds richness. If you’re on a health kick, feel free to swap in avocado oil—it’s just as delightful! -
3 cloves garlic, minced
Garlic is the heart of this dish, imparting aromatics that are simply enchanting. Don’t skimp on it! For those who enjoy a milder flavor, roasted garlic is a fantastic alternative. -
1/2 cup sun-dried tomatoes, chopped
These little gems bring a burst of concentrated flavor and color. If you can’t find them, fresh tomatoes can be used—just add them a bit earlier during the cooking process to let their juices infuse the dish! -
1 cup vegetable broth
A must for added depth and richness. Chicken broth is also a fine choice if you’re not catering to strict vegetarians. Want to make your own? Just simmer a medley of veggies for a lovely homemade option! -
1 teaspoon dried oregano
This herb introduces warmth and earthiness. If you’re feeling adventurous, try substituting it with Italian seasoning for a more complex flavor profile. -
Salt and pepper to taste
Essential for balancing and bringing out all the flavors—adjust according to your preference! -
Fresh herbs (like basil or parsley) for garnish
Finishing with fresh herbs elevates every dish. You could also use chives or even arugula for a peppery twist!
Step-by-Step Instructions
Now that we have our ingredients ready, let’s get cooking! Follow along closely, and I promise you’ll have everyone swooning over your culinary magic.
-
Prep Your Kitchen: Start by gathering all your ingredients and utensils. This way, you’ll be organized and ready to roll. Have a pot, cutting board, knife, and a wooden spoon on hand.
-
Sauté the Garlic: In a medium-sized pot, heat the olive oil over medium heat. Once it shimmers, add the minced garlic and sauté for about 1-2 minutes until it becomes fragrant but not brown. Chef’s Tip: Keep stirring to prevent burning! We want sweet, aromatic garlic, not bitter.
-
Add Sun-Dried Tomatoes: Toss in the chopped sun-dried tomatoes. Cook for another 2 minutes, allowing their essence to blend beautifully with the garlic. Here’s a fun fact—sun-dried tomatoes can soak up a lot of flavor, making them a fantastic addition to various dishes!
-
Gently Fold in Cannellini Beans: Next, add the drained and rinsed cannellini beans to the pot. Use your wooden spoon to fold them in gently, careful not to mash the beans. We want them whole for texture!
-
Pour in the Broth: Time to add the vegetable broth! Pour it in and give everything a good stir. Bring the mixture to a gentle simmer and let it bubble away for about 10 minutes. This allows the beans to absorb all those beautiful flavors. Little Chef Hack: Taste the broth as it simmers; if you feel it needs more seasoning, don’t hesitate to sprinkle in a pinch of salt or pepper!
-
Season with Oregano: After 10 minutes, sprinkle in the dried oregano. Give everything one final stir! Let it simmer for another 5 minutes so that the flavors can deepen beautifully.
-
Finish with Fresh Herbs: Before serving, taste one last time to adjust the seasoning. Once satisfied, remove the pot from the heat and stir in fresh herbs for that final flourish.
And voilà! Your Marry Me White Beans are ready for their moment in the spotlight!
Serving Suggestions
Serve these lovely beans in warm bowls, drizzled with a touch of extra virgin olive oil for that finishing touch. A generous sprinkle of freshly chopped basil or parsley not only looks beautiful but adds a pop of freshness that will make your heart sing. Pair your beans with crusty bread for that added comfort, or serve them over a bed of fluffy rice for a heartier meal.
Recipe Variations
Feeling adventurous? Here are some creative twists on the original recipe:
-
Spicy Kick: Add a pinch of red pepper flakes while sautéing the garlic for a delightful kick. Perfect for those who like a little heat!
-
Lemon Zest: Brighten the dish with a touch of fresh lemon zest added just before serving. It’ll elevate the flavors to a whole new level.
-
Creamy Addition: For a richer dish, stir in a spoonful of cream or a dollop of ricotta cheese just before serving.
-
Protein Boost: Toss in some cooked sausage or shredded chicken for added protein and heartiness.
-
Herb Swap: Experiment with different fresh herbs based on what you have, such as dill or cilantro, for a unique twist!
Chef’s Notes
You know, Marry Me White Beans has become a staple in my go-to repertoire. Each time I make it, I’m reminded of that fun summer evening filled with laughter and love. It always brings my friends and family together, reminding me that food truly has a magical ability to create connections. It’s fascinating how an experiment in the kitchen can spawn a dish that resonates so deeply with people. It’s these moments that inspire me to keep cooking, creating, and sharing with all of you.
Oh, and just a heads up: while this dish is creamy and comforting, it thickens quite nicely as it cools. So if you happen to have leftovers (if that’s possible!), add a splash of water or broth when reheating for that perfect consistency.
FAQs and Troubleshooting
1. Can I use dried beans instead of canned?
Absolutely! If you prefer to use dried beans, soak and cook them ahead of time according to package instructions. About 2 cups of cooked beans will work perfectly in this recipe.
2. The dish seems too thick; how can I fix it?
If your beans turned out thicker than desired, simply add a bit more vegetable broth or water while reheating to achieve your preferred consistency.
3. I don’t like sun-dried tomatoes; what can I substitute?
No worries! You can use roasted peppers, fresh tomatoes, or even sautéed mushrooms for depth and flavor.
4. How do I store leftovers?
Store any leftover beans in an airtight container in the fridge for up to 4 days. They also freeze well if you want to save some for later!
Nutritional Info
While the main focus of this dish is the love and joy it brings to your table, here’s a quick nutritional scoop:
- Calories: Approximately 230-250 calories per serving
- Protein: 12g
- Carbohydrates: 34g
- Fat: 7g
- Fiber: 8g
Whether you’re celebrating a newfound romance or cherishing a delicious meal solo, Marry Me White Beans is sure to become a beloved dish in your home. So, tie on that apron and get cooking; love is just a spoonful away! Happy cooking!
PrintMarry Me White Beans
A heartwarming dish featuring creamy cannellini beans, sun-dried tomatoes, and fresh herbs, perfect for impressing a date or enjoying on a cozy afternoon.
- Prep Time: 10 minutes
- Cook Time: 20 minutes
- Total Time: 30 minutes
- Yield: 4 servings 1x
- Category: Main Course
- Method: Stovetop
- Cuisine: Italian
- Diet: Vegetarian
Ingredients
- 2 cans of cannellini beans, drained and rinsed
- 2 tablespoons olive oil
- 3 cloves garlic, minced
- 1/2 cup sun-dried tomatoes, chopped
- 1 cup vegetable broth
- 1 teaspoon dried oregano
- Salt and pepper to taste
- Fresh herbs (like basil or parsley) for garnish
Instructions
- Prep your kitchen: Start by gathering all your ingredients and utensils.
- Sauté the garlic: In a medium-sized pot, heat the olive oil over medium heat. Add minced garlic and sauté for about 1-2 minutes until fragrant.
- Add sun-dried tomatoes: Toss in the chopped sun-dried tomatoes and cook for another 2 minutes.
- Gently fold in cannellini beans: Add the drained and rinsed beans to the pot and fold them in gently.
- Pour in the broth: Add the vegetable broth and bring the mixture to a gentle simmer for about 10 minutes.
- Season with oregano: After 10 minutes, sprinkle in the dried oregano and let it simmer for another 5 minutes.
- Finish with fresh herbs: Taste and adjust seasoning; then stir in fresh herbs before serving.
Notes
This dish thickens as it cools, so add a splash of water or broth when reheating to maintain consistency.
Nutrition
- Serving Size: 1 serving
- Calories: 250
- Sugar: 4g
- Sodium: 350mg
- Fat: 9g
- Saturated Fat: 1g
- Unsaturated Fat: 6g
- Trans Fat: 0g
- Carbohydrates: 34g
- Fiber: 8g
- Protein: 12g
- Cholesterol: 0mg
Keywords: white beans, casseroles, vegetarian, comforting, easy recipe
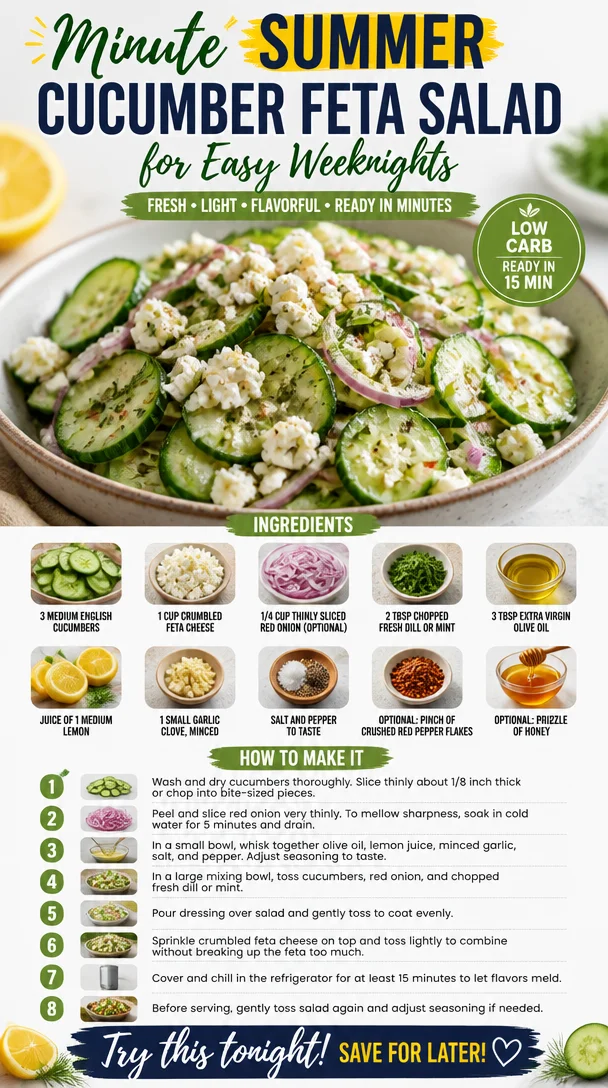
Minute Summer Cucumber Feta Salad for Easy Weeknights
The Ultimate Classic Cucumber Feta Salad Recipe: A Refreshing Summer Delight
Hello there, fellow food lovers! Today, we’re diving into a recipe that’s one of my all-time favorites: the Classic Cucumber Feta Salad. Not only is this dish a vibrant celebration of fresh ingredients, but it’s also incredibly simple to make. Perfect for summer picnics, effortless dinners, or just to brighten up your weeknight meals, this salad is sure to impress. So grab your apron and let’s get started on this tasty journey!
A Taste of Nostalgia
Growing up, summer weekends at my grandmother’s house were sacred. The sun would shine brightly, the garden was bursting with life, and the air was filled with laughter and the sizzling sounds of the grill. One particularly vivid memory is of my grandmother whipping up her famous cucumber salad. She’d take the freshest cucumbers from her garden, paired with a sprinkling of salty feta cheese and a drizzle of good olive oil. The combination was simple yet delightful, and it embodied everything great about summer—the warmth, the sunshine, and the joy of being together.
Now, every time I make this Classic Cucumber Feta Salad, I’m transported back to those carefree days, sharing stories and enjoying the simple flavors of fresh ingredients. It’s more than just a salad; it’s a reminder to cherish those moments spent around the table. Plus, it’s a recipe that anyone can make, and I’m excited to help you recreate this summer staple.
Ingredients
Here’s a list of all the ingredients you’ll need for this refreshing salad, along with some helpful notes:
-
3 medium English cucumbers: English cucumbers are perfect for this salad because they have a thinner skin and fewer seeds, making them ideal for slicing. If you can’t find them, you can use regular cucumbers; just peel them if the skin is too thick.
-
1 cup crumbled feta cheese: Feta adds a creamy and salty kick to the salad. You can substitute it with goat cheese or even a dairy-free cheese option if you want to keep it vegan.
-
1/4 cup thinly sliced red onion (optional): Red onion offers a mild, sweet crunch. If you’re not a fan of onion, feel free to leave it out, or replace it with green onions for a milder flavor.
-
2 tablespoons chopped fresh dill or mint: Fresh herbs elevate this salad beautifully. Dill adds a classic flavor reminiscent of summertime, while mint brings a refreshing twist. Use whatever you have on hand or prefer!
-
3 tablespoons extra virgin olive oil: This will serve as the base of your dressing. A good-quality olive oil will enhance the flavors and add richness. If you prefer, you can substitute with avocado oil for a different taste.
-
Juice of 1 medium lemon (about 2 tablespoons): Fresh lemon juice brightens the salad and balances the creaminess of the feta. If you’re in a pinch, bottled lemon juice will work, but fresh is always best!
-
1 small garlic clove, minced: Garlic adds wonderful flavor. If you’re sensitive to raw garlic, you can reduce the amount or omit it altogether.
-
Salt and pepper to taste: Seasoning is essential! Don’t forget to taste as you go.
-
Optional: pinch of crushed red pepper flakes: If you like a little heat, this is a perfect addition!
-
Optional: drizzle of honey: For those who enjoy a sweet twist, a bit of honey can offset the saltiness of the feta beautifully.
Step-by-Step Instructions
Now that we have our ingredients ready, let’s jump into making this gorgeous salad! Follow these steps, and I promise you’ll surprise yourself with your kitchen prowess.
-
Prepare the cucumbers: Start by washing your cucumbers thoroughly. Slice them thinly using a sharp knife or a mandolin for uniformity. If you prefer, you can also chop them into bite-size pieces for a more casual vibe. Set them aside in a large mixing bowl.
-
Add the onion (if using): If you opted for red onion, add the thinly sliced pieces to the bowl with the cucumbers. This adds a lovely crunch and sweetness. If the flavor is too strong for your taste, soaking the onion slices in water for a few minutes can help mellow them out!
-
Mix in the feta: Crumble the feta cheese over the cucumbers and onion. The creamy texture of the cheese will blend wonderfully with the other ingredients, providing that signature salty flavor.
-
Chop the herbs: Roughly chop the fresh dill or mint (or both!). Add the herbs to the salad mix, giving it that colorful burst of green while infusing fresh flavors.
-
Make the dressing: In a small bowl, whisk together the extra virgin olive oil, lemon juice, minced garlic, salt, and pepper. If you’re feeling adventurous, you can also mix in the crushed red pepper flakes and honey at this stage.
-
Combine everything: Drizzle the dressing over the cucumber mixture and gently toss until everything is evenly coated. Be careful not to mash the feta; you still want those lovely crumbles to shine through!
-
Taste and adjust: Now’s your chance to taste your salad! Add more salt, pepper, or lemon juice as needed. It should be a delightful balance of fresh, crunchy, salty, and savory.
-
Chill: For the best flavor, let the salad sit in the fridge for about 30 minutes. This allows all the flavors to meld beautifully.
Serving Suggestions
Once your salad has chilled and is ready to serve, it’s time to plate! This Cucumber Feta Salad is as beautiful as it is delicious. Serve it in a large bowl for family-style dining or portion it into individual servings for a more formal gathering. Drizzle with a little extra olive oil and sprinkle some fresh herbs on top for a lovely presentation. It pairs wonderfully with grilled meats, crusty bread, or even as a stand-alone light lunch!
Recipe Variations
Now that you know the classic recipe, why not get a bit creative? Here are a few fun variations you can try:
-
Mediterranean Twist: Add kalamata olives and cherry tomatoes for a colorful Mediterranean vibe.
-
Spicy Kick: Toss in some sliced jalapeños or a diced red chili for a spicy twist!
-
Fruit Fusion: Add diced watermelon or strawberries for a sweet and refreshing take.
-
Quinoa Boost: Mix in some cooked quinoa for added texture and heartiness.
-
Vegan Delight: Swap feta for soaked cashews blended with nutritional yeast, lemon juice, and a pinch of salt for a vegan-friendly version.
Chef’s Notes
Every recipe has its journey, and this Cucumber Feta Salad has evolved over the years. Initially, I kept it super simple, just cucumbers and feta. But as I’ve grown to appreciate the flavors and textures that different ingredients bring, I’ve added herbs, spices, and even fruits to make this dish my own. One of my kitchen stories involves an impromptu summer barbecue where I forgot the lemon! Instead, I used some balsamic vinegar—totally unexpected, yet surprisingly delightful. Cooking is all about the spirit of experimentation, so don’t shy away from making this salad your own.
FAQs and Troubleshooting
-
Can I make this salad ahead of time?
Absolutely! This salad can be made a day in advance. Just make sure to store it in an airtight container in the fridge. The flavors will deepen, but be cautious with cucumbers as they may release water, making the salad a bit soggy. -
What if my cucumbers are bitter?
If your cucumbers taste bitter, it could be due to a harsh skin. Peeling them before using can help reduce bitterness. Also, scrubbing them under cold water before slicing can improve flavor! -
How long will this salad last?
This salad is best enjoyed fresh but can typically last 2-3 days in the fridge. Just remember that the cucumbers will lose some of their crunch over time. -
What can I serve with this salad?
This cucumber feta salad is incredibly versatile! It pairs well with grilled chicken, steak, seafood, or even some hearty pasta dishes. Perfect alongside anything hot off the grill!
Nutritional Information
While this recipe is also about flavor, it’s good to know what you’re enjoying! Each serving of this Classic Cucumber Feta Salad is packed with refreshing veggies and heart-healthy fats from olive oil. It’s low in calories, making it a guilt-free addition to any meal!
There you have it, my dear friends! The Classic Cucumber Feta Salad is not just a dish; it’s a summer experience waiting to happen. I hope you try this recipe and make your own cherished memories around the table. Remember, cooking should be fun and fulfilling, so enjoy every moment in your kitchen. Happy cooking! 🍽️
PrintClassic Cucumber Feta Salad
A refreshing summer salad made with fresh cucumbers, crumbled feta cheese, and herbs.
- Prep Time: 15 minutes
- Cook Time: 0 minutes
- Total Time: 30 minutes
- Yield: 4 servings 1x
- Category: Salad
- Method: No-Cook
- Cuisine: Mediterranean
- Diet: Vegetarian
Ingredients
- 3 medium English cucumbers
- 1 cup crumbled feta cheese
- 1/4 cup thinly sliced red onion (optional)
- 2 tablespoons chopped fresh dill or mint
- 3 tablespoons extra virgin olive oil
- Juice of 1 medium lemon (about 2 tablespoons)
- 1 small garlic clove, minced
- Salt and pepper to taste
- Optional: pinch of crushed red pepper flakes
- Optional: drizzle of honey
Instructions
- Prepare the cucumbers: Start by washing your cucumbers thoroughly. Slice them thinly using a sharp knife or a mandolin for uniformity. Set them aside in a large mixing bowl.
- Add the onion (if using) to the bowl with the cucumbers.
- Mix in the feta cheese over the cucumbers and onion.
- Chop the fresh dill or mint and add to the salad.
- Make the dressing by whisking together olive oil, lemon juice, minced garlic, salt, and pepper.
- Combine everything by drizzling the dressing over the salad and gently tossing.
- Taste and adjust seasoning as needed.
- Chill in the fridge for about 30 minutes.
Notes
Great for summer picnics and pairs well with grilled meats.
Nutrition
- Serving Size: 1 serving
- Calories: 200
- Sugar: 3g
- Sodium: 450mg
- Fat: 15g
- Saturated Fat: 4g
- Unsaturated Fat: 10g
- Trans Fat: 0g
- Carbohydrates: 10g
- Fiber: 2g
- Protein: 6g
- Cholesterol: 15mg
Keywords: cucumber, salad, feta, summer, healthy
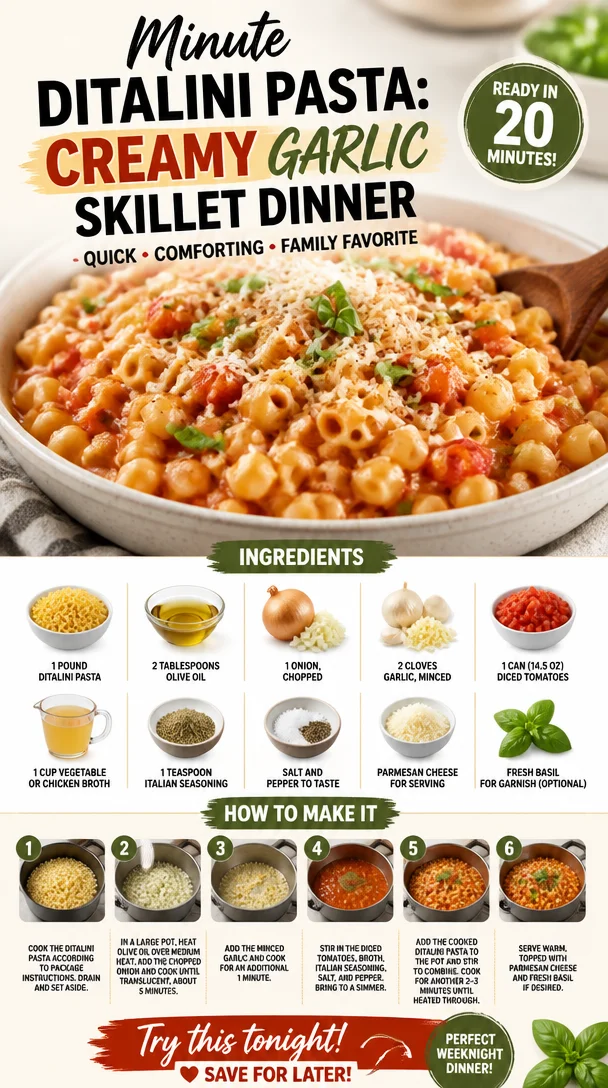
Minute Ditalini Pasta: Creamy Garlic Skillet Dinner
Ditalini Pasta Recipe: A Cozy Dinner Idea You’ll Love!
Hello, fellow food lovers! Today, I’m thrilled to share a delightful recipe that has become a staple in my kitchen: Ditalini Pasta. This comforting dish is not only quick to prepare but also bursting with flavors that’ll warm your heart and fill your home with inviting aromas. Best of all? It’s perfect for any occasion, whether you’re hosting a dinner party or whipping up a cozy meal for yourself. So, roll up your sleeves, and let’s get cooking!
A Fond Memory: The Dinner Table
I remember the first time I made a ditalini pasta dish for a gathering. It was a chilly evening, and I had invited a few close friends over for dinner. As I stirred the pot on the stove, the smell of sautéed garlic and onions filled the air, instantly bringing a cozy vibe to my home. I set a rustic wooden table with candles and fresh herbs, creating an ambiance that felt special yet relaxed.
When my friends arrived, we shared stories, laughter, and a few glasses of wine as I served the ditalini. Each bite was a testament to the warmth and joy of cooking for loved ones. As we dug in, I realized that food isn’t just about nourishment; it’s about connection. Those moments spent around the table, feasting on delicious food together, are what I cherish the most. This dish holds a special place in my heart because it perfectly embodies that spirit of comfort and togetherness.
Ingredients You’ll Need
Let’s gather our ingredients! Here’s what you’ll need for a delightful ditalini pasta dish:
-
1 pound ditalini pasta
Ditalini is a small, tubular pasta that works beautifully in soups or served as a light, hearty dish. Looking for a substitute? Use elbow macaroni or orzo for a similar texture. -
2 tablespoons olive oil
A staple in Mediterranean cooking, olive oil adds richness and flavor. If you’re seeking a lighter option, avocado oil is a great alternative. -
1 onion, chopped
Onions provide an aromatic base for the dish. You can swap with shallots for a sweeter taste or use green onions for a brighter flavor. -
2 cloves garlic, minced
Garlic adds a punch of flavor. If you’re short on fresh garlic, garlic powder can be used, but for best results, fresh is always preferred. -
1 can (14.5 ounces) diced tomatoes
Canned tomatoes are perfect for this dish, adding acidity and a pop of color. They can be substituted with fresh diced tomatoes or crushed tomatoes if you prefer. -
1 cup vegetable or chicken broth
Broth enriches the dish, enhancing the flavor profile. For a vegetarian version, go with vegetable broth, or use chicken broth if you’d like a meaty depth. -
1 teaspoon Italian seasoning
This aromatic blend typically includes basil, oregano, and thyme. No Italian seasoning on hand? Try mixing equal parts of the individual herbs for a homemade option. -
Salt and pepper to taste
Basic, but essential! They are crucial for seasoning and enhancing all flavors. Adjust according to your preference. -
Parmesan cheese for serving
A sprinkle of Parmesan cheese adds a nutty, salty finish. Pecorino Romano can be a bold substitute, or nutritional yeast works for a dairy-free option. -
Fresh basil for garnish (optional)
This herb adds a lovely fresh note on top! If fresh basil isn’t available, try fresh parsley for a similar touch.
Now that we have everything ready, we can dive into the fun part — cooking!
Step-by-Step Instructions
-
Cook the Pasta
In a large pot, bring salted water to a rolling boil. Add 1 pound of ditalini pasta and cook according to package instructions until al dente (approximately 6-8 minutes). Stir occasionally to prevent sticking. Once done, drain the pasta and set aside. This small pasta shape holds sauces beautifully! -
Sauté the Aromatics
In the same pot, heat 2 tablespoons of olive oil over medium heat. Add the chopped onion and sauté until it becomes translucent, about 5 minutes. The smell will be divine! Now, add 2 minced garlic cloves and sauté for another minute, until fragrant. Pro tip: keep an eye on the garlic so it doesn’t burn! -
Incorporate Tomatoes and Broth
Pour in 1 can of diced tomatoes (with juices) and 1 cup of broth. Stir well, and season with 1 teaspoon of Italian seasoning, salt, and pepper. Let this simmer on low for 5-10 minutes. This step allows the flavors to meld beautifully, creating a savory tomato base. -
Combine the Pasta
Add the cooked ditalini pasta back into the pot, stirring gently to combine everything. Make sure every piece is coated in the delicious sauce. Keep it on low heat just for a couple more minutes, allowing the pasta to absorb some of the sauce flavors. If it looks too thick, you can add a little more broth or water to reach your desired consistency. -
Serve and Enjoy
Just before serving, taste and adjust seasonings as needed. If you feel inspired, toss in some fresh basil! Now, scoop individual portions into bowls, generously top with freshly grated Parmesan cheese, and maybe a drizzle of olive oil for that final touch. Enjoy it with a piece of crusty bread — it’s a match made in heaven!
Serving Suggestions
For an elegant presentation, use a large serving bowl and let the colorful ditalini dish shine! Garnish with fresh basil leaves and a sprinkle of grated Parmesan across the top. If you want to elevate it further, add a dash of red pepper flakes for a little heat. This dish pairs beautifully with a simple side salad or some grilled vegetables for a complete meal.
Recipe Variations
-
Add Proteins
Feel free to incorporate cooked sausage, shredded rotisserie chicken, or even chickpeas for a protein boost! -
Vegetable Medley
Toss in sautéed spinach, zucchini, or bell peppers for extra nutrients and flavor. -
Creamy Twist
Stir in a splash of cream or milk just before serving for a creamy tomato pasta sensation. -
Spicy Kick
Add some crushed red pepper flakes or diced jalapeños for a spicier variation. -
Herb-Infused
Experiment with different herbs! Try adding fresh thyme or oregano for a different flavor profile.
Chef’s Notes
This ditalini pasta recipe has gracefully evolved in my kitchen over the years. I started with just a simple tomato broth, but over time, I’ve discovered the beauty of adding herbs and vegetables to enhance the flavors. I once added some roasted bell pepper by chance, and it became an instant hit! Cooking is all about experimenting, so don’t hesitate to make this dish your own. Trust me, no one ever leaves the table disappointed — it’s always a crowd-pleaser!
FAQs and Troubleshooting
-
Q: My pasta ended up sticky. What happened?
A: This can occur if the pasta isn’t stirred enough while cooking or if it’s overcooked. Always remember to stir during cooking and follow the recommended cooking time! -
Q: Can I meal prep this dish?
A: Absolutely! Ditalini pasta stores well. Just keep the pasta and sauce separate to avoid mushiness. Store in airtight containers in the fridge for up to 3 days. -
Q: Is there a way to make this dish gluten-free?
A: Yes! Swap the ditalini pasta for a gluten-free pasta alternative, and you’re good to go! -
Q: How can I make sure my seasoning is on point?
A: Always taste as you go! Start with less salt and seasonings, then add more until you reach your desired flavor profile.
Nutritional Info (Optional)
While I love celebrating the culinary experience, a rough breakdown of a serving of this ditalini pasta would be as follows (assuming 6 servings total):
- Calories: ~300
- Protein: ~9g
- Carbohydrates: ~42g
- Fat: ~9g
By marrying hearty ingredients and simple methods, you’ve created a delightful ditalini pasta dish that speaks of love and joy. I hope you enjoyed this culinary journey as much as I have loved sharing it with you. Now, tie on that apron, grab your ingredients, and let’s get cooking! Here’s to many delicious moments spent around your table. Cheers!
PrintDitalini Pasta
A delightful and comforting ditalini pasta dish, perfect for any occasion, filled with flavors and warmth.
- Prep Time: 10 minutes
- Cook Time: 20 minutes
- Total Time: 30 minutes
- Yield: 6 servings 1x
- Category: Main Course
- Method: Stovetop
- Cuisine: Italian
- Diet: Vegetarian
Ingredients
- 1 pound ditalini pasta
- 2 tablespoons olive oil
- 1 onion, chopped
- 2 cloves garlic, minced
- 1 can (14.5 ounces) diced tomatoes
- 1 cup vegetable or chicken broth
- 1 teaspoon Italian seasoning
- Salt and pepper to taste
- Parmesan cheese for serving
- Fresh basil for garnish (optional)
Instructions
- Cook the Pasta in a large pot of salted boiling water according to package instructions until al dente (approximately 6-8 minutes). Drain and set aside.
- Sauté the Aromatics by heating olive oil in the same pot over medium heat. Add chopped onion and sauté until translucent, about 5 minutes. Then, add minced garlic and sauté for another minute.
- Incorporate Tomatoes and Broth by pouring in diced tomatoes and broth. Season with Italian seasoning, salt, and pepper, then let simmer on low for 5-10 minutes.
- Combine the Pasta back into the pot, stirring gently to coat. Allow to heat through for a couple more minutes, adding more broth if needed.
- Serve and Enjoy by tasting and adjusting seasonings as needed. Scoop into bowls, top with Parmesan cheese, and enjoy with crusty bread.
Notes
Feel free to experiment with adding proteins or vegetables. This dish is versatile and allows for many variations!
Nutrition
- Serving Size: 1 serving
- Calories: 300
- Sugar: 6g
- Sodium: 500mg
- Fat: 12g
- Saturated Fat: 2g
- Unsaturated Fat: 8g
- Trans Fat: 0g
- Carbohydrates: 42g
- Fiber: 3g
- Protein: 9g
- Cholesterol: 5mg
Keywords: ditalini pasta, comfort food, easy dinner recipe, vegetarian pasta, Italian cuisine