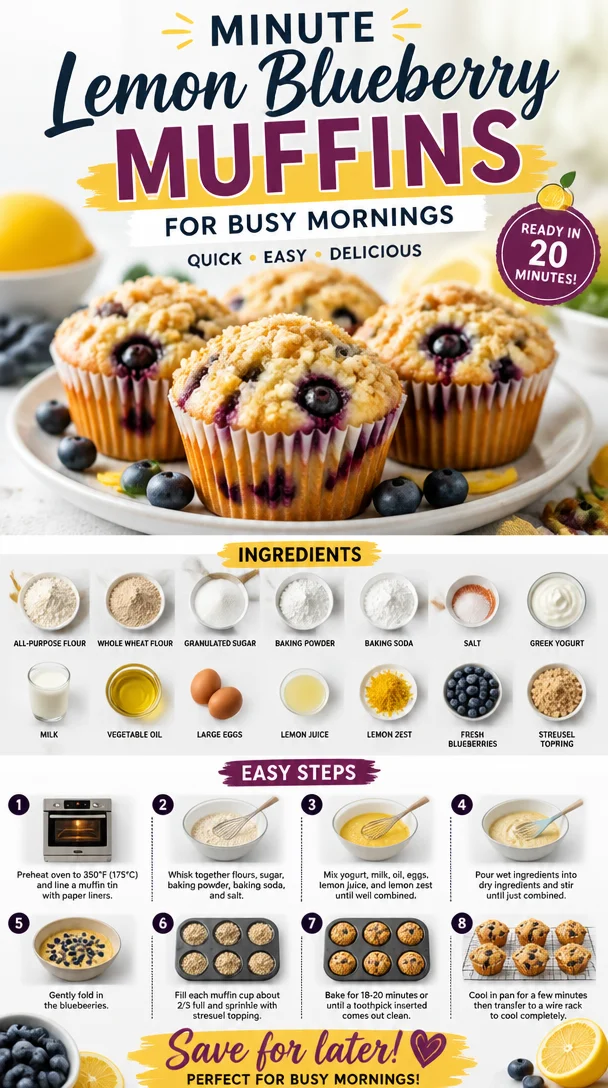
Minute Lemon Blueberry Muffins for Busy Mornings
The Perfect Lemon Blueberry Muffins: A Recipe for Sunshine
Hello, fellow food lovers! Savannah here from Ivory Apron, and today we’re diving into a recipe that’s not just delicious but also packed with nostalgia: Lemon Blueberry Muffins. There’s something magical about the combination of tart lemons and sweet blueberries that brings a spark of joy to any morning. Whether you’re enjoying these for breakfast or brunch, they’re sure to put a smile on your face!
A Sweet Memory
Let me take you back to a sunny Saturday morning a few years ago. I had gathered a few dear friends for a casual brunch in my backyard. As the golden rays peeked through the trees, I decided that lemon blueberry muffins would be the star of the spread. The delightful aroma of baking muffins wafted through the air, mingling with the sounds of laughter and cheerful chatter.
As I pulled the warm muffins out of the oven, my friends immediately circled around, drawn by the fresh scents dancing around us. We slathered those muffins with creamy butter and tried to be polite as we devoured them! Each bite was a burst of fluffy goodness, the tang of the lemon elevating the sweetness of the blueberries. That morning became one of those perfect moments that linger in your memory, reminding me why I love cooking and sharing good food with good friends. Now, let’s create some sunshine in your kitchen with my beloved lemon blueberry muffins!
Ingredients You’ll Need
Here’s a list of everything you’ll need to whip up these delightful muffins, along with some chef insights to help you along the way:
-
1 cup all-purpose flour
A classic choice for baking, it keeps the muffins light and fluffy. If you’re looking for a gluten-free option, almond flour or a gluten-free blend can be substituted but may alter the texture slightly. -
1 cup whole wheat flour
Adds a nutty flavor and boosts the nutritional value. You could opt for spelt flour if you want something different but retain a wholesome taste. -
1/2 cup granulated sugar
Sweetness is key! If you’d like to reduce sugar, coconut sugar or maple syrup can work, but adjust the liquid to keep the muffins moist. -
2 teaspoons baking powder
This leavening agent keeps your muffins light. Ensure it’s fresh! If it’s been sitting in the back of your pantry for a while, it might need a little check. -
1/2 teaspoon baking soda
Balances the acidity of the lemon juice. You can omit it if you don’t have it on hand, but the muffins will be a bit denser. -
1/4 teaspoon salt
Balances sweetness. Always a critical ingredient to enhance flavor! -
1/2 cup Greek yogurt
Keeps the muffins moist and adds protein. You can use regular yogurt or buttermilk in a pinch, but Greek gives that lovely tang. -
1/2 cup milk
Regular or any non-dairy milk (like almond or oat) can be used here. Just remember, the thickness might change the muffin texture. -
1/4 cup vegetable oil
Adds moisture without the density of butter. You can substitute melted coconut oil for a lighter flavor. -
2 large eggs
Binds everything together and aids in that fluffy texture. You can replace with flax eggs (1 tablespoon ground flaxseed + 3 tablespoons water) for a vegan option. -
1 tablespoon lemon juice
Freshly squeezed is best! You can substitute with lime juice for a fun twist. -
1 tablespoon lemon zest
This is where the magic happens! The flavor is potent. Avoid substitutes here; zest makes a significant difference in taste. -
1 cup fresh blueberries
Use fresh for bursts of flavor; frozen blueberries will work, but they may bleed into the batter. If frozen, don’t thaw them to keep the bursting juices intact. -
1/2 cup streusel topping (optional)
An elegant touch! Mix flour, sugar, and butter together until crumbly. For a spice kick, you can add a bit of cinnamon!
Step-by-Step Instructions
Now to the fun part! Let’s create those muffins step by step. I’ll sprinkle in some chef hacks to guide you along the way!
-
Preheat your oven to 375°F (190°C)
This is crucial! Preheating ensures that your muffins rise beautifully right from the start. -
Prepare a muffin tin
Line a 12-cup muffin tin with paper liners or grease them lightly with cooking spray. If you have a silicone muffin pan, even better! They pop right out after baking. -
Whisk the dry ingredients
In a large bowl, combine the all-purpose flour, whole wheat flour, sugar, baking powder, baking soda, and salt. Give it a quick whisk! This is where the air gets in, helping your muffins rise.Chef tip: If you’re measuring flour, gently spoon it into the measuring cup instead of scooping it straight from the bag. This prevents compacting the flour and making your muffins dense.
-
Mix wet ingredients
In another bowl, whisk together the Greek yogurt, milk, vegetable oil, eggs, lemon juice, and lemon zest until smooth.Chef hack: If your yogurt is cold, let it sit at room temperature for about 10 minutes for easy mixing.
-
Combine the mixtures
Gradually add the wet ingredients to the dry ingredients. Stir gently using a spatula until just combined. It’s okay if a few lumps remain; over-mixing will lead to tough muffins! -
Fold in the blueberries
Gently fold in the fresh blueberries. Be tender here! You want those lovely berries intact, giving you sweet bursts in every bite.Pro tip: Toss the blueberries in a little flour before folding them in to prevent sinking during baking.
-
Fill the muffin tin
Use an ice cream scoop or spoon to fill each muffin cup about ¾ of the way full. This allows room for them to rise without spilling over. -
Add streusel topping (optional)
If you’re going for the streusel topping, sprinkle a generous amount over each muffin. This adds a delightful crunch and sweetness to each muffin. -
Bake
Pop those beauties in the preheated oven and bake for 18-22 minutes, or until a toothpick inserted in the center comes out clean (or with a few crumbs, but no wet batter!). -
Cool and enjoy
Let your muffins cool in the pan for about 5 minutes before transferring them to a wire rack. This helps them set and keeps the bottoms from steaming.
Serving Suggestions
To serve, plate your muffins on a beautiful cake stand or wooden board. This makes them look extra tempting! You might like to drizzle a bit of honey or serve them with a dollop of whipped cream for an elegant touch. Aim for a cozy vibe — perhaps a fresh cup of coffee or tea to complete your muffin experience!
Recipe Variations
- Lemon Poppy Seed Muffins: Substitute half of the blueberries for poppy seeds for a delightful crunch and flavor.
- Lemon Blueberry Oat Muffins: Swap half of the all-purpose flour with rolled oats for a heartier muffin!
- Coconut Lemon Blueberry Muffins: Add shredded coconut for a tropical twist!
- Gluten-Free Version: Use a gluten-free all-purpose flour blend and check for any other gluten-containing ingredients.
- Maple Lemon Muffins: Replace granulated sugar with maple syrup for a deeper sweetness.
Chef’s Notes
This recipe has been a staple in my kitchen for years, evolving over time. I once experimented with different fruits and flavorings, but the classic lemon and blueberry combo always had a special place in my heart. I recall a time when I accidentally used expired baking powder — yikes! The muffins turned out flat but taught me the value of freshness in baking. Now, I always have a fresh stash!
FAQs and Troubleshooting
-
Why did my muffins sink in the middle?
This can happen if the batter is over-mixed or if the baking powder was old. Always gently fold your batter and ensure all your ingredients are fresh! -
How do I store the leftovers?
Store cooled muffins in an airtight container at room temperature for 2-3 days or in the fridge for up to a week. You can freeze them for up to 3 months; just wrap them individually! -
Can I make these vegan?
Absolutely! Replace the eggs with flax eggs, use plant-based yogurt and milk, and substitute granulated sugar with maple syrup or agave. -
What can I do if my muffins are too dry?
If your muffins come out dry, try reducing the flour a bit next time, or adding a touch more Greek yogurt or milk for moisture. Always keep an eye on the baking time; every oven behaves differently!
Nutritional Info
These cupcakes are not only delicious but can be a nutritious snack when made right! Each muffin approximately contains:
- Calories: 180
- Protein: 4g
- Carbohydrates: 30g
- Fats: 6g
- Fiber: 2g
(Note: Nutritional values are approximate and will vary based on specific ingredients and portion sizes.)
So there you have it, my lemon blueberry muffin recipe, perfect for brightening your day — and your brunch table! Grab your apron and let’s bake some love. Don’t forget to share your creations with me on social media, and always remember: good food is about showing up and creating moments to cherish. Happy baking! 🍋🫐
PrintThe Perfect Lemon Blueberry Muffins
Delightfully fluffy lemon blueberry muffins that bring joy to any morning, perfect for breakfast or brunch.
- Prep Time: 15 minutes
- Cook Time: 20 minutes
- Total Time: 35 minutes
- Yield: 12 muffins 1x
- Category: Breakfast
- Method: Baking
- Cuisine: American
- Diet: Vegetarian
Ingredients
- 1 cup all-purpose flour
- 1 cup whole wheat flour
- 1/2 cup granulated sugar
- 2 teaspoons baking powder
- 1/2 teaspoon baking soda
- 1/4 teaspoon salt
- 1/2 cup Greek yogurt
- 1/2 cup milk
- 1/4 cup vegetable oil
- 2 large eggs
- 1 tablespoon lemon juice
- 1 tablespoon lemon zest
- 1 cup fresh blueberries
- 1/2 cup streusel topping (optional)
Instructions
- Preheat your oven to 375°F (190°C).
- Prepare a muffin tin by lining it with paper liners or greasing it lightly.
- Whisk the dry ingredients in a large bowl: all-purpose flour, whole wheat flour, sugar, baking powder, baking soda, and salt.
- Mix the wet ingredients in another bowl: Greek yogurt, milk, vegetable oil, eggs, lemon juice, and lemon zest.
- Combine the mixtures, gradually adding wet to dry until just combined.
- Fold in the fresh blueberries gently.
- Fill the muffin tin about ¾ of the way full with the batter.
- Add streusel topping if desired.
- Bake for 18-22 minutes until a toothpick comes out clean.
- Cool the muffins for about 5 minutes before transferring them to a wire rack.
Notes
You can substitute ingredients for vegan options or gluten-free alternatives as needed. Store leftovers in an airtight container for up to a week.
Nutrition
- Serving Size: 1 muffin
- Calories: 180
- Sugar: 5g
- Sodium: 150mg
- Fat: 6g
- Saturated Fat: 2g
- Unsaturated Fat: 4g
- Trans Fat: 0g
- Carbohydrates: 30g
- Fiber: 2g
- Protein: 4g
- Cholesterol: 30mg
Keywords: lemon blueberry muffins, breakfast muffins, healthy muffins
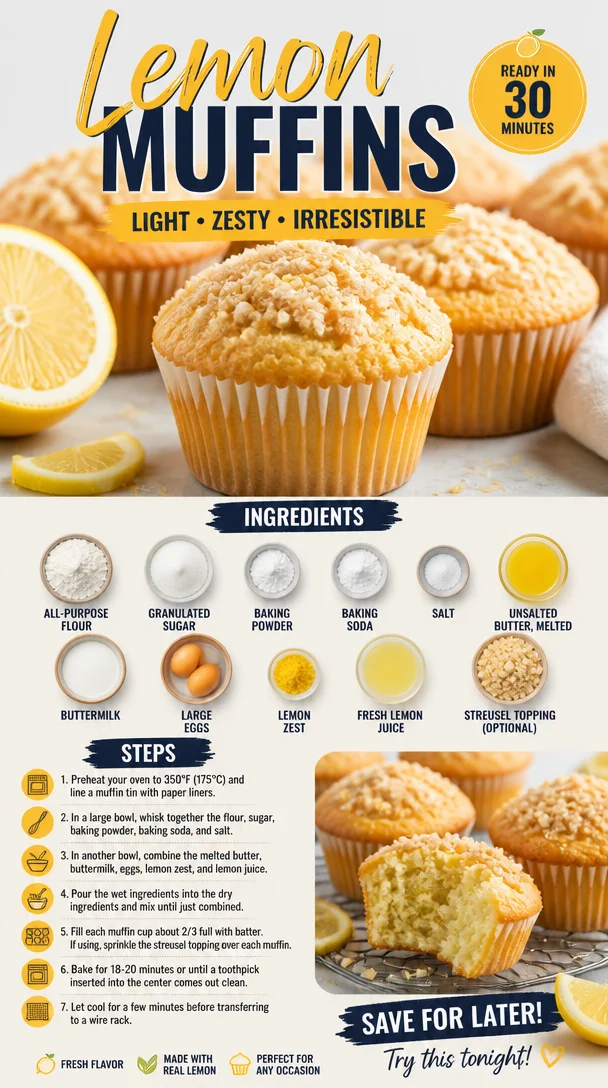
Lemon Muffins
Delightfully Zesty Lemon Muffins: A Sunshine-Packed Delight
Hello, fellow food lovers! Today, we’re diving into a dish that will brighten up your breakfast table or your afternoon snack time — Lemon Muffins. These muffins are a delightful combination of sweet and tangy, with a zesty burst of lemon that feels like sunshine in every bite. Perfectly fluffy with a hint of crumbly joy on top, they are a delicious way to start your day, share with friends, or savor with a cup of tea.
Now, let me take you on a little journey back to my childhood, where the aroma of freshly baked lemon muffins wafted through my grandmother’s kitchen. Every Sunday morning, as the sun peeked through the curtains, we would gather around her quaint wooden table, basking in the golden rays and the warmth of her love. My grandmother had a special knack for baking, and her lemon muffins were a family favorite. She taught me how to balance the perfect amount of sweetness with tartness, turning what could have been an ordinary muffin into something extraordinary.
We’d sit together, her gentle hands guiding mine as we measured ingredients and whisked them together, sharing stories about life, dreams, and the magic of cooking. There was something about mixing the batter and zesting the lemons that felt like a secret rite of passage. That simple act of baking became a cherished memory, one that inspired me to create inviting moments around the table for years to come. Now, it’s my turn to share this recipe with you, hoping to spark joy in your kitchens and create your own delightful memories.
Ingredients
Here’s what you’ll need to whip up these gorgeous Lemon Muffins:
-
1 1/2 cups all-purpose flour
A classic base for baking, all-purpose flour provides the structure needed for fluffy muffins. If you’d like a healthier option, try substituting half with whole wheat flour for added fiber. -
1 cup granulated sugar
Sugar adds sweetness and moisture, balancing the tanginess of the lemons. If you want to cut back on calories, coconut sugar or a sweetener of your choice can work just fine! -
2 teaspoons baking powder
This little powerhouse helps the muffins rise, creating that light and airy texture we all crave. Make sure your baking powder is fresh for the best results! -
1/2 teaspoon baking soda
Baking soda complements the acidity of the lemon juice, helping the muffins get that perfect lift. Store it in a cool, dry place to maintain its potency. -
1/4 teaspoon salt
A pinch of salt brings out all the beautiful flavors in your muffins. It may seem small, but it’s a key player! -
1/2 cup unsalted butter, melted
Butter infuses richness and moisture, creating a tender crumb. You can use coconut oil or a dairy-free butter substitute if you’re looking for a vegan option. -
1 cup buttermilk
Buttermilk adds depth of flavor and a touch of tanginess, contributing to that irresistible moist texture. If you don’t have buttermilk on hand, you can make your own by adding a tablespoon of vinegar to regular milk and letting it sit for a few minutes. -
2 large eggs
Eggs bind everything together and help with leavening. For an egg-free alternative, consider using flaxseed meal — mix one tablespoon of flaxseed with three tablespoons of water and let it sit for a few minutes until it thickens. -
1 tablespoon lemon zest
Highlighting the bright notes of lemon, zest adds an aromatic punch. Make sure to use organic lemons to avoid any waxy residues. -
1/4 cup fresh lemon juice
This is where the magic happens! Freshly squeezed lemon juice packs a vibrant punch. If you’re in a pinch, bottled lemon juice works—but fresh is best for flavor. -
1/2 cup streusel topping (optional)
For that beautiful, crunchy topping, combine flour, sugar, and butter for a decadent touch! Alternatively, you can leave this out for a lighter muffin.
Step-by-Step Instructions
Now that we’ve gathered all our ingredients, let’s get baking! Follow these steps, and I promise you’ll be the proud owner of the zestiest lemon muffins.
-
Preheat the Oven
Start by preheating your oven to 400°F (200°C). This ensures your muffins rise beautifully and get that perfect golden color. Trust me, the anticipation will make it even more delightful! -
Prepare the Muffin Tin
Grease your muffin tin with butter or line it with paper liners. If you’re using a non-stick muffin tin, greasing isn’t necessary, but it sure helps to be safe! -
Mix Dry Ingredients
In a large mixing bowl, whisk together the flour, sugar, baking powder, baking soda, and salt. This is the foundation of your muffins. Mixing them together thoroughly helps distribute the leavening agents evenly. -
Combine Wet Ingredients
In another bowl, mix the melted butter, buttermilk, eggs, lemon zest, and lemon juice until well combined. Feel free to dance as you whisk; it really adds flavor! -
Fold Wet into Dry
Gently fold the wet ingredients into the dry mixture with a spatula just until combined. Don’t overmix; a few lumps are perfect! Think of it as a delicate process — you don’t want to deflate your muffins. -
Fill the Muffin Tin
Spoon the batter into the prepared muffin tin, filling each cup about 3/4 full. This allows enough room for the muffins to rise without spilling over. If you’re using streusel topping, sprinkle it generously over each muffin. -
Bake
Place the muffin tin in the preheated oven and bake for 15–20 minutes, or until a toothpick inserted into the center comes out clean. The smell wafting through your kitchen will be heavenly! -
Cool and Enjoy
Once they’re baked, remove them from the oven and let them cool for a few minutes in the muffin tin before transferring them to a wire rack. This helps them firm up while keeping them deliciously moist.
Serving Suggestions
To showcase your beautiful lemon muffins, serve them on a lovely cake stand with a dusting of powdered sugar for a touch of elegance. Pair them with a side of fresh berries or a dollop of whipped cream for an extra special treat! And, of course, a cup of freshly brewed coffee or tea is an absolute must!
Recipe Variations
Feel free to get creative! Here are a few variations you can try:
- Blueberry Lemon Muffins: Add a cup of fresh blueberries for a delightful berry twist.
- Lemon Poppy Seed Muffins: Incorporate two tablespoons of poppy seeds for added crunch and flavor.
- Glazed Lemon Muffins: For an extra layer of sweetness, drizzle a lemon glaze made from powdered sugar and lemon juice over the cooled muffins.
- Vegan Lemon Muffins: Use almond or coconut milk in place of buttermilk and flaxseed for eggs to create a vegan-friendly option.
Chef’s Notes
Every time I whip up a batch of lemon muffins, I’m transported back to my grandmother’s kitchen. I often think about how her love for cooking shaped my passion for it. The beauty of this recipe is its simplicity; it’s a canvas that allows you to add your own flair. Over the years, I’ve seen these muffins evolve — some days they are just plain lemon, while others they burst with blueberries.
One kitchen story comes to mind: I once mistakenly used baking soda instead of baking powder and ended up with a muffin explosion in my oven! A lesson learned never to rush in the kitchen! So take your time, enjoy the process, and remember that every misstep is an opportunity to create something new.
FAQs and Troubleshooting
Q: My muffins turned out dense and heavy. What went wrong?
A: This could be due to overmixing the batter. Remember, gentle folding is key!
Q: Can I use all whole wheat flour?
A: You can! Just note that it may result in a denser muffin. A mix of whole wheat and all-purpose flour usually yields the best results.
Q: How can I keep my muffins fresh?
A: Store them in an airtight container at room temperature for up to three days, or freeze them for longer storage. They taste delightful even after freezing—just thaw and enjoy!
Q: What if I don’t have buttermilk?
A: No worries! Mix one cup of milk with a tablespoon of vinegar and let it sit for five minutes; voilà, you have homemade buttermilk!
Nutritional Info (Optional)
While I typically focus on the joy and connection that comes from cooking, a rough estimate for each muffin is about 180 calories, 5 grams of fat, 25 grams of carbohydrates, and 3 grams of protein.
And there you have it — my lemon muffin recipe that’s sure to brighten your day! Now, it’s your turn to tie on your apron, gather your ingredients, and create some special memories in your own kitchen. Happy baking, and remember, good food is all about showing up and sharing with those you love! 🍋🧁
PrintDelightfully Zesty Lemon Muffins

A delightful combination of sweet and tangy lemon muffins, perfectly fluffy with a hint of crumbly joy on top. Light and airy, these muffins are a perfect way to start your day.
- Prep Time: 15 minutes
- Cook Time: 20 minutes
- Total Time: 35 minutes
- Yield: 12 servings 1x
- Category: Dessert
- Method: Baking
- Cuisine: American
- Diet: Vegetarian
Ingredients
- 1 1/2 cups all-purpose flour
- 1 cup granulated sugar
- 2 teaspoons baking powder
- 1/2 teaspoon baking soda
- 1/4 teaspoon salt
- 1/2 cup unsalted butter, melted
- 1 cup buttermilk
- 2 large eggs
- 1 tablespoon lemon zest
- 1/4 cup fresh lemon juice
- 1/2 cup streusel topping (optional)
Instructions
- Preheat your oven to 400°F (200°C).
- Prepare your muffin tin by greasing it with butter or lining it with paper liners.
- Mix together the flour, sugar, baking powder, baking soda, and salt in a large mixing bowl.
- Combine the melted butter, buttermilk, eggs, lemon zest, and lemon juice in another bowl.
- Fold the wet ingredients into the dry mixture with a spatula until just combined.
- Fill each muffin cup about 3/4 full with batter.
- Bake for 15–20 minutes, or until a toothpick comes out clean.
- Cool for a few minutes in the tin, then transfer to a wire rack.
Notes
For an extra layer of sweetness, drizzle a lemon glaze made from powdered sugar and lemon juice over the cooled muffins. Store in an airtight container for up to three days.
Nutrition
- Serving Size: 1 muffin
- Calories: 180
- Sugar: 25g
- Sodium: 200mg
- Fat: 5g
- Saturated Fat: 3g
- Unsaturated Fat: 2g
- Trans Fat: 0g
- Carbohydrates: 25g
- Fiber: 1g
- Protein: 3g
- Cholesterol: 40mg
Keywords: lemon muffins, breakfast muffins, dessert, baking, easy recipes
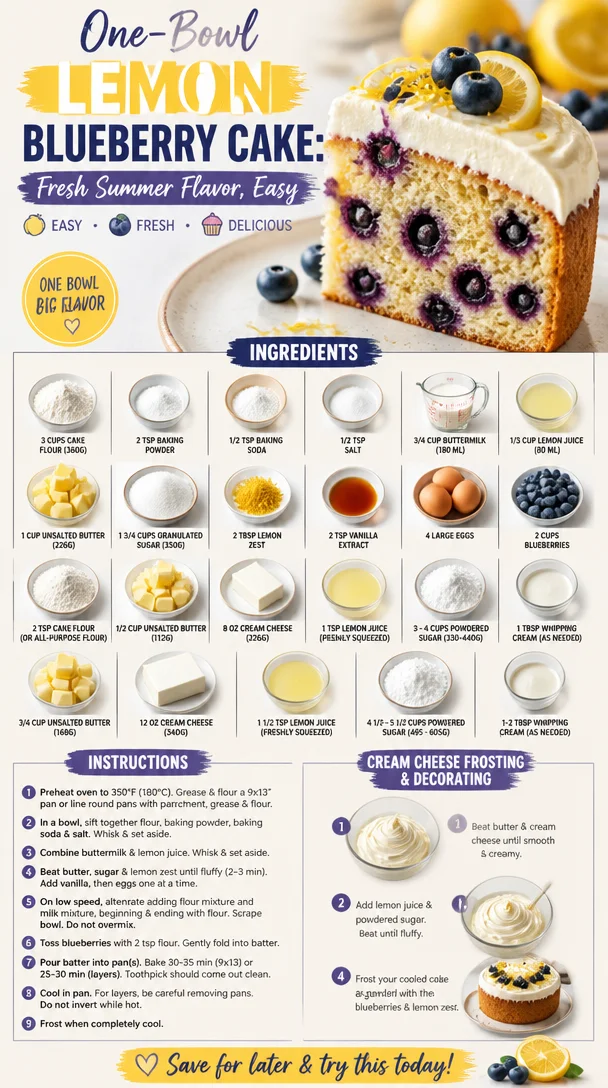
One-Bowl Lemon Blueberry Cake: Fresh Summer Flavor, Easy
The Delightful Union of Lemon and Blueberry: A Cake to Cherish
Hello fellow food lovers! Today, I am absolutely thrilled to share a recipe that has been a staple in my kitchen and a true crowd-pleaser — the Lemon Blueberry Cake. This cake beautifully captures the bright essence of lemon paired with the sweet, juicy burst of blueberries, resulting in a dessert that is simply irresistible. Whether it’s a casual Tuesday night or a festive celebration, this cake will bring a touch of elegance and joy to your table.
Let’s dive into this delightful journey filled with flavors, stories, and, of course, a sprinkling of love. I promise, making this Lemon Blueberry Cake will be as enjoyable as tasting it!
A Sweet Memory Wrapped in Citrus
When I think of lemon blueberry cake, I flash back to the summers of my childhood. My grandmother had this tiny garden behind her quaint little house, brimming with blueberries and a lemon tree that looked like it had jumped straight out of a storybook. Every summer, we would gather the ripe blueberries and slice fresh lemons from her garden, spending afternoons creating various treats. One particular day, we decided to bake a lemon blueberry cake — an experiment that turned out to be deliciously memorable!
I can still feel the warm sunshine on my back and smell the zesty aroma wafting through the kitchen. As we whisked together our ingredients, there was laughter, stories filled with joy, and those occasional flour dust clouds that reminded me how inviting and messy the kitchen can be. As the cake rose in the oven, the scents mingled in the air, and we couldn’t wait for that first bite. From that day forward, lemon blueberry cake became a family tradition, a recipe I am passionate about sharing with you all.
Ingredients You’ll Need
To craft this delightful Lemon Blueberry Cake, you’ll need a handful of ingredients — most of which you might already have in your pantry. Here’s the list:
-
3 cups cake flour (360 grams)
Cake flour gives the cake a light and airy texture. If you don’t have cake flour, you can substitute it with all-purpose flour; just add an extra tablespoon per cup. -
2 teaspoons baking powder
This is essential for lift. Make sure it’s fresh for the best results! -
1/2 teaspoon baking soda
This helps balance the acidity of the lemon, giving your cake an extra rise. -
1/2 teaspoon salt
Salt is the secret ingredient that enhances all the flavors in your cake. Don’t skip it! -
3/4 cup buttermilk (180 ml, room temperature)
If you don’t have buttermilk, you can create a substitute by mixing 3/4 cup of milk with 1 tablespoon of vinegar or lemon juice. Let it sit for a few minutes until it curdles slightly. -
1/3 cup lemon juice (80 ml, freshly squeezed)
Freshly squeezed lemon juice is a must! The store-bought kind just doesn’t have the same punch of flavor. -
1 cup unsalted butter (226 grams, softened to room temperature)
Room temperature butter ensures a creamy mixture with no lumps. For a dairy-free option, you can use a plant-based butter. -
1 3/4 cups granulated sugar (350 grams)
This is the magic sweetener! You can substitute part of this with honey or maple syrup for a different flavor profile, but remember to adjust the wet ingredients accordingly. -
2 tablespoons lemon zest
Grate the yellow part of the lemon skin to get that essential aroma and flavor! A microplane works wonders for this. -
2 teaspoons vanilla extract
A staple in many desserts! Opt for pure vanilla extract for a deeper flavor. -
4 large eggs (room temperature)
Eggs act as a binder. Make sure they’re room temperature to help with emulsification! -
2 cups blueberries
Fresh blueberries are best, but you can use frozen. Just keep them frozen until you’re ready to use them to prevent the cake from turning blue! -
2 teaspoons cake flour (or all-purpose flour)
Dust the blueberries with flour to help distribute them evenly throughout the cake batter.
For the Cream Cheese Frosting:
-
1/2 cup unsalted butter (112 grams, softened)
Just like the cake, ensure this is soft for easy mixing. -
8 oz brick-style cream cheese (226 grams)
Full-fat cream cheese gives the frosting both texture and flavor. Avoid using spreadable cream cheese. -
1 teaspoon lemon juice (freshly squeezed)
A touch of acid enhances the flavor of the frosting. -
3 – 4 cups powdered sugar (330-440 grams, sifted)
Sifting eliminates lumps and leads to a smooth frosting. -
1 tablespoon whipping cream (as needed)
Use this to adjust the consistency of the frosting. -
3/4 cup unsalted butter (168 grams, softened)
Another lovely butter addition for creamier frosting! -
12 ounces brick-style cream cheese (340 grams, full fat)
Ensures your frosting is rich and decadent. -
1 1/2 teaspoons lemon juice (freshly squeezed)
Just like before, don’t skimp on freshness here. -
4 1/2 – 5 1/2 cups powdered sugar (495 – 605 grams, sifted)
Adjust according to your preferred sweetness and stability. -
1-2 tablespoons whipping cream (as needed)
This will help to achieve the desired texture of your frosting.
Step-by-Step Instructions
Alright, let’s roll up those sleeves and get baking! Follow these easy steps:
-
Preheat your oven to 350°F (175°C). This is where the magic begins!
-
Prep your pans: Grease and flour two 9-inch round cake pans. You can also line the bottoms with parchment paper for easier release later.
-
Combine dry ingredients: In a mixing bowl, whisk together the cake flour, baking powder, baking soda, and salt. This ensures they’re evenly distributed, which leads to a consistent rise. Set aside.
-
Get your liquids ready: In another bowl, whisk the buttermilk, lemon juice, and lemon zest until combined. The acidity of the lemon juice coupled with the buttermilk will make your cake tender and flavorful.
-
Cream the butter and sugar: In your stand mixer, beat the softened unsalted butter and granulated sugar until it’s light and fluffy, about 3-4 minutes. This step is key for a light cake texture, so take your time!
-
Add eggs: One at a time, add the room temperature eggs, mixing well after each addition. Scrape down the sides of the bowl as needed. This ensures all ingredients are well incorporated.
-
Add vanilla: Mix in the vanilla extract — oh, that aroma is heavenly!
-
Combine wet and dry ingredients: Gradually add the flour mixture into the butter mixture, alternating with the buttermilk mixture. Start and end with the dry ingredients. Mix until just combined; avoid overmixing!
-
Toss the blueberries: In a small bowl, toss the fresh blueberries with 2 teaspoons of cake flour. This will help them not sink to the bottom. Gently fold them into the batter, being careful not to break them apart.
-
Pour and bake: Divide the batter evenly between your prepared cake pans and smooth the tops with a spatula. Bake in the preheated oven for about 25-30 minutes, or until a toothpick inserted into the center comes out clean.
-
Cool the cakes: Once baked, remove from the oven and allow the cakes to cool in the pans for 10 minutes. Then turn them out onto a wire rack to cool completely. Patience is key here!
-
Prepare the frosting: In a mixing bowl, beat together the softened cream cheese and butter until fluffy. Gradually add in sifted powdered sugar and mix until smooth. Finally, mix in the lemon juice and whip until light and airy. If it’s too thick, add a bit of whipping cream to achieve your desired consistency.
-
Frost the cakes: Once the cakes are completely cool, spread a generous layer of frosting between the two cake layers. Place the second layer on top and frost the top and sides of the cake. Decorate with fresh blueberries if you desire — it adds a lovely touch!
Serving Suggestions
Let the cake chill in the refrigerator for about an hour before serving, as this helps the frosting set a bit. Slice and serve on pretty plates with a garnish of lemon slices or extra blueberries on top. A refreshing cup of herbal tea or a sparkling lemonade pairs beautifully, elevating your dessert presentation even further.
Recipe Variations
Here are a few fun variations to help you make this recipe your own:
- Lemon Poppy Seed Twist: Add 2 tablespoons of poppy seeds to the batter for an added crunch.
- Berry Medley: Substitute some blueberries with raspberries or blackberries for an extra burst of flavor and color.
- Lemon Curd Filling: For an extra tangy surprise, layer some lemon curd between the cake layers, then frost as usual.
- Gluten-Free Option: Substitute regular flour with a gluten-free all-purpose blend. Just make sure it contains xanthan gum for the best results.
- Vegan Makeover: Replace eggs with flax eggs and use a dairy-free butter substitute along with plant-based cream cheese for a delightful vegan dessert.
Chef’s Notes
It’s funny — as much as I strive for perfection in the kitchen, things sometimes do go awry! I’ll never forget the time I misread my grandmother’s old recipe and added a whole cup of baking soda instead of baking powder. The resulting cake was a disaster! But mistakes like those are what you learn from. They make cooking an adventure and a rich, personal experience. Over the years, my lemon blueberry cake has transformed from a messy kitchen masterpiece to a cherished family recipe. Each time I bake it, I feel like I’m bringing a part of my history to the table.
FAQs and Troubleshooting
Q: My cake is too dense; what went wrong?
A: There could be a few reasons for this. Make sure that you’re not overmixing your batter after adding the flour. Also, double-check that you’re using fresh baking powder and baking soda.
Q: Why did my blueberries sink to the bottom?
A: Dusting the blueberries in flour helps prevent sinking. If they still sink, it may be due to the batter being too runny. Make sure to check your measurements!
Q: How do I store leftover cake?
A: Store any leftovers in an airtight container in the fridge for up to 5 days. You can also freeze individual slices wrapped tightly in plastic wrap for up to 3 months!
Q: Can I make this cake ahead of time?
A: Absolutely! You can bake the cake ahead of time and freeze the layers without frosting. When you’re ready to serve, thaw them, frost, and enjoy!
Nutritional Info
While I won’t dive deep into technical nutritional breakdowns, it’s essential to remember that desserts are meant for enjoyment! That said, treat yourself, savor each bite, and share with your loved ones. Cooking and eating should be a celebration of life, not a stressor!
So there you have it, my dear friends! A delightful journey through the zesty and sweet creation of Lemon Blueberry Cake. I encourage you to try this recipe, make it your own, and perhaps create your cherished memories in the kitchen.
Remember to tie on your apron, enjoy the process, and allow the warm essence of home cooking to fill your heart and the hearts of those you love. Happy Baking!
PrintLemon Blueberry Cake
A delightful and moist cake that combines the brightness of lemon with the sweetness of blueberries, perfect for any occasion.
- Prep Time: 20 minutes
- Cook Time: 30 minutes
- Total Time: 50 minutes
- Yield: 10 servings 1x
- Category: Dessert
- Method: Baking
- Cuisine: American
- Diet: Vegetarian
Ingredients
- 3 cups cake flour (360 grams)
- 2 teaspoons baking powder
- 1/2 teaspoon baking soda
- 1/2 teaspoon salt
- 3/4 cup buttermilk (180 ml, room temperature)
- 1/3 cup lemon juice (80 ml, freshly squeezed)
- 1 cup unsalted butter (226 grams, softened to room temperature)
- 1 3/4 cups granulated sugar (350 grams)
- 2 tablespoons lemon zest
- 2 teaspoons vanilla extract
- 4 large eggs (room temperature)
- 2 cups blueberries
- 2 teaspoons cake flour (or all-purpose flour)
- For the Cream Cheese Frosting:
- 1/2 cup unsalted butter (112 grams, softened)
- 8 oz brick-style cream cheese (226 grams)
- 1 teaspoon lemon juice (freshly squeezed)
- 3 – 4 cups powdered sugar (330–440 grams, sifted)
- 1 tablespoon whipping cream (as needed)
Instructions
- Preheat your oven to 350°F (175°C).
- Prep your pans: Grease and flour two 9-inch round cake pans.
- Combine dry ingredients: In a mixing bowl, whisk together the cake flour, baking powder, baking soda, and salt. Set aside.
- Get your liquids ready: In another bowl, whisk the buttermilk, lemon juice, and lemon zest until combined.
- Cream the butter and sugar: In your stand mixer, beat the softened unsalted butter and granulated sugar until light and fluffy.
- Add eggs: One at a time, add the room temperature eggs, mixing well after each addition.
- Add vanilla: Mix in the vanilla extract.
- Combine wet and dry ingredients: Gradually add the flour mixture into the butter mixture, alternating with the buttermilk mixture.
- Toss the blueberries: Dust the fresh blueberries with 2 teaspoons of cake flour and fold them into the batter.
- Pour and bake: Divide the batter between your prepared cake pans and bake for about 25-30 minutes.
- Cool the cakes: Let the cakes cool in the pans for 10 minutes before turning them out onto a wire rack to cool completely.
- Prepare the frosting: Beat together softened cream cheese and butter until fluffy, then gradually add sifted powdered sugar.
- Frost the cakes: Spread frosting between the two layers and on top and sides of the cooled cake.
Notes
For a gluten-free option, substitute regular flour with a gluten-free blend. A vegan version can be made using flax eggs and dairy-free ingredients.
Nutrition
- Serving Size: 1 slice
- Calories: 400
- Sugar: 30g
- Sodium: 150mg
- Fat: 18g
- Saturated Fat: 10g
- Unsaturated Fat: 6g
- Trans Fat: 0g
- Carbohydrates: 50g
- Fiber: 2g
- Protein: 4g
- Cholesterol: 80mg
Keywords: lemon, blueberry, cake, dessert, sweet, baking
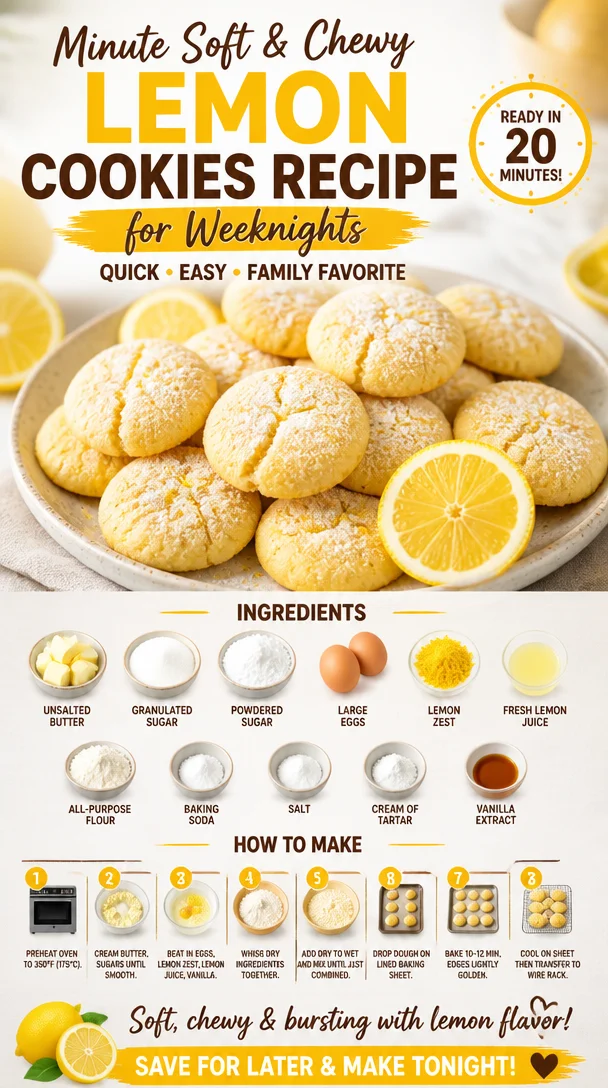
Minute Soft & Chewy Lemon Cookies Recipe for Weeknights
Soft & Chewy Lemon Cookies: A Taste of Sunshine
Hello, fellow food lovers! Today, let’s take a delightful journey into the world of baking with soft and chewy lemon cookies that will brighten up any day. There’s something so uplifting about the freshness of lemon, don’t you think? Whether it’s the first bite of a warm cookie or the way the scent wafts through your kitchen, these lemon cookies are sure to bring a bit of sunshine into your life. Ready to whip up something scrumptious? Let’s dive right in!
A Little Nostalgia in Every Bite
Growing up, my grandmother had this magical way of making every holiday special. I remember bustling around the kitchen with her, the air scented with citrus and sugar, as she would bake her famous lemon cookies. While I had my little hands busy mixing and measuring, she’d often share stories about her childhood, where every cookie was made with love and laughter. The laughter often turned into playful contests over who could make the best cookies—her firm belief was that the secret ingredient was always a heaping spoonful of joy.
I still use her recipes, adding my own spin along the way, but that warm memory stays with me every time I mix up these zesty delights. These cookies remind me that baking is about creating memories as much as it is about the final product. So, gather your love and let’s get baking these soft, chewy lemon cookies!
Ingredients You’ll Need
Here’s what you need for your lemon cookies. Each ingredient plays an important role, so let’s break it down a bit:
-
1 cup unsalted butter, softened
Using unsalted butter gives you complete control over the salt levels in your cookies. Make sure it’s softened for easier blending. Margarine can be used in a pinch, but nothing beats the rich flavor of butter! -
1 cup granulated sugar
This is your main sweetener, giving cookies the delightful structure we all love. If you want a hint of caramel flavor, try brown sugar instead! -
1/2 cup powdered sugar
Powdered sugar adds a touch of sweetness and helps create that soft, melt-in-your-mouth texture. You can make your own by blending granulated sugar until fine! -
2 large eggs
Eggs act as a binding agent in your cookie dough. If you’re vegan, try using flax eggs (1 tablespoon ground flaxseed mixed with 2.5 tablespoons water for each egg). -
1 tablespoon lemon zest
Zest brings a wonderful aromatic citrus flavor. Use a microplane for finely grating it. Don’t skip this—it’s super important for enhancing the lemon taste! -
1/4 cup fresh lemon juice
Freshly squeezed lemon juice is a must! It brightens up the cookies and gives them that refreshing tang. If you’re in a hurry, bottled lemon juice will work, but fresh is always best. -
3 cups all-purpose flour
This is the main structure of your cookies. Alternatively, you can substitute half of the flour with almond flour for a lovely nutty flavor. -
1 teaspoon baking soda
Baking soda is your leavening agent that helps in achieving the perfect rise—so don’t skip it! Baking powder can be a substitute, but you’ll need a bit more. -
1/2 teaspoon salt
Just a dash of salt enhances the sweetness and balances flavors. -
1/2 teaspoon cream of tartar
This ingredient adds stability to your cookies and helps them maintain a soft, chewy texture. If you don’t have it, a bit of extra baking soda can help too. -
1/2 teaspoon vanilla extract
A hint of vanilla rounds out flavors beautifully and adds a lovely aroma. Feel free to use organic or homemade for an extra boost!
Step-by-Step Instructions for Soft & Chewy Lemon Cookies
Now that we have our delightful ensemble of ingredients, let’s get to the fun part—baking! Follow these simple steps to create your batch of lemon goodness:
-
Preheat Your Oven
Preheat your oven to 350°F (175°C). This is crucial for achieving the perfectly baked cookie. While it heats up, you can prepare your cookie dough! -
Cream the Butter and Sugars
In a large mixing bowl, beat the softened butter with the granulated and powdered sugars until the mixture is light and fluffy—about 2-3 minutes. This process incorporates air, which helps your cookies rise beautifully. -
Add Eggs and Flavorings
One at a time, add the eggs, mixing well after each addition. Then, stir in the lemon zest, lemon juice, and vanilla extract. The mixture will look slightly curdled, but don’t worry; it’s perfectly normal! -
Combine Dry Ingredients
In a separate bowl, whisk together the flour, baking soda, salt, and cream of tartar. Gradually add this dry mix to the wet mixture, stirring just until combined. Overmixing can create tough cookies—no one wants that! -
Chill Your Dough (Optional)
For a thicker cookie with a lovely chewy center, chill your dough for at least 30 minutes. This step isn’t mandatory, but it helps prevent spreading while baking. -
Scoop and Bake
Using a cookie scoop or tablespoon, drop your dough onto a lined baking sheet, spacing them about 2 inches apart. Bake in the preheated oven for 10-12 minutes, or until the edges are lightly golden. -
Cool Your Cookies
Allow the cookies to cool on the baking sheet for about 5 minutes before transferring them to a wire rack. This helps them set up while still warm, keeping that delicious chewy texture. -
Enjoy!
There’s nothing quite like a warm cookie. Pair with a glass of milk, or enjoy them on their own for a cozy treat. Trust me; you’ll be coming back for more!
Serving Suggestions
Presentation matters, right? For an elevated feel, arrange your cookies on a beautiful platter. Maybe garnish them with a sprinkle of lemon zest or even edible flowers for a stunning touch. Don’t forget to pour a tall glass of cold milk or a refreshing lemonade to complete the experience!
Recipe Variations
Get creative with these fun twists on your lemon cookies:
- Lemon Poppy Seed Cookies: Add a tablespoon of poppy seeds for a delightful crunch.
- Chocolate-Dipped Lemon Cookies: Dip half of each cookie in melted dark chocolate for a delicious flavor contrast.
- Lemon Blueberry Cookies: Fold in a cup of fresh or frozen blueberries into the dough for extra fruity goodness.
- Lavender Lemon Cookies: Incorporate a teaspoon of culinary lavender for a soothing floral aroma.
- Gluten-Free Version: Substitute all-purpose flour with a gluten-free flour blend. Ensure that your other ingredients are gluten-free as well.
Chef’s Notes
These cookies have evolved quite a bit in my kitchen! I remember when I first started experimenting with lemon cookies, they would often come out too dry or too flat. It took a few trials (and a bit of patience) to discover the perfect balance of ingredients and chilling times. The soft, chewy texture has become a family favorite—my kids often request them on special occasions. And you should see their faces when they come out of the oven, oh yes, it’s a beautiful sight!
FAQs and Troubleshooting
Q: My cookies spread too much in the oven. What went wrong?
A: This could be due to overmixing or not chilling the dough long enough. Try chilling for at least 30 minutes to an hour next time.
Q: Why are my cookies too hard?
A: Overbaking can lead to a tough cookie. Keep an eye on them and pull them out once the edges are golden but the centers still look slightly soft.
Q: Can I freeze the cookie dough?
A: Yes! You can freeze the dough for up to three months. Scoop it into balls, freeze on a tray, and then transfer to a freezer bag. Bake from frozen, adding a couple of extra minutes to the baking time.
Q: How do I store leftover cookies?
A: Keep them in an airtight container at room temperature for up to a week. For longer storage, pop them in the freezer; they’ll be just as delicious once thawed.
Nutritional Info (Optional)
For those interested in a general idea, one lemon cookie has approximately 150 calories, 7g of fat, 21g of carbohydrates, and 1g of protein (depending on exact size and variations).
So there you have it! An easy, delightful recipe for soft and chewy lemon cookies that not only tastes amazing but also carries with it a sense of nostalgia and warmth. I can’t wait to hear how yours turn out. Remember, each cookie carries a piece of your story—the laughter, love, and good times shared around the table. Happy baking!
PrintSoft & Chewy Lemon Cookies

Delightful soft and chewy lemon cookies that bring a taste of sunshine to your day.
- Prep Time: 15 minutes
- Cook Time: 12 minutes
- Total Time: 27 minutes
- Yield: 24 cookies 1x
- Category: Dessert
- Method: Baking
- Cuisine: American
- Diet: Vegetarian
Ingredients
- 1 cup unsalted butter, softened
- 1 cup granulated sugar
- 1/2 cup powdered sugar
- 2 large eggs
- 1 tablespoon lemon zest
- 1/4 cup fresh lemon juice
- 3 cups all-purpose flour
- 1 teaspoon baking soda
- 1/2 teaspoon salt
- 1/2 teaspoon cream of tartar
- 1/2 teaspoon vanilla extract
Instructions
- Preheat your oven to 350°F (175°C).
- Cream the butter and sugars until light and fluffy, about 2-3 minutes.
- Add the eggs one at a time, mixing well after each. Then stir in lemon zest, lemon juice, and vanilla.
- Combine dry ingredients in a separate bowl, then gradually add to wet mixture, stirring until just combined.
- Chill your dough for at least 30 minutes for a thicker cookie (optional).
- Scoop dough onto a lined baking sheet, spacing them 2 inches apart.
- Bake for 10-12 minutes until the edges are lightly golden.
- Cool on the baking sheet for 5 minutes before transferring to a wire rack.
Notes
Chilling the dough helps prevent spreading while baking. For variation, consider adding poppy seeds or dipping in chocolate.
Nutrition
- Serving Size: 1 cookie
- Calories: 150
- Sugar: 12g
- Sodium: 150mg
- Fat: 7g
- Saturated Fat: 4g
- Unsaturated Fat: 3g
- Trans Fat: 0g
- Carbohydrates: 21g
- Fiber: 0g
- Protein: 1g
- Cholesterol: 30mg
Keywords: lemon cookies, chewy cookies, baking, dessert, cookies
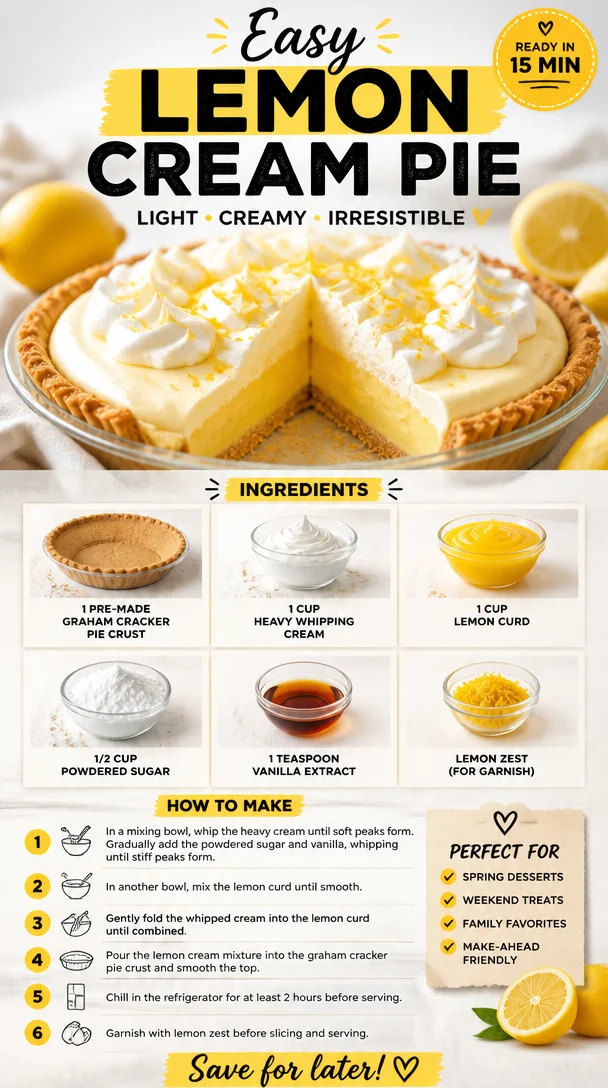
Easy Lemon Cream Pie
Easy Lemon Cream Pie: A Delightful Bite of Sunshine
Hello, my fellow food enthusiasts! Today, we’re diving into a dessert that’s as bright and refreshing as a sunny day: the Easy Lemon Cream Pie. Whether you’re hosting a summer barbecue, planning a holiday gathering, or just want to treat yourself to something sweet, this pie is a delightful choice that strikes the perfect balance between sweet and tangy.
Lemon cream pie is one of those magical desserts that whisk you away to a sun-kissed patio, where laughter dances in the air and the warmth of the sun feels like a warm embrace. And let’s be honest—there’s something incredibly satisfying about combining pantry staples to create a dessert that looks (and tastes!) anything but ordinary.
When I first made this Easy Lemon Cream Pie—a recipe that has become a staple in my kitchen—I was taken back in time to family gatherings where desserts were the highlight of the meal. Warm summers spent outside, sharing stories with family, sipping lemonade, and taking those first heavenly bites of this creamy wonder. It’s that nostalgia that drives me to share this recipe, hoping it can create similar moments for you!
So, grab your apron and let’s get started on the journey to make this delightful dessert.
A Slice of Nostalgia
One of my fondest memories tied to lemon cream pie is the summer I attempted to impress my friends with my “culinary skills.” It was a hot July afternoon, and I was determined to create a dessert that would be crowned the highlight of our get-together. With everything set—music blasting, patio lights twinkling—I decided to whip up this lemon cream pie, inspired by my grandmother’s recipe.
As I mixed the lemon curd and whipped cream, the bright aroma of citrus filled the room. Little did I know that a few minor mishaps would turn my kitchen into a scene from a slapstick comedy! In my excitement, I accidentally knocked over a container of powdered sugar, creating a cloud of confectioners’ fog that left my kitchen looking like a snowstorm had hit. But in true culinary spirit, I rolled with it, scooping the sugar off the counter with a laugh.
When the pie finally set and we cut into it, the first bite was pure bliss—smooth, creamy, bursting with lemon flavor, with a subtle sweetness. The laughter we shared that day made for one of my favorite culinary memories. Now, every time I make this easy lemon cream pie, I remember that playful summer and the joy of creating something that brought everyone together.
Ingredients
Let’s gather the ingredients for this sweet creation! Here’s what you’ll need:
-
1 pre-made graham cracker pie crust: This saves time and effort! You can also use crushed graham crackers mixed with melted butter for a homemade version, but don’t be afraid to go for store-bought if you prefer ease.
-
1 cup heavy whipping cream: This will create a luscious, fluffy texture. If you want a lighter alternative, you can opt for coconut cream, which adds a delightful tropical twist.
-
1 cup lemon curd: You can make your own (which I highly recommend if you have the time) or buy high-quality lemon curd from the store. It’s tangy, sweet, and bursting with lemony goodness!
-
1/2 cup powdered sugar: This helps to sweeten the whipping cream while maintaining that soft, delicate texture. If you’re out of powdered sugar, you can blend granulated sugar until it’s fine.
-
1 teaspoon vanilla extract: This adds a warm undertone that balances the tartness of the lemons and enhances the overall flavor.
-
Lemon zest (for garnish): Not just for looks! The zest provides a fragrant citrus burst that will make your pie look and taste even fresher.
Step-by-Step Instructions
Ready to create a lemony masterpiece? Here’s how we do it, step by step:
-
Prepare Your Ingredients: Start by gathering all your ingredients and set them out on the counter. This makes the process smoother, and you won’t miss any essentials!
-
Whip the Cream: In a large mixing bowl, pour in the heavy whipping cream. Using an electric mixer, whip the cream on medium speed until it starts to thicken. Gradually add in the powdered sugar and continue to whip until soft peaks form. This should take about 3–5 minutes. Here’s a little chef’s hack: Be careful not to over-whip—if you go too far, the cream can turn into butter. We want light, airy clouds of cream, not a dairy disaster!
-
Combine the Ingredients: Gently fold in the lemon curd into the whipped cream using a spatula. It’s essential to do this slowly so as not to deflate the whipped cream—think delicate embraces, not aggressive mixing! Continue folding until the mixture is smooth and creamy. You want to retain that beautiful lightness while blending the flavors.
-
Fill the Pie Crust: Carefully pour the lemon cream mixture into your pre-made graham cracker pie crust. Use a spatula to spread it evenly. Here’s the fun part: Don’t worry about it being perfect! A little rustic charm adds to its homemade allure!
-
Chill: Cover your pie with plastic wrap and place it in the refrigerator for at least 2–3 hours to let it set. If you’re in a hurry, you can freeze it for about an hour but keep an eye on it—you don’t want to serve lemon slush.
-
Garnish and Serve: Once set, remove the pie from the fridge. Before serving, sprinkle lemon zest on top for an extra zing and pop of color. Slice with a sharp knife and watch your guests light up at that luscious filling!
Serving Suggestions
When plating this Easy Lemon Cream Pie, simplicity is key. Slice the pie into generous portions and place them on dessert plates. A drizzle of raspberry sauce (if you’re feeling fancy) or a side of fresh berries can elevate the presentation beautifully. Serve chilled and consider pairing it with a scoop of vanilla ice cream or a dollop of extra whipped cream. Trust me, your guests will thank you!
Recipe Variations
Mix things up a bit! Here are some creative twists you can try:
-
Berry Lemon Cream Pie: Fold in a cup of fresh or frozen mixed berries, like blueberries or strawberries, into your lemon cream for a fruity burst.
-
Meringue Topping: For a more traditional look, add a fluffy meringue topping instead of lemon zest. Bake it in the oven until golden brown for that classic touch.
-
Ginger Snap Crust: Switch out the graham cracker crust for a ginger snap crust for a spiced twist. The warmth of ginger complements the tartness of the lemon perfectly!
-
Coconut Cream Substitution: Swap out half of the heavy whipping cream with coconut cream for a tropical vibe that’s refreshing and unique.
-
Vegan Version: Use a vegan pie crust, coconut cream, and dairy-free powdered sugar to create a stunning vegan lemon cream pie.
Chef’s Notes
This Easy Lemon Cream Pie has stood the test of time in my kitchen. What started as a fun experiment transformed into a staple recipe passed down through friends and family. I love how versatile it is—it’s been the star at birthday parties, holiday gatherings, and casual dinners alike.
And let’s not forget those hilarious cooking mishaps! Like the time I mistakenly estimated a cup of lemon curd as two cups, resulting in a pie that was more like a lemon soup! We all laughed—because even the biggest kitchen blunders often lead to the best stories. Cooking is about experimenting, having fun, and sharing those imperfect moments with loved ones.
FAQs and Troubleshooting
Q: My pie is too runny; what went wrong?
A: If your pie turned out runny, it could be that the heavy cream wasn’t whipped enough, or it didn’t chill long enough. Ensure soft peaks form, and allow time for it to set in the refrigerator for at least 2 hours!
Q: Can I use homemade lemon curd?
A: Absolutely! Homemade lemon curd adds a depth of flavor that’s genuinely delightful. Just be sure it’s properly cooled before mixing it with the whipped cream.
Q: How long does this pie last?
A: Properly covered, this pie will last in the refrigerator for about 3–4 days. Ideal for those who want to savor it over a few days!
Q: Can I freeze the pie?
A: Yes! This pie freezes well. Just make sure you cover it tightly with plastic wrap and foil to prevent freezer burn. When you’re ready to enjoy it, let it thaw in the refrigerator.
Nutritional Info
While we won’t get too bogged down with numbers, this pie is a delicious treat best enjoyed occasionally as part of a balanced diet. One slice packs a punch of creamy goodness, bright lemony flavor, and happiness!
And there you have it—your guide to crafting a delightful Easy Lemon Cream Pie that radiates sunshine and joy! I hope this recipe inspires you to gather around your table, share laughter, and create sweet memories. Remember, cooking is about enjoying the process, having fun, and serving love on a plate. So tie on that ivory apron and let’s make magic happen! Happy baking! 🍋✨
PrintEasy Lemon Cream Pie

A bright and refreshing dessert that strikes the perfect balance between sweet and tangy.
- Prep Time: 15 minutes
- Cook Time: 0 minutes
- Total Time: 180 minutes
- Yield: 8 servings 1x
- Category: Dessert
- Method: Chilling
- Cuisine: American
- Diet: Vegetarian
Ingredients
- 1 pre-made graham cracker pie crust
- 1 cup heavy whipping cream
- 1 cup lemon curd
- 1/2 cup powdered sugar
- 1 teaspoon vanilla extract
- Lemon zest (for garnish)
Instructions
- Prepare Your Ingredients: Gather all your ingredients and set them out on the counter.
- Whip the Cream: In a large mixing bowl, whip the heavy cream on medium speed until it thickens. Gradually add the powdered sugar and continue to whip until soft peaks form.
- Combine the Ingredients: Gently fold the lemon curd into the whipped cream using a spatula.
- Fill the Pie Crust: Pour the lemon cream mixture into the pie crust and spread it evenly.
- Chill: Cover the pie with plastic wrap and refrigerate for at least 2–3 hours to let it set.
- Garnish and Serve: Sprinkle lemon zest on top before serving and enjoy!
Notes
This pie can be frozen; just cover it tightly to prevent freezer burn.
Nutrition
- Serving Size: 1 slice
- Calories: 300
- Sugar: 18g
- Sodium: 150mg
- Fat: 20g
- Saturated Fat: 10g
- Unsaturated Fat: 8g
- Trans Fat: 0g
- Carbohydrates: 30g
- Fiber: 1g
- Protein: 3g
- Cholesterol: 40mg
Keywords: lemon pie, dessert, summer dessert, easy pie recipe, creamy lemon pie
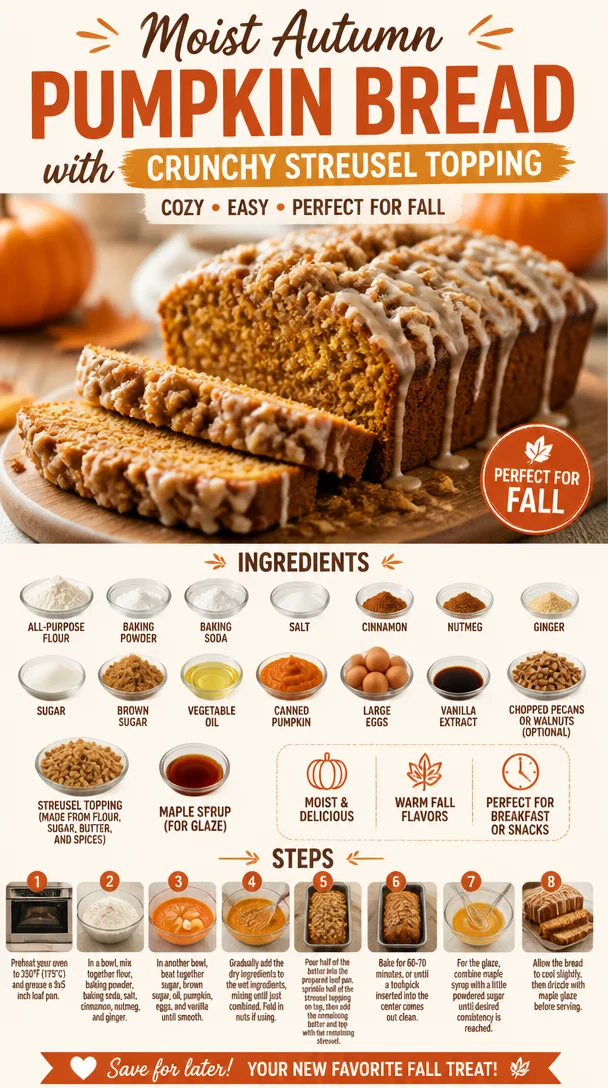
Moist Autumn Pumpkin Bread with Crunchy Streusel Topping
Moist Pumpkin Bread with Streusel Topping: A Slice of Fall Heaven
Hello, fellow foodies! Today, we’re diving into a cozy corner of my kitchen to revisit a classic recipe that wraps you in warmth like your favorite sweater—a Moist Pumpkin Bread with Streusel Topping. If there’s one thing I love about fall, it’s the excuse to indulge in pumpkin everything! This recipe is not only simple but also incredibly satisfying, making it perfect for gatherings or just enjoying a slice with your morning coffee. Let’s get baking!
A Cherished Memory in Every Bite
As a child, autumn was an enchanted time of year in my family. The leaves would change into stunning shades of orange and brown, inviting us to play outside. But the best part of fall? The warm, fragrant scents wafting through our home as my mom baked her famous pumpkin bread. I can still hear the sound of her mixing bowl clanking against the counter, the aroma of spices filling the air like a warm hug.
Gathered around our rickety dining table—each of us with a slice covered in a generous pat of butter—I remember the laughter, the stories shared, and the cozy comfort that only home-baked goods can provide. That is the essence of this pumpkin bread! It’s not just a recipe; it’s a doorway to childhood memories and heartwarming moments. And my goal is to recreate that lovely experience for you in your home.
Ingredients: Your Flavor Building Blocks
Here’s what you’ll need to whip up this delightful pumpkin bread, along with some chef insights that will help you elevate the dish:
-
2 cups all-purpose flour
The backbone of your bread. If you prefer a healthier take, consider swapping in whole wheat flour—just be aware that it may slightly alter the texture. -
1 teaspoon baking powder
This is your rising agent. If you run out of baking powder, you can substitute it with baking soda if you adjust the acid in your recipe slightly. -
1/2 teaspoon baking soda
Another rising agent, ensuring your bread is light and fluffy. -
1 teaspoon salt
Essential for balancing sweetness. If you’re watching your sodium intake, try a salt substitute, but use it sparingly. -
1 teaspoon cinnamon
No pumpkin bread is complete without this spice! It adds warmth and depth. You could swap it with allspice for an interesting twist. -
1/2 teaspoon nutmeg
A pinch goes a long way! Nutmeg adds a nutty sweetness that pairs beautifully with pumpkin. -
1/2 teaspoon ginger
For that subtle kick! You can use ground ginger or fresh ginger paste if you want a more vibrant flavor. -
1 cup sugar
Regular granulated sugar works here, but if you’re aiming for less refined sugar, coconut sugar is a great alternative. -
1/2 cup brown sugar
This will give your bread a lovely caramel undertone. Dark brown sugar will yield a richer flavor! -
1/2 cup vegetable oil
Vegetable oil keeps the bread moist. You can substitute it with melted coconut oil for a tropical twist. -
1 cup canned pumpkin
Pure pumpkin puree is perfect for this recipe. If you only have fresh pumpkin, be sure to roast and puree it first! -
4 large eggs
These provide structure. You can replace them with flax eggs for a vegan version. -
1 teaspoon vanilla extract
This adds a sweet floral note. Always go for pure vanilla extract when possible—it makes a world of difference. -
1/2 cup chopped pecans or walnuts (optional)
Adds a nice crunch! If you’re nut-free, feel free to omit this ingredient. -
1/2 cup streusel topping
Made from flour, sugar, butter, and spices, this crumbly topping is the crowning glory of your bread. -
1/4 cup maple syrup (for glaze)
Optional, but a drizzle of maple syrup post-baking gives your pumpkin bread a lovely sheen and extra sweetness.
Step-by-Step Instructions: Let’s Get Cooking!
Now, let’s roll up our sleeves and get to baking!
-
Preheat Your Oven
Preheat oven to 350°F (175°C). A hot oven ensures an even bake, giving you that perfect rise. -
Prepare Your Pan
Grease and flour a 9×5-inch loaf pan or line it with parchment paper for easy removal. No one likes a loaf that sticks! -
Mix the Dry Ingredients
In a large bowl, whisk together the flour, baking powder, baking soda, salt, cinnamon, nutmeg, and ginger. Mixing them first helps distribute the leavening agents evenly throughout your bread. -
Cream the Sugars and Oil
In another bowl, combine the granulated sugar, brown sugar, and vegetable oil. Whisk until well combined. This will help create a tender crumb, giving your bread that delightful moistness. -
Add Wet Ingredients
Beat in the pumpkin, eggs, and vanilla extract into the sugar-oil mixture. Mix until smooth. You want everything well incorporated to avoid clumps of pumpkin in your batter. -
Combine Wet and Dry Ingredients
Gently fold the dry ingredients into the wet mixture. Be careful not to overmix—this is where a light hand shines. A few lumps are okay; they’ll bake out. -
Stir in Nuts (if using)
If you’re adding pecans or walnuts, fold them in with your spatula. They will add a delightful crunch to each bite! -
Make the Streusel Topping
In a small bowl, mix flour, sugar, and spices, then cut in butter until crumbly. Sprinkle this delicious topping over the batter in the pan. Trust me, it’s going to add a fantastic texture! -
Bake the Bread
Pour the mixture into your prepared loaf pan and smooth the top. Bake for about 60-70 minutes, or until a toothpick inserted in the center comes out clean. -
Cool Down
Once baked, let your pumpkin bread cool in the pan for about 10 minutes. This process helps retain moisture. Then transfer it to a wire rack to cool completely. -
Glazing Time (optional)
For an extra touch of deliciousness, mix your maple syrup with a splash of water to thin it out, then drizzle over your cooled bread.
Serving Suggestions: Let’s Plate It Up!
When it comes to serving, simplicity is key! Slice your moist pumpkin bread and arrange the pieces on a rustic wooden board. If you’re feeling fancy, add a dollop of whipped cream or a scoop of homemade vanilla ice cream on the side. Pair it with a steaming cup of herbal tea or a rich coffee for an unforgettable experience. Trust me; your guests will be swooning!
Recipe Variations: Get Creative!
Now that you have the basics down, let’s shake things up! Here are a few delicious twists to try with this pumpkin bread:
- Chocolate Chip Variation: Fold in 1 cup of semi-sweet chocolate chips for a decadent treat.
- Spiced Up: Add 1 teaspoon of pumpkin pie spice for a bolder flavor profile.
- Gluten-Free: Swap the all-purpose flour for a 1:1 gluten-free flour blend.
- Coconut Twist: Mix in shredded coconut for a tropical flair.
- Mini Muffins: Bake your batter in muffin tins for delightful little treats. Just adjust the baking time to about 20-25 minutes.
Chef’s Notes: Keep it Heartfelt
Ah, the nostalgia of cooking! This recipe has been a staple in my home for years. I remember the first time I baked it for a friend’s gathering; I nervously watched people take their first bites. The moment their faces lit up and they asked for seconds—oh, the joy of creating something that brings happiness!
Pumpkin bread is inherently forgiving. It can evolve with the seasons and your taste, so don’t hesitate to sprinkle in your personality, just as I did.
FAQs and Troubleshooting: Let’s Clear Things Up!
-
Why is my pumpkin bread dense?
Overmixing can lead to dense bread. Mix just until combined for a lighter texture! -
Can I use fresh pumpkin instead of canned?
Absolutely! Just roast and puree your pumpkin, but make sure it’s well-drained. -
How can I tell when it’s done baking?
A toothpick inserted into the center should come out clean. If it comes out with batter, give it a few more minutes. -
What’s the best way to store pumpkin bread?
Wrap the loaf tightly in plastic wrap or foil, and keep it at room temperature for up to four days or freeze individual slices for up to three months.
Nutritional Info (Optional)
While I focus on deliciousness, considering nutritional value is always a good idea! Here’s a general breakdown per slice (based on 12 slices):
- Calories: 210
- Total Fat: 10g
- Saturated Fat: 1g
- Cholesterol: 33mg
- Sodium: 150mg
- Total Carbohydrates: 30g
- Dietary Fiber: 1g
- Sugars: 12g
- Protein: 3g
Conclusion
There you have it—a delightful journey to baking a Moist Pumpkin Bread with a crunchy Streusel Topping! I hope this recipe not only fills your kitchen with wonderful aromas but also inspires heartwarming stories around your table. Remember, cooking is about connection and creativity, so follow your instincts and make this recipe your own.
Happy baking, and may your kitchen be filled with love and laughter! 🥰🍂
PrintMoist Pumpkin Bread with Streusel Topping
This Moist Pumpkin Bread with Streusel Topping is a nostalgic fall favorite that wraps you in warmth and comfort.
- Prep Time: 20 minutes
- Cook Time: 70 minutes
- Total Time: 90 minutes
- Yield: 12 servings 1x
- Category: Dessert
- Method: Baking
- Cuisine: American
- Diet: Vegetarian
Ingredients
- 2 cups all-purpose flour
- 1 teaspoon baking powder
- 1/2 teaspoon baking soda
- 1 teaspoon salt
- 1 teaspoon cinnamon
- 1/2 teaspoon nutmeg
- 1/2 teaspoon ginger
- 1 cup sugar
- 1/2 cup brown sugar
- 1/2 cup vegetable oil
- 1 cup canned pumpkin
- 4 large eggs
- 1 teaspoon vanilla extract
- 1/2 cup chopped pecans or walnuts (optional)
- 1/2 cup streusel topping
- 1/4 cup maple syrup (for glaze, optional)
Instructions
- Preheat your oven to 350°F (175°C).
- Prepare a 9×5-inch loaf pan by greasing and flouring it or lining it with parchment paper.
- Mix the dry ingredients: In a large bowl, whisk together the flour, baking powder, baking soda, salt, cinnamon, nutmeg, and ginger.
- Cream the sugars and oil: In another bowl, combine the granulated sugar, brown sugar, and vegetable oil; whisk until well combined.
- Add the pumpkin, eggs, and vanilla extract to the sugar-oil mixture and mix until smooth.
- Combine the wet and dry ingredients gently, being careful not to overmix.
- Stir in the nuts if using.
- Make the streusel topping: Mix flour, sugar, and spices in a small bowl, then cut in butter until crumbly.
- Bake the mixture in your prepared pan for about 60-70 minutes, or until a toothpick comes out clean.
- Cool the bread for about 10 minutes in the pan, then transfer it to a wire rack.
- Glaze with maple syrup mixed with water if desired.
Notes
Feel free to experiment with variations like adding chocolate chips or making mini muffins.
Nutrition
- Serving Size: 1 slice
- Calories: 210
- Sugar: 12g
- Sodium: 150mg
- Fat: 10g
- Saturated Fat: 1g
- Unsaturated Fat: 7g
- Trans Fat: 0g
- Carbohydrates: 30g
- Fiber: 1g
- Protein: 3g
- Cholesterol: 33mg
Keywords: pumpkin bread, fall recipe, baked goods
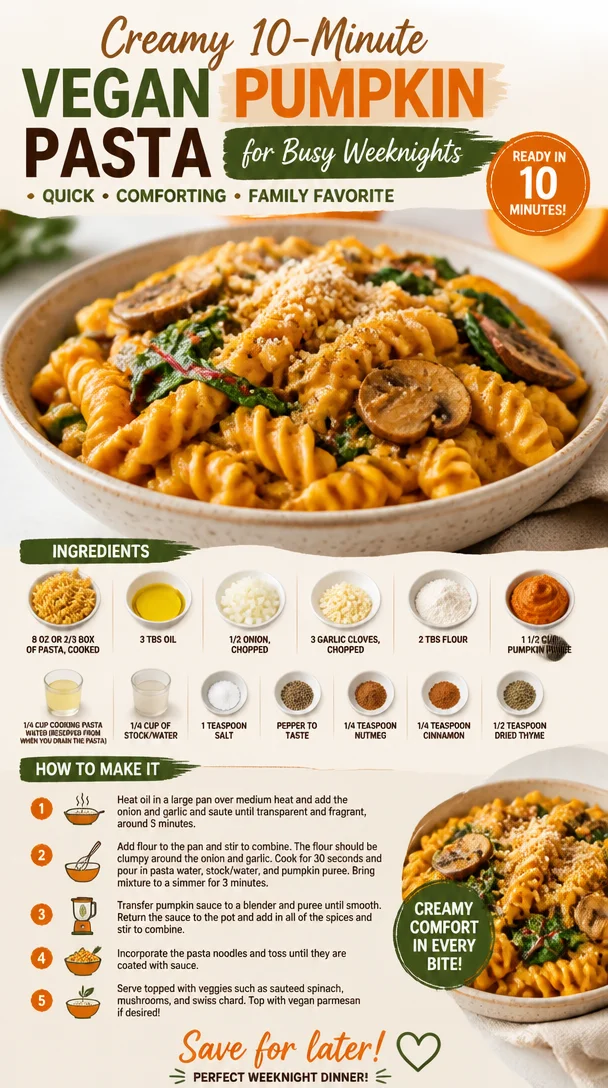
Creamy 10-Minute Vegan Pumpkin Pasta for Busy Weeknights
10-Minute Vegan Pumpkin Pasta: A Delightful Fall Favorite
Hello, fellow foodies! Welcome back to my kitchen, where I’m always excited to share my latest culinary creation. Today, we’re diving into the wonderful world of quick and cozy meals with none other than my 10-Minute Vegan Pumpkin Pasta!
As the leaves turn and autumn rolls in, there’s nothing quite like the warm, comforting flavors of pumpkin to usher in the season. This dish is not only perfect for a busy weeknight dinner but also offers that comforting vibe we all crave as we gather around the table. Ready to embrace some deliciousness? Let’s get cooking!
Personal Story: A Cozy Autumn Tradition
Every year, as the days grow shorter and the air turns crisp, I can’t help but think back to my childhood. My family had this delightful little tradition where we’d gather to carve pumpkins and roast the seeds, setting the stage for all things fall. What sticks out most, though, is the time my sister and I, armed with our little aprons, attempted to concoct our own pumpkin pasta from scratch. We were ambitious, using everything from the pumpkin guts to the last drop of cream. Sure, it was a chaotic mess, but it was filled with laughter, a few flour explosions, and some surprisingly tasty results! That day ignited my passion for making shared meals easy and enjoyable, regardless of skill or time constraints.
Fast forward to today, and I’ve channeled that love into this quick, vegan pasta that embodies all the rich flavors of fall. Let’s bring that comforting feel into your kitchen with this 10-minute wonder!
Ingredients
Let’s take a look at the ingredients you’ll need. Each one is essential for creating this delectable dish, and I’ll share some helpful tips along the way:
-
8 oz or 2/3 box of pasta, cooked
Use any pasta you like! I often opt for whole wheat or gluten-free options to suit different dietary needs. Just remember, if you’re using lentil or chickpea pasta, cooking time may vary slightly. -
3 tablespoons oil
Olive oil is my go-to for its flavor and health benefits, but feel free to use avocado oil or coconut oil if you prefer a milder taste. -
1/2 onion, chopped
Yellow or white onions work beautifully here. For a milder flavor, you can switch to shallots. -
3 garlic cloves, chopped
Garlic adds zest and warmth to the dish. If you’re a fan of garlic, don’t hesitate to throw in an extra clove! -
2 tablespoons flour
This helps to thicken our sauce. You can use all-purpose flour or a gluten-free alternative like cornstarch or chickpea flour. -
1 1/2 cups pumpkin puree
Canned pumpkin is super convenient, but if you’re feeling adventurous, you can roast fresh pumpkin and puree it yourself. Just scoop out the seeds, roast it until soft, and blend! -
1/4 cup cooking pasta water
This liquid is gold when it comes to adding flavor to sauces. Don’t forget to save it before draining your pasta! -
1/4 cup stock or water
Vegetable broth can add depth, but water will work just fine if you’re in a pinch. -
1 teaspoon salt
A must for enhancing the flavors in your dish. Adjust to your taste preference. -
Pepper to taste
Freshly cracked black pepper adds a lovely warmth; feel free to add as much as you like! -
1/4 teaspoon nutmeg
A hint of nutmeg complements pumpkin beautifully. It’s the secret ingredient that makes this dish sing! -
1/4 teaspoon cinnamon
Cinnamon rounds out the sweetness of the pumpkin and adds a cozy touch. -
1/2 teaspoon dried thyme
Adds an earthy component. Fresh thyme is also delightful if you have it on hand!
Step-by-Step Instructions
Let’s bring this pumpkin pasta to life! Here’s your day in the kitchen:
-
Cook your pasta
Start by boiling a pot of salted water. Add your pasta and cook according to package instructions until al dente, usually about 8–10 minutes. Make sure to reserve 1/4 cup of the cooking water before draining! -
Sauté the aromatics
In a large skillet, heat the olive oil over medium heat. Add the chopped onion and sauté for about 3-4 minutes until translucent and fragrant. Add the garlic in the last minute, cooking until soft. This step is essential for that lovely base flavor! -
Thicken it up
Stir in the flour, letting it cook for about a minute, creating a roux. This will help thicken your sauce. Don’t rush this; the flour needs a moment to cook. You’ll notice it starts to form a paste. -
Bring in the star—pumpkin!
Slowly whisk in the pumpkin puree along with the stock or water, mixing until you have a smooth consistency. If it feels too thick, add a splash more liquid until you reach your desired consistency. It should be creamy but not too heavy. -
Season it right
Add in the reserved pasta water, salt, pepper, nutmeg, cinnamon, and thyme. Stir well, allowing the flavors to meld together. Give it a taste here; if it feels like it needs a little kick, go crazy with those spices! -
Combine and serve
Toss your cooked pasta into the skillet, mixing everything thoroughly until each piece is coated in that luscious sauce. You can sprinkle a bit more pasta water in if it looks dry.
Serving Suggestions
Plating this dish should feel effortless, like a warm hug at the end of a long day. Transfer a generous serving of pasta onto a plate or into a shallow bowl. Finish it off with a sprinkle of freshly cracked pepper and perhaps a dash of extra thyme or a swirl of olive oil for that extra flair.
Pair it with a green salad or some crusty bread for a complete meal that feels cozy yet sophisticated.
Recipe Variations
Let’s get creative! Here are a few twists you can try with this recipe:
- Spicy Pumpkin Pasta: Add a pinch of red pepper flakes for a nice kick.
- Herbed Pumpkin Pasta: Mix in fresh herbs like sage or parsley for an herbal touch.
- Creamy Vegan Version: Replace some of the pumpkin puree with cashew cream for an extra creamy texture.
- Protein Boost: Add cooked chickpeas or lentils to round out the meal and add protein.
- Mushroom Delight: Stir in sautéed mushrooms for a hearty addition.
Chef’s Notes
Every recipe holds a special place in my heart, and this one is no exception. It has evolved quite a bit over the years. Initially, it started as a trial and error experience, but through each round of flavor testing, I learned that simplicity is key. Though the original version was more complex, I found that a straightforward approach allows the pumpkin’s natural sweetness and warmth to shine without getting lost in heavy ingredients.
Also, I can’t resist telling you about the time I mistook pumpkin spice for cinnamon! Let’s just say the kitchen ended up smelling pretty festive – much to my surprise!
FAQs and Troubleshooting
1. What type of pasta works best?
You can use any pasta! I love penne or fusilli for this recipe based on their ability to catch that delightful sauce.
2. Can I use fresh pumpkin instead of canned?
Absolutely! Roast the pumpkin until tender, then puree it for an even fresher flavor.
3. My sauce is too thick; how can I fix it?
No worries! Just add a splash more of the reserved pasta water to loosen it up.
4. How do I store leftovers?
Store in an airtight container in the fridge for up to 3 days. Reheat on the stove with a splash of water or broth to keep it creamy.
Nutritional Info
While exact numbers may vary based on portion sizes and specific ingredients used, here’s a rough breakdown of per serving:
- Calories: approx. 350
- Protein: 10g
- Net Carbs: 60g
- Fat: 10g
This quick and easy 10-Minute Vegan Pumpkin Pasta is a celebration of fall’s flavors and autumn comfort. I’m so excited for you to try this! Remember, cooking should bring joy, laughter, and togetherness—so tie on your apron and let’s make some magic in the kitchen!
Happy cooking! 🍂💛
Print10-Minute Vegan Pumpkin Pasta

A quick and cozy meal that celebrates the comforting flavors of fall with pumpkin pasta, perfect for busy weeknight dinners.
- Prep Time: 5 minutes
- Cook Time: 5 minutes
- Total Time: 10 minutes
- Yield: 4 servings 1x
- Category: Main Course
- Method: Cooking
- Cuisine: Italian
- Diet: Vegan
Ingredients
- 8 oz (or 2/3 box) pasta, cooked
- 3 tablespoons olive oil
- 1/2 onion, chopped
- 3 garlic cloves, chopped
- 2 tablespoons flour
- 1 1/2 cups pumpkin puree
- 1/4 cup cooking pasta water
- 1/4 cup stock or water
- 1 teaspoon salt
- Pepper to taste
- 1/4 teaspoon nutmeg
- 1/4 teaspoon cinnamon
- 1/2 teaspoon dried thyme
Instructions
- Cook your pasta: Boil a pot of salted water, add the pasta, and cook according to package instructions until al dente, usually about 8–10 minutes. Reserve 1/4 cup of the cooking water before draining.
- Sauté the aromatics: In a large skillet, heat the olive oil over medium heat. Add the chopped onion and sauté for about 3-4 minutes until translucent. Add the garlic in the last minute, cooking until soft.
- Thicken it up: Stir in the flour and let it cook for about a minute to form a roux.
- Bring in the star—pumpkin!: Whisk in the pumpkin puree along with the stock or water, mixing until smooth. Adjust with more liquid if too thick.
- Season it right: Add in the reserved pasta water, salt, pepper, nutmeg, cinnamon, and thyme. Stir well and taste.
- Combine and serve: Toss your cooked pasta into the skillet and mix until each piece is coated in sauce.
Notes
Serve with freshly cracked pepper and a sprinkle of thyme or a swirl of olive oil for extra flair. Pairs well with a green salad or crusty bread.
Nutrition
- Serving Size: 1 serving
- Calories: 350
- Sugar: 6g
- Sodium: 400mg
- Fat: 10g
- Saturated Fat: 1g
- Unsaturated Fat: 8g
- Trans Fat: 0g
- Carbohydrates: 60g
- Fiber: 4g
- Protein: 10g
- Cholesterol: 0mg
Keywords: pumpkin pasta, vegan pasta, quick meals, fall recipes, cozy dinner
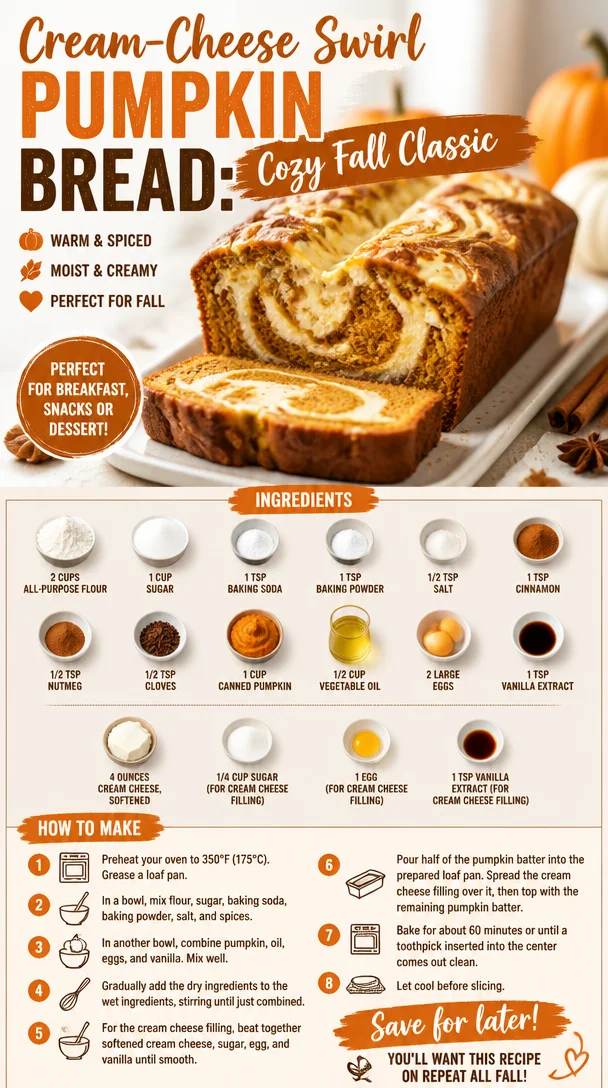
Cream-Cheese Swirl Pumpkin Bread: Cozy Fall Classic
The Ultimate Pumpkin Bread with Cream Cheese Recipe: A Slice of Fall Heaven
Hello, friends! With crisp autumn air, vibrant leaves painting the landscape, and the scent of warm spices filling the kitchen, it’s officially the season for pumpkin bread. There’s something truly magical about this loaf — a blend of cozy flavors that instantly creates the warmest feelings of nostalgia. Whether you’re whipping it up for a Sunday brunch, a cozy gathering, or simply to enjoy with your morning coffee, this pumpkin bread with cream cheese is a must-try!
With every slice, you’re not just satisfying your sweet tooth; you’re embracing the essence of fall. Join me as we dive into this recipe, filled with warmth and a dash of nostalgia that’ll make your kitchen feel like home.
A Slice of My Pumpkin Bread Memory
Let me take you back to my childhood kitchen, where autumn meant two things: the vibrant colors of fallen leaves outside, and the mouth-watering aroma of pumpkin bread wafting through the house. My grandmother, adorned in her worn-out apron, would gather us kids around the counter. Each year, she insisted we get our hands sticky, mixing the batter as we laughed and exchanged stories.
I vividly remember the first time I cracked an egg for the cream cheese filling. It felt like a rite of passage! That simple act of folding in the cream cheese mixture always added a layer of excitement. When that loaf came out of the oven — golden-brown, with a glossy, sugar-dusted top — you could almost hear our collective gasps of delight. It was a family ritual, a moment of pure joy! Today, I pass that same magic on to you with this easy yet indulgent pumpkin bread recipe that captures the essence of those cherished moments.
Ingredients: The Essentials for Your Perfect Pumpkin Bread
Here’s what you’ll need for this incredible pumpkin bread with cream cheese filling, along with a few tips to ensure you’ve got the best results:
-
2 cups all-purpose flour: This forms the structure of your bread. You can substitute with whole wheat flour for a nuttier flavor or gluten-free flour if needed.
-
1 cup sugar: Sweetness is key! You can reduce this by using coconut sugar or maple syrup for a more natural option.
-
1 teaspoon baking soda: It provides that lovely rise you’re after.
-
1 teaspoon baking powder: This helps ensure your loaf is fluffy and not dense.
-
1/2 teaspoon salt: Just enough to balance the sweetness.
-
1 teaspoon cinnamon: The classic fall spice.
-
1/2 teaspoon nutmeg: Adds that distinctive warmth.
-
1/2 teaspoon cloves: A little goes a long way in enhancing flavors.
-
1 cup canned pumpkin: This is where the magic happens! Fresh pumpkin can also work, just make sure it’s properly pureed.
-
1/2 cup vegetable oil: For moisture; you can also use melted coconut oil for a tropical twist.
-
2 large eggs: Acts as a binder for your ingredients.
-
1 teaspoon vanilla extract: Because it’s just better with a splash of vanilla.
-
4 ounces cream cheese, softened: The star of our filling. Make sure it’s at room temperature for smooth mixing!
-
1/4 cup sugar (for cream cheese filling): Enhances the sweetness of the cream cheese.
-
1 egg (for cream cheese filling): Helps bind the cream cheese mixture.
-
1 teaspoon vanilla extract (for cream cheese filling): Adds extra flavor to the filling.
Step-by-Step Instructions: Let’s Get Baking!
Now, let’s roll up our sleeves and bake this lovely bread together! Follow these steps, and you’ll not only have a delicious loaf but will also create memories along the way.
-
Preheat Your Oven: Set your oven to 350°F (175°C) and grease a 9×5-inch loaf pan. A lined pan helps with easy removal later.
-
Mix the Dry Ingredients: In a large bowl, whisk together the flour, sugar, baking soda, baking powder, salt, cinnamon, nutmeg, and cloves. Making sure they’re well combined helps ensure an even flavor.
-
Combine the Wet Ingredients: In another bowl, mix the canned pumpkin, vegetable oil, 2 eggs, and 1 teaspoon of vanilla extract. Make sure everything is blended smoothly. If you love a hint of nuttiness, feel free to add some chopped walnuts or pecans here!
-
Fold them Together: Pour the wet ingredients into the dry ingredients. Gently mix until just combined! A few lumps are perfectly okay. Over-mixing could lead to a dense loaf, and we want it fluffy!
-
Prepare the Cream Cheese Filling: In a separate bowl, beat together the softened cream cheese, 1/4 cup sugar, 1 egg, and 1 teaspoon vanilla extract until smooth. It should be creamy and spreadable.
-
Layer the Mixtures: Transfer half the pumpkin batter to the prepared loaf pan, smoothing it out. Next, dollop the cream cheese mixture over the batter, spreading it gently to create an even layer. Finish off by pouring the remaining pumpkin batter on top. Don’t worry about perfection — it’s the little imperfections that make it homemade!
-
Bake Away: Place the loaf in your preheated oven and bake for about 60-70 minutes. The top should be golden brown, and a toothpick inserted into the center should come out clean.
-
Cool: Once baked, allow the bread to cool in the pan for about 20 minutes before transferring it to a wire rack. This step ensures that the bread holds its shape.
-
Slice and Enjoy: After a bit of patience while it cools, slice the bread and watch the beautiful cream cheese swirl emerge. Heaven!
Serving Suggestions: How to Present Your Pumpkin Bread
For that Instagram-worthy shot (if you’re into that kind of thing!), slice your pumpkin bread and arrange it on a beautiful platter. A drizzle of honey or maple syrup can add a lovely touch. Garnish with a sprinkle of cinnamon or a dollop of whipped cream cheese. Pair it with a hot cup of your favorite spiced latte for an extra cozy vibe.
Recipe Variations: Get Creative!
-
Chocolate Chip Pumpkin Bread: Fold in a cup of chocolate chips to the batter for a decadent touch.
-
Nutty Banana-Pumpkin Fusion: Add a mashed ripe banana for moisture and flavor depth while incorporating some walnuts for crunch.
-
Gluten-Free Version: Swap in gluten-free baking flour and ensure your baking powder is certified gluten-free.
-
Maple Sugar Sweetness: Replace regular sugar with maple sugar for a unique twist that’s perfect for fall.
-
Vegan Option: Use flax eggs (1 tablespoon of ground flaxseed mixed with 2.5 tablespoons of water for each egg) and non-dairy cream cheese to make it vegan-friendly.
Chef’s Notes: A Little Extra Love
Fall has a special place in my heart, and this pumpkin bread takes me back to those cherished moments in my grandmother’s kitchen. Each time I bake it, I’m greeted with the same warmth, just like having her by my side. And since then, I’ve played with this recipe, adapting flavors and filling options — it never fails to inspire creativity in my kitchen. You might find layers of apple or even a hint of bourbon-infused spices when I’m feeling adventurous!
FAQs and Troubleshooting: Let’s Clear Up Your Questions!
-
Why did my pumpkin bread turn out dense?
- This can happen if the batter was overmixed or if you packed the flour too tightly. Ensure you use the spoon-and-level method for measuring flour and mix just until combined.
-
Can I freeze the pumpkin bread?
- Absolutely! Wrap it tightly in plastic wrap and aluminum foil before storing it in the freezer. It should last up to three months. Just defrost at room temperature when you’re ready to enjoy.
-
How do I know when my bread is done baking?
- Aside from the toothpick test, your bread should slightly spring back when you gently press the top and look for a golden-brown color.
-
Is it necessary to add eggs?
- Eggs act as binders and contribute to the moisture content. If you’re looking for an eggless option, flax eggs are a great substitute, or you could use unsweetened applesauce.
Nutritional Info (Optional)
This delicious pumpkin bread offers a little taste of nostalgia while packing a flavorful punch. Although it’s a treat, here’s a rough estimate for one slice (about 1/12th of the recipe):
- Calories: 200
- Total Fat: 9g
- Saturated Fat: 2g
- Cholesterol: 30mg
- Sodium: 160mg
- Total Carbohydrates: 30g
- Dietary Fiber: 1g
- Sugars: 10g
- Protein: 3g
So there you have it, friends! An incredible pumpkin bread with cream cheese recipe that’s not only a treat for the taste buds but a journey back to those moments spent in the kitchen. I hope you’ll create your own beautiful memories as you bake this loaf. Let’s gather around the table, savor each slice, and celebrate the joys of food together. Happy baking!
PrintThe Ultimate Pumpkin Bread with Cream Cheese

This pumpkin bread with cream cheese filling captures the essence of fall with cozy flavors and nostalgia.
- Prep Time: 15 minutes
- Cook Time: 70 minutes
- Total Time: 85 minutes
- Yield: 12 servings 1x
- Category: Dessert
- Method: Baking
- Cuisine: American
- Diet: Vegetarian
Ingredients
- 2 cups all-purpose flour
- 1 cup sugar
- 1 teaspoon baking soda
- 1 teaspoon baking powder
- 1/2 teaspoon salt
- 1 teaspoon cinnamon
- 1/2 teaspoon nutmeg
- 1/2 teaspoon cloves
- 1 cup canned pumpkin
- 1/2 cup vegetable oil
- 2 large eggs
- 1 teaspoon vanilla extract
- 4 ounces cream cheese, softened
- 1/4 cup sugar (for cream cheese filling)
- 1 egg (for cream cheese filling)
- 1 teaspoon vanilla extract (for cream cheese filling)
Instructions
- Preheat your oven to 350°F (175°C) and grease a 9×5-inch loaf pan.
- Mix the dry ingredients: In a large bowl, whisk together the flour, sugar, baking soda, baking powder, salt, cinnamon, nutmeg, and cloves.
- Combine the wet ingredients: In another bowl, mix the canned pumpkin, vegetable oil, 2 eggs, and 1 teaspoon of vanilla extract.
- Fold them together: Pour the wet ingredients into the dry ingredients and gently mix until just combined.
- Prepare the cream cheese filling: In a separate bowl, beat together the softened cream cheese, 1/4 cup sugar, 1 egg, and 1 teaspoon vanilla extract until smooth.
- Layer the mixtures: Transfer half the pumpkin batter to the prepared loaf pan, dollop the cream cheese mixture over it, and pour the remaining pumpkin batter on top.
- Bake for about 60-70 minutes until the top is golden brown and a toothpick inserted into the center comes out clean.
- Cool in the pan for about 20 minutes before transferring to a wire rack.
- Slice and enjoy your homemade pumpkin bread!
Notes
For an Instagram-worthy shot, slice and arrange on a platter. Drizzle with honey or maple syrup and garnish with cinnamon.
Nutrition
- Serving Size: 1 slice
- Calories: 200
- Sugar: 10g
- Sodium: 160mg
- Fat: 9g
- Saturated Fat: 2g
- Unsaturated Fat: 7g
- Trans Fat: 0g
- Carbohydrates: 30g
- Fiber: 1g
- Protein: 3g
- Cholesterol: 30mg
Keywords: pumpkin bread, fall recipes, cream cheese, cozy baking, sweet treats
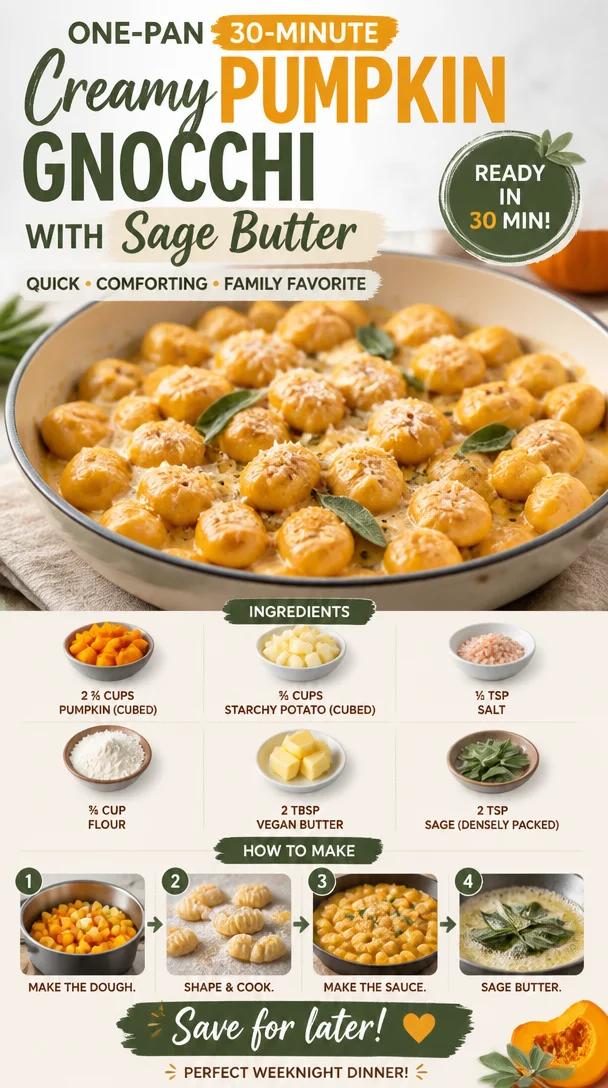
One-Pan 30-Minute Creamy Pumpkin Gnocchi with Sage Butter
Easy Pumpkin Gnocchi: A Heartwarming Fall Delight
Hello, food lovers! Autumn is officially here, and you know what that means — it’s time to cozy up in the kitchen and whip up something delicious that captures the flavors of this gorgeous season. Today, I’m thrilled to share with you my recipe for Easy Pumpkin Gnocchi, a dish that is both comforting and elegant, perfect for a small gathering or a quiet dinner at home.
Now, don’t be intimidated by the thought of making gnocchi; it may sound fancy, but I promise that with just a few quality ingredients and a bit of intention, you’ll create something absolutely divine. This recipe is all about simplicity and joy in cooking, much like the philosophy of my kitchen, Ivory Apron. So tie your apron on tightly, let’s embrace that beautiful orange goodness, and together we’ll create a timeless dish that smells and tastes like autumn on a plate!
A Special Memory: The First Taste of Fall
Let me take you on a little trip down memory lane. The first time I made pumpkin gnocchi was during a crisp September afternoon. My dear friend Chloe and I were eager to celebrate the changing seasons and decided to have a cozy cooking day. With warm drinks in hand, we transformed my kitchen into our very own culinary playground.
As we rolled the dough together, laughter filled the air. With flour flying and pumpkins roasted, I couldn’t help but reminisce about the first time I tasted homemade gnocchi at my grandmother’s house. I remember feeling like a culinary superstar – it was the ultimate comfort food! By the end of our cooking adventure, the kitchen was a glorious mess, and our bellies were full of our delicious creations. Those moments of laughter, warmth, and simplicity truly reminded me why I love cooking and sharing meals with loved ones.
Now, I want you to recreate this joy and make your own memorable moments. Let’s dive into the ingredients that will make this dish shine!
Ingredients
Here’s what you’ll need to whip up this delightful pumpkin gnocchi:
-
2 ⅔ cups pumpkin (cubed): Look for fresh pumpkin if you can; it’s sweeter and more flavorful than canned options. If you’re in a pinch, you can use canned pumpkin puree instead.
-
⅔ cup starchy potato (cubed): Use russet or Idaho potatoes, as their high starch content gives the gnocchi a light and fluffy texture. If you’re going for a dietary swap, sweet potatoes work wonderfully too!
-
½ tsp salt: This may seem minimal, but it really enhances the flavors. Feel free to adjust based on your taste preferences.
-
¾ cup flour: All-purpose flour is ideal for this dish, but you can opt for a gluten-free blend if you need to. Just remember to add a little extra if the dough feels sticky!
-
2 tbsp vegan butter: This gives your dish a lovely rich flavor. You can substitute with olive oil or even coconut oil for a unique twist.
-
2 tsp sage (densely packed): Fresh sage is ideal for this recipe, but dried sage can work too — just halve the amount you use to avoid overpowering the dish.
Step-by-Step Instructions
Ready to get your hands a little doughy? Let’s start cooking!
-
Prepare the Pumpkin and Potato: Begin by peeling and cubing your pumpkin and potato. Toss them together on a baking sheet, drizzle with a little olive oil, and sprinkle with a pinch of salt. Roast in a preheated oven at 425°F (220°C) for about 25-30 minutes until they’re tender and slightly caramelized. The roasting brings out the natural sweetness!
-
Mash It Up: Once roasted, let the pumpkin and potato cool slightly and transfer them into a large mixing bowl. Using a potato masher or a fork, mash them together until smooth. My personal tip? The smoother the mixture, the lighter the gnocchi will be!
-
Make the Dough: Add the salt and gradually sprinkle in the flour. Gently combine the mixture until a soft dough starts forming. Avoid overworking the dough — you don’t want tough gnocchi! It’s okay if it feels a bit sticky; you can adjust with a little extra flour as you knead.
-
Shape the Gnocchi: Flour your work surface lightly and turn the dough out. Divide it into 4 pieces and roll each piece into a long snake about ½ inch thick. Cut into uniform pieces, about 1-inch long. This is where you can sprinkle a bit of extra flour if it gets too sticky.
-
Add the Classic Gnocchi Indentation: To give your gnocchi its signature shape (and help sauce stick to it), use the back of a fork to gently create an indentation on each piece. This is a fun step, and trust me, it’s super satisfying!
-
Cooking Time!: Bring a large pot of salted water to a boil. Drop in the gnocchi a few at a time and cook until they float to the surface, which should take about 2-4 minutes. Use a slotted spoon to carefully remove them and transfer them to a plate or dish.
-
Sauté and Serve: In a skillet, melt the vegan butter (or your chosen fat) over medium heat and add in the sage leaves. Cook for just a minute until fragrant, then add the gnocchi to the skillet. Sauté for a couple of minutes until nicely golden and crispy on the edges.
Serving Suggestions
When it comes to plating your pumpkin gnocchi, simplicity is key. Serve them in a warm bowl, drizzled with a bit of the melted sage butter from the skillet. A sprinkle of freshly grated Parmesan (or a vegan alternative if you prefer) on top, along with a few crispy sage leaves for garnish, will give it that extra touch of elegance.
For added texture, consider serving alongside a simple arugula salad dressed with lemon vinaigrette — the peppery greens balance beautifully with the sweetness of the gnocchi.
Recipe Variations
-
Spinach and Ricotta Stuffed Gnocchi: Add a surprise twist! Fill your gnocchi with a mix of ricotta, cooked spinach, and a hint of nutmeg for an extra indulgent bite.
-
Pumpkin Alfredo Sauce: Want to go creamy? Toss your gnocchi with a silky pumpkin Alfredo sauce made from heavy cream, grated Parmesan, and more roasted pumpkin blended in for a touch of sweetness.
-
Colorful Veggie Medley: Sauté seasonal veggies like Brussels sprouts, bell peppers, or cherry tomatoes in addition to the gnocchi for a pop of color and nutrients on the plate.
-
Spicy Kick: Toss in a pinch of chili flakes while sautéing for a subtly spicy contrast to the sweetness of the pumpkin.
-
Herbs Galore: Try substituting sage with other herbs like thyme or rosemary to change up the flavor profile completely!
Chef’s Notes
I’ve experimented with this pumpkin gnocchi recipe countless times, and it never ceases to evoke a sense of warmth. The beauty of cooking is that it evolves, just like us! I’ve had moments where the gnocchi was a bit too sticky, leading me to add more flour until the dough was just right. I learned that cooking is all about adjusting and adapting — and those “oops” moments make the best kitchen memories.
And did I mention the delightful leftovers? This gnocchi holds up beautifully in the fridge and can be reheated, making it a perfect meal prep option. Just sauté them lightly in a bit of olive oil, and they’ll crisp up nicely!
FAQs and Troubleshooting
1. Why did my gnocchi turn out mushy?
- If your gnocchi ended up too soft, it might have been due to overworking the dough or too much moisture in the potatoes. Ensure they’re well-drained and let them cool before mashing for the best texture.
2. Can I freeze the gnocchi?
- Absolutely! Before cooking, lay them out on a baking sheet to freeze individually. Once frozen, transfer to a freezer-safe bag. Cook from frozen — just add an extra minute or two to the boiling time.
3. What can I use if I don’t have sage?
- No sage? No problem! Basil, thyme, or even oregano can add a delightful flavor to your gnocchi. Just remember to adjust the amount based on the herbs’ strength.
4. My dough is too sticky; what do I do?
- If your dough is becoming too sticky, gradually sprinkle in more flour during the mixing process. Just be cautious; a little goes a long way to keep your gnocchi light!
Nutritional Info
Note: For an idea of the nutritional content, per serving (assuming four servings) and depending on specific ingredient brands used:
- Calories: Approximately 250
- Protein: 5g
- Total Fat: 8g
- Carbohydrates: 42g
This recipe is not just a way to fill your belly; it’s an experience, a moment of creativity in the kitchen that leads to beautiful memories around the table. Thank you for joining me on this pumpkin gnocchi journey. I can’t wait to hear about your own culinary adventures! Happy cooking, and take a moment to savor every bite!
PrintEasy Pumpkin Gnocchi

A comforting and elegant pumpkin gnocchi recipe perfect for fall gatherings.
- Prep Time: 15 minutes
- Cook Time: 30 minutes
- Total Time: 45 minutes
- Yield: 4 servings 1x
- Category: Main Course
- Method: Baking
- Cuisine: Italian
- Diet: Vegetarian
Ingredients
- 2 ⅔ cups pumpkin (cubed)
- ⅔ cup starchy potato (cubed)
- ½ tsp salt
- ¾ cup flour
- 2 tbsp vegan butter
- 2 tsp sage (densely packed)
Instructions
- Prepare the Pumpkin and Potato: Begin by peeling and cubing your pumpkin and potato. Toss them together on a baking sheet, drizzle with a little olive oil, and sprinkle with a pinch of salt. Roast in a preheated oven at 425°F (220°C) for about 25-30 minutes until they’re tender and slightly caramelized.
- Mash It Up: Once roasted, let the pumpkin and potato cool slightly and transfer them into a large mixing bowl. Using a potato masher or a fork, mash them together until smooth.
- Make the Dough: Add the salt and gradually sprinkle in the flour. Gently combine the mixture until a soft dough starts forming. Avoid overworking the dough.
- Shape the Gnocchi: Flour your work surface lightly and turn the dough out. Divide it into 4 pieces and roll each piece into a long snake about ½ inch thick. Cut into uniform pieces, about 1-inch long.
- Add the Classic Gnocchi Indentation: Use the back of a fork to gently create an indentation on each piece.
- Cooking Time!: Bring a large pot of salted water to a boil. Drop in the gnocchi a few at a time and cook until they float to the surface, which should take about 2-4 minutes.
- Sauté and Serve: In a skillet, melt the vegan butter over medium heat and add in the sage leaves. Cook for just a minute until fragrant, then add the gnocchi to the skillet.
Notes
For added texture, serve with a simple arugula salad dressed with lemon vinaigrette. This dish holds up beautifully in the fridge for meal prep.
Nutrition
- Serving Size: 1 serving
- Calories: 250
- Sugar: 2g
- Sodium: 200mg
- Fat: 8g
- Saturated Fat: 2g
- Unsaturated Fat: 6g
- Trans Fat: 0g
- Carbohydrates: 42g
- Fiber: 4g
- Protein: 5g
- Cholesterol: 0mg
Keywords: pumpkin gnocchi, fall recipes, Italian cuisine, homemade gnocchi
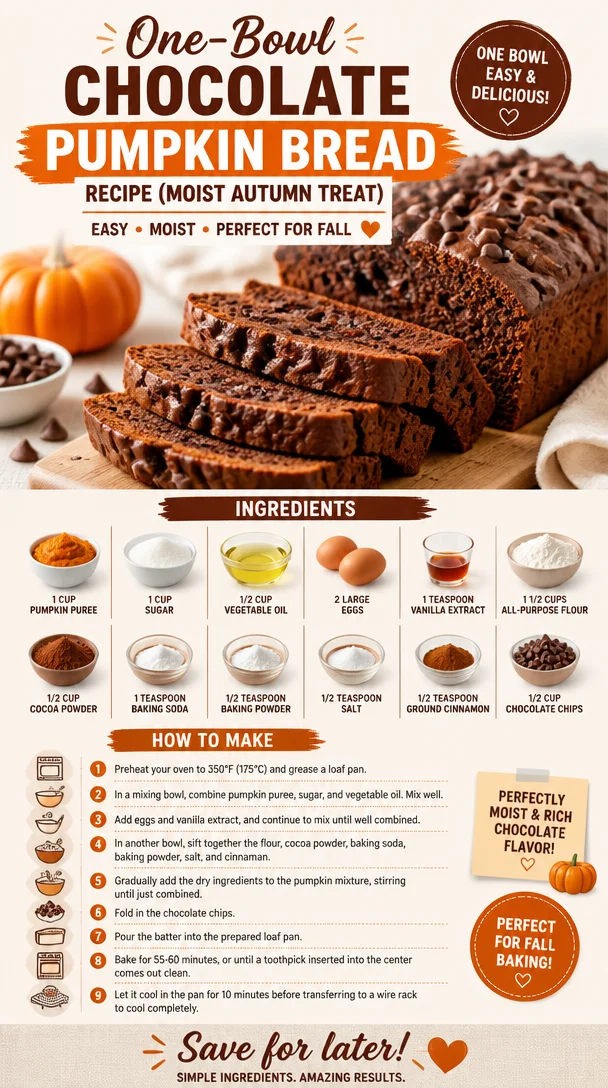
One-Bowl Chocolate Pumpkin Bread Recipe (Moist Autumn Treat)
The Ultimate Chocolate Pumpkin Bread Recipe: A Cozy Culinary Hug
Hello, fellow food lovers! Savannah here, and I can’t wait to share one of my absolute favorite cozy recipes with you: Chocolate Pumpkin Bread. This delightful loaf is perfect for crisp fall mornings, holiday gatherings, or simply when you need a little sweet comfort in your life. Trust me, this bread embodies the very essence of joy and warmth, making it the perfect treat to share with family and friends.
Now, let’s dive into this recipe that’ll have your kitchen smelling heavenly and your taste buds dancing!
A Slice of My Story
As a kid, I remember autumn weekends spent navigating the bustling pumpkin patches with my family, the smell of freshly baked goodies wafting through the air. Pumpkin spice lattes weren’t the only cozy flavors of the season; it was all about the rich, satisfying taste of pumpkin bread. One particular memory that stands out is when my grandmother and I decided to give her traditional pumpkin bread a modern twist by adding chocolate.
We whisked together ingredients in her tiny kitchen, draping a welcoming haze of cocoa powder and pumpkin spice. When we pulled our creation from the oven, the aroma was intoxicating. The first taste was pure bliss; the chocolate and pumpkin danced together in perfect harmony. It’s this blend of nostalgia and comfort that always brings me back to the kitchen, and today, I want to share that same warmth with you.
Ingredients
Before we jump into the nitty-gritty of baking, here’s a list of what you’ll need to create this luscious chocolate pumpkin bread.
-
1 cup pumpkin puree: This is the star of the show! You can use canned pumpkin puree for convenience or make your own by roasting fresh pumpkins. Don’t confuse this with pumpkin pie filling, which has added sugar and spices.
-
1 cup sugar: Regular granulated sugar works beautifully here, but you can swap it for brown sugar for a richer flavor or use coconut sugar for a slight caramel undertone.
-
1/2 cup vegetable oil: This keeps the bread moist and delicious. If you prefer a healthier option, you could use melted coconut oil or unsweetened applesauce for a lower-fat version.
-
2 large eggs: Eggs help bind the ingredients together and add moisture. For a vegan option, substitute with flax eggs (1 tablespoon of ground flaxseed mixed with 2.5 tablespoons of water per egg).
-
1 teaspoon vanilla extract: A must for that beautiful depth of flavor. You can always substitute with maple extract for a unique twist.
-
1 1/2 cups all-purpose flour: This provides the structure. For a gluten-free version, use a 1:1 gluten-free baking flour blend.
-
1/2 cup cocoa powder: Unsweetened cocoa powder deepens the flavor. For a more intense chocolate hit, go for Dutch-processed cocoa.
-
1 teaspoon baking soda: This is our leavener, ensuring our bread rises beautifully.
-
1/2 teaspoon baking powder: Works hand-in-hand with baking soda to achieve that fluffy texture.
-
1/2 teaspoon salt: A pinch of salt enhances all those sweet flavors.
-
1/2 teaspoon ground cinnamon: Adds warmth; you can also mix in nutmeg if you’re feeling adventurous.
-
1/2 cup chocolate chips: Go for semi-sweet or dark chocolate, whichever you adore. You can even use white chocolate or peanut butter chips for a fun variation.
Step-by-Step Instructions
-
Preheat Your Oven: Start by preheating your oven to 350°F (175°C). This ensures even baking right from the get-go!
-
Prepare Your Loaf Pan: Grease a 9×5 inch loaf pan with butter or non-stick spray, or line it with parchment paper for easy removal later. I always recommend this step so your bread slides out without fuss!
-
Mix the Wet Ingredients: In a large mixing bowl, whisk together the pumpkin puree, sugar, vegetable oil, eggs, and vanilla extract. You want a smooth mixture with no lumps. This is the heart of our bread, so make sure it’s well combined.
-
Sift the Dry Ingredients: In another bowl, mix the flour, cocoa powder, baking soda, baking powder, salt, and cinnamon. Sifting these ingredients helps avoid clumps and ensures an even distribution—no one wants a surprise bite of flour!
-
Combine the Mixtures: Gradually fold the dry mixture into the wet mixture using a spatula or wooden spoon. Be gentle! Overmixing can lead to tough bread. You just want it combined until there are no dry spots left.
-
Add the Chocolate Chips: Once your batter is ready, it’s time for the chocolate chips! Gently fold them in to distribute evenly throughout the batter.
-
Pour and Bake: Pour the batter into your prepared loaf pan. Use a spatula to smooth the top if needed. Bake in the preheated oven for about 50-60 minutes, or until a toothpick inserted in the center comes out clean. Keep an eye on it! Oven times can vary.
-
Cool Before Slicing: Once baked, allow the bread to cool in the pan for about 10 minutes before transferring it to a wire rack to cool completely. This cooling time helps maintain texture, ensuring your bread doesn’t crumble when sliced.
Serving Suggestions
To serve your chocolate pumpkin bread, slice it into generous, warm pieces, and arrange them on a beautiful platter. Drizzle with a touch of honey or a dollop of whipped cream for extra indulgence. Pair it with a steaming cup of coffee or spiced chai for a cozy afternoon treat.
Recipe Variations
- Nutty Surprise: Toss in some chopped walnuts or pecans for a delightful crunch.
- Spice it Up: Add a teaspoon of pumpkin pie spice for an even warmer flavor profile.
- Dairy-Free: Swap chocolate chips for dairy-free options to keep the recipe vegan-friendly.
- Pumpkin Chocolate Swirl: For a marbled effect, reserve half of the batter, mix some additional cocoa in, and layer them before baking.
- Frosted Delight: Top your cooled bread with a simple cream cheese or chocolate frosting for an exquisite dessert twist!
Chef’s Notes
This chocolate pumpkin bread recipe has come a long way since that initial experimental batch with my grandmother. We’ve adjusted flavors, swapped ingredients, even played around with glazes. It’s a recipe that brings back fond memories, and every bite evokes a sense of nostalgia. Plus, I just love how forgiving this bread is; you can mix in whatever you have on hand and still come out with a delightful result!
FAQs and Troubleshooting
Q: My bread came out dense. What went wrong?
A: Dense bread usually results from overmixing or using too much flour. When combining wet and dry mixtures, mix just until incorporated.
Q: Can I freeze this bread?
A: Absolutely! Let it cool completely, then wrap it tightly in plastic wrap and foil before placing it in the freezer. It can last up to 3 months!
Q: What if I didn’t have pumpkin puree?
A: No pumpkin? No problem! Use unsweetened applesauce for a similar moisture level, but just keep in mind the taste will be different!
Q: How do I know when my bread is done?
A: A toothpick inserted in the center should come out clean or with just a few moist crumbs attached. Be sure not to open the oven too early, though, as this can affect the rise.
Nutritional Info (optional)
You can approximate your nutritional information with the ingredients you’ve selected, but keep in mind this might vary based on your substitutions!
Thank you so much for joining me today in the kitchen! I hope you feel inspired and ready to whip up this Chocolate Pumpkin Bread wherever you are. Now, grab your apron, tie it on, and let’s make something timeless together. Happy baking, friends!
PrintUltimate Chocolate Pumpkin Bread
A delightful loaf of chocolate pumpkin bread perfect for fall mornings and holiday gatherings, combining cozy flavors of pumpkin and chocolate.
- Prep Time: 15 minutes
- Cook Time: 60 minutes
- Total Time: 75 minutes
- Yield: 8 servings 1x
- Category: Dessert
- Method: Baking
- Cuisine: American
- Diet: Vegetarian
Ingredients
- 1 cup pumpkin puree
- 1 cup sugar
- 1/2 cup vegetable oil
- 2 large eggs
- 1 teaspoon vanilla extract
- 1 1/2 cups all-purpose flour
- 1/2 cup cocoa powder
- 1 teaspoon baking soda
- 1/2 teaspoon baking powder
- 1/2 teaspoon salt
- 1/2 teaspoon ground cinnamon
- 1/2 cup chocolate chips
Instructions
- Preheat your oven to 350°F (175°C).
- Prepare a 9×5 inch loaf pan by greasing it or lining it with parchment paper.
- Mix the pumpkin puree, sugar, vegetable oil, eggs, and vanilla extract in a large bowl until smooth.
- Sift the flour, cocoa powder, baking soda, baking powder, salt, and cinnamon into another bowl.
- Combine the dry mixture into the wet mixture gently until no dry spots remain.
- Add the chocolate chips and fold them in evenly.
- Pour the batter into the prepared loaf pan and smooth the top.
- Bake for 50-60 minutes or until a toothpick inserted comes out clean.
- Cool in the pan for 10 minutes before transferring to a wire rack.
Notes
Serve with a drizzle of honey or whipped cream, and enjoy with coffee or chai.
Nutrition
- Serving Size: 1 slice
- Calories: 250
- Sugar: 15g
- Sodium: 180mg
- Fat: 10g
- Saturated Fat: 1.5g
- Unsaturated Fat: 8g
- Trans Fat: 0g
- Carbohydrates: 35g
- Fiber: 3g
- Protein: 4g
- Cholesterol: 25mg
Keywords: chocolate, pumpkin, bread, fall, dessert