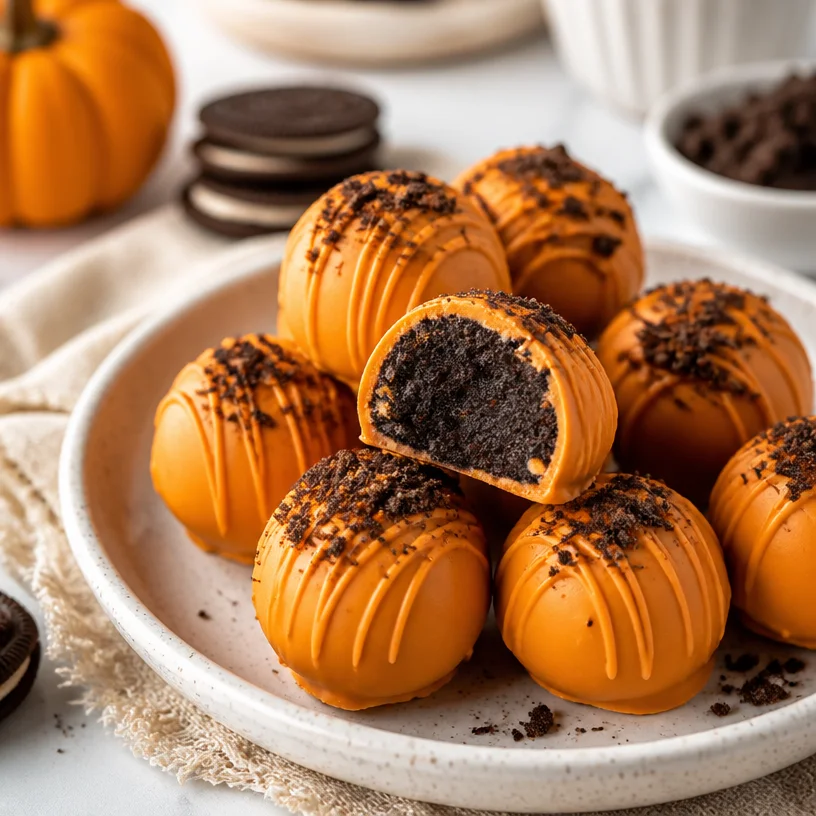
No-Bake Pumpkin Oreo Truffles: 4-Ingredient Treats
Indulge in Fall: Pumpkin Oreo Truffles
Hello, fellow food enthusiasts! It’s that magical time of year when the air starts to crisp, pumpkins adorn every porch, and cozy gatherings begin to fill our calendars. Today, I’m thrilled to share a delightful treat that captures the essence of autumn—Pumpkin Oreo Truffles! These little bite-sized wonders are not only dreamy in flavor but also easy to whip up. Get ready to gather your friends and family around the table, because these truffles are sure to impress without sending you into a baking frenzy.
A Sweet Memory: Pumpkin Patch Adventures
Let me take you down memory lane to one of my favorite autumn traditions—visiting the local pumpkin patch. The air is filled with the scent of spiced cider, and laughter echoes throughout the fields as families navigate through hay mazes and pick their perfect pumpkins. It’s more than just a fun outing; it’s a bonding experience.
I still remember one year, my friends and I decided to throw an impromptu pumpkin carving party. We had our pumpkins on the table, carving tools in hand, when the idea struck us! What if we could make something delicious with these pumpkins instead of just letting them sit on the porch? That evening, we concocted a simple pumpkin dessert with crushed Oreos, cream cheese, and a sprinkle of fall spices. Flash forward a few years later, and here we are with these incredible Pumpkin Oreo Truffles—a recipe inspired by that unforgettable night.
Ingredients
Just like my unforgettable memories, this recipe combines simple ingredients to create something truly special. Here’s what you’ll need:
-
Oreos: These crunchy chocolate cookies are the star of the show! Their rich flavor pairs perfectly with the pumpkin and cream cheese. If you want a gluten-free option, try using gluten-free chocolate sandwich cookies instead.
-
Cream Cheese: This brings a lovely creaminess to the truffles, binding everything together. For a lighter version, you can use reduced-fat cream cheese, although full-fat will give you the best flavor and texture.
-
Pumpkin Puree: Make sure to use 100% pure pumpkin puree (not pumpkin pie filling). If you want to switch it up, you can try using sweet potato puree for a different twist.
-
Orange Chocolate: This will serve as the delightful coating for our truffles. It adds both flavor and a sunny pop of color. If orange chocolate is hard to find, you can substitute it with white chocolate and add a bit of orange zest for that citrusy kick.
-
Spices (Cinnamon and Nutmeg): A dash of these will enhance the pumpkin flavor and give your truffles that warm, cozy feel. Feel free to experiment with other spices like ginger or allspice if you like a bit more warmth.
-
Sea Salt (Optional): A sprinkle of sea salt can elevate the sweetness and enhance the flavors. Trust me, it’s a game-changer!
Step-by-Step Instructions
Now that we have our ingredients lined up, let’s dive into making these delightful Pumpkin Oreo Truffles.
-
Prepare the Oreo Crumbs: Grab a blender or food processor and add about 15 Oreos. Pulse them until they are finely crushed.
Pro Tip: You can also put the Oreos in a zip-lock bag and crush them with a rolling pin! It’s a great way to relieve any stress while you’re at it.
-
Mix in the Cream Cheese and Pumpkin: In a large bowl, combine the crushed Oreos, 4 oz of cream cheese, and ½ cup of pumpkin puree. Mix with a spatula until everything is well combined—you want to achieve a thick, dough-like consistency.
Chef Insight: If the mixture seems too wet, add a few more crushed Oreos. If it’s too dry, a touch more pumpkin or cream cheese can bring it to the right texture.
-
Spice It Up: Add in ½ teaspoon of cinnamon, ¼ teaspoon of nutmeg, and a pinch of sea salt. This simple addition will make your truffles taste like fall in a bite!
-
Chill the Mixture: Cover the bowl with plastic wrap and refrigerate for about 30 minutes. This will help the mixture firm up, making it easier to roll into balls.
Insider Hack: While the mixture chills, clean up your kitchen! You’ll thank me later when it’s time to savor these truffles.
-
Form the Truffles: Once your mixture is chilled, use a small cookie scoop or your hands to form about 1-inch balls. Place them on a baking sheet lined with parchment paper.
Chef’s Note: Don’t worry about making them perfect—each truffle will have its own charm.
-
Melt the Orange Chocolate: In a microwave-safe bowl, melt the orange chocolate in 30-second intervals, stirring between each until smooth.
Chocolate Tip: If you find the chocolate too thick, add a teaspoon of coconut oil to thin it out a bit.
-
Coat the Truffles: Dip each truffle into the melted chocolate, using a fork to help coat it evenly. Let the excess drip off before placing them back onto the parchment-lined baking sheet.
Presentation Tip: For a festive touch, sprinkle some crushed Oreos or festive sprinkles on top right after coating while the chocolate is still wet.
-
Chill Again: Pop the truffles back into the fridge for about an hour to let the chocolate set.
-
Serve and Enjoy: Once the chocolate has hardened, transfer the truffles to a beautiful serving platter and get ready to impress your guests!
Serving Suggestions
To showcase these delightful Pumpkin Oreo Truffles, consider arranging them in a charming dessert stand, garnished with a sprinkle of crushed Oreos and a few autumn leaves for that extra seasonal flair. If you’re feeling festive, serve them alongside a warm cup of spiced cider or a creamy pumpkin spice latte!
Recipe Variations
These truffles are versatile! Here are a few twists you might enjoy:
-
Maple Syrup Drizzle: Swap the orange chocolate for a melted maple-flavored chocolate and drizzle with pure maple syrup for a delicious twist.
-
Nutty Crust: Incorporate finely chopped pecans or walnuts into your Oreo mixture for a delightful crunch.
-
Dairy-Free Delight: Use vegan cream cheese and dairy-free chocolate to cater to dairy-free friends!
-
Spiced Pumpkin Pie: Add a teaspoon of pumpkin pie spice to the mix to intensify that fall flavor!
Chef’s Notes
I have to admit, these Pumpkin Oreo Truffles have evolved over the years. Initially, I was hesitant about the idea of blending Oreos with pumpkin, fearing a flavor clash. But after that first batch, I realized the combination was a match made in heaven! As I continued to share these truffles with friends, tweaking and adjusting, they became a sought-after staple at my autumn gatherings.
And of course, there’s always room to experiment. I often encourage my guests to get creative—finding their favorite chocolate coatings or even rolling the truffles in crushed nuts or coconut.
FAQs and Troubleshooting
1. Can I use homemade pumpkin puree?
Absolutely! Just make sure it’s well-drained to avoid excess moisture that can affect the mixture’s consistency.
2. My chocolate coating turned out lumpy; what happened?
This often happens if the chocolate was overheated. Always melt it slowly and stir frequently for a smooth result. If it’s lumpy, a touch of coconut oil can help smooth it out.
3. How long will they last?
Properly stored in an airtight container in the fridge, these truffles can last about a week. But trust me, they won’t last that long once your friends get a taste!
4. Can I freeze these truffles?
Yes! Just place them in an airtight container with parchment paper between layers. They’ll stay fresh for about a month. Thaw them in the fridge for a few hours before serving.
Nutritional Info
While I always encourage savoring treats in moderation, here’s a little breakdown for you. Each pumpkin Oreo truffle has around 100 calories, 5 grams of fat, and 10 grams of carbohydrates. Not too bad for a delightful fall indulgence!
So there you have it, my lovely foodies! These Pumpkin Oreo Truffles are not just a treat; they’re a celebration of fall. Whether for a gathering or a cozy night in, I can’t wait for you to try this recipe and share it around your table. Let’s get cooking, and remember: with every bite, you’re not just enjoying a dessert; you’re creating sweet memories with every truffle! Happy cooking! 🍂🎃
PrintPumpkin Oreo Truffles
Delightful Pumpkin Oreo Truffles that capture the essence of autumn, combining the flavors of Oreo, pumpkin, and warm spices.
- Prep Time: 15 minutes
- Cook Time: 0 minutes
- Total Time: 45 minutes
- Yield: 24 truffles 1x
- Category: Dessert
- Method: Chilling and Coating
- Cuisine: American
- Diet: Vegetarian
Ingredients
- 15 Oreos, crushed
- 4 oz cream cheese
- ½ cup pumpkin puree
- ½ teaspoon cinnamon
- ¼ teaspoon nutmeg
- Optional: Sea salt
- Orange chocolate, for coating
Instructions
- Prepare the Oreo crumbs by crushing them finely in a blender or food processor.
- Mix together the crushed Oreos, cream cheese, and pumpkin until well combined.
- Spice it up by adding cinnamon, nutmeg, and sea salt.
- Chill the mixture in the refrigerator for 30 minutes to firm up.
- Form the mixture into 1-inch balls and place them on a lined baking sheet.
- Melt the orange chocolate in a microwave-safe bowl.
- Coat each truffle in melted chocolate and let the excess drip off.
- Chill the truffles in the fridge for an hour to set the chocolate.
- Serve and enjoy your delightful Pumpkin Oreo Truffles!
Notes
You can experiment with different chocolate coatings or add crushed nuts for a crunch.
Nutrition
- Serving Size: 1 truffle
- Calories: 100
- Sugar: 6g
- Sodium: 100mg
- Fat: 5g
- Saturated Fat: 2g
- Unsaturated Fat: 3g
- Trans Fat: 0g
- Carbohydrates: 10g
- Fiber: 1g
- Protein: 1g
- Cholesterol: 10mg
Keywords: pumpkin, truffles, dessert, fall, autumn, Oreo
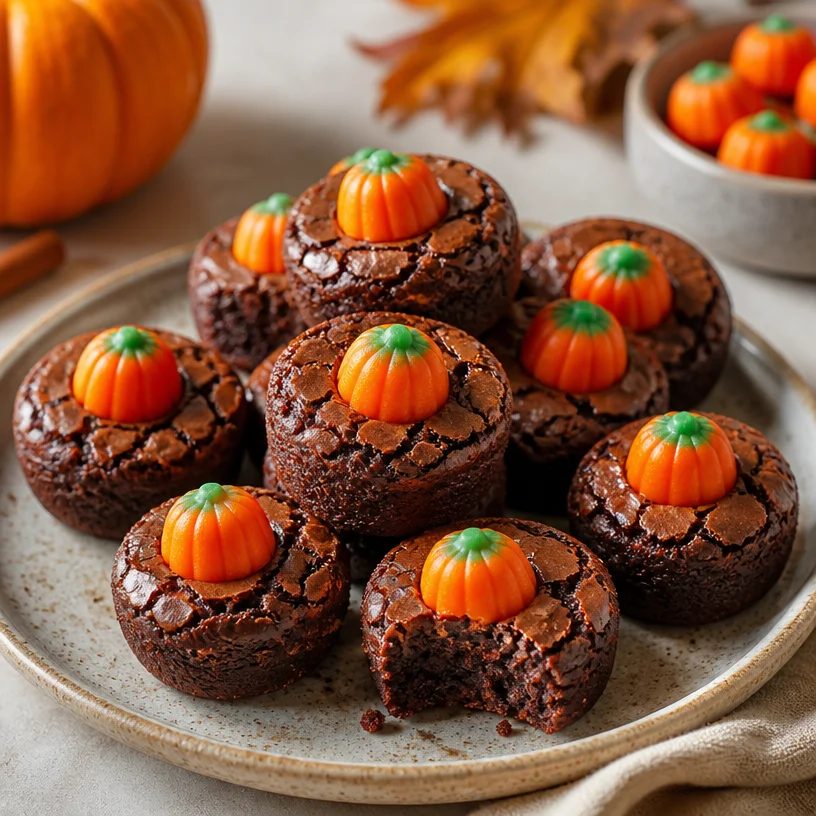
Pumpkin Brownie Bites: Quick Fall Treats for Busy Weeknights
Indulge in the Sweetness of Fall: Pumpkin Brownie Bites
Hello, fellow foodies! As the air turns crisp and the leaves begin to fall, there’s an undeniable shift that awakens my culinary curiosity. It’s the magical season of pumpkin spice, cozy sweaters, and heartwarming gatherings. Today, we’re diving into a delightful treat that brings together the rich, fudgy goodness of brownies with the festive charm of pumpkin: Pumpkin Brownie Bites.
Now, brownie lovers, get ready to elevate your dessert game! Picture this: fudgy brownie bites topped with adorable candy pumpkins, making them not just delicious but downright adorable. They’re perfect for autumn gatherings, Halloween parties, or just a cozy night in. Trust me, once you try these, you’ll want to make them a seasonal staple.
Let’s get started on this sweet adventure! Follow along as I guide you through my recipe, share some fun kitchen stories, and sprinkle in a few tips and tricks to ensure your pumpkin brownie bites come out perfectly every time.
A Slice of Nostalgia
I remember the first time I made brownies by myself. I must have been around 10 years old, pouring over my mom’s old recipe box, searching for the perfect dessert to surprise her after a long day. Little did I know I was setting the foundation for a lifelong love affair with chocolate!
As I mixed the ingredients together, there was something magical about watching that cocoa powder transform into a thick, velvety batter. The sweet aroma that filled the kitchen as they baked was pure heaven. Fast forward a few years to when the leaves turned golden and crisp—I discovered the intrigue of incorporating pumpkin into the mix. Even in the early days of my culinary journey, I understood the beauty of blending flavors and seasons.
Now, combining that childhood love of brownies with the creamy texture and warm spice of pumpkin feels like a celebration of all things cozy. With every bite, you’ll taste nostalgia, comfort, and a hint of seasonal magic. Let’s bring that feeling to life in your kitchen!
Ingredients
Here’s what you’ll need to whip up these delightful Pumpkin Brownie Bites:
-
1 cup unsweetened cocoa powder
A rich, dark cocoa powder yields the best flavor. If you’re in a pinch, you can substitute it with Dutch-process cocoa for a lighter touch. -
1 cup granulated sugar
This sweetens the brownies beautifully! For a twist, consider swapping half for brown sugar for a caramel-like complexity. -
1 cup all-purpose flour
Standard flour works best, but you can easily use a gluten-free mix if you’re accommodating those with dietary restrictions. Make sure it’s a blend specifically for baking. -
1/2 cup unsalted butter, melted
Butter adds a lovely richness to the brownies. You can substitute with coconut oil for a dairy-free option. -
3 large eggs
These give structure to your brownies. If vegan, consider using flax eggs (1 tablespoon ground flaxseed + 2.5 tablespoons water = 1 egg) instead. -
1 cup canned pumpkin puree
Look for pure pumpkin, not the spiced pie filling. This autumn staple adds moisture and flavor! -
1 teaspoon vanilla extract
Pure vanilla extract enhances all the flavors. For a fun twist, try using maple syrup instead. -
1 teaspoon baking powder
Ensures your brownies rise beautifully. If you’re out, baking soda can work as a substitute in half the amount. -
Pinch of salt
A little salt balances the sweetness. Trust me; it’s a game-changer! -
Candy pumpkins for decoration
These festive candies bring a pop of color and fun! Feel free to swap them with seasonal sprinkles or nuts for texture.
Step-by-Step Instructions
Now that we’ve gathered our ingredients, let’s bring these pumpkin brownie bites to life. Trust me, this process is just as enjoyable as the final product!
Step 1: Preheat and Prep
Preheat your oven to 350°F (175°C) and line a mini muffin tin with paper liners. If you don’t have liners, a quick spritz of non-stick spray will do the trick. This helps with easy removal later on!
Step 2: Mix Dry Ingredients
In a medium mixing bowl, whisk together the cocoa powder, granulated sugar, flour, baking powder, and salt. This step is crucial for ensuring that all the dry ingredients are well combined, promoting an even bake. Plus, it will smell heavenly!
Step 3: Blend Wet Ingredients
In another large bowl, combine your melted butter, eggs, pumpkin puree, and vanilla extract. Mix until everything is fully blended and looks smooth. This pumpkin mixture adds a warm, comforting element to your brownies.
Step 4: Combine
Pour the dry ingredients into the wet mixture and fold gently with a spatula. Be careful not to overmix; we just want everything to come together. If you see a few flour streaks—no worries! That little bit of flour will mix in when it bakes.
Step 5: Scoop and Fill
Using a small cookie scoop or spoon, fill each muffin tin cup about three-quarters of the way full. This way, they have room to rise while maintaining their bite-sized charm.
Step 6: Bake
Pop your tray into the preheated oven and bake for about 15 minutes. Keep an eye on them! You’ll know they’re ready when they puff slightly and a toothpick inserted comes out with a few moist crumbs—this will ensure that signature fudgy texture.
Step 7: Cool and Decorate
Let your brownie bites cool in the pan for 5-10 minutes before transferring them to a wire rack to cool completely. Once cooled, top each brownie with a candy pumpkin for that cute fall flair. Not only do they look great, but they add a sweet little crunch!
Serving Suggestions
To elevate your serving game, consider placing your pumpkin brownie bites on a beautiful platter adorned with autumn leaves or mini pumpkins. Drizzling a little chocolate ganache or a dusting of powdered sugar can add an extra touch of elegance. These treats can be a whimsical centerpiece at your next gathering, and trust me, they’ll disappear in a flash!
Recipe Variations
Don’t be afraid to experiment! Here are some fun twists to put your personal spin on these pumpkin brownie bites:
- Nutty Delight: Add chopped walnuts or pecans for a crunchy texture.
- Spiced Pumpkin: Mix in a teaspoon of pumpkin pie spice to intensify that fall flavor.
- Chocolate Chunk: Toss in some chocolate chips or chunks for a delightful melt-in-your-mouth experience.
- Frosted Bliss: Top them with a cream cheese frosting drizzle for a richer finish.
- Minty Fresh: Add a few drops of peppermint extract for a refreshing take when the holidays roll around.
Chef’s Notes
Every recipe tells a story, and this one is no exception! When I first combined pumpkin and brownie batter, it felt like magic in my kitchen. It’s incredible how two simple ingredients can create something so comforting and festive. Over the years, I’ve played around with spices and mix-ins, but the core joy of creating this treat has never changed. It’s like a hug in dessert form, and I can’t wait for you to experience that!
FAQs and Troubleshooting
Q1: My brownie bites are too dry. What happened?
A: This can happen if you overbake them. Be sure to check them a couple of minutes before the recommended time. The brownies will continue to set as they cool.
Q2: Can I use fresh pumpkin instead of canned?
A: Absolutely! Just make sure to cook and puree it, then drain out any excess moisture so your brownies don’t turn out soggy.
Q3: How do I ensure my brownie bites are fudgy?
A: Keep an eye on the baking time and don’t overmix the batter. Less mixing leads to a denser, fudgier texture!
Q4: Can I freeze these brownie bites?
A: Yes! They freeze wonderfully. Just ensure they’re in an airtight container, and they’ll keep for up to three months. Thaw them at room temperature before enjoying!
Nutritional Info
While I’m all about indulgence, I believe in balance too! These treats bring joy and are best enjoyed in moderation. A rough estimate is around 100 calories per brownie bite, depending on toppings and variations.
So there you have it! A fall-inspired treat that will bring warmth and joy to your gatherings and celebrations. I hope you feel inspired to tie on your apron and create these delightful Pumpkin Brownie Bites. Just remember, cooking should be fun, lighthearted, and always filled with love.
Let’s make something special together this season! Happy baking, and I can’t wait to hear how your pumpkin brownie bites turn out!
PrintPumpkin Brownie Bites
Delightfully fudgy brownie bites infused with pumpkin and topped with candy pumpkins, perfect for autumn gatherings.
- Prep Time: 15 minutes
- Cook Time: 15 minutes
- Total Time: 30 minutes
- Yield: 24 servings 1x
- Category: Dessert
- Method: Baking
- Cuisine: American
- Diet: Vegetarian
Ingredients
- 1 cup unsweetened cocoa powder
- 1 cup granulated sugar
- 1 cup all-purpose flour
- 1/2 cup unsalted butter, melted
- 3 large eggs
- 1 cup canned pumpkin puree
- 1 teaspoon vanilla extract
- 1 teaspoon baking powder
- Pinch of salt
- Candy pumpkins for decoration
Instructions
- Preheat your oven to 350°F (175°C) and line a mini muffin tin with paper liners.
- Mix together the cocoa powder, granulated sugar, flour, baking powder, and salt in a medium mixing bowl.
- Blend melted butter, eggs, pumpkin puree, and vanilla extract in another bowl until smooth.
- Combine the dry ingredients into the wet mixture and fold gently.
- Scoop and fill each muffin tin cup about three-quarters full.
- Bake in the preheated oven for about 15 minutes.
- Cool in the pan for 5-10 minutes before transferring to a wire rack and decorating with candy pumpkins.
Notes
For a vegan option, use flax eggs instead of regular eggs. You can also try using brown sugar for a caramel-like complexity.
Nutrition
- Serving Size: 1 brownie bite
- Calories: 100
- Sugar: 8g
- Sodium: 50mg
- Fat: 5g
- Saturated Fat: 2.5g
- Unsaturated Fat: 2.5g
- Trans Fat: 0g
- Carbohydrates: 13g
- Fiber: 1g
- Protein: 1g
- Cholesterol: 30mg
Keywords: pumpkin, brownies, fall dessert, Halloween treats, cozy baking
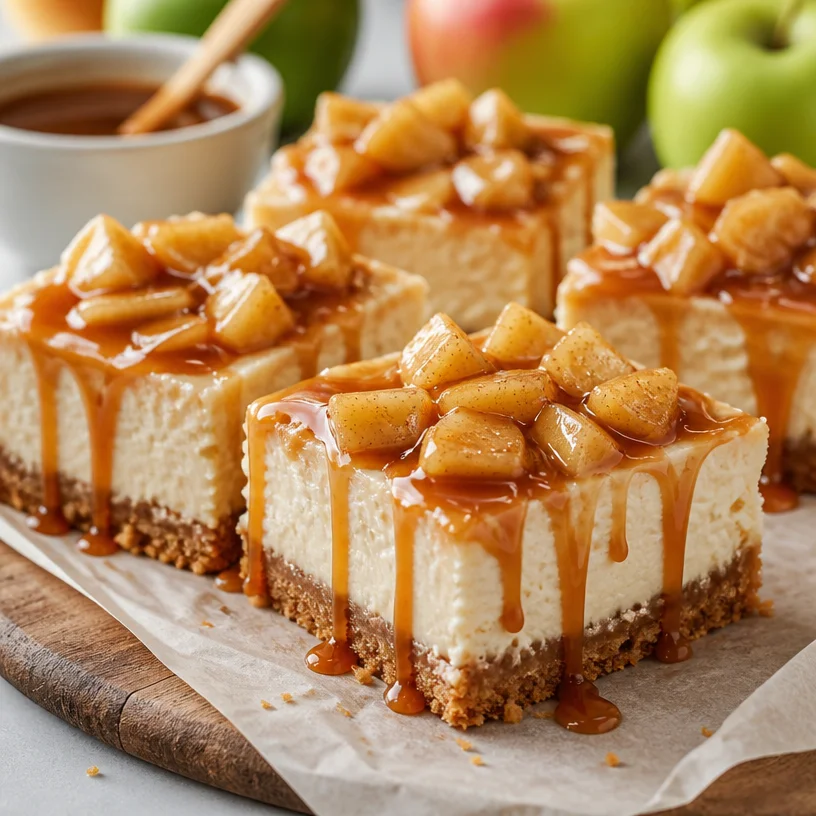
Seasonal Apple Caramel Cheesecake Bars: Easy 30-Minute Treat
Indulge in the Sweetness: Caramel Apple Cheesecake Bars
Hello there, fellow food lovers! Today, we’re diving into a delightful dessert that combines the best of two irresistible worlds: the creamy richness of cheesecake and the cozy, nostalgic flavors of caramel apples. Yes, you guessed it! We’re making Caramel Apple Cheesecake Bars, and I am thrilled to share this recipe with you.
Imagine this: You’re wrapping up a lively evening with friends, perhaps having just enjoyed some hearty entrees, and now it’s time for dessert. You pull out these luscious bars from the fridge, and as you slice into them, the sweet, caramel aroma wafts through the room. Your guests’ eyes light up, and in an instant, they know they’re in for a treat. What follows is a moment of bliss as they indulge in creamy cheesecake layered with tender apples and a drizzle of rich caramel. It’s the kind of dessert that transforms an ordinary day into a special occasion.
A Walk Down Memory Lane
Let me take you back a few years—yes, nostalgia is a big part of why I love cooking. Every autumn, my family would visit a local apple orchard, where the air was crisp and the trees were heavy with fruit. We’d pick crisp, juicy Granny Smith apples, and I’d always beg my mom to take home a jar of the homemade caramel they sold at the cider mill.
That magical combination of sweet, sticky caramel and tangy apples would inspire me to create different treats, but more than that, those moments spent together, laughing and tasting, were the highlight of every season. Fast forward to today, and I’ve turned that childhood love into a recipe that not only pays homage to those days but lets you recreate them in your own kitchen.
Ingredients
Here’s what you’ll need to bring these fabulous bars to life:
-
1 cup graham cracker crumbs: This will be the base of your crust. You can substitute with crushed digestive biscuits for a different flavor.
-
1/4 cup sugar: A bit of sweetness to bring out the flavor in the crust. Feel free to use coconut sugar for a charming twist.
-
1/2 cup unsalted butter, melted: This keeps the crust together. If you’re watching your dairy intake, try coconut oil as a replacement.
-
2 (8 oz) packages cream cheese, softened: The star of the show! Make sure it’s at room temperature for that creamy texture.
-
1 cup sugar: This sweetens the cheesecake layer. If you want a less sweet version, reduce the sugar to 3/4 cup without sacrificing flavor!
-
1 tsp vanilla extract: For that lovely aromatic note. Use pure vanilla extract for the best flavor, but imitation will work if that’s what you have.
-
2 large eggs: These help bind everything and give the cheesecake its structure. You can use flax eggs for a vegan option.
-
2 cups peeled and diced apples (such as Granny Smith): Fresh, juicy apples add a wonderful tartness and texture. If you want a sweeter touch, go for Honeycrisp or Fuji.
-
1 cup caramel sauce: This adds that sweet, luscious topping. Store-bought is fine, but if you’re feeling adventurous, try making your own!
-
1 tsp cinnamon: For warmth and spice. Opt for nutmeg if you’re looking for a change or want to switch up the flavor profile.
-
1/4 tsp nutmeg: This pairs beautifully with apples and adds another layer of flavor.
Step-by-Step Instructions
Now, let’s bring all these delightful ingredients together! Here’s how to make these Caramel Apple Cheesecake Bars step by step:
-
Preheat Your Oven: Start by preheating your oven to 325°F (160°C). A hot oven ensures that the cheesecake bakes evenly and sets properly.
-
Prepare the Crust:
- In a medium mixing bowl, combine the graham cracker crumbs, sugar, and melted butter.
- Mix until the crumbs are fully coated and the mixture resembles wet sand.
- Press this mixture firmly into the bottom of a greased 9×9-inch baking pan. You want a nice and even layer.
-
Bake the Crust:
- Place the pan in the preheated oven for about 8-10 minutes, or until it’s fragrant and just golden. This will give your crust a little crunch and set the foundation for the creamy cheesecake.
-
Make the Cheesecake Filling:
- In a large mixing bowl, beat the softened cream cheese with the sugar using a handheld mixer until it’s smooth and creamy. Don’t rush this step; take your time to combine the ingredients thoroughly.
- Add the vanilla extract and the eggs, one at a time, mixing well after each addition. You want to incorporate air into the mixture for a light texture, but be careful not to overmix.
-
Add the Apples:
- Gently fold in the diced apples, and sprinkle in that lovely cinnamon and nutmeg. The goal is to evenly distribute the apples throughout the cheesecake mix.
-
Pour and Swirl:
- Pour the cheesecake mixture over your pre-baked crust.
- Drizzle your caramel sauce on top—don’t skimp on this part! Then, use a knife to swirl it gently into the batter. This creates pretty patterns and ensures each bite is filled with sticky goodness.
-
Bake:
- Bake in the oven for 35-40 minutes, or until the edges are set, and the center still has a slight jiggle. Remember that it will firm up as it cools!
-
Cool Down:
- Once baked, turn off the oven and crack open the oven door—let the cheesecake cool inside for about an hour. This prevents cracking.
-
Chill in the Fridge:
- After it’s cooled to room temperature, refrigerate for at least 4 hours (or overnight, if you can resist!). This helps the flavors meld beautifully.
-
Slice & Serve:
- Once chilled, lift the bars out of the pan using the parchment paper for easy slicing. Cut into squares and drizzle with more caramel sauce before serving. Yum!
Serving Suggestions
For an eye-catching presentation, serve these bars on a beautiful platter topped with a sprinkle of cinnamon or a dollop of whipped cream. Add a few apple slices and a drizzle of caramel for that extra wow factor. Your guests will be impressed not just by the flavors, but also by the adorable presentation!
Recipe Variations
Want to mix things up? Here are a few fun ideas:
- Nutty Crunch: Stir in 1/2 cup of chopped walnuts or pecans into the crust for added crunch and flavor.
- Spice it Up: Switch out the cinnamon for pumpkin pie spice for a fall-inspired twist.
- Chocolate Lover?: Add chocolate chips to the cheesecake filling or melt some dark chocolate to drizzle on top before serving.
- Vegan Version: Use vegan cream cheese, flax eggs, and non-dairy butter for a plant-based version that doesn’t skimp on flavor.
Chef’s Notes
This recipe has become a staple in my kitchen! Initially, it started as a quick twist on traditional cheesecake, but as I experimented and refined it, I found the perfect balance between creamy and tangy. Plus, I’ve learned that if you leave a few extra caramel drizzles on the plate, it just makes everything a bit more inviting. There’s something about dessert that should feel communal—where everyone feels welcome to grab a slice and indulge.
FAQs and Troubleshooting
1. Why is my cheesecake cracking?
- Cracks often happen if the cheesecake bakes too long or if the oven temperature is too high. Cooling gradually in the oven with the door cracked can help.
2. Can I make these bars gluten-free?
- Absolutely! Just use gluten-free graham crackers or almond flour for the crust.
3. What can I do if my cheesecake is too soft?
- If it doesn’t set properly, it may need a bit longer in the fridge. If you find the filling not firm enough after chilling, you can mix in a tablespoon of cornstarch next time before baking.
4. How do I know when the cheesecake is done?
- The edges should look firm, and the center should have a slight jiggle—just like jello—it will firm up as it cools!
Nutritional Info
While I won’t dive too deep into the numbers, rest assured these bars are a balanced indulgence with the richness of cream cheese, along with the fiber and vitamins from apples. Perfect for a treat! Just remember, moderation is key.
Now that you’re armed with this delicious recipe, I hope you feel inspired to tie on your apron and create something truly special in your kitchen. Whether you’re celebrating a gathering or simply treating yourself, these Caramel Apple Cheesecake Bars are sure to become a beloved favorite. Happy cooking, and may your table always be set with love!
PrintCaramel Apple Cheesecake Bars
Delight in these creamy cheesecake bars infused with tender apples and rich caramel, perfect for any gathering.
- Prep Time: 20 minutes
- Cook Time: 50 minutes
- Total Time: 70 minutes
- Yield: 8 servings 1x
- Category: Dessert
- Method: Baking
- Cuisine: American
- Diet: Vegetarian
Ingredients
- 1 cup graham cracker crumbs
- 1/4 cup sugar
- 1/2 cup unsalted butter, melted
- 2 (8 oz) packages cream cheese, softened
- 1 cup sugar
- 1 tsp vanilla extract
- 2 large eggs
- 2 cups peeled and diced apples (such as Granny Smith)
- 1 cup caramel sauce
- 1 tsp cinnamon
- 1/4 tsp nutmeg
Instructions
- Preheat your oven to 325°F (160°C).
- In a medium mixing bowl, combine the graham cracker crumbs, sugar, and melted butter.
- Mix until the crumbs are fully coated and resemble wet sand.
- Press this mixture into the bottom of a greased 9×9-inch baking pan.
- Place the pan in the preheated oven for 8-10 minutes, or until fragrant and just golden.
- In a large mixing bowl, beat the softened cream cheese with the sugar until smooth and creamy.
- Add the vanilla extract and eggs, one at a time, mixing well after each.
- Gently fold in the diced apples with cinnamon and nutmeg.
- Pour the cheesecake mixture over your pre-baked crust.
- Drizzle the caramel sauce on top, then swirl it into the batter.
- Bake for 35-40 minutes, until the edges are set with a slight jiggle in the center.
- Once baked, turn off the oven and crack the door, letting the cheesecake cool inside for an hour.
- Refrigerate for at least 4 hours or overnight to set.
- Slice into squares and serve with more caramel sauce.
Notes
For a nutty crunch, stir in chopped walnuts or pecans; for a vegan version, use vegan cream cheese and flax eggs.
Nutrition
- Serving Size: 1 bar
- Calories: 300
- Sugar: 15g
- Sodium: 300mg
- Fat: 18g
- Saturated Fat: 10g
- Unsaturated Fat: 6g
- Trans Fat: 0g
- Carbohydrates: 34g
- Fiber: 2g
- Protein: 4g
- Cholesterol: 60mg
Keywords: cheesecake, caramel, apples, dessert, fall recipes
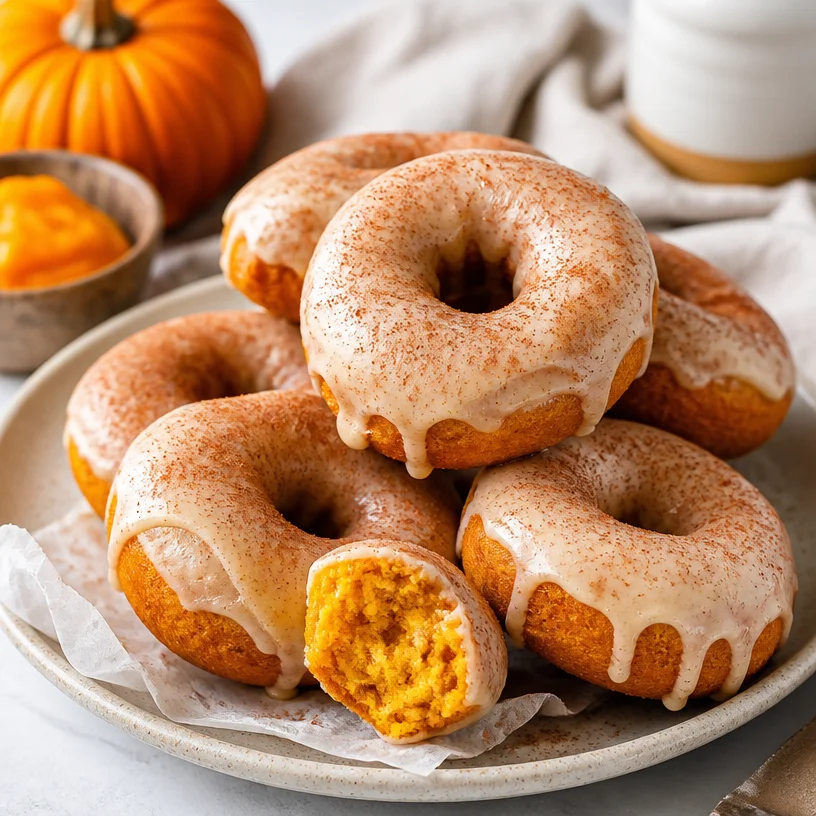
Pumpkin Donuts
How to Make Irresistible Pumpkin Donuts: A Warm and Cozy Fall Treat
Hello, fellow food lovers! As the crisp autumn air rolls in and the leaves start to paint the world in shades of amber and gold, there’s nothing quite like the enchanting aroma of freshly baked donuts wafting through your kitchen. Today, I’m excited to share with you a delightful recipe for pumpkin donuts that embodies the spirit of the season—all while being completely approachable and oh-so-satisfying!
These homemade pumpkin donuts are not just a treat for the taste buds, but they also come with a story. Let’s dive into this cozy kitchen journey together!
A Personal Touch: The First Time I Made Pumpkin Donuts
I can still remember the first time I decided to make pumpkin donuts. It was a chill October Saturday, and I was hosting a little gathering for my friends. As I flipped through a well-loved cookbook, the recipe for pumpkin donuts caught my eye, and I couldn’t resist giving it a shot. The anticipation built as the aroma of warm spices filled the air, drawing everyone into the kitchen like moths to a flame.
The donuts turned out beautifully—golden, fluffy, and just the right amount of sweetness. My friends were impressed, but beyond that, each bite was met with laughter and stories shared over mugs of warm cider. That one baking session turned into a cherished tradition, and pumpkin donuts quickly became a staple at my autumn gatherings. Now, every time I whip up a batch, it brings a wave of nostalgia and warmth that I can’t help but share with you all!
Ingredients You’ll Need
Gathering quality ingredients is key to achieving that perfect donut. Here’s what you’ll need, along with some insider tips to make your baking experience a breeze:
-
½ cup milk (warm, between 95-105°F)
- This is crucial for activating the yeast. Don’t overheat it; you want it warm, not scalding!
-
1½ teaspoons active dry yeast
- Fresh yeast makes all the difference! If you’re using instant yeast, you can skip the warming step with the milk.
-
3¼ cups all-purpose flour (fluffed, spooned, and leveled)
- Fluff your flour before measuring to ensure you don’t end up with dense donuts.
-
⅓ cup granulated sugar
- This adds sweetness and helps the donuts rise nicely.
-
½ teaspoon salt
- A little salt enhances all the lovely flavors!
-
½ teaspoon pumpkin spice (store-bought or homemade)
- You can easily make your own blend with cinnamon, nutmeg, and ginger.
-
⅔ cup pumpkin puree (NOT pumpkin pie mix)
- Make sure it’s pure pumpkin; the added sugar and spices in pie mix can throw off the balance.
-
1 large egg
- This helps bind the ingredients and adds richness.
-
3 tablespoons unsalted butter (softened)
- Softened butter makes it easier to cream with the sugar, giving your donuts that tender texture.
-
½ cup granulated sugar (for coating)
- This is used for rolling the donuts after frying. You could even add more spices to this mix for an extra kick.
-
¾ teaspoon ground cinnamon
- A classic flavor pairing with pumpkin!
-
4 ounces cream cheese (softened)
- This will be part of your glaze, lending a deliciously creamy texture.
-
¼ cup pumpkin puree (for glaze)
- Yes, more pumpkin! It will make the glaze rich and flavorful.
-
½ teaspoon pumpkin spice
- For the glaze, it ties the whole flavor theme together.
-
1 teaspoon vanilla extract (optional)
- If you like a hint of vanilla in your glaze, toss it in!
-
1 cup powdered sugar
- Essential for that sweet, dreamy glaze.
-
1 cup heavy cream (cold)
- You’ll need this for the cream cheese glaze to achieve the perfect texture.
Step-by-Step Instructions
Now that we have everything ready, let’s get cooking! Follow these steps to create your pumpkin donuts, and don’t forget to have a little fun along the way!
Step 1: Activate the Yeast
- In a small bowl, combine the warm milk and active dry yeast. Allow it to sit for about 5-10 minutes until frothy. This means your yeast is alive and ready to work its magic!
Step 2: Mix the Wet Ingredients
- In a large mixing bowl, whisk together the pumpkin puree, sugar, softened butter, egg, and the activated yeast mixture. Use a rubber spatula or wooden spoon to combine everything thoroughly—this is where all that cozy autumn flavor begins to come to life!
Step 3: Combine Dry Ingredients
- In another bowl, whisk together the flour, salt, and pumpkin spice. Adding dry ingredients in a separate bowl helps ensure even distribution—no one wants a rogue clump of salt in their donut!
Step 4: Bring It All Together
- Gradually add the dry ingredients to the wet mixture. Mix until just combined. The dough will be slightly sticky, so resist the urge to add too much extra flour here! If you find it’s too sticky to handle, you can sprinkle a little more flour on your surface.
Step 5: Knead and Rise
- Lightly flour your work surface and turn the dough out onto it. Knead the dough for about 5 minutes until it’s smooth and elastic. Shape it into a ball and place it in a greased bowl. Cover it with a clean kitchen towel and let it rise in a warm place until it doubles in size, about 1 hour.
Step 6: Shape the Donuts
- Once the dough has risen, punch it down to release the air. Roll it out to about ½ inch thickness on a floured surface. Use a donut cutter (or two round cutters of different sizes) to cut out donuts. Place the cut donuts on a parchment-lined tray while you heat your oil.
Step 7: Fry the Donuts
- In a heavy-bottomed pot, heat about 2 inches of vegetable oil to 350°F (monitor with a candy thermometer). Fry the donuts in batches for about 2-3 minutes on each side, or until golden brown. Remove with a slotted spoon and let them drain on paper towels.
Step 8: Prepare the Glaze
- While the donuts cool, make the glaze. In a mixing bowl, whisk together the softened cream cheese, pumpkin puree, powdered sugar, pumpkin spice, and heavy cream until smooth.
Step 9: Glaze ‘Em Up
- Once the donuts are cool enough to handle, dip the tops into the glaze and set them on a cooling rack to let the glaze set. You can sprinkle a bit more cinnamon sugar over the top for a finishing touch.
Serving Suggestions
For an elevated presentation, stack the glazed donuts on a rustic wooden board. Add a few autumn leaves or mini pumpkins around the base for a festive touch. Maybe even serve with a steaming cup of chai or a spiced cider for the ultimate autumn experience!
Recipe Variations
- Baked Pumpkin Donuts: Feel free to bake these instead of frying! Simply pour the batter into a donut pan and bake at 350°F for about 12-15 minutes.
- Gluten-Free Option: Substitute all-purpose flour with a 1:1 gluten-free blend for a gluten-free treat.
- Flavor Twists: Add chocolate chips or chopped nuts into the batter for a delightful crunch.
- Vegan Option: Use a flax egg (1 tablespoon ground flaxseed + 2.5 tablespoons water) instead of the chicken egg, and substitute dairy with plant-based alternatives.
Chef’s Notes
Ah, this pumpkin donut recipe has evolved over the years. I remember the first few times they came out a bit too dense! After much experimenting, I realized it was all about the yeast activation and giving it enough time to rise. You know it’s a good day in the kitchen when the dough is perfectly pillowy!
Also, speaking of stories, I once tried a savory version of these by adding cheese and herbs. They were a disaster! But hey, that’s the beauty of cooking—every mistake is a lesson in creating something even better. So don’t be afraid to let your creativity flow!
FAQs and Troubleshooting
Q1: My donuts are too dense. What went wrong?
A: The dough may not have risen enough, or perhaps the yeast was inactive. Make sure your milk is at the right temperature, and give the dough ample time to rise.
Q2: Can I prep the dough ahead of time?
A: Absolutely! After shaping the donuts, let them rise, then chill them in the fridge overnight. Just let them come to room temperature before frying.
Q3: How do I store the leftover donuts?
A: Place them in an airtight container at room temperature for a day or two, or in the fridge if you want them to last longer. They’re best enjoyed fresh, but a quick zap in the microwave makes them taste warm again!
Q4: What’s the best way to make a thicker glaze?
A: If you prefer a thicker glaze, reduce the amount of heavy cream or add more powdered sugar until you reach the desired consistency.
Nutritional Info
(If you want nutritional information, I recommend calculating it per serving based on your specific ingredients and serving sizes.)
There you have it, my lovely foodies! A delightful recipe for pumpkin donuts that will make your home smell like an autumn wonderland and your loved ones keep coming back for more. Remember, cooking should be fun, so take your time, enjoy the process, and, most importantly, savor the moments shared around the table.
Happy baking! 🎃🍩
PrintIrresistible Pumpkin Donuts
Delicious homemade pumpkin donuts perfect for cozy autumn gatherings.
- Prep Time: 20 minutes
- Cook Time: 30 minutes
- Total Time: 50 minutes
- Yield: 12 servings 1x
- Category: Dessert
- Method: Frying
- Cuisine: American
- Diet: Vegetarian
Ingredients
- ½ cup warm milk (between 95-105°F)
- 1½ teaspoons active dry yeast
- 3¼ cups all-purpose flour (fluffed, spooned, and leveled)
- ⅓ cup granulated sugar
- ½ teaspoon salt
- ½ teaspoon pumpkin spice
- ⅔ cup pumpkin puree (not pumpkin pie mix)
- 1 large egg
- 3 tablespoons unsalted butter (softened)
- ½ cup granulated sugar (for coating)
- ¾ teaspoon ground cinnamon
- 4 ounces cream cheese (softened)
- ¼ cup pumpkin puree (for glaze)
- ½ teaspoon pumpkin spice (for glaze)
- 1 teaspoon vanilla extract (optional)
- 1 cup powdered sugar
- 1 cup heavy cream (cold)
Instructions
- Activate the yeast: In a small bowl, combine the warm milk and active dry yeast. Allow it to sit for about 5-10 minutes until frothy.
- Mix the wet ingredients: In a large mixing bowl, whisk together the pumpkin puree, sugar, softened butter, egg, and the activated yeast mixture.
- Combine the dry ingredients: In another bowl, whisk together the flour, salt, and pumpkin spice.
- Bring it all together: Gradually add the dry ingredients to the wet mixture. Mix until just combined.
- Knead and rise: Knead the dough for about 5 minutes until it’s smooth and elastic. Let it rise until doubled in size, about 1 hour.
- Shape the donuts: Roll the dough out to about ½ inch thickness and cut out donuts.
- Fry the donuts: Heat oil to 350°F and fry the donuts for about 2-3 minutes on each side until golden brown.
- Prepare the glaze: In a mixing bowl, whisk together the softened cream cheese, pumpkin puree, powdered sugar, pumpkin spice, and heavy cream until smooth.
- Glaze ’em up: Dip the tops of the donuts into the glaze and let them set on a cooling rack.
Notes
For a thicker glaze, reduce the amount of heavy cream or add more powdered sugar.
Nutrition
- Serving Size: 1 donut
- Calories: 290
- Sugar: 15g
- Sodium: 200mg
- Fat: 12g
- Saturated Fat: 7g
- Unsaturated Fat: 4g
- Trans Fat: 0g
- Carbohydrates: 36g
- Fiber: 1g
- Protein: 3g
- Cholesterol: 25mg
Keywords: pumpkin donuts, fall treats, dessert, baking, cozy recipes
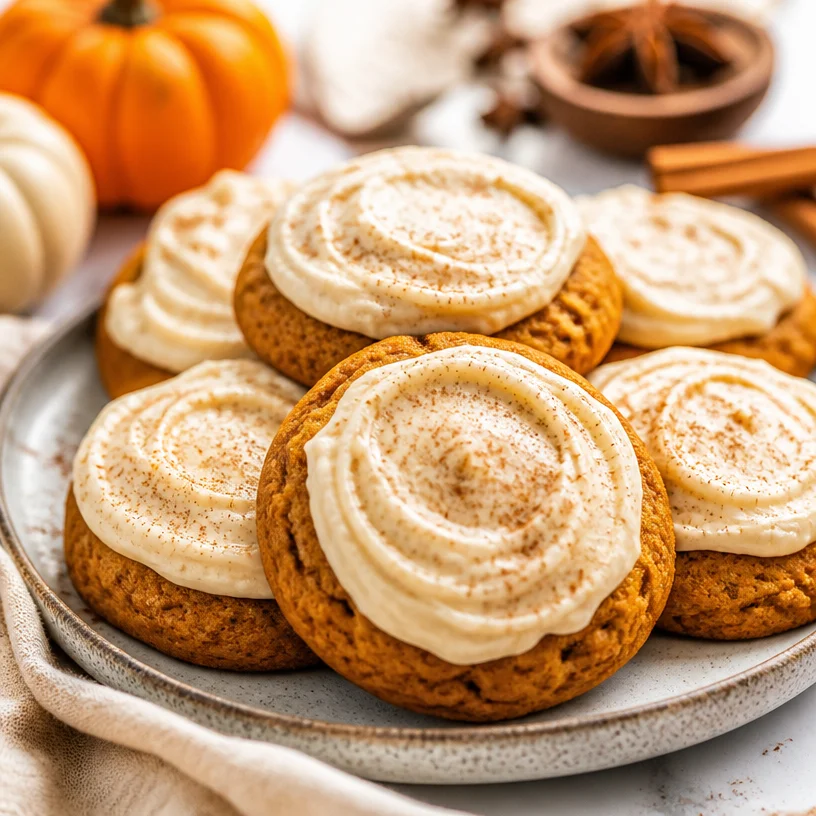
Minute Fall Pumpkin Cookies with Cream Cheese Frosting
The Ultimate Pumpkin Cookies with Cream Cheese Frosting Recipe
Hello, fellow food enthusiasts! If there’s one thing I adore about the changing seasons, it’s the beautiful way they influence our cooking and baking. With fall in full swing, the vibrant colors of leaves and the comforting aroma of pumpkin spice fill the air. Today, I’m excited to share one of my all-time favorite fall treats: Pumpkin Cookies with Cream Cheese Frosting! These cookies are an absolute delight—soft, fluffy, and wonderfully spiced, topped with a luscious cream cheese frosting that is simply to die for. So, tie on your apron, grab your mixing bowls, and let’s create something delightful together.
A Taste of Nostalgia
I can still picture my grandmother in her sunny kitchen, clad in her well-loved apron, bringing magic to life during the fall season. One of my fondest memories is when she introduced me to pumpkin cookies. Every year, as soon as the leaves began to crunch underfoot, we would set aside an entire afternoon to bake and create. The scent of cinnamon and nutmeg wafting through the air filled our home with warmth and happiness. She taught me that cooking is as much about the ingredients as it is about the love and joy that you infuse into the process.
Her secret ingredient? Laughter. She would always say that a little giggle while mixing the flour made the cookies extra special. I guess that’s why every time I bake these pumpkin cookies, I feel her presence in my kitchen. They stir up wonderful memories of time spent together, showcasing how food can create lasting bonds.
Ingredients
Here’s what you need to whip up these scrumptious cookies:
-
2 1/2 cups (312 g) all-purpose flour
A key ingredient, this will help give structure to your cookies. If you’re looking for gluten-free options, you can substitute a 1:1 gluten-free baking flour mix. -
1 teaspoon baking powder
This helps your cookies rise, creating that lovely, fluffy texture. Make sure it’s fresh for the best results! -
1 teaspoon baking soda
It works in tandem with the baking powder to achieve that perfect lift. If you run out, you can use another teaspoon of baking powder instead. -
1 tablespoon pumpkin pie spice (plus extra for sprinkling)
A glorious mix of cinnamon, nutmeg, ginger, and cloves that will instantly transport you to a cozy autumn day. Feel free to adjust the spice level according to your taste. -
1/2 teaspoon salt
Balances the sweetness and enhances the flavors in your cookies. Even if you’re cutting back on salt, a pinch can go a long way here. -
3/4 cup (170 g) unsalted butter (room temperature)
Softened butter is a must for creaming with sugar! You can use coconut oil for a dairy-free version; just melt it slightly before mixing. -
3/4 cup (150 g) granulated sugar
Sweetness! You can substitute part of it with brown sugar for a deeper, molasses-like flavor. -
1/2 cup (100 g) packed light brown sugar
This adds moisture and a subtle caramel flavor that’s just perfect for these cookies. -
1 1/4 cups (305 g) canned pumpkin puree
Pure pumpkin goodness! Always opt for pure pumpkin and not pumpkin pie filling, which has extra sugar and spices. -
1 large egg (room temperature)
Offers richness; it helps bind the mixture. If you’re looking for an egg substitute, you can use a mashed banana or 1/4 cup of unsweetened applesauce. -
1 teaspoon pure vanilla extract
Adds a wonderful depth of flavor to the cookies. Homemade vanilla extract is an absolute treat! -
8 ounces (1 brick or 226 g) block-style cream cheese (softened but still cool)
This is the star of the frosting! You can use Greek yogurt for a healthier twist, but it won’t be quite as creamy. -
¼ cup (56 g) unsalted butter (softened but still cool)
This gives the frosting a beautiful texture. Just as with the cream cheese, you could substitute this with coconut cream for a dairy-free option. -
1 teaspoon pure vanilla extract
For that delicious pop of flavor in your frosting. -
1 3/4 cups (210 g) confectioners’ sugar (sifted)
This ensures your frosting is smooth and sweet! You can whisk in a little cocoa powder for a chocolatey twist.
Step-by-Step Instructions
Now that we have our ingredients lined up, let’s start baking these beauties!
Step 1: Preheat Your Oven
Start by preheating your oven to 350°F (175°C). This is a crucial step! An appropriately heated oven ensures your cookies rise beautifully.
Step 2: Mix Your Dry Ingredients
In a medium bowl, whisk together the flour, baking powder, baking soda, pumpkin pie spice, and salt. This little mixture will combine all those dry goods nicely, ensuring they distribute evenly in the cookie dough. Tip: Sift the flour and powdered sugar to avoid any lumps in your cookies or frosting.
Step 3: Cream the Butter and Sugars
In your mixing bowl, add the unsalted butter, granulated sugar, and light brown sugar. Beat with a hand mixer or stand mixer on medium speed until it’s light and fluffy—about 2-3 minutes. This step is where the magic begins! The air you incorporate here will give your cookies that delightful texture.
Step 4: Add Egg, Vanilla, and Pumpkin Purée
Next, add the egg, vanilla extract, and pumpkin puree to the mixture. Mix until everything is well combined, scraping down the sides of the bowl as needed. You’ll love how the pumpkin puree gives it a beautiful color!
Step 5: Gradually Add the Dry Ingredients
Lower the mixer speed and gradually fold in your dry ingredients. Mix just until combined; your batter should be thick and slightly sticky. Chef’s Note: Over-mixing can lead to chewy cookies, which we definitely don’t want.
Step 6: Scoop and Shape the Cookies
Using a cookie scoop (or a tablespoon), drop rounded balls of dough onto parchment-lined baking sheets, leaving enough space between each cookie to allow for spreading. You can sprinkle a little extra pumpkin spice on top of each cookie for a lovely finish before they go into the oven.
Step 7: Bake
Bake in the preheated oven for 10-12 minutes, or until the edges are set but the centers appear soft. Remember, they will continue to cook a bit as they cool. Tip: For a lovely golden edge, keep an eye on your cookies—the dark chocolate color of the pumpkin can make it harder to tell when they’re done.
Step 8: Cool the Cookies
Let them cool on the baking sheet for a few minutes before transferring them to wire racks. This allows them to firm up a little without becoming too hard.
Step 9: Make the Cream Cheese Frosting
In a medium bowl, combine cream cheese, unsalted butter, and vanilla extract. Beat until it’s wonderfully smooth and creamy. Gradually add the confectioners’ sugar, mixing until everything is well combined. If your frosting is too thin, add more sugar until you reach your desired consistency.
Step 10: Frost Those Cookies!
Once the cookies are completely cool, frost each one generously with your cream cheese frosting. You can also pipe it on for a little extra flair!
Serving Suggestions
These pumpkin cookies are lovely on their own, but they can also be paired with a hot cup of chai tea or an aromatic pumpkin spice latte. For an added touch, you can garnish with a sprinkle of pumpkin pie spice or even some toasted pecans for a delightful crunch.
Recipe Variations
- Choco-Pumpkin Delight: Add a sprinkle of chocolate chips into the cookie batter for a deliciously sweet twist!
- Nuts About It: Fold in some finely chopped walnuts or pecans for added texture and richness.
- Spiced Just Right: Swap out the pumpkin pie spice for a chai spice mix for a unique flavor experience!
- Gluten-Free Option: Replace the all-purpose flour with a gluten-free blend to make these cookies suitable for gluten-sensitive friends.
Chef’s Notes
These pumpkin cookies have come a long way since my grandmother’s kitchen. The original recipe was simple, but over the years, I’ve made small tweaks that allow me to showcase seasonal flavors while ensuring they’re easy to whip up for any gathering. There’s nothing like seeing friends and family enjoy a homemade treat, especially when it conjures up such sweet memories.
FAQs and Troubleshooting
1. Why are my cookies flat?
Cookies could flatten due to warm butter or overmixing. Ensure your butter is at room temperature and try to mix just until combined.
2. Can I freeze the dough?
Absolutely! You can scoop the cookie dough onto a baking tray, freeze until solid, then transfer to a freezer bag for up to 2 months. When ready, bake straight from the freezer; just add a couple of extra minutes to the baking time.
3. How do I know when they’re done baking?
The edges will set while the centers may still look soft. A light golden color around the edges is a great indicator that they’re ready!
4. Can I use fresh pumpkin puree instead of canned?
Sure thing! Just make sure to cook and drain any excess moisture from fresh pumpkin before using it in the recipe.
Nutritional Info (Optional)
Caloric value, fat content, sugars, and other nutritional information can be added here depending on the user’s preferences.
So there you have it—my cherished recipe for Pumpkin Cookies with Cream Cheese Frosting! As you whisk and bake your way through this recipe, remember that the best ingredients are the stories and laughter you bring to your kitchen. Whether it’s autumn or a warm evening any other time of the year, these cookies are sure to delight your taste buds and those of everyone gathered around your table. Enjoy baking, and remember—good food isn’t just about what’s on your plate; it’s about the love and joy that comes with it. Happy baking!
PrintThe Ultimate Pumpkin Cookies with Cream Cheese Frosting
Delightful, soft pumpkin cookies topped with luscious cream cheese frosting – a perfect fall treat!
- Prep Time: 15 minutes
- Cook Time: 12 minutes
- Total Time: 27 minutes
- Yield: 24 servings 1x
- Category: Dessert
- Method: Baking
- Cuisine: American
- Diet: Vegetarian
Ingredients
- 2 1/2 cups (312 g) all-purpose flour
- 1 teaspoon baking powder
- 1 teaspoon baking soda
- 1 tablespoon pumpkin pie spice (plus extra for sprinkling)
- 1/2 teaspoon salt
- 3/4 cup (170 g) unsalted butter (room temperature)
- 3/4 cup (150 g) granulated sugar
- 1/2 cup (100 g) packed light brown sugar
- 1 1/4 cups (305 g) canned pumpkin puree
- 1 large egg (room temperature)
- 1 teaspoon pure vanilla extract
- 8 ounces (1 brick or 226 g) block-style cream cheese (softened but still cool)
- 1/4 cup (56 g) unsalted butter (softened but still cool)
- 1 teaspoon pure vanilla extract
- 1 3/4 cups (210 g) confectioners’ sugar (sifted)
Instructions
- Preheat your oven to 350°F (175°C).
- Mix your dry ingredients in a medium bowl.
- Cream the butter and sugars in a mixing bowl until light and fluffy.
- Add the egg, vanilla, and pumpkin puree to the mixture.
- Gradually add the dry ingredients to the wet mixture.
- Scoop rounded balls of dough onto parchment-lined baking sheets.
- Bake for 10-12 minutes or until edges are set.
- Cool the cookies on the baking sheet for a few minutes.
- Make the cream cheese frosting in a medium bowl.
- Frost each cookie generously with the frosting.
Notes
These cookies pair wonderfully with chai tea or pumpkin spice lattes. Try adding nuts or chocolate chips for variation!
Nutrition
- Serving Size: 1 cookie
- Calories: 180
- Sugar: 10g
- Sodium: 150mg
- Fat: 8g
- Saturated Fat: 4g
- Unsaturated Fat: 3g
- Trans Fat: 0g
- Carbohydrates: 24g
- Fiber: 1g
- Protein: 2g
- Cholesterol: 20mg
Keywords: pumpkin cookies, cream cheese frosting, fall dessert, autumn baking
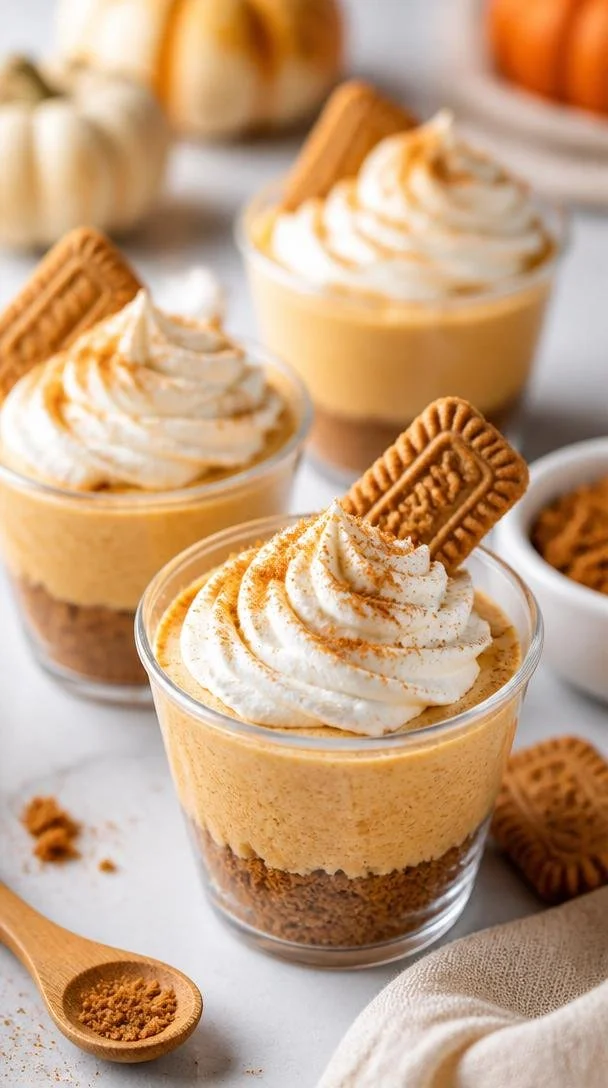
Minute No-Bake Pumpkin Pie Cup Dessert (Dairy-Free)
Pumpkin Pie in a Cup: A Delightful Autumn Treat
Fall is in the air! The leaves are changing, and the scent of pumpkin spice is wafting through the neighborhoods. This time of year is all about warm drinks, cozy sweaters, and of course, decadent desserts that bring people together. Today, I’m excited to share one of my favorite desserts: Pumpkin Pie in a Cup. It’s a playful twist on the classic pumpkin pie that captures all the comforting flavors we love—without the fuss of a traditional pie crust.
Imagine enjoying the smooth, creamy filling of pumpkin pie tucked right into a cup, topped with fluffy whipped cream and perhaps even a sprinkle of cinnamon or nutmeg. It’s the perfect dessert for gatherings with friends or a special treat to enjoy while curled up with a good book. Plus, it’s so easy to make that you’ll find yourself adding it to your go-to recipes for every autumn occasion.
My Pumpkin Pie Memories
Growing up, my family always celebrated the start of fall with a big Thanksgiving dinner. The centerpiece of that feast was my grandmother’s famous pumpkin pie. The aroma of spices gently wafting through the kitchen as she baked the pies was a smell I’ll never forget. I can picture my little self, tugging at her apron and stealing bites of the spiced pumpkin filling as she rolled the pie crust—it was a grand adventure of flavors and aromas. Each year, she would teach me a little more about the craft of baking, but I could never quite replicate her skill with a traditional pie.
So, one autumn evening, I decided to transform my memories into something simple yet equally satisfying. That led to the birth of the Pumpkin Pie in a Cup! It’s a dessert that captures the spirit of those cherished kitchen moments while allowing the flavors of pumpkin and spice to shine. I’m thrilled to share it with you now!
Ingredients
Let’s gather our ingredients. For Pumpkin Pie in a Cup, you’ll need:
-
2 cups Biscoff cookie crumbs (from about 30 cookies)
These delectable cookies bring a spiced, caramel-like flavor that pairs beautifully with pumpkin. You can substitute them with graham cracker crumbs or gingersnap cookies for different variations. -
6 Tablespoons unsalted butter (melted)
Butter adds richness and helps bind the cookie crust together. If you need a dairy-free option, coconut oil works fabulously here! -
8 ounces cream cheese (softened)
Cream cheese gives our filling that silky smooth texture. If you’re avoiding dairy, you could substitute with a vegan cream cheese alternative, but mind the consistency—it may differ slightly. -
1/2 cup granulated white sugar
This sweetens the filling beautifully. For a lower-calorie option, you can use coconut sugar or maple syrup instead. Just keep in mind that sweetness levels may vary! -
1 cup pumpkin puree (NOT pumpkin pie mix)
Pure pumpkin puree is key to achieving that rich pumpkin flavor. Avoid pumpkin pie filling as it contains extra sugars and spices that can throw off your dish. -
1 teaspoon pumpkin pie spice
This blend of cinnamon, nutmeg, ginger, and cloves is essential for that quintessential autumn flavor. You can also make your own blend or use cinnamon alone for a lighter spice profile. -
6 ounces frozen whipped topping (thawed)
This gives our filling an airy lightness. If you’re feeling fancy, you can whip up your own cream, but just make sure it’s fully whipped before folding it into the mixture. Extra whipped cream on top is highly recommended for serving!
Step-by-Step Instructions
Now, let’s get right into making this delightful Pumpkin Pie in a Cup.
-
Prepare Your Crust
Begin by preheating your oven to 350°F (175°C). In a large mixing bowl, combine the Biscoff cookie crumbs and melted butter. Mix until the crumbs are well-coated—think of it as making small sandy pebbles. You want it to hold together when pressed. -
Press and Bake the Crust
Take your mixture and evenly distribute it into the bottoms of your serving cups (about 6-8 cups, depending on size). Use the back of a spoon or your fingers to press down firmly. Bake the crusts for about 10 minutes, until they are golden and fragrant. Allow them to cool while you make the filling. -
Make the Filling
In another mixing bowl, beat the softened cream cheese with an electric mixer until it’s smooth and creamy. This will be the smooth base for our filling. Slowly add in the granulated sugar and continue mixing until well combined—this should take about 2 minutes. -
Add the Pumpkin and Spices
Now, add in the pumpkin puree and pumpkin pie spice. Mix on low speed until all ingredients are well-incorporated. You should notice that glorious orange hue! This is your pumpkin filling magic in the making. -
Fold in the Whipped Topping
Gently fold in the thawed whipped topping until it’s evenly distributed throughout the mixture. This step is critical for keeping the filling light and airy—think fluffy clouds of pumpkin! Don’t rush it; be gentle and ensure everything is combined. -
Assemble the Cups
With the crusts cooled and the filling ready, spoon the pumpkin mixture on top of the crusts in each cup. Don’t worry about getting it perfect—rustic is the name of the game here! Use a spatula to smooth the top if desired. -
Chill and Serve
Place the assembled cups in the refrigerator for at least 2-4 hours (or overnight if you want to get a head start!). This allows the filling to set perfectly. When you’re ready to serve, top each cup with a generous dollop of whipped cream and perhaps a dash of cinnamon for that extra autumn flair.
Serving Suggestions
These cups make for a lovely presentation at any gathering! You can serve them on a decorative tray, lined with autumn leaves or sprigs of rosemary for a stunning display. For that little extra touch, consider adding mini pumpkin decorations or serving with a side of caramel sauce for drizzling—because who can resist that combo?
Recipe Variations
Now, let’s talk creativity! Here are a few variations you can play with:
-
Maple Pumpkin Delight: Drizzle some maple syrup in the crust or mix it with the pumpkin filling for a sweeter take on autumn flavors.
-
Nutty Touch: Add finely chopped pecans or walnuts into the crust mixture for a delightful crunch.
-
Chai Spice Twist: Swap out pumpkin pie spice for chai spice to enhance the flavor palette with aromatic notes of cardamom and black pepper.
-
Vegan Version: Use a vegan cream cheese alternative, coconut whipped cream, and dairy-free cookie crumbs to create a plant-based version of this delight.
-
Chocolate Lover’s Dream: Fold in some mini chocolate chips into the pumpkin filling for a rich, chocolatey treat—after all, chocolate and pumpkin are a match made in heaven!
Chef’s Notes
As I’ve developed this recipe, it has become a staple in my gatherings—one of those delightful desserts that never fails to bring smiles. I fondly remember a particular Thanksgiving when I forgot to chill the filling overnight, so I served it warm. Surprisingly, everyone loved it just as much! That’s the beauty of this dessert—it’s flexible and always turns out delicious no matter how you prepare it. Just like my grandmother’s pie, it becomes less about the perfection and more about the moments we share.
FAQs and Troubleshooting
-
Can I use fresh pumpkin instead of canned?
Absolutely! Just make sure to cook and puree your pumpkin until it’s smooth. Fresh pumpkin may need to be drained a bit to avoid excess moisture. -
What if my crust crumbles?
If the crust doesn’t hold together, you may not have added enough butter or pressed it down hard enough. Try adding a touch more melted butter and ensure you’re compacting it into the cup evenly. -
How long can I store these cups?
They can be stored in the refrigerator for up to 3 days, though they’re best enjoyed within the first couple of days for freshness. -
I don’t have whipped topping. What can I use?
You can make your own whipped cream! Just whip heavy cream with a bit of sugar and vanilla until soft peaks form. It’s just as tasty and feels a little more homemade!
Nutritional Info
While I haven’t listed precise nutritional values, this dessert does have sweet notes of pumpkin and spiced goodness, making it a delightful treat to enjoy in moderation, especially during those cozy fall evenings!
Let’s embrace the season and share joyful moments around the table with this Pumpkin Pie in a Cup. It’s a recipe that invites laughter, cozy conversations, and all the warm feels autumn has to offer. Enjoy, and happy cooking! 🥳🍁
PrintPumpkin Pie in a Cup
A delightful twist on classic pumpkin pie served in a cup, featuring creamy pumpkin filling and a spiced cookie crust.
- Prep Time: 20 minutes
- Cook Time: 10 minutes
- Total Time: 240 minutes
- Yield: 6 servings 1x
- Category: Dessert
- Method: Baking
- Cuisine: American
- Diet: Vegetarian
Ingredients
- 2 cups Biscoff cookie crumbs
- 6 tablespoons unsalted butter (melted)
- 8 ounces cream cheese (softened)
- 1/2 cup granulated white sugar
- 1 cup pumpkin puree (NOT pumpkin pie mix)
- 1 teaspoon pumpkin pie spice
- 6 ounces frozen whipped topping (thawed)
Instructions
- Preheat your oven to 350°F (175°C).
- Combine the Biscoff cookie crumbs and melted butter in a large mixing bowl.
- Press the mixture into the bottoms of your serving cups, creating a crust.
- Bake the crusts for about 10 minutes, until golden and fragrant.
- Allow to cool while preparing the filling.
- Beat the softened cream cheese until smooth and creamy in another mixing bowl.
- Gradually add in the granulated sugar and mix for about 2 minutes.
- Add the pumpkin puree and pumpkin pie spice, mixing on low speed until well combined.
- Fold in the thawed whipped topping until evenly distributed.
- Spoon the pumpkin mixture on top of the cooled crusts in each cup.
- Chill the assembled cups in the refrigerator for at least 2-4 hours.
- Serve topped with whipped cream and a dash of cinnamon.
Notes
For variations, consider adding maple syrup, nuts, or chocolate chips to the filling.
Nutrition
- Serving Size: 1 cup
- Calories: 320
- Sugar: 18g
- Sodium: 350mg
- Fat: 18g
- Saturated Fat: 10g
- Unsaturated Fat: 6g
- Trans Fat: 0g
- Carbohydrates: 35g
- Fiber: 2g
- Protein: 4g
- Cholesterol: 40mg
Keywords: pumpkin pie, dessert, fall recipes, Thanksgiving, pumpkin spice
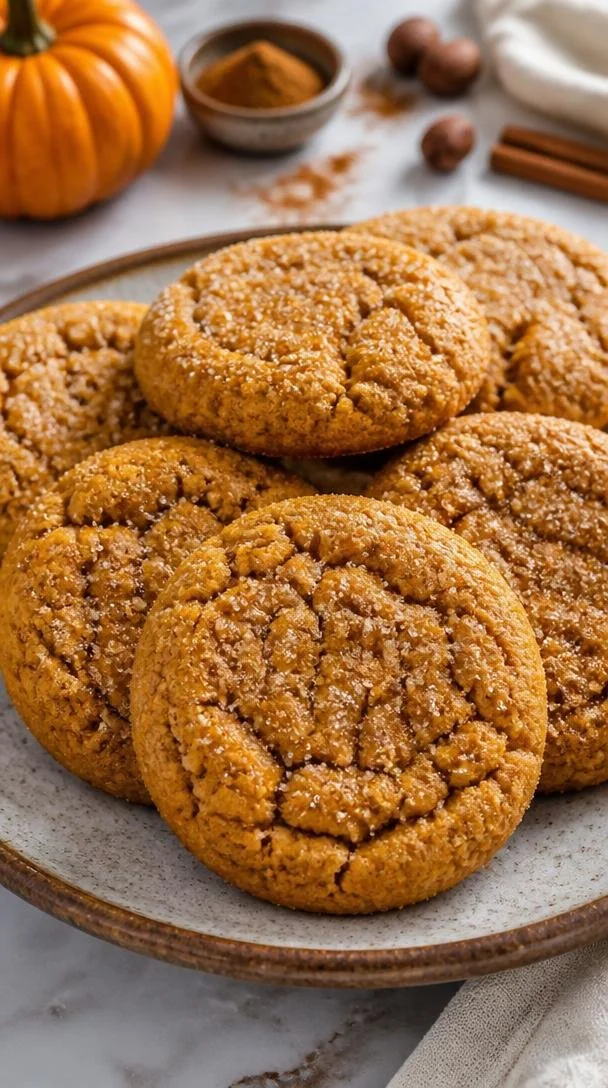
Easy One-Bowl Chewy Pumpkin Cookies in 25 Minutes Flat
Chewy Pumpkin Cookies: A Delicious Fall Treat
Welcome, food lovers! Today, we’re diving into the cozy world of baking with a recipe that brings a taste of autumn right into your kitchen: chewy pumpkin cookies. These delightful treats are perfect for crisp evenings when you want to enjoy something sweet that’s also a bit wholesome. Plus, they’re incredibly easy to whip up, making them a favorite around my table.
I remember the first time I tried a pumpkin cookie. It was at a friend’s autumn gathering, where the air was filled with the rich aroma of spices and baked goods. As soon as I took a bite, I was transported to a haven of fall flavors—the warm spices, the soft texture, and that subtly sweet pumpkin flavor all wrapped up in one cookie. It was love at first taste! Since then, I’ve perfected my chewy pumpkin cookie recipe, and I can’t wait to share it with you.
So, whether you’re cozying up at home, hosting a gathering, or just looking to satisfy a sweet tooth, let’s get started on these scrumptious chewy pumpkin cookies that will make your heart—and tummy—happy!
My Pumpkin Cookie Memory
One of my fondest memories is from a few years ago when I decided to host an impromptu pumpkin-themed gathering to celebrate the season. It was one of those crisp October days; the leaves were changing, and the sun was shining brightly. My friends and I gathered around the kitchen island, sipping spiced apple cider and sharing stories. The star of the show? My chewy pumpkin cookies, of course!
With laughter filling the room, we rolled out dough, sprinkled flour everywhere, and turned what could have been a stressful baking session into a joyful experience. When those cookies came out of the oven, we could hardly wait for them to cool! The sweet scent filled the house, and as we finally took our first bites, you could hear the “Mmm”s echoing through the room. Those cookies not only filled our stomachs but also created a warm atmosphere filled with connection and joy—reminding me that food truly brings people together.
Ingredients
Let’s gather our ingredients! Here’s what you’ll need for these gooey, chewy pumpkin cookies, along with some handy tips for each component:
-
1 cup pumpkin puree
(Canned or homemade, pumpkin puree is the star of the show. If you’re feeling adventurous, you can use butternut squash puree as a fantastic substitute!) -
1 cup brown sugar
(This adds moisture and rich flavor! For a lighter touch, you can swap half of this with coconut sugar or white sugar.) -
1/2 cup granulated sugar
(Gives just the right amount of sweetness without overpowering the pumpkin. Feel free to reduce this slightly for a less sweet cookie.) -
1/2 cup butter (softened)
(Butter contributes to that fabulous chewy texture. If you want to make it dairy-free, coconut oil or vegan butter works well!) -
1 egg
(This binds everything together. You can replace it with a flax egg for a vegan option: mix 1 tablespoon ground flaxseed with 2.5 tablespoons water and let it sit for a few minutes to thicken.) -
2 cups all-purpose flour
(Essential for structure! For a gluten-free version, feel free to use a 1:1 gluten-free flour blend.) -
1 teaspoon baking soda
(This helps the cookies rise and gives them a nice texture. Make sure it’s fresh for the best results!) -
1 teaspoon baking powder
(Works in conjunction with baking soda for extra fluffiness!) -
1 teaspoon pumpkin spice
(A blend of cinnamon, nutmeg, and clove that gives our cookies that wonderful autumn flavor. You can make your own mix too!) -
1/2 teaspoon salt
(Enhances all the flavors! Don’t skimp on this step.) -
1/4 cup granulated sugar (for topping)
(This gives the cookies a lovely sugary crust! You can opt for sparkling sugar for a little extra sparkle.)
Step-by-Step Instructions
Now that we have our ingredients ready, let’s get baking! Follow these steps carefully, and I promise you’ll have a batch of scrumptious pumpkin cookies in no time.
Step 1: Preheat Your Oven
First things first—let’s get the oven preheating! Set it to 350°F (175°C). This ensures our cookies bake evenly and come out perfectly chewy.
Step 2: Cream the Butter and Sugars
In a large mixing bowl, beat together the softened butter, brown sugar, and granulated sugar until the mixture is light and fluffy—about 2-3 minutes. Tip: Using a hand mixer or stand mixer can save you some elbow grease, but a good old wooden spoon works too!
Step 3: Add the Egg and Pumpkin
Next, crack in your egg and add the pumpkin puree, mixing until well combined. This is where the magic starts to happen. The pumpkin will add moisture and flavor, and your mix will have a beautiful orange hue. Chef’s Hack: For a hint of flavor, try adding a touch of vanilla extract to this mix!
Step 4: Dry Ingredients Unite
In another bowl, whisk together the all-purpose flour, baking soda, baking powder, pumpkin spice, and salt. This step ensures that all the leaveners and spices are evenly distributed throughout the flour. Tip: Sifting the flour can provide an even lighter cookie, but it’s not absolutely necessary.
Step 5: Combine Wet and Dry Ingredients
Slowly add the dry mixture to the pumpkin mixture in increments, gently folding until just combined. Pro Tip: Don’t overmix! We want those cookies to stay tender and chewy, and overworking the dough can lead to extra gluten formation.
Step 6: Scoop and Shape
Using a cookie scoop or a tablespoon, drop rounded mounds of dough onto a parchment-lined baking sheet, spacing them about 2 inches apart. This allows room for them to spread! If you want, you can slightly flatten the tops with your fingers for an even bake.
Step 7: Sugar Crust
Before popping them in the oven, sprinkle a little granulated sugar on top of each cookie. This not only gives them a lovely sweet crust but adds a festive touch. Remember to resist eating the dough—though it may be tempting!
Step 8: Bake
Bake your cookies in the preheated oven for 10-12 minutes or until they’re light golden around the edges but still soft in the center. Tip: They will continue to firm up as they cool, so don’t overbake!
Step 9: Cool and Enjoy!
Let the cookies cool on the baking sheet for about 5 minutes before transferring them to a wire rack to cool completely. This waiting period allows them to set while remaining soft and chewy. And now, patience is key, my friends!
Serving Suggestions
When you’re ready to serve, consider plating these cookies on a beautiful platter sprinkled with extra pumpkin spice or a drizzle of white chocolate for added flair. Pair them with a warm cup of spiced chai tea or a latte, and you’ll have an irresistible snack that’s perfect for sharing (if you’re feeling generous!).
Recipe Variations
Want to switch it up a bit? Here are a few ideas:
- Chocolate Chip Twist: Fold in a cup of chocolate chips for a classic combo!
- Nutty Delight: Add 1/2 cup of chopped walnuts or pecans for a crunchy texture.
- Gluten-Free: Use a gluten-free flour blend instead of all-purpose flour.
- Spiced Up: Increase the pumpkin spice to 1.5 teaspoons for an extra kick of flavor.
- Frosted Version: Top with a cream cheese frosting for a decadent dessert!
Chef’s Notes
Ah, these cookies have a special place in my heart! This recipe has evolved over time, adapted from my classic sugar cookie base to incorporate the deliciousness of pumpkin. I vividly remember my first attempt—I accidentally spilled too much pumpkin puree, and that batch turned out a bit too chewy for my liking. But guess what? They were still gobbled up by my friends! The lesson? Often, the best moments in the kitchen come from those happy accidents.
FAQs and Troubleshooting
1. Why are my cookies flat?
If your cookies spread too much, it could be due to too much butter or not enough flour. Always carefully measure your ingredients, and if your butter was too soft, try chilling the dough for 30 minutes before baking.
2. How do I store my pumpkin cookies?
These cookies can be stored in an airtight container at room temperature for up to a week. If you’d like them to last longer, freeze the baked cookies. Just be sure to let them cool completely before freezing and place parchment paper between layers.
3. Can I make these ahead of time?
Absolutely! You can whip up the dough ahead of time and refrigerate it for up to 3 days before baking. Alternatively, freeze the shaped cookie dough balls and bake them directly from the freezer—just add an extra minute or two to the baking time.
4. How do I know when they’re done?
Look for edges that are set and lightly golden; the centers will appear soft. Trust your instinct—it’s the best guide!
Nutritional Info
(For reference, here’s a high-level breakdown of the nutritional info per cookie if you make about 24 cookies—calories may vary.)
- Calories: 108
- Protein: 1.5g
- Fat: 4.5g
- Carbohydrates: 16g
- Fiber: 0.5g
- Sugar: 6g
And there you have it! Your guide to creating these delightful chewy pumpkin cookies. With a warm, inviting texture and a sprinkle of fall flavors, they’re bound to become a favorite in your baking repertoire. I can’t wait to hear about your own kitchen adventures and the wonderful moments these cookies help create. So, tie on your apron, grab that mixer, and let’s bake a batch together! Happy baking, friends!
PrintChewy Pumpkin Cookies
Delicious chewy pumpkin cookies that capture the essence of fall with warm spices and a soft texture.
- Prep Time: 15 minutes
- Cook Time: 12 minutes
- Total Time: 27 minutes
- Yield: 24 cookies 1x
- Category: Dessert
- Method: Baking
- Cuisine: American
- Diet: Vegetarian
Ingredients
- 1 cup pumpkin puree
- 1 cup brown sugar
- 1/2 cup granulated sugar
- 1/2 cup butter (softened)
- 1 egg
- 2 cups all-purpose flour
- 1 teaspoon baking soda
- 1 teaspoon baking powder
- 1 teaspoon pumpkin spice
- 1/2 teaspoon salt
- 1/4 cup granulated sugar (for topping)
Instructions
- Preheat your oven to 350°F (175°C).
- Cream the softened butter, brown sugar, and granulated sugar until light and fluffy.
- Add the egg and pumpkin puree, mixing until combined.
- Whisk together flour, baking soda, baking powder, pumpkin spice, and salt in another bowl.
- Combine the dry mixture with the pumpkin mixture until just mixed.
- Scoop rounded mounds of dough onto a parchment-lined baking sheet.
- Sprinkle granulated sugar on top of each cookie.
- Bake for 10-12 minutes until golden around the edges.
- Cool for 5 minutes on the baking sheet before transferring to a wire rack.
Notes
These cookies can be stored in an airtight container for up to a week. Dough can be refrigerated for up to 3 days or frozen for later use.
Nutrition
- Serving Size: 1 cookie
- Calories: 108
- Sugar: 6g
- Sodium: 200mg
- Fat: 4.5g
- Saturated Fat: 2.5g
- Unsaturated Fat: 2g
- Trans Fat: 0g
- Carbohydrates: 16g
- Fiber: 0.5g
- Protein: 1.5g
- Cholesterol: 30mg
Keywords: pumpkin cookies, fall cookies, chewy cookies, dessert, autumn treats

Minute Baked Apple Fritter Bites for Cozy Mornings
Heavenly Baked Apple Fritter Bites for Cozy Mornings
There’s something undeniably magical about crisp autumn mornings. The air is tinged with a hint of spice, and the hues of red and gold from the trees create a picturesque backdrop. If you’re anything like me, those mornings call for a special breakfast that’s warm, comforting, and laden with the joyful essence of fall. Enter my Heavenly Baked Apple Fritter Bites — the perfect treat to cuddle up with as you sip your coffee or tea.
These delightful fritters are like little bites of heaven, bursting with juicy apple goodness and warm spices. The best part? They’re baked, not fried, making them a guilt-free indulgence for your cozy mornings. Trust me, once you whip these up and the enticing aroma fills your kitchen, you’ll find yourself wishing every day was breakfast day!
When I first began making these fritters, it was after a particularly crisp evening spent at an apple orchard. There’s something so nostalgic about wandering through rows of apple trees, picking the perfect fruit, and dreaming up all the delicious things you can do with them. As I brought home bags of Honeycrisp apples, the wheels in my head turned faster than a whirring mixer. I was determined to craft a light, fluffy fritter that channeled all the warm, cozy vibes of fall — and boy, did I succeed! These bites are now a go-to for any morning gathering, proving that sometimes, inspiration strikes at the most unexpected moments.
So, grab your apron, and let’s make some magical kitchen memories together with these Heavenly Baked Apple Fritter Bites!
Personal Story
A childhood favorite of mine was always my grandmother’s apple pie, which would fill her home with sweetness every harvest season. I remember sneaking into the kitchen, trying to grab some of the warm, spiced filling when she wasn’t looking, and being promptly caught — a tender moment now stored in my heart forever. As we sat at her wooden table, sharing stories and laughter, I realized that food was beyond just sustenance; it was a way to connect and create memories.
Years later, I found myself in a similar scene, only this time, I was the one in the kitchen, surrounded by friends, baking these apple fritter bites while the sweet scent danced through the air. Just like my grandmother had done for me, I was sharing not only food but comfort, laughter, and warmth. These fritter bites became more than just a recipe; they carried on a legacy of love, just like her cherished apple pie.
Ingredients
Let’s take a look at what you’ll need to create these delectable bites. Each ingredient plays a vital role, and I’ve added some tips along the way to help you customize and elevate your fritters.
-
1 1/2 cups all-purpose flour
This is the backbone of your batter! For a gluten-free alternative, you can use a 1:1 gluten-free flour blend. It will yield great results while keeping everything light and fluffy. -
2 tsp baking powder
This little powerhouse works to lift your fritters, giving them that delightful fluffiness we all crave. -
1/2 tsp kosher salt
A touch of salt enhances the sweetness and balances the flavors. If you’re out of kosher salt, sea salt works just as well. -
2 tsp ground cinnamon
This warm spice adds all the cozy vibes. Feel free to adjust the amount based on your preference — I won’t judge if you want to sprinkle a little extra for that autumnal kick! -
1/4 cup unsalted butter (melted)
This adds richness to the batter. Dairy-free? Just swap it with melted coconut oil for a plant-based option! -
1/4 cup granulated sugar
It sweetens the batter, but if you’re aiming for a healthier twist, coconut sugar can be an excellent substitute. -
1 large egg
This acts as a binding agent that helps bring everything together. For a vegan option, just use a flax egg (1 tbsp ground flaxseed mixed with 2.5 tbsp water). -
1/2 tsp vanilla extract
Vanilla brings a lovely depth of flavor to the fritters, though you can omit it if you’re in a pinch. -
1/2 cup unsweetened applesauce
This keeps your fritters moist and adds an extra apple flavor! Want more texture? You can substitute it with additional diced apples. -
1 1/2 cups finely diced Honeycrisp or Gala apples
These sweet varieties hold their shape well and add a delightful juiciness. You could experiment with whatever sweet, firm apples you have on hand. -
2 cups powdered sugar
A must for that classic sugary glaze! Adjust the quantity to your taste, but trust me, there’s no such thing as too much powdered sugar for fritters. -
1/3 cup apple cider or juice
Freshly pressed apple cider enhances the flavor and adds a nice, tangy taste to the fritters. -
2 tbsp apple cider or juice (to add to the glaze)
It complements the sweetness of the powdered sugar, making the glaze absolutely divine.
Step-by-Step Instructions
Now that we have our ingredients ready, let’s dive into the lovely world of cooking these fritters. Follow along with these step-by-step instructions, and I’ll sprinkle in some chef commentary to make the process delightful and easy!
Step 1: Preheat the Oven
Start by preheating your oven to 350°F (175°C). While your oven warms up, it gives you some time to prepare your baking sheet!
Step 2: Prepare Your Baking Sheet
Line a baking sheet with parchment paper. This prevents sticking and makes for super easy cleanup — a win-win situation! If you’re feeling fancy, you might want to use a silicone baking mat for a reusable option that’s eco-friendly.
Step 3: Mix the Dry Ingredients
In a large mixing bowl, whisk together the flour, baking powder, salt, and cinnamon until well combined. By mixing these dry ingredients first, you help to evenly distribute the leavening agents, which will help your fritters rise beautifully!
Step 4: Combine Wet Ingredients
In another bowl, mix together the melted butter, granulated sugar, egg, vanilla extract, and applesauce until smooth. You want to ensure it’s creamy and well mixed. This is where all the flavors start to blend beautifully!
Step 5: Combine Wet and Dry Mixtures
Pour your wet mixture into the bowl with the dry ingredients. Gently fold the mixtures together using a spatula or a wooden spoon. Don’t overmix; a few lumps are perfectly okay! The key to tender fritters is ensuring you don’t develop too much gluten.
Step 6: Add the Diced Apples
Now for the best part — fold in those diced apples! Ensure they’re evenly distributed throughout the batter, providing sweet bites in every fritter.
Step 7: Portion the Batter
Using a cookie scoop or spoon, drop generous mounds of the batter onto your prepared baking sheet, spaced a couple of inches apart. This way, they have room to puff up beautifully as they bake.
Step 8: Bake
Pop the baking sheet into the oven and bake for 15–20 minutes, or until the fritters are golden brown and a toothpick inserted in the center comes out clean. Oh, the smell! It’s going to be heavenly.
Step 9: Prepare the Glaze
While your fritters are baking, whisk together the powdered sugar and apple cider to create a smooth glaze. Feel free to adjust the consistency: if it’s too thick, just add a tad more cider, and if it’s too thin, add more powdered sugar.
Step 10: Glaze and Serve
Once your fritters are out of the oven and have cooled slightly, it’s time to dip! Generously drizzle the glaze over the fritters or dip the tops for an extra dose of sweetness.
Step 11: Enjoy!
Serve these delightful fritters warm with a lovely cup of coffee or tea, and watch as smiles light up around your table.
Serving Suggestions
To plate your Heavenly Baked Apple Fritter Bites, simply stack them on a beautiful cake stand or a decorative plate. A light dusting of powdered sugar on top can add a real aesthetic charm. Provide small bowls of extra glaze for dipping or drizzling, and garnish with a sprinkle of cinnamon or even a few thinly sliced apple pieces for visual appeal. This presentation not only celebrates the dish but also enhances the inviting atmosphere you create around your table.
Recipe Variations
- Spiced Pumpkin Fritters: Add pumpkin puree and swap out the apples for pumpkin pie spice for a delightful fall twist.
- Maple Glaze: Replace the apple cider in your glaze with pure maple syrup for a sweet and earthy flavor.
- Nutty Addition: Toss in some chopped walnuts or pecans for crunch and added texture!
- Chocolate Drizzle: For the chocolate lovers, drizzle a melted chocolate ganache over the fritters instead of glaze.
- Berry Fritter Bites: Substitute apples with blueberries or cranberries for a slightly tart flavor that’s equally delicious.
Chef’s Notes
These fritter bites were born from my love for apples and the magical memories of fall. Over the years, this recipe has transformed into a cherished favorite in my home. I’ve played around with flavors and textures, and I really encourage you to make it your own!
One of my funniest kitchen experiences when making these fritters was having my dog, Oliver, watch me as I prepared them — he is convinced that flour is meant for him! Imagine a white dog with a floury face; it was irresistible! As I transformed moments like this into laughter and shared delicious bites, I realized that cooking isn’t just about creating a meal; it’s about crafting memories and smiles.
FAQs and Troubleshooting
-
Why didn’t my fritters rise?
- Ensure that your baking powder is fresh! If it’s been sitting in the pantry for a while, it might lose its strength. Additionally, make sure you’re properly measuring your ingredients.
-
How do I know my fritters are done?
- Inserting a toothpick is the best test! If it comes out clean or with a few moist crumbs, you’re good to go. The tops should also be golden brown.
-
Can I freeze these fritters?
- Yes, they freeze beautifully! Let them cool completely, then store in airtight containers. When ready to enjoy, just pop them in the toaster oven to reheat — they’ll get crispy again!
-
How can I store leftover fritters?
- Store your fritters in an airtight container at room temperature for up to two days. For longer freshness, keep them in the fridge for up to a week (though I doubt they’ll last that long!).
Nutritional Info
While the nutritional information may vary based on specific ingredients and serving sizes, a rough estimate for each fritter — not including glaze — is about:
- Calories: 150
- Protein: 2 g
- Carbohydrates: 20 g
- Fat: 6 g
Conclusion
There you have it — the recipe for my Heavenly Baked Apple Fritter Bites that bring all the cozy vibes to your mornings! Once you try these, I guarantee you’ll find an excuse to make them more often. Whether you’re hosting friends or simply treating yourself, these fritters are an ode to the simpler, beautiful moments life has to offer. So go ahead, tie on that apron, and let’s create something divine together!
Happy cooking! Here’s to cozy mornings filled with love, laughter, and delicious fritters!
PrintHeavenly Baked Apple Fritter Bites

Delightful bites of heaven, bursting with juicy apple goodness and warm spices, perfect for cozy mornings.
- Prep Time: 15 minutes
- Cook Time: 20 minutes
- Total Time: 35 minutes
- Yield: 12 servings 1x
- Category: Dessert
- Method: Baking
- Cuisine: American
- Diet: Vegetarian
Ingredients
- 1 1/2 cups all-purpose flour
- 2 tsp baking powder
- 1/2 tsp kosher salt
- 2 tsp ground cinnamon
- 1/4 cup unsalted butter (melted)
- 1/4 cup granulated sugar
- 1 large egg
- 1/2 tsp vanilla extract
- 1/2 cup unsweetened applesauce
- 1 1/2 cups finely diced Honeycrisp or Gala apples
- 2 cups powdered sugar
- 1/3 cup apple cider or juice
- 2 tbsp apple cider or juice (for glaze)
Instructions
- Preheat the oven to 350°F (175°C).
- Line a baking sheet with parchment paper.
- Whisk together flour, baking powder, salt, and cinnamon in a large bowl.
- Mix melted butter, granulated sugar, egg, vanilla extract, and applesauce in another bowl until smooth.
- Pour the wet mixture into the dry ingredients and gently fold them together.
- Fold in diced apples until evenly distributed.
- Drop mounds of batter onto the prepared baking sheet, spaced apart.
- Bake for 15–20 minutes or until golden brown.
- Whisk together powdered sugar and apple cider to create a glaze.
- Drizzle or dip fritters in the glaze.
- Serve warm with coffee or tea.
Notes
For a gluten-free option, substitute flour with a 1:1 gluten-free flour blend. To enhance the glaze, you can use maple syrup instead of apple cider.
Nutrition
- Serving Size: 1 fritter
- Calories: 150
- Sugar: 20g
- Sodium: 100mg
- Fat: 6g
- Saturated Fat: 3g
- Unsaturated Fat: 3g
- Trans Fat: 0g
- Carbohydrates: 20g
- Fiber: 1g
- Protein: 2g
- Cholesterol: 35mg
Keywords: apple fritters, baked fritters, autumn breakfast, cozy mornings, fall recipes