
Minute Charred Shrimp Avocado Bowl: Weeknight Meal Prep
The Ultimate Charred Shrimp and Avocado Bowl: A Flavorful Journey
Hello, my fellow food lovers! Today, I’m thrilled to take you on a culinary adventure that stems from one of my absolute favorite dishes—the Charred Shrimp and Avocado Bowl. It’s colorful, packed with flavor, and oh-so satisfying, making it the perfect meal for any occasion. Whether you’re hosting a dinner party or simply looking to spice up your weekday dinner routine, this dish is bound to impress. So, roll up your sleeves, tie on that apron, and let’s get cooking!
A Taste of Nostalgia
Ah, shrimp! This little seafood gem has been a part of many delightful gatherings in my life. I vividly remember a sunny afternoon at my Aunt Mae’s beach house, where she would host fabulous summer cookouts. As children, we would run excitedly along the shoreline while the adults prepared a feast that filled the air with mouthwatering aromas.
One afternoon, Aunt Mae introduced us to her famous charred shrimp skewers, which she marinated in zesty spices and grilled to perfection. It was love at first bite! The smoky flavor combined with a hint of citrus is forever etched in my culinary heart. That experience sparked my passion for cooking and entertaining—teaching me that food is not just about sustenance; it’s about connection and creating cherished memories.
Fast forward to today, and I’ve transformed that memory into my own Charred Shrimp and Avocado Bowl. It brings together juicy shrimp, creamy avocado, and vibrant mango for a dish that sings with freshness and flavor. Are you ready to dive in? Let’s talk ingredients!
Ingredients
-
1 cup long-grain white rice
This serves as the hearty base of your bowl. Rinse the rice well until the water runs clear to remove excess starch for fluffier grains. If you prefer something different, substitute with quinoa or cauliflower rice for a low-carb option. -
2 cups water
Essential for cooking the rice. You can also infuse the water with a bay leaf or a garlic clove for extra flavor. -
1 lb large shrimp
Peeled and deveined, these beauties bring an excellent protein punch. If you’re not a fan of shrimp, feel free to swap in scallops or grilled chicken. -
1 tbsp olive oil
Perfect for searing the shrimp while adding a subtle richness. Don’t have olive oil? Avocado oil or melted butter work just as well. -
1 tbsp chili powder
This spice adds a delicious kick! If you prefer less heat, go easy on it or try a sweeter paprika blend instead. -
1 tsp smoked paprika
This gives a wonderful smoky flavor reminiscent of grill marks, enhancing our charred theme. You can use regular paprika if you prefer a milder taste. -
0.5 tsp ground cumin
Cumin adds warmth and depth. Feel free to experiment with different spices like coriander for an additional layer of flavor! -
0.5 tsp kosher salt
A must for flavor development! You can also try sea salt for a more delicate taste or skip it if you’re watching your sodium intake. -
1 cup bright yellow mango
Fresh mango adds a burst of sweetness and color! If mango isn’t in season, substitute it with peach or pineapple for an equally delightful twist. -
0.25 cup purple onion
Finely minced, this brings a sharp, slightly sweet flavor. Red onion is perfect, but you can also use green onion (scallions) or shallots if preferred. -
1 tbsp green jalapeño
Minced jalapeño adds a nice touch of heat. For those who prefer milder flavors, omit it or replace it with a sprinkle of red pepper flakes. -
2 tbsp fresh green cilantro leaves
Chopped cilantro ties the dish together with its bright herbal notes. If you’re not a fan of cilantro, fresh parsley works nicely! -
1 tbsp fresh lime juice
A splash of lime juice brightens all the flavors! You can substitute with lemon juice if that’s what you have on hand. -
0.5 cup mayonnaise
This creamy base helps create a luscious sauce for the shrimp. If you want to lighten it up, swap half for Greek yogurt or try a vegan mayo. -
1 tbsp sriracha
This adds an exciting heat to the sauce. For less heat, opt for sweet chili sauce or leave it out entirely. -
1 large green avocado
Sliced into a fan for that Instagram-worthy presentation! Make sure your avocado is ripe for that creamy texture. If avocados are scarce, try using sliced cucumbers. -
1 tbsp black sesame seeds
For a final decorative touch! They add a nice crunch and visual pop. White sesame seeds or crushed nuts are wonderful alternatives.
Step-by-Step Instructions
Step 1: Prepare the Rice
Begin by rinsing the 1 cup of long-grain white rice under cold water until the water runs clear. This will help remove excess starch and keep your rice fluffy. In a medium saucepan, combine rinsed rice and 2 cups of water. Bring to a boil over high heat, then reduce to a simmer. Cover and cook for about 18-20 minutes, or until the water is absorbed and the rice is tender. Once done, fluff it with a fork and set it aside.
Chef Tip: Letting the rice rest for a few minutes after cooking allows it to firm up and prevents clumping.
Step 2: Season the Shrimp
While the rice is cooking, let’s get the shrimp ready! In a bowl, combine the 1 lb shrimp with 1 tbsp olive oil, 1 tbsp chili powder, 1 tsp smoked paprika, 0.5 tsp ground cumin, and 0.5 tsp kosher salt. Mix well, ensuring all the shrimp are coated evenly with the spices.
Chef Insight: Don’t be afraid to let the shrimp marinate for 15-30 minutes if you want an extra flavor punch.
Step 3: Sear the Shrimp
Heat a skillet over medium-high heat. Once hot, add the seasoned shrimp in a single layer. Cook for about 2-3 minutes on each side, until they turn pink and opaque. You might want to do this in batches to avoid overcrowding the pan.
Chef Hack: For an extra layer of flavor, squeeze a little lime juice over the shrimp while they cook.
Step 4: Make the Sauce
In a small bowl, combine 0.5 cup mayonnaise, 1 tbsp sriracha, and 1 tbsp fresh lime juice. Mix until smooth and set aside. This sauce will elevate the shrimp and bring everything together.
Serving Suggestion: Try using Greek yogurt instead of mayo for a lighter option!
Step 5: Build Your Bowl
Now comes the fun part! In your serving bowls, start by adding a generous scoop of the fluffy rice. Top it with the charred shrimp, then layer on the diced mango, purple onion, minced jalapeño, chopped cilantro, and the sliced avocado.
Plating Tip: Arrange the avocado in a beautiful fan shape to impress your guests!
Step 6: Drizzle with Sauce and Garnish
Drizzle your spicy mayo sauce over the top, then finish with a sprinkle of black sesame seeds. Voila! You now have a stunning Charred Shrimp and Avocado Bowl.
Serving Suggestions
Presentation is key! Serve the Charred Shrimp and Avocado Bowl in bright, colorful bowls that highlight the dish’s freshness. A sprinkle of fresh herbs and a squeeze of lime on top will add an inviting touch. For a side, consider crunchy tortilla chips or a light salad for added texture.
Recipe Variations
- Spicy Mango Salsa: Swap the diced mango for a spicy mango salsa by mixing diced mango with jalapeños, red onion, and lime juice for a zesty twist.
- Coconut Rice: Replace the water used for cooking rice with coconut milk for a creamy, tropical vibe.
- Herbed Quinoa: Change up the base from rice to quinoa, and toss in fresh herbs for an earthy touch.
- Lime Cilantro Rice: Mix lime zest and chopped cilantro into your cooked rice for added flavor.
- Cauliflower Rice: For a low-carb option, use cauliflower rice instead of traditional grains for a new spin.
Chef’s Notes
As I reflect on the evolution of this dish, I remember the first time I attempted to prepare shrimp. It was a disaster, to say the least! Overcooked shrimp is the enemy—chewy and tough. I learned through countless tries and errors that timing is everything. The added layer of flavors came after experimenting endlessly with sauces and spices. My goal is to pass along these lessons to you and instill confidence in your cooking journey!
FAQs and Troubleshooting
Q: How do I know when shrimp are cooked?
A: Cooked shrimp should be opaque and pink. You can also give them a gentle squeeze; they should feel firm but still tender.
Q: What if I don’t have fresh lime juice?
A: Bottled lime juice can work in a pinch, but fresh is always best for flavor. If you need a substitute, lemon juice is a great alternative.
Q: How can I prevent the avocado from browning?
A: To keep your avocado fresh, sprinkle a little lime juice over the slices before serving.
Q: Can I make this dish ahead of time?
A: Yes! You can prepare the shrimp and rice in advance and store them in airtight containers in the fridge. Just assemble the bowl when you’re ready to enjoy!
Nutritional Info (Optional)
- Calories: 490
- Protein: 34g
- Fat: 26g
- Carbohydrates: 43g
- Fiber: 5g
There you have it! The Ultimate Charred Shrimp and Avocado Bowl is a delightful balance of textures and flavors that perfectly showcases fresh ingredients. It’s an ode to my past memories while being an accessible dish for any night of the week.
So, gather your friends, tie on your apron, and embark on this delicious culinary adventure. Because, at the end of the day, it’s all about sharing beautiful moments around the table over incredible food. Happy cooking!
PrintUltimate Charred Shrimp and Avocado Bowl

A colorful and flavorful bowl featuring charred shrimp, creamy avocado, and vibrant mango, perfect for any occasion.
- Prep Time: 15 minutes
- Cook Time: 20 minutes
- Total Time: 35 minutes
- Yield: 4 servings 1x
- Category: Main Course
- Method: Searing
- Cuisine: Mexican
- Diet: Seafood
Ingredients
- 1 cup long-grain white rice
- 2 cups water
- 1 lb large shrimp, peeled and deveined
- 1 tbsp olive oil
- 1 tbsp chili powder
- 1 tsp smoked paprika
- 0.5 tsp ground cumin
- 0.5 tsp kosher salt
- 1 cup bright yellow mango, diced
- 0.25 cup purple onion, finely minced
- 1 tbsp green jalapeño, minced
- 2 tbsp fresh green cilantro leaves, chopped
- 1 tbsp fresh lime juice
- 0.5 cup mayonnaise
- 1 tbsp sriracha
- 1 large green avocado, sliced
- 1 tbsp black sesame seeds
Instructions
- Prepare the Rice: Rinse the rice under cold water until the water runs clear. Combine the rinsed rice and water in a medium saucepan and bring to a boil. Reduce to a simmer, cover, and cook for about 18-20 minutes. Fluff with a fork and set aside.
- Season the Shrimp: In a bowl, combine the shrimp with olive oil, chili powder, smoked paprika, ground cumin, and kosher salt. Mix well to coat the shrimp evenly.
- Sear the Shrimp: Heat a skillet over medium-high heat and add the seasoned shrimp in a single layer. Cook for about 2-3 minutes on each side until cooked through and opaque.
- Make the Sauce: In a small bowl, combine mayonnaise, sriracha, and lime juice. Mix until smooth and set aside.
- Build Your Bowl: In serving bowls, add a scoop of rice, topped with charred shrimp, diced mango, purple onion, minced jalapeño, cilantro, and sliced avocado.
- Drizzle with Sauce: Drizzle the spicy mayo sauce over the top and sprinkle with black sesame seeds.
Notes
To prevent avocado from browning, sprinkle with lime juice before serving. This dish can be made ahead of time; just assemble when ready to eat.
Nutrition
- Serving Size: 1 bowl
- Calories: 490
- Sugar: 10g
- Sodium: 600mg
- Fat: 26g
- Saturated Fat: 4g
- Unsaturated Fat: 14g
- Trans Fat: 0g
- Carbohydrates: 43g
- Fiber: 5g
- Protein: 34g
- Cholesterol: 220mg
Keywords: shrimp bowl, avocado recipe, healthy seafood
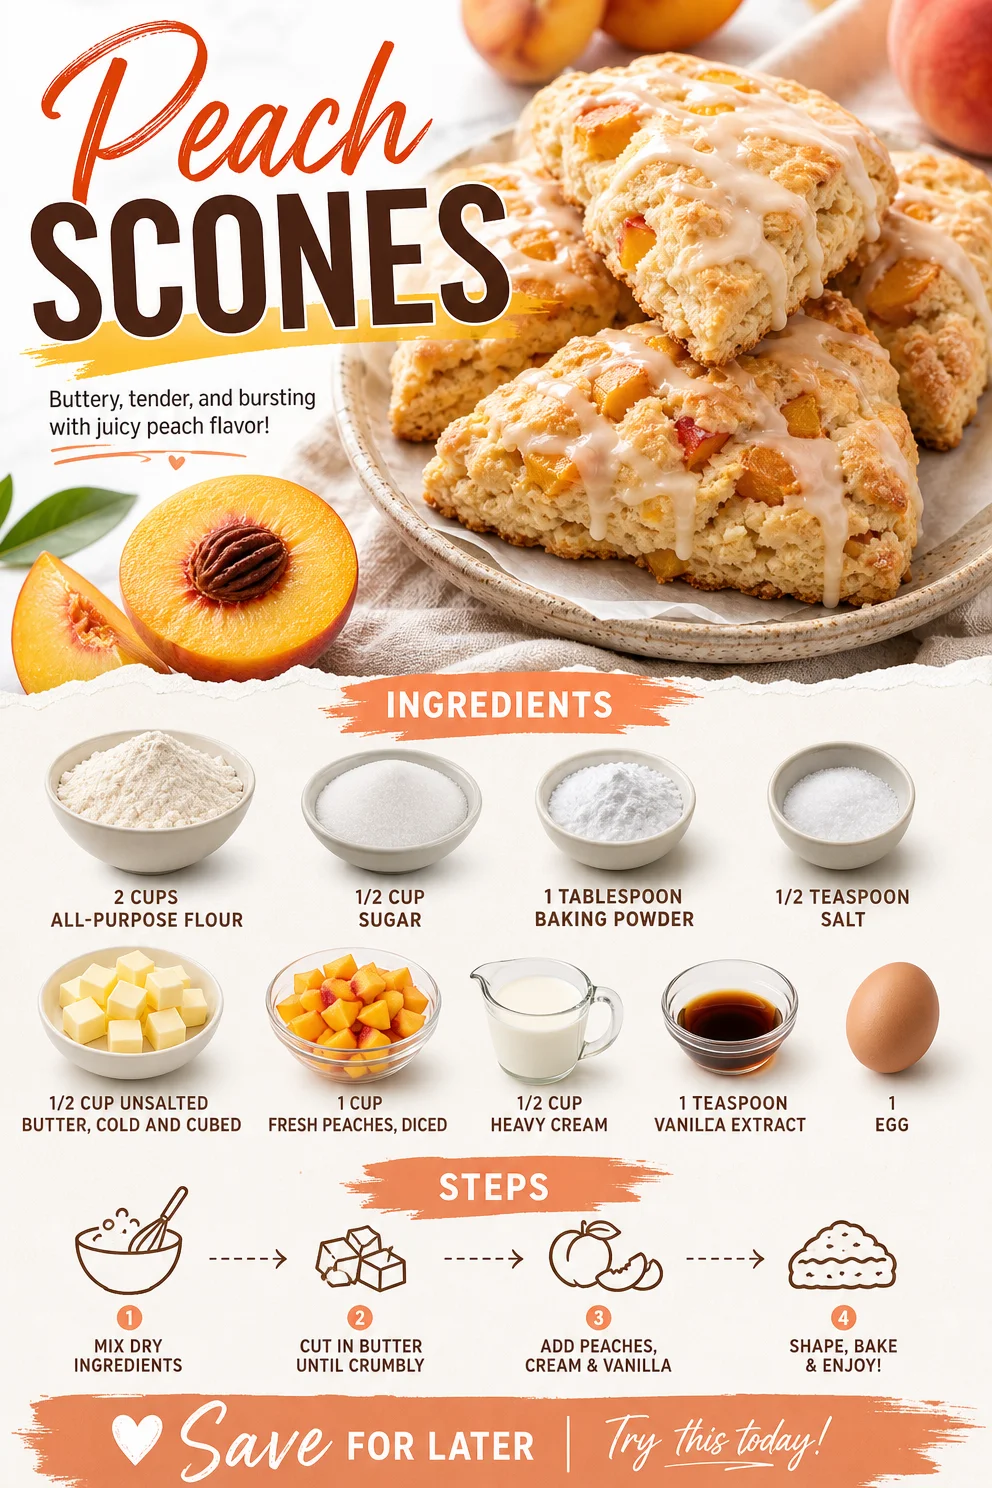
Peach Scones
The Sweetest Slice of Summer: Peach Scones
Welcome back to Ivory Apron, my cooking haven where elegance meets simplicity! Today, I’m thrilled to share one of my absolute favorite recipes: Peach Scones. There’s just something so heartwarming about biting into a warm scone, fresh out of the oven, especially when it’s bursting with juicy peach goodness. This recipe is perfect for a leisurely weekend brunch, a delightful afternoon tea, or even a special gathering with friends. So, let’s tie on our aprons and dive into this sweet adventure!
My Whimsical Peach Memory
Peaches have always held a special place in my heart. I fondly remember summer weekends at my grandparents’ house, where the air was filled with the sweet scent of ripe peaches from the tree in their backyard. My grandmother would gather us around the kitchen, and while we played underfoot, she’d whip up her irresistible peach cobbler. Oh, the joy of eating those juicy, sun-kissed peaches combined with the warmth of her laughter and the aromatic warmth of baked goods wafting through the kitchen!
Fast forward to today, and peaches still evoke that same nostalgia. They remind me that cooking is so much more than just following a recipe; it’s about creating memories and bringing loved ones together. This Peach Scone recipe draws inspiration from my grandmother’s kitchen, infusing it with a touch of elegance, proving that you don’t need a special occasion to indulge in deliciousness!
Ingredients
Let’s gather our ingredients for these delightful Peach Scones:
- 2 cups all-purpose flour: The backbone of any scone. You can substitute with whole wheat flour for a nuttier flavor or a gluten-free blend to suit different dietary needs.
- 1/2 cup sugar: This sweetens the dough just right. If you prefer a healthier option, consider natural sweeteners like honey or maple syrup; just adjust the liquid content accordingly.
- 1 tablespoon baking powder: This is our leavening agent, helping the scones rise. Make sure it’s fresh for optimal fluffiness; old baking powder can doom your scones to a flat fate.
- 1/2 teaspoon salt: A little bit of salt enhances all flavors, bringing the sweetness of the peaches forward.
- 1/2 cup unsalted butter, cold and cubed: Butter is essential for flakiness! If you’re in a pinch, coconut oil works well; just ensure it’s cold too.
- 1 cup fresh peaches, diced: Fresh peaches are essential! They add moisture and flavor, but you can swap them for nectarines or even mixed berries for a different twist.
- 1/2 cup heavy cream: This gives the scones a rich texture. Greek yogurt or a non-dairy cream can be used as alternatives.
- 1 teaspoon vanilla extract: Adds depth and warmth. Homemade vanilla extract can elevate the flavor even further.
- 1 egg: Used for richness and helping to bind everything together. If you’re vegan, a flax egg can work here (mix 1 tablespoon ground flaxseed with 2.5 tablespoons water)!
Step-by-Step Instructions
Alright, let’s get baking! Follow these detailed steps for perfectly golden peach scones.
-
Preheat the Oven: Preheat your oven to 400°F (200°C). This ensures your scones begin baking in the ideal hot environment, promoting a lovely rise!
-
Mix the Dry Ingredients: In a large mixing bowl, whisk together the flour, sugar, baking powder, and salt until they’re well combined. Chef Tip: Make sure to sift the flour to avoid clumps – this helps create a lighter texture.
-
Cut in the Butter: Add the cold, cubed butter to the flour mixture. Using a pastry cutter or your fingertips, quickly mix the butter into the flour until it resembles coarse crumbs. Little Hack: It’s key to keep the butter cold – this is what gives your scones their flaky layers, so try to work quickly!
-
Toss in the Peaches: Gently fold in the diced peaches. Commentary: The gesture of stirring should be gentle; you don’t want to bruise your lovely peaches too much.
-
Combine Wet Ingredients: In a separate bowl, whisk together the heavy cream, egg, and vanilla extract until smooth. Slowly pour this mixture into your dry ingredients, stirring until just combined. Tip: Do not overmix! The dough should be a tad sticky; that’s perfectly okay!
-
Shape the Dough: On a lightly floured surface, turn out the dough. Pat it into a circle about 1-inch thick; it doesn’t have to be perfect! Using a sharp knife or a bench scraper, cut the dough into 8 triangles. Chef Insight: If you prefer round scones, use a biscuit cutter instead!
-
Prepare for Baking: Place the scone triangles onto a parchment-lined baking sheet, leaving a bit of space between each. For a nice golden crust, brush the tops lightly with extra heavy cream. Bonus Trick: A sprinkle of sugar on top right before baking adds a delightful crunch!
-
Bake: Pop them in the oven and bake for about 15-20 minutes or until golden brown on top. Your kitchen will fill with that famous aroma – pure bliss!
-
Cool & Serve: Once baked, allow them to cool slightly on a wire rack. Serve warm, and prepare to be met with smiles and satisfied sighs!
Serving Suggestions
These scones are best enjoyed warm, straight from the oven! Serve them with a dollop of fresh whipped cream or a drizzle of honey. For an elegant twist, pair them with a chilled glass of lemonade or a steaming cup of tea. Presentation is key; arrange them on a beautiful cake stand or a rustic wooden platter. Trust me, your friends will feel pampered!
Recipe Variations
Here are some fun twists to try with your scones:
- Berry Peach Medley: Swap half of the peaches for raspberries or blueberries for a fruity explosion.
- Spiced Peach Scones: Add a pinch of cinnamon or nutmeg for a warm, cozy flavor.
- Savory Peach Scones: Mix in some crumbled cheese (like feta or cheddar) for a savory twist.
- Peach and Ginger: Add some finely chopped crystallized ginger for an unexpected zing!
Chef’s Notes
I can’t help but chuckle when reminiscing about my first batch of scones. You might say they were a bit of a disaster – I forgot to add the sugar! It was a lesson learned and a reminder of how essential every ingredient is to creating the dish’s harmony. Over the years, I’ve played with this recipe, adding a pinch of spice here and a new fruit there, but these classic peach scones always hold a special place in my heart. They never fail to spark a conversation or bring a smile!
FAQs and Troubleshooting
-
Why are my scones too dry?
If your scones end up dry, it might be due to overmixing the dough or measuring the flour incorrectly. Always spoon the flour into your measuring cup and level it off with a knife! -
Can I make the dough ahead of time?
Absolutely! You can prepare the dough, cut them into triangles, and refrigerate them. Just pop them in the oven when you’re ready, adding an extra 5 minutes to the baking time. -
What if my peaches are not ripe?
If your peaches are hard, try submerging them in warm water for 10 minutes to gently speed up the ripening process. Alternatively, you can sauté them in a bit of butter before adding them to the dough for enhanced flavor. -
How can I store leftovers?
Scones are best enjoyed fresh, but you can store leftovers in an airtight container at room temperature for up to two days. Reheat gently in the oven to bring back their warmth!
Nutritional Info
While these peach scones are not a health food, they’re a delightful indulgence! For those keeping an eye on nutrition, each scone (without any toppings) contains approximately:
- Calories: 250
- Fat: 10g
- Carbohydrates: 38g
- Protein: 3g
- Sugar: 7g
Remember, everything in moderation! Enjoy these beauties as part of a balanced diet.
I hope you feel inspired to try these Peach Scones in your own kitchen! With every bite, you’ll experience a little piece of nostalgia, a bit of elegance, and a whole lot of love. Happy baking, my friends! Don’t forget to share your creations and savor the moments around your table.
Let’s make every meal a beautiful memory!
PrintPeach Scones

Delightful peach scones, perfect for brunch or tea time, infused with nostalgia and flavor.
- Prep Time: 15 minutes
- Cook Time: 20 minutes
- Total Time: 35 minutes
- Yield: 8 scones 1x
- Category: Snack
- Method: Baking
- Cuisine: American
- Diet: Vegetarian
Ingredients
- 2 cups all-purpose flour
- 1/2 cup sugar
- 1 tablespoon baking powder
- 1/2 teaspoon salt
- 1/2 cup unsalted butter, cold and cubed
- 1 cup fresh peaches, diced
- 1/2 cup heavy cream
- 1 teaspoon vanilla extract
- 1 egg
Instructions
- Preheat your oven to 400°F (200°C).
- Mix together the flour, sugar, baking powder, and salt in a large mixing bowl.
- Cut in the cold, cubed butter until it resembles coarse crumbs.
- Toss in the diced peaches gently.
- Combine the heavy cream, egg, and vanilla extract in another bowl.
- Pour the wet mixture into the dry ingredients and stir until just combined.
- Shape the dough into a circle about 1-inch thick and cut into 8 triangles.
- Prepare a baking sheet with parchment paper and place the scone triangles on it.
- Bake for about 15-20 minutes or until golden brown.
- Cool on a wire rack and serve warm.
Notes
These scones are best enjoyed warm. Serve with whipped cream or honey for an extra treat.
Nutrition
- Serving Size: 1 scone
- Calories: 250
- Sugar: 7g
- Sodium: 150mg
- Fat: 10g
- Saturated Fat: 6g
- Unsaturated Fat: 4g
- Trans Fat: 0g
- Carbohydrates: 38g
- Fiber: 1g
- Protein: 3g
- Cholesterol: 30mg
Keywords: peach scones, breakfast, brunch, baking, summer treats

One-Pan High-Protein Cheeseburger Bowls for Low-Carb Prep
High-Protein Cheeseburger Bowls: Easy Low-Carb Meal Prep
Hello, lovely foodies! Today, we’re diving into a dish that’s not just satisfying but also packed with flavor: High-Protein Cheeseburger Bowls. For those looking to enjoy all the juicy, savory goodness of a cheeseburger while keeping things low-carb and meal-prep-friendly, this recipe is a fantastic option. Picture this: a delicious, hearty bowl filled with seasoned ground beef (or turkey, for my leaner friends), fresh veggies, melty cheese, and a tangy burger sauce that pulls it all together. It’s a simple, yet gourmet meal that makes weeknight dinners feel special and keeps you on track with your health goals.
As we journey into this recipe together, I’ll share playful insights, helpful tips, and even a bit of my kitchen history. Trust me; you’ll want to keep your apron on for this one! Let’s roll up those sleeves and create a dish that satisfies cravings and nourishes your body, one simple step at a time.
Personal Story
One of my fondest memories in the kitchen is a summer night spent grilling with my family. Picture this: the sun setting, a slight breeze rustling the leaves, and the smell of burgers cooking on the grill wafting through the air. My siblings and I would dart around, setting the picnic table, and waiting impatiently for our dad to deliver those delicious patties. As soon as the burgers hit the table, we’d pile them high with toppings, trying to outdo each other with extravagant creations.
This memory always brings a smile to my face—a reminder of laughter, love, and that joy of sharing good food with great company. Fast-forward to today, and while I’ve traded the grill for a stovetop on some days, the essence of those cheeseburgers remains. These High-Protein Cheeseburger Bowls embrace that nostalgic flavor with an elegant twist that fits my lifestyle today. Let’s capture that fun spirit of summer nights in a wholesome bowl that you can enjoy all week long!
Ingredients
Let’s get started on gathering our ingredients! I promise, they’re simple, and many are likely already hanging out in your pantry or fridge. Here’s what you’ll need:
-
1.5 lb Lean Ground Beef (or Ground Turkey):
- I prefer lean ground beef for a juicy burger flavor, but ground turkey is a fantastic low-fat substitute. Just make sure you season it well, as turkey can be a bit bland on its own.
-
1 teaspoon Salt:
- Essential for enhancing flavor! If you’re watching sodium, try using a low-sodium blend instead.
-
1/2 teaspoon Black Pepper:
- Freshly cracked pepper elevates the entire dish. Feel free to adjust according to your spice tolerance.
-
1 teaspoon Garlic Powder:
- A pantry staple that delivers that savory depth. If you have fresh garlic on hand, you can use 1-2 minced cloves for an extra kick.
-
1/2 teaspoon Onion Powder:
- Similar to garlic powder, it adds a warm flavor without the texture of fresh onions.
-
1/2 cup Shredded Sharp Cheddar Cheese:
- Cheddar adds creaminess and a bold flavor. You can swap it for pepper jack for some extra heat.
-
4 cups Shredded Iceberg or Romaine Lettuce:
- This is the base of your bowl! Feel free to mix in different greens, like spinach or kale, for variety and nutrition.
-
1 Medium Tomato, Diced:
- Freshness matters! You can swap for cherry tomatoes if you prefer those sweet little bites.
-
1/2 cup Dill Pickle Chips:
- The crunchiness and acidity of pickles complement the richness beautifully. If you’re not a fan, try sliced jalapeños for a spicy note instead.
-
1/4 cup Diced Red Onion:
- This adds a nice bite and color to your bowl. For a milder flavor, use green onions or omit altogether.
For the Tangy Burger Sauce:
-
1/2 cup Mayonnaise:
- A creamy base for your sauce. Try Greek yogurt for a lighter version!
-
2 tablespoons Ketchup:
- A touch of sweetness. You can opt for a sugar-free version to reduce the carbs.
-
1 tablespoon Yellow Mustard:
- Adds that classic tang! Feel free to use Dijon for a fancier twist.
-
1 tablespoon Sweet Pickle Relish:
- For that sweet-and-sour flavor! You can also use chopped olives for a different taste.
-
1 teaspoon Apple Cider Vinegar:
- A splash of acidity brightens the whole sauce. You can replace it with regular vinegar if that’s what you have.
Step-by-Step Instructions
Now that your ingredients are ready, let’s get cooking! Here’s how to make these delicious High-Protein Cheeseburger Bowls:
-
Cook the Ground Meat:
- In a large skillet over medium heat, add your ground beef or turkey. Use a wooden spoon to break it apart as it cooks. Cook until browned, about 8-10 minutes.
- Chef Tip: Ensure the pan is hot enough before adding the meat. It sears the surface, locking in flavors!
-
Season It Up:
- Once the meat is cooked through, sprinkle salt, black pepper, garlic powder, and onion powder over it. Stir well to distribute the spices evenly.
- Commentary: Trust me, the seasoning is key! Feel free to adjust based on your taste preferences.
-
Prepare the Burger Sauce:
- In a medium bowl, mix together the mayonnaise, ketchup, mustard, relish, and apple cider vinegar until smooth. Taste and adjust seasonings if needed.
- Chef Hack: If you’re a sauce lover, make a double batch! It’s also great on sandwiches or as a dip for veggies.
-
Assemble the Bowls:
- Start by placing a generous portion of shredded lettuce at the bottom of each bowl. Add a scoop of the seasoned meat on top.
- Plating Tip: You can layer it strategically for a beautiful presentation—lettuce on the bottom, meat in the middle, and topping at the end!
-
Add Fresh Toppings:
- Scatter diced tomatoes, dill pickle chips, and red onion over the meat. Top it all with shredded cheddar cheese.
- Chef Insight: If you’re using hot meat, the cheese will melt slightly, making it extra tasty!
-
Drizzle the Sauce:
- Spoon the tangy burger sauce over the cheese and toppings. Don’t be shy—this sauce packs the flavor!
- Presentation Note: Drizzle it artistically for that extra touch of elegance!
-
Serve and Enjoy:
- Dig in while it’s warm! These bowls can be enjoyed right away, but they also store beautifully for meal prep throughout the week.
- Final Tip: If you’re meal prepping, keep the lettuce separate until serving to prevent wilting.
Serving Suggestions
When it comes to serving these High-Protein Cheeseburger Bowls, keep it casual yet elevated. Dish out generous portions in wide bowls to encourage everyone to dig in! You can garnish with fresh herbs like parsley or chives for an added pop of color and flavor. If you’re feeling fancy, serve with a side of roasted veggies or zucchini fries for that classic diner experience. Enjoy it with a sparkling drink or a refreshing iced tea for that perfect meal vibe.
Recipe Variations
Get creative with your High-Protein Cheeseburger Bowls! Here are some fun twists you can try:
- Spicy Kick: Add sliced jalapeños or a sprinkle of crushed red pepper flakes for heat.
- Southwest Style: Toss in black beans, corn, and avocado for a southwestern flair.
- Mediterranean Twist: Swap the beef for lamb, add feta cheese, olives, and a drizzle of tzatziki for a Greek-inspired bowl.
- Cauliflower Substitute: For a low-carb spin, replace the lettuce with cauliflower rice.
- Vegan Option: Use lentils or mushrooms as your base, and swap the mayo for a vegan alternative.
Chef’s Notes
As I reflect on how this recipe evolved, it’s amusing to recognize how many interpretations it’s taken over the years. Initially inspired by those summer burger nights, I wanted to create something that felt indulgent yet healthy. Since then, I’ve played with flavors, textures, and ingredients, making it a staple in my kitchen. One memorable dinner, I mistakenly added way too much garlic powder, and the family joke became my “garlic cheeseburger bowls.” The laughter shared over food is what keeps me cooking and experimenting in the kitchen!
FAQs and Troubleshooting
Q: Can I make this in advance for meal prep?
A: Absolutely! These bowls store well in individual containers. Just keep the lettuce separate until you’re ready to eat to keep it fresh. They last for about 3-4 days in the fridge!
Q: What if I don’t have certain ingredients?
A: No worries! Feel free to swap out ingredients based on what you have. Use different greens, cheeses, or proteins; adapt it to your taste!
Q: Is this recipe family-friendly?
A: Yes! Kids love the handheld nature of burger bowls, and you can let them customize their toppings for extra fun.
Q: How can I reduce the fat content?
A: Opt for ground turkey or extra-lean ground beef. You can also reduce or omit the cheese and use a lighter sauce!
Nutritional Info
(Nutritional info is optional and based on specific serving sizes. Consider including it for audience specificity.)
Enjoy the journey of cooking these High-Protein Cheeseburger Bowls! It’s all about savoring the flavors, making memories, and gathering around the table. Happy cooking, my friends! Let’s create something timeless together at Ivory Apron.
PrintHigh-Protein Cheeseburger Bowls

Enjoy all the juicy goodness of a cheeseburger in a low-carb bowl packed with seasoned meat, fresh veggies, and a tangy sauce.
- Prep Time: 15 minutes
- Cook Time: 30 minutes
- Total Time: 45 minutes
- Yield: 4 servings 1x
- Category: Main Course
- Method: Stovetop
- Cuisine: American
- Diet: Low-Carb
Ingredients
- 1.5 lb Lean Ground Beef (or Ground Turkey)
- 1 teaspoon Salt
- 1/2 teaspoon Black Pepper
- 1 teaspoon Garlic Powder
- 1/2 teaspoon Onion Powder
- 1/2 cup Shredded Sharp Cheddar Cheese
- 4 cups Shredded Iceberg or Romaine Lettuce
- 1 Medium Tomato, Diced
- 1/2 cup Dill Pickle Chips
- 1/4 cup Diced Red Onion
- 1/2 cup Mayonnaise
- 2 tablespoons Ketchup
- 1 tablespoon Yellow Mustard
- 1 tablespoon Sweet Pickle Relish
- 1 teaspoon Apple Cider Vinegar
Instructions
- Cook the ground meat in a large skillet over medium heat for about 8-10 minutes until browned.
- Season the meat with salt, pepper, garlic powder, and onion powder.
- Prepare the burger sauce by mixing mayonnaise, ketchup, mustard, relish, and vinegar until smooth.
- Assemble the bowls with a base of shredded lettuce, then add the seasoned meat.
- Add fresh toppings: diced tomatoes, dill pickles, and red onion, followed by shredded cheese.
- Drizzle the tangy burger sauce over the top.
- Serve warm and enjoy!
Notes
For meal prep, store the lettuce separately until serving to keep it fresh.
Nutrition
- Serving Size: 1 bowl
- Calories: 450
- Sugar: 3g
- Sodium: 600mg
- Fat: 25g
- Saturated Fat: 10g
- Unsaturated Fat: 10g
- Trans Fat: 0g
- Carbohydrates: 15g
- Fiber: 3g
- Protein: 35g
- Cholesterol: 90mg
Keywords: cheeseburger bowls, meal prep, low-carb, healthy dinner, savory
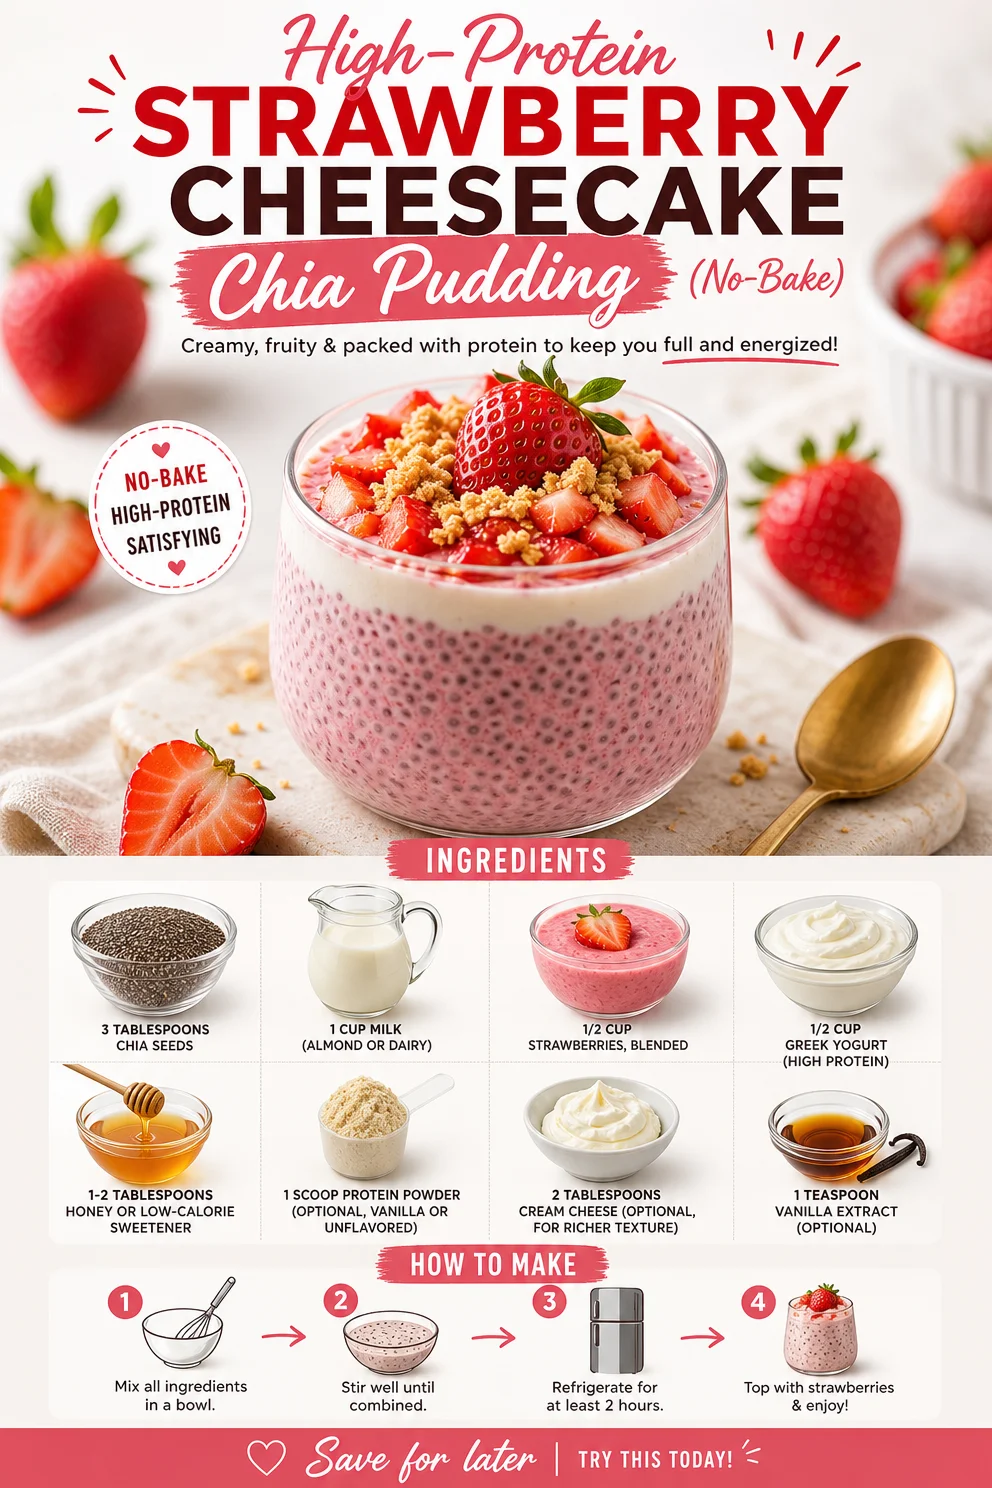
High-Protein Strawberry Cheesecake Chia Pudding (No-Bake)
High Protein Strawberry Cheesecake Chia Seed Pudding: A Delightful Twist on a Classic Treat
Welcome to the delightful world of High Protein Strawberry Cheesecake Chia Seed Pudding! If you’re anything like me, the sight of a creamy, dreamy dessert puts a smile on your face. This pudding isn’t just pretty; it’s packed with nutrition, flavor, and that indulgent cheesecake vibe that keeps you coming back for more. What could be better than enjoying a luscious dessert that doubles as a healthy breakfast or snack? So tie on your apron, grab your favorite mixing bowl, and let’s get cooking!
A Sweet Memory
When I think of dessert, my mind drifts back to long summer afternoons spent in my grandmother’s kitchen. There she was, a whirlwind of flour and sugar, creating swoon-worthy cheesecakes that filled our home with the scent of vanilla and berry goodness. I can still picture the way she’d smile while cracking eggs and mixing those creamy batters. Each delicious bite was a hug from her heart to ours, and I learned that cooking was not just about food—it was about creating connections. With strawberries juicy and sweet in season, we often turned to cheesecake recipes to celebrate every birthday, holiday, and family gathering. While this High Protein Strawberry Cheesecake Chia Seed Pudding is a healthier twist, it carries the same spirit of love and comfort from my childhood. Let’s make some new memories together!
Ingredients
Here’s everything you’ll need to whip up this fabulous dish. Each ingredient is a key player, so let’s break them down:
-
3 tablespoons chia seeds
- Why they’re great: Chia seeds are packed with fiber, omega-3 fatty acids, and protein. They also gel up beautifully, giving our pudding that creamy texture we love.
- Chef’s tip: If you’re in a pinch, flax seeds can be a nice substitute, but know that they won’t produce the same silky consistency.
-
1 cup milk (almond or dairy)
- Why it matters: The milk adds creaminess and flavor. You can go for whole, skim, or even nut milk for a dairy-free version.
- Substitution hint: Try coconut milk for a tropical flair or oat milk for a touch of sweetness.
-
1/2 cup strawberries, blended
- Berry goodness: Strawberries infuse the pudding with natural sweetness and vibrant color. I recommend using fresh, ripe strawberries for the best flavor.
- Chef insight: Frozen strawberries work, too! Just thaw them before blending for an equally delicious dessert.
-
1/2 cup Greek yogurt (high protein)
- Nutritional star: Greek yogurt is a protein powerhouse, making this dessert satisfying and great for muscle recovery.
- Substitution tip: If you’re avoiding dairy, opt for non-dairy yogurt—there are many delicious options available now!
-
1-2 tablespoons honey or low-calorie sweetener
- Taste enhancer: Honey adds a lovely floral sweetness, while your favorite low-calorie sweetener can keep it guilt-free.
- Switch it up: Maple syrup or agave nectar can also be used, each bringing a unique twist.
-
1 scoop protein powder (optional, vanilla or unflavored)
- Optional perk: If you’re looking to boost your protein intake, this is where you can sneak it in without compromising flavor.
-
2 tablespoons cream cheese (optional, for richer texture)
- Cheesecake magic: Cream cheese provides that cheesecake richness we all adore. This optional ingredient transforms pudding to dessert perfection.
-
1 teaspoon vanilla extract (optional)
- Flavor boost: Vanilla extract enhances everything—don’t skip it if you want that warm, comforting taste of homemade goodness.
Step-by-Step Instructions
Now for the fun part—let’s assemble our masterpiece! Follow these steps, and I promise you’ll have a delectable dessert in no time.
-
Prep the Chia Seeds
In a bowl, combine your 3 tablespoons of chia seeds with 1 cup of milk. Stir them well to ensure that all the seeds are submerged. This is the foundation of our pudding! -
Let it Rest
Cover the bowl with plastic wrap or a lid and let it rest in the refrigerator for at least 2 hours, or overnight if you’re planning ahead. The chia seeds will soak up the milk and develop that delightful pudding texture. While you’re waiting, why not catch up on your favorite cooking show? -
Blend Your Strawberries
While the chia seeds are doing their thing, it’s time to prep our strawberries. Toss 1/2 cup of fresh (or thawed) strawberries into a blender. Blend on high until smooth like a dreamy puree. Taste and adjust sweetness if desired! -
Mix in Yogurt and Sweetener
Once your chia seeds have jellied up, add in the blended strawberries, 1/2 cup of Greek yogurt, and 1-2 tablespoons of honey or your preferred sweetener into the chia mixture. Stir well until everything is beautifully combined. You want every spoonful to have that luscious strawberry goodness! -
Add Cream Cheese and Protein Powder (optional)
If you’re using them, mix in 2 tablespoons of cream cheese and 1 scoop of protein powder at this stage. The cream cheese can be softened in the microwave for a few seconds to make blending easier. This step gives the pudding that rich cheesecake vibe we’re aiming for. Stir until everything is fully incorporated. -
Flavor Boost
If you’re feeling fancy, add 1 teaspoon of vanilla extract for that delightful aroma. Mix until well-combined, and taste to adjust any flavors—maybe a touch more honey or an extra scoop of protein powder? -
Chill Again
Cover the bowl again and let your pudding chill in the fridge for at least another hour. This allows the flavors to meld together beautifully. And trust me, it’s worth the wait! -
Serve!
Once it’s all set, give it a good stir. The pudding will be thicker than before, and oh-so-delicious! Scoop it into your best bowls or dessert cups, and top with a few fresh strawberry slices or even a dollop of extra yogurt.
Serving Suggestions
Presentation is everything, even for pudding! Layer the chia seed pudding in clear cups to show off that beautiful color. Add a layer of blended strawberries at the bottom, followed by the chia mixture, and top with a few more whole strawberries or a sprinkle of granola for crunch. A drizzle of honey or a dollop of whipped cream can take it over the top!
Recipe Variations
- Tropical Twist: Swap out the strawberries for mango or pineapple for a refreshing tropical version.
- Chocolate Delight: Add cocoa powder or chocolate protein powder to make a rich chocolate version.
- Nutty Goodness: Stir in a tablespoon of almond or peanut butter for extra flavor and healthy fats.
- Spiced Chai: Add a dash of cinnamon or nutmeg for a cozy, spiced take on this pudding.
- No Sugar Added: Use ripe bananas in place of sweetener for a naturally sweet treat.
Chef’s Notes
This recipe has truly evolved over time. I originally started with standard chia seed pudding, and a few trials later, I found myself experimenting with flavors and textures until I hit on this high-protein cheesecake version. I remember the first time I served it at a breakfast gathering—it vanished faster than I could say “chia”! What I love most about this dish is its adaptability. Whether you want a quick breakfast or a show-stopping dessert, it fits the bill perfectly!
FAQs and Troubleshooting
Q: My pudding didn’t thicken. What went wrong?
A: The chia seeds need time to absorb the liquid and create that gel-like consistency. Make sure you let it chill long enough, preferably overnight. If it’s still runny, you can add a bit more chia seeds and let it sit for another hour.
Q: Can I make this vegan?
A: Absolutely! Use plant-based yogurt and milk, and skip the cream cheese. The pudding will still be delightful!
Q: How long will this keep in the fridge?
A: This pudding can last up to 3 days in the fridge. Be sure to store it in an airtight container.
Q: Can I double the recipe?
A: Yes! This is a fantastic make-ahead dish, so feel free to double it. Just remember the chilling time will remain the same.
Nutritional Info
While I don’t have exact nutritional values here, you can easily calculate them based on your specific ingredients and portion size. Generally, this pudding is low in sugar, high in protein (thanks to the Greek yogurt and optional protein powder), and packed with fiber from chia seeds—making it a guilt-free indulgence.
Let’s raise our spoons to new recipes, cherished memories, and delicious moments around the table! I can’t wait for you to try this High Protein Strawberry Cheesecake Chia Seed Pudding. Happy cooking, and remember—good food isn’t just about taste; it’s about making memories!
PrintHigh Protein Strawberry Cheesecake Chia Seed Pudding
A healthy twist on the classic cheesecake, this pudding is rich in protein and perfect for breakfast or dessert.
- Prep Time: 15 minutes
- Cook Time: 0 minutes
- Total Time: 135 minutes
- Yield: 4 servings 1x
- Category: Dessert
- Method: Chilling
- Cuisine: American
- Diet: Vegetarian
Ingredients
- 3 tablespoons chia seeds
- 1 cup milk (almond or dairy)
- 1/2 cup strawberries, blended
- 1/2 cup Greek yogurt (high protein)
- 1–2 tablespoons honey or low-calorie sweetener
- 1 scoop protein powder (optional, vanilla or unflavored)
- 2 tablespoons cream cheese (optional, for richer texture)
- 1 teaspoon vanilla extract (optional)
Instructions
- Prep the chia seeds: In a bowl, combine your 3 tablespoons of chia seeds with 1 cup of milk. Stir them well to ensure that all the seeds are submerged.
- Let it rest: Cover the bowl with plastic wrap or a lid and let it rest in the refrigerator for at least 120 minutes or overnight.
- Blend your strawberries: Toss 1/2 cup of fresh or thawed strawberries into a blender. Blend on high until smooth.
- Mix in yogurt and sweetener: Once your chia seeds have jellied up, add in the blended strawberries, 1/2 cup of Greek yogurt, and 1-2 tablespoons of honey or your preferred sweetener into the chia mixture. Stir well.
- Add cream cheese and protein powder (optional): If you’re using them, mix in 2 tablespoons of cream cheese and 1 scoop of protein powder.
- Flavor boost: If you’re feeling fancy, add 1 teaspoon of vanilla extract for that delightful aroma.
- Chill again: Cover the bowl again and let it chill in the fridge for at least another 60 minutes.
- Serve! Once it’s all set, give it a good stir and scoop it into bowls or dessert cups.
Notes
Enjoy fresh and vibrant flavors by layering the pudding for presentation.
Nutrition
- Serving Size: 1 serving
- Calories: 250
- Sugar: 8g
- Sodium: 100mg
- Fat: 8g
- Saturated Fat: 3g
- Unsaturated Fat: 5g
- Trans Fat: 0g
- Carbohydrates: 30g
- Fiber: 8g
- Protein: 12g
- Cholesterol: 10mg
Keywords: chia pudding, high protein dessert, healthy cheesecake, strawberry pudding, nutritious snack

Minute Mexican Shrimp Bowl: Bold Flavor, Easy Prep
Daringly Delicious Mexican Shrimp Bowl Bursting with Flavor
Hello, fabulous foodies! Today, we’re diving into one of my absolute favorite dishes — the Daringly Delicious Mexican Shrimp Bowl. This bowl is not just a meal; it’s an explosion of colors, flavors, and textures that will whisk you straight to a sun-kissed beach in Mexico with each delightful bite. With juicy shrimp expertly seasoned and tossed with fresh ingredients, this dish is perfect for any weeknight dinner or an impressive gathering. Are you ready to take your taste buds on an adventure? Let’s get cooking!
A Personal Story: Savoring the Moments
Let me take you back a few years to a sunny spring afternoon. I was hosting a small get-together for my closest friends, and the air was filled with laughter and the sound of clinking glasses. As I flipped a few shrimp in the sizzling sauté pan, a waft of garlic and spices danced around the kitchen, drawing my friends in like a fragrant magnet. The vibrant colors of diced avocado, bright cherry tomatoes, and the fresh green cilantro coming together in that bowl were nothing short of a culinary masterpiece.
I remember serving this dish and watching everyone’s eyes light up with delight as they dug in. The combination of flavors was both sophisticated and comforting, a reminder that good food is about connection and joy. That day solidified my love for crafting meals that not only taste incredible but also bring people together. And let me tell you, these Mexican Shrimp Bowls did just that!
Ingredients
Here’s what you’ll need to recreate this culinary delight. Each ingredient plays a vital role in building layers of flavor and texture — just like life, right?
-
1 lb shrimp, peeled and deveined: Fresh shrimp are a must for the best flavor; however, frozen shrimp work perfectly too! Just make sure to thaw them overnight in the fridge for optimal texture.
-
2 tbsp olive oil: This not only helps with cooking but adds a hint of flavor. If you’re looking for a twist, consider avocado oil for a different profile.
-
3 cloves garlic, minced: Ah, garlic! The flavor-building superstar. If you’re in a pinch, you can use 1 tsp of garlic powder, but I highly recommend fresh for depth.
-
1 tsp cumin (or smoked paprika): Cumin adds that warm, earthy flavor. If you want a smokier tone, swap it out for smoked paprika, bringing a delightful depth to your dish.
-
1 tsp chili powder (adjust to taste): Spice is subjective! Start with this base, and feel free to increase it to suit your heat preference.
-
2 tbsp fresh lime juice: This brightens the dish up wonderfully! For a fun twist, you can use lemon juice or even a splash of orange juice for sweetness.
-
1 large avocado, diced: Who doesn’t love avocado? Choose one that’s ripe for optimal creaminess (hint: gently squeeze to check for ripeness!).
-
1 small red onion, diced: Red onion adds a beautiful crunch and a hint of sweetness. If you’re not a fan, feel free to swap it out for green onions.
-
1 cup cherry tomatoes, halved: These sweet gems add brightness. If tomatoes aren’t in season, canned diced tomatoes will do in a pinch — just drain them!
-
1/4 cup cilantro, chopped (or parsley): Cilantro brings a burst of freshness. If you’re not a cilantro fan, parsley has a milder taste and will still work beautifully.
-
1 tsp salt: Essential for enhancing flavors. Start with this amount, and adjust to taste; even a pinch more can elevate your bowl.
-
1 can (15 ounces) black beans, rinsed and drained: A fantastic source of protein and texture. Feel free to substitute with pinto beans or chickpeas for another fabulous option.
-
2 cups cooked rice or quinoa: Both grains will serve as a lovely base. Use brown rice for a nutty flavor, or quinoa to add a protein-packed twist!
Step-by-Step Instructions
Alright, time to roll up your sleeves and dive into the cooking process!
-
Prep the Ingredients: Start by preparing all your veggies and shrimp. Chop, dice, and rinse those ingredients. This makes the cooking process smooth as butter! Trust me; it’s worth taking a moment to set everything out.
-
Heat the Olive Oil: In a large skillet, heat the olive oil over medium-high heat. You want it glistening but not smoking. If it starts to smoke, take it off the heat for a moment. We’re sautéing, not frying!
-
Sauté the Garlic: Add the minced garlic to the hot oil. Stir for about 30 seconds or until fragrant. You don’t want to burn the garlic — it should just become aromatic. The aroma should draw everybody toward the kitchen like a siren song.
-
Cook the Shrimp: Toss in the shrimp, cumin, chili powder, and salt. Stir and cook until the shrimp turns pink and opaque, about 3-4 minutes. Keep the heat high enough, but be sure to flip them gently, as overcooking can lead to rubbery shrimp.
-
Add Lime Juice: Once the shrimp is perfectly cooked, drizzle the fresh lime juice over them and give a final stir. That zesty kick will add so much brightness to your dish.
-
Combine with Black Beans: In a large mixing bowl, combine the cooked rice or quinoa, black beans, cherry tomatoes, diced avocado, red onion, and cilantro. Gently fold everything in to ensure even distribution without mashing the avocado. This is where we build harmony in our bowl!
-
Plate the Bowl: Now, it’s time to bring everything together! Place a generous scoop of the rice and beans mixture at the bottom of your serving bowl, and top it with the heavenly shrimp. Drizzle any remaining garlic oil from the pan on top for extra flair!
-
Garnish and Serve: Finish off with a sprig of cilantro for color and a hint of freshness. You can also squeeze a little more lime on top for extra brightness. Serve with tortilla chips on the side for that extra crunch, and watch your guests’ eyes light up as they dig in!
Serving Suggestions
When it comes to plating, remember that presentation matters! Use wide, shallow bowls to create a beautiful base. Layer the rice or quinoa first, followed by the shrimp, then artfully arrange the avocado, cherry tomatoes, and cilantro on top. A sprinkle of lime zest could also add a touch of elegance.
For extra pizzazz, serve with lime wedges and a small bowl of spicy salsa or guacamole on the side. Eating should be a celebration — let’s make it look as pretty as it is tasty!
Recipe Variations
Feeling adventurous? Here are some creative twists to make this dish your own:
-
Spicy Kick: Add sliced jalapeños for an added kick of spice to incorporate more heat!
-
Tropical Vibes: Include diced mango or pineapple for a sweet and tangy twist that complements the shrimp beautifully.
-
Protein Switch-Up: Switch the shrimp out for grilled chicken or diced tofu for a vegetarian option that’s equally delightful.
-
Grain Swap: Try using cauliflower rice for a low-carb alternative! Just sauté it briefly until it’s tender, as it packs an impressive flavor punch.
-
Herb Fiesta: Experiment with dill or basil instead of cilantro for a fresh twist on flavors!
Chef’s Notes
As with any recipe, this Mexican Shrimp Bowl has evolved over time. Originally, it was more about using whatever I had in the fridge, but now I like to highlight vibrant ingredients that create harmony. One of my favorite kitchen moments was experimenting with different spice blends until I stumbled upon the perfect combo for this dish.
Never underestimate the magic of a good pinch of salt or the zest of a fresh lime! And remember, cooking is not just about following a recipe—it’s about trusting your instincts and allowing the flavors to inspire you. Don’t hesitate to tweak recipes based on your taste — embrace the creative process!
FAQs and Troubleshooting
Q: What if my shrimp turns out rubbery?
A: This usually happens from overcooking. Cook the shrimp just until they turn pink and opaque (about 3-4 minutes).
Q: Can I make this in advance?
A: Absolutely! You can prep the rice, beans, and shrimp ahead of time but combine everything right before serving for optimal flavor and texture.
Q: How can I reduce the spice level?
A: If you’re sensitive to heat, simply reduce the chili powder to half a teaspoon or omit it entirely. The dish will still be fragrant and delicious!
Q: What’s a good side dish to serve with this bowl?
A: A light citrus salad or a refreshing corn salad would pair wonderfully, balancing the flavors in your shrimp bowl beautifully.
Nutritional Info
This scrumptious bowl is packed with protein, healthy fats, and an abundance of vitamins from the veggies. Each serving offers a wonderful balance of nutrients, making it as nourishing as it is delicious!
So there you have it, my lovely food enthusiasts — a Daringly Delicious Mexican Shrimp Bowl that not only satisfies the palate but also brings joy to your dining table. Whether it’s a cozy weeknight or a vibrant gathering, this recipe serves to create connections and treasured memories. Now, tie on your apron, pour yourself a refreshing drink, and get ready to whip up a dish that’s bursting with flavor! Happy cooking!
PrintDaringly Delicious Mexican Shrimp Bowl

An explosion of colors, flavors, and textures, this Mexican Shrimp Bowl features juicy shrimp expertly seasoned and tossed with fresh ingredients.
- Prep Time: 15 minutes
- Cook Time: 15 minutes
- Total Time: 30 minutes
- Yield: 4 servings 1x
- Category: Main Course
- Method: Sautéing
- Cuisine: Mexican
- Diet: Gluten-Free
Ingredients
- 1 lb shrimp, peeled and deveined
- 2 tbsp olive oil
- 3 cloves garlic, minced
- 1 tsp cumin (or smoked paprika)
- 1 tsp chili powder (adjust to taste)
- 2 tbsp fresh lime juice
- 1 large avocado, diced
- 1 small red onion, diced
- 1 cup cherry tomatoes, halved
- 1/4 cup cilantro, chopped (or parsley)
- 1 tsp salt
- 1 can (15 ounces) black beans, rinsed and drained
- 2 cups cooked rice or quinoa
Instructions
- Prep the ingredients: Start by preparing all your veggies and shrimp. Chop, dice, and rinse those ingredients.
- Heat the olive oil: In a large skillet, heat the olive oil over medium-high heat.
- Sauté the garlic: Add the minced garlic to the hot oil and stir for about 30 seconds or until fragrant.
- Cook the shrimp: Toss in the shrimp, cumin, chili powder, and salt, cooking until the shrimp turns pink and opaque, about 3-4 minutes.
- Add lime juice: Once cooked, drizzle the fresh lime juice over the shrimp and give a final stir.
- Combine with black beans: In a large mixing bowl, combine cooked rice or quinoa, black beans, cherry tomatoes, diced avocado, red onion, and cilantro.
- Plate the bowl: Place a generous scoop of the rice and beans mixture at the bottom of your serving bowl, and top it with the shrimp.
- Garnish and serve: Finish with a sprig of cilantro and serve with tortilla chips on the side.
Notes
For extra flavor, consider using avocado oil instead of olive oil and serve with lime wedges and spicy salsa.
Nutrition
- Serving Size: 1 serving
- Calories: 450
- Sugar: 5g
- Sodium: 600mg
- Fat: 20g
- Saturated Fat: 3g
- Unsaturated Fat: 14g
- Trans Fat: 0g
- Carbohydrates: 45g
- Fiber: 10g
- Protein: 25g
- Cholesterol: 160mg
Keywords: shrimp bowl, Mexican, healthy dinner, easy recipe, quick meal

Seasonal Blackberry Ice Cream Beginner-Friendly Summer Treat
Homemade Fresh Blackberry Ice Cream: A Summer Treat to Savor
Ah, summer! The season of sun-kissed skin, backyard barbecues, and, of course, delightful homemade ice cream. There’s nothing quite like the feeling of digging into a cold, creamy scoop of ice cream on a hot day. Today, I’m thrilled to share one of my favorite summer recipes: Homemade Fresh Blackberry Ice Cream. It’s a colorful and delicious treat that encapsulates the essence of summer in every spoonful.
What I adore about this blackberry ice cream recipe is that it’s not just about the satisfying creaminess; it’s also an ode to nature’s candy—those juicy, ripe blackberries. When you make this ice cream, you’re embracing the sweet, tart flavors of summer while creating a dessert that impresses without overwhelming. Let’s dive into this recipe, where I’ll guide you step-by-step to ensure your homemade ice cream turns out beautifully. Ready? Let’s make some magic in the kitchen!
A Sweet Memory
Growing up in a small town, summer meant my grandma’s house was the hub for family gatherings. On lazy Sunday afternoons, our backyard turned into a vibrant carnival with laughter, games, and, of course, food. One of the staples was my grandma’s berry ice cream. She’d gather blackberries from her garden, and with a few simple ingredients, would whip up the creamiest ice cream I’d ever tasted. I still remember the thrill of picking berries with my cousins and then the family’s collective excitement as we waited for the ice cream to churn. The moment those generous scoops were dished out, it was pure bliss. Each bite brought back the sunny memories of our summer gatherings. Fast forward to today, and I still crave that icy delight whenever blackberries are in season.
Ingredients
Here’s everything you’ll need to create this sensational blackberry ice cream:
-
2 cups fresh blackberries
These juicy gems are the star of the show! If blackberries are not available, you can easily swap them for raspberries or blueberries for a similar flavor profile. -
3/4 cup granulated sugar
Sweetness is key! This amount offers a perfect balance, but feel free to adjust to your taste. You could even experiment with honey or agave for a different sweetness. -
2 cups heavy cream
For that luxuriously creamy texture. If you’re looking for a lighter version, half and half works well, but expect a slightly different texture. -
1 cup whole milk
Adds creaminess but also some volume. You can substitute skim milk, but keep in mind that the final texture will be less rich. -
2 teaspoons pure vanilla extract
Using pure vanilla extract brightens the flavor. I always recommend avoiding imitation vanilla; a little goes a long way! -
1/4 teaspoon salt
Just a pinch! This enhances the overall flavor and balances the sweetness beautifully. -
1 tablespoon lemon juice
Fresh lemon juice brightens up the whole mixture and enhances the blackberry flavor. Trust me on this one—it’s a game changer!
Step-by-Step Instructions
Let’s get churning! Here’s how you can make your fabulous blackberry ice cream.
-
Prepare the Blackberries
Start by rinsing your blackberries under cold water. Make sure to gently pat them dry. In a medium bowl, sprinkle about 2 tablespoons of the granulated sugar over the blackberries. Allow them to sit for about 10-15 minutes so the sugar can draw out their delicious juices, giving you a natural blackberry syrup. -
Mash and Strain
After the blackberries have marinated in sugar, take a fork and lightly mash them. You’re not looking for a puree—just enough to break some of them open and release their juice. Once mashed, pour the mixture through a fine-mesh sieve into another bowl. Press down on the solids to extract as much juice as possible, then set that bowl aside. -
Mix the Cream Base
In a large mixing bowl, whisk together the heavy cream, whole milk, remaining sugar (adjust to your taste), vanilla extract, salt, and lemon juice. The mixture should feel rich and silky. If you have an electric mixer, you can use it on low speed to blend everything seamlessly. -
Combine Blackberry Mixture
Add the blackberry juice to the cream mixture and stir gently to combine. If you prefer a few chunks of blackberries in your ice cream, you can fold them in at this point—adding texture that’s simply divine. -
Chill the Mixture
Cover the bowl with plastic wrap and refrigerate the mixture for at least 2 hours (or overnight if you’re a planner!). Chilling the mixture ensures a smoother texture once it’s churned. -
Churn the Ice Cream
Pour the chilled berry-cream mixture into your ice cream maker following the manufacturer’s instructions. If you don’t have an ice cream maker, you can still make this work! Pour the mixture into a large bowl and place it in the freezer. Every 30 minutes, take it out and use a fork to scrape and stir it, breaking up any ice crystals. Repeat this process until the ice cream is thickened and creamy, usually about 3-4 hours. -
Freeze to Firm Up
Once the ice cream reaches your desired consistency, transfer it to an airtight container and place it in the freezer for at least 4 hours to firm up fully.
Serving Suggestions
When it’s finally time to serve your homemade blackberry ice cream, consider a few easy ideas to elevate your dish! Serve it in beautiful bowls and consider adding a sprig of fresh mint on top for a pop of color and freshness. You can also drizzle some raspberry sauce or a balsamic reduction for a gourmet touch. And if you really want to impress, sandwich it between two soft cookies for a delightful ice cream sandwich!
Recipe Variations
-
Berry Medley: Try using a mix of blackberries, raspberries, and blueberries for a colorful twist on this classic recipe.
-
Coconut Blackberry Ice Cream: Swap half of the heavy cream for coconut cream for a tropical flavor.
-
Vegan Option: Use coconut milk or an almond milk base with agave syrup instead of sugar for a delicious vegan-friendly treat.
-
Chocolate Swirl: Stir in some melted dark chocolate for a decadent fudgy experience!
-
Spiced Blackberry: Add a dash of cinnamon or cardamom to the cream mixture for a unique warm flavor that complements the berries.
Chef’s Notes
Every summer, this blackberry ice cream recipe takes me back to those wonderful afternoons spent with my grandma. It’s funny how a simple treat can evoke so many feelings of nostalgia and joy. Over the years, I’ve tweaked this recipe to match my taste and lifestyle, experimenting with different fruits and flavor combinations. Each iteration has taught me something new about balancing flavors and textures. The beauty of homemade ice cream is that it evolves with you—allowing space for creativity without fear! Just remember, the key is always to have fun in the kitchen.
FAQs and Troubleshooting
Q: Can I use frozen blackberries instead of fresh?
A: Absolutely! Just make sure to thaw them completely and drain off excess liquid before proceeding with the recipe. Frozen berries may slightly alter the texture but still yield delicious results.
Q: My ice cream turned out icy. What went wrong?
A: This could happen if the mixture wasn’t chilled sufficiently before churning. Additionally, incorporating too much air during churning can create ice crystals. A few more folds in the mixture as it freezes can help.
Q: How long can I store the ice cream?
A: Homemade ice cream can last about 2-3 weeks in the freezer, though it may need some time to soften when you take it out before scooping!
Q: How can I prevent ice crystals from forming?
A: Make sure to blend your mixture thoroughly and store the ice cream in an airtight container. If you’re freezing it without an ice cream maker, frequent stirring every 30 minutes will help create a creamy texture by breaking up ice crystals.
Nutritional Info (optional)
While I believe in enjoying dessert, it’s also great to be mindful of what you’re consuming. Here’s a general overview (per serving of 1/2 cup):
- Calories: Approx. 250
- Fat: 17g
- Carbohydrates: 24g
- Sugar: 20g
- Protein: 3g
Indulging in homemade blackberry ice cream isn’t just food; it’s a celebration of summer’s sweetest moments. I hope this recipe finds a warm spot in your heart and kitchen. So, tie on your apron, gather your ingredients, and let’s create something delicious together! Cheers to summer and all its tasty treats!
PrintHomemade Fresh Blackberry Ice Cream

A delightful homemade blackberry ice cream that captures the essence of summer with every creamy scoop.
- Prep Time: 15 minutes
- Cook Time: 10 minutes
- Total Time: 385 minutes
- Yield: 4 servings 1x
- Category: Dessert
- Method: Churning
- Cuisine: American
- Diet: Vegetarian
Ingredients
- 2 cups fresh blackberries
- 3/4 cup granulated sugar
- 2 cups heavy cream
- 1 cup whole milk
- 2 teaspoons pure vanilla extract
- 1/4 teaspoon salt
- 1 tablespoon lemon juice
Instructions
- Prepare the blackberries by rinsing them under cold water and patting them dry. Sprinkle 2 tablespoons of sugar over them and let sit for 10-15 minutes.
- Mash the blackberries lightly with a fork to release juices, then strain through a fine-mesh sieve into another bowl.
- Mix the heavy cream, whole milk, remaining sugar, vanilla extract, salt, and lemon juice in a mixing bowl until rich and silky.
- Combine the blackberry juice with the cream mixture and stir gently. Optionally, fold in some blackberry chunks.
- Chill the mixture in the refrigerator for at least 120 minutes.
- Churn the chilled mixture in an ice cream maker according to the manufacturer’s instructions or freeze while stirring every 30 minutes for 3-4 hours.
- Freeze in an airtight container for at least 240 minutes before serving.
Notes
Consider serving with fresh mint, raspberry sauce, or as an ice cream sandwich between cookies.
Nutrition
- Serving Size: 1/2 cup
- Calories: 250
- Sugar: 20g
- Sodium: 50mg
- Fat: 17g
- Saturated Fat: 10g
- Unsaturated Fat: 7g
- Trans Fat: 0g
- Carbohydrates: 24g
- Fiber: 2g
- Protein: 3g
- Cholesterol: 70mg
Keywords: blackberry ice cream, summer dessert, homemade ice cream, berry dessert
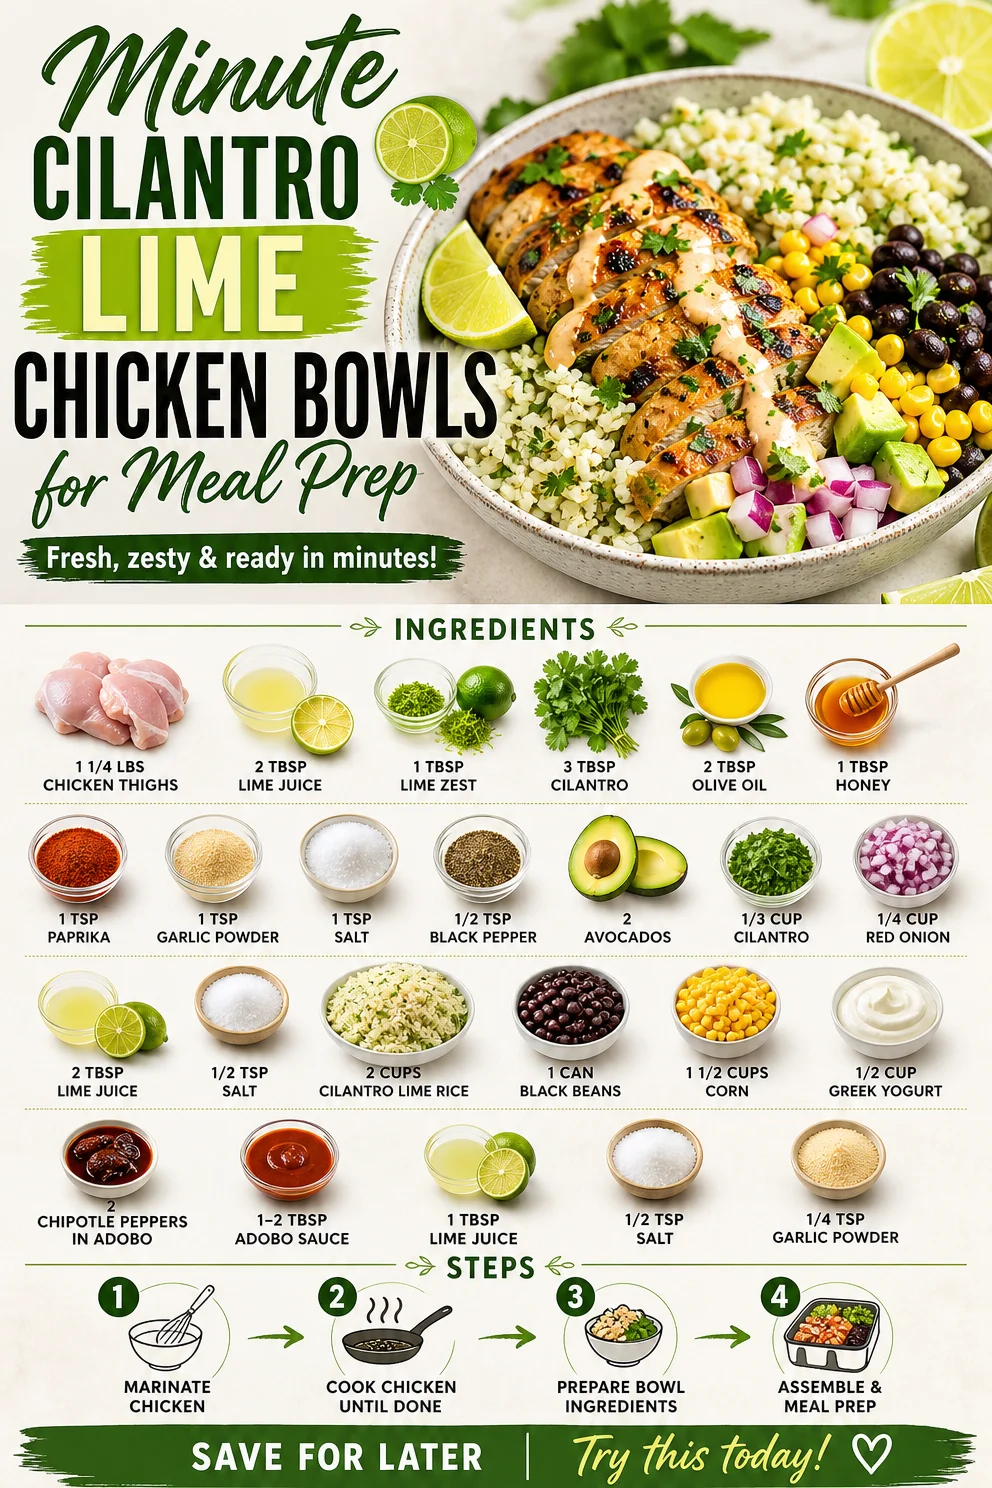
Minute Cilantro Lime Chicken Bowls for Meal Prep
Cilantro Lime Chicken Bowls: A Feast for Every Occasion
Introduction
Hello, my fellow food adventurers! Today, I’m excited to share one of my all-time favorite dishes: Cilantro Lime Chicken Bowls. When I think of comfort food that’s bursting with flavor but also feels light and refreshing, this dish jumps to the top of my list. Imagine tender, marinated chicken thighs glistening with a zesty lime glaze, served over fluffy cilantro lime rice, all topped off with creamy avocado and a sprinkle of fresh herbs. It’s like a burst of sunshine on your plate.
These bowls are perfect for any occasion—whether you’re hosting friends for a casual dinner, prepping meals for busy weeknights, or just looking to impress that special someone with your culinary skills. Plus, they’re incredibly versatile, so you can easily tailor them to fit your taste or dietary needs. Pair them with your favorite toppings, and you’ve got yourself a delightful meal that feels both indulgent and wholesome.
But before we dive into the recipe, let me take you on a little journey back in time, where my passion for vibrant, fresh flavors and colorful presentations truly began.
Personal Story
As a child, I spent countless afternoons in my grandmother’s kitchen, where the air always seemed infused with love and a dash of magic. She had this incredible ability to turn simple ingredients into something extraordinary, effortlessly teaching me that cooking was all about intention. One summer day, she introduced me to the wonders of lime and fresh herbs. We were making her famous chicken dish, one that paired zesty lime with fragrant cilantro—a combination that always made our taste buds dance.
“Cooking is like an art, Savannah,” she would say, “and your palette is your canvas.” I can still envision her peeling limes with a flourish, while I meticulously chopped cilantro, the vibrant green contrasting against the bright yellow kitchen walls. The aroma wafting through the air was intoxicating—inspiring me to savor each moment.
Fast forward to today, and those memories serve as the foundation for my culinary adventures! This Cilantro Lime Chicken Bowl is a loving nod to Grandma’s teachings, wrapped in the warmth of family gatherings where everyone feels right at home.
Ingredients
Before we get started with the recipe, let’s take a closer look at the ingredients that will come together to create this delightful dish:
-
1 1/4 pounds boneless skinless chicken thighs: Juicy and flavorful, chicken thighs are my go-to for this recipe. They stay tender and moist even after cooking. If you prefer, feel free to use chicken breasts, but be cautious not to overcook them.
-
2 tablespoons lime juice: Freshly squeezed lime juice is crucial for that zesty flavor. You can substitute it with lemon juice in a pinch, but lime gives that extra kick that complements the dish perfectly.
-
1 tablespoon lime zest: This is where the magic happens! The zest adds an aromatic layer that amplifies the lime flavor. If you’re in a pinch, you can skip the zest, but trust me—it’s worth the extra effort.
-
3 tablespoons fresh cilantro (finely diced): Cilantro brings a fresh, herbal note, brightening up every bite. If you’re not a fan, swap it out for parsley or omit it altogether for a different touch.
-
2 tablespoons olive oil: A healthy fat that adds richness. You can replace it with avocado oil or another neutral oil if you prefer.
-
1 tablespoon honey: This honey balances the acidity of the lime with a touch of sweetness. If you’re avoiding sugar, feel free to use maple syrup or omit the sweetness altogether.
-
1 teaspoon paprika: Adds a subtle smokiness. A smoked paprika will elevate the flavor even more, but regular paprika works just fine!
-
1 teaspoon garlic powder: An easy way to pack in flavor. If you prefer fresh garlic, you can substitute it with 2 cloves of minced garlic.
-
1 teaspoon salt: Essential for bringing out the flavors in your dish. Adjust the salt according to your taste or dietary needs.
-
1/2 teaspoon black pepper: A classic seasoning that rounds out the flavors. You can use white pepper for a milder taste if you want.
-
2 ripe avocados (cubed): Creamy and rich, avocados are a must for topping! If fresh avocados aren’t available, you can use a dollop of guacamole as an alternative.
-
1/3 cup cilantro (finely diced): A repeat mention here, but feel free to add extra cilantro for more flavor!
-
1/4 cup red onion (diced): Adds crunch and a punchy flavor. If red onion is too strong for your taste, soak it in cold water for 10 minutes to mellow out its bite.
-
2 tablespoons lime juice: A quick drizzle over the avocado and onion mix brightens it up. More lime, more lime!
-
1/2 teaspoon salt: Again, a bit of salt here will help balance the creamy avocados and enhance their flavor.
-
2 cups cooked cilantro lime rice: This is the base of your bowl, and you can use brown rice, quinoa, or cauliflower rice for a low-carb twist.
-
1 can black beans (drained and rinsed): Rich in protein and fiber, black beans add heartiness. If you want a different bean variety, kidney beans or pinto beans are tasty alternatives.
-
1 1/2 cups corn: Corn adds a lovely sweetness and texture. If you can’t find fresh corn, frozen corn will work beautifully.
-
1/2 cup plain Greek yogurt: Creamy and tangy, it acts as a wonderful base for the sauce. If you’re dairy-free, swap in coconut yogurt or vegan sour cream.
-
2 chipotle peppers in adobo: These little peppers bring smoky heat to the party. Adjust the number depending on your spice preference.
-
1-2 tablespoons adobo sauce: Adds depth and flavor. You can use salsa if you don’t have adobo sauce on hand.
-
1 tablespoon fresh lime juice: More brightness to marry the flavors!
-
1/2 teaspoon salt: Just a touch to season the yogurt sauce.
-
1/4 teaspoon garlic powder: For that extra burst of flavor!
Step-by-Step Instructions
Alright, let’s roll up our sleeves and get cooking! Here’s how to bring this beautiful dish to life:
-
Marinate the Chicken:
In a large bowl, combine the chicken thighs, lime juice, lime zest, fresh cilantro, olive oil, honey, paprika, garlic powder, salt, and black pepper. Make sure each piece of chicken is thoroughly coated in this flavorful marinade. Cover and refrigerate for at least 30 minutes (or up to 4 hours if you have the time!). This marinating step is where the magic happens—allowing the flavors to meld and infuse into the chicken. -
Cook the Chicken:
Preheat your grill or skillet over medium-high heat. If grilling, oil the grates to prevent sticking. If using a skillet, drizzle a bit of olive oil. Once hot, add the marinated chicken. Cook for about 6-7 minutes on each side or until the chicken is golden brown and charred in spots. Use a meat thermometer to check that the internal temperature reaches 165°F. Cooking tips: If using chicken breasts, they may cook quicker, so keep an eye on them to avoid dryness. -
Make the Cilantro Lime Rice:
If you don’t already have cooked cilantro lime rice, prepare it while the chicken is cooking. Cook your rice according to package instructions, then fluff it with a fork. Mix in lime juice, lime zest, and fresh cilantro for that zesty flavor. Taste and adjust the seasoning with salt as required. -
Prepare the Toppings:
While the chicken rests (it’s crucial to let it rest for a few minutes before slicing), prepare your toppings! In a bowl, combine cubed avocados, diced red onion, 2 tablespoons lime juice, and a sprinkle of salt. Toss gently to coat. You want it to be flavorful but still maintain the creaminess of the avocado. -
Make the Chipotle Yogurt Sauce:
In a separate bowl, mix together plain Greek yogurt, minced chipotle peppers, adobo sauce, lime juice, salt, and garlic powder. Give it a good stir until all the ingredients are combined. This sauce adds a creamy element with a kick—perfect for drizzling over your bowls. -
Slice the Chicken:
Once the chicken has rested, slice it into strips. You can absolutely shred it if you want more of a pulled chicken feel. Either way, it’s going to be delicious! -
Assemble the Bowls:
Now comes the fun part! Start with a base of your cilantro lime rice, then add sliced chicken, black beans, corn, and that yummy avocado-red onion mixture. Drizzle with chipotle yogurt sauce and garnish with more cilantro if you’re feeling fancy. Remember, there’s no right or wrong way to assemble; just let your creativity shine!
Serving Suggestions
When it comes to serving, think vibrancy and color! I love to use deep, beautiful bowls that enhance the freshness of the ingredients. You can add a wedge of lime on the side for an extra squeeze of zesty goodness right before digging in. Arrange your bowls so everyone can easily grab what they love, and if you want, set out extra toppings like jalapeños, shredded cheese, or tortilla chips for a crunchy contrast.
Recipe Variations
Feeling adventurous? Here are a few creative twists to personalize your Cilantro Lime Chicken Bowls:
-
Mediterranean Twist: Swap out the cilantro for parsley and add feta cheese and kalamata olives for a Mediterranean flair.
-
Tropical Vibes: Toss in diced mango instead of avocado for a sweet and refreshing contrast.
-
Spicy Kick: Add some diced jalapeños or spicy hot sauce to the chipotle yogurt sauce for an extra heat level.
-
Vegetarian Version: Substitute the chicken with grilled portobello mushrooms or roasted chickpeas for a hearty, plant-based bowl.
-
Breakfast Bowls: Make it a breakfast dish by adding a fried egg on top—trust me, it’s divine!
Chef’s Notes
As with every recipe, I’ve learned that love and experimentation are key ingredients. This bowl has evolved over the years, starting from my grandmother’s lime chicken idea to the vibrant, customizable version it is now. And honestly, it’s one of those dishes that tastes even better the next day as the flavors continue to meld. Just pop it in the fridge in an airtight container, and you’ll have delicious leftovers waiting for you!
Cooking can sometimes feel overwhelming, but each step is an opportunity to create memories, share stories, and explore new flavors. And hey, the occasional kitchen mishap? There’s always a funny story wrapped around it—one time, I accidentally used powdered sugar instead of flour for a sauce. Let’s just say it was quite the sweet surprise!
FAQs and Troubleshooting
Q1. Why are my chicken thighs dry?
It’s key to avoid overcooking them. Always use a meat thermometer to check for the internal temperature of 165°F. Chicken thighs are forgiving, but they can dry out if left too long on high heat.
Q2. How can I store leftovers?
Place leftovers in an airtight container and store in the fridge for up to 3 days. Reheat gently so the chicken doesn’t dry out.
Q3. Can I freeze these bowls?
You can freeze the cooked chicken and rice separately but avoid freezing fresh toppings like avocados and cilantro. Rest assured that everything can be assembled fresh when you are ready to enjoy!
Q4. What if my sauce is too thick?
If your chipotle yogurt sauce is too thick, just add a splash of lime juice or water until you reach your desired consistency.
Nutritional Info
While I’m not a nutritionist, I can reassure you that this meal is packed with protein, healthy fats, and fiber! Each serving contains approximately:
- Calories: 550
- Protein: 35g
- Carbohydrates: 70g
- Fat: 15g
- Fiber: 10g
Conclusion
So there you have it—my beloved Cilantro Lime Chicken Bowls! It’s a recipe that embodies the spirit of togetherness, creativity, and flavor. I hope it sparks joy in your kitchen, just as it does in mine. Whether you’re whipping it up for a casual family dinner or impressing guests at a gathering, it’s bound to be a hit.
Thank you for joining me on this culinary adventure! Remember, cooking should be a joyful experience, filled with laughter and love. Keep tying on that apron, and I can’t wait to hear all about your delicious creations! Until next time, happy cooking!
PrintCilantro Lime Chicken Bowls

Flavorful and refreshing Cilantro Lime Chicken Bowls with marinated chicken thighs over cilantro lime rice, topped with creamy avocado.
- Prep Time: 30 minutes
- Cook Time: 15 minutes
- Total Time: 45 minutes
- Yield: 4 servings 1x
- Category: Main Course
- Method: Grilling
- Cuisine: Mexican
- Diet: Gluten-Free
Ingredients
- 1 1/4 pounds boneless skinless chicken thighs
- 2 tablespoons lime juice
- 1 tablespoon lime zest
- 3 tablespoons fresh cilantro (finely diced)
- 2 tablespoons olive oil
- 1 tablespoon honey
- 1 teaspoon paprika
- 1 teaspoon garlic powder
- 1 teaspoon salt
- 1/2 teaspoon black pepper
- 2 ripe avocados (cubed)
- 1/3 cup cilantro (finely diced)
- 1/4 cup red onion (diced)
- 2 tablespoons lime juice
- 1/2 teaspoon salt
- 2 cups cooked cilantro lime rice
- 1 can black beans (drained and rinsed)
- 1 1/2 cups corn
- 1/2 cup plain Greek yogurt
- 2 chipotle peppers in adobo
- 1–2 tablespoons adobo sauce
- 1 tablespoon fresh lime juice
- 1/2 teaspoon salt
- 1/4 teaspoon garlic powder
Instructions
- Marinate the Chicken: In a large bowl, combine the chicken thighs, lime juice, lime zest, fresh cilantro, olive oil, honey, paprika, garlic powder, salt, and black pepper. Cover and refrigerate for at least 30 minutes.
- Cook the Chicken: Preheat your grill or skillet over medium-high heat. Cook for about 6-7 minutes on each side until golden brown and cooked through.
- Make the Cilantro Lime Rice: While the chicken cooks, prepare your rice according to package instructions and mix in lime juice, lime zest, and cilantro.
- Prepare the Toppings: Combine cubed avocados, diced red onion, lime juice, and salt in a bowl.
- Make the Chipotle Yogurt Sauce: In a separate bowl, mix Greek yogurt, minced chipotle peppers, adobo sauce, lime juice, salt, and garlic powder.
- Slice the Chicken: Once the chicken has rested, slice it into strips.
- Assemble the Bowls: Start with a base of rice, layer with chicken, black beans, corn, and avocado-red onion mixture, then drizzle with chipotle yogurt sauce.
Notes
Allow chicken to rest before slicing to retain moisture. Customize toppings to suit your preference.
Nutrition
- Serving Size: 1 bowl
- Calories: 550
- Sugar: 8g
- Sodium: 900mg
- Fat: 15g
- Saturated Fat: 3g
- Unsaturated Fat: 10g
- Trans Fat: 0g
- Carbohydrates: 70g
- Fiber: 10g
- Protein: 35g
- Cholesterol: 80mg
Keywords: cilantro lime chicken, chicken bowls, healthy dinner, flavorful meal

Ingredient Banana Chia Honey Milk Pudding in 15 Minutes
Indulge in the Creamy Delight of Banana Chia Honey Milk Pudding
Hello, fellow food lovers! Today, I’m beyond excited to take you into the kitchen for a delightful treat that’s both dreamy and nutritious: Banana Chia Honey Milk Pudding. This dish is an indulgent combination of creamy coconut milk, ripe bananas, and nutrient-packed chia seeds, topped with a touch of honey for that perfect sweet finish. It’s a recipe that anyone can whip up, no culinary experience necessary — and I promise, it’ll have your taste buds dancing with joy!
The Sweetness of Nostalgia
Before we dive into the delicious details, let’s take a moment to reminisce. I remember a sunny afternoon in my favorite childhood kitchen, where my mom introduced me to the magic of puddings. She would let me mash bananas with a fork while she whisked away in a flurry of coconut milk and honey. The warm fragrance of vanilla lingered in the air, promising a sweet treat ahead. Using simple ingredients, we would create a dish that felt special, even though it was crafted with love and spontaneity.
Whether we served it as a whimsical dessert after a weeknight dinner or an energizing breakfast on lazy weekends, that pudding always held a special place in my heart. It was simple yet complex, comforting yet elegant, just like this Banana Chia Honey Milk Pudding we’re making today. Let’s recreate that sweet memory, shall we?
Ingredients: A Symphony of Flavors
Gather these lovely ingredients and get ready for a joyful cooking experience!
-
2 cups coconut milk: This creamy delight serves as a base for our pudding. It’s vegan, rich, and adds a luxurious texture. If you’re looking for substitutes, almond milk or soy milk are great alternatives, though they may alter the flavor slightly.
-
2 medium ripe bananas: The stars of our pudding! Choose bananas that are well-ripened with plenty of spots; they’ll sweeten the dish naturally. If you’re out of bananas, you can try using applesauce or even a fruit puree!
-
2 teaspoons local honey: This sweet touch elevates the dish with a gentle floral note. Feel free to swap it out for maple syrup if you prefer a vegan option.
-
1 teaspoon vanilla extract: Adds a warm, aromatic quality. If you want to elevate the flavor even more, consider using vanilla bean paste instead.
-
1/2 teaspoon ground cinnamon: This spice contributes warmth and depth to the pudding. You can experiment with nutmeg or cardamom if you’re feeling adventurous!
-
6 teaspoons chia seeds: These little superheroes are essential for thickening our pudding. If you have a chia allergy (rare but possible), you can replace them with flaxseeds, though the texture might differ slightly.
Step-by-Step Instructions: Your Cooking Adventure
-
Prepare the Bananas: Start by peeling the two medium ripe bananas and slicing them into smaller pieces for easier blending. Place them in a mixing bowl and mash them up using a fork or potato masher until they reach your desired level of smoothness. Pro tip: a few lumps are perfectly fine; they add a delightful texture!
-
Combine Wet Ingredients: In a mixing bowl, add the mashed bananas, 2 cups of coconut milk, 2 teaspoons of local honey, 1 teaspoon of vanilla extract, and 1/2 teaspoon of ground cinnamon. Using a whisk, combine until everything is well incorporated. It shouldn’t take more than a minute or two!
-
Stir in Chia Seeds: Once your mixture is smooth, gently fold in 6 teaspoons of chia seeds. Cheerful little spoons of nutrition! Ensure they’re evenly distributed, as they will swell and thicken your pudding as it sets.
-
Let It Set: Transfer your banana-chia mixture into individual servings or one large bowl (get creative!). Cover with plastic wrap or a lid and pop it in the fridge for at least 2–4 hours, or ideally overnight. This is where the magic happens—our chia seeds will absorb the coconut milk and thicken into a dreamy pudding texture.
-
Serve and Enjoy: When you’re ready to dig in, take it out of the fridge and give it a good stir. If it looks too thick, you can always stir in a splash of coconut milk to loosen it up. Taste it — maybe it needs a dash more honey? Scoop it into pretty bowls, and you’re set for an elegant yet cozy treat!
Plating Perfection
To serve this delicious pudding, consider layering it in glass jars for a beautiful presentation. Top it with sliced bananas, a drizzle of honey, and a sprinkle of cinnamon. You could even add fresh berries or a dollop of whipped coconut cream for extra flair. The layered look is sure to impress anyone you gather around your table!
Recipe Variations: Get Creative
-
Tropical Twist: Add a spoonful of shredded coconut or diced mango to bring a burst of sunshine into every bite.
-
Chocolate Lovers: Stir in 1-2 tablespoons of cocoa powder or melted dark chocolate into the mixture for a rich, chocolatey version.
-
Nutty Crunch: Serve with a sprinkling of your favorite nuts like chopped almonds or walnuts on top for added crunch.
-
Berry Bliss: Mix in some chopped strawberries or blueberries to add a pop of color and additional nutrients.
-
Spicy Kick: For a more exotic flavor, try adding a pinch of cayenne or ginger for a surprising twist!
Chef’s Notes: A Touch of History
Over the years, this pudding recipe has transformed right alongside my cooking style. What once was made with just a dash of this and a pinch of that now thrives on a foundation of perfected ratios and flavorful enhancements. I’ve played with coconut blends, infusions of tea, and other spices along the way — but I keep coming back to this simple, nostalgic recipe.
I often think of how food creates bridges through generations. My childhood experiments with my mother were the initial spark, but now I feel like I’m continuing a legacy of delicious simplicity through this pudding. Each time you dive into it, I hope it feels like a cozy hug!
FAQs and Troubleshooting
1. Why isn’t my pudding thickening?
If your pudding isn’t setting up, it could be that the chia seeds didn’t absorb enough moisture. Make sure you’re allowing enough time in the fridge for them to soak up the liquid. Next time, ensure your mixture is well-combined!
2. Can I use other sweeteners instead of honey?
Absolutely! Feel free to swap honey with maple syrup, agave nectar, or even sugar. Just keep in mind that the flavor might shift a little depending on the sweetness and type you choose.
3. What can I do if my pudding is too thick?
No problem at all! Stir in a little more coconut milk until you reach your desired consistency. This pudding is wonderfully adaptable.
4. How long does this pudding last?
Stored in an airtight container in the fridge, your pudding will stay fresh for about 3-5 days. Just give it a good stir before serving again!
Nutritional Info
This Banana Chia Honey Milk Pudding is not only delicious but also packed with nutrients. Each serving provides a source of healthy fats, fiber, and potassium, making it a wholesome option for breakfast, dessert, or a snack.
I hope you’ve enjoyed making this Banana Chia Honey Milk Pudding as much as I’ve enjoyed sharing the recipe with you! Remember, cooking should feel fun and delightful, so gather your ingredients, tie on that apron, and let your creativity shine in the kitchen. Happy cooking, friends!
PrintBanana Chia Honey Milk Pudding

A delightful and nutritious pudding made with coconut milk, ripe bananas, and chia seeds, sweetened with honey.
- Prep Time: 15 minutes
- Cook Time: 0 minutes
- Total Time: 240 minutes
- Yield: 4 servings 1x
- Category: Dessert
- Method: Refrigerating
- Cuisine: Vegan
- Diet: Vegan
Ingredients
- 2 cups coconut milk
- 2 medium ripe bananas
- 2 teaspoons local honey
- 1 teaspoon vanilla extract
- 1/2 teaspoon ground cinnamon
- 6 teaspoons chia seeds
Instructions
- Prepare the bananas: Peel and slice the bananas, then mash them in a bowl until desired smoothness.
- Combine wet ingredients: In a bowl, mix mashed bananas, coconut milk, honey, vanilla, and cinnamon until well combined.
- Stir in chia seeds: Fold in chia seeds until evenly distributed.
- Let it set: Transfer to individual servings or a large bowl, cover, and refrigerate for 2-4 hours or overnight.
- Serve and enjoy: Stir before serving, adding more coconut milk if needed. Serve in bowls with toppings as desired.
Notes
Consider layering in glass jars for a beautiful presentation and top with fresh fruits or nuts.
Nutrition
- Serving Size: 1 serving
- Calories: 250
- Sugar: 12g
- Sodium: 60mg
- Fat: 14g
- Saturated Fat: 12g
- Unsaturated Fat: 2g
- Trans Fat: 0g
- Carbohydrates: 28g
- Fiber: 5g
- Protein: 4g
- Cholesterol: 0mg
Keywords: banana pudding, chia pudding, vegan dessert, healthy pudding, coconut milk pudding

Quick Bang Bang Chicken Bowl: 20-Minute Weeknight Feast
Savor Every Bite of This Bang Bang Chicken Bowl Delight
Hello, my culinary friends! If you’re looking to infuse your dinner routine with a delightful twist, you’ve landed in the right space! Today we’re whipping up a dish that’s not only bursting with flavor but also beautifully satisfying—it’s my Bang Bang Chicken Bowl! This dish brings a touch of fun and excitement to your table while keeping the process approachable and enjoyable.
Now, let me tell you, every time I make this dish, I’m transported back to those vibrant summer evenings spent with my family, gathered around the grill, the air thick with different aromas, laughter, and stories. This dish not only reminds me of those joyful times but also embodies the core of what cooking means to me: connection, love, and a little bit of adventure.
Bang Bang Chicken is a dish that’s both spicy and sweet, the perfect combination to tantalize your taste buds and leave you reaching for more. Think crispy, succulent chicken tossed in a sauce that packs a flavorful punch, all layered atop a bed of fluffy jasmine rice and fresh veggies. Each ingredient plays its distinct role, working together to create something wonderful.
Are you ready to embark on this culinary journey with me? Let’s dive into the deliciousness of this Bang Bang Chicken Bowl and savor every single bite!
Personal Story
One of my fondest memories tied to this dish takes me back to a summer trip with friends—a mini getaway that turned into an unforgettable culinary adventure. We rented a lakeside cabin and spent our days swimming, hiking, and of course, cooking! One evening, I decided to whip up a version of Bang Bang Chicken to share around our picnic table.
I remember marinating the chicken while my friends munched on snacks and debated whether pineapple belongs on pizza (it definitely does, by the way!). The sun dipped low in the sky, glowing orange—just like the crispy chicken I envisioned. The atmosphere swelled with anticipation and laughter, and as we feasted on the bowl of goodness, we shared stories about everything from high school crushes to dreams for the future. That meal reflected our bond, and each bite was laced with joy and friendship.
Today, every time I prepare a Bang Bang Chicken Bowl, I think of that beautiful evening filled with laughter and connection. I hope to inspire the same warmth and togetherness in your kitchen!
Ingredients
To create your own Bang Bang Chicken Bowl, gather these ingredients:
-
1 pound Boneless Skinless Chicken Breasts
This is the star of the show! For a different texture, feel free to swap it out for shrimp or tofu for a plant-based option. -
1 cup Cornstarch
Coating the chicken generously ensures a wonderfully crispy exterior. Don’t skip this; it’s key to that crunch! -
1 teaspoon Salt
Salt enhances flavor—it’s a must! Feel free to adjust to your taste preference. -
1 teaspoon Black Pepper
For a bit of kick! Use fresh cracked pepper for an extra aromatic boost. -
1 teaspoon Garlic Powder
It adds depth and warmth to the dish. Fresh minced garlic could be more potent if you’re feeling adventurous! -
1 teaspoon Paprika
This spice brings a mild smokiness and vibrant color. Swap in smoked paprika for a deeper flavor! -
1 cup Vegetable Oil
For frying! Heat thoroughly before adding the chicken for optimal crispiness. Peanut oil is a delightful alternative. -
2 cups Jasmine Rice
This fluffy rice is fragrant and comforting. Brown rice or quinoa can be healthier substitutes that still deliver on taste! -
2 cups Shredded Lettuce
For crunch! Other greens like arugula or spinach could add a different flair—go green! -
1 cup Diced Cucumber
A refreshing contrast to the warm chicken. Feel free to play with other crunchy veggies like bell peppers! -
1 cup Shredded Carrots
These not only add sweetness but also color and nutrition. Mix in colorful veggies for a vibrant dish! -
2 stalks Chopped Green Onions
For a fresh pop of flavor! It adds a lovely garnish, too. Shallots or chives would also work well. -
1/2 cup Mayonnaise
Creaminess all around! Swap with non-fat mayonnaise or Greek yogurt for a lighter option mantaining the flavor. -
3 tablespoons Sweet Chili Sauce
It lends that iconic sweetness with a touch of spice. You could even jazz it up with homemade versions! -
1 tablespoon Sriracha
Adjust it to your spice level! Use chili garlic sauce for tangy flavor or omit it for a milder experience.
Step-by-Step Instructions
Now that we have our ingredients ready, let’s dive into the delightful process of making this Bang Bang Chicken Bowl!
-
Prepare the Chicken:
Start by trimming any excess fat from your boneless skinless chicken breasts. Cut them into bite-size pieces, making sure they’re roughly equal for even cooking. This is a great time to add a pinch of salt and pepper for an initial flavor kick! -
Coat in Cornstarch:
In a shallow bowl, pour the cornstarch. Dredge each piece of chicken in the cornstarch until they are fully coated. This step is essential for achieving that glorious crunch! Let them rest for a few minutes while you heat the oil. -
Heat the Oil:
In a deep skillet or frying pan, pour in the vegetable oil. Heat it over medium-high heat until shimmering. If you’re unsure, you can test a small piece of chicken—if it sizzles when added, you’re good to go! Remember, hot oil is your friend for crispy chicken. -
Fry the Chicken:
Once the oil is hot, carefully add the chicken pieces in a single layer (don’t overcrowd the pan!). Fry until golden brown on one side, then flip to cook the other side, usually about 5-7 minutes total. You want that gorgeous golden crust! Use a slotted spoon to remove the chicken and place it on a plate lined with paper towels to absorb excess oil. -
Make the Sauce:
In a mixing bowl, combine the mayonnaise, sweet chili sauce, and sriracha. Whisk until smooth and creamy—this is where the magic happens! Adjust the sriracha based on how spicy you want it; a little goes a long way! -
Toss the Chicken:
In a large bowl, gently toss your crispy chicken with the sauce until well-coated. The beautiful thing about this dish is the balance of flavors; you want each piece to have a nice glaze without drowning in sauce! -
Prepare the Rice:
While the chicken is frying, cook your jasmine rice according to the package instructions. For added flavor, consider simmering the rice in chicken broth instead of water! -
Assemble the Bowls:
Once your rice is fluffy and the chicken is coated, it’s time to assemble. Start with a base of jasmine rice, top it with the saucy chicken, and add a handful of shredded lettuce, diced cucumber, and carrots. Garnish with chopped green onions for that fresh lift!
Serving Suggestions
To plate your Bang Bang Chicken Bowl, start with a generous scoop of jasmine rice in a deep bowl. Top it with a good portion of that luscious chicken, then layer on the fresh veggies, ensuring a pop of color and crunch. Serve immediately while everything is still warm, and don’t forget a drizzle of extra sauce on top if you’re feeling adventurous!
Recipe Variations
Here are a few fun twists to keep things interesting:
- Sweet and Spicy Twist: Add a pinch of crushed red pepper flakes to the sauce for an extra kick!
- Crispy Tofu Version: Swap chicken for cubes of crispy tofu for a satisfying vegetarian option.
- Grilled Chicken Bowls: Try grilling your marinated chicken for a smoky flavor—a game changer!
- Zoodle Alternative: Swap out rice for zucchini noodles if you’re feeling fancy and want a low-carb twist!
Chef’s Notes
This Bang Bang Chicken Bowl truly reflects my culinary philosophy: elevate comfort food while making it approachable. I remember the first time I shared this dish at a dinner party—it disappeared in minutes! Over the years, I’ve played with textures and flavor profiles, and each tweak has only made this dish feel more like home.
Another fun fact? My friends keep suggesting I go into business with this dish; the demand is real! Every time I make it, I’m reminded of the joy it brings to everyone at my table, and I love sharing those moments with you all.
FAQs and Troubleshooting
1. Why is my chicken not crispy?
Ensure your oil is hot enough before frying. If the oil isn’t sufficiently warmed, it can cause the chicken to steam instead of fry. Always heat the oil to the point of shimmering before adding your chicken.
2. Can I make the sauce ahead of time?
Absolutely! The sauce can be made in advance and stored in the refrigerator for up to a week. Just give it a good stir before using it!
3. How do I fix overly salty chicken?
If you find your chicken is too salty, try pairing it with additional rice or veggies to balance the flavors. A dollop of creamy sauce can also help mellow things out.
4. What can I serve alongside this dish?
Consider pairing your Bang Bang Chicken Bowl with a light, refreshing salad or some spring rolls for that extra crunch and freshness.
Nutritional Info
(If you’re curious about the nutritional content, just remember that this recipe will vary depending on portion sizes and any modifications you make. However, you can generally expect a good balance of protein from the chicken, carbohydrates from the rice, and essential vitamins from the veggies!)
And there you have it—a delightful Bang Bang Chicken Bowl that brings a flavor explosion to your kitchen! I hope you enjoy this recipe as much as I do. Remember, cooking is about creating beautiful experiences, so gather your loved ones, share your table, and savor every bite! Happy cooking!
PrintBang Bang Chicken Bowl

A delightful twist on dinner with crispy chicken in a flavorful sauce over jasmine rice and fresh veggies.
- Prep Time: 15 minutes
- Cook Time: 30 minutes
- Total Time: 45 minutes
- Yield: 4 servings 1x
- Category: Main Course
- Method: Frying
- Cuisine: Asian
- Diet: Non-Vegetarian
Ingredients
- 1 pound Boneless Skinless Chicken Breasts
- 1 cup Cornstarch
- 1 teaspoon Salt
- 1 teaspoon Black Pepper
- 1 teaspoon Garlic Powder
- 1 teaspoon Paprika
- 1 cup Vegetable Oil
- 2 cups Jasmine Rice
- 2 cups Shredded Lettuce
- 1 cup Diced Cucumber
- 1 cup Shredded Carrots
- 2 stalks Chopped Green Onions
- 1/2 cup Mayonnaise
- 3 tablespoons Sweet Chili Sauce
- 1 tablespoon Sriracha
Instructions
- Prepare the Chicken: Trim any excess fat from the chicken breasts and cut into bite-size pieces. Season with salt and pepper.
- Coat in Cornstarch: Dredge each piece of chicken in cornstarch until fully coated. Let rest while you heat the oil.
- Heat the Oil: Pour vegetable oil into a skillet and heat over medium-high heat until shimmering.
- Fry the Chicken: Carefully add the chicken in a single layer and fry until golden brown, about 5-7 minutes. Use a slotted spoon to remove and drain on paper towels.
- Make the Sauce: In a bowl, mix mayonnaise, sweet chili sauce, and sriracha until smooth.
- Toss the Chicken: Gently combine the fried chicken with the sauce until well-coated.
- Prepare the Rice: Cook jasmine rice according to package instructions, optionally using chicken broth for flavor.
- Assemble the Bowls: Start with a scoop of rice, top with chicken, and add lettuce, cucumber, and carrots. Garnish with green onions.
Notes
Add crushed red pepper flakes for extra heat or substitute chicken with tofu for a vegetarian option.
Nutrition
- Serving Size: 1 serving
- Calories: 450
- Sugar: 6g
- Sodium: 500mg
- Fat: 15g
- Saturated Fat: 2g
- Unsaturated Fat: 10g
- Trans Fat: 0g
- Carbohydrates: 60g
- Fiber: 4g
- Protein: 20g
- Cholesterol: 60mg
Keywords: Bang Bang Chicken, Chicken Bowl, Asian Cuisine, Fried Chicken, Comfort Food

Easy Mini Lemon Meringue Tarts for Quick Weeknight Desserts
Mini Lemon Meringue Tarts: A Sweet Bite of Sunshine
Hello, fellow food lovers! If you’re anything like me, you believe that cooking should be an exciting adventure, blending artistry with flavors that dance on your palate. Today, I’m thrilled to share a recipe that captures the essence of summer in every bite—Mini Lemon Meringue Tarts. These little beauties are perfect for any occasion, whether you’re throwing a dinner party or just indulging in a sweet treat after a long day. Let’s dive into the sunny world of tangy lemon curd and fluffy meringue topped tarts!
A Family Tradition
Growing up in my family, lemon meringue pie was almost a rite of passage. My grandma had a rhythm to her baking—the crackle of her mixing bowl, the sweet and sour aroma wafting through the air, and of course, her infamous meringue that always had to reach that perfect glossy peak. One summer afternoon, I decided to step into the kitchen, determined to replicate her masterpiece. Armed with her handwritten recipe and a heap of enthusiasm, I soon discovered the wonder of whipping egg whites and the magic of balancing sweet and tart flavors.
Though my first attempt ended in a bit of a mess—let’s just say there was more meringue on my face than on the pie—I still remember the joy of creating something special. After a few tries and many giggles later, I finally nailed the recipe. This experience sparked my love for baking and laid the foundation for many delightful kitchen adventures. Fast forward to today, and I’m excited to share a mini version of that classic dessert. Trust me, these Mini Lemon Meringue Tarts will win hearts just like my grandma’s pie!
Ingredients
Here’s what you’ll need to create your own mini lemon meringue tarts:
For the Tart Shells:
- 200 g unsalted butter: Adds a rich flavor and tender texture. If you prefer, you can use a plant-based butter for a dairy-free option.
- 100 g superfine sugar: This helps create a light and tender crust. You can also use powdered sugar if that’s what you have on hand.
- 1 extra-large egg: Acts as a binder in the crust. A flax egg (1 tablespoon flaxseed meal + 2.5 tablespoons water) can be a good substitute for a vegan version.
- 1 extra-large egg yolk: Contributes to the richness. No substitute for this—just embrace the decadence!
- 1 tsp vanilla extract: Enhances the flavor of the crust. Feel free to use almond extract for a twist!
- ½ tsp salt: Just a pinch to balance the sweetness.
- 350 g cake flour: A lighter flour for tender tarts. All-purpose flour will work too, just expect a slightly denser crust.
- 20 g unsalted butter (melted, for brushing tart tins): This is for greasing the tins easily.
For the Lemon Curd Filling:
- 2 tins condensed milk (385g per tin): Provides sweetness and thickness. You can opt for sweetened coconut milk if you’d like to go dairy-free.
- 3 extra-large egg yolks: These will thicken your curd beautifully.
- 80 ml lemon juice: Freshly squeezed is best for a vibrant flavor. Bottle juice works in a pinch, but freshness makes a difference!
- 1 tbsp lemon zest: Always zest before juicing! It adds a lovely aromatic element to your curd.
For the Meringue Topping:
- 4 extra-large egg whites: They’re the star of this meringue—so fluffy and perfect!
- 200 g superfine sugar: Helps stabilize the egg whites to create that dreamy meringue.
Step-by-Step Instructions
Let’s get cooking! Here’s how to create these delightful Mini Lemon Meringue Tarts.
-
Prepare the Tart Shells:
Preheat your oven to 180 °C (350 °F). In a large mixing bowl, cream together the 200 g unsalted butter and 100 g superfine sugar until it’s light and fluffy—this usually takes about 3 minutes at medium speed. Pro tip: A stand mixer can make this process easier, but a handheld mixer works just fine! -
Add the Wet Ingredients:
Mix in the 1 whole egg, 1 egg yolk, and 1 tsp vanilla extract, ensuring everything is well-combined. You want a lovely light yellow mixture that smells divine! -
Incorporate Dry Ingredients:
Gradually sift in the 350 g cake flour and ½ tsp salt. Use a spatula to fold in the flour until just combined. Be careful not to overmix! You want a soft dough that holds together when pressed. If it feels too crumbly, add a teaspoon of cold water. -
Shape and Chill:
Lightly flour your work surface, roll out the dough to about ½ cm thick, and cut out circles that will fit into your tart tins. Press the dough gently into the tins and poke a few holes in the bottom to prevent puffing. Pop these into the fridge for 20-30 minutes to chill—this will help keep them from shrinking during baking. -
Bake the Shells:
Brush the tart shells with melted butter and bake them in the preheated oven for about 15-18 minutes, or until they are golden brown. Keep an eye on them to avoid burning! -
Prepare the Lemon Curd:
While your shells are baking, let’s whip up that luscious lemon curd! In a medium saucepan over low heat, combine the two tins of condensed milk, 3 egg yolks, 80 ml lemon juice, and 1 tbsp lemon zest. Stir constantly until the mixture thickens, about 5-7 minutes. You’ll know it’s ready when it coats the back of a spoon.Tip: Don’t rush this step; patience is key!
-
Fill the Tarts:
Once your shells are cooled and the lemon curd thickened, pour the curd into each tart shell, filling them up to the brim. Set them aside to cool completely while you prepare the meringue. -
Make the Meringue:
In a clean mixing bowl, whip the 4 egg whites on medium speed until soft peaks form. Gradually add in the 200 g superfine sugar, a tablespoon at a time, until the meringue becomes glossy and holds stiff peaks. You want to be able to turn that bowl upside down without losing a drop of meringue! -
Top Your Tarts:
Pipe or spoon the meringue high onto each filled tart. Get creative with the design! A fun swirl or little peaks always looks wonderful. -
Toast the Meringue:
Using a kitchen torch, toast the meringues until they reach a lovely golden hue. If you don’t have a torch, simply pop them under the broiler for 2-3 minutes, keeping a close eye on them to avoid burning. -
Serve and Enjoy:
Let the tarts cool for a few minutes, then serve them chilled or at room temperature. Your guests will be singing your praises!
Serving Suggestions
For an elegant presentation, serve your Mini Lemon Meringue Tarts on a beautiful cake stand, garnished with fresh berries or mint leaves. Consider pairing them with a refreshing drink like iced tea with lemon or a sweet cocktail.
Recipe Variations
Here are a few fun twists you can try:
- Berry Bliss: Add a layer of fresh blueberries or raspberries underneath the lemon curd for a burst of vibrant flavor.
- Coconut Meringue: Incorporate toasted coconut into the meringue for a tropical twist.
- Savory Lemon Tarts: Replace lemon curd with a mixture of savory ingredients like goat cheese and thyme for a unique appetizer.
- Mini Cheesecakes: Swap out lemon curd with cheesecake filling for a delicious twist on classic tarts.
- Vegan Variation: Use aquafaba (chickpea water) in place of egg whites for a delightful vegan meringue.
Chef’s Notes
I can’t help but chuckle when reminiscing about the first time I tried to toast meringue under the broiler. I was so excited to impress my guests that I didn’t pay attention, and voilà! A charred, sad little mound of meringue was all that was left. Lesson learned: sometimes, less is more—especially when it comes to toasting. These tarts are all about bringing joy to the table without stress, so don’t worry about perfection; just enjoy the process!
FAQs and Troubleshooting
1. My meringue didn’t whip up nicely; what went wrong?
Make sure your mixing bowl and beaters are squeaky clean! Any fat or residue can inhibit the egg whites from whipping up properly.
2. How do I prevent my tart shells from getting soggy?
Chill your crusts before baking and make sure to bake until they are golden brown. Pre-baking helps develop a sturdy shell that can handle fillings without getting soggy.
3. Can I make these tarts in advance?
Absolutely! You can prepare the tart shells and lemon curd a day ahead and assemble them right before serving for a fresh meringue.
4. What’s the best way to store leftovers?
Store any leftover tarts in the refrigerator for up to 2 days. They taste amazing cold, but the meringue is best enjoyed fresh!
Nutritional Info
Each mini tart is a delightful treat, bursting with fresh lemon flavor, but be mindful of the sugar content! Indulging in these is best enjoyed in moderation as part of a balanced diet.
I hope you feel inspired to create these Mini Lemon Meringue Tarts in your own kitchen! Remember, it’s not just about the food; it’s the joy, laughter, and memories that gather around the table that makes cooking worthwhile. So grab your apron, and let’s make something delicious together! Happy cooking! 🍋✨
PrintMini Lemon Meringue Tarts

Delightful mini tarts with tangy lemon curd and fluffy meringue, perfect for any occasion.
- Prep Time: 30 minutes
- Cook Time: 30 minutes
- Total Time: 60 minutes
- Yield: 12 servings 1x
- Category: Dessert
- Method: Baking
- Cuisine: American
- Diet: Vegetarian
Ingredients
- 200 g unsalted butter
- 100 g superfine sugar
- 1 extra-large egg
- 1 extra-large egg yolk
- 1 tsp vanilla extract
- ½ tsp salt
- 350 g cake flour
- 20 g unsalted butter (melted, for brushing tart tins)
- 2 tins condensed milk (385 g per tin)
- 3 extra-large egg yolks
- 80 ml lemon juice
- 1 tbsp lemon zest
- 4 extra-large egg whites
- 200 g superfine sugar (for meringue)
Instructions
- Preheat your oven to 180 °C (350 °F). In a large mixing bowl, cream together the butter and sugar until light and fluffy.
- Mix in the egg, egg yolk, and vanilla extract until well-combined.
- Gradually sift in the cake flour and salt, folding until just combined.
- Roll out the dough, cut into circles, and press into tart tins. Chill for 20-30 minutes.
- Brush the tart shells with melted butter and bake for 15-18 minutes until golden brown.
- In a medium saucepan, combine the condensed milk, egg yolks, lemon juice, and zest over low heat. Stir until thickened.
- Pour the lemon curd into each tart shell once cooled.
- Whip the egg whites until soft peaks form, gradually adding sugar until glossy and stiff peaks form.
- Pipe the meringue onto the tarts and toast using a kitchen torch.
- Serve the tarts chilled or at room temperature.
Notes
For a creative twist, try adding fresh berries under the lemon curd or making a vegan version with aquafaba.
Nutrition
- Serving Size: 1 tart
- Calories: 250
- Sugar: 15g
- Sodium: 100mg
- Fat: 10g
- Saturated Fat: 5g
- Unsaturated Fat: 5g
- Trans Fat: 0g
- Carbohydrates: 30g
- Fiber: 1g
- Protein: 4g
- Cholesterol: 70mg
Keywords: lemon tarts, dessert, meringue, baking, summer treats