
Protein-Packed Coffee Chia Seed Pudding (5-Minute Prep)
Coffee Chia Seed Pudding With Protein: A Deliciously Energizing Dessert
Hey there, fellow foodies! If you’re anything like me, mornings are a sacred time—a ritual filled with the warmth of coffee and the promise of a delicious day ahead. There’s something about the aroma of freshly brewed coffee that just sets the mood, right? Now, imagine taking that glorious cup of joe and transforming it into a decadent dessert that’s as nutritious as it is indulgent. Enter: Coffee Chia Seed Pudding with Protein!
This delightfully creamy, coffee-infused pudding is a game-changer when it comes to breakfast or dessert. Yes, you read that right—both! Not only does it give you that caffeine boost thanks to our good friend, coffee, but it also packs an extra punch with protein, fiber, and healthy fats from chia seeds. It’s like a cozy hug in a bowl that you can enjoy at any time of day!
I love making this chia pudding for those busy mornings when I want something quick, flavorful, and oh-so-satisfying. Just mix, let it set, and voila—you’ve got breakfast or a snack ready to go! My friends are always astonished when they try this recipe, asking me for the secret. Spoiler alert: it’s simple, and I can’t wait to share it with you.
So grab your apron and let’s dive into this easy, heartwarming recipe that brings together the best of coffee and chia. Trust me, you’re going to want to keep this in your back pocket for those moments when you just need a little pick-me-up!
Personal Story
Let’s rewind a bit to when I first discovered my love for chia seeds. It was a sunny Saturday morning, and I had decided to throw a little breakfast gathering for my closest friends. At the time, I had just become obsessed with trying out new recipes from my favorite food blog. One of the recipes that caught my eye was a simple chia seed pudding. But it was missing something—something rich and familiar. That’s when it hit me: coffee!
I brewed a strong pot of coffee, mixed it with chia seeds, and the rest was history. As my friends arrived, they were greeted by the rich aroma of coffee and the excitement of a brand-new recipe that I was presenting. One bite, and they were hooked! It became a staple at our gatherings, a sort of culinary bonding moment over cups of coffee and bowls of chia pudding. It’s that warm memory of joy and connection that inspires me to keep sharing this recipe. I’m so grateful that I get to recreate that experience in my kitchen and now yours!
Ingredients
Let’s get to the heart of this recipe! Here’s everything you’ll need to whip up this delectable Coffee Chia Seed Pudding with Protein:
-
1 cup strong brewed coffee or cold brew
The base of our pudding! Brew it strong for robust flavor. If you’re sensitive to caffeine, you can opt for decaf or a caffeine-free coffee alternative. -
1/2 cup milk of choice (almond, oat, soy, coconut)
This adds creaminess. Almond milk gives a nutty flavor, while coconut milk lends a tropical touch. Feel free to swap for water or a milk blend. -
1 scoop vanilla or chocolate protein powder or 2–3 tbsp Greek yogurt
For an extra protein boost! Choose a flavor that complements the coffee. Greek yogurt adds creaminess, while protein powder keeps it light. -
4 tbsp chia seeds
These tiny seeds are nutrient powerhouses! They thicken the pudding. If you don’t have chia seeds, you could try flax seeds, but the texture may differ. -
1–2 tsp maple syrup or monk fruit sweetener
A touch of sweetness! Maple syrup offers a comforting caramel note. For less sugar, use monk fruit sweetener as a sugar-free option. -
1/2 tsp vanilla extract
Enhances the overall flavor. A high-quality extract is preferred; it makes a noticeable difference in taste! -
1/4 tsp cinnamon
Adds warmth and spice. You can also try cardamom for an exotic twist if you’re feeling adventurous! -
Optional:
- 1 tsp cocoa powder: For a mocha-like flavor – just mix in with the chia seeds.
- 1 tbsp nut butter: Stir in almond or peanut butter for creaminess.
- Shredded coconut: For a sweet finish or as a garnish.
Step-by-Step Instructions
Alright, now that we have our ingredients lined up, let’s get cooking! This part is quick and easy, so you can whip this up in no time.
Step 1: Brew the Coffee
Start by brewing your coffee. Use a method you love—French press, pour-over, or drip. Aim for a strong brew, as it will be the backbone of your pudding. If you want a chilled version, prepare cold brew instead. Let it cool a bit before moving on!
Step 2: Mix Ingredients
In a medium mixing bowl, whisk together the brewed coffee, milk of your choice, protein powder or Greek yogurt, chia seeds, maple syrup, vanilla extract, and cinnamon. Grab your favorite whisk and mix until all the ingredients are well combined. It’s essential to ensure the chia seeds are evenly distributed to avoid clumps later.
Step 3: Let it Set
Once you’ve mixed everything, cover your bowl with plastic wrap or transfer the mixture into individual jars for those Instagram-worthy portions! Place it in your refrigerator for at least 4 hours or overnight if you want to wake up to this delightful treat. As it sits, the chia seeds will absorb the liquid and expand, giving it that pudding-like texture.
Step 4: Stir Up the Pudding
After it’s set, give the pudding a good stir. You might notice a few chia seeds floating at the top—don’t worry! Just mix it back in, and you’ll end up with a beautiful, thick consistency. If it feels a bit too thick, stir in a bit more milk to reach your desired creaminess.
Step 5: Serve and Enjoy!
Scoop the pudding into your favorite bowls or jars. Top each portion with a sprinkle of shredded coconut, a dollop of nut butter, or a dusting of cocoa powder. The presentation is key here—your little dish of goodness is about to wow anyone who sees it!
Serving Suggestions
Serving this Coffee Chia Seed Pudding is all about making it feel special! Layer in mason jars for a beautiful breakfast display, or serve in cute dessert glasses topped with fresh berries, nuts, or chocolate shavings. Drizzle a little extra maple syrup or a swirl of nut butter on top for that extra tantalizing touch. You could even pair it with a side of fresh fruit or a slice of banana bread for a delightful brunch ensemble!
Recipe Variations
Now, let’s mix things up a bit! Here are some creative variations you can try:
- Mocha Delight: Add 1 tsp cocoa powder into the mix for a chocolatey twist! Top with chocolate shavings for extra indulgence.
- Nutty Buddy: Swirl in your favorite nut butter—peanut, almond, or even cashew—for a protein-packed treat.
- Tropical Escape: Swap the coffee for coconut milk and add some fresh pineapple chunks and toasted coconut flakes for a tropical vibe.
- Spiced Delight: Experiment with spices! Try adding a pinch of nutmeg or cardamom for warmth.
- Vanilla Berry Bliss: Stir in a handful of blueberries or strawberries for a fresh, fruity addition!
Chef’s Notes
Oh, let me tell you, this recipe has certainly evolved over time! Initially, I started with just coffee and chia seeds, but as I explored flavors and textures, it grew into this customizable delight. One of the funniest moments came when I tried making it with a leftover cold brew from my brunch party. I wasn’t sure how it would turn out, but it ended up being the best pudding of all time! Now, I always encourage experimenting with flavors and ingredients!
Regardless of how you make it, the most important part is enjoying the process and sharing those lovely moments with friends and family. Cooking is all about connection, and this pudding is a perfect way to bond—trust me!
FAQs and Troubleshooting
Can I prepare this pudding ahead of time?
Absolutely! Chia pudding stores well in the refrigerator for up to 5 days. Just make sure to keep it covered so it stays fresh.
What if my pudding isn’t thickening?
If your pudding hasn’t thickened enough, it likely needs more time in the fridge. If you’re in a pinch, you can add an extra tablespoon of chia seeds and let it sit for another hour.
Can I omit the protein powder?
Yes! If you prefer or don’t have protein powder on hand, you can substitute with Greek yogurt, or simply enjoy it without for a lighter treat.
How can I add more sweetness?
Simply adjust the sweetness to your liking! Start with the suggested amount of maple syrup or sweetener, and then taste before adding more. You can also use a drizzle of honey or agave syrup if you like.
Nutritional Info
- Calories: Approximately 190 per serving (excluding toppings)
- Protein: 15g (depending on protein powder)
- Carbs: 20g
- Fats: 6g
- Fiber: 8g
Conclusion
And there you have it—your new go-to recipe for Coffee Chia Seed Pudding with Protein! It’s simple, elegant, and oh-so-good. I hope you absolutely love it as much as I do. The best part? You can personalize it while creating beautiful moments in the kitchen and around your table!
So tie on that apron, pour another cup of coffee, and enjoy this deliciously energizing treat that’s perfect for any occasion. Can’t wait to hear how you make it your own—happy cooking, everyone!
PrintCoffee Chia Seed Pudding With Protein

A deliciously energizing dessert that combines the richness of coffee with the nutritious benefits of chia seeds.
- Prep Time: 10 minutes
- Cook Time: 0 minutes
- Total Time: 240 minutes
- Yield: 4 servings 1x
- Category: Dessert
- Method: Refrigeration
- Cuisine: American
- Diet: Vegetarian
Ingredients
- 1 cup strong brewed coffee or cold brew
- 1/2 cup milk of choice (almond, oat, soy, coconut)
- 1 scoop vanilla or chocolate protein powder or 2–3 tbsp Greek yogurt
- 4 tbsp chia seeds
- 1–2 tsp maple syrup or monk fruit sweetener
- 1/2 tsp vanilla extract
- 1/4 tsp cinnamon
- Optional: 1 tsp cocoa powder, 1 tbsp nut butter, shredded coconut
Instructions
- Brew the Coffee: Start by brewing your coffee using your preferred method for a strong brew. Let it cool slightly.
- Mix Ingredients: In a medium bowl, whisk together the brewed coffee, milk, protein powder or Greek yogurt, chia seeds, maple syrup, vanilla extract, and cinnamon until well combined.
- Let it Set: Transfer the mixture to a bowl or jars, cover, and refrigerate for at least 4 hours or overnight.
- Stir Up the Pudding: After it’s set, stir to redistribute the chia seeds. Add more milk if needed to adjust the consistency.
- Serve and Enjoy!: Scoop into bowls and top with toppings like shredded coconut, nut butter, or cocoa powder.
Notes
Store this pudding in the refrigerator for up to 5 days in a covered container.
Nutrition
- Serving Size: 1 serving
- Calories: 190
- Sugar: 6g
- Sodium: 100mg
- Fat: 6g
- Saturated Fat: 1g
- Unsaturated Fat: 5g
- Trans Fat: 0g
- Carbohydrates: 20g
- Fiber: 8g
- Protein: 15g
- Cholesterol: 0mg
Keywords: coffee chia pudding, healthy dessert, protein pudding, vegan dessert, chia seeds

Min No-Bake Chocolate Peanut Butter Mousse: Creamy Treat
Indulge in Decadence: No-Bake Chocolate Peanut Butter Mousse Dessert
Hello, dessert lovers! Have you ever had that delightful moment when a simple combination of ingredients takes you back to your childhood, to warm kitchens filled with giggles and the sweet aroma of treats wafting through the air? That feeling? The one that makes you want to create delicious memories around your table? Well, today we’re diving into a dreamy No-Bake Chocolate Peanut Butter Mousse Dessert that will have you reminiscing and indulging in nostalgia all at once.
I mean, who can resist that velvety layer of chocolate paired with the rich, creamy taste of peanut butter? Seriously, it’s like a flavor celebration right in your mouth. Picture this: a rich chocolate mousse layered atop a buttery graham cracker crust, finished with a luscious peanut butter cream. It’s not just a dessert; it’s an experience! Let’s get those taste buds tingling and prepare our hearts (and stomachs) for something special.
This dessert not only satisfies your sweet cravings, but it also spreads joy and simple joys of life. Each bite is a little reminder to slow down and enjoy the beautiful moments — whether you’re planning a cozy dinner for two, a lively gathering with friends, or just a special treat for yourself. Trust me, you’ll want to keep this recipe close at hand. Ready to get started? Let’s whip up this deliciousness together!
A Taste of Nostalgia
Growing up, my kitchen was a hub of creativity and laughter, especially when it came to dessert time. I can vividly remember those lazy summer days when my mom and I would invent things in the kitchen, armed with nothing but a list of ingredients and a whole lot of enthusiasm. One such day, we decided to experiment with peanut butter, chocolate, and whatever else we could get our hands on from the pantry. As we stirred and tasted, we became engrossed in creating the “perfect” dessert.
Of course, our concoction didn’t always look perfect, but oh, the flavors! We made a mess, dropped chocolate chips, and definitely had some spilled peanut butter along the way, but we were having the best time. Fast forward all these years, and that childhood love for sweet creations hasn’t changed a bit. The No-Bake Chocolate Peanut Butter Mousse Dessert we’re making today captures those joyous moments perfectly. So, roll up your sleeves, and let’s create a sweet memory together!
Ingredients
Here’s what you’ll need to whip up this amazing dessert:
-
1 1/2 cups graham cracker crumbs
These create the perfect buttery base. For a gluten-free version, swap them out for gluten-free graham crackers or even almond flour. -
1/2 cup unsalted butter, melted
The melted butter helps bind the crumbs together. You can use coconut oil for a non-dairy option. -
1 cup creamy peanut butter
The star of our show! Opt for natural peanut butter for a healthier twist. If you prefer almond or cashew butter, they’ll work wonderfully too. -
1 cup powdered sugar
Sweetness brings everything together. If you’re watching your sugar intake, you can use powdered erythritol as a substitute. -
1 cup heavy whipping cream
This will be whipped to create that light, fluffy mousse texture. If you need a dairy-free version, try canned coconut cream. -
8 oz cream cheese, softened
It adds richness and stability to the mousse. For a healthier variation, consider using Greek yogurt. -
1 cup chocolate chips
Semi-sweet or dark, chocolate chips melt beautifully for our mousse. You could also use dairy-free chocolate chips for a vegan option. -
1/2 cup heavy cream (for ganache)
This will make a rich ganache to pour over. Again, feel free to substitute with coconut cream for a non-dairy version.
Step-by-Step Instructions
Now, let’s dive into the magic of cooking! Here’s how to bring it all together:
-
Prepare the crust:
- In a mixing bowl, combine the graham cracker crumbs with the melted butter. Mix until all crumbs are moistened. This is your first crust layer, and don’t skimp on the butter! It’s what gives it that delicious “sticky” texture that holds everything together.
- Press the mixture firmly into the bottom of a 9-inch pie dish (or dessert dish of your choice). Make sure to create an even layer using the back of a measuring cup or your fingers. The more evenly you press it, the better the base will hold its shape!
-
Make the mousse:
- In another bowl, beat the softened cream cheese and peanut butter together until smooth and creamy. You can’t skip this step! Properly mixing these two will ensure a luscious mousse without any lumps.
- Gradually add in the powdered sugar while continuing to beat until combined. Oh, that sweetness is heavenly!
- In a separate bowl, whip the heavy whipping cream until soft peaks form. This is where the magic happens—fluffiness is key for the perfect mousse. Use a hand mixer or a whisk, whichever you fancy. If using a whisk, just make sure to add plenty of love and elbow grease!
-
Fold everything together:
- Gently fold the whipped cream into the peanut butter mixture, using a rubber spatula. Be careful not to deflate that fluffy whipped cream. You want to maintain all that delicious airiness for ultimate indulgence!
- Once fully combined, pour the mousse over the prepared crust. Use a spatula to smooth it out evenly. Utter bliss is happening!
-
Chill:
- Place the pie dish in the refrigerator for at least 2 hours to let the mousse set. Trust me; the wait will be worth it! Nothing beats a cold slice of dessert on a warm day.
-
Prepare the ganache:
- While you wait, let’s make that luscious ganache! In a small saucepan, heat the remaining heavy cream over medium heat until it begins to simmer. Remove from heat and stir in the chocolate chips until melted and glossy. This simple trick will give you the best ganache. If it’s a bit thick, you can always add a splash more cream until it reaches your desired consistency.
-
Top it off:
- Once the mousse is set, pour the chocolate ganache over the top. Spread it gently to make sure every inch is covered in chocolaty goodness. For a little flair, you can sprinkle some extra crushed graham crackers on top for a delightful crunch.
-
Chill again:
- Return the dessert to the fridge for at least another 30 minutes to firm up the ganache. This extra time will allow everything to meld beautifully.
-
Serve and enjoy:
- Slice it up—don’t forget to use a warm knife for cleaner cuts! Serve chilled, and watch everyone’s eyes light up as they take their first bite!
Serving Suggestions
To plate this No-Bake Chocolate Peanut Butter Mousse Dessert, gently slice generous pieces and place them on dessert plates. A dollop of whipped cream and a sprinkle of crushed peanuts on top always makes for a gorgeous finish. Garnish with chocolate shavings for that extra touch of elegance. Let the beauty speak for itself!
Recipe Variations
- Nut-Free Version: Use sunflower seed butter in place of peanut butter and check for nut-free graham crackers.
- Dairy-Free Delight: Substitute cream cheese and heavy cream with vegan options like cashew cream or silken tofu to achieve a creamy texture.
- Extra Chocolate: Add melted chocolate directly to the mousse for a more intensive chocolate flavor.
- Fruit Layer: Incorporate fresh banana or raspberry layers to add a fruity twist between the mousse layers.
- Spicy Kick: A sprinkle of cayenne pepper or chili powder in the chocolate ganache can create a delightful surprise!
Chef’s Notes
You know, this dessert has become one of those go-to recipes for me. Anytime someone asks for a quick and impressive treat, this is my answer! I love how adaptable it is; you can play around with flavors and textures endlessly. Each time I make it, I remember that day in the kitchen with my mom, a reminder that sometimes the best recipes come from spontaneous moments. Plus, there’s always something special about a no-bake dessert—fewer dishes and quicker mess clean-up!
FAQs and Troubleshooting
1. Why is my mousse not setting?
If your mousse hasn’t set, it may need a bit more chilling time. Just be patient; sometimes, it needs a few extra hours!
2. Can I make this ahead of time?
Absolutely! This dessert stores beautifully in the fridge for up to two days. It’s perfect for prepping ahead for gatherings.
3. How can I prevent my cream from deflating?
When folding in whipped cream, use a gentle hand and spatula, making sure not to stir too vigorously. You want to keep that airy texture intact!
4. What’s the best way to slice the dessert?
Run a knife under warm water, dry it off, and slice. This technique gives you crisp, clean edges with each piece!
With this No-Bake Chocolate Peanut Butter Mousse Dessert, you’re not just cooking; you’re creating memories—one delicious bite at a time. So gather your ingredients, bring some friends over, and let’s get to creating something magical. Until next time, happy cooking and sweet indulgences!
PrintNo-Bake Chocolate Peanut Butter Mousse Dessert

A rich and creamy no-bake dessert that combines layers of chocolate mousse and peanut butter cream over a buttery graham cracker crust.
- Prep Time: 15 minutes
- Cook Time: 0 minutes
- Total Time: 150 minutes
- Yield: 8 servings 1x
- Category: Dessert
- Method: No-Bake
- Cuisine: American
- Diet: Nut-Free, Gluten-Free Option
Ingredients
- 1 1/2 cups graham cracker crumbs
- 1/2 cup unsalted butter, melted
- 1 cup creamy peanut butter
- 1 cup powdered sugar
- 1 cup heavy whipping cream
- 8 oz cream cheese, softened
- 1 cup chocolate chips
- 1/2 cup heavy cream (for ganache)
Instructions
- Prepare the crust: In a mixing bowl, combine the graham cracker crumbs with the melted butter. Mix until all crumbs are moistened. Press the mixture firmly into the bottom of a 9-inch pie dish.
- Make the mousse: In another bowl, beat the softened cream cheese and peanut butter together until smooth. Gradually add in the powdered sugar while continuing to beat until combined. In a separate bowl, whip the heavy whipping cream until soft peaks form.
- Fold everything together: Gently fold the whipped cream into the peanut butter mixture. Once fully combined, pour the mousse over the prepared crust.
- Chill: Place the pie dish in the refrigerator for at least 120 minutes to let the mousse set.
- Prepare the ganache: In a saucepan, heat the remaining heavy cream until it begins to simmer. Remove from heat and stir in the chocolate chips until melted.
- Top it off: Once the mousse is set, pour the chocolate ganache over the top and spread it out evenly.
- Chill again: Return the dessert to the fridge for at least another 30 minutes.
- Serve and enjoy: Slice it up and serve chilled with whipped cream and crushed peanuts.
Notes
For a gluten-free version, use gluten-free graham crackers. For a dairy-free version, substitute cream cheese and heavy cream with vegan options.
Nutrition
- Serving Size: 1 slice
- Calories: 400
- Sugar: 20g
- Sodium: 250mg
- Fat: 24g
- Saturated Fat: 10g
- Unsaturated Fat: 12g
- Trans Fat: 0g
- Carbohydrates: 40g
- Fiber: 2g
- Protein: 6g
- Cholesterol: 35mg
Keywords: no-bake dessert, chocolate mousse, peanut butter, easy dessert, gluten-free
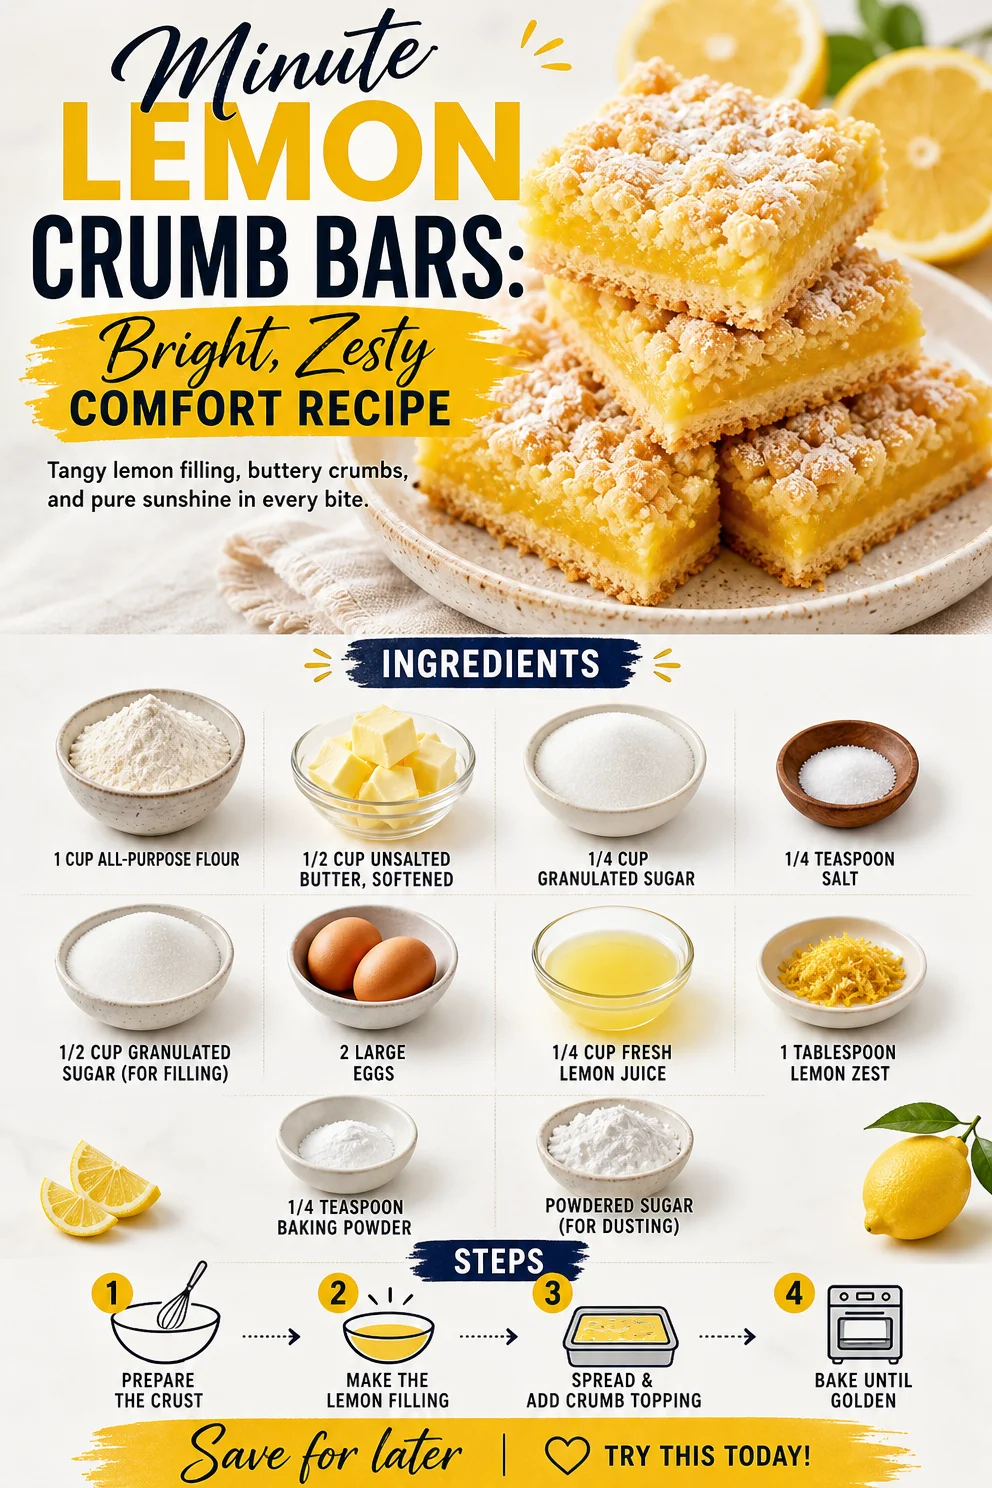
Minute Lemon Crumb Bars: Bright, Zesty Comfort Recipe
Easy Lemon Crumb Bars: A Slice of Sunshine
Hello, my fellow food enthusiasts! If there’s one thing I love more than whipping up delicious meals, it’s sharing the joy that food can bring. Today, we’re diving into a treat that’s as refreshing as a summer breeze—Lemon Crumb Bars. These bars are a delightful blend of tangy lemon filling and buttery crumb crust, perfect for brightening up your day or impressing your guests at your next gathering.
Lemon Crumb Bars hold a special place in my heart. I remember the first time I baked them for a friends’ brunch. The sun was shining, and I had just switched to a new recipe I found in an old cookbook. As I sprinkled the powdered sugar on top, I felt like a culinary artist crafting a masterpiece. When my friends took their first bite, I’ll never forget their reactions—eyes lighting up, smiles spreading wide, and a chorus of “Wow, these are amazing!” filling the kitchen. It was pure joy to see how a simple dessert could spark happiness. That laughter and those satisfied faces inspired me to keep perfecting this recipe, making it a staple for my gatherings and a shining star in my recipe collection.
Now, let’s jump right into the recipe. Grab your apron and your favorite mixing bowl, and let’s create something delicious together!
Ingredients
To make these delicious Lemon Crumb Bars, you’ll need:
-
1 cup all-purpose flour
- The backbone of the crumb crust! You can swap it with whole wheat flour for a nuttier flavor or gluten-free flour if you’re avoiding gluten. Just make sure to adjust the liquid slightly as gluten-free flour can absorb more moisture.
-
1/2 cup unsalted butter, softened
- Butter adds richness to your bars. If you’re in a pinch, coconut oil can be a suitable substitute for a dairy-free version, giving it a slight tropical twist!
-
1/4 cup granulated sugar
- This sweetens the crumb crust. If you prefer, you can use brown sugar for a slight caramel flavor.
-
1/4 teaspoon salt
- Always remember to balance your flavors! A touch of salt elevates sweetness and enhances the natural flavor of the lemon.
-
1/2 cup granulated sugar (for filling)
- This is all about that sweet-tangy filling! Adjust this to taste if you want a more tart experience.
-
2 large eggs
- Eggs help bind the filling and create a fluffy texture. For a vegan option, you can use flax eggs (1 tablespoon ground flaxseed mixed with 2.5 tablespoons water for each egg).
-
1/4 cup fresh lemon juice
- Fresh is best! It gives you that vibrant lemon flavor. Bottled lemon juice will work in a pinch, but fresh lemon juice is really where the magic happens.
-
1 tablespoon lemon zest
- This is where you capture the energy of lemons! Zest adds an extra layer of citrus goodness. Always zest before juicing your lemons.
-
1/4 teaspoon baking powder
- A little boost for the filling to ensure it doesn’t sit too dense—a fluffy, tender cake is the goal.
-
Powdered sugar (for dusting)
- A final touch! It makes everything look so pretty and finishes off your bars perfectly.
Step-by-Step Instructions
Now that we have our ingredients ready, it’s time to get those hands moving!
-
Preheat Your Oven: Start by preheating your oven to 350°F (175°C). This ensures that your bars bake evenly and gives you that wonderfully warm, inviting atmosphere while you cook!
-
Make the Crust: In a mixing bowl, combine 1 cup of all-purpose flour, 1/4 cup of granulated sugar, and a pinch of salt. Mix these dry ingredients together. Take your softened butter and cut it into the flour mixture. You want a crumbly texture—almost like wet sand. A quick tip: use a pastry cutter or your fingers for the best results.
-
Press and Bake: Take your crumbly mixture and press it evenly into the bottom of an 8×8-inch baking dish. Make sure to compact it well; nobody wants a crust that falls apart! Bake this in your preheated oven for about 15 minutes, until it’s lightly golden. While it’s baking, you can prepare your filling.
-
Prepare the Filling: In another bowl, whisk together the eggs and the remaining granulated sugar (1/2 cup). Add the fresh lemon juice, zest, and baking powder. Make sure everything is well combined! The mixture should be a lovely, sunny yellow.
-
Pour and Bake Again: Once your crust is out of the oven, pour the lemon filling over it while it’s still hot. Back into the oven it goes for another 20-25 minutes. You’ll know it’s done when the filling is set but slightly jiggly in the center (it will firm up as it cools).
-
Cool and Dust: Let the bars cool in the pan on a wire rack. Once cooled completely, dust with powdered sugar. For an elegant presentation, use a fine sieve—this will give you that dreamy frosting-like look.
Serving Suggestions
Cut your Lemon Crumb Bars into squares and serve them on a lovely platter. You can add a slice of lemon or a sprig of mint on top of each piece for a little color. Cozy up with some herbal tea or a refreshing lemonade, and you have the perfect afternoon treat!
Recipe Variations
-
Berry Lemon Bars: Add in fresh blueberries or raspberries to the filling for a fruity twist. They add a lovely color and flavor contrast!
-
Coconut Lemon Bars: Mix shredded coconut into the crumb crust for added texture and a hint of tropical flair.
-
Herbal Infusion: Infuse your lemon juice with fresh herbs like thyme or basil for an unexpected and delightful flavor pairing.
-
Chia Seed Switch: If you’re looking for a healthier option, consider adding chia seeds to your filling for a nutritious kick!
-
Spicy Kick: Incorporate a pinch of cayenne pepper or chili powder into the crust for an intriguing spicy undertone that complements the tart sweetness.
Chef’s Notes
I have to laugh sometimes at how these bars have evolved in my kitchen! I remember the first time I accidentally added too much lemon juice, thinking “more is better.” While the result was outrageous and sour (let’s just say I learned a valuable lesson!), it sparked a new exploration in flavor. Now, I have a perfect balance where every bite celebrates both the tartness and the sweetness of lemon. So, don’t be afraid to experiment! After all, cooking is all about finding what inspires you.
FAQs and Troubleshooting
1. My filling was too runny; what went wrong?
- If your filling didn’t set, it’s usually because it needed a bit more time in the oven. Remember, the filling will continue to firm up as it cools.
2. Can I make these bars dairy-free?
- Absolutely! Just substitute the butter with coconut oil or a dairy-free margarine.
3. How should I store my Lemon Crumb Bars?
- Store them in an airtight container in the fridge for up to a week. They can also be frozen for up to three months—just thaw them in the fridge overnight before serving.
4. What can I do if there’s a lemony aftertaste?
- This can sometimes happen if the lemon juice is overly concentrated. Make sure to balance your sugar with the acidity of the lemon and start with the recommended amount.
Nutritional Info (per serving)
- Calories: 180
- Total Fat: 7g
- Saturated Fat: 4g
- Cholesterol: 50mg
- Sodium: 60mg
- Total Carbohydrates: 27g
- Dietary Fiber: 1g
- Sugars: 12g
- Protein: 2g
Now that you have a delicious recipe for Lemon Crumb Bars, it’s time to brighten your day or impress your guests! Baking should be fun, so get creative, follow your instincts, and enjoy every moment in the kitchen. We’re not just making food; we’re creating memories. So tie on that apron and get baking—joy is just a slice away!
PrintEasy Lemon Crumb Bars

A refreshing treat made with tangy lemon filling and buttery crumb crust, perfect for gatherings.
- Prep Time: 10 minutes
- Cook Time: 35 minutes
- Total Time: 45 minutes
- Yield: 16 servings 1x
- Category: Dessert
- Method: Baking
- Cuisine: American
- Diet: Vegetarian
Ingredients
- 1 cup all-purpose flour
- 1/2 cup unsalted butter, softened
- 1/4 cup granulated sugar
- 1/4 teaspoon salt
- 1/2 cup granulated sugar (for filling)
- 2 large eggs
- 1/4 cup fresh lemon juice
- 1 tablespoon lemon zest
- 1/4 teaspoon baking powder
- Powdered sugar (for dusting)
Instructions
- Preheat your oven to 350°F (175°C).
- Mix the flour, 1/4 cup of sugar, and pinches of salt in a bowl.
- Cut the softened butter into the flour mixture until crumbly.
- Press the crumbly mixture into an 8×8-inch baking dish.
- Bake for 15 minutes until lightly golden.
- Whisk together the eggs and 1/2 cup of sugar in another bowl.
- Add the lemon juice, zest, and baking powder, and mix well.
- Pour the filling over the crust while still hot.
- Bake again for 20-25 minutes until set but slightly jiggly in the center.
- Cool in the pan on a wire rack, then dust with powdered sugar.
Notes
For a dairy-free version, substitute butter with coconut oil. Store bars in an airtight container in the fridge for up to a week.
Nutrition
- Serving Size: 1 square
- Calories: 180
- Sugar: 12g
- Sodium: 60mg
- Fat: 7g
- Saturated Fat: 4g
- Unsaturated Fat: 2g
- Trans Fat: 0g
- Carbohydrates: 27g
- Fiber: 1g
- Protein: 2g
- Cholesterol: 50mg
Keywords: lemon bars, dessert, easy recipe, summer treat, baking

Minute Mini Oreo Cheesecakes for Busy Weeknights
Mini Oreo Cheesecakes: A Sweet Indulgence for Every Occasion
Hello, fellow food lovers! Savannah here, and today I’ve got something truly delightful to share: Mini Oreo Cheesecakes. These bite-sized treasures are the perfect blend of creamy, dreamy cheesecake and that irresistible chocolatey crunch we all love from Oreos. Whether it’s a dinner party, a casual get-together, or simply a sweet treat after a long day, these mini cheesecakes will steal the show and keep your guests coming back for seconds—and maybe even thirds!
You might be wondering, “Savannah, what makes these mini cheesecakes so special?” Well, let me tell you, it’s all about the balance of flavors and textures. They are rich but not overwhelming, sweet but not cloyingly so. Plus, they are so easy to whip up! No need for any baking skills or fancy kitchen gadgets—just your trusty mixing bowl and a little bit of love. So, let’s dive into this scrumptious recipe that’s sure to bring joy to any table.
My Mini Oreo Cheesecake Story
I remember the first time I made mini cheesecakes. It was for a friend’s birthday celebration. I wanted to create something special that would stand out among the usual cake options. While browsing through my pantry for inspiration, the sight of those familiar black-and-white cookies caught my eye. “What if I could incorporate Oreos?” I thought. The idea of a mini cheesecake infused with that classic Oreo flavor sparked my creativity, and before I knew it, I was mixing and tasting, feeling like a true kitchen alchemist.
The party was a hit! Guests raved about these little morsels, and their faces lit up with joy after each bite. It was that night I discovered the magic of individual desserts. There’s something so personal about having a treat made just for you, and I knew I had to share this recipe with all my culinary companions. Fast forward to today, and I’m thrilled to guide you through making your very own Mini Oreo Cheesecakes!
Ingredients
Here’s what you’ll need to create these luscious little cheesecakes:
-
8 oz cream cheese, softened
This is the star of the show! Softening the cream cheese is essential for a smooth and creamy texture. If you’re in a pinch, you can use Neufchâtel for a lighter option. -
1/2 cup powdered sugar
This sweetener dissolves beautifully into the cream cheese, giving the filling that silky-smooth finish. Need a swap? Coconut sugar will work, but it’s dark and may affect the final color slightly. -
1/2 cup heavy cream
Whipping cream adds lightness and richness. If you prefer a lower-fat version, you can use half-and-half, but it won’t whip up quite as fluffy. -
1 tsp vanilla extract
A splash of vanilla enhances the flavors and adds a lovely aroma. Always opt for pure vanilla extract when you can—it’s worth it! -
10 Oreo cookies, crushed
These delicious cookies will give our cheesecakes that classic flavor and a nice crunch. If you’re feeling adventurous, try different flavored Oreos for a unique twist!
Step-by-Step Instructions
Now, let’s make these adorable cheesecakes! Follow these steps closely, and I promise they will be a breeze to whip up:
-
Prepare the Cupcake Liners
Start by placing cupcake liners in a muffin tin. This will help with the removal later and ensure a beautiful presentation. Pro tip: choose festive liners if you’re feeling celebratory! -
Crush the Oreos
Place your 10 Oreo cookies in a zip-top bag and crush them using a rolling pin or your hands until they resemble fine crumbs. Alternatively, you can pulse them in a food processor for finer crumbs. This will be your crust! Leave a handful of crumbs to sprinkle on top later — it’s all about that final touch! -
Make the Cheesecake Filling
In a mixing bowl, combine the 8 oz of softened cream cheese and 1/2 cup of powdered sugar. Using an electric mixer, beat until smooth and creamy. This step is crucial—you want to make sure there are no lumps! Keep scraping down the sides of your bowl to ensure an even consistency. -
Add the Heavy Cream and Vanilla
Pour in the 1/2 cup heavy cream and 1 tsp of vanilla extract into your cream cheese mixture. Beat again until the mixture is thick and fluffy. This step usually takes about 2-3 minutes. If you’re feeling fancy, whip the cream separately until it forms stiff peaks before folding it in—this adds extra lightness! -
Fold in the Oreo Crumbs
Gently fold in the crushed Oreos, ensuring they’re evenly distributed. This gives you that lovely contrast between the creamy cheesecake and the crunchy bits of cookie. -
Fill the Cups
Spoon the cheesecake filling into your prepared cupcake liners, filling them about three-quarters of the way full. Smooth the tops with a spatula for a neat finish. Don’t worry about being too precise—that little rustic charm adds to the inviting nature of the dessert! -
Chill and Set
Place the muffin tin in the fridge for at least 4 hours, or ideally overnight. This chilling time is essential to help your cheesecakes set properly. While you’re waiting, treat yourself to a cup of tea or coffee; you’ve earned it! -
Serve and Enjoy
Once the cheesecakes are set, remove them from the muffin tin and remove the cupcake liners carefully. Top with the reserved Oreo crumbs and a dollop of whipped cream for that extra touch of decadence!
Serving Suggestions
To serve your Mini Oreo Cheesecakes, you can plate them on a beautiful dessert stand or arrange them on a rustic wooden board for that charming, homey vibe. Consider adding fresh mint leaves or a drizzle of chocolate sauce for a pop of color and contrast. And remember—presentation matters, but it’s the taste that truly counts, so don’t stress too much about it!
Recipe Variations
Here are a few fun variations to spice up your Mini Oreo Cheesecakes:
-
Peanut Butter Twist
Add 1/4 cup of creamy peanut butter to your cheesecake mixture for a rich, nutty flavor. -
Minty Fresh
Substitute mint Oreos for a refreshing spin and add a drop or two of mint extract. -
Fruit-Filled Delight
Top your cheesecakes with fresh berries or a quick berry compote for a fruity contrast. -
Chocolate Drizzle
Melt some chocolate and drizzle it over the cheesecakes just before serving for a luxurious touch. -
Gluten-Free Version
Use gluten-free Oreos and ensure your powdered sugar is gluten-free for a luscious treat everyone can enjoy!
Chef’s Notes
I can’t help but laugh when I think back to the first time I made these cheesecakes. I was so eager to whip them up that I accidentally confusingly added double the amount of powdered sugar! What resulted was an unbelievably sweet filling—almost too much for my taste! But instead of a disaster, it turned into a fun learning experience. I learned to take my time and follow my intuition in the kitchen. Remember, every mishap is a chance to learn!
FAQs and Troubleshooting
-
Q: My cheesecakes are too liquidy. What went wrong?
A: Make sure the cream cheese is fully softened before mixing. Also, ensure you whip the heavy cream until it reaches stiff peaks before folding it into the mixture for perfect texture. -
Q: Can I freeze these cheesecakes?
Absolutely! Just wrap them tightly in plastic wrap and foil, then store them in an airtight container. They can be frozen for up to 2 months. Thaw them in the fridge before serving. -
Q: How long do these last in the fridge?
They should be good for about 5 days in the refrigerator. Just keep them covered to maintain freshness! -
Q: Are these kid-friendly?
Definitely! Little ones love the mini size. Just keep an eye on portion sizes if they’re in a sugar rush!
Nutritional Info (Optional)
While indulging in delicious desserts can mean giving up a bit on the nutritional side, here’s a rough estimate for each mini cheesecake:
- Calories: 150
- Fat: 10g
- Carbohydrates: 15g
- Protein: 2g
Ultimately, indulging in sweets occasionally is all about balance, so enjoy these cheesecakes guilt-free!
Mini Oreo Cheesecakes are a delightful way to spread joy and sweeten any occasion. With easy preparation, customizable flavors, and irresistible taste, they’ll become a favorite no matter where you serve them. So, roll up those sleeves, gather your ingredients, and let’s create something timeless at your table! Tie on your apron, and let the fun begin!
PrintMini Oreo Cheesecakes

Bite-sized mini cheesecakes that combine creamy cheesecake and crunchy Oreos for a delightful treat.
- Prep Time: 15 minutes
- Cook Time: 240 minutes
- Total Time: 255 minutes
- Yield: 12 servings 1x
- Category: Dessert
- Method: No-Bake
- Cuisine: American
- Diet: Vegetarian
Ingredients
- 8 oz cream cheese, softened
- 1/2 cup powdered sugar
- 1/2 cup heavy cream
- 1 tsp vanilla extract
- 10 Oreo cookies, crushed
Instructions
- Prepare the cupcake liners by placing them in a muffin tin.
- Crush the Oreo cookies in a zip-top bag until they resemble fine crumbs.
- Make the cheesecake filling by beating the cream cheese and powdered sugar until smooth.
- Add the heavy cream and vanilla extract to the mixture and beat until thick and fluffy.
- Fold in the crushed Oreos carefully.
- Fill the cupcake liners with the cheesecake mixture.
- Chill in the fridge for at least 4 hours, or overnight.
- Serve with reserved Oreo crumbs and whipped cream on top.
Notes
Can be customized with various Oreo flavors or toppings. Best served chilled for a delightful experience.
Nutrition
- Serving Size: 1 serving
- Calories: 150
- Sugar: 10g
- Sodium: 200mg
- Fat: 10g
- Saturated Fat: 6g
- Unsaturated Fat: 4g
- Trans Fat: 0g
- Carbohydrates: 15g
- Fiber: 1g
- Protein: 2g
- Cholesterol: 30mg
Keywords: cheesecake, mini desserts, Oreo, no-bake, easy recipes

One-Pan Pizza Pasta Bake: 30-Minute Weeknight Dinner
Easy Pizza Pasta Bake: The Ultimate Comfort Dish
Hello, fellow food lovers! If you’re like me, you have those days when you just need something comforting, nostalgic, and satisfying—without having to spend hours slaving away in the kitchen. Enter the Easy Pizza Pasta Bake! This dish combines all the flavors of your favorite pizza with the hearty goodness of pasta, making it perfect for busy weeknights or low-key gatherings with friends. So, grab your apron, and let’s dive into this delicious recipe that’s sure to become a family favorite!
A Slice of My Kitchen History
Let me take you back to a whimsical evening in my childhood kitchen. The aroma of bubbling marinara sauce filled the air as my mom prepared dinner. It was pizza night, and all my friends were coming over. Remember those carefree days when everyone gathered around the table, laughing, sharing stories, and, of course, indulging in delicious food? Those memories are some of the best, and they inspired me to create this Easy Pizza Pasta Bake.
While we usually made traditional pizzas, I always loved the idea of throwing everything into a baking dish and letting the oven do the magic. One time, my mom caught me attempting to recreate a pizza with the random mix of ingredients I could find—think leftover pasta, a jar of marinara, and a handful of cheese. The result was surprisingly delicious! It became a regular in our home, a dish of creativity born from the playful spirit of a child looking to mix things up. Now, I’m thrilled to share this comfort food with you!
Ingredients
Here’s what you’ll need for this delightful pizza pasta bake:
-
8 ounces penne pasta
- This pasta shape holds onto the sauce perfectly, but you can swap it with rotini, fusilli, or even spaghetti if you have it on hand.
-
1 cup marinara sauce
- Use store-bought for convenience or whip up a quick homemade version if you’re feeling adventurous—with crushed tomatoes, garlic, onion, and a sprinkle of herbs!
-
1 cup mozzarella cheese, shredded
- Who doesn’t love gooey cheese? If you want a little kick, try using pepper jack or a blend of Italian cheeses.
-
1/2 cup pepperoni slices
- Feel free to mix in your favorite toppings! I sometimes use turkey pepperoni for a lighter option or diced bell peppers for veggies.
-
1/2 cup Italian sausage, cooked and crumbled
- If you prefer to keep it meat-free, try adding mushrooms or eggplant for that meaty texture. Use plant-based sausage if you’re going vegan.
-
1/4 cup grated Parmesan cheese
- Not only does it add depth, but don’t hesitate to replace it with Pecorino Romano for a saltier bite.
-
1 teaspoon Italian seasoning
- This blend truly captures that pizza flavor, but you can substitute with oregano, basil, and thyme if you have them separately.
-
Salt and pepper to taste
- Always taste as you go! Adjust seasoning according to your palate.
-
Fresh basil for garnish (optional)
- Nothing beats fresh basil on top—it elevates the dish both visually and in flavor. You can also use parsley or arugula for a different flair.
Step-by-Step Instructions
Step 1: Preheat Your Oven
Start by preheating your oven to 350°F (175°C). This ensures your pizza pasta bake gets nice and bubbly in the oven!
Step 2: Cook the Pasta
In a large pot of boiling salted water, cook the penne pasta until it’s al dente, following package instructions (usually about 8-10 minutes). Remember, the pasta will continue to cook in the oven, so don’t overdo it! Drain and set aside.
Step 3: Mix Your Ingredients
In a large mixing bowl, combine the cooked pasta, marinara sauce, mozzarella cheese (save a handful for topping!), pepperoni, Italian sausage, Parmesan, Italian seasoning, and a pinch of salt and pepper. Stir everything together until well-coated—this is where the magic begins! It’s like a flavor fiesta in a bowl.
Step 4: Transfer to Baking Dish
Now, pour the mixture into a greased 9×13-inch baking dish. Use a spatula to spread it evenly. This is your canvas, so make sure every bit of that cheesy goodness is perfectly nestled in.
Step 5: Add the Last Touches
Sprinkle the remaining mozzarella cheese over the top. This layer will melt into a glorious, bubbly crown while baking—who can resist that?
Step 6: Bake
Pop it in the oven and let it bake for about 25-30 minutes, or until the cheese is bubbly and starting to brown. If you want that extra crunch, set the oven to broil for the last 2-3 minutes (but keep an eye on it to avoid burning!).
Step 7: Let It Cool
Once it’s out of the oven, let it sit for a few minutes. I know it’s hard to resist diving in—trust me! Giving it a moment allows the flavors to settle and makes it easier to serve.
Serving Suggestions
Scoop generous portions onto plates and garnish with fresh basil for an authentic pizzeria feel. Serve with a side of garlic bread and a fresh green salad for a complete meal. It’s casual yet elegant enough for those impromptu dinner gatherings!
Recipe Variations
-
Veggie Delight: Swap out the meats for a medley of your favorite vegetables—think mushrooms, bell peppers, and spinach.
-
Spicy Kick: Add red pepper flakes or some sliced jalapeños for a spicy twist.
-
BBQ Chicken: Replace the marinara with barbecue sauce and add shredded chicken for a twist on a classic BBQ pizza.
-
Mushroom and Spinach: Sauté mushrooms and spinach and mix them into the pasta for an earthy flavor.
-
Herbed Crust: Sprinkle some garlic powder and Italian herbs on the top layer of cheese for an extra flavor boost.
Chef’s Notes
This recipe has transformed in my kitchen over the years. Originally, it was a simple mixture of pasta and cheese, but as I discovered more flavors and ingredients, it evolved into this delicious pizza pasta bake that everyone loves. One-time, I had a surprise guest—a neighbor who dropped by unannounced—and I whipped this dish up in under an hour. They’re now a regular at my dinner table!
FAQs and Troubleshooting
Q: Can I make this ahead of time?
A: Absolutely! Assemble the dish in advance and store it in the fridge. When you’re ready to bake, just add a few extra minutes to the cooking time since it will be cold.
Q: My pasta came out mushy. What did I do wrong?
A: Overcooking the pasta before baking is the most common culprit. Always aim for al dente, as it will soak up some sauce and cook more in the oven.
Q: Can I freeze this dish?
A: Yes! Just cover tightly before freezing. When you’re ready to enjoy it, thaw in the fridge overnight before baking.
Q: What if I don’t have marinara?
A: No worries! Any tomato-based sauce will work. You can even use pesto for a unique flavor twist!
Nutritional Info (Optional)
While this dish is indulgent, it also packs in some nutrition! With the addition of Italian sausage and fresh basil, you get protein and antioxidants. For a healthier option, swap out regular pasta for whole wheat or lentil-based options, and load up your favorite veggies.
Now that you’ve got all the details, I can’t wait for you to try this Easy Pizza Pasta Bake! Remember, cooking should feel effortless and fun. So, gather your loved ones, tie on that apron, and let’s create those beautiful moments around the table together. Enjoy!
PrintEasy Pizza Pasta Bake

A comforting dish that combines the flavors of pizza with hearty pasta—ideal for busy weeknights and gatherings.
- Prep Time: 15 minutes
- Cook Time: 30 minutes
- Total Time: 45 minutes
- Yield: 4 servings 1x
- Category: Main Course
- Method: Baking
- Cuisine: Italian
- Diet: Vegetarian
Ingredients
- 8 ounces penne pasta
- 1 cup marinara sauce
- 1 cup mozzarella cheese, shredded
- 1/2 cup pepperoni slices
- 1/2 cup Italian sausage, cooked and crumbled
- 1/4 cup grated Parmesan cheese
- 1 teaspoon Italian seasoning
- Salt and pepper to taste
- Fresh basil for garnish (optional)
Instructions
- Preheat your oven to 350°F (175°C).
- Cook the penne pasta until al dente, about 8-10 minutes. Drain and set aside.
- Mix the cooked pasta with marinara sauce, mozzarella (reserve some for topping!), pepperoni, Italian sausage, Parmesan, Italian seasoning, and a pinch of salt and pepper.
- Transfer the mixture to a greased 9×13-inch baking dish and spread evenly.
- Add the remaining mozzarella cheese on top.
- Bake for about 25-30 minutes, until cheese is bubbly. Broil for an extra 2-3 minutes for a crunchy top.
- Let it cool for a few minutes before serving.
Notes
Can be assembled ahead of time and stored in the fridge. Adjust the cooking time if baking from cold. Freezable for later use.
Nutrition
- Serving Size: 1 serving
- Calories: 350
- Sugar: 5g
- Sodium: 400mg
- Fat: 12g
- Saturated Fat: 4g
- Unsaturated Fat: 6g
- Trans Fat: 0g
- Carbohydrates: 45g
- Fiber: 3g
- Protein: 15g
- Cholesterol: 30mg
Keywords: pizza, pasta, bake, comfort food, Italian

Minute Sweet & Spicy Sausage Ricotta Honey Pizza
Sweet & Spicy Sausage Ricotta Honey Pizza: A Flavorful Journey
Hello, my fellow food lovers! Today, we’re diving into a dish that has not only captured my heart but also filled my kitchen with delightful aromas—the Sweet & Spicy Sausage Ricotta Honey Pizza. If you’ve ever asked yourself how to marry sweet and savory in a way that leaves your palate dancing, then buckle up! This recipe promises to take traditional pizza night to dazzling new heights.
A Slice of Nostalgia
Some of my fondest memories are rooted in the magical world of pizza. Picture this: it’s Friday evening, and my childhood home is buzzing with excitement. The savory aroma of melting cheese permeates the air as my family gathers around the kitchen countertop. My father, with his zest for cooking, would whip up various toppings, always encouraging us to get inventive with flavors—a method he termed "pizza art."
One of those creations involved combining sweet Italian sausage with a drizzle of honey. At first, I thought it was a wild idea. “Honey on pizza? Really?” But the moment I took a bite, a spark ignited in me! The spicy notes of the sausage mingled beautifully with the sweetness of the honey, creating an experience that turned my skepticism into pure joy. As I crafted my own rendition of this dish today, I can’t help but smile, knowing that it represents not just a recipe, but a fantastic family tradition. Let’s roll up our sleeves and create our own flavorful masterpiece!
Ingredients
-
Pizza Dough
The base of any pizza is essential, and whether you make it from scratch or buy it pre-made, quality matters! You can also use whole wheat or gluten-free dough for a healthier spin. -
1 cup ricotta cheese
Creamy and luscious, ricotta adds a fantastic richness! If you want a lighter option, try substituting with cottage cheese or Greek yogurt. -
8 oz beef sausage, crumbled
My go-to is spicy Italian sausage, which packs a flavor punch. Feel free to swap with turkey sausage or a plant-based option for those looking for healthier or vegetarian alternatives! -
1/4 cup hot honey
This is where the magic happens! Hot honey offers a sweet kick. If you can’t find it, mix regular honey with a splash of chili oil for that sweet-heat vibe. -
1 cup mozzarella cheese, shredded
Because who can resist ooey-gooey melted mozzarella? You can also use a blend of cheeses like provolone or fontina for an extra layer of flavor. -
Salt and pepper to taste
Always important, a pinch of kosher salt and a crack of black pepper bring balance to the dish. -
Fresh basil for garnish (optional)
Nothing says “I’m fancy” quite like a sprinkle of fresh herbs! Basil adds an aromatic touch that ties the flavors together beautifully.
Step-by-Step Instructions
-
Prepare the Pizza Dough
- If using store-bought pizza dough, let it sit at room temperature for about 20 minutes to make it easier to shape. If you’re up for making it from scratch, now’s the time to roll up your sleeves! Dust your work surface with flour, and begin to stretch or roll the dough into your desired shape—thin crust or thicker! I always aim for about 12 inches. Don’t worry too much about perfection; rustic shapes have their charm!
-
Cook the Sausage
- In a skillet over medium heat, add your crumbled sausage. Cook for about 5-7 minutes, stirring occasionally until it’s browned and cooked through. Pro tip: Use a wooden spoon to break it into smaller pieces to get that crispy texture we all love. The sizzling sound? Music to a chef’s ears!
-
Preheat the Oven
- Preheat your oven to 475°F (245°C) or as high as it will go. If you’re using a pizza stone, place it in the oven while it heats. This helps achieve that wonderfully crisp bottom.
-
Assemble the Pizza
- Transfer your dough to a floured pizza peel or a baking sheet lined with parchment paper. Spread the ricotta cheese evenly across the base; it creates a creamy layer that balances the flavors. Top with the cooked sausage, then sprinkle shredded mozzarella all over. Don’t be shy; cheese is a dear friend!
-
Drizzle with Hot Honey
- Here’s where we make our sweet and spicy magic happen. Drizzle about half of the hot honey over the cheese and sausage. It will caramelize a bit during baking, creating a delicious sticky glaze.
-
Bake the Pizza
- Use the pizza peel to slide your pizza onto the hot pizza stone or place your baking sheet in the oven. Bake for 12-15 minutes, or until the crust is golden brown and the cheese is bubbling. Keep an eye on it, as every oven is a little different!
-
Finish with Fresh Basil
- Once out of the oven, let the pizza cool for a minute before garnishing with fresh basil leaves. Drizzle with the remaining hot honey for that extra kick of sweetness.
Serving Suggestions
When it comes to plating or serving, presentation is key. Cut the pizza into wedges and lay them on a colorful cutting board or a serving platter. A sprinkle of extra basil on top adds that pop of green, while the molten cheesy texture will have everyone drooling. Pair this delectable dish with a light salad or some sparkling water to elevate your pizza game, turning an ordinary meal into an unforgettable experience.
Recipe Variations
-
Veggie Delight
Swap the sausage for roasted veggies like bell peppers, zucchini, and red onions for a fresh take. -
Spicy Kick
Add jalapeños or crushed red pepper flakes for those who desire an extra punch. -
Cheesy Supreme
Experiment with a blend of cheeses! Add gorgonzola or cheddar to complement the mozzarella for a unique twist. -
Sweet & Savory
Toss in some caramelized onions or fig jam for an even more intriguing sweet element. -
Gluten-Free Option
Use a cauliflower crust or store-bought gluten-free dough to cater to gluten sensitivities.
Chef’s Notes
Over the years, this recipe has beautifully evolved. Initially, I only made it for special occasions, but I quickly realized that life’s too short not to indulge in deliciousness regularly. I’ve experimented with different cheeses and proteins, but something about the beef sausage paired with honey keeps bringing me back. And let’s be real—a crispy pizza crust with the scent of bubbling cheese is the ultimate comfort food! Remember, cooking is all about creativity, so don’t be afraid to make this pizza your own.
FAQs and Troubleshooting
Q: The crust didn’t rise or was too hard. What went wrong?
A: Ensure your dough is fresh and properly risen before stretching it. Allowing it to come to room temperature will help with elasticity.
Q: My cheese didn’t melt nicely. Any tips?
A: Use fresh mozzarella that’s been shredded, as pre-packaged versions often have anti-caking agents that hinder meltability.
Q: How do I store leftovers?
A: Wrap leftover slices in foil and store in the refrigerator. They can be reheated in the oven or on a skillet to revive that crispy texture.
Q: Can I freeze the dough?
A: Absolutely! You can freeze pizza dough wrapped tightly in plastic. Just let it thaw in the refrigerator overnight before using.
Nutritional Info
While I always advocate for enjoying food in moderation, a slice of this pizza can offer a satisfying balance! The proteins from the sausage and ricotta, along with the vitamins from basil, deliver delicious nourishment. With customizable ingredients, you can make this dish fit your dietary preferences too!
Let me tell you, there’s nothing quite like the joy that comes from sharing good food. So, as you tie on your apron and dive into making this Sweet & Spicy Sausage Ricotta Honey Pizza, remember—you’re not just cooking, you’re creating memories. Enjoy every moment, and don’t hesitate to take a few photos before it all gets devoured. Happy cooking!
PrintSweet & Spicy Sausage Ricotta Honey Pizza

A delicious pizza that combines sweet Italian sausage with ricotta cheese and a drizzle of hot honey for a sweet and spicy flavor explosion.
- Prep Time: 20 minutes
- Cook Time: 15 minutes
- Total Time: 35 minutes
- Yield: 4 servings 1x
- Category: Main Course
- Method: Baking
- Cuisine: Italian
- Diet: Non-Vegetarian
Ingredients
- 1 pizza dough
- 1 cup ricotta cheese
- 8 oz beef sausage, crumbled
- 1/4 cup hot honey
- 1 cup mozzarella cheese, shredded
- Salt and pepper to taste
- Fresh basil for garnish (optional)
Instructions
- Prepare the Pizza Dough
- Cook the Sausage
- Preheat the Oven
- Assemble the Pizza
- Drizzle with Hot Honey
- Bake the Pizza
- Finish with Fresh Basil
Notes
Feel free to customize the pizza with different toppings or use gluten-free dough if needed.
Nutrition
- Serving Size: 1 slice
- Calories: 350
- Sugar: 12g
- Sodium: 700mg
- Fat: 22g
- Saturated Fat: 10g
- Unsaturated Fat: 9g
- Trans Fat: 0g
- Carbohydrates: 30g
- Fiber: 2g
- Protein: 15g
- Cholesterol: 40mg
Keywords: pizza, sausage, ricotta, honey, sweet and spicy, easy dinner

Cucumber Tomato Avocado Salad: Quick Summer Meal Prep
The Ultimate Cucumber Tomato Avocado Salad: Fresh, Flavorful, and Fabulous!
Hello, food lovers! Welcome back to Ivory Apron! Today, we’re diving into a dish that truly captures the essence of summer — the refreshing Cucumber Tomato Avocado Salad! This vibrant salad is a burst of colors and flavors, perfect for any occasion, whether you’re hosting friends, having a family barbecue, or enjoying a cozy dinner at home.
Ah, salads—often overlooked yet deserving of love! This particular salad is a canvas where fresh ingredients shine, bringing out the best in one another. It’s incredibly simple yet bursting with flavor, and the best part? You can whip it up in no time! Trust me; this salad will soon become a staple in your kitchen repertoire. So, grab your apron, and let’s get started on this delightful culinary journey together!
A Memorable Summer Day
Before we get into the nitty-gritty of the recipe, let me share a personal story that perfectly captures the joy of this dish. A few summers ago, I hosted a gathering for some of my closest friends. We talked, laughed, and shared stories while standing outside under twinkling fairy lights, the scent of fresh herbs dancing in the air. As we enjoyed grilled kebabs sizzling on the barbecue, I served this Cucumber Tomato Avocado Salad as the refreshing counterpart.
The colorful salad complemented the smoky flavors from the grill perfectly! I remember one of my friends taking a bite and exclaiming, “This tastes like summer in a bowl!” We all couldn’t help but agree as we marveled at how something so simple could be so delicious. Moments like these remind me why I started Ivory Apron: to create spaces where people can connect over good food and shared experiences.
Ingredients: What You’ll Need
Now, let’s gather our ingredients. Here’s what you’ll need to create this refreshing salad, along with some insights and substitution tips:
-
1 cucumber, diced
Choose a firm cucumber without any soft spots for the best crunch. If you’re feeling adventurous, try a Persian cucumber for a sweeter flavor! -
1 cup cherry tomatoes, halved
Look for vibrant, juicy tomatoes. Grape tomatoes work well too, and you can even mix different colors for a more eye-catching dish. -
1 avocado, diced
Opt for a ripe avocado (it should give slightly when pressed). If you’re not planning to serve the salad right away, you can add the avocado just before serving to prevent browning! -
1/4 cup fresh cilantro, chopped
This adds a fresh zing! If cilantro isn’t your thing, feel free to substitute with parsley or basil for a different flavor. -
2 tablespoons olive oil
Extra virgin olive oil adds depth. If you prefer, avocado oil is a fantastic substitute for a more neutral flavor. -
2 tablespoons lemon juice
Fresh is always best! The acidity brightens the salad. If lemons are scarce, lime juice does the trick, too! -
Salt and pepper to taste
A simple seasoning, but don’t skip it! It enhances all the flavors. You can also finish with a sprinkle of sea salt for a bit of crunch.
Step-by-Step Instructions: Let’s Get Cooking!
Now onto the fun part! Here’s how to make your Cucumber Tomato Avocado Salad in just a few simple steps:
-
Prep Your Ingredients
Start by washing all your veggies under cold water. This not only freshens them up but also helps remove any residual dirt. As you’re washing, think about the flavors and textures you love; prepping is the foundation of good cooking! -
Dice the Cucumber
Take your cucumber and cut both ends off. Slice it in half lengthwise, then dice it into bite-sized pieces. If you enjoy a bit of texture, leaving the skin on adds a wonderfully crunchy contrast! -
Halve the Cherry Tomatoes
Grab your cherry tomatoes and slice them in half. This not only makes them easier to eat but also allows their juices to mingle beautifully with the other ingredients. Pro tip: if you layer them cut-side up in your serving dish, it looks stunning! -
Dice the Avocado Carefully
Cut the avocado in half, removing the pit with a swift twist of your knife (careful not to cut yourself!). Scoop the flesh out with a spoon and dice it in the shell before transferring it to a bowl. This method saves you from mashing it up while getting perfect cubes! -
Chop Fresh Cilantro
Take your freshly washed cilantro and chop it finely. If you love the flavor, add a little extra! Just remember, a little goes a long way—balancing the herbaceousness with the other fresh ingredients is key! -
Combine the Salad
In a large bowl, combine all your prepped vegetables. This is where the fun begins! Toss them gently to ensure everything is well distributed without mashing the avocado. -
Dress the Salad
Drizzle the olive oil and lemon juice over the salad. Season generously with salt and pepper. This is your moment to dress it up! Toss everything gently but thoroughly to ensure the dressing coats every ingredient like a warm hug. -
Taste and Adjust
Before serving, give it a taste! If it needs a little more salt or a extra squeeze of lemon, now’s the time to polish it to perfection. Remember, cooking is all about adjustments! -
Chill if You Have Time
If you can, pop the salad in the fridge for 15-20 minutes before serving. It gives the flavors a chance to meld, making every bite a burst of bright freshness.
Serving Suggestions: How to Plate It Up
When it comes to presenting your salad, remember: a little goes a long way! Serve your Cucumber Tomato Avocado Salad in a beautiful serving bowl, or for individual servings, layer it neatly on plates. Drizzle a bit of extra olive oil on top and a squeeze of lemon on the finished dish for that extra touch. You can also sprinkle a few whole cilantro leaves or pomegranate seeds on top for a pop of color. Remember, we eat with our eyes first!
Recipe Variations: Get Creative!
Feeling adventurous? Here are some fun variations to try with this Cucumber Tomato Avocado Salad:
- Add Protein: Toss in some chickpeas, crumbled feta, or grilled shrimp for a heartier version.
- Spice It Up: Try adding diced jalapeños or a sprinkle of chili flakes for a kick!
- Make It a Grain Bowl: Serve the salad over a bed of quinoa or farro for a filling meal.
- Herb Swap: Experiment with different herbs like dill or mint for a completely new flavor profile.
- Zesty Twist: Instead of lemon, try lime juice or even a splash of apple cider vinegar for a tangy finish!
Chef’s Notes: A Reflection
This salad has been a staple in my kitchen for quite some time now. It started as a simple side dish but evolved into a main event over the years! I love how adaptable it is—every season offers a new opportunity to change up the ingredients depending on what’s fresh and available. I’ve even made a version with grilled peaches in the summer, and it was a game-changer!
Another fond memory is making this dish with my grandmother, who always insisted on adding a pinch of sugar to the dressing to balance the acidity. It’s a small tip that stuck with me, ensuring every salad feels rounded out.
FAQs and Troubleshooting
-
What if my avocado is too firm to dice?
If your avocado isn’t ripe enough, try placing it in a brown paper bag at room temperature for a day or so. This helps speed up the ripening process! If you’re in a hurry, just prepare the salad without it and add it just before serving. -
Can I make this salad ahead of time?
To maintain freshness, it’s best to prepare this salad just before serving. If you do need to prep ahead, you can chop all the vegetables and store them separately in the fridge. Mix them with the dressing right before you’re ready to serve! -
How can I store leftovers?
Store any leftovers in an airtight container in the fridge for 1-2 days. Just keep in mind that the avocado may brown a bit, so it’s best enjoyed fresh! -
Can I add other vegetables?
Absolutely! Feel free to throw in other favorites like bell peppers, radishes, or even corn for added sweetness and crunch.
Nutritional Info
While exact nutritional values can vary, this salad is packed with vitamins and minerals. It’s low in calories while providing healthy fats from the avocado and plenty of fiber from the veggies. It’s a great option to enjoy guilt-free!
So there you have it, my friends! Your very own Cucumber Tomato Avocado Salad, ready to brighten up any table. Remember, cooking is about sharing and enjoying the process. So, tie on that apron, gather your loved ones, and let this salad be a delicious centerpiece for your next meal!
Happy cooking, and I can’t wait to hear about your culinary adventures! Let’s create some beautiful moments together around the table!
PrintCucumber Tomato Avocado Salad

A refreshing and colorful salad ideal for summer gatherings, made with diced cucumber, cherry tomatoes, avocado, cilantro, and a light dressing.
- Prep Time: 15 minutes
- Cook Time: 0 minutes
- Total Time: 15 minutes
- Yield: 4 servings 1x
- Category: Salad
- Method: No Cooking
- Cuisine: American
- Diet: Vegetarian
Ingredients
- 1 cucumber, diced
- 1 cup cherry tomatoes, halved
- 1 avocado, diced
- 1/4 cup fresh cilantro, chopped
- 2 tablespoons olive oil
- 2 tablespoons lemon juice
- Salt and pepper to taste
Instructions
- Prep your ingredients by washing all veggies under cold water.
- Dice the cucumber into bite-sized pieces.
- Halve the cherry tomatoes.
- Dice the avocado carefully.
- Chop the fresh cilantro.
- Combine all your prepped vegetables in a large bowl.
- Dress the salad with olive oil and lemon juice, then season.
- Taste and adjust the seasoning if necessary.
- Chill in the fridge for 15-20 minutes if time allows.
Notes
Serve in a beautiful bowl and drizzle with extra olive oil for a finishing touch.
Nutrition
- Serving Size: 1 serving
- Calories: 180
- Sugar: 3g
- Sodium: 100mg
- Fat: 15g
- Saturated Fat: 2g
- Unsaturated Fat: 10g
- Trans Fat: 0g
- Carbohydrates: 10g
- Fiber: 5g
- Protein: 3g
- Cholesterol: 0mg
Keywords: salad, cucumber, avocado, summer dish, healthy recipe

Ingredient Bacon Ranch Pasta Salad in 15 Minutes
Say Hello to Your New Favorite Dish: Bacon Ranch Pasta Salad
Welcome, food enthusiasts! Today, we’re diving into the world of summer picnics, potluck gatherings, and cozy barbecues with the ultimate crowd-pleaser: Bacon Ranch Pasta Salad. Imagine a vibrant dish bursting with flavor, creamy dressing, and the irresistible crunch of crispy bacon. That’s exactly what we’re serving up today. So, grab your apron, and let’s get cooking!
A Bite of Nostalgia
As I whisk away memories of summer afternoons, one dish always makes me smile: my Aunt Linda’s famous pasta salad. Growing up, every family gathering was punctuated by laughter and the clink of forks as we dug into that bright bowl of twirly pasta, colorful veggies, and chunks of bacon. Aunt Linda had a knack for making everyone feel welcome with her cooking, and her pasta salad was no exception. I remember the aroma of sizzling bacon wafting through the air and the way the kids would dash for the bowl before the adults even had a chance to claim their portion.
As I’ve grown into my role as a culinary creator, I’ve been inspired by Aunt Linda’s knack for hosting and sharing. This Bacon Ranch Pasta Salad is a nod to her original recipe—simplified, of course, for the everyday chef—and it’s become a staple for my gatherings. Your guests are guaranteed to leave with full hearts (and bellies) each time you serve it!
Ingredients You’ll Need
Let’s talk about the star players of this fantastic Bacon Ranch Pasta Salad. These ingredients come together in a symphony of flavors and textures that everyone will rave about.
-
12 ounces tri-color rotini pasta
- These fun, spiraled noodles hold onto the dressing and give a delightful bite. Feel free to swap in whole wheat or gluten-free pasta if you’re looking for alternatives!
-
1/2 cup mayonnaise
- The creamy base of our dressing offers richness. You can also use Greek yogurt for a lighter version—we all love a good swap!
-
1/2 cup sour cream
- Adds a tanginess that balances the creaminess of the mayo. Not a fan? Try using plain yogurt instead for a zesty flavor.
-
1 ounce dry ranch dressing mix
- The secret weapon! It brings all those classic ranch flavors without needing to mix everything from scratch. You could also use homemade ranch if you have a favorite recipe.
-
8 slices cooked bacon, chopped
- Crispy, savory perfection. Turkey bacon is a great alternative if you want to lighten things up or keep it turkey-friendly.
-
1 large tomato, diced
- Bursting with fresh flavor, tomatoes add a delightful juiciness. For a twist, you can use cherry tomatoes halved or even roasted tomatoes for a richer taste.
-
4.25-ounce can sliced black olives, drained
- A tasty addition that introduces a touch of brininess. If you’re not an olive fan, feel free to omit them or substitute with diced pickles for a different tangy kick!
-
1 cup shredded cheddar cheese
- The final touch that brings creaminess and a little saltiness to the dish. You can use other cheeses like Monterey Jack or even a spicy pepper jack if you’re feeling adventurous.
Step-by-Step Instructions
Now that we have our ingredients, it’s time to get to the fun part! Follow these detailed steps, and you’ll have this magical dish ready in no time.
-
Cook the Pasta
Bring a large pot of salted water to a boil. Add the tri-color rotini and cook according to the package instructions until al dente (usually around 8-10 minutes). The key here is to avoid overcooking, as we want that perfect bite! Once done, drain and rinse under cold water to stop the cooking. This also cools it down quickly so we can continue assembling! -
Prepare the Dressing
In a mixing bowl, whisk together the mayonnaise, sour cream, and dry ranch dressing mix until smooth. This creamy concoction is going to coat every delicious noodle, so give it a good mix! Pro Tip: Taste the dressing here. If you like it super flavorful, consider adding a splash of lemon juice or some fresh herbs. -
Combine Ingredients
In a large mixing bowl, combine the cooled pasta, ranch dressing, chopped bacon, diced tomato, sliced olives, and shredded cheese. Gently fold the ingredients together until everything is nicely coated in that creamy dressing. No need to be too rough here. We want this to look pretty, after all! -
Chill the Salad
Cover the bowl with plastic wrap, and pop it in the fridge for at least 30 minutes to let those flavors mingle. Trust me; this is a crucial step that elevates the taste. It’ll also help if any dressings need to thicken up! -
Final Touches
Once it’s chilled, give the salad another gentle toss. Depending on personal taste, you might want to adjust seasoning with salt and pepper. Sometimes, a sprinkle of paprika gives it a great finish, or even a dash of hot sauce if you like a bit of spice!
Serving Suggestions
For a beautiful presentation, serve your Bacon Ranch Pasta Salad in a large, colorful bowl. Consider garnishing with fresh herbs like parsley or chives for a pop of color. For gatherings, individual servings look delightful in small mason jars, making it easy for guests to grab and go.
Recipe Variations
Let your creativity run wild! Here are a few fun twists to make this salad uniquely yours:
-
Mediterranean Twist: Swap bacon for sliced pepperoni or salami, and use feta cheese in place of cheddar. Add chopped cucumbers for an undeniable freshness!
-
Tex-Mex Flair: Sprinkle some cilantro, black beans, corn, and spices like cumin into the mix. Use a jalapeño ranch dressing for an extra kick!
-
Vegetarian Delight: Omit the bacon entirely and load up on extra veggies. Zucchini, bell peppers, and even avocado will elevate the dish while keeping it hearty.
-
Creamy Avocado Ranch: Replace some mayo with ripe avocado for a creamy, healthy twist. Just remember to toss it with lemon juice to keep that vibrant green color!
Chef’s Notes
As I reflect on how this recipe has evolved, I remember the early days of experimenting—adding a little of this, a splash of that—turning a simple dish into a family favorite. I once made a version with leftover grilled chicken. It was a game changer! Each time I make it, I discover new possibilities, making it hard for me to serve the same dish twice in a row. Cooking should be fun and filled with personal touches, don’t you think?
FAQs and Troubleshooting
1. Can I make this a day ahead?
Absolutely! In fact, prepping it a day in advance allows the flavors to meld beautifully. Just keep it in an airtight container in the fridge until you’re ready to serve.
2. Why does my pasta salad seem dry?
If your pasta salad appears dry, it’s likely the pasta absorbed the dressing. Simply add a little more mayo or sour cream before serving. A splash of olive oil can also refresh the dressing.
3. How do I store leftovers?
Store any leftover pasta salad in an airtight container in the fridge for up to 3 days. Keep in mind that the pasta might absorb moisture, so you might want to mix in a little extra dressing when serving.
4. What if I don’t like ranch?
No worries! This salad is versatile. You could substitute the ranch dressing with any creamy dressing you love, like Caesar or a zesty vinaigrette!
Nutritional Info
This Bacon Ranch Pasta Salad is not only delicious, but it also packs a good protein punch from the bacon and cheese. Each serving contains approximately:
- Calories: 350
- Protein: 9g
- Carbohydrates: 30g
- Fat: 22g
- Fiber: 2g
Remember, it’s all about balance—you can enjoy this treat while incorporating fresh veggies to boost the nutrition!
There you have it! The perfect recipe for Bacon Ranch Pasta Salad that speaks elegance yet feels entirely approachable. I can’t wait for you to try it and sprinkle your own magic into the mix. Until next time, my friend—keep cooking with love and gathering your loved ones around the table! Cheers!
PrintBacon Ranch Pasta Salad

A delicious and creamy Bacon Ranch Pasta Salad perfect for summer picnics and potlucks.
- Prep Time: 15 minutes
- Cook Time: 10 minutes
- Total Time: 45 minutes
- Yield: 6 servings 1x
- Category: Side Dish
- Method: Mixing
- Cuisine: American
- Diet: Vegetarian option available
Ingredients
- 12 ounces tri-color rotini pasta
- 1/2 cup mayonnaise
- 1/2 cup sour cream
- 1 ounce dry ranch dressing mix
- 8 slices cooked bacon, chopped
- 1 large tomato, diced
- 4.25-ounce can sliced black olives, drained
- 1 cup shredded cheddar cheese
Instructions
- Cook the Pasta: Bring a large pot of salted water to a boil. Add the tri-color rotini and cook according to the package instructions until al dente. Once done, drain and rinse under cold water.
- Prepare the Dressing: In a mixing bowl, whisk together the mayonnaise, sour cream, and dry ranch dressing mix until smooth.
- Combine Ingredients: In a large mixing bowl, combine the cooled pasta, ranch dressing, chopped bacon, diced tomato, sliced olives, and shredded cheese. Gently fold the ingredients together.
- Chill the Salad: Cover the bowl with plastic wrap, and pop it in the fridge for at least 30 minutes.
- Final Touches: Once chilled, give the salad another gentle toss and adjust seasoning with salt and pepper as desired.
Notes
For a lighter version, substitute Greek yogurt for mayonnaise. Feel free to add more veggies or omit the bacon for a vegetarian option.
Nutrition
- Serving Size: 1 serving
- Calories: 350
- Sugar: 5g
- Sodium: 400mg
- Fat: 22g
- Saturated Fat: 7g
- Unsaturated Fat: 10g
- Trans Fat: 0g
- Carbohydrates: 30g
- Fiber: 2g
- Protein: 9g
- Cholesterol: 30mg
Keywords: pasta salad, bacon, ranch, summer recipes, potluck, picnic
Seasonal Beet Feta Salad with Crisp Cucumber and Dill
Irresistible Beet Feta Salad with Cucumber and Dill
Welcome to the colorful world of salads! Today, we’re diving into a dish that’s not just vibrant in appearance but also bursting with flavor: the Irresistible Beet Feta Salad with Cucumber and Dill. This refreshing combo is perfect for any occasion, whether you’re hosting a dinner party, prepping for a picnic, or simply craving a healthy side to your daily meals. The earthy sweetness of beets, combined with the creamy tanginess of feta and the cool crunch of cucumber, creates a symphony of flavors that will make your taste buds dance. So, grab your apron, and let’s get started on creating something truly delightful!
A Personal Story
Ah, beets! They always remind me of sunny afternoons at my grandmother’s house. She had a beautiful garden overflowing with vibrant veggies, and there was something magical about her knack for turning them into delicious dishes. I remember one day in particular when she’d prepare a simple beet salad that seemed like a celebration of colors. Growing up, I was somewhat skeptical of beets — the vibrant color, the earthy aroma — they always seemed a bit peculiar. But once I tasted her creation, I was hooked!
That gorgeous salad, with its drizzle of tangy vinaigrette and crumbled feta, was the highlight of the meal. To this day, I think of those gatherings whenever I whip up a beet salad. They evoke fond memories of laughter, good food, and the warmth of family. That’s why I’m so excited to share this recipe with you; it’s a true tribute to those moments and proves that cooking can come from the heart while being simple and approachable!
Ingredients
For this salad, you’ll need the following simple yet exquisite ingredients:
-
Beets:
- These root vegetables are the star of our salad, providing a sweet and earthy flavor. Look for firm, smooth-skinned beets. If you can’t find fresh, canned beets are a decent substitute (just rinse them well).
-
Feta Cheese:
- Crumbly, creamy, and tangy, feta cheese adds the perfect balance to the sweetness of the beets. You can swap it with goat cheese for a bolder flavor or even use a dairy-free feta if you prefer a plant-based option.
-
Cucumber:
- Fresh, crunchy cucumbers bring a refreshing flair. You can use English cucumbers for fewer seeds and a more tender skin or any other variety you like. Just be sure to slice them thinly to keep it light!
-
Fresh Dill:
- One of my favorite herbs! Its anise-like flavor complements beets beautifully. If you don’t have fresh dill, you can use dried dill (just remember to use less, as dried herbs are more potent).
-
Olive Oil:
- Extra virgin olive oil enhances the flavors of our salad and adds a silky finish. If you’re out, avocado oil or a nutty oil could also work in a pinch.
-
Lemon Juice:
- Bright, zesty lemon juice acts as our acidic kick. You can substitute it with balsamic vinegar for a sweeter touch if desired.
-
Salt and Pepper:
- Essential seasonings! Adjust to taste, but remember, fresh ingredients may need a little more seasoning to bring out their flavors.
Step-by-Step Instructions
Now that we have our ingredients ready, it’s time to get cooking! Here’s how you can make this irresistible salad:
-
Roast the Beets:
- Preheat your oven to 400°F (200°C). Start by washing the beets thoroughly to remove any dirt. Wrap each beet in aluminum foil, drizzle a bit of olive oil, and sprinkle with salt. Roast for about 45-60 minutes, or until they’re tender when pierced with a fork. Roasting intensifies their sweetness, making them irresistible!
-
Cool and Peel the Beets:
- Once the beets are cooked, allow them to cool for a few minutes. You can peel the skin off easily using your hands or a paper towel. Don’t worry about getting every last bit; a little skin adds character!
-
Slice the Beets:
- After peeling, slice the beets into cubes or wedges, depending on your preference. The key is to keep them roughly the same size for even distribution in the salad.
-
Prepare the Cucumber:
- While the beets cool, wash your cucumber and slice it thinly. You can cut them into half-moons or rounds — it’s all based on how fancy you want to get!
-
Chop Fresh Dill:
- Grab a bunch of fresh dill and finely chop it. The aroma alone will make your kitchen smell divine!
-
Make the Dressing:
- In a small bowl, whisk together olive oil, lemon juice, salt, and pepper. This simple vinaigrette will elevate our salad without overwhelming the delicate flavors.
-
Combine Everything:
- In a large bowl, combine roasted beet slices, cucumber pieces, crumbled feta, and chopped dill. Drizzle with the dressing and toss gently to combine. Be careful with this step; we want the ingredients combined but don’t want to mush the beets!
-
Taste and Adjust:
- Give the salad a taste. Need more salt? A dash more lemon? Adjust to your liking. Cooking is all about personalizing it to your taste!
Serving Suggestions
This salad is beautiful on its own, but a stunning presentation will take it to the next level! Lightly pile the salad in the center of a large serving platter or individual plates. Garnish with extra feta and dill for a pop of color and serve it alongside some crusty bread or grilled protein. It’s great for a standalone dish or as a side for your favorite main!
Recipe Variations
Feeling adventurous? Here are a few creative adaptations you can try:
-
Add Nuts: Walnuts or pecans can add a lovely crunch. Just toast them lightly beforehand for an extra nutty flavor!
-
Swap the Cheese: Try using cotija or crumbled blue cheese for a completely different flavor profile.
-
Mix in Fruits: Toss in some sliced apples or pears for sweetness that balances the beets’ earthiness.
-
Add Greens: Pair this salad with a handful of arugula or spinach for a nutritious kick!
-
Vegan Version: Omit the cheese or replace it with a nut-based cheese for a delectable vegan option.
Chef’s Notes
As a chef, every recipe I create has a little story attached to it. I remember the first time I attempted a beet salad without consulting my grandmother. The beets ended up a little too firm, and I’ll admit, I learned a valuable lesson that day: patience is key! Cooking should be enjoyed, not rushed. Over time, I figured out that roasting them makes all the difference in both flavor and texture. This salad has since evolved into one of my signature dishes; it’s fun, colorful, and just perfect for any gathering!
FAQs and Troubleshooting
-
How do I cook beets quickly?
- If you’re short on time, you can steam beets. Just peel and cut them into quarters, steam for about 15-20 minutes until tender, and they’ll be ready for your salad!
-
Can I prepare the salad in advance?
- Absolutely! This salad does well when prepared ahead. Just wait until serving to add the dressing to prevent the beets from bleeding too much color.
-
What if my beets are too earthy?
- A sprinkle of sugar can balance the earthy flavor of beets. Adding a bit more lemon juice can also enhance the overall flavor profile.
-
Can I use canned beets?
- Yes, canned beets are a great shortcut! Just rinse them, slice, and toss them in; they won’t have the same depth of flavor as roasted, but they’re still delicious.
Nutritional Info
This salad is not just a feast for the eyes; it’s healthy too! Each serving packs plenty of fiber, vitamins, and minerals from the beets and cucumbers while offering a good dose of protein from the feta. Plus, olive oil adds healthy fats, making it a fantastic option for any meal!
There you have it—my irresistible beet feta salad with cucumber and dill! Remember, cooking is all about enjoying the moments shared, whether you’re hosting a party or having a cozy night in. Tie on that ivory apron and let’s create something beautiful together. Happy cooking!
PrintIrresistible Beet Feta Salad with Cucumber and Dill

A vibrant and refreshing salad combining earthy beets, creamy feta, and crunchy cucumber, perfect for any occasion.
- Prep Time: 15 minutes
- Cook Time: 60 minutes
- Total Time: 75 minutes
- Yield: 4 servings 1x
- Category: Salad
- Method: Roasting
- Cuisine: Mediterranean
- Diet: Vegetarian
Ingredients
- 2 medium Beets
- 1 cup Feta Cheese, crumbled
- 1 medium Cucumber, thinly sliced
- 1/4 cup Fresh Dill, chopped
- 3 tablespoons Olive Oil
- 2 tablespoons Lemon Juice
- Salt, to taste
- Pepper, to taste
Instructions
- Preheat your oven to 400°F (200°C). Wrap the beets in foil with olive oil and salt, then roast for 45-60 minutes.
- Cool the cooked beets, then peel them using your hands or a paper towel.
- Slice the beets into cubes or wedges for even distribution.
- Wash and slice the cucumber thinly.
- Chop the fresh dill finely.
- Whisk together olive oil, lemon juice, salt, and pepper to make the dressing.
- Combine roasted beet slices, cucumber, feta, and dill in a bowl, drizzle with dressing, and toss gently.
- Taste and adjust seasoning as needed.
Notes
This salad can be prepared in advance; just add the dressing before serving to keep colors vibrant.
Nutrition
- Serving Size: 1 serving
- Calories: 250
- Sugar: 7g
- Sodium: 300mg
- Fat: 18g
- Saturated Fat: 5g
- Unsaturated Fat: 10g
- Trans Fat: 0g
- Carbohydrates: 20g
- Fiber: 3g
- Protein: 6g
- Cholesterol: 15mg
Keywords: beet salad, feta, cucumber, healthy salad, Mediterranean salad

Easy Lemon Fluff Salad: 10-Minute Creamy No-Bake Treat
A Taste of Nostalgia: Classic Lemon Fluff Salad
Hello, dear foodies! Today, we’re diving into a dessert that’s as light as a cloud and as refreshing as a spring day: Classic Lemon Fluff Salad. This delightful dish is the perfect balance of bright citrus and creamy sweetness, bringing a smile to your face with each fluffy spoonful. It’s not just a salad; it’s a nostalgic journey through family gatherings, summer picnics, and delightful potluck dinners. So, roll up your sleeves, and let’s whip up a bowl of sunshine!
A Little Slice of My Kitchen History
Let me take you back to a sunny afternoon at my grandmother’s house—what a place of warmth and joy! This was where I first took a bite of Lemon Fluff Salad. Picture this: lush green grass, a big wooden picnic table adorned with a checkered tablecloth, and my family gathered round, sharing laughter and stories. Grandma would always make this salad for special occasions and summer get-togethers, and it was as iconic as her homemade lemonade.
I remember the excitement as Grandma stirred together the bright yellow mix, her laughter echoing in the background. Watching her zest that lemon was a revelation! Who knew such a simple step could elevate a dish so much? When served chilled, that light and airy fluff would melt away any worries. Each taste brought back memories of long summer days and the feeling of togetherness. Now, every time I make it, I’m whisked back to those precious moments, and I hope to share that joy with you too!
Ingredients
Here’s what you’ll need to create this delightful Classic Lemon Fluff Salad:
-
20 oz crushed pineapple (undrained)
- This ingredient is the foundation of the fluffiness. The sweetness from the pineapple perfectly complements the tartness of the lemon. If you can’t find crushed pineapple, you can use chopped fresh pineapple—just make sure to drain some juice to maintain the right consistency.
-
3 oz instant lemon pudding mix
- This is the secret weapon! The instant pudding mix gives the salad its creamy texture and enhances that bright lemon flavor. If you want a twist, you could substitute it with vanilla pudding for a milder taste.
-
Juice and zest from 1 lemon
- This adds a fresh, zesty kick! A zester is your best friend here; it gives you that vibrant lemon zest that’s packed with oils—perfect for enhancing flavor. If you’re out of lemons, bottled lemon juice can work in a pinch, but it won’t have the aromatic benefits of the zest.
-
8 oz whipped topping (thawed)
- The whipped topping adds a luscious creaminess that lightens everything up. If you prefer, you can use homemade whipped cream for a fresher taste—just whip heavy cream with a bit of sugar until soft peaks form.
-
2 cups mini marshmallows
- Sweet little bites of joy! These marshmallows add a lovely texture and extra sweetness. If you’re not a fan of marshmallows, you can leave them out or swap for diced fruits like strawberries or bananas for a fresher alternative.
-
½ cup coconut
- This ingredient gives the salad a wonderful chewy texture and a hint of tropical flair. You can use sweetened or unsweetened coconut, depending on your preference. Don’t have coconut? No problem! You can replace it with slivered almonds for added crunch.
Step-by-Step Instructions
Now let’s get into the nitty-gritty of creating this delicious Lemon Fluff Salad!
-
Prepare the base
Start by grabbing a large mixing bowl. Open your can of crushed pineapple—no need to drain it—and pour it into the bowl. It’s okay if some juice comes along; this will help keep everything nice and moist. Just imagine that golden goodness glistening in the sun! -
Mix the pudding
Next, sprinkle the 3 oz of instant lemon pudding mix over the pineapple. Use a spatula to gently fold them together. You want to ensure that the pudding is well incorporated without creating clumps. The pudding will start to thicken up as it combines with the pineapple juices; it’s like magic in action! -
Add the zest and juice
Now, zest your lemon using a zester or fine grater to get about 1 tablespoon of zest. Set it aside, then cut the lemon in half to squeeze out the juice. Add both the zest and juice to the mixture, and fold gently. This is where the salad starts to come alive! The fragrance of lemon will fill your kitchen—how delightful! -
Incorporate the whipped topping
Now, let’s lighten things up! Take your 8 oz of thawed whipped topping and gently fold it into the pineapple mixture. Remember, the goal here is to keep it fluffy, so be gentle! This step adds that marvelous creaminess that makes every bite heavenly. -
Add the marshmallows and coconut
Time for the fun part! Gently fold in the 2 cups of mini marshmallows and ½ cup coconut. These little additions create bursts of sweetness and texture that’ll make your taste buds dance! -
Chill the salad
Transferring the mixture to a serving bowl, cover it and let it chill in the refrigerator for at least 2 hours. This allows the flavors to meld together beautifully and for the salad to firm up nicely. Trust me; the wait will be worth it!
Serving Suggestions
Presentation is key to making this dish truly shine! Spoon the chilled Lemon Fluff Salad into decorative bowls or a large glass trifle dish for a beautiful effect. Top it with a sprinkle of extra lemon zest or a few extra mini marshmallows for flair. Serve it alongside other goodies at your next gathering, or enjoy it solo as a sweet treat. Either way, it’s sure to impress!
Recipe Variations
Feeling adventurous? Here are some creative twists to try:
- Berry Delight: Mix in 1 cup of fresh berries—strawberries, blueberries, or raspberries—for a fruity explosion.
- Nutty Coconut Crunch: Swap coconut with toasted pecans or almonds for added crunch.
- Zesty Lime Fluff: Substitute lemon with lime for a tangy twist that’s just as refreshing!
- Tropical Pineapple: Add diced mango or kiwi for an exotic flair.
- Dairy-Free Option: Use coconut whipped cream and dairy-free pudding to make this salad suitable for lactose-intolerant friends.
Chef’s Notes
Ah, the memories this recipe stirs up! I’ve made this salad countless times, and each time, it brings a wave of nostalgia. It’s evolved into a family classic at my gatherings. Just last year, during a summer reunion, I decided to add that extra zest of lemon zest and wow, did it take the dish to another level! My cousin said it reminded them of Grandma’s recipe, and honestly, that’s the highest compliment I could ask for!
In the spirit of sharing, I encourage you to experiment with this recipe. Add your personal touch, and watch it become part of your family’s stories too!
FAQs and Troubleshooting
1. What can I use instead of whipped topping?
You can use homemade whipped cream! Just whip heavy cream with some sugar until soft peaks form for a fresher taste.
2. Can I make this salad ahead of time?
Absolutely! This salad actually benefits from being chilled overnight; the flavors get even better.
3. What if my salad seems too runny?
It might need a little more time to chill. If it’s still too runny after chilling, add a little more instant pudding mix to help thicken it.
4. How long can I store leftover salad?
Keep leftovers in an airtight container in the refrigerator. It’ll stay fresh for about 3-4 days, but honestly, it’s so good, I doubt there’ll be any left!
Nutritional Info
For those who like to keep track, here are approximate nutritional values per serving (makes about 8 servings):
- Calories: 180
- Total Fat: 5g
- Saturated Fat: 2g
- Cholesterol: 5mg
- Sodium: 50mg
- Total Carbohydrates: 34g
- Dietary Fiber: 1g
- Sugars: 24g
- Protein: 1g
Now that you have all the tools and stories to make this Classic Lemon Fluff Salad, it’s time to gather around your table, share a delicious dessert, and make those beautiful memories that linger long after the last spoonful is gone. Happy cooking, friends! 🍋✨
PrintClassic Lemon Fluff Salad

A delightful dessert salad that balances bright citrus and creamy sweetness, perfect for gatherings.
- Prep Time: 20 minutes
- Cook Time: 0 minutes
- Total Time: 120 minutes
- Yield: 8 servings 1x
- Category: Dessert
- Method: Chilling
- Cuisine: American
- Diet: Vegetarian
Ingredients
- 20 oz crushed pineapple (undrained)
- 3 oz instant lemon pudding mix
- Juice and zest from 1 lemon
- 8 oz whipped topping (thawed)
- 2 cups mini marshmallows
- ½ cup coconut
Instructions
- Start by grabbing a large mixing bowl. Open your can of crushed pineapple and pour it into the bowl.
- Sprinkle the instant lemon pudding mix over the pineapple. Use a spatula to gently fold them together.
- Zest your lemon to get about 1 tablespoon of zest. Squeeze out the juice and add both to the mixture, folding gently.
- Take your thawed whipped topping and gently fold it into the pineapple mixture.
- Fold in the mini marshmallows and coconut until evenly distributed.
- Transfer the mixture to a serving bowl, cover it, and let it chill in the refrigerator for at least 2 hours.
Notes
Add extra lemon zest or marshmallows on top for presentation. This salad also benefits from being made ahead of time.
Nutrition
- Serving Size: 1 serving
- Calories: 180
- Sugar: 24g
- Sodium: 50mg
- Fat: 5g
- Saturated Fat: 2g
- Unsaturated Fat: 3g
- Trans Fat: 0g
- Carbohydrates: 34g
- Fiber: 1g
- Protein: 1g
- Cholesterol: 5mg
Keywords: lemon, salad, dessert, fluff salad, summer dessert, pineapple, nostalgic