
Minute Lemon-Dill Salmon for Busy Weeknights (Healthy)
Elevate Your Dinner with Lemon Dill Salmon
Hello, fellow food lovers! Today, I’m thrilled to share a dish that is equal parts bright, flavorful, and simple enough to make any weeknight dinner feel special. Meet Lemon Dill Salmon, a beautiful pairing of flaky salmon fillets brilliantly complemented by the zest of lemon and the aromatic freshness of dill. If you’ve ever felt the urge to whip up something impressive yet approachable, this is the recipe for you!
In my culinary journey, I have developed a soft spot for seafood, especially salmon. This rich fish is not only delicious but also incredibly versatile. It’s the star of family dinners, simple lunches, and everything in between. I remember the first time I experienced the magic of herb-infused salmon. I was only ten, and my family hosted a summer barbecue. We used a charcoal grill, and there was something mesmerizing about those smoky flavors mingling with the bright notes of lemon and fresh herbs drifting through the air. This dish has been a staple in my kitchen ever since, a timeless recipe that embodies the joy of unexpected, delightful gatherings.
So, pull out your apron, pour yourself a little something bubbly, and let’s dive into the world of Lemon Dill Salmon!
Personal Story
One of my fondest memories associated with salmon revolves around a charming little cabin we rented for a family reunion by the lake. The sun was setting, casting a golden hue over everything, and the air was filled with laughter and delicious aromas. My aunt shared her secret lemon dill marinade for salmon, and we decided to grill it outside, creating an unforgettable experience. The flares of the barbecue, the sizzle of the fish, and the sparkle of laughter made that meal magical. After a delightful evening spent feasting on lemon dill salmon and sharing stories, I realized that food is more than just sustenance; it’s an invitation to connect, to share, and to create lasting memories. Now, each time I make this dish, I’m transported back to that serene lakeside evening, surrounded by loved ones, and it fills my heart with joy.
Ingredients
Here are the ingredients you’ll need to make this delightful dish:
-
4 salmon fillets
Freshness is key! Look for fillets that are bright and moist with a clean smell. If you’re in a pinch, frozen salmon works just as well—just thaw it out overnight in the fridge. -
2 tablespoons olive oil
A staple in many kitchens, olive oil brings richness and depth to the dish. Feel free to substitute it with avocado oil for a different flavor profile or sesame oil for an Asian twist! -
2 tablespoons butter
Butter adds a luscious creaminess that perfectly balances the acidity of lemon. For a dairy-free option, you can use ghee or even coconut oil, which will give a unique flavor twist. -
1 lemon (juiced and zested)
Fresh lemon juice brightens everything up! If you’re out of fresh lemons, bottled juice will do in a pinch, but nothing beats the vibrant flavor of fresh juice and zest. -
2 tablespoons fresh dill (chopped)
Dill is the star herb for this dish, delivering that signature fresh taste. If you’re not a fan of dill, you can substitute it with fresh parsley or tarragon for a lovely touch. -
Salt and pepper to taste
Seasoning is crucial! A pinch of salt and a twist of pepper really brings the flavors together. Experiment with other spices like smoked paprika for a delicious change.
Step-by-Step Instructions
Now, let’s get cooking! Here’s how to prepare your Lemon Dill Salmon in a few easy steps. Follow along and let your kitchen come alive with delicious aromas!
-
Preheat your oven or grill.
Set your oven to 400°F (200°C) or preheat your grill to medium-high heat. Preheating ensures that the salmon cooks evenly and gets that lovely texture we’re all after! -
Prepare the marinade.
In a small bowl, whisk together the olive oil, butter (melted), lemon juice, lemon zest, and fresh dill. The fragrant combination will have you dreaming of summer days! If you like a bit of kick, add a pinch of red pepper flakes to the mix. -
Season the salmon.
Place the salmon fillets on a baking tray lined with parchment paper or directly on the grill grates. Generously salt and pepper each fillet. Remember, seasoning is key to bringing out the natural flavors! -
Pour the marinade.
Drizzle the marinade generously over the salmon fillets, making sure each piece gets some love. Use a brush if you want to spread it evenly. This step is crucial for ensuring that flavor permeates through each bite! -
Bake or grill the salmon.
If you’re baking, place the tray in the oven and cook for about 12-15 minutes, or until the salmon flakes easily with a fork. If you’re grilling, close the lid and let it cook for approximately 6-8 minutes per side, depending on the thickness of your fillets. You want that perfect balance between tender and flaky! -
Garnish and serve.
Once cooked, remove the salmon from the oven or grill and let it rest for a few minutes. This allows the juices to redistribute, ensuring every bite is just as juicy as the last! Give it a sprinkle of fresh dill and a little more lemon zest before serving. -
Enjoy!
Plate it up, gather your loved ones, and dig in. Trust me, that first bite will transport you to a sunny picnic by the lake!
Serving Suggestions
To create a beautiful presentation, serve your Lemon Dill Salmon on a colorful platter over a bed of roasted seasonal vegetables or a light, fresh salad. A side of garlic mashed potatoes or quinoa pairs beautifully with the dish, creating a harmonious balance. Add a slice of lemon and a sprinkle of fresh dill on top for that pop of color and extra zesty flavor!
Recipe Variations
Mix things up a bit with these fun variations on Lemon Dill Salmon:
- Mediterranean Twist: Add chopped olives, capers, and feta cheese to your marinade for a Mediterranean flair.
- Cajun Style: Use Cajun seasoning instead of dill for a spicy kick that will awaken your tastebuds.
- Honey Glaze: Drizzle honey over the salmon before baking for a sweet and tangy version that caramelizes beautifully!
- Herb Medley: Mix in fresh herbs like basil and thyme alongside dill for a delightful herbal bouquet.
- Grilled Veggies: Add seasonal vegetables like asparagus, zucchini, or bell peppers to the grill for a complete, colorful meal.
Chef’s Notes
Over the years, I’ve tweaked this recipe more times than I can count! What started as a simple lemon dill marinade has evolved into a family favorite with endless possibilities. There was even one memorable dinner where I accidentally used orange zest instead of lemon zest! Surprisingly, it worked beautifully—sometimes mistakes can lead to delightful discoveries in the kitchen.
Cooking should be fun and open to modification, so don’t hesitate to play around with this recipe. Let your creativity shine and make it your own!
FAQs and Troubleshooting
-
What if my salmon is overcooked?
If you find yourself with overcooked salmon, don’t despair! Adding a splash of lemon juice or a drizzle of olive oil can help reintroduce moisture. -
Can I make this dish ahead of time?
Absolutely! You can marinate the salmon fillets a few hours ahead of time or even overnight. Just store them in the fridge until you’re ready to cook. -
How do I know when the salmon is done?
The salmon is perfectly cooked when it flakes easily with a fork and is opaque throughout. You can also use a meat thermometer—145°F (63°C) is the magic number! -
What sides pair well with lemon dill salmon?
The options are endless! Consider serving it with steamed vegetables, a fresh salad, rice pilaf, or even a light pasta for a perfect complement to your flavorful salmon.
Nutritional Info
Each serving of Lemon Dill Salmon packs a delightful protein punch along with healthy fats from salmon and olive oil. It’s a great source of omega-3 fatty acids, vitamin D, and provides a host of minerals! Pair it with your favorite sides for a balanced meal.
Elevating your home cooking doesn’t have to be an overwhelming task! With Lemon Dill Salmon, you’re armed with a beautiful recipe that brings elegance and ease to your table. So grab those ingredients, invite someone you love over, and savor the creativity that fills your kitchen. Cheers to delicious moments shared over a scrumptious meal! Happy cooking!
PrintLemon Dill Salmon

A bright and flavorful dish featuring flaky salmon fillets enhanced by lemon zest and fresh dill, perfect for weeknight dinners.
- Prep Time: 10 minutes
- Cook Time: 15 minutes
- Total Time: 25 minutes
- Yield: 4 servings 1x
- Category: Main Course
- Method: Grilling/Baking
- Cuisine: Mediterranean
- Diet: Pescatarian
Ingredients
- 4 salmon fillets
- 2 tablespoons olive oil
- 2 tablespoons butter
- 1 lemon (juiced and zested)
- 2 tablespoons fresh dill (chopped)
- Salt and pepper to taste
Instructions
- Preheat your oven or grill to 400°F (200°C).
- Prepare the marinade by whisking together olive oil, melted butter, lemon juice, lemon zest, and fresh dill.
- Season the salmon by placing fillets on a baking tray or grill and adding salt and pepper.
- Pour the marinade over the salmon fillets.
- Bake or grill the salmon for 12-15 minutes (baking) or 6-8 minutes per side (grilling).
- Garnish with fresh dill and lemon zest before serving.
Notes
Serve with roasted seasonal vegetables or a fresh salad for an elegant meal. Can be made ahead of time by marinating the salmon.
Nutrition
- Serving Size: 1 serving
- Calories: 350
- Sugar: 1g
- Sodium: 300mg
- Fat: 25g
- Saturated Fat: 8g
- Unsaturated Fat: 15g
- Trans Fat: 0g
- Carbohydrates: 1g
- Fiber: 0g
- Protein: 35g
- Cholesterol: 70mg
Keywords: salmon, lemon dill, seafood, healthy dinner, easy recipe
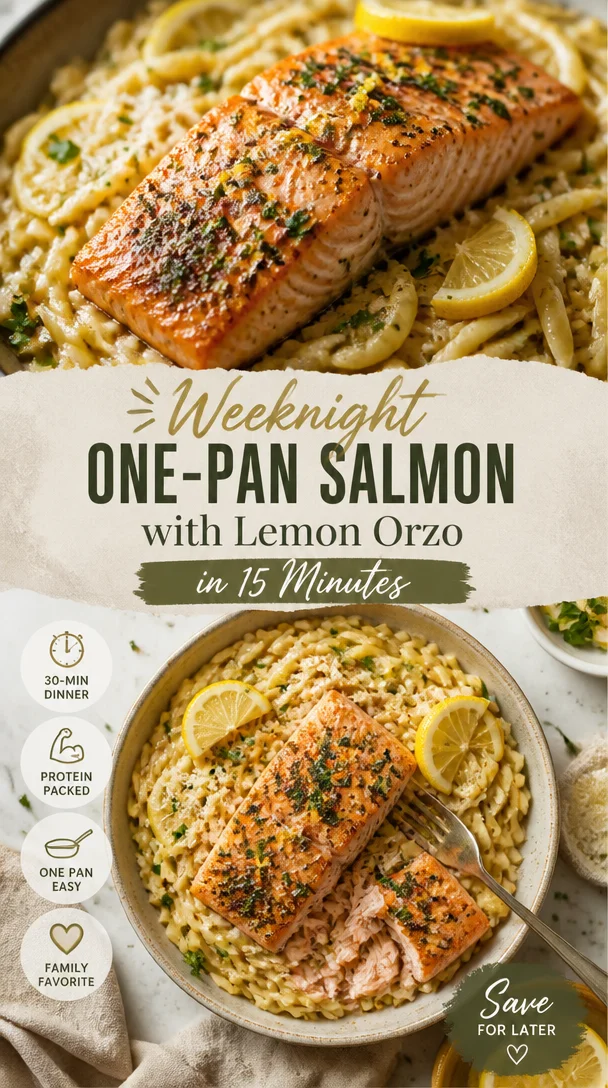
Weeknight One-Pan Salmon with Lemon Orzo in 15 Minutes
One Skillet Salmon with Lemon Orzo: A Dinner to Remember
Hello, friends! It’s Savannah here, your culinary companion from Ivory Apron, excited to whip up a delightful dish that will bring warmth to your table and smiles to your guests. Today, we’re diving headfirst into the world of One Skillet Salmon with Lemon Orzo. This dish is not just a meal; it’s a gathering of flavors, memories, and a sprinkling of love.
Picture this: You’ve had a long day, and the last thing on your mind is spending hours in the kitchen. But what if I told you that in less than 30 minutes, you could craft a stunning, flavorful dinner that looks like you’ve spent hours in the kitchen? Let’s break it down! This One Skillet Salmon is flaked, juicy, and perfectly seasoned, resting on a bed of creamy lemon orzo infused with vibrant spinach and finished with a sprinkle of Parmesan. It’s a straightforward yet elevated meal that feels like a hug on a plate.
I don’t know about you, but cooking has always been a way for me to express love and creativity. There’s something inherently joyful about sharing food, and I believe that every dish tells a story. Whether you’re making it for a special occasion or a cozy weeknight dinner, this One Skillet Salmon will surely become a beloved staple!
A Splash of Nostalgia: My Cooking Journey with Salmon
Growing up, my family hosted some of the most memorable gatherings. As a child, I remember watching my mother expertly handle salmon fillets, her special recipe always drawing family and friends to our dining table. Salmon wasn’t just a meal; it was a symbol of love — lovingly prepared to nourish our bodies and souls.
One summer evening, while the grill was sizzling, my mom decided to try something different, bringing the Mediterranean flavors directly into our kitchen. She tossed in some lemon and fresh herbs, and I swear the kitchen transformed into a fragrant oasis. I was enchanted! That night, we gathered around the table, that unforgettable aroma swirling around us. The combination of moist salmon with tangy lemon reminded me that cooking can create cherished memories.
It’s memories like these that drive my passion for cooking and sharing delicious recipes. Inspired by my mother’s creativity, I’ve refined my approach over the years, making it approachable and elegant at the same time. And trust me, this One Skillet Salmon with Lemon Orzo is bound to spark joy and a sense of togetherness — just like my childhood memories!
Ingredients: All You Need for Deliciousness
Let’s get into the heart of our dish! Here’s what you will need:
-
4 skinless salmon fillets: The star of this dish! Go for fresh or frozen (thawed) fillets. Salmon is packed with healthy fats, and the skinless option makes for easy eating. If salmon isn’t your thing, feel free to use another firm fish like cod or halibut.
-
1 tsp salt (divided): Salt is essential for enhancing the flavors of our dish. You can adjust to your taste preferences.
-
1 tsp coarsely ground black pepper (divided): Freshly ground pepper adds a deeper flavor profile. If you prefer less heat, use a pinch of white pepper instead.
-
1 tsp sweet paprika: This adds a lovely warmth and color to the salmon. Smoked paprika works beautifully here if you enjoy a smoky flavor!
-
1 tsp garlic powder: For that wonderful garlic flavor without the fuss. You can substitute with fresh minced garlic if you prefer.
-
1 tbsp olive oil: A rich, smooth oil to cook our salmon. Feel free to use avocado oil for higher heat tolerance.
-
1 tsp unsalted butter: This will enhance the richness of our dish. Margarine is also an option if you need to keep it dairy-free.
-
1 yellow onion (finely chopped): A classic aromatic that builds the foundation of our flavors. You can use shallots for a milder, sweeter flavor.
-
3 garlic cloves (minced): Garlic lovers rejoice! Fresh garlic adds such depth. If you’re short on time, pre-minced garlic works too.
-
1 cup dry orzo pasta: This small pasta cooks quickly and absorbs flavors beautifully. If you prefer gluten-free, substitute with rice or quinoa.
-
1 tsp dried thyme: This herb brings earthy notes. Fresh thyme is a lovely upgrade if you have it on hand!
-
3 cups low sodium chicken broth: A flavorful base for our orzo. Vegetable broth can be used for a vegetarian option.
-
5 ounces baby spinach: For color and goodness! You can swap with kale or arugula if preferred.
-
Juice from ½ lemon: Freshly squeezed lemon juice brightens the dish. Lime juice could work as an alternative for a twist.
-
½ cup grated Parmesan: For a bit of cheesy goodness! Nutritional yeast is a great vegan alternative.
-
Freshly ground black pepper (for serving): A finishing touch to elevate flavors.
-
Chili flakes (for serving): If you enjoy a bit of spice, these are perfect for a boost! Or totally omit if you’d like.
Step-by-Step Instructions: Let’s Cook!
Now that we have everything prepped, it’s time to bring our dish to life. Grab your apron, and let’s get started!
-
Season the Salmon: Start by patting your salmon fillets dry with a paper towel. This helps to achieve that beautiful crust. Season the fillets on both sides with ½ tsp salt, ½ tsp pepper, sweet paprika, and garlic powder. This seasoning will infuse the fish with fantastic flavor!
-
Heat the Skillet: In a large, deep skillet, heat the olive oil and butter over medium-high heat. Allow the butter to melt and bubble slightly, creating a beautiful base for cooking.
-
Sear the Salmon: Gently place the salmon fillets skin-side down (or side down if skinless) in the skillet. It’s important not to overcrowd the pan; if your skillet isn’t large enough, sear in batches. Cook for about 3-4 minutes without moving them until they develop a crispy exterior and beautiful color. Watch out for splatters!
-
Flip and Cook Through: Carefully flip the salmon fillets using a spatula and cook for another 2-3 minutes until they are opaque and cooked through. Transfer to a plate and cover loosely with foil to keep warm.
-
Sauté the Aromatics: In that same skillet, add the chopped onion and cook for 3-4 minutes until it’s soft and slightly caramelized. Stir in the minced garlic and dried thyme, cooking for an additional minute until fragrant—your kitchen should smell divine!
-
Add the Orzo: Next, throw in your dry orzo pasta and toss it around in the onion and garlic mixture. This step allows the pasta to absorb all that lovely flavor and get slightly toasted. Cook for about a minute.
-
Combine with Broth: Pour in 3 cups of chicken broth and bring it to a gentle simmer. Stir to combine, ensuring the orzo is submerged. Cook for about 10 minutes or until the orzo is tender and much of the liquid is absorbed. Stir occasionally to prevent sticking.
-
Incorporate Spinach and Lemon: Once the orzo is cooked, fold in the baby spinach, lemon juice, and Parmesan. Stir until the spinach wilts down and the cheese melts into that creamy goodness you desire. Adjust seasoning with salt and pepper to taste.
-
Serve: Flake the salmon and nestle it on top of your lemony orzo. Drizzle with a bit of olive oil, sprinkle with freshly cracked black pepper, and a pinch of chili flakes if desired. Your table is now ready to welcome guests or simply treat yourself to a nourishing homecooked meal!
Serving Suggestions: Plating with Love
For serving, I love using a wide, shallow bowl to showcase the vibrant colors of the dish. Start by spooning a generous mound of the lemon orzo mixture in the center, creating a cozy nest. Gently lay the perfectly seared salmon on top, allowing the golden crust to shine! Finish with a good sprinkle of Parmesan and a squeeze of fresh lemon. A sprig of fresh thyme on top adds a lovely finishing touch!
Recipe Variations: Play with Flavors
-
Herb Upgrade: Experiment with fresh herbs like dill or parsley instead of thyme for a different flavor profile.
-
Mediterranean Twist: Add sun-dried tomatoes and olives to the orzo for a Mediterranean flair.
-
Creamy Delight: Stir in a bit of heavy cream or cream cheese for a richer and creamier sauce.
-
Seafood Trio: Mix in shrimp or scallops along with the salmon for a seafood extravaganza!
-
Veggie Power: Toss in other sautéed vegetables, like bell peppers and zucchini, for added texture and nutrition.
Chef’s Notes: A Dash of Wisdom
This One Skillet Salmon has become one of my go-to recipes for weeknight dinners and entertaining alike. It’s versatile and can evolve based on your tastes and what you have in your pantry. I fondly remember making it for my friend’s birthday last year — nothing like a delicious meal to celebrate!
A little secret? Don’t forget to taste and adjust your seasoning during cooking. Cooking is all about making it your own and allowing your palate to guide you!
FAQs and Troubleshooting: Let’s Solve Your Questions!
Q: What if my salmon sticks to the skillet?
A: Ensure your pan is adequately heated before adding the salmon, and make sure to use enough oil. Letting the salmon cook without moving it around helps develop that lovely crust!
Q: Can I use whole wheat orzo?
A: Absolutely! Whole wheat orzo will add a nutty flavor and a touch of extra fiber while maintaining the dish’s integrity.
Q: How do I know when my salmon is cooked through?
A: Salmon is perfect when it flakes easily with a fork and is opaque throughout. You can also use a food thermometer; the internal temperature should reach 145°F (63°C).
Q: Can I make this dish in advance?
A: The orzo can be made ahead, but I recommend cooking the salmon fresh to maintain its texture. Reheat gently if needed, and enjoy!
Nutritional Info (Optional)
If you’re interested in the nutritional benefits of your meal, a serving of One Skillet Salmon with Lemon Orzo is approximately:
- Calories: 540
- Protein: 35g
- Fat: 22g
- Carbohydrates: 48g
- Fiber: 3g
Conclusion
And there you have it, friends! One Skillet Salmon with Lemon Orzo—a beautiful, quick dinner that’s sure to impress, whether you’re hosting or treating yourself. It’s all about the time spent together, creating memories, and of course, delicious food. I can’t wait to hear how your meal turns out! As always, tie on your apron, pour a glass of something bubbly, and enjoy the magic of cooking. Welcome to my kitchen — I’m honored to share this journey with you!
PrintOne Skillet Salmon with Lemon Orzo

A delicious, quick dish featuring perfectly seasoned salmon over creamy lemon orzo with spinach and Parmesan.
- Prep Time: 10 minutes
- Cook Time: 20 minutes
- Total Time: 30 minutes
- Yield: 4 servings 1x
- Category: Main Course
- Method: Skillet
- Cuisine: Mediterranean
- Diet: Pescatarian
Ingredients
- 4 skinless salmon fillets
- 1 tsp salt (divided)
- 1 tsp coarsely ground black pepper (divided)
- 1 tsp sweet paprika
- 1 tsp garlic powder
- 1 tbsp olive oil
- 1 tsp unsalted butter
- 1 yellow onion (finely chopped)
- 3 garlic cloves (minced)
- 1 cup dry orzo pasta
- 1 tsp dried thyme
- 3 cups low sodium chicken broth
- 5 ounces baby spinach
- Juice from ½ lemon
- ½ cup grated Parmesan
- Freshly ground black pepper (for serving)
- Chili flakes (for serving)
Instructions
- Season the salmon: Pat fillets dry, season with ½ tsp salt, ½ tsp pepper, paprika, and garlic powder.
- Heat the skillet: In a large skillet, heat olive oil and butter over medium-high heat.
- Sear the salmon: Place the fillets skin-side down in the skillet and cook for 3-4 minutes without moving.
- Flip and cook through: Carefully flip and cook for another 2-3 minutes until opaque.
- Sauté the aromatics: Add onion and cook for 3-4 minutes until soft. Stir in garlic and thyme for another minute.
- Add the orzo: Toss dry orzo in the onion mixture and cook for about a minute.
- Combine with broth: Pour in chicken broth and simmer for about 10 minutes or until the orzo is tender.
- Incorporate spinach and lemon: Fold in spinach, lemon juice, and Parmesan; season to taste.
- Serve: Flake salmon over orzo and garnish with olive oil, pepper, and chili flakes.
Notes
Taste and adjust seasoning as needed. This dish can be served with a variety of vegetables or pasta alternatives.
Nutrition
- Serving Size: 1 serving
- Calories: 540
- Sugar: 3g
- Sodium: 560mg
- Fat: 22g
- Saturated Fat: 5g
- Unsaturated Fat: 15g
- Trans Fat: 0g
- Carbohydrates: 48g
- Fiber: 3g
- Protein: 35g
- Cholesterol: 60mg
Keywords: salmon, orzo, one skillet, easy dinner, Mediterranean recipe
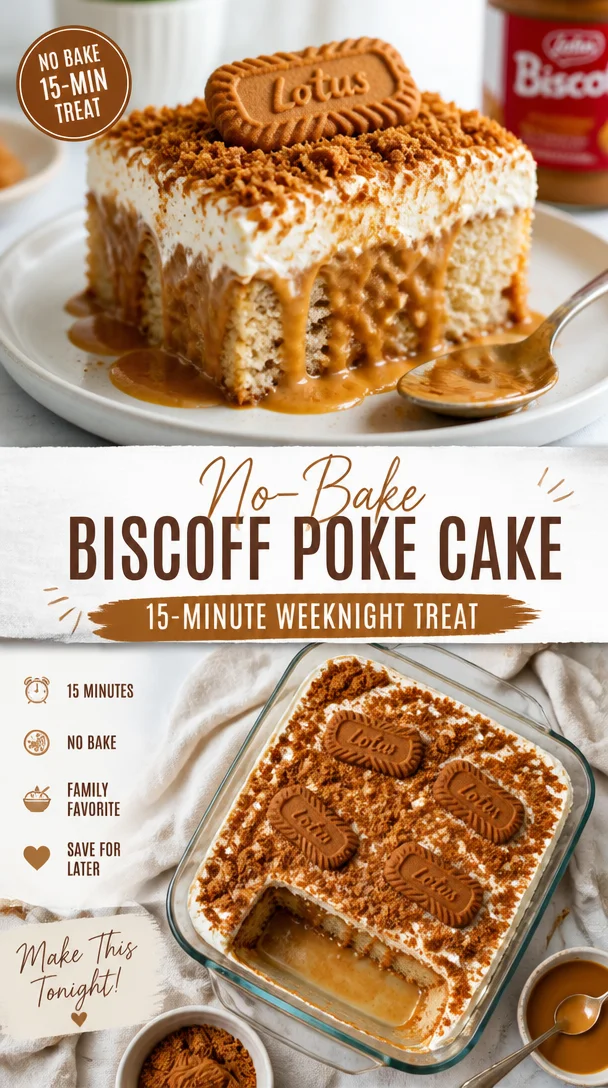
No-Bake Biscoff Poke Cake: 15-Minute Weeknight Treat
The Sweet Indulgence of Biscoff Poke Cake: A Delightful Journey into Dessert
Hello, fellow food lovers! Today, we’re diving into a world of decadence with a delightful creation that’s sure to become a favorite: Biscoff Poke Cake. Have you ever tasted those heavenly Biscoff cookies? You know the ones — perfectly spiced, subtly sweet, and utterly melt-in-your-mouth? Imagine transforming that unforgettable flavor into a moist, poke cake that dreams are made of! As soon as you poke into it, you’ll release waves of luscious flavors that take dessert to a whole new level.
I’ve been enamored with Biscoff cookies for years. Growing up, a simple Biscoff cookie paired with my afternoon tea was such a treat. The sweet aroma, the crisp texture — it all feels like home! It’s a flavor that brings back warm memories of family gatherings, lazy afternoons, and cozy moments. When I discovered Biscoff cookie butter, it felt like the universe had conspired to make my dessert dreams come true. That’s when the idea of a Biscoff Poke Cake was born.
The beauty of a poke cake lies in its simplicity; you create holes in the cake after it’s baked, and then fill those holes with a sweet, creamy filling. In this case, we’ll be incorporating a luscious vanilla pudding infused with Biscoff cookie butter. Trust me when I say, it’s a game-changer! So, grab your apron, and let’s make this mouthwatering Biscoff Poke Cake that will leave your friends and family in pure bliss!
Personal Story
One of my fondest childhood memories revolves around baking with my grandmother. Every weekend, without fail, we would gather in her cozy kitchen, adorned with family photos and the comforting scent of baked goods. While we whipped up cookies and cakes, laughter and stories filled the air. In those moments, I discovered the alchemy of combining simple ingredients into something magical. One day, she introduced me to her secret stash of Biscoff cookies, and after that, the world of flavors expanded in ways I never imagined!
We would often crumble those cookies on top of our favorite vanilla pudding dessert, creating layers of delight in each bite. The memory lingers to this day, and it’s from that nostalgia that my Biscoff Poke Cake was inspired. Every time I unwrap a package of Biscoff cookies or make this cake, I feel my grandmother’s warmth and love flowing through me. It’s my way of keeping her spirit and love for baking alive.
Ingredients
Here’s what you’ll need for this indulgent Biscoff Poke Cake:
Biscoff Cake:
-
1 box (15.25 oz.) Yellow Cake mix
- This is the base for our cake! If you’re feeling adventurous, you could also use a homemade yellow cake recipe. Just remember to adjust baking time as needed.
-
1 cup water
- Helps the cake mix combine! You can use milk for a richer flavor or even a nut milk for a dairy-free option.
-
½ cup vegetable oil (I used olive oil)
- This keeps the cake moist. Feel free to substitute with melted coconut oil or melted butter for added flavor.
-
3 eggs
- They add structure and richness to your cake. If you’re looking for a vegan option, you can use flax eggs (1 tablespoon of ground flaxseed + 2.5 tablespoons of water = 1 egg).
-
8 (about ½ cup) Biscoff cookies, crumbled
- Adds a lovely texture and extra flavor! If you can’t find Biscoff, you can use any speculoos-style cookies.
Vanilla Pudding:
-
1 box (5.1 oz.) Jello Instant Vanilla Pudding
- This gives our poke cake a creamy filling. You can also try butterscotch for a twist!
-
3 cups milk (2% or whole)
- Milk makes the pudding creamy. Try almond milk for a dairy-free version or even oat milk to keep it rich.
-
2 tablespoons Biscoff cookie butter
- This is the star of our filling! Consider making your own Biscoff spread if you’re up for a fun challenge!
Biscoff Buttercream:
-
1 cup (2 sticks) salted butter, room temperature
- Can’t go wrong with butter! For a vegan option, try using vegan butter instead.
-
½ cup Biscoff cookie butter
- Adds incredible flavor to the frosting. This is where the magic happens!
-
2 cups powdered sugar
- To sweeten up our buttercream. If you’re avoiding sugar, look for powdered coconut sugar as an alternative.
-
1 teaspoon vanilla extract
- Adds a lovely depth of flavor. Always choose pure vanilla extract for the best taste!
Whole Cake Decoration (Optional):
-
4 Biscoff Cookies (whole)
- These are for the top to elevate your cake’s appearance!
-
4 Biscoff Cookies (crushed)
- For a delightful crunchy topping that adds texture!
Cake Slice Garnish (Optional):
-
Whipped Topping
- Adds a creamy touch! You can use store-bought or make your own.
-
1 Biscoff Cookie (whole)
- A classic way to garnish each slice for that Instagram-worthy finish.
-
Crushed Biscoff Cookie Crumbles
- The more, the merrier! This adds a delightful visual appeal!
Step-by-Step Instructions
Let’s get our hands dirty and make this scrumptious Biscoff Poke Cake. Here we go!
1. Preheat the Oven
Preheat your oven to 350°F (175°C). This ensures that your cake bakes perfectly. Don’t skip this step; a preheated oven is crucial for even baking!
2. Prepare Your Cake Batter
In a large mixing bowl, combine the yellow cake mix, water, vegetable oil, and eggs. Mix until well combined! If you’re using an electric mixer, mix on medium speed for about 2 minutes until everything is smooth. Pro tip: Overmixing can lead to a dense texture, so mix until just combined.
3. Fold in Biscoff Cookies
Now, gently fold in the crumbled Biscoff cookies into the batter using a spatula. This will give your cake those fantastic bites of flavor! You can save some to sprinkle on top later if you want.
4. Bake the Cake
Pour the cake batter into a greased 9×13-inch baking pan. Make sure to spread the batter evenly. Bake in the preheated oven for about 30-35 minutes, or until a toothpick inserted in the center comes out clean. While your cake is baking, feel free to clean up your kitchen (or sneak a cookie – no judgments here!).
5. Make the Pudding
Once the cake is done, let it cool for a few minutes. In the meantime, make your vanilla pudding. In another bowl, whisk together the Jello Instant Vanilla Pudding mix, milk, and Biscoff cookie butter. Mix for about 2 minutes until the pudding thickens. You can taste test this mixture — guarantee it’ll be hard to resist!
6. Poke the Cake
Once the cake has cooled slightly, use the back of a wooden spoon or a skewer to poke holes all over the cake. Aim for about 20 holes — the more, the merrier!
7. Pour the Pudding
Carefully pour the Biscoff vanilla pudding over the poked cake, making sure it seeps into all those holes. Spread it with a spatula if needed to cover the surface evenly.
8. Chill the Cake
Cover your cake with plastic wrap and place it in the refrigerator. Allow it to chill for at least 1-2 hours (or even longer) — this will help the flavors meld beautifully!
9. Make the Biscoff Buttercream
While your cake is chilling, make the buttercream! In a mixing bowl, beat the room-temperature salted butter until it’s creamy. Gradually add in the powdered sugar, and mix until smooth and fluffy. Mix in the Biscoff cookie butter and vanilla extract and continue mixing until creamy!
10. Frost the Cake
Take your chilled cake out of the fridge and frost it generously with the Biscoff buttercream. Use a spatula to create swirls and peaks for that homemade look.
11. Decorate Your Cake
Finally, if you want to take your cake to the next level, add the whole Biscoff cookies and crushed cookies on top. It will not only look stunning but also add texture to each slice!
12. Slice and Serve
Cut into squares and serve with a dollop of whipped topping and a sprinkle of crushed Biscoff cookies.
Serving Suggestions
For a delightful presentation, serve your Biscoff Poke Cake on a beautiful platter. You can even layer it with fresh berries or a scoop of vanilla ice cream on the side—what a sweet surprise! Garnish each slice with a Biscoff cookie and a sprinkle of crumbs to make every piece a showstopper.
Recipe Variations
If you’re feeling a bit adventurous, here are a few ways you can switch up this recipe to suit your taste:
- Chocolate Lovers: Swap out some of the yellow cake mix for chocolate cake mix for a mildly spiced chocolate Biscoff poke cake.
- Nutty Delight: Add a tablespoon of chopped nuts into the cake batter for some crunch.
- Caramel Drizzle: Drizzle warm caramel sauce over the butterscotch pudding for an extra layer of sweetness.
- Fruit Twist: Add slices of bananas or strawberries on top of the Biscoff buttercream for a fruity version.
- Gluten-Free Option: Use a gluten-free cake mix, and you’ll have a gluten-free dessert that everyone can enjoy!
Chef’s Notes
Honestly, the inspiration for my Biscoff Poke Cake blossomed out of nostalgia and sheer love for easy, delectable desserts. I remember the first time I made this for a gathering; everyone was raving about how unique and delicious it felt.
Sometimes, the simplest recipes offer the most joy, and that’s what keeps me creating in the kitchen. I keep refining my recipes, finding ways to elevate them, and swapping ingredients as seasonal changes call for different flavors. And as always, I find joy in sharing these creations with you!
FAQs and Troubleshooting
1. What happens if my cake is too dry?
If your cake turns out dry, make sure you’re measuring your ingredients correctly. Overbaking can also lead to dry cake, so keep an eye on it!
2. Can I freeze my poke cake?
Absolutely! To freeze, cover the frosted cake tightly with plastic wrap and foil. It can be stored in the freezer for up to 3 months. Thaw in the fridge before serving.
3. My pudding didn’t thicken much. What did I do wrong?
Make sure to stir the pudding mixture until all lumps are gone. Also, giving it the entire 2 minutes to thicken is essential.
4. Can I make this a day ahead of time?
Yes, if you want to save time, you can prepare the cake a day before. Just ensure to add the frosting the day of serving for freshness.
Nutritional Info
This Biscoff Poke Cake is a delicious indulgence, and it’s meant to be enjoyed in moderation! Approximately, a slice contains around 350-400 calories, depending on the size of your piece and specific ingredients used.
So, what are you waiting for? Grab your Biscoff cookies and let’s create this unforgettable treat together! With every bite, you’re not just tasting cake, but the love and memories we’ve woven into each layer. Enjoy your baking adventure, and remember, good food is all about enjoying the moments around it. Happy baking!
PrintBiscoff Poke Cake
A moist poke cake filled with creamy vanilla pudding infused with Biscoff cookie butter, topped with rich Biscoff buttercream.
- Prep Time: 15 minutes
- Cook Time: 35 minutes
- Total Time: 50 minutes
- Yield: 12 servings 1x
- Category: Dessert
- Method: Baking
- Cuisine: American
- Diet: Vegetarian
Ingredients
- 1 box (15.25 oz.) Yellow Cake mix
- 1 cup water
- ½ cup vegetable oil
- 3 eggs
- 8 Biscoff cookies, crumbled
- 1 box (5.1 oz.) Jello Instant Vanilla Pudding
- 3 cups milk
- 2 tablespoons Biscoff cookie butter
- 1 cup (2 sticks) salted butter, room temperature
- ½ cup Biscoff cookie butter
- 2 cups powdered sugar
- 1 teaspoon vanilla extract
- 4 Biscoff Cookies (whole)
- 4 Biscoff Cookies (crushed)
- Whipped Topping (for garnish)
- 1 Biscoff Cookie (whole, for garnish)
- Crushed Biscoff Cookie Crumbles (for garnish)
Instructions
- Preheat your oven to 350°F (175°C).
- Combine the yellow cake mix, water, vegetable oil, and eggs in a large mixing bowl.
- Fold in the crumbled Biscoff cookies into the batter gently.
- Pour the cake batter into a greased 9×13-inch baking pan and bake for 30-35 minutes.
- Make the vanilla pudding by whisking together the pudding mix, milk, and Biscoff cookie butter.
- Poke holes all over the cooled cake using the back of a wooden spoon or a skewer.
- Pour the pudding over the poked cake, ensuring it seeps into the holes.
- Cover the cake with plastic wrap and chill in the refrigerator for at least 1-2 hours.
- Beat the room-temperature salted butter until creamy, then mix in the powdered sugar, Biscoff cookie butter, and vanilla extract.
- Frost the chilled cake generously with the Biscoff buttercream.
- Decorate with whole Biscoff cookies and crushed cookies on top.
- Slice and serve with whipped topping and crushed Biscoff cookies.
Notes
For best results, chill the cake for at least 2 hours before serving to allow flavors to meld.
Nutrition
- Serving Size: 1 slice
- Calories: 375
- Sugar: 28g
- Sodium: 300mg
- Fat: 20g
- Saturated Fat: 10g
- Unsaturated Fat: 8g
- Trans Fat: 0g
- Carbohydrates: 45g
- Fiber: 1g
- Protein: 4g
- Cholesterol: 60mg
Keywords: biscoff, poke cake, dessert, vanilla pudding, buttercream

Fudgy Biscoff Brownies with Cookie Butter Swirl Recipe
Indulge in Decadence: Biscoff Brownies Recipe
Welcome to the sweet escape that is decadent Biscoff brownies! Today, we’re diving into a recipe that beautifully marries rich, fudgy chocolate with that irresistible, spiced flavor of Biscoff cookie butter. If you’re a fan of brownies and love the warm, comforting taste of those iconic cookies, you’re in for a treat!
Most people think of brownies as a basic dessert, but I see them as a canvas for creativity. The first time I combined Biscoff cookie butter with brownies, I was instantly transported back to my childhood kitchen, where flour would dust the countertops and the sweet smell of sugar wafted through the air. It was a happy chaos of laughter and cookies, and you know what? That joyous energy is what I want to capture here today.
These brownies are not just a dessert; they’re an experience—a way to share joy, to gather friends, and to create sweet memories. So, apron on? Let’s jump into this delicious adventure!
Personal Story: The Magic of Brownies
Growing up, our family had a tradition of baking every Sunday. Each week, we would alternate treats—sometimes cookies, sometimes cakes, and of course, brownies. Those gooey delights were always my favorite. I fondly remember the excitement when my mom would pull them out of the oven, their tops all crackly and their insides undeniably decadent.
One Sunday, inspired by the lingering scent of spices from a box of Biscoff cookies, I decided to experiment. The day was gray, but as the brownies baked, the aroma flooded our small kitchen and brightened up the whole space. My siblings and I devoured them as soon as they were cool enough to touch, and we all agreed that the mix of chocolate and Biscoff was an instant classic. From that day forward, I’ve made those brownies countless times, and they’ve become a staple at family gatherings, holiday parties, and any time we just need a little sweet pick-me-up.
Ingredients
Here’s what you’ll need to create these luscious Biscoff brownies:
-
3/4 cup Biscoff cookie butter
The star of the show! This creamy spread adds a unique flavor that’s both sweet and spiced. You can substitute with other cookie butters if you’re in a pinch but nothing quite beats the original. -
1/2 cup light or dark brown sugar (packed)
This sugar adds depth and moisture to the brownies. If needed, feel free to use coconut sugar for a slightly different flavor. -
1/2 cup granulated sugar
This sugar balances the richness of the brownie while helping it rise. If watching your sugar intake, consider using a stevia blend. -
2 large eggs
Eggs provide structure. Make sure they’re at room temperature for the best results. -
1 large egg yolk
Adding an extra yolk contributes to that fudgy texture we all crave in brownies. You can omit this if you’re allergic, though the texture will be a bit different. -
1 tablespoon vanilla extract
This adds warmth to the flavors. Always use pure vanilla for the best aroma and taste. -
10 tablespoons unsalted butter
The butter creates richness. If you’re looking for a lactose-free version, try using coconut oil. -
2/3 cup + 1/4 cup semi-sweet chocolate chips
The chocolate chips add pockets of melty goodness. You can play with milk or dark chocolate to suit your taste. -
1/4 cup unsweetened Dutch cocoa powder
Cocoa powder intensifies the chocolate flavor. Don’t substitute with sweetened cocoa; we want control of that sweetness! -
2/3 cup + 1 tablespoon all-purpose flour
Flour gives structure. Be careful not to pack it too tightly when measuring! Spoon it into your measuring cup and level it off for accurate results. -
1 teaspoon espresso powder
A secret ingredient! Espresso powder enhances the chocolate flavor without making the brownies taste like coffee. Feel free to omit if you’re not a fan of coffee. -
1/2 teaspoon fine sea salt
Just a touch! Salt amplifies the sweet flavors in desserts. Always use fine salt for even distribution. -
4-5 Biscoff cookies (for the top)
These add a delicious decorative crunch! You can also use crushed-up Oreos or graham crackers for a different twist. -
Extra cookie butter (for the top)
Who doesn’t want a little more of the good stuff? Drizzling a bit on top before serving adds that touch of elegance.
Step-by-Step Instructions
Ready to whip up these delicious Biscoff brownies? Let’s get to it!
-
Preheat Your Oven: Set your oven to 350°F (175°C). This step is crucial—starting out with a properly heated oven ensures your brownies bake evenly and achieve that perfect fudgy texture!
-
Prepare Your Pan: Line an 8×8-inch baking pan with parchment paper, allowing some overhang for easy removal later. This trick saves you from wrestling with the brownies when it’s time to slice them!
-
Melt the Butter and Cookie Butter: In a medium saucepan over low heat, combine the unsalted butter and cookie butter. Stir occasionally until melted and smooth, then remove from heat. If you’re in a hurry, feel free to melt it in the microwave in intervals of about 20-30 seconds.*
-
Mix Sugars: In a mixing bowl, whisk together the light brown sugar and granulated sugar. Gradually add the melted butter mixture and stir until well combined. The warmth of the butter helps dissolve the sugars, making for a smoother final batter.
-
Incorporate Eggs: Add in the two large eggs and the additional egg yolk. Mix until fully incorporated—this step is vital for a soft texture, so take your time here!
-
Add Vanilla: Stir in the vanilla extract—believe me, it’ll elevate the flavor of your brownies to heavenly levels.
-
Combine Dry Ingredients: In another bowl, whisk together the flour, cocoa powder, espresso powder, and salt. Gradually add this dry mix to your wet ingredients, folding gently until just combined. Tip: Be careful not to overmix, or your brownies may end up a little tough!
-
Fold in Chocolate Chips: Gently fold in the 2/3 cup of chocolate chips. Seeing those little gems speckled throughout your brownie batter will make your heart sing.
-
Pour into the Pan: Pour the brownie batter into the prepared baking pan, using a spatula to spread it evenly. This is where you can get a little creative—press one or two of those Biscoff cookies into the top, and add a drizzle of extra cookie butter if you’re feeling adventurous!
-
Sprinkle More Chocolate Chips: Top with the remaining 1/4 cup of chocolate chips for that molten chocolate goodness throughout.
-
Bake: Place the pan in the oven and bake for 25-30 minutes. Start checking for doneness at the 25-minute mark—stick a toothpick into the center; if it comes out with a few moist crumbs, they’re ready! Remember, the brownies will continue to cook a bit once taken out of the oven, so don’t overbake!
-
Cool and Cut: Remove the brownies from the oven and let them cool in the pan for about 10 minutes. Then, using the parchment paper’s overhang, lift them out and let them cool on a wire rack. Once fully cooled, cut into squares. The hardest part? Waiting to dig in!
Serving Suggestions
For an impressive presentation, serve these brownies warm with a scoop of vanilla ice cream or a dollop of whipped cream on top. You can also sprinkle a little extra sea salt for that delightful sweet-plus-salty combination, or even drizzle more Biscoff cookie butter over each square for a decadent finish. The possibilities are as delightful as the tastes!
Recipe Variations
Feeling adventurous? Here are a few creative twists you can try:
- Nutty Biscoff: Add chopped walnuts or pecans for a crunchy texture.
- Minty Bliss: Substitute half of the chocolate chips with mint chips for a refreshing flavor.
- Nut Butter Brownies: Replace Biscoff with almond or peanut butter for a classic PB&J twist.
- Vegan Option: Use flax eggs and coconut oil instead of eggs and butter for a vegan version.
- Spiced Up: Add a pinch of cinnamon or ginger to the batter for a cozy fall flavor.
Chef’s Notes
These Biscoff brownies are an adaptation of a classic recipe, one I’ve made countless times with variations of my own. The addition of Biscoff cookie butter turned a traditional treat into something truly special and memorable. If you have any extra cookies left, crush them to use as a topping or even a crunchy base for other desserts. The beauty of these brownies is their versatility; with just a few tweaks, they can fit perfectly with any occasion. Oh, and don’t be surprised when they disappear in mere moments—trust me, they’re a crowd-pleaser!
FAQs and Troubleshooting
Q: Why are my brownies cakey instead of fudgy?
A: This could be due to overmixing the batter or adding too much flour. Be sure to measure carefully and mix just until combined.
Q: Can I freeze these brownies?
A: Absolutely! Once cooled, wrap them tightly in plastic wrap and store in an airtight container. They can last in the freezer for up to three months.
Q: How can I tell when my brownies are done?
A: A toothpick inserted into the center should come out with a few moist crumbs. If it’s clean or nearly clean, that means they might be overbaked.
Q: Can I use a different type of cookie butter?
A: Definitely! While Biscoff is a personal favorite, other flavors like Speculoos or even Nutella can offer a fun twist!
Nutritional Info (Optional)
For those curious about nutritional aspects, here’s a quick breakdown per serving (based on a 12-serving batch):
- Calories: ~220
- Fat: 12g
- Carbs: 28g
- Protein: 3g
- Sugars: 18g
Remember that these numbers may vary based on specific brands and substitutions used.
So, there you have it! An indulgent recipe for Biscoff brownies that truly honors the joy of cooking and sharing. I hope you try this recipe and savor every bite. Remember, cooking is all about creating moments—let those brownie bites be some of the sweetest! Now, who’s ready to tie on an apron and get started? ❤️
PrintBiscoff Brownies

Decadent brownies infused with rich chocolate and the irresistible flavor of Biscoff cookie butter.
- Prep Time: 15 minutes
- Cook Time: 30 minutes
- Total Time: 45 minutes
- Yield: 12 servings 1x
- Category: Dessert
- Method: Baking
- Cuisine: American
- Diet: Vegetarian
Ingredients
- 3/4 cup Biscoff cookie butter
- 1/2 cup light or dark brown sugar (packed)
- 1/2 cup granulated sugar
- 2 large eggs
- 1 large egg yolk
- 1 tablespoon vanilla extract
- 10 tablespoons unsalted butter
- 2/3 cup + 1/4 cup semi-sweet chocolate chips
- 1/4 cup unsweetened Dutch cocoa powder
- 2/3 cup + 1 tablespoon all-purpose flour
- 1 teaspoon espresso powder
- 1/2 teaspoon fine sea salt
- 4–5 Biscoff cookies (for the top)
- Extra cookie butter (for the top)
Instructions
- Preheat your oven to 350°F (175°C).
- Prepare an 8×8-inch baking pan lined with parchment paper.
- Melt the butter and cookie butter together in a saucepan over low heat.
- Mix the light brown sugar and granulated sugar together in a bowl, then add the melted butter mixture.
- Incorporate the eggs and egg yolk, mixing until fully combined.
- Add the vanilla extract and stir it in.
- Combine the flour, cocoa powder, espresso powder, and salt in another bowl, then gradually fold into the wet ingredients.
- Fold in the chocolate chips.
- Pour the batter into the prepared pan and top with Biscoff cookies and more chocolate chips.
- Bake for 25-30 minutes, checking for doneness.
- Cool in the pan for 10 minutes before transferring to a wire rack.
- Cut into squares and enjoy!
Notes
Serve warm with a scoop of vanilla ice cream or a dollop of whipped cream for an indulgent treat.
Nutrition
- Serving Size: 1 serving
- Calories: 220
- Sugar: 18g
- Sodium: 200mg
- Fat: 12g
- Saturated Fat: 7g
- Unsaturated Fat: 5g
- Trans Fat: 0g
- Carbohydrates: 28g
- Fiber: 2g
- Protein: 3g
- Cholesterol: 70mg
Keywords: Biscoff, Brownies, Chocolate, Dessert

Cookie Butter Cookies
Indulge in Whimsy: Cookie Butter Cookies
Welcome, dear friends! I am beyond thrilled to share with you one of the easiest, but oh-so-delightful treats that has taken my kitchen by storm: Cookie Butter Cookies. If you’re a fan of that aromatic, spiced goodness that is cookie butter (think Biscoff!), you’re going to love this recipe. With just a handful of ingredients, you can whip up soft, melt-in-your-mouth cookies that not only taste like a dream but also make your kitchen smell like a cookie bakery in full swing!
Picture this: a cozy evening with the aroma of warm cookies wafting through your home, a cup of tea or coffee in your hand, and your loved ones gathered around. Sounds perfect, right? This recipe is my little secret to creating those sweet moments that linger long after the last crumb has vanished. So, let’s dive into the delicious world of cookie butter cookies and make some magic happen!
A Whimsical Memory
Let me take you back to a rainy afternoon I spent in my grandmother’s kitchen. I was just a small child, but watching her bake was nothing short of mesmerizing. She had a knack for instilling magic into every loaf of bread and batch of cookies. One day, while rummaging through her pantry, we stumbled upon a jar of cookie butter. I was intrigued by the notion that something so sweet and spiced could exist.
“Let’s make cookies with this,” she said, and I’ll never forget the joy and wonder we shared as we blended the creamy, caramel-like spread with flour and sugar. It turned that gloomy day into a delightful cooking adventure filled with laughter and sprinkles of sugar. To this day, every time I use cookie butter, I am transported back to that cozy kitchen, and it inspires me to create and share recipes that bring joy and warmth to others.
Ingredients
Now, let’s gather our ingredients! Here’s what you’ll need to rustle up these delightful cookies:
-
1 cup cookie butter (Biscoff)
Cookie butter is the star of this show! If you can’t find Biscoff, any cookie butter works, or you can make your own by blending crushed cookies with a little oil. Just remember, the more spiced the cookie butter, the richer the flavor! -
1/2 cup brown sugar
This adds moisture and a lovely depth of flavor. If you’re out of brown sugar, you can use granulated sugar, but the cookies will be less chewy. -
1/4 cup granulated sugar
A little extra sweetness to balance things out. This sugar can also be replaced with coconut or raw sugar for a different nuance. -
1 egg
The binding agent that holds everything together. If you want to keep these cookies vegan, you can use a flax egg (1 tablespoon ground flaxseed mixed with 2.5 tablespoons of water), or even applesauce! -
1 teaspoon vanilla extract
A splash of vanilla elevates everything! If you want an extra kick, try adding almond extract instead—delicious! -
1 1/4 cups all-purpose flour
This binds our cookies. If you want an earthy twist, swap out a portion for whole wheat flour or almond flour, but keep in mind that it may change the texture a bit. -
1/2 teaspoon baking soda
This is essential for those lovely soft cookie interiors. If you are out of baking soda, double the amount of baking powder, but don’t forget to adjust the flour! -
1/4 teaspoon salt
A pinch of salt helps enhance the sweet flavors and balances the cookie butter’s sweetness. You can use sea salt or kosher salt for a different texture. -
1/2 cup chocolate chips (optional)
This is where you can let your creativity shine! Dark, semi-sweet, or even white chocolate—choose your favorite! For dairy-free, go for vegan chocolate chips.
Step-by-Step Instructions
Let’s get those ovens preheated to 350°F (175°C) because we’re about to embark on a baking adventure! Here’s how to whip up your cookie butter cookies, one step at a time:
-
Mix the Sugars and Cookie Butter
In a large mixing bowl, combine your cookie butter, brown sugar, and granulated sugar. Using a hand mixer or stand mixer, blend them together until the mixture becomes smooth and creamy. This usually takes about 1-2 minutes. Trust me, this is the base of deliciousness! -
Add the Egg and Vanilla
Crack that egg into the bowl and add the vanilla extract. Mix until well combined—the batter should look silky and inviting. You could even take this moment to sneak a taste (just a tiny one, for quality control!). -
Sift the Dry Ingredients
In a separate bowl, whisk together the flour, baking soda, and salt. Sifting helps aerate the flour, ensuring a light and fluffy texture. Gradually add the dry mixture to the wet ingredients, mixing carefully until there’s no flour left visible. This is the time when it all starts to come together! -
Incorporate Chocolate Chips
Fold in your choice of chocolate chips with a rubber spatula or wooden spoon. You want them evenly distributed, so take your time here—it’s worth it! -
Scoop the Dough
Using a cookie scoop or two spoons, drop rounded tablespoons of dough onto a lined baking sheet. Leave enough space in between because these babies will spread out in the oven, becoming soft and chewy pockets of joy. -
Bake
Pop those trays in your preheated oven for about 10-12 minutes. You want them to be golden on the edges but still soft in the center because they’ll continue to cook a bit after you take them out. -
Cool Down
Once baked, let them cool on the baking sheet for 5 minutes before transferring them to a wire rack. This step is crucial for ensuring they set perfectly!
Serving Suggestions
When it comes to plating these cookie butter cookies, simplicity is key. Stack them on a beautiful plate, perhaps with a sprinkling of sea salt on top for an elegant touch. You could even place them in a glass jar with a ribbon tied around it for a charming gift! Consider serving them with a scoop of vanilla ice cream or a dollop of whipped cream for a bit of decadence.
Recipe Variations
Feeling adventurous? Here are some delightful variations you can try:
-
Nutty Delight: Add 1/2 cup of chopped nuts (like walnuts or pecans) to the dough for an added crunch.
-
Spiced Perfection: Incorporate a teaspoon of cinnamon or a pinch of nutmeg into the dry ingredients to elevate those warm flavors!
-
Coconut Twist: Swap out half of the flour for shredded coconut for a tropical vibe.
-
Fruity Fun: Fold in dried fruits like cranberries or raisins for a chewy texture and a burst of flavor.
-
Caramel Surprise: Add a few caramel bits to the dough for a fun surprise in every bite.
Chef’s Notes
These cookie butter cookies hold a special place in my heart because they capture the essence of simplicity and joy in baking. Every time I make them, it transports me back to the kitchen with my grandmother. You know, there’s something about using cookie butter that makes baking feel a little more like child’s play. It’s fun, it’s messy, and it’s bound to bring a smile to anyone’s face. Plus, they’ve become a favorite treat among my friends, often ending with some friendly cookie wars to see whose version is best!
FAQs and Troubleshooting
1. Why are my cookies flat?
Flat cookies usually mean the butter got too warm or you didn’t use enough flour. Make sure to measure accurately and consider chilling the dough for 30 minutes before baking for thicker cookies!
2. Can I freeze the dough?
Absolutely! You can freeze the dough before baking. Just scoop out the dough, place it on a parchment-lined tray, and freeze them until solid. Transfer to a freezer bag and bake straight from the freezer, adding a couple of extra minutes to the baking time.
3. Why are my cookies too dry?
Overbaking often leads to dry cookies. Remember: if you take them out while they still look slightly underbaked in the middle, that’s okay. They’ll firm up as they cool.
4. How can I make these gluten-free?
Substituting the all-purpose flour for a gluten-free all-purpose blend usually works beautifully! Just make sure your cookie butter is gluten-free, too!
Nutritional Info
For those curious about the nutritional aspect, here’s an approximate rundown per cookie (assuming about 24 cookies total, depending on size):
- Calories: 120
- Protein: 1.5g
- Carbohydrates: 18g
- Fat: 5.5g
- Fiber: 1g
- Sugar: 8g
And there you have it—cookie butter cookies that will charm anyone lucky enough to have one (or two!). I hope this recipe brings sweetness to your kitchen, invites conversation to your table, and inspires you to create your own beautiful memories. Happy baking, friends! Let’s make life just a little sweeter, one cookie at a time!
PrintCookie Butter Cookies

Delightful, soft cookies made with cookie butter for a warm, sweet treat.
- Prep Time: 15 minutes
- Cook Time: 12 minutes
- Total Time: 27 minutes
- Yield: 24 cookies 1x
- Category: Dessert
- Method: Baking
- Cuisine: American
- Diet: Vegetarian
Ingredients
- 1 cup cookie butter (Biscoff)
- 1/2 cup brown sugar
- 1/4 cup granulated sugar
- 1 egg
- 1 teaspoon vanilla extract
- 1 1/4 cups all-purpose flour
- 1/2 teaspoon baking soda
- 1/4 teaspoon salt
- 1/2 cup chocolate chips (optional)
Instructions
- Mix the sugars and cookie butter in a large mixing bowl until smooth and creamy.
- Add the egg and vanilla extract, mixing until well combined.
- Sift the flour, baking soda, and salt in a separate bowl, then gradually incorporate this into the wet mixture.
- Incorporate the chocolate chips until evenly distributed.
- Scoop rounded tablespoons of dough onto a lined baking sheet, leaving space between each.
- Bake in a preheated oven at 350°F (175°C) for 10-12 minutes until golden on the edges.
- Cool on the baking sheet for 5 minutes before transferring to a wire rack.
Notes
You can freeze the dough before baking for later enjoyment. Chill the dough for thicker cookies if needed.
Nutrition
- Serving Size: 1 cookie
- Calories: 120
- Sugar: 8g
- Sodium: 100mg
- Fat: 5.5g
- Saturated Fat: 2g
- Unsaturated Fat: 3.5g
- Trans Fat: 0g
- Carbohydrates: 18g
- Fiber: 1g
- Protein: 1.5g
- Cholesterol: 30mg
Keywords: cookies, cookie butter, dessert, sweet treat, baking
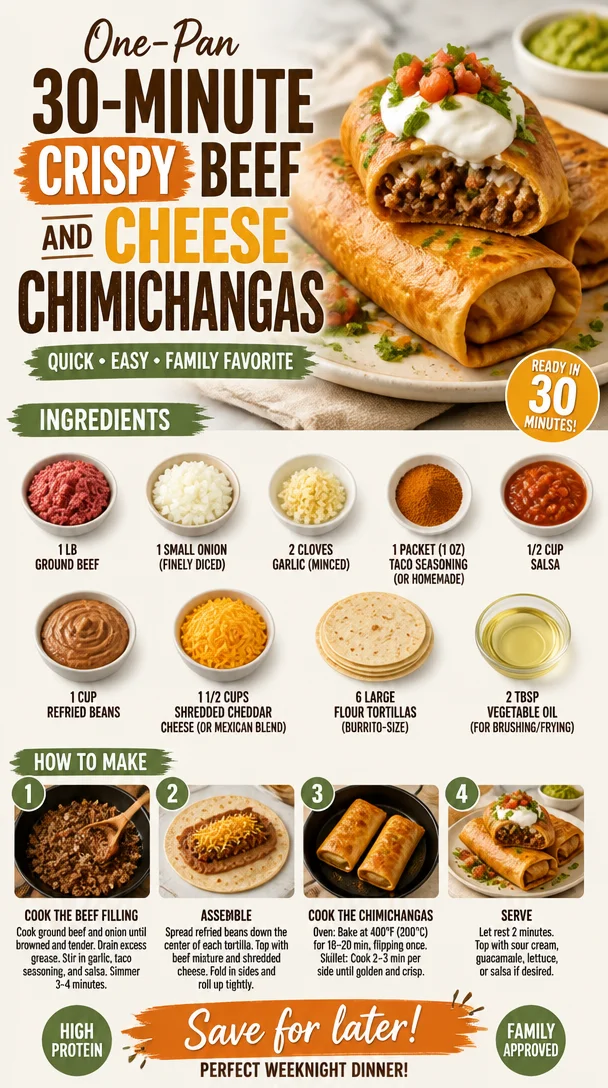
One-Pan 30-Minute Crispy Beef and Cheese Chimichangas
Beef and Cheese Chimichangas: A Family Favorite
Hey there, fellow food enthusiasts! Welcome back to Ivory Apron, your happy kitchen oasis where cooking feels elegant but never intimidating. Today, we’re diving into a dish that’s not just delicious—it’s packed with personal memories and a whole lot of flavor. Get ready to learn how to make the ultimate Beef and Cheese Chimichangas that will have everyone at your table asking for seconds.
Introduction
Chimichangas may have originated in the Southwestern United States, but in my kitchen, they feel like a warm embrace from the family. This dish is not just a recipe; it’s a celebration of flavors, people, and unforgettable moments. When you take a bite of a perfectly crispy chimichanga filled with seasoned beef, gooey cheese, and warm flavors, it’s a party in your mouth, and trust me, you’ll want to host this fiesta again and again!
Picture this: it’s Friday night, and my family gathers around the table, laughter bouncing off the walls, as I plate up golden, crispy chimichangas, fresh from the skillet. I’ve made a big batch, and each one is filled with ground beef, onions, cheese, and just the right amount of salsa to make things interesting. I remember my mom teaching me how to roll them just right, so the filling stays inside—that was the secret!
You can serve these beauties with a side of guacamole, a drizzle of sour cream, or even a fresh pico de gallo. They’re versatile, they’re comforting, and they turn any weeknight dinner into an occasion worth celebrating. Let’s not waste any time; grab your apron and let’s cook!
Personal Story
One of my fondest memories growing up involves my mom’s chimichangas. Every Sunday, she would pull out her trusty cast-iron skillet and set the mood with some tangy salsa and fresh guacamole ready to go. I remember standing on a tiny stool, my hands eagerly hovering around as I watched her expertly brown the tortillas, then filling them with seasoned beef and cheese before rolling them up like little warm presents.
My favorite part? The sizzle that filled the kitchen as they fried to a perfect golden brown! The best part was not just the eating (though that was certainly a highlight) but the stories shared around the table—stories of her childhood and mine, laughter and connection that lasted long after the plates were clean. These chimichangas weren’t just food; they were a symbol of home, comfort, and love. Now, I’m excited to share this joyful recipe with you so you can create those same happy memories in your kitchen!
Ingredients
Here’s what you’ll need to make these irresistible Beef and Cheese Chimichangas:
-
1 lb ground beef
A classic filling that’s both hearty and satisfying. You can substitute with ground turkey or chicken for a lighter option. -
1 small onion (finely diced)
Onion adds great flavor and sweetness to the filling. If you’re in a pinch, you can use shallots or even onion powder. -
2 cloves garlic (minced)
Fresh garlic gives a beautiful aromatic touch. In a hurry? Garlic powder can serve in a pinch—just use about ½ teaspoon. -
1 packet (1 oz) taco seasoning (or homemade)
Taco seasoning brings a punch of flavor! You can either buy a packet or make your own with spices like cumin, chili powder, and paprika. -
½ cup salsa
Salsa adds moisture and tanginess. Feel free to use your favorite store-bought brand or homemade salsa for freshness! -
1 cup refried beans
These provide a creamy texture and a little protein boost! For a vegetarian option, you can substitute with black beans or additional veggies. -
1½ cups shredded cheddar cheese (or Mexican blend)
Cheese makes everything better! Feel free to experiment with other cheeses like Monterey Jack or even queso blanco. -
6 large flour tortillas (burrito-size)
A sturdy tortilla holds your fillings well. You can also opt for whole grain tortillas or corn tortillas if gluten is a concern. -
2 tbsp vegetable oil (for brushing/frying)
Oil creates that crispy texture we all crave. If you’re looking for healthier options, try using avocado oil or even baking them instead of frying!
Step-by-Step Instructions
Let’s get cooking! Follow these steps, and you’ll be enjoying delightful chimichangas in no time:
-
Cook the Beef Mixture
In a large skillet, heat a drizzle of oil over medium heat. Add the finely diced onion and sauté until soft and translucent (about 3-4 minutes). Then, add the minced garlic and cook for another minute until fragrant. -
Add the Ground Beef
Next, add your ground beef, breaking it apart with a spatula. Cook until browned and no longer pink (about 6-8 minutes). Don’t forget to drain any excess fat—nobody likes greasy chimichangas! -
Season the Beef
Once the beef is cooked, sprinkle your taco seasoning over it and mix well. Pour in the salsa and refried beans. Stir until combined and heated through. Let this savory mixture simmer for a couple of minutes, allowing the flavors to meld together beautifully. -
Add Cheese
Remove the skillet from heat and fold in 1 cup of the shredded cheese until it gets melty and gooey. This is where the magic happens! -
Prepare the Tortillas
Lay out your flour tortillas on a clean surface, and place about 1/3 cup of the beef mixture in the center of each one. Fold in the sides and then roll it up like a burrito, making sure it’s nice and snug—no one likes a leaky chimichanga! -
Fry or Bake?
Now, here comes the fun part! If you’re frying, heat vegetable oil in a large skillet over medium-high heat. Once hot, add the chimichangas seam side down and cook for about 3-4 minutes per side until they turn golden brown and crispy. If you prefer baking, brush them with a little oil and place them seam side down on a baking sheet in a preheated oven at 425°F (220°C) for 20-25 minutes, flipping halfway. -
Garnish and Serve
Once they’re perfectly golden, remove the chimichangas from the oil (or oven) and let them drain on a paper towel. Sprinkle any remaining cheese over the top while they’re still hot, and serve with your favorite sides!
Serving Suggestions
Now that you’ve made these crispy delights, it’s time to show them off! Place your chimichangas on a large, colorful platter and add toppings of your choice—think diced avocado, fresh cilantro, or a drizzle of sour cream. If you’re feeling fancy, a sprinkle of queso fresco or a squeeze of lime can elevate them even further. Enjoy them with a side of fresh salsa and chips, or serve them alongside a light salad for a balanced meal!
Recipe Variations
Don’t hesitate to get creative! Here are some fun twists you can try on these chimichangas:
- Vegetarian version: Swap the ground beef for a mixture of beans, lentils, and veggies such as bell peppers and zucchini for a hearty vegetarian option.
- Spicy kick: Add diced jalapeños or a splash of hot sauce to the filling for that extra heat!
- Cheesy delights: Mix in different cheeses like pepper jack for a bit of spice.
- Breakfast chimichangas: Fill them with scrambled eggs, spicy sausage, and cheese for a delicious breakfast treat!
- Sweet twist: Try a dessert version! Fill tortillas with nut butter, bananas, and chocolate chips, then fry and sprinkle with powdered sugar.
Chef’s Notes
Making chimichangas has always been a fun family affair in my kitchen. Sometimes I’ll invite friends over, and we’ll all take turns rolling them up, laughing and sharing stories about our cooking mishaps. Just the other day, I was trying a new folding technique I’d seen online, and it went all wrong—think of a comical kitchen disaster! But you know what? Even the mishaps lead to delicious outcomes. That’s the beauty of cooking!
As I’ve perfected this recipe over the years, I’ve learned that it’s all about having fun in the kitchen. Whether you’re making them for a special occasion or just a cozy weeknight dinner, know that the laughter and love you put into these chimichangas are the secret ingredients!
FAQs and Troubleshooting
1. My chimichangas fell apart while frying, what went wrong?
Make sure to roll them tightly and tuck in the sides as you roll to prevent leaks. If they’re not sealed well, they may break apart in the oil.
2. Can I make these ahead of time?
Absolutely! You can prepare the filling a day in advance and just roll and fry them when you’re ready. You could also freeze them after assembling—just fry directly from frozen, adding a couple of extra minutes to the cooking time.
3. Why are my chimichangas not crispy?
Ensure the oil is hot enough when you add the chimichangas—if it’s not, they tend to absorb the oil and become soggy. A proper frying temperature is key!
4. Can I bake chimichangas instead of frying?
Definitely! Baking is a healthier alternative. Just brush them with a little oil before placing them in the oven for that golden color.
Nutritional Info (if applicable)
These Beef and Cheese Chimichangas are hearty and fulfilling, making them a satisfying dinner option! On average, one chimichanga contains around 350–400 calories, depending on specific ingredient choices and portion sizes. Pair with veggies or a side salad to enhance your meal’s nutritional content.
So there you have it—everything you need to make your time in the kitchen unforgettable while enjoying every bite! I hope this Beef and Cheese Chimichanga recipe becomes a favorite in your own home, just like it is in mine. Happy cooking, and don’t forget to gather around your beautiful table with the people you love. Until next time, keep chasing those flavors!
PrintBeef and Cheese Chimichangas
Deliciously crispy chimichangas filled with seasoned ground beef and gooey cheese, perfect for family gatherings.
- Prep Time: 15 minutes
- Cook Time: 30 minutes
- Total Time: 45 minutes
- Yield: 6 servings 1x
- Category: Main Course
- Method: Frying or Baking
- Cuisine: Mexican
- Diet: None specified
Ingredients
- 1 lb ground beef
- 1 small onion (finely diced)
- 2 cloves garlic (minced)
- 1 packet (1 oz) taco seasoning
- ½ cup salsa
- 1 cup refried beans
- 1½ cups shredded cheddar cheese
- 6 large flour tortillas (burrito-size)
- 2 tbsp vegetable oil (for brushing/frying)
Instructions
- Cook the Beef Mixture: In a large skillet, heat a drizzle of oil over medium heat. Add the finely diced onion and sauté until soft and translucent (about 3-4 minutes). Then, add the minced garlic and cook for another minute until fragrant.
- Add the Ground Beef: Next, add your ground beef, breaking it apart with a spatula. Cook until browned and no longer pink (about 6-8 minutes). Don’t forget to drain any excess fat.
- Season the Beef: Once the beef is cooked, sprinkle taco seasoning over it and mix well. Pour in salsa and refried beans. Stir until combined and heated through.
- Add Cheese: Remove the skillet from heat and fold in 1 cup of the shredded cheese until it gets melty and gooey.
- Prepare the Tortillas: Lay out tortillas on a clean surface, and place about 1/3 cup of the beef mixture in the center of each. Fold in the sides and roll it up like a burrito.
- Fry or Bake: If frying, heat vegetable oil over medium-high heat and add chimichangas seam side down, cooking for about 3-4 minutes per side until golden brown. To bake, brush with oil and place seam side down on a baking sheet in a preheated oven at 425°F (220°C) for 20-25 minutes.
- Garnish and Serve: Once golden, remove chimichangas from the oil (or oven) and let drain on a paper towel. Sprinkle remaining cheese on top while hot and serve with your favorite sides.
Notes
Feel free to customize the filling with other ingredients or spices to suit your taste.
Nutrition
- Serving Size: 1 chimichanga
- Calories: 375
- Sugar: 3g
- Sodium: 500mg
- Fat: 20g
- Saturated Fat: 8g
- Unsaturated Fat: 7g
- Trans Fat: 0g
- Carbohydrates: 30g
- Fiber: 3g
- Protein: 20g
- Cholesterol: 60mg
Keywords: chimichangas, beef, cheese, Mexican cuisine, comfort food
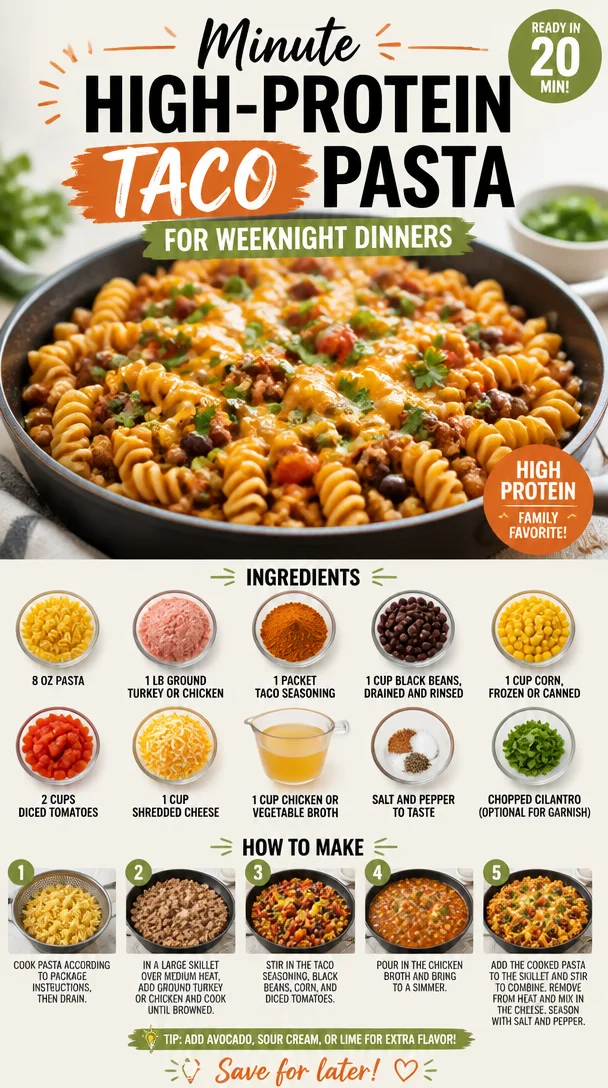
Minute High-Protein Taco Pasta for Weeknight Dinners
High Protein Taco Pasta: A Flavorful, Comforting Bowl of Joy
Hello, food lovers! Today, I’m thrilled to share a recipe that brings together the joy of tacos and the comforting heart of pasta. Yes, you guessed it right—I’m talking about High Protein Taco Pasta! This dish is not only packed with flavor, but it’s also a fantastic way to sneak in some extra protein. Let’s dive in and create a bowl of goodness that’s bound to impress.
A Little Story to Set the Mood
Let me take you back to my childhood, where food wasn’t just about sustenance but also about experiences. Every Friday night was taco night at my house, and my mom was the reigning queen of the taco. We’d gather around the table, ingredients spread out like a colorful canvas—crunchy tortillas, seasoned meat, loads of toppings, and always a story or two that went along with them. That’s where my love for mixing flavors and creating something new began, leading me to concoct this amazing taco pasta dish.
One night, in a moment of creativity (or maybe it was just hunger), I decided to swap tortillas for pasta! The result was a flavor explosion that combined my love for both. My friends and family were skeptical at first, but once they tried it, it was love at first bite. This dish quickly became a staple in my home, reminding me that food is always more than just ingredients—it’s about gathering, sharing, and creating memories.
Now, it’s your turn to create your own taco night twist, and I promise—this bowl of High Protein Taco Pasta will be the star of your table!
The Ingredients You’ll Need
Here’s what you’ll need to whip up this magical dish:
- 8 oz pasta: Any type you love works well! Whole wheat or protein-enriched pasta can boost the health benefits.
- 1 lb ground turkey or chicken: Lean and high in protein; you can also use plant-based options like lentils for a vegetarian version.
- 1 packet taco seasoning: Store-bought is convenient, but you can make your own with chili powder, cumin, garlic powder, and a pinch of salt.
- 1 cup black beans: Rinsed and drained for a tasty protein punch. Feel free to swap them for kidney beans if you prefer.
- 1 cup corn: Frozen, canned, or fresh—just make sure it’s sweet and delicious!
- 2 cups diced tomatoes: Fresh is great, but canned works too. Opt for fire-roasted tomatoes for extra flavor!
- 1 cup shredded cheese: I recommend cheddar or Mexican blend. Use a dairy-free cheese for a lactose-free twist.
- 1 cup chicken or vegetable broth: This elevates the dish’s base. Homemade broth makes all the difference, but store-bought is super convenient.
- Salt and pepper to taste: Don’t be shy! Seasoning is key to bringing flavors alive.
- Chopped cilantro (optional for garnish): A fresh touch that livens up the flavors. Skip it if you’re not a fan!
With these beautiful ingredients on your counter, let’s get ready to cook!
Step-by-Step Instructions
-
Boil the Pasta: Begin by bringing a pot of salted water to a rolling boil. Once it’s bubbling, add your choice of pasta and cook according to package instructions until al dente (usually 7-9 minutes). Remember to stir occasionally to prevent sticking. Chef’s tip: save about half a cup of pasta water before draining! It’ll help bring everything together later.
-
Cook the Meat: In a large skillet, heat a drizzle of olive oil over medium heat. Add the ground turkey or chicken, and break it apart with a wooden spoon. Sauté until browned and no longer pink, about 5-7 minutes. Hot tip: Add a pinch of salt while cooking to enhance the meat’s flavor right from the start!
-
Taco Seasoning Time: After the meat is browned, sprinkle in the taco seasoning and mix well. Cook for another 1-2 minutes to let the spices bloom. A little secret: If you have some extra heat-loving friends, add a dash of cayenne pepper for some spice!
-
Add The Goodies: Toss in the black beans, corn, and diced tomatoes into the skillet. Pour in the broth and stir everything together. Cheesy hack: If you want creaminess, you can add a bit of cream cheese or sour cream at this point for a richer dish!
-
Combine the Pasta: Now, add that glorious pasta you cooked earlier to the skillet. Toss everything together gently, and if it looks a bit dry, add some of that reserved pasta water. The goal is a deliciously cohesive mixture that clings to the noodles. Chef’s note: don’t be afraid to mix it up! Use a pair of tongs or even your hands for the best combination!
-
Cheesy Finish: Before serving, sprinkle the shredded cheese on top, cover with a lid, and let it sit for a few minutes on low heat until the cheese is melted and gooey. This takes the dish to the next level.
Serving Suggestions
To plate, spoon the cheesy taco pasta into vibrant bowls and garnish with the optional chopped cilantro. A little sprinkle of extra cheese on top never hurts! Serve it alongside a simple salad or some tortilla chips for a crunchy contrast. Don’t forget to pour yourself a refreshing drink to accompany this delightful dish. Cheers!
Recipe Variations
Here are some fun twists you can try with this recipe:
- Spicy Taco Pasta: Add jalapeños or diced green chilies for an extra kick!
- Vegetarian Version: Swap the meat for textured vegetable protein (TVP) or chickpeas for a delicious plant-based option.
- Creamy Taco Pasta: Mix in a cup of cream cheese or Greek yogurt before serving for a creamy texture.
- Mexican Street Corn Style: Stir in some crumbled feta, lime juice, and cilantro for a fun take on Elote (Mexican street corn).
- Zucchini Noodles: Replace pasta with spiralized zucchini for a low-carb alternative that’s equally delicious.
Chef’s Notes
This recipe has traveled with me through many occasions—family dinners, gatherings with friends, and even second-day lunches where it tastes even better! I often switch up the beans and add whatever veggies I have lying around, which makes this recipe versatile and adaptable to what’s in your pantry. I once used leftover roasted chicken, and it turned out fabulous!
Remember, cooking is all about experimenting, and something delicious often comes from what might seem like an accident. The kitchen is your playground—don’t be afraid to get a little messy and creative!
FAQs and Troubleshooting
Q: Can I use gluten-free pasta?
Absolutely! Gluten-free pasta works well in this recipe. Just pay attention to the cooking times, as they can vary.
Q: What if I don’t have taco seasoning?
No worries! You can make your own using chili powder, cumin, garlic powder, onion powder, and a bit of salt. Adjust to taste!
Q: How can I store leftovers?
Keep any leftovers in an airtight container in the fridge for up to 4 days. Just reheat gently when you’re ready to enjoy.
Q: My pasta turned out too mushy, what happened?
This can happen if the pasta is overcooked or if you didn’t reserve enough cooking water. Make sure to keep an eye on it during cooking and remember to save that starchy water for sauce consistency.
Nutritional Info
(Basic nutritional info per serving, based on the recipe as written:)
- Calories: 450
- Protein: 35g
- Carbohydrates: 45g
- Fat: 15g
Remember to adjust based on your specific ingredients!
Conclusion
There you have it—the perfect High Protein Taco Pasta that combines the rich flavors of taco night with the heartiness of pasta. I hope you enjoyed cooking along with me! Remember, as you gather around your table with friends and family, that love and intention are the secret ingredients in every meal. Until next time, happy cooking!
Let’s tie on our aprons and continue to create moments that bring us together. Cheers! 🍽️
PrintHigh Protein Taco Pasta

A flavorful twist combining the joys of tacos and pasta, packed with protein.
- Prep Time: 15 minutes
- Cook Time: 20 minutes
- Total Time: 35 minutes
- Yield: 4 servings 1x
- Category: Main Course
- Method: Cooking
- Cuisine: Mexican
- Diet: High Protein
Ingredients
- 8 oz pasta (whole wheat or protein-enriched recommended)
- 1 lb ground turkey or chicken (or lentils for vegetarian)
- 1 packet taco seasoning
- 1 cup black beans (rinsed and drained)
- 1 cup corn (frozen, canned, or fresh)
- 2 cups diced tomatoes (fresh or canned)
- 1 cup shredded cheese (cheddar or Mexican blend)
- 1 cup chicken or vegetable broth
- Salt and pepper to taste
- Chopped cilantro (optional for garnish)
Instructions
- Boil the pasta in salted water according to package instructions until al dente.
- Cook the meat in a skillet with olive oil until browned.
- Sprinkle in taco seasoning and cook for an additional 1-2 minutes.
- Add black beans, corn, diced tomatoes, and broth to the skillet, stirring together.
- Combine the cooked pasta with the mixture, adding reserved pasta water as needed.
- Sprinkle shredded cheese on top, cover, and let melt.
Notes
This dish is versatile and can be customized with ingredient swaps or additions like cream cheese for a creamy version.
Nutrition
- Serving Size: 1 serving
- Calories: 450
- Sugar: 5g
- Sodium: 600mg
- Fat: 15g
- Saturated Fat: 7g
- Unsaturated Fat: 5g
- Trans Fat: 0g
- Carbohydrates: 45g
- Fiber: 10g
- Protein: 35g
- Cholesterol: 70mg
Keywords: pasta, taco, high protein, comfort food, quick recipe
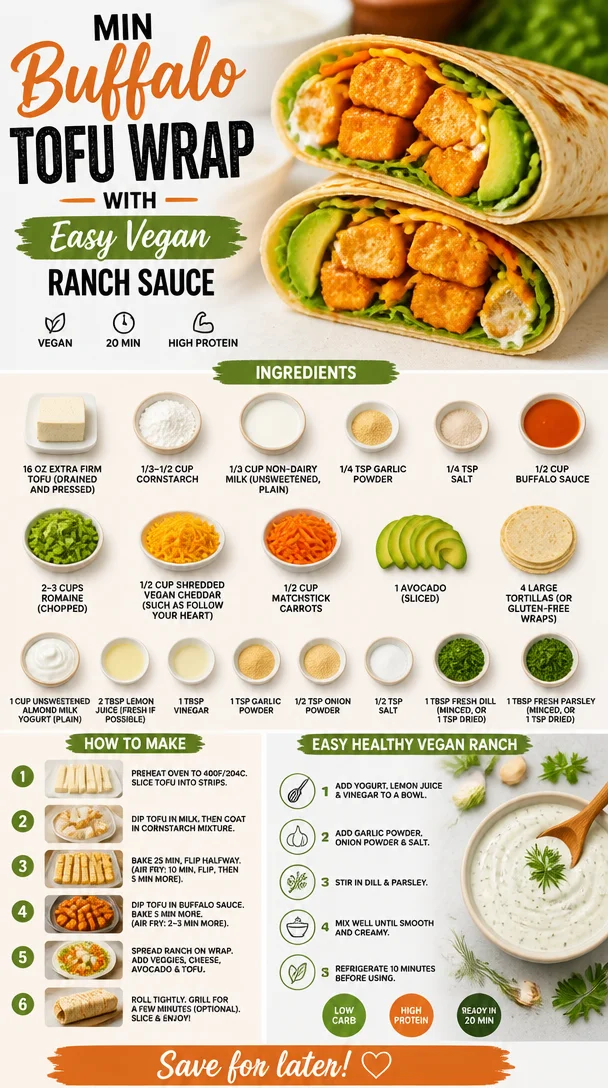
Min Buffalo Tofu Wrap with Easy Vegan Ranch Sauce
Buffalo Tofu Wraps with Easy Vegan Ranch
Introduction
Hey there, my food-loving friends! Today, I’m so excited to share a recipe that has become a staple in my kitchen: Buffalo Tofu Wraps with Easy Vegan Ranch. This dish is a glorious celebration of bold flavors and vibrant colors, perfect for those busy weeknights or when you want something delightful yet stress-free. It’s also a fantastic choice for gatherings, impressing both vegans and non-vegans alike.
I remember the first time I tried buffalo tofu wings at a local vegan cafe. I was skeptical at first; tofu wings? Really? But one bite changed everything. The crispy coating, the tangy heat of the buffalo sauce, and the cool creaminess of ranch dressing created a flavor explosion that had me craving more. It struck me that these components could easily transition into a wrap to make it even more filling and shareable! So, armed with the idea, I rushed home to create my own version of this dish. Spoiler alert: it was a huge hit, and I still make it regularly for get-togethers and casual dinners alike.
You’re going to love how straightforward this recipe is, with steps that lead you to quickly pop these wraps on the table. Let’s roll up our sleeves, tie on our aprons, and get cooking!
Personal Story
Let me take you back to a crisp fall evening a few years ago. I had invited over friends for a casual movie night, and I wanted to whip up something both satisfying and a bit different. Inspired by my newfound love for buffalo tofu, I decided to create these wraps. As the scent of frying tofu filled my kitchen, it brought back memories of my childhood, when my family would gather around the dinner table, sharing stories and laughter.
As I prepared, I laughed at how my kitchen was a delightful mess—spices scattered, veggie peels on the counter, and the sound of laughter escaping the living room where my friends waited in anticipation. The first wrap came together beautifully, and as I took my first satisfying bite, it felt like I was elevating not only my cooking but also the joy of gathering together. These wraps quickly became a beloved dish in my recipe repertoire, and they’ll surely find a special place in yours too!
Ingredients
Here’s what you’ll need to whip up these scrumptious Buffalo Tofu Wraps, along with a few insights to keep in mind:
-
16 oz block extra firm tofu (drained and pressed)
Tofu is a fantastic protein source and perfect for absorbing flavors. Extra firm is essential for that crispy texture. If you can’t find extra firm, you can use firm—just be careful to press it well to remove excess moisture. -
1/3–1/2 cup cornstarch
This is the magic ingredient for achieving a crispy coating. If you prefer a different texture, you can substitute with arrowroot powder or tapioca starch. -
1/3 cup non-dairy milk (unsweetened, plain)
This helps create a light batter. Almond milk, soy milk, or oat milk work like a charm! Choose whatever fits your dietary preference. -
1/4 tsp garlic powder
A must-have for flavor! If you adore garlic, feel free to double this. -
1/4 tsp salt
Essential for enhancing flavors. Adjust according to your taste! -
1/2 cup buffalo sauce
Choose your favorite brand! Want less heat? Pick a milder buffalo sauce or mix in a bit of ketchup. -
2-3 cups romaine (chopped)
Fresh, crunchy greens add a refreshing touch to the wraps. Feel free to swap with spinach or kale if you prefer. -
1/2 cup shredded vegan cheddar (such as Follow Your Heart)
This gives a cheesy flavor without the dairy. You can skip this if you want a lighter wrap or use nutritional yeast as a flavor enhancer. -
1/2 cup matchstick carrots
These add a beautiful crunch! If you’re short on time, buy pre-packaged matchstick carrots. -
1 avocado (sliced)
Creamy and rich, avocados elevate the meal. For a little zing, add a squeeze of lime over the slices! -
4 large tortillas (or gluten-free wraps)
Whole wheat or gluten-free, both work beautifully. A thicker wrap ensures everything holds together well. -
1 cup unsweetened almond milk yogurt (plain)
This is the base for your ranch dressing. Plain coconut yogurt or soy yogurt would work here too. -
2 tbsp lemon juice (fresh if possible)
A fresh-squeezed lemon gives brightness to your dressing. If you don’t have lemon, vinegar is a solid substitute. -
1 tbsp vinegar
This adds a tangy depth; apple cider vinegar is an excellent option. -
1 tsp garlic powder
More garlic goodness! Add more if you’re a fan. -
1/2 tsp onion powder
For a savory punch! Feel free to use fresh diced onion instead. -
1/2 tsp salt
To taste; you can also use garlic salt for added flavor. -
1 tbsp fresh dill (minced, or 1 tsp dried)
Fresh dill brings brightness; you can switch it out for fresh chives or parsley. -
1 tbsp fresh parsley (minced, or 1 tsp dried)
A touch of freshness that completes the ranch. Use any herbs that excite you!
Step-by-Step Instructions
Let’s dive into the cooking process! Follow along, and I promise, it’ll be a breeze.
-
Prepare Your Tofu
Start by draining your tofu and pressing it to remove excess moisture. The longer you press, the firmer the tofu will be! I usually wrap it in a clean kitchen towel or paper towels, place it on a plate, and set something heavy on top for about 15-20 minutes. -
Cut the Tofu
Once pressed, slice the tofu into bite-sized cubes or sticks. A sharp knife is your best friend here! -
Make the Tofu Coating
In a medium bowl, combine the cornstarch, garlic powder, and salt. Add the non-dairy milk and mix until smooth. Your batter should be thick enough to coat the tofu, so adjust your cornstarch and milk ratio accordingly if needed! -
Coat the Tofu
Toss the tofu pieces in this batter until well-coated. This step is crucial for that amazing crispiness; make sure each piece gets its fair share! -
Heat the Oil
In a large non-stick skillet, pour in a tablespoon of oil and heat it over medium heat. You want it hot enough that when you drop a small piece of tofu in, it sizzles! -
Fry the Tofu
Carefully add the battered tofu to the hot skillet in a single layer. Cook for about 3-4 minutes on each side until golden and crispy. Avoid overcrowding the pan; you want that lovely sear! -
Coat with Buffalo Sauce
Once your tofu is golden, remove it from the skillet and place it in a bowl. Pour the buffalo sauce over the tofu, tossing gently to coat each piece. This is where the magic happens! -
Prepare the Vegan Ranch
In a small bowl, mix the almond yogurt, lemon juice, vinegar, garlic powder, onion powder, salt, dill, and parsley. Whisk until combined and creamy. Take a moment to taste it and adjust the seasoning to your liking—this ranch is all about personalization! -
Assemble the Wraps
Take one tortilla and layer it with a handful of romaine, a big scoop of your buffalo tofu, a sprinkle of carrots, a slice of avocado, and a drizzle of your vegan ranch. Don’t be shy—fill it up! -
Wrap It Up
Fold the sides of the tortilla in toward the center, then roll it up from the bottom. Voila! Your wrap is ready to enjoy. If you’re feeling fancy, you can toast it in the skillet for an extra crispy touch.
Serving Suggestions
To serve these tasty wraps, cut them in half on a diagonal and display them on a colorful platter. You could accompany them with extra vegan ranch for dipping, sliced veggies, or even a simple green salad. It’s all about creating your own little spread that makes your gathering feel special!
Recipe Variations
Feeling adventurous? Here are a few exciting twists to keep your wraps fresh and flavorful:
- Spicy Buffalo Ranch: Add a few drops of hot sauce to your vegan ranch for an extra kick!
- Mediterranean Twist: Swap the buffalo sauce for a garlic tahini sauce and add roasted red peppers and olives for a fresh twist.
- BBQ Tofu Wrap: Change it up by using BBQ sauce instead of buffalo for a sweeter, smoky flavor.
- Add More Greens: Throw in some spinach, arugula, or even some sprouts for added freshness and nutrition.
- Stuff more veggies: Sautéed bell peppers or onions are a fantastic addition!
Chef’s Notes
Each time I make these Buffalo Tofu Wraps, I’m reminded of how versatile they are. I love to experiment with whatever’s in my fridge! Sometimes I’ll throw in roasted zucchini or even some quinoa for an added texture. Oh! And back to the frying—my first attempts were a little messy, with oil spattering everywhere. I learned to keep my calm (and my splatter guard handy!). The journey in this cooking adventure is what makes it fun—embrace those kitchen oops moments!
FAQs and Troubleshooting
Q: My tofu didn’t get crispy—what went wrong?
A: This could be from moisture left in the tofu—make sure you press out as much water as possible and try to fry it in a single layer in the pan.
Q: Can I bake the tofu instead of frying it?
A: Absolutely! Preheat your oven to 400°F (200°C), place the coated tofu on a baking sheet lined with parchment paper, and bake for about 25-30 minutes, flipping halfway through.
Q: Is there a gluten-free option for the wraps?
A: Yes! Just use gluten-free tortillas or wraps, and you’re all set!
Q: Can I make the ranch dressing ahead of time?
A: Yes! The vegan ranch can be made a day in advance; it’ll actually develop even more flavor as it sits. Just keep it in an airtight container in the fridge.
Nutritional Info
Per wrap (without additional veggies):
- Calories: Approximately 350
- Protein: 15g
- Carbohydrates: 38g
- Fat: 15g
- Fiber: 6g
These Buffalo Tofu Wraps are not only delicious but offer a satisfying balance of protein, healthy fats, and lots of fresh vegetables.
So there you have it, folks! Buffalo Tofu Wraps with Easy Vegan Ranch—easy to make, a joy to serve, and oh-so-delicious. Tie on that apron, gather your ingredients, and create some culinary magic! Happy cooking!
PrintBuffalo Tofu Wraps with Easy Vegan Ranch
Delicious and healthy Buffalo Tofu Wraps filled with crispy tofu, fresh veggies, and creamy vegan ranch dressing.
- Prep Time: 20 minutes
- Cook Time: 20 minutes
- Total Time: 40 minutes
- Yield: 4 servings 1x
- Category: Main Course
- Method: Frying
- Cuisine: American
- Diet: Vegan
Ingredients
- 16 oz block extra firm tofu (drained and pressed)
- 1/3–1/2 cup cornstarch
- 1/3 cup non-dairy milk (unsweetened, plain)
- 1/4 tsp garlic powder
- 1/4 tsp salt
- 1/2 cup buffalo sauce
- 2–3 cups romaine (chopped)
- 1/2 cup shredded vegan cheddar
- 1/2 cup matchstick carrots
- 1 avocado (sliced)
- 4 large tortillas (or gluten-free wraps)
- 1 cup unsweetened almond milk yogurt (plain)
- 2 tbsp lemon juice (fresh if possible)
- 1 tbsp vinegar
- 1 tsp garlic powder
- 1/2 tsp onion powder
- 1/2 tsp salt
- 1 tbsp fresh dill (minced, or 1 tsp dried)
- 1 tbsp fresh parsley (minced, or 1 tsp dried)
Instructions
- Prepare Your Tofu: Start by draining your tofu and pressing it to remove excess moisture for about 15-20 minutes.
- Cut the Tofu: Slice the tofu into bite-sized cubes or sticks.
- Make the Tofu Coating: In a bowl, combine cornstarch, garlic powder, and salt. Add non-dairy milk and mix until smooth.
- Coat the Tofu: Toss tofu pieces in the batter until well-coated.
- Heat the Oil: In a non-stick skillet, heat a tablespoon of oil over medium heat until hot.
- Fry the Tofu: Cook the battered tofu for about 3-4 minutes on each side until golden and crispy.
- Coat with Buffalo Sauce: Toss the cooked tofu in a bowl with buffalo sauce until well-coated.
- Prepare the Vegan Ranch: Mix almond yogurt, lemon juice, vinegar, garlic powder, onion powder, salt, dill, and parsley in a bowl until creamy.
- Assemble the Wraps: Layer romaine, buffalo tofu, carrots, avocado, and ranch on a tortilla.
- Wrap It Up: Fold the sides in and roll from the bottom. Optionally, toast in the skillet for extra crispiness.
Notes
Feel free to customize the wraps with additional veggies or sauces!
Nutrition
- Serving Size: 1 wrap
- Calories: 350
- Sugar: 5g
- Sodium: 400mg
- Fat: 15g
- Saturated Fat: 2g
- Unsaturated Fat: 10g
- Trans Fat: 0g
- Carbohydrates: 38g
- Fiber: 6g
- Protein: 15g
- Cholesterol: 0mg
Keywords: tofu wraps, buffalo tofu, vegan ranch, easy recipe
One-Pot Spinach Sauce Pasta: 20-Min Weeknight Dinner
Creamy Spinach Sauce Pasta: Elegant, Easy, and Effortlessly Delicious
Hey there, fellow foodies! Welcome back to my cozy corner of the kitchen, where we’re all about creating meals that feel luxurious but are oh-so-simple to whip up. Today, I’m excited to share one of my favorite recipes that captures the essence of elegance and comfort: Pasta with Spinach Sauce. This dish is deliciously creamy, green, and ready to impress your guests or make your weeknight dinner feel a little more special. Ready to dive in? Let’s set the table!
A Taste of Nostalgia
Let me take you back to a sunny afternoon spent at my grandmother’s house. I was about eight years old, standing on a stool, peering over the kitchen counter where she was deftly moving about, preparing one of her famous pasta dishes. The air was filled with the fragrant scent of sautéed garlic, and I remember the vibrant green of the spinach as she tossed it into the pan.
"Cooking is like magic," she said, with a twinkle in her eye, "You take a few simple ingredients and turn them into something extraordinary." Watching her toss the spinach into a glorious sauce and combine it with the freshly cooked pasta was nothing short of spellbinding.
That memory stuck with me, not just for the culinary skills my grandmother imparted but for the love and warmth that filled her kitchen. Today, when I cook this Creamy Spinach Sauce Pasta, I channel that same joy and sparkle. It’s not just about the food; it’s about creating beautiful moments around the table, just like Grandma used to do.
Ingredients
Here’s what you’ll need for this delightful pasta dish:
-
8oz (225 grams) pasta (penne, rigatoni, spaghetti, or your favorite)
- Use any pasta shape you love! Just keep an eye on the cooking time as different shapes can vary.
-
1 Tbsp olive oil or extra virgin olive oil
- A drizzle of high-quality olive oil adds richness. Don’t have olive oil? Any light oil will do in a pinch, but it’s worth the upgrade!
-
2-3 garlic cloves, finely sliced or minced
- Garlic is our aromatic superstar here! Want a milder flavor? Try roasting the garlic first for a sweeter profile.
-
9oz (250 grams) baby spinach, washed
- Fresh spinach is best for this recipe, but frozen spinach can work too; just make sure it’s thawed and drained.
-
¼ tsp fine salt, plus more to taste
- Seasoning is key! Start with less and add to your preference as you taste.
-
5oz (140 grams) cream cheese
- This creates that luscious creaminess! Don’t have cream cheese? You could use mascarpone or ricotta as alternatives.
-
1oz (30 grams) freshly grated parmesan cheese, plus more to serve
- Fresh cheese enhances flavor! If you’re in a pinch, pre-grated can work but won’t melt as beautifully.
-
¼ tsp ground nutmeg, or ⅓ of freshly grated nutmeg, or according to taste
- A tiny pinch of nutmeg warms up the flavors. Not a fan? Leave it out or switch it up with a dash of smoked paprika for a different vibe.
-
Black pepper, to taste
- Freshly cracked pepper adds a lovely kick! For a spicier twist, try red pepper flakes.
Step-by-Step Instructions
-
Cook the Pasta
Bring a large pot of salted water to a boil. Add your pasta and cook according to package instructions until al dente. Make sure to reserve about 1 cup of pasta water before draining! This starchy goodness will help you create a beautiful sauce. -
Sauté the Garlic
In a large skillet, heat the olive oil over medium heat. Once shimmering, add the minced garlic. Sauté for about 1-2 minutes, or until fragrant and golden. Be careful not to burn it—it can turn bitter! -
Add the Spinach
Toss in the baby spinach and sprinkle with salt. Cook, stirring occasionally, until the spinach wilts down, about 3-4 minutes. The vibrant color will remind you of sun-soaked days! -
Create the Sauce
Reduce the heat to low. Stir in the cream cheese until it melts and forms a creamy mixture. Add the reserved pasta water a little at a time until you reach your desired sauce consistency. This is where the magic happens! -
Flavor it Up
Add the grated parmesan and nutmeg. Stir until everything is well combined. Taste the sauce and adjust salt and pepper as needed. A good chef always tastes! -
Combine Pasta and Sauce
Add the drained pasta directly to the skillet. Toss gently to coat the pasta evenly with the spinach sauce. If the sauce is too thick, add more reserved pasta water, a tablespoon at a time. -
Serve
Plate your pasta, adding more parmesan and a drizzle of olive oil on top for that finishing touch. A sprinkle of pepper or a few fresh herbs could also brighten the plate.
Serving Suggestions
For an elegant presentation, twirl the pasta into a nest using a fork and spoon and place it in the center of your favorite plate. Add a light drizzle of olive oil and a sprinkle of fresh parmesan for a polished look. You can also toss in some toasted pine nuts or a squeeze of fresh lemon juice to brighten the flavors and make it pop!
Recipe Variations
Here are a few fun twists you can take with this dish:
-
Add Protein: Toss in some grilled chicken or shrimp for a heartier meal. You could also stir in some cannellini beans for a veggie-packed option!
-
Go Vegan: Substitute cream cheese with cashew cream (soaked blended cashews with a little water) and nutritional yeast instead of parmesan for a creamy sauce.
-
Pack a Punch: Incorporate sun-dried tomatoes or roasted red peppers for a burst of flavor and color.
-
Herb it Up: Fresh or dried herbs like basil or thyme can add an aromatic layer to your sauce. Sprinkle some in while cooking for a fragrant finish!
-
Extra Greens: Mix in other greens like kale or arugula for a nutritional boost and a flavor twist.
Chef’s Notes
This recipe has come a long way since my grandmother taught me the basics of cooking! Over time, I’ve learned the importance of balance in flavors and the joy of using fresh ingredients. I remember the first time I made this dish for a dinner party. I was nervous, but when my friends took their first bites, the compliments poured in. That moment solidified my belief that food is a love language, and a simple pasta can bring people together. Every time I make this dish, I reminisce about those early days in the kitchen with Grandma—her laughter echoing with each turn of the spatula.
FAQs and Troubleshooting
Q: My sauce seems too thick; how can I fix it?
A: No worries! Just add in a couple of tablespoons of reserved pasta water until it reaches your desired consistency.
Q: I ran out of garlic! Can I skip it?
A: While garlic adds tons of flavor, you can substitute with shallots or even a pinch of garlic powder in a pinch for a hint of that beloved garlic taste.
Q: Is it possible to make the sauce ahead of time?
A: Absolutely! You can make the sauce ahead and store it in the fridge. Just warm it up gently before adding the pasta and adjust the consistency with pasta water as needed.
Q: Can I freeze leftovers?
A: It’s best to consume this dish fresh; however, if you have leftovers, you can freeze the sauce separately. Just know that the texture may change a bit when thawed.
Nutritional Info (Optional)
For a single serving of this creamy spinach pasta:
- Calories: Approximately 450
- Protein: 14g
- Carbs: 55g
- Fat: 20g
- Fiber: 3g
This could vary based on the pasta choice and additional ingredients, of course!
And there you have it, my delightful Pasta with Spinach Sauce! I hope it brings as much joy to your kitchen as it does to mine. Remember, cooking is about having fun in the kitchen and enjoying the company of loved ones. So, grab your apron, gather around the table, and let’s keep those beautiful kitchen moments alive together. Happy cooking!
PrintCreamy Spinach Sauce Pasta

An elegant and easy pasta dish featuring a creamy spinach sauce that is perfect for impressing guests or enjoying a cozy dinner at home.
- Prep Time: 15 minutes
- Cook Time: 20 minutes
- Total Time: 35 minutes
- Yield: 4 servings 1x
- Category: Main Course
- Method: Baking
- Cuisine: Italian
- Diet: Vegetarian
Ingredients
- 8oz (225 grams) pasta (penne, rigatoni, spaghetti, or your favorite)
- 1 Tbsp olive oil or extra virgin olive oil
- 2–3 garlic cloves, finely sliced or minced
- 9oz (250 grams) baby spinach, washed
- ¼ tsp fine salt, plus more to taste
- 5oz (140 grams) cream cheese
- 1oz (30 grams) freshly grated parmesan cheese, plus more to serve
- ¼ tsp ground nutmeg, or according to taste
- Black pepper, to taste
Instructions
- Cook the Pasta: Bring a large pot of salted water to a boil. Add your pasta and cook according to package instructions until al dente. Reserve about 1 cup of pasta water before draining.
- Sauté the Garlic: In a large skillet, heat the olive oil over medium heat. Add the minced garlic and sauté for about 1-2 minutes until fragrant and golden.
- Add the Spinach: Toss in the baby spinach and sprinkle with salt. Cook, stirring occasionally, until the spinach wilts down, about 3-4 minutes.
- Create the Sauce: Reduce the heat to low. Stir in the cream cheese until it melts and forms a creamy mixture. Add the reserved pasta water gradually until reaching your desired consistency.
- Flavor it Up: Add the grated parmesan and nutmeg. Stir until well combined and adjust seasoning as needed.
- Combine Pasta and Sauce: Add the drained pasta directly to the skillet. Toss gently to coat the pasta evenly with the sauce.
- Serve: Plate your pasta, adding more parmesan and a drizzle of olive oil on top. Optionally, sprinkle with pepper or fresh herbs.
Notes
For an elegant presentation, twirl the pasta into a nest and top with additional parmesan and a drizzle of olive oil. You can also add toasted pine nuts or a squeeze of fresh lemon juice.
Nutrition
- Serving Size: 1 serving
- Calories: 450
- Sugar: 5g
- Sodium: 400mg
- Fat: 20g
- Saturated Fat: 10g
- Unsaturated Fat: 8g
- Trans Fat: 0g
- Carbohydrates: 55g
- Fiber: 3g
- Protein: 14g
- Cholesterol: 35mg
Keywords: Creamy, Spinach, Pasta, Easy Dinner, Vegetarian Recipe
One-Bowl Lemon Loaf: Moist, Zesty, Ready in 30 Minutes
The Ultimate Easy Moist Lemon Loaf: Brighten Your Day with This Delightful Treat
Hello, lovely people! If you’re anything like me, there’s something undeniably uplifting about the aroma of fresh lemons wafting through the kitchen. Today, I’m thrilled to share with you the secret to creating an easy, moist Lemon Loaf that’s sure to brighten any day. Whether it’s a gray afternoon, a weekend brunch, or an unexpected visit from friends, this lemon loaf offers the perfect balance of sweetness and citrus tang, turning any moment into a celebration. So, let’s roll up our sleeves and dive in!
Personal Story: A Zesty Memory
Before I delve into the nitty-gritty of this delightful recipe, let me share a special memory that ties me to lemon loaf. Growing up, my grandmother had a knack for creating comfort with her baking—a warm loaf of lemony goodness was often on the kitchen counter when I visited. There was one summer when my cousins and I would race back from the pool, eager to see if that zesty scent was indeed wafting through the air. The moment we spotted the golden crust, we’d practically tackle each other in our quest for the first slice.
One sunny afternoon, I decided to surprise her and bake my own lemon loaf, using her trusty old recipe. With flour dust flying and laughter echoing throughout the kitchen, I learned not just about the ingredients but about joy, connection, and sharing good food with the people we love. Once the loaf slid out of the oven, its irresistible aroma brought everyone running, just like in the good old days. In that moment, I discovered my passion for baking—and the magic of lemons.
Ingredients
Now, let’s gather our ingredients for this beautifully simple Lemon Loaf:
- 1 1/2 cups all-purpose flour: This is the foundation of your cake. You can substitute it with gluten-free flour for a gluten-free option, just make sure to use a blend designed for baking.
- 1 cup granulated sugar: Provides just the right sweetness. For a healthier take, feel free to swap in coconut sugar or use a sweetener like stevia.
- 1/2 cup unsalted butter, softened: Adds moisture and rich flavor. If you’re looking for a dairy-free option, substitute with coconut oil or vegan butter.
- 2 large eggs: They bring structure and leavening to the loaf. For an egg-free option, use flax eggs (1 tablespoon ground flaxseed mixed with 3 tablespoons water per egg).
- 1/2 cup milk: This adds tenderness. You can use any milk of your choice — almond, oat, or soy — for a non-dairy alternative.
- 1/4 cup fresh lemon juice: This is where the magic happens! For the best flavor, always use fresh lemon juice instead of bottled.
- Zest of 1 lemon: The zest enhances the lemon flavor and gives a lovely fragrance. If you can’t find fresh lemons, try using lemon extract, but use it sparingly.
- 1 1/2 teaspoons baking powder: This helps the loaf rise. If you’re in a pinch, baking soda can work too—just adjust the acidity by adding a little vinegar or yogurt.
- 1/2 teaspoon salt: Balances the sweetness and enhances flavor.
- 1 cup powdered sugar (for glaze): Smooth and sweet, this glaze takes the loaf over the top. Don’t worry, you can reduce the amount if you prefer less sweetness.
- 2-3 tablespoons fresh lemon juice (for glaze): This tangy addition to the glaze is what makes it so irresistible!
Step-by-Step Instructions
Let’s get into the fun part! Follow these steps to whip up your Easy Moist Lemon Loaf:
-
Preheat the oven to 350°F (175°C). This ensures your oven is hot enough to create that lovely crust on the loaf.
-
Prepare your pan: Grease a 9×5 inch loaf pan with some butter or cooking spray, and then line the bottom with parchment paper for easy removal later.
-
Mix the dry ingredients: In a medium bowl, whisk together the flour, baking powder, and salt. This step helps distribute the baking powder evenly, which is key for even rising throughout your loaf.
-
Cream the butter and sugar: In a large bowl, beat the softened butter and granulated sugar together using a mixer on medium speed until the mixture is light and fluffy. This usually takes around 3-5 minutes. The air you incorporate here will create a light texture in the loaf.
-
Add eggs one at a time: Beat in the eggs one at a time, making sure to mix well after each addition. Your batter should be smooth and creamy at this stage. Don’t forget to scrape down the sides of the bowl to include all the buttery goodness!
-
Incorporate the lemon juice and zest: Pour in the fresh lemon juice and lemon zest. Trust me, the aroma will be heavenly! Mix just until everything is combined.
-
Alternate dry ingredients and milk: Gradually add the flour mixture in three additions, alternating with the milk. Start and finish with the flour. Mix until just incorporated—overmixing can lead to a dense loaf.
-
Pour the batter into the prepared pan: Use a spatula to spread the batter evenly. Don’t worry if it doesn’t look perfect; it’ll spread out as it bakes.
-
Bake: Pop it in the preheated oven and bake for about 50-60 minutes, or until a toothpick inserted into the center comes out clean. Your kitchen will fill with a delightful lemony scent as it bakes!
-
Cool: Once baked, let it cool in the pan for about 10 minutes before transferring it to a wire rack to cool completely. This helps maintain the moisture—trust me, it’s worth the wait!
-
Make the glaze: While the loaf is cooling, whisk together the powdered sugar and fresh lemon juice in a small bowl until smooth. You may adjust the consistency by adding more sugar or lemon juice as needed.
-
Glaze the cooled loaf: Once the loaf has cooled, drizzle the glaze over the top, allowing it to cascade down the edges. Lovely, right? Let it sit for a few minutes before slicing for the best presentation.
Serving Suggestions
When serving your Lemon Loaf, a simple plating style works wonders. Cut into generous slices and arrange them on a beautiful serving platter. To elevate the presentation, sprinkle a bit of grated lemon zest on top and add some fresh berries or a sprig of mint for that extra touch of elegance. Serve with a hot cup of tea or a refreshing glass of lemon-infused water to complement the flavors perfectly.
Recipe Variations
Looking to switch it up? Here are a few creative twists you can try:
- Blueberry Lemon Loaf: Fold in 1 cup of fresh or frozen blueberries into the batter for a burst of berry goodness.
- Lemon Poppy Seed Loaf: Add 2 tablespoons of poppy seeds to the batter for that classic combination.
- Lemon Raspberry Swirl: Layer fresh raspberries into your batter for a stunning red and yellow swirl.
- Lemon Parmesan Savory Loaf: Replace some of the sugar with grated Parmesan and add fresh herbs for a savory take on the loaf.
- Gluten-free Lemon Loaf: Substitute the all-purpose flour with a 1:1 gluten-free baking blend for a gluten-free version.
Chef’s Notes
Over the years, my lemon loaf has evolved, and you know what? Each iteration came with a new funny kitchen story! Once, I completely miscalculated and added salt instead of sugar. The shocked look on my family’s faces at the first bite is something I’ll never forget! But from that mistake, I learned how oversights can lead to new recipes, and if you can laugh at the kitchen mishaps, you’re halfway to becoming a culinary pro.
FAQs and Troubleshooting
-
Why did my lemon loaf not rise?
This can happen if your baking powder is expired. Always check the expiration date before using; fresh leavening agents are key! -
My lemon loaf is too dense, what went wrong?
Overmixing can lead to a dense texture. Be gentle when combining the ingredients, especially after adding the flour. -
How do I store leftovers?
Wrap your lemon loaf tightly in plastic wrap or foil and store it in an airtight container at room temperature for up to 3 days. For longer preservation, freeze individual slices! -
Can I make this vegan?
Absolutely! Substitute the eggs with flax eggs and use plant-based milk and butter for a vegan-friendly loaf.
Nutritional Info
While it varies based on substitutions, here’s a rough estimate per slice (based on 12 servings):
- Calories: 220
- Total Fat: 9g
- Saturated Fat: 5g
- Carbohydrates: 32g
- Fiber: 1g
- Sugars: 16g
- Protein: 3g
There you have it—a delightful Easy Moist Lemon Loaf that’s bound to become a cherished recipe in your kitchen! I hope you enjoy this labor of love, and don’t forget to gather your loved ones around the table to share this scrumptious treat. Happy baking, and always remember: good food isn’t just about the dishes you create—it’s about the memories you make. Cheers!
PrintEasy Moist Lemon Loaf
A delightful lemon loaf that balances sweetness and citrus tang, perfect for any occasion.
- Prep Time: 15 minutes
- Cook Time: 60 minutes
- Total Time: 75 minutes
- Yield: 12 servings 1x
- Category: Dessert
- Method: Baking
- Cuisine: American
- Diet: Vegetarian
Ingredients
- 1 1/2 cups all-purpose flour
- 1 cup granulated sugar
- 1/2 cup unsalted butter, softened
- 2 large eggs
- 1/2 cup milk
- 1/4 cup fresh lemon juice
- Zest of 1 lemon
- 1 1/2 teaspoons baking powder
- 1/2 teaspoon salt
- 1 cup powdered sugar (for glaze)
- 2–3 tablespoons fresh lemon juice (for glaze)
Instructions
- Preheat the oven to 350°F (175°C).
- Prepare your pan by greasing a 9×5 inch loaf pan and lining the bottom with parchment paper.
- Mix the dry ingredients in a medium bowl: whisk together the flour, baking powder, and salt.
- Cream the butter and sugar in a large bowl using a mixer until light and fluffy, for about 3-5 minutes.
- Add eggs one at a time, mixing well after each addition.
- Incorporate the lemon juice and zest into the mixture.
- Alternate adding the flour mixture and milk in three additions, starting and finishing with the flour.
- Pour the batter into the prepared pan.
- Bake for about 50-60 minutes, or until a toothpick comes out clean.
- Cool in the pan for about 10 minutes before transferring to a wire rack.
- Make the glaze by whisking together powdered sugar and lemon juice until smooth.
- Glaze the cooled loaf and let it sit for a few minutes before slicing.
Notes
Store leftovers wrapped in plastic wrap or foil for up to 3 days at room temperature.
Nutrition
- Serving Size: 1 slice
- Calories: 220
- Sugar: 16g
- Sodium: 150mg
- Fat: 9g
- Saturated Fat: 5g
- Unsaturated Fat: 3g
- Trans Fat: 0g
- Carbohydrates: 32g
- Fiber: 1g
- Protein: 3g
- Cholesterol: 30mg
Keywords: lemon loaf, quick bread, citrus dessert