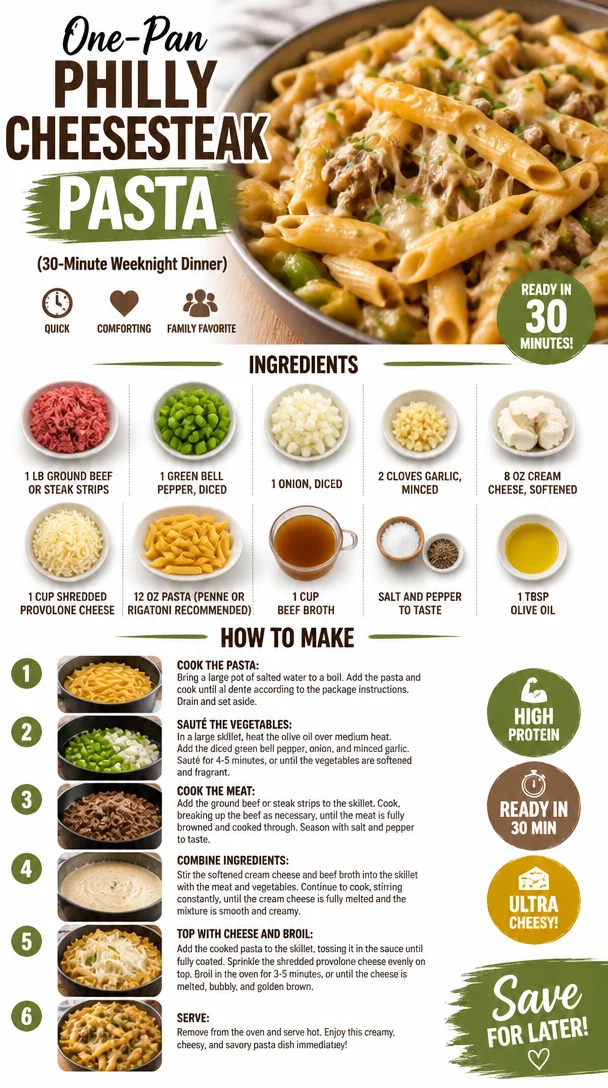
One-Pan Philly Cheesesteak Pasta (30-Minute Weeknight Dinner)
Philly Cheesesteak Pasta: A Comfort Food Fusion
Hello friends! Today, I am beyond excited to take you on a culinary journey where two incredible comfort foods meet in a warm, cheesy embrace: the Philly cheesesteak and pasta. Yep, you heard that right! We’re marrying the flavors of an iconic sandwich with the inviting textures of pasta. Grab your apron, because this dish is a showstopper that will have your family or guests cheering for more.
A Personal Tale
Before we dive into the cooking part, let me share a little story. Growing up, weekends in my house were synonymous with comfort food. I have vivid memories of my dad whipping up his famous Philly cheesesteaks. The sizzle of thinly sliced beef hitting the hot griddle, the aroma of onions caramelizing, and, of course, the delightful dance of melted cheese makes my mouth water just thinking about it. Each bite was pure bliss, a celebration of flavors wrapped in a buttery hoagie.
Fast forward to my culinary adventures, where I began experimenting and fusing classic dishes together. One day, while brainstorming dinner ideas, I thought: why not give those nostalgic flavors a new twist? And that’s how Philly Cheesesteak Pasta was born! It’s a perfect meal to evoke those fond memories while keeping things fresh and innovative. So let’s jump into this delightful recipe — your taste buds will thank you!
Ingredients
Before we roll up our sleeves, let’s gather everything we need to make this magical dish happen:
-
1 lb ground beef or steak strips
Use whatever you have on hand! If you’re looking for a leaner option, turkey or chicken can work as substitutes too. -
1 green bell pepper, diced
Feel free to swap in a red or yellow bell pepper for a splash of color and sweetness. -
1 onion, diced
Sweet or yellow onions are my go-to, but red onions add a lovely bite if you prefer. -
2 cloves garlic, minced
Garlic brings a depth of flavor. If you’re in a pinch, garlic powder works too—use about 1/2 teaspoon. -
8 oz cream cheese, softened
This adds that luscious creaminess we love. For a lighter version, you can use Neufchâtel cheese. -
1 cup shredded provolone cheese
Provolone is classic, but cheddar or mozzarella can definitely do the trick! -
12 oz pasta (penne or rigatoni recommended)
These shapes grab all that gooey sauce so perfectly. Feel free to use gluten-free pasta if needed! -
1 cup beef broth
Homemade is best, but store-bought works great as well. Vegetable broth can be an alternative for a vegetarian touch. -
Salt and pepper to taste
Don’t skimp on seasoning! It’s what makes flavors pop. -
1 tbsp olive oil
For sautéing! You can use butter for a richer flavor or even avocado oil for a twist.
Step-by-Step Instructions
Now that we have all our ingredients lined up, let’s get cooking!
-
Cook the Pasta
Bring a large pot of salted water to a boil. Add your pasta and cook according to package instructions until al dente. This usually takes about 8-10 minutes. TIP: Reserve about 1 cup of pasta water before draining; it’ll help create a silky sauce later! -
Sauté the Vegetables
In a large skillet, heat the olive oil over medium heat. Toss in the diced onion and bell pepper. Sauté them for about 5-7 minutes or until the onion becomes translucent and the peppers soften. The aroma will be heavenly! -
Add the Garlic
Next, add in the minced garlic and cook for an additional 1-2 minutes, stirring constantly to avoid burning. Garlic loves to brown quickly, and nobody likes bitter flavors in their pasta! -
Cook the Beef
Push the vegetables to the side of the skillet and then add the ground beef (or steak strips) into the pan. Season with salt and pepper. Brown the meat for about 5-7 minutes, breaking it apart with a spatula until cooked through. Combine the beef with the veggies towards the end. -
Creamy Base Creation
Reduce the heat to low, then add your softened cream cheese and pour in the beef broth. Stir until the cream cheese melts and everything becomes beautifully creamy. If the mixture feels too thick, slowly add some pasta water until you reach your desired sauce consistency. -
Cheesy Goodness
Remove the skillet from the heat and fold in the shredded provolone cheese until everything is thoroughly mixed and wonderfully cheesy! This will be a moment of joy, friends—just wait for the smell! -
Combine with Pasta
Finally, toss your cooked pasta into the skillet and mix to coat all those delightful flavors and textures together. If needed, you can always add a splash more of the reserved pasta water to help coat the pasta evenly.
Serving Suggestions
Time to plate up! Transfer generous scoops of the creamy Philly cheesesteak pasta into bowls. For an elegant touch, sprinkle some additional provolone cheese or fresh parsley on top. A sprinkle of crushed red pepper flakes can add a delightful kick too! This dish is a showstopper and perfect for both weeknight dinners or special gatherings.
Recipe Variations
Why not get adventurous? Here are a few fun twists to consider for your Philly Cheesesteak Pasta:
- Mushroom Madness: Add sliced mushrooms for an earthy flavor that pairs beautifully with the beef.
- Spice It Up: Mix in some jalapeños for a spicy kick or use hot sausage instead of ground beef.
- Veggie Delight: For a meat-free option, double the veggies or substitute tofu or lentils for protein.
- Mac and Cheese Style: To give it a mac and cheese flair, mix in some sharp cheddar alongside the provolone.
- Herbed Infusion: Fresh thyme or oregano can be added for an herbal note that brightens up the pasta.
Chef’s Notes
Oh, there’s always that “oops” moment in the kitchen, right? The first time I made this dish, I accidentally reached for cayenne pepper instead of black pepper. Let’s just say, “spicy” is an understatement! It was a lesson in distractions, but honestly, that fiery version sparked a whole new love affair with this pasta. Now, I always keep a good balance of flavor when making it!
Over the years, I’ve evolved this recipe from its original concept to something I feel fully embraces the cheesy comfort while remaining easy to whip up whenever the craving strikes.
FAQs and Troubleshooting
1. Why is my sauce too thick?
If your sauce turned out thicker than you’d like, don’t panic! Just gradually stir in some reserved pasta water until you get that silky texture.
2. Can I use other types of cheese?
Absolutely! This dish is quite versatile with cheese. Experiment with a mix of cheeses depending on what lures you!
3. How do I store leftovers?
This dish stores well in an airtight container in the fridge for about 3-4 days. Just reheat gently on the stove, adding a touch of broth or water to revive that creaminess.
4. What if I can’t find provolone cheese?
Don’t fret! Mozzarella or even gouda would work in a pinch. Just remember, the melt factor is key to achieving that ooey-gooey goodness!
Nutritional Info
While I encourage you to indulge in comfort food, a rough estimate for one serving of Philly Cheesesteak Pasta is around 450-500 calories. It’s packed with protein and flavor, making it a delightful choice for dinner.
So there you have it, my friends! A recipe that not only celebrates the flavors of Philly but also crafts new memories around your table. Get ready for compliments when you serve this one up—enjoy every bite, and remember, cooking should always be fun! Until next time, happy cooking from all of us here at Ivory Apron.
PrintPhilly Cheesesteak Pasta
A delicious fusion of classic Philly cheesesteak flavors combined with creamy pasta for a comforting meal.
- Prep Time: 15 minutes
- Cook Time: 30 minutes
- Total Time: 45 minutes
- Yield: 4 servings 1x
- Category: Main Course
- Method: Stovetop
- Cuisine: American
- Diet: None
Ingredients
- 1 lb ground beef or steak strips
- 1 green bell pepper, diced
- 1 onion, diced
- 2 cloves garlic, minced
- 8 oz cream cheese, softened
- 1 cup shredded provolone cheese
- 12 oz pasta (penne or rigatoni recommended)
- 1 cup beef broth
- Salt and pepper to taste
- 1 tbsp olive oil
Instructions
- Cook the Pasta: Bring a large pot of salted water to a boil. Add your pasta and cook according to package instructions until al dente (about 8-10 minutes). Reserve about 1 cup of pasta water before draining.
- Sauté the Vegetables: In a large skillet, heat the olive oil over medium heat. Toss in the diced onion and bell pepper. Sauté for about 5-7 minutes until the onion is translucent and the peppers soften.
- Add the Garlic: Add the minced garlic and cook for an additional 1-2 minutes, stirring constantly.
- Cook the Beef: Push the vegetables to the side of the skillet and add the ground beef. Season with salt and pepper and brown the meat for 5-7 minutes until cooked through.
- Creamy Base Creation: Reduce the heat to low, then add the softened cream cheese and the beef broth. Stir until everything is creamy, adding pasta water if needed.
- Cheesy Goodness: Remove from heat and fold in the shredded provolone cheese until well mixed.
- Combine with Pasta: Toss your cooked pasta into the skillet and mix to coat with the sauce, adding more pasta water if necessary.
Notes
For extra flavor, consider adding spices or serving with crushed red pepper flakes. Store leftovers in an airtight container for 3-4 days.
Nutrition
- Serving Size: 1 serving
- Calories: 450
- Sugar: 4g
- Sodium: 600mg
- Fat: 25g
- Saturated Fat: 10g
- Unsaturated Fat: 8g
- Trans Fat: 1g
- Carbohydrates: 40g
- Fiber: 3g
- Protein: 25g
- Cholesterol: 70mg
Keywords: Philly Cheesesteak, Pasta, Comfort Food, Fusion, Cheesy Dish
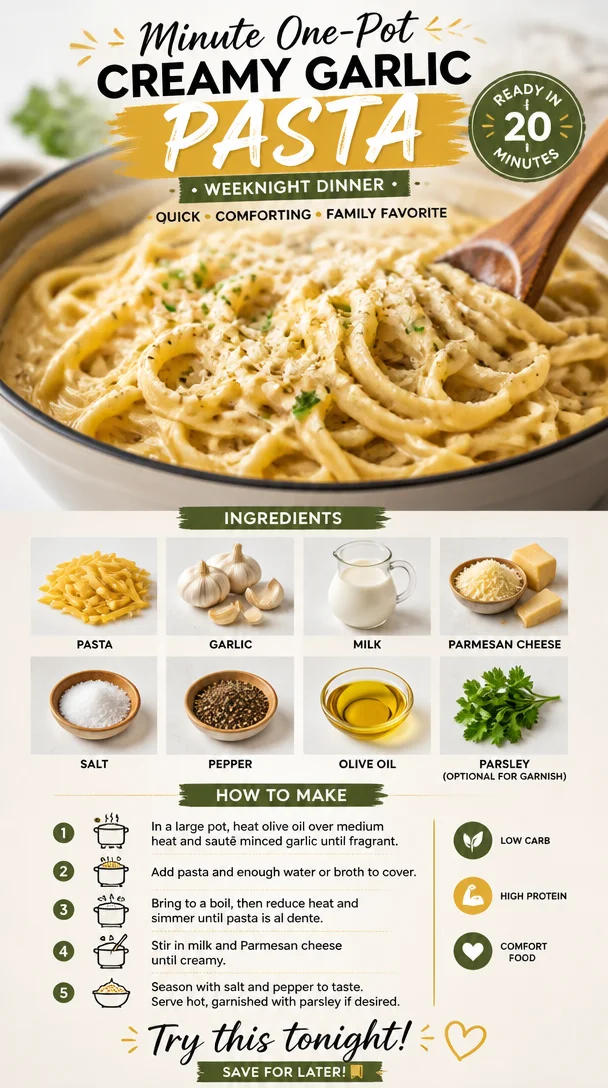
Minute One-Pot Creamy Garlic Pasta (Weeknight Dinner)
One Pot Creamy Garlic Pasta: A Delightful Dinner Recipe
Hello, food lovers! Today, we’re whisking you away on a culinary adventure with a dish that’s not just delicious but also incredibly comforting: One Pot Creamy Garlic Pasta. This dish is a dream come true for those busy weeknights when you want to whip up something quick, easy, and absolutely satisfying. Imagine twirling al dente pasta coated in a velvety garlic-cream sauce, all made in just one pot. Yes, please!
There’s something magical about gathering around the dinner table with loved ones, and this pasta dish makes those moments even more special. Being a host-at-heart, I adore meals that invite conversation and connection. The rich aroma of garlic cooking, combined with the creamy sauce, fills the air with warmth and comfort — perfect for any occasion! Let’s dive into this culinary delight together.
Personal Story
I still remember the first time I made a dish similar to this creamy garlic pasta in my college dorm. I had friends drop by for a study session, and, determined to impress them with my fledgling cooking skills, I grabbed a box of pasta and a jar of store-bought Alfredo sauce. Fast forward to a few minutes later, and I found myself burnt out on textbooks and ready to share a meal that felt like a hug in a bowl.
With a bit of garlic and some fresh parsley I’d stashed away, I transformed the mundane into something memorable. My friends raved about my “special recipe,” which lead to countless pasta nights that brought us together over good food and laughter. Even back then, I realized that simple ingredients, when combined with a dash of creativity and love, could create something truly delightful. That same spirit lives on in this One Pot Creamy Garlic Pasta!
Ingredients
Here’s what you’ll need for this creamy, dreamy dish:
-
Pasta: I usually opt for fettuccine or spaghetti, but any shape works! If you’re gluten-free, try using gluten-free pasta varieties. They cook a bit differently, so just follow the package directions for timing.
-
Garlic: Fresh garlic is key for that aromatic flavor. If you’re in a pinch, you can substitute with garlic powder — use about 1/4 teaspoon for every clove.
-
Milk: Whole milk gives a rich creaminess, but you could substitute with almond or oat milk for a dairy-free option. Just know that the flavors will be slightly different.
-
Parmesan cheese: Freshly grated Parmesan adds depth and umami. In a bind, you can use Pecorino Romano or even nutritional yeast for a vegan twist!
-
Salt: Essential for flavoring the pasta water and the sauce, bringing all the elements to life.
-
Pepper: Freshly cracked black pepper enhances the taste; it’s a game-changer. You can also consider a pinch of red pepper flakes for a spicy kick.
-
Olive oil: This is for sautéing the garlic and improving flavor. Feel free to use butter if you prefer a richer taste!
-
Parsley (optional for garnish): Fresh parsley adds a pop of color and freshness. If you don’t have any, basil works just as well!
Step-by-Step Instructions
Now that we’ve gathered our ingredients, let’s dive into creating this delectable dish!
-
Boil Your Pasta: Start by bringing a large pot of salted water to a boil. The salt ensures that your pasta is perfectly seasoned. Once boiling, add the pasta of your choice and cook according to the package directions until al dente. You want it firm to the bite to hold up in the sauce later. Reserve about 1 cup of pasta water; this starchy liquid is like liquid gold when it comes to thickening your sauce!
-
Sauté the Garlic: In the same pot, after draining the pasta, add a drizzle of olive oil over medium heat. Then, toss in 4 minced garlic cloves. Sauté for about 1–2 minutes until fragrant but be careful not to let it burn. Burnt garlic can make your dish bitter, and nobody wants that!
-
Craft the Creamy Sauce: Now, pour in 2 cups of milk while gently stirring the garlic. Turn the heat to medium-low and bring the mixture to a simmer. This is where the magic happens! Stir continuously to prevent sticking and bring balance to the flavors.
-
Incorporate the Cheese: Gradually whisk in 1 cup of grated Parmesan cheese, stirring until melted and blended. This step is crucial because it creates that creamy texture we all love. If the sauce seems thick, add in some reserved pasta water, a little at a time, until you reach your desired consistency.
-
Combine and Season: Add the drained pasta back into the pot with the sauce. Toss everything together until the pasta is well-coated. Season with salt and freshly cracked black pepper to taste. You can adjust the seasonings based on your preference!
-
Garnish and Serve: If you have fresh parsley, chop some up and sprinkle it over the top for a fresh finish. The colors will pop, making your dish look as delicious as it tastes!
Don’t forget: cooking is all about practice and finding what works best for you. If you find the sauce too thin, let it cook a bit longer to thicken. If too thick, add a splash of reserved pasta water until it reaches that creamy consistency. Chef’s hack: Keeping a bit of the starchy pasta water on hand is a great strategy for achieving the perfect sauce!
Serving Suggestions
For a beautiful presentation, twirl the pasta in the center of your plate and drizzle a little extra sauce around it. A sprinkle of freshly cracked pepper and a few parsley leaves on top can turn this simple dish into a showstopper! Pair it with a crisp green salad, garlic bread, or your favorite roasted vegetables for a complete meal.
Recipe Variations
Feeling adventurous? Here are a few twists to keep things fresh:
-
Add Protein: Toss in cooked chicken, shrimp, or even crispy bacon for an added boost.
-
Veggie Delight: Add sautéed spinach, broccoli, or sun-dried tomatoes for a burst of color and nutrition.
-
Herb Infusion: Experiment with herbs — fresh basil, thyme, or even dill could elevate your flavors to new heights.
-
Creamy Vegan Version: Use coconut milk, nutritional yeast instead of Parmesan, and add a tablespoon of cashew cream for richness.
-
Spicy Kick: Stir in red pepper flakes or a dash of hot sauce for a spicy surprise!
Chef’s Notes
This One Pot Creamy Garlic Pasta has evolved over the years into a much-loved staple in my kitchen. When I first started whipping it up, I was all about simplifying the steps. As my cooking journey progressed, I began experimenting with ingredients and flavor combinations that pushed this simple dish to new heights. The beauty of cooking, after all, is the ability to improvise and make it your own!
Oh, and speaking of kitchen adventures, once I accidentally added way too much garlic — I must have been in a clove frenzy! The result? A pasta that could ward off vampires for miles! A great reminder that sometimes, even the mishaps lead to memorable meals.
FAQs and Troubleshooting
Q1: My sauce turned out too thick! What can I do?
No worries! Simply add a splash of the reserved pasta water and stir it in until you achieve your desired consistency.
Q2: Can I make this dish ahead of time?
Absolutely! While it’s best enjoyed fresh, you can store leftovers in the fridge for up to three days. Just reheat gently in a pan, adding a splash of milk to help revive the creamy texture.
Q3: Can I freeze this pasta?
While it can be frozen, keep in mind that the texture may change upon thawing. If possible, try to enjoy it fresh or within a few days. If freezing, make sure to seal it tightly to prevent freezer burn.
Q4: How can I make this recipe gluten-free?
You can easily substitute regular pasta with your favorite gluten-free pasta. Just adjust the cooking time according to the package instructions, and you’re all set!
Nutritional Info
Though this rich dish is indulgent, it’s important to enjoy in moderation. Here’s a quick breakdown of approximate nutritional information per serving (without added protein):
- Calories: 450
- Protein: 15g
- Fat: 18g
- Carbohydrates: 60g
- Fiber: 3g
Conclusion
One Pot Creamy Garlic Pasta is more than just a dish; it’s a celebration of simplicity and the joy of cooking. With a handful of quality ingredients and a little love, you can create something uniquely delicious and inviting. Whether it’s a cozy family dinner or an elegant gathering, this pasta is sure to charm everyone around the table.
So, put on your apron, grab a lovely glass of your favorite beverage, and let’s make some culinary magic happen. Happy cooking, my friends!
PrintOne Pot Creamy Garlic Pasta
A comforting and quick one-pot creamy garlic pasta perfect for busy weeknights.
- Prep Time: 15 minutes
- Cook Time: 20 minutes
- Total Time: 35 minutes
- Yield: 4 servings 1x
- Category: Main Course
- Method: Baking
- Cuisine: Italian
- Diet: Vegetarian
Ingredients
- Fettuccine or spaghetti (or any pasta shape)
- 4 cloves garlic, minced
- 2 cups whole milk (or almond/oat milk)
- 1 cup freshly grated Parmesan cheese (or Pecorino Romano/nutritional yeast)
- Salt to taste
- Freshly cracked black pepper
- Olive oil (or butter)
- Fresh parsley (optional for garnish)
Instructions
- Boil a large pot of salted water. Add pasta and cook until al dente, reserving 1 cup of pasta water.
- Sauté garlic in the same pot with olive oil over medium heat for 1–2 minutes until fragrant.
- Pour milk into the pot, stirring, and bring to a simmer over medium-low heat.
- Incorporate grated Parmesan cheese gradually, stirring until melted and blended.
- Add the drained pasta back in, tossing to coat, and season with salt and pepper.
- Garnish with fresh parsley before serving.
Notes
For variations, consider adding protein, sautéed veggies, or experimenting with different herbs.
Nutrition
- Serving Size: 1 serving
- Calories: 450
- Sugar: 6g
- Sodium: 450mg
- Fat: 18g
- Saturated Fat: 8g
- Unsaturated Fat: 6g
- Trans Fat: 0g
- Carbohydrates: 60g
- Fiber: 3g
- Protein: 15g
- Cholesterol: 30mg
Keywords: creamy pasta, garlic pasta, one pot recipe, quick dinner
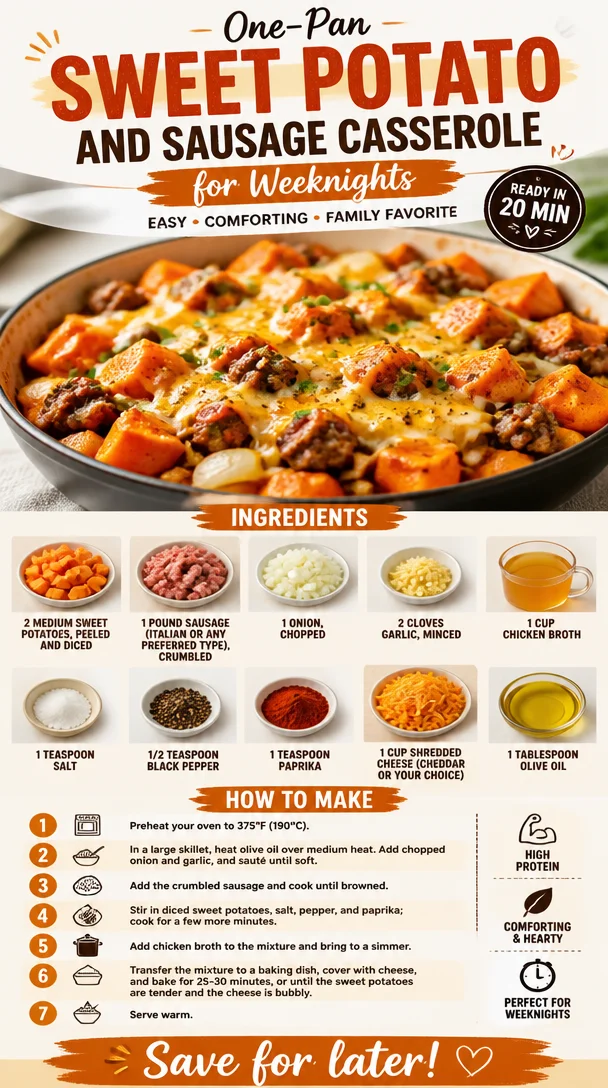
One-Pan Sweet Potato and Sausage Casserole for Weeknights
Sweet Potato and Sausage Casserole: A Heartwarming Delight
Hello, my lovely foodies! Today, we’re diving into a recipe that’s not just a meal but a cozy hug in a dish: Sweet Potato and Sausage Casserole. If you’re looking for comfort food that is both hearty and comforting, you’ve struck gold! This recipe takes simple ingredients and spins them into magic, perfect for any night of the week.
The Warmth of Family Gatherings
Let me take you back for a moment. It was a chilly autumn evening at my family’s home, and the comforting scent of sweet potatoes roasting filled the air. My mom was busy in the kitchen, and I sat perched on a stool, watching her like a hawk. The kitchen was warm, laughter echoed as my siblings ran around, and the calming tunes of our favorite playlist set the mood. This is where my love for home-cooked meals was born — in the warmth of those cherished moments.
One dish that stood out was a savory casserole that combined the earthiness of sweet potatoes with the savory zing of sausage. It has since become one of my go-to meals for family gatherings and casual weeknight dinners alike. This type of food brings people together, and every bite carries a hint of nostalgia. So, grab your apron and let’s whip up this delightful dish together!
Ingredients
Here’s what you’ll need for our Sweet Potato and Sausage Casserole:
-
2 medium sweet potatoes, peeled and diced
Sweet potatoes provide a natural sweetness and are a great source of vitamins. You can swap them for white potatoes if you’re in a pinch, but the flavor will be different. -
1 pound sausage (Italian or any preferred type), crumbled
Italian sausage adds a delightful spice and depth to the dish. Need a lighter option? Chicken or turkey sausage works like a charm! -
1 onion, chopped
Onions are the base of so many wonderful flavors. Don’t have onion? Leeks or shallots can step in for a milder taste. -
2 cloves garlic, minced
Garlic is essential for that aromatic punch. If you’re not a fan of fresh garlic, try garlic powder — just remember, it’s not quite the same! -
1 cup chicken broth
Broth infuses the casserole with moisture and richness. Vegetable broth will do the trick if you want a vegetarian option. -
1 teaspoon salt
Salt enhances all the flavors in your dish. Always taste to adjust — you know your palate best! -
1/2 teaspoon black pepper
Black pepper adds a mild kick. Feel adventurous? Try a sprinkle of cayenne for extra heat! -
1 teaspoon paprika
This adds a subtle smokiness that’s simply sublime. Smoked paprika? Even better! -
1 cup shredded cheese (cheddar or your choice)
Cheese makes everything better! Cheddar is classic, but feel free to swap in Monterey Jack or even a dairy-free option. -
1 tablespoon olive oil
Olive oil is great for sautéing and provides healthy fats. Avocado oil can be a lovely alternative!
Step-by-Step Instructions
Ready to get cooking? Let’s break this down into easy-to-follow steps:
-
Preheat your oven to 375°F (190°C). A warm oven is essential for a perfectly baked casserole.
-
Sauté the sausage: In a large skillet, heat the olive oil over medium heat. Once hot, add the crumbled sausage. Break it apart with a spatula and cook for about 6-8 minutes until golden and cooked through. You want those caramelized bits of flavor!
Chef’s Tip: If you prefer, you can cook the sausage ahead of time. This can save you a few minutes on a busy weeknight.
-
Add the onions: Toss in the chopped onion once the sausage is browned. Cook for about 3-4 minutes until they soften and turn translucent.
Chef Hack: To avoid tears, try chilling the onion in the fridge for about 10 minutes before chopping!
-
Introduce the garlic: Add minced garlic to the mix and sauté for another 1-2 minutes until fragrant. Your kitchen will start to smell divine!
-
Mix in the sweet potatoes: Next, add your diced sweet potatoes, salt, black pepper, and paprika. Pour in the chicken broth and give everything a gentle stir to combine.
Note: If you like a little more texture, consider adding chopped bell peppers at this stage for a colorful twist.
-
Simmer and soften: Cover the skillet with a lid and allow it to simmer for about 10 minutes, or until the sweet potatoes begin to soften. This step helps to create a cozy, melded flavor in your casserole.
-
Transfer to a baking dish: Pour the sausage and vegetable mixture into a greased 9×13 inch baking dish.
Pro Tip: A little cooking spray or a light brush of olive oil on the dish will ensure an easy release when serving!
-
Sprinkle the cheese: Top the mixture generously with your shredded cheese. Who doesn’t love melted cheese?
-
Bake: Pop it in the oven and bake for about 25-30 minutes, until the sweet potatoes are tender and the cheese is golden and bubbly.
Serving Suggestions
Once out of the oven, let your Sweet Potato and Sausage Casserole cool for a few minutes. It’s so tempting to dive right in, but allowing it to rest will help it set—and make for easier serving! For an elevated touch, serve it with a fresh green salad or some crusty bread on the side. It creates a lovely contrast with the warm, savory casserole.
Recipe Variations
Now, the beauty of this recipe is its versatility! Here are a few delectable twists to keep things exciting:
- Spicy Variation: Add in some diced jalapeños for a spicy kick!
- Cheesy Delight: Mix in some cream cheese for a creamier casserole.
- Herbaceous Touch: Stir in fresh herbs like thyme or rosemary for an aromatic lift.
- Veggie-Loaded: Toss in some spinach or kale right before baking for a pop of color and nutrition.
- Gluten-Free: Substitute regular sausage with gluten-free sausage and ensure your broth is certified gluten-free.
Chef’s Notes
This casserole is the kind of dish that can either be prepared ahead of time or assembled in a rush, making it a fantastic option for busy evenings or spontaneous guests. I once had a friend drop by unexpectedly, and a quick turn in the kitchen transformed simple ingredients into a feast! Over the years, I’ve played around with this recipe—sometimes adding a sprinkle of nuts for crunch or even a drizzle of maple syrup for some added sweetness. This dish constantly evolves, and I love that it’s as flexible as my schedule!
FAQs and Troubleshooting
1. What if my sweet potatoes are still hard after baking?
No worries! If they’re not as soft as you’d like, cover the dish with foil and bake for another 10-15 minutes.
2. Can I use frozen sweet potatoes?
Absolutely! Just be sure to thaw them and drain any excess water before adding them to the dish.
3. How can I store leftovers?
Store any leftovers in an airtight container in the refrigerator for up to 4 days. Reheat in the microwave or oven.
4. Can I make this dish vegetarian?
Definitely! Swap the sausage with plant-based sausage or make a veggie-only version, adding lots of colorful vegetables.
Nutritional Info
While I don’t typically dive into numbers, this casserole is packed with nutrients! Sweet potatoes are high in fiber, vitamins A and C, and the sausage provides protein. Add a salad, and you’ve got a well-rounded meal!
There you have it, my dear friends! Your very own Sweet Potato and Sausage Casserole, crafted with love and perfect for sharing. Remember, cooking is all about joy. I hope this dish becomes a part of your kitchen repertoire, just like it has in mine. Let’s gather around that table, create memories, and continue to enjoy the beautiful art of cooking together. Happy cooking! 🍽️
PrintSweet Potato and Sausage Casserole
A heartwarming Sweet Potato and Sausage Casserole that’s perfect for family gatherings and cozy dinners.
- Prep Time: 15 minutes
- Cook Time: 30 minutes
- Total Time: 45 minutes
- Yield: 4 servings 1x
- Category: Main Course
- Method: Baking
- Cuisine: American
- Diet: Gluten-Free
Ingredients
- 2 medium sweet potatoes, peeled and diced
- 1 pound sausage (Italian or any preferred type), crumbled
- 1 onion, chopped
- 2 cloves garlic, minced
- 1 cup chicken broth
- 1 teaspoon salt
- 1/2 teaspoon black pepper
- 1 teaspoon paprika
- 1 cup shredded cheese (cheddar or your choice)
- 1 tablespoon olive oil
Instructions
- Preheat your oven to 375°F (190°C).
- Sauté the sausage: In a large skillet, heat the olive oil over medium heat. Once hot, add the crumbled sausage. Break it apart with a spatula and cook for about 6-8 minutes until golden and cooked through.
- Add the onions: Toss in the chopped onion and cook for about 3-4 minutes until they soften and turn translucent.
- Introduce the garlic: Add minced garlic to the mix and sauté for another 1-2 minutes until fragrant.
- Mix in the sweet potatoes: Add diced sweet potatoes, salt, black pepper, and paprika. Pour in the chicken broth and give everything a gentle stir to combine.
- Simmer and soften: Cover the skillet and allow it to simmer for about 10 minutes, or until the sweet potatoes begin to soften.
- Transfer to a baking dish: Pour the sausage and vegetable mixture into a greased 9×13 inch baking dish.
- Sprinkle the cheese: Top the mixture generously with shredded cheese.
- Bake: Pop it in the oven and bake for about 25-30 minutes, until the sweet potatoes are tender and the cheese is golden and bubbly.
Notes
This casserole can be prepared ahead of time or assembled quickly. It’s versatile; try adding nuts for crunch or a drizzle of maple syrup for sweetness.
Nutrition
- Serving Size: 1 serving
- Calories: 400
- Sugar: 6g
- Sodium: 700mg
- Fat: 20g
- Saturated Fat: 7g
- Unsaturated Fat: 10g
- Trans Fat: 0g
- Carbohydrates: 35g
- Fiber: 6g
- Protein: 25g
- Cholesterol: 60mg
Keywords: sweet potato, casserole, sausage, comfort food, family recipe
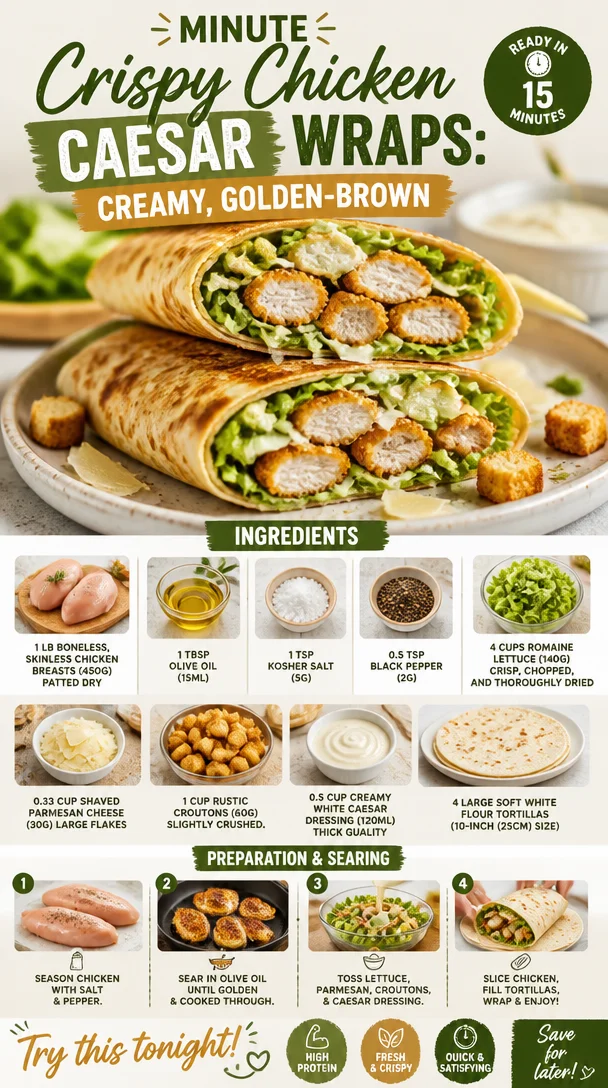
Minute Crispy Chicken Caesar Wraps: Creamy, Golden-Brown
Ultimate Chicken Caesar Wraps: Crispy, Creamy, and Golden-Brown
Hello, fellow food enthusiasts! I’m thrilled to share one of my absolute favorite recipes with you today—the Ultimate Chicken Caesar Wraps. These wraps are the perfect marriage of crispy and creamy, bringing you restaurant-quality flavor straight to your kitchen. Whether you’re in the mood for a quick weeknight dinner or a delightful lunch, this recipe will leave you feeling satisfied and inspired. So, let’s roll up our sleeves and dive into cooking together!
Personal Story
I vividly remember my first experience with a classic Caesar salad. As a child, my mom would take me to this lovely little bistro that had the most amazing homemade Caesar dressing. The aroma of garlic and freshly squeezed lemon would waft through the air as we sat at our small table adorned with a simple checkered tablecloth. I loved watching the waiter toss the salad right in front of us, adding crunchy croutons and a shower of Parmesan cheese that sent my taste buds into a delightful frenzy.
Fast forward to today, and I still crave those flavors! But you know me—I love taking things to the next level, so why not wrap up all that creamy, crispy goodness in a tortilla? And just like that, the Ultimate Chicken Caesar Wrap was born! Each bite is not only a tribute to those beautiful bistro memories but also a delicious celebration of easy cooking and effortless entertaining.
Ingredients
-
1 lb boneless, skinless chicken breasts (450g), patted dry
So versatile and lean! You can substitute chicken thighs for a richer flavor and juicier bite. If you’re looking for a plant-based option, consider grilled portobello mushrooms. -
1 tbsp olive oil (15ml)
A splash of olive oil adds richness and helps the chicken develop a beautiful golden crust. Feel free to swap it with avocado oil for a higher smoke point and a light flavor. -
1 tsp kosher salt (5g)
This simple ingredient enhances the overall flavor of the chicken. Sea salt can also work well here but adjust the amount as for strength. -
0.5 tsp black pepper (2g)
This adds a lovely warmth and a bit of spice to your wrap. If you’re after something a little more adventurous, smoked paprika is a fantastic alternative. -
4 cups romaine lettuce (140g), crisp, chopped, and thoroughly dried
Romaine offers a lovely crunch that pairs perfectly with creamy dressing. Iceberg lettuce can be a good alternative, but I’d skip leafy varieties like spinach as they can wilt fast. -
0.33 cup shaved parmesan cheese (30g)
Parmigiano-Reggiano is worth splurging on if you’re feeling fancy. In a pinch, Pecorino Romano offers a nice, tangy alternative. -
1 cup rustic croutons (60g), slightly crushed
These provide a satisfying crunch. You can make your own by toasting day-old bread with olive oil and garlic or buy store-bought for convenience. -
0.5 cup creamy white Caesar dressing (120ml)
Always go for a high-quality dressing. If you’re looking for lower fat, a yogurt-based dressing can provide creaminess without all the calories. -
4 large soft white flour tortillas (10-inch/25cm size)
Perfect for holding all the delicious fillings without tearing. Corn tortillas can be a gluten-free option, or you can try whole wheat for a heartier bite!
Step-by-Step Instructions
-
Prepare the Chicken:
Start by heating your skillet over medium-high heat. While it’s warming up, season your chicken breasts on both sides with kosher salt and black pepper. Now, drizzle a tablespoon of olive oil into the heated skillet and watch it shimmer—this is your golden canvas! -
Cook the Chicken:
Place the chicken in the skillet, cooking for about 6-7 minutes on one side until it turns beautifully golden. Here’s a little chef hack: avoid moving the chicken around too much as it cooks. Let it sear properly for that perfect crust. Once it’s golden, flip it over and cook on the other side for an additional 6-7 minutes or until the internal temperature reaches 165°F (75°C). Use a meat thermometer for accuracy! -
Rest the Chicken:
Remove the chicken from the skillet and let it rest on a cutting board for about 5 minutes. This is crucial as it allows the juices to redistribute, ensuring your chicken stays moist and flavorful. -
Slice the Chicken:
Once rested, slice the chicken into thin strips. Don’t sweat it if some bits are thicker than others; it just adds character and a homemade touch! -
Assemble the Wraps:
Lay out your tortillas on a clean surface. Start by placing a generous handful of chopped romaine lettuce in the center of each tortilla. Follow up with sliced chicken, a sprinkle of shaved Parmesan, and some slightly crushed croutons for that satisfying crunch. Drizzle the creamy Caesar dressing over the top—don’t be shy! -
Wrap it Up:
Now for the fun part! Fold in the sides of the tortilla over the filling, then roll it tightly from one end to the other. Voila! You’ve created a beautifully wrapped Chicken Caesar masterpiece. -
Toast the Wraps (optional):
If you love a little warmth, place the wrapped tortillas in the skillet for a minute on each side until they’re lightly toasted. This makes the wraps extra delicious and adds even more crunch!
Serving Suggestions
When serving your Ultimate Chicken Caesar Wraps, cut them diagonally in half for an inviting presentation. You can arrange them on a platter with an extra drizzle of Caesar dressing on the side for dipping. For a pop of color and freshness, add a side of vibrant cherry tomatoes or crunchy carrot sticks. Remember, creating a warm and inviting atmosphere is half the fun!
Recipe Variations
- Vegetarian Option: Replace the chicken with grilled zucchini and bell peppers for a delightful veggie twist.
- Spicy Caesar: Add red pepper flakes or a splash of hot sauce to your Caesar dressing for an exciting kick.
- Avocado Lovers: Slice some ripe avocado to layer into your wrap for an extra creamy dimension and healthy fats.
- Grain-Free: Swap the flour tortillas with lettuce leaves or large collard greens for a refreshing, gluten-free wrap.
Chef’s Notes
Oh, how these wraps have evolved! Initially, they were just a quick lunch option. But after countless dinner parties and potlucks where they received rave reviews, they became a staple in my entertaining arsenal. And you wouldn’t believe how easy they are to customize! My friends often reference them as the “Swiss Army knife of wraps”—you can dress them up or down, depending on your vibe.
Funny story—one time, I was in a hurry and decided to grill the chicken while juggling a call from my mom! Long story short, I ended up with charred chicken and had to tweak my recipe on the fly. But if there’s one thing I’ve learned, it’s that cooking is all about embracing the unexpected!
FAQs and Troubleshooting
1. My chicken is dry—what went wrong?
Overcooking can lead to dry chicken. Always cook until it reaches 165°F (75°C) and let it rest afterward.
2. Can I make the wraps ahead of time?
Absolutely! Prepare the filling in advance, but it’s best to assemble the wraps just before serving to keep the tortillas from getting soggy.
3. What if I can’t find croutons?
No worries! You can use toasted nuts or seeds for a crunchy element. Peanuts or sunflower seeds work beautifully in a pinch.
4. How do I make them gluten-free?
Simply swap out the flour tortillas for gluten-free wraps or large lettuce leaves to keep the flavors intact.
Nutritional Info
For those keeping track, each Ultimate Chicken Caesar Wrap contains approximately:
- Calories: 450
- Protein: 35g
- Carbs: 34g
- Fat: 24g
Of course, values will vary based on your specific ingredients and portion sizes!
So, there you have it! The Ultimate Chicken Caesar Wraps are as delightful in flavor as they are in texture and visual appeal. Whether you’re hosting friends or enjoying a cozy night in, these wraps will surely impress. Let’s gather around the table and create something beautiful—together! Happy cooking, everyone!
PrintUltimate Chicken Caesar Wraps

Crispy and creamy chicken Caesar wraps that bring restaurant-quality flavor straight to your kitchen.
- Prep Time: 15 minutes
- Cook Time: 15 minutes
- Total Time: 30 minutes
- Yield: 4 servings 1x
- Category: Main Course
- Method: Cooking
- Cuisine: American
- Diet: None
Ingredients
- 1 lb boneless, skinless chicken breasts (450g), patted dry
- 1 tbsp olive oil (15ml)
- 1 tsp kosher salt (5g)
- 0.5 tsp black pepper (2g)
- 4 cups romaine lettuce (140g), crisp, chopped, and thoroughly dried
- 0.33 cup shaved parmesan cheese (30g)
- 1 cup rustic croutons (60g), slightly crushed
- 0.5 cup creamy white Caesar dressing (120ml)
- 4 large soft white flour tortillas (10-inch/25cm size)
Instructions
- Prepare the chicken: Heat your skillet over medium-high heat. Season chicken breasts with salt and pepper, then drizzle olive oil into the skillet.
- Cook the chicken: Place chicken in the skillet and cook for 6-7 minutes per side until golden and internal temperature reaches 165°F (75°C).
- Rest the chicken: Remove from skillet and let it rest on a cutting board for 5 minutes.
- Slice the chicken: After resting, slice the chicken into thin strips.
- Assemble the wraps: Lay tortillas out, add romaine, sliced chicken, shaved Parmesan, croutons, and Caesar dressing.
- Wrap it up: Fold sides of tortilla and roll tightly from one end to the other.
- Toast the wraps (optional): Toast in the skillet for 1 minute on each side until lightly golden.
Notes
Serve with a drizzle of Caesar dressing on the side and a side of cherry tomatoes or carrot sticks.
Nutrition
- Serving Size: 1 wrap
- Calories: 450
- Sugar: 3g
- Sodium: 600mg
- Fat: 24g
- Saturated Fat: 6g
- Unsaturated Fat: 12g
- Trans Fat: 0g
- Carbohydrates: 34g
- Fiber: 2g
- Protein: 35g
- Cholesterol: 70mg
Keywords: chicken caesar wraps, easy lunch, quick dinner, recipe, wraps
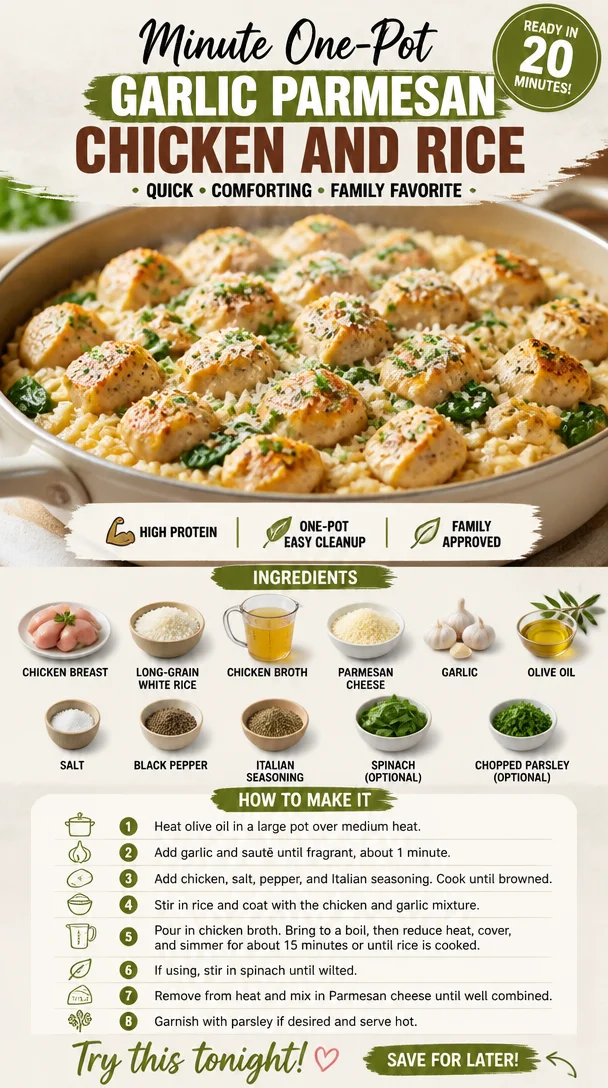
Minute One-Pot Garlic Parmesan Chicken and Rice
One-Pot Garlic Parmesan Chicken and Rice: An Effortless Delight
Hello, fellow food lovers! Today, I’m excited to share with you one of my go-to dishes: One-Pot Garlic Parmesan Chicken and Rice. It’s a recipe that checks all the boxes for a hearty, comforting meal without the fuss of a complicated kitchen endeavor. Picture this: juicy chicken pieces simmered alongside fluffy rice, all brought together by the inviting flavors of garlic and rich Parmesan. And the best part? You only need one pot to create this masterpiece!
Why do I love this dish? Because it embodies everything I stand for at Ivory Apron: elegance without intimidation. It’s about serving up something that not only looks beautiful on the plate but also warms the heart and gathers everyone around the table. Whether you’re hosting friends, cooking for family, or simply treating yourself to a delightful dinner, this dish is here to make the experience joyful and stress-free.
Let me take you on a little culinary journey. We’ll explore a memorable personal story connected to this dish, dive into the ingredients you’ll need, and walk through the cooking process step by step. And don’t worry—I’ll sprinkle in plenty of tips and tricks to ensure your dinner turns out stunning. Ready? Let’s tie our aprons and get cooking!
A Flavorful Memory
I still vividly remember the first time I made this dish. It was a rainy Saturday afternoon, and I’d invited a few close friends over for an impromptu dinner. The kind of gathering where there’s something magical in the air, everyone’s cozy, and laughter mingles with the aromas wafting from the kitchen. I wanted to create something simple yet delicious, something that would allow me to enjoy my guests rather than be glued to the stove.
As I sautéed garlic and chicken in the pot, the fragrant aroma filled the kitchen and seemed to weave its way into our conversation. The chatter flowed, and before long, my friends were diving in, their faces lighting up at the first bites of creamy rice and tender chicken. It was that moment I realized the true power of food—not just as nourishment, but as a connector of hearts and memories. This dish has been a staple ever since, a reminder that the best meals don’t have to be complicated. All we need is love, quality ingredients, and a little bit of inspiration.
Ingredients You’ll Need
Before we jump into cooking, let’s gather our ingredients. Here’s what you’ll need for this delicious One-Pot Garlic Parmesan Chicken and Rice:
-
1 pound chicken breast, cut into cubes
I recommend using boneless, skinless chicken for ease of cooking. If you prefer, you could substitute with chicken thighs for a richer flavor. -
1 cup long-grain white rice
This type of rice cooks beautifully and absorbs all the flavor from the broth and spices. If you want a healthier swap, try brown rice, but be sure to adjust the cooking time as it takes longer to cook. -
2 cups chicken broth
Using homemade broth elevates the dish! However, store-bought works wonders too—just check for low-sodium options to control salt levels. -
1 cup grated Parmesan cheese
Freshly grated cheese melts better and adds a creamier texture compared to the pre-grated kind—definitely worth the extra effort! -
4 cloves garlic, minced
You can never have too much garlic, right? If you’re in a pinch, garlic powder can work as a substitute, but fresh is always best for that robust flavor! -
1 tablespoon olive oil
A drizzle of olive oil not only adds flavor but helps in sautéing. You could use butter for a richer taste or even avocado oil for a higher smoke point. -
1 teaspoon salt
Adjustable based on your palate—don’t go overboard if you’re using salted broth! -
1/2 teaspoon black pepper
Freshly cracked black pepper adds a lovely warmth. Feel free to add a pinch of red pepper flakes if you like a bit of heat! -
1 teaspoon Italian seasoning
This blend of herbs enhances the dish beautifully. If you want to customize, consider fresh thyme or rosemary instead! -
2 cups spinach (optional)
A great way to sneak in some greens! You can replace it with kale or even omit it if greens aren’t your thing. -
Chopped parsley for garnish (optional)
A sprinkle of fresh parsley brightens up the dish visually and adds a hint of freshness—so inviting!
With our ingredients prepped and ready to go, it’s time to fire up that stove!
Step-by-Step Cooking Instructions
Step 1: Sauté the Chicken
Start by heating that lovely tablespoon of olive oil in a large pot over medium heat. Once it’s hot, add your cubed chicken. Cook for about 5-7 minutes, turning occasionally until it’s nicely browned on all sides and cooked through. Chef Tip: Don’t overcrowd the pot—this helps to ensure you get a beautiful sear on the chicken.
Step 2: Add Garlic
Once the chicken has reached that golden perfection, toss in the minced garlic. Cook it for about 1 minute or until that intoxicating aroma seeps into the air. Pro tip: Keep an eye on the garlic! It can go from perfectly fragrant to burnt in a flash!
Step 3: Combine Rice and Broth
Next, stir in the cup of long-grain white rice, allowing it to mingle with the chicken and garlic for another minute. Just imagine that gorgeous flavor building up! Now, pour in 2 cups of chicken broth and bring the mixture to a gentle boil. Chef Hack: You can increase the flavor further by adding a splash of white wine along with the broth!
Step 4: Season It Up
Once it hits a boil, season with salt, black pepper, and Italian seasoning. Then lower the heat to a simmer and cover the pot. Let it cook for about 15-20 minutes, or until the rice is tender and has absorbed all that delicious broth. Quick tip: Resist the urge to lift the lid too often—this lets precious steam escape!
Step 5: Incorporate the Parmesan and Greens
Once it’s done, remove the pot from heat. Stir in that luxurious cup of grated Parmesan cheese until melted and creamy. If you’re adding spinach, fold it in now, allowing it to wilt into the warm dish. Little insider secret: Reserve a little Parmesan for serving—it’s a nice touch!
Step 6: Fluff and Serve
Use a fork to fluff the rice for a light and airy texture. You’re almost there! Chef’s tip: At this point, a squeeze of lemon or some lemon zest can elevate those flavors further—just a thought!
Serving Suggestions
Now that we’ve concocted this creamy, dreamy dish, it’s time to serve it up. I love plating it in deep bowls, giving a generous scoop of the chicken and rice, then garnishing with that chopped parsley we set aside. A sprinkle of extra Parmesan on top never hurts either! Pair it with a crispy green salad or some roasted veggies for a delightful meal that’s as beautiful as it is delicious.
Recipe Variations
Feeling adventurous? Here are some fun flavor variations to keep things fresh:
- Lemon Herb Chicken and Rice: Add lemon juice and zest during the cooking process for a vibrant, zesty twist.
- Spicy Cajun Chicken and Rice: Mix in some Cajun seasoning for a kick that will dance on your taste buds!
- Mushroom and Chicken Risotto: Swap the rice for arborio rice and stir constantly while gradually adding broth for a creamy, risotto-style dish.
- Mediterranean Twist: Add sun-dried tomatoes and olives for an extra layer of flavor, plus some feta cheese as a garnish for that tangy touch.
Chef’s Notes
This recipe has been a staple in my kitchen for years, evolving along the way with my ever-changing whims and tastes. I remember the first time I forgot to add the cheese at the end, thinking I’d ruined dinner. But surprise! With a drizzle of olive oil and a sprinkle of herbs, it was still a hit! That experience taught me that cooking is about experimentation and good vibes—perfection isn’t the goal; enjoyment is.
FAQs and Troubleshooting
Q: My rice didn’t cook all the way. What went wrong?
A: Make sure you’re using the right ratio of liquid to rice, and check if your heat was too high. If your rice is still hard when the liquid is gone, add a little more broth or water and cover it for a few more minutes.
Q: Can I use brown rice instead?
A: Absolutely! Just extend the cooking time by about 10-15 minutes, as brown rice takes longer to cook. You may also need to increase the liquid a tad.
Q: Will this dish freeze well?
A: Yes, it freezes well! Just cool it completely before transferring it to an airtight container. It’s perfect for a quick meal later—just reheat it over low heat with a splash of broth!
Q: How do I make this dish vegetarian?
A: Swap chicken for your favorite plant-based protein, like chickpeas or tofu, and use vegetable broth instead of chicken broth. The recipe will still shine with all those amazing flavors!
This One-Pot Garlic Parmesan Chicken and Rice is more than just a meal; it’s an experience that brings warmth and joy to any table. So, go ahead and recreate those cozy vibes in your kitchen. Remember, good food is about connection, laughter, and moments spent together. Happy cooking, and enjoy every bite!
PrintOne-Pot Garlic Parmesan Chicken and Rice

A hearty and comforting one-pot dish featuring juicy chicken, fluffy rice, and rich flavors of garlic and Parmesan.
- Prep Time: 10 minutes
- Cook Time: 30 minutes
- Total Time: 40 minutes
- Yield: 4 servings 1x
- Category: Main Course
- Method: Stovetop
- Cuisine: Italian
- Diet: Healthy
Ingredients
- 1 pound chicken breast, cut into cubes
- 1 cup long-grain white rice
- 2 cups chicken broth
- 1 cup grated Parmesan cheese
- 4 cloves garlic, minced
- 1 tablespoon olive oil
- 1 teaspoon salt
- 1/2 teaspoon black pepper
- 1 teaspoon Italian seasoning
- 2 cups spinach (optional)
- Chopped parsley for garnish (optional)
Instructions
- Sauté the Chicken: Heat olive oil in a large pot over medium heat. Add cubed chicken and cook for about 5-7 minutes until browned and cooked through.
- Add Garlic: Toss in the minced garlic and cook for 1 minute until fragrant.
- Combine Rice and Broth: Stir in white rice, then pour in chicken broth and bring to a gentle boil.
- Season It Up: Once boiling, season with salt, black pepper, and Italian seasoning. Lower the heat to a simmer, cover, and cook for 15-20 minutes.
- Incorporate the Parmesan and Greens: Remove from heat and stir in Parmesan cheese until melted. Add spinach if using.
- Fluff and Serve: Fluff the rice with a fork and garnish with parsley and extra Parmesan if desired.
Notes
Optional variations include adding lemon juice for freshness or replacing chicken with chickpeas for a vegetarian version.
Nutrition
- Serving Size: 1 serving
- Calories: 450
- Sugar: 2g
- Sodium: 800mg
- Fat: 15g
- Saturated Fat: 6g
- Unsaturated Fat: 7g
- Trans Fat: 0g
- Carbohydrates: 50g
- Fiber: 2g
- Protein: 30g
- Cholesterol: 75mg
Keywords: Garlic Chicken, Parmesan Rice, Comfort Food, One-Pot Meal, Easy Dinner
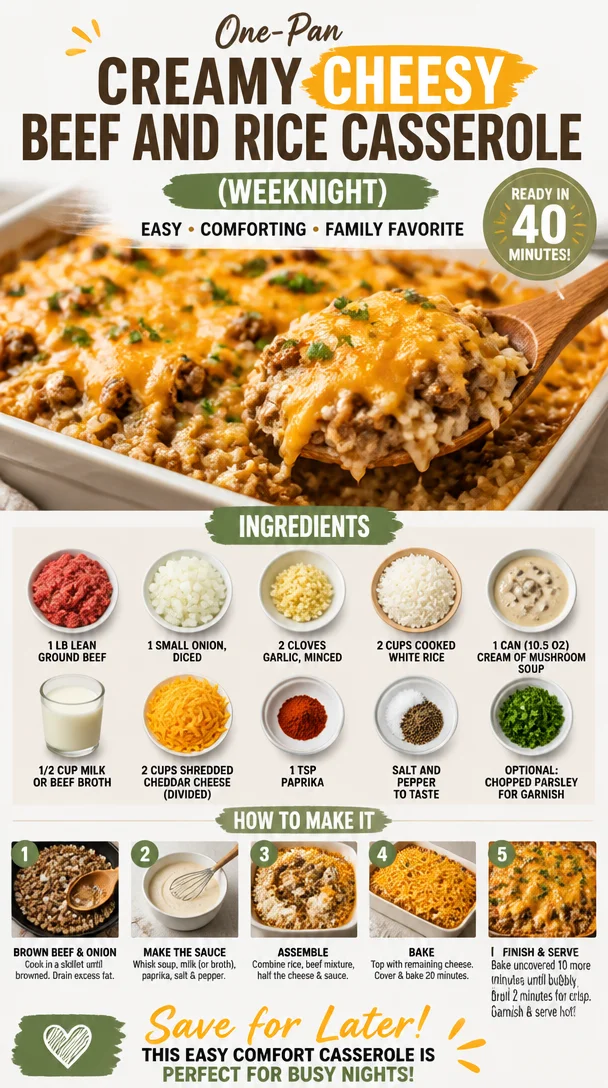
One-Pan Creamy Cheesy Beef and Rice Casserole (Weeknight)
Cheesy Ground Beef and Rice Casserole: The Ultimate Comfort Dish
Hello, fellow foodies! Are you ready to dive into one of my all-time favorite comfort dishes that brings a little nostalgia to my kitchen? Let’s talk about Cheesy Ground Beef and Rice Casserole! This dish is like a warm hug on a plate and is perfect for gathering with family or friends. It’s hearty, cheesy, and oh-so-delicious, and it proves that simple ingredients can come together to create something truly special.
Ever since I was young, I have memories of my mom whipping this casserole up on chilly evenings. The aroma of ground beef, garlic, and melted cheese wafting through the house had a magical way of luring us all into the kitchen, ready to dig in. I still vividly remember the excitement of scraping the casserole dish clean, eyes widening at the gooey, cheesy goodness, and the satisfaction of a completely devoured meal. Plus, the best part? It was a one-pot wonder that made cleanup a breeze!
Now, as I navigate through adulthood, I’ve put my twist on this beloved classic, making it even easier and more flavorful. When I create recipes, my goal is to keep them approachable yet impressive—you know, the kind of dishes that make you the kitchen superstar without requiring a degree from culinary school. So grab your favorite apron, roll up your sleeves, and let’s create a dish that’s going to make your dinner table shine!
Personal Story
Growing up, I remember the playful chaos of weeknight dinners. My siblings and I were convinced that we could be declared world-class taste testers for the delicious concoctions coming from our mom’s kitchen. One dish that topped our charts was her Cheesy Ground Beef and Rice Casserole. Every bite was a delightful mix of flavors, and I still cherish those moments, gathered around our table, clinking forks, and sharing stories.
Fast forward to today, and I’ve found ways to make this meal align with my culinary style. I’ve dabbled and experimented with various ingredients over the years, celebrating its roots but adding my flair. The nostalgia remains, but now it feels modern and accessible to even the busiest of home cooks. I want you to experience that warmth and togetherness, much like I did growing up.
Ingredients
Here’s what you’ll need to whip up this delightful casserole. Each ingredient holds a special place in this comforting dish, and I’ve added some notes and substitute tips to keep your creative juices flowing:
-
1 lb lean ground beef
This is the star of our show! Use ground turkey or chicken for a leaner option, or even plant-based ground meat for a vegetarian twist. -
1 small onion, diced
Onion adds a savory depth. Shallots are a fantastic substitute if you want a sweeter essence. -
2 cloves garlic, minced
Because really, who doesn’t love garlic? You can also use garlic powder in a pinch—about a teaspoon of it will do. -
2 cups cooked white rice
Leftover rice is perfect for this! Brown rice or quinoa can be used for a nuttier flavor and healthier vibe. -
1 can (10.5 oz) cream of mushroom soup (or cream of chicken)
Adds creamy richness! If you want to make it from scratch, sauté some mushrooms, add cream, and blend it together. You could also opt for a dairy-free version. -
1/2 cup milk or beef broth
Whichever you have on hand will work! Vegetable broth can be a wonderful substitute for added flavor. -
2 cups shredded cheddar cheese (divided)
Cheese means everything in this dish! Mix it up with Monterey Jack or even a spicy pepper jack if you’re feeling adventurous. -
1 tsp paprika
A subtle warmth that complements the cheese. Smoked paprika adds a lovely smoky touch—highly recommended! -
Salt and pepper to taste
Always essential! Don’t shy away—season as you go to enhance those flavors. -
Optional: chopped parsley for garnish
For that pop of color! You can also use green onions or cilantro for a fresher vibe.
Step-by-Step Instructions
Now that we’ve got our ingredients ready, let’s jump into the kitchen and start cooking! Follow these easy and fun steps to create your casserole masterpiece.
-
Preheat the Oven: Start by preheating your oven to 350°F (175°C). We want it nice and toasty for our casserole.
-
Brown the Beef: In a large skillet over medium heat, add the ground beef and cook until it’s browned, breaking it apart with a spatula (about 7-8 minutes). The key here is to render the fat without overcooking. You want a slightly golden hue; trust me, that flavor is essential!
-
Add Onion and Garlic: Toss in the diced onion and minced garlic. Sauté for another 3-4 minutes, or until the onions are soft and translucent. This is where the kitchen aromas start to dance! Stir occasionally, too.
-
Combine Other Ingredients: Reduce the heat to low and stir in the cooked rice, cream of mushroom soup, milk (or broth), half of the cheddar cheese (saving the other half for the top), and paprika. Season with salt and pepper to taste. Mix it all together until everything is well incorporated—you want to see that creamy goodness around every morsel.
-
Transfer to Baking Dish: Now, grab a 9×13-inch baking dish and lightly grease it (non-stick spray works wonders!). Pour the beef and rice mixture into the dish, spreading it evenly.
-
Cheese Galore: Sprinkle the remaining cheddar cheese generously on top of the mixture—this is where the magic happens! The golden, bubbly crust will be the crown jewel of our dish.
-
Bake: Place the casserole in the preheated oven and bake for about 25-30 minutes or until the cheese is melted and bubbly. I like to keep an eye on it to ensure it doesn’t overcook (nobody wants burnt edges on a cheesy casserole!).
-
Cool and Serve: Once it’s baked to perfection, remove it from the oven and let it cool for about 5-10 minutes before digging in. This is essential for the flavors to settle and for slicing purposes.
Serving Suggestions
To plate this delightful casserole, scoop out generous portions onto plates and sprinkle with chopped parsley for that touch of elegance. Add a crisp green salad or some roasted vegetables on the side to balance out the meal. And if you’re feeling extra fancy, serve it with a glass of chilled white wine or sparkling water with a slice of lemon. Perfect!
Recipe Variations
Now, let’s unleash our creativity! Here are some fun twists and variations to take your casserole up a notch:
-
Mexican Fiesta: Add black beans, corn, and diced tomatoes with green chilies for a Mexican-inspired take. Spice it up with some cumin and top with tortilla chips for crunch!
-
Italian Flavor Bomb: Swap the cheddar for mozzarella and stir in Italian seasoning. Top with marinara sauce and bake until bubbly. Instant comfort with an Italian flair!
-
Vegetarian Delight: Substitute the ground beef with lentils or chickpeas and use veggie broth. Toss in your favorite chopped veggies, like bell peppers and zucchini, for color and nutrition.
-
Cheesy Broccoli: Mix steamed broccoli florets into the casserole for extra nutrients and a pop of color. You can even swap out half of the cheese for a cheese sauce for extra creaminess.
Chef’s Notes
Cheesy Ground Beef and Rice Casserole has been a staple in my kitchen for years, evolving every time I whip it up. I remember one rainy day I had friends over, and I decided to experiment by introducing some Italian spices and marinara sauce. Let’s just say they devoured every last bite, and that night turned into an impromptu cooking party! Who knew a humble casserole could bring so much joy and laughter?
Also, don’t be afraid to make this dish your mantra in the kitchen! It’s forgiving and versatile, letting you play with flavors as you wish. Mixing things up is part of the fun!
FAQs and Troubleshooting
Here are a few questions I often get about this recipe—let’s clear up any confusion!
Q: Can I use brown rice instead of white?
A: Absolutely! Just be sure to adjust your cooking time, as brown rice takes longer to cook. If you’re using leftover brown rice, it fits perfectly into this recipe.
Q: My casserole turned out too runny. What happened?
A: This can happen if too much liquid was added. Next time, reduce the milk or broth slightly. If it’s still too runny, bake it a bit longer to help it set.
Q: Can I freeze leftovers?
A: Yes! This casserole freezes beautifully. Just make sure it’s cooled completely before transferring to an airtight container. Reheat in the oven or microwave, adding a splash of milk or broth if needed.
Q: How do I store leftovers?
A: Place any leftovers in an airtight container and store them in the refrigerator for up to 3 days. Reheat gently to maintain the cheese’s creaminess.
Nutritional Info (Optional)
For a healthier plate, keep in mind that this recipe serves about 6 people and each serving has approximately:
- Calories: 400
- Protein: 25g
- Carbohydrates: 40g
- Fat: 20g
Remember that actual values can vary based on specific ingredients used.
So, there you have it! A delightful, comforting dish that will become a favorite in your home, just as it has in mine. I hope this journey through Cheesy Ground Beef and Rice Casserole has inspired you to don your apron and get cooking. Enjoy the laughter, the memories, and of course, the delicious food. Cheers to many gatherings around your table!
PrintCheesy Ground Beef and Rice Casserole
A comforting and cheesy casserole that combines ground beef, rice, and delicious ingredients for the perfect family meal.
- Prep Time: 15 minutes
- Cook Time: 30 minutes
- Total Time: 45 minutes
- Yield: 4-6 servings 1x
- Category: Main Course
- Method: Baking
- Cuisine: American
- Diet: Omnivore
Ingredients
- 1 lb lean ground beef
- 1 small onion, diced
- 2 cloves garlic, minced
- 2 cups cooked white rice
- 1 can (10.5 oz) cream of mushroom soup (or cream of chicken)
- 1/2 cup milk or beef broth
- 2 cups shredded cheddar cheese (divided)
- 1 tsp paprika
- Salt and pepper to taste
- Optional: chopped parsley for garnish
Instructions
- Preheat the oven to 350°F (175°C).
- Brown the beef in a large skillet over medium heat for about 7-8 minutes.
- Add the diced onion and minced garlic; sauté for another 3-4 minutes.
- Combine the cooked rice, cream of mushroom soup, milk (or broth), half of the cheddar cheese, and paprika; season with salt and pepper.
- Transfer the mixture to a lightly greased 9×13-inch baking dish.
- Sprinkle the remaining cheddar cheese on top.
- Bake for 25-30 minutes or until the cheese is melted and bubbly.
- Cool for 5-10 minutes before serving.
Notes
Serve with a side salad or roasted vegetables for a complete meal. Leftovers can be frozen for later enjoyment.
Nutrition
- Serving Size: 1 serving
- Calories: 400
- Sugar: 3g
- Sodium: 800mg
- Fat: 20g
- Saturated Fat: 10g
- Unsaturated Fat: 8g
- Trans Fat: 0g
- Carbohydrates: 40g
- Fiber: 2g
- Protein: 25g
- Cholesterol: 70mg
Keywords: casserole, ground beef, comfort food, cheese, rice
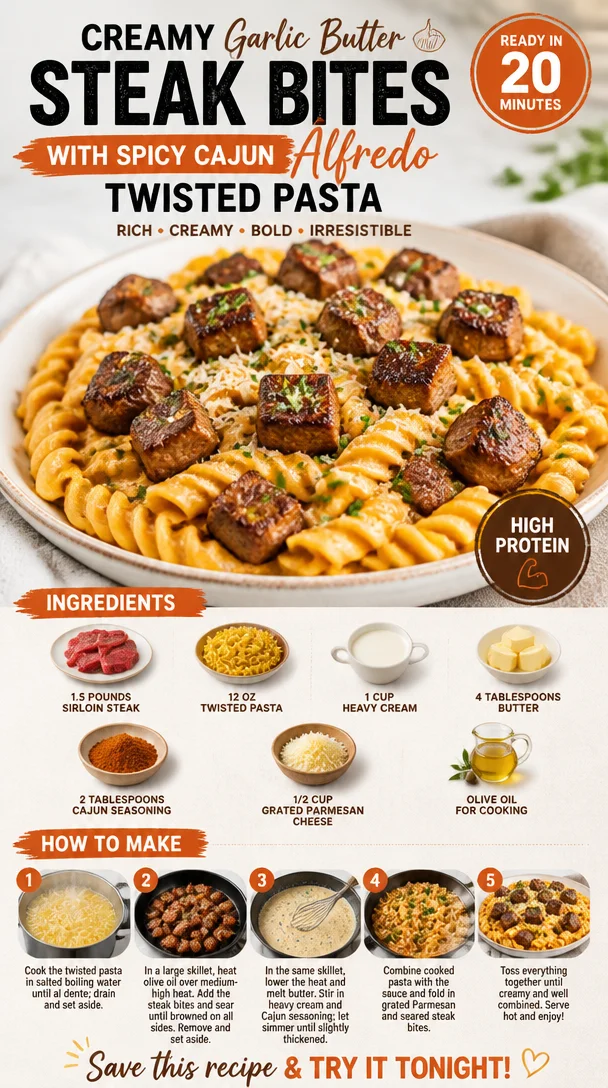
Creamy Garlic Butter Steak Bites with Spicy Cajun Alfredo Twisted Pasta
Creamy Garlic Butter Steak Bites with Spicy Cajun Alfredo Twisted Pasta: A Culinary Adventure
Hello, dear food lovers! Today, I’m thrilled to take you on a mouthwatering journey to create one of my absolute favorite dishes: Creamy Garlic Butter Steak Bites with Spicy Cajun Alfredo Twisted Pasta. This recipe perfectly balances hearty flavors with a touch of decadence, making it ideal for a weeknight dinner or an intimate gathering with friends.
Picture this: succulent steak bites swimming in a rich garlic butter sauce, served over twisted pasta drenched in a spicy Cajun Alfredo. It’s comfort food at its finest. Trust me, this dish will transport you to flavor town quicker than you can say “let’s eat!”
A Stroll Down Memory Lane: The Steak Bites That Changed Everything
I’ll never forget the first time I made creamy garlic butter steak bites. It was a chilly fall evening, and my friends had gathered at my house for dinner. With a few simple ingredients and a lot of love, I whipped up this dish that turned out to be a showstopper. There was laughter, the warmth of candles flickering, and the enticing aroma wafting through the kitchen.
Watching my friends’ faces light up with every bite is a memory etched in my mind — from the first taste of that garlic butter kiss to the last twirl of pasta. Each forkful was wrapped in deliciousness, and I could see that everyone felt right at home. Every guest asked for seconds (and thirds!), which, if you know me, is the highest compliment I could receive. This dish transformed my approach to cooking; it taught me that good food isn’t just about the ingredients but the joy of sharing moments with loved ones.
The Ingredients You’ll Need
Let’s gather our ingredients! Don’t worry; they’re all easily accessible, and I’ve included some fun insights for you:
-
1.5 pounds sirloin steak (or chicken/turkey):
- Rich in flavor and tender, sirloin takes this dish up a notch. If you prefer a lighter dish, swap it for chicken or turkey. They’ll soak up that creamy sauce beautifully!
-
12 oz twisted pasta (rotini or fusilli):
- Twisted pasta is perfect for trapping that rich sauce! If you want to switch things up, try penne or even whole wheat pasta for a healthier twist.
-
1 cup heavy cream:
- This is where the creamy magic happens! If you’re after a lighter version, substitute half and half or even cashew cream for a dairy-free option.
-
4 tablespoons butter:
- Butter adds richness; it’s a non-negotiable element for that silky sauce. Don’t skip it! You can use olive oil if you want to lower the saturated fat content slightly.
-
2 tablespoons Cajun seasoning:
- Spice things up! If you’re a heat seeker, feel free to add an extra sprinkle. If you’re looking for milder flavors, try Italian seasoning or paprika instead.
-
1/2 cup grated Parmesan cheese:
- Parmesan brings that savoriness we crave. If you’re dairy-free, nutritional yeast is a fantastic substitute!
-
Olive oil for cooking:
- A drizzle of olive oil keeps the pan non-stick and adds a subtle flavor. You can substitute with avocado oil if desired.
Step-by-Step Instructions
Ready to create this deliciousness? Let’s get cooking! Follow these steps for steak bites and pasta perfection.
-
Cook the Pasta:
- Start by boiling a large pot of salted water. Add your twisted pasta and cook according to the package instructions until al dente. Give it a good stir occasionally to prevent sticking. Drain, but remember to reserve about a cup of pasta water!
-
Sear the Steak Bites:
- While the pasta is cooking, cut your sirloin steak into bite-sized pieces, roughly 1-2 inches. In a large skillet, heat about 2 tablespoons of olive oil over medium-high heat. Once hot, add the steak bites in a single layer (don’t overcrowd the pan!). Season with salt and pepper. Sear for about 2-3 minutes on each side until they get that delectable golden crust. Remove them from the skillet and set aside.
-
Make the Garlic Butter:
- In the same skillet, reduce the heat to medium and add 4 tablespoons of butter. Let it melt and get bubbly, then toss in 4-5 minced garlic cloves (oh, the aroma!). Sauté for about 30 seconds until fragrant but careful not to burn it!
-
Mix in the Heavy Cream and Cajun Seasoning:
- Now, it’s time to add the heavy cream and Cajun seasoning. Whisk it all together until smooth. Allow it to simmer for about 2-3 minutes; that’s when the magic happens as it starts thickening. If it’s too thick, add a splash of that reserved pasta water!
-
Combine Pasta and Steak:
- Once your sauce is beautifully creamy, toss in the cooked twisted pasta and steak bites. Toss gently until everything is well-coated. If the dish seems a bit dry, add more pasta water to achieve your desired creaminess.
-
Finish with Parmesan:
- Finally, sprinkle in the grated Parmesan cheese. Stir until melted and incorporated, creating an irresistible, cheesy goodness.
-
Taste & Adjust:
- Give it a taste test! This is the perfect moment to adjust seasoning if needed — you can add a pinch more Cajun seasoning or salt at this stage.
Serving Suggestions to Impress
Now for the fun part — plating! Transfer your creamy Cajun steak pasta to a beautiful serving bowl or plate. A sprinkle of freshly chopped parsley on top for color—make it as vibrant as your dining space! For an extra flair, drizzle a bit of high-quality olive oil and some grated Parmesan on top. 🍽️
This dish is not just meant to be delicious; it should look like a work of art too!
Recipe Variations
Feeling creative? Here are some fun twists to mix things up:
-
Add Vegetables:
- Toss in sautéed bell peppers, spinach, or cherry tomatoes for a pop of color and nutrition.
-
Spicy Kick:
- Throw in some crushed red pepper flakes for an extra heat bomb! Go big or go home, right?
-
Seafood Delight:
- Swap the steak for shrimp or lobster for a luscious seafood variation!
-
Herb Infusion:
- Fresh herbs like basil or parsley add even more flavor. Toss them in right before serving!
-
Vegan Version:
- When you swap the protein for mushrooms (like portobello), use coconut cream and nutritional yeast for cheesiness. Bingo!
Chef’s Notes: My Kitchen Confessions
Here’s a little secret: this creamy garlic butter steak bites dish has evolved over time. The first time I made it, I forgot to add the Parmesan cheese. You know what? It tasted incredible anyway! I realized cooking is all about intuition—don’t stress if you forget an ingredient. Feel free to improvise, just as I did, and allow your palette to guide you.
And, of course, there always seems to be that one friend who says, “I’m not a fan of this ingredient.” Challenge accepted, my friend! I love turning skeptics into fans every single time.
FAQs and Troubleshooting
1. My sauce is too thick, what should I do?
- No worries! Just add a splash of reserved pasta water or more heavy cream to loosen it up to your desired consistency.
2. The steak bites are tough. What did I do wrong?
- Overcooking is often the culprit. Sear your steak bites until just browned, as they will continue to cook in the sauce.
3. Can I make this dish ahead of time?
- Absolutely! Prepare the pasta and garlic butter sauce separately. When ready to serve, simply reheat the components together!
4. What can I do with leftovers?
- Store leftovers in an airtight container in the fridge. Reheat in the microwave, adding a dash of cream or water to revive that creamy texture.
Nutritional Info (Optional)
This dish is a comforting meal, but if you’re curious about the nutritional value, here’s a rough estimate per serving (assuming 4 servings total):
- Calories: Approximately 700
- Protein: 35g
- Carbohydrates: 50g
- Fats: 40g
Conclusion
So there you have it — Creamy Garlic Butter Steak Bites with Spicy Cajun Alfredo Twisted Pasta — a dish that’s guaranteed to impress your family and friends, or just bring a sparkle of joy to your weeknight meals. Remember, cooking is all about celebrating flavors and gathering around the table.
I hope you enjoyed this culinary adventure as much as I do! Now, tie on that apron, gather your ingredients, and let’s get cooking. Cheers to great food and even better company! 🍷✨
PrintCreamy Garlic Butter Steak Bites with Spicy Cajun Alfredo Twisted Pasta
A delectable dish featuring succulent steak bites in a rich garlic butter sauce served over twisted pasta with spicy Cajun Alfredo.
- Prep Time: 15 minutes
- Cook Time: 30 minutes
- Total Time: 45 minutes
- Yield: 4 servings 1x
- Category: Main Course
- Method: Searing, Simmering
- Cuisine: American
- Diet: Gluten Free
Ingredients
- 1.5 pounds sirloin steak (or chicken/turkey)
- 12 oz twisted pasta (rotini or fusilli)
- 1 cup heavy cream
- 4 tablespoons butter
- 2 tablespoons Cajun seasoning
- 1/2 cup grated Parmesan cheese
- Olive oil for cooking
Instructions
- Cook the Pasta: Start by boiling a large pot of salted water. Add your twisted pasta and cook according to the package instructions until al dente. Drain, but remember to reserve about a cup of pasta water!
- Sear the Steak Bites: While the pasta is cooking, cut your sirloin steak into bite-sized pieces. Heat about 2 tablespoons of olive oil over medium-high heat. Add the steak bites in a single layer and season with salt and pepper. Sear for about 2-3 minutes on each side until golden crusted. Remove from the skillet and set aside.
- Make the Garlic Butter: In the same skillet, reduce the heat to medium and add 4 tablespoons of butter. Let it melt, then toss in 4-5 minced garlic cloves. Sauté for about 30 seconds until fragrant.
- Mix in the Heavy Cream and Cajun Seasoning: Add the heavy cream and Cajun seasoning, whisking until smooth. Allow it to simmer for about 2-3 minutes until it starts thickening.
- Combine Pasta and Steak: Toss in the cooked pasta and steak bites, mixing gently until everything is well-coated. Adjust the creaminess by adding reserved pasta water if necessary.
- Finish with Parmesan: Sprinkle in the grated Parmesan cheese and stir until melted and combined.
- Taste & Adjust: Give it a taste test and adjust seasoning if needed.
Notes
For added nutrition, consider mixing in sautéed vegetables or changing the protein to shrimp or mushrooms for variations.
Nutrition
- Serving Size: 1 serving
- Calories: 700
- Sugar: 2g
- Sodium: 800mg
- Fat: 40g
- Saturated Fat: 20g
- Unsaturated Fat: 15g
- Trans Fat: 1g
- Carbohydrates: 50g
- Fiber: 3g
- Protein: 35g
- Cholesterol: 90mg
Keywords: steak bites, creamy pasta, Cajun Alfredo, comfort food, dinner recipe
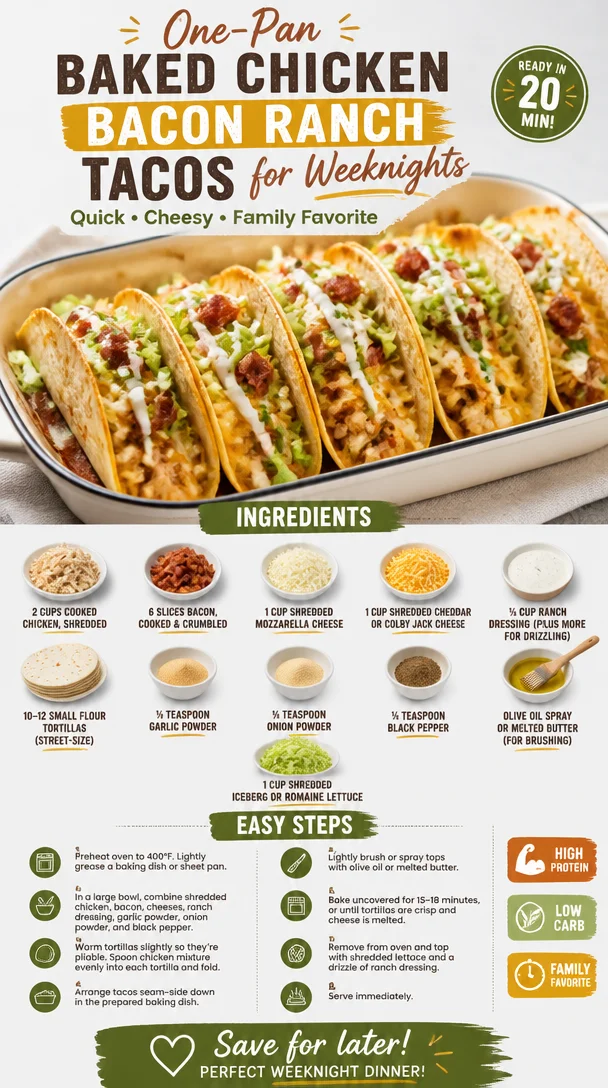
One-Pan Baked Chicken Bacon Ranch Tacos for Weeknights
Baked Chicken Bacon Ranch Tacos: A Culinary Adventure Awaits!
Welcome back to my cozy kitchen, food lovers! Today, we’re diving into a scrumptious and indulgent recipe that will light up your dinner table — Baked Chicken Bacon Ranch Tacos! If you’re anything like me, you know that combining crispy tortillas with juicy chicken, crispy bacon, and a delightful ranch finish is a match made in foodie heaven. These tacos aren’t just a meal; they’re a celebration of flavors that beckon you to gather your friends and family around the table.
I started making these delightful tacos when I was in college, where experimenting in the kitchen was fueled by both hunger and a limited budget. I vividly remember hosting casual weeknight dinners for friends, where I threw together whatever I had on hand. One evening, after an exhausting class, I opened my fridge and saw remnants of cooked chicken, a few slices of leftover bacon, and an unopened bottle of ranch dressing. In a brilliant stroke of inspiration (and probably a little too much caffeine), I decided to create something epic. Thus, the Chicken Bacon Ranch Tacos were born!
Little did I know, this simple combination would quickly become a beloved staple among my group. Fast forward a few years, and this recipe has stood the test of time, transforming from a late-night study snack to the star of dinner parties. So, grab your apron and let’s dive into this delicious dish that combines comfort and elegance in every bite!
Ingredients
Here’s what you’ll need to craft these fabulous tacos. Each ingredient plays a crucial role in delivering that wow factor:
-
2 cups cooked chicken, shredded
Perfect for utilizing leftover rotisserie chicken! If you don’t have leftovers, poach, bake, or grill chicken breasts; they cook up beautifully and shred easily. -
6 slices bacon, cooked and crumbled
Can I just say, bacon makes everything better? For a healthier alternative, try turkey bacon or omit it altogether for a lighter dish. -
1 cup shredded mozzarella cheese
Classic melty goodness! If you’re looking for a twist, swap it for pepper jack for an extra kick or use dairy-free cheese for a lactose-free option. -
1 cup shredded cheddar or Colby Jack cheese
This cheese adds a nice sharpness. Feel free to mix it with other cheeses you have on hand or try a flavored variety for something different. -
⅓ cup ranch dressing (plus more for drizzling)
The creamy heart of this dish! Use homemade ranch for deeper flavor or try a yogurt-based dressing for a lighter option. -
10–12 small flour tortillas (street-size)
Flour tortillas are soft and pliable, perfect for this treatment. Corn tortillas can also work if you’re looking for a gluten-free option! -
½ teaspoon garlic powder
A quintessential flavor booster. If you love fresh flavors, consider using minced garlic instead. -
½ teaspoon onion powder
Adds depth and sweetness. In place of this, finely diced onions can bring a fresh crunch if you sauté them lightly. -
¼ teaspoon black pepper
Essential for a hint of spice! Adjust according to your taste; cayenne pepper can be fun for those who love heat. -
Olive oil spray or melted butter (for brushing)
Just enough to give your tacos that golden beauty! If you’re keeping things light, use spray; if flavor is your focus, melted butter it is! -
1 cup shredded iceberg or romaine lettuce
A fresh, crunchy addition! You can also use spinach or kale for a nutrient boost.
Step-by-Step Instructions
Ready to get your hands a bit messy? Let’s cook!
-
Preheat the Oven
Start by preheating your oven to 400°F (200°C). A hot oven ensures our tacos get that golden-brown crunch. While we wait, let’s prepare our ingredients! -
Mix the Filling
In a large bowl, combine the shredded chicken, crumbled bacon, mozzarella cheese, cheddar cheese, ranch dressing, garlic powder, onion powder, and black pepper. I love to use my hands here to incorporate everything thoroughly. You want it to be a cohesive, cheesy delight! -
Warm the Tortillas
Since we’re working with flour tortillas, I recommend warming them in the microwave for about 30 seconds to a minute. This will make them more malleable and prevent them from tearing when we stuff them. -
Assemble the Tacos
Lay the warmed tortillas on a flat surface. Spoon a generous amount of the chicken mixture into the center of each tortilla. Don’t be shy – pile it on! Once filled, gently fold each tortilla over, creating a little taco pocket. -
Brush with Oil
Use a pastry brush or your fingers to lightly brush the tops of the tacos with olive oil or melted butter. This will give your tacos a beautiful golden color while they bake. -
Bake to Perfection
Place your assembled tacos seam-side down in a baking dish. Bake them in the preheated oven for about 15-20 minutes, or until the cheese is bubbly and the tortillas are golden brown. It’s hard to resist peeking, but trust me, they’ll look gorgeous! -
Garnish and Serve
Once they’re out of the oven, let them sit for a minute. Top with a drizzle of ranch dressing and a handful of shredded lettuce for crunch.
Serving Suggestions
Presentation can elevate a simple meal into a stunning culinary experience! Serve your baked tacos on a beautiful platter, arranged neatly with a side of homemade salsa or guacamole. Sprinkle some chopped fresh cilantro on top for a burst of color and flavor that will delight your guests! You can also serve them with a lime wedge on the side to add a zesty squeeze!
Recipe Variations
Feeling adventurous? Here are a few fun twists to consider:
-
Buffalo Chicken Bacon Ranch Tacos: Swap the ranch dressing with buffalo sauce for a fiery kick! Add blue cheese crumbles for the ultimate flavor combination.
-
Veggie Version: Replace the chicken and bacon with black beans or chickpeas for a plant-based alternative, and add extra veggies like bell peppers and corn. You’ll get a whole new flavor profile!
-
Cheesy Taco Bake: Layer the tacos in a baking dish, cover with extra cheese, and bake until bubbly and gooey—think of it like a cheesy taco casserole!
-
Southwest Tacos: Incorporate corn, diced jalapeños, and Mexican spices for a southwestern twist. Serve with avocado crema for a cool contrast.
-
Breakfast Tacos: Use scrambled eggs instead of chicken and mix in some sautéed bell peppers. Use salsa verde for a breakfast taco that’s to die for!
Chef’s Notes
Oh, the memories these tacos bring back! I remember once trying to impress my friends with an elaborate three-course meal, and while my entrees were decent, the tacos ended up stealing the show! It’s funny how the simplest recipes often resonate the most. Over the years, I’ve tweaked the original version, but keeping that perfect balance of flavors has always been the heart and soul of this dish.
And you know, if you have any leftover filling, toss it into an omelet for breakfast the next day or scoop it up with tortilla chips. Waste not, want not, right?
FAQs and Troubleshooting
Q: My tortillas are tearing when I fold them. What can I do?
A: Warm them up a bit longer! Heating makes them pliable. Warming in a skillet instead of the microwave works wonders as well.
Q: How can I make these tacos spicier?
A: Consider using spicy ranch dressing or adding jalapeños to the filling. You can also sprinkle some cayenne pepper in with your spices!
Q: Can I prepare these in advance?
A: Absolutely! Assemble the tacos but don’t bake them. Cover them with foil and store in the refrigerator for up to 24 hours. Bake them just before serving.
Q: My tacos are soggy! What happened?
A: This can happen if you add too much dressing or if the tacos sit too long before baking. Always try to use just enough dressing to combine the ingredients without making them wet.
Nutritional Info
While exact nutritional content can vary based on specific ingredients and brands, here’s a rough estimate per serving (two tacos):
- Calories: 380-450
- Protein: 25g
- Carbohydrates: 35g
- Fat: 20g
- Fiber: 2g
(Note: Adjust the nutritional info based on your ingredient choices and portions.)
There you have it! A delightful journey from my kitchen to yours with these Baked Chicken Bacon Ranch Tacos. May they bring joy and deliciousness to your table just as they have in mine. Remember, cooking is about creating memories and enjoying the process. So, what are you waiting for? Tie on your apron and let’s get cooking!
PrintBaked Chicken Bacon Ranch Tacos

Delicious baked tacos filled with shredded chicken, crispy bacon, and a creamy ranch dressing, perfect for gatherings.
- Prep Time: 15 minutes
- Cook Time: 20 minutes
- Total Time: 35 minutes
- Yield: 4 servings 1x
- Category: Main Course
- Method: Baking
- Cuisine: Mexican
- Diet: None
Ingredients
- 2 cups cooked chicken, shredded
- 6 slices bacon, cooked and crumbled
- 1 cup shredded mozzarella cheese
- 1 cup shredded cheddar or Colby Jack cheese
- ⅓ cup ranch dressing (plus more for drizzling)
- 10–12 small flour tortillas (street-size)
- ½ teaspoon garlic powder
- ½ teaspoon onion powder
- ¼ teaspoon black pepper
- Olive oil spray or melted butter (for brushing)
- 1 cup shredded iceberg or romaine lettuce
Instructions
- Preheat the oven to 400°F (200°C).
- Mix the shredded chicken, crumbled bacon, mozzarella cheese, cheddar cheese, ranch dressing, garlic powder, onion powder, and black pepper in a large bowl.
- Warm the tortillas in the microwave for about 30 seconds to 1 minute.
- Assemble the tacos by spooning a generous amount of the chicken mixture into the center of each tortilla, then gently folding them over.
- Brush the tops of the tacos with olive oil or melted butter.
- Bake the tacos seam-side down in a baking dish for about 15-20 minutes, or until the cheese is bubbly and the tortillas are golden brown.
- Garnish the baked tacos with a drizzle of ranch dressing and shredded lettuce before serving.
Notes
For extra flavor, consider trying different cheese varieties or adding vegetables.
Nutrition
- Serving Size: 2 tacos
- Calories: 415
- Sugar: 1g
- Sodium: 950mg
- Fat: 25g
- Saturated Fat: 10g
- Unsaturated Fat: 10g
- Trans Fat: 0g
- Carbohydrates: 35g
- Fiber: 2g
- Protein: 25g
- Cholesterol: 75mg
Keywords: tacos, chicken, bacon, ranch, baked, dinner, easy recipe
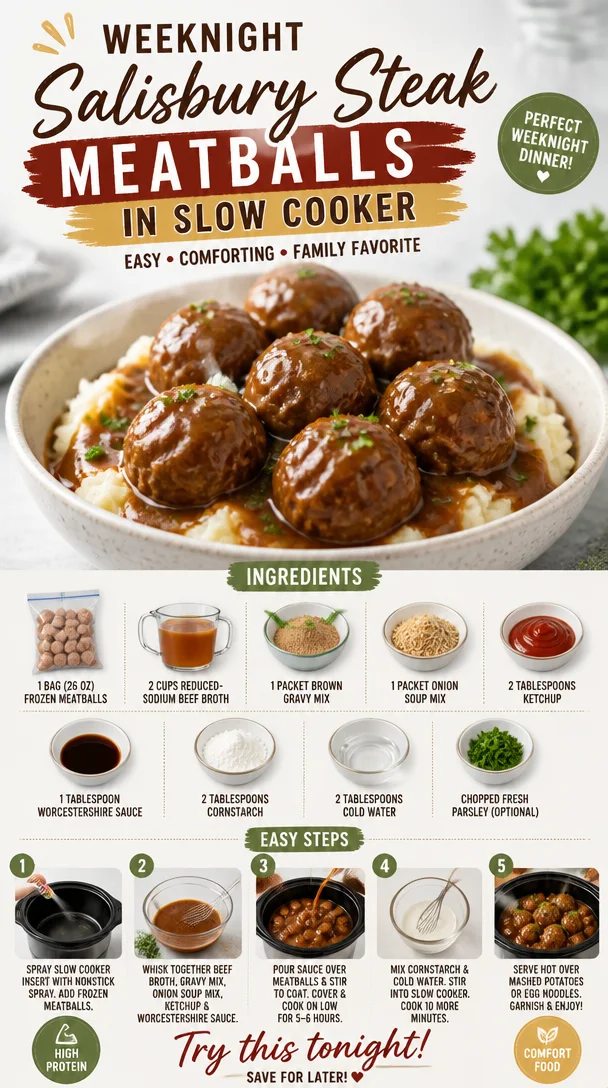
Weeknight Salisbury Steak Meatballs in Slow Cooker
Slow Cooker Salisbury Steak Meatballs: Family-Friendly Comfort
Introduction
Hello, my lovely foodies! Today, we’re diving into the cozy, hearty world of Slow Cooker Salisbury Steak Meatballs! Imagine your kitchen filled with the mouthwatering aroma of savory beef simmering gently, melding with rich gravy, and the anticipation of warmth and comfort that fills the air. This dish is the epitome of family-friendly comfort food; it’s easy to prep, warmly nostalgic, and utterly delicious.
What I adore about this recipe is how effortlessly it allows me to gather loved ones around the table. It’s one of those dishes everyone can enjoy, whether you have picky eaters or those who appreciate flavorful, hearty meals. Plus, there’s something magical about cooking in a slow cooker. You toss in the ingredients, set it, and let it work its wonders. And trust me, there will be no leftovers!
So, let’s roll up our sleeves and get started. I’ll be sharing a story that takes me back to my childhood, the essential ingredients we need, and step-by-step instructions so you can whip this up in no time. Ready to elevate your weeknight dinners? Let’s go!
Personal Story
Ah, Salisbury steak! Just hearing the name takes me back to my childhood dinners at Grandma’s house. She adored hosting family meals, and her dining table was like a cozy haven, complete with flickering candles and laughter filling the room. One of her staples was Salisbury steak, and it was always accompanied by a mound of creamy mashed potatoes and buttery corn.
I remember one particular evening, as the winter winds howled outside, Grandma’s kitchen was filled with warmth and savory smells. She had me help her shape the meat, and I loved the process of rolling tiny meatballs in my hands. The fun part? Sneaking bites of the raw meat (don’t worry—food safety is always a top priority now!). Once Grandma caught me, she’d laugh, reminding me, “You’ll ruin your appetite!”
After dinner, we’d gather around the table, sharing stories and feasting on her heavenly food. Those moments were simple yet so rich, igniting my passion for cooking and gatherings. Today, I aim to recreate that warmth in my own kitchen with these Slow Cooker Salisbury Steak Meatballs.
Ingredients
Here’s what you’ll need to craft this comforting dish:
-
1 bag (26 oz) frozen meatballs (about 30–35 meatballs)
Using frozen meatballs saves time, but feel free to make your own! If homemade, use a mix of beef and pork for extra flavor. -
2 cups reduced-sodium beef broth
Opting for reduced-sodium helps control the saltiness, allowing you to adjust flavors as needed. You could also use homemade broth for a deeper flavor! -
1 packet brown gravy mix
This is the secret to that rich, silky gravy. You can substitute with a homemade version using flour and beef stock if you prefer. -
1 packet onion soup mix
If you’re feeling adventurous, try making your own with dried onions, garlic powder, and a dash of seasoning. -
2 tablespoons ketchup
A little sweetness and tang! You can use BBQ sauce or even a splash of hoisin sauce for a fun twist. -
1 tablespoon Worcestershire sauce
This adds a lovely depth of flavor to the gravy. Don’t skip it! You can swap with soy sauce for a different kick. -
2 tablespoons cornstarch
This is our secret weapon for thickening the gravy. If you’re gluten-free, you can use arrowroot powder instead. -
2 tablespoons cold water
To mix with the cornstarch and create that beautifully thick gravy. -
Chopped fresh parsley for garnish (optional)
A sprinkle of green adds freshness and color. Feel free to swap with chives or thyme if you prefer!
Step-by-Step Instructions
Now, let’s bring these flavors together step by step!
-
Prepare Your Slow Cooker:
Start by plugging in your slow cooker and setting it to low heat. Slow cooking is about patience, so let’s keep those flavors developing slowly! -
Mix the Gravy Base:
In a medium bowl, combine the beef broth, brown gravy mix, onion soup mix, ketchup, and Worcestershire sauce. Whisk them together until you have a smooth mixture. It’ll smell fantastic—trust me, this is the essence of comfort in a bowl! -
Add the Meatballs:
Toss your frozen meatballs directly into the slow cooker. They don’t require thawing, as they’ll cook wonderfully in that savory broth. (Chef tip: Scattering them makes sure every meatball gets good flavor!) -
Pour Over the Gravy Mixture:
Pour your beautifully mixed gravy over the meatballs. Ensure all those tasty morsels are coated (yes, a gentle stir here and there wouldn’t hurt!). -
Set and Forget:
Cover the slow cooker and let it work its magic on low for about 4-6 hours. If you’re in a pinch, you can set it to high for 2-3 hours, but I do love how the flavors bloom over a longer cook. -
Thicken the Gravy:
About 30 minutes before serving, mix the cornstarch with cold water in a small bowl to create a slurry. Stir this into the slow cooker to thicken the gravy. This step is key for creating that luscious, creamy texture we love! -
Garnish and Serve:
Before serving, give the meatballs a gentle stir. Taste a meatball to ensure the seasoning is just right, then sprinkle with fresh parsley.
Serving Suggestions
To serve your Slow Cooker Salisbury Steak Meatballs, I recommend dishing them out into shallow bowls or plate them with a heap of mashed potatoes or egg noodles underneath. Make sure to drizzle that luscious gravy all over! A fresh salad or some steamed veggies on the side adds a nice pop of color and freshness.
Recipe Variations
-
Spicy Kick: Add a teaspoon of cayenne pepper or some red pepper flakes into the gravy for a little heat!
-
Herb Infusion: Toss in a few sprigs of fresh thyme or rosemary before cooking for an aromatic twist.
-
Vegetable Boost: Mix in some frozen peas or diced carrots right at the start for added nutrition and color.
-
Gluten-Free: Swap gravy mix with a gluten-free version or make your own with gluten-free flour.
-
Serving Options: Instead of serving with mashed potatoes, try it over creamy polenta or buttered egg noodles for a different texture and flavor profile.
Chef’s Notes
This recipe has evolved quite over the years. I used to make it with ground beef and shape them into patties, but let’s be real — sometimes you just want that simplicity! One of my funniest memories was when my sweet toddler tried to help by adding too much Worcestershire sauce. Let’s just say it turned into a savory explosion!
Now, I cherish those moments in the kitchen, encouraging my kids to help and modify recipes to their liking. Cooking should be a joyful experience; don’t hesitate to experiment!
FAQs and Troubleshooting
1. Can I use fresh meatballs?
Of course! Just adjust your cooking time. Fresh meatballs may take a little less time to cook, around 2-3 hours on high or 4-5 hours on low.
2. My gravy is too thin; what can I do?
If you find your gravy isn’t quite thickening to your liking, mix an additional tablespoon of cornstarch with cold water and add that to your slow cooker, then allow it to cook for another 15-30 minutes.
3. What can I serve with this dish?
You can serve it with mashed potatoes, rice, or egg noodles, or even spoon it over crusty bread for a delightful twist.
4. Can I meal prep this?
Absolutely! You can prepare everything in advance, pop it in the fridge, and toss it in the slow cooker when you’re ready. Just add an extra 30 minutes to the cook time if your meatballs are cold.
Nutritional Info
(Estimated values per serving, based on 6 servings)
- Calories: 275
- Protein: 18g
- Fat: 15g
- Carbohydrates: 20g
- Fiber: 2g
- Sodium: 660mg
And there you have it! Embrace the art of simple, beautiful cooking and make Slow Cooker Salisbury Steak Meatballs a staple in your home. Happy cooking, my friends! I can’t wait to hear how your family enjoys it!
PrintSlow Cooker Salisbury Steak Meatballs

A cozy, hearty dish perfect for family dinners, featuring savory beef meatballs simmered in a rich gravy.
- Prep Time: 15 minutes
- Cook Time: 360 minutes
- Total Time: 375 minutes
- Yield: 6 servings 1x
- Category: Main Course
- Method: Slow Cooking
- Cuisine: American
- Diet: Gluten-Free Option Available
Ingredients
- 1 bag (26 oz) frozen meatballs (about 30–35 meatballs)
- 2 cups reduced-sodium beef broth
- 1 packet brown gravy mix
- 1 packet onion soup mix
- 2 tablespoons ketchup
- 1 tablespoon Worcestershire sauce
- 2 tablespoons cornstarch
- 2 tablespoons cold water
- Chopped fresh parsley for garnish (optional)
Instructions
- Prepare your slow cooker: Plug in and set to low heat.
- Mix the gravy base: In a medium bowl, combine beef broth, brown gravy mix, onion soup mix, ketchup, and Worcestershire sauce.
- Add the meatballs: Toss frozen meatballs directly into the slow cooker.
- Pour over the gravy mixture: Ensure all meatballs are coated.
- Set and forget: Cover and let it cook on low for 4-6 hours.
- Thicken the gravy: Mix cornstarch with cold water and stir into the slow cooker 30 minutes before serving.
- Garnish and serve: Give meatballs a gentle stir, taste for seasoning, and sprinkle with parsley.
Notes
For a spicy kick, add cayenne pepper or red pepper flakes to the gravy. You can also mix in frozen peas or diced carrots for added nutrition.
Nutrition
- Serving Size: 1 serving
- Calories: 275
- Sugar: 4g
- Sodium: 660mg
- Fat: 15g
- Saturated Fat: 5g
- Unsaturated Fat: 7g
- Trans Fat: 0g
- Carbohydrates: 20g
- Fiber: 2g
- Protein: 18g
- Cholesterol: 45mg
Keywords: slow cooker, Salisbury steak, meatballs, comfort food, family-friendly, easy recipes
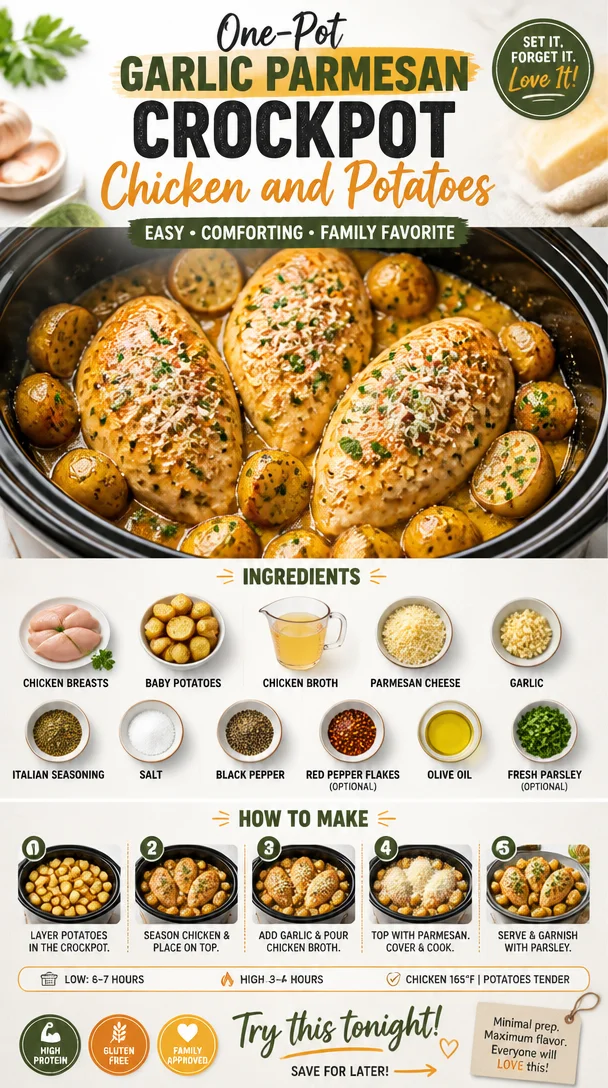
One-Pot Garlic Parmesan Crockpot Chicken and Potatoes
Garlic Parmesan Crockpot Chicken and Potatoes: An Incredible Ultimate Recipe
Hello and welcome to another culinary adventure with me, Savannah Pierce, right here at Ivory Apron! If you’re anything like me, you love a meal that not only impresses your guests but also requires minimal effort in the kitchen. Enter the star of today’s show—Garlic Parmesan Crockpot Chicken and Potatoes. This dish is perfect for busy weeknights when you want something cozy without sacrificing flavor. Grab your apron, and let’s dive into this delicious recipe that’s all about ease and elegance!
Introduction
Imagine this: a chilly evening, the aromas of garlic and Parmesan wafting through your home, and your family or friends gathered around the table, eager to dig in. Sounds delightful, right? With this Garlic Parmesan Crockpot Chicken and Potatoes, you can create that scene effortlessly! The best part? You set it and forget it, leaving you free to enjoy the good company.
This recipe is perfect for those of us who lead busy lives but still want to serve a comforting, home-cooked meal. The tender chicken, creamy Parmesan, and perfectly cooked baby potatoes are a match made in heaven. Plus, it requires just a handful of simple ingredients that come together beautifully, ensuring that you’re not spending hours slaving away in the kitchen.
Cooking doesn’t always have to be about elaborate techniques or fancy dinners. Instead, it can be an opportunity to connect with loved ones, share stories, and enjoy delicious food together. And that’s precisely what I hope to inspire in you with this crockpot wonder. Not only will it satiate your taste buds, but it will also create new memories around your table.
So, whether you’re planning a family dinner, hosting friends for a casual gathering, or simply want to treat yourself after a long day, this Garlic Parmesan Crockpot Chicken and Potatoes is the dish for you. Now, let’s roll up our sleeves and get started!
Personal Story
I remember the first time I made a similar dish for my friends during a cozy fall gathering. The leaves had just turned, and the air was crisp, making it the perfect time for comfort food. I had a small apartment with a cute dining area, but it was pretty tight—definitely not the big, marble-countered kitchen I had dreamed of.
Armed with a modest crockpot and a bunch of ingredients, I set out to create a hearty meal that would warm us from the inside out. Smells started to swirl through the air, and it didn’t take long before my friends began to gather around, drawn by the enticing fragrance. Sharing that meal, full of laughter and warmth, truly encapsulated why I love cooking so much—it’s about bringing people together.
That evening was not just about the food; it was an experience, a heartwarming reminder that cooking could be elegant without being intimidating. It’s this very philosophy that inspired me to create recipes like this Garlic Parmesan Crockpot Chicken and Potatoes that are designed to deliver satisfaction with ease.
Ingredients
Let’s talk about what goes into making this delightful dish! Here’s your handy ingredient list to whip up this comforting meal:
-
4 boneless, skinless chicken breasts: The star of our dish! Chicken breasts provide a lean source of protein and absorb the flavors beautifully. If you’re looking for a healthier option, you can substitute with chicken thighs or even tofu for a vegetarian twist.
-
1.5 pounds baby potatoes, halved: These little gems add heartiness to the meal. Their creamy texture when cooked makes them a favorite! If you can’t find baby potatoes, feel free to use Yukon Gold or red potatoes, just cut them into bite-sized pieces.
-
1 cup chicken broth: This will impart a deep flavor to both the chicken and potatoes. For a vegetarian option, you can swap this out with vegetable broth.
-
1/2 cup grated Parmesan cheese: This ingredient adds richness and a delightful tang. If you’re a fan of dairy-free cooking, nutritional yeast can be a great substitute.
-
4 cloves garlic, minced: Garlic is a must for this recipe, giving it that aromatic kick. If you’re still looking for flavor but need a garlic substitute, onion powder does a good job too!
-
1 tablespoon Italian seasoning: This blend of dried herbs adds depth to the dish. You can easily make your own mix with basil, oregano, thyme, and rosemary.
-
1 teaspoon salt: A little seasoning goes a long way! Adjust according to your preference, especially if you’re using pre-made broth that is already salty.
-
1/2 teaspoon black pepper: Freshly ground black pepper adds a bit of a kick. If you want to amp it up, consider using cayenne pepper.
-
1/2 teaspoon red pepper flakes (optional): For those who like a bit of heat, these are perfect! Feel free to skip them if you prefer a milder flavor.
-
2 tablespoons olive oil: This fat helps to keep the chicken moist and adds a nice richness. You can substitute with avocado oil if you wish.
-
Fresh parsley for garnish (optional): A simple sprig of parsley elevates the dish’s presentation—along with its flavor!
These ingredients combine to create a soulful, flavorful meal that’s perfect for any occasion. Let’s move on to the fun part—cooking!
Step-by-Step Instructions
-
Prep Your Ingredients: Begin by gathering all your ingredients and chopping your garlic. Take a moment to enjoy the fresh aroma! If you have any veggies lying around, feel free to chop them up and toss them in for extra nutrition.
-
Sear the Chicken (Optional): While this step is optional, I love to sear the chicken breasts in a pan with a little bit of olive oil before placing them in the crockpot. This helps to lock in moisture and adds a rich depth of flavor. Just a few minutes on each side until they’re golden brown will do the trick.
-
Layer the Potatoes: In your crockpot, layer the halved baby potatoes first. This ensures they cook evenly and soak up all the delicious broth as it simmers.
-
Add the Chicken: Place the seared (or raw) chicken breasts on top of the potatoes. This way, the chicken juices can drizzle down and flavor the potatoes beneath—such a delicious duo!
-
Mix the Sauce: In a bowl, combine the chicken broth, minced garlic, Italian seasoning, salt, black pepper, and red pepper flakes. Whisk them together until well mixed, and then pour this mixture over the chicken and potatoes.
-
Add the Parmesan and Olive Oil: Sprinkle the grated Parmesan cheese on top of everything, then drizzle the olive oil over it. This will create a creamy, cheesy crust on the chicken that is simply divine.
-
Crockpot Time: Cover your crockpot and set it on low for about 6-8 hours or high for 3-4 hours. The chicken should be cooked through and tender, and the potatoes soft and flavorful.
-
Finishing Touches: When your timer goes off, take a moment to admire the masterpiece you’ve created! Remove the lid and let the magical aromas fill your kitchen. If you want to add an extra touch, you can sprinkle some additional Parmesan and freshly chopped parsley before serving.
-
Serve and Enjoy: A cozy meal like this is best served hot. Encourage your loved ones to dig in and enjoy!
Serving Suggestions
For a beautiful presentation, serve the chicken and potatoes on a large platter. Drizzle any extra sauce over the top, and garnish with fresh parsley for that pop of color. You could also pair this dish with a simple green salad or some crusty bread to soak up all that delicious sauce. I love to use IvoryApron.com’s seasonal salads for inspiration!
Recipe Variations
-
Lemon Garlic Twist: Add the zest of one lemon and a splash of lemon juice for a refreshing zing.
-
Herb-Roasted Version: Swap out the Italian seasoning for a blend of fresh herbs like rosemary, thyme, and sage for a more aromatic experience.
-
Creamy Mushroom Addition: Toss in some sliced mushrooms for an earthy flavor that pairs beautifully with Parmesan.
-
Spicy Cajun Delight: Use Cajun seasoning instead for a spicy kick and serve with some corn on the cob.
-
Vegan Option: Swap the chicken for chickpeas and use vegan Parmesan for a hearty plant-based version.
Chef’s Notes
Every recipe has a story—and this one, well, it started as a simple way to feed friends but evolved into a favorite in my kitchen. I love using my crockpot, especially on busy days when I want to come home to a delicious meal ready to go. Over time, I’ve played around with the ingredients and found that you really can customize it to fit your tastes and dietary needs. Plus, every time I make it, I’m reminded of that fall gathering, with friends surrounding the table and sharing laughs—and isn’t that what cooking is all about?
FAQs and Troubleshooting
1. Can I use frozen chicken breasts?
Yes! You can use frozen chicken breasts, but you’ll need to increase the cooking time by about an hour if cooking on low or by about 30 minutes on high.
2. What should I do if my chicken is dry?
Overcooking can lead to dry chicken, so make sure to follow the times carefully. If you find yourself in this situation, serving the chicken with additional sauce can help compensate for texture.
3. I don’t have Italian seasoning. What should I do?
No worries! You can create your own mix using dried basil, oregano, thyme, and rosemary in equal proportions.
4. Can I double the recipe?
Absolutely! Just make sure your crockpot is large enough to accommodate the extra ingredients. However, you may need to adjust the cooking time slightly.
Nutritional Info
While I often focus on flavors and experiences rather than strict nutritional data, you can expect a balanced meal featuring lean protein, healthy carbs, and a wealth of vitamins from the potatoes. Each serving offers significant protein, moderate fats from the olive oil and cheese, and plenty of flavor without feeling heavy.
And there you have it—your ultimate guide to making Garlic Parmesan Crockpot Chicken and Potatoes! I’m so excited for you to try it out and hope it brings as much joy to your table as it does to mine. Until next time, keep gathering those beautiful moments around your table, because good food is all about showing up!
PrintGarlic Parmesan Crockpot Chicken and Potatoes
A comforting meal featuring tender chicken, creamy Parmesan, and perfectly cooked baby potatoes, all made effortlessly in a crockpot.
- Prep Time: 10 minutes
- Cook Time: 240 minutes
- Total Time: 250 minutes
- Yield: 4 servings 1x
- Category: Main Course
- Method: Crockpot
- Cuisine: Italian
- Diet: Gluten-Free
Ingredients
- 4 boneless, skinless chicken breasts
- 1.5 pounds baby potatoes, halved
- 1 cup chicken broth
- 1/2 cup grated Parmesan cheese
- 4 cloves garlic, minced
- 1 tablespoon Italian seasoning
- 1 teaspoon salt
- 1/2 teaspoon black pepper
- 1/2 teaspoon red pepper flakes (optional)
- 2 tablespoons olive oil
- Fresh parsley for garnish (optional)
Instructions
- Prep your ingredients by gathering all and chopping your garlic.
- Sear the chicken breasts in a pan with olive oil (optional).
- Layer the halved baby potatoes first in the crockpot.
- Add the seared (or raw) chicken breasts on top of the potatoes.
- Mix the chicken broth, minced garlic, Italian seasoning, salt, black pepper, and red pepper flakes in a bowl.
- Pour the mixture over the chicken and potatoes.
- Sprinkle grated Parmesan cheese on top, then drizzle with olive oil.
- Crockpot on low for 6-8 hours or high for 3-4 hours.
- Finishing touches: add more Parmesan and parsley before serving.
- Serve and enjoy your cozy meal!
Notes
This recipe is flexible; you can substitute chicken with chickpeas for a vegan option or add lemon zest for extra flavor.
Nutrition
- Serving Size: 1 serving
- Calories: 400
- Sugar: 3g
- Sodium: 500mg
- Fat: 14g
- Saturated Fat: 5g
- Unsaturated Fat: 9g
- Trans Fat: 0g
- Carbohydrates: 46g
- Fiber: 4g
- Protein: 22g
- Cholesterol: 70mg
Keywords: crockpot, chicken, parmesan, potatoes, easy dinner, comfort food