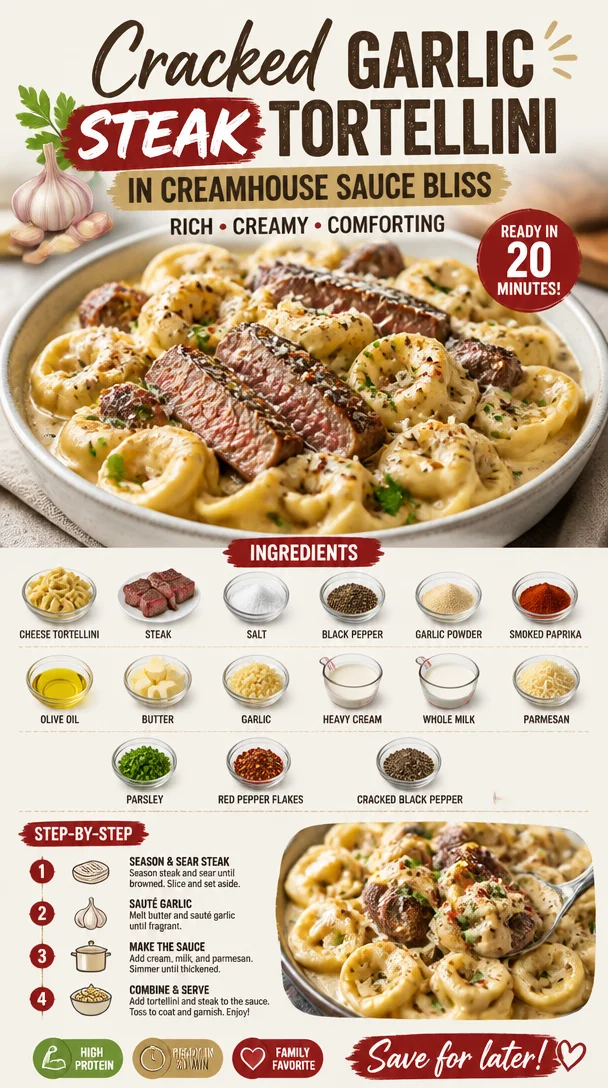
Cracked Garlic Steak Tortellini in Creamhouse Sauce Bliss
Cracked Garlic Steak Tortellini in Creamhouse Sauce Bliss
Hello, fellow food enthusiasts! Today, I’m sharing a recipe that’s not just a dish; it’s a delightful experience. Imagine tender cheese tortellini enveloped in a rich cream sauce, adorned with perfectly seared steak and a hint of garlicky goodness. Quite honestly, there’s nothing better than a plate of Cracked Garlic Steak Tortellini in Creamhouse Sauce Bliss. This dish is perfect for those cozy weeknights when you want to impress without the stress.
A Culinary Memory Worth Sharing
Let me take you back to a balmy summer evening when I decided to host a dinner party for my closest friends. It was one of those nights when everything just seemed to click. I had just returned from the farmer’s market with a bounty of fresh ingredients, and of course, I had a fresh batch of cheese tortellini. As I prepped the meal, the aroma of sizzling steak mingling with garlic hit the air, and it felt like magic. Every bite we took was met with laughter and stories, making it a celebration of good food and even better company.
That evening taught me two things: first, that simple ingredients can create extraordinary moments, and second, never underestimate the power of a good cream sauce! The star of our meal was a variation of this very recipe, bringing joy and warmth to our gathering. Today, I’d like to rekindle that joy by sharing this timeless recipe with you.
Ingredients
Here’s what you need to whip up this dish that’s all about comfort and flavor:
-
20 oz cheese tortellini
Fresh or refrigerated varieties yield the best texture and taste. You could also use frozen, but make sure to cook it according to package instructions. -
1 lb steak (sirloin or ribeye)
Sirloin is leaner; ribeye is more tender and packed with flavor. Opt for grass-fed if you’re looking for a more robust flavor! -
Salt and black pepper
Essential for seasoning the steak and balancing the dish. Kosher salt is preferred for its larger grains, but you can use table salt if that’s all you have. -
1 tsp garlic powder
While fresh garlic is ideal for the sauce, a sprinkle of garlic powder enhances the steak. -
1 tsp smoked paprika
Adds a hint of smokiness that pairs beautifully with the creamy sauce. If you want a bit more heat, try using hot paprika instead! -
2 tbsp olive oil
Essential for searing the steak, bringing in a nice crust. Can be substituted with vegetable oil for a different flavor profile, but olive oil is my go-to. -
4 tbsp butter
Creates a creamy sauce base and adds depth of flavor. For a dairy-free version, you can use vegan butter. -
5 cloves garlic, minced
Adds aromatic richness to the sauce; trust me, more garlic is never a bad idea! -
1 cup heavy cream
Contributes to that velvety smoothness we all crave. You can swap it for half-and-half for a lighter version, but it won’t be quite as dreamy. -
3/4 cup whole milk
Balances the richness of the sauce, making it easy to devour. If you’re looking for a dairy-free option, coconut milk can work, though it will change the flavor slightly. -
1 1/4 cups parmesan, shredded or freshly grated
Brings a savory, cheesy flavor that ties everything together. Always taste your parmesan — there’s nothing like that nutty goodness! -
Parsley, chopped (optional)
Brightens the dish with color and freshness. Fresh basil could be a fantastic substitute! -
Red pepper flakes (optional)
For a spicy kick that can elevate the dish. Adjust the level of heat to your liking — I like to keep it mild! -
Cracked black pepper (optional garnish)
Elevates the flavor with a little pop. Freshly cracked is always better than pre-ground!
Step-by-Step Instructions
Let’s get cooking! Grab your apron and let’s dive into the steps of creating this creamy delight:
-
Cook the Tortellini:
Start by bringing a large pot of salted water to a boil. Add the cheese tortellini, cooking it according to the package instructions. Fresh pasta usually takes about 3-5 minutes, but keep an eye on them. Once they float to the top, they’re ready! Drain and set aside, but don’t rinse— we want to keep that starchy goodness!Chef Tip: While the tortellini cooks, prep your other ingredients to keep things moving smoothly.
-
Prepare the Steak:
While the pasta is cooking, take your steak out of the fridge to let it come to room temperature for about 15 minutes. This ensures even cooking. Pat the steak dry with a paper towel, then season generously with salt, black pepper, garlic powder, and smoked paprika on both sides.Chef Insight: Searing a steak at room temperature helps achieve a beautiful crust.
-
Sear the Steak:
In a large skillet, heat 2 tablespoons of olive oil over medium-high heat. Once hot, add the steak. Let it sear without moving it around for about 3-4 minutes on one side until nicely browned. Flip and sear for another 3-4 minutes for medium-rare.Chef Hack: Use a meat thermometer—130°F is your magic number for medium-rare! Once cooked, remove the steak from the skillet and let it rest on a cutting board for at least 5 minutes before slicing.
-
Create the Sauce:
In the same skillet (don’t wipe it out; we want those delicious drippings!), melt the 4 tablespoons of butter over medium heat. Add minced garlic and sauté for about 1-2 minutes until fragrant. Pour in the heavy cream and whole milk, stirring gently to combine.Pro Tip: Scrape the bottom of the skillet to incorporate all those tasty bits into the sauce!
-
Cheese It Up:
Gradually whisk in the parmesan cheese until it melts and incorporates into a creamy sauce. Season with salt and pepper to taste. If it’s too thick, add a splash of milk until you reach your desired consistency.Chef Insight: If your sauce is clumpy, you may need to lower the heat and whisk continuously!
-
Combine Everything:
Now, add the drained tortellini to the skillet, tossing gently to coat in the creamy sauce. Slice your perfectly rested steak against the grain and lay it over the tortellini, spooning some of that lovely sauce over the top.Chef Tip: Don’t skip the slicing step! Cutting against the grain helps tenderize the steak.
Serving Suggestions
Plate up your Cracked Garlic Steak Tortellini with an artistic flair! Twirl the tortellini in the center of the plate, nestling in the slices of steak. Drizzle with extra cream sauce and a sprinkle of chopped parsley for a pop of color. Your guests will think you’re a culinary wizard!
Recipe Variations
Want to switch things up? Here are a few delicious twists:
- Add Veggies: Toss in sautéed spinach or roasted cherry tomatoes for a pop of color and nutrition.
- Make it Spicy: Add a diced jalapeño to the sauce or use spicier sausage instead of steak.
- Go Vegetarian: Substitute the steak with sautéed mushrooms or zucchini slices for a hearty yet plant-based version.
- Herbed Cream Sauce: Incorporate fresh herbs like basil or thyme to the sauce for an aromatic twist.
Chef’s Notes
This recipe has evolved over time, and it’s become one of my go-to comfort meals! The combination of steak and tortellini was inspired by those cozy Italian restaurants where you feel right at home. Plus, I’ve learned that the secret to a truly great pasta dish lies in the way you layer flavors. Remember, it doesn’t have to be perfect — just make it with love!
FAQs and Troubleshooting
1. My sauce is too thick; what do I do?
Simply whisk in a bit more milk or cream until you reach your desired consistency!
2. Can I use a different type of cheese?
Absolutely! Fontina, pecorino, or even a good quality cheddar can work. Just be sure to adjust the seasonings as needed.
3. What if I overcooked the steak?
If your steak is overcooked, slice it thinly and mix it into the sauce. The creaminess can help mask a little of the dryness!
4. Is there a way to make this dish dairy-free?
Yes! Use dairy-free butter, coconut milk or oat milk, and a dairy-free cheese alternative to create a similarly satisfying dish while keeping it dairy-free.
Nutritional Info (Optional)
Per serving, you’ll find a hearty portion of protein, healthy fats, and comfort carbs, making this a fulfilling dish! While exact nutrition can vary based on exact ingredients, this dish typically contains about 600-700 calories per serving.
There you have it, friends! Your culinary adventure awaits with this Cracked Garlic Steak Tortellini in Creamhouse Sauce Bliss. Tag me on social media when you make it; I can’t wait to see how you make it your own. Remember, no matter how simple or complex your dish, the heart of cooking lies in sharing it with others. So tie on that apron, pour a glass of your favorite drink, and let’s create something fabulous together!
PrintCracked Garlic Steak Tortellini in Creamhouse Sauce Bliss

A delightful dish featuring tender cheese tortellini enveloped in a rich cream sauce with perfectly seared steak and a hint of garlicky goodness.
- Prep Time: 15 minutes
- Cook Time: 20 minutes
- Total Time: 35 minutes
- Yield: 4 servings 1x
- Category: Main Course
- Method: Searing and Saucing
- Cuisine: Italian
- Diet: Meat
Ingredients
- 20 oz cheese tortellini
- 1 lb steak (sirloin or ribeye)
- Salt and black pepper
- 1 tsp garlic powder
- 1 tsp smoked paprika
- 2 tbsp olive oil
- 4 tbsp butter
- 5 cloves garlic, minced
- 1 cup heavy cream
- 3/4 cup whole milk
- 1 1/4 cups parmesan, shredded or freshly grated
- Parsley, chopped (optional)
- Red pepper flakes (optional)
- Cracked black pepper (optional garnish)
Instructions
- Cook the Tortellini: Start by bringing a large pot of salted water to a boil. Add the cheese tortellini, cooking it according to the package instructions. Once they float to the top, they’re ready! Drain and set aside.
- Prepare the Steak: Take your steak out of the fridge to let it come to room temperature for about 15 minutes. Pat the steak dry and season generously with salt, black pepper, garlic powder, and smoked paprika on both sides.
- Sear the Steak: In a large skillet, heat 2 tablespoons of olive oil over medium-high heat. Add the steak and let it sear without moving it for about 3-4 minutes on one side. Flip and sear for another 3-4 minutes for medium-rare. Let it rest before slicing.
- Create the Sauce: In the same skillet, melt 4 tablespoons of butter over medium heat. Add minced garlic and sauté for 1-2 minutes. Pour in the heavy cream and whole milk, stirring gently to combine.
- Cheese It Up: Gradually whisk in the parmesan cheese until melted. Season with salt and pepper to taste. If it’s too thick, add a splash of milk.
- Combine Everything: Add the drained tortellini to the skillet and toss gently to coat in the sauce. Slice the rested steak against the grain and lay it over the tortellini.
Notes
For a dairy-free version, substitute with vegan butter, coconut milk, and dairy-free cheese alternatives. Consider adding sautéed vegetables or using spicier sausage for variations.
Nutrition
- Serving Size: 1 serving
- Calories: 650
- Sugar: 3g
- Sodium: 800mg
- Fat: 35g
- Saturated Fat: 15g
- Unsaturated Fat: 15g
- Trans Fat: 0g
- Carbohydrates: 45g
- Fiber: 2g
- Protein: 35g
- Cholesterol: 90mg
Keywords: steak tortellini, cream sauce, Italian recipe, comfort food, dinner party
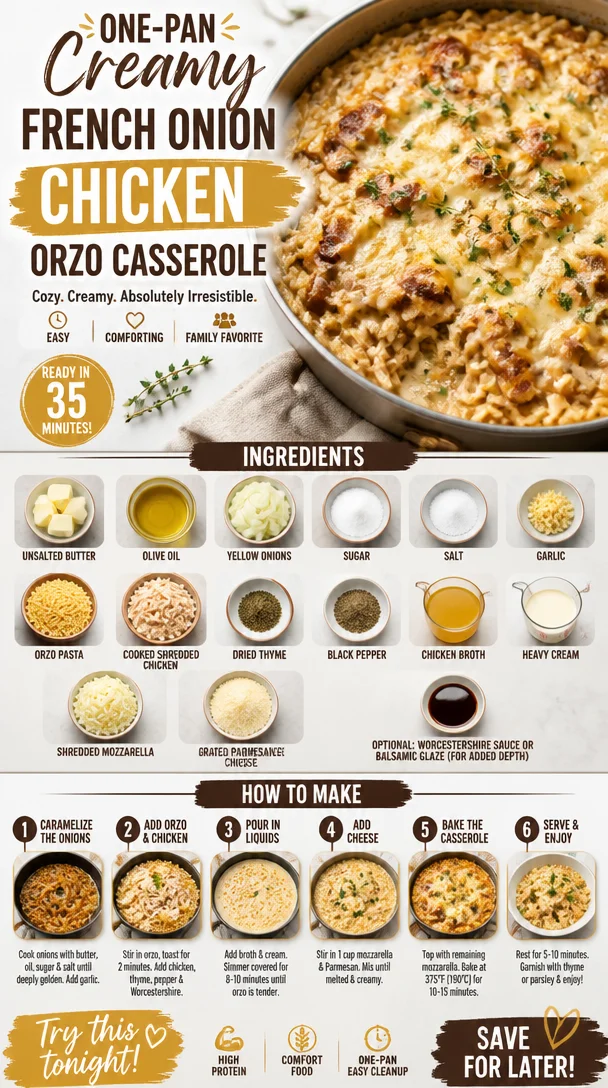
One-Pan Creamy French Onion Chicken Orzo Casserole
French Onion Chicken Orzo Casserole: A Cozy Comfort Meal
Hello, dear foodies! Today, I’m thrilled to share a recipe that will warm your heart and soul—the French Onion Chicken Orzo Casserole. This dish beautifully combines the rich flavors of French onion soup with the comfort of creamy orzo and tender chicken. It’s a cozy meal perfect for weeknight dinners or any time you’re craving something hearty yet elegant.
As I meander through my culinary journey, I can’t help but think of rainy evenings spent in the kitchen, the kind when the aroma of slowly caramelized onions fills the air. With the pitter-patter of rain outside, I’m transported back to my childhood, where my family would gather, laughing and sharing stories over a bowl of something wonderfully comforting. That’s what cooking is all about—the magic that happens when you bring people to your table, nourishing not just their bodies but their hearts.
So tie on your apron, turn on your favorite playlist, and let’s get cooking!
A Slice of Nostalgia
I remember the first time I had French onion soup. My grandmother, with her twinkling eyes, introduced me to the dish when I was just a little sous-chef in her kitchen. One evening, she patiently taught me how to caramelize onions, explaining how the transformation from raw to golden brown was a labor of love. The soup, adorned with toasted bread and bubbling cheese, became my comfort dish during long winter nights.
Fast forward to today, I’ve taken that classic flavor and woven it into this casserole that brings all those memories flooding back but in an easy-to-make format. So, grab your spoon, and let’s make some magic happen!
Ingredients
Here’s what you’ll need to create this delightful casserole:
- 2 tablespoons unsalted butter: For that rich, creamy base. You could substitute with ghee if you’re dairy-free.
- 1 tablespoon olive oil: Adds flavor and prevents the butter from burning. Use avocado oil for a higher smoke point.
- 2 large yellow onions (thinly sliced): Sweet and savory, the star of our dish! If you prefer milder flavors, try using shallots.
- 1 teaspoon sugar: This helps caramelize the onions, balancing their natural sweetness. Brown sugar also works if you have it on hand.
- 1/2 teaspoon salt: Enhances the flavors and aids in drawing moisture out of the onions.
- 3 garlic cloves (minced): For that aromatic kick. If you’re not a fan of garlic, you can skip it or use garlic powder instead.
- 1 1/2 cups orzo pasta: This tiny pasta shape soaks up the flavors beautifully. Substitute with quinoa or rice for a gluten-free option.
- 2 cups cooked shredded chicken (rotisserie works well): A great shortcut for busy weeknights. You can use turkey or even chickpeas for a veggie twist.
- 1/2 teaspoon dried thyme: Adds an earthy depth. Fresh thyme works wonderfully too!
- 1/4 teaspoon black pepper: For a touch of spice. Adjust to your taste.
- 2 cups low-sodium chicken broth: The flavorful base of our casserole; homemade broth takes it to the next level. Use vegetable broth for a vegetarian version.
- 1 cup heavy cream (or half and half for a lighter option): Creaminess is key! You can use coconut cream if you need it dairy-free.
- 1 1/2 cups shredded mozzarella cheese: For gooey goodness! Feel free to substitute with your favorite cheese blend.
- 1/2 cup grated Parmesan cheese: Adds a nutty flavor and enhances the dish. Nutritional yeast is a great alternate for a dairy-free option.
- Optional: 1/2 teaspoon Worcestershire sauce or balsamic glaze: Adds depth and complexity. This step really elevates the dish but can be left out if you prefer.
Step-by-Step Instructions
-
Caramelize the Onions: In a large skillet, melt the butter and olive oil over medium heat. Once hot, add the sliced onions and sprinkle them with sugar and salt. Cook for about 20-25 minutes, stirring occasionally, until they are a beautiful golden brown. Patience is key here! Low and slow caramelization unlocks sweet flavors. Pro tip: If the onions start to stick, add a tiny splash of broth to deglaze the pan.
-
Add Garlic: Once your onions are perfectly caramelized, add the minced garlic and cook for another 1-2 minutes. You want to smell that aroma wafting through your kitchen. It’s the good stuff, my friends!
-
Combine Ingredients: In a large mixing bowl, combine the cooked onions and garlic with the orzo pasta, shredded chicken, dried thyme, black pepper, and the remainder of the broth and cream. If you’re adding Worcestershire sauce or balsamic glaze, now’s the time! This mixture should be creamy and inviting.
-
Transfer to Casserole Dish: Grease a 9×13-inch casserole dish, then pour the orzo mixture into it. Spread it out evenly, making sure every bit is coated in that luscious sauce.
-
Cheese It Up: Sprinkle the mozzarella and Parmesan generously over the top. Because let’s be real, cheese is life!
-
Bake: Preheat your oven to 375°F (190°C). Bake the casserole for 25-30 minutes, or until the cheese is melted and bubbly. You want that golden crust that promises a delightful bite. If you want an extra crispy top, broil for an additional 1-2 minutes—but buddy, keep a close eye on it!
-
Rest a Bit: Once it’s out of the oven, let it rest for about 5-10 minutes. This allows the flavors to mingle and makes serving so much neater. Plus, it gives you a moment to breathe and admire your handiwork.
Serving Suggestions
When serving your French Onion Chicken Orzo Casserole, a simple side salad dressed with a light vinaigrette pairs beautifully. You can plate the casserole in individual bowls, topped with fresh herbs—like parsley or chives—for a pop of color. Trust me, thoughtful plating can transform your meal from ordinary to extraordinary!
Recipe Variations
Feeling adventurous? Here are a few ways you can mix it up:
- Add Vegetables: Incorporate spinach, mushrooms, or bell peppers for extra nutrients and flavors.
- Swap Proteins: Use steak, shrimp, or even a plant-based protein for a twist.
- Seasonal Flavors: Experiment with herbs like rosemary or sage during autumn for a seasonal flair.
- Spice It Up: Add a pinch of red pepper flakes for a hint of heat!
Chef’s Notes
Oh, the laughs I’ve had over this recipe! I remember one time when I invited a group of friends over for dinner, and I forgot to buy cheese. I had to get creative with a random assortment of cheeses from my fridge—cheddar, gouda, and even a bit of feta made an appearance. It turned out scrumptious, and now I always tell folks to use what they have on hand. Cooking should be flexible and fun, don’t you think?
This recipe has also evolved through the years. Initially, it was just a simple pasta bake, but as my love for French onion soup grew, I decided to take a classic and give it my personal touch.
FAQs and Troubleshooting
Q: Can I make this casserole gluten-free?
A: Absolutely! Just swap the orzo for a gluten-free pasta option or quinoa. The cooking times may vary, so keep an eye on it!
Q: It seems a bit dry—why?
A: If it feels dry, it could be that the pasta absorbed too much liquid during baking. Next time, add a bit more broth or cream before baking!
Q: Can I make this ahead of time?
A: Definitely! Assemble it as directed, cover, and refrigerate for up to 24 hours. Just add a few extra minutes to the baking time.
Q: How do I store leftovers?
A: Keep any leftovers in an airtight container in the fridge for up to 3 days. Reheat gently in the oven or microwave—add a splash of broth if it gets dry!
Nutritional Info
While I don’t typically focus on numbers, a serving of this casserole generally contains around 450 calories, depending on your specific ingredients and portion sizes. It’s packed with protein, and lots of cheesy goodness—as comfort food should be!
I hope this French Onion Chicken Orzo Casserole finds its way into your kitchen and creates as many lovely memories for you as it has for me. Remember, cooking is about joy, intention, and gathering around the table. Here’s to many beautiful meals ahead! Happy cooking!
PrintFrench Onion Chicken Orzo Casserole
A cozy comfort meal that combines the rich flavors of French onion soup with creamy orzo and tender chicken, perfect for weeknight dinners.
- Prep Time: 15 minutes
- Cook Time: 30 minutes
- Total Time: 45 minutes
- Yield: 4 servings 1x
- Category: Main Course
- Method: Baking
- Cuisine: French
- Diet: Gluten-Free Option Available
Ingredients
- 2 tablespoons unsalted butter
- 1 tablespoon olive oil
- 2 large yellow onions (thinly sliced)
- 1 teaspoon sugar
- 1/2 teaspoon salt
- 3 garlic cloves (minced)
- 1 1/2 cups orzo pasta
- 2 cups cooked shredded chicken
- 1/2 teaspoon dried thyme
- 1/4 teaspoon black pepper
- 2 cups low-sodium chicken broth
- 1 cup heavy cream
- 1 1/2 cups shredded mozzarella cheese
- 1/2 cup grated Parmesan cheese
- Optional: 1/2 teaspoon Worcestershire sauce or balsamic glaze
Instructions
- Caramelize the onions: In a large skillet, melt the butter and olive oil over medium heat. Add the sliced onions, sugar, and salt. Cook for about 20-25 minutes until golden brown.
- Add garlic: Once onions are caramelized, add minced garlic and cook for another 1-2 minutes.
- Combine ingredients: In a mixing bowl, combine cooked onions, garlic, orzo, shredded chicken, thyme, black pepper, remaining broth, and cream.
- Transfer to a casserole dish: Grease a 9×13-inch dish and pour the mixture into it, spreading evenly.
- Cheese it up: Sprinkle mozzarella and Parmesan over the top.
- Bake: Preheat oven to 375°F (190°C) and bake for 25-30 minutes until cheese is melted and bubbly.
- Rest a bit: Let it rest for 5-10 minutes before serving.
Notes
Serve with a side salad and fresh herbs for garnish. This dish is flexible; you can adjust ingredients based on what you have.
Nutrition
- Serving Size: 1 serving
- Calories: 450
- Sugar: 6g
- Sodium: 500mg
- Fat: 20g
- Saturated Fat: 10g
- Unsaturated Fat: 7g
- Trans Fat: 0g
- Carbohydrates: 45g
- Fiber: 3g
- Protein: 25g
- Cholesterol: 70mg
Keywords: comfort food, casserole, chicken, French onion, weeknight dinner, creamy, orzo, cozy meal
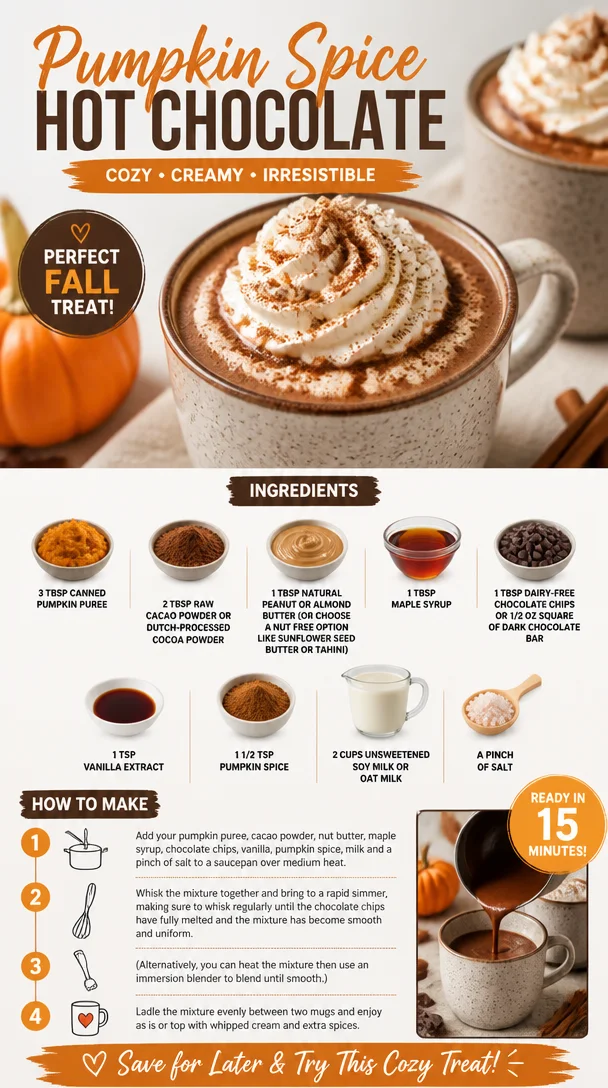
Pumpkin Spice Hot Chocolate
The Cozy Comfort of Pumpkin Spice Hot Chocolate
Hello, my fellow kitchen adventurers! As the crisp autumn air nudges its way into our lives, there’s something undeniably magical about cozying up with a warm mug of delightfully spiced pumpkin hot chocolate. You know that feeling when the leaves crunch under your feet, and there’s a slight chill in the breeze? It’s the perfect time to wrap your hands around a steaming cup of pure comfort, and let me tell you, this pumpkin spice hot chocolate is here to bring all the warmth and joy of the season right to your table!
Imagine walking into a room filled with the aroma of rich chocolate and warm spices—a scented invitation to gather and indulge. This isn’t just any hot chocolate; it’s a delightful concoction that marries the smooth flavors of creamy cocoa with the comforting essence of pumpkin spice. It’s like a warm hug in a cup, perfect for sharing with friends, sipping while wrapped in a cozy blanket, or enjoying as an afternoon treat while you work on your latest culinary project.
A Sweet Memory
Let me take you back to a sunny fall afternoon when I was in college, still in the throes of figuring out who I was as both a student and a soon-to-be chef. My roommate and I decided to throw our very own pumpkin spice party. Armed with mini pumpkins, homemade pumpkin bread, and an enthusiastic spirit, we spent the day trying out various pumpkin recipes. We even invited friends over to taste our creations.
One memory that stands out is when we decided to lean into the trend and whip up a batch of pumpkin spice hot chocolate from scratch. It was a spontaneous mix of our favorite ingredients—a little of this, a dash of that—and we ended up with a drink that was ever so slightly decadent, yet inviting. As we sipped our concoction by the window, looking out at the golden leaves fluttering down, it felt like we had created something magical. It became one of those legendary recipes that we still talk about fondly to this day. And now, I’m thrilled to share the joy of that memory with you through this recipe!
Ingredients
Grab your apron, and let’s gather the makings of this delightful drink. Here’s what you’ll need:
-
3 tbsp canned pumpkin puree
The star of the show! It adds creaminess and richness to your hot chocolate. If you don’t have canned pumpkin, you can make your own by roasting pumpkin flesh and blending it until smooth. -
2 tbsp raw cacao powder or Dutch-processed cocoa powder
Both options create a lovely chocolatey flavor. Raw cacao is less processed and retains more nutrients, while Dutch-processed cocoa lends a smoother, milder taste. Choose based on your flavor preference! -
1 tbsp natural peanut or almond butter (or a nut-free option like sunflower seed butter or tahini)
This adds a delightful creaminess and depth. If you’re nut-free, don’t hesitate to try tahini for that rich, nutty flavor that complements the pumpkin perfectly. -
1 tbsp maple syrup
Natural sweetness without the refined sugar! If you prefer, swap it out for agave syrup or honey depending on your dietary preferences. -
1 tbsp dairy-free chocolate chips or 1/2 oz square of dark chocolate bar
You can choose semi-sweet or dark chocolate for your hot chocolate. If you prefer sweeter, go for the semi-sweet option! -
1 tsp vanilla extract
A touch of vanilla elevates the overall flavor profile. It’s a hint of warmth that will remind you of cozy baking days. -
1 1/2 tsp pumpkin spice
A blend of sweet and warm spices that captures the essence of fall! You can use store-bought pumpkin spice or make your own with cinnamon, nutmeg, and cloves. -
2 cups unsweetened soy milk or oat milk
Both of these plant-based milks work beautifully, creating a creamy base for your hot chocolate. If you prefer, feel free to use almond milk or regular dairy if that’s more your style!
Step-by-Step Instructions
Alright, let’s get into the nitty-gritty of creating this lovely drink!
-
Prepare Your Ingredients
Start by measuring out all your ingredients. This is my favorite part because it’s like gathering your magical elixirs! It makes the cooking process feel more seamless and enjoyable. -
Mix Everything Except the Milk
In a small saucepan over low heat, combine the pumpkin puree, cacao powder, nut butter, maple syrup, chocolate chips, pumpkin spice, and vanilla extract. Use a whisk to mix them well until everything is smooth and heavenly. Don’t forget to take a moment to enjoy the aroma wafting up—trust me, it smells divine! -
Heat the Milk
Now, it’s time to warm the milk in a separate saucepan. Heat it slowly over medium heat until it begins to steam but doesn’t boil. You want to unlock that creamy essence without scorching it. -
Combine and Whisk Again
Once the milk is heated, pour it into your saucepan with the pumpkin mixture. This is where the magic happens! Whisk everything together vigorously. You want to ensure that all the ingredients are well incorporated and nothing is left floating at the top. It should be smooth and silky, with that lovely color of fall. -
Serve
Remove the saucepan from the heat once everything is combined and heated to your liking. You can serve it right away, but it’s also delicious if you let it sit for a minute to meld flavors a bit more. -
Top It Off!
For an extra special touch, top your hot chocolate with whipped cream (dairy or dairy-free), a sprinkle of pumpkin spice, or even a few extra chocolate chips. This is your drink, so have fun with it!
Serving Suggestions
Now, let’s talk about presentation because we want everything to look as good as it tastes! Pour your delightful pumpkin spice hot chocolate into your favorite mugs. You can even consider using clear mugs to showcase the beautiful rich color of the drink. Add a dollop of whipped cream, a sprinkle of pumpkin spice, or a cinnamon stick for that extra cozy flair. Serve with a slice of your favorite fall dessert, such as pumpkin bread or spiced cookies for a sensory experience!
Recipe Variations
Here are a few creative twists you can try:
- Salted Caramel Pumpkin Spice Hot Chocolate: Drizzle caramel sauce on top or blend a bit into the mix for sweetness and depth.
- Spicy Pumpkin Hot Chocolate: Add a pinch of cayenne pepper or a sprinkle of chili powder for a warm kick that compliments the chocolate!
- Nutty Chocolate Delight: Substitute hazelnut butter for peanut butter for a lovely nutty flavor combination.
- Vegan Peppermint Pumpkin Spice: Add a few drops of peppermint extract for a refreshing twist during the holiday season.
- Sweeten with Dates: For a healthier alternative, blend in a few pitted dates instead of maple syrup for natural sweetness along with added nutrients!
Chef’s Notes
Oh, how this recipe has evolved over the years! I started with a basic cocoa and a lonely can of pumpkin at the bottom of my pantry. Over time, I’ve played and tweaked, experimenting with different nut butters and spices. One hilarious mishap was when I added far too much cayenne pepper in my zealous enthusiasm. Let’s just say it was more of a “spicy experiment” rather than a comforting drink! But that’s the beauty of cooking—sometimes our missteps lead to the best memories!
FAQs and Troubleshooting
-
Can I make this ahead of time?
Absolutely! You can prepare the base of the hot chocolate ahead of time and store it in the fridge. When you’re ready to enjoy, just heat it up gently on the stove or in the microwave. -
What if my hot chocolate turns out too thick?
No worries! Simply whisk in a little more plant milk until you reach your desired consistency. -
Are there alternatives for pumpkin spice?
Yes! You can create your own blend using a mix of cinnamon, nutmeg, and cloves to achieve that similar warm flavor profile if you don’t have pumpkin spice on hand. -
Can I use regular dairy milk instead of plant milk?
Absolutely! Just remember that using regular milk will change the overall flavor slightly, but it will still be delicious!
Nutritional Info (Optional)
While I believe that good food is about enjoyment rather than counting numbers, here’s a rough idea for you to ponder:
- Calories: ~250 per serving
- Protein: ~5g
- Carbohydrates: ~30g
- Healthy fats: ~10g
So there you have it—your go-to recipe for a cozy, delicious pumpkin spice hot chocolate that’s sure to warm your heart and bring the delightful flavors of the season into your kitchen. Enjoy every sip and remember: cooking should be fun and shared. Gather your loved ones around and let’s celebrate the simple moments, one mug at a time! Happy cooking!
PrintPumpkin Spice Hot Chocolate

A warm, cozy pumpkin spice hot chocolate perfect for autumn days.
- Prep Time: 10 minutes
- Cook Time: 15 minutes
- Total Time: 25 minutes
- Yield: 2 servings 1x
- Category: Beverage
- Method: Stovetop
- Cuisine: American
- Diet: Vegan
Ingredients
- 3 tbsp canned pumpkin puree
- 2 tbsp raw cacao powder or Dutch-processed cocoa powder
- 1 tbsp natural peanut or almond butter (or sunflower seed butter or tahini)
- 1 tbsp maple syrup
- 1 tbsp dairy-free chocolate chips or 1/2 oz square of dark chocolate bar
- 1 tsp vanilla extract
- 1 1/2 tsp pumpkin spice
- 2 cups unsweetened soy milk or oat milk
Instructions
- Prepare your ingredients by measuring them out.
- Mix everything except the milk in a small saucepan over low heat until smooth.
- Heat the milk in a separate saucepan until it begins to steam.
- Combine the heated milk with the pumpkin mixture and whisk vigorously.
- Serve it immediately or let it sit for a minute to enhance the flavors.
- Top with whipped cream, pumpkin spice, or chocolate chips as desired.
Notes
For added creativity, consider variations like salted caramel or spicy pumpkin hot chocolate.
Nutrition
- Serving Size: 1 serving
- Calories: 250
- Sugar: 8g
- Sodium: 150mg
- Fat: 10g
- Saturated Fat: 2g
- Unsaturated Fat: 8g
- Trans Fat: 0g
- Carbohydrates: 30g
- Fiber: 4g
- Protein: 5g
- Cholesterol: 0mg
Keywords: pumpkin spice, hot chocolate, vegan drinks, fall recipes, cozy beverages
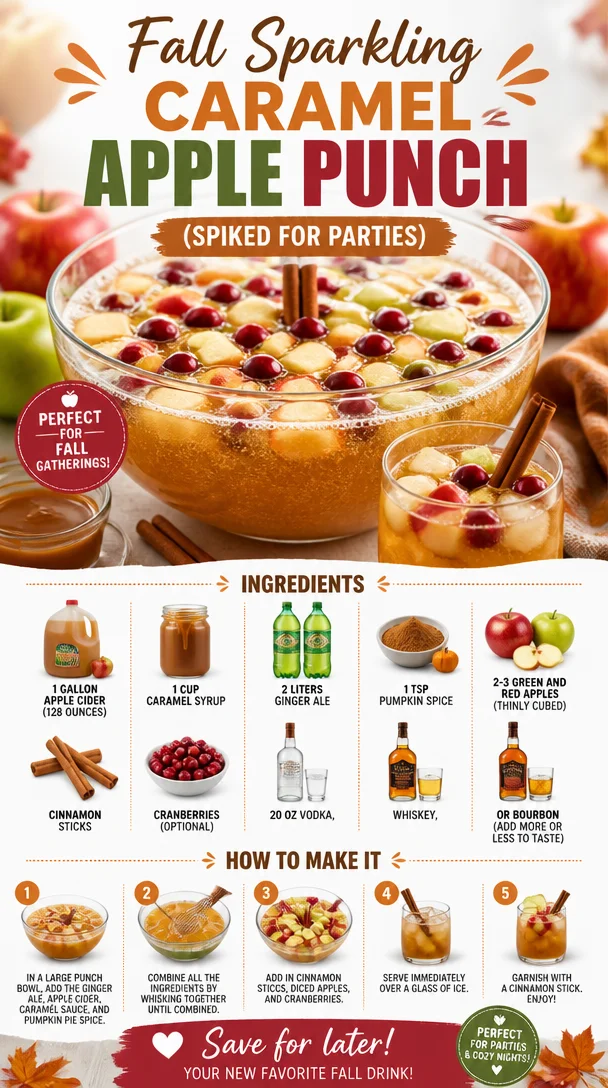
Fall Sparkling Caramel Apple Punch (Spiked for Parties)
Sparkling Caramel Apple Punch: The Perfect Fall Refreshment (Spiked Option!)
Hello, friends! As we wave goodbye to the hot summer days and welcome the crisp air of fall, it’s time to celebrate the season with a delightful drink that perfectly encapsulates autumn—a Sparkling Caramel Apple Punch! Picture this: a gathering of friends around a cozy fire, laughter filling the air, and in everyone’s hand, a glistening cup of this spiced, sweet, and effervescent punch. What could be better?
This punch is not just a drink; it’s an experience. Fall is all about gatherings, warmth, and nostalgia, and what better way to capture that essence than with a drink that combines the delicious flavors of apple cider and caramel? Whether you’re throwing a festive party or simply enjoying a quiet evening at home, this recipe is your go-to for making any moment special. And if you’re in the mood to spice things up a bit, I’ve got you covered with an option to add a little kick. Let’s dive into the world of flavors!
A Sip of Nostalgia
Growing up, autumn was my favorite season. My family had a tradition of driving out to the orchard to pick apples every October. We would traverse the rows of trees, laughing and tossing apples to one another, filling our baskets until they brimmed. Once we returned home, we’d warm up with mugs of hot apple cider, often drizzled with caramel sauce. That warm, sweet aroma has since been woven into the fabric of my autumn memories.
Fast forward to today, and those childhood fantasies inspire every warm gathering I aim to create. This Sparkling Caramel Apple Punch reminds me of those crisp days and joyful family moments. As I sip this drink, I can almost hear the rustling of leaves and smell the pumpkin spice in the air. It’s a nostalgic hug in a mug—and that’s something I want to share with you.
Ingredients
Here’s what you’ll need to make a batch of this heartwarming, sparkling concoction:
-
1 gallon apple cider (128 ounces): The star of the show! Choose a sweet variety to add the perfect touch of autumn sweetness.
-
1 cup caramel syrup: This will lend a rich, sweet flavor and give you those gorgeous caramel notes. You can make your own or buy it pre-made.
-
2 liters ginger ale: Adds a delightful fizz to the punch. If you prefer a less sweet option, club soda can be a great substitute.
-
1 tsp pumpkin spice: A warm blend of flavors that ties everything together beautifully. Feel free to double this if you love a strong spice hit!
-
2-3 green and red apples (thinly cubed): A fresh crunch that complements the sweetness. Use Granny Smith for tartness and Fuji or Gala for sweetness.
-
Cinnamon sticks: Not only do they add flavor but they also make for beautiful stirrers! Optional, but highly recommended.
-
Cranberries (optional): If you’re feeling festive, throw some in! They’ll add a pop of color and a zesty flair.
-
20 oz Vodka, Whiskey, or Bourbon: For the spiked version, this is where the fun really begins! Adjust the amount based on your taste preference—let’s keep it playful!
Step-by-Step Instructions
Ready to make your sparkling punch? Here’s how you do it, step by step:
-
Gather Your Ingredients: Before you start, lay all your ingredients out on the counter. This way, everything you need is in sight, making it easier as you go.
-
Combine the Base: In a large punch bowl or a pitcher, pour in the entire gallon of apple cider. The cider serves as a lovely base that embodies the essence of fall. Don’t be shy—let that wonderful aroma fill the kitchen!
-
Add Caramel Syrup: Drizzle in the cup of caramel syrup and stir gently. Don’t whisk too aggressively; we want to maintain that silky texture. The syrup will meld beautifully with the cider, creating a luscious mix!
-
Sprinkle in the Spice: Throw the pumpkin spice into the mixture and give it another gentle stir. This adds that warm, inviting scent reminiscent of pumpkin patches and cozy fireside chats.
-
Toss in the Fruit: It’s time to add the cubed apples. As you do this, take a moment to appreciate the colors—bright red and green apples swirling in the punch are downright beautiful.
-
Pour in the Fizz: When you’re ready to serve, slowly add the two liters of ginger ale. Watch how it fizzes and dances! For additional sweetness, you could also add a splash of lemon-lime soda if you like.
-
Add the Kick: If you’re making the spiked version, now’s the time to pour in the Vodka, Whiskey, or Bourbon. Start slow; you can always add more once you’ve given it a taste!
-
Garnish: Toss in a couple of cinnamon sticks and cranberries now. They not only look festive but also keep infusing flavor into the punch as it sits.
-
Serve: Ladle the punch into glasses filled with ice (if you desire). Garnish with an apple slice on the rim for a delightful presentation.
-
Enjoy: Raise your glass and toast to fall, good friends, and wonderful memories!
Serving Suggestions
When it comes to serving your Sparkling Caramel Apple Punch, don’t be afraid to get creative! Use clear glass mugs or mason jars for a rustic vibe. Add a fresh apple slice and a cinnamon stick as decor, and if you’re feeling indulgent, drizzle a bit of extra caramel on top. Don’t forget to put out a small bowl of cinnamon sugar for guests who want to rim their glasses—it’s a fun touch that elevates the experience!
Recipe Variations
Feeling adventurous? Here are some delightful twists you can add to this recipe:
-
Cranberry Apple Punch: Substitute half of the apple cider with cranberry juice for a tart twist.
-
Sparkling Pear Option: Replace ginger ale with sparkling pear juice for a fruity change-up.
-
Herbal Punch: Add fresh mint leaves to the mix for a refreshing herbal note.
-
Apple Pie Punch: For even more flavor, steep some cloves and nutmeg while simmering the apple cider before mixing!
Chef’s Notes
This recipe is rooted in the simplicity of flavors and the joy of togetherness. I initially created this punch for a cozy fall gathering but soon realized how adaptable it is. Each time I make it, I enjoy trying new flavors and inviting others to share their favorite additions. A funny memory comes to mind: at one of our family gatherings, I mistakenly swapped out the ginger ale for tonic water. Let’s just say that punch was unforgettable—just not in the best way!
FAQs and Troubleshooting
Q: Can I make this punch in advance?
A: Absolutely! You can prepare the cider and caramel mix a day ahead. Just add the ginger ale and any alcohol right before serving to maintain the fizz!
Q: How can I make this non-alcoholic?
A: No problem! Just skip the vodka, whiskey, or bourbon, and add an additional cup of ginger ale for sweetness.
Q: What if my punch is too sweet?
A: If it’s on the sweeter side, add a splash of lemon juice or a little club soda to balance it out.
Q: Can I use store-bought caramel?
A: Yes, store-bought caramel works great! Just make sure to warm it slightly so it blends well with the cider.
Nutritional Info
While this punch is all about indulgence, it’s still good to keep track. Each serving (approx. 8 oz) contains:
- Calories: ~250 (spiked version varies)
- Carbs: ~55g
- Sugars: ~50g
This punch is a fun treat, but as always, moderation is key!
And there you have it! Your step-by-step guide to crafting the ultimate Sparkling Caramel Apple Punch. Whether enjoyed by the fire or at your next fall get-together, I hope this recipe brings warmth and joy to your table. Here’s to creating beautiful memories and delicious drinks—cheers! 🍏🥂
PrintSparkling Caramel Apple Punch

A delightful drink that combines the delicious flavors of apple cider and caramel, perfect for fall gatherings.
- Prep Time: 15 minutes
- Cook Time: 0 minutes
- Total Time: 15 minutes
- Yield: 8 servings 1x
- Category: Beverage
- Method: Mixing
- Cuisine: American
- Diet: Vegetarian
Ingredients
- 1 gallon apple cider (128 ounces)
- 1 cup caramel syrup
- 2 liters ginger ale
- 1 tsp pumpkin spice
- 2–3 green and red apples (thinly cubed)
- Cinnamon sticks (optional)
- Cranberries (optional)
- 20 oz Vodka, Whiskey, or Bourbon (for spiked version)
Instructions
- Gather your ingredients: Lay all your ingredients out on the counter.
- Combine the base: In a large punch bowl, pour in the gallon of apple cider.
- Add caramel syrup: Drizzle in the cup of caramel syrup and stir gently.
- Sprinkle in the spice: Add the pumpkin spice and stir again.
- Toss in the fruit: Add the cubed apples to the mixture.
- Pour in the fizz: Slowly add the ginger ale just before serving.
- Add the kick: If spiking, pour in the Vodka, Whiskey, or Bourbon.
- Garnish: Add cinnamon sticks and cranberries if desired.
- Serve: Ladle into glasses filled with ice and garnish with an apple slice.
- Enjoy: Raise your glass and toast to good friends and memories!
Notes
Feel free to get creative with serving and garnishing for added flair.
Nutrition
- Serving Size: 8 oz
- Calories: 250
- Sugar: 50g
- Sodium: 50mg
- Fat: 0g
- Saturated Fat: 0g
- Unsaturated Fat: 0g
- Trans Fat: 0g
- Carbohydrates: 55g
- Fiber: 2g
- Protein: 0g
- Cholesterol: 0mg
Keywords: fall punch, caramel apple, autumn drink, festive beverage, spiked drink
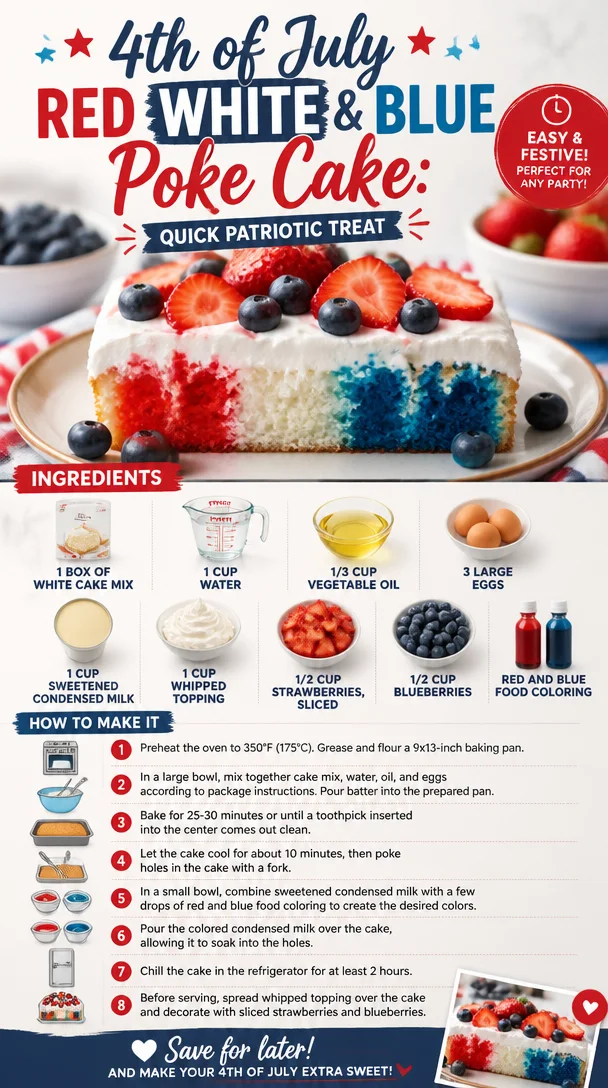
4th of July Red White & Blue Poke Cake: Quick Patriotic Treat
Celebrate in Style with a Red, White, and Blue Patriotic Poke Cake
Hello, fellow food lovers! With summer festivities around the corner—think Fourth of July barbecues, Memorial Day gatherings, or just a sunny afternoon picnic—there’s no better way to celebrate than with a delightful Red, White, and Blue Patriotic Poke Cake! This cake is not just festive and fun; it’s a true showstopper that will have your friends and family gathering around the table with smiles all around.
There’s something magical about a poke cake. The concept is simple: poke holes in a baked cake and let it soak up a delicious mixture, usually sweet, to create layers of flavor. It’s effortless elegance in dessert form! Today, I’m here to guide you through crafting this stunning cake that is as easy as putting on your apron and tying it up. Let’s make some magic happen in the kitchen!
A Sweet Memory to Cherish
Whenever I think about festive treats, I am transported back to the summers of my childhood, spending weekends at my grandma’s house. She had a knack for bringing everyone together with her delicious desserts. One summer, she decided to celebrate the Fourth of July with a poke cake adorned in red and blue, topped with fluffy whipped topping and a sprinkle of berries. I vividly remember the excitement of poking holes into the cake with her and pouring that sweet, vibrant mixture over it. The anticipation of the first bite was palpable!
As the cake chilled in the refrigerator, we gathered outside, the warm sun kissing our skin while we sipped lemonade and chatted about fireworks and family stories. When that cake finally made its grand entrance, it was the highlight of our gathering. Each slice was a burst of flavors, and I realized that dessert has a way of stitching hearts together.
Fast forward to today, I carry that nostalgic joy in every poke cake I create. Let’s recreate some of that magic together as we whip up our Red, White, and Blue Patriotic Poke Cake!
Ingredients
-
1 box of white cake mix
This serves as the cake’s base. Grab your favorite brand! You can also use a homemade white cake recipe if you want to take it to the next level. For a gluten-free option, consider using a gluten-free cake mix. -
1 cup water
The liquid that comes together with the cake mix to give it a lovely moist texture. You can swap it with milk for a richer flavor. -
1/3 cup vegetable oil
Oil keeps the cake tender. If you’re feeling fancy, try melted coconut oil for a subtle tropical twist. -
3 large eggs
Eggs provide structure and moisture. If you’re looking for an egg-free version, you can replace each egg with 1/4 cup unsweetened applesauce or a flax egg (1 tablespoon of ground flaxseed mixed with 2.5 tablespoons of water). -
1 cup sweetened condensed milk
This rich milk adds indulgent sweetness and creaminess. If you prefer a dairy-free option, look for coconut condensed milk. -
1 cup whipped topping
A fluffy topping that crowns your cake beautifully. You can use homemade whipped cream if you’re feeling inspired. Homemade is always a bit more special! -
1/2 cup strawberries, sliced
Beautiful red berries bursting with flavor. If strawberries are out of season, you can use raspberries or cherries. -
1/2 cup blueberries
Sweet, succulent, and perfect for our blue layer. You can also play around with blackberries or even diced kiwi for a twist. -
Red and blue food coloring
Essential for creating that gorgeous patriotic effect! Feel free to use natural food colorings for a healthier option.
Step-by-Step Instructions
-
Preheat the Oven
Preheat your oven to 350°F (175°C). This step is crucial for a perfectly baked cake. While the oven heats up, gather your ingredients to streamline the process! -
Mix the Cake Batter
In a large mixing bowl, combine the cake mix, water, vegetable oil, and eggs. Using an electric mixer, beat on medium speed until smooth (about 2-3 minutes). Here’s a handy tip: Be sure to scrape the sides of the bowl for a uniform batter; those little flour pockets try to hide and can lead to a lumpy cake! -
Bake the Cake
Pour the cake batter into a greased 9×13-inch baking pan. Bake in your preheated oven for 30-35 minutes, or until a toothpick inserted in the center comes out clean. Enjoy that delightful smell wafting through your kitchen! -
Cool and Poke
Once baked, allow the cake to cool in the pan for about 10 minutes. After that, grab a wooden spoon or a straw and poke holes all over the cake—not too deep, just enough to make openings for the sauce. This part is fun! It’s like giving the cake a bit of a massage. -
Prepare the Soaking Mixture
In a medium bowl, combine your sweetened condensed milk with 1/2 cup of whipped topping. For a colorful twist, divide this mixture into two separate bowls. Add red food coloring to one bowl and blue to the other. Stir until you achieve your desired colors. -
Soak the Cake
Begin by pouring the red mixture over the cake, letting it sink into those lovely holes. Use a spatula to spread any remaining mixture evenly. Repeat the process with the blue mixture. -
Chill the Cake
Cover the cake with plastic wrap (or just a clean kitchen towel if you want to keep it rustic) and chill in the refrigerator for at least 2 hours. This step is crucial for all those flavors to meld together beautifully! -
Top the Cake
Once chilled, it’s time to spread the remaining whipped topping over the cake. Be generous—this is the creamy crown that takes your poke cake to the next level! -
Add the Berries
Finally, arrange your sliced strawberries and blueberries on top of the whipped topping. Create patterns, make designs—be as creative as you like! Let your festive spirit shine.
Serving Suggestions
When it’s time to serve, slice the cake into squares and present them on a bright platter. You might want to garnish also with a sprig of mint for that refreshing touch. The stunning red, white, and blue layers shining through will have your guests reaching for their forks!
Recipe Variations
-
Add a Layer of Lemon
Consider making a zesty lemon syrup to drizzle over the cake before adding the whipped topping. It adds a refreshing twist that brightens up the flavors! -
Chocolate Charm
Add cocoa powder to your cake mix for a chocolate sponge and pair with dark chocolate ganache on top. The combination of chocolate, fruit, and whipped cream? Simply delectable. -
Dairy-Free Delight
Swap the whipped topping for coconut whipped cream and use plant-based condensed milk. You won’t miss a beat with this scrumptious alternative! -
Nutty Crunch
Toasted almond or pecan pieces sprinkled on top before serving will introduce a crispy texture that complements the cake’s moisture beautifully. -
Ice Cream Surprise
Why not serve individual pieces with a scoop of vanilla ice cream? It’s a match made in summer heaven!
Chef’s Notes
I absolutely adore how poke cakes have an element of surprise; each bite has a burst of flavor, and there’s just something special about the way it brings layers of delight.
Over the years, I’ve adapted the recipe in numerous ways, experimenting with different flavor combinations. I once made a tropical version with pineapple and coconut that stole the show at a summer gathering. Every poke cake I bake feels like a canvas for creativity!
FAQs and Troubleshooting
Q: Why did my cake fall flat?
A: This can happen if your eggs weren’t fresh or if the batter was overmixed. Always check the date on your eggs and mix just until combined for best results.
Q: Can I make this cake ahead of time?
A: Absolutely! The cake keeps well in the fridge for 3-4 days. Just be mindful of adding the whipped topping and fruit closer to serving time to keep them fresh.
Q: Could I make this gluten-free?
A: Yes! You can substitute the white cake mix with a gluten-free blend. Just check that your other ingredients are gluten-free too (some whipped toppings may not be!).
Q: What should I do if I run out of sweetened condensed milk?
A: You can create a quick alternative by simmering 2 cups of milk with 2/3 cup of sugar until it thickens (about 30 minutes); just remember to stir frequently!
Nutritional Info
While I like to focus on indulging in delicious food rather than strict dietary guidelines, here’s a rough idea (per slice, based on 12 servings):
- Calories: 270
- Fat: 10g
- Carbohydrates: 39g
- Protein: 3g
Enjoy this cake as a treat, and remember, it’s all about balance in life.
Well, there you have it—a deliciously festive Red, White, and Blue Patriotic Poke Cake that’s perfect for any celebration! I hope this recipe brings you as much joy as it has brought me over the years. Now, tie your apron and let’s get baking! Happy celebrating!
PrintRed, White, and Blue Patriotic Poke Cake
A festive and delightful poke cake perfect for summer celebrations, layered with a sweet filling and topped with fresh berries.
- Prep Time: 15 minutes
- Cook Time: 35 minutes
- Total Time: 50 minutes
- Yield: 12 servings 1x
- Category: Dessert
- Method: Baking
- Cuisine: American
- Diet: Vegetarian
Ingredients
- 1 box of white cake mix
- 1 cup water
- 1/3 cup vegetable oil
- 3 large eggs
- 1 cup sweetened condensed milk
- 1 cup whipped topping
- 1/2 cup strawberries, sliced
- 1/2 cup blueberries
- Red and blue food coloring
Instructions
- Preheat your oven to 350°F (175°C).
- Mix the cake batter by combining the cake mix, water, vegetable oil, and eggs in a large mixing bowl.
- Beat on medium speed for 2-3 minutes until smooth.
- Pour the cake batter into a greased 9×13-inch baking pan.
- Bake for 30-35 minutes or until a toothpick inserted comes out clean.
- Cool the cake in the pan for about 10 minutes.
- Poke holes all over the cake using a wooden spoon or straw.
- Prepare the soaking mixture by combining sweetened condensed milk with 1/2 cup of whipped topping, dividing into two bowls and adding food coloring.
- Pour the red mixture over the cake, followed by the blue mixture.
- Chill the cake in the refrigerator for at least 2 hours.
- Spread remaining whipped topping over the cake.
- Add sliced strawberries and blueberries on top for decoration.
Notes
This cake can be made ahead of time and stored in the fridge for 3-4 days. Add fresh fruit closer to serving time for optimal freshness.
Nutrition
- Serving Size: 1 slice
- Calories: 270
- Sugar: 22g
- Sodium: 180mg
- Fat: 10g
- Saturated Fat: 4g
- Unsaturated Fat: 6g
- Trans Fat: 0g
- Carbohydrates: 39g
- Fiber: 1g
- Protein: 3g
- Cholesterol: 30mg
Keywords: poke cake, patriotic cake, Fourth of July dessert, summer dessert, festive cake
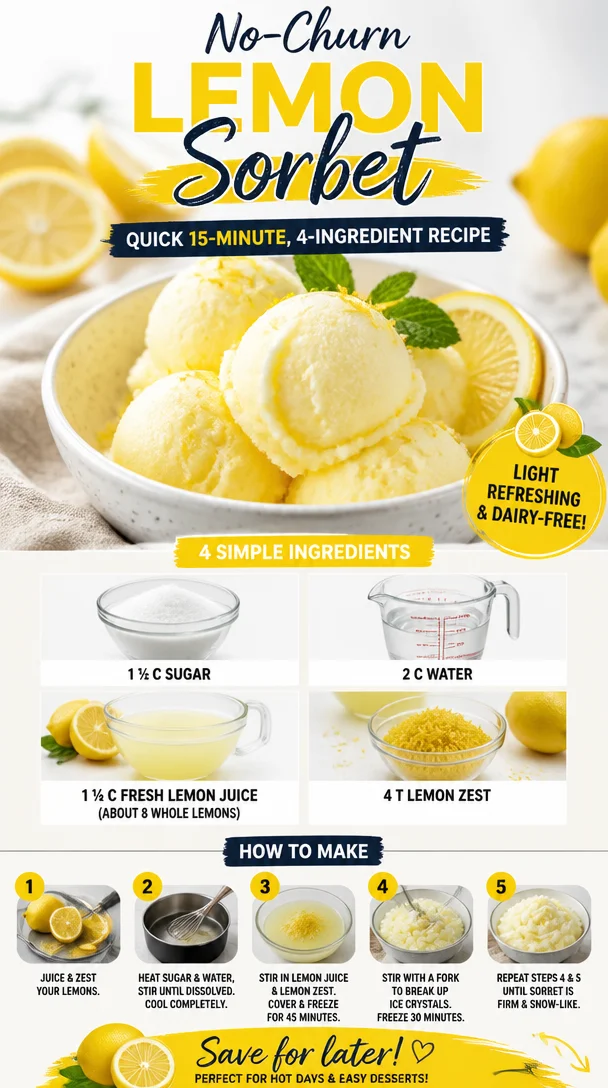
No-Churn Lemon Sorbet: Quick 15-Minute, 4-Ingredient Recipe
The Ultimate No-Ice Cream Maker Lemon Sorbet Recipe
Hello, fellow foodies! It’s Savannah from Ivory Apron, and I’m so excited to share a refreshing recipe that transports me to idyllic summer days — Lemon Sorbet. This dessert is not only incredibly simple to make, but it also brings a burst of sunshine to your table, regardless of the season. You won’t need any fancy equipment; all you need is a few pantry staples and a little bit of time.
Whether you’re wrapping up a dinner party or just trying to provide a sweet finish to a weekday meal, lemon sorbet is the perfect palate cleanser and a delightful treat that everyone will adore. Let’s dive into this simple yet elegant recipe!
A Dash of Nostalgia
Back when I was a child, summers meant long, sun-drenched days filled with family BBQs and laughter. My grandmother had this magical little lemon sorbet recipe that we all awaited each summer. I can still picture the cheerful yellow of the sorbet served in those quaint dishware she saved for special occasions. As my family and I took our first bites, the flavors danced on our tongues like a refreshing breeze wafting through the warm air.
Now, as a recipe creator, those memories encourage me to whip up sorbet every summer. Every spoonful is a nostalgic journey, and I love sharing it with friends and family, just like my grandma did. Let’s recreate those sweet memories together with this recipe that is both effortless and rewarding!
Ingredients You’ll Need
To make this delightful lemon sorbet, gather these ingredients:
-
1 ½ cups of sugar
This acts as the sweetener to balance the tartness of the lemons. You can substitute with half the amount of honey or agave syrup for a different flavor profile that adds a lovely depth. -
2 cups of water
Essential for creating a simple syrup when combined with sugar. If you want a more herbal note, consider using herbal teas like chamomile or mint as the liquid base. -
1 ¼ cups of fresh lemon juice (approximately 8 whole lemons)
Fresh is best! The acidity and brightness of the lemons provide a refreshing zing. In a pinch, you might use bottled lemon juice, but trust me, fresh lemons elevate the flavor immensely. -
4 tablespoons of lemon zest
This zest adds an extra layer of lemony goodness and aroma. If you’re out of lemons, you could use the zest of limes for a tropical twist.
Step-by-Step Instructions
Let’s get to the fun part — making the sorbet! Follow these steps to achieve a smooth, luscious lemon sorbet without needing an ice cream maker.
-
Make the Simple Syrup
In a medium saucepan over medium heat, combine the 2 cups of water and 1 ½ cups of sugar. Stir gently until the sugar dissolves completely. This should take about 3-5 minutes. You want the mixture to come to a gentle simmer — no need to boil vigorously! Once the sugar has dissolved, remove it from the heat and let it cool. -
Juice the Lemons
While your syrup is cooling, it’s time to juice the lemons! Roll them on the countertop for a few seconds to release more juice. Cut the lemons in half and use a citrus juicer or your hands to extract 1 ¼ cups of fresh lemon juice. Strain the juice to remove seeds and pulp if desired for a smoother texture. -
Combine
Once the syrup is at room temperature, mix in the fresh lemon juice and 4 tablespoons of lemon zest. This combination is the heart of your sorbet! Give it a good stir to ensure all ingredients meld beautifully. -
Pour and Freeze
Pour the lemon mixture into a shallow dish, preferably a metal pan as it conducts heat better to freeze faster. Cover it with plastic wrap. Place it in your freezer for about 4-5 hours. You want the mixture to be solid, but not rock-hard. -
Scrape for Fluffiness
After 4-5 hours, take the dish out of the freezer. Using a fork, scrape the frozen layer to break it up. This will give your sorbet that light, fluffy texture. If you prefer a creamier consistency, you can blend the mixture briefly in a food processor. -
Final Freeze
Return the sorbet to the freezer for an additional 2 hours to firm up. Trust me; it’ll be worth the wait!
Serving Suggestions
Once your lemon sorbet is ready to serve, scoop it into charming bowls or elegant glasses. A sprig of fresh mint or a twist of lemon peel can elevate the presentation. Serve this sorbet as a stand-alone dessert or alongside a fruit salad or a slice of cake for added flair.
Recipe Variations
Feeling adventurous? Here are a few creative twists you can add to the classic lemon sorbet:
- Berry Lemon Sorbet: Blend in some pureed berries like strawberries or raspberries before freezing for a vibrant twist.
- Minty Lemon Sorbet: Add a handful of muddled fresh mint leaves to the mixture, giving your sorbet a refreshing herbaceous finish.
- Ginger Lemon Sorbet: Grate fresh ginger and add it for a zesty and spicy kick.
- Honey Lemon Sorbet: Swap sugar with honey (use about 1 cup as it’s sweeter) for a unique flavor profile and added health benefits.
- Creamy Lemon Sorbet: Stir in a bit of coconut cream or yogurt for a richer texture.
Chef’s Notes
This recipe holds a special place in my kitchen because it harkens back to those sun-soaked summers spent with my grandmother. As I refine it, I’ve learned that adjusting the sweetness to your taste is completely normal! Depending on the tartness of your lemons, you might want to add a bit more sugar — that’s the beauty of cooking! Feel free to experiment a bit and find the right balance for you.
And fun fact: I once made this sorbet for a big family gathering and forgot to set a timer. When I finally remembered it, I rushed to the kitchen in a panic, but to my delight, it turned out perfectly! A little spontaneity can sometimes lead to the most delightful surprises in cooking.
FAQs and Troubleshooting
-
My sorbet is too hard. What can I do?
If your sorbet is rock-hard, let it sit at room temperature for about 10 minutes before scooping. You can also blend it in a food processor with a splash of water or juice to soften it up. -
Can I use store-bought lemon juice?
Yes, while fresh lemons are best for flavor, if in a pinch, bottled juice can work. Just ensure it’s 100% lemon juice with no added sugars or preservatives. -
What if I don’t have a shallow dish?
A shallow dish helps the mixture freeze evenly, but you can use any container. If using a deeper container, check the sorbet more frequently and scrape it with a fork as it freezes. -
Can I make it ahead of time?
Absolutely! This lemon sorbet can be made a few days in advance. Just give it a good scrape before serving!
And there you have it — a refreshing, chic, and utterly delightful lemon sorbet that’s perfect for any occasion. It’s a beautiful way to wrap up a meal or simply cool down on a warm day. There’s something undeniably special about whipping up something so simple yet stunning. So, tie on your apron, grab those lemons, and let’s make some delicious memories together! Cheers to crafting culinary magic!
PrintThe Ultimate No-Ice Cream Maker Lemon Sorbet

A refreshing lemon sorbet that is simple to make and a perfect palate cleanser.
- Prep Time: 10 minutes
- Cook Time: 15 minutes
- Total Time: 150 minutes
- Yield: 4 servings 1x
- Category: Dessert
- Method: Freezing
- Cuisine: American
- Diet: Vegan
Ingredients
- 1 ½ cups of sugar
- 2 cups of water
- 1 ¼ cups of fresh lemon juice (approximately 8 whole lemons)
- 4 tablespoons of lemon zest
Instructions
- Make the Simple Syrup: In a medium saucepan over medium heat, combine the 2 cups of water and 1 ½ cups of sugar. Stir gently until the sugar dissolves completely, about 3-5 minutes. Remove from heat and let cool.
- Juice the Lemons: Roll them on the countertop to release more juice. Cut in half and extract 1 ¼ cups of fresh lemon juice. Strain to remove seeds and pulp if desired.
- Combine the cooled syrup with the fresh lemon juice and 4 tablespoons of lemon zest. Stir to mix.
- Pour the mixture into a shallow dish and cover with plastic wrap. Freeze for about 4-5 hours until solid but not rock-hard.
- Scrape the mixture with a fork to achieve a fluffy texture. Optionally, blend briefly in a food processor for creaminess.
- Final Freeze: Return the sorbet to the freezer for an additional 2 hours to firm up.
Notes
Adjust sweetness to your taste depending on the tartness of the lemons. This sorbet can be made a few days in advance.
Nutrition
- Serving Size: 1 serving
- Calories: 180
- Sugar: 36g
- Sodium: 5mg
- Fat: 0g
- Saturated Fat: 0g
- Unsaturated Fat: 0g
- Trans Fat: 0g
- Carbohydrates: 46g
- Fiber: 0g
- Protein: 0g
- Cholesterol: 0mg
Keywords: lemon sorbet, dessert, vegan, refreshing, summer treat
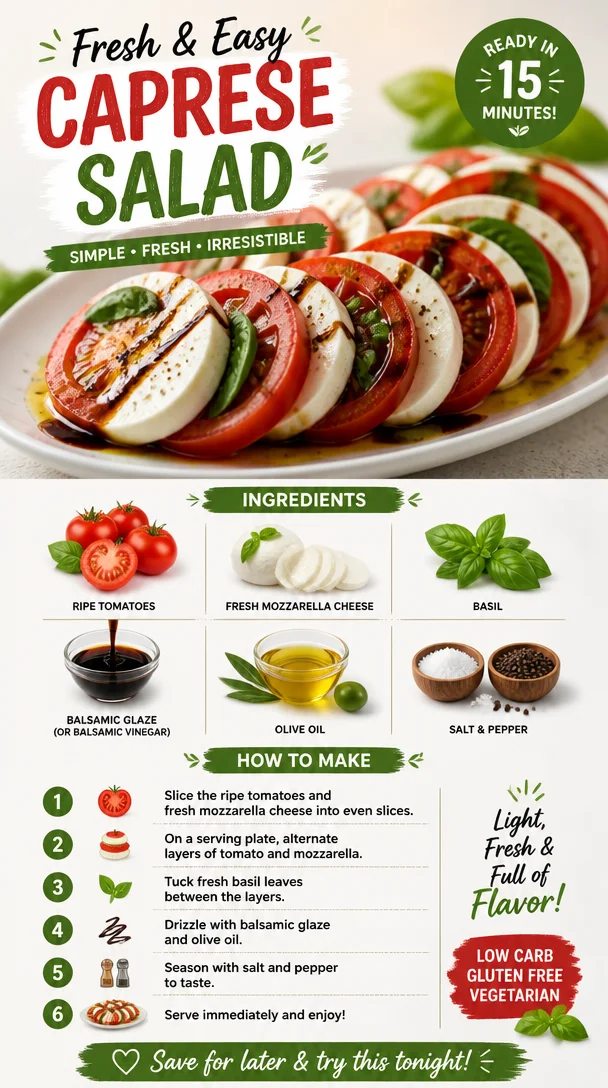
Caprese Salad
Caprese Salad: The Perfect Summer Delight
Hello, dear food lovers! Today, I’m super excited to share one of my all-time favorite dishes: Caprese Salad. This vibrant Italian classic embodies everything I adore about cooking: simplicity, fresh ingredients, and the ability to create a beautiful dish that delights the senses. Whether you’re hosting a summer get-together or just treating yourself to a fresh, light meal, Caprese Salad is a surefire winner that never fails to impress.
Picture this: the sun is shining, birds are chirping, and you’re gathering around the table with your loved ones. There’s something magical about summer evenings, isn’t there? The air is filled with laughter, the clinking of glasses, and the enticing aroma of delicious food wafting from the kitchen. And right in the center of your table? A stunning platter of Caprese Salad, inviting everyone to dig in. Each bite brings together the juicy sweetness of ripe tomatoes, the creaminess of fresh mozzarella, and the fragrant burst of aromatic basil—all drizzled with a tangy balsamic glaze that ties everything together beautifully.
This salad isn’t just food; it’s an experience. It’s the taste of summer, the essence of Italian cuisine, and a simple way to showcase the beauty of fresh ingredients. So, let’s dive into the heart of this dish and learn how to create a Caprese Salad that not only looks exquisite but tantalizes the taste buds too.
A Nostalgic Memory
Ah, Caprese Salad and me—we go way back! I remember the first time I had a truly authentic Caprese Salad. It was during a summer trip to the Amalfi Coast with my family. We stumbled upon a quaint little trattoria nestled between vibrant lemon trees and azure waters. It was there that I was introduced to the wonders of fresh mozzarella and sun-ripened tomatoes. The dish arrived on a rustic wooden table, its colors popping against the Mediterranean backdrop.
With each bite, my taste buds danced with delight. The mozzarella was soft and creamy, the tomatoes juicy and sweet, and the basil brought in such a fragrant freshness. It was a simple dish, but the quality of the ingredients made all the difference. I learned then that sometimes the best meals are born from the best ingredients—and that lesson has stayed with me. Since that day, Caprese Salad has become my go-to summer dish, and now, I’m thrilled to share it with you!
Ingredients
Let’s gather our ingredients and get ready to create this delicious salad. Here’s what you’ll need:
-
Ripe Tomatoes
Look for the ripest, juiciest tomatoes you can find. Heirloom tomatoes are an excellent choice for their flavor and vibrant colors. If you can’t find fresh ones, cherry tomatoes will do in a pinch—just cut them in half for a sweet bite! -
Fresh Mozzarella Cheese
For that creamy texture, fresh mozzarella is key. Look for the balls packed in water for the best flavor. If you’d like a lower-fat option, you could try part-skim mozzarella, but keep in mind it won’t have the same luxurious creaminess. -
Basil
Fresh basil adds an aromatic lift that is essential to this dish. If you can’t find fresh basil, try substituting with a sprinkle of dried basil, but it won’t have quite the same impact! -
Balsamic Glaze (or Balsamic Vinegar)
A drizzle of balsamic glaze elevates the salad with a sweet tang. If you prefer a less sweet option, you can go with traditional balsamic vinegar; just be mindful to use it sparingly, as it’s stronger in flavor. -
Olive Oil
A good quality extra virgin olive oil is crucial for drizzling over your salad—think of it as the finishing touch! It adds flavor and richness. -
Salt and Pepper
Simple yet essential! Use fresh cracked black pepper and flaky sea salt to season your salad. A pinch of salt can really enhance the flavors of the tomatoes.
Step-by-Step Instructions
Step 1: Prepare Your Ingredients
Start by washing your tomatoes under cool, running water. Pat them dry with a clean towel. If you’re using large tomatoes, slice them into thick rounds (about 1/4 to 1/2 inch thick). For cherry tomatoes, halving them will create delightful little bite-sized pieces.
Step 2: Slice the Mozzarella
Next, let’s take care of that creamy mozzarella! Slice the fresh mozzarella into similar-sized rounds to match the tomatoes. If you happen to have mozzarella pearls, they’re fantastic for an easy, rustic salad presentation.
Step 3: Arrange the Salad
Now comes the fun part! On a large serving platter, alternate layers of tomato slices and mozzarella. You can arrange them in a circle, line them up, or just pile them haphazardly—there’s no right or wrong here! As you layer, tuck in fresh basil leaves in between. This not only adds flavor but also makes the salad look stunning.
Step 4: Drizzle with Olive Oil and Balsamic
Once you have beautifully arranged your salad, it’s time to dress it up! Drizzle a generous glug of extra virgin olive oil over the entire salad. Then follow that with a drizzle of balsamic glaze (or vinegar, if that’s what you have). Don’t be shy—this is what brings all the flavors together!
Step 5: Season to Taste
Finally, it’s time to add the finishing touches. Season your Caprese Salad with a sprinkle of flaky sea salt and a few cracks of fresh black pepper. This little moment is where your salad becomes magic, accentuating the flavors of all those fresh ingredients.
Step 6: Serve and Enjoy
Now, step back and admire your creation—it’s a beauty! Serve your Caprese Salad immediately at room temperature for the best flavor. Watch it disappear as everyone digs into this delightful dish!
Serving Suggestions
When it comes to plating, keep it simple yet elegant. A beautiful wooden board or a flat white platter truly showcases your colorful layers. You might even consider garnishing the salad with a few extra basil leaves or a sprinkle of crushed red pepper flakes for a hint of heat. Serve alongside some crusty bread or grilled chicken for a complete meal, or enjoy it solo as a refreshing appetizer.
Recipe Variations
-
Caprese Skewers: Assemble cherry tomatoes, mozzarella balls, and fresh basil onto skewers for a fun appetizer!
-
Avocado Twist: Add slices of creamy avocado for a rich texture and flavor boost.
-
Pesto Drizzle: Swap out the balsamic for a fresh basil pesto drizzle for an herbaceous twist.
-
Mediterranean Style: Include Kalamata olives and slices of roasted red bell pepper for a Mediterranean flair.
-
Grilled Caprese: Grill the tomatoes and mozzarella for a smoky flavor profile—perfect for summer barbecues!
Chef’s Notes
Caprese Salad holds a special place in my heart, not just for its fresh flavors but also for the stories it gathers around the table. Over the years, I’ve played around with different ingredients and variations to make this dish my own. I once hosted an Italian night for friends and made Caprese Salad a centerpiece dish. I told everyone to bring their favorite Italian wines—needless to say, we ended up spending the night laughing over great food and even better company! Remember, cooking isn’t just about following a recipe; it’s about making memories and sharing love through the food you create.
FAQs and Troubleshooting
1. My tomatoes are bland. How can I fix this?
Make sure to choose fully ripe, in-season tomatoes—they should be vibrant in color and firm yet slightly yielding when pressed. If you end up with a lackluster tomato, a sprinkle of salt and a dash of balsamic can help enhance the flavor right away!
2. Can I make Caprese Salad in advance?
While this salad is best enjoyed fresh, you can slice your tomatoes and mozzarella in advance. Just store them separately in the fridge and assemble right before serving to keep everything fresh.
3. The basil is bruised and wilting. What did I do wrong?
Basil is delicate, so be gentle while handling it. Store it in a glass of water on your countertop—similar to a bouquet—rather than the fridge, which can cause wilting.
4. There’s too much balsamic glaze on my salad! How can I fix it?
No worries! Add more fresh ingredients—like extra tomatoes and mozzarella—to balance out the flavors. Just remember that less is often more when it comes to dressings.
Nutritional Info
While I generally lean toward the more relaxed side of eating, it’s always good to know what’s going on in our meals. A standard serving of Caprese Salad (without additional toppings) can be about:
- Calories: 300 (depending on oil and portion size)
- Protein: 16g
- Fat: 20g (largely healthy fats from olive oil and mozzarella)
- Carbohydrates: 8g
So, there you have it—a refreshing dive into the world of Caprese Salad! I hope you find joy in preparing, sharing, and indulging in this delightful dish. Remember, cooking is all about bringing people together, so gather your loved ones and let the magic of good food create lasting memories. Happy cooking!
PrintCaprese Salad
A vibrant Italian classic salad made with fresh mozzarella, ripe tomatoes, and aromatic basil, drizzled with balsamic glaze.
- Prep Time: 10 minutes
- Cook Time: 0 minutes
- Total Time: 10 minutes
- Yield: 4 servings
- Category: Salad
- Method: No Cooking
- Cuisine: Italian
- Diet: Vegetarian
Ingredients
- Ripe Tomatoes
- Fresh Mozzarella Cheese
- Basil
- Balsamic Glaze (or Balsamic Vinegar)
- Olive Oil
- Salt and Pepper
Instructions
- Prepare your ingredients by washing the tomatoes and slicing them.
- Slice the mozzarella into rounds.
- Arrange the salad by alternating layers of tomato and mozzarella on a platter.
- Drizzle olive oil and balsamic glaze over the salad.
- Season with salt and pepper to taste.
- Serve immediately at room temperature.
Notes
For variations, try adding avocado, olives, or grilled ingredients.
Nutrition
- Serving Size: 1 serving
- Calories: 300
- Sugar: 5g
- Sodium: 300mg
- Fat: 20g
- Saturated Fat: 6g
- Unsaturated Fat: 12g
- Trans Fat: 0g
- Carbohydrates: 8g
- Fiber: 2g
- Protein: 16g
- Cholesterol: 30mg
Keywords: Caprese Salad, Italian Salad, Fresh Ingredients, Summer Salad
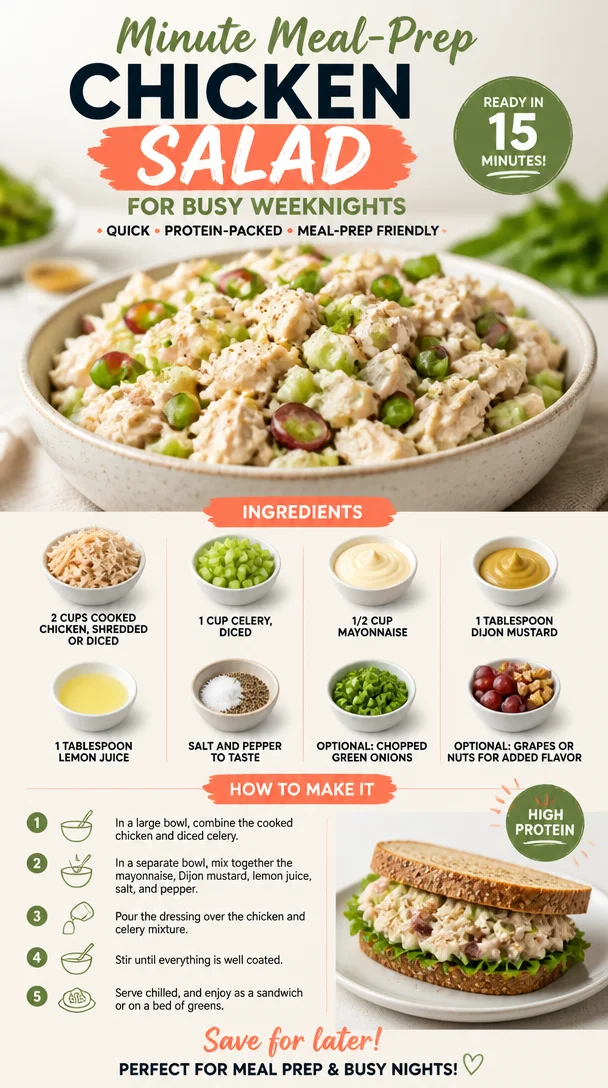
Minute Meal-Prep Chicken Salad for Busy Weeknights
The Ultimate Easy Chicken Salad: A Simple Classic for Every Occasion
Hello, lovely friends! Today, we’re diving into the world of one of my all-time favorite dishes: Easy Chicken Salad. Whether it’s a sunny picnic in the park or a cozy lunch at home, this dish is your go-to for something deliciously satisfying and fuss-free. The best part? You can whip it up in no time, with ingredients you probably already have at home!
Let me set the scene. Picture this: sunny afternoons, the scent of freshly cut grass wafting through the air, and laughter echoing from friends gathered around. Everyone is interested in two things: good company and delicious food! I remember one summer backyard barbecue when I decided to bring my version of chicken salad. Nothing fancy, just the classic goodness we’ve all come to love. But oh, how it stole the show!
By the end of the day, I had a circle of friends savoring every bite, sneaking spoonfuls straight from the bowl, and asking for the recipe. It was a reminder of how simple ingredients can create moments filled with joy and connection. Chicken salad became more than just a dish; it turned into a delightful memory that I cherish to this day.
So, gather ‘round because I can’t wait to share my easy chicken salad recipe with you — one that’s not just super tasty, but also gives you the chance to play around, customize, and make it your own!
Ingredients
Let’s take a look at what you’ll need to create this delightful chicken salad:
-
2 cups cooked chicken, shredded or diced: Use leftover rotisserie chicken for an effortless option, or simply boil some chicken breasts. You can even substitute with grilled or baked chicken for added flavor.
-
1 cup celery, diced: The crunchy texture adds a delightful contrast. If celery isn’t your jam, feel free to swap it out with diced bell peppers or cucumber.
-
1/2 cup mayonnaise: This creamy base is what holds it all together. For a healthier twist, use Greek yogurt or a dairy-free mayo alternative!
-
1 tablespoon Dijon mustard: It brings in a tangy zip! If you don’t have it on hand, regular mustard or even a splash of vinegar can work.
-
1 tablespoon lemon juice: This citrusy note brightens up the flavors. Lime juice can also be a delicious alternative!
-
Salt and pepper to taste: Don’t skimp on seasoning! Always make sure to taste and adjust as needed.
-
Optional: chopped green onions, grapes, or nuts: These goodies add extra flavor and texture! Think of toasted almonds for crunch or sweet grapes for a delightful twist!
Step-by-Step Instructions
Now, let’s get cooking! Here’s how to make your Easy Chicken Salad step-by-step:
-
Prepare Your Chicken: Start by shredding or dicing your cooked chicken into bite-sized pieces. If you haven’t cooked your chicken yet, no worries! Just boil some chicken breasts in salty water for about 15-20 minutes, or until they’re tender and cooked through. Remove from the pot, let them cool, and then shred!
-
Chop Your Veggies: Dice your celery finely. If you’re adding in any optional ingredients like green onions or grapes, now is the time! Remember, finesse in chopping adds to the texture and appeal of the salad, so take your time, and enjoy the prep.
-
Mix the Base: In a large bowl, combine the mayonnaise, Dijon mustard, and lemon juice. Stir them together thoroughly to create a creamy base. Here’s a little tip: if your mayo seems a bit thick, add a splash of water or more lemon juice until it reaches your desired consistency!
-
Combine It All: Add the shredded chicken and diced celery to the mayo mixture. Sprinkle with salt and pepper. Now comes the fun part — fold everything together gently. You want it well combined but still fluffy and light.
-
Taste Test Time: This is the moment of truth! Grab a spoon and taste your chicken salad. Adjust seasoning as needed, adding more salt, pepper, or even a touch more mustard if you’d like.
-
Chill Out: For the best flavors, cover the bowl and pop it in the fridge for at least 30 minutes before serving. This allows the flavors to meld beautifully together. Trust me, it makes a big difference!
Serving Suggestions
Ready to serve your chicken salad? Scoop generous portions onto a bed of mixed greens, or serve it in a fresh whole grain wrap. You could even stuff it into hollowed-out avocados for a stunning presentation! Drizzle with a little extra lemon juice before serving, and voila — a dish that’s as beautiful as it is delicious.
Recipe Variations
Feeling adventurous? Here are some creative twists you can try:
-
Mediterranean Chicken Salad: Add diced cucumber, olives, and crumbled feta cheese for a refreshing Mediterranean vibe!
-
Curry Chicken Salad: Incorporate curry powder and some chopped apples or raisins for a sweet and savory combo that’s sure to impress.
-
Southwestern Chicken Salad: Throw in black beans, corn, and diced jalapeños for a zesty kick.
-
Herbed Chicken Salad: Mix in fresh herbs like dill or parsley for an uplift in flavor that sings freshness.
-
Nuts & Fruits Delight: Add walnuts or pecans for crunch, along with dried cranberries or grapes for a sweet contrast.
Chef’s Notes
This chicken salad has been a staple in my kitchen for years, evolving with every gathering and celebration. I can’t begin to tell you how many variations I’ve tried — some that went hugely well and others that may have caused a tiny kitchen disaster (hey, we all have our off days!).
One particularly funny memory involved attempting to impress my friends by adding a splash of wine to the salad! Let’s just say, it wasn’t my finest hour — but we had a great laugh and finished every last bite anyway.
FAQs and Troubleshooting
1. Can I use canned chicken?
Absolutely! Canned chicken is a great shortcut. Just make sure to drain and rinse it for the best texture.
2. What can I use instead of mayonnaise?
If you’re looking for a healthier option, Greek yogurt or avocado mash are wonderful alternatives.
3. How long does chicken salad last in the fridge?
Properly stored in an airtight container, your chicken salad should be good for about 3-4 days. Just be sure to note any additions, as some ingredients might shorten the shelf life!
4. Help! My chicken salad is too dry!
No problem! Just add a bit more mayonnaise or some chicken broth to moisten it up. Mix thoroughly, and you’ll be back on track.
Nutritional Information (Optional)
Cooking chicken salad doesn’t have to come with a hefty calorie count! Each serving of this Easy Chicken Salad (assuming six servings) can contain approximately 250 calories, depending on how much mayonnaise you use.
Wrap Up
And there you have it, friends! A delightful, easy chicken salad that’s perfect for any occasion — picnics, potlucks, or even just an easy weeknight dinner. Remember, this dish is all about making beautiful moments around the table, no matter how simple or extravagant the meal may be.
I can’t wait for you to tie on your apron and give this recipe a try! Enjoy the process, make it uniquely yours, and most importantly, share it with the people you care about because good food truly is about showing up!
Happy cooking!
PrintUltimate Easy Chicken Salad
A simple and classic chicken salad perfect for any occasion, easy to prepare and customizable.
- Prep Time: 15 minutes
- Cook Time: 20 minutes
- Total Time: 35 minutes
- Yield: 6 servings 1x
- Category: Salad
- Method: Mixing
- Cuisine: American
- Diet: Gluten-Free
Ingredients
- 2 cups cooked chicken, shredded or diced
- 1 cup celery, diced
- 1/2 cup mayonnaise
- 1 tablespoon Dijon mustard
- 1 tablespoon lemon juice
- Salt and pepper to taste
- Optional: chopped green onions, grapes, or nuts
Instructions
- Prepare your chicken: Start by shredding or dicing your cooked chicken into bite-sized pieces.
- Chop your veggies: Dice your celery finely. Add any optional ingredients if desired.
- Mix the base: In a large bowl, combine the mayonnaise, Dijon mustard, and lemon juice.
- Combine it all: Add the shredded chicken and diced celery to the mayo mixture. Sprinkle with salt and pepper.
- Taste test time: Grab a spoon and taste your chicken salad. Adjust seasoning as needed.
- Chill out: Cover the bowl and refrigerate for at least 30 minutes before serving.
Notes
This chicken salad can last in the fridge for about 3-4 days when stored properly.
Nutrition
- Serving Size: 1 serving
- Calories: 250
- Sugar: 2g
- Sodium: 350mg
- Fat: 15g
- Saturated Fat: 2g
- Unsaturated Fat: 8g
- Trans Fat: 0g
- Carbohydrates: 5g
- Fiber: 1g
- Protein: 20g
- Cholesterol: 60mg
Keywords: chicken salad, easy recipe, picnic food, healthy salad, quick meal
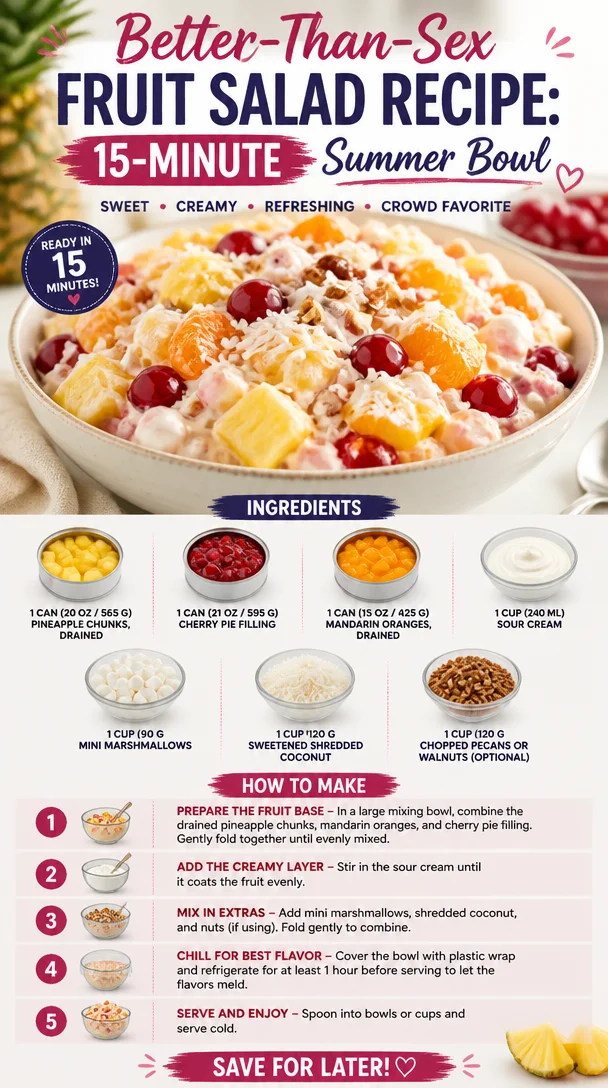
Better-Than-Sex Fruit Salad Recipe: 15-Minute Summer Bowl
Better Than Sex Fruit Salad: A Sweet Indulgence for Every Occasion
Hello, my lovely foodies! Today, I am bursting with excitement to share a recipe that never fails to bring smiles and giggles to the table. We’re diving into the delightful world of Better Than Sex Fruit Salad – a dish so tempting, you’ll wonder how something so simple can bring such joy!
Now, let’s get real here. Who wouldn’t want to enjoy a fruit salad that combines fun, nostalgia, and a hint of cheeky humor? This salad has garnered a reputation for being the star of barbecues, potlucks, and family feasts alike. It’s fruity, creamy, and sweet – all the things we love in a dessert as we gather with friends and family.
Let’s set the scene: Imagine a vibrant, sunny day with laughter echoing as you flip burgers on the grill. The air is tinged with the sweet scent of summer, and you reach for the dish that ties it all together – this luscious fruit salad. A harmonious blend of flavors and textures, garnished with a sprinkle of laughter, it becomes a centerpiece everyone wants to dig into second and third servings.
Let me take you back to the first time I tasted Better Than Sex Fruit Salad. It was at my Aunt Clara’s backyard barbecue. She always had a flair for dramatic cooking, and this dish was no exception. As soon as she plopped that giant bowl on the table, the crowd erupted with oohs and aahs. I remember sneaking a few spoonfuls before dinner, captivated by the combination of juicy fruits, creamy sour cream, and crunchy nuts. It was a simple dish that ignited a whirlwind of joy, and I was hooked.
Fast forward to today, and I’ve made my own tweaks while keeping the essence of Aunt Clara’s creation alive. It remains a family favorite, proving that great food truly brings us together. So, are you ready to make magic happen in your kitchen? Let’s roll up those sleeves and get to it!
Ingredients
To whip up your own Better Than Sex Fruit Salad, you’ll need the following ingredients:
-
1 can (20 oz / 565 g) pineapple chunks, drained
Fresh or canned, pineapple adds a tropical sweetness. If you prefer fresh, just chop up an equivalent amount, and grab a ripe pineapple for that extra zing! -
1 can (21 oz / 595 g) cherry pie filling
This is one of the stars of the show! You can find it in the baking aisle. Don’t fancy cherries? Swap with strawberry pie filling for a berry twist. -
1 can (15 oz / 425 g) mandarin oranges, drained
These little gems add a burst of color and flavor. You can use fresh mandarin oranges, but peeling those little guys takes patience. -
1 cup (240 ml) sour cream
The creamy dressing that ties everything together. Greek yogurt works well as a health-conscious alternative, offering a similar texture with extra protein. -
1 cup (90 g) mini marshmallows
Adding a hint of nostalgia, these soft bites bring sweetness. Swap with chopped dates or dried fruit if you prefer a healthier option that still satisfies that sweet tooth. -
1 cup (120 g) sweetened shredded coconut
Coconut adds a tropical flair and a chewy texture. Unsweetened coconut works too, especially for those who want to dial down the sweetness. -
1 cup (120 g) chopped pecans or walnuts (optional)
A nutty crunch elevates the dish. Don’t have nuts on hand? Try sunflower seeds or omit them entirely for a nut-free treat.
Step-by-Step Instructions
Now that we’re prepped and excited, let’s dive into making this luscious fruit salad!
-
Prepare the Fruits
Start by draining the canned fruits. This step is key to avoiding a watery salad. Make sure your pineapple, cherries, and mandarin oranges are all well-drained. Use a fine mesh strainer if you have one. Place them in a large mixing bowl with enough space for stirring. -
Add the Cherry Pie Filling
Next, scoop in that cherry pie filling. The tartness of the cherries pairs beautifully with the sweetness of the pineapple and oranges. Gently fold it into the fruits, being careful not to break up the oranges too much. It should feel like a delightful, colorful mashup! -
Incorporate the Sour Cream
Time to introduce the star dressing! Add the cup of sour cream to the bowl and start folding it in. This is where the magic happens—the creamy texture envelops the fruits, creating a luscious filling. Make sure every piece of fruit gets kissed by that creamy goodness! -
Mix in the Mini Marshmallows and Coconut
Sprinkle in the mini marshmallows and sweetened shredded coconut. Again, fold them in gently. This is where the texture of the salad starts to shine! Don’t forget to taste the mixture at this stage—oh, the sweetness will have you swooning. -
Add the Chopped Nuts
If you’re opting for those delicious pecans or walnuts, now is the time to add them. Stir lightly to distribute evenly. This crunch factor makes this fruit salad a must-have on your table! Plus, it adds that lovely contrast in texture. -
Chill Before Serving
Cover the mixing bowl with plastic wrap or transfer the salad to a serving bowl with a lid. Refrigerate for at least 30 minutes before serving to let the flavors meld together. Trust me; this waiting game is worth it! -
Serve and Enjoy
When you’re ready to serve, give it a quick stir to mix any settling. Scoop it into individual bowls or let guests serve themselves from a big, beautiful platter. Don’t forget to go in for seconds!
Serving Suggestions
When it comes to plating, simplicity is key. Use a chilled glass bowl to showcase the vivid colors of the salad, or opt for individual dessert cups for a more polished presentation. Garnish each serving with a light sprinkle of coconut on top and a few extra pecans for that added crunch.
Serve alongside grilled meat or barbecue for a satisfying contrast, or enjoy it as a stand-alone light dessert. Either way, don’t forget the spoons and enjoy every spoonful!
Recipe Variations
Want to play around with flavors? Here are a few ideas:
- Tropical Twist: Add banana slices and swap out the cherry pie filling for mango puree.
- Berry Delight: Replace the cherries with mixed berries for a fresh take filled with seasonal flavors.
- Creamy Dream: Stir in a splash of vanilla extract for a deeper flavor profile, elevating the creamy aspect.
- Nut-Free Option: Omit the nuts and double down on the marshmallows for that added sweetness, perfect for those with allergies.
- Healthy Spin: Use low-fat Greek yogurt instead of sour cream and ditch the mini marshmallows. Add a handful of fresh berries for extra color and flavor!
Chef’s Notes
Oh, the stories I could tell you about this fruit salad! Over the years, I’ve seen it grace countless tables – from birthday parties to holiday feasts. Once, I absentmindedly added a sprinkle of cinnamon, and you wouldn’t believe the compliments that rolled in! It prompted a new trend among my friends, who now swear by the addition.
This recipe has evolved but kept its roots firmly planted in joy and comfort. Keep it playful, get your little ones involved by letting them pour the ingredients in, and don’t shy away from making it your own. Every kitchen holds a unique flavor story, and this dish can be a memory waiting to happen.
FAQs and Troubleshooting
-
Can I make this fruit salad ahead of time?
Absolutely! It can be prepared the day before; just keep it covered in the fridge. The flavors deepen and become even more delightful! -
What if my fruit salad seems too sweet?
Balance is key! You can add a squeeze of lemon or lime juice to offset the sweetness. Plus, it adds a refreshing zing! -
How long will leftovers last?
If stored properly, this fruit salad can last 2-3 days in the fridge. Just keep in mind that the fruits may soften over time. -
Can I change the base?
Definitely! Greek yogurt or light cream cheese blended with a little whipped cream will give you different textures and flavors while keeping it creamy.
Nutritional Info
While I typically focus on joy rather than counting calories, it’s helpful to know that each serving packs a punch of vitamins from the fruits, healthy fats from the nuts, and a touch of sweetness from the sour cream and marshmallows.
And there you have it, friends! Your ultimate guide to making a Better Than Sex Fruit Salad that’s sure to impress and satisfy. I hope you have as much fun making it as I do. Here’s to countless delicious memories around the table—grab that apron and let’s create something beautiful together!
PrintBetter Than Sex Fruit Salad
A creamy, fruity salad that combines tropical flavors and textures for a delightful dessert perfect for any occasion.
- Prep Time: 15 minutes
- Cook Time: 0 minutes
- Total Time: 30 minutes
- Yield: 8 servings 1x
- Category: Dessert
- Method: No Cooking
- Cuisine: American
- Diet: Vegetarian
Ingredients
- 1 can (20 oz / 565 g) pineapple chunks, drained
- 1 can (21 oz / 595 g) cherry pie filling
- 1 can (15 oz / 425 g) mandarin oranges, drained
- 1 cup (240 ml) sour cream
- 1 cup (90 g) mini marshmallows
- 1 cup (120 g) sweetened shredded coconut
- 1 cup (120 g) chopped pecans or walnuts (optional)
Instructions
- Prepare the Fruits: Start by draining the canned fruits and place them in a large mixing bowl.
- Add the Cherry Pie Filling: Scoop in the cherry pie filling and gently fold it into the fruits.
- Incorporate the Sour Cream: Add the sour cream and fold it in until every piece of fruit is coated.
- Mix in the Mini Marshmallows and Coconut: Sprinkle in the mini marshmallows and sweetened shredded coconut, folding gently to combine.
- Add the Chopped Nuts: If using, stir in the pecans or walnuts evenly.
- Chill Before Serving: Cover with plastic wrap and refrigerate for at least 30 minutes before serving.
- Serve and Enjoy: Give it a quick stir before serving in individual bowls or on a platter.
Notes
This fruit salad can be made a day in advance for deeper flavors. Add a squeeze of lemon to balance sweetness if desired.
Nutrition
- Serving Size: 1 serving
- Calories: 320
- Sugar: 22g
- Sodium: 200mg
- Fat: 15g
- Saturated Fat: 5g
- Unsaturated Fat: 10g
- Trans Fat: 0g
- Carbohydrates: 48g
- Fiber: 2g
- Protein: 4g
- Cholesterol: 10mg
Keywords: fruit salad, dessert, summer recipe, easy recipe, potluck dish
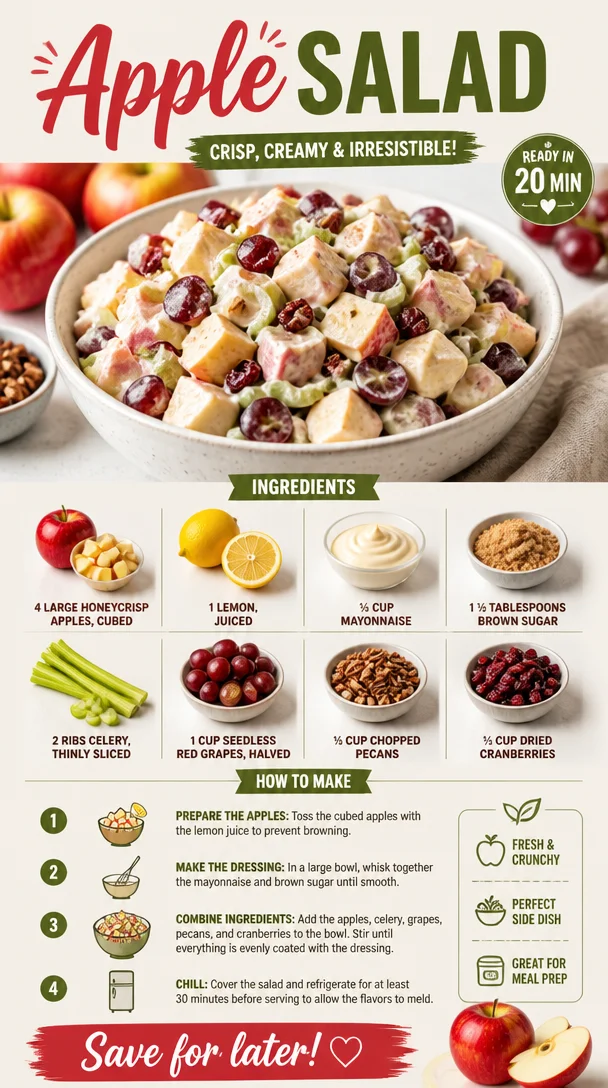
Apple Salad
The Ultimate Apple Salad: A Crisp and Refreshing Delight
Hello, my fellow food enthusiasts! Today we’re diving into a dish that’s as refreshing as a crisp autumn day: the delightful apple salad. This recipe is not just a salad; it’s a celebration of flavors and memories that I can’t wait to share with you. Are you ready to elevate your salad game? Let’s get started!
Introduction
Picture this: the air is filled with a hint of chill, and the leaves are turning shades of gold and crimson. This time of year always means one thing for me — it’s apple season! There’s just something magical about walking through an orchard, basking in the sun, and picking the freshest, juiciest apples straight from the trees. The feeling of that crunch as you bite into a freshly picked Honeycrisp apple is enough to awaken anyone’s taste buds!
But let’s be real; apples aren’t just an autumn treat. They’re a perennial favorite in kitchens all year round! That’s why I’ve developed this vibrant apple salad that’s perfect for any occasion—whether it’s a joyful family gathering, a friendly potluck, or a simple weeknight dinner. With the creaminess of mayonnaise, the tang of lemon, and the crunch of celery and pecans, this salad combines a symphony of flavors and textures that’s hard to resist.
What I love most about this apple salad is not just the deliciously refreshing taste but also the way it brings people together around the table. It has this wonderful knack for feeling both nourishing and slightly indulgent at the same time. Plus, it’s so easy to whip up that it might just become your new go-to for any gathering! So, let’s roll up our sleeves, tie on our aprons, and embark on this delightful culinary adventure together.
Personal Story
Growing up, my family was all about cozy dinners and hearty meals, but the true highlight of any food gathering was my grandmother’s apple salad. Each fall, she would meticulously prepare it for our Thanksgiving feast — a vibrant dish nestled between her renowned roasted turkey and velvety mashed potatoes. She always let us kids get involved, and I specifically remember clamoring around the kitchen, excitedly waiting to mix the ingredients together!
The star of the show was, of course, the Honeycrisp apples. I still taste the moment when I first bit into that salad. It was a delightful explosion of sweetness from the grapes, the subtle nutty warmth of pecans, and a creamy dressing that tied it all together beautifully. As we gathered around the table, our laughter mingled with the sounds of clinking forks and satisfying mmm’s. It felt like more than just a dish; it was a moment of pure joy.
My grandmother always said that cooking is a way to show love, and I carry that wisdom into my kitchen today. Get ready, because I’m about to give you the secrets to the ultimate apple salad — one that will surely become a cherished tradition in your home just like it has in mine.
Ingredients
Here’s what you’ll need to create this delightful apple salad:
-
4 large Honeycrisp apples, cubed
Why Honeycrisp? They’re sweet, juicy, and have that perfect crispness, making them a top choice for salads. If you can’t find them, Fuji or Gala apples work beautifully too! -
1 lemon, juiced
Fresh lemon juice not only brightens the flavors but also prevents the apples from browning. You can substitute with lime juice for a zesty twist! -
⅓ cup mayonnaise
Creamy and rich, mayonnaise is the heart of the dressing. For a lighter option, Greek yogurt is a fantastic substitute that adds a tangy flavor. -
1 ½ tablespoons brown sugar
This adds a touch of sweetness to balance the tartness of the apples and lemon. Feel free to adjust the sweetness to your taste, or use honey instead! -
2 ribs celery, thinly sliced
Celery introduces that wonderful crunch to the salad. If you’re not a fan, try using chopped green apples for an extra tart kick. -
1 cup seedless red grapes, halved
These juicy gems add sweetness and a burst of flavor. You could substitute with other berries like blueberries or strawberries for a vibrant twist! -
½ cup chopped pecans
Nuts bring some richness and texture. If you prefer, walnuts or almonds can be a great alternative. -
½ cup dried cranberries
Cranberries offer a lovely chewy texture and a tart contrast to the sweet apple. Raisins work as a good substitute if cranberries are hard to find!
Step-by-Step Instructions
Step 1: Prepare Your Apples
Start by washing your Honeycrisp apples thoroughly — we want every bit of that crispness to shine! Cube them into bite-sized pieces. As you cut the apples, don’t forget to squirt them generously with fresh lemon juice. This keeps them looking fresh and prevents browning. You can even toss them lightly as you cut to ensure a consistent coating.
Step 2: Mix the Dressing
In a large mixing bowl, whisk together the mayonnaise, brown sugar, and the remaining lemon juice. Aliasing the brown sugar with the mayo creates a creamy, luscious dressing that clings to all those apple pieces. Taste it — don’t be afraid to adjust the sweetness according to your preference!
Step 3: Combine and Toss
Add the cubed apples, sliced celery, halved grapes, chopped pecans, and dried cranberries into the bowl of dressing. Using a gentle folding motion, mix everything together, ensuring each apple piece is well-coated in the dressing. This is where the magic happens! You’ll start to see the colors mingle — bright greens, reds, and creamy whites popping against each other.
Step 4: Chill in the Fridge
Cover your mixing bowl with plastic wrap or a lid and refrigerate the salad for at least 30 minutes. Chilling allows the flavors to meld beautifully while adding that refreshing, crisp texture — it becomes an enchanting medley of tastes once cooled.
Step 5: Serve and Enjoy
When you’re ready to serve, give the salad a gentle toss to refresh everything. I like to present it in a beautiful bowl garnished with a few extra pecans and cranberries sprinkled on top for visual appeal. Trust me; a little extra love in presentation goes a long way!
Serving Suggestions
For serving, consider placing the apple salad on the table in a beautiful, wide bowl, allowing everyone to serve themselves. Pair it with crusty bread or even as a side to roasted chicken or grilled sandwiches. You could even serve it in individual cups as a refreshing starter for a dinner party — presentation always adds that elegant touch!
Recipe Variations
-
Vegan Twist: For a plant-based version, swap out the mayonnaise for a vegan mayo or cashew cream. This adds creaminess without the eggs!
-
Spicy Kick: Add a teaspoon of Dijon mustard into the dressing for a spicy tang that enhances the flavor profile wonderfully!
-
Herb Infusion: Experiment with adding some freshly chopped mint or basil to the salad. It adds an unexpected herbal freshness that’s simply delightful.
-
Cheesy Addition: Crumbled feta or goat cheese sprinkled on top can introduce a creamy, salty element that pairs beautifully with the sweetness of the apples.
-
Nut-Free Option: If you or your guests are nut-sensitive, feel free to omit the nuts entirely or swap in toasted sunflower seeds for that delightful crunch without the allergens.
Chef’s Notes
This apple salad has a special place in my heart because it embodies so many childhood memories spent in the kitchen with my family. Over the years, I’ve played with the ingredients and learned what works and what doesn’t. One time, I mistakenly used spoiled mayo, and the whole dish went sideways! But that mishap sparked my creativity, and from that day on, I used fresh yogurt as an option, which turned out to be a hit.
Cooking is about experimentation and connecting with those around us. Each time I prepare this dish, I think of how my family would gather around the table, whether for special occasions or a casual weekday dinner. It brings warmth, laughter, and love into my home, which is what I hope for you.
FAQs and Troubleshooting
1. My apples turned brown too quickly; how do I prevent this?
Don’t be shy with the lemon juice! It not only adds flavor but also creates a barrier on the apple surface that prevents browning. If you’re prepping in advance, keep the salad chilled until you’re ready to serve.
2. What can I do if my dressing is too thick?
If you find your mayonnaise dressing too thick, just add a bit of water or additional lemon juice to thin it out. Stir until you reach your desired consistency.
3. Can I make this salad ahead of time?
Absolutely! This salad can be prepared up to 24 hours in advance. Just remember to keep it refrigerated, and give it a light toss before serving.
4. How do I ensure that the salad stays crunchy?
Serve it immediately after mixing to enjoy a crunchy texture, and avoid letting it sit for too long after dressing. If you’re making it ahead, you can keep the dressing separate and mix just before serving.
Nutritional Info
While I love to indulge in my recipes, I’m also conscious of balanced meals. This apple salad packs a punch with vitamins, fiber, and healthy fats, making it a nutrient-rich side. Each serving can contain approximately:
- Calories: 200
- Protein: 2g
- Carbohydrates: 28g
- Fat: 10g
Remember, nutrition can vary based on specific ingredient brands and quantities used, so feel free to adjust to your dietary needs!
Today we’ve crafted something extraordinary together—an apple salad that not only satisfies your palate but also your heart. I hope it finds a cherished place in your kitchen rituals and brings your loved ones together around the table. Happy cooking, friends! Let’s create those delicious moments; you’ve got this!
PrintThe Ultimate Apple Salad
A crisp and refreshing apple salad combining the flavors of Honeycrisp apples, tangy lemon, and crunchy pecans, perfect for any occasion.
- Prep Time: 15 minutes
- Cook Time: 0 minutes
- Total Time: 30 minutes
- Yield: 4 servings 1x
- Category: Salad
- Method: No-Cook
- Cuisine: American
- Diet: Vegetarian
Ingredients
- 4 large Honeycrisp apples, cubed
- 1 lemon, juiced
- ⅓ cup mayonnaise
- 1 ½ tablespoons brown sugar
- 2 ribs celery, thinly sliced
- 1 cup seedless red grapes, halved
- ½ cup chopped pecans
- ½ cup dried cranberries
Instructions
- Prepare your apples by washing them thoroughly and cubing them into bite-sized pieces. Toss with lemon juice to prevent browning.
- Mix the dressing by whisking together mayonnaise, brown sugar, and remaining lemon juice in a large bowl.
- Combine the cubed apples, sliced celery, halved grapes, chopped pecans, and dried cranberries in the bowl with the dressing, and gently mix.
- Chill the salad in the fridge for at least 30 minutes to allow the flavors to meld.
- Serve and enjoy, garnished with extra pecans and cranberries if desired.
Notes
Feel free to adjust the sweetness of the dressing to your taste. This salad can be made ahead of time and stored in the refrigerator.
Nutrition
- Serving Size: 1 serving
- Calories: 200
- Sugar: 16g
- Sodium: 150mg
- Fat: 10g
- Saturated Fat: 1g
- Unsaturated Fat: 9g
- Trans Fat: 0g
- Carbohydrates: 28g
- Fiber: 3g
- Protein: 2g
- Cholesterol: 5mg
Keywords: apple salad, refreshing salad, fall recipes, healthy recipes, Thanksgiving salad