
Vegan Mango Bread: One-Bowl, 30-Minute Breakfast Bake
Vegan Mango Bread: A Sweet Slice of Paradise
Hello, fellow food enthusiasts! If you’ve ever enjoyed the glorious, sun-kissed sweetness of a ripe mango, you’ll absolutely love this Vegan Mango Bread. Today, I’m thrilled to share with you a brilliant recipe that merges the delightful flavors of mango with the warmth of homemade bread. Whether you enjoy it for breakfast, as a snack, or as a comforting dessert, this lush loaf is sure to impress.
Why Mango Bread?
I’ll tell you why mango bread has a special place in my heart. Growing up, my grandmother had a mango tree in her backyard—it was like having our own little tropical paradise. Every summer, we would gather as a family under that tree, picking ripe, juicy mangoes and savoring the juicy goodness right there. The smell of sweet mangoes would fill the air, mingling with laughter and the sound of stories being shared. It was pure magic.
One hot afternoon, my grandmother surprised us with mango bread made from freshly picked mangoes. As the loaf baked, that familiar fruity aroma enveloped our home, drawing us all to the kitchen like moths to a flame. We took our first bites, and it was an explosion of flavor! The sweetness of the mangoes combined with warm spices and a tender crumb made it unforgettable. I still remember those sunny afternoons, and that’s why I created my vegan version of this beloved classic.
This Vegan Mango Bread recipe is light, fluffy, and has just the right touch of sweetness from the mango. Plus, the punch of cardamom will transport you straight to a sunny day, enjoying the warmth surrounded by love. Let’s dive into the ingredients!
Ingredients
Here’s what you’ll need for this luscious loaf:
-
2 cups flour
(I used unbleached all-purpose flour, but whole wheat flour also works well for a heartier texture. For a gluten-free option, look for a 1:1 gluten-free flour blend.) -
1 tsp baking powder
(This helps the bread rise to fluffy perfection. Always check the expiration date to ensure freshness!) -
1 tsp baking soda
(Works together with the baking powder to create lift in the bread.) -
1/4 tsp salt
(A little pinch of salt enhances the flavors and balances the sweetness of the mango.) -
1 tbsp corn starch
(This is our secret ingredient for a tender crumb. If you don’t have corn starch, you can replace it with an equal amount of arrowroot powder.) -
3/4 cup sugar
(I prefer organic cane sugar for its subtle flavor. You can swap it with coconut sugar for a deeper, caramel-like taste, or use a sugar substitute for a lower-calorie option.) -
2 tsp ground cardamom
(A warm and aromatic spice that adds a lovely depth. If you’re not a cardamom fan, try cinnamon or nutmeg instead!) -
1/4 cup avocado oil
(A neutral oil that adds moisture to our loaf. Other vegetable oils, like canola or grapeseed oil, would work fine.) -
2 cups mango puree
(You can use canned puree or make your own from fresh mangoes. If you’re using fresh mangoes, peel them, chop them up, and blend until smooth. Choose ripe mangoes for maximum sweetness!)
With these simple yet powerful ingredients, we’re about to create something truly special. Let’s get cooking!
Step-by-Step Instructions
-
Preheat Your Oven:
Preheat your oven to 350°F (175°C). This is where the magic happens, so make sure to get it nice and cozy! -
Mix Dry Ingredients:
In a large mixing bowl, whisk together the flour, baking powder, baking soda, salt, corn starch, sugar, and ground cardamom. This dry mix is where all the wonderful flavors develop. Make sure there are no lumps in the mixture! -
Combine Wet Ingredients:
In another bowl, mix together the avocado oil and the mango puree until smooth. This is YOUR time to shine—this mixture will create a luscious moist loaf that is bound to be delightful. -
Blend It Together:
Pour the wet mixture into the dry ingredients and gently fold until just combined. Overmixing will lead to a dense loaf, and we want a light and airy texture! It’s okay if there are a few lumps—embrace the imperfect beauty of homemade goodness! -
Prep the Pan:
Grease a 9×5-inch loaf pan with a little avocado oil or line it with parchment paper for easy removal. Your neighbors will thank you when the heavenly scent wafts through the air—everyone loves a generous loaf of mango bread! -
Pour and Smooth:
Transfer your batter into the prepared loaf pan. Use a spatula to smooth out the top. This is also a great moment to channel your inner artist—perhaps sprinkle a touch more cardamom on top for an elegant finish! -
Bake to Perfection:
Bake for 50-60 minutes or until a toothpick inserted into the center comes out clean. The kitchen aroma will be heavenly, and trust me—waiting will be the hardest part! -
Cool Down:
Once baked, remove the loaf from the oven, and let it cool in the pan for about 10 minutes. Then, carefully transfer it to a wire rack to cool completely. This step is crucial for allowing that signature fluffy texture to settle in. -
Slice it Up:
Once cooled, slice yourself a generous piece and enjoy it fresh. The smell alone is enough to need no further encouragement!
Serving Suggestions
For a beautiful presentation, serve your Vegan Mango Bread on a rustic wooden board. You can drizzle a bit of agave or maple syrup on top and sprinkle some toasted coconut flakes or crushed nuts (like almonds or pistachios) for an extra touch. How about pairing a slice with a dollop of coconut whip or plant-based butter? It’s an ideal winter treat or a summer delight!
Recipe Variations
-
Coconut Mango Bread:
Add shredded coconut to the batter for a tropical twist. -
Nutty Delight:
Fold in chopped walnuts or pecans for added crunch and flavor. -
Mango Chocolate Chip:
A handful of dairy-free chocolate chips makes for a decadent touch. -
Zesty Lime:
Add zest from one lime to the batter for a refreshing citrus kick. -
Spicy Kick:
A pinch of cayenne pepper offers a great contrast to the sweetness of the mango!
Chef’s Notes
You know, every time I make this bread, it brings back memories of those sweltering afternoons spent in the backyard with my grandma. I can still hear her laughter and feel the warmth of the sun on my back. When I first tried to recreate that mango bread, I struggled—like many of us do in the kitchen—but each attempt brought me closer to the magic of those childhood days. We all have our kitchen blunders, don’t we? The trick is to embrace them, and you’ll surely end up perfecting your own lovely version of this recipe.
FAQs and Troubleshooting
1. What if my mango puree isn’t sweet enough?
If you find your mangoes aren’t super sweet, you can add more sugar to the batter or mix in a touch of maple syrup for sweetness.
2. Can I use frozen mangoes?
Absolutely! Just ensure they’re thawed and well-drained before blending into puree.
3. Why is my bread dense?
This can happen if you overmix the batter or if your leavening agents (baking powder and baking soda) are old. Make sure they’re fresh, and mix until just combined.
4. How do I store leftover mango bread?
Wrap it tightly in plastic wrap or aluminum foil and store it at room temperature for 2-3 days, or refrigerate it for up to a week. You can also freeze slices for later enjoyment!
Nutritional Info
Note: Nutritional information may vary based on specific ingredients used and portion sizes.
- Calories: Approximately 200 per slice
- Protein: 2g
- Carbohydrates: 30g
- Fat: 8g
- Fiber: 1g
And there you have it, a delightful recipe for Vegan Mango Bread that’s sure to bring a smile to your face and warmth to your table. I hope you enjoy making this sweet treat as much as I do! Remember, cooking is all about love, joy, and a sprinkle of creativity. Tie on that apron, and let’s see what magic you create in your kitchen! Enjoy! 🍞✨
PrintVegan Mango Bread

A delightful and light Vegan Mango Bread that merges the sweetness of mango with warm spices, perfect for any time of the day.
- Prep Time: 15 minutes
- Cook Time: 60 minutes
- Total Time: 75 minutes
- Yield: 10 servings 1x
- Category: Dessert
- Method: Baking
- Cuisine: Vegan
- Diet: Vegan
Ingredients
- 2 cups flour (unbleached all-purpose or whole wheat)
- 1 tsp baking powder
- 1 tsp baking soda
- 1/4 tsp salt
- 1 tbsp corn starch
- 3/4 cup sugar
- 2 tsp ground cardamom
- 1/4 cup avocado oil
- 2 cups mango puree
Instructions
- Preheat your oven to 350°F (175°C).
- Mix together the flour, baking powder, baking soda, salt, corn starch, sugar, and ground cardamom in a large mixing bowl.
- Combine the avocado oil and mango puree in another bowl until smooth.
- Blend the wet mixture into the dry ingredients and gently fold until just combined.
- Prep a 9×5-inch loaf pan by greasing it with avocado oil or lining it with parchment paper.
- Pour the batter into the prepared loaf pan and smooth the top with a spatula.
- Bake for 50-60 minutes or until a toothpick inserted into the center comes out clean.
- Cool the loaf in the pan for about 10 minutes before transferring it to a wire rack to cool completely.
- Slice the cooled loaf and enjoy fresh.
Notes
For added flavor, consider variations like coconut mango bread or mango chocolate chip.
Nutrition
- Serving Size: 1 slice
- Calories: 200
- Sugar: 10g
- Sodium: 150mg
- Fat: 8g
- Saturated Fat: 1g
- Unsaturated Fat: 7g
- Trans Fat: 0g
- Carbohydrates: 30g
- Fiber: 1g
- Protein: 2g
- Cholesterol: 0mg
Keywords: Vegan, Mango, Bread, Dessert, Healthy
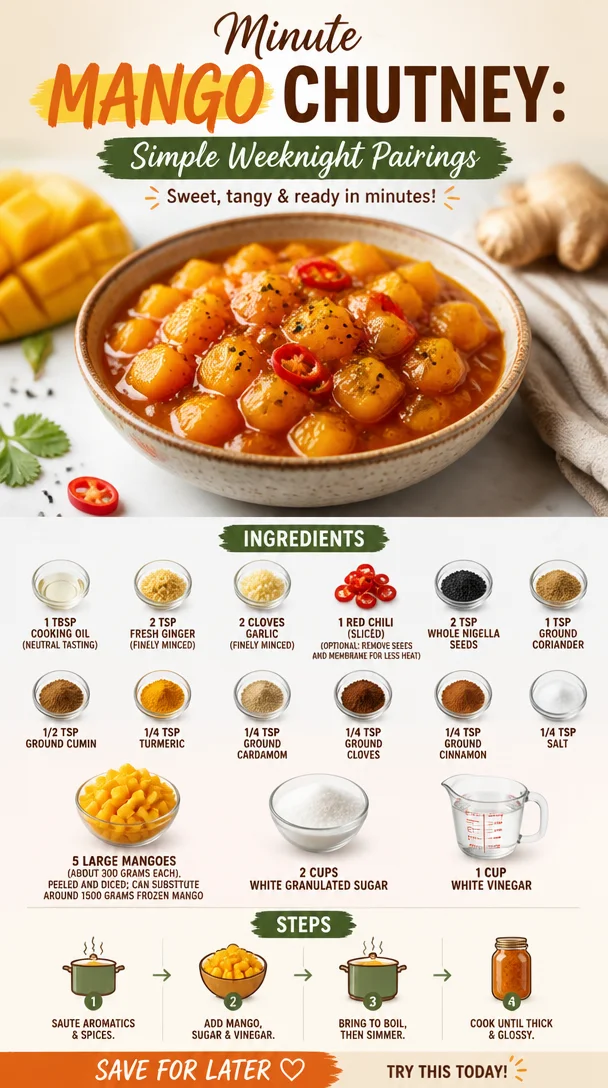
Minute Mango Chutney: Simple Weeknight Pairings
The Best Mango Chutney: A Flavorful Companion for Every Table
Welcome back to Ivory Apron, food lovers! Today, we’re diving into the colorful and aromatic world of Mango Chutney. This delightful condiment is not just a burst of flavor; it’s a bridge between cultures, a celebration of fresh ingredients, and a way to spice up your everyday meals. Whether you’re slathering it on grilled meats or using it to brighten up a simple cheese platter, mango chutney is the sticky-sweet nectar that adds a splash of personality to your dishes.
As you prepare to embark on this culinary adventure, I want you to know that this is more than just a recipe; it’s a chance to gather your loved ones and create beautiful moments around your table. So, let’s roll up our sleeves, tie on our aprons, and get ready to make the best mango chutney you’ll ever taste!
A Personal Story
Ah, mangoes! They hold a special place in my heart. Growing up, my grandmother had a mango tree that seemed to bear fruit all summer long. I remember spending lazy afternoons under that tree, the air thick with sweet, tropical scents. Grandpa would climb up to pluck the ripe mangoes, handing them down to us with a grin. Some would end up in our bellies, while others would be transformed into her famous chutney.
The kitchen was a symphony of sounds: the rhythmic chopping of mangoes, the sizzling of spices, and the occasional giggle as we tasted and adjusted flavors. That chutney was a staple at every family gathering, the perfect accompaniment to curries and grilled meats. As I learned to replicate her recipe, I treasured every bite of nostalgia. Now, it’s time to share that joy with you!
Ingredients
Here’s everything you’ll need to create this vibrant and delicious mango chutney:
-
1 tablespoon cooking oil (neutral-tasting): A light oil like canola or sunflower allows the spices to shine without overwhelming the other flavors.
-
2 teaspoons fresh ginger (finely minced): Ginger adds a warm heat and lots of depth. If you don’t have fresh, you can use ground ginger, but it won’t have the same freshness.
-
2 cloves garlic (finely minced): Garlic brings a savory richness that complements the sweetness of the mango.
-
1 red chili (sliced): For those who crave a bit of spice! Removing the seeds and membrane will tone down the heat, making it milder.
-
2 teaspoons whole nigella seeds: These little black seeds add a unique, slightly onion-like flavor. If you can’t find them, cumin seeds will make a good substitute.
-
1 teaspoon ground coriander: Adds herbal undertones. Ground cumin can replace this if you’re out.
-
1/2 teaspoon ground cumin: Earthy and warm, it pairs perfectly with the sweetness of mango.
-
1/4 teaspoon turmeric: Adds beautiful color and a hint of bitterness, balancing out the sweetness.
-
1/4 teaspoon ground cardamom: This fragrant spice will elevate your mango chutney with a touch of elegance.
-
1/4 teaspoon ground cloves: Strong in flavor, so a little goes a long way here.
-
1/4 teaspoon ground cinnamon: Sweet and warm—this is what gives your chutney that cozy, comforting essence.
-
1/4 teaspoon salt: Don’t skip this; it’ll enhance all those beautiful flavors!
-
5 large mangoes (about 300 grams each, peeled and diced): Ripe, juicy mangoes are the star of this show! If fresh mangoes are out of season, feel free to substitute them with around 1500 grams of frozen mango.
-
2 cups white granulated sugar: This balances the tanginess and adds the classic chutney sweetness. Brown sugar can also work if you want a deeper flavor.
-
1 cup white vinegar: Provides the necessary acidity to balance the sweetness and acts as a preserving agent—essential for keeping your chutney fresh.
Step-by-Step Instructions
Now let’s get cooking! Here’s how to make this mouthwatering mango chutney:
-
Prep Your Ingredients:
Start by gathering all your ingredients. Dice the mangoes and set them aside. Mince your ginger and garlic, and slice your red chili (remember to remove seeds for less heat!). -
Heat the Oil:
In a large saucepan, heat 1 tablespoon of cooking oil over medium heat. You’ll want that oil just hot enough to sizzle when you add your ginger and garlic. -
Sauté the Aromatics:
Once the oil is hot, throw in the minced ginger and garlic. Sauté them for about 1-2 minutes until fragrant. Keep an eye on them; you want them golden, not burnt! -
Add the Spices:
Toss in the red chili, nigella seeds, ground coriander, cumin, turmeric, cardamom, cloves, cinnamon, and salt. Stir everything together for about 30 seconds. This step blooms the spices, releasing their natural oils and enhancing their flavors. -
Incorporate the Mangoes:
Now, it’s time to add your diced mangoes to the pan. Stir gently to coat the mango pieces with the spice mixture. Allow them to cook for about 5 minutes on medium heat until they start to break down. -
Sweeten the Pot:
Pour in the sugar and vinegar. Stir until the sugar has completely dissolved, and the mixture becomes syrupy. Let this cook for another 15-20 minutes on low heat. Stir occasionally to prevent sticking while watching the mangoes transform into a tantalizing chutney. -
Check Your Consistency:
After about 20 minutes, you want your chutney to be thick and glossy. If it’s not there yet, simmer for a few extra minutes, stirring gently. -
Cool and Store:
Once your chutney has reached the desired consistency, remove it from the heat and let it cool. Transfer to a clean, sterilized jar. It will keep well in the fridge for up to a month (although I doubt it’ll last that long!).
Serving Suggestions
Mango chutney is incredibly versatile! Serve it alongside grilled chicken or fish for a tropical twist, or pair it with cheese and charcuterie for a vibrant appetizer spread. A dollop on top of a savory curry can elevate it to new heights. If you have leftovers, try mixing some chutney into a yogurt dip for a refreshing sidekick!
Recipe Variations
-
Spicy Mango Chutney: If you like it hot, be brave! Add a few more red chilies or include a splash of hot sauce for an extra kick.
-
Herbed Chutney: Stir in fresh herbs like cilantro or mint after cooking to add a refreshing element.
-
Peach-Mango Fusion: Swap out half the mangoes for peaches when they’re in season. It makes for a fantastic summer chutney!
-
Apple-Mango Chutney: Try adding diced apples for a crunchy texture and a hint of tartness.
-
Curry-Infused Chutney: Add a teaspoon of curry powder to the spice mix for a unique twist that amplifies the flavors.
Chef’s Notes
You know, every time I whip up a batch of this mango chutney, I can’t help but think of that sunny summer day under my grandmother’s tree. Each preparation feels like a step back in time—a playful mix of nostalgia and innovation. Over the years, I’ve experimented with different spices and fruit combinations, and it has been a thrilling journey.
One funny mishap happened when I accidentally over-sweetened a batch while trying to use up leftover holiday sugar. A quick pinch of salt and a dash of vinegar transformed my gooey mess into a sweet-and-savory masterpiece—sometimes our kitchen “oops” can lead to delightful surprises!
FAQs and Troubleshooting
-
Why is my chutney too sweet?
If your chutney tastes overly sweet, add a splash more vinegar to balance it out. Remember, a little salt can also enhance the flavors. -
Can I use frozen mangoes?
Absolutely! Frozen mango works great, but make sure to let them thaw a bit and drain any excess liquid before cooking. -
How thick should the chutney be?
The chutney will thicken as it cools. Ideally, it should be thick enough to dollop on a plate but still somewhat pourable. -
How should I store the chutney?
Store your chutney in a clean, airtight jar in the refrigerator. It can last for up to a month, but trust me, it won’t last long with how delicious it is!
Nutritional Info
While I believe in enjoying food without guilt, it’s always handy to know what you’re serving. Here’s a simple breakdown per tablespoon of chutney:
- Calories: 70 kcal
- Fat: 0.5g
- Carbohydrates: 17g
- Sugar: 14g
- Fiber: 1g
So there you have it! A lush, delectable mango chutney that’s bound to bring joy to your gatherings and family dinners. This recipe is not just about feeding the stomach; it’s about nourishing the soul and creating memories that will last long after the meal is finished. Until next time, happy cooking, and may your table be filled with love and laughter!
Let’s keep those aprons tied on tight while we create and celebrate together!
PrintThe Best Mango Chutney
A vibrant and flavorful mango chutney that adds a splash of personality to any dish.
- Prep Time: 15 minutes
- Cook Time: 45 minutes
- Total Time: 60 minutes
- Yield: 10 servings 1x
- Category: Condiment
- Method: Cooking
- Cuisine: Indian
- Diet: Vegetarian
Ingredients
- 1 tablespoon cooking oil (neutral-tasting)
- 2 teaspoons fresh ginger (finely minced)
- 2 cloves garlic (finely minced)
- 1 red chili (sliced)
- 2 teaspoons whole nigella seeds
- 1 teaspoon ground coriander
- 1/2 teaspoon ground cumin
- 1/4 teaspoon turmeric
- 1/4 teaspoon ground cardamom
- 1/4 teaspoon ground cloves
- 1/4 teaspoon ground cinnamon
- 1/4 teaspoon salt
- 5 large mangoes (about 300 grams each, peeled and diced)
- 2 cups white granulated sugar
- 1 cup white vinegar
Instructions
- Prep Your Ingredients: Gather all your ingredients. Dice the mangoes and set them aside. Mince your ginger and garlic, and slice your red chili (remove seeds for less heat).
- Heat the Oil: In a large saucepan, heat 1 tablespoon of cooking oil over medium heat until sizzles when you add ginger and garlic.
- Sauté the Aromatics: Add minced ginger and garlic, sauté for 1-2 minutes until fragrant.
- Add the Spices: Toss in red chili, nigella seeds, ground coriander, cumin, turmeric, cardamom, cloves, cinnamon, and salt. Stir for 30 seconds to bloom the spices.
- Incorporate the Mangoes: Add diced mangoes and stir to coat with the spices. Cook for about 5 minutes on medium heat until they start to break down.
- Sweeten the Pot: Pour in sugar and vinegar, stir until sugar dissolves, then cook for another 15-20 minutes on low heat until syrupy.
- Check Your Consistency: Ensure chutney is thick and glossy, simmering longer if needed.
- Cool and Store: Once thickened, remove from heat, let cool, and store in a sterilized jar in the fridge for up to a month.
Notes
Consider adding fresh herbs or spices for variations. Store in a clean, airtight jar for freshness.
Nutrition
- Serving Size: 1 tablespoon
- Calories: 70
- Sugar: 14g
- Sodium: 240mg
- Fat: 0.5g
- Saturated Fat: 0g
- Unsaturated Fat: 0.5g
- Trans Fat: 0g
- Carbohydrates: 17g
- Fiber: 1g
- Protein: 0g
- Cholesterol: 0mg
Keywords: mango chutney, condiment, sweet and spicy, Indian recipes, mango recipes

Prosciutto and Burrata Pizza
Elevate Your Weeknight Dinner with Prosciutto and Burrata Pizza
Hello and welcome, my fellow food enthusiasts! Today, I’m thrilled to take you on a delectable journey into the world of homemade pizza. We’re diving into a delicious creation that combines the luxurious flavors of prosciutto and burrata cheese—with a twist that will elevate your weeknight dinner to something spectacular. Let’s roll up those sleeves and get cooking because nothing brings people together quite like a slice of pizza topped with love and creativity!
When I think of pizza, I think of cozy weekends spent with friends, the smell of dough rising in the kitchen, and those glorious moments when your family gathers around the kitchen table, eagerly awaiting their first slice. It’s where culinary art meets memories that linger long after the last bite has been taken.
So, let’s talk about this Prosciutto and Burrata Pizza, a dish that not only tantalizes the taste buds but also tells a story. One of my fondest memories of pizza dates back to my college days. One evening, my friends and I decided to host a little pizza night challenge. Each of us had to create our own version of pizza with whatever ingredients we could find in the pantry. I went for a rich, creamy burrata and savory prosciutto combination, and let me tell you, it was an absolute hit! That evening led to laughter, spontaneous dance parties in the kitchen, and maybe a little food fight—memories to cherish forever. Now, every time I make this pizza, I’m reminded of the joy and camaraderie that cooking can bring.
Alright, let’s get to work on our delicious dish!
Ingredients
To create this delightful Prosciutto and Burrata Pizza, gather the following ingredients:
-
2 cups all-purpose flour
- This is your base for the pizza dough. You can substitute with whole wheat flour for a nuttier flavor or gluten-free flour to fit dietary needs.
-
1 packet active dry yeast (2 ¼ teaspoons)
- This little packet is what makes the dough rise and obtain that perfect chewy texture. If you’re out of yeast, you can try using baking powder, but the texture will be different.
-
1 teaspoon sugar
- A dash of sweetness helps activate the yeast and boosts flavor. Brown sugar offers a deeper flavor profile if you’re feeling adventurous!
-
1 teaspoon salt
- Essential for flavoring your dough. Without it, your pizza can taste a bit bland. Use sea salt or kosher salt for a gourmet touch.
-
3/4 cup warm water
- This is crucial for dissolving the yeast. The water should be warm but not hot—think baby bath warm. Too hot will kill the yeast!
-
2 tablespoons olive oil
- Adds richness to the dough and helps achieve that crispy crust. Extra virgin olive oil is always a beautiful choice here.
-
4 oz prosciutto, sliced
- This salty, savory delight adds depth to your pizza. You can substitute it with crispy bacon or even smoked salmon for a playful twist.
-
8 oz burrata cheese
- The star of our show! This creamy cheese adds a luxurious feel to the dish. If burrata isn’t available, fresh mozzarella will do the trick.
-
2 cups arugula
- This peppery green adds a fresh bite. Spinach could be a milder alternative, but arugula’s distinct flavor makes it special.
-
1 tablespoon honey
- A drizzle at the end adds a lovely sweetness that contrasts beautifully with the salty prosciutto. Maple syrup could work if you’re out of honey.
-
Black pepper to taste
- This is just the finishing touch to enhance all those flavors. Feel free to add a pinch of chili flakes if you enjoy a little heat!
Step-by-Step Instructions
Now that we have our ingredients, it’s time to get cooking! Follow these steps to create your Prosciutto and Burrata Pizza:
-
Activate the Yeast: In a small bowl, combine the warm water, sugar, and yeast. Let it sit for about 5-10 minutes until it’s foamy and bubbly. This is the yeast doing its thing—don’t skip this part!
-
Make the Dough: In a large bowl, whisk together the flour and salt. Make a well in the center and pour in the yeast mixture along with the olive oil. Using your hands or a wooden spoon, mix until a shaggy dough forms. If it’s too sticky, add a little more flour, one tablespoon at a time.
-
Knead the Dough: On a floured surface, turn out the dough and knead it for about 5-7 minutes until it’s smooth and elastic. Think of this as your mini workout, and trust me, your dough will thank you! If it’s too sticky, don’t be afraid to sprinkle flour on your hands or your work surface.
-
Let it Rise: Place the kneaded dough into a lightly greased bowl, cover it with a clean kitchen towel, and let it rise in a warm spot for about 1 hour, or until it’s doubled in size. I recommend placing it in the oven (turned off) with the light on to create a cozy environment.
-
Preheat the Oven: About 20 minutes before the dough is done rising, preheat your oven to 475°F (245°C) with a pizza stone or baking sheet inside. This ensures a crispy bottom crust when baking.
-
Roll out the Dough: Once the dough has risen, punch it down and turn it out onto a floured surface. Roll it out to your desired thickness—thinner for a crispy base, thicker for a chewier crust. You can also shape it into a rectangle if using a baking sheet!
-
Assemble Your Pizza: Transfer your rolled-out dough onto parchment paper (if you’re not using a pizza stone). Now, lay on the prosciutto slices evenly, followed by chunks of creamy burrata. If you haven’t already, tear the burrata open to expose that lovely creamy center.
-
Bake the Pizza: Carefully slide your assembled pizza onto the preheated stone or baking sheet in the oven. Bake for about 10-12 minutes or until the edges are golden brown and the cheese is melting gloriously.
-
Finish with Arugula and Honey: Once the pizza is out of the oven, immediately top with fresh arugula, drizzle with honey, and season with fresh black pepper. Don’t be shy with that pepper; it truly elevates the dish!
Serving Suggestions
To serve your Prosciutto and Burrata Pizza, slice it into generous pieces and plate it on a rustic wooden board or a simple white platter. The contrast of the creamy burrata and vibrant arugula makes for a stunning presentation. You could even garnish with some extra black pepper and a sprinkle of fresh herbs like basil or microgreens for that finished touch.
Recipe Variations
-
Vegan Twist: Swap the burrata with cashew cheese or a vegan cream cheese alternative and omit the prosciutto. Add roasted veggies for a delightful plant-based pizza.
-
Spicy Kick: Add sliced jalapeños or a drizzle of chili oil before baking for an extra kick of heat.
-
Herbed Crust: Mix in dried herbs like oregano or thyme into your flour before kneading the dough for an aromatic crust.
-
Mediterranean Style: Top your pizza with cherry tomatoes, olives, and a sprinkle of feta for a fresh Mediterranean flair.
-
Pesto Base: Instead of tomato sauce, spread a layer of pesto on the dough before adding the toppings for a flavor explosion!
Chef’s Notes
This Prosciutto and Burrata Pizza is one of my favorite go-to recipes for gatherings or a cozy night in because it strikes the right balance between casual and sophisticated. Over time, I’ve played with different toppings—like adding figs in the fall or roasted artichokes for springtime. The memories created in the kitchen while preparing this dish with friends and family remind me of the joy that food brings to our lives. Plus, it’s a fantastic conversation starter, sparking stories about where you found that perfect cheese or your favorite pizza experiences from travels abroad.
FAQs and Troubleshooting
-
What if my dough doesn’t rise?
- If your dough isn’t rising, first check the freshness of your yeast. If it’s too old, it won’t activate. The water temperature needs to be warm (not hot!) to activate the yeast successfully.
-
How do I get a crispy crust?
- Make sure your oven is fully preheated, and your baking surface is hot before sliding in the pizza. Bake it at a high temperature, and avoid adding too much liquid to the toppings, as that could make the crust soggy.
-
Can I prepare the dough in advance?
- Absolutely! You can make the dough ahead of time and store it in the refrigerator for up to 24 hours. Just allow it to come to room temperature before rolling it out.
-
What if my burrata is too firm?
- Burrata should be soft and creamy at room temperature. If yours feels too firm, let it sit at room temperature for about 30 minutes before using to allow it to soften up.
Nutritional Information
(This will vary based on portion size and toppings used but here’s a rough estimate per slice)
- Calories: 250
- Total Fat: 12g
- Saturated Fat: 5g
- Carbohydrates: 30g
- Fiber: 1g
- Protein: 8g
That’s it, my friends! Whether you’re feeding friends, family, or simply treating yourself, this Prosciutto and Burrata Pizza will surely become a favorite in your household. So, tie on that apron, get into the kitchen, and let’s create some magic around the table together! Happy cooking!
PrintProsciutto and Burrata Pizza

A luxurious pizza featuring prosciutto and creamy burrata, perfect for elevating your weeknight dinners.
- Prep Time: 15 minutes
- Cook Time: 30 minutes
- Total Time: 45 minutes
- Yield: 4 servings 1x
- Category: Main Course
- Method: Baking
- Cuisine: Italian
- Diet: Vegetarian
Ingredients
- 2 cups all-purpose flour
- 1 packet active dry yeast (2 ¼ teaspoons)
- 1 teaspoon sugar
- 1 teaspoon salt
- 3/4 cup warm water
- 2 tablespoons olive oil
- 4 oz prosciutto, sliced
- 8 oz burrata cheese
- 2 cups arugula
- 1 tablespoon honey
- Black pepper to taste
Instructions
- Activate the yeast: In a small bowl, combine the warm water, sugar, and yeast. Let it sit for about 5-10 minutes until it’s foamy and bubbly.
- Make the dough: In a large bowl, whisk together the flour and salt. Make a well in the center and pour in the yeast mixture along with the olive oil.
- Mix until a shaggy dough forms. If it’s too sticky, add a little more flour, one tablespoon at a time.
- Knead the dough: On a floured surface, turn out the dough and knead it for about 5-7 minutes until it’s smooth and elastic.
- Let it rise: Place the kneaded dough into a lightly greased bowl, cover with a towel, and let it rise for about 1 hour, or until doubled in size.
- Preheat the oven: About 20 minutes before the dough is done rising, preheat your oven to 475°F (245°C).
- Roll out the dough: Once risen, punch it down and roll it out to your desired thickness.
- Assemble your pizza: Lay on the prosciutto slices evenly followed by chunks of burrata.
- Bake the pizza: Carefully slide your pizza onto the preheated stone or baking sheet and bake for about 10-12 minutes.
- Finish with arugula and honey: After baking, top with fresh arugula, drizzle with honey, and season with black pepper.
Notes
For a vegan version, substitute burrata with cashew cheese and omit prosciutto. Add roasted veggies for extra flavor.
Nutrition
- Serving Size: 1 slice
- Calories: 250
- Sugar: 2g
- Sodium: 800mg
- Fat: 12g
- Saturated Fat: 5g
- Unsaturated Fat: 7g
- Trans Fat: 0g
- Carbohydrates: 30g
- Fiber: 1g
- Protein: 8g
- Cholesterol: 25mg
Keywords: pizza, prosciutto, burrata, homemade pizza, weeknight dinner

Minute Blackberry Mojito: Fresh Summer Cocktail Recipe
The Ultimate Blackberry Mojito Recipe: A Refreshing Twist on a Classic
Hello lovelies! Welcome back to my culinary corner, where we’ll be crafting a delightful drink that’s perfect for any occasion—whether you’re lounging on the patio or hosting a spirited gathering. Today, we’re diving into the world of the Blackberry Mojito, a refreshing cocktail that not only dazzles the eyes but also tantalizes the taste buds.
The Sweetness of Nostalgia: A Fond Memory
Let me take you down memory lane for a moment. It was a balmy summer evening a few years ago, and a close friend of mine decided to throw an impromptu garden party. She had strung lights across the backyard, creating a cozy atmosphere that felt like magic. Between laughter and clinking glasses, she introduced me to her fabulous invention—a mojito made with fresh blackberries!
The combination was pure bliss. I remember savoring that zesty, minty drink while a slight breeze rustled the leaves around us. It was a moment of simple joy, and ever since, blackberries have held a special place in my heart (and my cocktail repertoire). Today, I’m thrilled to share my version of that unforgettable Blackberry Mojito with you!
Ingredients: Gather Your Flavorful Essentials
Let’s make sure you have everything you need for this delightful concoction. Here’s what you’ll require:
-
Fresh Blackberries: The stars of the show! Opt for ripe, sweet blackberries—they will lend their vibrant color and natural sweetness to the cocktail. If you’re in a pinch, you can also use frozen blackberries, but fresh is best for that luscious flavor.
-
Fresh Mint Leaves: Bright and aromatic, mint is essential for that refreshing mojito flavor. If you can’t find fresh mint, you could use mint extract (but only a drop or two!), though it won’t provide the same vibrant aroma.
-
Lime Juice: Freshly squeezed lime juice balances the sweetness of the blackberries perfectly. No bottled stuff here! If you’re out of limes, lemon juice is a good substitute, but it’ll change the flavor profile a bit.
-
White Rum: This smooth spirit is the base of our mojito. Light rum works best, but if you fancy something different, try a coconut-rum for a tropical twist or skip the alcohol for a virgin version!
-
Simple Syrup: To sweeten the deal, we’ll need simple syrup. You can make this by dissolving equal parts sugar and water or buy a pre-made version. If you’re looking to cut calories, honey or agave syrup can also do the trick!
-
Club Soda: To add a touch of effervescence, club soda is ideal. If you want extra flavor, swap it for lemon-lime soda or ginger beer for a spicy kick.
-
Ice: Fresh, cold ice will give our cocktail the refreshing chill it needs. For an added aesthetic, consider using crushed ice or even ice cubes with frozen berries inside!
Step-by-Step Instructions: Crafting Your Blackberry Mojito
Ready to shake up some delightful flavors? Let’s roll up our sleeves and get started!
-
Muddle the Ingredients: In a sturdy glass or cocktail shaker, combine about 6-8 fresh blackberries and a handful of mint leaves. Use a muddler or the back of a spoon to gently smash the blackberries and mint together. The goal here is to release the berries’ juices and the mint’s essential oils—don’t go overboard; we want the mint to remain fragrant, not shredded.
-
Add the Lime Juice: Squeeze in the juice of half a lime. If you absolutely love lime, feel free to juice a whole one for extra zing! Give everything another gentle muddle to mix it all together.
-
Pour in the Rum: Add 1.5 ounces of white rum to the muddled mixture. If you prefer a lighter cocktail, you can reduce this to 1 ounce.
-
Sweeten It Up: Add ½ ounce of simple syrup, or more to taste depending on how sweet you like your drinks. If you’re feeling adventurous, try adding a splash of flavored syrup like blackberry or vanilla!
-
Stir and Fill with Ice: Using a bar spoon or regular spoon, gently stir the cocktail to combine everything. Fill the glass with ice—crushed if you prefer a slushy texture, or cubed for a classic presentation.
-
Top It Off: Pour club soda over the ice until the glass is almost full. Give it a gentle stir to mingle the flavors.
-
Garnish and Enjoy: To make your cocktail pop, garnish with a few whole blackberries and a sprig of fresh mint. A lime wedge on the rim adds a nice touch too!
Voilà, your Blackberry Mojito is ready to be savored!
Serving Suggestions: How to Present This Gorgeous Cocktail
When serving your Blackberry Mojito, opt for a tall glass (a highball glass is perfect), and fill it generously with ice. Allow the beautiful colors to shine through. If you want to impress your guests, consider serving it with a colorful straw or a fun cocktail stirrer adorned with fruits or mint.
Pair this drink with fresh appetizers like goat cheese and fig crostinis or spicy shrimp tacos, and you have a perfect summer gathering!
Recipe Variations: Get Creative!
One of the best parts about cocktails is how versatile they are! Here are a few inspiring twists on the Blackberry Mojito:
-
Raspberry Blackberry Mojito: Swap out half of the blackberries for fresh raspberries for a berry duo delight.
-
Spicy Mojito: Add a few slices of fresh jalapeño to the muddling process for an unexpected kick!
-
Herbal Remix: Try swapping mint with basil or adding a few sprigs of rosemary for an earthy flavor profile.
-
Frozen Blackberry Mojito: Blend all of the ingredients with ice instead of serving it on the rocks for a slushy, refreshing drink.
-
Mojito Mocktail: Don’t drink alcohol? Simply omit the rum and add a bit more club soda for a delightful non-alcoholic refreshment!
Chef’s Notes: A Bit of Reflection
Ah, the Blackberry Mojito—a recipe that has become a staple in my summer gatherings! Over the years, I’ve played around with it endlessly, sometimes even incorporating different herbs depending on the season. I once served a Rosemary Blackberry Mojito at a spring soirée, and let me tell you, it was a game changer!
One of my funniest kitchen stories revolves around a friends’ gathering where someone mistakenly replaced the simple syrup with chili syrup thinking it was a fun twist. Let’s just say our laughter was as much from the burning sensation as it was from the crazy cocktail mix-up!
Learning from that, I always advise tasting your simple syrup first before adding it to your cocktails. That way, you avoid unexpected surprises!
FAQs and Troubleshooting: Common Questions Answered
1. Can I use frozen blackberries instead of fresh ones?
Absolutely! Frozen blackberries work well, especially if you’re blending for a frozen cocktail. Just make sure to let them thaw beforehand if you’re muddling them!
2. What if I don’t have mint?
No worries! You can use other fresh herbs like basil for a different yet delightful flavor.
3. My mojito is too sweet; how can I fix it?
If your drink ends up too sweet, balance it by adding more lime juice or club soda. A touch of additional mint can also help to counteract the sweetness.
4. How should I store leftover mojito ingredients?
If you have extra blackberries or mint, place them in an airtight container in the fridge. Fresh herbs will last a bit longer in a glass of water. However, I doubt you’ll have leftovers—this cocktail is too good to resist!
Nutritional Info (Optional)
For those counting calories, a standard Blackberry Mojito (without any added sugar) has approximately 150-180 calories, depending on the amount of rum and syrup you use. Enjoy your cocktail in moderation and savor every sip!
And there you have it—a delightful journey into the world of Blackberry Mojitos! They’re perfect for summer gatherings or just a refreshing evening on your porch. Remember, cooking (and cocktail-making!) should be fun, so don’t shy away from experimenting and adding your special twist. Cheers to you and the unforgettable moments around your table!
PrintThe Ultimate Blackberry Mojito

A refreshing twist on the classic mojito, made with fresh blackberries and mint for a delightful summer cocktail.
- Prep Time: 10 minutes
- Cook Time: 0 minutes
- Total Time: 10 minutes
- Yield: 1 serving 1x
- Category: Beverage
- Method: Mixing
- Cuisine: Cocktail
- Diet: Vegetarian
Ingredients
- 6–8 Fresh Blackberries
- A handful of Fresh Mint Leaves
- Juice of 1/2 Lime
- 1.5 ounces White Rum
- ½ ounce Simple Syrup
- Club Soda
- Ice
Instructions
- Muddle the ingredients: In a sturdy glass or cocktail shaker, combine blackberries and mint leaves, then gently smash together.
- Add the lime juice: Squeeze in the juice of half a lime and muddle again.
- Pour in the rum: Add white rum to the muddled mixture.
- Sweeten it up: Mix in simple syrup, adjusting sweetness to taste.
- Stir and fill with ice: Gently stir and fill the glass with ice.
- Top it off: Pour club soda over the ice and stir gently.
- Garnish and enjoy: Decorate with blackberries and mint, and add a lime wedge.
Notes
For a non-alcoholic version, omit the rum and add more club soda. Experiment with different berries or herbs for unique flavors.
Nutrition
- Serving Size: 1 cocktail
- Calories: 170
- Sugar: 8g
- Sodium: 5mg
- Fat: 0g
- Saturated Fat: 0g
- Unsaturated Fat: 0g
- Trans Fat: 0g
- Carbohydrates: 21g
- Fiber: 2g
- Protein: 0g
- Cholesterol: 0mg
Keywords: Blackberry Mojito, Summer Cocktail, Refreshing Drink, Berry Drink, Mojito Recipe
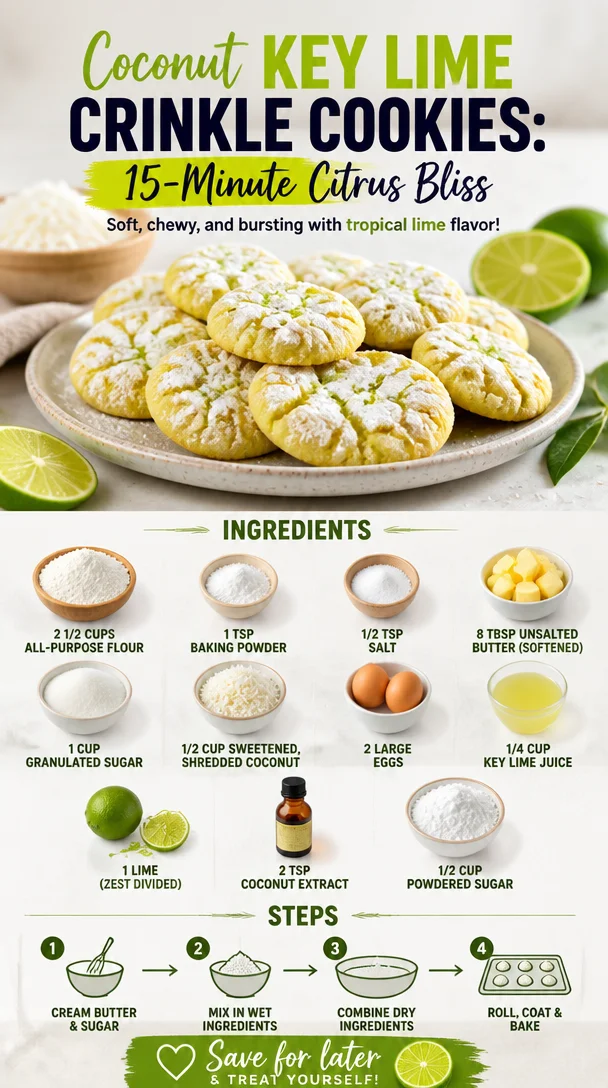
Coconut Key Lime Crinkle Cookies: 15-Minute Citrus Bliss
Coconut Key Lime Crinkle Cookies: A Tropical Delight
Hello, my fellow food lovers! Today, we are diving into a delightful recipe that brings a taste of the tropics right to your kitchen. We’re talking about Coconut Key Lime Crinkle Cookies—soft, chewy, and bursting with zesty lime goodness. Imagine biting into a cookie that melts in your mouth and the tropical flavors whisk you away to a sunny beach. Sounds heavenly, right? Let’s roll up our sleeves, tie on our aprons, and get started!
A Whisk of Nostalgia
I vividly remember the first time I tried my hand at baking cookies—specifically, these Coconut Key Lime Crinkle Cookies. It was a lazy summer afternoon, and my best friend and I decided to turn our small kitchen into a vibrant cookie factory. With flour dust dancing in the sunlight and laughter echoing off the walls, we whipped up a batch that would become a summer staple in our households.
As we mixed ingredients, we couldn’t stop dreaming up ways to elevate the classic cookie. Why not add a dash of coconut? Or make it bright with zesty key lime? The experimentation was half the fun! The cookies emerged from the oven—a little crinkle on top, golden on the edges, and soft in the middle. They were an instant hit! Each bite felt like a sunny escape, and before we knew it, we were sharing them with family and friends at every gathering.
Fast forward to today, and I’m thrilled to share this recipe with all of you, where every crumb carries a sprinkle of nostalgia and bliss.
Ingredients
Let’s gather our ingredients! Here’s what you’ll need to whip up these delightful Coconut Key Lime Crinkle Cookies:
-
2 1/2 cups all-purpose flour
This is the backbone of your cookies, providing structure. If you’re looking for a gluten-free option, try a 1:1 gluten-free flour blend! -
1 tsp baking powder
This little magic powder helps your cookies rise and become fluffy. Make sure it’s fresh for the best results! -
1/2 tsp salt
A pinch of salt enhances the sweetness and balances the flavors. Trust me; it’s essential. -
8 tbsp unsalted butter (softened)
Butter brings richness and flavor. If you’re in a pinch, you can use margarine or coconut oil for a dairy-free option! -
1 cup granulated sugar
This adds sweetness and helps with texture. Brown sugar can be subbed for a chewier cookie with a hint of caramel flavor. -
1/2 cup sweetened, shredded coconut
It gives the cookies that tropical flair! If you’d like less sweetness, try using unsweetened coconut. -
2 large eggs
Eggs bind the ingredients and provide moisture. You can replace each egg with 1/4 cup of applesauce for a vegan twist! -
1/4 cup key lime juice
The zingy star that brightens the cookies! Freshly squeezed is always best, but bottled works if that’s what you have. -
1 lime (zest divided)
The lime zest intensifies the lime flavor—don’t skip this step! Save half for decorating the cookies. -
2 tsp coconut extract
For a deeper coconut flavor, this extract is a game-changer. You can use vanilla extract if you’re out of coconut. -
1/2 cup powdered sugar
This is for rolling the cookies before baking, giving them their signature crinkle effect and a touch of sweetness!
Step-by-Step Instructions
Alright, my kitchen companions, let’s get baking!
-
Preheat Your Oven
Begin by preheating your oven to 350°F (175°C). This is the magic number for getting those cookies perfectly baked. -
Mix the Dry Ingredients
In a large bowl, whisk together the flour, baking powder, and salt. This ensures that your leavening and seasoning are evenly distributed. -
Cream the Butter and Sugar
In another bowl, beat the softened butter and granulated sugar until light and fluffy—about 3 minutes. This step is crucial; it helps incorporate air, leading to a lighter cookie! -
Add the Eggs and Flavorings
Next, beat in the eggs, key lime juice, coconut extract, and half of the lime zest. Mix until well combined, scraping down the sides of the bowl as needed. -
Combine Dry and Wet
Gradually add the dry ingredients to your wet mixture. Mix until just combined—don’t overmix! This will keep your cookies tender. -
Fold in the Coconut
Gently fold in the shredded coconut with a spatula until it’s evenly incorporated. This is where the fun begins—you can already smell the tropical goodness! -
Chill the Dough
Cover the bowl with plastic wrap and chill the dough for 30 minutes. This step helps prevent the cookies from spreading too much. -
Prepare for Baking
Line your baking sheets with parchment paper. Put the powdered sugar in a shallow bowl for rolling the cookies. -
Shape the Cookies
Once chilled, scoop out about two tablespoons of dough and roll them into balls. Next, roll each ball in powdered sugar until well coated. -
Bake the Cookies
Place the sugar-coated dough balls on your prepared baking sheet, leaving some space between them. Bake for 10-12 minutes or until the edges are lightly golden. -
Cool and Enjoy
Allow the cookies to cool on the baking sheet for a few minutes before transferring them to a wire rack. While they cool, sprinkle them with the remaining lime zest for a radiant touch.
Serving Suggestions
These Coconut Key Lime Crinkle Cookies are best served warm, with a refreshing glass of iced tea or a chilled coconut water. For a fun twist, serve them with a scoop of coconut ice cream on the side—talk about a tropical treat!
Recipe Variations
-
Chocolate Chip Twist: Add a cup of semi-sweet chocolate chips for a delightful contrast to the tartness of the lime.
-
Lemon Coconut Cookies: Substitute the key lime juice with freshly squeezed lemon juice for a zesty lemon version.
-
Nutty Coconut: Fold in 1/2 cup of chopped macadamia nuts for an extra crunch and a nutty flavor that complements the coconut!
-
Vegan Version: Use flax eggs (1 tablespoon of flaxseed meal mixed with 2.5 tablespoons of water for each egg) and coconut oil instead of butter.
-
Gluten-Free: Use almond flour or a gluten-free flour blend to make this cookie gluten-free without sacrificing taste.
Chef’s Notes
This recipe has evolved over the years, and I still remember the excitement when I decided to add shredded coconut and key lime into my cookie mix. Initially, my friends were skeptical—could a cookie be both tropical and comforting? But with the first bite of the warm, crinkly treat, they were converts!
Some days, I turn these cookies into an impromptu snack with a drizzle of white chocolate on top or even serve them as dessert for a dinner party, and they never fail to impress. Baking is all about experimentation; don’t be afraid to put your twist on it!
FAQs and Troubleshooting
-
Why are my cookies flat?
Check if your butter is too warm or if you skipped chilling the dough. Either can lead to flat cookies. Cooling helps them retain their shape. -
Can I use fresh key limes?
Absolutely! Fresh key limes provide a vibrant flavor. Just make sure you have enough on hand to get that 1/4 cup of juice. -
How do I store leftover cookies?
Store them in an airtight container at room temperature for up to a week, or freeze them for longer storage. Just ensure they’re completely cooled to keep that freshness! -
What if my dough is too sticky?
If the dough feels overly sticky, chill it a little longer or add a sprinkle of flour until you can easily handle it.
Nutritional Info
(If applicable—Feel free to modify based on data)
Per cookie (based on 24 cookies):
- Calories: 150
- Total Fat: 7g
- Saturated Fat: 4g
- Cholesterol: 20mg
- Sodium: 50mg
- Total Carbohydrates: 21g
- Dietary Fiber: 0.5g
- Sugars: 10g
- Protein: 2g
And there you have it, my lovely foodies—Coconut Key Lime Crinkle Cookies! I hope these cookies bring a sprinkle of sunshine into your day. Happy baking, and remember to gather around the table and share those delicious moments! 🍪🌴🍋
PrintCoconut Key Lime Crinkle Cookies

Soft, chewy cookies bursting with zesty lime and tropical coconut flavors, perfect for summer snacking.
- Prep Time: 15 minutes
- Cook Time: 12 minutes
- Total Time: 57 minutes
- Yield: 24 cookies 1x
- Category: Dessert
- Method: Baking
- Cuisine: American
- Diet: Vegetarian
Ingredients
- 2 1/2 cups all-purpose flour
- 1 tsp baking powder
- 1/2 tsp salt
- 8 tbsp unsalted butter (softened)
- 1 cup granulated sugar
- 1/2 cup sweetened, shredded coconut
- 2 large eggs
- 1/4 cup key lime juice
- 1 lime (zest divided)
- 2 tsp coconut extract
- 1/2 cup powdered sugar
Instructions
- Preheat your oven to 350°F (175°C).
- Mix the dry ingredients: whisk together the flour, baking powder, and salt.
- Cream the softened butter and granulated sugar until light and fluffy.
- Add in the eggs, key lime juice, coconut extract, and half of the lime zest.
- Combine the dry and wet ingredients, mixing until just combined.
- Fold in the shredded coconut.
- Chill the dough for 30 minutes covered with plastic wrap.
- Prepare your baking sheets with parchment paper and set aside powdered sugar in a shallow bowl.
- Shape the cookies by scooping two tablespoons of dough and rolling them in powdered sugar.
- Bake for 10-12 minutes or until the edges are lightly golden.
- Cool on the baking sheet for a few minutes before transferring to a wire rack and sprinkle with remaining lime zest.
Notes
Serve warm with iced tea or coconut water. For a fun twist, try them with coconut ice cream.
Nutrition
- Serving Size: 1 cookie
- Calories: 150
- Sugar: 10g
- Sodium: 50mg
- Fat: 7g
- Saturated Fat: 4g
- Unsaturated Fat: 3g
- Trans Fat: 0g
- Carbohydrates: 21g
- Fiber: 0.5g
- Protein: 2g
- Cholesterol: 20mg
Keywords: cookies, key lime, coconut

No-Bake Coconut Orange Glow Dessert: Creamy Citrus Delight
Creamy Citrus Delight: Coconut Orange Glow Dessert Recipe
Hello there, wonderful food lovers! Today, we’re diving deep into a tropical escapade with a dessert that’s not just a treat for the taste buds but also a feast for the senses. Let me introduce you to the Coconut Orange Glow Dessert – a creamy citrus delight that will have you dreaming of sun-soaked beaches and balmy evenings.
Introduction
You know, sometimes life feels overwhelmingly busy, and what’s missing is that little bit of sweetness that brings joy back. This Coconut Orange Glow Dessert is just the thing to elevate your day, whether you’re celebrating a special moment or simply treating yourself after a long week. It’s creamy, light, and bursting with that vibrant citrus flavor that screams refreshment.
Imagine sitting outside on a warm day, the sun catching the bright orange hue of this dessert, while a gentle breeze dances with the sweet scent of coconut. Not to mention, it’s incredibly easy to whip up, making it a go-to recipe for both seasoned chefs and enthusiastic home cooks. Trust me, once you make it, you’ll be asked to share the recipe (and possibly to make it again and again). A sprinkle of toasted coconut on top adds a satisfying crunch, making it not only a delight for your palate but also a visual treat. Let’s dive in and uncover the magic of this little bowl of sunshine!
Personal Story
I still remember the first time I tasted a dessert like this one. It was at my dear friend Lily’s beach bonfire party. The sun was just setting, casting a golden glow over everything, and the sweet scent of tropical fruit filled the air. She served this velvety dessert, and I was transported straight to paradise with each spoonful. The combination of coconut and orange was so unexpected yet perfectly harmonious.
That night, I spent more time plotting how I would recreate that dessert in my kitchen than I did enjoying the bonfire! It wasn’t just about the taste but also about the memories and laughter that followed. This dessert became a symbol of good times, fresh starts, and the beauty found in simple pleasures. Now, I’m excited to bring a piece of that beachy memory into your home with this Coconut Orange Glow Dessert!
Ingredients
To create this tropical masterpiece, here’s what you’ll need:
-
2 cups full-fat coconut milk: The star of the show! Creamy and luscious, it gives the dessert a silky texture. If you’re looking for a lighter option, consider using light coconut milk, but be aware it might alter the creaminess.
-
1/3 cup granulated sugar: This sweetens things up beautifully. If you’re after a healthier alternative, feel free to swap in honey or maple syrup—just adjust for sweetness to your taste!
-
1/2 cup freshly squeezed orange juice: Fresh is key here! This will brighten the dish and enhance that tropical vibe. Bottled juice is okay in a pinch, but nothing beats the flavor of fresh oranges.
-
1 tsp vanilla extract: This adds a warm, aromatic twist. I always opt for pure vanilla extract; it gives a richer flavor than the imitation versions.
-
1 tsp lime zest: A touch of lime brings a sharpness that complements the sweetness perfectly. No lime? No problem! Lemon zest will add a delightful zing too.
-
1/2 cup whipped cream: For an airy finish. You can use store-bought whipped cream or whip your own. And if you prefer a dairy-free version, coconut whipped cream works wonderfully!
-
A pinch of toasted coconut flakes: For that lovely crunch and an extra hit of flavor. Toasting coconut ensures it brings out the nuttiness, elevating the entire dessert.
Step-by-Step Instructions
Now, let’s get cooking! Here’s how to create your Coconut Orange Glow Dessert step by step:
-
Gather Your Ingredients: Make sure you have everything ready to go. This makes the process smoother and ensures you don’t forget anything mid-recipe.
-
Combine the Coconut Milk and Sugar: In a saucepan over medium heat, whisk together the coconut milk and granulated sugar. Heat until warm (but not boiling), stirring occasionally. You want the sugar to dissolve completely, creating a sweet coconut syrup. This will take about 3-5 minutes.
Tip: If you’re feeling adventurous, try adding a pinch of salt— it really helps to balance out the sweetness!
-
Add Orange Juice and Zest: Remove the saucepan from heat and stir in the freshly squeezed orange juice, lime zest, and vanilla extract. This combination brings a bright, citrusy flavor and will make your kitchen smell like a tropical paradise.
Chef Hack: Taste and adjust! If you want more sweetness, now’s your chance to add a bit more sugar or honey—just dissolve it well before proceeding.
-
Cool and Thicken: Allow the mixture to cool for about 10-15 minutes. This will thicken slightly as it cools. If you’d like a creamier texture, you can also blend the mixture briefly with a hand blender to fluff it up a bit.
-
Fold in the Whipped Cream: Gently fold in the whipped cream until combined. This step gives the dessert that cloud-like texture, making it light and airy.
Tip: Be gentle and don’t over-mix— you want to retain all that lovely airiness!
-
Chill: Pour the mixture into serving dishes or glasses, and refrigerate for at least two hours. This chilling time allows the flavors to develop and solidifies the dessert.
Chef’s Insight: If you’re short on time, popping them in the freezer for 30 minutes can work too, but let them sit out for a few minutes before serving to soften.
-
Serve and Garnish: Before serving, sprinkle a pinch of toasted coconut flakes on top for that satisfying crunch and a pop of extra flavor.
Presentation Tip: Layered desserts in clear glasses look stunning, but don’t stress! Any cute bowl or ramekin works great too!
Serving Suggestions
When it’s time to serve your Coconut Orange Glow Dessert, consider pairing it with some fresh tropical fruit—like mango slices or berries—for an added pop of color and flavor. This makes for a beautiful presentation that your guests will swoon over. Grab a few mint leaves for garnish if you have them on hand; they’ll add a refreshing touch that complements the citrus beautifully.
Recipe Variations
Feel free to get creative with this dessert! Here are a few variations you might enjoy:
-
Mango Coconut Glow: Substitute half of the orange juice with fresh mango puree for a delightful twist.
-
Tropical Combo: Add a splash of pineapple juice or some crushed pineapple for an even more tropical vibe.
-
Chocolate Drizzle: For a decadent touch, drizzle some melted dark chocolate over the top right before serving. The flavor of chocolate paired with citrus is to die for!
-
Coconut Lime Delight: Increase the lime zest and juice for a sharper, more tangy taste—perfect for lime lovers!
-
Nutty Flavors: Consider adding a hint of almond extract or some finely chopped pistachios for a unique flavor profile.
Chef’s Notes
This recipe has evolved into the beautiful creation it is today through a bit of trial and error. I originally played around with variations that missed the mark—too sweet, too heavy, or too bland. The balance of flavors is crucial, and I’ve learned that taking the time to adjust is what makes a recipe truly shine.
I once experimented by adding too much lime juice, turning it into an unintentional lime sherbet! But, hey, kitchen mishaps often lead to delightful surprises. Through that, I embraced the concept of ‘happy accidents,’ learning to adapt and turn them into something delicious. So, next time you’re in the kitchen, don’t fear the mistakes—embrace them instead!
FAQs and Troubleshooting
Q: My mixture is too runny; what did I do wrong?
A: If you find your mixture is too runny after chilling, it might be because the coconut milk wasn’t thick enough or the whip cream wasn’t fully incorporated. Next time, consider adding a bit more cornstarch to thicken it up or leaving it in the fridge longer to firm up.
Q: How long does this dessert last?
A: Your Coconut Orange Glow Dessert can last in the refrigerator for up to 3 days. Just make sure to cover it with plastic wrap to prevent it from absorbing any odors!
Q: Can I make this vegan?
A: Absolutely! The recipe is already vegan if you stick with coconut cream and plant-based whipped cream. Just ensure the sugar is vegan, as some sugars are processed using bone char.
Q: How can I store leftovers?
A: Store any leftovers in an airtight container in the fridge. I recommend finishing it within three days for the best taste and texture!
Nutritional Info
This dessert is a great option if you’re looking for something refreshing that isn’t overly sugary. Here’s a rough nutritional breakdown (per serving):
- Calories: 200
- Total Fat: 15g
- Saturated Fat: 10g
- Carbohydrates: 16g
- Sugars: 13g
- Protein: 2g
Ultimately, numbers are just numbers—what matters most is the joy these flavors bring you and your loved ones!
So there you have it! The Coconut Orange Glow Dessert is not just a recipe; it’s a little piece of sunshine to brighten your days. I can’t wait for you to try this and to hear your kitchen tales. Happy cooking!
PrintCoconut Orange Glow Dessert

A creamy citrus delight that combines the refreshing flavors of coconut and orange, perfect for warm days and special occasions.
- Prep Time: 15 minutes
- Cook Time: 5 minutes
- Total Time: 120 minutes
- Yield: 4 servings 1x
- Category: Dessert
- Method: Refrigerating
- Cuisine: Tropical
- Diet: Vegan
Ingredients
- 2 cups full-fat coconut milk
- 1/3 cup granulated sugar
- 1/2 cup freshly squeezed orange juice
- 1 tsp vanilla extract
- 1 tsp lime zest
- 1/2 cup whipped cream
- A pinch of toasted coconut flakes
Instructions
- Gather your ingredients.
- Combine the coconut milk and sugar in a saucepan over medium heat; whisk until warm.
- Add the orange juice, lime zest, and vanilla extract; mix well.
- Cool for about 10-15 minutes to thicken.
- Fold in the whipped cream gently until combined.
- Chill in serving dishes for at least two hours.
- Serve and garnish with toasted coconut flakes.
Notes
For added flavor, consider pairing with fresh tropical fruits or a drizzle of chocolate.
Nutrition
- Serving Size: 1 serving
- Calories: 200
- Sugar: 13g
- Sodium: 50mg
- Fat: 15g
- Saturated Fat: 10g
- Unsaturated Fat: 3g
- Trans Fat: 0g
- Carbohydrates: 16g
- Fiber: 1g
- Protein: 2g
- Cholesterol: 0mg
Keywords: coconut dessert, orange dessert, vegan dessert, tropical dessert, creamy dessert
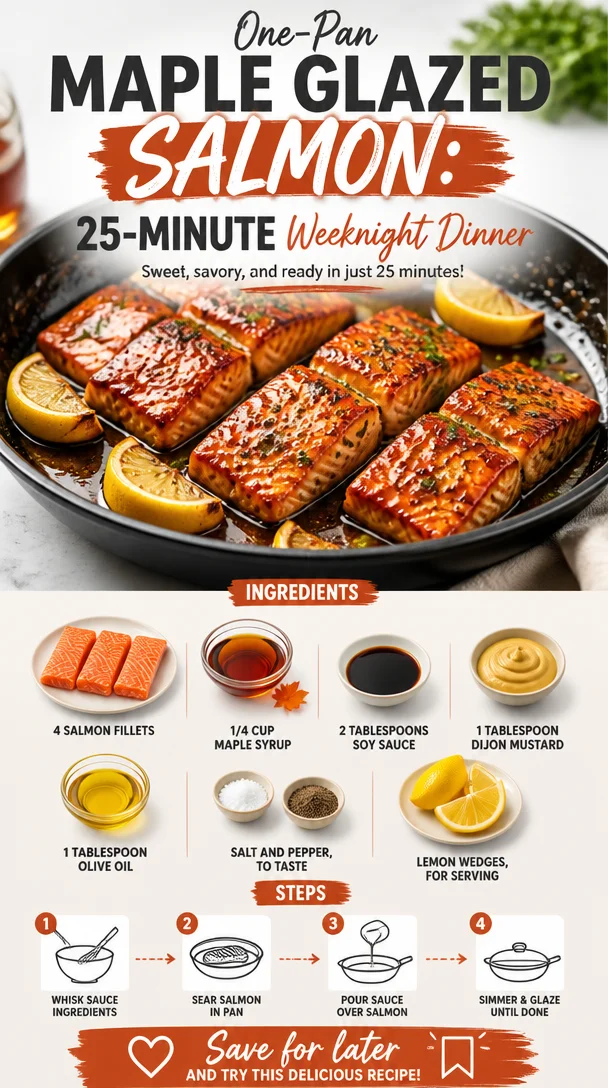
One-Pan Maple Glazed Salmon: 25-Minute Weeknight Dinner
Maple Glazed Baked Salmon: A Delightful Dish to Savor
Hello, my culinary friends! Today, I’m thrilled to share a recipe that truly exemplifies my philosophy of cooking with elegance without the intimidation factor. Enter the Maple Glazed Baked Salmon — a dish that merges sweet and savory in a way that will have your tastebuds dancing and your dinner guests raving. This recipe is not only delicious; it also comes together in a pinch, making it perfect for busy weeknights or last-minute dinner parties.
Picture this: you’re back from a long day, and the last thing you want to do is slave away at the stove. But you want to serve something impressive, something that feels personal and lovely. That’s where this salmon comes in. With just a handful of ingredients, a little bit of prep, and the wonderful transformation of baking, you can craft a dish that looks like it belongs in a fine-dining restaurant. So, grab your apron, and let’s dive into this culinary adventure!
My Personal Story: The First Glaze
I vividly remember the first time I made maple-glazed salmon. It was during a dreary winter evening, and I was longing for something bright and cheerful. I decided to host a small gathering for my friends to lift our spirits. On a whim, I concocted this glaze out of maple syrup, soy sauce, and a little Dijon mustard. The aroma wafting through the kitchen drew everyone in, lifting our moods even before we sat down to eat.
As my friends gathered around the table, I remember seeing their eyes widen with delight as I placed the salmon in front of them. What started as a simple dish quickly transformed into a highlight of our evening filled with laughter and good cheer. That first bite — oh, that beautiful balance of sweet maple and savory salmon — left a lasting impression. Ever since, this recipe has been a staple in my home. It’s a reminder that food can indeed bring us together and create warm memories that linger long after the last bite.
Ingredients
Now, let’s talk about what you need to bring this delightful dish to life. Here’s a breakdown of the ingredients:
-
4 salmon fillets
These should be fresh and preferably wild-caught. If you’re unable to find salmon, you can substitute with other fish like trout or arctic char. -
1/4 cup maple syrup
Pure maple syrup is the gold standard for this recipe, packing that sweet richness. If you’re in a pinch, you can use honey or agave nectar for an alternative flavor profile. -
2 tablespoons soy sauce
This adds a savory depth to the glaze. For a gluten-free option, use tamari. You can also try coconut aminos for a milder flavor. -
1 tablespoon Dijon mustard
The mustard provides a zesty kick that beautifully balances out the sweetness. If you’re in a bind, yellow mustard works too, but it’ll be less sophisticated. -
1 tablespoon olive oil
A drizzle of olive oil adds richness and helps with the cooking process. You can substitute it with avocado oil or melted coconut oil if needed. -
Salt and pepper to taste
Always taste your food! A pinch of salt and a touch of pepper will enhance the flavors beautifully. -
Lemon wedges for serving
Fresh lemon juice cuts through the richness of the salmon, adding a bright finish. Feel free to use lime if you prefer a citrus twist!
Step-by-Step Instructions
Let’s get cooking! Follow these steps, and you’ll have a beautifully glazed salmon that will impress anyone sitting around your table.
-
Preheat your oven to 375°F (190°C).
Preheating ensures even cooking. I recommend setting your timer for about 10 minutes after mixing your glaze to let the oven reach temperature while you prep! -
Prepare the baking dish.
Lightly grease a baking dish with a little olive oil to prevent the salmon from sticking. This also helps in non-slip plating later! -
Mix the maple glaze.
In a small bowl, whisk together the maple syrup, soy sauce, Dijon mustard, and olive oil until combined. This glaze is the heart of the recipe, so make sure to blend well for a smooth consistency. -
Season the salmon.
Place your salmon fillets in the prepared baking dish, skin side down (if you have skin-on fillets). Generously sprinkle with salt and pepper. Here, a light hand with the salt is best—the soy sauce already adds a nice salty touch. -
Dress the salmon with the glaze.
Pour the maple glaze over the salmon fillets. Use a brush or the back of a spoon to spread it evenly. This ensures every bite is full of that luscious flavor. -
Bake the salmon.
Place the baking dish in the preheated oven. Bake for about 15-20 minutes, or until the salmon flakes easily with a fork. It’s like magic watching that bright pink fillet turn into something beautifully succulent! -
Broil for a perfect finish (optional).
If you’d like a caramelized top, switch the oven to broil for the last 2-3 minutes. Keep a close eye during this step. You want that glaze to bubble just enough to create a gorgeous finish without burning! -
Let it rest.
Once out of the oven, allow the salmon to rest for a minute before serving. This will help retain moisture and allow those flavors to settle beautifully.
Serving Suggestions
Now that your salmon is cooked to perfection, it’s time to plate! Serve the maple glazed salmon with some lemon wedges on the side for that zesty touch. Pair it with vibrant sides like roasted asparagus or a fresh green salad drizzled with a light vinaigrette. These accompaniments not only complement the sweetness of the glaze but also elevate the entire meal presentation.
To create a stunning visual feast, consider placing the salmon on a colorful platter, garnished with fresh herbs like parsley or dill. A sprinkle of sesame seeds can also add a nice crunch and visual contrast!
Recipe Variations
Feeling adventurous? Here are some variations you can explore with this base recipe:
-
Herb-Infused Maple Glaze: Add fresh herbs like thyme or rosemary to your glaze for an earthy twist.
-
Spicy Maple Salmon: Stir in a teaspoon of chili flakes or sriracha to your glaze for a sweet and spicy combination.
-
Citrus Maple Glaze: Mix in some fresh orange or lime juice into the glaze for a zesty flavor profile.
-
Maple Mustard Crust: Before glazing, sprinkle the fillets with crushed nuts or breadcrumbs for a crunchy layer.
-
Sweet Potato & Kale Side: Serve with roasted sweet potatoes and sautéed kale for a beautiful, contrast-filled plate!
Chef’s Notes
This recipe has undergone quite the evolution in my kitchen! Initially, I used brown sugar instead of maple syrup. While it was delicious, I find that maple syrup offers a natural sweetness that really complements the salmon’s flavor without overwhelming it. And if there’s anything my cooking journey has taught me, it’s that simple tweaks can yield the most breathtaking results!
One time, I forgot to add the mustard to my glaze—cue panic! I quickly grabbed some balsamic vinegar instead, and let me tell you, the flavor explosion was unexpected but truly delightful! So don’t be afraid to experiment a little; cooking is all about finding what resonates with your palate.
FAQs and Troubleshooting
-
Can I use frozen salmon?
Absolutely! Just ensure it’s fully thawed and patted dry before marinating. If you bake it from frozen, increase the baking time by 5-10 minutes. -
How do I know when the salmon is done?
Perfectly baked salmon should flake easily with a fork and have an internal temperature of around 145°F (63°C). A good meat thermometer can be your best friend in the kitchen! -
What if the glaze burns?
If you notice the glaze starting to burn during baking or broiling, tent the salmon with aluminum foil to shield it from direct heat. -
Can I make the glaze ahead of time?
Absolutely! You can prepare the glaze up to a day in advance and store it in the fridge. Just give it a good whisk before using it.
Nutritional Info
While I don’t provide the exact nutritional information (as I believe in enjoying food in moderation!) I can share that this recipe is a fantastic source of omega-3 fatty acids from the salmon, along with a delightful mix of vitamins and minerals from the glaze ingredients.
Remember, cooking is not just about eating; it’s about enjoying the process, the flavors, and the company you gather. So, tie on that apron, invite over some friends, and enjoy the succulent heights of this Maple Glazed Baked Salmon. You’ve got this!
Let me know how yours turns out, and happy cooking! 🌟
PrintMaple Glazed Baked Salmon
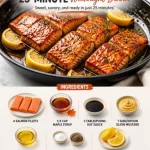
A delightful dish that merges sweet and savory flavors, perfect for busy weeknights or dinner parties.
- Prep Time: 10 minutes
- Cook Time: 20 minutes
- Total Time: 30 minutes
- Yield: 4 servings 1x
- Category: Main Course
- Method: Baking
- Cuisine: American
- Diet: Pescatarian
Ingredients
- 4 salmon fillets
- 1/4 cup pure maple syrup
- 2 tablespoons soy sauce
- 1 tablespoon Dijon mustard
- 1 tablespoon olive oil
- Salt and pepper to taste
- Lemon wedges for serving
Instructions
- Preheat your oven to 375°F (190°C).
- Prepare the baking dish by lightly greasing it with olive oil.
- Mix the maple glaze in a small bowl: whisk together the maple syrup, soy sauce, Dijon mustard, and olive oil.
- Season the salmon fillets with salt and pepper in the greased baking dish.
- Dress the salmon with the glaze, spreading it evenly.
- Bake the salmon for about 15-20 minutes, until it flakes easily with a fork.
- Broil for the last 2-3 minutes for a caramelized top (optional).
- Let it rest before serving.
Notes
For a gluten-free option, substitute soy sauce with tamari. Feel free to experiment with herbs or spices in the glaze.
Nutrition
- Serving Size: 1 fillet
- Calories: 350
- Sugar: 15g
- Sodium: 400mg
- Fat: 12g
- Saturated Fat: 1.5g
- Unsaturated Fat: 10g
- Trans Fat: 0g
- Carbohydrates: 24g
- Fiber: 0g
- Protein: 30g
- Cholesterol: 70mg
Keywords: salmon, maple glaze, easy recipes, baked salmon, weeknight dinner
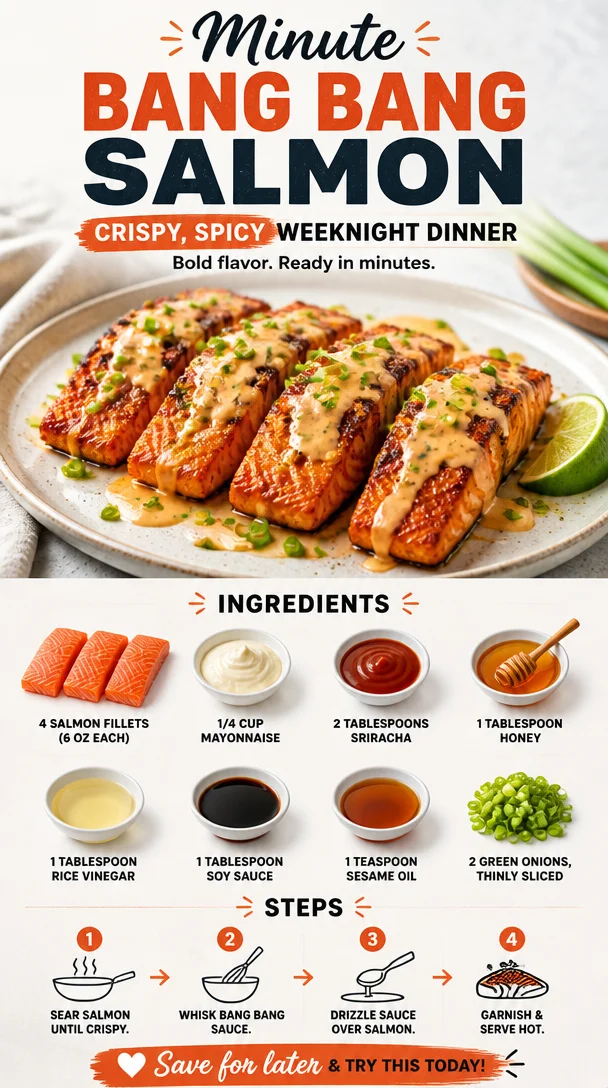
Minute Bang Bang Salmon: Crispy, Spicy Weeknight Dinner
Bang Bang Salmon: An Irresistibly Delicious Dish
Hello, fellow foodies! I’m thrilled to share a vibrant and delicious dish that’s sure to make your taste buds dance: Bang Bang Salmon. This dish is not just about the flavors; it’s about bringing people together around the table and creating memorable moments with simple, elegant cooking. Grab your apron and let’s dive into this flavorful journey!
A Whirlwind of Flavor
Bang Bang Salmon is a whimsical nod to the popularity of spicy seafood dishes often served in upscale eateries. Imagine crispy, succulent salmon fillets coated in a luscious, slightly spicy sauce that balances creamy and zesty elements beautifully. This dish is perfect for a casual weeknight dinner or an elegant dinner party—it truly shines no matter the occasion.
I love this dish not just because it’s packed with flavor but also for the vibrant energy it brings to my kitchen. The bright colors and aromas fill the air with anticipation, making cooking feel special. And let’s be honest: who doesn’t love a good excuse to make the kitchen smell incredible?
A Nostalgic Memory
Every time I make Bang Bang Salmon, I’m reminded of a long-ago summer evening spent at a charming little seaside restaurant. The sun was setting, painting the sky in shades of pink and orange, and the air was filled with laughter and the scent of fresh seafood. I was with my best friends, and we shared a platter of spicy fish tacos drizzled with a similar bang bang sauce. Those tacos were delightful, and we devoured them with gusto, our taste buds awakening to the bold flavors.
It’s funny how a memory tied to food can linger in our hearts, isn’t it? Each bite of Bang Bang Salmon takes me back to that carefree evening, reminding me of the power of good food and good company. So, let’s recreate that feeling at home!
Ingredients You’ll Need
Before we get into the cooking, let’s gather our ingredients. The beauty of this dish is that it’s made with accessible components that make it zing without overwhelming your pantry! Here’s what you’ll need:
- 4 salmon fillets (6 oz each): Fresh or thawed, salmon is rich in healthy fats and loaded with flavor. If you’re not a salmon fan, you can swap it with chicken breasts or tofu for a vegetarian option!
- 1/4 cup mayonnaise: This creamy base adds richness. You can use low-fat mayo or even Greek yogurt for a healthier twist.
- 2 tablespoons sriracha: This brings the heat! Don’t worry—it’s customizable; start with one tablespoon if you prefer a milder flavor.
- 1 tablespoon honey: This adds a touch of sweetness to balance the spice. Maple syrup or agave can work as substitutes if you want a vegan option.
- 1 tablespoon rice vinegar: This gives our sauce a tangy twist. Apple cider vinegar or white wine vinegar are suitable replacements.
- 1 tablespoon soy sauce: For that savory depth. You can use tamari or coconut aminos for a gluten-free alternative.
- 1 teaspoon sesame oil: This adds a nutty aroma. If you’re in a pinch, olive oil will work, though it has a different flavor profile.
- 2 green onions, thinly sliced: For garnish and a fresh zing! Feel free to use chives if that’s what you have on hand.
Step-by-Step Instructions
Now that we have our vibrant ingredients, let’s get cooking! Follow these detailed steps for a delightful Bang Bang Salmon experience:
-
Preheat Your Oven: Set your oven to 425°F (220°C). The high heat will give our salmon that perfect crispy exterior while keeping it moist inside.
-
Prepare the Sauce: In a mixing bowl, combine the mayonnaise, sriracha, honey, rice vinegar, soy sauce, and sesame oil. Stir until the sauce is smooth and well incorporated. You’ll want to taste it at this stage; if you prefer it spicier, add an extra drizzle of sriracha!
-
Prepare the Salmon: Line a baking sheet with parchment paper for easy cleanup. Place the salmon fillets skin-side down on the sheet and season with a sprinkle of salt and pepper. Drizzle a little olive oil on top if you like—it helps the skin crisp up beautifully.
-
Sauce It Up: Generously spread half of the bang bang sauce over the salmon fillets, ensuring they are well-coated. Reserve the other half for serving!
-
Bake the Salmon: Place the baking sheet in the preheated oven and let the salmon bake for about 12-15 minutes. You’ll know it’s done when the salmon flakes easily with a fork. The edges should be golden and slightly crispy.
-
Garnish and Serve: Once the salmon is out of the oven, sprinkle your thinly sliced green onions over the top. This adds a fresh crunch and vibrant color. Drizzle with the reserved bang bang sauce for that extra kick!
-
Plating Heroics: Don’t forget to make the presentation beautiful! Serve the salmon on a bed of fluffy rice, quinoa, or alongside roasted vegetables. A fresh squeeze of lime juice can elevate the flavors even more.
Serving Suggestions
To plate your Bang Bang Salmon beautifully, place a generous spoonful of jasmine rice next to the fillet, allowing the sauce to drizzle down the side. Add a handful of colorful, roasted vegetables, and finish with a sprinkle of additional green onions. Your guests (and you!) will be wowed by the dish’s visual appeal before the first bite!
Recipe Variations
Ready to mix things up? Here are a few creative twists you can incorporate into your Bang Bang Salmon:
- Crispy Tofu: For a vegetarian option, swap out the salmon with firm tofu, patted dry and cut into slices. Coat and bake them in the same way for a delightful plant-based alternative.
- Spicy Honey Garlic: Add minced garlic to your bang bang sauce for a punchy flavor and a touch more sweetness.
- Tropical Twist: Mix in a bit of pineapple juice into your sauce for a tropical vibe that pairs beautifully with salmon!
- Zoodles: Serve the salmon over zoodles (zucchini noodles) to lighten things up and add a fresh crunch to the dish.
Chef’s Notes
As with any recipe, don’t hesitate to make this your own! I’ve played around with the sauce over the years—adding in different spices, swapping out the sweetener, and adjusting the heat level. One time, I even added a hint of lime zest to the sauce, and it brought out a refreshing element that paired perfectly with the salmon. It’s all about experimenting, so have fun with it!
And let’s not forget: if you accidentally burn the edges (it happens to the best of us!), simply scrape off the burnt bits, drizzle on extra sauce, and no one will be the wiser!
FAQs and Troubleshooting
1. My salmon is overcooked and dry! What happened?
- It can happen! Salmon is best when cooked just until it’s flaky. Try reducing the cooking time next time, and use an instant-read thermometer; 125°F (52°C) for medium-rare and 145°F (63°C) for well-done is the sweet spot!
2. Can I make the sauce in advance?
- Absolutely! This sauce can be made up to two days ahead and stored in the fridge. Just give it a quick stir before using it.
3. How can I make this gluten-free?
- It’s really simple! Just swap regular soy sauce with tamari or coconut aminos, which are both gluten-free.
4. What can I serve with Bang Bang Salmon?
- Some great sides include steamed asparagus, quinoa, or a crunchy cabbage salad for a delightful contrast in texture.
Nutritional Info (Optional)
This dish is a powerhouse of nutrients! Salmon is a great source of omega-3 fatty acids, while the sauce is rich in flavor without being overly heavy. Depending on your side choices, a meal of Bang Bang Salmon can fit beautifully into a balanced diet.
So, what are you waiting for? Tie on that apron, pour yourself a refreshing beverage, and get that salmon sizzling! I have no doubt this Bang Bang Salmon will become a favorite at your table. Cheers to good food and great company!
PrintBang Bang Salmon
A vibrant and delicious dish featuring crispy salmon fillets coated in a slightly spicy, creamy sauce.
- Prep Time: 15 minutes
- Cook Time: 15 minutes
- Total Time: 30 minutes
- Yield: 4 servings 1x
- Category: Main Course
- Method: Baking
- Cuisine: American
- Diet: Pescatarian
Ingredients
- 4 salmon fillets (6 oz each)
- 1/4 cup mayonnaise
- 2 tablespoons sriracha
- 1 tablespoon honey
- 1 tablespoon rice vinegar
- 1 tablespoon soy sauce
- 1 teaspoon sesame oil
- 2 green onions, thinly sliced
Instructions
- Preheat your oven to 425°F (220°C).
- Prepare the sauce by combining mayonnaise, sriracha, honey, rice vinegar, soy sauce, and sesame oil in a bowl, stirring until smooth.
- Prepare a baking sheet with parchment paper and place the salmon fillets skin-side down, seasoning with salt and pepper.
- Sauce the salmon by spreading half of the bang bang sauce over the fillets.
- Bake the salmon in the oven for 12-15 minutes until it flakes easily and is slightly crispy at the edges.
- Garnish with green onions and drizzle with the reserved bang bang sauce before serving.
- Plate the salmon with rice, quinoa, or roasted vegetables for a beautiful presentation.
Notes
You can substitute salmon with chicken or tofu for a vegetarian option. Make sure to adjust cooking times accordingly.
Nutrition
- Serving Size: 1 serving
- Calories: 350
- Sugar: 6g
- Sodium: 600mg
- Fat: 20g
- Saturated Fat: 3g
- Unsaturated Fat: 15g
- Trans Fat: 0g
- Carbohydrates: 18g
- Fiber: 1g
- Protein: 30g
- Cholesterol: 80mg
Keywords: Bang Bang Salmon, easy salmon recipes, spicy seafood, dinner recipes

One Skillet Salmon with Lemon Orzo
One Skillet Salmon with Lemon Orzo: A Flavorful Hug on a Plate
Hello, fellow foodies and kitchen adventurers! I’m excited to gather in this digital kitchen today to share one of my absolute favorite recipes: One Skillet Salmon with Lemon Orzo. This dish encapsulates everything I love about cooking — it’s easy to prepare, packed with flavor, and looks just as elegant as it tastes. Plus, it’s made in one skillet, which means less fuss and more time to enjoy your meal!
An Ode to Family Dinners
Growing up, family dinners were sacred in my household. My mom had this incredible knack for turning simple ingredients into masterpieces. I remember one evening vividly: the sun was setting, and the kitchen was filled with wonderful aromas as she prepared her signature lemony salmon dish. The table was set beautifully, candles flickering, and laughter echoed around the room.
That night, my mom served salmon — perfectly seasoned, crispy-skinned, and perched atop a bed of fluffy lemon orzo. It was a dish that brought us together, nourishing both body and soul. As we savored each bite, I watched as my family relished the moment, savoring the flavors and moments alike. Inspired by those evenings, I created this One Skillet Salmon with Lemon Orzo recipe to bring that feeling of warmth and connection to your table.
So grab your apron and let’s create some memories!
Ingredients
Here’s what you’ll need for this delectable dish:
-
4 skinless salmon fillets: Fresh or frozen can work here. If using frozen, make sure to thaw them properly for even cooking. I love the delicate flavor of salmon; it’s so versatile!
-
1 tsp salt (divided): Salt enhances flavor. Use kosher salt for a little crunch or fine sea salt for precise measurements.
-
1 tsp coarsely ground black pepper (divided): Freshly ground is always best! It adds that beautiful punch of flavor.
-
1 tsp sweet paprika: This adds a hint of sweetness and color. You can swap it for smoked paprika for a deeper flavor.
-
1 tsp garlic powder: A little goes a long way for that garlicky goodness. If you love fresh, feel free to substitute with fresh minced garlic.
-
1 tbsp olive oil: Great for cooking; it adds heart-healthy fats. You can substitute with avocado oil if you prefer a high smoke point.
-
1 tsp unsalted butter: Adds richness. You could use ghee for a lactose-free option!
-
1 yellow onion (finely chopped): The base of the flavor! Sweet onions work wonderfully, but a red onion can also add a beautiful color.
-
3 garlic cloves (minced): We’re layering in that garlic flavor! Fresh is always my go-to.
-
1 cup dry orzo pasta: A fun pasta shape! You can use quinoa or rice for a gluten-free option.
-
1 tsp dried thyme: Adds an earthy aroma. Fresh thyme is also a fantastic substitute if you have it!
-
3 cups low-sodium chicken broth: Elevates the flavor of the orzo. Vegetable broth works well for a vegetarian twist!
-
5 ounces baby spinach: Adds a pop of color and nutrients. You can substitute with kale or Swiss chard.
-
Juice from ½ lemon: Acidity brightens the flavors. Use a whole lemon to add zest if you’re feeling extra citrusy!
-
½ cup grated Parmesan: For a creamy finish. Nutritional yeast is a great dairy-free alternative!
-
Freshly ground black pepper (for serving) and chili flakes (for serving): A personal touch to finish off the dish with just the right kick!
Step-by-Step Instructions
-
Prep the Salmon: Start by patting the salmon fillets dry with a paper towel. Season them with ½ teaspoon of salt, ½ teaspoon of black pepper, paprika, and garlic powder on both sides. This step is crucial; it ensures the salmon is flavorful from the inside out while forming a beautiful crust.
-
Heat Things Up: In a large skillet over medium heat, add 1 tablespoon of olive oil and 1 teaspoon of butter. Heat until the oil shimmers. This is where the magic begins – the perfect balance of oil and butter will give your salmon that perfect golden sear.
-
Sear the Salmon: Carefully place the seasoned salmon fillets in the skillet, skin-side down (if you have skin on). Cook them for 4-5 minutes without touching them. This attention to timing is key! You want that gorgeous crust to develop. Flip and cook for an additional 3-4 minutes or until the salmon is cooked through and flakes easily with a fork. Once done, transfer the salmon to a plate.
-
Create the Flavor Base: In the same skillet, add the chopped onion and sauté until translucent, about 3-4 minutes. Add the minced garlic and cook for another minute until aromatic. Here’s a little chef hack: scraping the bottom of the pan as you sauté helps incorporate those delicious bits left behind from the salmon, enhancing the overall flavor!
-
Add the Orzo: Stir in the dry orzo and thyme, cooking for a minute to toast the pasta slightly. This is a trick I learned to enhance the nuttiness of the orzo — trust me, it makes a difference!
-
Pour in the Broth: Gradually add the chicken broth and stir well. Bring everything to a gentle boil, then reduce the heat to low. This is the perfect moment to cover the skillet and let the pasta absorb all those wonderful flavors.
-
Add the Spinach: After about 10 minutes, check on the orzo. Once it’s tender and has absorbed most of the liquid, add the baby spinach and stir in the lemon juice. Cover again for a minute for the spinach to wilt. This step not only adds color but boosts nutritional value too!
-
Return the Salmon: Nestle the salmon fillets back into the skillet, sprinkle with grated Parmesan, and cover for just a minute to allow the cheese to melt lightly. Doesn’t that just sound amazing?
-
Serve and Enjoy: Give everything one last sprinkle of black pepper and chili flakes. This dish is begging to be devoured!
Serving Suggestions
For an elegant presentation, plate the orzo first, then gently rest the salmon on top. A little extra sprinkle of Parmesan and a slice of lemon on the side elevate both the look and flavor. Serve it alongside a fresh garden salad or some roasted veggies for a complete meal that’s sure to impress!
Recipe Variations
Here are a few fun twists to keep your One Skillet Salmon fresh:
-
Mediterranean Twist: Add cherry tomatoes and olives for a burst of flavor and color.
-
Herb-Infused: Swap out thyme for fresh dill or basil for a fresh herbal kick.
-
Creamy Comfort: Stir in a splash of heavy cream or a dollop of crème fraîche for a luxuriously creamy sauce.
-
Citrus Explosion: Use lime or orange juice instead of lemon for a whole new vibe.
-
Spicy Affair: Toss in a bit of sriracha or harissa for those who love a kick!
Chef’s Notes
This dish has certainly evolved over time! I used to stick to basic recipes, but after countless family gatherings, I realized how essential it is to morph as flavors come in and out of season. My love for adding green veggies like spinach sparked once I noticed how bright and colorful my plates could be! Each time I prepare this meal, I add a personal touch. It’s a constant reminder that cooking is all about expressing yourself through flavors, as simple and beautiful as that might be.
FAQs and Troubleshooting
Q1: My salmon is sticking to the pan. What should I do?
A1: Make sure your pan is hot enough before adding oil and the salmon. If it’s still sticking, let it sear longer before flipping.
Q2: Can I use whole wheat orzo?
A2: Absolutely! Just adjust the cooking time slightly, as whole wheat orzo may take a bit longer to cook.
Q3: What if I overcooked the salmon?
A3: Don’t worry! Flaked salmon mixed into the orzo still tastes fantastic. Just serve it as a salmon orzo “stew.”
Q4: Can I prepare this dish ahead of time?
A4: You can prep the ingredients beforehand and store them separately. Cook the salmon just before serving, and add to the orzo for the freshest taste!
Nutritional Info
While I usually prefer to savor the flavors rather than count calories, here’s a general overview if you’re tracking:
- Calories: Approx. 550 per serving
- Protein: 40g
- Carbohydrates: 45g
- Fat: 20g
- Fiber: 3g
Remember, these values can vary based on the specific ingredients used!
In closing, I hope this One Skillet Salmon with Lemon Orzo becomes a staple in your kitchen, just as it has in mine. Cooking should be about joy, experimentation, and connection — at the heart of it all, it’s about showing up for one another. So tie on that apron, pour yourself a glass of something bubbly, and let’s create something timeless together. Happy cooking!
PrintOne Skillet Salmon with Lemon Orzo

A delightful dish of perfectly seasoned salmon served atop a bed of fluffy lemon orzo, all made in one skillet for easy cleanup.
- Prep Time: 15 minutes
- Cook Time: 30 minutes
- Total Time: 45 minutes
- Yield: 4 servings 1x
- Category: Main Course
- Method: Skillet
- Cuisine: Mediterranean
- Diet: Pescatarian
Ingredients
- 4 skinless salmon fillets
- 1 tsp salt (divided)
- 1 tsp coarsely ground black pepper (divided)
- 1 tsp sweet paprika
- 1 tsp garlic powder
- 1 tbsp olive oil
- 1 tsp unsalted butter
- 1 yellow onion (finely chopped)
- 3 garlic cloves (minced)
- 1 cup dry orzo pasta
- 1 tsp dried thyme
- 3 cups low-sodium chicken broth
- 5 ounces baby spinach
- Juice from ½ lemon
- ½ cup grated Parmesan
- Freshly ground black pepper (for serving)
- Chili flakes (for serving)
Instructions
- Prep the salmon: Pat the salmon fillets dry and season with ½ teaspoon of salt, ½ teaspoon of black pepper, paprika, and garlic powder on both sides.
- Heat things up: In a large skillet over medium heat, add olive oil and butter until shimmering.
- Sear the salmon: Place seasoned salmon in the skillet, skin-side down, and cook for 4-5 minutes without moving. Flip and cook for an additional 3-4 minutes.
- Create the flavor base: In the same skillet, add chopped onion and sauté until translucent, about 3-4 minutes. Add minced garlic and cook for another minute.
- Add the orzo: Stir in dry orzo and thyme, cooking for a minute to toast the pasta slightly.
- Pour in the broth: Gradually add chicken broth and stir. Bring to a gentle boil, then reduce heat to low.
- Add the spinach: After about 10 minutes, stir in baby spinach and lemon juice. Cover for a minute.
- Return the salmon: Nestle the salmon back into the skillet, sprinkle with Parmesan, and cover briefly to melt the cheese.
- Serve and enjoy: Finish with black pepper and chili flakes on top.
Notes
For an elegant presentation, plate the orzo first, then top with salmon. A sprinkle of extra Parmesan and a lemon slice adds a nice touch.
Nutrition
- Serving Size: 1 serving
- Calories: 550
- Sugar: 2g
- Sodium: 800mg
- Fat: 20g
- Saturated Fat: 6g
- Unsaturated Fat: 11g
- Trans Fat: 0g
- Carbohydrates: 45g
- Fiber: 3g
- Protein: 40g
- Cholesterol: 70mg
Keywords: salmon, one skillet, lemon orzo, easy recipes, family dinners

One-Pot Creamy Garlic Butter Steak Orzo: Weeknight Dinner
One Pot Creamy Garlic Butter Steak Orzo: A Cozy Culinary Adventure
Hello, food lovers! Today, I’m thrilled to share a dish that’ll quickly become one of your go-to favorites: One Pot Creamy Garlic Butter Steak Orzo. Picture this: it’s a weeknight, and you’re craving something hearty, comforting, and a little luxurious all at once—but you don’t want to spend hours in the kitchen. Well, my friends, this dish is your answer! With succulent bites of steak, the creamy richness of garlic butter, and perfectly cooked orzo, this one-pot wonder is sure to impress your family or dinner guests without the fuss.
Why One Pot?
I know, I know… One pot sounds like a dream, but how can something this sumptuous really come together in just one dish? It’s all about the layering of flavors and cooking techniques that make this recipe shine. You’ll find that the orzo absorbs all the delightful juices from the steak and garlic, resulting in a flavorful, creamy pasta that truly sings. And the clean-up? A breeze!
Personal Story
This dish brings back fond memories of wandering through my favorite local farm market. One sunny Saturday morning, I stumbled upon a butcher stall, the aroma of perfectly grilled steak wafting through the air. The butcher was chatting with customers about how to prepare the most tender cuts of steak, and I couldn’t resist but ask for tips. Inspired by the conversation, I went home that day eager to create something magical. After experimenting with various ingredients and cooking techniques, I landed on this creamy garlic butter sauce that perfectly complements the steak.
Every time I whip up this dish, I can almost hear the laughter of friends gathered around my table, savoring every last bite. I love how food has the power to bring people together and create lasting memories. This One Pot Creamy Garlic Butter Steak Orzo is my favorite way to share a little love through good food!
Ingredients
Here’s what you’ll need to recreate this delightful dish at home:
-
1 lb sirloin steak, cut into bite-sized pieces
Sirloin steak is tender and flavorful, making it ideal for this dish. If you’re looking for a leaner option, you could substitute with chicken or even mushrooms for a vegetarian twist. -
2 tablespoons olive oil
Olive oil adds a lovely richness and flavor to the dish. If you prefer a lighter taste, avocado oil is a great alternative. -
4 cloves garlic, minced
Garlic is the star of this recipe! It adds depth and a warm aroma. Feel free to use roasted garlic if you’re looking for a milder, sweeter flavor. -
1 cup orzo pasta
Orzo is a tiny pasta that cooks quickly and absorbs flavors beautifully. If you’re gluten-free, look for a compatible rice-based orzo. -
4 cups beef broth
Homemade beef broth elevates the dish, but store-bought works just fine. Low-sodium versions are easier to control the saltiness. -
1 cup heavy cream
Cream provides a rich, velvety finish. For a lighter option, half-and-half or a non-dairy milk like coconut cream can be used. -
1 cup grated Parmesan cheese
Parmesan brings a nutty, salty taste that balances the creaminess. Pecorino Romano is a lovely substitute if you’d like something sharper. -
2 tablespoons butter
Butter enhances the flavors and give a glossy finish. Don’t skip it! For a healthier fat, you can replace it with additional olive oil. -
Salt and pepper to taste
Simple seasonings that let the dish shine. Fresh herbs or spices can augment the flavor if you like to experiment! -
Fresh parsley for garnish
A pop of color and freshness! Feel free to use other herbs like chives or basil if you have them on hand.
Step-by-Step Instructions
-
Sear the Steak
In a large skillet, heat the olive oil over medium-high heat. Add the sirloin steak pieces and season generously with salt and pepper. Sear for about 3-4 minutes until browned on all sides. This step is crucial to develop flavor! Once seared, remove the steak from the skillet and set aside. -
Sauté the Garlic
Lower the heat to medium and add the minced garlic to the same skillet. Sauté for about 30 seconds until fragrant—be careful not to burn it! The garlic should be golden but not brown, as it can turn bitter if overcooked. -
Add the Orzo
Stir in the orzo and toast it lightly in the garlic oil for about 2 minutes. This toasting step adds an extra layer of flavor. Once you smell that nutty aroma, you’re ready for the next step! -
Incorporate the Broth
Pour in the beef broth, stirring to combine. Bring it to a low boil, then reduce the heat and let it gently simmer. Cover the skillet and allow the orzo to cook for about 10 minutes or until it absorbs most of the liquid. Stir occasionally to prevent sticking and ensure even cooking. -
Cream It Up
When the orzo is almost cooked, it’s time to add your cream. Stir in the heavy cream and then add back the cooked steak. Allow everything to simmer together for an additional 2-3 minutes until the sauce thickens slightly. -
Finish with Cheese and Butter
Remove from heat and stir in the grated Parmesan cheese and butter until melted and creamy. Taste and adjust the seasoning as needed. The cheese will further enhance the creaminess and add a hint of umami. -
Garnish and Serve
Finally, sprinkle with fresh parsley to add color and freshness. I recommend serving this dish straight from the skillet—presentation is key, and it creates a cozy, inviting atmosphere!
Serving Suggestions
When it comes to plating this One Pot Creamy Garlic Butter Steak Orzo, keep it simple yet elegant. Serve it directly from the pot for that rustic touch, or use a large platter to display the beautiful, creamy orzo alongside the succulent steak bites. Add a sprinkle of extra Parmesan on top and a few fresh parsley leaves for that pop of color!
Pair your dish with a light salad—think arugula with lemon vinaigrette or a simple mixed green salad—to balance the richness of the orzo. And, of course, a glass of your favorite red wine will elevate the experience!
Recipe Variations
Want to mix things up a bit? Here are a few creative ideas:
- Herb-Infused: Add fresh herbs like thyme or rosemary while cooking the orzo for a fragrant twist.
- Cheesy Delight: Swap in different cheeses—try goat cheese or feta for a tangy flavor.
- Veggie Boost: Toss in some sautéed spinach or mushrooms in the final minutes for added color and nutrients.
- Spicy Kick: Sprinkle crushed red pepper flakes or add a dash of hot sauce if you’re feeling adventurous.
- Lemon Zest: A splash of lemon juice and some zest before serving can brighten the flavors beautifully.
Chef’s Notes
You know what’s funny? I almost didn’t combine steak with orzo. I grew up thinking pasta was only meant for marinara sauce or Alfredo. But then one day, as I was mulling over what to create for a gathering, I decided to put that delicious steak and creamy pasta together. It was a hit! This dish has evolved a lot but fundamentally stays true to that original spirit. It’s all about comfort with a touch of elegance, just like a beautifully set dinner table.
Whenever I whip this dish up, I see familiar faces light up and relish the experience of sharing food that nourishes both the body and the soul.
FAQs and Troubleshooting
-
Q: What if my orzo is overcooked?
A: If your orzo is mushy, it might be best to turn this dish into a creamy soup! Just add extra beef broth until it reaches the desired consistency. -
Q: Can I make this dish ahead of time?
A: Yes, you can prepare this dish a few hours in advance. Just store it in the fridge once cooled and reheat gently on the stove with a splash of broth or cream to loosen it up. -
Q: What’s the best way to store leftovers?
A: Store any leftovers in an airtight container in the fridge for up to 3 days. Reheat gently on the stove with a bit of additional liquid to keep it from drying out. -
Q: Can I use another type of pasta?
A: Absolutely! If you’ve got rice or another short pasta, feel free to substitute. Adjust the cooking time and liquid accordingly, as different pastas may require different timings.
Nutritional Info
(If you’d like to include this section, it would typically have calorie counts, macronutrient breakdowns, etc. You can tailor it based on specific nutritional guidelines or recommendations.)
I hope you’re excited to dive into this delightful One Pot Creamy Garlic Butter Steak Orzo! Whether it’s for a casual dinner or an intimate celebration, this dish will surely leave a lasting impression. Let’s tie on our aprons together and make something delicious! Happy cooking!
PrintOne Pot Creamy Garlic Butter Steak Orzo

A hearty and comforting one-pot dish featuring succulent steak, creamy garlic butter sauce, and perfectly cooked orzo. Quick to prepare, perfect for weeknights.
- Prep Time: 10 minutes
- Cook Time: 20 minutes
- Total Time: 30 minutes
- Yield: 4 servings 1x
- Category: Main Course
- Method: Stovetop
- Cuisine: Italian
- Diet: None
Ingredients
- 1 lb sirloin steak, cut into bite-sized pieces
- 2 tablespoons olive oil
- 4 cloves garlic, minced
- 1 cup orzo pasta
- 4 cups beef broth
- 1 cup heavy cream
- 1 cup grated Parmesan cheese
- 2 tablespoons butter
- Salt and pepper to taste
- Fresh parsley for garnish
Instructions
- Sear the steak: In a large skillet, heat the olive oil over medium-high heat. Add the sirloin steak pieces and season generously with salt and pepper. Sear for about 3-4 minutes until browned on all sides. Remove the steak and set aside.
- Sauté the garlic: Lower the heat and add the minced garlic to the skillet. Sauté for about 30 seconds until fragrant, being careful not to burn.
- Add the orzo: Stir in the orzo and toast it lightly in the garlic oil for about 2 minutes.
- Incorporate the broth: Pour in the beef broth, stirring to combine. Bring to a low boil, then reduce heat and cover the skillet. Let it simmer for about 10 minutes until the orzo absorbs most of the liquid.
- Cream it up: When the orzo is almost cooked, stir in the heavy cream and return the cooked steak to the skillet. Simmer for an additional 2-3 minutes until the sauce thickens.
- Finish with cheese and butter: Remove from heat and stir in the grated Parmesan cheese and butter until melted and creamy. Adjust seasoning as needed.
- Garnish and serve: Sprinkle with fresh parsley before serving directly from the skillet.
Notes
Feel free to experiment with different cheeses or add vegetables for variations. This dish pairs well with a light salad and a glass of red wine.
Nutrition
- Serving Size: 1 serving
- Calories: 450
- Sugar: 3g
- Sodium: 700mg
- Fat: 18g
- Saturated Fat: 9g
- Unsaturated Fat: 7g
- Trans Fat: 0g
- Carbohydrates: 45g
- Fiber: 2g
- Protein: 28g
- Cholesterol: 80mg
Keywords: one pot, creamy orzo, steak dish, quick dinner, comfort food