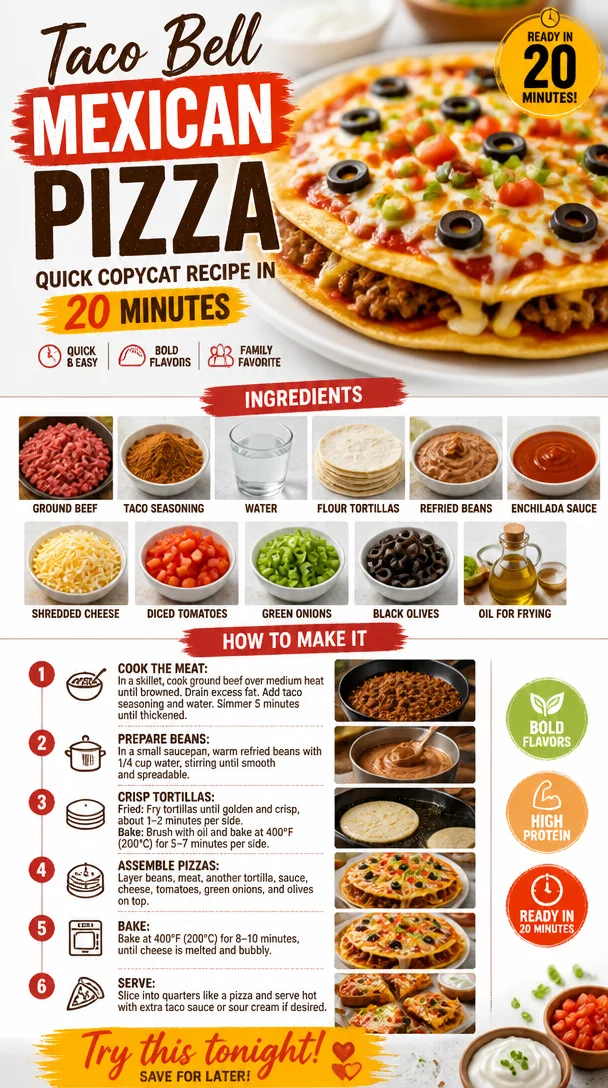
Taco Bell Mexican Pizza: Quick Copycat Recipe in 20 Minutes
The Ultimate Guide to Taco Bell Mexican Pizza: A Nostalgic Twist on a Classic Favorite
Hey there, food lovers! Today, we’re diving into a dish that has captured the hearts of many: the Taco Bell Mexican Pizza. It’s the kind of comfort food that transports us back to our teenage years, late-night cravings, and those carefree road trips with friends. If you’ve ever craved that crispy, cheesy goodness topped with all the flavors of the Southwest, you’re in for a treat.
When I think about the Mexican Pizza, I remember the first time I tried it during a friend’s birthday party. We were all huddled around a table, laughing and sharing stories, when someone pulled out that iconic box. The moment I took a bite, it was love at first taste! The crunchy tortillas, savory beef, creamy beans, and melty cheese all layered together made a flavor explosion that was nothing short of magical. That night, we devoured those pizzas faster than we could order more — and from then on, it became a staple on our gatherings.
But here’s the thing: you don’t need to hit the drive-thru to enjoy this deliciousness! Today, I’m excited to share my homemade version of Taco Bell’s Mexican Pizza, so you can whip it up in your own kitchen, enjoy it with your loved ones, and maybe even share some nostalgic stories of your own. Let’s gather around the table and create a meal that feels like a cozy throwback but is just as special today!
Personal Story
I vividly remember those summer evenings in my college town, where the local Taco Bell was the ultimate hangout spot. My friends and I would pile into our cars after late-night study sessions or weekend escapades, craving something quick and satisfying. One night, as we sat munching on delish Mexican pizzas, someone proposed a friendly debate: “What’s better, the tacos or the pizzas?” It turned into a playful rivalry, the laughter echoing through the parking lot as we passed around the food.
That evening sparked my passion for recreating those fast-food favorites in my own kitchen. I figured, why not take those beloved memories and transform them into something I could whip up anytime? Thus, the journey to perfect my homemade Mexican Pizza began. And guess what? It’s not just about the taste — it’s about gathering, connecting, and building new memories with every bite.
Ingredients
Let’s get into the deliciousness! Here’s what you’ll need to create your own Taco Bell Mexican Pizza at home:
For the Meat Filling:
- 1 lb ground beef (or ground turkey/chicken): This is your main protein. Ground beef gives that classic flavor, but turkey or chicken is great for a lighter option.
- 1 packet taco seasoning (or 2 Tbsp homemade blend): For that zesty kick! If you prefer to control the spices, using a homemade blend with chili powder, cumin, and garlic is a fantastic way to customize it.
- 2/3 cup water: This helps to create a juicy filling while cooking the meat.
For Assembly:
- 8 small (6-inch) flour tortillas (or corn tortillas, lightly fried): Flour tortillas are softer, while corn tortillas give a nice crunch. You can lightly fry them in oil for that perfect crispy texture.
- 1 can (15 oz refried beans): The creamy element that brings everything together! You can use black or pinto beans if that’s what you have on hand.
- 1/4 cup water (to thin beans slightly): A little splash makes the beans more spreadable — no one wants dry beans!
- 1 cup red enchilada sauce (or mild taco sauce): Adds a delightful saucy layer; feel free to use homemade if you have a favorite recipe!
- 2 cups shredded Mexican blend cheese (or cheddar/monterey jack): Cheese is a must! A Mexican blend will give you a range of flavors, but cheddar is perfectly delightful too.
- 1/2 cup diced tomatoes: Fresh and juicy, these bright flavors balance out the richness.
- 1/4 cup sliced green onions: They add a lovely crunch and a pop of color.
- 1/4 cup sliced black olives (optional): If you like a briny touch, throw some in — they’re an excellent addition!
- Oil for frying (or cooking spray if baking): If you’re going the frying route, you’ll need some oil; otherwise, cooking spray works wonders if baking.
Step-by-Step Instructions
Now that we have our ingredients, let’s get cooking! Follow me closely, and let’s build this beauty step by step.
-
Cook the Meat:
- In a large skillet over medium heat, add the ground beef (or turkey/chicken). Use a wooden spoon to break it apart as it cooks.
- Add the taco seasoning and water. Stir until the meat is evenly coated in the seasoning. Let it simmer for about 5 minutes or until fully cooked, stirring occasionally. Pro tip: If you’re using lean meats like turkey, consider adding a splash of olive oil to keep it moist!
-
Prepare the Tortillas:
- If you’re frying the tortillas for that authentic crunch, heat about ¼ inch of oil in another skillet over medium heat. When hot, carefully add a tortilla and fry for about 30 seconds on each side, or until golden brown. Drain on paper towels and repeat for all tortillas.
- If baking, preheat the oven to 400°F (200°C). Lightly spray tortillas with cooking spray, lay them on a baking sheet, and bake for about 5 minutes, flipping halfway through.
-
Thinning the Beans:
- In a small saucepan, combine the refried beans and 1/4 cup water. Heat over low while stirring, until smooth and spreadable. If you have homemade beans, this step is just as easy!
-
Assemble the Pizza:
- On a large flat surface or a baking sheet, start with two tortillas for the first layer. Spread a layer of refried beans, followed by the seasoned meat, and drizzle some enchilada sauce on top. Sprinkle a generous amount of cheese over it.
- Add another tortilla on top of that — you’re building layers here! Repeat with another layer of beans, meat, sauce, and cheese. Look at those delicious layers stacking up!
-
Bake the Pizzas:
- Once you’ve assembled your pizzas (you can create two or more depending on your grilling skill), pop them in the oven for about 10-15 minutes or until the cheese is all melty and bubbly. Getting as close to that Taco Bell experience as possible!
-
Garnish and Serve:
- Remove from the oven and top with diced tomatoes, green onions, and black olives if using. Slice into quarters and dig in!
Serving Suggestions
When it comes to plating, keep it casual and inviting. Serve the Mexican pizzas on colorful plates, and don’t hesitate to drizzle some extra enchilada sauce on top, or even a dollop of sour cream for added richness. A side of fresh guacamole and tortilla chips can round out your feast beautifully!
Recipe Variations
Feel free to get creative with your Mexican Pizza! Here are some tasty twists to try:
- Veggie Delight: Skip the meat and load up on sautéed bell peppers, mushrooms, and spinach for a flavorful vegetarian option.
- Spicy Kick: Add jalapeños or a sprinkle of cayenne pepper to the meat mixture for an extra spicy twist!
- BBQ Ranch Version: Use shredded rotisserie chicken mixed with BBQ sauce instead of taco seasoning.
- Breakfast Pizza: Swap the beef for scrambled eggs and add some breakfast sausage or bacon, topped with avocado slices.
- Cauliflower Tortillas: For a low-carb version, use cauliflower tortillas or make your own from cauliflower rice for a guilt-free treat.
Chef’s Notes
As I’ve grown more comfortable in the kitchen, I’ve come to appreciate the joy of experimenting with flavors. This Mexican Pizza recipe started as a nostalgic homage to Taco Bell but has evolved into something uniquely mine. When I make it, I often invite friends over for “build-your-own” style pizza night — each person personalizes their pizza with their favorite toppings. It’s a delightful way to catch up while playing with food!
And let me tell you, the kitchen doesn’t have to be serious business! I remember one time, in my eagerness, I accidentally mistook cayenne for paprika — let’s just say the spice level was a bit of a surprise for my guests! But we laughed it off and turned the whole evening into a spicy fiesta. It’s the moments like these that remind us why we cook.
FAQs and Troubleshooting
1. Why does my tortilla keep breaking?
- Make sure to heat them before assembly. If they’re too cold or dry, they tend to crack. Frying or lightly cooking them makes them more pliable.
2. Can I make this ahead of time?
- Absolutely! You can prepare the meat filling and beans, and assemble the pizzas up to a day in advance. Just keep them covered in the fridge — pop them in the oven when you’re ready to bake!
3. What can I substitute for refried beans?
- Black beans or even hummus can work in a pinch! Just mash them slightly and season to your preference.
4. How can I make it gluten-free?
- Opt for corn tortillas and ensure all sauces and ingredients are certified gluten-free. Double-check those labels!
Nutritional Info (optional)
While it’s all about enjoying this delightful treat, it’s good to know that each serving is packed with protein and flavor. A single slice (1/8 of the pizza) contains approximately:
- Calories: 250-300
- Protein: 15g
- Fat: 12g
- Carbohydrates: 30g
Enjoy every bite, and remember, the beauty of cooking lies in shared moments, laughter, and, of course, delicious food.
So, let’s dust off those aprons and get to work! Thanks for joining me today in creating a dish that’s sure to impress and bring back fond memories. Happy cooking!
PrintTaco Bell Mexican Pizza
Recreate the beloved Taco Bell Mexican Pizza in your own kitchen with layers of flavor and nostalgia.
- Prep Time: 15 minutes
- Cook Time: 30 minutes
- Total Time: 45 minutes
- Yield: 4 servings 1x
- Category: Main Course
- Method: Baking or Frying
- Cuisine: Mexican
- Diet: None
Ingredients
- 1 lb ground beef (or ground turkey/chicken)
- 1 packet taco seasoning (or 2 Tbsp homemade blend)
- 2/3 cup water
- 8 small (6-inch) flour tortillas (or corn tortillas, lightly fried)
- 1 can (15 oz) refried beans
- 1/4 cup water (to thin beans slightly)
- 1 cup red enchilada sauce (or mild taco sauce)
- 2 cups shredded Mexican blend cheese (or cheddar/monterey jack)
- 1/2 cup diced tomatoes
- 1/4 cup sliced green onions
- 1/4 cup sliced black olives (optional)
- Oil for frying (or cooking spray if baking)
Instructions
- Cook the meat: In a large skillet over medium heat, add the ground beef (or turkey/chicken). Use a wooden spoon to break it apart as it cooks. Add the taco seasoning and water. Stir until the meat is evenly coated. Let it simmer for about 5 minutes until fully cooked.
- Prepare the tortillas: If frying, heat about ¼ inch of oil in another skillet. Fry each tortilla for about 30 seconds on each side until golden brown. If baking, preheat the oven to 400°F (200°C) and bake the tortillas for about 5 minutes.
- Thinning the beans: In a small saucepan, combine the refried beans and 1/4 cup water. Heat over low while stirring, until smooth and spreadable.
- Assemble the pizza: On a baking sheet, start with two tortillas, layer with refried beans, seasoned meat, enchilada sauce, and cheese. Repeat with another tortilla and layers.
- Bake the pizzas: Once assembled, bake in the oven for about 10-15 minutes until the cheese is melted and bubbly.
- Garnish and serve: Remove from the oven and top with diced tomatoes, green onions, and olives. Slice into quarters and enjoy!
Notes
Experiment with toppings and feel free to make it vegetarian or add a spicy kick.
Nutrition
- Serving Size: 1 slice
- Calories: 275
- Sugar: 2g
- Sodium: 500mg
- Fat: 14g
- Saturated Fat: 6g
- Unsaturated Fat: 6g
- Trans Fat: 0g
- Carbohydrates: 34g
- Fiber: 5g
- Protein: 18g
- Cholesterol: 40mg
Keywords: Taco Bell, Mexican Pizza, comfort food, homemade, recipe

One-Pan Breakfast Pizza with Biscuits and Sausage Gravy
Biscuits and Sausage Gravy Breakfast Pizza: A Delicious Morning Treat
Hello, my fellow food lovers! Today, I’m super excited to share with you a dish that’s come to mean a lot to me over the years: Biscuits and Sausage Gravy Breakfast Pizza. Picture this: a delicious, warm pizza crust topped with creamy sausage gravy, fluffy scrambled eggs, and gooey cheese—a true morning masterpiece! This breakfast pizza combines two beloved classics in a way that’s not only indulgent but also surprisingly approachable. So, grab your apron, and let’s dive into this delightful recipe that will make your breakfast feel like a special occasion!
Personal Story
I still remember the first time I had the idea for breakfast pizza. It was a lazy Sunday morning, the kind where you linger in your pajamas, caffeinated bliss pulsing through your veins, and a little craving for something hearty starts to set in. It was my friends’ brunch gathering, and someone had brought over the most luscious homemade sausage gravy. As I savored each bite, I pondered how it would be on a crispy pizza crust. That’s the magic of cooking—every dish tells a story and reminds us of the people we cherish. This pizza not only carries those memories; it invites you to create new ones. So, whether it’s a cozy brunch with friends or a cheerful family breakfast, this pizza is your delicious passport to flavor-town!
Ingredients
Here’s what you’ll need for this delightful dish along with some helpful insights:
-
1 package (16 oz) breakfast sausage
A flavorful base! Go for your favorite brand. For a healthier option, you can use turkey or chicken sausage without sacrificing flavor. -
1/4 cup all-purpose flour
This will help thicken your gravy. Feel free to use gluten-free flour if that suits your needs—it works well in this recipe! -
2 cups milk, divided
I recommend whole milk for richness, but 2% works too. Alternatively, you can use almond milk for a dairy-free version, though I would recommend adjusting the seasoning slightly. -
Ground black pepper, to taste
A staple in the kitchen! Freshly ground gives a better punch. Add more or less depending on your spice tolerance! -
1 tbsp olive oil (optional)
This can help cook your sausage slightly faster and prevent sticking. If your sausage is high in fat, you might not need it at all. -
1 pre-baked pizza crust (12-inch)
Choose a thin, crispy crust for an enjoyable texture, or go for a thicker, fluffier style based on your preference! -
Cooking spray
A quick spritz on the pizza crust can prevent sticking and ensure golden-brown edges. -
6 large eggs
The star of the show! These will add fluffiness when scrambled. You can also replace these with egg-substitute for a lighter meal. -
1/4 cup milk (for eggs)
This makes your scrambled eggs extra creamy. You can use the same milk you use for the gravy! -
1 cup shredded Cheddar cheese (or more, as desired)
Cheddar brings a sharpness that complements the gravy beautifully. You can mix it up with Monterey Jack or Pepper Jack for added flavor! -
Crispy fried onions for topping
These add that perfect finishing crunch! You can find them at the grocery store, or you could make your own if you have time!
Step-by-Step Instructions
Now, let’s get cooking! Here’s how you whip up this Biscuits and Sausage Gravy Breakfast Pizza step by step.
-
Prepare the Gravy
Start by cranking your stovetop to medium heat. In a large skillet, add your breakfast sausage. If you’re using the olive oil, drizzle it in alongside your sausage. Cook until browned, breaking it apart with a spatula. This step not only adds flavor but creates a lovely base for your gravy!Chef Tip: If you prefer your sausage a little spicy, consider using a spicy blend or adding red pepper flakes into the skillet while the sausage cooks.
-
Create the Roux
Once the sausage is nicely browned (think golden goodness), sprinkle the flour directly over the sausage. Stir constantly for about 2 minutes. This roux will thicken your gravy. Don’t skip this step—it’s vital for flavor and texture!Fun Fact: The roux should turn a nice golden color without burning; that’s when you know it’s ready for the next step!
-
Whisk in the Milk
Gradually pour in 1.5 cups of the milk, stirring continuously to avoid lumps. Let the gravy simmer for about 5-7 minutes, stirring until it thickens to a creamy consistency. This is the moment your kitchen will start smelling heavenly!Chef Hack: If your gravy is too thick, don’t fret! Just add a splash more milk until you reach your desired consistency.
-
Season the Gravy
Season generously with ground black pepper (and salt, if you like it). Taste and adjust according to your preference. Remember, this is a flexible sauce, and you’re the chef! -
Prep the Eggs
In a separate bowl, whisk together your eggs and the remaining 1/4 cup of milk until fully combined. Season with a pinch of salt and pepper.Chef Insight: Whisking air into your eggs will make them incredibly fluffy while cooking. It’s all about that texture!
-
Scramble the Eggs
In another skillet over medium-low heat, scramble your egg mixture. Stir often, and focus on soft curds. Once they’re nearly done, remove from heat—they will continue to cook in the residual heat!Trick to Remember: You want them soft and creamy, not rubbery. Don’t overcook them!
-
Assemble the Pizza
Preheat your oven according to your pizza crust instructions (usually around 425°F). On a baking sheet, spray your pre-baked pizza crust with cooking spray. Pour the creamy sausage gravy evenly across the top, followed by the scrambled eggs.Chef Tip: Make sure to leave a little edge without gravy for an effortless slice later!
-
Cheese It Up
Generously sprinkle the shredded Cheddar cheese over the top. If you’re feeling extra cheesy, why not add more? -
Bake It
Pop the loaded pizza in the oven! Bake for about 10-15 minutes, or until the cheese is bubbly and lightly golden. You’ll know it’s perfect when those edges start to get crispy!Final Touch: If you like an extra crispy top, you can broil it on high for the last minute—just watch it closely!
-
Add a Crunch
Once out of the oven, garnish the pizza with crispy fried onions for that added layer of texture and flavor. Give it a couple of minutes to cool down, and then it’s time to slice and serve!
Serving Suggestions
When it comes to serving your Biscuits and Sausage Gravy Breakfast Pizza, presentation is key! I love to cut it into triangular slices and place them on a beautiful platter. You can add a sprinkle of fresh herbs like chives or parsley for a pop of color. Pair it with fresh fruit on the side for a refreshing contrast and to balance out all those rich flavors. If you want to go the extra mile, serve it alongside some mimosas or a rich coffee blend!
Recipe Variations
-
Veggie Delight: Add some sautéed peppers and onions to the sausage for a heartier flavor and extra nutrition.
-
Spicy Option: Spice it up by using hot breakfast sausage or adding jalapeños for a kick!
-
Herbed Twist: Stir in some fresh herbs, like thyme or rosemary, into the egg mixture for a fragrant twist.
-
Savory Swap: Try swapping the sausage for crumbled bacon or chorizo for a unique flavor profile.
-
Dairy-Free Delight: Use plant-based sausage and dairy-free cheese for a lighter, allergen-friendly option.
Chef’s Notes
This recipe has evolved over the years in my kitchen! The first time I made it, I was super cautious about the gravy and ended up with a lumpy mess—but that mistake led to so many delicious tweaks! I’ve experimented with various toppings and spices, all of which added their own special touch. Whenever I bring this dish to gatherings, it never fails to bring smiles and compliments. And if there are leftovers (which is rare), I love reheating a slice and having it for lunch!
FAQs and Troubleshooting
-
My gravy turned out lumpy. What happened?
No worries! It’s all about whisking it thoroughly! Make sure to add the milk slowly while stirring constantly. If it’s already lumpy, you can blend it with an immersion blender before serving. -
Can I make this pizza ahead of time?
Absolutely! You can prepare the components (the gravy and scrambled eggs) ahead of time. Simply assemble and bake when you’re ready to serve! -
What’s the best way to reheat leftovers?
You can warm it up in the oven at a low temperature or in the microwave. If using the oven, cover it with foil to keep it from drying out. -
How can I make this vegetarian?
Just swap the sausage for a hearty veggie crumble or mushrooms sautéed until golden! The gravy will still be just as creamy and delicious!
Nutritional Info
This recipe is rich in flavors and nutrients, delivering hearty satisfaction. Each serving provides protein from the sausage and eggs while giving you a balanced start to the day. As always, adjust according to your dietary needs!
There you have it, my friends! A delightful dish that brings comfort to the breakfast table while keeping your gatherings elegant and inviting. Biscuits and Sausage Gravy Breakfast Pizza is sure to nourish both body and soul, and it makes for fantastic memories around the table. Remember, cooking is all about sharing moments and flavors with those you love. So, tie on that apron and let’s make some breakfast magic! Bon appétit!
PrintBiscuits and Sausage Gravy Breakfast Pizza

A delicious breakfast pizza topped with creamy sausage gravy, fluffy scrambled eggs, and gooey cheese, perfect for a special morning treat.
- Prep Time: 15 minutes
- Cook Time: 30 minutes
- Total Time: 45 minutes
- Yield: 4 servings 1x
- Category: Breakfast
- Method: Baking
- Cuisine: American
- Diet: None
Ingredients
- 1 package (16 oz) breakfast sausage
- 1/4 cup all-purpose flour
- 2 cups milk, divided
- Ground black pepper, to taste
- 1 tbsp olive oil (optional)
- 1 pre-baked pizza crust (12-inch)
- Cooking spray
- 6 large eggs
- 1/4 cup milk (for eggs)
- 1 cup shredded Cheddar cheese (or more, as desired)
- Crispy fried onions for topping
Instructions
- Prepare the gravy: Heat your stovetop to medium heat and cook the breakfast sausage in a large skillet. If using, drizzle in olive oil. Cook until browned, breaking apart with a spatula.
- Create the roux: Once browned, sprinkle flour over the sausage and stir constantly for about 2 minutes.
- Whisk in the milk: Gradually pour in 1.5 cups of milk, stirring continuously. Let simmer for 5-7 minutes until thickened.
- Season the gravy: Add ground black pepper and adjust seasoning to taste.
- Prep the eggs: Whisk together the eggs and remaining 1/4 cup of milk in a separate bowl, seasoning with salt and pepper.
- Scramble the eggs: In another skillet, scramble the egg mixture over medium-low heat until soft and creamy.
- Assemble the pizza: Preheat oven and spray pre-baked pizza crust with cooking spray. Pour sausage gravy evenly across the top, followed by scrambled eggs.
- Cheese it up: Generously sprinkle shredded Cheddar cheese over the top.
- Bake it: Bake for 10-15 minutes until cheese is bubbly and golden.
- Add a crunch: Garnish with crispy fried onions before slicing and serving.
Notes
Serve with fresh fruit and a sprinkle of herbs for color. Pairs well with mimosas or coffee.
Nutrition
- Serving Size: 1 slice
- Calories: 450
- Sugar: 6g
- Sodium: 750mg
- Fat: 22g
- Saturated Fat: 9g
- Unsaturated Fat: 10g
- Trans Fat: 0g
- Carbohydrates: 40g
- Fiber: 2g
- Protein: 18g
- Cholesterol: 300mg
Keywords: breakfast pizza, sausage gravy, brunch recipe, breakfast ideas
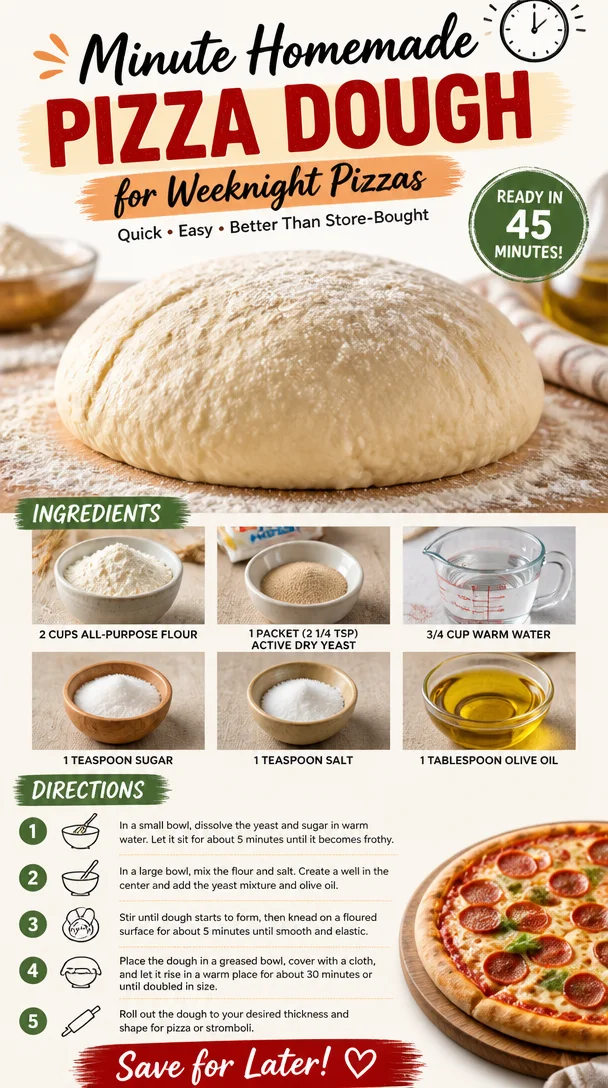
Minute Homemade Pizza Dough for Weeknight Pizzas
The Joy of Homemade: A Simple Guide to Easy Pizza Dough
Hello, kitchen adventurers! Today, we’re diving into something that makes hearts (and stomachs) sing: homemade pizza dough! There’s something so magical about the smell of fresh dough resting on your countertop and the thought of transforming it into your favorite pizza masterpiece. With this easy pizza dough recipe, you’ll be hosting pizza nights that your friends and family will talk about for weeks. So, roll up your sleeves, tie on your ivory apron, and let’s get started!
A Slice of Nostalgia
When I think of pizza, my mind takes me back to childhood, sitting in my grandmother’s dimly lit kitchen surrounded by family. The air was filled with the aroma of melting cheese, bubbling tomato sauce, and the earthy scent of fresh basil. I remember her flour-dusted apron and the twinkle in her eye as she rolled out the dough. We used to gather around the table to shape our own pizzas, each of us crafting our own delicious work of art. It was messy, it was chaotic, but most importantly, it was filled with laughter and togetherness.
One evening, after a bit too much flour had made its way onto the floor, we came up with an “official” title for our creations—“pizza masterpieces.” Each was so unique, from the toppings we chose to the shapes we made. That joyful spirit of creativity and connection is what I want to capture in today’s recipe. Making your own pizza dough might seem a little labor-intensive, but trust me—it’s worth every second when you see your loved ones gathered around the table, ready to enjoy what you’ve created together.
What You’ll Need: Ingredients
Before we jump into the process, let’s gather our ingredients.
-
2 cups all-purpose flour
A versatile choice for creating that perfect base. You can substitute with whole wheat flour for a nuttier flavor or gluten-free flour if you’re avoiding gluten. Just keep in mind that it may affect the texture slightly. -
1 packet (2 1/4 tsp) active dry yeast
This little magic granule helps the dough rise! If you don’t have active dry yeast, you can use instant yeast, which doesn’t require proofing. Just toss it in with the flour! -
3/4 cup warm water
The warmth is crucial for activating the yeast. Make sure it’s not too hot (aim for around 110°F) or it can kill the yeast. If you’re unsure, let it cool for a few moments after boiling. -
1 teaspoon sugar
Just a touch to feed the yeast! It helps the dough rise and adds a hint of sweetness. For a sugar substitute, agave syrup or honey can work too! -
1 teaspoon salt
Essential for flavor! Don’t skip it; it balances the dough. If you’re cutting back on sodium, you can reduce it to 1/2 teaspoon. -
1 tablespoon olive oil
This adds richness and flavor. You can swap it with melted butter or any neutral oil like vegetable or canola oil if you prefer.
Step-by-Step Instructions
Now let’s get to the fun part! Here’s how to make your easy pizza dough step by step:
-
Activate the Yeast: In a mixing bowl, combine the warm water, yeast, and sugar. Stir lightly and let it sit for about 5–10 minutes until it becomes frothy. This shows the yeast is alive and ready to work its magic!
-
Mix the Dry Ingredients: In a large bowl, whisk together the flour and salt. Ensure they’re well combined. Whisking helps to aerate the flour, which makes for a lighter dough.
-
Combine Wet and Dry: Create a well in the center of the flour mixture and pour in the activated yeast mixture and olive oil. Use a fork to mix until a shaggy dough begins to form. It will be quite sticky at this point—don’t worry, that’s perfect!
-
Knead the Dough: Dust your countertop with a little flour and transfer the dough onto it. Knead for about 5–7 minutes until it’s smooth and elastic. If the dough is too sticky, sprinkle a little extra flour as you knead. Proudly channel your inner chef here!
-
Let It Rise: Once kneaded, shape the dough into a ball and place it into a lightly greased bowl. Cover with a damp cloth or plastic wrap. Let it rise in a warm place for about 1 hour, or until it has doubled in size. This is the perfect time to clean up or prepare your toppings!
-
Preheat Your Oven: About 30 minutes before you’re ready to bake, preheat your oven to 475°F (245°C). If you’re using a pizza stone, place it in the oven while it’s heating to ensure it’s hot enough to create a crispy crust.
-
Shape Your Pizza: Once the dough has risen, punch it down to release the air and turn it out onto a floured surface. Divide it into two halves if you want to make two pizzas (or save half for later!). Roll it out with a rolling pin or stretch it by hand to your desired thickness.
-
Top and Bake: Now comes the fun part! Add your favorite sauce, cheese, and toppings. Slide your pizza onto the hot pizza stone or a baking sheet. Bake for 10-12 minutes, or until the cheese is bubbling and the crust is golden brown.
Serving Suggestions
Once your pizza is out of the oven, it’s time to serve! Let it cool for a couple of minutes, then slice it up with a sharp pizza cutter. For an extra touch, drizzle a little olive oil or sprinkle fresh herbs over the top. Presenting your creation on a wooden board with some fresh arugula or a side salad makes it feel extra special. Enjoy with a fresh glass of sparkling water or your favorite beverage!
Recipe Variations
Here are a few fun twists to try with your pizza dough:
-
Herbed Dough: Add 1 tablespoon of Italian seasoning or fresh herbs like rosemary or basil into the flour for extra flavor.
-
Whole Wheat Dough: Swap half of the all-purpose flour with whole wheat for a nutty taste and added nutrition.
-
Cheese-Stuffed Crust: Roll the edges of the dough around some mozzarella sticks before baking for a cheesy surprise!
-
Calzone Variation: Use half the dough to create a delicious calzone stuffed with your favorite fillings.
Chef’s Notes
Over the years, this pizza dough recipe has grown alongside my love for hosting. I started off with a very basic formula and tweaked it as I discovered different flavors and techniques. The best part? I’ve hosted various pizza parties where guests create their own masterpieces, just like I did with my grandmother. There’s magic in that shared experience—the laughter, the taste of crispy crust, and the delight of cooking together.
And don’t get me started on the joy of leftovers! Cold pizza for breakfast? Yes, please! Sometimes I reinvent the dough too, using toppings from the previous night’s meal.
FAQs and Troubleshooting
Q: My dough isn’t rising. What went wrong?
A: It could be that your yeast is expired or the water was too hot. Make sure your water is warm, not boiling! If it’s your first time, double-check the expiration on the yeast packet.
Q: Can I freeze the dough?
A: Absolutely! After the first rise, you can wrap the dough tightly in plastic wrap and store it in the freezer for up to three months. Just defrost in the fridge overnight when you’re ready to use it.
Q: My pizza crust is too thick and doughy. How can I make it thinner?
A: When shaping the pizza, be sure to stretch it out evenly. If you prefer a thinner crust, roll it out to about 1/4 inch thick instead of 1/2 inch.
Q: How can I make the crust crispier?
A: Preheating your oven and pizza stone is crucial! Also, using a baking sheet directly on the oven rack can help. For an even crisper crust, you can also bake the pizza on a perforated pizza pan.
Nutritional Info (optional)
While I focus more on deliciousness than nutritional details, here’s a rough estimation for one serving of this pizza dough (based on the entire recipe divided into 4 servings):
- Calories: 150
- Protein: 4g
- Fat: 3g
- Carbohydrates: 26g
Remember, toppings will vary, so be sure to factor those in as well!
And there you have it! Your easy pizza dough recipe is ready to inspire countless culinary creations. Remember, cooking is all about joy and connection, so gather your friends and family, and let’s make some pizza memories! Bon appétit!
PrintHomemade Pizza Dough
An easy and versatile recipe for making homemade pizza dough, perfect for family pizza nights.
- Prep Time: 15 minutes
- Cook Time: 12 minutes
- Total Time: 1 hour 27 minutes
- Yield: 4 servings 1x
- Category: Main Course
- Method: Baking
- Cuisine: Italian
- Diet: Vegetarian
Ingredients
- 2 cups all-purpose flour
- 1 packet (2 1/4 tsp) active dry yeast
- 3/4 cup warm water
- 1 teaspoon sugar
- 1 teaspoon salt
- 1 tablespoon olive oil
Instructions
- Activate the yeast: In a mixing bowl, combine the warm water, yeast, and sugar. Stir lightly and let it sit for about 5–10 minutes until it becomes frothy.
- Mix the dry ingredients: In a large bowl, whisk together the flour and salt.
- Combine wet and dry: Create a well in the center of the flour mixture and pour in the activated yeast mixture and olive oil.
- Knead the dough: Dust your countertop and transfer the dough. Knead for about 5–7 minutes until smooth and elastic.
- Let it rise: Shape the dough into a ball and place it in a greased bowl. Cover and let it rise for about 1 hour.
- Preheat your oven: About 30 minutes before baking, preheat your oven to 475°F (245°C).
- Shape your pizza: Punch down the risen dough and divide if making two pizzas. Roll out to desired thickness.
- Top and bake: Add your favorite toppings and bake for 10-12 minutes, or until golden brown.
Notes
For a unique flavor, try adding Italian seasoning or using whole wheat flour. Leftover dough can be frozen for later use.
Nutrition
- Serving Size: 1 serving
- Calories: 150
- Sugar: 1g
- Sodium: 400mg
- Fat: 3g
- Saturated Fat: 0.5g
- Unsaturated Fat: 2g
- Trans Fat: 0g
- Carbohydrates: 26g
- Fiber: 1g
- Protein: 4g
- Cholesterol: 0mg
Keywords: pizza, dough, homemade, Italian, family recipe
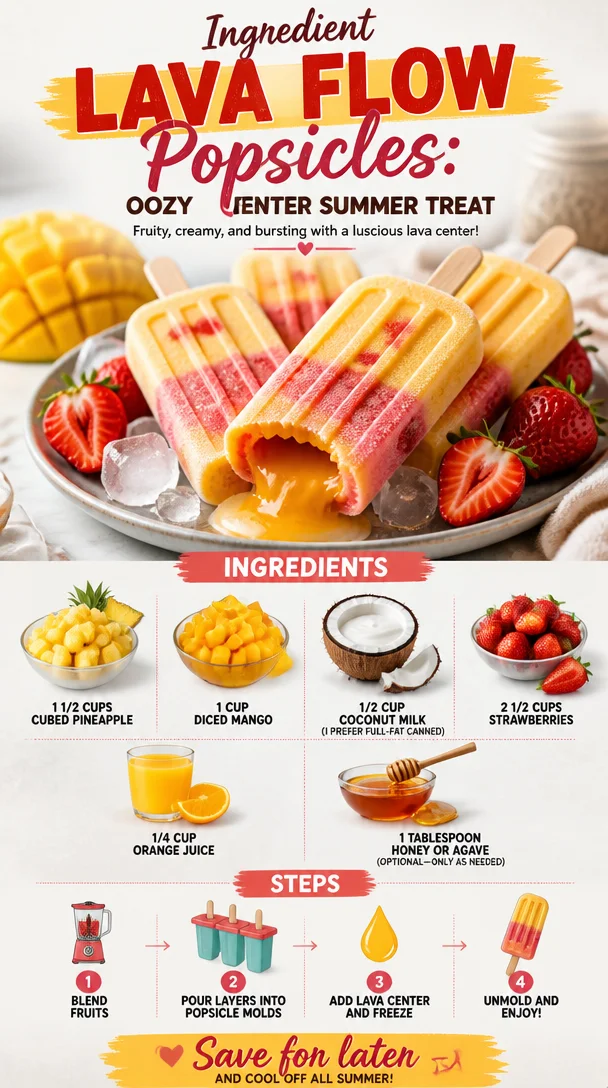
Ingredient Lava Flow Popsicles: Oozy Center Summer Treat
Dive into Delight: Lava Flow Popsicles
Introduction
Hello, food lovers! Are you feeling the heat of summer? If so, there’s nothing quite like a refreshing treat to keep things cool while satisfying your sweet tooth. Today, I’m excited to share with you a recipe that’s bursting with tropical flavors and nostalgic memories—Lava Flow Popsicles! These delightful frozen creations not only tantalize your taste buds but also transport you straight to a sun-kissed beach with each bite.
Picture yourself lounging in the sun, ocean waves crashing in the distance, while you indulge in these stunning popsicles. With their vibrant colors and layers of fruit, they’re as fun to make as they are to eat. Plus, they’re a fantastic activity to involve the little ones in. Have them help you blend, pour, and, of course, taste! You’ll not only create a delicious treat together but also memories that will last a lifetime.
If you’re looking for something simple, refreshing, and oh-so-tasty, you’re in the right place. These Lava Flow Popsicles require minimal ingredients and effort, but oh, do they deliver on flavor! Whether you need a way to cool down on a hot summer day, want to impress guests at your next gathering, or simply crave a healthy dessert option, these popsicles are your perfect solution. So, let’s roll up our sleeves, grab our ingredients, and bring a splash of summer into our kitchens!
Personal Story
I still remember the first time I had a lava flow drink—sipping on it while soaking in the sun at a beachside bar, surrounded by palm trees and laughter. The bartender artfully layered the vibrant colors, and I marveled at how something so delightful could also look like a work of art! I instantly fell in love with the blend of coconut, strawberry, and the golden notes of pineapple and mango. It felt like summer in a glass!
Years later, when I started experimenting with popsicle recipes, the lava flow drink quickly came to mind. I couldn’t shake the thought of creating a frozen dessert that mirrored those sun-drenched memories—all while being easy enough to whip up in my kitchen. The Lava Flow Popsicles were born from this inspiration—bringing a touch of nostalgia to every bite while keeping things super simple and downright delicious. Now, every time I make these pops, I’m reminded of that blissful day by the beach, evoking warm vibes and blissful summer memories. Let’s channel that tropical energy together as we make these delightful popsicles!
Ingredients
-
1 1/2 cups cubed pineapple
Sweet, juicy pineapple adds the perfect tropical touch. You can use fresh or canned pineapple, but make sure it’s packed in juice rather than syrup for a healthier option. -
1 cup diced mango
Mango provides a lovely sweetness and a beautiful golden color. Frozen mango is a great substitute if you don’t have fresh mango on hand—just let it thaw a bit before blending. -
1/2 cup coconut milk (I prefer full-fat canned)
This creamy addition creates that luscious texture we adore. Full-fat coconut milk works best for a richer flavor, but you can also use light coconut milk for a lighter option. -
2 1/2 cups strawberries
Strawberries bring that bright red color and a flavorful tang. Fresh strawberries are fantastic, but if they’re out of season, frozen strawberries work well too—just defrost them first. -
1/4 cup orange juice
A splash of orange juice brightens the flavors and adds a refreshing zing. Freshly squeezed is always best, but store-bought works in a pinch! -
1 Tablespoon honey or agave (optional – only as needed)
Adjust the sweetness to your liking! If your fruit is very sweet, you may not need any sweetener, but honey or agave is a great addition if you want to enhance the flavor.
Step-by-Step Instructions
-
Prep Your Ingredients
Start by gathering all your fruits. If you’re using fresh pineapple and mango, peel and chop them into cubes. For strawberries, remove the stems and chop any large ones in half. This makes blending a breeze! -
Blend the Pineapple Layer
In a blender, combine the cubed pineapple and half of the coconut milk. Blend until smooth and creamy. Taste and see if it needs a bit of sweetness; if so, add honey or agave. -
Prepare the Mango Layer
Next, rinse out the blender (or wipe it down if you’re feeling lazy). Add in the mango chunks and the rest of the coconut milk. Blend until creamy. This layer should be luxurious and smooth! -
Create the Strawberry Layer
Now, it’s strawberry time! Add the strawberries to the cleaned blender along with the orange juice. Blend until well-combined. You might notice a delicious tang here; that’s what we want! -
Layer Your Popsicles
Grab your popsicle molds and start layering! Begin with a couple of tablespoons of the pineapple mixture, then add the mango layer. It’s okay if they mix a bit; that’s part of the charm! Finally, top with the strawberry layer. Continue this until the molds are filled, leaving a little space at the top for expansion. -
Insert Sticks and Freeze
If your popsicle molds come with lids, put them on. Otherwise, insert popsicle sticks directly into the molds. Place them in the freezer for at least 4-6 hours or until fully frozen. If you’re feeling impatient (we’ve all been there), try giving them a few hours and then testing one! -
Unmold and Enjoy!
Once the popsicles are frozen, run warm water over the outside of the molds to help release them easily. Serve these up right away—they won’t last long once your guests (or family!) get a taste!
Serving Suggestions
To display your Lava Flow Popsicles, arrange them upright in a colorful bowl filled with ice for a fun presentation! You can also serve them on wooden boards with tropical-themed decorations, like slices of fresh fruit and a sprig of mint for an elegant touch. The vibrant colors speak for themselves, so let them shine!
Recipe Variations
- Berry Burst: Swap out the strawberries for blueberries or raspberries for a different fruit combo!
- Citrus Splash: Instead of orange juice, try lemon or lime for a zesty twist.
- Creamy Coconut: Use more coconut milk in the pineapple or mango layers for an extra creamy popsicle!
- Tropical Additions: Add a handful of spinach to the mango layer for a vibrant green, nutrient-packed boost!
- Boozy Popsicles: For an adult twist, add a splash of rum or coconut flavored liqueur to the coconut milk.
Chef’s Notes
I love how versatile this recipe can be! Over the years, I’ve played around with different fruits and layers, discovering that almost any combination works beautifully. One time, I got adventurous and added a splash of passion fruit puree for an explosion of flavor—talk about tropical bliss!
Here’s a fun kitchen story: the first time I attempted to make these popsicles, I was eager to show them off at a summer gathering. However, I completely forgot to check the freezer! They were still liquid when it was time to serve. Let’s just say, there was a lot of laughter as we enjoyed a colorful fruit slush instead!
FAQs and Troubleshooting
1. My popsicles won’t come out of the molds, what do I do?
Running the molds under warm water for a few seconds should help release the popsicles. If they’re still stuck, let them sit for a moment, and try again.
2. Can I make these ahead of time?
Absolutely! Lava Flow Popsicles store well in the freezer for about 3 weeks. Just wrap them in plastic wrap or place them in a zip-top bag to prevent freezer burn.
3. What if I don’t have popsicle molds?
No molds, no problem! Use paper cups and wooden sticks or even ice cube trays for mini pops—it will work just fine!
4. Can I use frozen fruit?
Definitely! Frozen fruit is a fantastic option, but be sure to let it thaw slightly before blending to get the right consistency.
Nutritional Info
These popsicles are not only a delightful treat but also a healthier choice compared to store-bought desserts. Each popsicle is made primarily from fruit and coconut milk, providing a dose of vitamins, minerals, and healthy fats. For a specific nutritional breakdown, feel free to calculate based on the quantities given, but you can rest assured they’re a guilt-free indulgence!
With this Lava Flow Popsicle recipe, you’re all set for a slice of summer bliss, any time of year. I can’t wait for you to try these and share your tropical moments. Cheers to sweet memories and even sweeter treats! 🍍✨
PrintLava Flow Popsicles

Refreshing and vibrant Lava Flow Popsicles bursting with tropical flavors—perfect for cooling down on hot summer days!
- Prep Time: 15 minutes
- Cook Time: 0 minutes
- Total Time: 360 minutes
- Yield: 8 servings 1x
- Category: Dessert
- Method: Freezing
- Cuisine: Tropical
- Diet: Vegan
Ingredients
- 1 1/2 cups cubed pineapple
- 1 cup diced mango
- 1/2 cup full-fat coconut milk
- 2 1/2 cups strawberries
- 1/4 cup orange juice
- 1 Tablespoon honey or agave (optional)
Instructions
- Prep your ingredients by gathering all fruits and chopping as needed.
- Blend the pineapple layer, mixing cubed pineapple with half the coconut milk until smooth.
- Prepare the mango layer by blending mango chunks with the remaining coconut milk.
- Create the strawberry layer by blending strawberries with orange juice.
- Layer your popsicles by starting with a pineapple mixture, then adding mango, and topping with the strawberry layer.
- Insert popsicle sticks and freeze for at least 4-6 hours.
- Unmold the popsicles by running warm water over the molds and enjoy!
Notes
These popsicles can be stored in the freezer for about 3 weeks. You can also use different fruit combinations or even add a splash of rum for an adult twist.
Nutrition
- Serving Size: 1 popsicle
- Calories: 150
- Sugar: 18g
- Sodium: 5mg
- Fat: 6g
- Saturated Fat: 5g
- Unsaturated Fat: 1g
- Trans Fat: 0g
- Carbohydrates: 25g
- Fiber: 3g
- Protein: 1g
- Cholesterol: 0mg
Keywords: popsicles, summer treat, tropical dessert, healthy dessert, refreshing snacks

Healthy Greek Yogurt Lemon Loaf Cake
Healthy Greek Yogurt Lemon Loaf Cake: A Culinary Hug in Every Slice
Hello, fellow food enthusiasts! Today, we’re diving into a delicately aromatic world of sunshine and sweetness with a recipe that will elevate your dessert game — Healthy Greek Yogurt Lemon Loaf Cake. This delectable cake is not only irresistibly moist and zesty, but it also packs a punch of protein thanks to the Greek yogurt. So grab your apron, tie it on, and let’s whip up something extraordinary that will delight your taste buds and warm your heart.
A Slice of Nostalgia
Let me whisk you back in time for a moment. I remember the first time I had a lemon loaf cake — I was at my Aunt Clara’s house for one of our summer family gatherings. She had this enchanting garden filled with vibrant flowers and herbs, and the aroma of her kitchen was like a warm hug from the sun. That day, she brought out a lemon loaf cake that was so fluffy and fragrant, it practically sang "summertime" with every bite!
As I took a slice, the tangy lemon danced with the sweet undertones, and the texture was unlike any dessert I’d had before. I practically begged her for the recipe, which she graciously shared — though she tossed in a playful reminder that a little love and creativity in the kitchen goes a long way. Inspired by those early memories and my love for healthy cooking, I wanted to create a version that packed all the flavor without sacrificing nutrition. Enter this Healthy Greek Yogurt Lemon Loaf Cake!
Ingredients
Here’s what you’ll need to create this zesty masterpiece:
-
1½ cups all-purpose flour
A staple in any kitchen, all-purpose flour can also be substituted with whole wheat flour for added fiber and nutrition. -
2 large eggs
Eggs provide structure and moisture. For a vegan option, you can use flaxseed eggs (1 tbsp flaxseed meal + 2.5 tbsp water = 1 egg). -
1 cup plain unsweetened Greek yogurt (whole-milk recommended)
This is the star ingredient, adding creaminess and a wonderful tang. If you want to lighten it further, opt for fat-free Greek yogurt. -
½ cup honey or maple syrup
Both sweeteners add a natural sweetness. Maple syrup will give it a deeper flavor, while honey lends a floral note. -
¼ cup neutral oil (vegetable, canola, or light olive oil)
Oil contributes to the cake’s moisture. Avocado oil is a lovely, heart-healthy alternative! -
¼ cup freshly squeezed lemon juice
Fresh juice is key for that zesty punch! Bottled lemon juice lacks the bright flavor, so make the squeeze worthwhile. -
Zest of 2 lemons
Lemon zest adds an intense, aromatic lemony flavor. Always zest before juicing — it’s a game-changer! -
2 tsp baking powder
This helps the cake rise. Ensure it’s fresh for the best results! -
½ tsp salt
A little salt enhances sweetness and balances flavors beautifully. -
1 tsp vanilla extract
This adds depth and warmth to your cake, reminiscent of an inviting kitchen filled with love.
Step-by-Step Instructions
Let’s get down to business and bake this delightful lemon loaf cake! Make sure to preheat your oven to 350°F (175°C), and grease a loaf pan while daydreaming about the deliciousness that’s coming your way.
-
Mix the Wet Ingredients: In a large bowl, whisk together the Greek yogurt, eggs, honey or maple syrup, oil, lemon juice, lemon zest, and vanilla extract until smooth. Make sure everything is well combined, like old friends catching up over a cup of tea!
-
Combine Dry Ingredients: In another bowl, whisk together the flour, baking powder, and salt. This little separation allows the baking powder to distribute evenly — think of it as a dance party where everyone gets a chance to shine!
-
Mix Wet and Dry Together: Gradually fold the dry ingredients into the wet mixture, stirring gently until just combined. Be careful not to overmix — we want a fluffy cake, not a dense brick!
-
Pour into the Pan: Transfer the batter into your prepared loaf pan. Smooth the top using a spatula so it bakes evenly.
-
Bake: Pop it in the oven and let it work its magic for about 45-50 minutes. The cake is ready when a toothpick inserted in the center comes out clean. Enjoy the delightful aroma filling your home — it’s like an invitation for the neighbors to stop by for a taste!
-
Cool Down: Once baked, cool the loaf in the pan for about 10-15 minutes. Then, carefully transfer it to a wire rack to cool completely. This is the hard part — the smell will make it tempting to dive right in!
Serving Suggestions
Now, how do we present this lovely loaf? Slicing it while it’s still warm is a treat, but for the perfect serving, allow it to cool completely first. Serve it on a beautiful platter with a dusting of powdered sugar or a drizzle of a lemon glaze (just mix some powdered sugar with lemon juice). Garnish with fresh berries or a sprig of mint to make it pop!
Recipe Variations
Feeling adventurous? Here are a few creative twists you can try with this lemon loaf cake:
-
Berry Burst: Add a cup of fresh blueberries or diced strawberries to the batter for a fruity surprise.
-
Nutty Addition: Fold in some chopped walnuts or almonds for crunch and a boost of healthy fats.
-
Coconut Twist: Swap half the Greek yogurt for coconut yogurt and add unsweetened shredded coconut for a tropical vibe!
-
Spicy Surprise: Add a teaspoon of ground ginger or cardamom for a spiced version — perfect for cozy evenings.
Chef’s Notes
This cake has a special place in my kitchen not just for its taste, but also for its versatility. Over the years, I’ve played with the ingredients, adapting it for seasonal flavors and occasions. One funny story: I once made this loaf for a friend’s birthday, but mistook baking soda for baking powder. Let’s just say the resulting cake had some interesting “character.” A quick lesson that always double-checking your spices can save the day!
FAQs and Troubleshooting
-
Why did my cake sink?
This can happen if the batter was overmixed or if it went into the oven too early. Ensure all ingredients are prepped and ready before starting! -
Can I make this cake gluten-free?
Absolutely! Substitute the all-purpose flour with a gluten-free blend. Just make sure it contains xanthan gum for structure. -
How can I store leftover cake?
Wrap it in plastic wrap and store it in the fridge for up to a week. You can also freeze slices for enjoying later — just thaw and enjoy! -
Can I make this as muffins?
Yes! This recipe can be transformed into muffins; just reduce baking time to around 20-25 minutes, keeping an eye on doneness.
Nutritional Info
While I won’t provide exact numbers, rest assured this cake, thanks to Greek yogurt and natural sweeteners, is a lighter option than traditional desserts. It combines healthy fats with proteins and the zesty goodness of lemons, making it a delightful treat you can feel good about!
So there you have it — a slice of Healthy Greek Yogurt Lemon Loaf Cake ready to brighten up your day! Whether you’re sharing it with loved ones or simply treating yourself, each bite is a little moment of joy. Let’s keep celebrating the art of cooking together. Happy baking!
PrintHealthy Greek Yogurt Lemon Loaf Cake

A moist and zesty loaf cake made with Greek yogurt, perfect for a healthy dessert option.
- Prep Time: 15 minutes
- Cook Time: 50 minutes
- Total Time: 65 minutes
- Yield: 8 servings 1x
- Category: Dessert
- Method: Baking
- Cuisine: Greek
- Diet: Healthy
Ingredients
- 1½ cups all-purpose flour
- 2 large eggs
- 1 cup plain unsweetened Greek yogurt
- ½ cup honey or maple syrup
- ¼ cup neutral oil (vegetable, canola, or light olive oil)
- ¼ cup freshly squeezed lemon juice
- Zest of 2 lemons
- 2 tsp baking powder
- ½ tsp salt
- 1 tsp vanilla extract
Instructions
- Preheat your oven to 350°F (175°C), and grease a loaf pan.
- Mix the Wet Ingredients: In a large bowl, whisk together the Greek yogurt, eggs, honey or maple syrup, oil, lemon juice, lemon zest, and vanilla extract until smooth.
- Combine Dry Ingredients: In another bowl, whisk together the flour, baking powder, and salt.
- Mix Wet and Dry Together: Gradually fold the dry ingredients into the wet mixture, stirring gently until just combined.
- Pour into the Pan: Transfer the batter into your prepared loaf pan and smooth the top using a spatula.
- Bake: Let it bake for about 45-50 minutes until a toothpick inserted in the center comes out clean.
- Cool Down: Cool the loaf in the pan for about 10-15 minutes, then transfer it to a wire rack to cool completely.
Notes
For variation, try adding berries, nuts, shredded coconut, or spices for a unique twist on the classic flavor.
Nutrition
- Serving Size: 1 slice
- Calories: 250
- Sugar: 10g
- Sodium: 200mg
- Fat: 8g
- Saturated Fat: 1g
- Unsaturated Fat: 7g
- Trans Fat: 0g
- Carbohydrates: 37g
- Fiber: 2g
- Protein: 7g
- Cholesterol: 60mg
Keywords: lemon loaf, Greek yogurt cake, healthy dessert, moist cake, zesty cake

Protein-Packed Greek Yogurt Blondie Brownies (One-Bowl)
Indulge in Healthy Decadence: Greek Yogurt Blondie Brownies
Hello, fellow food lovers! Today, we’re diving into a recipe that’s all about balance—healthy enough for a guilt-free snack yet decadent enough to satisfy that sweet tooth. Meet my Greek Yogurt Blondie Brownies! These delightful treats are the perfect blend of rich flavors and wholesome ingredients, allowing you to indulge without remorse.
Imagine this: a soft, chewy brownie that’s melted in your mouth, bursting with notes of peanut butter and a hint of chocolate—oh, yes, please! And the secret? We’re using Greek yogurt to add moisture and creaminess while packing an extra protein punch. So, get your apron on, pour a little something sparkling, and let’s whip up these beauties together!
A Sweet Memory to Share
I still remember the first time I discovered the power of Greek yogurt in baking. It was at a cozy little café in my hometown, where I’d often meet friends for coffee and pastries after our Saturday morning farmer’s market excursions. One day, I stumbled upon their special: Greek Yogurt Brownies. Intrigued, I ordered one and was blown away. It was rich, fudgy, and had this wonderful moist texture. That little box of goodies sparked a flurry of ideas back in my own kitchen.
That inspired me to combine two of my go-to flavors—peanut butter and chocolate—in a blondie version, swapping out the butter and oil for creamy Greek yogurt. The result? An absolute game changer! And I think you’re going to love it just as much as I do.
Let’s Gather Our Ingredients
Before we unleash the magic, here’s what you’ll need to bring this gorgeous recipe to life:
-
1 ¼ cups thick Greek yogurt (divided): The star of our show! Greek yogurt adds moisture and richness while providing protein. For a dairy-free version, opt for coconut yogurt—just pick one without added sugars.
-
½ cup maple syrup: This natural sweetener brings a warm, caramel flavor. You can swap it with honey or agave syrup, but be sure to adjust the moisture a bit since honey is denser.
-
⅓ cup crunchy peanut butter: We want those delightful nutty chunks! Feel free to use almond butter or sunflower seed butter if you’re looking for a nut-free option.
-
1 cup oat flour: This gluten-free alternative is light and gives the blondies a lovely texture. You can make your own oat flour by blending rolled oats in a blender until fine.
-
2 tsp baking powder: Our rising agent! Make sure it’s fresh for the best fluffiness.
-
¼ tsp salt: A pinch of salt balances the sweetness and enhances all the flavor elements.
-
½ cup cocoa powder: This adds a rich chocolatey depth. You can use raw cacao powder for an extra health boost.
-
¼ cup dark chocolate (chopped): Because who doesn’t love bits of chocolate? You can trade this for chocolate chips if that’s what you have on hand.
Step-by-Step Instructions
Now that we have everything prepped, let’s get these blondies baking!
-
Preheat the Oven: First things first, preheat your oven to 350°F (175°C). Grease an 8-inch square baking dish or line it with parchment paper for easy removal.
-
Mix the Wet Ingredients: In a large mixing bowl, combine 1 cup of the Greek yogurt, maple syrup, and peanut butter. Whisk them together until smooth and creamy. This step is key—getting a good emulsification means a more consistent batter!
-
Combine the Dry Ingredients: In another bowl, mix oat flour, baking powder, salt, and cocoa powder. Stir well to break up any clumps—you want these ingredients to blend seamlessly into your wet mix.
-
Mix Everything Together: Pour the dry mixture into the wet mixture. Gently fold the ingredients together until just combined. Overmixing can lead to dense blondies, and we want them soft and chewy!
-
Chocolate Touch: Fold in the chopped dark chocolate. This will add delightful pockets of melted chocolate that feel like little surprises as you bite into it.
-
Transfer to Baking Dish: Spread the batter evenly in your prepared baking dish. Use a spatula to smooth out the top—don’t worry about perfection; we want rustic charm here!
-
Bake: Pop your dish in the oven and bake for 20-25 minutes, or until a toothpick inserted in the center comes out with a few moist crumbs. Don’t overbake; you want chewy, not dry!
-
Cool: Allow your blondies to cool in the pan for about 10 minutes before transferring to a wire rack. This helps set the structure and makes slicing much easier.
-
Slice and Serve: Once cooled, slice into squares. You can make them as big or as small as you like! They’re perfect for sharing—or enjoying all on your own!
Serving Suggestions
Plate your Greek Yogurt Blondie Brownies on a colorful dish and serve them warm for an extra melty treat. A dollop of the remaining Greek yogurt on top with a drizzle of maple syrup or a sprinkle of sea salt can elevate the experience. Garnish with fresh berries or a few extra chocolate shavings for that "wow" factor!
Recipe Variations
Here are some delicious twists you can try with your blondies:
- Nutty Variation: Add a ¼ cup of chopped nuts like walnuts or pecans for crunch.
- Fruit Fusion: Fold in ½ cup of mashed banana or apple sauce for added moisture and sweetness.
- Flavor Swap: Experiment by swapping peanut butter for almond or cashew butter for a different nutty profile.
- Spicy Kick: Add a pinch of cinnamon or a dash of cayenne pepper for a delightful twist!
- Cheesy Goodness: Mix in ¼ cup of cream cheese for a rich, creamier texture.
Chef’s Notes
Baking is an art and a science—it’s amazing how creatively we can adjust recipes! This Greek Yogurt Blondie Brownies recipe has evolved from my original brown butter version; the yogurt simply makes everything lighter and healthier! Baking is also about experimentation; don’t hesitate to play around and make it your own! I remember when I first started using Greek yogurt in desserts—my family was skeptical, but they were pleasantly surprised by how much they loved it!
FAQs and Troubleshooting
1. My blondies turned out too dry. What went wrong?
Overbaking is usually the culprit. Make sure to check for doneness around the 20-minute mark, using a toothpick for precision.
2. Can I store leftovers?
Absolutely! Store your blondies in an airtight container at room temperature for up to 3 days. For longer storage, wrap them individually and freeze for up to a month.
3. My batter seems too runny; what should I do?
Sometimes, Greek yogurt can vary in thickness. If your mixture seems too loose, add a tablespoon of oat flour at a time until you reach the desired consistency.
4. Can I substitute Greek yogurt for sour cream?
Yes! Sour cream can substitute Greek yogurt in this recipe with similar results in moisture and richness.
Nutritional Info
(Approximation per blondie based on common ingredient values: 120 calories, 5g protein, 4g fat, 15g carbs; may vary based on ingredient choices.)
Now you’re armed with all the tips and tricks to create the most delectable Greek Yogurt Blondie Brownies ever! I hope you enjoy making them as much as I do. Don’t forget to invite friends to share your creation; after all, good food is all about good company!
Happy baking, and remember: life is short, eat the brownie (or two)!
PrintGreek Yogurt Blondie Brownies

Indulge in a healthy yet decadent treat with these Greek Yogurt Blondie Brownies, combining rich flavors of peanut butter and chocolate for a guilt-free snack.
- Prep Time: 15 minutes
- Cook Time: 25 minutes
- Total Time: 40 minutes
- Yield: 12 servings 1x
- Category: Dessert
- Method: Baking
- Cuisine: American
- Diet: Healthy
Ingredients
- 1 ¼ cups thick Greek yogurt (divided)
- ½ cup maple syrup
- ⅓ cup crunchy peanut butter
- 1 cup oat flour
- 2 tsp baking powder
- ¼ tsp salt
- ½ cup cocoa powder
- ¼ cup dark chocolate (chopped)
Instructions
- Preheat the oven to 350°F (175°C).
- Grease an 8-inch square baking dish or line with parchment paper.
- Combine Greek yogurt, maple syrup, and peanut butter until smooth.
- Mix oat flour, baking powder, salt, and cocoa powder in a separate bowl.
- Pour the dry ingredients into the wet mixture and gently fold together.
- Fold in the chopped dark chocolate.
- Spread the batter evenly in the prepared baking dish.
- Bake for 20-25 minutes until a toothpick comes out with moist crumbs.
- Cool for 10 minutes before transferring to a wire rack.
- Slice into squares and serve.
Notes
Serve with a dollop of Greek yogurt and drizzle of maple syrup for added flavor.
Nutrition
- Serving Size: 1 blondie
- Calories: 120
- Sugar: 8g
- Sodium: 100mg
- Fat: 4g
- Saturated Fat: 1g
- Unsaturated Fat: 3g
- Trans Fat: 0g
- Carbohydrates: 15g
- Fiber: 2g
- Protein: 5g
- Cholesterol: 5mg
Keywords: blondies, healthy brownies, Greek yogurt, peanut butter, dessert

Low Carb Greek Yogurt Blueberry Muffins
Low Carb Greek Yogurt Blueberry Muffins: A Deliciously Wholesome Treat
Hello, lovely foodies! Today, I’m excited to share with you one of my go-to recipes for a tasty and healthy snack: Low Carb Greek Yogurt Blueberry Muffins! If you’re anything like me, you truly appreciate when you can indulge your cravings without compromising your health goals. These muffins are not only easy to make, but they’re also fluffy, flavorful, and perfect for breakfast, brunch, or a little afternoon pick-me-up.
Let’s get into it!
A Little Personal Touch
I often think back to the summer weekends spent at my grandparents’ cozy cabin, nestled by the lake. Mornings there were always filled with the delightful aroma of fresh-baked muffins wafting through the air. My grandmother would often let me help in the kitchen, teaching me her tried-and-true muffin techniques. It’s where I first fell in love with cooking, especially when it came to mixing and pouring batter, sneaking bites of warm blueberries fresh from the mixing bowl!
The tradition of muffin-making is something I’ve carried into adulthood, refined my techniques, and naturally, embraced my love for healthier alternatives. This recipe for Low Carb Greek Yogurt Blueberry Muffins channels those fond memories while also giving you a wholesome treat that doesn’t derail those healthy eating habits. The best part? You won’t even miss the carbs!
Ingredients
Let’s gather our ingredients and talk about why they matter!
-
4 eggs: These are the binding agents and will give the muffins a nice rise. If you’re vegan, you can substitute with flax eggs (1 tbsp ground flaxseed mixed with 3 tbsp water = 1 egg).
-
½ cup plain Greek yogurt: Not only does this provide moisture, but it also adds protein to keep you satisfied. If you’re looking for a dairy-free option, a similar amount of coconut yogurt works great!
-
1 tsp vanilla extract: This enhances the flavor, making your muffins taste delightful! Using pure vanilla extract is always preferred for its natural flavor, but imitation vanilla will work in a pinch.
-
3 cups almond flour: A fantastic low-carb alternative to regular flour, it gives these muffins a lovely nutty flavor. If you have a nut allergy, you might consider using sunflower seed flour.
-
⅔ cup Swerve sweetener: This zero-calorie sweetener is my secret weapon! It’s a great substitute for sugar and doesn’t affect blood sugar levels. If you prefer, feel free to use your favorite granulated sweetener, but keep in mind that the sweetness levels may vary.
-
1 tbsp baking powder: For that perfect rise in your muffins! Make sure your baking powder is fresh for the best results.
-
1+ cups fresh blueberries: These provide a burst of flavor and antioxidants. Frozen blueberries can also work, but make sure to thaw and drain them first.
Step-by-Step Instructions
Let’s dive into making these delightful muffins!
-
Preheat Your Oven: Start by preheating your oven to 350°F (175°C). This is essential for getting that perfect golden-brown top!
-
Mix the Wet Ingredients: In a large mixing bowl, crack the 4 eggs and whisk them well. Add in the ½ cup of Greek yogurt and the 1 tsp of vanilla extract. Mix until it’s creamy and smooth. This is the moment to blend in all those cozy flavors and textures!
-
Combine the Dry Ingredients: In another bowl, whisk together the 3 cups of almond flour, ⅔ cup Swerve sweetener, and 1 tbsp baking powder. Mixing your dry ingredients separately ensures that the baking powder is evenly distributed throughout the muffins.
-
Combine Wet and Dry Ingredients: Gradually add the dry mixture into the wet mixture. Stir gently until everything is well combined. Be careful not to overmix; just blend until no dry flour is visible. Overmixing can result in dense muffins, and we want them light and fluffy!
-
Fold in the Blueberries: Now comes the fun part—gently fold in the blueberries! Use a spatula to stir them in, being careful not to crush them. A blueberry explosion in your muffin is a joy you’ll want to savor.
-
Prepare the Muffin Tin: Line your muffin tin with paper liners or lightly grease each cup. This will help to avoid any sticking and make cleanup super easy!
-
Scoop the Batter: Using a large ice cream scoop or spoon, fill each muffin cup about ¾ full with the batter. This will allow them to rise beautifully without overflowing.
-
Bake to Perfection: Pop the muffin tin into the oven and bake for 20-25 minutes or until a toothpick inserted in the center comes out clean. The aroma wafting through your kitchen will be the best part—trust me!
-
Cool and Enjoy: Once baked, remove the muffins from the oven and let them cool in the pan for a few minutes before transferring them to a wire rack. This ensures they won’t steam and become soggy.
Serving Suggestions
These muffins are delightful fresh out of the oven, but they’re equally wonderful at room temperature or even slightly warmed with a bit of butter or Greek yogurt spread on top. Serve them on a beautiful platter with fresh berries and a drizzle of honey or a sprinkle of lemon zest for an elegant touch.
Recipe Variations
Feeling adventurous? Here are a few tasty twists on this classic recipe to keep things exciting:
- Lemon Blueberry Muffins: Add the zest of one lemon to the batter for a refreshing citrus flavor.
- Nutty Delight: Stir in a ½ cup of chopped nuts like walnuts or pecans to give your muffins a lovely crunch.
- Chocolate Chip Twist: Swap in some dark chocolate chips instead of or along with blueberries for a sweeter treat.
- Spiced Up: Add a teaspoon of cinnamon or nutmeg for a warm, cozy flavor profile.
- Savory Addition: Throw in some crumbled feta cheese and fresh herbs for a unique savory muffin perfect for brunch.
Chef’s Notes
Creating this recipe was such a joy! I’ve evolved it over time, gradually swapping out traditional ingredients for healthier alternatives without sacrificing taste. I once attempted to include protein powder for an extra boost, but let me tell you – the texture became quite like a brick! So, I focused on balancing richness and moisture with Greek yogurt. Trust me on this one; it’s tried and true!
FAQs and Troubleshooting
Here are some common questions and a few tips to ensure your muffins are a hit:
-
Why are my muffins dense?
Overmixing is often the culprit. Just mix until combined! -
Can I use frozen blueberries?
Yes, but be sure to thaw and drain them to prevent excess moisture in the batter. -
Do I need to let the batter sit?
Nope! You can bake immediately. Just get that oven preheated, and you’re good to go! -
What should I do if I want sweeter muffins?
Adjust the Swerve sweetener to your taste. Just keep in mind that the relevant sweetness can vary based on the brand.
Nutritional Info
(based on recipe serving size of 12 muffins)
- Calories: 140
- Fat: 10g
- Carbohydrates: 5g
- Fiber: 3g
- Protein: 6g
Conclusion
Cooking should be fun and stress-free, where you find joy in creating and sharing delightful meals. These Low Carb Greek Yogurt Blueberry Muffins not only pay homage to my childhood memories, but they are an excellent way to embrace a healthier lifestyle. I hope you find the same happiness making them as I do!
So tie on that apron and get ready to whip up something delicious! If you try these muffins, I’d love to hear your stories and any variations that you come up with. Happy baking, everyone! 🍽️
PrintLow Carb Greek Yogurt Blueberry Muffins

Deliciously wholesome low carb muffins made with Greek yogurt and blueberries, perfect for breakfast or a snack.
- Prep Time: 10 minutes
- Cook Time: 25 minutes
- Total Time: 35 minutes
- Yield: 12 muffins 1x
- Category: Snack
- Method: Baking
- Cuisine: Greek
- Diet: Low Carb, Vegetarian
Ingredients
- 4 eggs
- ½ cup plain Greek yogurt
- 1 tsp vanilla extract
- 3 cups almond flour
- ⅔ cup Swerve sweetener
- 1 tbsp baking powder
- 1+ cups fresh blueberries
Instructions
- Preheat your oven to 350°F (175°C).
- Mix the wet ingredients in a large bowl: crack the 4 eggs and whisk, then add ½ cup Greek yogurt and 1 tsp vanilla extract. Mix until creamy.
- Combine the dry ingredients in another bowl: whisk together 3 cups almond flour, ⅔ cup Swerve sweetener, and 1 tbsp baking powder.
- Combine the wet and dry ingredients, stirring gently until well combined.
- Fold in the blueberries gently with a spatula.
- Prepare the muffin tin by lining it with paper liners or greasing each cup.
- Scoop the batter into each muffin cup until about ¾ full.
- Bake for 20-25 minutes or until a toothpick comes out clean.
- Cool in the pan for a few minutes before transferring to a wire rack.
Notes
Serve warm with butter or Greek yogurt spread on top. Try variations like adding lemon zest, nuts, or chocolate chips.
Nutrition
- Serving Size: 1 muffin
- Calories: 140
- Sugar: 0g
- Sodium: 200mg
- Fat: 10g
- Saturated Fat: 1g
- Unsaturated Fat: 9g
- Trans Fat: 0g
- Carbohydrates: 5g
- Fiber: 3g
- Protein: 6g
- Cholesterol: 180mg
Keywords: low carb, muffins, blueberry, healthy snacks, Greek yogurt

Key Lime Pie Yogurt Bark Recipe
Key Lime Pie Yogurt Bark Recipe: A Flavorful and Fun Treat
Hello, dear friends! Today, I’m incredibly excited to share a recipe that captures the vibrant flavors of summer and the spirit of fun gatherings—Key Lime Pie Yogurt Bark! If you’re looking for a refreshing treat that is as easy to make as it is delicious, you’re in the right place. This delightful dessert is perfect for those hot days when all you want to do is kick back, relax, and enjoy something light yet satisfying.
Imagine biting into a creamy, tangy mixture that transports you straight to a beachside café in Key West. Layered with the flavors of zesty lime and topped with crunchy bits of graham crackers and toasted coconut, this yogurt bark not only tastes divine but also looks beautiful when served. Plus, it’s made with wholesome ingredients, offering a dessert you can feel good about sharing!
So, grab your apron, and let’s whip up this tasty treat together.
A Sweet Slice of Nostalgia
Let me share a fond memory related to key lime pie. It takes me back to childhood summers spent in my grandmother’s cozy kitchen. She was a master baker, always filling her home with the scent of freshly baked goodies. One of my favorite moments was when she would let me help make her famous key lime pie. I loved squeezing those limes, watching the vibrant green juice flow, and feeling like a real chef as we whipped the filling together.
After we popped it into the fridge, we’d always sneak a taste of the filling before it was set. That zesty sweetness, that perfect balance—it’s a flavor that forever holds a special place in my heart. It also taught me the importance of using fresh ingredients and the joy that comes from creating something beautiful in the kitchen.
So, l loved the idea of turning that nostalgic pie into a healthier, no-bake treat that everyone could enjoy. The result? Our Key Lime Pie Yogurt Bark! This treat embodies those cherished memories while being simple to create and delightful to eat.
Ingredients
Here’s what you’ll need to create this scrumptious Key Lime Pie Yogurt Bark:
-
2.5 cups Greek yogurt
A great source of protein and creaminess. You can use plain, non-fat or low-fat Greek yogurt for a creamier texture. Looking for a dairy-free option? Go for your favorite dairy-free yogurt! -
3.5 tbsp key lime juice
This brings the signature tangy flavor of key lime pie! If you can’t find key limes, regular limes can work in a pinch, although the flavor will be slightly different. -
2 tbsp powdered Swerve (or 1 tbsp honey)
This sweetener keeps the bark light and healthy. Adjust the sweetness as per your taste. If you prefer honey, just keep in mind it will add a bit of floral flavor. -
1 teaspoon vanilla extract
This addition enhances the overall flavor, bringing in a warm note that complements the tartness of the lime. -
1 tablespoon lime zest
Zest is your secret weapon for adding vibrant flavor without extra liquid. It adds brightness and a cheerful yellow hue. -
1/3 cup crushed gluten-free graham crackers
I love using Simple Mills Honey Cinnamon Sweet Thins for their perfect crunch and subtle sweetness, making your bark feel extra special! -
1/4 cup toasted coconut
Unsweetened coconut adds a lovely chewiness and a hint of tropical flavor. You can toast it in the oven for a few minutes for a nutty aroma. -
1 scoop vanilla protein powder
This is optional but adds an extra punch of protein. Feel free to use regular or a dairy-free option if you prefer.
Step-by-Step Instructions
Ready to make some delicious Key Lime Pie Yogurt Bark? Let’s dive in with these simple steps!
Step 1: Prepare the Base
Start by grabbing a large mixing bowl. Add your Greek yogurt, key lime juice, powdered Swerve (or honey), vanilla extract, and lime zest. Now, the fun part—grab your whisk and start mixing! You want to achieve a smooth, creamy consistency that’s well combined. This is the base of your bark, so take a moment to admire the beautiful pale green color!
Tip: Taste your mixture and adjust the sweetness as needed. Key limes can vary in tartness, so a quick taste test ensures you’re hitting the right notes.
Step 2: Mix in the Crunch
Once your yogurt mixture is perfectly creamy, it’s time to fold in the texture. Add the crushed gluten-free graham crackers and toasted coconut to the bowl. Gently fold everything together, allowing the toppings to integrate without breaking apart too much.
Note: If you want a crunchier bark, save some of the graham cracker and coconut to sprinkle on top!
Step 3: Spread and Freeze
Line a baking sheet with parchment paper. Pour your creamy mixture onto the parchment and spread it out to about 1/2-inch thickness. You want it to be uniform so that it freezes evenly.
Chef’s Hack: Use an offset spatula for a beautifully smooth surface to make slicing easier later on!
Step 4: Freeze and Set
Once your yogurt mixture is spread out, pop it into the freezer. It will need about 4-6 hours to set completely. I often make this the night before, allowing it to freeze overnight for the best results.
Tip: If you find yourself waiting impatiently, take this time to prepare for serving—maybe whip up some fresh whipped cream or slice some fresh fruit!
Step 5: Slice and Serve
Once frozen, take the bark out of the freezer and let it sit for about 5-10 minutes to soften slightly. This makes slicing easier. Using a sharp knife or pizza cutter, cut the bark into squares or irregular pieces—however you like it!
Insider Tip: For a fun presentation, drizzle a little melted dark chocolate on top or a few extra sprinkles of lime zest.
Serving Suggestions
For serving, arrange your Key Lime Pie Yogurt Bark on a lovely platter or cutting board. I enjoy garnishing it with lime slices or additional toasted coconut for that extra tropical flair. You can also serve it alongside a dollop of whipped cream for an elevated dessert feel.
And don’t forget to have some fun serving utensils on hand—a bright cake knife or colorful serving plates can really make your dessert pop!
Recipe Variations
Want to mix things up? Here are some fun twists you can try with your Key Lime Pie Yogurt Bark:
-
Berry Swirl: Fold in fresh raspberries or blueberries for an additional layer of flavor and color!
-
Coconut Lime: Replace the vanilla protein powder with coconut-flavored protein for an extra tropical vibe.
-
Chili-Lime Twist: For a little kick, sprinkle some chili powder before freezing for a spicy contrast.
-
Nutty Delight: Add crushed nuts like macadamias or almonds for an additional crunch.
-
Dairy-Free Delight: Swap the Greek yogurt for your favorite dairy-free yogurt, coconut yogurt provides a rich and creamy base!
Chef’s Notes
As I dove into experimenting with this recipe, I realized that Key Lime Pie Yogurt Bark is a representation of summer for me—light, refreshing, and brimming with flavor. Over the years, I’ve made it countless times, tweaking it here and there until I found the perfect balance of tartness and sweetness.
One of my funniest mishaps happened when I accidentally grabbed salt instead of sugar—let me tell you, my family’s faces were priceless! Now I always double-check those labels!
We’ve all had those “oops!” moments in the kitchen, but it’s the laughter shared around the table that makes cooking all the more joyful.
FAQs and Troubleshooting
1. What if my yogurt bark isn’t setting properly?
If it’s been in the freezer long enough (4-6 hours) and seems too soft, it may be due to excess liquid in the yogurt. Make sure you’re using a thick Greek yogurt to avoid this issue.
2. Can I use regular limes instead of key limes?
Absolutely! While key limes provide that classic flavor, regular limes work just as well in this recipe. Adjust the sweetness based on your taste!
3. How should I store any leftovers?
Store leftover bark in an airtight container in the freezer for up to two weeks. Just separate layers with parchment paper to avoid sticking.
4. Can I make this bark ahead of time?
Yes! This delicious treat freezes wonderfully, making it an excellent option for meal prep or entertaining. Just be sure to let it sit for a few minutes before slicing!
Nutritional Info (if applicable)
While not calculated in detail here, this yogurt bark is a healthier dessert alternative, packed with protein from Greek yogurt and beneficial fats from coconuts. The use of powdered swerve or honey instead of granulated sugar makes it a light treat that anyone can enjoy.
And there you have it, my friends—your road map to delightful Key Lime Pie Yogurt Bark! This recipe is sure to become a favorite at your summer gatherings or simply enjoyed on a cozy evening at home. Remember, no matter how delicious the dessert, it’s the memories created around the table that makes it truly special. Happy cooking!
PrintKey Lime Pie Yogurt Bark

A refreshing and easy-to-make treat capturing the vibrant flavors of summer, perfect for hot days and gatherings.
- Prep Time: 15 minutes
- Cook Time: 0 minutes
- Total Time: 360 minutes
- Yield: 8 servings 1x
- Category: Dessert
- Method: Freezing
- Cuisine: American
- Diet: Healthy
Ingredients
- 2.5 cups Greek yogurt
- 3.5 tbsp key lime juice
- 2 tbsp powdered Swerve (or 1 tbsp honey)
- 1 teaspoon vanilla extract
- 1 tablespoon lime zest
- 1/3 cup crushed gluten-free graham crackers
- 1/4 cup toasted coconut
- 1 scoop vanilla protein powder (optional)
Instructions
- Prepare the Base: In a large mixing bowl, combine Greek yogurt, key lime juice, powdered Swerve (or honey), vanilla extract, and lime zest. Mix until smooth and creamy.
- Mix in the Crunch: Fold in crushed gluten-free graham crackers and toasted coconut gently.
- Spread and Freeze: Line a baking sheet with parchment paper, pour the mixture, and spread to about 1/2-inch thickness.
- Freeze and Set: Place in the freezer for 4-6 hours until set.
- Slice and Serve: Allow to soften for 5-10 minutes, then cut into squares and enjoy.
Notes
For serving, garnish with lime slices or whipped cream. Leftovers can be stored in an airtight container in the freezer for up to two weeks.
Nutrition
- Serving Size: 1 piece
- Calories: 150
- Sugar: 6g
- Sodium: 30mg
- Fat: 5g
- Saturated Fat: 3g
- Unsaturated Fat: 2g
- Trans Fat: 0g
- Carbohydrates: 20g
- Fiber: 1g
- Protein: 6g
- Cholesterol: 15mg
Keywords: key lime pie, yogurt bark, summer dessert, healthy treat, no-bake dessert
Creamy Tomato Basil Bisque: 15-Minute Weeknight Comfort
Creamy Tomato Basil Bisque: A Cozy Culinary Hug
Hello, my friends! Today, we’re diving into a warm, comforting classic that dances on your taste buds and wraps around you like a soft, cozy blanket. Yes, I’m talking about Creamy Tomato Basil Bisque. This dish is perfect for those chilly nights when you just want to curl up with something delicious and nourishing. It’s creamy, it’s bright, and it’s bursting with the fresh flavors of summer — even if you enjoy it in the heart of winter!
As we gather around the table and embark on this culinary adventure together, I hope you can feel the joy and warmth that a pot of homemade bisque can bring. So, grab your favorite apron and let’s get cooking!
A Taste of Nostalgia
Before we jump into the recipe, let me share a little personal story. I have fond memories of my grandmother’s kitchen, where the tantalizing aroma of roasted tomatoes would fill the air, beckoning us to the table. She had a magical way of transforming simple ingredients into something extraordinary.
Every Saturday, I would spend the day at her house, and we would make a big batch of tomato soup together. We would pick ripe tomatoes from her garden, their skins so bright they seemed to glow in the sunlight. Our laughter mingled with the sounds of chopping and simmering, and it always felt like we were making more than just soup — we were making memories.
As we poured the velvety bisque into bowls, she would sprinkle fresh basil on top, the vibrant green sparkling like jewels. The first spoonful was always an experience; the creamy tang of the tomatoes perfectly complemented the fresh, herbaceous notes of basil, igniting a symphony of flavors in my mouth.
That feeling of comfort and love has been at the heart of my cooking since then, and I’m excited to share this delicious bisque with all of you. Let’s recreate that magic together!
Ingredients
Here’s what you’ll need to create your own bowl of bliss:
-
2 lbs Roma tomatoes, roasted
Sweet and juicy, Roma tomatoes are perfect for roasting due to their lower moisture content. If you can’t find Roma, any variety will do, but you might need to adjust cooking times slightly. -
1 cup fresh basil, chopped
Fresh basil adds a bright, herby flavor that elevates the bisque. If fresh basil isn’t available, feel free to use a teaspoon of dried basil, but fresh is always best for that vibrant taste! -
1 medium onion, chopped
A pivotal player in adding depth and sweetness. If you’re aiming for a sweeter flavor, try caramelizing the onion first! -
2 cloves garlic, minced
Garlic brings warmth and richness. You can substitute with garlic powder (1 teaspoon) in a pinch, but fresh is always the way to go! -
4 cups vegetable broth
This adds a lovely base to our soup. You can make your own or choose a high-quality store-bought option. Want an extra kick? Try a low-sodium chicken broth! -
1 cup heavy cream
This makes the bisque indulgently creamy. For a lighter version, swap it with coconut cream or cashew cream for a vegan-friendly option. -
Salt and pepper to taste
Essential for highlighting all those fantastic flavors. Feel free to adjust based on your preferences! -
Olive oil
This will help sauté our aromatics and lend a beautiful flavor. If you’re out, avocado oil works beautifully too!
Step-by-Step Instructions
Now, let’s get down to business and whip up this sumptuous bisque. Follow along with these steps, and I promise you’ll be savoring every last spoonful in no time!
-
Roast the Tomatoes: Preheat your oven to 400°F (200°C). Slice your Roma tomatoes in half, drizzle them with olive oil, and sprinkle with salt and pepper. Spread them on a baking sheet, cut side up, and roast for about 30-40 minutes until they are caramelized and bursting with sweetness.
Chef Tip: Keep an eye on your tomatoes! If they’re starting to brown too quickly, don’t hesitate to lower the heat a tad. Roasting brings out the natural sugars in the tomatoes, making your bisque super sweet and flavorful.
-
Sauté the Aromatics: In a large pot, heat 2 tablespoons of olive oil over medium heat. Add the chopped onion and a pinch of salt, cooking until the onion is translucent and fragrant — about 5 minutes. Next, toss in the minced garlic and sauté for another minute, making sure it doesn’t burn.
Chef Hack: To prevent your garlic from burning, you can add it right at the end of the onion cooking time. Garlic can turn bitter if it cooks too long!
-
Combine and Simmer: Once your tomatoes are ready, carefully transfer them to the pot with the onion and garlic mixture. Pour in the vegetable broth and bring everything to a boil. Once boiling, reduce the heat and let it simmer for about 10 minutes to meld those delicious flavors together.
-
Blend It Up: Remove the pot from the heat. You can use an immersion blender for this step, which is a game changer, or transfer the bisque to a blender in batches. Blend until smooth — you want it creamy and luscious!
Little Tip: If you prefer a chunkier texture, blend just half the soup and mix it back with the unblended part.
-
Add the Cream and Basil: Stir in the heavy cream until fully combined, and then add the chopped fresh basil. Let it simmer for another 5 minutes to infuse the flavors.
Pro Tip: Taste before serving! Adjust the seasoning with salt and pepper as needed. Sometimes just a pinch more can bring everything together!
-
Serve Hot: Your bisque is ready to be devoured! Ladle it into bowls and maybe top it with a drizzle of olive oil or a little extra basil for flair.
Serving Suggestions
For an elevated presentation, consider serving your bisque in elegant bowls. A sprinkle of freshly cracked pepper and a drizzle of olive oil on top will make it visually irresistible. Pair it with crusty bread for dipping or a simple side salad for a complete meal.
If you’re feeling fancy, why not serve it with a sprinkle of homemade croutons or a dollop of pesto on top? The options are endless!
Recipe Variations
Here are some creative twists and variations on this bisque:
-
Roasted Garlic Tomato Basil Bisque: Throw in a head of roasted garlic with the tomatoes for an even deeper flavor profile.
-
Spicy Tomato Basil Bisque: Add a pinch of red pepper flakes or a diced jalapeño while sautéing the onions for some heat!
-
Vegan Tomato Basil Bisque: Substitute the heavy cream with full-fat coconut milk for a rich, creamy vegan version. Add a squeeze of lemon for a burst of acidity.
-
Herbed Tomato Basil Bisque: Experiment by adding other herbs like thyme or oregano for a unique flavor twist.
-
Lentil Tomato Basil Bisque: For added protein, toss in some red lentils before blending. They will cook down and add a lovely creaminess too!
Chef’s Notes
This recipe has evolved over time. Initially, it was a simple formula handed down to me by my grandmother — just tomatoes, basil, and cream. Over the years, I’ve played around with the ingredients and techniques. I often remind myself that cooking is all about experimenting and finding out what you love!
One funny kitchen misadventure I had occurred while I was testing a variation that included sun-dried tomatoes. The first time I made it, I accidentally used tomato puree instead of roasted tomatoes. Talk about a flavor bomb! The bisque still turned out well, but it definitely packed a punch and taught me the importance of careful ingredient selection.
FAQs and Troubleshooting
-
Why is my bisque too thin?
If your bisque turns out thinner than expected, you can thicken it by simmering it without a lid for a few extra minutes to evaporate some of the liquid. Alternatively, blend in a little more roasted tomato or add cornstarch mixed with water to achieve a creamier consistency. -
Can I make this bisque in advance?
Absolutely! This bisque actually tastes even better the next day as the flavors meld together. Just be sure to store it in an airtight container in the fridge and reheat gently on the stove. -
What if I don’t have fresh basil?
If fresh basil isn’t available, dried basil is a suitable substitute. Use about 1 teaspoon of dried basil for the best results. Or get creative and try using fresh parsley for a different herbaceous note. -
Can I freeze the bisque?
Yes! This bisque freezes beautifully. Just make sure it’s completely cooled before transferring it to freezer-safe containers. When you’re ready to enjoy it, let it thaw overnight in the fridge and reheat on the stove.
Nutritional Information
If you’re curious: this creamy delight is rich in vitamins and is a filling, heartwarming meal option. A typical serving of this bisque provides a good source of vitamins A and C, with healthy fats coming from the cream and olive oil.
So there you have it, my friends! Your very own bowl of Creamy Tomato Basil Bisque awaits. I hope this dish brings warmth to your kitchen and smiles to your table, just like it has in mine. Remember, cooking is a journey and there’s no right or wrong way — only delicious flavors waiting to be discovered.
Let’s keep gathering around our tables, sharing good food and good company. Until next time, tie on that apron and let the cooking adventures continue at Ivory Apron!
PrintCreamy Tomato Basil Bisque
A cozy and comforting bisque bursting with the fresh flavors of summer, perfect for chilly nights.
- Prep Time: 15 minutes
- Cook Time: 40 minutes
- Total Time: 55 minutes
- Yield: 4 servings 1x
- Category: Soup
- Method: Baking
- Cuisine: Italian
- Diet: Vegetarian
Ingredients
- 2 lbs Roma tomatoes, roasted
- 1 cup fresh basil, chopped
- 1 medium onion, chopped
- 2 cloves garlic, minced
- 4 cups vegetable broth
- 1 cup heavy cream
- Salt and pepper to taste
- Olive oil
Instructions
- Roast the tomatoes: Preheat your oven to 400°F (200°C). Slice your Roma tomatoes in half, drizzle them with olive oil, and sprinkle with salt and pepper. Spread them on a baking sheet, cut side up, and roast for about 30-40 minutes until they are caramelized and bursting with sweetness.
- Sauté the aromatics: In a large pot, heat 2 tablespoons of olive oil over medium heat. Add the chopped onion and a pinch of salt, cooking until the onion is translucent and fragrant — about 5 minutes. Next, toss in the minced garlic and sauté for another minute, making sure it doesn’t burn.
- Combine and simmer: Once your tomatoes are ready, carefully transfer them to the pot with the onion and garlic mixture. Pour in the vegetable broth and bring everything to a boil. Once boiling, reduce the heat and let it simmer for about 10 minutes to meld those delicious flavors together.
- Blend it up: Remove the pot from the heat. Use an immersion blender or transfer the bisque to a blender in batches. Blend until smooth.
- Add the cream and basil: Stir in the heavy cream until fully combined, and then add the chopped fresh basil. Let it simmer for another 5 minutes to infuse the flavors.
- Serve hot: Ladle it into bowls and top with a drizzle of olive oil or a little extra basil for flair.
Notes
For an elevated presentation, consider serving with crusty bread or a simple side salad.
Nutrition
- Serving Size: 1 serving
- Calories: 350
- Sugar: 8g
- Sodium: 800mg
- Fat: 24g
- Saturated Fat: 12g
- Unsaturated Fat: 10g
- Trans Fat: 0g
- Carbohydrates: 30g
- Fiber: 4g
- Protein: 6g
- Cholesterol: 60mg
Keywords: tomato, bisque, soup, creamy, basil, vegetarian, comfort food

Ingredient No-Bake Mango Cheesecake: Creamy Summer Dream
Indulge in Tropical Bliss: A Mango Cheesecake Recipe
Hello, fellow food enthusiasts! Today, we’re diving into a dessert that’s as vibrant as a tropical sunset: Mango Cheesecake. Picture this: a smooth, creamy cheesecake with the bright, fruity essence of mango. This delightful treat not only enchants the taste buds, but it also makes a stunning centerpiece for any gathering. Let me take you on a culinary journey where we’ll explore how to create this luscious dessert from scratch, complete with some personal anecdotes, tips, and plenty of kitchen wisdom. Let’s put on those aprons and get started!
A Mango Moment: My Love for Cheesecake
I’ve always loved desserts that tell a story, and for me, mango cheesecake has a special place in my heart. Growing up, my family had a tradition of visiting a small bakery nestled in our neighborhood. Every Saturday, we would stroll down with the sun warming our faces and anticipation bubbling in our bellies. One particular visit stands out in my memory: the first time I tasted mango cheesecake.
I remember the moment vividly—the aroma of fresh mangoes wafting through the air as I took the first bite. The creamy texture combined with the tropical sweetness transported me to a beachside paradise. From that day on, making mango cheesecake at home became my mission. This recipe isn’t just about food; it’s about creating memories, embracing the flavors of fun, and sharing that joy with loved ones. So let’s harness that inspiration and jump into a world of creamy deliciousness!
Ingredients: A Taste of Paradise
Here’s what you’ll need to whip up your very own mango cheesecake. Each ingredient plays an important role, so let’s explore them:
-
14-16 Graham crackers (or plain cookies): These create the perfect crunchy base. You can also use digestive biscuits, almond cookies, or even gluten-free options.
-
50 grams butter, melted: Butter binds your crust together and adds rich flavor. For a lighter option, try coconut oil for a tropical twist!
-
400 grams cream cheese (at room temperature): The heart of your cheesecake, cream cheese gives it that creamy, rich texture. You can substitute it with mascarpone or vegan cream cheese for a dairy-free option.
-
2 tablespoons cornstarch: This helps stabilize the cheesecake, ensuring it holds its shape. If you’re avoiding cornstarch, arrowroot powder works great too!
-
½ cup sugar: Sweetness is essential! You can swap this for coconut sugar or a sugar substitute like stevia if you prefer a low-calorie treat.
-
Pinch of sea salt/kosher salt: Just a hint of salt enhances the flavors in your cheesecake. Don’t skip this step—it’s like magic for taste!
-
2 ripe mangoes, peeled and chopped (or 1 cup store-bought mango puree): Fresh mangoes bring brightness and freshness. If mangoes aren’t in season, frozen mango works, too, just ensure it’s fully thawed and drained.
-
2 eggs (at room temperature): They add richness and help bind everything together. For a vegan option, you could use aquafaba (chickpea brine) or flax eggs.
-
Pinch of cardamom powder (optional): This adds a warm, aromatic twist. If you’re a fan of spice, go for it! Otherwise, feel free to leave it out.
Step-by-Step Instructions: Creating Your Masterpiece
Now that we have all our ingredients ready, let’s get our hands a little messy, shall we?
-
Preheat your oven: Preheat your oven to 325°F (160°C). This is an essential step to ensure your cheesecake bakes evenly.
-
Prepare the crust: In a food processor, blend the graham crackers until finely crushed. You can also place them in a zip-top bag and crush them with a rolling pin for some hands-on fun! Add in the melted butter and a sprinkle of salt, mixing until the crumbs resemble wet sand.
-
Shape the crust: Press this mixture firmly into the bottom of a springform pan. Use the back of a measuring cup to get an even layer—it makes a difference! Bake it in the preheated oven for about 8-10 minutes until it’s set and slightly golden. Let it cool while you prepare the filling.
-
Blend the cheesecake filling: In a large mixing bowl, beat the cream cheese until creamy and smooth—this usually takes about 2-3 minutes with a hand mixer on medium speed. Add in the sugar and cornstarch, mixing until thoroughly combined.
-
Incorporate the eggs and mango: One at a time, add the eggs to the mixture, blending well after each addition. Then, fold in the chopped mango or mango puree. (Fun tip: reserve a bit of mango for topping your cheesecake later!) If you’re using cardamom, add it in now for that extra aromatic touch.
-
Pour and bake: Pour the creamy filling over your cooled crust, smoothing it out gently with a spatula. Bake for 45-55 minutes, or until the edges are set and the center is slightly wobbly. Don’t be alarmed by the wobble! It will firm up as it cools—trust me!
-
Cool down: Once done, turn off the oven and crack the oven door open for the cheesecake to gently cool down. Let it cool in the oven for an hour to prevent cracking.
-
Chill: After it has cooled, refrigerate the cheesecake for at least 4 hours, or preferably overnight. This patient’s wait will reward you with a perfectly set cheesecake!
Serving Suggestions: Plating to Impress
When it’s finally time to serve your mango cheesecake, let’s make it visually stunning! Carefully run a knife around the edge of the springform pan before releasing the sides. Slice your cheesecake into wedges and arrange it on a beautiful plate. Drizzle with a mango puree or a sprinkle of fresh herbs like mint for contrast. The vibrant colors and smooth textures will dazzle your guests and make your cheesecake all the more inviting.
Recipe Variations: A Twist on Tradition
Feeling adventurous? Here are a few variations to give your mango cheesecake a personalized touch:
-
Coconut Mango Cheesecake: Keep the mango but add shredded coconut to the crust for an added tropical flair. You can also use coconut milk in the filling!
-
Chocolate Swirl: Add chocolate to the mix! Swirl in melted dark or milk chocolate into the mango filling before baking for a decadent chocolate-mango experience.
-
Berry Delight: Top your cheesecake with seasonal berries for a color burst and added freshness. Strawberries, raspberries, or blueberries pair beautifully!
-
Spiced Mango Cheesecake: Add a pinch of cinnamon along with the cardamom for a warm, spiced cheesecake experience—perfect for cozy gatherings.
-
Nutty Crust: Substitute some of the graham crackers with crushed nuts like pecans or walnuts for a different texture and flavor.
Chef’s Notes: A Touch of Personal Flavor
Over the years, I’ve tinkered with this recipe and found joy in sharing it with family and friends. Each time I make it, I feel like I’m not just creating a dessert, but a piece of love to share around the table. There was that one time I tried to impress my in-laws, and as I pulled the cheesecake from the refrigerator, it had magically transformed into this tall, creamy tower of perfection—only to have it topple over right before serving due to overzealous slicing! Laughter filled the kitchen, and I served the ‘deconstructed’ mango cheesecake instead. We all enjoyed it more than any picture-perfect slice; after all, sharing laughter over dessert is the true win!
FAQs and Troubleshooting: Your Cheesecake Questions Answered
-
Why does my cheesecake have cracks?
Cracks can form from sudden temperature changes or overbaking. To minimize this, cool your cheesecake gradually in the oven and avoid opening the door too soon. -
How can I tell if my cheesecake is done?
The cheesecake should be slightly wobbly in the center but set around the edges. It’ll firm up as it cools, so don’t worry if it jiggles a bit! -
Can I freeze this cheesecake?
Absolutely! Wrap individual slices tightly in plastic wrap, then in foil, and freeze for up to three months. Just thaw in the fridge before serving. -
What if I can’t find fresh mango?
No worries—canned or frozen mango is a great alternative! Just ensure it’s well-drained before using to prevent a soggy cheesecake.
Nutritional Info: Deliciously Indulgent
While indulgent desserts are meant to be enjoyed, it’s always nice to have a rough idea of the nutritional aspects. This mango cheesecake per slice (based on 12 slices) contains roughly:
- Calories: 350
- Total Fat: 22g
- Saturated Fat: 12g
- Cholesterol: 80mg
- Carbohydrates: 30g
- Sugars: 20g
- Protein: 6g
Conclusion: Let’s Celebrate with Mango Cheesecake!
And there you have it, my friends—a mango cheesecake that’s sure to impress and create beautiful memories around your table. Cooking is all about connecting with the ingredients and sharing love through food. I hope this recipe inspires you to sprinkle a bit of joy in your kitchen and share the sweet rewards with those you cherish.
So grab those ripe mangoes, tie on your apron, and let’s jump into a world of flavor! Happy baking!
PrintMango Cheesecake

A smooth, creamy cheesecake infused with the vibrant essence of mango, perfect for any gathering.
- Prep Time: 20 minutes
- Cook Time: 55 minutes
- Total Time: 4 hours 15 minutes
- Yield: 12 servings 1x
- Category: Dessert
- Method: Baking
- Cuisine: Tropical
- Diet: Vegetarian
Ingredients
- 14–16 Graham crackers (or plain cookies)
- 50 grams butter, melted
- 400 grams cream cheese, at room temperature
- 2 tablespoons cornstarch
- ½ cup sugar
- Pinch of sea salt/kosher salt
- 2 ripe mangoes, peeled and chopped (or 1 cup store-bought mango puree)
- 2 eggs, at room temperature
- Pinch of cardamom powder (optional)
Instructions
- Preheat your oven to 325°F (160°C).
- Blend the graham crackers until finely crushed in a food processor.
- Press the mixture into the bottom of a springform pan and bake for 8-10 minutes.
- Beat the cream cheese in a mixing bowl until creamy and smooth.
- Add the sugar and cornstarch, mixing until combined.
- Incorporate the eggs one at a time, blending well after each addition.
- Fold in the chopped mango or mango puree.
- Pour the filling over the cooled crust and smooth it out.
- Bake for 45-55 minutes or until the edges are set and the center is slightly wobbly.
- Cool in the oven with the door cracked open for an hour.
- Chill in the refrigerator for at least 4 hours before serving.
Notes
For a twist, consider adding shredded coconut to the crust or topping with seasonal berries.
Nutrition
- Serving Size: 1 slice
- Calories: 350
- Sugar: 20g
- Sodium: 250mg
- Fat: 22g
- Saturated Fat: 12g
- Unsaturated Fat: 8g
- Trans Fat: 0g
- Carbohydrates: 30g
- Fiber: 2g
- Protein: 6g
- Cholesterol: 80mg
Keywords: mango cheesecake, dessert, tropical dessert, cheesecake recipe, fruity cheesecake