
Minute No-Bake Strawberry Mousse (Fresh & Creamy)
Easy Fresh Strawberry Mousse: A Delightful Dessert for Any Occasion
Hello food lovers! If you’re here, it means you’re probably ready to whip up something delightful in the kitchen that’s both impressive and incredibly easy. Well, you’re in for a treat! Today, we’ll be crafting a luscious Easy Fresh Strawberry Mousse that’s light, fluffy, and bursting with the sweet taste of summer. This dessert is perfect for any occasion—whether you’re hosting a dinner party, celebrating a birthday, or simply treating yourself after a long week.
Picture this: a light, airy mousse with a beautiful pink hue, topped off with fresh strawberries and a dash of mint. It’s like a hug in dessert form! I can’t wait to share the process with you, complete with my personal touches and lots of tips to ensure your mousse turns out perfect every time. So, let’s dive in!
A Sweet Slice of Nostalgia
One of my fondest memories involves a summer spent at my grandma’s house. Every year, we’d visit, and amidst all the adventures—catching fireflies, gardening, and late-night card games—there was always a special treat waiting for us: Grandma’s signature strawberry mousse. She would send us out to the garden to pick the ripest strawberries, and we’d laugh as we tried to find the biggest, juiciest ones to bring back to the kitchen.
Once we returned, we’d gather around her old wooden table, sharing stories while she mixed up her ingredients with love and a sprinkle of humor. I can still hear her saying, “The secret ingredient is always a bit of joy!” I realized later that cooking with her wasn’t just about making a delicious dessert; it was about the connections we forged around the table.
Now, whenever I make this Easy Fresh Strawberry Mousse, it’s like I’m transported back to that sunlit kitchen, surrounded by love and laughter. I hope this recipe brings as much joy to you as it does to me!
Ingredients
Here’s what you’ll need to create your very own strawberry mousse:
-
2 cups fresh strawberries, hulled
Fresh strawberries are the star of this dessert! Use ripe, juicy strawberries for the best flavor. If you’re in a pinch, you can substitute with frozen strawberries (thawed), but fresh ones have that unbeatable sweetness. -
1/4 cup powdered sugar
This sweetens the mousse while keeping it smooth and creamy. You can adjust the sweetness based on your preference—feel free to start with less and add more if needed! -
1 tablespoon fresh lemon juice
Brightens up the flavor and balances the sweetness. You can also use lime juice for a fun twist! -
1 teaspoon vanilla extract
Because, let’s be honest, everything’s better with vanilla. For a different flavor profile, try using almond extract or a splash of orange zest! -
1 1/2 cups heavy cream, cold
This is what gives the mousse its rich texture. Make sure it’s very cold before whipping! If you need a lighter alternative, opt for coconut cream, but the texture will differ a bit.
Step-by-Step Instructions
Now that we have everything prepared, let’s get to work! Follow these steps to create your strawberry masterpiece:
-
Prep the Strawberries
Start by washing your strawberries thoroughly. Hull them (remove the green tops) and slice them in half. This will help release their juices when blended. Place them in a medium bowl and sprinkle them with 2 tablespoons of powdered sugar. Toss gently and let them sit for about 10 minutes. This will create a natural syrup that really enhances the flavor! -
Blend the Strawberries
After the strawberries have macerated, use a blender or food processor to puree them until smooth. You can leave a few small chunks if you like a bit of texture—just make sure it’s not too chunky! -
Strain the Puree (Optional)
If you prefer a super smooth mousse, strain the puree through a fine-mesh sieve to remove any seeds. This step is optional, but it does yield that lovely, velvety texture. -
Combine Ingredients
In a separate bowl, whisk together the strawberry puree, remaining powdered sugar, lemon juice, and vanilla extract until well combined. It should taste fresh and sweet—don’t be afraid to give it a little taste! -
Whip the Cream
In a large mixing bowl (preferably chilled), pour the heavy cream. Using an electric mixer, whip the cream on medium speed until soft peaks form. This means when you lift the whisk or beaters, the cream should hold its shape but still be light and fluffy. Be careful not to overwhip; it can turn grainy. -
Fold the Cream into the Strawberry Mixture
Take a couple of spoonfuls of whipped cream and mix it into the strawberry puree to lighten it up. Then gently fold in the rest of the whipped cream using a spatula. This technique helps maintain the airiness of the mousse, giving it that light texture we’re after. -
Chill
Once combined, divide the mousse into serving dishes or glasses. Cover with plastic wrap and place them in the fridge for at least 2-4 hours, or until they’re fully set. This chilling time allows the flavors to meld beautifully together and gives the mousse that perfect, airy consistency.
Serving Suggestions
When it’s time to serve your gorgeous strawberry mousse, consider a few simple yet elegant touches. Add a dollop of whipped cream on top, toss on some fresh strawberry slices, and maybe a sprig of mint for color! For a fancy touch, serve the mousse in elegant glassware or chilled dessert cups. It adds an element of richness and makes your guests feel special—even if it’s just a Tuesday!
Recipe Variations
If you want to get a little creative, here are some fun twists to try with your Easy Fresh Strawberry Mousse:
- Chocolate Strawberry Mousse: Drizzle melted chocolate into the mousse before chilling for an indulgent treat.
- Balsamic Strawberry Mousse: Add a splash of balsamic vinegar to the strawberry puree for a unique, sophisticated flavor.
- Coconut Strawberry Mousse: Substitute half of the heavy cream with coconut cream for a tropical flair.
- Vegan Strawberry Mousse: Use coconut whipped cream and agave syrup for a dairy-free option. You can blend in silken tofu for added creaminess!
Chef’s Notes
I’ll let you in on a little secret: the first time I attempted to make this mousse, it was a hilarious disaster! I accidentally whipped the cream too long and ended up with butter. Let’s just say, my friends were equally impressed and confused! From that day on, I learned the art of gentle whipping and the importance of patience in cooking. This mousse has evolved since then, becoming a beloved staple in my kitchen, and I’m thrilled to pass it on to you with all my little lessons learned!
FAQs and Troubleshooting
1. Can I use frozen strawberries?
Yes! Thaw and drain the strawberries before using them, but keep in mind fresh strawberries have the best flavor.
2. What if my mousse is too runny?
If your mousse doesn’t set, try adding a bit more whipped cream to stabilize it. Also, ensure you chilled it for the appropriate amount of time.
3. Can I make this ahead of time?
Absolutely! It’s perfect for prepping a day ahead. Just cover it well and keep it in the fridge.
4. How long does this mousse last?
It’s best enjoyed within 2-3 days of making it, but it can last up to five days in the fridge. Just be sure to cover it tightly!
Whether it’s for a special gathering or a cozy night at home, this Easy Fresh Strawberry Mousse is sure to delight and bring smiles to your table. So go ahead, tie on your apron, pour yourself a little bubbly, and create something joyful. Because in the end, food is about more than just the taste; it’s about the connections we make and the memories we share.
Welcome to the Ivory Apron family—happy cooking!
PrintEasy Fresh Strawberry Mousse

A light and fluffy strawberry mousse bursting with fresh flavors, perfect for any occasion.
- Prep Time: 10 minutes
- Cook Time: 0 minutes
- Total Time: 240 minutes
- Yield: 4 servings 1x
- Category: Dessert
- Method: Chilling
- Cuisine: American
- Diet: Vegetarian
Ingredients
- 2 cups fresh strawberries, hulled
- 1/4 cup powdered sugar
- 1 tablespoon fresh lemon juice
- 1 teaspoon vanilla extract
- 1 1/2 cups heavy cream, cold
Instructions
- Prep the strawberries by washing them thoroughly, hulling them, and slicing in half. Sprinkle with 2 tablespoons of powdered sugar and let sit for 10 minutes.
- Blend the strawberries until smooth using a blender or food processor.
- Strain the puree through a fine-mesh sieve if a super smooth mousse is desired (optional).
- Combine the strawberry puree, remaining powdered sugar, lemon juice, and vanilla extract in a separate bowl.
- Whip the cold heavy cream in a large mixing bowl until soft peaks form.
- Fold the whipped cream into the strawberry mixture until well combined.
- Chill in the fridge for at least 2-4 hours until set before serving.
Notes
For added flavor, consider variations like chocolate drizzle or balsamic vinegar. Serve in elegant glassware with fresh strawberries and mint.
Nutrition
- Serving Size: 1 serving
- Calories: 250
- Sugar: 22g
- Sodium: 30mg
- Fat: 18g
- Saturated Fat: 11g
- Unsaturated Fat: 7g
- Trans Fat: 0g
- Carbohydrates: 24g
- Fiber: 2g
- Protein: 2g
- Cholesterol: 60mg
Keywords: strawberry mousse, easy dessert, summer dessert, fruit dessert

Min Strawberry Cheesecake Sweet Rolls (Beginner-Friendly)
Easy Strawberry Cheesecake Sweet Rolls
Hello, my fellow food enthusiasts! Are you ready to embark on a delicious adventure that will delight your taste buds and elevate your brunch game? Today, I’m sharing a recipe that embodies the essence of comfort and indulgence: Easy Strawberry Cheesecake Sweet Rolls. Picture this: warm, fluffy rolls filled with a creamy cheesecake mixture and bursting with juicy strawberries, all drizzled with a sweet glaze. Sounds heavenly, right?
There’s something magical about sweet rolls that brings back fond memories. As a child, I remember the aroma of freshly baked goods wafting through my grandmother’s kitchen, where she would whip up delightful treats for any occasion. She always had a knack for transforming simple ingredients into extraordinary creations. This recipe draws inspiration from those cherished moments and adds a fun, modern twist that makes it perfect for gatherings or simply indulging in a sweet treat on any day.
These rolls are not only easy to make but are also incredibly versatile! You can whip them up for a weekend brunch with friends, a cozy family breakfast, or even as a playful dessert after dinner. So, roll up your sleeves, tie on that apron, and let’s dive into this scrumptious adventure together. Trust me, your kitchen will be the happiest place on earth!
Personal Story
Let me take you back to one of my favorite childhood memories. It was a sunny Saturday morning, and I was over at my grandmother’s house, where the kitchen always felt like a cozy haven filled with the scent of baked goods. She had just pulled a batch of her famous cinnamon rolls from the oven. The way her eyes sparkled as she rolled out the dough and coaxed it into shape always fascinated me. On that particular day, she decided to experiment with a new recipe—a blend of cheesecake filling and fresh strawberries.
As she mixed the cream cheese with powdered sugar and a splash of vanilla, I was enchanted by how simple ingredients could come together to create something so divine. I remember plucking strawberries from the garden while she guided me on how to slice them perfectly. Those sweet rolls turned out to be a family favorite, blending the creamy richness of cheesecake with the vibrant freshness of strawberries. That day instilled in me a love for baking and a joy in sharing food with loved ones. Today, I carry that cherished memory with me as I guide you through making these delightful Easy Strawberry Cheesecake Sweet Rolls!
Ingredients
Dough Ingredients:
-
2 ½ cups all-purpose flour
- This forms the base of our sweet rolls. If you prefer a nuttier flavor, you can substitute it with whole wheat flour.
-
2 ¼ teaspoons active dry yeast (one packet)
- The magical ingredient that helps our rolls rise. Make sure it’s fresh for the best results!
-
¼ cup granulated sugar
- Adds a touch of sweetness to the dough. You could substitute it with coconut sugar for a healthier option.
-
½ teaspoon salt
- Balances the sweetness and enhances the other flavors in our rolls.
-
¾ cup warm milk (110°F/43°C)
- Warm milk helps activate the yeast. For a dairy-free version, almond or oat milk works wonderfully!
-
3 tablespoons unsalted butter, melted
- Adds richness. For a vegan twist, feel free to use melted coconut oil instead.
-
1 large egg
- Gives the dough structure. You can substitute it with a flax egg (1 tablespoon ground flaxseed mixed with 3 tablespoons water) for a vegan option.
Filling Ingredients:
-
8 oz cream cheese, softened
- This creates the luscious cheese filling. If you want a dairy-free option, use vegan cream cheese.
-
½ cup powdered sugar
- Sweetens the cream cheese and complements the strawberries beautifully.
-
1 teaspoon vanilla extract
- A splash of vanilla adds depth and enhances the sweet flavors.
-
1 cup fresh strawberries, diced
- They bring a burst of brightness and flavor to the rolls. If using frozen strawberries, thaw them and drain any excess liquid to avoid sogginess.
Glaze (optional):
-
1 cup powdered sugar
- This sweet glaze is the icing on the cake (or roll, in this case).
-
2 tablespoons milk (or plant-based milk)
- This thins out the glaze for easy drizzling.
-
½ teaspoon vanilla extract
- Just like in the filling, vanilla elevates the glaze and ties the flavors together.
Step-by-Step Instructions
-
Prepare the Dough:
- In a large mixing bowl, whisk together the flour, sugar, and salt. In a small bowl, combine the warm milk and yeast, letting it sit for about 5 minutes until frothy. This step is crucial—if your yeast doesn’t bubble, it’s time to grab a fresh packet!
-
Mix:
- Once frothy, add the yeast mixture, melted butter, and egg to the dry ingredients. Stir until combined, and then knead the dough on a floured surface for about 5-7 minutes until it’s soft and elastic. If the dough sticks to your hands, sprinkle a little more flour as needed.
-
First Rise:
- Place the dough in a greased bowl, cover it with a damp kitchen towel, and let it rise in a warm space for about 1 hour or until it doubles in size. This is a great time to tidy up your kitchen or take a coffee break!
-
Make the Filling:
- While your dough is rising, prepare the filling! In a mixing bowl, beat together the softened cream cheese, powdered sugar, vanilla extract, and diced strawberries until smooth. Taste and adjust the sweetness if desired. You’ll want to have this ready for when the dough is done rising!
-
Roll it Out:
- After the dough has risen, punch it down gently to release the air. Roll the dough out on a floured surface into a large rectangle (about 12×18 inches). Aim for a thickness of about 1/4 inch to ensure that you don’t have overly thick rolls.
-
Spread the Filling:
- Evenly spread the cream cheese mixture over the surface of the rolled-out dough, leaving about 1 inch of space around the edges. This is where the magic happens—each bite will be filled with rich cheesecake goodness and fresh strawberries!
-
Roll it Up:
- Starting from the long edge, carefully roll the dough into a tight log. Try to keep it even to ensure consistent baking. This is the part that makes your rolls extra delightful!
-
Slice:
- With a sharp knife or dental floss (yes, I’m serious!), slice the log into 12 even pieces. Place them in a greased baking dish, leaving a little space between each roll to allow for expansion during baking.
-
Second Rise:
- Cover the rolls with the kitchen towel again and let them rise for another 30 minutes. If you gently poke one with your fingertip, it should bounce back, indicating that it’s ready to go.
-
Preheat Oven:
- While the rolls are rising, preheat your oven to 350°F (175°C). The anticipation is building, and soon your kitchen will smell like heaven!
- Bake:
- Bake the rolls in the preheated oven for about 25-30 minutes or until they’re golden brown. Look at those beauties rise and bake—it’s pure joy!
- Prepare the Glaze:
- As your rolls cool slightly, whisk together the powdered sugar, milk, and vanilla extract until smooth. If it’s too thick, add a splash more milk until it reaches your desired drizzling consistency.
- Drizzle:
- Once your rolls have cooled for about 10 minutes, drizzle the glaze over the top. This makes them look fancy and adds just the right amount of sweetness!
Serving Suggestions
To serve these delightful Easy Strawberry Cheesecake Sweet Rolls, arrange them on a beautiful platter for a stunning presentation. A light dusting of powdered sugar on top can further enhance their visual appeal. Pair with a side of fresh strawberries or whipped cream for an extra touch of elegance. These rolls are perfect for brunch, dessert, or a special afternoon treat with coffee or tea!
Recipe Variations
-
Mixed Berry Delight:
- Substitute the strawberries with a mix of blueberries, raspberries, and blackberries for a vibrant berry medley!
-
Chocolate Lovers:
- Add mini chocolate chips into the cream cheese filling for a decadent twist. Chocolate and strawberries are always a winning combo!
-
Lemon Zest:
- Incorporate the zest of one lemon into the cream cheese filling for a refreshing citrus kick that balances the sweetness.
-
Nutty Crunch:
- Fold in some chopped pecans or walnuts into the filling for an extra layer of texture and flavor.
-
Gluten-Free Option:
- Swap the all-purpose flour with a 1:1 gluten-free flour blend and ensure your baking powder and other ingredients are gluten-free as well.
Chef’s Notes
As a chef, I love how recipes evolve over time. This one has a special place in my kitchen because it reminds me of carefree days spent with my grandmother, creating family favorites. I’ve played around with ingredients—adding flavors from the season or experimenting with different fruits. Once, I replaced the strawberries with peaches, and wow, what a delightful twist that was! And yes, I may have eaten half the batch before sharing.
Baking these rolls will fill your home with warmth and happiness. I promise, there’s something therapeutic about kneading dough and waiting for it to rise—it’s a labor of love that’s oh-so-worth it!
FAQs and Troubleshooting
1. My rolls didn’t rise. What went wrong?
- If your rolls didn’t rise, it’s likely due to inactive yeast. Always check the expiration date on your yeast, and ensure your milk isn’t too hot when mixing—aim for warming it to about 110°F/43°C.
2. How do I store leftovers?
- Keep any leftover rolls in an airtight container at room temperature for up to 2 days. They can also be refrigerated for up to a week, but I highly doubt they’ll last that long!
3. Can I freeze these sweet rolls?
- Absolutely! Freeze them before glazing. Wrap them tightly in plastic wrap, then foil, before placing them in a freezer-safe bag. When you’re ready to enjoy, thaw them overnight in the refrigerator and warm them slightly before glazing.
4. My dough is too sticky. How can I fix this?
- If your dough is sticking to your hands or the surface, try sprinkling a little more flour, knead thoroughly, or let it rest for a few minutes, which can help with the stickiness.
Nutritional Info
While indulging in these rolls, it’s good to keep a mindful view on nutrition. Each sweet roll holds an enticing balance of flavors—rich in carbohydrates from the dough, protein from the cream cheese, and plenty of vitamins from the strawberries.
Estimated Nutritional Info per Roll:
- Calories: 220
- Protein: 4g
- Fat: 5g
- Carbohydrates: 40g
- Fiber: 1g
- Sugar: 10g
Remember, everything in moderation!
With this recipe, I hope I’ve sparked joy in your kitchen and inspired you to create something delicious and share it with the people you love. Happy baking, and may your days be filled with sweet rolls and sweet moments!
Let’s keep those aprons tied and the conversation flowing around the table—because cooking is so much more than just preparing food; it’s about bringing people together. Enjoy!
PrintEasy Strawberry Cheesecake Sweet Rolls

Delightful sweet rolls filled with creamy cheesecake and juicy strawberries, drizzled with a sweet glaze.
- Prep Time: 15 minutes
- Cook Time: 30 minutes
- Total Time: 45 minutes
- Yield: 12 servings 1x
- Category: Dessert
- Method: Baking
- Cuisine: American
- Diet: Vegetarian
Ingredients
- 2 ½ cups all-purpose flour
- 2 ¼ teaspoons active dry yeast
- ¼ cup granulated sugar
- ½ teaspoon salt
- ¾ cup warm milk (110°F/43°C)
- 3 tablespoons unsalted butter, melted
- 1 large egg
- 8 oz cream cheese, softened
- ½ cup powdered sugar
- 1 teaspoon vanilla extract
- 1 cup fresh strawberries, diced
- 1 cup powdered sugar (for glaze)
- 2 tablespoons milk (or plant-based milk)
- ½ teaspoon vanilla extract (for glaze)
Instructions
- Prepare the Dough: In a large mixing bowl, whisk together the flour, sugar, and salt. In a small bowl, combine the warm milk and yeast, letting it sit for about 5 minutes until frothy.
- Mix: Once frothy, add the yeast mixture, melted butter, and egg to the dry ingredients. Stir until combined, and then knead the dough on a floured surface for about 5-7 minutes until soft and elastic.
- First Rise: Place the dough in a greased bowl, cover it with a damp kitchen towel, and let it rise in a warm space for about 1 hour.
- Make the Filling: In a mixing bowl, beat together the softened cream cheese, powdered sugar, vanilla extract, and diced strawberries until smooth.
- Roll it Out: After the dough has risen, punch it down gently and roll it out on a floured surface into a large rectangle (about 12×18 inches).
- Spread the Filling: Evenly spread the cream cheese mixture over the surface of the rolled-out dough.
- Roll it Up: Starting from the long edge, carefully roll the dough into a tight log and slice it into 12 even pieces.
- Second Rise: Cover the rolls with a kitchen towel again and let them rise for another 30 minutes.
- Preheat Oven: Preheat your oven to 350°F (175°C).
- Bake: Bake the rolls in the preheated oven for about 25-30 minutes or until golden brown.
- Prepare the Glaze: Whisk together the powdered sugar, milk, and vanilla extract until smooth.
- Drizzle: Once your rolls have cooled for about 10 minutes, drizzle the glaze over the top.
Notes
For a gluten-free option, swap the all-purpose flour with a gluten-free flour blend. These sweet rolls can be frozen before glazing.
Nutrition
- Serving Size: 1 roll
- Calories: 220
- Sugar: 10g
- Sodium: 200mg
- Fat: 5g
- Saturated Fat: 3g
- Unsaturated Fat: 2g
- Trans Fat: 0g
- Carbohydrates: 40g
- Fiber: 1g
- Protein: 4g
- Cholesterol: 30mg
Keywords: strawberry cheesecake, sweet rolls, brunch recipe, dessert
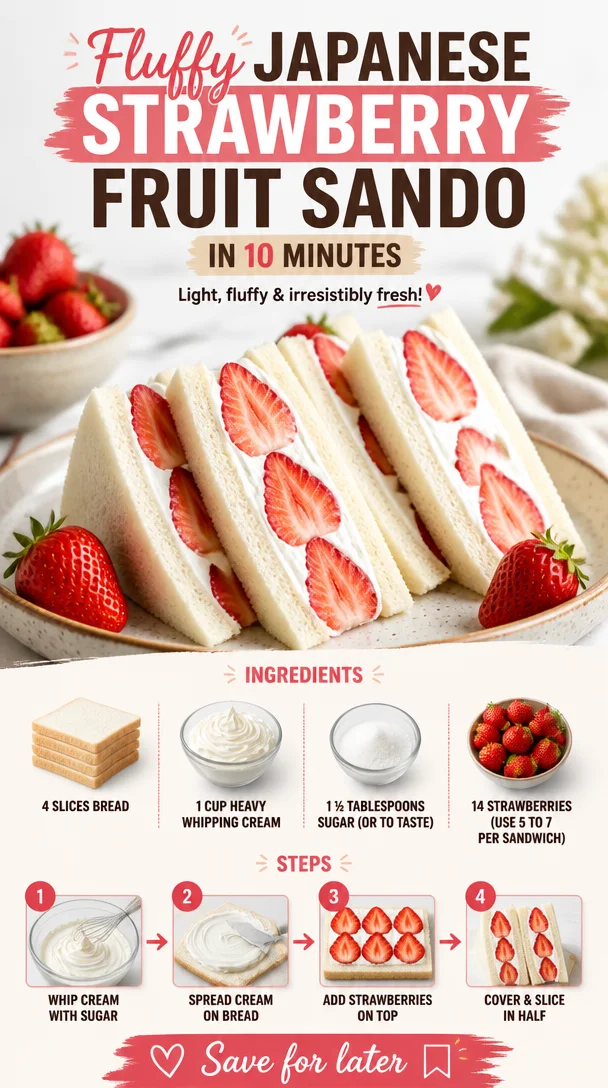
Fluffy Japanese Strawberry Fruit Sando in 10 Minutes
Indulge in Sweet Simplicity: Japanese Fruit Sandwich (フルーツサンド)
Welcome, kitchen adventurers! Today, I’m thrilled to share a delightful treat that’s been winning hearts everywhere — the Japanese Fruit Sandwich, or as it’s affectionately known: フルーツサンド (Furu-tsu Sando). This fluffy masterpiece showcases vibrant strawberries nestled between luscious whipped cream and soft bread, making for a perfect afternoon snack or a whimsical dessert.
Now, I know what you might be thinking: “A sandwich with fruit? Really?” Yes, my friends! This isn’t just any sandwich; it’s a celebration of fresh flavors and textures wrapped in a soft embrace of bread that will make your taste buds dance. Think of it as a rosy cloud of happiness delivered on two slices of happiness! In the busy world of modern life, we all need a little bit of sweetness, and this fruity delight offers that in every glorious bite.
As I recall my first encounter with this Japanese delight, I can’t help but smile. It was during my travels through Japan, where I stumbled across a charming cafe tucked away in a quiet alley. The moment I sank my teeth into that creamy, fruity goodness, I knew I had met my culinary soulmate! The strawberries were perfectly ripe, and the whipped cream was delicately sweetened. It hit all the right notes of nostalgia and comfort. I felt transported back to my childhood, where flavors were simple yet oh-so-satisfying.
Get ready, because I’m going to guide you through making your very own Japanese Fruit Sandwich at home. Dust off that apron and let’s dive into the magic of this sweet treat!
What You’ll Need: Ingredients
To whip up these dreamy fruit sandwiches, gather the following ingredients:
- 4 slices of bread: Choose soft white bread or shokupan (Japanese milk bread) for that pillowy texture. If you’re feeling adventurous, fluffy brioche also works wonderfully!
- 1 cup heavy whipping cream: This is the star of the show! It brings richness and creaminess. If you prefer a lighter option, coconut cream can be a lovely substitute.
- 1 ½ Tablespoons sugar: Sweetening the cream is essential, but taste as you go! You might want to use more or less depending on your sweet tooth.
- 14 strawberries: Fresh and ripe is the name of the game. Aim for sweet, juicy strawberries; you’ll use about 5 to 7 strawberries per sandwich, depending on their size. Alternatively, feel free to swap out strawberries for other fruits like kiwi or mango for fun variations!
Step-by-Step Instructions: Let’s Get Cooking!
Step 1: Prepare the Strawberries
Start by washing and hulling your strawberries. Halve them if they’re large, or leave them whole for a more decadent bite. Remember, it’s all about keeping things visually appetizing! The more colorful, the better.
Chef hack: To enhance the flavor, sprinkle a bit of sugar over the halved strawberries and let them sit for about 10 minutes. This will create a lovely syrup that adds an extra burst of sweetness!
Step 2: Make the Whipped Cream
In a mixing bowl, combine the heavy whipping cream and sugar. Using a hand mixer or a stand mixer, whip the cream until soft peaks form. Be careful not to over-whip it; we want that creamy texture, not butter!
Tip: If you’d like to add flavor to your whipped cream, consider incorporating a splash of vanilla extract or a hint of citrus zest for an interesting twist!
Step 3: Assemble the Sandwiches
Grab your slices of bread and spread a generous layer of the whipped cream on one slice. Arrange your strawberries on top of the cream, making sure to create an aesthetically pleasing pattern.
Now, top it all off with another layer of whipped cream before pressing down with another slice of bread to create a sandwich. Make sure the fillings are aligned for a beautiful presentation!
Step 4: Slice and Serve
Using a sharp knife, slice the sandwiches into quarters or halves, depending on your preference. You can remove the crusts if you want a more traditional look, but I say embrace the crust!
Presentation tip: For a final touch, dust the sandwiches with a sprinkle of powdered sugar for a dreamy finish. You can also arrange them on a pretty plate, adding any leftover strawberries for a pop of color!
Serving Suggestions
When serving these delightful fruit sandwiches, think about creating a serene setting. Pair them with a cup of green tea or a light coffee, and maybe even some delicate pastries. The soft, fluffy nature of the fruit sando makes it perfect for brunch gatherings, picnics, or even as a light dessert after a hearty meal.
Recipe Variations
- Tropical Twist: Swap out the strawberries for ripe mango slices, adding a touch of shredded coconut to the cream for a tropical escape.
- Berry Medley: Mix different berries like blueberries and raspberries with your strawberries for a colorful, berry-burst experience!
- Nutty Delight: Stir in some finely chopped nuts like pistachios or almonds into the whipped cream for added texture and flavor!
- Dairy-Free Option: Substitute heavy cream with coconut cream for a vegan twist. Sweeten with maple syrup if desired.
Chef’s Notes
As I reflect on my journey with this fruit sandwich, I can’t help but giggle at how simple ingredients can create such joy. I remember once trying to impress a friend during a casual get-together, but in my haste, I over-whipped the cream — uh oh! While it didn’t look “perfect,” it made for some great laughs, and we still enjoyed every last morsel.
Over the years, I’ve seen this recipe evolve; some even add a touch of matcha to the whipped cream for a delightful green hint. It’s all about making it your own, so don’t hesitate to get creative!
FAQs and Troubleshooting
Q: Can I use other fruits besides strawberries?
Absolutely! While strawberries are classic, feel free to experiment with other fruits like peaches, kiwi, or even banana.
Q: My whipped cream didn’t hold its shape. What went wrong?
Over-whipping can cause the cream to break down, so be sure to stop as soon as soft peaks form. If it breaks, you can try gently folding in a bit more heavy cream to salvage it.
Q: What’s the best way to store leftover sandwiches?
If you have leftovers (not likely, but just in case!), store them in an airtight container in the fridge for up to a day. Keep in mind the bread might lose its texture, but they’ll still taste great!
Q: Can I make these ahead of time?
While I recommend enjoying them fresh for the best texture, you can prepare the components ahead of time and assemble them just before serving.
Nutritional Info (Optional)
While I don’t usually focus too much on nutrition when sharing these delicious concoctions, it’s always good to be mindful. As a rough estimate, each sandwich (with strawberries) can contain around 300-400 calories, depending on the amounts used. It’s all about balance! Enjoy these sandwiches as part of a delightful experience rather than just a snack.
So, there you have it! A delightful, airy, and oh-so-tempting Japanese Fruit Sandwich that’s sure to charm anyone who takes a bite. Whether you’re enjoying it with friends, on a lazy afternoon, or even as a late-night treat, this recipe is one you’ll come back to time and time again.
Thanks for joining me in this kitchen adventure, and I can’t wait to hear how your fruit sandwiches turn out. Happy cooking, and remember — good food is all about sharing the love! 🍓✨
PrintJapanese Fruit Sandwich (フルーツサンド)
A delightful Japanese treat featuring vibrant strawberries, luscious whipped cream, and soft bread, perfect for a light snack or dessert.
- Prep Time: 15 minutes
- Cook Time: 5 minutes
- Total Time: 20 minutes
- Yield: 2 servings 1x
- Category: Dessert
- Method: No-Cook
- Cuisine: Japanese
- Diet: Vegetarian
Ingredients
- 4 slices of soft white bread or shokupan (Japanese milk bread)
- 1 cup heavy whipping cream
- 1 ½ tablespoons sugar
- 14 strawberries, fresh and ripe
Instructions
- Prepare the strawberries by washing and hulling them. Halve them if large.
- Make the whipped cream by combining heavy whipping cream and sugar, then whipping until soft peaks form.
- Assemble the sandwiches by spreading whipped cream on one slice, adding strawberries, topping with more cream, and placing another slice on top.
- Slice the sandwiches into quarters or halves and serve with a dusting of powdered sugar.
Notes
Consider adding a splash of vanilla extract to the whipped cream for extra flavor. Store leftovers in an airtight container in the fridge for up to a day.
Nutrition
- Serving Size: 1 sandwich
- Calories: 350
- Sugar: 14g
- Sodium: 200mg
- Fat: 25g
- Saturated Fat: 15g
- Unsaturated Fat: 8g
- Trans Fat: 0g
- Carbohydrates: 30g
- Fiber: 2g
- Protein: 3g
- Cholesterol: 75mg
Keywords: fruit sandwich, Japanese dessert, whipped cream, strawberries, soft bread

Chocolate Covered Strawberries
Chocolate Covered Strawberries: A Sweet Treat with Heart
Hello, my fellow food lovers! It’s Savannah here, and today we’re diving into a delectable treat that perfectly balances elegance and simplicity: chocolate covered strawberries. These little delights are not just a feast for the eyes but also for the palate, with their luscious chocolate coating and sweet, juicy strawberries. Whether you’re preparing for a special occasion, planning a romantic evening in, or simply looking for a fun and easy treat to whip up, chocolate covered strawberries are always a hit!
A Sweet Memory
Growing up, my summers were filled with the joy of berry picking at my family’s favorite local farm. The sun would shine down on us as we wandered through rows of vibrant strawberries, their scent filling the air. Once we had gathered a basket full of the ripest berries, we would rush home in anticipation, our hands stained red from the fruit. My mom would melt chocolate on the stove, filling the kitchen with a warm, sweet aroma that was simply irresistible.
Together, we would dip each strawberry into the silky chocolate, letting the excess drip off, and carefully place them on a baking sheet lined with parchment paper. As we waited for them to set in the fridge, we whispered about our favorite toppings— chopped nuts, sprinkles, or coconut flakes. Those moments were more than just about cooking; they were about bonding, laughter, and creating sweet memories that I cherish to this day. So let’s recreate that nostalgia together, shall we?
Ingredients
Here’s what you’ll need to make these delightful treats:
-
Fresh Strawberries: Select ripe, firm strawberries with bright green leaves. Opt for organic if possible for the best flavor. If strawberries aren’t in season, you can also experiment with other berries!
-
Chocolate: Use high-quality chocolate for melting. You can choose bittersweet, semisweet, or even white chocolate. For a healthier option, you could use dark chocolate with high cocoa content.
-
Optional Toppings: Get creative! Consider crushed nuts, sprinkles, coconut flakes, or even sea salt for a gourmet touch.
Chef Insight:
When choosing chocolate, 60-70% cocoa content is ideal for a rich flavor that isn’t overly sweet. However, make sure to avoid chocolate chips as they often contain stabilizers that make them resistant to melting.
Step-by-Step Instructions
Let’s dive into the fun part and get started with our chocolate covered strawberries!
-
Prepare Your Strawberries:
- First, rinse your strawberries under cool running water and gently pat them dry with a paper towel. Make sure they are completely dry; any moisture will prevent the chocolate from adhering properly.
- Want a pro tip? Leave the green tops on! They’re not just for decoration; they provide a convenient handle while dipping.
-
Melt the Chocolate:
- Break the chocolate into small, even pieces and place them in a microwave-safe bowl.
- Microwave your chocolate in 30-second intervals, stirring after each interval until it’s almost completely melted. Take your time here—chocolate can seize up quickly if it overheats.
-
Dip the Strawberries:
- Hold a strawberry by the green stem and dip it into the melted chocolate, swirling it around to coat it evenly. Let the excess chocolate drip off.
- For a thicker coating, dip it back into the chocolate again, then set it on the parchment paper.
-
Add Your Toppings:
- If you’re using toppings, sprinkle them over the chocolate while it’s still wet so they’ll stick nicely. You can also try rolling the dipped strawberry in the toppings for an even coat.
-
Let Them Set:
- Transfer the baking sheet to the refrigerator and let the chocolate set for at least 30 minutes. If you’re in a hurry, a 10-minute stay in the freezer can work wonders too!
-
Serve and Enjoy:
- Once the chocolate is set, transfer the strawberries to a beautiful serving platter. You can even drizzle extra melted chocolate on top for that chef’s touch.
Serving Suggestions
When plating your chocolate covered strawberries, consider creating a lovely arrangement. Use a tiered cake stand for a beautiful display or place them in small, individual cups for a fun party snack. It’s all about making those strawberries shine, so let your creativity flow! A sprinkle of edible gold dust never hurt anyone either!
Recipe Variations
Now, let’s mix things up a bit! Here are a few delicious variations to try out:
-
Spicy Chocolate: Add a pinch of cayenne or chili powder to your melted chocolate for a delightful kick!
-
Nutty Chocolate: Roll your dipped strawberries in crushed pistachios or almonds for a crunchy texture.
-
Coconut Crush: Dip your strawberries in melted white chocolate and then roll them in shredded coconut for a tropical vibe.
-
Zesty Lime: Top the chocolate with finely grated lime zest for a citrusy twist.
-
Dark Chocolate Raspberry Mix: Instead of strawberries, try raspberries dipped in dark chocolate for a rich and tangy sweet!
Chef’s Notes
Chocolate covered strawberries are a recipe that has stood the test of time. I love how they effortlessly transform any occasion into something special. Over the years, I’ve played with different chocolates and toppings, finding that the best memories are made of real, simple ingredients shared with loved ones. They’ve evolved from simple kitchen adventures to show-stoppers at dinner parties and anniversaries.
One memorable twist? I once did an “Around the World” chocolate dip experience at a gathering, featuring spices and flavors from various cultures. Wasabi chocolate dip? Yes, please!
FAQs and Troubleshooting
Q: My chocolate seizes up; what happened?
A: Seizing can happen when water gets into the chocolate. Make sure your bowl and utensils are completely dry, and try using a double boiler next time for more control over the melting process.
Q: Can I use chocolate chips?
A: Technically, yes—but note that they may have stabilizers that prevent them from melting smoothly. If you do use them, ensure to add a splash of coconut oil or shortening to help them melt.
Q: How do I store leftover chocolate covered strawberries?
A: Store them in a single layer in an airtight container in the fridge for up to 2 days. They might lose a bit of their firmness but will still be delicious!
Q: Can I freeze chocolate covered strawberries?
A: Yes, but it’s best to enjoy them fresh! If you freeze them, keep them in an airtight container, but they may become mushy once thawed.
Nutritional Info
(Example – Optional section; adjust as needed based on actual ingredients)
- Calories: Approximately 75 per strawberry (based on semisweet chocolate and medium strawberry)
- Carbohydrates: 10g
- Fat: 4g
- Protein: 1g
- Fiber: 1g
So there you have it! Chocolate covered strawberries are not just a treat; they’re a symbol of shared moments around the table. Whether it’s a quiet evening or a festive celebration, I hope this recipe brings as much joy to your table as it has to mine. Grab your apron, and let’s get dipping! Happy cooking!
PrintChocolate Covered Strawberries

Delicious chocolate covered strawberries, a perfect balance of elegance and simplicity, ideal for any occasion.
- Prep Time: 15 minutes
- Cook Time: 5 minutes
- Total Time: 20 minutes
- Yield: 12 servings 1x
- Category: Dessert
- Method: No-Cook
- Cuisine: American
- Diet: Vegetarian
Ingredients
- 1 pound fresh strawberries
- 8 ounces bittersweet or semisweet chocolate
- Optional toppings: crushed nuts, sprinkles, coconut flakes, sea salt
Instructions
- Prepare your strawberries: Rinse under cool water and pat dry; leave the green tops on for easy dipping.
- Melt the chocolate: Break into small pieces and microwave in 30-second intervals, stirring until almost melted.
- Dip the strawberries: Hold by the green stem and swirl into the chocolate to coat; let excess drip off.
- Add your toppings: Sprinkle while chocolate is still wet or roll in toppings for better adherence.
- Let them set: Place in the refrigerator for at least 30 minutes, or 10 minutes in the freezer.
- Serve and enjoy: Transfer to a platter and drizzle extra chocolate if desired.
Notes
Store leftovers in a single layer in an airtight container in the fridge for up to 2 days.
Nutrition
- Serving Size: 1 strawberry
- Calories: 75
- Sugar: 9g
- Sodium: 5mg
- Fat: 4g
- Saturated Fat: 2g
- Unsaturated Fat: 2g
- Trans Fat: 0g
- Carbohydrates: 10g
- Fiber: 1g
- Protein: 1g
- Cholesterol: 0mg
Keywords: chocolate, strawberries, dessert, sweet treat, easy recipe
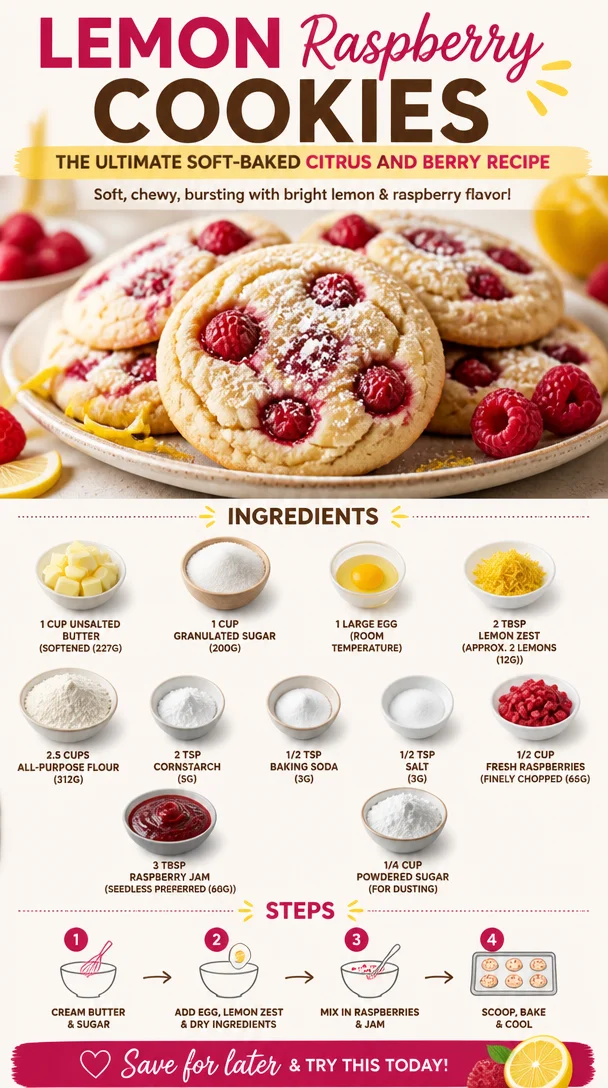
Lemon Raspberry Cookies: The Ultimate Soft-Baked Citrus and Berry Recipe
Lemon Raspberry Cookies: The Ultimate Soft-Baked Citrus and Berry Recipe
Hello, fellow foodies! If you’re ready to elevate your baking game and create a treat that’s bursting with flavor, then you’ve landed in the right spot. Today, we’re diving into the delightful world of Lemon Raspberry Cookies—a soft-baked cookie recipe that combines zingy lemon with sweet, juicy raspberries for a perfect balance that’s undeniably irresistible. Picture this: a cookie that melts in your mouth, leaving you with the bright notes of citrus and the luscious burst of berries. Mmm, can you smell it already? Let’s make it happen!
The Joy of Nostalgia
I can’t help but reminisce about sunlit afternoons in my childhood kitchen, the air filled with the tantalizing scents of fresh citrus. My grandmother, with her warm smile and flour-dusted apron, would gather me into her kitchen to bake treats for our family gatherings. Her lemon bars were legendary, but what I loved most were those moments spent whisking away in laughter, surrounded by the warmth of my family. Years later, I decided to take that nostalgia and infuse it with a touch of modern flair. Enter, the Lemon Raspberry Cookie! Each bite of these cookies transports me back to those sunny afternoons, with a superb burst of flavor. It’s not just about baking; it’s about creating memories, and I can’t wait for you to experience that joy.
Ingredients
Let’s get all our goodies together! Here’s what you’ll need to whip up these citrusy, berry delights:
-
1 cup Unsalted Butter (Softened – 227g)
Softened butter creates a rich, tender texture. If you’re in a pinch, substitute with margarine or coconut oil for a dairy-free option! -
1 cup Granulated Sugar (200g)
Sweetness is key! You can use coconut sugar for a slight caramel flavor, but keep in mind it will darken the cookies. -
1 Large Egg (Room temperature)
This ingredient brings moisture and binds everything together. For a vegan alternative, use a flax egg (1 tbsp ground flaxseed mixed with 2.5 tbsp water). -
2 tbsp Lemon Zest (Approx. 2 lemons – 12g)
Zest adds a bright flavor punch! Don’t skip this; it transforms the cookie into a full citrus experience. -
2.5 cups All-Purpose Flour (312g)
The foundation of any cookie. If you want gluten-free cookies, swap this with a 1:1 gluten-free all-purpose blend. -
2 tsp Cornstarch (5g)
This ingredient gives our cookies that soft-baked quality. If you’re in a bind, you can substitute with an equal amount of arrowroot powder. -
1/2 tsp Baking Soda (3g)
A leavening agent that helps the cookies rise. Make sure it’s fresh for the best results! -
1/2 tsp Salt (3g)
Balances the sweetness and enhances flavors. It can be omitted if you’re watching your sodium intake. -
1/2 cup Fresh Raspberries (Finely chopped – 65g)
Fresh berries bring a juicy burst! You can use frozen but make sure to thaw and pat them dry first. -
3 tbsp Raspberry Jam (Seedless preferred – 60g)
This adds an extra layer of raspberry flavor and moisture. Swap with any other jam if you’re feeling adventurous! -
1/4 cup Powdered Sugar (For dusting)
A simple finishing touch that looks oh-so-elegant on top of your cookies.
Step-by-Step Instructions
Alright, cue the apron and let’s get cooking! Here’s how you make these beautiful cookies:
-
Preheat Your Oven:
Start by preheating your oven to 350°F (175°C). This will ensure that your cookies bake evenly and perfectly. -
Cream Butter and Sugar:
In a large mixing bowl, cream together the softened butter and granulated sugar until light and fluffy—about 2-3 minutes. This step is crucial, as it helps incorporate air into your cookie dough for that lovely fluffy texture! -
Add the Egg and Lemon Zest:
Beat in the egg and lemon zest until well combined. You want that lemon aroma to permeate the batter. Pro tip: Use the microplane grater for fine zesting that packs in the most flavor without the bitter pith. -
Whisk Dry Ingredients:
In a separate bowl, whisk together the flour, cornstarch, baking soda, and salt. This helps to distribute the leavening agent evenly, so no surprise spots of baking soda in your cookies! -
Combine Wet and Dry Mixtures:
Gradually add the dry mixture to the wet mixture, mixing until just combined. Be careful not to overmix! Overworking the dough can lead to tough cookies. Chef hack: You want clumps of flour to still be visible; they will incorporate with the next step. -
Fold in the Raspberries and Jam:
Gently fold in the finely chopped raspberries and raspberry jam, ensuring they’re evenly distributed throughout the dough. The jam will add extra sweetness and moisture, so don’t be shy about it! -
Scoop the Dough:
Using a cookie scoop or tablespoon, drop dough onto a baking sheet lined with parchment paper, spacing them a few inches apart. They will spread a bit, so give them room! -
Bake:
Pop the cookies in the oven for 12-15 minutes, or until the edges are lightly golden. Keep an eye on them—the aroma of lemon and raspberry will have your head spinning! -
Cool Down:
Allow the cookies to cool on the baking sheet for 5 minutes before transferring them to a wire rack to cool completely. This cool-down allows the cookies to set up perfectly! -
Dust with Powdered Sugar:
Once cooled, finish them off with a light dusting of powdered sugar for that elegant touch that makes them look as special as they taste.
Serving Suggestions
To serve these Lemon Raspberry Cookies, arrange them on a beautiful platter or tiered stand, dusting with a bit of powdered sugar just before serving. Pair them with a lovely cup of tea or a refreshing lemon-infused sparkling water for a delightful afternoon treat.
Recipe Variations
- Add White Chocolate Chips: Incorporate white chocolate chips for a creamy contrast to the tart raspberries.
- Swap Berries: Try using blueberries or blackberries instead for a different berry experience.
- Lemon Icing Drizzle: Drizzle a simple icing made of powdered sugar and lemon juice over the cooled cookies for a little extra sweetness and another layer of lemon.
- Make it a Sandwich Cookie: Spread some raspberry jam between two cookies for a tasty twist!
- Add Nuts: Chopped pistachios or walnuts can add crunch and a whole new flavor profile.
Chef’s Notes
I’ve played around with this recipe over the years, trying different combinations and swaps. I once tried adding a touch of rosemary for a fragrant herbal note, which turned out surprisingly delightful! It’s amazing what a little experimentation can yield. Also, remember—these cookies can be a little soft when they come out of the oven, but they firm up as they cool. So when in doubt, wait a few minutes before you start munching!
FAQs and Troubleshooting
-
Why are my cookies flat?
If your cookies spread too much, consider using cold butter instead of softened, or double-check your baking soda to ensure it’s fresh. -
Can I freeze my dough?
Absolutely! Just scoop the dough onto a baking sheet, freeze until firm, and then transfer to a freezer-safe bag. Bake straight from the freezer with an added minute or two to the bake time. -
Can I use frozen raspberries?
Yes, but be sure to thaw and pat them dry to prevent excess moisture that can be released during baking. -
How do I know when they’re done baking?
Look for a light golden edge; they will continue to cook slightly after coming out of the oven, creating that perfect soft-baked texture.
Conclusion
There you have it—Lemon Raspberry Cookies that are not only delicious but wrapped in a story that connects deliciousness to cherished memories. So, tie on that apron, gather your ingredients, and let’s bake something that will bring joy not just to your palate but to your entire kitchen! Happy baking, friends! 🍋🍪❤️
PrintLemon Raspberry Cookies
Delightful soft-baked cookies combining zingy lemon and sweet raspberries for an irresistible treat.
- Prep Time: 15 minutes
- Cook Time: 15 minutes
- Total Time: 30 minutes
- Yield: 24 cookies 1x
- Category: Dessert
- Method: Baking
- Cuisine: American
- Diet: Vegetarian
Ingredients
- 1 cup Unsalted Butter (Softened – 227g)
- 1 cup Granulated Sugar (200g)
- 1 Large Egg (Room temperature)
- 2 tbsp Lemon Zest (Approx. 2 lemons – 12g)
- 2.5 cups All-Purpose Flour (312g)
- 2 tsp Cornstarch (5g)
- 1/2 tsp Baking Soda (3g)
- 1/2 tsp Salt (3g)
- 1/2 cup Fresh Raspberries (Finely chopped – 65g)
- 3 tbsp Raspberry Jam (Seedless preferred – 60g)
- 1/4 cup Powdered Sugar (For dusting)
Instructions
- Preheat your oven to 350°F (175°C).
- Cream together the softened butter and granulated sugar until light and fluffy—about 2-3 minutes.
- Add the egg and lemon zest until well combined.
- Whisk together the flour, cornstarch, baking soda, and salt in a separate bowl.
- Combine the dry mixture with the wet mixture, mixing until just combined.
- Fold in the chopped raspberries and raspberry jam.
- Scoop dough onto a baking sheet lined with parchment paper.
- Bake for 12-15 minutes, until edges are lightly golden.
- Cool on the baking sheet for 5 minutes before transferring to a wire rack.
- Dust with powdered sugar before serving.
Notes
These cookies can be soft when they come out of the oven; they firm up as they cool.
Nutrition
- Serving Size: 1 cookie
- Calories: 200
- Sugar: 12g
- Sodium: 100mg
- Fat: 10g
- Saturated Fat: 6g
- Unsaturated Fat: 2g
- Trans Fat: 0g
- Carbohydrates: 23g
- Fiber: 1g
- Protein: 2g
- Cholesterol: 30mg
Keywords: lemon cookies, raspberry cookies, soft-baked cookies, dessert
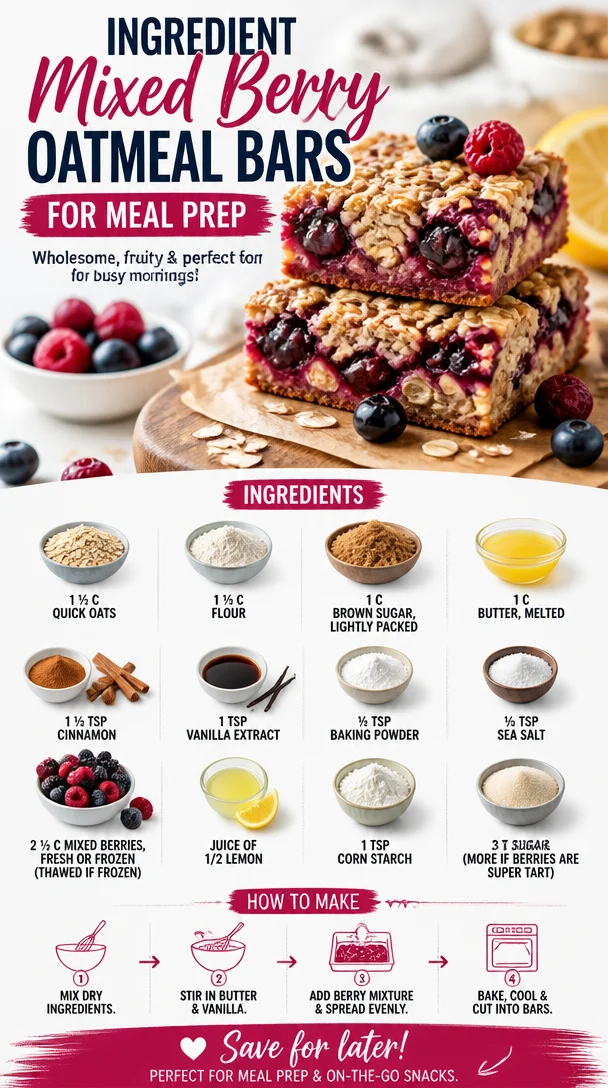
Ingredient Mixed Berry Oatmeal Bars for Meal Prep
Mixed Berry Oatmeal Bars: A Taste of Nostalgia
Hello, lovely foodies! Grab your aprons and get ready to embark on a delicious journey into the world of Mixed Berry Oatmeal Bars. There’s something incredibly special about a recipe that combines simplicity with nostalgia, and these bars do just that. Whether you’re looking for a delightful breakfast treat, a snack for your afternoon tea, or a sweet indulgence to satisfy your dessert cravings, these oatmeal bars are here to steal the show!
Personal Story: A Whiff of Summer
Growing up, my summers were all about vibrant berries. My family had a tradition of heading to the local farm where we’d pick fresh strawberries, blueberries, and raspberries until our baskets overflowed. There was something magical about stepping into those sun-drenched fields, with the air filled with the sweet aroma of ripening fruit. We’d pick, laugh, and eat berries until our fingers (and faces) were stained a deep crimson or azure.
After our adventures, my mother would become our family’s kitchen magician. One of her favorite recipes was a berry crumble that then inspired these oatmeal bars. I can still hear the bubbling sound of berries simmering on the stovetop, mixed with the warm notes of cinnamon wafting through our home. We would gather around the table, eagerly awaiting the first cut into that gorgeous, gooey dessert. It was during those cherished moments that I realized how food could create such lasting connections and memories with loved ones.
So, in the spirit of those beautiful summer days, let’s create a recipe that embodies joy, simplicity, and an abundance of flavor! Here’s how you can make these Mixed Berry Oatmeal Bars at home.
Ingredients
It doesn’t take much to bring these delicious bars to life! Let’s go over the ingredients you’ll need:
-
1 ½ cups quick oats
These oats provide the chewy base for our bars. Quick oats cook faster and offer a delightful texture. If you prefer, you can swap them with rolled oats for a heartier bite. -
1 ½ cups all-purpose flour
This is the foundation of the bars, lending them structure. If you’re going for a gluten-free option, almond flour or a gluten-free flour blend works wonders! -
1 cup brown sugar, lightly packed
Brown sugar gives a lovely depth of flavor, thanks to its molasses content. You can use coconut sugar for a healthier twist or even replace it with granulated sugar if you’re in a pinch. -
1 cup butter, melted
Melting the butter brings richness and helps bind the ingredients together. For a lighter option, substitute half of the butter with unsweetened applesauce! -
1 ½ teaspoon cinnamon
This warm spice adds warmth and depth to our bars. You could swap it out for nutmeg for a completely different spice profile. -
1 teaspoon vanilla extract
Vanilla enhances all the flavors in these bars. Feel free to use almond extract for a nutty flavor! -
½ teaspoon baking powder
This helper gives our bars a slight rise, making them soft and fluffy. Baking soda can be used instead; just remember to decrease the amount slightly! -
½ teaspoon sea salt
Salt balances the sweetness and elevates the overall taste. If you’re watching sodium, kosher salt is a great substitute! -
2 ½ cups mixed berries (fresh or frozen)
The star of the show! Use whatever berries you love. If you’re using frozen, don’t forget to thaw and drain them first. -
Juice of ½ lemon
A splash of lemon juice brightens the berry flavor and helps cut through the sweetness. Lime juice makes a zesty alternative! -
1 teaspoon cornstarch
This thickens the berry mixture, ensuring your bars hold together beautifully. If you don’t have cornstarch, flour will do in a pinch! -
3 tablespoons sugar (more if berries are super tart)
A touch of sugar sweetens the berry filling just right. Adjust based on the sweetness of your berries!
Step-by-Step Instructions
Alright, let’s get cookin’! Follow these simple steps, and soon enough, you’ll have a batch of these scrumptious bars cooling on your counter.
-
Preheat Your Oven
Preheat your oven to 350°F (175°C). This step ensures your bars bake evenly. While the oven warms up, you can prepare your baking pan! -
Grease Your Baking Pan
Grease a 9×13 inch baking pan with butter or line it with parchment paper for easy removal. The parchment will give you crisp edges and prevent any sticky moments. Trust me; it’s worth it! -
Mix the Dry Ingredients
In a large bowl, combine the quick oats, flour, cinnamon, baking powder, and sea salt. Whisk them together until they are evenly mixed. This ensures the flavors distribute evenly throughout the bars. -
Combine the Wet Ingredients
In another bowl, whisk together the melted butter, brown sugar, and vanilla extract until smooth and creamy. Now, here’s a little chef hack: don’t let the butter cool too much before mixing with the sugar; warm butter helps dissolve the sugar, making for a moist bar. -
Create the Oat Mixture
Pour the wet ingredients into the dry mixture and stir until just combined. Don’t overmix! We want a nice crumbly texture where you can see the oats. -
Set Aside for Filling
Reserve about 1 to 1 ½ cups of the oat mixture (we’ll use this for the topping). Press the rest into the bottom of your prepared baking pan. Use a spatula to spread it out evenly. -
Prepare the Berry Filling
In a medium bowl, toss your mixed berries with lemon juice, cornstarch, and sugar. This juicy goodness is what will make your bars sing! Even if I’m using frozen berries, I still love this step; it creates a sweet and zesty burst when baked. -
Spread the Berry Mixture
Carefully spread the berry mixture over the pressed oat base. Don’t be shy; we want to maximize that berry goodness! -
Top It Off
Crumble the reserved oat mixture over the berry layer. There’s no need to cover it completely; let the berries peek through for that gorgeous rustic vibe! -
Bake Until Golden
Pop the pan in the oven and bake for 25-30 minutes, or until the top is golden and the berries are bubbling. The smell that’ll fill your kitchen will make it hard to wait, but trust me; it’s worth it! -
Cool and Cut
Once baked, let the bars cool in the pan for at least 10 minutes, then lift them out with the parchment paper. Cool completely before cutting into squares (if you can resist the temptation!).
Serving Suggestions
When it comes to serving these Mixed Berry Oatmeal Bars, a simple presentation can go a long way. Slice them into squares or rectangles and place them on a beautiful platter. For an elegant touch, dust them with powdered sugar or serve with a dollop of whipped cream or a scoop of vanilla ice cream. They’re perfect for brunch gatherings, afternoon tea, or just as an after-dinner sweet. Pair them with a cup of chamomile tea or a latte, and you’ll be set for a lovely experience!
Recipe Variations
These oatmeal bars are so versatile; you can mix things up with some creative twists!
- Nutty Delight: Add in ½ cup of chopped nuts like almonds or walnuts for an extra crunch.
- Tropical Vibes: Swap the berries for mango and coconut for a tropical twist.
- Chocolate Chip Heaven: Stir in some chocolate chips for a dessert version that’s sure to please!
- Vegan Version: Replace butter with coconut oil and the eggs with flaxseed to make this recipe vegan-friendly.
- Spice It Up: Switch to pumpkin pie spice for a fall-inspired flavor that everyone will adore.
Chef’s Notes
Cooking is a delightful journey; I often find inspiration in the simplest of moments. The original recipe for these bars has evolved over the years, as I’ve experimented with different berries and flavor combinations. One funny kitchen story? Once, I accidentally grabbed cayenne pepper instead of cinnamon! Let’s just say—spicy oatmeal bars aren’t for the faint of heart!
These bars truly capture the essence of what home baking is about. They are comforting, delicious, and somehow remind me of those carefree childhood summers. I hope you create your own memories with this recipe!
FAQs and Troubleshooting
-
Why are my bars crumbly?
If your bars turn out crumbly, it could be due to not using enough butter or not compressing the oat mixture firmly enough into the pan. Make sure to pack the bottom layer down well! -
Can I use frozen berries?
Absolutely! Just remember to thaw them and drain any excess liquid to prevent soggy bars. Trust me, they’ll still be absolutely delicious! -
How do I store leftovers?
Store any leftovers in an airtight container in the fridge for up to a week. You can also freeze them for up to three months; just thaw before enjoying. -
Can I make these bars gluten-free?
Yes! Simply swap out regular flour for a gluten-free flour blend and ensure your oats are certified gluten-free. A marvelous treat for everyone!
Nutritional Info
Note: The nutritional information varies based on ingredient brands and specific substitutions used. Generally, each bar is a delightful balance of fiber, healthy fats, and a hint of sweetness with a burst of berry freshness!
Conclusion
I hope this Mixed Berry Oatmeal Bars recipe brightens your kitchen and brings a smile to your face. Engage your senses and savor the flavors, all while creating warm moments around your table. Let’s continue to celebrate the joy of cooking together, one recipe at a time!
Tie your apron, gather your loved ones, and embrace the warmth of home-baked goodness. Happy cooking!
PrintMixed Berry Oatmeal Bars
Delicious and nostalgic Mixed Berry Oatmeal Bars perfect for breakfast, snacks, or dessert.
- Prep Time: 15 minutes
- Cook Time: 30 minutes
- Total Time: 45 minutes
- Yield: 12 servings 1x
- Category: Snack
- Method: Baking
- Cuisine: American
- Diet: Vegetarian
Ingredients
- 1 ½ cups quick oats
- 1 ½ cups all-purpose flour
- 1 cup brown sugar, lightly packed
- 1 cup butter, melted
- 1 ½ teaspoon cinnamon
- 1 teaspoon vanilla extract
- ½ teaspoon baking powder
- ½ teaspoon sea salt
- 2 ½ cups mixed berries (fresh or frozen)
- Juice of ½ lemon
- 1 teaspoon cornstarch
- 3 tablespoons sugar (more if berries are super tart)
Instructions
- Preheat your oven to 350°F (175°C).
- Grease a 9×13 inch baking pan with butter or line with parchment paper.
- Mix the dry ingredients: oats, flour, cinnamon, baking powder, and sea salt.
- Combine the wet ingredients: whisk together melted butter, brown sugar, and vanilla extract.
- Create the oat mixture by pouring wet ingredients into the dry and stir until just combined.
- Set aside about 1 to 1 ½ cups of the oat mixture for the topping; press the rest into the bottom of your baking pan.
- Prepare the berry filling: mix berries with lemon juice, cornstarch, and sugar.
- Spread the berry mixture over the pressed oat base.
- Top with the reserved oat mixture, crumbling it over the berries.
- Bake for 25-30 minutes until golden and bubbly.
- Cool for at least 10 minutes before lifting out and slicing.
Notes
Store leftovers in an airtight container for up to a week. Can be frozen for three months.
Nutrition
- Serving Size: 1 serving
- Calories: 200
- Sugar: 10g
- Sodium: 150mg
- Fat: 9g
- Saturated Fat: 5g
- Unsaturated Fat: 2g
- Trans Fat: 0g
- Carbohydrates: 30g
- Fiber: 3g
- Protein: 3g
- Cholesterol: 30mg
Keywords: oatmeal bars, berry dessert, easy snack, healthy treats, summer recipes
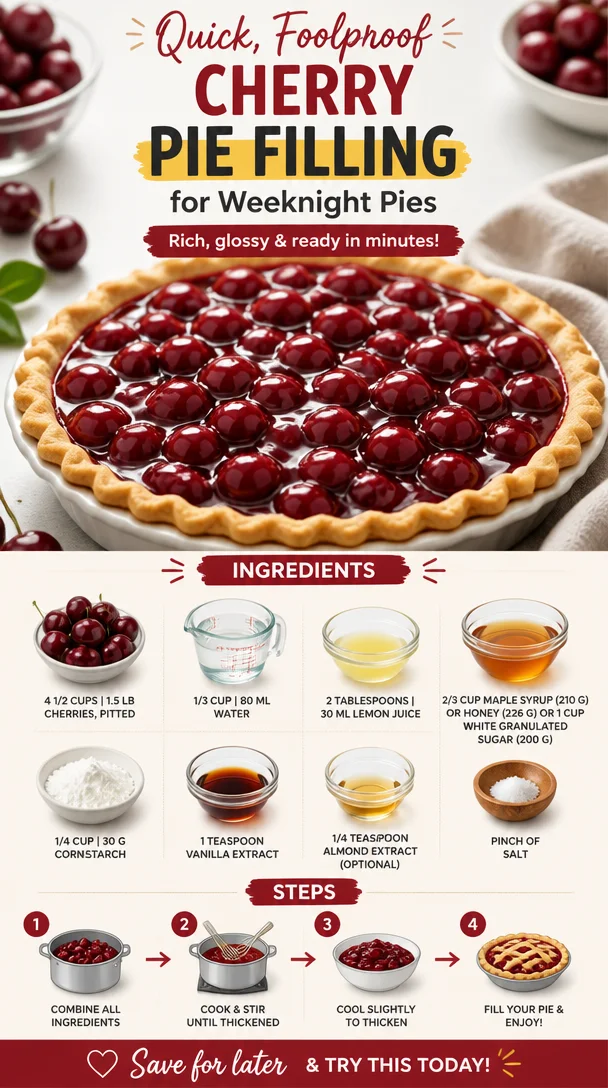
Quick, Foolproof Cherry Pie Filling for Weeknight Pies
The Sweet Symphony of Cherry Pie Filling
Welcome to my cozy corner of the kitchen, where the aroma of freshly baked pies dances through the air and memories linger like the sweetest notes of a favorite song. Today, we’re diving into the delightful world of Cherry Pie Filling. This luscious creation is not just a filling; it’s a story waiting to be told, a family tradition frosted with love, and a sprinkle of nostalgia.
Personal Story: The Cherry Pie that Stole My Heart
Growing up, my summers were filled with backyard barbecues, laughter, and the echo of my grandmother’s voice guiding me through the joyful chaos of the kitchen. One of my fondest memories is the annual cherry-picking expedition. My family and I would head to a local farm, baskets in hand, ready to pluck the brightest, juiciest cherries from the trees. The thrill of searching for the perfect cherries was only rivaled by the sweet reward that followed — Grandma’s famous cherry pie.
The process was magical. We’d sit together at the kitchen table, pitting cherries and sharing stories about our day. The kitchen would fill with the sound of laughter and the sugary scent of the pie crust baking in the oven. As the pie cooled, we’d gather around the table, savoring the fruits of our labor with whipped cream and smiles that could light up the room. It was in those moments that I learned not just how to bake but how to connect through food. And that, my friends, is what I want to share with you today — the joy of making your own cherry pie filling.
Ingredients
Let’s gather our ingredients! Here’s what you’ll need, along with some handy insights for each:
-
4 1/2 cups | 1.5 lbs cherries, pitted
Fresh cherries are ideal, but if they’re out of season, feel free to use frozen ones. Just make sure they are pitted and thawed before cooking! -
1/3 cup | 80 ml water
Water helps create the sauce for our filling. If you’re feeling adventurous, try swapping it with cherry juice for an extra flavor boost! -
2 tablespoons | 30 ml lemon juice
The zing of lemon juice balances the sweetness of the cherries. If you’re out of fresh lemons, bottled juice is a fine substitute, just watch for the acidity level! -
2/3 cup | 210 g maple syrup or honey (226 g) or 1 cup white granulated sugar (200 g)
Each sweetener gives a unique flavor — maple syrup adds a warm depth, while honey provides floral notes. Use what you have or mix and match for fun! -
1/4 cup | 30 g cornstarch
Cornstarch thickens the filling. For a gluten-free option, you can use tapioca starch instead — it works wonders! -
1 teaspoon vanilla extract
Vanilla enhances all the flavors beautifully. You can also experiment with almond extract for a delightful twist! -
1/4 teaspoon almond extract (optional)
This is where magic happens! It brings a lovely nutty flavor that complements the cherries perfectly. -
Pinch of salt
Don’t skip the salt — it enhances sweetness and balances flavors like a pro!
Step-by-Step Instructions
Ready to create your cherry pie filling? Let’s get cooking! Here’s how to whip this up, step by step:
-
Prep the Cherries
Start by washing and pitting your cherries. If you’re using fresh cherries, a good cherry pitter can save you time and keep your hands stain-free. Remember, it’s okay to mess up a bit; cooking is all about having fun! -
Combine Ingredients
In a medium saucepan, combine the pitted cherries, water, lemon juice, and half of your sweetener (maple syrup, honey, or sugar). Stir gently to mix — you want the cherries to feel embraced by the liquid warmth! -
Bring to a Simmer
Set your saucepan over medium heat. Bring the mixture to a simmer, allowing the cherries to release their juices and meld with the other ingredients. This step takes about 5-7 minutes. You’ll know it’s ready when the cherries start to bubble and fill your kitchen with a sweet aroma. -
Thicken the Filling
While stirring, mix your cornstarch with a little cold water in a small bowl to create a slurry. It’s important to get this right; it’s the secret to a silky-smooth filling! Gradually add this to the cherry mixture, stirring constantly. Continue cooking for another 2-3 minutes until the filling thickens. If it feels too thick, don’t panic; a splash of water can help loosen it. -
Add the Finishing Touches
Remove the saucepan from heat. Stir in the vanilla extract and almond extract, if using, along with that pinch of salt. Give it a taste — does it need a touch more sweetener? Adjust to your liking! Plus, if you want an even deeper cherry flavor, let it cool slightly before adding more extract. -
Cool and Enjoy
Transfer your cherry filling into a bowl and let it cool to room temperature. Trust me, the wait is worth it! Once it’s cool, it’s ready to be spooned into pies, slathered on pancakes, or enjoyed straight from the bowl (I won’t tell anyone!).
Serving Suggestions
When it comes to serving your cherry pie filling, the possibilities are endless! Whether you’re layering it into a flaky pie crust, drizzled over a scoop of vanilla ice cream, or even added to yogurt parfaits, make it beautiful. For that professional touch, consider placing it in a decorative dish and garnishing with a sprig of mint or a dusting of powdered sugar. You want to make it look as fabulous as it tastes!
Recipe Variations
Don’t be afraid to get creative with your cherry pie filling! Here are a few fun variations to try:
-
Berry Medley: Add raspberries or blueberries for a mixed berry flavor that’s bursting with summer vibes.
-
Spiced Up: Introduce cinnamon or nutmeg for a warm twist, making it perfect for fall desserts.
-
Zesty Citrus: Replace the lemon juice with fresh orange juice and zest for a bright, citrusy twist.
-
Chocolate Cherry: Stir in mini chocolate chips or cocoa powder for a decadent chocolate-cherry filling that’s perfect for a rich dessert.
-
Low-Sugar Option: Use a sugar substitute like erythritol or stevia for a guilt-free version!
Chef’s Notes
Ah, cherry pie filling — it’s been a beloved staple in my kitchen for years, and it never ceases to amaze me how the simplest ingredients can come together to create something so delectable. I still remember the first time I experimented with using honey instead of sugar. It took some trial and error, but that golden sweetness added a whole new dimension!
Another memory that always brings a smile is when I decided to surprise my friends with a cherry bake-off. Little did they know I had a few sneaky tricks up my apron’s sleeve! Watching their reactions to my secret almond extract was priceless.
FAQs and Troubleshooting
1. My filling turned out too runny. What went wrong?
Sometimes, it needs a little more cornstarch to thicken. Mix a teaspoon of cornstarch with cold water and add that to your simmering cherry mixture until it reaches the desired thickness.
2. Can I use frozen cherries?
Absolutely! Frozen cherries work beautifully. Just make sure they are pitted, and thaw them thoroughly — the juices will help flavor the filling.
3. How long does the cherry filling last?
Stored in an airtight container in the fridge, your cherry pie filling will last about 4-5 days. If you want to freeze it, just let it cool completely and place it in a freezer-safe container!
4. Can I use this filling for something other than pies?
Definitely! Cherry pie filling is versatile and can be used in parfaits, cheesecakes, pancakes, and even as a topping for yogurt or oatmeal.
Nutritional Info
(If applicable, please consult your nutritional database or calculating software based on your exact ingredients and portion sizes.)
In closing, I hope this cherry pie filling recipe inspires you to create cherished memories in your kitchen. Every bite tells a story, and I can’t wait for you to make this recipe your own. Tie on that apron and let’s get cooking. Cheers to sweet moments and beautiful gatherings around the table!
PrintSweet Symphony of Cherry Pie Filling
A delightful cherry pie filling recipe that brings nostalgia to every bite, perfect for enhancing pies, pancakes, or yogurt.
- Prep Time: 10 minutes
- Cook Time: 15 minutes
- Total Time: 25 minutes
- Yield: 2 cups 1x
- Category: Dessert
- Method: Stovetop
- Cuisine: American
- Diet: Vegetarian
Ingredients
- 4 1/2 cups (1.5 lbs) cherries, pitted
- 1/3 cup (80 ml) water
- 2 tablespoons (30 ml) lemon juice
- 2/3 cup (210 g) maple syrup or 1 cup (200 g) white granulated sugar
- 1/4 cup (30 g) cornstarch
- 1 teaspoon vanilla extract
- 1/4 teaspoon almond extract (optional)
- Pinch of salt
Instructions
- Prep the cherries by washing and pitting them.
- Combine ingredients in a medium saucepan: pitted cherries, water, lemon juice, and half of your sweetener.
- Bring the mixture to a simmer over medium heat, about 5-7 minutes.
- Thicken the filling by mixing cornstarch with cold water to create a slurry, then gradually add it to the cherry mixture.
- Add the finishing touches: stir in vanilla and almond extract, plus a pinch of salt.
- Cool the filling to room temperature before using.
Notes
For variations, try adding raspberries, cinnamon, or mini chocolate chips. Store in an airtight container for 4-5 days in the fridge.
Nutrition
- Serving Size: 1/4 cup
- Calories: 150
- Sugar: 28g
- Sodium: 5mg
- Fat: 0g
- Saturated Fat: 0g
- Unsaturated Fat: 0g
- Trans Fat: 0g
- Carbohydrates: 38g
- Fiber: 1g
- Protein: 1g
- Cholesterol: 0mg
Keywords: cherry pie filling, dessert, easy recipe, homemade cherry filling, summer recipe
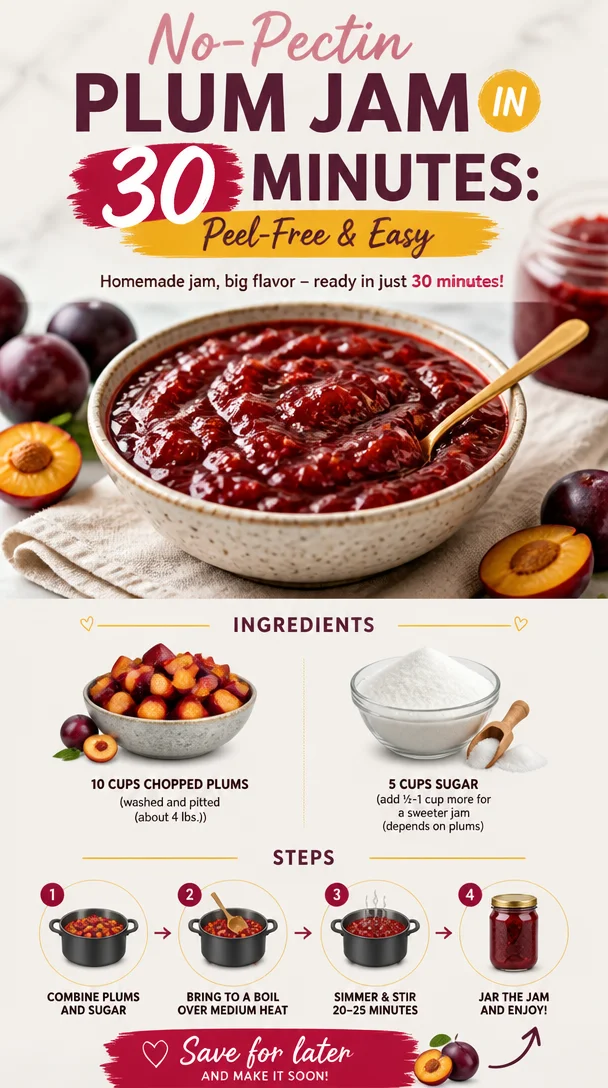
No-Pectin Plum Jam in 30 Minutes: Peel-Free & Easy
Homemade Plum Jam Without Pectin: A Sweet, Simple Recipe
Hello, fellow food lovers! Today, I’m excited to share with you one of my all-time favorite recipes: plum jam made without pectin. Yes, you heard that right! This recipe is not only wonderfully easy, but it also celebrates the natural goodness of ripe plums. Trust me; this jam will leave your kitchen smelling divine and your taste buds dancing with delight. So grab your apron, and let’s dive into a culinary adventure filled with sweetness—and no peeling necessary!
A Taste of Nostalgia
Growing up, summers were a magical time filled with the comforting scent of fruit wafting through the air. My grandma had this old plum tree in her backyard—it produced the juiciest plums you could imagine! I still remember those long summer afternoons, picking plums with my cousins, the sun shining down on us, and laughter echoing around the yard. We would gather buckets full of fruit, which soon became the centerpiece of our family kitchen.
The highlight of those summers was definitely the day we would spend making jam. Standing beside my grandma, I watched as she turned those ripe plums into jars of sunshine that we would savor all year long. She never used pectin, believing the plums had enough natural pectin to create a perfect balance of sweetness and tartness. And oh, how I loved slathering that homemade jam over warm toast, hearing the pop of each jar as we sealed them up. Today, I’m excited to share that same joy with you, minus the peeling—because who has time for that?
Ingredients
To create this delightful plum jam, you’ll need the following ingredients:
-
10 cups of ripe plums (washed and pitted; about 4 lbs.): The star of the show! Choose plums that yield slightly when you press them, indicating they’re ripe and juicy. Optional: Korean or Italian plums work beautifully!
-
5 cups of granulated sugar: This helps to sweeten the jam and act as a preservative. Want it sweeter? Feel free to add an extra ½ to 1 cup of sugar! Remember, the sweetness of plums can vary, so taste-testing is key.
Quick Chef Insights on Ingredients:
- Plums: You can substitute other stone fruits like peaches or apricots if you’re feeling adventurous.
- Sugar: If you want to experiment, try using brown sugar for a caramel note, or even honey for a unique flavor twist. Keep in mind that honey has a different sweetness profile, so adjust accordingly!
Step-by-Step Instructions
Ready to start cooking? Let’s walk through the simple steps to jam-making bliss:
-
Prepare the Plums: First things first, take your gorgeous plums and chop them into quarters—no need to peel! Place the chopped plums into a large pot. If you encounter any pits, make sure to remove them, as we want nothing but sweet fruit goodness.
-
Add Sugar: Sprinkle the sugar evenly over the plums in the pot. Gently stir to combine. Let this mixture sit for about 30 minutes. What’s happening here? This resting period allows the plums to release their juices and creates a lovely syrup!
-
Cook Over Medium Heat: After 30 minutes, place your pot on the stove over medium heat. Stir occasionally, and watch as the sugar dissolves and the plums soften. This process will take about 15-20 minutes. You may notice some foaming; just skim it off if it bothers you!
-
Mash and Simmer: Once your plums have softened, grab a potato masher (or an immersion blender if you like your jam smoother) and mash to your desired consistency. I like mine a little chunky for that rustic feel! Continue to simmer the jam for about 20-30 minutes, allowing it to thicken. Remember, it’ll continue to set as it cools.
-
Test for Doneness: If you’re unsure if your jam is ready, do the “plate test.” Spoon a little jam onto a chilled plate, let it sit for about a minute, then run your finger through it. If it holds its shape and doesn’t run back together—voilà, you’re ready to jar it up!
-
Can Your Jam: Sterilize your jars by boiling them in water for 10 minutes. Remove them carefully, and while they are still hot, fill with the jam, leaving about ¼ inch of headspace. Wipe the rims with a clean cloth to ensure a proper seal, then screw on the lids tightly. Optional: You can process the jars in a water bath for 10 minutes if you want long-term preservation.
Congratulations! You’ve got yourself some delicious, homemade plum jam!
Serving Suggestions
Let’s talk about presentation—no jam deserves to be hidden away! Pour your luscious plum jam into a cute little jar and tie it up with a twine bow for that charming touch. Serve with warm, crusty bread, scones, or a delightful cheese platter. It’s also fantastic as a filling for pastries or drizzled over yogurt for breakfast. Just remember to keep tasting—it’s too good not to!
Recipe Variations
Feeling creative? Here are a few variations to keep your jam exciting:
-
Spiced Plum Jam: Add a cinnamon stick or some cloves while cooking for a warm, spiced flavor.
-
Zesty Plum Jam: Throw in some grated lemon or orange zest for a refreshing citrus kick.
-
Herbed Plum Jam: Consider adding fresh rosemary or thyme. Trust me; it’s a flavor explosion!
-
Stone Fruit Medley: Combine plums with peaches or apricots for a fruit jam with an extra depth of flavor.
-
Less Sugary: Use a sugar substitute like stevia or monk fruit for a lower-sugar version, but be sure to read the instructions to ensure proper sweetness levels.
Chef’s Notes
This recipe has become a staple in my kitchen over the years. The beauty of making jam without pectin is that it’s forgiving—it allows you to experiment and adjust to your taste with each batch. One summer, I went a little wild and threw in some leftover berries! Oh, the glorious result had us spreading berry-plum goodness on everything.
And here’s a funny tidbit: the first time I tried making jam as a teenager, I got so distracted by a phone call that I missed the “plate test.” Let’s just say, my family had a rather syrupy surprise that year! Good thing I learned my lessons early on.
FAQs and Troubleshooting
-
Why didn’t my jam thicken?
- There are a few reasons: perhaps the plums weren’t ripe enough, or it didn’t cook long enough. If this happens, you can re-cook the jam with a bit of extra sugar until it reaches your desired thickness.
-
Can I use frozen plums?
- Absolutely! Just be sure to thaw them first before following the main recipe. You might need to adjust sugar depending on how tart they are once thawed.
-
How long will my jam last?
- If processed properly, sealed jars can last up to one year in a cool, dark place. Once opened, store in the refrigerator and consume within a few weeks.
-
What’s the best way to serve my jam?
- My personal favorite is on warm croissants, but feel free to explore! Try it on almond butter toast or mixed into oatmeal for a flavor dynamo.
Nutritional Info
(Optional, based on serving size and preferences.)
Now that you’re well-equipped to make the most delightful plum jam ever, I can’t wait for you to try it! So gather those ingredients, channel your inner chef, and make some memories in the kitchen. Happy cooking, and remember—good food is all about showing up, enjoying the process, and sharing it with the ones you love. Cheers!
PrintHomemade Plum Jam Without Pectin
This easy recipe for plum jam celebrates the natural sweetness of ripe plums without the need for pectin.
- Prep Time: 30 minutes
- Cook Time: 50 minutes
- Total Time: 80 minutes
- Yield: 4 cups 1x
- Category: Condiment
- Method: Canning
- Cuisine: American
- Diet: Vegan
Ingredients
- 10 cups of ripe plums (washed and pitted; about 4 lbs.)
- 5 cups of granulated sugar
Instructions
- Prepare the plums by chopping them into quarters and placing them in a large pot.
- Add sugar evenly over the plums and stir gently, then let sit for 30 minutes.
- Cook over medium heat, stirring occasionally, for 15-20 minutes until sugar dissolves and plums soften.
- Mash the plums to your desired consistency and continue to simmer for 20-30 minutes to thicken.
- Test for doneness using the plate test; if it holds its shape, it’s ready.
- Can your jam by sterilizing jars and filling them while hot, ensuring proper seals.
Notes
Feel free to substitute other stone fruits or adjust the sugar for desired sweetness.
Nutrition
- Serving Size: 1 tablespoon
- Calories: 45
- Sugar: 11g
- Sodium: 0mg
- Fat: 0g
- Saturated Fat: 0g
- Unsaturated Fat: 0g
- Trans Fat: 0g
- Carbohydrates: 12g
- Fiber: 0g
- Protein: 0g
- Cholesterol: 0mg
Keywords: plum jam, homemade jam, fruit preserves, easy recipes

Skillet Plum Cobbler: 25-Minute One-Pan Weeknight Dessert
Easy Skillet Plum Cobbler: A Sweet Slice of Summer
Hello, fellow food lovers! Today, we’re diving into one of my favorite desserts that never fails to chase the blues away—an Easy Skillet Plum Cobbler. I’ll be sharing all the sweet details of this irresistibly warm, fruity dish that’s perfect for gatherings, quiet family dinners, or simply indulging after a long day. Get ready to impress your loved ones with a dessert that feels fancy but is totally approachable!
Imagine this: it’s a sunny afternoon, and the farmers’ market is bursting at the seams with fresh, ripe plums. The vibrant purples and reds draw you in, and you can’t resist picking up a few pounds. Those juicy beauties scream of summer sweetness and remind you of your childhood spent picking fruit from grandma’s garden. This cobbler is my homage to those cherished memories, and I can’t wait to recreate that nostalgia with you in the kitchen.
A Sweet Memory
I remember the first time I made this Easy Skillet Plum Cobbler. It was a warm Sunday afternoon, and I had just returned home from a family gathering filled with laughter and stories. My grandma used to always whip up something sweet when we visited, but for some reason, that day, I felt inspired to take a leap and create my own version. I gathered my plums, rummaged through the pantry, and started tossing ingredients together, singing along to my favorite tunes while the oven preheated.
With every slice of that sweet, juicy plum and sprinkle of sugar, I felt an echo of my summer days in grandma’s kitchen—baking adventures filled with creativity, flour fights, and, of course, the wonderful aroma of baked fruit wafting through the air. As the cobbler baked, my family gathered around the kitchen island, intrigued by the smell that wrapped around us like a warm hug. Once I pulled it from the skillet, the bubbling juices and golden crust drew everyone in. It was a hit! And in that moment, I realized that food is more than just sustenance; it’s memory-making, and that’s what my cooking journey is all about.
Ingredients
Now, let’s chat about the star players in this scrumptious dish. Here’s what you’ll need:
-
6 cups fresh plums (pitted and sliced): Plums are juicy and tangy, making them perfect for cobbler. If plums are out of season, feel free to substitute with peaches, cherries, or apricots.
-
3/4 cup granulated sugar: This sweetens the fruit and the batter. You can use brown sugar for a richer flavor or coconut sugar for a healthier alternative.
-
1 tablespoon lemon juice: The acidity enhances the flavor of the plums. If you’re out of lemons, a splash of vinegar will work in a pinch.
-
1 teaspoon vanilla extract: This adds depth to the dish. Always opt for pure vanilla extract—it makes a noticeable difference!
-
1 tablespoon cornstarch: Helps thicken the juices from the fruit. If you’re out of cornstarch, you can use arrowroot or even all-purpose flour as a substitute, but cornstarch is the best option for a clear, glossy finish.
-
1 cup all-purpose flour: This is the base for the cobbler batter. For gluten-free options, you can use a gluten-free all-purpose blend.
-
1 cup granulated sugar: This will sweeten the batter. Just like the first sugar measurement, feel free to experiment with different sugars.
-
1 teaspoon baking powder: This helps the cobbler rise and gives it that fluffy texture we crave.
-
1/2 teaspoon salt: Just a pinch enhances all the flavors.
-
1/2 cup (1 stick) unsalted butter, melted: This rich ingredient gives the cobbler its luxurious texture. You can substitute with coconut oil for a dairy-free version.
-
1/2 cup whole milk: This adds moisture. You can swap it out for almond milk or any non-dairy milk if you’re keeping it plant-based.
-
1/2 teaspoon vanilla extract: Extra vanilla means extra flavor—always a good thing!
Step-by-Step Instructions
Now, let’s get cooking! Grab your apron, and let’s dive in.
Step 1: Prepare the Plums
Start by washing your plums thoroughly. Next, cut them in half and remove the pits. Slice the halves into wedges. Toss the sliced plums in a large mixing bowl with 3/4 cup granulated sugar, 1 tablespoon lemon juice, and 1 tablespoon cornstarch. This will create the most gorgeous syrupy base as they marinate while we prepare the batter. Let them sit for about 15-20 minutes, allowing those juicy flavors to meld together.
Step 2: Preheat the Oven and Prepare the Skillet
While the plums are mingling, preheat your oven to 350°F (175°C). Get your skillet ready! I love using a cast iron skillet. It’s not only great for cooking even heat but also looks fantastic when serving. If you don’t have one, any oven-safe skillet or baking dish will do. For extra flavor, add 2 tablespoons of butter to the skillet and place it in the oven to melt. This buttery base adds richness and helps create a beautiful crust.
Step 3: Whisk Together Dry Ingredients
In another bowl, combine 1 cup of flour, 1 cup of granulated sugar, 1 teaspoon of baking powder, and 1/2 teaspoon of salt. Whisk these dry ingredients together until well mixed. This ensures the baking powder is evenly distributed.
Step 4: Combine with Wet Ingredients
In a separate bowl, mix together the 1/2 cup of melted unsalted butter, 1/2 cup of whole milk, and 1/2 teaspoon of vanilla extract. Stir until combined. Then, pour the wet mixture into the bowl with your dry ingredients. Gently stir until just combined—do not overmix! A few lumps are perfectly fine; they will bake out.
Step 5: Assemble the Cobbler
Remove the hot skillet from the oven—careful, it’s hot! Pour the marinated plum mixture into the skillet, spreading them evenly. Now, dollop the batter over the plums. Don’t worry about covering every inch; it’s nice when the fruit peeks through. Use a spatula to gently spread the batter but remember, rustic is the name of the game here!
Step 6: Bake to Perfection
Return the skillet to the oven and bake for 30-35 minutes or until the top is golden brown and a toothpick inserted into the center comes out clean. The plums will bubble around the edges, creating a beautiful, messy presentation that invites everyone to dig in.
Serving Suggestions
Once your Skillet Plum Cobbler is out of the oven and cooled slightly, it’s time to serve! For a touch of elegance, I love to dust it lightly with powdered sugar. Serve it warm with a scoop of vanilla ice cream melting atop the cobbler. The contrast of the warm dessert and the cold ice cream is heavenly!
Recipe Variations
Here are a few fun twists to consider:
- Berry Twist: Mix in a cup of blueberries or raspberries with your plums for a burst of berry flavor!
- Almond Flour Variation: Substitute half the all-purpose flour with almond flour for a nutty flavor and a gluten-free option.
- Spices Galore: Sprinkle in some cinnamon and nutmeg for added warmth—perfect for cozy gatherings.
- Zesty Upgrade: Add a teaspoon of orange zest to the fruit mixture for a citrusy kick.
- Nutty Streusel Topping: Mix together oats, brown sugar, and chopped nuts to create a streusel topping for added texture.
Chef’s Notes
This recipe has evolved in my kitchen over the years. Initially, it was a haphazard assembly of what I had on hand, but each iteration led to this refined yet simple treat. It’s become a staple for summer gatherings and always brings back fond memories of time spent in the kitchen.
A funny story: the first time I brought this dish to a friends’ potluck, I forgot to let it cool slightly. As I served it, the ice cream melted immediately into a delicious but sloppy mixture. Everyone loved it anyway and jokingly called it “cobbler soup!” Sometimes, unexpected mishaps lead to the best laughs, doesn’t it?
FAQs and Troubleshooting
Q: My cobbler turned out gummy. What went wrong?
A: This can happen if the batter is overmixed or if it didn’t bake long enough. Make sure to mix gently and check for doneness with a toothpick.
Q: Can I use frozen plums?
A: Absolutely! Just make sure to thaw and drain excess moisture before using them. They can be a little more watery than fresh fruit.
Q: What if I don’t have a skillet?
A: No worries! You can use any oven-safe baking dish. Just adjust the baking times as needed since it may cook differently.
Q: How can I store leftovers?
A: Store any leftovers in an airtight container in the fridge for up to three days. Reheat in the oven or microwave, making sure to warm it gently so it stays delicious.
Nutritional Info
Though I don’t have precise nutritional information for this recipe at hand, homemade desserts are often best enjoyed in moderation and shared with those you love! You can experiment with healthier substitutes to make it a bit lighter if you’re trying to keep it wholesome.
So there you have it, my friends—a fantastic Easy Skillet Plum Cobbler recipe to brighten your day and dazzle your dinner guests! Be sure to grab your favorite plums and try this delightful dish. I can’t wait to hear how it turns out! Let’s cook with intention and make our tables a little sweeter. Happy baking!
PrintEasy Skillet Plum Cobbler

A warm, fruity dessert that captures the essence of summer, perfect for gatherings or quiet family dinners.
- Prep Time: 20 minutes
- Cook Time: 35 minutes
- Total Time: 55 minutes
- Yield: 8 servings 1x
- Category: Dessert
- Method: Baking
- Cuisine: American
- Diet: Vegetarian
Ingredients
- 6 cups fresh plums (pitted and sliced)
- 3/4 cup granulated sugar
- 1 tablespoon lemon juice
- 1 teaspoon vanilla extract
- 1 tablespoon cornstarch
- 1 cup all-purpose flour
- 1 cup granulated sugar
- 1 teaspoon baking powder
- 1/2 teaspoon salt
- 1/2 cup (1 stick) unsalted butter, melted
- 1/2 cup whole milk
- 1/2 teaspoon vanilla extract
Instructions
- Prepare the plums: Wash, pit, and slice the plums and toss with sugar, lemon juice, and cornstarch.
- Preheat the oven to 350°F (175°C) and prepare the skillet with butter.
- Whisk together the flour, sugar, baking powder, and salt in a bowl.
- Combine the wet ingredients in another bowl and mix into the dry ingredients until just combined.
- Assemble the cobbler in the skillet, spreading the plum mixture and dolloping the batter on top.
- Bake for 30-35 minutes until golden brown and a toothpick comes out clean.
Notes
Serve warm with powdered sugar and a scoop of vanilla ice cream for a heavenly treat.
Nutrition
- Serving Size: 1 serving
- Calories: 350
- Sugar: 24g
- Sodium: 150mg
- Fat: 15g
- Saturated Fat: 9g
- Unsaturated Fat: 5g
- Trans Fat: 0g
- Carbohydrates: 54g
- Fiber: 3g
- Protein: 4g
- Cholesterol: 30mg
Keywords: plum cobbler, summer dessert, easy dessert, fruit cobbler, skillet dessert
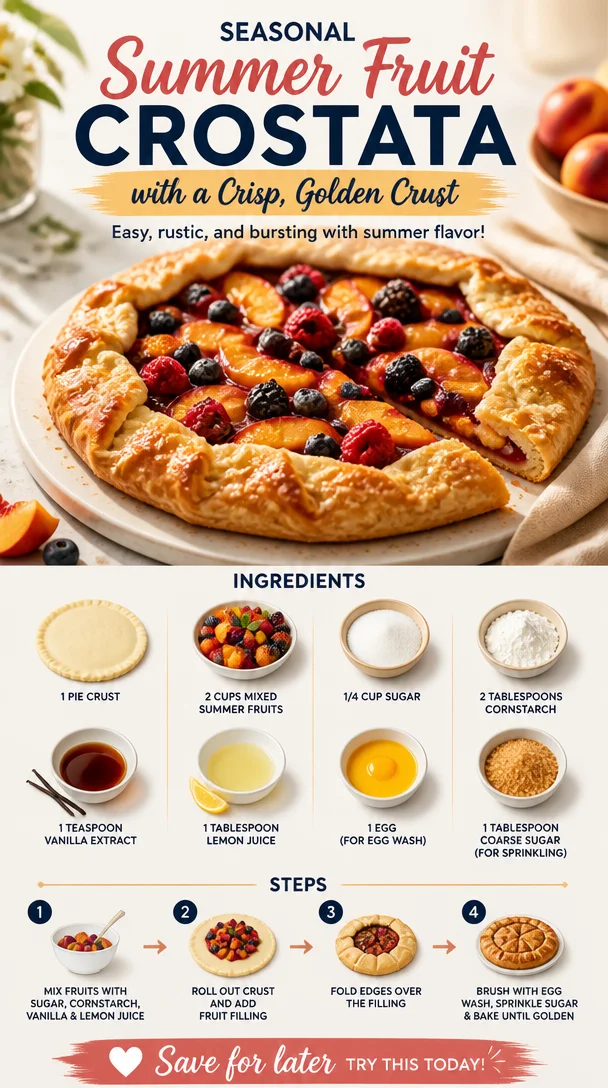
Seasonal Summer Fruit Crostata with a Crisp, Golden Crust
A Slice of Summer: Crafting the Perfect Fruit Crostata
Introduction
Welcome to the sun-kissed days of summer, the season where vibrant fruits burst with flavor and our taste buds come alive! There’s something truly magical about this time of year when you can wander through local farmers’ markets or even your backyard and gather a stunning array of juicy peaches, succulent berries, and fragrant apricots. Today, I’m thrilled to share with you my beloved recipe for a Summer Fruit Crostata with a Crispy Crust—a dish that not only celebrates summer’s bounty but also brings warmth, laughter, and a sense of nostalgia to any gathering.
Imagine gathering your friends or family around a table adorned with twinkling fairy lights, slices of golden crostata glistening in the evening sun, and the sweet aroma of baked fruit wafting through the air. This crostata is an ode to relaxed summer evenings and the joy of sharing desserts with loved ones, each bite awakening memories of sun-soaked picnics and long lazy days.
Let’s roll up our sleeves and dive into creating this delicious masterpiece, perfect for both seasoned chefs and curious kitchen novices alike!
Personal Story
Summer fruit crostata reminds me of my childhood summers spent at my grandmother’s house. She had this lovely kitchen that was always filled with the sweet scents of baking. I can still hear her laughter as she handed me a rolling pin, encouraging me to help her make the pastry for her famous fruit galette. We’d always race to the Farmers’ Market each Saturday morning to pick out the freshest fruits—peaches with their fuzzy skins, tart berries bursting with juice, and golden apricots that seemed to glow under the summer sun.
I can vividly recall her gentle guidance as we pulled together ingredients, covered the kitchen in flour, and danced to the tunes of her favorite oldies station. The best part, however, was the impatient wait while the crostata baked, the aroma enveloping us like a warm hug. Each bite was a reminder of the love and care we poured into it. It’s not just dessert; it’s a treasure trove of memories. Now, I love recreating that joy with friends, bringing those cherished moments full circle right in my own kitchen!
Ingredients
Let’s gather our ingredients! Here’s what you’ll need to craft your stunning summer fruit crostata:
-
1 pie crust
Tip: Feel free to use store-bought for convenience or make your own with a simple flour and butter mixture. A homemade crust adds to the nostalgia, while a store-bought one saves time! -
2 cups mixed summer fruits (e.g., peaches, berries, apricots)
Substitution tips: Don’t hesitate to experiment! Cherries, plums, or even tropical fruits like mango can add a fun twist. Just remember to adjust the sugar based on the fruit’s sweetness. -
1/4 cup sugar
Quick insight: This not only sweetens the filling but helps in drawing out the fruit juices, creating a luscious filling. You can use coconut sugar or honey for a different flavor profile. -
2 tablespoons cornstarch
Chef insight: Cornstarch is key in thickening the juicy filling without making it soupy. If you’re in a pinch, flour can also work, but I recommend sticking with cornstarch for the best texture. -
1 teaspoon vanilla extract
Tip: Use pure vanilla extract for the best flavor. If you have some on hand, a splash of almond extract can bring out an incredible depth to the fruits. -
1 tablespoon lemon juice
Chef hack: This brightens the flavors of the fruit. If you don’t have fresh lemons, a little splash of apple juice can also do the trick. -
1 egg (for egg wash)
Tip: The egg wash gives the crust that beautiful golden finish. If you want a vegan option, a splash of plant-based milk works too! -
1 tablespoon coarse sugar (for sprinkling)
Insight: Coarse sugar adds that perfect crunch on top. If you can’t find it, granulated sugar works just fine too!
Step-by-Step Instructions
Now, let’s bring this crostata to life step-by-step, shall we? Roll up those sleeves and let’s get cooking!
-
Prepare the Pie Crust
If you’re making your own crust, start by combining 1 1/4 cups of flour, 1/2 teaspoon of salt, and 1/2 cup of cold butter in a food processor until crumbly. Add cold water, one tablespoon at a time, until it forms a dough. Wrap it in plastic wrap and chill for at least 30 minutes. If using store-bought, let it sit at room temperature while you prep your filling. -
Preheat the Oven
Preheat your oven to 375°F (190°C). This ensures a crispy, golden crust! -
Prepare Your Fruits
While the pie crust chills, prepare your fruits! Slice your peaches, wash your berries, and chop apricots. If you’re using stone fruits, be sure to remove the pits. Combine your fruit in a large bowl. -
Make the Filling
Sprinkle the sugar, cornstarch, vanilla extract, and lemon juice over the fruit. Toss gently to coat. This not only sweetens the fruit but also creates a delicious syrup as it bakes. -
Roll Out the Pie Crust
Flour your work surface and gently roll out your chilled pie crust into a rough circle, about 12 inches in diameter. Don’t worry about perfection! This rustic look is part of its charm. -
Transfer to Baking Sheet
Carefully transfer the rolled dough to a parchment-lined baking sheet. You can use the rolling pin to help move it without tearing. -
Add the Filling
Spoon the fruit mixture into the center of the crust, leaving about a 2-inch border around the edges. This will be your crust edge. -
Fold the Crust Over
Gently fold the edges of the dough over the fruit, crimping or pleating it slightly as you go. This makes it look beautiful! -
Brush with Egg Wash
Using a pastry brush, apply the egg wash over the crust. This gives it a gorgeous golden color when baked. -
Sprinkle with Coarse Sugar
Finally, sprinkle the coarse sugar over the crust to give it some crunchy sweetness. -
Bake
Pop the crostata into the preheated oven and bake for 30-35 minutes, until the crust is golden and the fruit bubbly. If the edges brown too quickly, cover them with a bit of foil. -
Cool and Serve
Allow the crostata to cool on a wire rack for at least 15 minutes. This waiting period will make slicing a lot easier!
Serving Suggestions
When it comes to serving your Summer Fruit Crostata, simplicity is the name of the game. Slice it into wedges and serve each piece warm (or at room temperature) with a scoop of vanilla ice cream or a dollop of freshly whipped cream. If you’re feeling fancy, top it with a sprinkle of fresh mint leaves to add a pop of color and freshness.
Recipe Variations
Want to mix things up? Here are some fun variants and tips to try:
-
Berry Delight: Use only mixed berries like strawberries, blueberries, and raspberries for a berry-focused crostata. Adjust the sugar according to the tartness of the berries.
-
Tropical Twist: Add diced mango and pineapple for a vibrant tropical fruit crostata. A hint of coconut in the crust can enhance the island vibes.
-
Spiced Autumn Version: As summer transitions to fall, consider adding a pinch of cinnamon or nutmeg to your filling for a warm, spicy twist.
-
Nutty Crust: Incorporate ground almonds or pecans into your crust for an added layer of flavor and crunch.
-
Gluten-Free Option: Swap the regular pie crust with a gluten-free pie crust made from almond flour or gluten-free all-purpose flour for a gluten-free adaptation.
Chef’s Notes
Creating this Summer Fruit Crostata has been a delightful journey over the years. I’ve experimented with various fruits and crusts, and each time, the joy of watching friends and family gather around, savoring every bite, is what keeps me going. One time, I even served a berry crostata at a summer gathering, and the aftermath was a flurry of laughter and “can I have the recipe?” requests. Nothing beats the gratitude of sharing a piece of your heart (and your kitchen) with others.
As you make this crostata, don’t stress about it being perfect. Cooking is about connection and joy, not rigid perfection! Embrace the quirks of your baking, and remember: that’s where the magic happens!
FAQs and Troubleshooting
Q: My crust looks too thick; how can I make it thinner?
A: If your dough feels thick, simply roll it out gently with a rolling pin. Remember, it’s okay if it’s not perfectly even—rustic is charming!
Q: What should I do if the filling turns out too watery?
A: Make sure to use cornstarch as indicated and consider leaving your crostata in the oven for a few extra minutes. The cornstarch should help bind everything together. Let it cool slightly to help thicken the juices.
Q: Can I make this ahead of time?
A: Absolutely! You can prepare the filling and store it in the refrigerator for a day or two. Just assemble and bake when you’re ready to enjoy!
Q: How do I store leftovers?
A: The crostata can be stored at room temperature for up to 2 days, or you can refrigerate it for up to a week. Just be sure to cover it to keep it from drying out.
Making a Summer Fruit Crostata is not just about creating a dish; it’s about weaving together the flavors of summer, the joy of cooking, and the beauty of sharing. So tie on that apron, gather your friends, and let’s create something timeless together!
Welcome to the world of Ivory Apron—let’s cook up some memories!
PrintSummer Fruit Crostata

A delightful crostata filled with vibrant summer fruits, perfect for sharing at gatherings.
- Prep Time: 15 minutes
- Cook Time: 35 minutes
- Total Time: 50 minutes
- Yield: 8 servings 1x
- Category: Dessert
- Method: Baking
- Cuisine: Italian
- Diet: Vegetarian
Ingredients
- 1 pie crust
- 2 cups mixed summer fruits (e.g., peaches, berries, apricots)
- 1/4 cup sugar
- 2 tablespoons cornstarch
- 1 teaspoon vanilla extract
- 1 tablespoon lemon juice
- 1 egg (for egg wash)
- 1 tablespoon coarse sugar (for sprinkling)
Instructions
- Prepare the pie crust
- Preheat the oven to 375°F (190°C)
- Prepare your fruits
- Make the filling
- Roll out the pie crust
- Transfer to a baking sheet
- Add the filling
- Fold the crust over
- Brush with egg wash
- Sprinkle with coarse sugar
- Bake for 30-35 minutes
- Cool and serve
Notes
Serve warm with a scoop of vanilla ice cream or whipped cream for the perfect touch.
Nutrition
- Serving Size: 1 slice
- Calories: 280
- Sugar: 12g
- Sodium: 150mg
- Fat: 10g
- Saturated Fat: 4g
- Unsaturated Fat: 5g
- Trans Fat: 0g
- Carbohydrates: 36g
- Fiber: 2g
- Protein: 3g
- Cholesterol: 40mg
Keywords: crostata, summer dessert, fruit tart, easy baking, Italian dessert