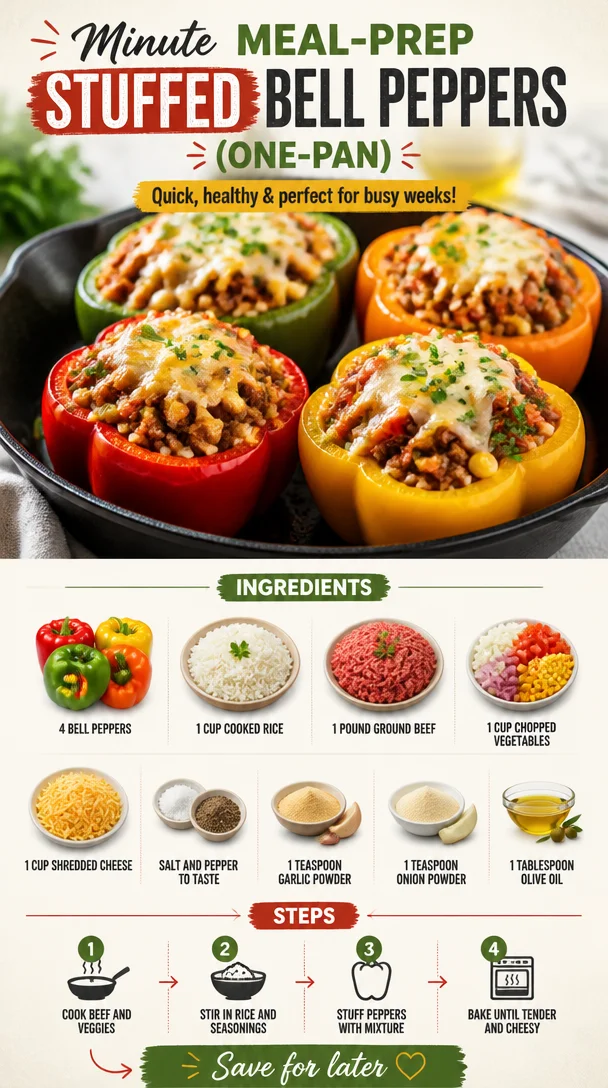
Minute Meal-Prep Stuffed Bell Peppers (One-Pan)
Stuffed Bell Peppers: An Elegant Comfort Food for Every Table
Hello, fellow foodies! Today, we’re diving into a dish that’s not just a staple of cozy family dinners but also a canvas for creativity in the kitchen: Stuffed Bell Peppers. These vibrant vegetables, when filled with a delicious medley of ingredients, transform into a feast for the eyes and the stomach! Plus, they’re as fun to make as they are to eat. So roll up your sleeves, tie on your apron, and let’s create something wonderful together.
Introduction
Have you ever had that moment in the kitchen where you create something so delicious that the entire family gathered around the table falls silent in awe? That’s the magic of cooking, my friends. Stuffed bell peppers are reminiscent of my early kitchen adventures, where I learned that cooking isn’t merely about following a recipe—it’s about storytelling and connection.
These beauties are not only colorful and appetizing but also incredibly versatile. You can stuff them with whatever your heart desires! Classic beef and rice, zesty chicken and quinoa, or even a hearty vegetarian mix. They’re essentially blank canvases ready for you to paint your culinary masterpiece.
When you serve stuffed bell peppers, the world seems a little brighter. Their joyful colors contrast beautifully on any table, inviting guests to dig in and enjoy. It’s a beautiful small act of hospitality, transforming a simple meal into a memorable experience.
So, let’s get cooking! You’ll find a delightful combination of flavors and textures in this stuffed peppers recipe, and I promise it’s easy enough for any level of cook.
Personal Story
I remember the first time I made stuffed bell peppers. It was a rainy Saturday afternoon when my mom casually mentioned she could use some help in the kitchen. I was only about ten years old, and even though I had spent time observing her culinary skills, I wasn’t quite ready for the spotlight. But how could I resist the warm aroma of onions sizzling away?
We decided to turn those beautiful, shiny bell peppers into stuffed marvels. I was so excited! With it being an impromptu cooking class, my mom taught me how to cut the peppers with care, ensuring I didn’t slice my fingers (thanks, mom!). The best part was stuffing them with passion and laughter, sneaking bites of the flavorful filling as we prepared.
Fast forward to now, and I still make these peppers, perhaps with a few more culinary skills under my belt. Each time I whip them up, I’m reminded of those carefree afternoons filled with love and laughter. And now it’s my pleasure to share this beloved recipe so you can create your own memories around the table!
Ingredients
To create these delicious stuffed bell peppers, gather the following ingredients:
-
4 bell peppers: Choose your favorite colors—red, yellow, or green. Each adds its own unique flavor. If you’re short on bell peppers, zucchini or eggplant can be a fun alternative!
-
1 cup cooked rice: It acts as the base of our filling. You can use white, brown, or even cauliflower rice for a low-carb option.
-
1 pound ground beef: This gives a hearty texture. If you prefer leaner meat, turkey or chicken works beautifully too!
-
1 cup chopped vegetables: Think onions, diced tomatoes, or corn. Fresh veggies add crunch and nutrition. Got leftover veggies? Chop them up and toss them in!
-
1 cup shredded cheese: Cheddar, mozzarella, or pepper jack for a kick! Cheese makes everything better, but you can omit it for a dairy-free option.
-
Salt and pepper to taste: Always important for balancing flavors!
-
1 teaspoon garlic powder: A quick and easy way to add mouthwatering flavor.
-
1 teaspoon onion powder: It complements the fresh onions or can stand in if you’re out.
-
1 tablespoon olive oil: For sautéing the vegetables, adding a healthy touch!
Step-by-Step Instructions
Ready to stuff some peppers? Here’s a simple step-by-step guide that’ll have you looking like a pro in no time!
-
Preheat Your Oven: Start by preheating your oven to 375°F (190°C). This is key for getting those peppers nice and tender while the filling gets melty and magical.
-
Prepare the Peppers: Cut the tops off your bell peppers and scoop out the seeds. Don’t toss those tops! Finely chop them and add to your filling later. (Tip: If your peppers won’t stand upright, don’t be afraid to trim a bit off the bottom—just be careful not to create a hole!)
-
Sauté the Vegetables: In a skillet, heat the olive oil over medium heat. Add the chopped peppers, onions (if you’re using them), garlic powder, and onion powder. Sauté for about 5-7 minutes until they soften. This will bring out their natural sweetness.
-
Add the Meat: Crumble in the ground beef, seasoning it with salt and pepper. Cook until it’s browned and no longer pink. (Chef’s hack: Use a wooden spoon to break up the meat for even cooking!)
-
Combine the Filling: Once the meat is nicely browned, turn off the heat and stir in the cooked rice and any additional chopped veggies. If you’re feeling extra saucy, this is when you could mix in some salsa or diced tomatoes for added moisture.
-
Cheese It Up: Fold in half of your shredded cheese into the filling mix. This gives it that creamy texture and helps bind everything together.
-
Stuff Those Peppers: Generously spoon the filling into each bell pepper, pressing it down gently to pack it in. Don’t be shy—overfilling is encouraged!
-
Top with Cheese: Place the stuffed peppers upright in a baking dish and sprinkle the remaining cheese on top (the more cheese, the better!).
-
Bake Them: Cover the dish with foil and bake at 375°F for about 25 minutes. Then, remove the foil and bake for another 10-15 minutes until the peppers are tender and the cheese is bubbly and golden.
-
Rest and Serve: Let them cool for a few minutes before serving. This helps the flavors settle and makes them easier to handle.
Serving Suggestions
For an inviting presentation, arrange the stuffed peppers on a large plate or a wooden serving board. Serve alongside a fresh green salad or some garlic bread. Drizzle with a little olive oil or balsamic glaze for added sparkle. And don’t forget those little touches—a sprinkle of fresh herbs like parsley or cilantro for color and vibrance!
Recipe Variations
-
Mexican Style: Swap the rice for quinoa and add spices like cumin and chili powder. Top with avocado and fresh cilantro for a twist!
-
Mediterranean Delight: Use feta cheese, olives, and cooked couscous for a Mediterranean spin. Finish with a squeeze of lemon juice for brightness.
-
Vegetarian Version: Replace the beef with black beans or lentils. Add in extra veggies like mushrooms, spinach, or zucchini.
-
Spicy Kick: Mix in jalapeños or spicy sausage for those who love a little heat!
-
Comfort Food Classic: Stir in a can of tomato soup into the stuffing for a creamy, comforting surprise.
Chef’s Notes
Ah, stuffed peppers have come a long way since my mom and I first whipped them up! Initially, I was all about the classic beef and rice method. However, over the years, I began exploring different combinations, opening up a world of possibilities. Whether you decide to use leftovers, create a vegetarian option, or even play with spices, this recipe is truly foolproof!
Remember, don’t stress about perfection; cooking should be fun! There are days when the stuffing spills out of the peppers while baking, and that’s OK! It just adds more flavor to the pan. And if a few bits fall onto the plate, that just means more for tasting!
FAQs and Troubleshooting
-
What if my peppers are too firm after baking?
If you prefer softer peppers, simply extend the baking time by 10 minutes. You can also steam the peppers in the microwave for a couple of minutes before stuffing them. -
Can I prepare these ahead of time?
Absolutely! You can prepare the stuffed peppers and store them in the fridge for up to 24 hours before baking. Just add a few extra minutes to the cooking time. -
What’s the best way to reheat leftovers?
Place the peppers in a baking dish with a little splash of water to keep them moist and cover with foil. Heat at 350°F for about 15-20 minutes, or until warmed through. -
How do I choose the right bell peppers?
Look for firm, unblemished peppers with shiny skin—these are the freshest. Heavier peppers usually have thicker walls and more flesh for stuffing!
Nutritional Info
For a rough estimate: Each stuffed pepper contains approximately 350 calories, 20g of protein, and 15g of fat (depending on the chosen ingredients). They are a hearty meal packed with vegetables!
And there you have it—your ultimate guide to making stunning stuffed bell peppers! With this recipe, not only do you get to enjoy a beautiful meal, but you also get to create cherished moments with those around your table. Remember, each dish is an opportunity for love and laughter. So gather those you care about, and let’s make something magical together. Cheers to cooking with the heart!
PrintStuffed Bell Peppers

Colorful and hearty stuffed bell peppers made with a delicious filling of beef, rice, and fresh vegetables, perfect for family dinners!
- Prep Time: 15 minutes
- Cook Time: 30 minutes
- Total Time: 45 minutes
- Yield: 4 servings 1x
- Category: Main Course
- Method: Baking
- Cuisine: American
- Diet: Mixed
Ingredients
- 4 bell peppers (any color)
- 1 cup cooked rice
- 1 pound ground beef
- 1 cup chopped vegetables (onions, diced tomatoes, corn)
- 1 cup shredded cheese (cheddar, mozzarella, or pepper jack)
- Salt and pepper to taste
- 1 teaspoon garlic powder
- 1 teaspoon onion powder
- 1 tablespoon olive oil
Instructions
- Preheat your oven to 375°F (190°C).
- Prepare the peppers by cutting off the tops and scooping out the seeds, saving the tops for later.
- Sauté the vegetables in a skillet with olive oil over medium heat for 5-7 minutes.
- Add the ground beef and season with salt and pepper, cooking until browned.
- Combine the cooked rice and any additional vegetables into the skillet, mixing well.
- Cheese it up by folding in half of the shredded cheese into the filling.
- Stuff the mixture into the peppers, pressing down gently.
- Top the peppers with the remaining cheese.
- Bake for 25 minutes covered with foil, then uncover and bake for an additional 10-15 minutes.
- Rest for a few minutes, then serve warm.
Notes
Feel free to customize the filling with whatever leftover vegetables you have or try different spices for a unique flavor!
Nutrition
- Serving Size: 1 stuffed pepper
- Calories: 350
- Sugar: 5g
- Sodium: 400mg
- Fat: 15g
- Saturated Fat: 6g
- Unsaturated Fat: 8g
- Trans Fat: 0g
- Carbohydrates: 40g
- Fiber: 4g
- Protein: 20g
- Cholesterol: 60mg
Keywords: stuffed peppers, comfort food, family dinner, bell peppers, easy recipes

Korean Cucumber Salad: 15-Minute Crunchy Tangy Side Dish
Korean Cucumber Salad: An Incredible Ultimate Recipe for an Amazing Side Dish
Hello, fellow food lovers! Let’s talk about a dish that’s refreshing, vibrant, and incredibly versatile—Korean Cucumber Salad. You might be wondering, “Why cucumbers?” Well, not only are they crisp and hydrating, but they also serve as the perfect canvas for a burst of flavors that truly awaken your taste buds. Trust me; one bite of this salad will transport you straight to a lively Korean barbecue or a cherished family gathering!
Personal Story
I can still remember the first time I tasted a fabulous Korean Cucumber Salad. It was at a bustling little restaurant in downtown Seoul, where my friends and I huddled together, elbows on the table, eagerly sharing plates. The tangy, slightly spicy, and wonderfully aromatic salad danced on my tongue, balancing perfectly with the rich meats we devoured. What made it even more memorable was the warmth of the surrounding laughter and chatter, creating an atmosphere that felt like home, even in a distant city.
Years later, I found myself recreating that same salad in my kitchen. As I sliced into the cucumbers, the memories flooded back; all the experiences—new and old—that food can evoke are simply magical. So join me as we recreate this delightful dish! It’s more than just a salad; it’s a story, a memory, and a celebration of flavor.
Ingredients
Here’s what you’ll need for this delicious Korean Cucumber Salad:
-
2 large cucumbers (Korean or Persian): These varieties are sweeter and crisper than regular cucumbers. If you can’t find them, feel free to substitute with English cucumbers.
-
1 teaspoon salt: This helps draw out moisture from the cucumbers, creating a lovely texture. Don’t skip it!
-
2 tablespoons rice vinegar: Adds that perfect tang. If you prefer a milder acidity, you could use apple cider vinegar.
-
1 tablespoon soy sauce: For a savory umami punch. You can opt for tamari if you’re looking for a gluten-free option.
-
1 tablespoon chili flakes (or gochugaru for authentic flavor): This spice varies in heat, so adjust to your taste. Gochugaru offers a rich red color and a smoky depth.
-
1 teaspoon sugar: Balances the acidity of the vinegar. If you prefer a healthier alternative, honey or agave could work nicely.
-
1 tablespoon sesame oil: This adds a nutty aroma. If you’re cooking for someone with a sesame allergy, feel free to substitute with olive oil.
-
1 tablespoon sesame seeds: These add a delightful crunch and a bit of nuttiness. Toast them lightly for an extra burst of flavor!
-
2 green onions, finely chopped: These bring a fresh bite and a splash of color to the salad.
-
1 garlic clove, minced (optional): This adds depth and flavor, but if you’re not a garlic fan, feel free to omit it.
Step-by-Step Instructions
-
Prep the Cucumbers:
Start by washing the cucumbers thoroughly. If you’re using Persian or Korean cucumbers, there’s no need to peel them; their skin is tender and adds extra flavor. For English cucumbers, you may choose to peel them if you prefer a milder taste. Cut them in half lengthwise, and then slice them into thin half-moons. The thinner the slices, the quicker they will pickle and become delicious! -
Salt the Cucumbers:
In a large bowl, combine the cucumbers and salt. Toss gently to coat them evenly. Let them sit for about 15–20 minutes. This process will draw out excess moisture and help keep your salad crisp. While you wait, feel free to hum along to your favorite cooking playlist! -
Prepare the Dressing:
In a separate bowl, whisk together the rice vinegar, soy sauce, chili flakes (or gochugaru), sugar, sesame oil, and minced garlic (if using). Taste your dressing. It should be a perfect balance of tangy, salty, and a touch sweet. Adjust the flavors as needed—add a pinch more sugar or an extra splash of vinegar if desired. -
Combine Cucumbers and Dressing:
Once your cucumbers have released some water, drain the excess liquid. Add the cucumbers into the bowl with your dressing. Toss everything together until the cucumbers are well-coated. -
Final Touches:
Add in your chopped green onions and sesame seeds. Give it one last gentle toss to incorporate. At this stage, you can also let it marinate for an additional 10-15 minutes for the flavors to meld beautifully, although it’s perfectly delightful immediately after mixing!
Serving Suggestions
To serve, scoop the salad into a beautiful bowl, perhaps one that’s a bit rustic to complement the charming nature of the dish. Garnish with a few extra sesame seeds and a sprinkle of green onions for that extra pop of color. This salad pairs brilliantly with grilled meats, rice dishes, or even as a stunning starter to any Asian-inspired meal.
Recipe Variations
-
Add Protein: Toss in some cooked shrimp or grilled chicken for a more substantial salad.
-
Spicy Twist: For extra heat, add a splash of Korean chili paste or a few slices of fresh chili peppers.
-
Vegan Version: Stick to the original recipe, but use tamari instead of soy sauce for gluten-free needs.
-
Herbaceous Delight: Add finely chopped cilantro or mint for an extra layer of freshness.
-
Creamy Fun: Mix in a tablespoon of Greek yogurt for a creamy version that’s rich and refreshing!
Chef’s Notes
What I love about this Korean Cucumber Salad is its incredible adaptability. Over the years, I’ve played with different flavor profiles, but I always return to this classic version. I once had a mishap where I accidentally added too much vinegar—whoops! A sprinkle of sugar saved the day, teaching me that sometimes, improvisation leads to the best discoveries.
FAQs and Troubleshooting
1. My salad turned out too salty; what went wrong?
If your cucumbers were salted too long, they might absorb more salt than intended. Always remember to drain and rinse your cucumbers if you feel they are too salty before adding the dressing.
2. Can I make this salad ahead of time?
You can prep the cucumbers and the dressing separately ahead of time. Just mix them together about 30 minutes before serving for the best flavor.
3. What can I do if it’s too tangy?
Add a bit more sugar to balance the acidity. You can also mix in some additional cucumbers if you have them on hand.
4. Should I refrigerate the salad?
Yes, keeping it in the fridge for a few hours before serving helps the flavors meld beautifully. Just be sure to eat it within a day or two for the best texture!
Nutritional Info
While I’ve focused on the deliciousness of this recipe, it’s also important to keep in mind that this salad is low in calories yet full of flavor! Each serving is refreshingly light, making it a guilt-free addition to your meals.
So there you have it, folks! A beautiful, crisp, and flavorful Korean Cucumber Salad that’s perfect for any occasion. It’s not just a side dish; it’s a celebration of fresh ingredients and delightful memories. Let’s get cooking! 🍽️
PrintKorean Cucumber Salad

A refreshing and vibrant Korean Cucumber Salad that serves as the perfect side dish, bursting with flavors that awaken your taste buds.
- Prep Time: 20 minutes
- Cook Time: 0 minutes
- Total Time: 20 minutes
- Yield: 4 servings 1x
- Category: Side Dish
- Method: No Cook
- Cuisine: Korean
- Diet: Vegan
Ingredients
- 2 large cucumbers (Korean or Persian)
- 1 teaspoon salt
- 2 tablespoons rice vinegar
- 1 tablespoon soy sauce
- 1 tablespoon chili flakes (or gochugaru)
- 1 teaspoon sugar
- 1 tablespoon sesame oil
- 1 tablespoon sesame seeds
- 2 green onions, finely chopped
- 1 garlic clove, minced (optional)
Instructions
- Start by washing the cucumbers thoroughly. Cut them in half lengthwise, and then slice them into thin half-moons.
- In a large bowl, combine the cucumbers and salt. Toss gently to coat them evenly. Let them sit for about 15-20 minutes.
- In a separate bowl, whisk together the rice vinegar, soy sauce, chili flakes (or gochugaru), sugar, sesame oil, and minced garlic (if using).
- Once your cucumbers have released some water, drain the excess liquid. Add the cucumbers into the bowl with your dressing. Toss everything together.
- Add in your chopped green onions and sesame seeds. Give it one last gentle toss.
Notes
This salad pairs brilliantly with grilled meats or as a starter to any Asian-inspired meal. Can be made ahead of time for best flavor.
Nutrition
- Serving Size: 1 serving
- Calories: 100
- Sugar: 2g
- Sodium: 300mg
- Fat: 7g
- Saturated Fat: 1g
- Unsaturated Fat: 5g
- Trans Fat: 0g
- Carbohydrates: 12g
- Fiber: 2g
- Protein: 3g
- Cholesterol: 0mg
Keywords: Korean salad, cucumber salad, refreshing side dish
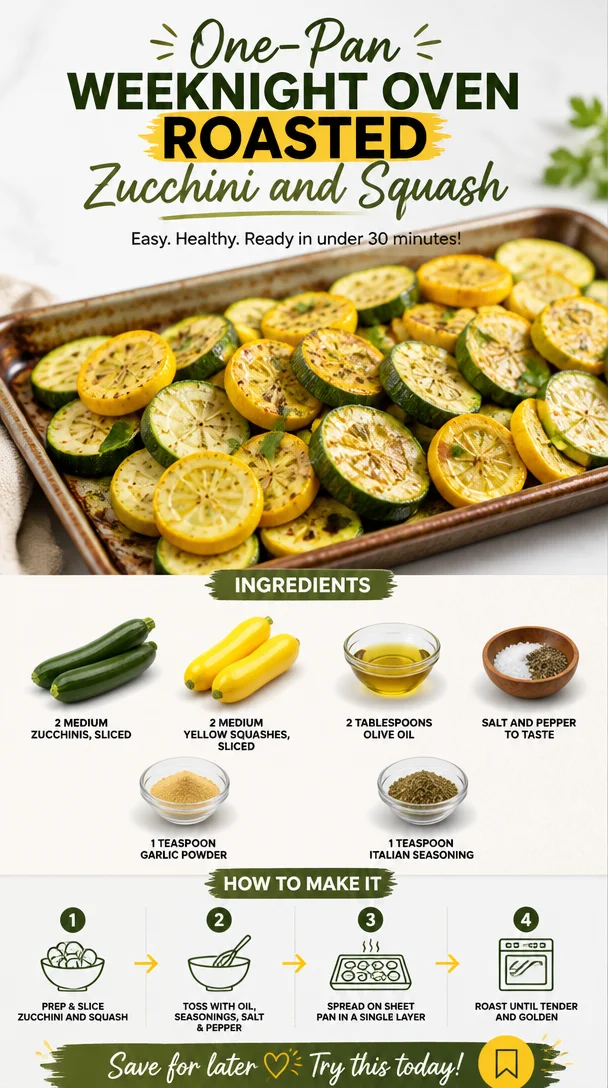
One-Pan Weeknight Oven Roasted Zucchini and Squash
Oven Roasted Zucchini and Squash: A Summer Classic
Hello, fellow foodies! Today, we’re diving into a delightful side dish that highlights the natural sweetness and creaminess of seasonal vegetables. I’m excited to share my recipe for Oven Roasted Zucchini and Squash! This dish is vibrant, flavorful, and pairs beautifully with practically any main course. Plus, it’s the perfect accompaniment for summer gatherings, backyard barbecues, or even a cozy weeknight dinner.
The Magic of Roasting
Roasting veggies is an absolute game changer! When you pop them into the oven, they caramelize beautifully, bringing out all those delicious flavors while adding a delightful texture. A sprinkle of olive oil, a dash of seasoning, and you’ve got yourself a dish that feels fancy yet is incredibly easy to prepare. Think of it as culinary alchemy—turning simple ingredients into pure gold!
So, let’s roll up those sleeves and unlock the full potential of zucchini and squash, two of summer’s unsung heroes.
My Personal Story: A Summer Family Gathering
One of my fondest food memories involves my grandmother’s garden. Every summer, I’d eagerly await the moment she announced it was time to pick fresh zucchinis and squash. Armed with a small basket, I’d head out to her vibrant garden, feeling the warmth of the sun on my back and the earthy scent of the soil underfoot.
After our harvest, we’d return to her kitchen, exchanging stories and laughter while my grandma washed and sliced the vegetables. I loved how she made the simplest ingredients feel special, often roasting them with her signature blend of herbs and spices. It wasn’t just about the food; it was about bringing the family together, sharing memories, and creating moments that would last a lifetime.
Those afternoons instilled in me a love for cooking and a desire to share the joy of delicious food with others. And now, I invite you to embrace that same warmth at your table with this scrumptious oven-roasted zucchini and squash recipe!
Ingredients
Here’s what you’ll need to create this vibrant side dish:
-
2 medium zucchinis, sliced
Zucchini is a versatile summer squash that adds moisture and a mild flavor to dishes. If you can’t find zucchini, yellow squash works just as well! -
2 medium yellow squashes, sliced
Yellow squash packs a slightly sweeter taste and adds a lovely color. Feel free to mix in any other summer squashes you have on hand. -
2 tablespoons olive oil
Olive oil not only helps the veggies crisp up beautifully but also adds rich flavor. For a twist, consider using flavored oils like garlic or herbed oil. -
Salt and pepper to taste
Basic seasonings that elevate the dish. Always start with less, as you can add more if needed later. -
1 teaspoon garlic powder
Garlic powder lends a warm, savory depth to the roasted vegetables. Fresh minced garlic is also a fantastic alternative if you want a punchier flavor. -
1 teaspoon Italian seasoning
A blend of herbs like oregano, basil, and thyme, this seasoning brings a beautiful, fragrant touch. You can easily swap it for fresh herbs, adjusting to your taste.
Step-by-Step Instructions
-
Preheat the Oven
Start by preheating your oven to 425°F (220°C). A hot oven is key to roasting vegetables perfectly and achieving that lovely caramelization we’re after. -
Prep the Veggies
Slice your zucchinis and yellow squashes into even rounds or half-moons (about ½ inch thick). Even size ensures they cook uniformly. If you’re feeling adventurous, try cutting them into fun shapes! -
Season the Veggies
In a large mixing bowl, toss the sliced zucchini and squash with olive oil, garlic powder, Italian seasoning, salt, and pepper. Make sure every slice is generously coated—I recommend using your hands for this step. It’s all about love and attention! -
Spread Evenly on a Baking Sheet
Line a baking sheet with parchment paper for easy cleanup. Spread the seasoned veggies in a single layer, ensuring they’re not overcrowded. If they’re piled on top of each other, they’ll steam rather than roast, so spread them out like you’re placing the perfect arrangement of flowers. -
Roast Away
Pop that baking sheet into your preheated oven and roast for about 20-25 minutes. Halfway through, take a fork and give the veggies a gentle toss to ensure even cooking. You want them to be tender with golden edges. -
Check for Doneness
Keep an eye on your zucchini and squash as they roast. Once they’re fork-tender and beautifully browned, take them out and let them cool slightly. -
Taste and Adjust
Give them a little taste! You can add more salt, pepper, or even a squeeze of lemon juice for brightness if you feel it needs a little extra zing.
Serving Suggestions
To plate your oven-roasted zucchini and squash, gather them in a pretty serving dish, allowing their vibrant colors to shine. For a touch of elegance, you can sprinkle some freshly grated Parmesan or crumbled feta cheese on top right before serving. Garnish with a few sprigs of fresh basil or parsley for a touch of green and extra flavor.
Recipe Variations
-
Mediterranean Twist
Add some sliced cherry tomatoes and Kalamata olives to the veggies before roasting. The tomatoes bring sweetness, and the olives offer a savory punch. -
Spicy Kick
Mix in some red pepper flakes for a bit of heat! Just a pinch can elevate the flavor profile and wake up your taste buds. -
Cheesy Goodness
Toss the veggies with shredded mozzarella or gouda before roasting, turning them into a delightfully cheesy dish. -
Herbed Lemon Roasted
Add lemon zest and fresh thyme or rosemary for a refreshing, herbaceous note that brightens up the dish. -
Balsamic Glaze Drizzle
After you’ve taken your roasted veggies out of the oven, drizzle them with balsamic glaze for a tangy-sweet finish.
Chef’s Notes
This oven-roasted zucchini and squash dish has become a staple in my kitchen, and I love how it can adapt to whatever I have on hand. I can remember once when I mistakenly dropped the entire baking sheet onto the floor—it was a disaster! However, my kitchen was filled with laughter as we scooped up the roasted goodness off the floor to salvage what we could. Cooking is about enjoying the process, and that little mishap became a cherished memory.
Over the years, this recipe has evolved—what started as just simple salt and pepper now showcases a list of lovely spices and twists. I encourage you to make this dish your own!
FAQs and Troubleshooting
Q: Why are my veggies mushy instead of crispy?
A: This could be due to overcrowding the baking sheet. Make sure the veggies are in a single layer and give them room to breathe—instead of steaming, they should roast for that delightful caramelization!
Q: Can I prepare this dish in advance?
A: While it’s best fresh, you can slice the veggies and toss them in oil/seasoning a few hours ahead. Just cover and refrigerate until you’re ready to roast.
Q: What can I do with leftovers?
A: These roasted veggies are perfect to toss into salads, pasta, or even stir-fries. They also make a fantastic omelet filling!
Q: Can I cook other vegetables this way?
A: Absolutely! Carrots, bell peppers, and eggplant can roast beautifully, providing you mix up the cooking times accordingly.
Nutritional Info
(Adjust based on actual recipe servings)
- Servings: 4
- Calories: Approximately 115 per serving
- Fat: 8g
- Carbohydrates: 10g
- Fiber: 3g
- Protein: 2g
So, there you have it—Oven Roasted Zucchini and Squash! I hope this recipe becomes a delightful addition to your dinner table, just as it has in mine. Tie on that apron, pour a drink for yourself, and let’s create some culinary magic together. Happy cooking!
PrintOven Roasted Zucchini and Squash
A vibrant and flavorful summer side dish that highlights the natural sweetness of zucchini and squash, perfect for gatherings or weeknight dinners.
- Prep Time: 10 minutes
- Cook Time: 25 minutes
- Total Time: 35 minutes
- Yield: 4 servings 1x
- Category: Side Dish
- Method: Roasting
- Cuisine: American
- Diet: Vegetarian
Ingredients
- 2 medium zucchinis, sliced
- 2 medium yellow squashes, sliced
- 2 tablespoons olive oil
- Salt and pepper to taste
- 1 teaspoon garlic powder
- 1 teaspoon Italian seasoning
Instructions
- Preheat the oven to 425°F (220°C).
- Slice the zucchinis and yellow squashes into even rounds or half-moons (about ½ inch thick).
- Toss the sliced zucchini and squash with olive oil, garlic powder, Italian seasoning, salt, and pepper in a large mixing bowl.
- Line a baking sheet with parchment paper and spread the seasoned veggies in a single layer.
- Roast in the preheated oven for about 20-25 minutes, tossing halfway through.
- Check the veggies for doneness; they should be fork-tender and browned.
- Taste and adjust seasoning if needed, possibly adding a squeeze of lemon juice.
Notes
Feel free to customize this dish with additional ingredients like cherry tomatoes, balsamic glaze, or cheese.
Nutrition
- Serving Size: 1 serving
- Calories: 115
- Sugar: 3g
- Sodium: 200mg
- Fat: 8g
- Saturated Fat: 1g
- Unsaturated Fat: 7g
- Trans Fat: 0g
- Carbohydrates: 10g
- Fiber: 3g
- Protein: 2g
- Cholesterol: 0mg
Keywords: zucchini, squash, roasted vegetables, summer side dish, vegetarian
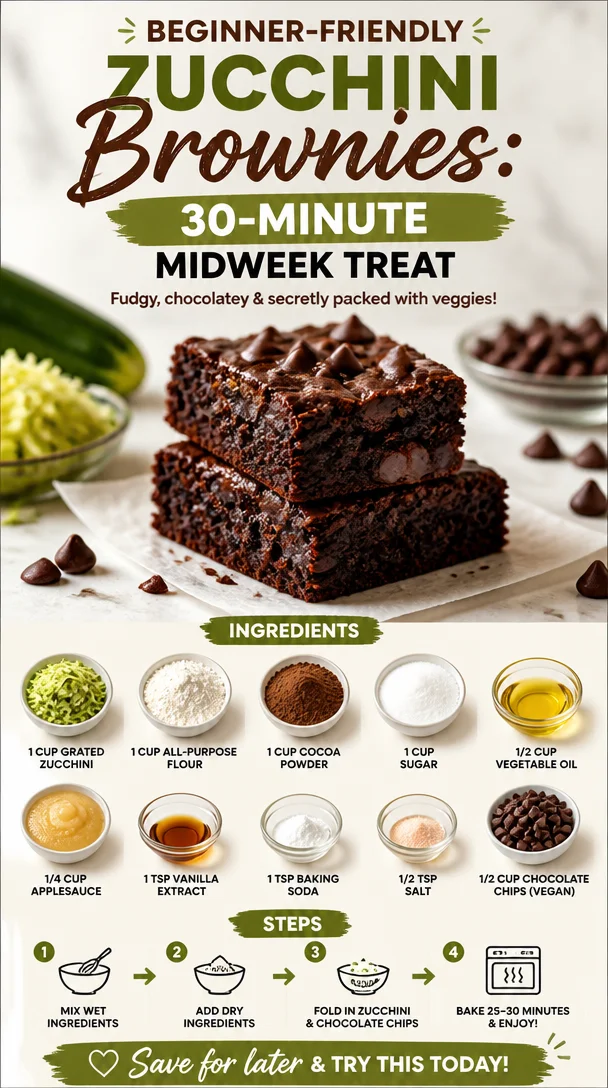
Beginner-friendly Zucchini Brownies: 30-Minute Midweek Treat
Zucchini Brownies: A Deliciously Surprising Treat
Hey there, foodie friends! Are you ready to dive into a dessert that will change the way you think about vegetables? Today, we’re whipping up Zucchini Brownies — a delightful twist on a classic favorite that’s not just indulgent but also surprisingly good for you! Whenever I think of brownies, I can’t help but reminisce about those blissful afternoons spent in my grandmother’s kitchen, sneaking spoonfuls of warm batter from the bowl. It was a sacred ritual that filled the air with sweet, chocolatey goodness.
Brownies have a special place in my heart, and I believe every kitchen should have a go-to brownie recipe. But wait! What if I told you that we could sneak some greens in without compromising that rich chocolaty flavor? That’s right! Zucchini is our secret weapon here, adding moisture and a subtle sweetness while remaining completely undetectable. You might even find yourself in a happy debate over whether zucchini deserves its spot in dessert land.
As we journey through this recipe, I invite you to embrace the unexpected and delight in the whimsical nature of cooking. Grab your apron, gather your ingredients, and let’s create something magical together!
A Little Kitchen Story
Let me take you back to a sunny afternoon in my childhood. Picture this: my grandmother, donned in her favorite apron, exuded warmth as she reigned over her domain — the kitchen. The comforting aroma of chocolate was intoxicating. I stood on a stool beside her, eager to learn her secret brownie techniques. I watched as she combined rich cocoa powder, sugar, and butter, the mixture bubbling joyously in the bowl.
One day, while rummaging through the fridge, she pulled out a surprising addition: zucchini! I was skeptical, to say the least. “Zucchini in brownies? No way!” But her reassuring smile melted my doubts. “Trust me, dear.” And trust her I did! The result was a batch of gooey, fudgy brownies that were every bit as indulgent as they were mysterious.
Now, every time I whip up a batch of Zucchini Brownies, I fondly think of Grandma and her surprising little twist. They’ve become a beloved family recipe, proving that you can sneak in the good stuff while keeping the rich and decadent flavor we all crave. This recipe is about more than just baking; it’s about creating memories and inviting loved ones to partake in your culinary adventures.
Ingredients
Let’s talk about the stars of the show! Here’s what you’ll need to recreate these delightful Zucchini Brownies:
-
1 cup grated zucchini
Zucchini adds moisture and a hint of sweetness without being detectable. You can substitute it with shredded carrots for a different flavor, though the texture may vary slightly. -
1 cup all-purpose flour
A basic but essential ingredient, providing structure. For a gluten-free version, you can use a 1:1 gluten-free flour blend, and the result should still be delightful. -
1 cup cocoa powder
This rich cocoa powder is what gives our brownies that signature chocolate flavor. Use Dutch-processed cocoa for a deeper flavor, or if you’re feeling adventurous, try a blend of dark and regular cocoa! -
1 cup sugar
Sweetness is key in brownies! You can use organic cane sugar, brown sugar for a hint of caramel, or even coconut sugar for a healthier option if you prefer. -
1/2 cup vegetable oil
This keeps the brownies moist and fudgy. You can use melted coconut oil for a wonderful flavor twist, or swap it for unsweetened applesauce for a lighter version, but keep that in mind since it will change the texture slightly. -
1/4 cup applesauce
This adds additional moisture and helps cut down on oil. Feel free to use homemade or store-bought. If you want to keep things simple, just double the vegetable oil. -
1 tsp vanilla extract
Vanilla brings all the flavors together in harmony. Make sure to use real vanilla extract for the best flavor — it makes a big difference! -
1 tsp baking soda
Our leavening agent that will help the brownies rise to the occasion. Don’t substitute with baking powder; they have different leavening properties. -
1/2 tsp salt
A crucial element that enhances all the flavors. It may sound small, but a pinch of salt balances the sweetness beautifully. -
1/2 cup chocolate chips (vegan)
These are the cherry on top! Choose vegan chocolate chips if you’re keeping it dairy-free. You can also use white chocolate chips or nuts for a different flavor profile.
Step-by-Step Instructions
Now that we have our ingredients lined up, let’s dive into the baking process! Trust me, this is going to be a breeze.
-
Preheat Your Oven
Start by preheating your oven to 350°F (175°C). This step is crucial for achieving that perfect fudgy texture in your brownies. While the oven heats up, line an 8-inch square baking pan with parchment paper for easy removal later. -
Prepare the Zucchini
Wash and grate your zucchini; a box grater works wonders here! Don’t worry about peeling it; the skin packs a ton of nutrients. After grating, squeeze out any excess moisture using a clean kitchen towel. This prevents the brownies from getting too soggy. -
Mix the Wet Ingredients
In a large mixing bowl, combine the vegetable oil, applesauce, sugar, and vanilla extract. Whisk them together until it’s smooth and all the ingredients are well combined. Feel free to let loose here — mix with joy! -
Add the Dry Ingredients
Next up, sift in the flour, cocoa powder, baking soda, and salt. Sifting helps prevent clumps and ensures even distribution of the dry ingredients. Gently fold the mixture using a spatula until just combined. Avoid over mixing; we’re aiming for tender brownies here! -
Incorporate the Zucchini and Chocolate Chips
Gently fold in the grated zucchini and 1/2 cup of chocolate chips until evenly distributed. You can reserve a few chips to sprinkle on top for that irresistible melty finish! -
Pour the Mixture into the Baking Pan
Spread the brownie batter evenly in the greased baking pan, using a spatula to smooth out the top. Don’t worry about perfection; those little imperfections add character! -
Bake to Perfection
Slide the pan into the preheated oven and bake for 25-30 minutes or until a toothpick inserted in the center comes out with a few moist crumbs. Remember, it’s better to underbake slightly for a fudgy texture! -
Cool and Serve
Once baked, remove the brownies from the oven and let them cool in the pan for about 10 minutes. Then, carefully lift them out using the parchment paper and let them cool completely on a wire rack. This helps set the fudgy texture; patience is key! -
Slice and Enjoy
Once cooled, slice into squares (or rectangles, if you’re feeling fancy) and serve. Optional but recommended: dust with powdered sugar for some extra flair!
Serving Suggestions
When it comes to serving these Zucchini Brownies, a little creativity goes a long way! Consider presenting them warm with a scoop of vanilla ice cream or a dollop of whipped cream on top. If you want to impress, drizzle some melted dark chocolate over the brownies for that “wow” factor. You could even sprinkle some crushed nuts or sea salt on top for added texture and flavor. These brownies can be enjoyed on their own or with a freshly brewed cup of coffee for that cozy afternoon treat!
Recipe Variations
Ready to mix things up? Here are a few fun ideas to personalize your Zucchini Brownies:
- Nutty Bliss: Fold in 1/2 cup of chopped walnuts or pecans for a crunchy texture that complements the brownies beautifully.
- Minty Fresh: Add 1 tsp of peppermint extract for a refreshing mint chocolate brownie twist!
- Fruity Addition: Throw in a handful of dried cherries or cranberries to add a sweet and tangy fruit element.
- Spicy Kick: For a fall-inspired treat, add a pinch of cinnamon or pumpkin spice for warmth and depth.
- Swaps for the Health-Conscious: Substitute half the sugar with a natural sweetener like maple syrup or agave nectar for a healthier version.
Chef’s Notes
Ah, the beauty of Zucchini Brownies! They bring all sorts of delicious memories and a few funny kitchen stories along. I once attempted to bake these brownies for a friend’s birthday party and realized I had run out of cocoa powder! In a moment of creativity, I used dark chocolate bars melted down instead, and guess what? They turned out even better than the original recipe! This little mishap reminded me that sometimes the best recipes evolve through experimentation.
Every time I bake these brownies, I think about how far they’ve come from my grandmother’s original recipe — add a little zucchini here, a dash of this there — and it has become a sweet tradition in my family. I love seeing how each batch brings joy to others as they indulge in the rich flavors.
FAQs and Troubleshooting
Why are my brownies dry?
Dry brownies can result from overbaking. Always keep an eye on them and test with a toothpick for gooeyness. Slightly underbaking can give you a more fudgy brownie.
Can I make these brownies ahead of time?
Absolutely! Zucchini Brownies store well in an airtight container for up to 3 days at room temperature. For longer storage, try freezing them for up to a month.
What can I substitute for eggs?
Although this recipe does not contain eggs, if you ever have a version that does, you could replace each egg with 1/4 cup of unsweetened applesauce or 1/4 cup of mashed banana for moisture.
What if I can’t find vegan chocolate chips?
If you can’t find vegan chocolate chips, feel free to finely chop up your favorite chocolate bar. Just ensure it’s dairy-free!
Nutritional Info
While I love focusing on taste and experience rather than strict nutrition, it’s worth noting that these Zucchini Brownies carry health benefits thanks to the zucchini! They’re a great source of vitamins while still satisfying that sweet tooth. Each brownie (based on 16 servings) contains approximately:
- Calories: 130
- Carbohydrates: 22g
- Protein: 2g
- Fat: 5g
- Fiber: 1g
Keep in mind these values can vary based on ingredient choices.
So there you have it, my dear kitchen companions! Zucchini Brownies are not just a delicious dessert; they’re a canvas for creativity and a testament to how we can embrace the unexpected in our kitchens. The next time you’re tempted to sneak a veggie into a dessert, I say go for it — you may just create a new favorite recipe that your family will cherish for years to come. Happy baking! 🍫✨
PrintZucchini Brownies

A delightful twist on classic brownies, incorporating zucchini for added moisture and sweetness.
- Prep Time: 15 minutes
- Cook Time: 30 minutes
- Total Time: 45 minutes
- Yield: 16 servings 1x
- Category: Dessert
- Method: Baking
- Cuisine: American
- Diet: Vegetarian; Vegan
Ingredients
- 1 cup grated zucchini
- 1 cup all-purpose flour
- 1 cup cocoa powder
- 1 cup sugar
- 1/2 cup vegetable oil
- 1/4 cup applesauce
- 1 tsp vanilla extract
- 1 tsp baking soda
- 1/2 tsp salt
- 1/2 cup chocolate chips (vegan)
Instructions
- Preheat your oven to 350°F (175°C) and line an 8-inch square baking pan with parchment paper.
- Prepare and grate your zucchini, then squeeze out excess moisture using a clean towel.
- Mix the vegetable oil, applesauce, sugar, and vanilla in a large bowl until smooth.
- Add the flour, cocoa powder, baking soda, and salt, sifting them into the bowl and folding gently until just combined.
- Incorporate the grated zucchini and chocolate chips until evenly distributed.
- Pour the batter into the prepared baking pan and spread evenly.
- Bake for 25-30 minutes, testing with a toothpick for doneness.
- Cool for about 10 minutes in the pan before transferring to a wire rack to cool completely.
- Slice into squares and serve, optionally dusted with powdered sugar.
Notes
For added creativity, try mixing in nuts, mint extract, or dried fruits. Store in an airtight container for up to 3 days.
Nutrition
- Serving Size: 1 brownie
- Calories: 130
- Sugar: 12g
- Sodium: 200mg
- Fat: 5g
- Saturated Fat: 1g
- Unsaturated Fat: 4g
- Trans Fat: 0g
- Carbohydrates: 22g
- Fiber: 1g
- Protein: 2g
- Cholesterol: 0mg
Keywords: Zucchini Brownies, Dessert, Vegan Brownies, Healthy Brownies, Chocolate Dessert

Fourth of July Creamy BLT Pasta Salad (15-Minute BBQ Side)
Celebrate Summer with a Creamy BLT Pasta Salad
Hello, fellow foodies! As the warm breeze flutters through the garden and the scent of summer fills our kitchens, there’s one thing that’s simply perfect for any gathering — a delightful dish that marries comfort with a touch of elegance. That’s right, I’m here to share my Creamy BLT Pasta Salad recipe, one that’s bursting with summer flavors and a family favorite to boot. Perfect for 4th of July BBQs, picnics, and any outdoor soirée, this dish is as fun to prepare as it is to share!
The Allure of the Creamy BLT Pasta Salad
Growing up, summer weekends were filled with warm sun, laughter, and, of course, plenty of good food. I remember my mom hosting backyard barbecues where we’d gather around a huge picnic table, plates overflowing with all sorts of delicious dishes. The star player, however, was her creamy pasta salad. It quickly became a tradition, each year adding its own twists and turns as my mom perfectly blended flavors.
In particular, my favorite was the BLT twist. Imagine crispy bacon, juicy tomatoes, and crunchy lettuce seamlessly woven into your pasta — blissful, right? There’s something about a creamy pasta dish that instantly brings a feeling of nostalgia. Plus, it’s perfect for showcasing the ripe, juicy tomatoes straight from the garden! Let me take you through the steps to create this summertime joy in your kitchen.
Ingredients
Here’s what you’ll need for this delightful recipe:
-
12 oz (340 g) rotini pasta
The spirals hold onto the creamy dressing and bits of flavor beautifully. You can substitute with any pasta shape you have on hand — fusilli, penne, or even whole wheat pasta work here too! -
8 strips thick-cut bacon
This adds a savory crunch. If you prefer a healthier option, turkey bacon or even crispy roasted chickpeas can substitute for that delightful crunch. -
2 cups (300 g) ripe cherry tomatoes, halved
Fresh and sweet, these tomatoes add a juicy burst. Grape tomatoes can also do the trick if that’s what you have around! -
3 cups (90 g) romaine lettuce, chopped
This brings a refreshing crunch to the salad. If you’re looking for something a bit different, try baby spinach or arugula for a peppery kick. -
½ cup (120 ml) mayonnaise
This is the base for our creamy dressing. For a lighter option, use Greek yogurt or a vegan mayonnaise if you’re aiming for plant-based. -
¼ cup (60 ml) sour cream or plain Greek yogurt
A dollop of tanginess. If you’re aiming for a richer flavor, feel free to use crème fraîche. -
1 tablespoon Dijon mustard
This adds a subtle kick. If you want more sweetness, honey mustard is a great alternative! -
1 tablespoon apple cider vinegar
The acidity balances the richness of the dressing. White wine vinegar also works well! -
½ teaspoon garlic powder
For that zesty backbone. Fresh minced garlic can also be used for an extra punch. -
Salt and black pepper, to taste
Season well! Always taste as you go; seasoning is key in this salad. -
2 tablespoons fresh chives, chopped (optional)
These add a beautiful garnish and a hint of onion flavor. You can also use green onions or fresh parsley if you prefer.
Step-by-Step Instructions
Step 1: Cook the Pasta
Begin by bringing a large pot of salted water to a boil. Once boiling, add the rotini pasta. Cook according to package instructions until al dente, typically around 8-10 minutes. Tip: Reserve about half a cup of pasta water before draining — it’s liquid gold for adjusting the texture of your dressing!
Step 2: Prepare the Bacon
While your pasta cooks, let’s get that bacon sizzling! In a large skillet over medium heat, cook the bacon strips until they’re crispy, about 5-7 minutes. Once they’re golden, transfer them to a paper towel-lined plate to cool. Chef Hack: Instead of discarding the bacon grease, you can use a tablespoon of it for added flavor in your dressing!
Step 3: Combine the Dressing
In a large mixing bowl, whisk together the mayonnaise, sour cream (or Greek yogurt), Dijon mustard, apple cider vinegar, and garlic powder. Add salt and pepper to taste. If the dressing feels too thick, add a bit of the reserved pasta water to help loosen it up. Tip: Taste the dressing to ensure it suits your palate — adjust seasoning as needed!
Step 4: Chop and Mix
Chop your cooled bacon into bite-sized pieces and prepare the tomatoes and lettuce. Add the cooked and drained pasta to the bowl of dressing, tossing gently to coat. Then add in the bacon, cherry tomatoes, and chopped romaine lettuce. Give it all a gentle stir until everything is well combined.
Step 5: Chill and Enjoy
Cover the bowl with plastic wrap or transfer to an airtight container. Allow the pasta salad to chill in the refrigerator for at least 30 minutes. This resting time allows the flavors to meld beautifully! Chef Tip: The salad keeps well for 3 days in the fridge, so this can be made in advance for a stress-free gathering.
Serving Suggestions
To serve, plate the pasta salad in a pretty bowl, garnishing with fresh chives on top. For an elevated touch, consider serving it in individual mason jars for a fun, portable presentation, great for picnics! Pair it with grilled chicken or shrimp for a complete meal.
Recipe Variations
-
Mediterranean Twist: Substitute bacon with crumbled feta and add kalamata olives, diced cucumbers, and bell peppers. Drizzle with a lemon-oregano dressing for a refreshing change!
-
Creamy Avocado BLT: Incorporate cubed ripe avocado into the salad for extra creaminess and healthy fats.
-
Spicy BLT Salad: Add a kick! Toss in some diced jalapeños or a touch of sriracha in your dressing for a spicy spin.
-
Vegan Delight: Use plant-based bacon, vegan mayo, and coconut yogurt for a delicious dairy-free option.
-
Herb-Infused: Experiment with fresh herbs like basil or dill for a unique flavor profile!
Chef’s Notes
As I mentioned, this pasta salad is a staple from my childhood summers. It’s a dish that grows and evolves with the seasons and ingredients available. I love tinkering with it, whether adding seasonal veggies or switching up the dressing flavors! Just the other day, I added some roasted corn, and it took me right back to those summer BBQs. Sometimes, it’s the simplest recipes that hold the most precious memories.
FAQs and Troubleshooting
Q: Can I make this pasta salad ahead of time?
A: Absolutely! It actually tastes better after sitting a bit as the flavors meld together. Just store it in an airtight container in the fridge for up to 3 days.
Q: My pasta salad seems too dry, what do I do?
A: No worries! Just add some reserved pasta water or a splash of milk to loosen it up. The creamy dressing should cling nicely without being heavy.
Q: Can I use other vegetables in this salad?
A: Yes! Feel free to toss in your favorites — bell peppers, cucumbers, or even sweet corn can add wonderful flavors and colors to your salad.
Q: How do I prevent my pasta from getting mushy?
A: Make sure to cook the pasta al dente; it should have a slight bite to it. Rinse it with cold water after draining to stop the cooking process and avoid it getting mushy.
Nutritional Info (per serving)
- Calories: 280
- Protein: 9g
- Carbohydrates: 30g
- Fat: 14g
There you have it! A creamy, comforting BLT pasta salad that’s perfect for summer gatherings. Here’s to good food, good friends, and creating beautiful moments around the table. Grab your apron, pour a refreshing lemonade, and let’s get cooking! Enjoy every bite!
PrintCreamy BLT Pasta Salad

A delightful BLT pasta salad bursting with summer flavors, perfect for gatherings and picnics.
- Prep Time: 15 minutes
- Cook Time: 15 minutes
- Total Time: 30 minutes
- Yield: 4 servings 1x
- Category: Salad
- Method: Chilling
- Cuisine: American
- Diet: Pescatarian
Ingredients
- 12 oz (340 g) rotini pasta
- 8 strips thick-cut bacon
- 2 cups (300 g) ripe cherry tomatoes, halved
- 3 cups (90 g) romaine lettuce, chopped
- ½ cup (120 ml) mayonnaise
- ¼ cup (60 ml) sour cream or plain Greek yogurt
- 1 tablespoon Dijon mustard
- 1 tablespoon apple cider vinegar
- ½ teaspoon garlic powder
- Salt and black pepper, to taste
- 2 tablespoons fresh chives, chopped (optional)
Instructions
- Begin by bringing a large pot of salted water to a boil. Once boiling, add the rotini pasta. Cook according to package instructions until al dente, typically around 8-10 minutes. Reserve about half a cup of pasta water before draining.
- While your pasta cooks, in a large skillet over medium heat, cook the bacon strips until crispy, about 5-7 minutes. Transfer to a paper towel-lined plate to cool.
- In a large mixing bowl, whisk together the mayonnaise, sour cream, Dijon mustard, apple cider vinegar, and garlic powder. Add salt and pepper to taste. If the dressing feels too thick, add a bit of the reserved pasta water.
- Chop your cooled bacon into bite-sized pieces and prepare the tomatoes and lettuce. Add the cooked and drained pasta to the bowl of dressing, tossing gently to coat. Then add in the bacon, cherry tomatoes, and chopped romaine lettuce. Stir until well combined.
- Cover the bowl with plastic wrap or transfer to an airtight container. Allow the pasta salad to chill in the refrigerator for at least 30 minutes.
Notes
This pasta salad is even better when made ahead, allowing the flavors to meld. Stores well for up to 3 days.
Nutrition
- Serving Size: 1 serving
- Calories: 280
- Sugar: 4g
- Sodium: 800mg
- Fat: 14g
- Saturated Fat: 4g
- Unsaturated Fat: 8g
- Trans Fat: 0g
- Carbohydrates: 30g
- Fiber: 3g
- Protein: 9g
- Cholesterol: 30mg
Keywords: pasta salad, summer recipes, BBQ, picnic recipes
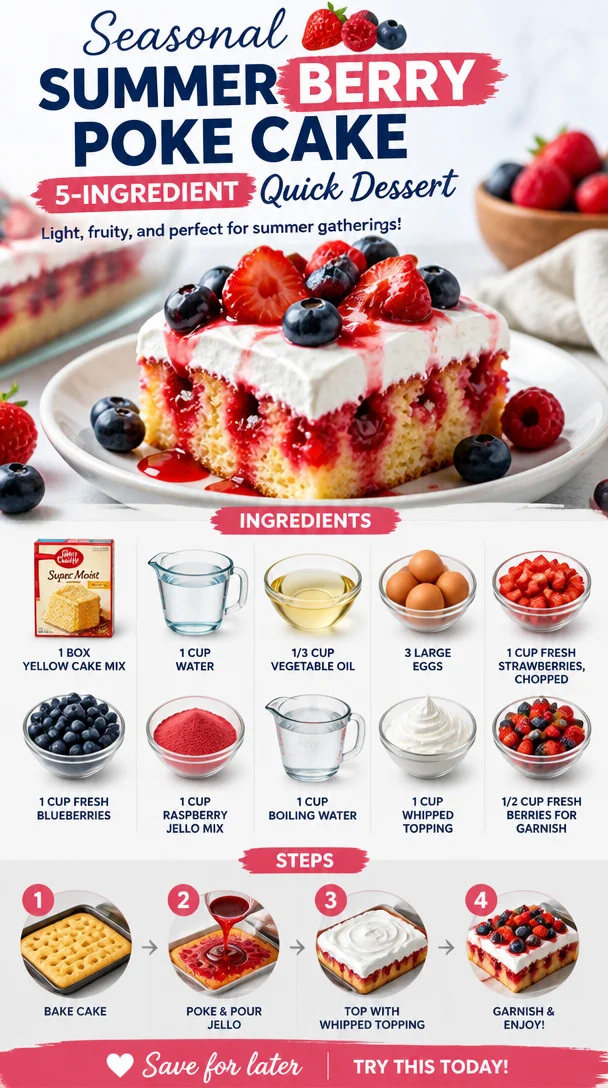
Seasonal Summer Berry Poke Cake: 5-Ingredient Quick Dessert
The Ultimate Summer Berry Poke Cake: A Burst of Flavor and Nostalgia
Hello, fellow food lovers! I can’t tell you how excited I am to share one of my all-time favorite summer desserts with you — the delightful Summer Berry Poke Cake. Think of sunshine, fresh-picked berries, and the joy of gatherings with loved ones. This lovely dessert doesn’t just taste amazing; it also has a special place in my heart, and I can’t wait to dive into the details of how it all came together.
The Memory That Inspired It All
Growing up, my grandmother was the queen of summer desserts. There was always something sweet and fruity wafting through her kitchen — from cobblers to pies, but her poke cake was the one that stole my heart. I vividly remember the sweet aroma of yellow cake baking, mingling with that fresh berry scent wafting through the air. Every summer, we would gather for family picnics, and she would proudly unveil her signature poke cake drenched in red raspberry Jell-O, topped with whipped cream and the freshest berries.
Eating that cake was always a delight, but the best memories revolved around us sitting around the picnic table, laughing and sharing stories while enjoying the splendid flavors that only summer can bring. When I created my version of her poke cake, it brought back all those warm and fuzzy feelings. I made it a little more vibrant with an extra punch of colorful berries. So, roll up your sleeves and let’s channel that summer nostalgia into the kitchen!
Ingredients
Here’s what you’ll need to create this mouthwatering cake:
-
1 box yellow cake mix
This is your base! You could switch it up with a gluten-free cake mix or even a lemon cake mix if you want to add a citrusy twist. -
1 cup water
Perfect for mixing the cake. Use cold or room temperature water; both work well, though cold water keeps the batter smooth. -
1/3 cup vegetable oil
This adds moisture and richness. If you’re looking to be a bit healthier, you could substitute with unsweetened applesauce! -
3 large eggs
Eggs provide structure. If you have egg allergies, you can use flax eggs as a binder (1 tablespoon ground flaxseed mixed with 2.5 tablespoons water equals 1 egg). -
1 cup fresh strawberries, chopped
These sweet gems are essential for that summery flavor. If strawberries are out of season, feel free to swap them for blackberries or your berry of choice! -
1 cup fresh blueberries
Antioxidant-rich and bursting with flavor, they add a delightful joy to the cake! They can also be substituted with diced peaches for a tropical flair. -
1 cup raspberry Jell-O mix
Essential for infusing flavor and color, this is what makes the cake “poke”! You could also use another flavor, like strawberry or cherry. -
1 cup boiling water
This is what dissolves the Jell-O mix, allowing it to soak beautifully into the cake. -
1 cup whipped topping
For that luscious frosting! You can use homemade whipped cream if you prefer, which will elevate the texture. -
1/2 cup fresh berries for garnish
Choose whatever berries you love — a rainbow of colors makes for an Instagram-worthy dessert!
Step-by-Step Instructions
Now that we’ve rounded up our ingredients, let’s embark on our sweet journey:
-
Preheat your Oven:
Start by preheating your oven to 350°F (175°C). This will ensure your cake bakes evenly and comes out perfectly golden. -
Mix Your Batter:
In a large mixing bowl, combine the yellow cake mix, water, vegetable oil, and eggs. Whisk until smooth. This is the fun part — get your family involved and let everyone take turns mixing. It’s a great way to create lasting memories (and get everyone a bit messy!). -
Pour and Bake:
Grease a 9×13-inch baking pan and pour in the cake batter. Bake it in the preheated oven for 25-30 minutes or until a toothpick inserted into the center comes out clean. While it’s baking, you’ll have the perfect opportunity to let the delicious aroma fill your home. -
Cool the Cake:
Once baked, allow the cake to cool in the pan for about 10-15 minutes. You want it to be warm, but not hot, before you start poking holes in it. -
Poke the Holes:
Using the handle of a wooden spoon or a straw, gently poke holes all over the top of the cake, about 1 inch apart. This is what allows that delicious Jell-O mixture to seep into the cake — trust me, it’s worth it. -
Prepare the Jell-O Mixture:
In a separate bowl, dissolve the raspberry Jell-O in 1 cup of boiling water, stirring until fully dissolved. This is where the magic begins! -
Pour the Jell-O Over the Cake:
Carefully pour the Jell-O mixture over the cake evenly, ensuring it fills in all the holes. You’ll see it start to seep into the cake, creating irresistible pockets of fruity goodness. -
Let It Chill:
Next, let the cake cool in the refrigerator for at least 2-3 hours (or overnight if you can wait that long!). This helps the flavors mingle and makes it easier to cut clean slices. -
Top It Off:
Once chilled, remove the cake from the fridge and spread the whipped topping over the top. Decorate with the fresh berries for a stunning finish. -
Slice and Serve:
You’re ready to slice into this summer delight. Serve it in generous squares and watch as your guests smile with delight!
Serving Suggestions
To elevate your serving experience, plate the slices on colorful dessert plates, and add a sprig of mint on top for a lovely pop of color. Pair slices with a scoop of vanilla ice cream or a dollop of extra whipped cream — because who can ever say no to ice cream, right?
Recipe Variations
The beauty of the Summer Berry Poke Cake is its versatility. Consider these fun variations:
- Tropical Twist: Replace berries with diced pineapple and mango for a tropical version.
- Lemon Burst: Swap out the yellow cake for lemon cake and use lemon Jell-O for a zesty kick.
- Chocolate Lover’s Dream: Use chocolate cake mix and raspberry Jell-O for a delicious chocolate-berry fusion.
- Vegan Version: Replace eggs with flax eggs, and use plant-based whipped cream.
Chef’s Notes
You know what’s great about this recipe? It’s not just a cake; it’s an experience! Each summer’s gathering and celebration becomes intertwined with this beloved poke cake. I’ll never forget the year I accidentally forgot to poke holes in the cake. My friends loved it anyway, but I resolved never to make that mistake again!
Over time, I’ve played around with flavors — from peach to lemon — but I always circle back to my original love for a strawberry-blueberry-raspberry combination. Each version reminds me of those warm summer afternoons spent with family.
FAQs and Troubleshooting
Q1: What if my cake comes out too dense?
Sometimes, if you overmix your batter, it can result in a dense cake. Just mix until the ingredients are incorporated!
Q2: Can I use frozen berries?
Absolutely! Fresh berries are great, but frozen will work too. Just ensure they’re thawed and drained before you use them to avoid excess moisture.
Q3: How do I store leftover cake?
Cover any leftover cake with plastic wrap or aluminum foil and keep it in the refrigerator for up to 3 days. Although, let’s be honest — it rarely lasts that long!
Q4: How can I tell when the cake is fully baked?
A toothpick inserted into the center of the cake should come out clean or with just a few moist crumbs. If there’s wet batter clinging to it, bake for a few more minutes and check again.
Nutritional Info
(Disclaimer: Nutritional information will vary depending on brands and ingredients used, but here’s a general ballpark per slice):
- Calories: approx. 260
- Fat: 10g
- Carbohydrates: 40g
- Protein: 2g
- Sugars: 15g
There you have it, my lovely friends! A cheerful Summer Berry Poke Cake that brings back memories of warm afternoons and joyful gatherings. So, tie on your apron and get baking! Let’s make some sweet memories this summer — one poke cake at a time!
PrintUltimate Summer Berry Poke Cake
A delightful summer dessert bursting with fresh berries and nostalgic flavors, perfect for gatherings.
- Prep Time: 15 minutes
- Cook Time: 30 minutes
- Total Time: 180 minutes
- Yield: 12 servings 1x
- Category: Dessert
- Method: Baking
- Cuisine: American
- Diet: Vegetarian
Ingredients
- 1 box yellow cake mix
- 1 cup water
- 1/3 cup vegetable oil
- 3 large eggs
- 1 cup fresh strawberries, chopped
- 1 cup fresh blueberries
- 1 cup raspberry Jell-O mix
- 1 cup boiling water
- 1 cup whipped topping
- 1/2 cup fresh berries for garnish
Instructions
- Preheat your oven to 350°F (175°C).
- Mix the yellow cake mix, water, vegetable oil, and eggs in a large mixing bowl until smooth.
- Pour the cake batter into a greased 9×13-inch baking pan and bake for 25-30 minutes.
- Cool the cake in the pan for about 10-15 minutes.
- Poke holes in the cake using a wooden spoon handle.
- Prepare the Jell-O mixture by dissolving it in 1 cup of boiling water.
- Pour the Jell-O mixture over the cake, ensuring it seeps into the holes.
- Let the cake cool in the refrigerator for at least 2-3 hours.
- Top the chilled cake with whipped topping and decorate with fresh berries.
- Slice and serve!
Notes
For additional variations, consider using diced pineapple and mango for a tropical twist, or lemon cake with lemon Jell-O for a zesty kick.
Nutrition
- Serving Size: 1 slice
- Calories: 260
- Sugar: 15g
- Sodium: 200mg
- Fat: 10g
- Saturated Fat: 1.5g
- Unsaturated Fat: 8g
- Trans Fat: 0g
- Carbohydrates: 40g
- Fiber: 1g
- Protein: 3g
- Cholesterol: 50mg
Keywords: Summer, Berry, Poke Cake, Dessert, Refreshing, Nostalgic
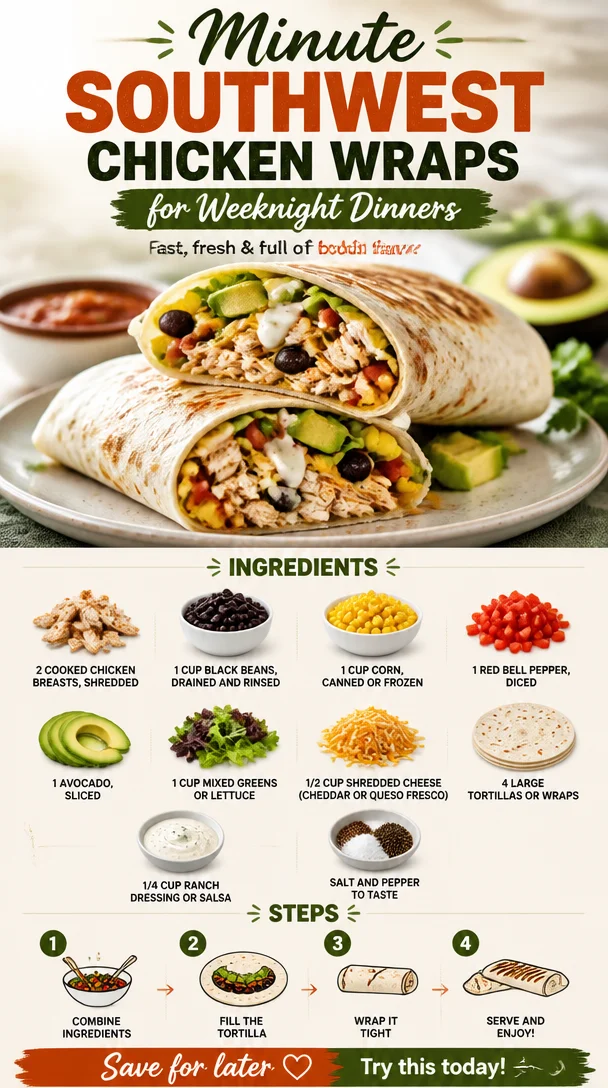
Minute Southwest Chicken Wraps for Weeknight Dinners
Southwest Chicken Wraps: A Flavorful Journey to Your Kitchen Table
Hello, fellow food lovers! Today, we’re diving into a dish that’s not only scrumptious but also a fiesta of flavors: Southwest Chicken Wraps! This recipe is close to my heart for many reasons, from its vibrant ingredients to its effortless preparation. It’s the perfect balance of health, satisfaction, and a touch of fun that makes it an ideal meal for any day of the week! So, grab your apron, and let’s whip up something truly delightful.
A Taste of Nostalgia
One of my fondest memories is from a lazy summer afternoon spent at my best friend Mia’s house. With the sun pouring through her kitchen window and laughter filling the air, we decided to make wraps for lunch—specifically, Southwest Chicken Wraps. I vividly remember the clatter of the knife against the cutting board as we diced bell peppers, the sound of laughter as we debated which dressing was the best, and the satisfaction of rolling our wraps with just the right amount of filling.
Mia’s mom, an expert home cook, quietly guided us while also sharing stories from her childhood in the Southwest. Each ingredient came with a story and a sprinkle of love. Once we sat down to devour our creations, it felt less like a meal and more like a celebration. Every bite was a burst of flavor, and we felt like culinary geniuses. That day instilled in me the joy of cooking for friends and family—something I cherish deeply and aim to replicate with my own recipes today.
Ingredients
Now, let’s talk about what you’ll need to create these delightful Southwest Chicken Wraps. Each ingredient is a key player in shaping the dish—a mix of textures and flavors that come together harmoniously.
-
2 cooked chicken breasts, shredded
For the best results, use grilled or rotisserie chicken. You can substitute with turkey or even chickpeas for a vegetarian twist! -
1 cup black beans, drained and rinsed
These not only add protein but also give a wonderful creamy texture. You could swap them out for pinto beans if you prefer. -
1 cup corn, canned or frozen
Sweet corn brings a burst of freshness. If you’re feeling adventurous, try roasted corn for deeper flavor! -
1 red bell pepper, diced
Sweet, crunchy, and colorful! Feel free to use yellow or orange peppers for a different taste palette. -
1 avocado, sliced
Creamy goodness! If avocados are out of season, consider using guacamole—just keep the seasoning in check! -
1 cup mixed greens or lettuce
Any green will do! Spinach or arugula can add a peppery kick. -
1/2 cup shredded cheese (cheddar or queso fresco)
Add a layer of creaminess with cheese! Try pepper jack for an extra kick or vegan cheese for a dairy-free option. -
4 large tortillas or wraps
Choose whole-wheat for a healthier option or a gluten-free wrap if necessary. -
1/4 cup ranch dressing or salsa
This is where you can really play with flavors! Swap ranch for a creamy chipotle dressing, or go full salsa for something fresher. -
Salt and pepper to taste
Always taste as you go to get the seasoning just right!
Step-by-Step Instructions
Let’s get cooking! Here’s how to bring these mouthwatering Southwest Chicken Wraps to life.
-
Prepare the Chicken
In a large bowl, shred your cooked chicken breasts using two forks. If you’re short on time, pre-shredded chicken from the store could also work! Season with salt and pepper and toss in with a tablespoon of salsa or ranch dressing for added flavor.
Little tip: If you’re using leftover chicken, warming it slightly in a pan can enhance the flavor! -
Mix in the Goodies
Add the drained black beans, corn, diced red pepper, and a pinch of salt to the bowl with the chicken. Mix thoroughly to combine the ingredients. You’re aiming for a colorful combination that looks as good as it tastes!
Commentary: Tossing the ingredients allows the black beans to soak up some of the chicken’s juices, making everything even more flavorful! -
Assemble the Wrap
Lay out your tortillas on a clean surface. Begin by placing a generous scoop of the chicken mixture in the center of each tortilla. Layer on a few slices of avocado, a handful of mixed greens or lettuce, and a sprinkle of cheese. Drizzle with more ranch or salsa if desired.
Chef hack: Always keep your filling towards the center, leaving space on the sides to fold in! -
Rolling It Up
To wrap, fold in the sides first, then roll from the bottom upwards to create a neat little parcel. Make sure to tuck as you roll to keep everything in place!
Pro tip: If you’re worried about your wrap falling apart, you can secure it with a toothpick or wrap it in parchment paper for serving! -
Finish with a Toast
If you’re feeling fancy and want to add a touch of crispiness, place the wraps seam-side down in a skillet over medium heat. Cook for about 2-3 minutes on each side or until golden brown.
Little chef secret: This step not only crisp up the wraps but also warms them nicely!
Serving Suggestions
Now that your Southwest Chicken Wraps are ready, it’s time to plate! Cut each wrap in half to showcase the colorful filling inside. Serve with a side of extra salsa or even guacamole for dipping. You might want to include some tortilla chips or a light salad on the side to balance the meal. Enjoyably messy, these wraps are meant to be eaten with your hands—perfect for a casual gathering or weeknight dinner!
Recipe Variations
A little creativity goes a long way! Here are some fun twists on our Southwest Chicken Wraps:
- Spicy Southwest Wrap: Add diced jalapeños or a drizzle of hot sauce for that extra kick.
- Mediterranean Twist: Swap chicken for shredded lamb or falafel and add tzatziki sauce instead of ranch.
- Vegan Delight: Replace chicken with grilled portobello mushrooms and use hummus instead of ranch.
- Breakfast Wrap: Fill with scrambled eggs instead of chicken, along with sautéed veggies and cheese for a hearty breakfast!
- Mango Salsa Kick: Toss in a spoonful of mango salsa for a sweet and savory flavor.
Chef’s Notes
Making Southwest Chicken Wraps reminds me of those sun-soaked afternoons with friends. They’ve been a staple in my kitchen since that summer, evolving along the way as I experimented with different flavors and ingredients. What started as a fun lunch has blossomed into a delightful dinner favorite.
I must tell you—a funny story: the first time I made these wraps, I was so excited to impress my friends that I forgot the avocado and ran out to the grocery store mid-prep! I laughed at myself for the extra trip, but that’s the beauty of cooking—there’s always room for a little improvisation.
FAQs and Troubleshooting
1. What if my wraps fall apart?
To avoid this, don’t overfill your wraps. Tuck the filling in tightly while rolling, and consider using a toothpick to hold them together until serving.
2. Can I make these wraps ahead of time?
Absolutely! Assemble the wraps, and wrap them tightly in plastic or parchment paper. Store in the fridge for up to 24 hours. Just wait to add the avocado until right before eating to keep it fresh.
3. What if I don’t like ranch dressing?
No problem! You can always swap ranch for your favorite dressing, or simply use a squeeze of lime and sprinkle of cumin for a fresh, zesty flavor.
4. Can I freeze these wraps?
Not ideal for freezing as the veggies may lose their crispness upon thawing. However, you can freeze the chicken mixture and assemble the wraps fresh when you’re ready!
Nutritional Info (Optional)
If you’re interested in the nutritional content of these delicious Southwest Chicken Wraps, a typical serving provides approximately:
- Calories: 450
- Protein: 30g
- Carbohydrates: 40g
- Fat: 18g
(Note: Nutritional values may vary based on specific ingredients used.)
So there you have it, a comprehensive guide to crafting your own Southwest Chicken Wraps from scratch! I hope you find joy in preparing these tasty wraps as much as I do. Remember, cooking is about sharing love and laughter, and there’s no better way to do that than around the table. Until next time, happy cooking, and don’t forget to tie on your apron!
PrintSouthwest Chicken Wraps
A flavorful journey with succulent chicken, black beans, corn, and fresh veggies wrapped in a tortilla, perfect for casual gatherings or weeknight dinners.
- Prep Time: 15 minutes
- Cook Time: 10 minutes
- Total Time: 25 minutes
- Yield: 4 servings 1x
- Category: Main Course
- Method: Assembling and Cooking
- Cuisine: Mexican
- Diet: None
Ingredients
- 2 cooked chicken breasts, shredded
- 1 cup black beans, drained and rinsed
- 1 cup corn, canned or frozen
- 1 red bell pepper, diced
- 1 avocado, sliced
- 1 cup mixed greens or lettuce
- 1/2 cup shredded cheese (cheddar or queso fresco)
- 4 large tortillas or wraps
- 1/4 cup ranch dressing or salsa
- Salt and pepper to taste
Instructions
- Prepare the Chicken: In a large bowl, shred your cooked chicken breasts using two forks. Season with salt and pepper and toss in with a tablespoon of salsa or ranch dressing for added flavor.
- Mix in the Goodies: Add the drained black beans, corn, diced red pepper, and a pinch of salt to the bowl with the chicken. Mix thoroughly to combine the ingredients.
- Assemble the Wrap: Lay out your tortillas on a clean surface. Place a generous scoop of the chicken mixture in the center of each tortilla. Layer on a few slices of avocado, a handful of mixed greens or lettuce, and a sprinkle of cheese.
- Rolling It Up: Fold in the sides first, then roll from the bottom upwards to create a neat little parcel. Tuck as you roll to keep everything in place!
- Finish with a Toast: If desired, place the wraps seam-side down in a skillet over medium heat. Cook for about 2-3 minutes on each side or until golden brown.
Notes
These wraps can be made ahead of time. Store in the fridge for up to 24 hours. Consider using a toothpick to secure wraps while serving.
Nutrition
- Serving Size: 1 wrap
- Calories: 450
- Sugar: 2g
- Sodium: 600mg
- Fat: 18g
- Saturated Fat: 4g
- Unsaturated Fat: 10g
- Trans Fat: 0g
- Carbohydrates: 40g
- Fiber: 8g
- Protein: 30g
- Cholesterol: 70mg
Keywords: Southwest chicken wraps, easy wrap recipe, Mexican wraps, healthy wraps, chicken recipes
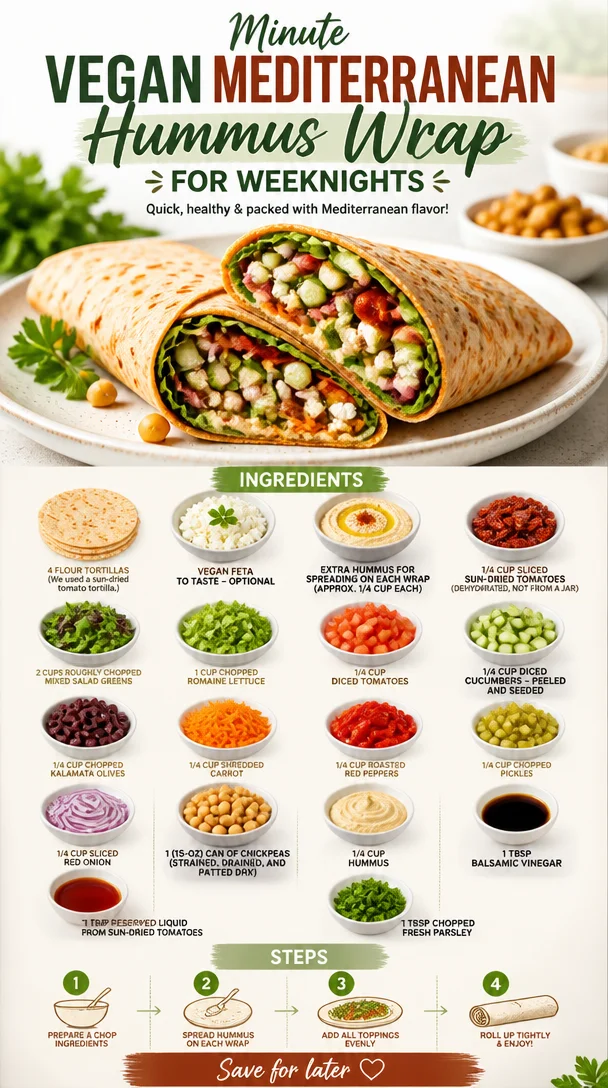
Minute Vegan Mediterranean Hummus Wrap for Weeknights
Vegan Mediterranean Hummus Wrap: A Flavorful Journey
Hello and welcome back to my kitchen! Today, we’re venturing into the vibrant world of Mediterranean cuisine with a recipe that’s as colorful as it is delicious: Vegan Mediterranean Hummus Wraps! If you’ve been looking for a dish that marries simplicity and flavor while embracing the bounties of fresh ingredients, this one’s for you.
These wraps are loaded with fresh veggies, hearty chickpeas, and that creamy, dreamy hummus we all know and love. Not only is this recipe vegan, but it’s also perfect for meal prep, lunchboxes, or a quick and satisfying dinner after a busy day. Let’s dive into this enchanting recipe and I promise, you’ll leave feeling inspired!
My Mediterranean Memory
Let me take you on a little trip down memory lane. I still remember the first time I tasted Mediterranean cuisine. I was at a quaint little café with a friend who raved about their wraps. With each bite, I was transported! The harmonious blend of flavors—crunchy vegetables, rich spices, and that velvety hummus—was absolutely mesmerizing.
I remember how we lingered over our plates, laughing and sharing stories about our day, all while sipping on bright, refreshing lemonade. That experience ignited my passion for cooking and brought me to create comforting yet elegant dishes that celebrate such rich culinary experiences. And now, I want to share that joy with you through these Vegan Mediterranean Hummus Wraps. Let’s create our own beautiful moments around the table!
Ingredients
Here’s what you’ll need to make these vibrant wraps:
-
4 large flour tortillas (Tip: I used a sun-dried tomato tortilla for added flavor, but feel free to choose your favorite!)
-
Vegan feta to taste (optional) (If you want that cheesy burst, this adds a wonderful salty bite, but it’s great without it too!)
-
Extra hummus for spreading (Approx. 1/4 cup for each wrap; because, honestly, who doesn’t love hummus?)
-
1/4 cup sliced sun-dried tomatoes (Opt for dehydrated for deeper flavor; if you’re using those from a jar, just drain them well.)
-
2 cups roughly chopped mixed salad greens (Get creative here! Spinach, arugula, and kale are all great options.)
-
1 cup chopped romaine lettuce (Adds that delightful crunch we all crave.)
-
1/4 cup diced tomatoes (Use fresh tomatoes for a burst of juiciness; cherry tomatoes make a wonderful substitute!)
-
1/4 cup diced cucumbers (Peeled and seeded; for an extra crunch. If you love texture, leave the skin on!)
-
1/4 cup chopped kalamata olives (For those briny, bold flavors; if you’re not a fan of olives, capers work well too.)
-
1/4 cup shredded carrot (Adds sweetness and color. Pre-shredded options are available if you’re in a rush!)
-
1/4 cup roasted red peppers (They bring smoky depth. You can roast your own or buy them jarred—just be sure to drain well.)
-
1/4 cup chopped pickles (Adds a zingy crunch that elevates the dish.)
-
1/4 cup sliced red onion (A little punch of flavor; soak them in cold water for 10 minutes to mellow if you like.)
-
1 15-oz can of chickpeas (Strained, drained, and patted dry; make sure to pat them well to avoid soggy wraps.)
-
1/4 cup hummus (Use your favorite store-bought or homemade for full control over flavors.)
-
1 Tbsp balsamic vinegar (For that sweet tang. A splash of lemon juice would work too!)
-
1 Tbsp reserved liquid from sun-dried tomatoes (Enhances flavor—don’t skip this part!)
-
1 Tbsp chopped fresh parsley (For a fresh, herbaceous finish; basil or dill would also be fantastic!)
Step-by-Step Instructions
Let’s walk through this delightful recipe, step by step, so you can nail it right in your own kitchen!
-
Prep Your Ingredients: Start by gathering all your veggies and equipment. Clean and chop your tomatoes, cucumbers, olives, and any other veggies you’re using. Remember, a sharp knife does wonders! Plus, it’s safer.
-
Make the Filling: In a mixing bowl, combine your chickpeas, diced cucumbers, diced tomatoes, kalamata olives, shredded carrots, roasted red peppers, pickles, and red onion. Drizzle in 1 tablespoon of balsamic vinegar and 1 tablespoon of the reserved liquid from the sun-dried tomatoes. Gently mix, and here’s the fun part—get in there with your hands! This ensures everything is coated evenly. If you want a little more zest, toss in some lemon juice or even a splash of your favorite hot sauce for a kick.
-
Prepare Your Tortillas: Lay your tortillas flat on a clean surface. Spread about 1/4 cup of your favorite hummus across each tortilla. Remember, this is where the flavor begins! Feel free to use a butter knife or even the back of a spoon for an even spread.
-
Layer on the Goodness: Now it’s time to assemble! Start with a generous handful of mixed greens, followed by a cup of your chickpea filling. If you’re adding vegan feta, sprinkle it on top now. Pro tip: don’t overstuff! You want to be able to roll them up neatly without any filling escaping.
-
Rolling Your Wrap: Fold the sides in towards your filling, then roll from the bottom up, tucking in as you go. It might take a little practice, but you’ll get the hang of it! If you find your tortillas tearing too easily, just give them a quick zap in the microwave (about 10-15 seconds) to soften.
-
Cut and Serve: Once rolled tightly, cut each wrap in half diagonally. Voilà! You have beautiful, colorful wraps ready for plating.
-
Presentation Tip: Serve these delightful wraps with an extra dollop of hummus on the side, a sprinkle of fresh parsley, and maybe even a few extra olives for garnish on a rustic wooden board. Your guests will think you’re a culinary magician!
Recipe Variations
Feel like switching things up? Here are some fun twists to make this recipe your own:
- Spicy Kick: Add sliced jalapeños or a spicy hummus variant to bring the heat.
- Mediterranean Grain Bowl: Skip the wraps and serve everything over a bed of quinoa or farro for a nutritious bowl option.
- Herbed Avocado: Swap your hummus with a smooth avocado spread and sprinkle everything with fresh dill or cilantro.
- Crunchy Nuts: Toss in some chopped almonds or walnuts for a satisfying crunch.
- Seasonal Twist: Use roasted seasonal vegetables like zucchini or bell peppers for a fresh twist based on what’s in season.
Chef’s Notes
This recipe has been a constant in my kitchen for years! I love how versatile it is and how it can evolve with seasonal ingredients. One time, I added roasted sweet potatoes on a whim, and let me tell you, it was a game-changer! Also, if you ever have leftover filling, use it as a salad topping or even in a grain bowl the next day—it’s a great way to minimize waste and keep your meals exciting.
FAQs and Troubleshooting
1. My wraps keep unrolling; what do I do?
- A tight roll is key! Make sure to tuck in the sides while rolling and not to overfill. If you’re still having trouble, secure with a toothpick or parchment paper.
2. Can I make this wrap ahead of time?
- Absolutely! Assemble your wraps, wrap them tightly in foil or parchment, and store them in the fridge for up to 2 days. Just know that the veggies may release some moisture, so it’s best enjoyed fresh.
3. What if I want to make these gluten-free?
- It’s easy! Just swap out the flour tortillas for gluten-free wraps, and you’re good to go.
4. I’m not a fan of chickpeas; what can I use instead?
- No problem! Try black beans, lentils, or edamame for a protein-packed twist.
Nutritional Info (Optional)
While I won’t harp on numbers too much, each wrap generally yields a balanced mix of protein, healthy fats, and tons of vitamins from those lovely fresh vegetables. A great meal option for anyone looking to enjoy delicious and nourishing food!
So there you have it—a fantastic, versatile, and scrumptious Vegan Mediterranean Hummus Wrap! I hope you take a moment to gather your ingredients, tie on your apron, and create this with your loved ones. Remember, cooking is about bringing joy, love, and a touch of elegance to the everyday. Happy cooking, friends!
PrintVegan Mediterranean Hummus Wrap
A vibrant wrap filled with fresh veggies, hearty chickpeas, and creamy hummus, perfect for meal prep or a quick lunch.
- Prep Time: 15 minutes
- Cook Time: 0 minutes
- Total Time: 15 minutes
- Yield: 4 servings 1x
- Category: Main Course
- Method: No Cooking
- Cuisine: Mediterranean
- Diet: Vegan
Ingredients
- 4 large flour tortillas
- Vegan feta to taste (optional)
- Extra hummus for spreading (Approx. 1/4 cup for each wrap)
- 1/4 cup sliced sun-dried tomatoes
- 2 cups roughly chopped mixed salad greens
- 1 cup chopped romaine lettuce
- 1/4 cup diced tomatoes
- 1/4 cup diced cucumbers
- 1/4 cup chopped kalamata olives
- 1/4 cup shredded carrot
- 1/4 cup roasted red peppers
- 1/4 cup chopped pickles
- 1/4 cup sliced red onion
- 1 15-oz can of chickpeas
- 1/4 cup hummus
- 1 Tbsp balsamic vinegar
- 1 Tbsp reserved liquid from sun-dried tomatoes
- 1 Tbsp chopped fresh parsley
Instructions
- Prep your ingredients: Start by gathering all your veggies and equipment. Clean and chop your tomatoes, cucumbers, olives, and any other veggies you’re using.
- Make the filling: In a mixing bowl, combine your chickpeas, diced cucumbers, diced tomatoes, kalamata olives, shredded carrots, roasted red peppers, pickles, and red onion. Drizzle in balsamic vinegar and reserved liquid from sun-dried tomatoes.
- Prepare your tortillas: Lay your tortillas flat and spread about 1/4 cup of hummus across each tortilla.
- Layer on the goodness: Start with a handful of mixed greens, followed by a cup of chickpea filling. If using vegan feta, sprinkle it on top.
- Rolling your wrap: Fold the sides in towards your filling and roll from the bottom up, tucking in as you go.
- Cut and serve: Once rolled tightly, cut each wrap in half diagonally.
Notes
For added flavor, use sun-dried tomato tortillas. Enjoy with extra hummus on the side.
Nutrition
- Serving Size: 1 wrap
- Calories: 280
- Sugar: 4g
- Sodium: 350mg
- Fat: 10g
- Saturated Fat: 1g
- Unsaturated Fat: 8g
- Trans Fat: 0g
- Carbohydrates: 40g
- Fiber: 8g
- Protein: 10g
- Cholesterol: 0mg
Keywords: vegan, mediterranean, wraps, healthy lunch, meal prep

Smoky Grilled Watermelon: Quick 15-Min Summer Snack
Smoky Grilled Watermelon: A Flavorful Summer Delight
Hello, fellow food lovers! Today, I’m thrilled to share a unique recipe that perfectly captures the essence of summer—Smoky Grilled Watermelon. Now, I know what you might be thinking: “Watermelon on the grill? Really?” Trust me, this dish is a delightful revelation. The sweet fruit takes on a smoky char that’s both surprising and utterly delicious, making it the perfect addition to your summer barbecues or even as a light appetizer on a warm evening. So, grab your apron, and let’s dive into this deliciously adventurous culinary journey together!
Personal Story
This recipe takes me back to one of my favorite summer nights a few years ago. I had gathered a group of friends for a backyard barbecue, complete with sizzling burgers and fresh corn on the cob. As the sun dipped below the horizon, casting a golden glow over our happy gathering, I wanted to serve a dessert that felt special yet didn’t take me away from the laughter and stories being shared. That’s when I grabbed a watermelon from the kitchen and decided to take a chance.
After cutting it into thick slices and tossing them on the grill, the magic happened. The watermelon developed those gorgeous char marks, and when I drizzled it with honey, a squeeze of lime, and a sprinkle of fresh cilantro, I knew I was onto something. Each smoky, sweet bite had everyone raving and scratching their heads in delight at how something so simple could taste so good. This Smoky Grilled Watermelon became a staple at our summer gatherings, and I can’t wait for you to experience it too!
Ingredients
-
1 small watermelon: The star of the show! Choose a ripe watermelon that feels heavy for its size. If you can’t find a small one, a larger one works just as well; just adjust the cooking time accordingly.
-
2 tablespoons honey: This natural sweetener adds a lovely depth to the dish. If you prefer, you can swap it with agave syrup or maple syrup for a different flavor profile.
-
Juice of 1 lime: The acidity from lime juice brings balance to the sweetness of the watermelon. If limes aren’t available, try lemon juice as a substitute.
-
Fresh cilantro, chopped: This herb adds a refreshing touch to the grilled watermelon. If you’re not a fan, mint would be a delightful alternative, or you could leave it out altogether for a simpler flavor.
-
Salt and pepper to taste: It might sound unconventional, but a little seasoning enhances the overall taste. Sea salt or flaky salt works beautifully here.
-
Olive oil: A drizzle of olive oil helps enhance the grill marks and prevents sticking. You can also use avocado oil or a flavored oil for an extra kick.
Step-by-Step Instructions
-
Prepare the Watermelon:
Start by cutting the watermelon into thick slices, about 1-inch thick. The thickness is key; too thin, and they might fall apart on the grill, but too thick will not absorb the smoky flavor as well. If the watermelon is particularly seedy, feel free to remove the seeds to make eating easier. -
Preheat the Grill:
Heat your grill to medium-high. It’s essential for achieving those perfect grill marks and a smoky flavor. If you’re using a charcoal grill, allow the coals to turn white and ashy for even cooking. -
Drizzle with Olive Oil:
Lightly brush both sides of the watermelon slices with olive oil. This step not only adds flavor but also keeps the melon from sticking to the grill. If you have a grill pan, that works like a charm, too! -
Grill the Watermelon:
Place the watermelon slices on the hot grill. Let them cook for about 3-4 minutes on each side, or until you see lovely grill marks and the edges start to caramelize. Don’t walk away—this is when magic happens! -
Prepare the Honey-Lime Drizzle:
While the watermelon is grilling, mix honey and lime juice in a small bowl. This glaze is the secret weapon to elevating your grilled watermelon. -
Season and Serve:
Once the watermelon is grilled, remove it from the heat. Drizzle your honey-lime mixture over the warm slices and sprinkle with chopped cilantro, salt, and pepper. -
Presentation:
Serve warm, either as a starter or a spectacular dessert. I love to plate it alongside crispy prosciutto or even a tangy feta cheese for a savory-sweet combo that’s out of this world!
Serving Suggestions
When it comes to plating, keep it simple yet elegant! Arrange the grilled watermelon on a rustic wooden board or a vibrant platter. Drizzle some extra honey over the top, and let those fresh herbs shine. You can add crumbled feta or a sprinkle of chili flakes for a touch of heat to impress your guests. Trust me; this simple act of presentation will elevate your dish from ordinary to extraordinary!
Recipe Variations
-
Spicy Grilled Watermelon: Add a sprinkle of cayenne pepper or smoked paprika to the honey-lime drizzle for some heat that perfectly complements the sweetness.
-
Fruit Salad Spin: Chop the grilled watermelon into bite-sized pieces and toss it into a refreshing fruit salad with blueberries and mint.
-
Watermelon Salsa: Dice the grilled watermelon and combine it with diced red onion, jalapeño, cilantro, and lime juice for a unique salsa to serve with chips.
-
Skewered Delight: For a fun twist, thread the grilled watermelon onto skewers with shrimp or sausage for a delightful barbecue treat.
-
Dessert Twist: Incorporate a scoop of vanilla ice cream on top of a warm slice for a refreshing yet decadent dessert.
Chef’s Notes
Every time I make Smoky Grilled Watermelon, it reminds me of those warm summer nights filled with laughter and good company. Over the years, I’ve perfected this recipe, adding layers of flavor through fresh herbs and tangy drizzles. It’s evolved beyond just a side dish; it’s become an experience—an adventure for the palate! Plus, watching people’s faces light up as they taste something that appears so simple yet is wonderfully complex is truly gratifying.
FAQs and Troubleshooting
Q: Can I prepare the watermelon in advance?
Absolutely! You can grill the watermelon a few hours ahead of time. Just keep it in the fridge until you’re ready to serve. A hint of warmth before serving will make it even more tantalizing.
Q: What if I don’t have a grill?
No problem! You can use a grill pan on your stovetop or even roast the watermelon slices under the broiler in your oven. Just keep an eye on them to prevent burning!
Q: Can I use larger watermelon pieces?
You can, but larger thick cuts may require longer grilling times and could be harder to manage while cooking. Stick with 1-inch thick slices for best results.
Q: How do I know when the watermelon is done?
Look for nice grill marks and a slightly caramelized edge. It should feel warm to the touch and have softened just a bit, yet still hold its shape!
Nutritional Info
While the nutritional values can vary based on the size of the watermelon and the amount of honey used, a typical serving of grilled watermelon with the ingredients listed contains around 100 calories, making it a delightful guilt-free treat!
Now that you have the lowdown on how to create this stunning Smoky Grilled Watermelon, it’s time to gather your friends and impress them with your culinary prowess! Remember, cooking is about exploration and joy—so don’t be afraid to make this dish your own. Happy grilling, friends!
PrintSmoky Grilled Watermelon

A flavorful summer delight that combines smoky charred watermelon with a honey-lime drizzle, perfect for barbecues or as a light appetizer.
- Prep Time: 15 minutes
- Cook Time: 10 minutes
- Total Time: 25 minutes
- Yield: 4 servings 1x
- Category: Appetizer
- Method: Grilling
- Cuisine: American
- Diet: Vegetarian
Ingredients
- 1 small watermelon
- 2 tablespoons honey
- Juice of 1 lime
- Fresh cilantro, chopped
- Salt and pepper to taste
- Olive oil
Instructions
- Prepare the watermelon: Cut into thick slices about 1-inch thick.
- Preheat the grill to medium-high for optimal flavor.
- Drizzle both sides of the watermelon with olive oil.
- Grill the watermelon slices for 3-4 minutes on each side until grill marks appear.
- Prepare the honey-lime drizzle by mixing honey and lime juice in a small bowl.
- Season and serve by drizzling the honey-lime mixture over grilled watermelon and sprinkling with cilantro, salt, and pepper.
Notes
Serve warm as a starter or dessert, optionally pairing with crispy prosciutto or feta cheese.
Nutrition
- Serving Size: 1 serving
- Calories: 100
- Sugar: 15g
- Sodium: 50mg
- Fat: 3g
- Saturated Fat: 0.5g
- Unsaturated Fat: 2g
- Trans Fat: 0g
- Carbohydrates: 24g
- Fiber: 1g
- Protein: 2g
- Cholesterol: 0mg
Keywords: grilled watermelon, summer recipe, vegetarian appetizer, smoky flavor, barbecue side

Minute Mexican Watermelon Salad with Zesty Lime & Chili
Refreshing Mexican Watermelon Salad: A Summer Staple
Hello, dear friends! Today, I’m thrilled to share one of my absolute favorite recipes with you: Mexican Watermelon Salad. This dish embodies the bright flavors and joyful spirit of summer, making it a perfect addition to any gathering or just a simple dinner on your patio. Not only is it a feast for the eyes, but it’s also easy to prepare and incredibly refreshing. So, let’s dive right in!
A Personal Touch: Childhood Memories
I still remember the first time I tasted a watermelon salad. It was during a long, hot summer at my grandmother’s house. Every weekend, we would gather at her backyard, which was filled with the scents of grilled meats and fresh herbs. It was a celebration of family, love, and – of course – food!
One particularly sunny afternoon, while the adults were busy at the grill and kids were running around, my grandma brought out a vibrant bowl of watermelon salad that caught everyone’s attention. The combination of juicy watermelon, crunchy veggies, and a sprinkle of cheese was unlike anything I had tasted before. It was more than just food; it was happiness served in a bowl!
Fast forward to today, and I’ve taken that nostalgic recipe and infused it with my own flair. Now, I want to share this delightful experience with you, so that you can create your own beautiful moments around the table.
Ingredients: Gathering the Goodies
Here’s what you’ll need to make this delicious Mexican Watermelon Salad. Each ingredient adds its own unique charm to the dish, making it truly special!
-
6 cups watermelon, cut into cubes (rind and seeds discarded):
Sweet, juicy watermelon is the star here! Look for a ripe, heavy melon with a uniform shape. If you can’t find watermelon, cantaloupe or honeydew can work in a pinch. -
1/2 cup Queso Fresco cheese:
This crumbly Mexican cheese adds a delightful creaminess and saltiness. If you can’t find it, feel free to substitute feta cheese; it will provide a similar texture and flavor. -
1/3 cup fresh cilantro leaves, chopped:
Cilantro brings a fresh, earthy taste that complements the sweetness of the watermelon beautifully. If cilantro isn’t your thing, try fresh mint for a different twist. -
1/2 cup clover honey:
Honey adds a touch of natural sweetness and balances the flavors. If you prefer a lower-sugar option, you could use agave syrup or maple syrup instead. -
1/4 cup fresh lime juice:
This provides that zesty punch that really lifts the dish. Fresh is best, so squeeze those limes right before using. Bottled lime juice can work in a pinch, but the flavor won’t be as vibrant. -
1 heaping teaspoon grated lime zest:
Zest brings an aromatic burst of lime flavor. Be careful not to add too much, as it can be quite potent! If you don’t have limes, lemons can be a good alternative. -
1/2 teaspoon flaky salt (Kosher or Himalayan salt will work too):
Salt enhances all the flavors in this salad. Flaky salt gives a delightful texture, but regular table salt works too—just use a little less, as it’s more concentrated.
Step-by-Step Instructions: Let’s Get Cooking!
Now that we have our ingredients, it’s time to put them together! Follow these steps, and I promise you’ll create a salad that will dazzle your taste buds and those of your guests.
-
Prep the Watermelon:
Start by cutting your watermelon into cubes. Discard the rind and seeds to keep it clean and easy to eat. Look for a sweet, ripe piece—fresh watermelon will make all the difference in this dish.Chef Tip: If you want to make it even more fun, use a melon baller to create round shapes for a playful presentation!
-
Chop the Cilantro:
Take your fresh cilantro and rinse it thoroughly to remove any grit. Once dry, chop it coarsely. You want to maintain some texture, so don’t chop it too finely!Chef Insight: If you are cooking for someone who isn’t a fan of cilantro, chopped green onions also make a great alternative!
-
Grate the Lime Zest:
Using a fine grater or zester, take the zest off your lime. Be careful to only use the green part, as the white pith underneath can be bitter.Tip: Zesting limes before cutting them makes it easier to juice them later!
-
Juice the Limes:
Cut your limes in half and juice them into a separate bowl, removing any seeds. Fresh lime juice is essential for brightness in this dish.Chef Hack: If you microwave your limes for about 10 seconds before juicing, you’ll yield more juice!
-
Mix It All Together:
In a large bowl, combine the watermelon cubes, chopped cilantro, grated lime zest, and lime juice. Gently toss the ingredients together with a spatula.Tip: Be gentle when mixing so you don’t break the watermelon cubes and lose that beautiful texture!
-
Add Cheese and Honey:
Sprinkle the queso fresco over the salad and then drizzle the honey. This adds a delicious creaminess and sweetness that ties everything together.Chef Tip: If you like it extra sweet, feel free to add a bit more honey or add some fresh berries for extra flavor!
-
Season with Salt:
Finish off with a sprinkle of flaky salt. This brings all the flavors together! Taste and adjust as needed—if it feels a bit flat, it might need a touch more salt or lime. -
Chill and Serve:
Allow it to rest in the refrigerator for at least 15 minutes before serving. This helps the flavors meld together beautifully.Chef Note: You can prepare this salad a few hours ahead and store it in the refrigerator, but I suggest waiting to add the cheese until right before serving to keep it fresh.
Serving Suggestions: Let’s Make It Beautiful!
When it’s time to serve your Mexican Watermelon Salad, I love presenting it in a large, colorful bowl, letting all those vibrant colors shine!
To plate, use a slotted spoon so you can drain some of the extra juice if needed, keeping the salad from becoming too soggy. You can also garnish with additional cilantro or a few lime wedges on the side for an extra pop of freshness.
This salad looks beautiful alongside grilled chicken or seafood, making it ideal for summer barbecues or patio dinners.
Recipe Variations: Get Creative!
While the original recipe is delightful, feel free to experiment with some variations to suit your taste:
-
Spicy Kick: Add a diced jalapeño or a sprinkle of chili powder for a little heat.
-
Fruit Medley: Incorporate diced mango or pineapple to enhance the tropical vibe.
-
Nutty Crunch: Top with toasted pumpkin seeds or sliced almonds for added texture and flavor.
-
Herb Swap: Try fresh mint or basil instead of cilantro for a different flavor profile.
-
Vegan Version: Omit the cheese or replace it with a vegan cheese alternative for a plant-based option.
Chef’s Notes: A Taste of Evolution
Over the years, this Mexican Watermelon Salad has evolved in so many delightful ways. Initially, I was skeptical about adding cheese to such a sweet and fruity dish, but it turned out to be a game-changer! The contrast of sweet and salty is just divine.
Plus, this salad is incredibly forgiving; you can adjust it based on what you have on hand. At times, I’ve thrown in some feta cheese or even a handful of berries when I was low on ingredients, and it always turned out fantastic.
Cooking is about creating memories, and I hope this recipe helps you make some wonderful moments with loved ones.
FAQs and Troubleshooting: Your Questions Answered
1. Can I make this salad ahead of time?
Absolutely! Just keep in mind that it’s best to add queso fresco and honey right before serving to maintain freshness. You can prepare everything else in advance.
2. What can I substitute for watermelon?
If you can’t find a ripe watermelon, other melons like cantaloupe or honeydew make great substitutes. Just remember, the flavor profile will change a bit!
3. Why is my salad too watery?
This can happen if the watermelon is overripe or if it sits too long after being cut. To help, you can drain off excess liquid before serving.
4. How do I store leftovers?
Store leftovers in an airtight container in the refrigerator. The salad is best enjoyed within 1-2 days, as the watermelon can become mushy over time.
Nutritional Info
While the nutritional values can vary based on the specific ingredients used, here is a rough estimate per serving:
- Calories: 150
- Protein: 4g
- Fat: 8g
- Carbohydrates: 21g
- Fiber: 1g
And there you have it—a delightful Mexican Watermelon Salad that will impress everyone at your table! I hope you enjoy making this recipe as much as I do. Remember, cooking is about connection, creativity, and joy—so tie on your apron and enjoy every moment in the kitchen! If you try this recipe, don’t forget to share your results with me. Happy cooking!
PrintRefreshing Mexican Watermelon Salad

A vibrant and refreshing salad combining juicy watermelon, crunchy vegetables, and creamy queso fresco, perfect for summer gatherings.
- Prep Time: 15 minutes
- Cook Time: 0 minutes
- Total Time: 15 minutes
- Yield: 4 servings 1x
- Category: Salad
- Method: No Cooking Required
- Cuisine: Mexican
- Diet: Vegetarian
Ingredients
- 6 cups watermelon, cut into cubes (rind and seeds discarded)
- 1/2 cup Queso Fresco cheese
- 1/3 cup fresh cilantro leaves, chopped
- 1/2 cup clover honey
- 1/4 cup fresh lime juice
- 1 heaping teaspoon grated lime zest
- 1/2 teaspoon flaky salt
Instructions
- Prep the watermelon: Start by cutting your watermelon into cubes. Discard the rind and seeds.
- Chop the cilantro: Rinse and dry the cilantro, then chop coarsely.
- Grate the lime zest: Use a fine grater to take the zest off your lime.
- Juice the limes: Cut limes in half and juice into a separate bowl, removing seeds.
- Mix it all together: In a large bowl, combine watermelon, cilantro, lime zest, and lime juice.
- Add cheese and honey: Sprinkle queso fresco over the salad and drizzle with honey.
- Season with salt: Finish with a sprinkle of flaky salt and adjust as needed.
- Chill and serve: Allow the salad to rest in the refrigerator for at least 15 minutes before serving.
Notes
Best enjoyed fresh, add cheese just before serving to maintain texture. Great for summer barbecues!
Nutrition
- Serving Size: 1 serving
- Calories: 150
- Sugar: 25g
- Sodium: 240mg
- Fat: 8g
- Saturated Fat: 4g
- Unsaturated Fat: 4g
- Trans Fat: 0g
- Carbohydrates: 21g
- Fiber: 1g
- Protein: 4g
- Cholesterol: 15mg
Keywords: watermelon salad, summer salad, Mexican recipes, refreshing salad