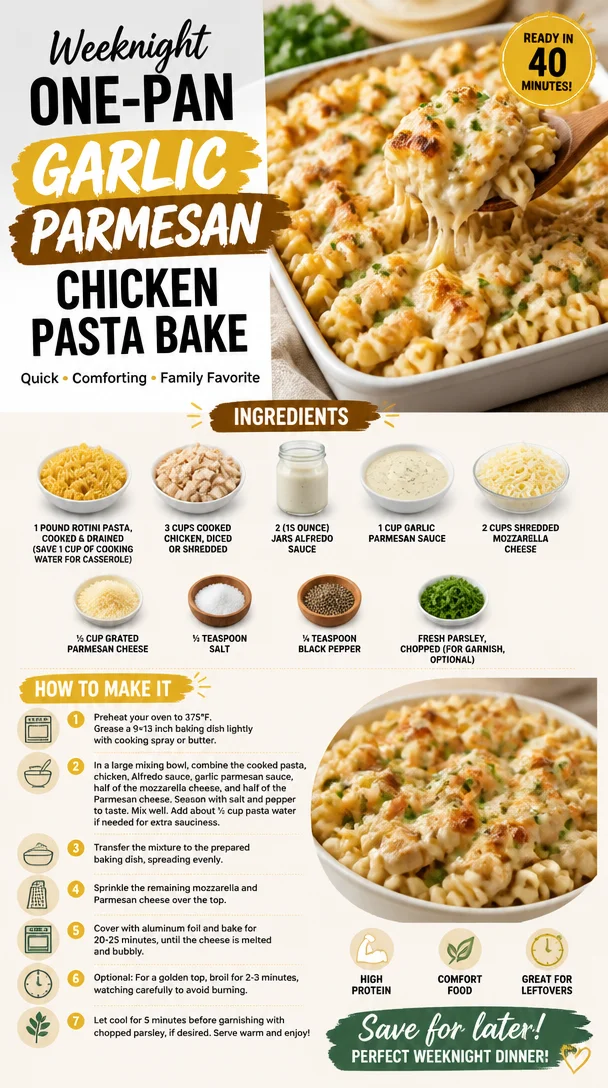
Weeknight One-Pan Garlic Parmesan Chicken Pasta Bake
The Ultimate Garlic Parmesan Chicken Pasta Bake: A Cozy Culinary Classic
Welcome to the wonderfully aromatic world of Garlic Parmesan Chicken Pasta Bake! If you’re looking for a cozy dish that brings comfort and satisfaction to the table, you’re in the right place. This crowd-pleasing recipe is not just a meal; it’s a delightful experience that turns a simple dinner into a warm gathering. So grab your apron, roll up your sleeves, and let’s dive into this cheesy, garlicky goodness that will have you and your loved ones coming back for seconds—maybe even thirds!
Imagine this: it’s a chilly evening, and the aroma of garlic wafts through your kitchen as you prepare a hearty meal. You can hear the laughter of your kids or friends in the background, eager to dig into a delicious supper. That’s the essence of cooking—creating memories that linger long after the last bite. And trust me, this Garlic Parmesan Chicken Pasta Bake is one of those recipes that makes cooking feel less like a chore and more like a joyful celebration.
This pasta bake is rich, creamy, and oh-so-satisfying, featuring a luscious garlic Parmesan sauce blended beautifully with tender chicken and al dente rotini pasta. The cheesy topping melts to golden perfection, creating a dish that is not only comforting but also incredibly inviting. Imagine pulling this beauty out of the oven and hearing gasps of delight. Yes, it’s that kind of dish! Plus, it’s a fantastic way to use leftover chicken, making it an economical and tasty choice.
I promise you, whether you serve it for family weeknight dinners, casual gatherings, or even a festive occasion, this pasta bake will steal the spotlight. So, who’s ready to bring some warmth into the kitchen? Let’s get cooking!
My Love for Comfort Food
When I think back to my childhood, one meal always stands out: my mom’s creamy chicken bake. It was a Saturday tradition, and the entire family would gather around the kitchen island, eagerly awaiting the moment she pulled that bubbling dish out of the oven. The blend of tender chicken, swirls of pasta, and melting cheese had us all in a blissful food coma.
I’d help her with the prep, stirring the sauces while she would share stories of our family’s history—about how my grandmother perfected her Alfredo sauce and how everyone demanded the recipe for holiday gatherings. Those moments were not just about food; they were about connection, love, and community. Fast forward years later, and here I am, sharing my love for cooking through recipes that honor those cherished memories. This Garlic Parmesan Chicken Pasta Bake is my ode to those family dinners that felt effortless yet extraordinary, proving that food has a magical way of bringing us together.
Ingredients
Here’s what you’ll need to create this scrumptious pasta bake. Each ingredient comes with a little chef insight to help you navigate through your culinary adventure!
-
1 pound rotini pasta (cooked and drained): Rotini’s corkscrew shape is perfect for holding onto that creamy sauce, ensuring every bite is filled with flavor. If you want to switch things up, penne or fusilli also work beautifully.
-
3 cups cooked chicken (diced or shredded): This is your star ingredient! Use leftover rotisserie chicken for convenience, or poach chicken breasts for a cleaner option. If you want to go vegetarian, swap in sautéed mushrooms or chickpeas for a delicious twist.
-
2 (15 ounce) jars Alfredo sauce: Store-bought makes life easier; however, if you’re feeling adventurous, a homemade Alfredo sauce is simply divine! The creaminess is essential, so don’t skip this step.
-
1 cup garlic Parmesan sauce: This adds an extra layer of flavor. You can make this at home or look for a bottled version. A dash of garlic powder can be a quick substitute if you can’t find this specific sauce.
-
2 cups shredded mozzarella cheese: Mozzarella gives that gooey, stretchy quality we all love. Provolone or a blend of Italian cheeses can add a wonderful twist if you want to experiment.
-
½ cup grated Parmesan cheese: For that unmistakable umami flavor! If needed, you can use nutritional yeast as a dairy-free alternative.
-
½ teaspoon salt: Balance is key! Adjust to your taste; remember, if your chicken and sauces have salt, reduce the amount here.
-
¼ teaspoon black pepper: A subtle kick! Feel free to increase this if you like a bit more spice.
-
Fresh parsley (chopped, for garnish, optional): This vibrant herb adds a fresh brightness. Fresh basil or chives can also be lovely alternatives!
Step-by-Step Instructions
Now, let’s roll up our sleeves and get cooking! Follow these detailed steps to create your Garlic Parmesan Chicken Pasta Bake:
1. Preheat the Oven
Preheat your oven to 375°F (190°C). A warm oven is crucial for a perfectly cooked pasta bake.
2. Cook the Pasta
In a large pot, bring water to a boil and add a pinch of salt. Cook the rotini pasta according to the package instructions until al dente. Remember, it’ll continue cooking in the oven, so don’t overdo it! Once ready, drain the pasta and save 1 cup of that starchy cooking water. This liquid will help bring everything together in the bake.
3. Combine the Main Ingredients
In a large mixing bowl, combine the cooked chicken, Alfredo sauce, garlic Parmesan sauce, and drained rotini. Stir gently to ensure the pasta and chicken are coated in the creamy sauce. If you see it looking a little thick, add a splash of the reserved pasta water to keep it well mixed.
4. Season It Up
Season the mixture with salt and black pepper. Taste as you go! It’s all about finding that perfect blend of flavors that suits your palate.
5. Cheese, Please!
Stir in 1.5 cups of shredded mozzarella cheese, reserving the remaining 0.5 cup for the top. The cheese will enrich the dish and add that scrumptious gooey texture we crave in a pasta bake.
6. Transfer to Baking Dish
Pour the delicious mixture into a greased 9×13 inch baking dish, spreading it evenly with a spatula. This is where the magic begins to happen!
7. Top It Off
Sprinkle the remaining mozzarella and the grated Parmesan cheese evenly over the top. This will create a gooey, cheesy crust when baked.
8. Bake to Perfection
Place the dish in the preheated oven and bake for around 25-30 minutes, or until the cheese is bubbly and golden brown. Keep an eye on it—every oven behaves differently.
9. Garnish and Serve
Once it’s out, allow the dish to cool for a few minutes (if you can wait!) before garnishing with freshly chopped parsley. It adds a lovely splash of color and an aromatic quality that makes your dish look inviting.
Serving Suggestions
To serve, dish out generous portions onto plates, making sure to get a bit of that gooey cheese and tender chicken in every scoop. This pasta bake pairs perfectly with a simple side salad or some garlic bread to soak up all that creamy goodness. Plus, don’t forget to offer a little extra grated Parmesan on the side for those cheese lovers!
Recipe Variations
-
Veggie Delight: Swap the chicken for an assortment of roasted vegetables like bell peppers, zucchini, and spinach for a delightful vegetarian option.
-
Spicy Kick: Add red pepper flakes to the mixture or garnish with sliced jalapeños for those who enjoy a bit of heat!
-
Herbed Magic: Incorporate fresh herbs such as thyme or rosemary into the mix to elevate the flavor profile even further.
-
Creamy Tomato Twist: Mix in a cup of tomato sauce to the Alfredo base for a pink sauce variation that’s simply scrumptious.
Chef’s Notes
This Garlic Parmesan Chicken Pasta Bake holds a special place in my heart, as it reminds me of the family gatherings that shaped my love for cooking. Over the years, I’ve experimented with different sauces and cheeses, and I’ve seen what works and what doesn’t. One time, I tried using vegan cheese, and while it didn’t melt quite the same, it was a hit with my dairy-free friends. Cooking is all about spontaneity and finding joy in your unique creations. So don’t hesitate to make this recipe your own!
FAQs and Troubleshooting
Q: Why is my pasta bake watery?
A: If you find your pasta bake has excess liquid, you may have used too much sauce or not drained your pasta properly. Ensure you don’t add extra sauce beyond what’s listed and that your pasta is well drained before mixing.
Q: Can I freeze leftovers?
A: Absolutely! This pasta bake freezes beautifully. Just let it cool completely, then store it in an airtight container. To reheat, bake from frozen—just add a bit of extra time.
Q: How do I make it ahead of time?
A: Prepare the pasta bake up to the baking step, cover it, and refrigerate for up to 24 hours. When you’re ready to enjoy, simply pop it into the oven and bake until heated through.
Q: What’s the best way to store leftovers?
A: Store any leftovers in an airtight container in the refrigerator for up to 3 days.
Nutritional Info
While this recipe may not win a health award, it does offer a great balance of protein from the chicken, carbs from the pasta, and a happy dose of dairy for those who can enjoy it! Just remember to enjoy in moderation and pair with colorful veggies when serving!
Now that you’ve mastered the art of the Garlic Parmesan Chicken Pasta Bake, go ahead and create those beautiful moments around your table! Happy cooking!
PrintGarlic Parmesan Chicken Pasta Bake
A cozy and creamy pasta bake featuring garlic and Parmesan, perfect for family gatherings.
- Prep Time: 15 minutes
- Cook Time: 30 minutes
- Total Time: 45 minutes
- Yield: 4 servings 1x
- Category: Main Course
- Method: Baking
- Cuisine: Italian
- Diet: Gluten-Free Option Available
Ingredients
- 1 pound rotini pasta (cooked and drained)
- 3 cups cooked chicken (diced or shredded)
- 2 (15 ounce) jars Alfredo sauce
- 1 cup garlic Parmesan sauce
- 2 cups shredded mozzarella cheese
- ½ cup grated Parmesan cheese
- ½ teaspoon salt
- ¼ teaspoon black pepper
- Fresh parsley (chopped, for garnish, optional)
Instructions
- Preheat your oven to 375°F (190°C).
- Cook the rotini pasta according to the package instructions until al dente, then drain and save 1 cup of cooking water.
- Combine the cooked chicken, Alfredo sauce, garlic Parmesan sauce, and drained rotini in a large mixing bowl.
- Season the mixture with salt and black pepper to taste.
- Stir in 1.5 cups of shredded mozzarella cheese, reserving 0.5 cup for topping.
- Transfer the mixture into a greased 9×13 inch baking dish.
- Top with the remaining mozzarella and grated Parmesan cheese.
- Bake for around 25-30 minutes, or until the cheese is bubbly and golden brown.
- Garnish with freshly chopped parsley before serving.
Notes
Feel free to substitute ingredients to make it vegetarian or to add spices for a kick.
Nutrition
- Serving Size: 1 serving
- Calories: 450
- Sugar: 3g
- Sodium: 750mg
- Fat: 20g
- Saturated Fat: 10g
- Unsaturated Fat: 9g
- Trans Fat: 0g
- Carbohydrates: 45g
- Fiber: 2g
- Protein: 25g
- Cholesterol: 60mg
Keywords: pasta bake, garlic chicken, comfort food, cheesy pasta, family dinner
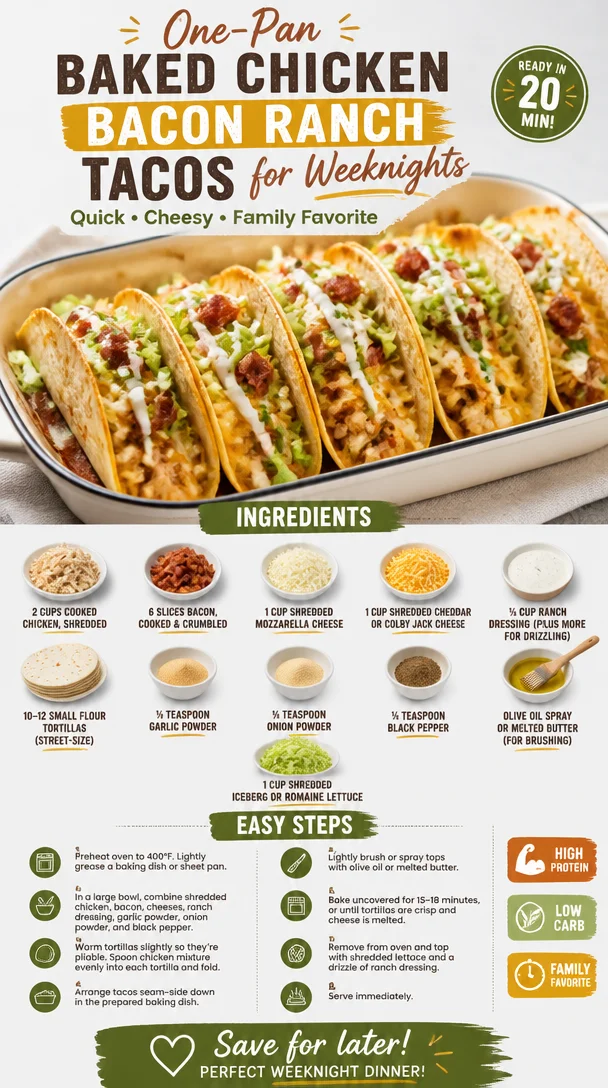
One-Pan Baked Chicken Bacon Ranch Tacos for Weeknights
Baked Chicken Bacon Ranch Tacos: A Culinary Adventure Awaits!
Welcome back to my cozy kitchen, food lovers! Today, we’re diving into a scrumptious and indulgent recipe that will light up your dinner table — Baked Chicken Bacon Ranch Tacos! If you’re anything like me, you know that combining crispy tortillas with juicy chicken, crispy bacon, and a delightful ranch finish is a match made in foodie heaven. These tacos aren’t just a meal; they’re a celebration of flavors that beckon you to gather your friends and family around the table.
I started making these delightful tacos when I was in college, where experimenting in the kitchen was fueled by both hunger and a limited budget. I vividly remember hosting casual weeknight dinners for friends, where I threw together whatever I had on hand. One evening, after an exhausting class, I opened my fridge and saw remnants of cooked chicken, a few slices of leftover bacon, and an unopened bottle of ranch dressing. In a brilliant stroke of inspiration (and probably a little too much caffeine), I decided to create something epic. Thus, the Chicken Bacon Ranch Tacos were born!
Little did I know, this simple combination would quickly become a beloved staple among my group. Fast forward a few years, and this recipe has stood the test of time, transforming from a late-night study snack to the star of dinner parties. So, grab your apron and let’s dive into this delicious dish that combines comfort and elegance in every bite!
Ingredients
Here’s what you’ll need to craft these fabulous tacos. Each ingredient plays a crucial role in delivering that wow factor:
-
2 cups cooked chicken, shredded
Perfect for utilizing leftover rotisserie chicken! If you don’t have leftovers, poach, bake, or grill chicken breasts; they cook up beautifully and shred easily. -
6 slices bacon, cooked and crumbled
Can I just say, bacon makes everything better? For a healthier alternative, try turkey bacon or omit it altogether for a lighter dish. -
1 cup shredded mozzarella cheese
Classic melty goodness! If you’re looking for a twist, swap it for pepper jack for an extra kick or use dairy-free cheese for a lactose-free option. -
1 cup shredded cheddar or Colby Jack cheese
This cheese adds a nice sharpness. Feel free to mix it with other cheeses you have on hand or try a flavored variety for something different. -
⅓ cup ranch dressing (plus more for drizzling)
The creamy heart of this dish! Use homemade ranch for deeper flavor or try a yogurt-based dressing for a lighter option. -
10–12 small flour tortillas (street-size)
Flour tortillas are soft and pliable, perfect for this treatment. Corn tortillas can also work if you’re looking for a gluten-free option! -
½ teaspoon garlic powder
A quintessential flavor booster. If you love fresh flavors, consider using minced garlic instead. -
½ teaspoon onion powder
Adds depth and sweetness. In place of this, finely diced onions can bring a fresh crunch if you sauté them lightly. -
¼ teaspoon black pepper
Essential for a hint of spice! Adjust according to your taste; cayenne pepper can be fun for those who love heat. -
Olive oil spray or melted butter (for brushing)
Just enough to give your tacos that golden beauty! If you’re keeping things light, use spray; if flavor is your focus, melted butter it is! -
1 cup shredded iceberg or romaine lettuce
A fresh, crunchy addition! You can also use spinach or kale for a nutrient boost.
Step-by-Step Instructions
Ready to get your hands a bit messy? Let’s cook!
-
Preheat the Oven
Start by preheating your oven to 400°F (200°C). A hot oven ensures our tacos get that golden-brown crunch. While we wait, let’s prepare our ingredients! -
Mix the Filling
In a large bowl, combine the shredded chicken, crumbled bacon, mozzarella cheese, cheddar cheese, ranch dressing, garlic powder, onion powder, and black pepper. I love to use my hands here to incorporate everything thoroughly. You want it to be a cohesive, cheesy delight! -
Warm the Tortillas
Since we’re working with flour tortillas, I recommend warming them in the microwave for about 30 seconds to a minute. This will make them more malleable and prevent them from tearing when we stuff them. -
Assemble the Tacos
Lay the warmed tortillas on a flat surface. Spoon a generous amount of the chicken mixture into the center of each tortilla. Don’t be shy – pile it on! Once filled, gently fold each tortilla over, creating a little taco pocket. -
Brush with Oil
Use a pastry brush or your fingers to lightly brush the tops of the tacos with olive oil or melted butter. This will give your tacos a beautiful golden color while they bake. -
Bake to Perfection
Place your assembled tacos seam-side down in a baking dish. Bake them in the preheated oven for about 15-20 minutes, or until the cheese is bubbly and the tortillas are golden brown. It’s hard to resist peeking, but trust me, they’ll look gorgeous! -
Garnish and Serve
Once they’re out of the oven, let them sit for a minute. Top with a drizzle of ranch dressing and a handful of shredded lettuce for crunch.
Serving Suggestions
Presentation can elevate a simple meal into a stunning culinary experience! Serve your baked tacos on a beautiful platter, arranged neatly with a side of homemade salsa or guacamole. Sprinkle some chopped fresh cilantro on top for a burst of color and flavor that will delight your guests! You can also serve them with a lime wedge on the side to add a zesty squeeze!
Recipe Variations
Feeling adventurous? Here are a few fun twists to consider:
-
Buffalo Chicken Bacon Ranch Tacos: Swap the ranch dressing with buffalo sauce for a fiery kick! Add blue cheese crumbles for the ultimate flavor combination.
-
Veggie Version: Replace the chicken and bacon with black beans or chickpeas for a plant-based alternative, and add extra veggies like bell peppers and corn. You’ll get a whole new flavor profile!
-
Cheesy Taco Bake: Layer the tacos in a baking dish, cover with extra cheese, and bake until bubbly and gooey—think of it like a cheesy taco casserole!
-
Southwest Tacos: Incorporate corn, diced jalapeños, and Mexican spices for a southwestern twist. Serve with avocado crema for a cool contrast.
-
Breakfast Tacos: Use scrambled eggs instead of chicken and mix in some sautéed bell peppers. Use salsa verde for a breakfast taco that’s to die for!
Chef’s Notes
Oh, the memories these tacos bring back! I remember once trying to impress my friends with an elaborate three-course meal, and while my entrees were decent, the tacos ended up stealing the show! It’s funny how the simplest recipes often resonate the most. Over the years, I’ve tweaked the original version, but keeping that perfect balance of flavors has always been the heart and soul of this dish.
And you know, if you have any leftover filling, toss it into an omelet for breakfast the next day or scoop it up with tortilla chips. Waste not, want not, right?
FAQs and Troubleshooting
Q: My tortillas are tearing when I fold them. What can I do?
A: Warm them up a bit longer! Heating makes them pliable. Warming in a skillet instead of the microwave works wonders as well.
Q: How can I make these tacos spicier?
A: Consider using spicy ranch dressing or adding jalapeños to the filling. You can also sprinkle some cayenne pepper in with your spices!
Q: Can I prepare these in advance?
A: Absolutely! Assemble the tacos but don’t bake them. Cover them with foil and store in the refrigerator for up to 24 hours. Bake them just before serving.
Q: My tacos are soggy! What happened?
A: This can happen if you add too much dressing or if the tacos sit too long before baking. Always try to use just enough dressing to combine the ingredients without making them wet.
Nutritional Info
While exact nutritional content can vary based on specific ingredients and brands, here’s a rough estimate per serving (two tacos):
- Calories: 380-450
- Protein: 25g
- Carbohydrates: 35g
- Fat: 20g
- Fiber: 2g
(Note: Adjust the nutritional info based on your ingredient choices and portions.)
There you have it! A delightful journey from my kitchen to yours with these Baked Chicken Bacon Ranch Tacos. May they bring joy and deliciousness to your table just as they have in mine. Remember, cooking is about creating memories and enjoying the process. So, what are you waiting for? Tie on your apron and let’s get cooking!
PrintBaked Chicken Bacon Ranch Tacos

Delicious baked tacos filled with shredded chicken, crispy bacon, and a creamy ranch dressing, perfect for gatherings.
- Prep Time: 15 minutes
- Cook Time: 20 minutes
- Total Time: 35 minutes
- Yield: 4 servings 1x
- Category: Main Course
- Method: Baking
- Cuisine: Mexican
- Diet: None
Ingredients
- 2 cups cooked chicken, shredded
- 6 slices bacon, cooked and crumbled
- 1 cup shredded mozzarella cheese
- 1 cup shredded cheddar or Colby Jack cheese
- ⅓ cup ranch dressing (plus more for drizzling)
- 10–12 small flour tortillas (street-size)
- ½ teaspoon garlic powder
- ½ teaspoon onion powder
- ¼ teaspoon black pepper
- Olive oil spray or melted butter (for brushing)
- 1 cup shredded iceberg or romaine lettuce
Instructions
- Preheat the oven to 400°F (200°C).
- Mix the shredded chicken, crumbled bacon, mozzarella cheese, cheddar cheese, ranch dressing, garlic powder, onion powder, and black pepper in a large bowl.
- Warm the tortillas in the microwave for about 30 seconds to 1 minute.
- Assemble the tacos by spooning a generous amount of the chicken mixture into the center of each tortilla, then gently folding them over.
- Brush the tops of the tacos with olive oil or melted butter.
- Bake the tacos seam-side down in a baking dish for about 15-20 minutes, or until the cheese is bubbly and the tortillas are golden brown.
- Garnish the baked tacos with a drizzle of ranch dressing and shredded lettuce before serving.
Notes
For extra flavor, consider trying different cheese varieties or adding vegetables.
Nutrition
- Serving Size: 2 tacos
- Calories: 415
- Sugar: 1g
- Sodium: 950mg
- Fat: 25g
- Saturated Fat: 10g
- Unsaturated Fat: 10g
- Trans Fat: 0g
- Carbohydrates: 35g
- Fiber: 2g
- Protein: 25g
- Cholesterol: 75mg
Keywords: tacos, chicken, bacon, ranch, baked, dinner, easy recipe
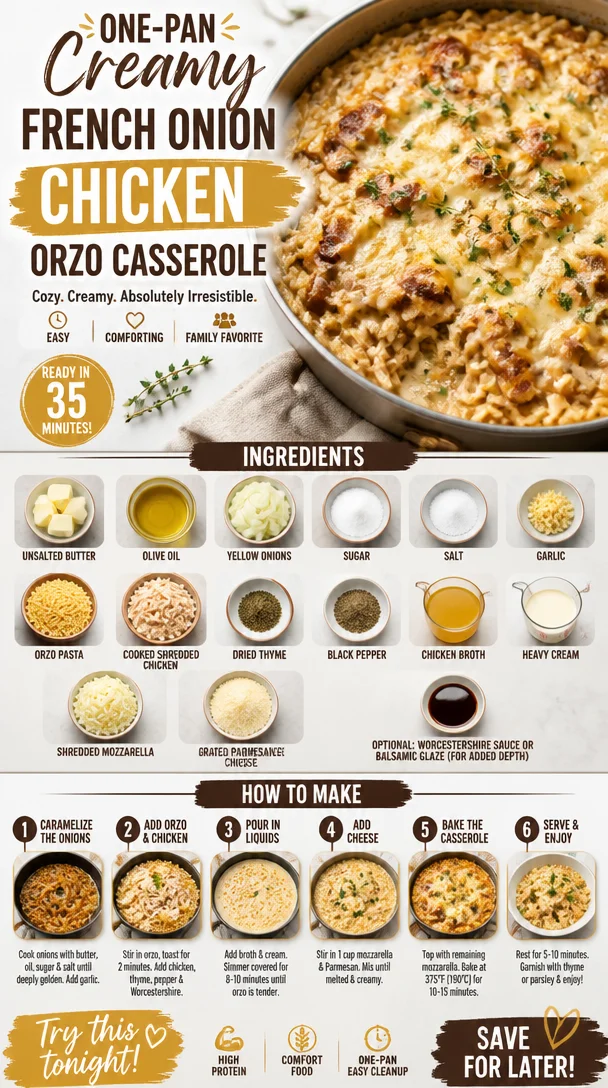
One-Pan Creamy French Onion Chicken Orzo Casserole
French Onion Chicken Orzo Casserole: A Cozy Comfort Meal
Hello, dear foodies! Today, I’m thrilled to share a recipe that will warm your heart and soul—the French Onion Chicken Orzo Casserole. This dish beautifully combines the rich flavors of French onion soup with the comfort of creamy orzo and tender chicken. It’s a cozy meal perfect for weeknight dinners or any time you’re craving something hearty yet elegant.
As I meander through my culinary journey, I can’t help but think of rainy evenings spent in the kitchen, the kind when the aroma of slowly caramelized onions fills the air. With the pitter-patter of rain outside, I’m transported back to my childhood, where my family would gather, laughing and sharing stories over a bowl of something wonderfully comforting. That’s what cooking is all about—the magic that happens when you bring people to your table, nourishing not just their bodies but their hearts.
So tie on your apron, turn on your favorite playlist, and let’s get cooking!
A Slice of Nostalgia
I remember the first time I had French onion soup. My grandmother, with her twinkling eyes, introduced me to the dish when I was just a little sous-chef in her kitchen. One evening, she patiently taught me how to caramelize onions, explaining how the transformation from raw to golden brown was a labor of love. The soup, adorned with toasted bread and bubbling cheese, became my comfort dish during long winter nights.
Fast forward to today, I’ve taken that classic flavor and woven it into this casserole that brings all those memories flooding back but in an easy-to-make format. So, grab your spoon, and let’s make some magic happen!
Ingredients
Here’s what you’ll need to create this delightful casserole:
- 2 tablespoons unsalted butter: For that rich, creamy base. You could substitute with ghee if you’re dairy-free.
- 1 tablespoon olive oil: Adds flavor and prevents the butter from burning. Use avocado oil for a higher smoke point.
- 2 large yellow onions (thinly sliced): Sweet and savory, the star of our dish! If you prefer milder flavors, try using shallots.
- 1 teaspoon sugar: This helps caramelize the onions, balancing their natural sweetness. Brown sugar also works if you have it on hand.
- 1/2 teaspoon salt: Enhances the flavors and aids in drawing moisture out of the onions.
- 3 garlic cloves (minced): For that aromatic kick. If you’re not a fan of garlic, you can skip it or use garlic powder instead.
- 1 1/2 cups orzo pasta: This tiny pasta shape soaks up the flavors beautifully. Substitute with quinoa or rice for a gluten-free option.
- 2 cups cooked shredded chicken (rotisserie works well): A great shortcut for busy weeknights. You can use turkey or even chickpeas for a veggie twist.
- 1/2 teaspoon dried thyme: Adds an earthy depth. Fresh thyme works wonderfully too!
- 1/4 teaspoon black pepper: For a touch of spice. Adjust to your taste.
- 2 cups low-sodium chicken broth: The flavorful base of our casserole; homemade broth takes it to the next level. Use vegetable broth for a vegetarian version.
- 1 cup heavy cream (or half and half for a lighter option): Creaminess is key! You can use coconut cream if you need it dairy-free.
- 1 1/2 cups shredded mozzarella cheese: For gooey goodness! Feel free to substitute with your favorite cheese blend.
- 1/2 cup grated Parmesan cheese: Adds a nutty flavor and enhances the dish. Nutritional yeast is a great alternate for a dairy-free option.
- Optional: 1/2 teaspoon Worcestershire sauce or balsamic glaze: Adds depth and complexity. This step really elevates the dish but can be left out if you prefer.
Step-by-Step Instructions
-
Caramelize the Onions: In a large skillet, melt the butter and olive oil over medium heat. Once hot, add the sliced onions and sprinkle them with sugar and salt. Cook for about 20-25 minutes, stirring occasionally, until they are a beautiful golden brown. Patience is key here! Low and slow caramelization unlocks sweet flavors. Pro tip: If the onions start to stick, add a tiny splash of broth to deglaze the pan.
-
Add Garlic: Once your onions are perfectly caramelized, add the minced garlic and cook for another 1-2 minutes. You want to smell that aroma wafting through your kitchen. It’s the good stuff, my friends!
-
Combine Ingredients: In a large mixing bowl, combine the cooked onions and garlic with the orzo pasta, shredded chicken, dried thyme, black pepper, and the remainder of the broth and cream. If you’re adding Worcestershire sauce or balsamic glaze, now’s the time! This mixture should be creamy and inviting.
-
Transfer to Casserole Dish: Grease a 9×13-inch casserole dish, then pour the orzo mixture into it. Spread it out evenly, making sure every bit is coated in that luscious sauce.
-
Cheese It Up: Sprinkle the mozzarella and Parmesan generously over the top. Because let’s be real, cheese is life!
-
Bake: Preheat your oven to 375°F (190°C). Bake the casserole for 25-30 minutes, or until the cheese is melted and bubbly. You want that golden crust that promises a delightful bite. If you want an extra crispy top, broil for an additional 1-2 minutes—but buddy, keep a close eye on it!
-
Rest a Bit: Once it’s out of the oven, let it rest for about 5-10 minutes. This allows the flavors to mingle and makes serving so much neater. Plus, it gives you a moment to breathe and admire your handiwork.
Serving Suggestions
When serving your French Onion Chicken Orzo Casserole, a simple side salad dressed with a light vinaigrette pairs beautifully. You can plate the casserole in individual bowls, topped with fresh herbs—like parsley or chives—for a pop of color. Trust me, thoughtful plating can transform your meal from ordinary to extraordinary!
Recipe Variations
Feeling adventurous? Here are a few ways you can mix it up:
- Add Vegetables: Incorporate spinach, mushrooms, or bell peppers for extra nutrients and flavors.
- Swap Proteins: Use steak, shrimp, or even a plant-based protein for a twist.
- Seasonal Flavors: Experiment with herbs like rosemary or sage during autumn for a seasonal flair.
- Spice It Up: Add a pinch of red pepper flakes for a hint of heat!
Chef’s Notes
Oh, the laughs I’ve had over this recipe! I remember one time when I invited a group of friends over for dinner, and I forgot to buy cheese. I had to get creative with a random assortment of cheeses from my fridge—cheddar, gouda, and even a bit of feta made an appearance. It turned out scrumptious, and now I always tell folks to use what they have on hand. Cooking should be flexible and fun, don’t you think?
This recipe has also evolved through the years. Initially, it was just a simple pasta bake, but as my love for French onion soup grew, I decided to take a classic and give it my personal touch.
FAQs and Troubleshooting
Q: Can I make this casserole gluten-free?
A: Absolutely! Just swap the orzo for a gluten-free pasta option or quinoa. The cooking times may vary, so keep an eye on it!
Q: It seems a bit dry—why?
A: If it feels dry, it could be that the pasta absorbed too much liquid during baking. Next time, add a bit more broth or cream before baking!
Q: Can I make this ahead of time?
A: Definitely! Assemble it as directed, cover, and refrigerate for up to 24 hours. Just add a few extra minutes to the baking time.
Q: How do I store leftovers?
A: Keep any leftovers in an airtight container in the fridge for up to 3 days. Reheat gently in the oven or microwave—add a splash of broth if it gets dry!
Nutritional Info
While I don’t typically focus on numbers, a serving of this casserole generally contains around 450 calories, depending on your specific ingredients and portion sizes. It’s packed with protein, and lots of cheesy goodness—as comfort food should be!
I hope this French Onion Chicken Orzo Casserole finds its way into your kitchen and creates as many lovely memories for you as it has for me. Remember, cooking is about joy, intention, and gathering around the table. Here’s to many beautiful meals ahead! Happy cooking!
PrintFrench Onion Chicken Orzo Casserole
A cozy comfort meal that combines the rich flavors of French onion soup with creamy orzo and tender chicken, perfect for weeknight dinners.
- Prep Time: 15 minutes
- Cook Time: 30 minutes
- Total Time: 45 minutes
- Yield: 4 servings 1x
- Category: Main Course
- Method: Baking
- Cuisine: French
- Diet: Gluten-Free Option Available
Ingredients
- 2 tablespoons unsalted butter
- 1 tablespoon olive oil
- 2 large yellow onions (thinly sliced)
- 1 teaspoon sugar
- 1/2 teaspoon salt
- 3 garlic cloves (minced)
- 1 1/2 cups orzo pasta
- 2 cups cooked shredded chicken
- 1/2 teaspoon dried thyme
- 1/4 teaspoon black pepper
- 2 cups low-sodium chicken broth
- 1 cup heavy cream
- 1 1/2 cups shredded mozzarella cheese
- 1/2 cup grated Parmesan cheese
- Optional: 1/2 teaspoon Worcestershire sauce or balsamic glaze
Instructions
- Caramelize the onions: In a large skillet, melt the butter and olive oil over medium heat. Add the sliced onions, sugar, and salt. Cook for about 20-25 minutes until golden brown.
- Add garlic: Once onions are caramelized, add minced garlic and cook for another 1-2 minutes.
- Combine ingredients: In a mixing bowl, combine cooked onions, garlic, orzo, shredded chicken, thyme, black pepper, remaining broth, and cream.
- Transfer to a casserole dish: Grease a 9×13-inch dish and pour the mixture into it, spreading evenly.
- Cheese it up: Sprinkle mozzarella and Parmesan over the top.
- Bake: Preheat oven to 375°F (190°C) and bake for 25-30 minutes until cheese is melted and bubbly.
- Rest a bit: Let it rest for 5-10 minutes before serving.
Notes
Serve with a side salad and fresh herbs for garnish. This dish is flexible; you can adjust ingredients based on what you have.
Nutrition
- Serving Size: 1 serving
- Calories: 450
- Sugar: 6g
- Sodium: 500mg
- Fat: 20g
- Saturated Fat: 10g
- Unsaturated Fat: 7g
- Trans Fat: 0g
- Carbohydrates: 45g
- Fiber: 3g
- Protein: 25g
- Cholesterol: 70mg
Keywords: comfort food, casserole, chicken, French onion, weeknight dinner, creamy, orzo, cozy meal
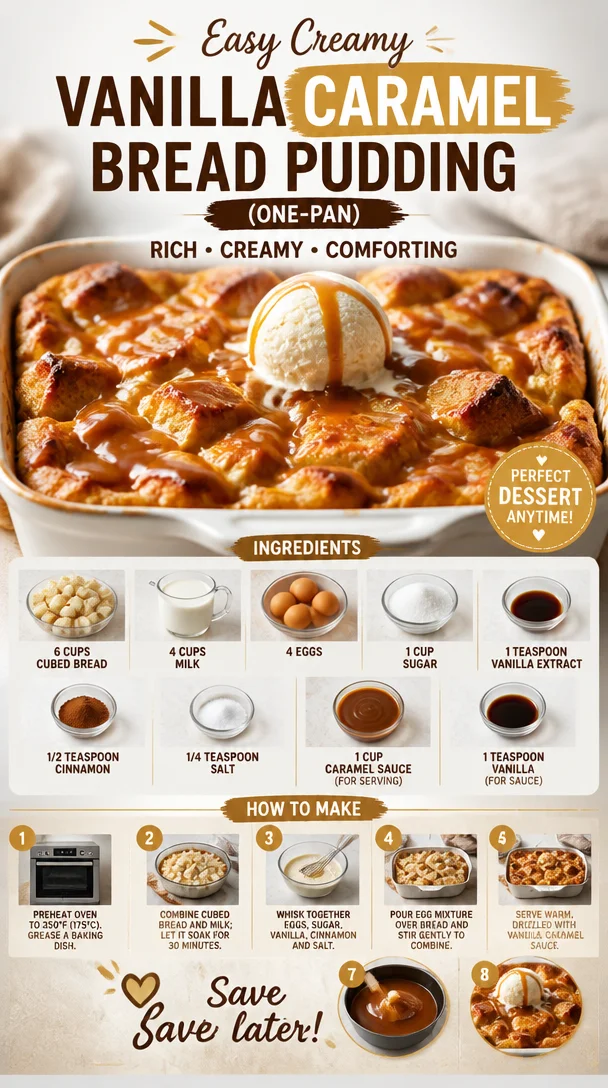
Easy Creamy Vanilla Caramel Bread Pudding (One-Pan)
Indulge in Comfort: Bread Pudding with Vanilla Caramel Sauce
Introduction
Hello, dear friends! If you’ve found yourself here, I’m guessing you’re in search of a sweet treat that warms your heart and satiates that cravings for comfort food. Well, you’re in for a delightful experience because we’re diving into the cozy world of bread pudding, paired with a delectable homemade vanilla caramel sauce.
Oh, bread pudding! It’s the quintessential dish that effortlessly marries nostalgia with indulgence. It’s a dessert that doesn’t need to be fancy; in fact, its beauty lies in its simplicity. The rich, custardy layers of bread soaked in creamy goodness, coupled with the sweet, luscious caramel sauce — it’s nothing short of celestial. Plus, it’s the perfect way to utilize that leftover bread that’s been sitting on your countertop, which, let’s be honest, we all have.
As we navigate through this recipe, imagine the aroma of cinnamon filling your kitchen and the joy of serving a warm dessert that makes everyone feel right at home. Gather around as we embark on a culinary adventure that promises warmth, love, and perhaps a little culinary magic. Tie on your apron, and let’s get started!
Personal Story
I can still remember the very first time I made bread pudding. It was a chilly autumn evening, and I had invited a few close friends over for a cozy dinner. I wanted to impress them, but I also yearned for that comforting embrace of home-cooked flavors. As I rummaged through my pantry, I stumbled upon a half-loaf of stale bread just begging to be transformed.
Armed with my grandmother’s well-loved recipe, which had been scribbled on a piece of paper stained with butter and love, I set out on a mission. I mixed together all the ingredients, and as the pudding baked, I felt the warmth that only home kitchens can offer. The smell wafted through the air, pulling my friends into the kitchen like a hypnotic love spell. When I served that golden-brown slice topped with a drizzle of caramel sauce, it was a hit! Each spoonful was filled with laughter and sweet memories, and I knew that bread pudding would forever hold a special place in my heart and kitchen.
Ingredients
To create this delightful dish, you’ll need the following:
-
6 cups cubed bread: Use day-old bread for the best results; it soaks up the custard beautifully. If you don’t have bread on hand, brioche or challah is a fantastic substitute.
-
4 cups milk: This is the foundation of the custard. Whole milk gives a rich flavor, but feel free to use 2% or even a plant-based milk, though it might slightly alter the taste.
-
4 eggs: Eggs act as the binding agent, giving that lovely custard texture. If you’re vegan, you can replace them with flax eggs (1 tablespoon flaxseed meal + 2.5 tablespoons water per egg).
-
1 cup sugar: This sweetens up the pudding. Brown sugar brings in more depth of flavor, while white sugar will give it a more straightforward sweetness.
-
1 teaspoon vanilla extract: Pure extracts elevate the flavor profile. If you’re in a pinch, imitation vanilla can work as well.
-
1/2 teaspoon cinnamon: This cozy spice adds warmth and a hint of nostalgia. You can swap it out for nutmeg or pumpkin spice for a different flavor twist.
-
1/4 teaspoon salt: Just a pinch to balance the sweetness.
-
1 cup caramel sauce (for serving): You can use store-bought or make your own for an extra special kick.
-
1 teaspoon vanilla (for sauce): Again, pure is always better, but use what you have!
Step-by-Step Instructions
-
Preheat Your Oven: Start by preheating your oven to 350°F (175°C). This ensures that your pudding bakes evenly and beautifully.
-
Prep the Bread: Cube your bread into bite-sized pieces. Now, you can use a serrated knife for ease! Place the cubed bread in a large mixing bowl. If you want a head start, you can toast the cubes in the oven for about 10 minutes to give them a slightly crispy exterior — this helps prevent them from becoming mushy later!
-
Mix the Custard: In a separate bowl, whisk together the milk, eggs, sugar, vanilla extract, cinnamon, and salt until well blended. This step is crucial as it creates the creamy custard that will soak into our beloved bread. Pro tip: whisking using a handheld mixer can give you a fluffier mix, but a good ol’ whisk will work just fine too!
-
Combine: Pour the custard mixture over the cubed bread, ensuring that every piece gets a good soaking. Gently fold the mixture with a spatula or your hands — be gentle though, we don’t want to mush the bread pieces!
-
Let it Soak: Allow the mixture to sit for about 15 minutes. This waiting game is essential. It gives the bread time to soak up all that delicious custard, leading to a more flavorful and moist pudding.
-
Transfer to Baking Dish: Grease a 9×13-inch baking dish (or any preferred large dish) with butter or a non-stick spray. Transfer the bread mixture into the dish, spreading it evenly.
-
Bake: Place the dish in the preheated oven and bake for about 45-55 minutes or until the top is golden and the custard is set. If you gently shake the dish, it should jiggle slightly in the center — that’s a good sign of creamy goodness!
-
Cool It Down: Once done, remove the dish from the oven and let it cool for about 10–15 minutes. This will help set the pudding a bit more, making it easier to slice.
-
Prepare the Caramel Sauce: While the pudding is cooling, you can prepare your caramel sauce. If you’re using store-bought, just warm it up slightly. For those feeling adventurous and wanting to make your own, melt 1 cup of sugar in a saucepan over medium heat, stirring constantly until it turns a beautiful amber color, then slowly add 1/2 cup of heavy cream (careful, it will bubble vigorously) along with the vanilla. Let it simmer for a minute, and voilà!
Serving Suggestions
This bread pudding is a showstopper, so when it comes to serving, simplicity is key. Cut it into generous squares, plate it nice and warm, and drizzle with that luscious caramel sauce. Sprinkle a little extra cinnamon or even some toasted nuts on top for that added crunch and elegance. Add a scoop of vanilla ice cream or a dollop of whipped cream if you want to elevate it even more; your guests will thank you!
Recipe Variations
-
Chocolate Chip Bread Pudding: Fold in 1 cup of semi-sweet chocolate chips for a rich twist that chocolate lovers will adore.
-
Fruit-Filled Delight: Toss in some fresh or dried fruits like raisins, cranberries, or diced apples right into the custard mix for a fruity burst.
-
Nutty Flavor: Add in 1/2 cup of chopped pecans or walnuts for that delightful crunch and added texture.
-
Spiced Up Version: Experiment with different spices such as cardamom or ginger for a warm, spiced profile that changes the entire mood of the dish.
-
Dairy-Free: Use almond or oat milk and flax eggs for an entirely plant-based version!
Chef’s Notes
This recipe has been my go-to for years, and what I adore about it is its flexibility. I have tried various breads, from rustic sourdough to even leftover brioche, and each offered its own unique charm. I’ve also experimented with various toppings; my family can never decide between caramel sauce or a scoop of ice cream — it’s a sweet dilemma!
Just remember, like any dish, bread pudding gets better with practice, and I encourage you to make it your own. You can amp up the flavors or stick to the classics, but as long as you’re cooking with intention and love, it will always shine through.
FAQs and Troubleshooting
-
Why is my bread pudding soggy?
- This usually happens if the bread wasn’t stale enough or it was oversoaked. Ensure you’re using older, denser bread and follow the soaking time as instructed.
-
Can I make this bread pudding ahead of time?
- Absolutely! You can assemble it a day in advance and store it in the fridge. Just bake it when you’re ready to serve!
-
What can I substitute for milk?
- Any non-dairy milk works, but avoid sweetened varieties for an optimal flavor balance.
-
How should I store leftovers?
- Store any leftovers in an airtight container in the fridge for up to 3 days. Reheat in the oven or microwave, and top with caramel sauce before serving!
Conclusion
There you have it, my wonderful food lovers! A comforting and elegant bread pudding made for any occasion, whether it’s a family gathering, a casual get-together, or a midnight snack. The warm, aromatic flavors of cinnamon and vanilla intertwined with the rich caramel make every bite a celebration of flavors.
Don’t forget to share your creations with me! I’d love to hear your little kitchen stories and see your beautiful bread puddings. Until next time, remember that the best ingredients are laughter, love, and a pinch of kindness. Now, go ahead and set that table — it’s time for dessert!
PrintBread Pudding with Vanilla Caramel Sauce
A comforting and simple bread pudding served with a rich homemade vanilla caramel sauce.
- Prep Time: 15 minutes
- Cook Time: 50 minutes
- Total Time: 65 minutes
- Yield: 8 servings 1x
- Category: Dessert
- Method: Baking
- Cuisine: American
- Diet: Vegetarian
Ingredients
- 6 cups cubed bread
- 4 cups milk
- 4 eggs
- 1 cup sugar
- 1 teaspoon vanilla extract
- 1/2 teaspoon cinnamon
- 1/4 teaspoon salt
- 1 cup caramel sauce (for serving)
- 1 teaspoon vanilla (for sauce)
Instructions
- Preheat your oven to 350°F (175°C).
- Cube your bread into bite-sized pieces and place them in a large mixing bowl.
- Whisk together the milk, eggs, sugar, vanilla extract, cinnamon, and salt until well blended.
- Pour the custard mixture over the cubed bread, ensuring every piece gets soaked.
- Let the mixture sit for about 15 minutes to soak up the custard.
- Grease a 9×13-inch baking dish and transfer the bread mixture into it.
- Bake for 45-55 minutes or until the top is golden and the custard is set.
- Cool for about 10–15 minutes before serving.
- Prepare the caramel sauce: Warm it if store-bought or make your own by melting sugar and adding cream and vanilla.
Notes
For best results, use day-old bread and consider experimenting with toppings and add-ins like chocolate chips or nuts.
Nutrition
- Serving Size: 1 serving
- Calories: 350
- Sugar: 20g
- Sodium: 300mg
- Fat: 10g
- Saturated Fat: 5g
- Unsaturated Fat: 3g
- Trans Fat: 0g
- Carbohydrates: 50g
- Fiber: 2g
- Protein: 8g
- Cholesterol: 150mg
Keywords: bread pudding, dessert, caramel sauce, comfort food
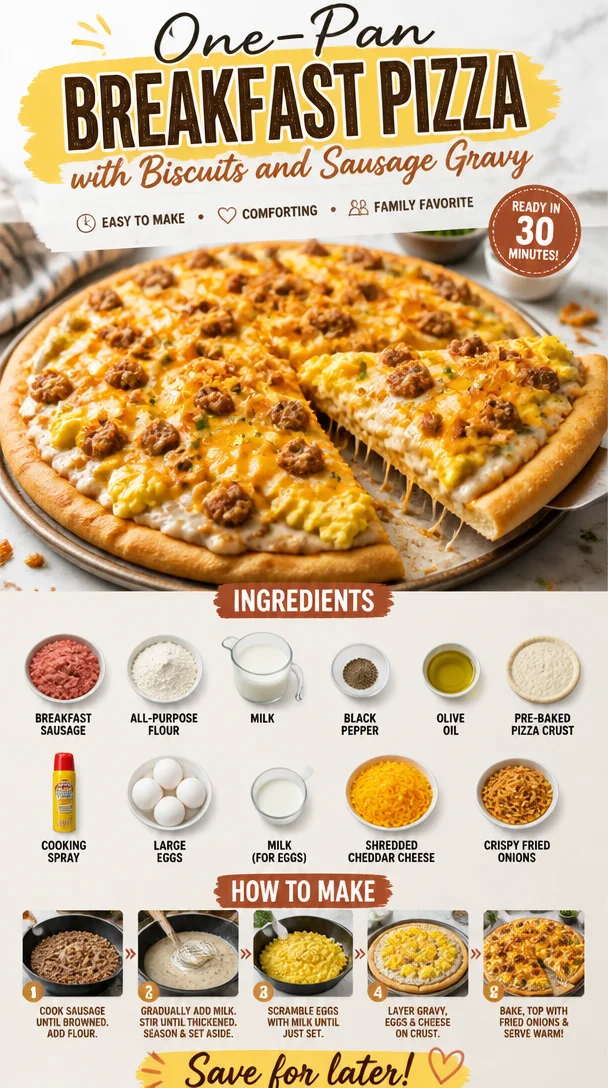
One-Pan Breakfast Pizza with Biscuits and Sausage Gravy
Biscuits and Sausage Gravy Breakfast Pizza: A Delicious Morning Treat
Hello, my fellow food lovers! Today, I’m super excited to share with you a dish that’s come to mean a lot to me over the years: Biscuits and Sausage Gravy Breakfast Pizza. Picture this: a delicious, warm pizza crust topped with creamy sausage gravy, fluffy scrambled eggs, and gooey cheese—a true morning masterpiece! This breakfast pizza combines two beloved classics in a way that’s not only indulgent but also surprisingly approachable. So, grab your apron, and let’s dive into this delightful recipe that will make your breakfast feel like a special occasion!
Personal Story
I still remember the first time I had the idea for breakfast pizza. It was a lazy Sunday morning, the kind where you linger in your pajamas, caffeinated bliss pulsing through your veins, and a little craving for something hearty starts to set in. It was my friends’ brunch gathering, and someone had brought over the most luscious homemade sausage gravy. As I savored each bite, I pondered how it would be on a crispy pizza crust. That’s the magic of cooking—every dish tells a story and reminds us of the people we cherish. This pizza not only carries those memories; it invites you to create new ones. So, whether it’s a cozy brunch with friends or a cheerful family breakfast, this pizza is your delicious passport to flavor-town!
Ingredients
Here’s what you’ll need for this delightful dish along with some helpful insights:
-
1 package (16 oz) breakfast sausage
A flavorful base! Go for your favorite brand. For a healthier option, you can use turkey or chicken sausage without sacrificing flavor. -
1/4 cup all-purpose flour
This will help thicken your gravy. Feel free to use gluten-free flour if that suits your needs—it works well in this recipe! -
2 cups milk, divided
I recommend whole milk for richness, but 2% works too. Alternatively, you can use almond milk for a dairy-free version, though I would recommend adjusting the seasoning slightly. -
Ground black pepper, to taste
A staple in the kitchen! Freshly ground gives a better punch. Add more or less depending on your spice tolerance! -
1 tbsp olive oil (optional)
This can help cook your sausage slightly faster and prevent sticking. If your sausage is high in fat, you might not need it at all. -
1 pre-baked pizza crust (12-inch)
Choose a thin, crispy crust for an enjoyable texture, or go for a thicker, fluffier style based on your preference! -
Cooking spray
A quick spritz on the pizza crust can prevent sticking and ensure golden-brown edges. -
6 large eggs
The star of the show! These will add fluffiness when scrambled. You can also replace these with egg-substitute for a lighter meal. -
1/4 cup milk (for eggs)
This makes your scrambled eggs extra creamy. You can use the same milk you use for the gravy! -
1 cup shredded Cheddar cheese (or more, as desired)
Cheddar brings a sharpness that complements the gravy beautifully. You can mix it up with Monterey Jack or Pepper Jack for added flavor! -
Crispy fried onions for topping
These add that perfect finishing crunch! You can find them at the grocery store, or you could make your own if you have time!
Step-by-Step Instructions
Now, let’s get cooking! Here’s how you whip up this Biscuits and Sausage Gravy Breakfast Pizza step by step.
-
Prepare the Gravy
Start by cranking your stovetop to medium heat. In a large skillet, add your breakfast sausage. If you’re using the olive oil, drizzle it in alongside your sausage. Cook until browned, breaking it apart with a spatula. This step not only adds flavor but creates a lovely base for your gravy!Chef Tip: If you prefer your sausage a little spicy, consider using a spicy blend or adding red pepper flakes into the skillet while the sausage cooks.
-
Create the Roux
Once the sausage is nicely browned (think golden goodness), sprinkle the flour directly over the sausage. Stir constantly for about 2 minutes. This roux will thicken your gravy. Don’t skip this step—it’s vital for flavor and texture!Fun Fact: The roux should turn a nice golden color without burning; that’s when you know it’s ready for the next step!
-
Whisk in the Milk
Gradually pour in 1.5 cups of the milk, stirring continuously to avoid lumps. Let the gravy simmer for about 5-7 minutes, stirring until it thickens to a creamy consistency. This is the moment your kitchen will start smelling heavenly!Chef Hack: If your gravy is too thick, don’t fret! Just add a splash more milk until you reach your desired consistency.
-
Season the Gravy
Season generously with ground black pepper (and salt, if you like it). Taste and adjust according to your preference. Remember, this is a flexible sauce, and you’re the chef! -
Prep the Eggs
In a separate bowl, whisk together your eggs and the remaining 1/4 cup of milk until fully combined. Season with a pinch of salt and pepper.Chef Insight: Whisking air into your eggs will make them incredibly fluffy while cooking. It’s all about that texture!
-
Scramble the Eggs
In another skillet over medium-low heat, scramble your egg mixture. Stir often, and focus on soft curds. Once they’re nearly done, remove from heat—they will continue to cook in the residual heat!Trick to Remember: You want them soft and creamy, not rubbery. Don’t overcook them!
-
Assemble the Pizza
Preheat your oven according to your pizza crust instructions (usually around 425°F). On a baking sheet, spray your pre-baked pizza crust with cooking spray. Pour the creamy sausage gravy evenly across the top, followed by the scrambled eggs.Chef Tip: Make sure to leave a little edge without gravy for an effortless slice later!
-
Cheese It Up
Generously sprinkle the shredded Cheddar cheese over the top. If you’re feeling extra cheesy, why not add more? -
Bake It
Pop the loaded pizza in the oven! Bake for about 10-15 minutes, or until the cheese is bubbly and lightly golden. You’ll know it’s perfect when those edges start to get crispy!Final Touch: If you like an extra crispy top, you can broil it on high for the last minute—just watch it closely!
-
Add a Crunch
Once out of the oven, garnish the pizza with crispy fried onions for that added layer of texture and flavor. Give it a couple of minutes to cool down, and then it’s time to slice and serve!
Serving Suggestions
When it comes to serving your Biscuits and Sausage Gravy Breakfast Pizza, presentation is key! I love to cut it into triangular slices and place them on a beautiful platter. You can add a sprinkle of fresh herbs like chives or parsley for a pop of color. Pair it with fresh fruit on the side for a refreshing contrast and to balance out all those rich flavors. If you want to go the extra mile, serve it alongside some mimosas or a rich coffee blend!
Recipe Variations
-
Veggie Delight: Add some sautéed peppers and onions to the sausage for a heartier flavor and extra nutrition.
-
Spicy Option: Spice it up by using hot breakfast sausage or adding jalapeños for a kick!
-
Herbed Twist: Stir in some fresh herbs, like thyme or rosemary, into the egg mixture for a fragrant twist.
-
Savory Swap: Try swapping the sausage for crumbled bacon or chorizo for a unique flavor profile.
-
Dairy-Free Delight: Use plant-based sausage and dairy-free cheese for a lighter, allergen-friendly option.
Chef’s Notes
This recipe has evolved over the years in my kitchen! The first time I made it, I was super cautious about the gravy and ended up with a lumpy mess—but that mistake led to so many delicious tweaks! I’ve experimented with various toppings and spices, all of which added their own special touch. Whenever I bring this dish to gatherings, it never fails to bring smiles and compliments. And if there are leftovers (which is rare), I love reheating a slice and having it for lunch!
FAQs and Troubleshooting
-
My gravy turned out lumpy. What happened?
No worries! It’s all about whisking it thoroughly! Make sure to add the milk slowly while stirring constantly. If it’s already lumpy, you can blend it with an immersion blender before serving. -
Can I make this pizza ahead of time?
Absolutely! You can prepare the components (the gravy and scrambled eggs) ahead of time. Simply assemble and bake when you’re ready to serve! -
What’s the best way to reheat leftovers?
You can warm it up in the oven at a low temperature or in the microwave. If using the oven, cover it with foil to keep it from drying out. -
How can I make this vegetarian?
Just swap the sausage for a hearty veggie crumble or mushrooms sautéed until golden! The gravy will still be just as creamy and delicious!
Nutritional Info
This recipe is rich in flavors and nutrients, delivering hearty satisfaction. Each serving provides protein from the sausage and eggs while giving you a balanced start to the day. As always, adjust according to your dietary needs!
There you have it, my friends! A delightful dish that brings comfort to the breakfast table while keeping your gatherings elegant and inviting. Biscuits and Sausage Gravy Breakfast Pizza is sure to nourish both body and soul, and it makes for fantastic memories around the table. Remember, cooking is all about sharing moments and flavors with those you love. So, tie on that apron and let’s make some breakfast magic! Bon appétit!
PrintBiscuits and Sausage Gravy Breakfast Pizza

A delicious breakfast pizza topped with creamy sausage gravy, fluffy scrambled eggs, and gooey cheese, perfect for a special morning treat.
- Prep Time: 15 minutes
- Cook Time: 30 minutes
- Total Time: 45 minutes
- Yield: 4 servings 1x
- Category: Breakfast
- Method: Baking
- Cuisine: American
- Diet: None
Ingredients
- 1 package (16 oz) breakfast sausage
- 1/4 cup all-purpose flour
- 2 cups milk, divided
- Ground black pepper, to taste
- 1 tbsp olive oil (optional)
- 1 pre-baked pizza crust (12-inch)
- Cooking spray
- 6 large eggs
- 1/4 cup milk (for eggs)
- 1 cup shredded Cheddar cheese (or more, as desired)
- Crispy fried onions for topping
Instructions
- Prepare the gravy: Heat your stovetop to medium heat and cook the breakfast sausage in a large skillet. If using, drizzle in olive oil. Cook until browned, breaking apart with a spatula.
- Create the roux: Once browned, sprinkle flour over the sausage and stir constantly for about 2 minutes.
- Whisk in the milk: Gradually pour in 1.5 cups of milk, stirring continuously. Let simmer for 5-7 minutes until thickened.
- Season the gravy: Add ground black pepper and adjust seasoning to taste.
- Prep the eggs: Whisk together the eggs and remaining 1/4 cup of milk in a separate bowl, seasoning with salt and pepper.
- Scramble the eggs: In another skillet, scramble the egg mixture over medium-low heat until soft and creamy.
- Assemble the pizza: Preheat oven and spray pre-baked pizza crust with cooking spray. Pour sausage gravy evenly across the top, followed by scrambled eggs.
- Cheese it up: Generously sprinkle shredded Cheddar cheese over the top.
- Bake it: Bake for 10-15 minutes until cheese is bubbly and golden.
- Add a crunch: Garnish with crispy fried onions before slicing and serving.
Notes
Serve with fresh fruit and a sprinkle of herbs for color. Pairs well with mimosas or coffee.
Nutrition
- Serving Size: 1 slice
- Calories: 450
- Sugar: 6g
- Sodium: 750mg
- Fat: 22g
- Saturated Fat: 9g
- Unsaturated Fat: 10g
- Trans Fat: 0g
- Carbohydrates: 40g
- Fiber: 2g
- Protein: 18g
- Cholesterol: 300mg
Keywords: breakfast pizza, sausage gravy, brunch recipe, breakfast ideas
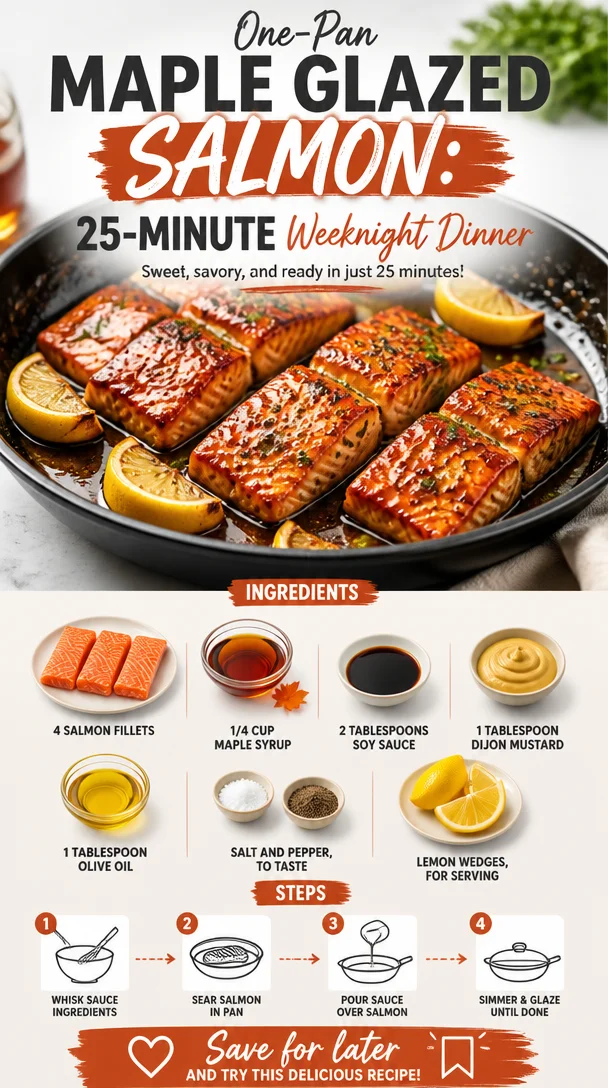
One-Pan Maple Glazed Salmon: 25-Minute Weeknight Dinner
Maple Glazed Baked Salmon: A Delightful Dish to Savor
Hello, my culinary friends! Today, I’m thrilled to share a recipe that truly exemplifies my philosophy of cooking with elegance without the intimidation factor. Enter the Maple Glazed Baked Salmon — a dish that merges sweet and savory in a way that will have your tastebuds dancing and your dinner guests raving. This recipe is not only delicious; it also comes together in a pinch, making it perfect for busy weeknights or last-minute dinner parties.
Picture this: you’re back from a long day, and the last thing you want to do is slave away at the stove. But you want to serve something impressive, something that feels personal and lovely. That’s where this salmon comes in. With just a handful of ingredients, a little bit of prep, and the wonderful transformation of baking, you can craft a dish that looks like it belongs in a fine-dining restaurant. So, grab your apron, and let’s dive into this culinary adventure!
My Personal Story: The First Glaze
I vividly remember the first time I made maple-glazed salmon. It was during a dreary winter evening, and I was longing for something bright and cheerful. I decided to host a small gathering for my friends to lift our spirits. On a whim, I concocted this glaze out of maple syrup, soy sauce, and a little Dijon mustard. The aroma wafting through the kitchen drew everyone in, lifting our moods even before we sat down to eat.
As my friends gathered around the table, I remember seeing their eyes widen with delight as I placed the salmon in front of them. What started as a simple dish quickly transformed into a highlight of our evening filled with laughter and good cheer. That first bite — oh, that beautiful balance of sweet maple and savory salmon — left a lasting impression. Ever since, this recipe has been a staple in my home. It’s a reminder that food can indeed bring us together and create warm memories that linger long after the last bite.
Ingredients
Now, let’s talk about what you need to bring this delightful dish to life. Here’s a breakdown of the ingredients:
-
4 salmon fillets
These should be fresh and preferably wild-caught. If you’re unable to find salmon, you can substitute with other fish like trout or arctic char. -
1/4 cup maple syrup
Pure maple syrup is the gold standard for this recipe, packing that sweet richness. If you’re in a pinch, you can use honey or agave nectar for an alternative flavor profile. -
2 tablespoons soy sauce
This adds a savory depth to the glaze. For a gluten-free option, use tamari. You can also try coconut aminos for a milder flavor. -
1 tablespoon Dijon mustard
The mustard provides a zesty kick that beautifully balances out the sweetness. If you’re in a bind, yellow mustard works too, but it’ll be less sophisticated. -
1 tablespoon olive oil
A drizzle of olive oil adds richness and helps with the cooking process. You can substitute it with avocado oil or melted coconut oil if needed. -
Salt and pepper to taste
Always taste your food! A pinch of salt and a touch of pepper will enhance the flavors beautifully. -
Lemon wedges for serving
Fresh lemon juice cuts through the richness of the salmon, adding a bright finish. Feel free to use lime if you prefer a citrus twist!
Step-by-Step Instructions
Let’s get cooking! Follow these steps, and you’ll have a beautifully glazed salmon that will impress anyone sitting around your table.
-
Preheat your oven to 375°F (190°C).
Preheating ensures even cooking. I recommend setting your timer for about 10 minutes after mixing your glaze to let the oven reach temperature while you prep! -
Prepare the baking dish.
Lightly grease a baking dish with a little olive oil to prevent the salmon from sticking. This also helps in non-slip plating later! -
Mix the maple glaze.
In a small bowl, whisk together the maple syrup, soy sauce, Dijon mustard, and olive oil until combined. This glaze is the heart of the recipe, so make sure to blend well for a smooth consistency. -
Season the salmon.
Place your salmon fillets in the prepared baking dish, skin side down (if you have skin-on fillets). Generously sprinkle with salt and pepper. Here, a light hand with the salt is best—the soy sauce already adds a nice salty touch. -
Dress the salmon with the glaze.
Pour the maple glaze over the salmon fillets. Use a brush or the back of a spoon to spread it evenly. This ensures every bite is full of that luscious flavor. -
Bake the salmon.
Place the baking dish in the preheated oven. Bake for about 15-20 minutes, or until the salmon flakes easily with a fork. It’s like magic watching that bright pink fillet turn into something beautifully succulent! -
Broil for a perfect finish (optional).
If you’d like a caramelized top, switch the oven to broil for the last 2-3 minutes. Keep a close eye during this step. You want that glaze to bubble just enough to create a gorgeous finish without burning! -
Let it rest.
Once out of the oven, allow the salmon to rest for a minute before serving. This will help retain moisture and allow those flavors to settle beautifully.
Serving Suggestions
Now that your salmon is cooked to perfection, it’s time to plate! Serve the maple glazed salmon with some lemon wedges on the side for that zesty touch. Pair it with vibrant sides like roasted asparagus or a fresh green salad drizzled with a light vinaigrette. These accompaniments not only complement the sweetness of the glaze but also elevate the entire meal presentation.
To create a stunning visual feast, consider placing the salmon on a colorful platter, garnished with fresh herbs like parsley or dill. A sprinkle of sesame seeds can also add a nice crunch and visual contrast!
Recipe Variations
Feeling adventurous? Here are some variations you can explore with this base recipe:
-
Herb-Infused Maple Glaze: Add fresh herbs like thyme or rosemary to your glaze for an earthy twist.
-
Spicy Maple Salmon: Stir in a teaspoon of chili flakes or sriracha to your glaze for a sweet and spicy combination.
-
Citrus Maple Glaze: Mix in some fresh orange or lime juice into the glaze for a zesty flavor profile.
-
Maple Mustard Crust: Before glazing, sprinkle the fillets with crushed nuts or breadcrumbs for a crunchy layer.
-
Sweet Potato & Kale Side: Serve with roasted sweet potatoes and sautéed kale for a beautiful, contrast-filled plate!
Chef’s Notes
This recipe has undergone quite the evolution in my kitchen! Initially, I used brown sugar instead of maple syrup. While it was delicious, I find that maple syrup offers a natural sweetness that really complements the salmon’s flavor without overwhelming it. And if there’s anything my cooking journey has taught me, it’s that simple tweaks can yield the most breathtaking results!
One time, I forgot to add the mustard to my glaze—cue panic! I quickly grabbed some balsamic vinegar instead, and let me tell you, the flavor explosion was unexpected but truly delightful! So don’t be afraid to experiment a little; cooking is all about finding what resonates with your palate.
FAQs and Troubleshooting
-
Can I use frozen salmon?
Absolutely! Just ensure it’s fully thawed and patted dry before marinating. If you bake it from frozen, increase the baking time by 5-10 minutes. -
How do I know when the salmon is done?
Perfectly baked salmon should flake easily with a fork and have an internal temperature of around 145°F (63°C). A good meat thermometer can be your best friend in the kitchen! -
What if the glaze burns?
If you notice the glaze starting to burn during baking or broiling, tent the salmon with aluminum foil to shield it from direct heat. -
Can I make the glaze ahead of time?
Absolutely! You can prepare the glaze up to a day in advance and store it in the fridge. Just give it a good whisk before using it.
Nutritional Info
While I don’t provide the exact nutritional information (as I believe in enjoying food in moderation!) I can share that this recipe is a fantastic source of omega-3 fatty acids from the salmon, along with a delightful mix of vitamins and minerals from the glaze ingredients.
Remember, cooking is not just about eating; it’s about enjoying the process, the flavors, and the company you gather. So, tie on that apron, invite over some friends, and enjoy the succulent heights of this Maple Glazed Baked Salmon. You’ve got this!
Let me know how yours turns out, and happy cooking! 🌟
PrintMaple Glazed Baked Salmon
A delightful dish that merges sweet and savory flavors, perfect for busy weeknights or dinner parties.
- Prep Time: 10 minutes
- Cook Time: 20 minutes
- Total Time: 30 minutes
- Yield: 4 servings 1x
- Category: Main Course
- Method: Baking
- Cuisine: American
- Diet: Pescatarian
Ingredients
- 4 salmon fillets
- 1/4 cup pure maple syrup
- 2 tablespoons soy sauce
- 1 tablespoon Dijon mustard
- 1 tablespoon olive oil
- Salt and pepper to taste
- Lemon wedges for serving
Instructions
- Preheat your oven to 375°F (190°C).
- Prepare the baking dish by lightly greasing it with olive oil.
- Mix the maple glaze in a small bowl: whisk together the maple syrup, soy sauce, Dijon mustard, and olive oil.
- Season the salmon fillets with salt and pepper in the greased baking dish.
- Dress the salmon with the glaze, spreading it evenly.
- Bake the salmon for about 15-20 minutes, until it flakes easily with a fork.
- Broil for the last 2-3 minutes for a caramelized top (optional).
- Let it rest before serving.
Notes
For a gluten-free option, substitute soy sauce with tamari. Feel free to experiment with herbs or spices in the glaze.
Nutrition
- Serving Size: 1 fillet
- Calories: 350
- Sugar: 15g
- Sodium: 400mg
- Fat: 12g
- Saturated Fat: 1.5g
- Unsaturated Fat: 10g
- Trans Fat: 0g
- Carbohydrates: 24g
- Fiber: 0g
- Protein: 30g
- Cholesterol: 70mg
Keywords: salmon, maple glaze, easy recipes, baked salmon, weeknight dinner

Skillet Plum Cobbler: 25-Minute One-Pan Weeknight Dessert
Easy Skillet Plum Cobbler: A Sweet Slice of Summer
Hello, fellow food lovers! Today, we’re diving into one of my favorite desserts that never fails to chase the blues away—an Easy Skillet Plum Cobbler. I’ll be sharing all the sweet details of this irresistibly warm, fruity dish that’s perfect for gatherings, quiet family dinners, or simply indulging after a long day. Get ready to impress your loved ones with a dessert that feels fancy but is totally approachable!
Imagine this: it’s a sunny afternoon, and the farmers’ market is bursting at the seams with fresh, ripe plums. The vibrant purples and reds draw you in, and you can’t resist picking up a few pounds. Those juicy beauties scream of summer sweetness and remind you of your childhood spent picking fruit from grandma’s garden. This cobbler is my homage to those cherished memories, and I can’t wait to recreate that nostalgia with you in the kitchen.
A Sweet Memory
I remember the first time I made this Easy Skillet Plum Cobbler. It was a warm Sunday afternoon, and I had just returned home from a family gathering filled with laughter and stories. My grandma used to always whip up something sweet when we visited, but for some reason, that day, I felt inspired to take a leap and create my own version. I gathered my plums, rummaged through the pantry, and started tossing ingredients together, singing along to my favorite tunes while the oven preheated.
With every slice of that sweet, juicy plum and sprinkle of sugar, I felt an echo of my summer days in grandma’s kitchen—baking adventures filled with creativity, flour fights, and, of course, the wonderful aroma of baked fruit wafting through the air. As the cobbler baked, my family gathered around the kitchen island, intrigued by the smell that wrapped around us like a warm hug. Once I pulled it from the skillet, the bubbling juices and golden crust drew everyone in. It was a hit! And in that moment, I realized that food is more than just sustenance; it’s memory-making, and that’s what my cooking journey is all about.
Ingredients
Now, let’s chat about the star players in this scrumptious dish. Here’s what you’ll need:
-
6 cups fresh plums (pitted and sliced): Plums are juicy and tangy, making them perfect for cobbler. If plums are out of season, feel free to substitute with peaches, cherries, or apricots.
-
3/4 cup granulated sugar: This sweetens the fruit and the batter. You can use brown sugar for a richer flavor or coconut sugar for a healthier alternative.
-
1 tablespoon lemon juice: The acidity enhances the flavor of the plums. If you’re out of lemons, a splash of vinegar will work in a pinch.
-
1 teaspoon vanilla extract: This adds depth to the dish. Always opt for pure vanilla extract—it makes a noticeable difference!
-
1 tablespoon cornstarch: Helps thicken the juices from the fruit. If you’re out of cornstarch, you can use arrowroot or even all-purpose flour as a substitute, but cornstarch is the best option for a clear, glossy finish.
-
1 cup all-purpose flour: This is the base for the cobbler batter. For gluten-free options, you can use a gluten-free all-purpose blend.
-
1 cup granulated sugar: This will sweeten the batter. Just like the first sugar measurement, feel free to experiment with different sugars.
-
1 teaspoon baking powder: This helps the cobbler rise and gives it that fluffy texture we crave.
-
1/2 teaspoon salt: Just a pinch enhances all the flavors.
-
1/2 cup (1 stick) unsalted butter, melted: This rich ingredient gives the cobbler its luxurious texture. You can substitute with coconut oil for a dairy-free version.
-
1/2 cup whole milk: This adds moisture. You can swap it out for almond milk or any non-dairy milk if you’re keeping it plant-based.
-
1/2 teaspoon vanilla extract: Extra vanilla means extra flavor—always a good thing!
Step-by-Step Instructions
Now, let’s get cooking! Grab your apron, and let’s dive in.
Step 1: Prepare the Plums
Start by washing your plums thoroughly. Next, cut them in half and remove the pits. Slice the halves into wedges. Toss the sliced plums in a large mixing bowl with 3/4 cup granulated sugar, 1 tablespoon lemon juice, and 1 tablespoon cornstarch. This will create the most gorgeous syrupy base as they marinate while we prepare the batter. Let them sit for about 15-20 minutes, allowing those juicy flavors to meld together.
Step 2: Preheat the Oven and Prepare the Skillet
While the plums are mingling, preheat your oven to 350°F (175°C). Get your skillet ready! I love using a cast iron skillet. It’s not only great for cooking even heat but also looks fantastic when serving. If you don’t have one, any oven-safe skillet or baking dish will do. For extra flavor, add 2 tablespoons of butter to the skillet and place it in the oven to melt. This buttery base adds richness and helps create a beautiful crust.
Step 3: Whisk Together Dry Ingredients
In another bowl, combine 1 cup of flour, 1 cup of granulated sugar, 1 teaspoon of baking powder, and 1/2 teaspoon of salt. Whisk these dry ingredients together until well mixed. This ensures the baking powder is evenly distributed.
Step 4: Combine with Wet Ingredients
In a separate bowl, mix together the 1/2 cup of melted unsalted butter, 1/2 cup of whole milk, and 1/2 teaspoon of vanilla extract. Stir until combined. Then, pour the wet mixture into the bowl with your dry ingredients. Gently stir until just combined—do not overmix! A few lumps are perfectly fine; they will bake out.
Step 5: Assemble the Cobbler
Remove the hot skillet from the oven—careful, it’s hot! Pour the marinated plum mixture into the skillet, spreading them evenly. Now, dollop the batter over the plums. Don’t worry about covering every inch; it’s nice when the fruit peeks through. Use a spatula to gently spread the batter but remember, rustic is the name of the game here!
Step 6: Bake to Perfection
Return the skillet to the oven and bake for 30-35 minutes or until the top is golden brown and a toothpick inserted into the center comes out clean. The plums will bubble around the edges, creating a beautiful, messy presentation that invites everyone to dig in.
Serving Suggestions
Once your Skillet Plum Cobbler is out of the oven and cooled slightly, it’s time to serve! For a touch of elegance, I love to dust it lightly with powdered sugar. Serve it warm with a scoop of vanilla ice cream melting atop the cobbler. The contrast of the warm dessert and the cold ice cream is heavenly!
Recipe Variations
Here are a few fun twists to consider:
- Berry Twist: Mix in a cup of blueberries or raspberries with your plums for a burst of berry flavor!
- Almond Flour Variation: Substitute half the all-purpose flour with almond flour for a nutty flavor and a gluten-free option.
- Spices Galore: Sprinkle in some cinnamon and nutmeg for added warmth—perfect for cozy gatherings.
- Zesty Upgrade: Add a teaspoon of orange zest to the fruit mixture for a citrusy kick.
- Nutty Streusel Topping: Mix together oats, brown sugar, and chopped nuts to create a streusel topping for added texture.
Chef’s Notes
This recipe has evolved in my kitchen over the years. Initially, it was a haphazard assembly of what I had on hand, but each iteration led to this refined yet simple treat. It’s become a staple for summer gatherings and always brings back fond memories of time spent in the kitchen.
A funny story: the first time I brought this dish to a friends’ potluck, I forgot to let it cool slightly. As I served it, the ice cream melted immediately into a delicious but sloppy mixture. Everyone loved it anyway and jokingly called it “cobbler soup!” Sometimes, unexpected mishaps lead to the best laughs, doesn’t it?
FAQs and Troubleshooting
Q: My cobbler turned out gummy. What went wrong?
A: This can happen if the batter is overmixed or if it didn’t bake long enough. Make sure to mix gently and check for doneness with a toothpick.
Q: Can I use frozen plums?
A: Absolutely! Just make sure to thaw and drain excess moisture before using them. They can be a little more watery than fresh fruit.
Q: What if I don’t have a skillet?
A: No worries! You can use any oven-safe baking dish. Just adjust the baking times as needed since it may cook differently.
Q: How can I store leftovers?
A: Store any leftovers in an airtight container in the fridge for up to three days. Reheat in the oven or microwave, making sure to warm it gently so it stays delicious.
Nutritional Info
Though I don’t have precise nutritional information for this recipe at hand, homemade desserts are often best enjoyed in moderation and shared with those you love! You can experiment with healthier substitutes to make it a bit lighter if you’re trying to keep it wholesome.
So there you have it, my friends—a fantastic Easy Skillet Plum Cobbler recipe to brighten your day and dazzle your dinner guests! Be sure to grab your favorite plums and try this delightful dish. I can’t wait to hear how it turns out! Let’s cook with intention and make our tables a little sweeter. Happy baking!
PrintEasy Skillet Plum Cobbler

A warm, fruity dessert that captures the essence of summer, perfect for gatherings or quiet family dinners.
- Prep Time: 20 minutes
- Cook Time: 35 minutes
- Total Time: 55 minutes
- Yield: 8 servings 1x
- Category: Dessert
- Method: Baking
- Cuisine: American
- Diet: Vegetarian
Ingredients
- 6 cups fresh plums (pitted and sliced)
- 3/4 cup granulated sugar
- 1 tablespoon lemon juice
- 1 teaspoon vanilla extract
- 1 tablespoon cornstarch
- 1 cup all-purpose flour
- 1 cup granulated sugar
- 1 teaspoon baking powder
- 1/2 teaspoon salt
- 1/2 cup (1 stick) unsalted butter, melted
- 1/2 cup whole milk
- 1/2 teaspoon vanilla extract
Instructions
- Prepare the plums: Wash, pit, and slice the plums and toss with sugar, lemon juice, and cornstarch.
- Preheat the oven to 350°F (175°C) and prepare the skillet with butter.
- Whisk together the flour, sugar, baking powder, and salt in a bowl.
- Combine the wet ingredients in another bowl and mix into the dry ingredients until just combined.
- Assemble the cobbler in the skillet, spreading the plum mixture and dolloping the batter on top.
- Bake for 30-35 minutes until golden brown and a toothpick comes out clean.
Notes
Serve warm with powdered sugar and a scoop of vanilla ice cream for a heavenly treat.
Nutrition
- Serving Size: 1 serving
- Calories: 350
- Sugar: 24g
- Sodium: 150mg
- Fat: 15g
- Saturated Fat: 9g
- Unsaturated Fat: 5g
- Trans Fat: 0g
- Carbohydrates: 54g
- Fiber: 3g
- Protein: 4g
- Cholesterol: 30mg
Keywords: plum cobbler, summer dessert, easy dessert, fruit cobbler, skillet dessert
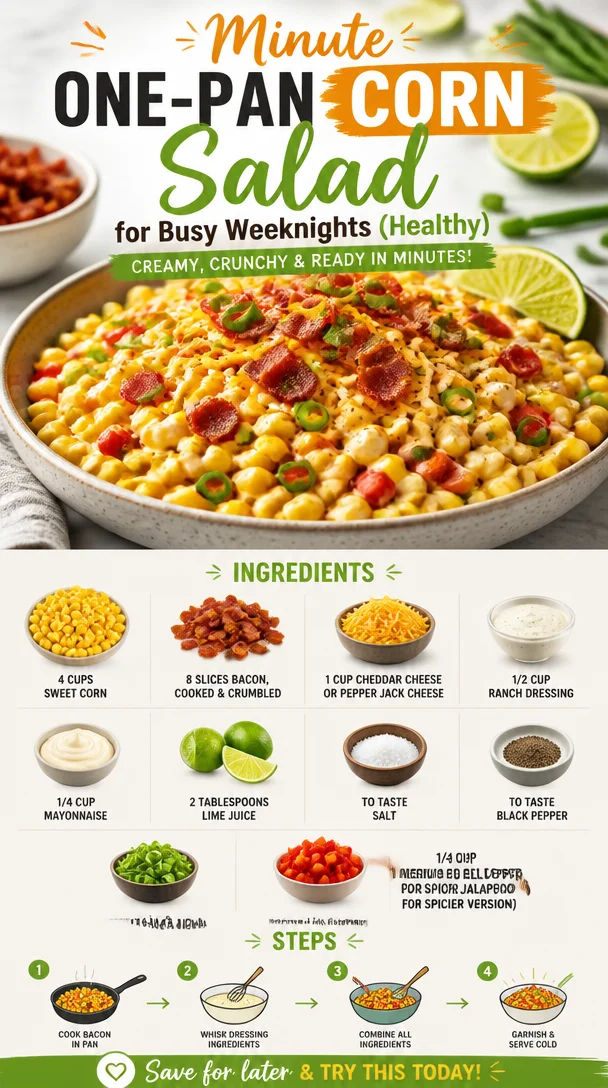
Minute One-Pan Corn Salad for Busy Weeknights (Healthy)
Crack Corn Salad: A Celebration of Summer Flavors
Every summer brings its own set of memories, a tapestry of laughter, sunshine, and the delightful scent of grilling meat wafting through the air. One dish that always manages to steal my heart (and the spotlight at potlucks) is the ever-so-vibrant Crack Corn Salad. It’s colorful, creamy, and absolutely bursting with flavor, which makes it perfect for gatherings or simple family dinners. But what I love most is the story behind it—one that resonates with warm gatherings and good friends.
A Nostalgic Journey
As a child, summers at my grandmother’s house were magical. Her backyard was a verdant paradise with tall corn stalks swaying gently in the breeze. I can still visualize the joyful chaos of family coming together with pots and pans, music playing softly in the background, and laughter echoing from every corner. Among the seemingly endless array of dishes was my grandmother’s famous corn salad — creamy, crunchy, and oh-so-delicious.
This Crack Corn Salad, as we dubbed it, was an essential part of our summer BBQs. I remember sneaking bites while the adults were busy chatting, a little bit of bacon falling over my fingers and cheese sticking to my lips as I savored each spoonful. Every bite transported me back to those carefree days. Today, as I share this recipe with you, I hope it brings a sprinkle of nostalgia and joy to your own table.
Ingredients
Let’s dive into the ingredients! Here’s what you’ll need to create this delightful dish, along with some chef insights to help you personalize it:
-
4 cups sweet corn (fresh, frozen, or canned)
Whether you’re using fresh, sweet corn cut straight off the cob or grabbing frozen during off-seasons, the key here is to ensure it’s dried well if frozen or canned. Sweet corn is the star of this salad, bringing sweetness and crunch! -
8 slices bacon, cooked and crumbled
Bacon adds a delightful smokiness and crisp texture. You can substitute with turkey bacon or crispy chickpeas for a healthier or vegetarian option. -
1 cup cheddar cheese or pepper jack cheese, shredded
Cheese adds a creamy richness; cheddar offers a classic taste while pepper jack brings a lovely hint of spice. Feel free to experiment with your favorite! -
1/2 cup ranch dressing
I recommend store-bought for convenience and consistency, but homemade ranch is always a hit! Plus, you can control the flavors to suit your preference. -
1/4 cup mayonnaise
Adds extra creaminess! Swap it out for Greek yogurt if you’re looking to lighten things up—a great source of protein too! -
2 tablespoons lime juice
Freshly squeezed is highly recommended; it brightens up the salad and enhances all those gorgeous flavors. -
To taste salt
Start with a pinch, and adjust based on the saltiness of your cheese and bacon. -
To taste black pepper
Start light and adjust based on your palate. A bit of pepper can really elevate the dish! -
1/4 cup green onions, sliced
They bring a fresh crunch, but feel free to omit them if you’re not a fan—scallions or chopped chives are also great. -
1 medium red bell pepper, diced
For a pop of color and sweetness. If you’re in the mood for heat, swap this with a jalapeño!
Step-by-Step Instructions
Now, let’s get cooking! Follow these steps to whip up your own Crack Corn Salad:
-
Prep the Ingredients: Whether you’re using fresh corn, bacon, or veggies, the first step is to prepare everything. If you’re using fresh corn, grill or boil it for a few minutes until tender. If frozen or canned, just make sure it’s dried well.
-
Cook the Bacon: In a skillet over medium heat, cook the bacon until crispy. This should take about 5-7 minutes, depending on the thickness. Once done, transfer it to a paper towel-lined plate to drain. Save a bit for garnish!
-
Combine the Core Ingredients: In a large bowl, mix the corn, crumbled bacon, shredded cheese, and diced red bell pepper.
-
Make the Dressing: In a separate bowl, whisk together the ranch dressing, mayonnaise, and lime juice until smooth. This creamy dressing is what ties everything together—don’t skip it!
-
Add Seasonings: Pour the dressing over the corn mixture and sprinkle in salt and pepper. Mix gently until everything is well coated. Remember, you can always add more seasoning later, so start small!
-
Fold in the Greens: It’s time to add the sliced green onions. Gently fold them in, ensuring they’re evenly distributed throughout the salad.
-
Chill & Serve: Cover the salad and let it chill in the fridge for at least 30 minutes. This will allow all those lovely flavors to mingle and develop.
-
Plate It Up: When you’re ready to serve, scoop the salad into a beautiful bowl or a platter, sprinkle a little reserved bacon on top for garnish, and voilà! You’ve got a showstopper on your hands ready to impress.
Serving Suggestions
Crack Corn Salad is best served cold or at room temperature. For a stunning presentation, consider serving it in a beautiful, wide bowl. Garnish it with a sprinkle of fresh herbs or edible flowers if you’re feeling fancy. This dish pairs beautifully with grilled meats, burgers, or as a refreshing side for a picnic.
Recipe Variations
- Southwestern Twist: Add black beans and corn chips for a bit of crunch.
- Mediterranean Style: Swap out the ranch for a yogurt-based dressing and add kalamata olives and minced garlic.
- Fruit Addition: Throw in some diced avocado or fresh diced tomatoes to add sweetness and creaminess—a fantastic summer addition!
- Vegan Version: Replace bacon with smoked tempeh and use dairy-free cheese and yogurt!
Chef’s Notes
Over the years, my Crack Corn Salad has become a canvas for creativity. What started as my grandmother’s simplest recipe evolved into a fan-favorite that I now love to personalize for every gathering. One time, I decided on a whim to add chopped jalapeños for a spicy kick, and it instantly became a hit with my friends! Remember, cooking is all about experimenting. Don’t be afraid to throw in your own flair!
FAQs and Troubleshooting
1. Can I make this salad ahead of time?
Absolutely! It tastes even better the next day as the flavors meld together. Just be sure to give it a good stir before serving.
2. What should I do if the salad seems too dry?
If you find your salad lacking moisture, simply mix in a bit more ranch dressing or a splash of lime juice until you get the desired consistency.
3. Is there a gluten-free version?
Yes! Just ensure that your dressing is gluten-free, and you’re good to go. Most ranch dressings available on the market are naturally gluten-free, but it doesn’t hurt to check.
4. How do I store leftovers?
Store any leftovers in an airtight container in the fridge. Enjoy them within a couple of days for the best flavor.
Creating dishes that bring people together is what I love most about cooking. This Crack Corn Salad is not just a crowd-pleaser; it’s a reminder of those sunny days and shared moments spent around the table. So why not gather your loved ones, whip up this delightful dish, and recreate those memories in your own kitchen? Tie on your apron, pour yourself a sparkling drink, and let the joy of cooking lead the way! Enjoy every bite!
PrintCrack Corn Salad
A colorful and creamy salad bursting with summer flavors, perfect for potlucks and family gatherings.
- Prep Time: 15 minutes
- Cook Time: 10 minutes
- Total Time: 45 minutes
- Yield: 8 servings 1x
- Category: Salad
- Method: Chilling
- Cuisine: American
- Diet: Pescatarian
Ingredients
- 4 cups sweet corn (fresh, frozen, or canned)
- 8 slices bacon, cooked and crumbled
- 1 cup cheddar cheese or pepper jack cheese, shredded
- 1/2 cup ranch dressing
- 1/4 cup mayonnaise
- 2 tablespoons lime juice
- To taste salt
- To taste black pepper
- 1/4 cup green onions, sliced
- 1 medium red bell pepper, diced
Instructions
- Prep the ingredients: Whether using fresh corn, bacon, or veggies, prepare everything. Grill or boil fresh corn for a few minutes until tender.
- Cook the bacon: In a skillet over medium heat, cook the bacon until crispy, about 5-7 minutes. Transfer to a paper towel-lined plate.
- Combine the core ingredients: In a large bowl, mix the corn, crumbled bacon, shredded cheese, and diced red bell pepper.
- Make the dressing: In a separate bowl, whisk together the ranch dressing, mayonnaise, and lime juice until smooth.
- Add seasonings: Pour the dressing over the corn mixture and sprinkle in salt and pepper. Mix gently until well coated.
- Fold in the greens: Add the sliced green onions and gently fold them into the salad.
- Chill & serve: Cover the salad and let it chill in the fridge for at least 30 minutes.
- Plate it up: Serve in a beautiful bowl or platter, garnished with a little reserved bacon.
Notes
Tastes even better the next day as flavors meld together. Feel free to personalize with additional ingredients.
Nutrition
- Serving Size: 1 serving
- Calories: 320
- Sugar: 4g
- Sodium: 600mg
- Fat: 22g
- Saturated Fat: 7g
- Unsaturated Fat: 12g
- Trans Fat: 0g
- Carbohydrates: 28g
- Fiber: 4g
- Protein: 8g
- Cholesterol: 20mg
Keywords: corn salad, summer salad, BBQ side dish, potluck dish
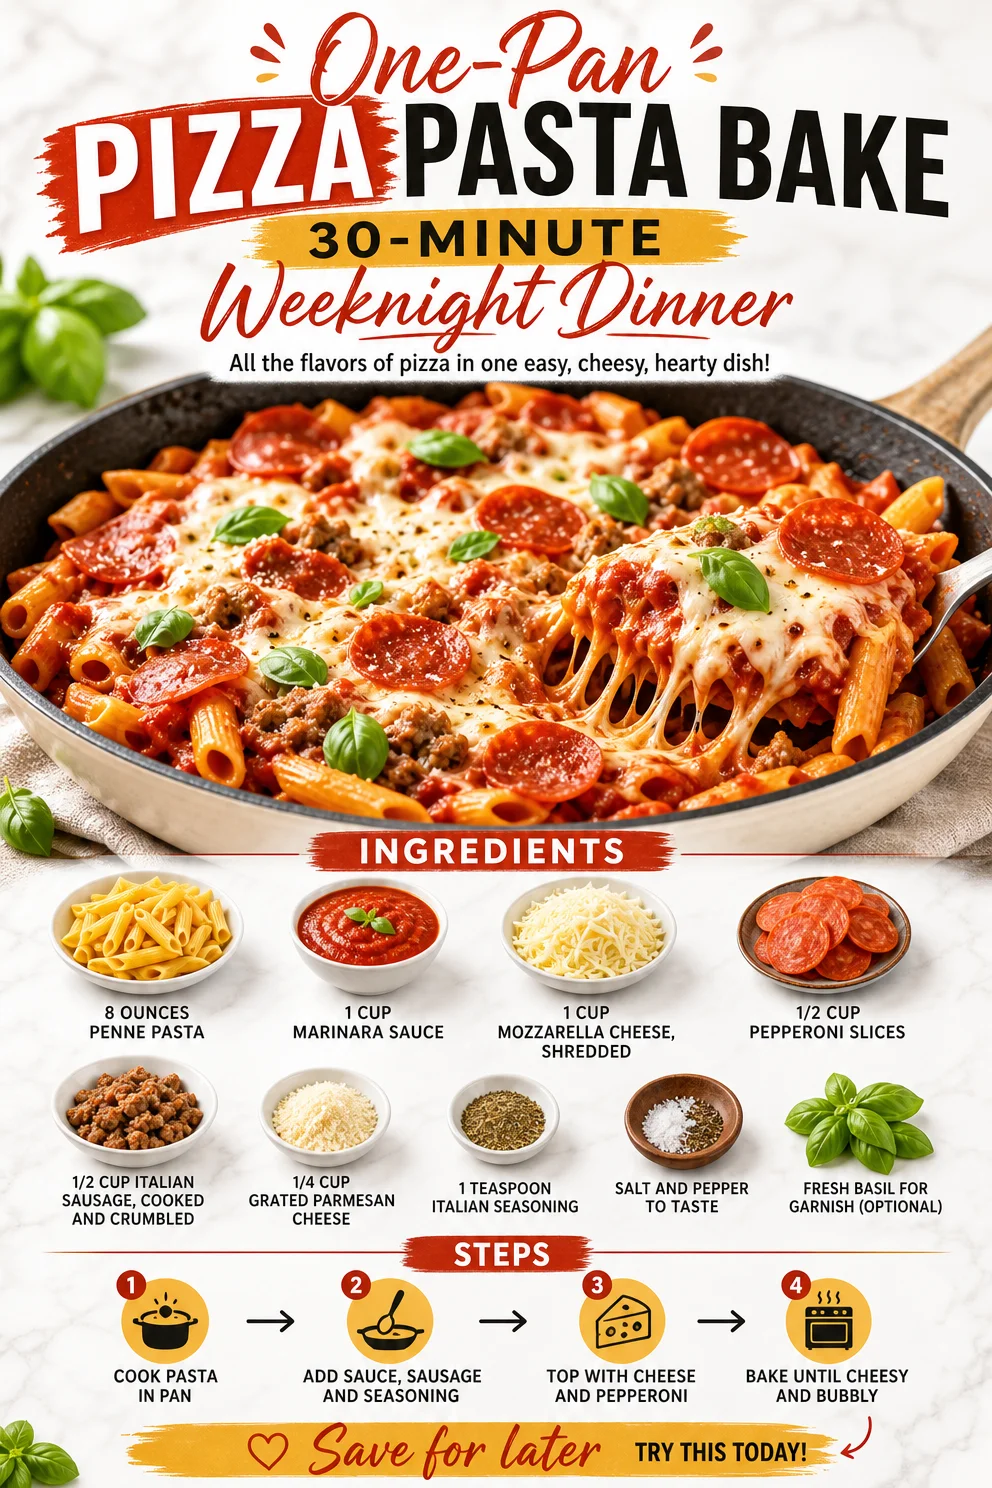
One-Pan Pizza Pasta Bake: 30-Minute Weeknight Dinner
Easy Pizza Pasta Bake: The Ultimate Comfort Dish
Hello, fellow food lovers! If you’re like me, you have those days when you just need something comforting, nostalgic, and satisfying—without having to spend hours slaving away in the kitchen. Enter the Easy Pizza Pasta Bake! This dish combines all the flavors of your favorite pizza with the hearty goodness of pasta, making it perfect for busy weeknights or low-key gatherings with friends. So, grab your apron, and let’s dive into this delicious recipe that’s sure to become a family favorite!
A Slice of My Kitchen History
Let me take you back to a whimsical evening in my childhood kitchen. The aroma of bubbling marinara sauce filled the air as my mom prepared dinner. It was pizza night, and all my friends were coming over. Remember those carefree days when everyone gathered around the table, laughing, sharing stories, and, of course, indulging in delicious food? Those memories are some of the best, and they inspired me to create this Easy Pizza Pasta Bake.
While we usually made traditional pizzas, I always loved the idea of throwing everything into a baking dish and letting the oven do the magic. One time, my mom caught me attempting to recreate a pizza with the random mix of ingredients I could find—think leftover pasta, a jar of marinara, and a handful of cheese. The result was surprisingly delicious! It became a regular in our home, a dish of creativity born from the playful spirit of a child looking to mix things up. Now, I’m thrilled to share this comfort food with you!
Ingredients
Here’s what you’ll need for this delightful pizza pasta bake:
-
8 ounces penne pasta
- This pasta shape holds onto the sauce perfectly, but you can swap it with rotini, fusilli, or even spaghetti if you have it on hand.
-
1 cup marinara sauce
- Use store-bought for convenience or whip up a quick homemade version if you’re feeling adventurous—with crushed tomatoes, garlic, onion, and a sprinkle of herbs!
-
1 cup mozzarella cheese, shredded
- Who doesn’t love gooey cheese? If you want a little kick, try using pepper jack or a blend of Italian cheeses.
-
1/2 cup pepperoni slices
- Feel free to mix in your favorite toppings! I sometimes use turkey pepperoni for a lighter option or diced bell peppers for veggies.
-
1/2 cup Italian sausage, cooked and crumbled
- If you prefer to keep it meat-free, try adding mushrooms or eggplant for that meaty texture. Use plant-based sausage if you’re going vegan.
-
1/4 cup grated Parmesan cheese
- Not only does it add depth, but don’t hesitate to replace it with Pecorino Romano for a saltier bite.
-
1 teaspoon Italian seasoning
- This blend truly captures that pizza flavor, but you can substitute with oregano, basil, and thyme if you have them separately.
-
Salt and pepper to taste
- Always taste as you go! Adjust seasoning according to your palate.
-
Fresh basil for garnish (optional)
- Nothing beats fresh basil on top—it elevates the dish both visually and in flavor. You can also use parsley or arugula for a different flair.
Step-by-Step Instructions
Step 1: Preheat Your Oven
Start by preheating your oven to 350°F (175°C). This ensures your pizza pasta bake gets nice and bubbly in the oven!
Step 2: Cook the Pasta
In a large pot of boiling salted water, cook the penne pasta until it’s al dente, following package instructions (usually about 8-10 minutes). Remember, the pasta will continue to cook in the oven, so don’t overdo it! Drain and set aside.
Step 3: Mix Your Ingredients
In a large mixing bowl, combine the cooked pasta, marinara sauce, mozzarella cheese (save a handful for topping!), pepperoni, Italian sausage, Parmesan, Italian seasoning, and a pinch of salt and pepper. Stir everything together until well-coated—this is where the magic begins! It’s like a flavor fiesta in a bowl.
Step 4: Transfer to Baking Dish
Now, pour the mixture into a greased 9×13-inch baking dish. Use a spatula to spread it evenly. This is your canvas, so make sure every bit of that cheesy goodness is perfectly nestled in.
Step 5: Add the Last Touches
Sprinkle the remaining mozzarella cheese over the top. This layer will melt into a glorious, bubbly crown while baking—who can resist that?
Step 6: Bake
Pop it in the oven and let it bake for about 25-30 minutes, or until the cheese is bubbly and starting to brown. If you want that extra crunch, set the oven to broil for the last 2-3 minutes (but keep an eye on it to avoid burning!).
Step 7: Let It Cool
Once it’s out of the oven, let it sit for a few minutes. I know it’s hard to resist diving in—trust me! Giving it a moment allows the flavors to settle and makes it easier to serve.
Serving Suggestions
Scoop generous portions onto plates and garnish with fresh basil for an authentic pizzeria feel. Serve with a side of garlic bread and a fresh green salad for a complete meal. It’s casual yet elegant enough for those impromptu dinner gatherings!
Recipe Variations
-
Veggie Delight: Swap out the meats for a medley of your favorite vegetables—think mushrooms, bell peppers, and spinach.
-
Spicy Kick: Add red pepper flakes or some sliced jalapeños for a spicy twist.
-
BBQ Chicken: Replace the marinara with barbecue sauce and add shredded chicken for a twist on a classic BBQ pizza.
-
Mushroom and Spinach: Sauté mushrooms and spinach and mix them into the pasta for an earthy flavor.
-
Herbed Crust: Sprinkle some garlic powder and Italian herbs on the top layer of cheese for an extra flavor boost.
Chef’s Notes
This recipe has transformed in my kitchen over the years. Originally, it was a simple mixture of pasta and cheese, but as I discovered more flavors and ingredients, it evolved into this delicious pizza pasta bake that everyone loves. One-time, I had a surprise guest—a neighbor who dropped by unannounced—and I whipped this dish up in under an hour. They’re now a regular at my dinner table!
FAQs and Troubleshooting
Q: Can I make this ahead of time?
A: Absolutely! Assemble the dish in advance and store it in the fridge. When you’re ready to bake, just add a few extra minutes to the cooking time since it will be cold.
Q: My pasta came out mushy. What did I do wrong?
A: Overcooking the pasta before baking is the most common culprit. Always aim for al dente, as it will soak up some sauce and cook more in the oven.
Q: Can I freeze this dish?
A: Yes! Just cover tightly before freezing. When you’re ready to enjoy it, thaw in the fridge overnight before baking.
Q: What if I don’t have marinara?
A: No worries! Any tomato-based sauce will work. You can even use pesto for a unique flavor twist!
Nutritional Info (Optional)
While this dish is indulgent, it also packs in some nutrition! With the addition of Italian sausage and fresh basil, you get protein and antioxidants. For a healthier option, swap out regular pasta for whole wheat or lentil-based options, and load up your favorite veggies.
Now that you’ve got all the details, I can’t wait for you to try this Easy Pizza Pasta Bake! Remember, cooking should feel effortless and fun. So, gather your loved ones, tie on that apron, and let’s create those beautiful moments around the table together. Enjoy!
PrintEasy Pizza Pasta Bake
A comforting dish that combines the flavors of pizza with hearty pasta—ideal for busy weeknights and gatherings.
- Prep Time: 15 minutes
- Cook Time: 30 minutes
- Total Time: 45 minutes
- Yield: 4 servings 1x
- Category: Main Course
- Method: Baking
- Cuisine: Italian
- Diet: Vegetarian
Ingredients
- 8 ounces penne pasta
- 1 cup marinara sauce
- 1 cup mozzarella cheese, shredded
- 1/2 cup pepperoni slices
- 1/2 cup Italian sausage, cooked and crumbled
- 1/4 cup grated Parmesan cheese
- 1 teaspoon Italian seasoning
- Salt and pepper to taste
- Fresh basil for garnish (optional)
Instructions
- Preheat your oven to 350°F (175°C).
- Cook the penne pasta until al dente, about 8-10 minutes. Drain and set aside.
- Mix the cooked pasta with marinara sauce, mozzarella (reserve some for topping!), pepperoni, Italian sausage, Parmesan, Italian seasoning, and a pinch of salt and pepper.
- Transfer the mixture to a greased 9×13-inch baking dish and spread evenly.
- Add the remaining mozzarella cheese on top.
- Bake for about 25-30 minutes, until cheese is bubbly. Broil for an extra 2-3 minutes for a crunchy top.
- Let it cool for a few minutes before serving.
Notes
Can be assembled ahead of time and stored in the fridge. Adjust the cooking time if baking from cold. Freezable for later use.
Nutrition
- Serving Size: 1 serving
- Calories: 350
- Sugar: 5g
- Sodium: 400mg
- Fat: 12g
- Saturated Fat: 4g
- Unsaturated Fat: 6g
- Trans Fat: 0g
- Carbohydrates: 45g
- Fiber: 3g
- Protein: 15g
- Cholesterol: 30mg
Keywords: pizza, pasta, bake, comfort food, Italian