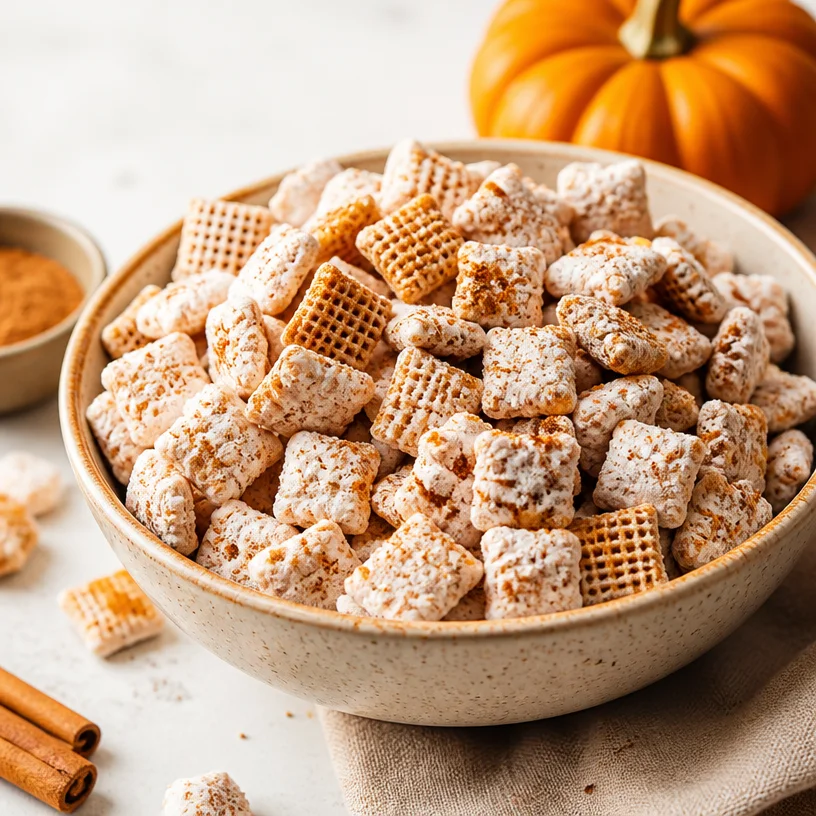
Fall Pumpkin Spice Puppy Chow: 15-Minute No-Bake Treat
Embrace the Cozy Vibes with Pumpkin Spice Puppy Chow
Hello, fellow food lovers! If you’re anything like me, the onset of autumn sparks a joyful transition in the kitchen. Leaves begin to change, the air gets crisper, and suddenly, every recipe calls for pumpkin spice. Today, I’m sharing a delightful treat that captures all of those cozy flavors in a fun and sweet way: Pumpkin Spice Puppy Chow!
Imagine a blend of crunchy Chex cereal coated in creamy white chocolate with the warm, inviting essence of pumpkin spice. It’s a snack that is perfect for those cozy nights in, festive gatherings, or even just as a little treat for yourself while you cuddle under a blanket with your favorite book. Puppy Chow, also known as Muddy Buddies, has long been a staple in my treat repertoire, and adding that pumpkin spice twist takes it to a whole new level of deliciousness!
So grab your apron and let’s dive into this easy and fun fall recipe, designed to impress everyone from family to friends—yes, even that neighbor you keep meaning to invite over for coffee!
My Pumpkin Spice Story
Back in college, I hosted a pumpkin-themed dinner party every year when the leaves began to turn. I’d invite friends over, and we’d share everything from pumpkin soup to pumpkin pie, creating an evening of warmth and laughter. One year, after making a more traditional dessert, I had a sudden urge to try something different. That’s when I whipped up a batch of Puppy Chow and tossed in some pumpkin spice just for fun.
As my friends gathered around the table, they couldn’t get enough of this sweet, crunchy, and subtly spiced snack. The laughter, delicious bites, and cozy atmosphere made it a memory I cherish to this day. The simplicity of Puppy Chow mixed with the lovely warmth of the season was a hit! I like to think of that night as my jump into culinary creativity, where all it took was a little imagination—and a sprinkle of pumpkin spice—to delight everyone.
Let’s create some of that magic in your kitchen!
Ingredients
Gathering quality ingredients is key to making this recipe truly shine.
-
Chex Cereal:
- Use the original rice or corn Chex for that perfect crunch. These cereals are gluten-free, making them an excellent choice for anyone with dietary restrictions. Feel free to swap with any crunchy cereal you love!
-
White Chocolate Chips:
- A rich and creamy base for your Puppy Chow. Look for quality white chocolate for the best flavor. If you’re feeling adventurous, you can swap with dark chocolate or even caramel chips for a different twist!
-
Pumpkin Spice:
- This magical blend typically includes cinnamon, nutmeg, ginger, and allspice. You can make your own at home or buy a pre-made mix. If you want to get creative, consider a blend of your own favorite spices like cardamom or all spice!
-
Powdered Sugar:
- This serves as the “snow” coating for your puppy chow. It gives that sweet touch and helps to seal in the flavor. No substitutions for this one—powdered sugar is key!
-
Vanilla Extract:
- Just a splash elevates the flavor profile, rounding out the sweetness. Homemade vanilla extract works wonders, or use a good quality store-bought option.
-
Sea Salt (Optional):
- Just a sprinkle at the end can enhance the sweetness and create a wonderful contrast in flavors. It’s not necessary, but I personally love the balance it brings!
Step-by-Step Instructions
Now that we have our ingredients ready, let’s get to the good stuff—the cooking!
-
Prep Your Workspace:
- First, clear some counter space and gather all your tools: a microwave-safe bowl, a large mixing bowl, a spatula, and a baking sheet lined with parchment paper.
-
Melt the White Chocolate:
- In a microwave-safe bowl, add the white chocolate chips. Microwave them on high power for 30-second intervals, stirring well between each, until they’re completely melted and smooth. Keep an eye on it; you don’t want to overheat the chocolate!
-
Add Pumpkin Spice and Vanilla:
- Once melted, stir in the pumpkin spice and vanilla extract until fully combined. This is where the magic happens! The warm aroma is sure to get your taste buds tingling.
-
Coat the Chex Cereal:
- Place your Chex cereal in a large mixing bowl. Pour the melted white chocolate mixture over the cereal. Using a spatula, gently fold the cereal until it’s evenly coated. Be careful not to crush the cereal; you want those lovely little squares to stay intact!
-
Add the Powdered Sugar:
- Transfer the coated Chex to a large plastic bag (or sprinkle directly into the mixing bowl if you prefer). Add the powdered sugar and seal the bag, shaking gently until all the cereal pieces are coated. If you used a mixing bowl, sprinkle the sugar generously over the mixture and fold until well-coated.
-
Spread and Cool:
- Pour the Puppy Chow mixture onto your lined baking sheet in an even layer to cool. This step helps to prevent clumping.
-
Let it Set:
- Allow it to sit for about 30 minutes. The coating will firm up, making it delightfully crispy and crunchy!
-
Serve and Enjoy:
- Once it’s ready, feel free to serve right away or store it in an airtight container for up to a week. Just don’t be surprised if your friends and family devour it all in one night!
Serving Suggestions
To make your Pumpkin Spice Puppy Chow truly festive, consider serving it in small clear bags tied with twine or in decorative bowls at a gathering. For an extra touch, sprinkle a little sea salt on top before serving or dust with extra powdered sugar to give it that lovely snowy effect. It makes a gorgeous centerpiece for any fall-themed table!
Recipe Variations
Feeling adventurous? Here are a few delightful twists to try with your Puppy Chow:
- Nutty Addition: Toss in some chopped pecans or walnuts for a crunchy element that pairs perfectly with the pumpkin spice.
- Chocolate Drizzle: After coating, drizzle some melted dark or milk chocolate over the finished product for a richer taste.
- Dried Fruit: Mix in some dried cranberries or raisins for a chewy texture and a hint of tartness to balance the sweetness.
- Different Spices: Swap the pumpkin spice for chai spice or cinnamon sugar for a different flavor profile that still embraces warmth!
- Vegan Option: Use dairy-free chocolate chips and plant-based butter to create a vegan-friendly version without losing any deliciousness!
Chef’s Notes
Creating Puppy Chow has always been a light-hearted joy for me. I remember one particular holiday season when I tried to make a double batch for a gathering but accidentally doubled the pumpkin spice instead of the chocolate! The result was a wonderfully strong flavor that—surprisingly—everyone loved! It had a kick to it that made it unique and memorable.
From that point on, I embraced the idea of experimenting and letting a bit of joy and whimsy enter my recipes. The kitchen is all about exploration, and it’s okay to have a few happy accidents along the way.
FAQs and Troubleshooting
1. Why did my Puppy Chow clump together?
If you find your Puppy Chow has clumped together, it might be because the chocolate wasn’t cooled enough when mixed or wasn’t evenly coated. Be sure to cool it slightly before mixing and ensure the powdered sugar fully coats the cereal!
2. Can I make this ahead of time?
Absolutely! Puppy Chow can be made up to a week in advance. Just store it in an airtight container at room temperature, and it’ll stay fresh and delicious!
3. What can I use if I don’t have powdered sugar?
You can make your own powdered sugar by blending regular granulated sugar in a blender or food processor until it’s super fine. It will work just as well!
4. Can I use different types of cereal?
Definitely! While Chex is traditional, you could use any similar crisp cereal, like Crispix, or even granola for a fun texture. Just keep in mind that different cereals absorb chocolate differently, so you might need to adjust the quantities a bit.
Nutritional Info
Per serving (about 1/4 cup):
- Calories: 190
- Total Fat: 9g
- Saturated Fat: 5g
- Carbohydrates: 28g
- Sugars: 12g
- Protein: 1g
So there you have it! A simple and fun recipe for Pumpkin Spice Puppy Chow that’s perfect for bringing warmth and joy into your autumn gatherings. Grab your apron, embrace those cozy vibes, and let’s create some delightful memories together in the kitchen. Happy snacking!
PrintPumpkin Spice Puppy Chow
A cozy and delightful twist on the classic Puppy Chow, combining crunchy cereal with creamy white chocolate and warm pumpkin spice for a perfect autumn treat.
- Prep Time: 10 minutes
- Cook Time: 5 minutes
- Total Time: 45 minutes
- Yield: 8 servings 1x
- Category: Snack
- Method: No-Cook
- Cuisine: American
- Diet: Vegetarian
Ingredients
- 4 cups Chex cereal (rice or corn)
- 2 cups white chocolate chips
- 2 teaspoons pumpkin spice
- 1 cup powdered sugar
- 1 teaspoon vanilla extract
- Sea salt (optional)
Instructions
- Prep your workspace by gathering all your tools: a microwave-safe bowl, a large mixing bowl, a spatula, and a baking sheet lined with parchment paper.
- Melt the white chocolate chips in a microwave-safe bowl, using high power for 30-second intervals, stirring between each, until completely melted and smooth.
- Add the pumpkin spice and vanilla extract to the melted chocolate and stir until fully combined.
- Coat the Chex cereal in a large mixing bowl by pouring the melted white chocolate over it, gently folding until evenly coated.
- Add the powdered sugar to the coated cereal, sealing it in a large plastic bag and shaking gently until all pieces are coated, or sprinkle directly in the mixing bowl.
- Spread the Puppy Chow mixture onto your lined baking sheet in an even layer to cool.
- Let it sit for about 30 minutes until the coating firms up.
- Serve and enjoy immediately or store in an airtight container for up to a week.
Notes
Consider packaging in small clear bags for gifting or serving in decorative bowls at gatherings. Top with a sprinkle of sea salt for added flavor.
Nutrition
- Serving Size: 1/4 cup
- Calories: 190
- Sugar: 12g
- Sodium: 50mg
- Fat: 9g
- Saturated Fat: 5g
- Unsaturated Fat: 4g
- Trans Fat: 0g
- Carbohydrates: 28g
- Fiber: 1g
- Protein: 1g
- Cholesterol: 0mg
Keywords: Pumpkin Spice, Puppy Chow, Snack, Autumn Treat, Easy Recipe
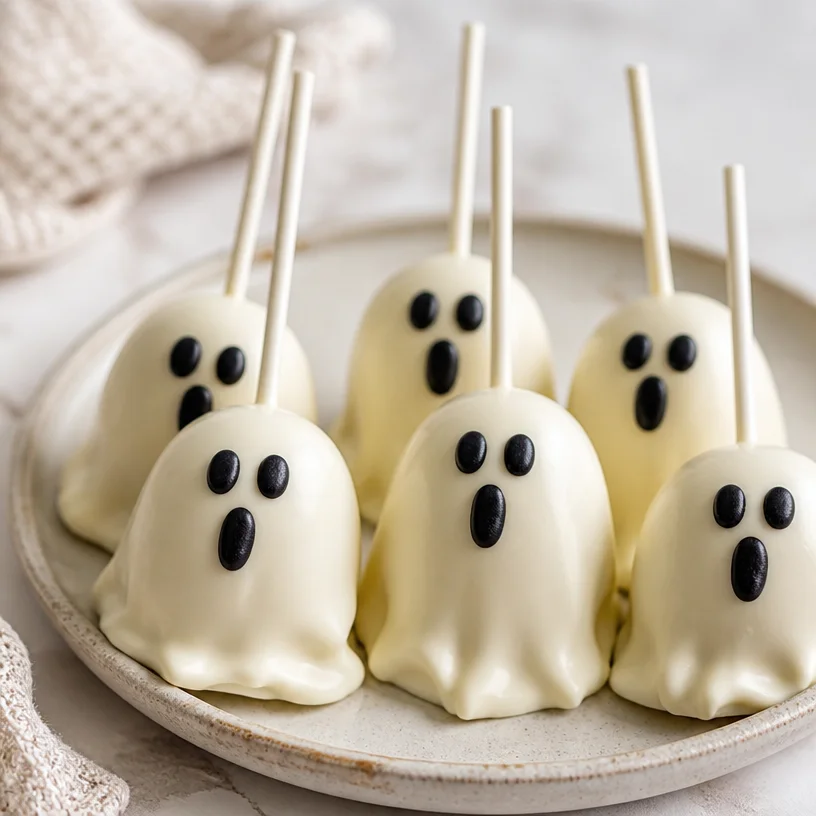
Spooky Ghost Marshmallow Pops: Quick Halloween Treats
Ghost Marshmallow Pops: A Sweet Treat for Spooky Nights
Welcome, my fellow foodies! I’m so excited to have you here, baking your way into the spirit of Halloween with a treat that’s not only delicious but also a fun, festive activity for everyone. Today, we’ll be diving into the delightfully spooky world of Ghost Marshmallow Pops. These whimsically adorable treats are perfect for Halloween parties, school bake sales, or even cozy nights in with a good movie and a warm blanket. Grab your apron, and let’s get started!
Creating these little ghostly delights is extremely simple, allowing you to channel your inner child while simultaneously impressing guests with your culinary creativity. The beautiful thing about these pops is their versatility — they can be as simple or as fancy as you like! Plus, they’re so much fun to make that you can easily involve the kiddos for a thrilling family bonding experience. Are you ready? Let’s whip up some Ghost Marshmallow Pops and create a treat that will haunt your friends and family in the best way possible!
A Sweet Memory from the Past
As I stand here mixing up those creamy white chocolate and setting marshmallows on skewers, I can’t help but recall a delightful Halloween from my childhood. My friends and I gathered at my house, which, of course, was transformed into a haunted mansion. We decorated cupcakes and whipped up all kinds of spooky snacks. I remember one particular moment vividly; my mom brought out these cute marshmallow pops she had decorated to resemble little ghosts. Every bite was a delightful combination of sweet marshmallow and rich chocolate, and I remember giddy laughter filling the room. It was moments like these that sparked my love for cooking and entertaining.
Now, every Halloween, I try to rekindle that same spirit and charm by making Ghost Marshmallow Pops. Each bite is not just a treat; it’s a memory wrapped in flavor! Whether you’re planning a big Halloween bash or just want to add a sprinkle of fun to your family dinner, these pops are sure to do the trick.
Ingredients
Here’s what you’ll need to conjure up these ghostly delights:
-
Marshmallows:
- The star of the show! Look for nice, fluffy marshmallows (regular size works best). You can also swap them for mini marshmallows if you prefer smaller ghosts or want to make a variety.
-
White Chocolate:
- Use high-quality white chocolate chips or melts for an easy melt-and-dip. If you’re feeling adventurous, you can substitute with white chocolate almond bark. Just remember, the smoother the chocolate, the easier the dipping!
-
Black Icing or Chocolate (for eyes):
- This is where the personality of your ghosts comes to life! You can use store-bought black icing in a tube for precision, or have fun tempering some dark chocolate and dabbing on little dots for eyes. Feel free to get creative! Mini chocolate chips or edible eyes work too.
-
Lollipop Sticks or Skewers:
- These are essential for turning our marshmallows into pops! Lollipop sticks give a more professional look, but wooden skewers work just fine too. If you want to keep things simple, you can also skip the stick and just leave the marshmallows as sweet little bites.
Step-by-Step Instructions
Now, let’s get down to the fun part — making our Ghost Marshmallow Pops! Here’s a detailed guide to ensure you nail it:
-
Prep Your Workspace:
- Before you dive into melting chocolate, clear off a space in the kitchen, and gather all your ingredients. Lay down some parchment paper on a baking sheet for your completed pops. This will help prevent sticking!
-
Melt the White Chocolate:
- In a microwave-safe bowl, add your white chocolate. Heat in 30-second intervals, stirring in between until the chocolate is completely melted and smooth. Make sure not to overheat, as this can cause the chocolate to seize.
-
Skewer the Marshmallows:
- Take your lollipop sticks or skewers and gently insert them into the marshmallows, about halfway through. They should stand up straight and not wobble much. This process is simple, but take your time — you don’t want to push too hard and break the marshmallow.
-
Dip the Marshmallows:
- Holding the skewer, dip each marshmallow into the melted white chocolate, letting the excess drip off. You want a nice, even coating. If you’d like a thicker layer, you can dip them twice after the first layer has cooled for a minute.
-
Set on Parchment:
- Place the dipped marshmallows onto your parchment-lined baking sheet. This is your time to get artistic — feel free to twirl or tilt the marshmallows as you go to create a ghostly swirl shape!
-
Add the Eyes:
- While the chocolate is still soft, take your black icing or melted chocolate and carefully dot two little eyes onto each ghost. They don’t have to be perfect; a little irregularity makes them more charming and fun!
-
Let Them Set:
- Allow your Ghost Marshmallow Pops to set at room temperature, or you can speed up the process by placing them in the refrigerator for about 10-15 minutes until the chocolate hardens.
-
Enjoy!
- Serve these pops at your next gathering, or simply enjoy them yourself while watching your favorite Halloween movie. Treat yourself to an adorable sculptural snack!
Serving Suggestions
To plate your Ghost Marshmallow Pops, stick them in a simple mason jar filled with festive candies or popcorn for a charming centerpiece at your Halloween party. Alternatively, you can lean them against each other on a decorative platter for a spooky display. Either way, a little sprinkle of edible glitter or Halloween-themed confetti will add the finishing touch to your spooky treats!
Recipe Variations
If you’d like to shake things up, here are a few creative twists and variations for your Ghost Marshmallow Pops:
-
Drizzle of Chocolate:
- After dipping in white chocolate, you can drizzle dark chocolate or orange-colored candy melts over the top for a fun contrast.
-
Flavored Marshmallows:
- Try using flavored marshmallows, such as pumpkin spice or chocolate mint, for a different taste twist!
-
Sprinkle Toppings:
- While the chocolate is still wet, try sprinkling some crushed graham crackers, candy corn, or festive sprinkles on top for added texture and flavor.
-
Fruit-based Pops:
- Want a healthier approach? Dip ripe strawberries in white chocolate and decorate with chocolate eyes instead. These little guys would make for a ghostly fruit display!
-
Vegan Version:
- Swap regular marshmallows for vegan marshmallows and use dairy-free chocolate instead. This way, everyone can enjoy a spooky treat!
Chef’s Notes
These Ghost Marshmallow Pops are a fantastic way to get creative and have fun in the kitchen, and I love watching everyone’s eyes light up when they see what you’ve made. They’ve evolved over the years from simple marshmallows dipped in chocolate to now becoming a mini canvas for culinary expression!
One funny kitchen story that comes to mind involves my dog, Charlie, who decided that he was the real ghost of the kitchen one Halloween. While I was getting ready to dip my marshmallows, he snuck onto the counter and helped himself to a few marshmallows! It was hilarious, and while I couldn’t be mad at him, I made sure to keep a watchful eye during future baking endeavors.
FAQs and Troubleshooting
1. What should I do if my chocolate seizes?
- If your chocolate seizes, don’t panic! Try adding a teaspoon of vegetable oil or shortening to the bowl and reheat gently while stirring. This should bring it back to a smoother consistency.
2. Can I use flavorings in the melted chocolate?
- Absolutely! Feel free to add a few drops of extract, like vanilla or almond, to enhance the flavor of your chocolate. Just be sure to use oil-based extracts if you’re melting chocolate, as water can cause it to seize.
3. What’s the best way to store leftovers?
- Store your pops in an airtight container at room temperature. They should last for 3-5 days. If you need to refrigerate them, be sure to separate layers with parchment to keep them from sticking.
4. Can I make these ahead of time?
- Yes! These Ghost Marshmallow Pops can be made a day in advance. Just make sure to keep them in a cool, dry place to prevent the chocolate from melting.
Nutritional Info (Optional)
For those interested in the nutritional aspect, each Ghost Marshmallow Pop contains approximately:
- Calories: 100
- Fat: 5g
- Carbohydrates: 15g
- Protein: 1g
However, keep in mind that this is an estimate based on the ingredients used.
So, there you have it! A delightfully spooky recipe that’s as fun to make as it is to eat. I hope you feel encouraged to tie on your apron, indulge in a little kitchen adventure, and perhaps even relive some of those special moments like I do every Halloween. Here’s to creating cherished memories with food and friends — one Ghost Marshmallow Pop at a time! Happy haunting!
PrintGhost Marshmallow Pops

Delicious and whimsical Ghost Marshmallow Pops perfect for Halloween celebrations.
- Prep Time: 15 minutes
- Cook Time: 5 minutes
- Total Time: 20 minutes
- Yield: 12 servings
- Category: Dessert
- Method: Dipping
- Cuisine: American
- Diet: Vegetarian
Ingredients
- Marshmallows (regular or mini)
- White chocolate chips or melts
- Black icing or chocolate (for eyes)
- Lollipop sticks or wooden skewers
Instructions
- Prep your workspace: Clear off a space in the kitchen, and gather all your ingredients. Lay down some parchment paper on a baking sheet.
- Melt the white chocolate in a microwave-safe bowl by heating in 30-second intervals, stirring until smooth.
- Skewer the marshmallows by inserting lollipop sticks or skewers halfway through them.
- Dip the marshmallows into the melted white chocolate, letting excess drip off.
- Set the dipped marshmallows on a parchment-lined baking sheet.
- Add the eyes with black icing or melted chocolate while the chocolate is still soft.
- Let them set at room temperature or refrigerate for about 10-15 minutes until chocolate hardens.
- Enjoy! Serve and enjoy these spooky treats, or decorate them for a festive display.
Notes
These pops can be made a day in advance. Store in an airtight container.
Nutrition
- Serving Size: 1 pop
- Calories: 100
- Sugar: 15g
- Sodium: 20mg
- Fat: 5g
- Saturated Fat: 3g
- Unsaturated Fat: 2g
- Trans Fat: 0g
- Carbohydrates: 15g
- Fiber: 0g
- Protein: 1g
- Cholesterol: 0mg
Keywords: Halloween, dessert, marshmallow, treats, spooky snacks, family fun
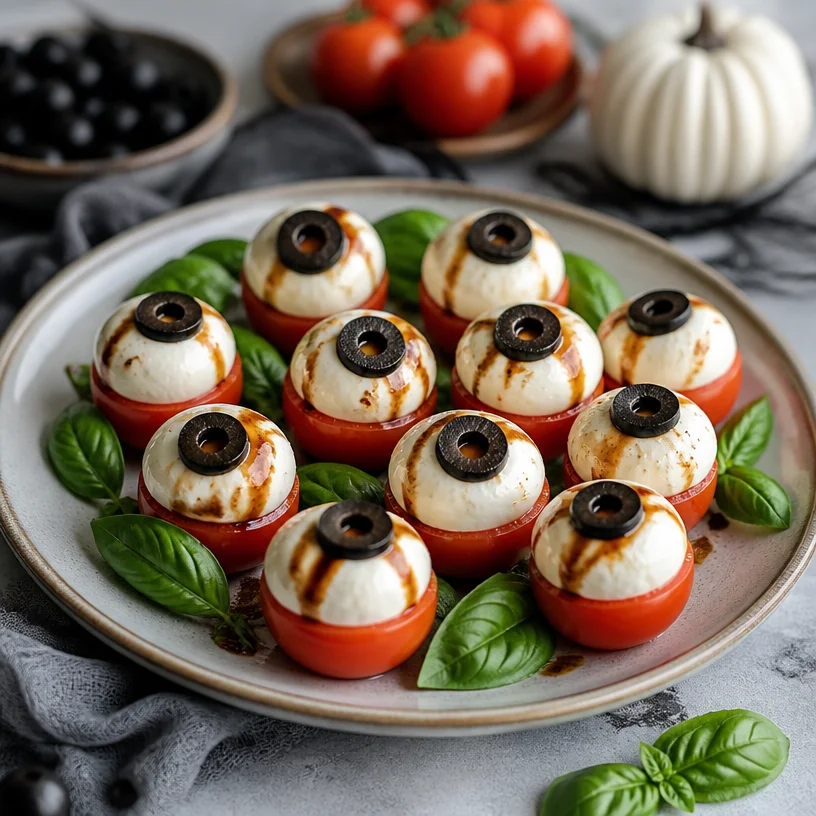
Spooky Eyeball Caprese Bites for Halloween Parties
Eyeball Caprese Bites: A Spook-tacular Twist on an Italian Classic
Hello, lovely friends! As the days shorten and the air grows crisp, the excitement of autumn begins to take hold. One thing I adore about this season is the playful spirit it brings, especially with gatherings—whether spooky Halloween parties or cozy fall dinners. Today, I’m thrilled to share a fun and spooky twist on a classic appetizer that will not only impress your guests but also spark a conversation or two. Are you ready for Eyeball Caprese Bites? These delightful little morsels combine the elegance of traditional Caprese salad with a fun, eerie aesthetic that’s perfect for your next gathering!
A Bite of Nostalgia
Let me take you back to my childhood for a moment. I remember the excitement that swirled around our kitchen every Halloween. My mother was a magician in her own right, transforming ordinary dishes into whimsical delights. I can still see her rolling up her sleeves, her apron dusted with flour, and turning basic ingredients into creepy creations. One year, she made “witches’ fingers” with green bell peppers and almond slices, and I was utterly captivated.
But it was her play with flavors—like the fresh mozzarella, juicy tomatoes, and vibrant basil of Caprese salad—that truly inspired me. I’ve always loved how food can evoke memories and bring people together. So, when I was contemplating a festive dish that encapsulated those heartfelt moments, Eyeball Caprese Bites leaped to mind. This fun take not only looks captivating but also packs a punch of deliciousness. So let’s dive in, shall we?
Ingredients
Here’s what you’ll need to bring these delightful eyeball bites to life:
-
Cherry Tomatoes
Beautifully juicy, cherry tomatoes are perfect for this recipe. Choose a mix of red, yellow, or even heirloom varieties for added color! If you can’t find cherry tomatoes, grape tomatoes can be a fine substitute. Just make sure they’re firm and ripe. -
Fresh Mozzarella Balls (Bocconcini or Ciliegine)
These little gems are creamy and rich, making them the star of the show. They come in various sizes, but for this recipe, go for the smaller ones, about the size of the cherry tomatoes. If you’re looking for a dairy-free option, try marinated tofu or cashew cheese for a similar texture. -
Black Olives
They add the perfect touch of a "pupil" to our eyeballs! You can use kalamata olives or any black olives you prefer. For a twist, consider using green olives for a different flavor profile. Just ensure they’re pitted before use—no one wants an unwelcome surprise when biting into these. -
Fresh Basil Leaves
Basil adds that quintessential Italian flavor we love in Caprese. Look for vibrant green leaves, and if you want to add a little fun, consider using basil-flavored vegan cream cheese for a unique spin.
Step-by-Step Instructions
Now, let’s get cooking! Follow these simple steps to assemble your Eyeball Caprese Bites.
-
Prepare the Tomatoes
Start by carefully slicing the tops off each cherry tomato, just enough to create a little cap. Use a paring knife to scoop out the insides lightly. Don’t worry if you lose a tomato or two—that’s what taste testing is for! -
Stuff with Mozzarella
Take your fresh mozzarella balls and gently press them into the hollowed tomatoes. You want them to sit snugly, resembling a little eyeball peeking out. If you’re feeling extra creative, try stuffing some of the mozzarella with a hint of pesto or roasted garlic for a flavor kick. -
Create the Olives’ Pupils
Next, slice your black olives in half. Using one olive half, place it right in the center of each stuffed mozzarella ball to create the “pupil.” This is my favorite part because it’s where the dish comes to life! -
Add the Basil
Finish your eyeballs off by placing a small basil leaf on top of each tomato. It’s an easy way to introduce that classic Caprese flavor and adds a pop of green to contrast with the red and white! -
Drizzle and Serve
For an added touch, drizzle balsamic reduction over your assembled Eyeball Caprese Bites right before serving. This not only enhances the flavor but also adds a beautiful presentation element.
Serving Suggestions
When it comes to serving, remember that presentation is everything! Arrange your Eyeball Caprese Bites on a beautiful platter, perhaps with some spooky decorations like mini pumpkins or black lace for a Halloween touch. If you want to keep it simple, a wooden cutting board can add a rustic charm. Trust me, your guests won’t be able to resist diving in!
Recipe Variations
Want to shake things up a bit? Here are a few fun twists to consider:
- Caprese Skewers: Thread your eyeball ingredients onto skewers for a fun, handheld appetizer that’s perfect for mingling.
- Spicy Eyeballs: Add a slice of jalapeño or a sprinkle of chili flakes on top for a spicy kick.
- Herbed Ricotta Swap: Instead of mozzarella, use herbed ricotta or goat cheese for a creamier texture and a burst of flavor.
- Vegan Option: Swap the mozzarella for marinated tofu balls and use olives for the pupils for a delightful vegan treat.
Chef’s Notes
As I reflect on how Eyeball Caprese Bites have evolved over the years, I can’t help but laugh at some of the mishaps that happened along the way! I once tried using grape tomatoes instead of cherry tomatoes, thinking they’d be cuter—what a mess that was! The cheese didn’t fit quite right, and let’s just say they didn’t have the same visual impact. Now I always stick with cherry tomatoes for that perfectly playful look!
These bites have become a staple at my gatherings, not just for Halloween. They are so versatile and loved by all, young and old! I love how they blend elegance and whimsy and how they offer a delightful surprise on the table.
FAQs and Troubleshooting
1. Can I prepare these ahead of time?
Absolutely! You can prep the components a few hours in advance. Just assemble them right before serving to keep the ingredients fresh.
2. What if I don’t have fresh mozzarella?
You can substitute with string cheese, paneer, or even tofu for a dairy-free version.
3. My tomatoes are too big; what do I do?
If your tomatoes are oversized, you can always cut them in half for a more manageable bite—and they look slightly more spooky that way!
4. How long will these last?
These are best enjoyed fresh, but if you have leftovers, store them in an airtight container for up to 2 days in the refrigerator. The texture may slightly change, but the flavors will still be fun!
Nutritional Info
While I didn’t calculate the exact nutritional information here, these bites are generally low in calories, particularly if you’re mindful of portions. Cherry tomatoes and basil are nutrient-dense, providing vitamins and antioxidants, while mozzarella offers protein and calcium. Just keep an eye on the balsamic drizzle if you’re counting calories!
Thank you for joining me on this delightful culinary adventure! I hope you’re inspired to create your own Eyeball Caprese Bites this season, bringing together family and friends around your table. Remember, it’s all about the joy of cooking and sharing. Tie on that apron, gather your ingredients, and let’s make something memorable! Happy cooking!
PrintEyeball Caprese Bites

A fun and spooky twist on traditional Caprese salad, perfect for Halloween parties and fall gatherings.
- Prep Time: 15 minutes
- Cook Time: 0 minutes
- Total Time: 15 minutes
- Yield: 4 servings
- Category: Appetizer
- Method: No-Cook
- Cuisine: Italian
- Diet: Vegetarian
Ingredients
- Cherry Tomatoes
- Fresh Mozzarella Balls (Bocconcini or Ciliegine)
- Black Olives
- Fresh Basil Leaves
Instructions
- Prepare the Tomatoes by slicing the tops off each cherry tomato and scooping out the insides.
- Stuff with Mozzarella by pressing the fresh mozzarella balls into the hollowed tomatoes.
- Create the Olives’ Pupils by slicing black olives in half and placing one half in the center of each mozzarella ball.
- Add the Basil by placing a small basil leaf on top of each tomato.
- Drizzle and Serve by adding balsamic reduction over the assembled bites just before serving.
Notes
For a spicy kick, add jalapeño slices or chili flakes on top. These can be prepared a few hours in advance and assembled right before serving.
Nutrition
- Serving Size: 1 serving
- Calories: 150
- Sugar: 2g
- Sodium: 300mg
- Fat: 10g
- Saturated Fat: 4g
- Unsaturated Fat: 6g
- Trans Fat: 0g
- Carbohydrates: 10g
- Fiber: 2g
- Protein: 6g
- Cholesterol: 15mg
Keywords: Eyeball Caprese Bites, Halloween appetizers, spooky food ideas, Caprese salad, easy party snacks
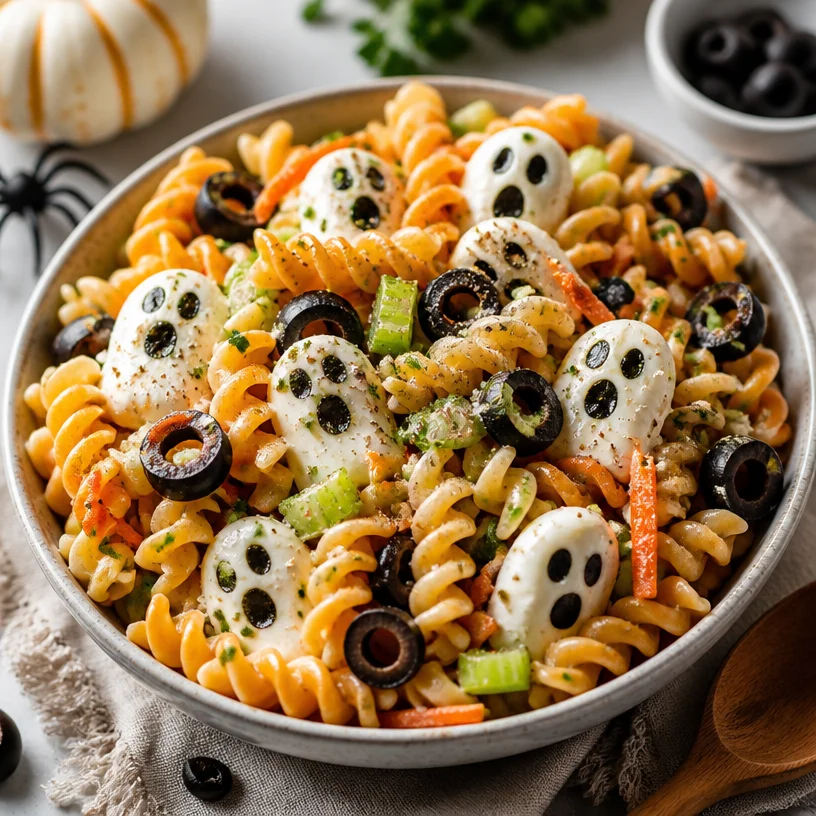
Halloween Pasta Salad: 15-Min Spooky, Crispy Bowls
Spooktacular Halloween Pasta Salad: An Elegant Treat for All Ages
Hello, fellow food lovers! As October rolls in and the leaves begin to crunch under our feet, thoughts of Halloween start swirling around in our minds. Whether you’re organizing a fun gathering for friends, a family get-together, or simply looking to add a festive flair to your dinner table, I have the perfect recipe for you: a Halloween Pasta Salad! This vibrant, whimsical dish is not only a feast for the eyes but also a celebration of flavors that will keep your guests delighted and coming back for more.
As we all know, Halloween is about more than just scares and sweets. It’s a time for gathering around tables decked out in clever decorations and mouthwatering treats. My Halloween Pasta Salad is versatile and easy to whip up, and it brings a dash of elegance while remaining totally approachable. Believe me; you don’t need to have the skills of a Michelin-star chef to impress with this pasta salad!
What makes this dish especially special to me is how it encapsulates the very essence of entertaining—bringing people together over delectable food. There’s something about the colors of Halloween—vibrant oranges, deep greens, and a pop of white—that sparks creativity in the kitchen. And when food looks playful, it creates an atmosphere where everyone can relax and have fun, easing the chatter and laughs into the evening.
So, let’s roll up our sleeves, tie on our aprons, and conjure up some deliciousness in the kitchen together!
My Love for Pasta Salad
One vivid memory that always brings a smile to my face happens in my childhood kitchen. Picture this: I was around ten years old, standing on my tiptoes to reach the counter, armed with a wooden spoon and a sense of adventure. My mom decided we would make a special dish, a vibrant pasta salad, to celebrate the changing season.
With colorful ingredients spread out before us—bright red cherry tomatoes, crisp greens, and morsels of mozzarella—the kitchen blossomed into a canvas of color. As we added olives and a drizzle of olive oil, I felt the excitement of creativity flowing through me. The beauty of this recipe was that it didn’t just taste good; it felt like an experience!
Now, as an adult and a lover of hosting, I treasure that kitchen memory. It taught me that cooking is all about connection—the joy of creating something lovely to share with others. With this Halloween Pasta Salad, I aim to replicate the fun of my childhood while giving it a festive twist that’s sure to please both kids and adults alike.
Ingredients
Let’s gather our witch’s brew of ingredients and get ready to create some magic! Here’s what you’ll need:
-
Pasta: Choose your favorite type—penne, rotini, or even spooky-shaped Halloween pasta if you can find it! Whole grain or gluten-free options work wonderfully too.
-
Olives: Black olives add that delicious briny flavor. If you’re not a fan, green olives or even capers bring a unique twist!
-
Mozzarella: Fresh mozzarella balls (bocconcini) are fantastic here. They’re both tender and creamy. For a vegan option, try marinated tofu or vegan cheese.
-
Cherry Tomatoes: Their sweet burst of flavor is essential! Any color works—red, orange, or even yellow add a fun pop.
-
Bell Peppers: Choose orange or yellow for that festive autumn hue. If you want a little heat, red peppers can bring a nice kick!
-
Basil and Parsley: Fresh herbs elevate any dish! If you have dried herbs, use them sparingly. Dried basil can work in a pinch.
-
Olive Oil: A good-quality extra virgin olive oil is a must for drizzling and adding depth.
-
Balsamic Vinegar: Adds a tangy sweetness. You can substitute red wine vinegar if that’s what you have!
-
Salt and Pepper: Essential to bring all the flavors together. Freshly cracked black pepper adds a nice touch!
Step-by-Step Instructions
Now that we have our ingredients, it’s time to get cooking! Let’s dive into the delightful process of crafting this Halloween Pasta Salad.
-
Cook the Pasta: Begin by bringing a large pot of salted water to a rolling boil; this is where the magic will begin! Add your pasta of choice and cook according to package instructions until al dente (usually about 8-10 minutes). Remember to stir occasionally to prevent sticking. Chef Tip: Always taste your pasta a minute or two before the suggested cooking time to catch that perfect doneness!
-
Prep the Olives: While the pasta is cooking, take your olives and slice them in half. This not only makes them more visually interesting but also ensures their briny goodness coats the pasta beautifully. If you’re using olives from a jar, remember to rinse them under cold water to remove excess brine. Chef Insight: If you want a fancier presentation, consider pitting and slicing black olives into fun shapes or eyes!
-
Dice the Cherry Tomatoes and Bell Peppers: Chop your cherry tomatoes into halves (or quarters for larger ones) and dice the bell peppers into bite-sized pieces. The colors of orange, yellow, and red should shine through, creating a beautiful autumn palette! Presentation Hack: For an extra pop of seasoning, sprinkle a tiny pinch of salt on the tomatoes to enhance their sweetness.
-
Prepare the Herbs: Finely chop your fresh basil and parsley. This step brings a fresh element to the pasta salad and contributes a lovely aroma that sets the mood. Chef Hint: If you want to save time, chiffonade (stack, roll and slice) the basil. This gives an elegant look!
-
Combine Ingredients: Once your pasta is cooked, don’t forget to reserve about a half cup of pasta water before draining! Drain and rinse the pasta under cold water to stop the cooking process. In a large mixing bowl, combine the pasta with olives, cherry tomatoes, diced bell peppers, mozzarella, and herbs.
-
Dress It Up: Add a generous drizzle of olive oil, a splash of balsamic vinegar, and season with salt and pepper. Mix gently, letting all those flavors mingle together. If it feels a bit dry, add a bit of the reserved pasta water to loosen it up.
-
Chill and Serve: It’s best to let the salad chill in the refrigerator for at least 30 minutes. This allows the flavors to meld beautifully. But if you’re eager, dig in right away!
-
Garnish for Spookiness: For that Halloween touch, consider garnishing with additional herbs, a few extra olives, and maybe even some pumpkin seeds for crunch!
Serving Suggestions
When it’s time to serve your Halloween Pasta Salad, I recommend presenting it in a large, deep serving bowl. This not only makes for a beautiful centerpiece but also gives everyone easy access. For an added festive flair, you can decorate the table with mini pumpkins or fun Halloween-themed napkins. This salad is also lovely served on fun Halloween plates, or even better—a cauldron-shaped dish for that extra whimsy!
Recipe Variations
-
Ghostly Pesto Pasta Salad: Swap out the oil and vinegar for store-bought or homemade pesto to give the salad a deliciously vibrant flavor and bright green hue!
-
Pumpkin Spice Surprise: Add a touch of pumpkin puree to your dressing for a festive spin, bringing autumn flavor and color to the mix.
-
Zesty Lemon Twist: Replace balsamic vinegar with fresh lemon juice and zest to give your pasta salad a refreshing twist!
-
Cheesy Boost: Mix in some crumbled feta or goat cheese for an extra creamy dimension.
-
Protein-Packed Option: Incorporate some grilled chicken or chickpeas for a heartier meal.
Chef’s Notes
One of my favorite things about this recipe is its adaptability. Over the years, I’ve played around with various add-ins depending on what’s in season or in my fridge. You can easily make this recipe your own! I remember one Halloween, we had a last-minute guest, and I had some roasted pumpkins sitting around. I cubed them up and tossed them in! The sweetness added a delightful contrast and an unexpected element to the dish. Food is always evolving, just like our tastes.
FAQs and Troubleshooting
1. What type of pasta should I use?
Any pasta shape works! Penne, rotini, or even Halloween-themed shapes if you can find them add a fun twist. Just be sure to cook it al dente.
2. Can I assemble this salad ahead of time?
Absolutely! You can make this pasta salad a day in advance. Just store it in the refrigerator in an airtight container and give it a good stir before serving.
3. It’s too dry! What can I do?
Don’t panic! Simply add a splash of reserved pasta water or extra olive oil as needed. Give it a toss to bring everything back together.
4. Can I customize this with different veggies?
You bet! Feel free to use whatever veggies you enjoy or have on hand—zucchini, broccoli, or even roasted carrots can be great additions.
As you can see, this Halloween Pasta Salad is so much more than just a side dish. It’s an invitation to gather, create, and enjoy. I hope it brightens your table and fills your hearts with joy. So, stretch your apron strings, grab a glass of something bubbly, and let’s celebrate the beauty of cooking and gathering around our tables!
Happy Halloween cooking! 🎃👻✨
PrintSpooktacular Halloween Pasta Salad

A vibrant and whimsical pasta salad perfect for Halloween gatherings, bringing together delightful flavors and colors.
- Prep Time: 15 minutes
- Cook Time: 10 minutes
- Total Time: 45 minutes
- Yield: 4 servings
- Category: Salad
- Method: Mixing
- Cuisine: Italian
- Diet: Vegetarian
Ingredients
- Pasta: penne, rotini, or spooky-shaped
- Olives: black or green
- Mozzarella: fresh mozzarella balls or vegan alternatives
- Cherry Tomatoes: red, orange, or yellow
- Bell Peppers: orange, yellow, or red
- Basil: fresh or dried
- Parsley: fresh or dried
- Olive Oil: extra virgin
- Balsamic Vinegar: or red wine vinegar
- Salt and Pepper: to taste
Instructions
- Cook the pasta in a boiling pot of salted water until al dente, about 8-10 minutes.
- Prep the olives by slicing them in half.
- Dice the cherry tomatoes and bell peppers into bite-sized pieces.
- Prepare the fresh basil and parsley by finely chopping them.
- Combine the cooked pasta, olives, tomatoes, bell peppers, mozzarella, and herbs in a large bowl.
- Dress the salad with olive oil, balsamic vinegar, salt, and pepper, mixing gently.
- Chill the salad in the refrigerator for at least 30 minutes before serving.
- Garnish with additional herbs, olives, or pumpkin seeds for a spooky touch.
Notes
This salad is adaptable; feel free to include seasonal add-ins like roasted pumpkins for extra sweetness.
Nutrition
- Serving Size: 1 serving
- Calories: 350
- Sugar: 5g
- Sodium: 400mg
- Fat: 12g
- Saturated Fat: 4g
- Unsaturated Fat: 6g
- Trans Fat: 0g
- Carbohydrates: 45g
- Fiber: 3g
- Protein: 15g
- Cholesterol: 30mg
Keywords: Halloween, pasta salad, festive dish, party food, vegetarian dish
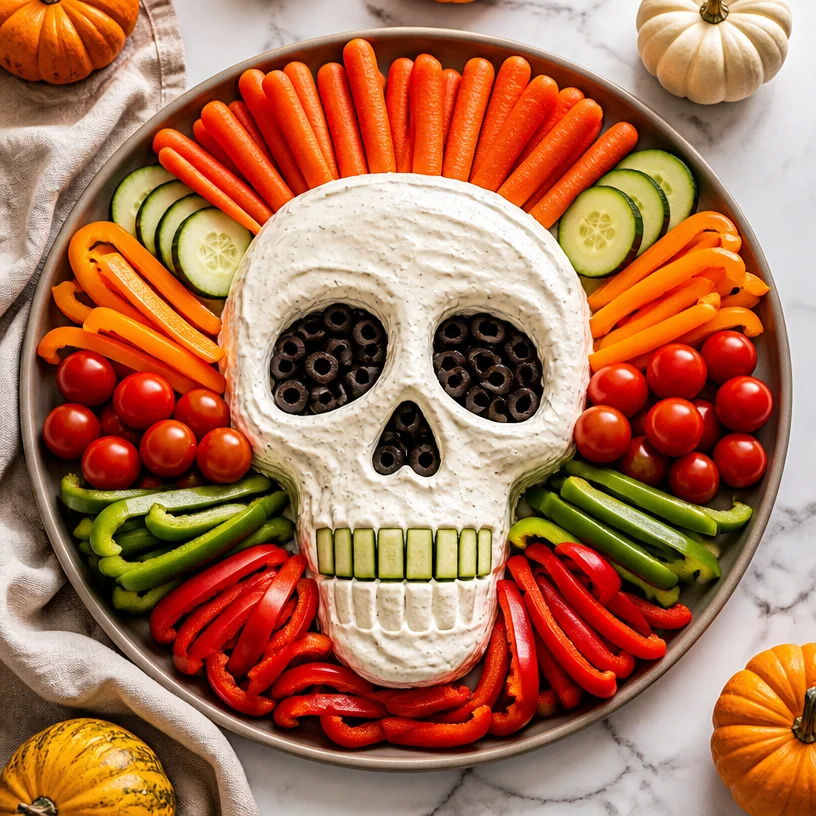
Halloween Skull Veggie Tray: Quick Spooky Party Platter
The Spook-tacular Skull Veggie Tray: Elevate Your Halloween Party with Style!
Ah, Halloween! A time for ghouls and goblins, but also an opportunity to make a bang in the kitchen! Whether you’re hosting a spooky gathering for friends or just looking to spice up a family dinner, crafting a Skull Veggie Tray is a clever way to impress your guests while sticking to healthy snacks. Who would have thought that a simple plate of vegetables could transform into a festive centerpiece?
Picture this: flickering candles, a playlist of spine-tingling tunes, and a table adorned with cobwebs. The final piece of the puzzle? A beautifully arranged Skull Veggie Tray that’s both eye-catching and delicious! This isn’t just any veggie platter; it’s a playful nod to the season that brings smiles along with a dash of horror—perfect for those Instagram moments!
In today’s blog post, I’ll walk you through creating this delightful and spooky dish. From personal memories and clever tips to its presentation, I’ll ensure that you not only nail this recipe but also have fun in the process. So grab your apron, and let’s dive into the wonderful world of veggie creativity!
A Memory From My Childhood
As a child, Halloween was filled with magic for me. I remember the vibrant orange and black decorations, the anticipation of trick-or-treating, and, oddly enough, my family’s legendary Halloween parties. My mom always took the time to create something special in the kitchen, and one year, she decided to craft a whimsical veggie tray.
With her hostess hat on, she artfully arranged carrots, cucumbers, and other colorful veggies into a fun, spooky design. I can still see the pride on her face as she served it to the guests, proudly declaring it the "Healthier Choice." People loved it—and so did I! Watching adults revel in healthy snacks inspired me to bring that same joy into my own hosting ventures. Now, it’s my turn to carry the torch with the Skull Veggie Tray, keeping tradition alive while adding my modern twist.
Ingredients
Gather ‘round, fellow foodies! Let’s look at the ingredients you’ll need to bring this Skull Veggie Tray to life. Each component plays a role in sculpting this festive masterpiece.
-
Carrots: Sweet and crunchy! Choose baby carrots for an easy option, or slice large carrots into sticks for that perfect skull shape. If you’re not a fan of carrots, parsnips offer a similar texture with a slight sweetness.
-
Cucumber: A refreshing touch! Opt for English cucumbers, which are less bitter and have fewer seeds. Want something different? Zucchini can also be a fun substitute.
-
Bell Peppers: These colorful beauties add a burst of sweetness and texture. Go for a mix of colors (red, yellow, green) for visual appeal. If you want to spice it up, use jalapeños or even roasted red peppers for added flavor.
-
Cherry Tomatoes: Their juicy pop adds a fantastic contrast to the crunch of other veggies. If tomatoes aren’t your thing, consider using radishes for a spicy flair.
-
Ranch Dip: The perfect creamy accompaniment! You can use store-bought ranch dressing or whip up a homemade version with sour cream, a dash of garlic powder, and fresh herbs. For a healthier twist, try Greek yogurt instead of sour cream!
These ingredients combine to create a lively, vibrant display perfect for Halloween or any occasion that calls for festive snacking. Plus, they’re all packed with vitamins—truly a win-win!
Step-by-Step Instructions
Ready to create the ultimate Skull Veggie Tray? Follow these simple steps and feel free to put your personal stamp on it along the way!
-
Prepare Your Veggies: Start by washing all your vegetables thoroughly. Give them a little scrub under water—this will help remove any lingering dirt or pesticides. For extra crunch, you can soak the carrots in ice water for 30 minutes to get that refreshing crispness.
-
Create Your Skull Outline: Find a large platter or board. You can even use parchment paper to map out your skull outline! Use a pencil to draw a simple skull shape if you’re feeling artsy. If you prefer to eyeball it, go for a rounded skull shape at the top with a wide jaw.
-
Arranging Your Carrots: Using baby carrots or sliced carrots, place them in the shape of the skull. Start at the forehead and work your way down to the jaw. Use larger carrot sticks for the jawline to create definition.
-
Adding the Cucumber: Slice cucumber into rounds and gradually position them to form the eye sockets for a haunting effect. You can also cut them into half moons for added variety. If you’re artistic, consider creating a cheekbone effect for an extra spooky vibe!
-
Bell Peppers for Detail: Now, let’s make it pop! Slice bell peppers into strips or triangles. Use red or yellow bell pepper pieces to create a nose and wide teeth along the jawline. Assemble them carefully to achieve that distinctive skull expression—feel free to channel your inner artist!
-
Cherry Tomatoes & Final Touches: Scatter cherry tomatoes around the platter, filling any gaps and adding color. They can double as bloodshot eyes if you place them within the eye sockets—creepy and delightful!
-
Prepare Your Ranch Dip: Pour your ranch dressing into a small bowl and place it in the center of the veggie tray or off to one side. It serves as the perfect accompaniment for dipping into those scrumptious veggies.
-
Secure and Serve: If you’re transporting your tray, consider using toothpicks and a little bit of plastic wrap to secure some of the veggies lightly. It’ll keep everything in place while ensuring that your Skull Veggie Tray reaches its destination intact.
And voila! You now have a spooky yet fun Skull Veggie Tray ready to dazzle your guests.
Serving Suggestions
When it’s time to serve, gather everyone around and draw them into the delight of your Skull Veggie Tray. It can be the conversational piece at your Halloween party. Encourage guests to dive in, offering them small plates or bowls for their veggie haul. You might even want to provide some fun napkins or Halloween-themed plates for a cohesive look!
Remember, there’s no wrong way to enjoy this tray! Whether they’re dipping or grazing straight from the platter, everyone will love this creative take on a healthy snack.
Recipe Variations
Looking to shake things up a bit? Here are a few variations for your Skull Veggie Tray that you might find inspiring:
-
Spooky Spreads: Instead of ranch, try a hummus dip mixed with roasted garlic or a spicy guacamole for that extra kick.
-
Add Some Protein: Include bite-sized pieces of cheese, like cubes of cheddar or mozzarella, to complement your veggies and add a hearty touch.
-
Herbaceous Twist: Add herbs like parsley or dill sprigs for freshness. They can also double as a garnish to enhance the overall presentation.
-
Creative Shapes: Use a cookie cutter to create spooky veggie shapes (like bats and ghosts) for a child-friendly option.
-
Flavor Boost: Spice up your ranch by incorporating hot sauce or different seasoning blends. Try ranch packets from your pantry for some quick flavor variations!
Chef’s Notes
I adore how a simple veggie tray can bring people together! It’s funny how, with a bit of creativity, an ordinary platter can steal the show. Over the years, I’ve made more veggie trays than I can count, and while they started as a simple way to present healthy options, they’ve turned into a canvas for my culinary imagination.
Once, at a Halloween bash, I accidentally knocked over the tray, sending veggies flying everywhere. Instead of panicking, I spun it as a fun “veggie explosion” moment, and everyone laughed—sometimes, you just have to embrace the chaos!
Crafting this Skull Veggie Tray has become a cherished Halloween tradition that adds a touch of whimsy to our gatherings. Here’s to continuing that legacy with each new creation while keeping it relaxed, casual, and full of joy!
FAQs and Troubleshooting
Q: How long can I prepare the veggie tray in advance?
A: You can prep the veggies a few hours ahead of time. Just be sure to keep everything covered and chilled to maintain freshness!
Q: Can I make this vegan-friendly?
A: Absolutely! The veggie tray is naturally vegan. Just choose a vegan ranch dressing or make your own using tahini or avocado for a creamy dip.
Q: What do I do if my veggies start to wilt?
A: Be sure to keep your veggies submerged in ice water and refrigerate until just before serving. This will help them stay crisp!
Q: Can I mix other vegetables into the tray?
A: Yes! Feel free to include snap peas, celery sticks, or even broccoli florets for variety. Just be mindful of how they fit into your skull design!
Nutritional Info
While I generally focus more on flavor than numbers, it is worthwhile to note that this Skull Veggie Tray is low in calories and high in vitamins A and C, fiber, and antioxidants. Perfect for guilt-free snacking!
So, there you have it—your guide to crafting a show-stopping Skull Veggie Tray that will charm all your guests while nourishing them. Cooking is truly about sharing and connecting. Enjoy the festivities, and happy Halloween! Your ghostly kitchen awaits! 🍁👻✨
PrintSkull Veggie Tray

A spooky and creative veggie tray perfect for Halloween parties, featuring a playful skull design made with fresh vegetables.
- Prep Time: 15 minutes
- Cook Time: 0 minutes
- Total Time: 15 minutes
- Yield: 8 servings
- Category: Appetizer
- Method: Assembly
- Cuisine: American
- Diet: Vegan
Ingredients
- Carrots (baby or sliced)
- Cucumber (English or zucchini)
- Bell Peppers (mix of red, yellow, green)
- Cherry Tomatoes
- Ranch Dip (store-bought or homemade)
Instructions
- Prepare your veggies by washing them thoroughly.
- Create your skull outline on a platter or board.
- Arranging your carrots in the shape of the skull starting from the forehead.
- Adding sliced cucumber for eye sockets.
- Bell peppers to create nose and teeth details.
- Scatter cherry tomatoes around the tray for color.
- Prepare your ranch dip in a small bowl in the center.
- Secure and serve your veggie tray for guests to enjoy.
Notes
Consider adding other veggies such as snap peas or celery sticks for variety.
Nutrition
- Serving Size: 1 serving
- Calories: 100
- Sugar: 6g
- Sodium: 200mg
- Fat: 7g
- Saturated Fat: 1g
- Unsaturated Fat: 6g
- Trans Fat: 0g
- Carbohydrates: 10g
- Fiber: 3g
- Protein: 2g
- Cholesterol: 0mg
Keywords: Halloween, veggie tray, healthy snacks, party food
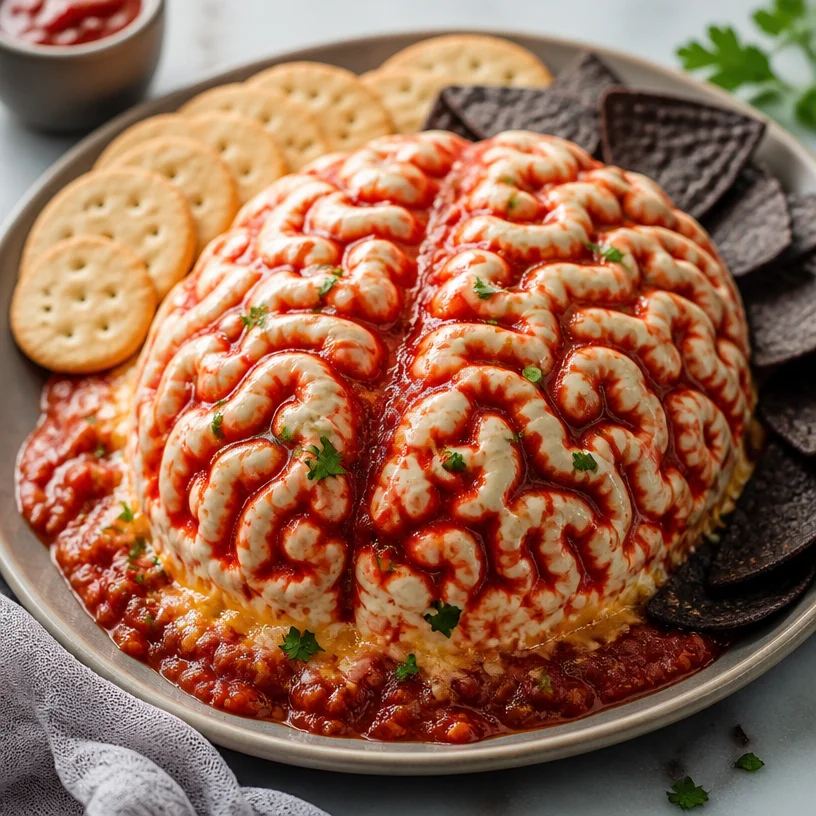
Spooky 15-Minute Halloween Zombie Brain Dip for Party Guests
Zombie Brain Dip: A Spooktacular Treat for Foodies
Hello, fellow food lovers! Today, we’re diving into a delightfully eerie dish: Zombie Brain Dip! Perfect for Halloween parties, themed gatherings, or just a fun night in with friends, this dip is both visually striking and utterly delicious. Who knew that a dish named “Zombie Brain” could become the star of your next get-together?
Picture this: a creamy, vibrant dip that looks like it came straight out of a cult classic horror film. But don’t worry; it’s not just a pretty face—it’s packed with flavor and just a little bit of whimsy. Let’s stir the pot and whip this up to impress your guests while also giving them something to talk about!
My Personal Story: A Haunted Kitchen Memory
Let me take you back to my first Halloween bash as an adult. There I was, an aspiring hostess with a flair for the dramatic, eager to impress my friends. I decided to make an entire spread of creepy Halloween-themed dishes, including my now-famous Zombie Brain Dip.
The day of the party, I cooked and danced around my kitchen, channeling my inner Julia Child while dressed in my finest witch costume, complete with a pointy hat. When I brought the dip to the table, everyone was captivated by its ghastly appearance. The ooohs and aaahs were priceless! As my friends dug in, their initial horror transformed into delight, bites of the creamy, tangy dip disappearing in no time. That moment sparked my love not just for cooking, but for creating experiences through food—bonding over laughter and tasty bites.
Ingredients
To recreate this spooky delight, let’s gather the following ingredients. Each one plays a vital role in building the flavor and texture of our Zombie Brain Dip.
-
Cream Cheese: The base of our dip, giving it that luscious texture. You can substitute with Greek yogurt for a lighter version, just know it’ll alter the flavor somewhat.
-
Salsa: Choose your favorite jarred salsa or make your own for a fresher taste. Salsa provides flavor and color but can be swapped with diced tomatoes or even a spicy pico de gallo if you want to rev up that heat.
-
Green Food Coloring (optional): For that ghoulish aesthetic! You can skip it if you prefer a more natural look or want to save time.
-
Tortilla Chips or Veggies: Ideal for serving! Use your favorite chip brand, or go for sliced cucumbers and bell peppers for a healthier option.
Step-by-Step Instructions
Ready to get cooking? Let’s get right to it! Follow these steps to create your jaw-dropping Zombie Brain Dip:
-
Prepare Your Ingredients: First things first, make sure your cream cheese is softened to room temperature. It’ll blend easier and result in a creamier dip. If you forget to leave it out, you can microwave it on low for about 15 seconds—just don’t let it melt.
-
Mix the Base: In a mixing bowl, combine 8 ounces of softened cream cheese with 1 cup of salsa. Using an electric mixer on medium speed, blend them together until smoothly integrated. This is the moment to channel your inner rock star—sing while mixing!
-
Add Color: Here comes the fun part! If you’re adding food coloring for that brainy look, now’s the time. Just a drop or two of green food coloring will do. Mix it in, and keep adding until you reach your desired shade—think slimy and spooky, but not too unappetizing!
-
Taste for Seasoning: Give your dip a taste. Want to make it hotter? Stir in a pinch of cayenne pepper or some chopped jalapeños. Feel free to add salt or pepper for extra seasoning, but remember, the salsa will have flavor as well!
-
Chilling Time: Once you’re satisfied with the taste, transfer the dip to a serving bowl. Cover it with plastic wrap and refrigerate for at least 30 minutes. This helps the flavors meld together and makes it easier to serve with a firm consistency.
-
Serve and Dazzle: Finally, when everyone’s arrived and the time is right, pull your dip from the fridge, and it’s showtime! Serve it alongside tortilla chips or sliced veggies for a color contrast that will wow your guests.
Serving Suggestions
Presentation is key! To make your Zombie Brain Dip really pop, consider shaping it into an actual brain. Use a rubber spatula to mold the dip, creating grooves on the surface to mimic brain folds. Serve it in a shallow dish. Surround it with chips and fresh veggie sticks. A sprinkle of fresh herbs or a drizzle of olive oil on top can add some visual appeal!
Recipe Variations
Want to mix things up a bit? Here are some fun twists you can try with this recipe:
-
Spicy Brain: Add some diced jalapeños or a few dashes of your favorite hot sauce to the cream cheese mixture for a fiery kick.
-
Tex-Mex Twist: Incorporate some black beans, corn, or diced avocado to the dip for a heartier option, and a hint of fresh lime juice for brightness.
-
Veggie-Loaded Dip: Sneak in some finely chopped bell peppers or scallions for a crunchy surprise while also enhancing the flavor profile.
-
Dairy-Free Option: Swap cream cheese with a dairy-free alternative like cashew cream or a nut-based cheese spread for your vegan friends.
Chef’s Notes
As I mentioned, this dip has become a staple in my entertaining arsenal. I remember one Halloween when I served this alongside a “witch’s brew” punch. The combination brought life to the party, and everyone had a blast. Over the years, I’ve simplified the recipe and found new ways to add seasonal elements, like stirring in roasted pumpkin for an autumnal feel. It evolves with me, just as every great recipe should!
FAQs and Troubleshooting
1. My dip is too runny! What can I do?
If your dip ended up too thin, try chilling it longer to allow it to firm up. Alternatively, mix in a few tablespoons of sour cream or Greek yogurt to thicken it up.
2. Can I make this dip ahead of time?
Absolutely! Prepare your Zombie Brain Dip a day in advance and store it in the refrigerator. Just be sure to add the food coloring before serving for maximum effect.
3. What if I can’t find cream cheese?
A solid alternative is to use ricotta cheese or herbed cheese spreads, which both bring a different flavor and texture but still yield delicious results.
4. How do I prevent the dip from turning brown?
Once made, cover the dip tightly with plastic wrap before refrigerating. You can also add a few drops of lemon juice to keep the freshness intact.
Nutritional Info
(Optional section for readers interested in nutritional details, particularly if you have a family or a special dietary focus.)
This Zombie Brain Dip is a fun dish, but like all creamy dips, it’s best enjoyed in moderation. A standard serving (1/4 cup) contains approximately 150 calories, with about 12g of fat and 5g of carbohydrates. Using lighter ingredients can help lower those numbers while still delivering that luscious, creamy feel!
Now that you’re ready to conjure up this spooky delight, let’s get cooking! Tie on your apron, gather your friends, and prepare for an unforgettable culinary adventure. Happy cooking, and may your Halloween be filled with laughter and delicious bites! 🍽️👻
PrintZombie Brain Dip
A creamy and vibrant dip that looks like a spooktacular brain, perfect for Halloween parties.
- Prep Time: 15 minutes
- Cook Time: 30 minutes
- Total Time: 45 minutes
- Yield: 4 servings 1x
- Category: Appetizer
- Method: Mixing and Chilling
- Cuisine: American
- Diet: Vegetarian
Ingredients
- 8 oz Cream Cheese
- 1 cup Salsa
- Green Food Coloring (optional)
- Tortilla Chips or Veggies (for serving)
Instructions
- Prepare your ingredients: Soften cream cheese to room temperature.
- Mix the base: Combine cream cheese and salsa in a mixing bowl and blend until smooth.
- Add color: Stir in green food coloring until you reach the desired shade.
- Taste for seasoning: Adjust with cayenne, jalapeños, salt, or pepper as desired.
- Chill the dip: Transfer to a bowl, cover, and refrigerate for at least 30 minutes.
- Serve and dazzle: Serve with tortilla chips or sliced veggies for a fun presentation.
Notes
For best presentation, shape the dip into a brain and mold grooves to mimic brain folds. Add herbs or olive oil for appeal.
Nutrition
- Serving Size: 1/4 cup
- Calories: 150
- Sugar: 2g
- Sodium: 250mg
- Fat: 12g
- Saturated Fat: 6g
- Unsaturated Fat: 4g
- Trans Fat: 0g
- Carbohydrates: 5g
- Fiber: 1g
- Protein: 2g
- Cholesterol: 30mg
Keywords: Halloween, dip, spooky, appetizer, party food
No-Bake Pumpkin Patch Dirt Cups for Easy Fall Treats
Pumpkin Patch Dirt Cups: A Sweet Autumn Treat
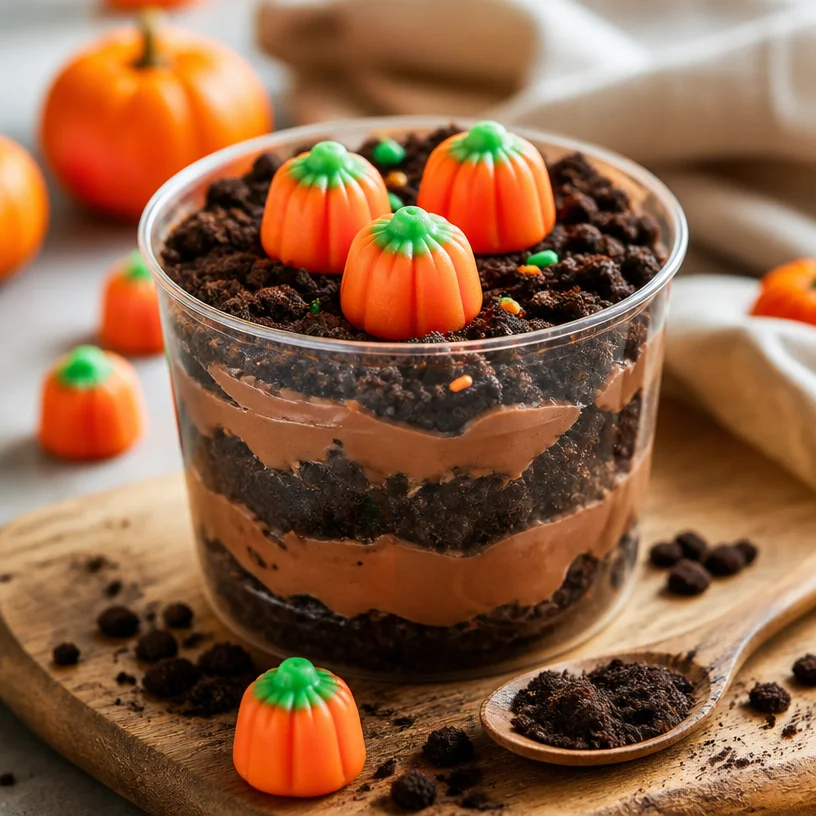
Hello, fellow food lovers! As the leaves start to turn and the air takes on that crisp, cozy vibe, there’s nothing quite like indulging in seasonal treats that capture the essence of fall. Today, I’m diving into a nostalgic dessert that whisked me back to my childhood: Pumpkin Patch Dirt Cups. These delightful little cups are a playful twist on traditional dirt cups, perfect for themed parties, Halloween gatherings, or just a sweet afternoon snack.
Imagine mini chocolate pudding cups topped with crumbled cookies, adorned with adorable candy pumpkins. It’s like a little piece of autumn served right in your hands! The balance of creamy chocolate with the crunch of cookie crumbs is an adventure for your taste buds. Plus, it’s hard not to smile when you see the vibrant candy pumpkins peeking out from the “dirt”! Let’s get our aprons on and jump into this fun recipe that’s as easy to make as it is delicious.
A Fond Memory: The Sweetness of Autumn
I have such a fond memory tied to these Pumpkin Patch Dirt Cups! The first time I made them was at a friend’s fall festival years ago. It was a crisp October afternoon, and the air was filled with the fragrant scent of cinnamon and nutmeg. We gathered in her kitchen, laughter echoing while we prepped for the festivities ahead. I vividly remember the vibrant autumn decorations, the hay bales stacked outside, and the anticipation of the spooky-themed party later that evening.
We took a break from carving pumpkins to whip up these adorable cups together, chatting about everything from our favorite seasonal flavors to our childhood Halloween memories. I can still recall the joy on everyone’s faces when they took their first spoonful, eyes lighting up like little pumpkins! It was more than just a dessert; it was a shared experience, a moment of creativity that brought us closer and celebrated the essence of fall. And now, I’m thrilled to share this recipe with you, so you can create those same joyful moments in your own kitchen!
Ingredients
Here’s what you’ll need to create your very own Pumpkin Patch Dirt Cups:
-
Chocolate Pudding
- This creamy delight serves as the base of our dirt cups. You can use store-bought pudding for convenience or make a homemade version for an extra touch of love!
-
Chocolate Cookie Crumbs
- Crushed chocolate sandwich cookies (like Oreos) provide that irresistible "dirt" texture. If you prefer a slightly different flavor, graham cracker crumbs can be a fantastic alternative for an earthy base.
-
Candy Pumpkins
- These adorable little candies are the cutest part of this dish! They add a pop of color and a playful touch. If candy pumpkins aren’t available, you could substitute with gummy worms or edible flowers for a unique twist.
-
Whipped Cream (optional)
- Adding a dollop of whipped cream on top brings a light, airy texture that complements the dense chocolate pudding perfectly. You can use store-bought or homemade whipped cream, just like Grandma used to make.
A Chef’s Tip:
Feel free to get creative with the toppings! Crushed nuts, sprinkles, or even caramel drizzle can add that extra flair to your pumpkin patch dirt cups.
Step-by-Step Instructions
Now, let’s get cooking! Follow these steps to create your own Pumpkin Patch Dirt Cups:
-
Prepare the Pudding
- If you’re going the homemade route, start by making your chocolate pudding according to your recipe. This usually involves mixing cocoa powder, sugar, milk, and cornstarch over medium heat until it thickens. If using a store-bought version, simply follow the instructions on the package.
-
Chill the Pudding
- Once your pudding is ready, transfer it into a bowl, cover it with plastic wrap, and pop it in the refrigerator. This step is essential for achieving that smooth, cool texture—about 30 minutes should do the trick!
-
Crush the Cookies
- While the pudding is chilling, grab your chocolate sandwich cookies and crush them into fine crumbs. You can do this by placing them in a zip-top bag and using a rolling pin or just pulsing them in a food processor. Don’t worry about making perfect crumbs; a bit of texture adds charm!
-
Assemble the Cups
- Once your pudding is chilled, it’s time to fill your cups. Start by adding a generous layer of chocolate pudding to the bottom of each cup. Use a small spoon or a piping bag for easy filling!
-
Add Cookie Crumbs
- Next, sprinkle a layer of crushed chocolate cookies on top of the pudding. The key here is to create nice layers, just like a mini parfait!
-
Repeat the Layers
- Add another layer of pudding followed by more cookie crumbs. You can keep layering until you reach the top of your cups, leaving just enough space to add those cute candy pumpkins!
-
Finish with Whipped Cream
- If you’re using whipped cream, add a little dollop on the very top of your pumpkin patch dirt cups. This will give it a wonderful fluffy finish and makes it even more inviting.
-
Decorate with Candy Pumpkins
- Finally, crown your creation with candy pumpkins, placing them right on top of the whipped cream. Feel free to arrange them however you like—it’s all about the presentation and having fun!
-
Chill Again (if desired)
- For the best flavor and texture, let your dirt cups sit in the fridge for a bit before serving. This allows the flavors to meld beautifully together.
-
Serve and Enjoy!
- When you’re ready to serve, bring your delightful pumpkin patch dirt cups to the table. Watch as faces light up when they see these cute treats—it’s heartwarming!
Serving Suggestions
To serve your Pumpkin Patch Dirt Cups, place them on a decorative platter or inside an autumn-themed basket for a charming presentation. You can nestle them in a bed of hay or faux leaves to enhance the “pumpkin patch” feel. Provide small spoons for your guests and let the digging in begin! You might also consider pairing this dessert with hot apple cider or a sweet, spiced chai—perfect for enhancing the fall-themed experience.
Recipe Variations
Here are a few fun twists to try with your Pumpkin Patch Dirt Cups:
- Pumpkin Spice Pudding: Add a teaspoon of pumpkin spice to your chocolate pudding for a delightful flavor twist.
- Nutty Delight: Mix in some chopped nuts (like pecans or walnuts) into the cookie crumb layer for added texture and flavor.
- Guilty Pleasure: Drizzle a little melted chocolate or caramel over the top for an extra sweet touch.
- Seasonal Swaps: Instead of candy pumpkins, use mini ghost-shaped candies for a Halloween spin or chocolate-covered raisins for an earthy look.
Chef’s Notes
These Pumpkin Patch Dirt Cups have evolved over time; I’ve played with different layers and toppings to find the perfect combination that delights both kids and adults alike. One time, I had a little mishap when I accidentally grabbed the cayenne pepper instead of the cocoa powder for a batch—let’s just say it wasn’t our most successful dessert! But that’s the beauty of cooking: sometimes the best memories come from unexpected moments.
I’ve found that these cups are not just a dessert; they become an experience! The joy of creating and sharing something playful keeps everyone smiling, and I adore how they spark conversations and laughter.
FAQs and Troubleshooting
Q: Can I make this recipe ahead of time?
Absolutely! These dirt cups can be prepared a day in advance. Just keep them covered in the fridge, and they’ll still taste fabulous the next day.
Q: My pudding isn’t thickening; what went wrong?
If your pudding isn’t thickening, it likely needs more time on the heat, or the cornstarch might not have been fully incorporated. Make sure to stir continuously and keep an eye on it.
Q: What if I can’t find candy pumpkins?
No worries! You can substitute them with gummy worms, chocolate fingers, or even sprigs of mint for a fresh touch. The important thing is to keep it fun!
Q: Can I use dairy-free alternatives?
Absolutely! You can use non-dairy milk and whipped cream to make this a dairy-free dessert. Look for dairy-free chocolate pudding for the best results.
Nutritional Info
While indulgent treats like these aren’t usually considered "health food," moderation is the key!
- Serving Size: 1 cup
- Calories: Approx. 250
- Total Fat: 12 g
- Saturated Fat: 6 g
- Carbohydrates: 37 g
- Sugars: 24 g
- Protein: 3 g
As you savor these delicious Pumpkin Patch Dirt Cups, remember that the joy of cooking and sharing treats is what matters most! So, tie on that apron, gather your loved ones, and let’s create beautiful moments around the table. Happy cooking!
PrintPumpkin Patch Dirt Cups

Delightful mini chocolate pudding cups topped with cookie crumbs and candy pumpkins, perfect for Halloween gatherings and fall celebrations.
- Prep Time: 15 minutes
- Cook Time: 10 minutes
- Total Time: 45 minutes
- Yield: 4 servings 1x
- Category: Dessert
- Method: Chilling
- Cuisine: American
- Diet: Vegetarian
Ingredients
- 2 cups Chocolate Pudding
- 1 cup Chocolate Cookie Crumbs (like Oreos)
- 1 cup Candy Pumpkins
- 1 cup Whipped Cream (optional)
Instructions
- Prepare the pudding by mixing cocoa powder, sugar, milk, and cornstarch over medium heat until thickened.
- Chill the pudding in the refrigerator for about 30 minutes.
- Crush the chocolate sandwich cookies into fine crumbs.
- Assemble the cups by adding layers of chocolate pudding and cookie crumbs in serving cups.
- Add a layer of whipped cream on top if desired.
- Decorate with candy pumpkins on top of the whipped cream.
- Chill again if desired to meld flavors.
- Serve and enjoy!
Notes
Feel free to customize toppings with nuts, sprinkles, or caramel drizzle. Perfect for themed parties and gatherings.
Nutrition
- Serving Size: 1 cup
- Calories: 250
- Sugar: 24g
- Sodium: 200mg
- Fat: 12g
- Saturated Fat: 6g
- Unsaturated Fat: 4g
- Trans Fat: 0g
- Carbohydrates: 37g
- Fiber: 2g
- Protein: 3g
- Cholesterol: 15mg
Keywords: pumpkin treats, Halloween dessert, nostalgic dessert, fall snacks
Monster Cookies
Monster Cookies: A Whimsical Treat for Every Occasion!
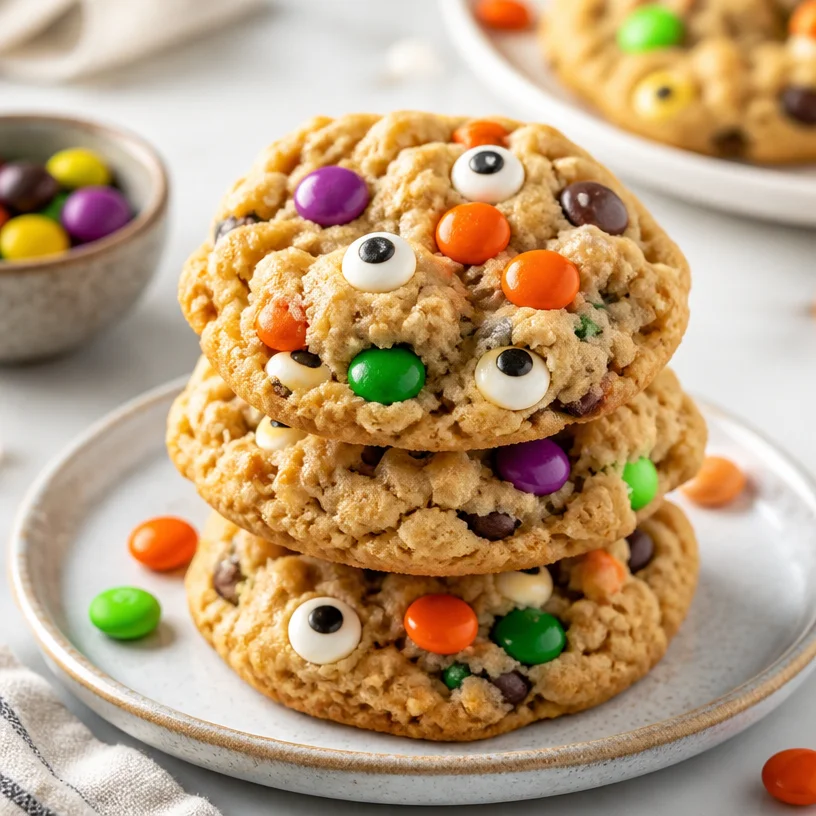
Hello, dear food lovers! Today, we’re diving into the delightful world of Monster Cookies — a whimsical treat that’s not just for Halloween, but perfect for any occasion where smiles and sweet cravings collide. Imagine cookies loaded with oats, chocolate, and, of course, candy eyes peering at you from the platter. Isn’t that just irresistible? Whether you’re baking with kids, celebrating a birthday, or just wanting to push the gray days away, these colorful delights have your back. Grab your apron, and let’s dive into the art of cookie-making!
My Monster Cookie Memory
Let’s take a little stroll down memory lane, shall we? I can still remember the first time I baked Monster Cookies. It was a rainy Saturday, and my younger cousin was over for a sleepover. Armed with a family-sized box of oats and a few bags of colorful candies, we decided to create something magnificent. The best part? We got carried away with the candy eyes! A kitchen disaster turned into a full-fledged monster celebration as we emerged with monstrous creations adorned with googly eyes staring back from every plate. These cookies were not only delicious; they were an expression of our childlike energy, creativity, and, of course, giggles. Since that day, Monster Cookies have held a special spot in my heart, and now, I want to share that joy with you!
Ingredients
Before we get to the fun part of mixing and baking, let’s gather our ingredients. Here’s what you’ll need to whip up a batch of these delightful Monster Cookies:
-
1 cup of unsalted butter, softened: This gives the cookies a rich flavor. If you’re vegan, you can substitute it with coconut oil or a vegan butter.
-
1 cup of brown sugar: For that deep, caramel-like sweetness. If you don’t have brown sugar, you can replace it with white sugar and a splash of molasses.
-
1/2 cup of granulated sugar: To balance the richness. This sugar can be replaced with coconut sugar for a more natural option.
-
2 large eggs: They bind the ingredients together and add moisture. You can substitute each egg with a tablespoon of ground flaxseed mixed with three tablespoons of water for a vegan version.
-
1 teaspoon of vanilla extract: This adds depth to the flavor. Pure vanilla extract is ideal, but imitation vanilla works too in a pinch.
-
2 cups of all-purpose flour: The backbone of our cookies. You could swap it out for a gluten-free flour blend if you’re catering to gluten sensitivities.
-
1 teaspoon of baking soda: This helps the cookies rise and ensures a chewy texture. No substitutes needed for this one!
-
1/2 teaspoon of salt: Enhances the overall flavor. If you’re watching your sodium intake, consider using sea salt sparingly.
-
2 cups of old-fashioned oats: Chewy and hearty, oats are the star! Instant oats can work, but they won’t give the same texture.
-
1 cup of chocolate chips: Feel free to use dark, milk, or white chocolate! For a fun twist, try adding butterscotch or peanut butter chips.
-
1 cup of candy eyes: These are essential for the monster effect! If you can’t find candy eyes, just chop up some colorful candies.
Step-by-Step Instructions
Now that we’ve got all our ingredients prepped and ready to go, it’s time to turn these ingredients into mouthwatering Monster Cookies! Ready? Let’s bake!
-
Preheat the Oven: Preheat your oven to 350°F (175°C). This ensures that your cookies bake evenly. While waiting, enjoy the anticipation of that warm, sweet aroma soon to waft through your kitchen!
-
Cream the Butter and Sugars: In a large mixing bowl, add your softened butter, brown sugar, and granulated sugar. Using a hand mixer or stand mixer, cream them together until the mixture is light and fluffy. This step introduces air into the batter, making your cookies soft and chewy. Don’t skimp on this!
-
Add Eggs and Vanilla: Next, crack the eggs into the bowl and pour in the vanilla extract. Mix until combined. The mixture should look smooth and silky. If you’re using flax eggs, blend them separately before adding to the mixture to ensure even mixing.
-
Combine Dry Ingredients: In another bowl, whisk together the flour, baking soda, and salt. This ensures even distribution of the baking soda and salt throughout the dough. Gradually add this dry mixture to your wet ingredients, mixing until just combined. Be careful not to overmix, as that can lead to tough cookies!
-
Fold in the Oats and Chocolate Chips: Add the oats and chocolate chips (or your chosen mix-ins) into the dough. Using a spatula or wooden spoon, fold them in gently. Here’s a chef hack: reserve a handful of chocolate chips to sprinkle on top before baking for extra visual pop!
-
Add the Candy Eyes: Now, for the fun part! Gently fold in your candy eyes, ensuring they’re evenly distributed in the dough. Be careful not to crush them!
-
Scoop the Dough: Using a cookie scoop or a spoon, drop generous portions of dough onto a baking sheet lined with parchment paper. Leave enough space between each mound for spreading—about two inches should do.
-
Bake: Place the baking sheet in your preheated oven and bake for 10-12 minutes, or until the cookies are slightly golden around the edges but still soft in the center. The delicious smell will drive you wild!
-
Cool: Let the cookies sit on the baking sheet for 5 minutes before transferring them to a wire rack to cool completely. This resting period helps them set beautifully.
Serving Suggestions
When it comes to serving your Monster Cookies, presentation is key. Arrange them on a colorful platter, perhaps alongside some milk or a fun dip like chocolate ganache. Get creative! You might even stack them for a towering display. A sprinkle of sea salt on top can elevate the flavor, balancing out the sweetness beautifully. For an extra festive touch, consider garnishing with sprigs of mint or edible flowers. Trust me; your guests will be smitten!
Recipe Variations
Monster Cookies are incredibly versatile! Here are some fun variations to consider:
-
Nutty Monster Cookies: Add 1 cup of chopped nuts like walnuts or pecans for crunch.
-
Peanut Butter Twist: Substitute half the butter with peanut butter to give your cookies a nutty flavor.
-
Add Dried Fruit: For a chewy texture and tartness, throw in 1 cup of dried cranberries or cherries.
-
Spice it Up: Add 1 teaspoon of cinnamon or a pinch of cayenne for a fun flavor kick.
-
Mini Monster Cookies: Scoop smaller portions for bite-sized cookies, perfect for parties!
Chef’s Notes
Throughout my baking journey, these Monster Cookies have evolved. Initially, they were just a fun way to get my cousin involved in the kitchen, but over the years, we’ve experimented! I once had a baking mishap where I mixed up the sugar measurements. Little did I know, the extra sweetness created a different kind of monster! Sometimes the kitchen can surprise you in the best ways. Don’t be afraid to play and explore different flavors; you never know what delightful concoction you might whip up!
FAQs and Troubleshooting
1. Why are my cookies flat?
Flat cookies can be a result of overly softened butter or too much liquid. Make sure your butter is just softened, not melted. Also, double-check your flour measurements, making sure to sift it if necessary.
2. Can I freeze Monster Cookie dough?
Absolutely! Feel free to scoop the dough onto baking sheets, freeze until firm, then transfer to a Ziplock bag. They can be stored for up to 3 months. Bake directly from the freezer, adding a minute or two to the baking time.
3. How do I store leftover cookies?
Keep your cookies in an airtight container at room temperature for up to a week. For longer storage, consider freezing them as mentioned above!
4. Can I make these gluten-free?
Definitely! Substitute the all-purpose flour with a gluten-free blend. Be cautious with your baking soda, as it might react differently depending on the mix!
Nutritional Info
While I believe in enjoying every bite without guilt, here’s a quick glance at the nutritional info (per cookie, based on 24 cookies):
- Calories: 150
- Total Fat: 7g
- Saturated Fat: 4g
- Carbohydrates: 20g
- Fiber: 1g
- Sugars: 9g
- Protein: 2g
Remember, indulge and enjoy!
And there you have it, my lovely friends – Monster Cookies that will make your heart sing and your taste buds dance! These cookies embody a spirit of playfulness and creativity that I absolutely adore. Now, tie on your apron, gather your loved ones, and bring a little whimsy to your kitchen. Happy baking! 🍪✨
PrintMonster Cookies
A whimsical treat perfect for any occasion, these Monster Cookies are loaded with oats, chocolate, and colorful candy eyes!
- Prep Time: 15 minutes
- Cook Time: 12 minutes
- Total Time: 27 minutes
- Yield: 24 cookies 1x
- Category: Dessert
- Method: Baking
- Cuisine: American
- Diet: Vegetarian
Ingredients
- 1 cup of unsalted butter, softened
- 1 cup of brown sugar
- 1/2 cup of granulated sugar
- 2 large eggs
- 1 teaspoon of vanilla extract
- 2 cups of all-purpose flour
- 1 teaspoon of baking soda
- 1/2 teaspoon of salt
- 2 cups of old-fashioned oats
- 1 cup of chocolate chips
- 1 cup of candy eyes
Instructions
- Preheat the oven: Preheat your oven to 350°F (175°C).
- Cream the butter and sugars: In a large mixing bowl, add the softened butter, brown sugar, and granulated sugar. Cream them together until light and fluffy.
- Add eggs and vanilla: Crack the eggs into the bowl and pour in the vanilla extract. Mix until combined.
- Combine dry ingredients: In another bowl, whisk together the flour, baking soda, and salt. Gradually add this dry mixture to your wet ingredients.
- Fold in the oats and chocolate chips: Add the oats and chocolate chips into the dough and fold them in gently.
- Add the candy eyes: Gently fold in the candy eyes, ensuring they’re evenly distributed.
- Scoop the dough: Drop generous portions of dough onto a baking sheet lined with parchment paper.
- Bake: Place the baking sheet in the oven and bake for 10-12 minutes.
- Cool: Let the cookies sit on the baking sheet for 5 minutes before transferring them to a wire rack.
Notes
For a nutty flavor, consider adding chopped nuts. These cookies are versatile and can be made gluten-free by using a gluten-free flour blend.
Nutrition
- Serving Size: 1 cookie
- Calories: 150
- Sugar: 9g
- Sodium: 100mg
- Fat: 7g
- Saturated Fat: 4g
- Unsaturated Fat: 2g
- Trans Fat: 0g
- Carbohydrates: 20g
- Fiber: 1g
- Protein: 2g
- Cholesterol: 30mg
Keywords: cookies, monster cookies, baking, fun treats, snacks
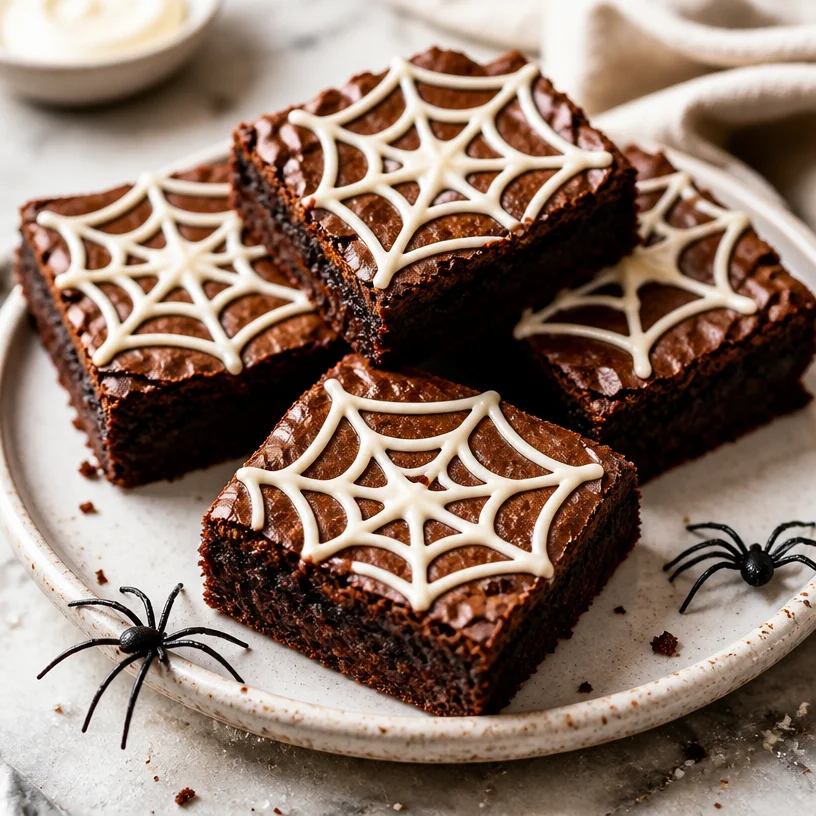
Halloween Spider Web Brownies: Easy Crowd-Pleasing Treat
Spider Web Brownies: A Spooktacular Treat for Every Occasion
Hello, fellow food lovers! Get ready to indulge in a delightful fusion of decadence and whimsy with my Spider Web Brownies. These rich, fudgy brownies topped with easy-to-make white icing are sure to be a hit at any gathering—be it a Halloween celebration, a cozy get-together, or even a potluck. The combination of ooey-gooey chocolate and a playful spooky design will have everyone reaching for seconds!
A Taste of Nostalgia
When I think about brownies, I can’t help but remember my childhood baking marathons with my grandmother. She would invite me into her warm kitchen, filling the air with rich chocolate aromas that felt like a warm hug. We would whip up her famous brownies, and she would let me add the finishing touches—sometimes nuts, sometimes frosting, but always with a sprinkle of love.
One Halloween, we got a bit adventurous and decided to turn those classic brownies into Spider Web Brownies. With some white icing for web designs and a few plastic spiders as dramatic decor, we transformed her tray of delectable treats into spooky masterpieces. Watching my friends’ eyes widen with delight when they saw those eerie yet adorable treats is a memory I’ll always cherish. Let’s dive into this joy of baking together!
Ingredients
To create your own Spider Web Brownies, you’ll need the following ingredients:
-
1 batch of brownies (your favorite recipe or box mix)
- Chef Insight: If you opt for a box mix, choose a high-quality one to ensure rich flavors. Can’t find a mix? My simple homemade brownie recipe uses dark chocolate for extra depth!
-
White icing (store-bought or homemade)
- Substitution Tip: If you prefer to avoid store-bought icing, mix powdered sugar with a tiny bit of milk and vanilla extract until you reach a smooth, pipeable consistency. Easy and delicious!
Step-by-Step Instructions
Ready to dive into the fun? Let’s get those brownies baking!
-
Prepare Your Brownies:
- Preheat your oven as per your brownie recipe’s instructions (usually around 350°F or 175°C).
- Grease a baking pan with non-stick spray or line it with parchment paper for easy removal. Trust me; you’ll thank me later!
-
Mixing the Batter:
- If you’re making brownies from scratch, melt your chocolate and butter together. Stir in sugar, then eggs, followed by flour and vanilla. Mix until combined, being careful not to over-mix.
- For boxed brownies, follow the package instructions—make sure to mix until smooth.
-
Bake the Brownies:
- Pour your batter into the prepared pan, spreading it evenly. Bake for the recommended time (usually about 20–25 minutes) until a toothpick inserted comes out with a few moist crumbs. Remember, it’s okay if they look a little gooey—they’ll firm up as they cool!
-
Cool and Decorate:
- Once baked, remove the brownies from the oven and let them cool completely in the pan before transferring them to a wire rack.
- Once cool, drizzle the white icing on top. This is where the fun begins! To make a spider web, start by piping a spiral from the center outward. Then make straight lines from the center to the edge of the pan to create the iconic web design. Use a toothpick or skewer to gently drag lines for the web effect.
-
Add Some Spooky Flair:
- As a final touch, you can add some plastic spiders (or candy spiders for a sweeter twist) on top. They’ll give your brownies that perfect spooky vibe.
Serving Suggestions
Serve your Spider Web Brownies on a festive platter, and don’t forget to decorate the table with some fall-themed items. Add a few mini pumpkins or fake cobwebs to create an inviting atmosphere. When serving, be sure to cut generous squares—these treats are meant to be shared and savored!
Recipe Variations
Feeling adventurous? Here are some fun twists you can try with your Spider Web Brownies:
- Peanut Butter Swirl: Before baking, swirl in some peanut butter for an extra layer of flavor.
- Minty Madness: Add a drop of peppermint extract to the brownie batter for a minty surprise.
- Nutty Delight: Toss in some chopped walnuts or pecans to add a crunchy texture.
- Gluten-Free Alternative: Substitute traditional flour with a gluten-free blend for a delicious inclusive option.
- Flavored Icing: Use colored icing or flavored icings (like vanilla or almond) to switch things up!
Chef’s Notes
These Spider Web Brownies have a special place in my heart and have evolved over the years. Initially, I used to go all out with themes for every holiday. Now, I appreciate the simplicity of elegant touches. Although I still sprinkle in those fun designs, I love how they can add a little magic to everyday moments.
Once during a cooking class, I jokingly added gummy worms to the mix thinking it’d be hilarious. Let’s just say, it was way more popular than I anticipated! Though I’m back to spiders for the classic Halloween vibes, don’t be afraid to get creative with toppings.
FAQs and Troubleshooting
1. Why are my brownies too cakey?
If your brownies turned out too cakey, it may be because you overmixed the batter or baked them too long. Stick to the cooking time indicated in the recipe, and resist the urge to over-mix!
2. My icing is too runny. How can I fix it?
If your icing is runny, add more powdered sugar a tablespoon at a time until it reaches your desired thickness. You want it smooth but pipeable!
3. Can I freeze the brownies?
Absolutely! Once the brownies are fully cooled, you can freeze them before icing. Wrap them tightly in plastic wrap and foil, and they’ll last up to three months in the freezer. Just thaw and ice them when you’re ready to enjoy!
4. How do I store the decorated brownies?
Store your decorated brownies in an airtight container at room temperature for up to five days. If using icing, it’s best to consume them sooner for the best taste and presentation.
Nutritional Info
While nutritional information will vary based on your chosen recipe for brownies and icing, a typical serving boasts around 250-300 calories. Each brownie brings a delightful mix of fats, sugars, and carbohydrates that cater to your sweet tooth while keeping those moments around the table joyful. Just remember: moderation is key!
There you have it—a whimsical yet delectable recipe for Spider Web Brownies that will bring delight to any gathering. I hope you enjoy making these spooky treats as much as I enjoyed sharing the recipe with you! Tie on that apron, have some fun in the kitchen, and remember that every bite should be as joyous as the gathering itself. Happy baking!
PrintSpider Web Brownies
Delightful fudgy brownies decorated with a spooky spider web design, perfect for Halloween or any gathering.
- Prep Time: 15 minutes
- Cook Time: 25 minutes
- Total Time: 40 minutes
- Yield: 16 servings 1x
- Category: Dessert
- Method: Baking
- Cuisine: American
- Diet: Vegetarian
Ingredients
- 1 batch of brownies (your favorite recipe or box mix)
- White icing (store-bought or homemade)
Instructions
- Preheat your oven as per your brownie recipe’s instructions (usually around 350°F or 175°C).
- Grease a baking pan with non-stick spray or line it with parchment paper for easy removal.
- Melt your chocolate and butter together if making from scratch, then stir in sugar, eggs, flour, and vanilla until combined.
- Pour your batter into the prepared pan and bake for 20–25 minutes until a toothpick comes out with a few moist crumbs.
- Cool completely in the pan before transferring to a wire rack.
- Drizzle white icing on top to create the spider web design by piping a spiral and dragging lines with a toothpick.
- Add plastic spiders or candy spiders on top for decoration.
Notes
These brownies can be customized with different toppings and flavors to suit your taste. Enjoy the festive presentation!
Nutrition
- Serving Size: 1 brownie
- Calories: 300
- Sugar: 25g
- Sodium: 200mg
- Fat: 15g
- Saturated Fat: 8g
- Unsaturated Fat: 6g
- Trans Fat: 0g
- Carbohydrates: 40g
- Fiber: 2g
- Protein: 4g
- Cholesterol: 30mg
Keywords: brownies, Halloween, dessert, spider web, chocolate
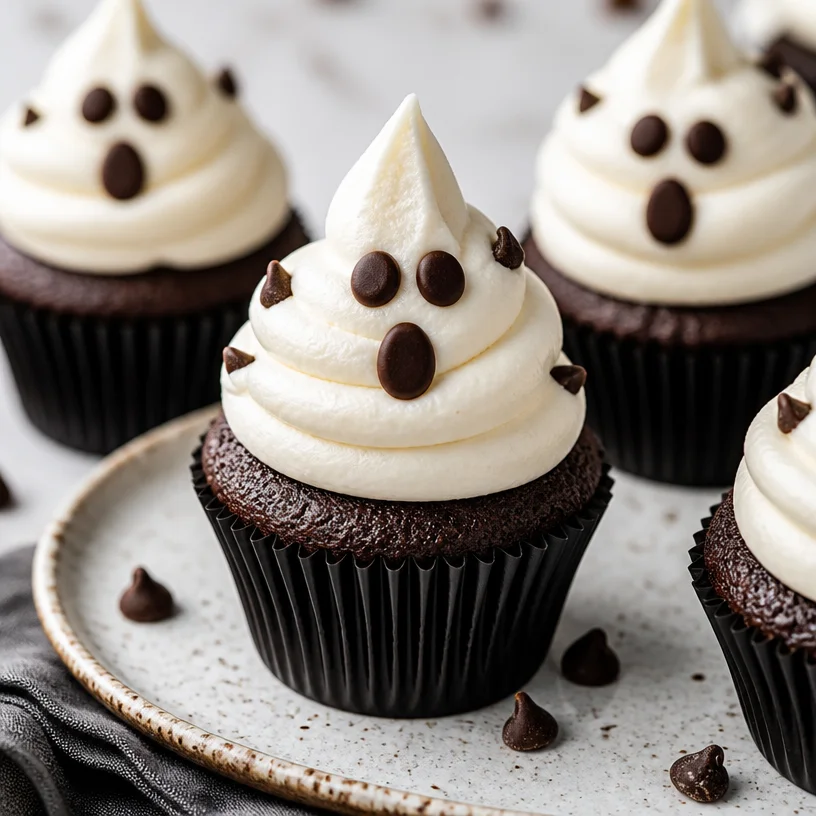
Ghost Cupcakes
Ghost Cupcakes: A Spooktacular Treat for Ghoulish Gatherings
Hello, fellow food enthusiasts! Today, we’re diving into the whimsically delicious world of Ghost Cupcakes—the perfect treat to haunt your kitchen and delight your guests! Whether you’re hosting a Halloween bash or simply looking to add a touch of seasonal fun to your dessert table, these charming little cupcakes will brighten any gathering with their spooky faces and delightful flavors.
Imagine soft, fluffy cupcakes topped with silky buttercream, decorated to look like friendly little ghosts—irresistible, right? I remember the first time I made these whimsical treats with my niece. We set out on an adventurous baking mission, armed with a sprinkle of mischief and a whole lot of enthusiasm. As we whipped up the batter, flour flew into the air like a cloud of spooky magic, and giggles echoed throughout the kitchen. The best part? Licking the bowl and, of course, decorating those cupcakes to capture the perfect ghostly spirit!
Baking allows us to create memories and share joy, and these Ghost Cupcakes are no exception. So, let’s slip on our aprons, grab those mixing bowls, and channel our inner ghostly chefs!
My Ghostly Baking Memory
One Halloween night, many years ago, I found myself whipped up a cupcake party in our kitchen with friends. We were a motley crew of aspiring bakers, and our task was to concoct the spookiest treats we could dream of. Little did we know that what started as a quest for the creepiest cupcake would result in a night of belly laughs, flour fights, and plenty of ghostly confections.
As the evening rolled on, we experimented with flavors, and I decided to add a light touch of almond extract to my batter. My friends were curious—how would that taste? By the end of the night, those cupcakes turned out not just to be frighteningly adorable but also absolutely delicious! That night, amidst the laughter and chaos, I learned a valuable lesson: Baking isn’t just about the final product; it’s about the joy of creating together. And now, I’m excited to share this ghostly delight with you!
Ingredients
Let’s gather our ingredients for these delightful Ghost Cupcakes! I promise you’ll find every bite worth haunting.
-
1 ½ cups all-purpose flour
A vital ingredient for structure and stability. For gluten-free options, you can swap this with a 1:1 gluten-free baking flour blend. -
1 ½ teaspoons baking powder
This is our little magic ingredient that makes cupcakes rise and become fluffy! Make sure it’s fresh; old baking powder can lead to dense cupcakes. -
½ teaspoon salt
A pinch of salt enhances the flavor of the sweet ingredients, bringing balance to your cupcakes. -
½ cup unsalted butter, softened
Creaming butter adds a rich flavor and tender texture. If you’re dairy-free, substituting with coconut oil or a vegan margarine works just as well. -
1 cup sugar
This is essential for sweetness! For a healthier option, you could use coconut sugar or a sugar substitute, but make sure to check your ratios. -
2 large eggs
Eggs help bind the ingredients, creating a wonderful structure. For vegan cupcakes, you can use ½ a mashed banana or ¼ cup of applesauce per egg. -
1 teaspoon vanilla extract
Pure vanilla extract adds fragrance and depth of flavor. If you’re in a pinch, imitation vanilla works, but there’s no substitute for the real thing! -
½ cup milk
This moisture-rich ingredient keeps your cupcakes tender. You can easily use any plant-based milk, like almond or oat milk, to suit dietary needs. -
1 cup buttercream frosting
The ghoulish topping! If time is tight, you can use store-bought buttercream or whip up a quick homemade version. -
Chocolate chips, for eyes
Mini chocolate chips are perfect for creating a spooky yet cute look for our ghosts!
Step-by-Step Instructions
Now that we have our ingredients, let’s get our ghostly bake on! Follow these steps for perfectly fluffy Ghost Cupcakes:
Step 1: Preheat and Prep
Preheat your oven to 350°F (175°C). Line a cupcake pan with paper liners—choose fun ones to add to the spirit of the occasion. I like to use white liners to complement the ghostly theme!
Step 2: Whisk Dry Ingredients
In a large mixing bowl, whisk together the flour, baking powder, and salt. Get your whisk moving! This is crucial for ensuring the baking powder is evenly distributed, leading to beautifully risen cupcakes.
Step 3: Cream the Butter and Sugar
In another bowl, cream the softened butter and sugar together until light and fluffy—about 3–4 minutes. If your butter isn’t soft enough, cheat a little and microwave it for 10 seconds. Just remember, we want it soft, not melted!
Step 4: Add Eggs and Vanilla
Crack in the eggs one at a time, mixing well after each addition. Pour in that glorious vanilla extract and give it a quick mix. Your kitchen should be starting to smell divine by now!
Step 5: Combine Wet and Dry
Next, alternate adding the flour mixture and milk to the butter mixture, starting and ending with the flour. This method ensures that the batter remains light and fluffy. Mix just until combined—don’t overdo it!
Step 6: Fill the Cupcake Liners
With a spoon (or a cookie scoop for even portions), fill each cupcake liner about ⅔ of the way full with batter. This gives them enough room to rise without overflowing.
Step 7: Bake!
Place your cupcake pan in the preheated oven and bake for 18–20 minutes, or until a toothpick inserted in the center comes out clean. Every oven is different, so start checking at the 18-minute mark.
Step 8: Cool Completely
Once baked, let your cupcakes cool in the pan for 5 minutes, then carefully transfer them to a wire rack to cool completely. Resist the urge to frost them when they’re warm; let them cool down to prevent your buttercream from melting away!
Step 9: Frost the Ghosts
Once the cupcakes are completely cool, it’s time to frost! If you have a piping bag, use a round tip for that ghostly swirl, or you can apply frosting with a spatula. Let your creativity flow like a spooky apparition!
Step 10: Create Ghostly Faces
Use mini chocolate chips to stick onto the buttercream, creating cute little eyes. You can make them happy, surprised, or even mischievous! Just remember, the scarier the face, the sweeter the treat.
Serving Suggestions
To serve, arrange your Ghost Cupcakes on a spooky-themed cake stand or a simple white platter. They look fabulous when surrounded by seasonal décor—think pumpkins, spider webs, and a few flickering candles for a hauntingly festive atmosphere!
Recipe Variations
Feeling adventurous? Here are some fun twists you can try with your Ghost Cupcakes:
- Choco-Ghost Delight: Incorporate mini chocolate chips into the batter for extra chocolatey goodness.
- Pumpkin Spice Ghosts: Replace ½ cup of the flour with canned pumpkin puree and add 1 teaspoon pumpkin spice for a fall twist.
- Colorful Spooks: Tweak the vanilla buttercream with some food coloring for pastel or vibrant ghosts.
- Vegan Ghosties: Follow the substitutions mentioned in the ingredient section to make your treats vegan-friendly.
- Spicy Cinnamon Ghosts: Add a teaspoon of cinnamon and a pinch of nutmeg for a warm, spicy flavor perfect for autumn.
Chef’s Notes
Ghost Cupcakes hold a special place in my heart—not only for their incredible flavors but also for the joy they bring when shared. Over the years, this recipe has evolved; whether experimenting with different flavors or offering gluten-free choices, each iteration has added to the fun! The true essence of these cupcakes lies in the smiles they bring as friends and family gather around. So, grab your favorite spooky playlist, and let’s bake up a storm!
FAQs and Troubleshooting
Q: My cupcakes sunk in the middle. What went wrong?
A: Most often, this can be due to overmixing the batter or not testing your oven temperature accurately. Always ensure your batter is mixed just until combined, and consider using an oven thermometer for precision!
Q: Can I make the batter ahead of time?
A: You can prepare the batter in advance, but I recommend baking them right before you need them. Freshly baked cupcakes yield the best flavor and texture.
Q: How do I store unused cupcakes?
A: Store your Ghost Cupcakes in an airtight container at room temperature for up to 3 days. If you frost them, they can last a little less. For longer storage, freeze un-frosted cupcakes for up to 3 months.
Q: What should I do if my frosting is too runny?
A: If your buttercream is runny, try adding more powdered sugar to thicken it up. You can also refrigerate it for a short while to firm it up before frosting.
Now that you’ve dipped your toes into this delightful Halloween treat, I hope you feel inspired to bake your own Ghost Cupcakes! They’re not just a treat; they’re a chance to create connections and build memories around your table. Happy baking!
PrintGhost Cupcakes
Whimsical Ghost Cupcakes topped with silky buttercream, perfect for Halloween gatherings.
- Prep Time: 15 minutes
- Cook Time: 20 minutes
- Total Time: 35 minutes
- Yield: 12 servings 1x
- Category: Dessert
- Method: Baking
- Cuisine: American
- Diet: Vegetarian
Ingredients
- 1 ½ cups all-purpose flour
- 1 ½ teaspoons baking powder
- ½ teaspoon salt
- ½ cup unsalted butter, softened
- 1 cup sugar
- 2 large eggs
- 1 teaspoon vanilla extract
- ½ cup milk
- 1 cup buttercream frosting
- Chocolate chips, for eyes
Instructions
- Preheat your oven to 350°F (175°C). Line a cupcake pan with paper liners.
- Whisk together the flour, baking powder, and salt in a large mixing bowl.
- Cream the softened butter and sugar together until light and fluffy—about 3–4 minutes.
- Add the eggs one at a time, mixing well after each addition. Pour in the vanilla extract and mix again.
- Combine the flour mixture and milk to the butter mixture, alternating between the two, starting and ending with flour.
- Fill each cupcake liner about ⅔ of the way full with batter.
- Bake for 18–20 minutes, or until a toothpick inserted in the center comes out clean.
- Cool the cupcakes in the pan for 5 minutes, then transfer to a wire rack to cool completely.
- Frost the cooled cupcakes with frosting and use mini chocolate chips for eyes to create ghostly faces.
Notes
For gluten-free cupcakes, swap all-purpose flour with a gluten-free baking flour blend. You can personalize frosting colors and add flavors to the batter for variations.
Nutrition
- Serving Size: 1 cupcake
- Calories: 200
- Sugar: 15g
- Sodium: 150mg
- Fat: 8g
- Saturated Fat: 5g
- Unsaturated Fat: 2g
- Trans Fat: 0g
- Carbohydrates: 28g
- Fiber: 0g
- Protein: 2g
- Cholesterol: 30mg
Keywords: Ghost Cupcakes, Halloween Treats, Dessert, Fun Recipes, Baking