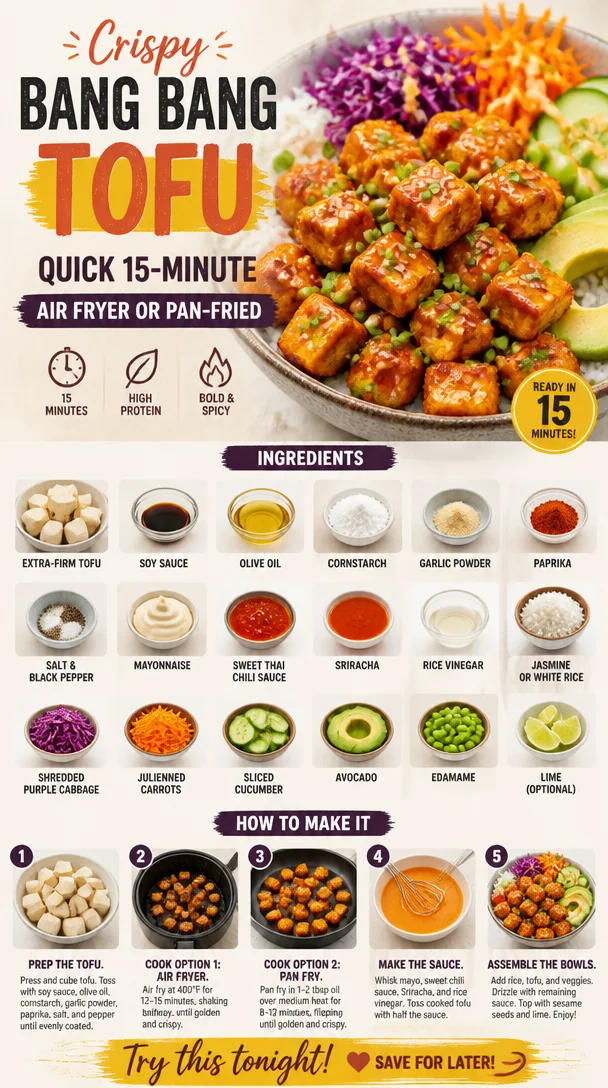
Crispy Bang Bang Tofu: Quick 15-Minute Air Fryer or Pan-Fried
Hello, fellow food lovers! If you’re ready to spice up your weeknight dinners with a dish that’s bursting with flavor, you’ve come to the right place. Today, we’re diving into the world of Bang Bang Tofu, a recipe that’s just as fun to make as it is to eat. Whether you’re a seasoned chef or just starting your culinary journey, this dish is all about embracing the joy of cooking while creating something deliciously satisfying.
Picture this: crispy, golden tofu triangles coated in a creamy, tangy sauce that dances between sweet and spicy. Trust me, once you take a bite, you’ll be hooked. Not only is this dish a feast for the taste buds, but it’s also perfect for those looking to explore a plant-based lifestyle without sacrificing flavor. Plus, we’ll be whipping this up using either an air fryer for that extra crunch or a good ol’ pan-frying technique, so everyone gets a chance to shine in the kitchen!
Now, you might be wondering why it’s called "Bang Bang Tofu." Well, the name is all about that zingy sauce that packs a punch, reminiscent of the famous bang bang shrimp but with a delightful plant-based twist. So, let’s grab our aprons, pour ourselves a glass of something refreshing, and get ready to create a meal that celebrates flavor and fun!
Personal Story
I remember the first time I had bang bang anything—my friend Lisa picked this charming little restaurant for our girls’ night out, and I was completely taken with the vibrant flavors of the dish on her plate. The sweet and spicy sauce was unlike anything I’d ever tried, and it set my creative juices flowing. I knew I had to replicate it at home. After several attempts and a few not-so-successful experiments (let’s just say my kitchen had more than one “creative mess”), I finally landed on a version that not only honored that initial flavor explosion but also featured my beloved tofu, which holds up beautifully to all those bold flavors.
Sharing that dish with loved ones at dinner parties became a tradition, just as important to me as setting the table and gathering everyone together. It perfectly encapsulated my philosophy: good food isn’t just about taste; it’s about creating connections, memories, and full bellies. Now, I’m excited to share this recipe with you, so you can make your own memories around the table!
Ingredients
Gathering the right ingredients is key to making this dish come alive. Here’s what you’ll need to whip up a spectacular batch of Bang Bang Tofu:
-
1 14–16 oz block extra-firm tofu, pressed and cubed
The star of our show! Extra-firm tofu holds up well during cooking and gives you that crispy texture we crave. If you’re in a pinch, soft or silken tofu can work, but the result will be different—more delicate and creamier. -
1 tablespoon soy sauce
Adds a savory umami depth. For a gluten-free option, try tamari instead. -
1 tablespoon olive oil
This helps with crisping up the tofu when pan-frying. Feel free to swap it for sesame oil for an added nutty flavor! -
1-2 tablespoons cornstarch
This is the secret weapon for crunchy tofu! If you’re looking for a low-carb option, arrowroot powder is a great substitution. -
½ teaspoon garlic powder
Brings a subtle garlicky warmth. Fresh garlic is also a delightful option for that extra punch but may yield a stronger flavor. -
½ teaspoon paprika
Adds a hint of smokiness. You can use smoked paprika for an even richer flavor. -
Salt and black pepper (to taste)
Essential for seasoning. Don’t skimp—season your tofu well to enhance its flavor! -
¼ cup mayonnaise
The base of our creamy sauce. If you prefer a vegan option, try silken tofu blended until smooth or a store-bought vegan mayo. -
1 ½ tablespoon sweet Thai chili sauce
Adds sweetness and a delightful kick! Adjust based on your spice tolerance. -
1 ½ teaspoon Sriracha
For that fiery finish! You can adjust the amount to match your heat preference. -
½ teaspoon rice vinegar
Balances out the richness of the mayo. A touch of lemon juice works in a pinch for brightness. -
Optional for serving:
- Cooked jasmine or white rice
For a nice base to soak up all that lovely sauce. - Shredded purple cabbage
Adds a pop of color and crunch. - Julienned carrots
A refreshing, sweet crunch to complement the dish. - Sliced cucumber
Cooling and crisp, perfect alongside the spicy tofu. - Avocado
Creamy slices elevate your dish in a delightful way. - Edamame
A great source of protein, offering a nice bite to the meal.
- Cooked jasmine or white rice
Step-by-Step Instructions
Ready to get cooking? Let’s break it down into easy, manageable steps to make our Bang Bang Tofu shine.
Step 1: Press the Tofu
Before we dive into frying, we need to ensure our tofu is adequately pressed to remove excess moisture. This is crucial for that sought-after crisp! Wrap your tofu block in a clean dish towel or paper towels, and place something heavy on top (like a skillet or canned goods) for about 15-30 minutes. While you wait, you can start preparing your sauce!
Step 2: Prepare Your Sauce
In a small bowl, mix together the mayonnaise, sweet Thai chili sauce, Sriracha, and rice vinegar. Give it a good stir until everything is well combined. Depending on your taste preferences, feel free to adjust the Sriracha for more heat or sweeten it up with a bit more chili sauce. Set this aside while we work on the tofu.
Step 3: Cut the Tofu
Once the tofu is pressed, cut it into even cubes or triangles—whatever shape you prefer! This will help ensure even cooking. The smaller the pieces, the crispier they’ll be, so keep that in mind!
Step 4: Season the Tofu
In a mixing bowl, combine your pressed tofu cubes with soy sauce, olive oil, garlic powder, paprika, cornstarch, salt, and black pepper. Gently toss everything together until each piece of tofu is well coated. This is where the magic begins! The cornstarch helps create that beautiful, crispy crust when cooked.
Step 5: Choose Your Cooking Method
Now, we’ll decide how to cook our tofu. Choose between air frying or pan-frying—both have their perks!
Air Fryer Method:
- Preheat your air fryer to 400°F (200°C).
- Arrange the tofu cubes in a single layer in the air fryer basket (you may need to work in batches).
- Air fry for about 15-20 minutes, shaking the basket halfway through to ensure even crisping. You want them golden brown and crispy!
Pan-Frying Method:
- In a large skillet, heat a few tablespoons of oil over medium-high heat.
- Once the oil is hot, carefully add the tofu in a single layer, making sure not to overcrowd the pan (you may need to cook in batches if necessary).
- Fry each side for about 3-4 minutes or until golden brown and crispy, flipping them gently to avoid breakage. Remove them once they’re perfectly crispy and transfer to a paper towel-lined plate to drain excess oil.
Step 6: Mix the Tofu with the Sauce
Once your tofu is beautifully crispy, return it to the mixing bowl with your prepared sauce. Toss gently to coat each piece without breaking the tofu. You want that yummy sauce to cling to every corner!
Step 7: Assemble Your Dish
It’s time to serve! If you’re adding rice, place a generous scoop on the bottom of your plate. Layer some shredded purple cabbage, julienned carrots, sliced cucumber, and edamame. Finally, finish off by topping with your sauced-up Bang Bang Tofu and a sprinkle of sesame seeds or chopped green onions for that final touch.
Serving Suggestions
For an extra splash of color and texture, consider adding some avocado slices on top of your dish. Not only does it look stunning, but that creamy goodness complements the crispy tofu beautifully. Arrange everything thoughtfully on the plate, showcasing the vibrant colors of the vegetables against the crispy tofu bites. Invite your friends and family to sit down and dig in—this dish is not just a meal; it’s an experience!
Recipe Variations
Let’s sprinkle in some creativity to keep things fresh! Here are a few delightful twist options for our Bang Bang Tofu:
- Spicy Bang Bang Cauliflower: Swap out tofu for cauliflower florets. Just coat them as you would the tofu and roast or air fry until crispy.
- Crispy Bang Bang Eggplant: Eggplant is a fantastic substitution! Slice it into thick rounds, coat similarly, and pan-fry until wonderfully golden.
- Bang Bang Tofu Tacos: Serve your bang bang tofu inside corn tortillas with some fresh cilantro, avocado, and lime for a zesty twist.
- Soy-Free Option: Use coconut aminos instead of soy sauce for a soy-free version while retaining flavor!
Chef’s Notes
Oh, and let me tell you—the evolution of this recipe was a journey! In my early testing days, I experimented endlessly with the sauce, adding ingredients I thought might dazzle. One night, I included too much vinegar by accident—dad walked in, tasted it, and gave me that classic “what have you done?” look. Tuning in to how the flavors meld together was an essential part of the learning process. Perfection comes with practice, and I can promise you, this recipe is a crowd favorite!
FAQs and Troubleshooting
1. Why is my tofu not crispy?
Make sure you press the tofu adequately to remove excess moisture and use cornstarch as a coating. If pan-frying, ensure your oil is hot enough before adding the tofu.
2. Can I make this recipe ahead of time?
You can prep the tofu and sauce ahead, but for the best texture, fry it just before serving. Reheating can make the tofu lose its crispiness.
3. How can I store leftovers?
Store any leftovers in an airtight container in the refrigerator for up to 3 days. To reheat, pop them in the air fryer for a few minutes to revive some of that crispiness.
4. What’s a good dipping sauce?
The bang bang sauce is fantastic on its own; however, a sweet and sour or peanut sauce would also complement the dish beautifully!
Nutritional Info
(Please note this is approximate and may vary based on brands and specific quantities used.)
- Calories: ~350 per serving (based on serving size of tofu and sauce only)
- Protein: ~10g
- Carbohydrates: ~20g
- Fat: ~25g
Conclusion
And there you have it, my friends! A deliciously bold, crispy Bang Bang Tofu dish that’s perfect for any occasion—be it a cozy weeknight dinner or a lively gathering. Remember, the heart of good food is all about making memories, so let this recipe inspire you to gather around the table and share in the beauty of creating meals together.
If you try this recipe (which I guarantee you will love), let me know how it goes! Happy cooking, and here’s to many bang bang moments around your table!
PrintBang Bang Tofu
A crispy, golden tofu dish coated in a creamy, tangy sauce that balances sweet and spicy flavors, perfect for plant-based meals.
- Prep Time: 15 minutes
- Cook Time: 30 minutes
- Total Time: 45 minutes
- Yield: 4 servings 1x
- Category: Main Course
- Method: Air Frying, Pan-Frying
- Cuisine: Asian
- Diet: Vegan
Ingredients
- 1 14–16 oz block extra-firm tofu, pressed and cubed
- 1 tablespoon soy sauce
- 1 tablespoon olive oil
- 1–2 tablespoons cornstarch
- ½ teaspoon garlic powder
- ½ teaspoon paprika
- Salt and black pepper (to taste)
- ¼ cup mayonnaise
- 1 ½ tablespoon sweet Thai chili sauce
- 1 ½ teaspoon Sriracha
- ½ teaspoon rice vinegar
- Optional for serving: cooked jasmine or white rice, shredded purple cabbage, julienned carrots, sliced cucumber, avocado, edamame
Instructions
- Press the tofu to remove excess moisture for about 15-30 minutes.
- Prepare the sauce by mixing mayonnaise, sweet Thai chili sauce, Sriracha, and rice vinegar until well combined.
- Cut the pressed tofu into even cubes or triangles.
- Season the tofu with soy sauce, olive oil, garlic powder, paprika, cornstarch, salt, and black pepper.
- Choose your cooking method: air fryer or pan-frying.
- Mix the crispy tofu with the prepared sauce to coat each piece.
- Assemble the dish with rice and toppings as desired.
Notes
For extra crunch, air fry at 400°F (200°C) for 15-20 minutes, shaking halfway through. Adjust spice levels to personal preference.
Nutrition
- Serving Size: 1 serving
- Calories: 350
- Sugar: 5g
- Sodium: 400mg
- Fat: 25g
- Saturated Fat: 4g
- Unsaturated Fat: 15g
- Trans Fat: 0g
- Carbohydrates: 20g
- Fiber: 3g
- Protein: 10g
- Cholesterol: 0mg
Keywords: Bang Bang Tofu, Vegan Tofu Recipe, Crispy Tofu, Plant-Based Meals, East Asian Cuisine
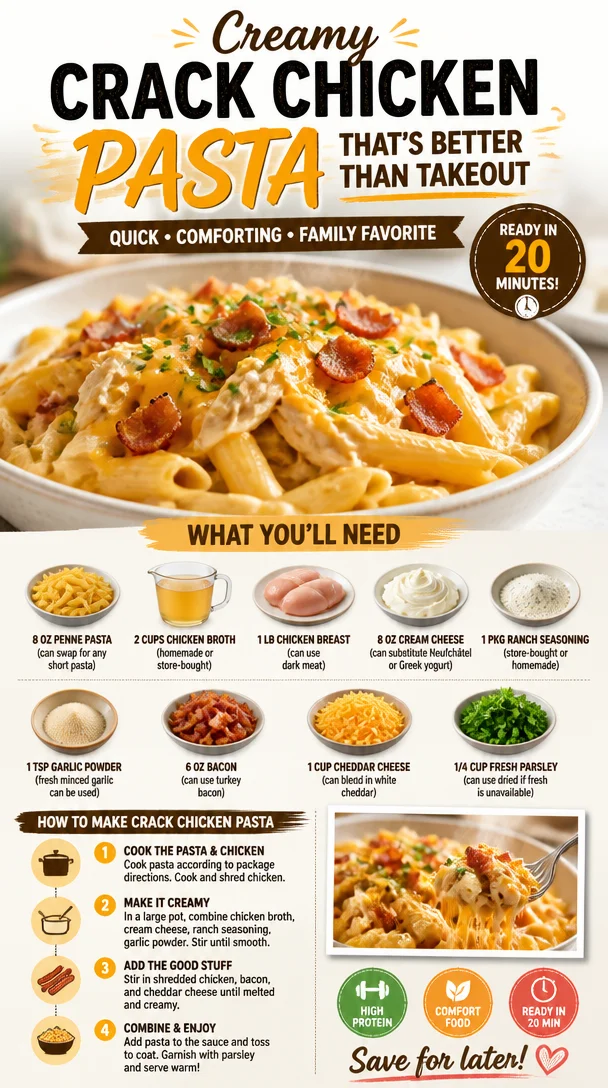
Creamy Crack Chicken Pasta That’s Better Than Takeout
Creamy Crack Chicken Pasta That’s Better Than Takeout
Hello, fellow food lovers! Today, I’m thrilled to share with you a dish that embodies everything sumptuous and comforting about weeknight dinners—Creamy Crack Chicken Pasta. Not only is it better than takeout, but it’s also so straightforward that you’ll wonder why you ever considered ordering in again.
Introduction
Imagine this: it’s a chilly evening, the kind that makes you want to curl up with a cozy blanket and a show, but your stomach is growling for something hearty. Enter this Creamy Crack Chicken Pasta! It’s indulgent, creamy, and loaded with flavor, making every mouthful a little hug from the inside.
What’s even better? You probably have most of the ingredients in your kitchen already. This dish is a culmination of my favorite things—chicken, cheese, and a kick of ranch seasoning that takes the flavor profile to a delightful new level. With just a few pantry staples and some love, you’ll whip up a meal that will have your family flocking to the table. And if they start to linger just a little bit longer than usual, I won’t blame them!
The concept of “Crack Chicken”—a creamy, ranch-infused dish that’s been making waves on social media—gets a pasta twist here. Each bite is creamy and full of savory goodness, thanks to the cream cheese and cheddar, while the bacon adds that oh-so-delicious crunch. Perfect for a cozy night in or a casual gathering with friends, this dish is versatile, comforting, and unapologetically delicious. So, grab your apron, and let’s get cooking!
Personal Story
There’s something magical about the combination of chicken and cheese that always takes me back to family dinners growing up. I remember my mom making her infamous creamy chicken bake on special occasions, where chicken was cooked to juicy perfection and wrapped in a velvety cheese sauce. I would hover around the kitchen, impatiently waiting for her to serve it up. It became a signature dish that everyone anticipated, not just for its flavor, but also for the love and laughter that filled the room.
When I first tried a version of Crack Chicken on social media, I couldn’t help but feel nostalgic. As I experimented with its flavors, I realized I could elevate it with pasta! The idea of adding penne to this creamy concoction brought back fond memories and tied everything together. Now, every time I make this dish, I feel like I’m serving up a little slice of my childhood while simultaneously creating new memories with friends and family.
Ingredients
Here’s what you’ll need:
-
8 oz Penne Pasta
This is the star of the show! Short pasta shapes like penne hold onto the creamy sauce beautifully. You can easily substitute it with any short pasta, such as rigatoni or rotini, depending on what you have on hand. -
2 cups Chicken Broth
Using homemade chicken broth adds a depth of flavor, but store-bought works perfectly fine too! Look for low-sodium options to control the salt content. -
1 lb Chicken Breast
Chicken breast is lean and cooks quickly, but feel free to use darker cuts like thighs for a richer flavor. -
8 oz Cream Cheese
A key player in making the pasta oh-so-creamy! If you’re looking for a lighter option, Neufchâtel cheese or even Greek yogurt can work as substitutes without compromising the texture too much. -
1 pkg Ranch Seasoning
You can purchase this from the store, or if you’re feeling adventurous, whip up a homemade blend with dill, garlic, onion powder, and a pinch of salt. -
1 tsp Garlic Powder
If you prefer fresh flavors, one to two cloves of minced garlic will work wonders here. -
6 oz Bacon
Because bacon makes everything better! For a healthier twist, turkey bacon will still give you the crispy goodness without the added fat. -
1 cup Cheddar Cheese
Sharp cheddar works really well, but blending in some white cheddar or even pepper jack can add an exciting twist to the dish. -
1/4 cup Fresh Parsley
A sprinkle of fresh parsley not only adds color but also a refreshing brightness! Dried parsley is a fantastic substitute if fresh isn’t available.
Step-by-Step Instructions
Let’s roll up our sleeves and dive into this easy cooking process. Follow these steps for a creamy and delicious dish that you can whip up in no time:
-
Cook the Pasta:
Start by boiling a large pot of salted water. Once boiling, add the penne pasta and cook according to the package instructions until al dente. Remember, we’re going to combine it with the creamy sauce later, so it’s okay if it’s a tad undercooked. Drain the pasta and set it aside. -
Cook the Chicken:
In a large skillet, heat a drizzle of olive oil over medium heat. Season the chicken breast with salt and pepper, and add it to the skillet. Cook for about 6-7 minutes per side, or until the chicken reaches an internal temperature of 165°F. A quick tip: Let the chicken sit for a minute before slicing so that the juices redistribute and keep the meat moist. Once cooked, shred it with two forks (or go ahead and chop it for a chunkier style). -
Sauté the Bacon:
In the same skillet (because why dirty more dishes?), cook the bacon until crispy. This will allow the drippings to flavor the subsequent steps. Remove the bacon, crumble it, and set it aside. Don’t wipe the skillet clean; all those lovely bits will add flavor! -
Create the Sauce:
Now, in the same skillet, reduce the heat to low. Pour in the chicken broth, followed by the cream cheese, ranch seasoning, and garlic powder. Stir until the cream cheese is completely melted and everything is well-combined. This is where the magic happens, so take your time and appreciate the aromas! -
Combine Everything:
Add the shredded chicken and cooked pasta to the creamy sauce. Give a good stir until everything is beautifully coated in richness. If you find the mixture is too thick, don’t be shy to add a splash more chicken broth until you get your desired consistency! -
Cheesy Goodness:
Sprinkle in the cheddar cheese, stirring until it melts into the sauce. You’ll see it become gooey and irresistible. Don’t forget to taste it now—this is when you can adjust seasonings if you wish! -
Add the Bacon and Parsley:
Finally, fold in the crumbled bacon and chopped parsley. This adds that crunchy texture and fresh flavor we’re after!
Serving Suggestions
Plate your Creamy Crack Chicken Pasta with a generous sprinkle of fresh parsley on top. You can also add additional cheese or a sprinkle of crushed red pepper flakes for some extra heat. Serve it with a side of crusty garlic bread to scoop up every last bit of creamy goodness—trust me, you won’t want to waste any leftovers!
Recipe Variations
Feeling adventurous? Here are some creative twists you can try on this delicious dish:
- Vegetarian Version: Replace the chicken with sautéed mushrooms and spinach for a delicious veggie option.
- Spicy Kick: Add a teaspoon of crushed red pepper flakes or some chopped jalapeños for a zesty boost.
- Creamy One-Pot Dish: Skip the extra pot. Add the uncooked pasta directly to the skillet with the sauce ingredients, then stir in additional broth for cooking as needed.
- Herbaceous Touch: Experiment with dried herbs like thyme or rosemary for added depth in flavor.
- Cheesy Twist: Try blending in cream cheese flavored with herbs or spicy cheeses for a unique flavor profile.
Chef’s Notes
I’ll let you in on a fun kitchen story: The first time I ever attempted making a variation of this creamy dish, I miscalculated how much cream cheese I needed—not once, but twice! The first result turned out too thick, and the second too soupy! Eventually, I found that sweet spot that balanced creaminess perfectly. Now, it’s one of my go-to recipes, not just for its flavor, but for the laughs I’ve had in the kitchen while perfecting it. Cooking, after all, is a journey!
FAQs and Troubleshooting
-
Should I let the pasta cool down before mixing it with the sauce?
No need! Add the pasta directly after cooking as it helps the sauce cling beautifully and absorb flavor. -
What if my pasta gets too mushy?
Try cooking it for a minute or two less than the package instructs. It’ll soften more when mixed with the creamy sauce. -
Can I freeze the leftovers?
Yes, but note that the texture might change a bit when reheated. Just store it in an airtight container for up to 2 months and reheat slowly on the stove while adding a splash of chicken broth. -
What if I don’t have ranch seasoning?
No problem! You can whip up your own version by combining dried dill, garlic powder, onion powder, and salt.
Nutritional Info
For those curious about the nutritional breakdown, each serving (based on 4 servings per recipe) approximately contains:
- Calories: 540
- Protein: 35g
- Carbohydrates: 40g
- Fat: 28g
Remember that these values can vary based on ingredients used!
Conclusion
There you have it—Creamy Crack Chicken Pasta that’s bound to be a crowd-pleaser! It’s creamy, comforting, and packed with flavors that will make even the pickiest eaters feel right at home. Next time you’re torn between cooking at home or grabbing takeout, remember this delightful recipe!
So, tie on that apron, invite a few friends over (or keep it just for yourself), and enjoy this scrumptious dish that’s sure to become a household favorite. Happy cooking!
PrintCreamy Crack Chicken Pasta

Indulgent and creamy pasta dish with chicken, cheese, and ranch seasoning that’s better than takeout.
- Prep Time: 15 minutes
- Cook Time: 30 minutes
- Total Time: 45 minutes
- Yield: 4 servings 1x
- Category: Main Course
- Method: Stovetop
- Cuisine: American
- Diet: None
Ingredients
- 8 oz Penne Pasta
- 2 cups Chicken Broth
- 1 lb Chicken Breast
- 8 oz Cream Cheese
- 1 pkg Ranch Seasoning
- 1 tsp Garlic Powder
- 6 oz Bacon
- 1 cup Cheddar Cheese
- 1/4 cup Fresh Parsley
Instructions
- Cook the Pasta: Boil a large pot of salted water, add penne pasta, and cook until al dente. Drain and set aside.
- Cook the Chicken: Heat olive oil in a skillet over medium heat, season chicken breast, and cook until an internal temperature of 165°F. Shred the chicken.
- Sauté the Bacon: In the same skillet, cook the bacon until crispy, crumble it, and set aside.
- Create the Sauce: In the skillet, reduce heat to low, add chicken broth, cream cheese, ranch seasoning, and garlic powder. Stir until melted.
- Combine Everything: Add shredded chicken and cooked pasta to the sauce, stir to coat. Adjust consistency with additional broth if needed.
- Cheesy Goodness: Add cheddar cheese and stir until melted.
- Add the Bacon and Parsley: Fold in crumbled bacon and chopped parsley.
Notes
Serve with a sprinkle of parsley and additional cheese or red pepper flakes for extra flavor. Pair with garlic bread.
Nutrition
- Serving Size: 1 serving
- Calories: 540
- Sugar: 3g
- Sodium: 800mg
- Fat: 28g
- Saturated Fat: 12g
- Unsaturated Fat: 9g
- Trans Fat: 0g
- Carbohydrates: 40g
- Fiber: 2g
- Protein: 35g
- Cholesterol: 90mg
Keywords: pasta, chicken, creamy, comfort food, quick dinner, weeknight meal
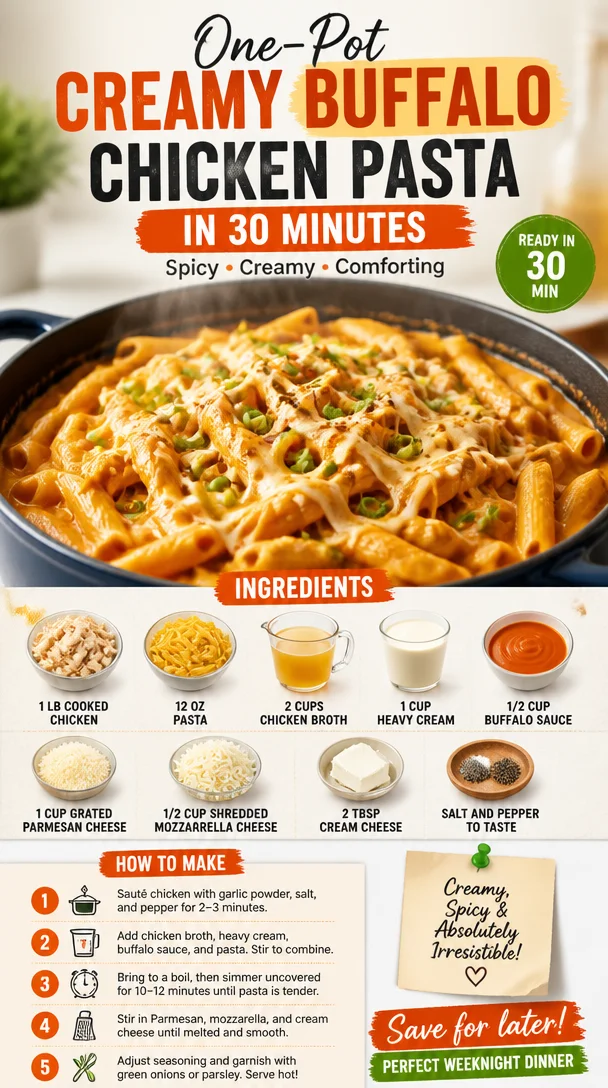
One-Pot Creamy Buffalo Chicken Pasta in 30 Minutes
One-Pot Creamy Spicy Buffalo Chicken Pasta: A Flavorful Feast
Introduction
Hey there, fellow cooking enthusiasts! Today, I’m thrilled to share with you one of my all-time favorite comfort food recipes: One-Pot Creamy Spicy Buffalo Chicken Pasta. If you love the bold flavors of buffalo sauce combined with the comforting creaminess of a rich pasta dish, then this recipe is sure to tickle your taste buds!
Imagine it’s a chilly evening, and the sun is setting, casting a warm glow through your kitchen window. You’ve had a long day, and you’re ready to unwind with something delicious yet simple to make. This dish is perfect for those cozy nights when you want to gather friends or family around the table without spending hours in the kitchen.
What I adore about this recipe is its versatility — you can add your favorite veggies, adjust the spice level, or even switch up the kinds of cheese you use. It’s all about creating something beautiful and tasty that feels approachable, gorgeous, and just a bit indulgent. So, tie on your apron and let’s dive into this delightful recipe that marries rustic charm with a bit of heat!
Personal Story
I’ll never forget the first time I made a spicy buffalo chicken dish from scratch. It was a rainy afternoon, and I was craving the zing of buffalo sauce but also the coziness of pasta. I rummaged through my pantry, pulling together leftover chicken from last night’s dinner, some pasta, and of course, that ever-present bottle of buffalo sauce. A few trial and errors later, I landed on a one-pot creation that blew my mind — and my taste buds!
That first batch was bubbling on the stove, filling the air with a glorious aroma that made my stomach growl. As I plated it up, the golden cheese melted into the creamy sauce, and the vibrant orange buffalo notes peeked through. It was a comforting explosion of flavor, and I remember serving it to my friends that night. One bite, and there were gasps of delight followed by requests for the recipe. That’s when I knew I had stumbled upon something special, something I wanted to share on my journey with Ivory Apron.
Ingredients
Let’s gather our ingredients for this creamy spicy delight! Here’s what you’ll need:
-
1 lb cooked chicken (shredded or diced): You can use rotisserie chicken for the ultimate convenience or leftovers from a previous roast. Feel free to swap it with shredded tofu or chickpeas for a vegetarian twist!
-
12 oz fettuccine or penne pasta: Either shape works wonders here. Go for whole grain or gluten-free pasta if that’s more your style!
-
2 cups chicken broth: Store-bought is perfectly fine, but homemade broth can elevate the flavor. If you’re looking to go vegetarian, vegetable broth works too!
-
1 cup heavy cream: This is what gives the dish a luscious creaminess. For a lighter option, replace it with half-and-half or even coconut cream for a dairy-free version.
-
1/2 cup buffalo sauce: Choose your favorite brand or make your own! If you’re sensitive to spice, feel free to reduce this amount or use a milder hot sauce.
-
1 cup grated Parmesan cheese: A classic choice that adds depth and richness. Nutritional yeast can be a great dairy-free substitute!
-
1/2 cup shredded mozzarella cheese: This adds that beautiful melty texture. Use any melty cheese of your choice — cheddar works wonderfully, too!
-
2 tbsp cream cheese: This helps to thicken the sauce and gives it a delightful tang. If you’re dairy-free, replace it with a non-dairy cream cheese.
-
Salt and pepper to taste: A little seasoning can go a long way, so adjust according to your preference!
Step-by-Step Instructions
Now, let’s get cooking! Follow these easy steps to make this one-pot sensation:
-
Prep your ingredients: Start by gathering and measuring all your ingredients. You want everything close by so that cooking goes seamlessly. This also gives you a moment to appreciate the colors and textures of your food — it’s part of the joy of cooking!
-
Cook the pasta: In a large pot or deep skillet, bring 2 cups of chicken broth to a simmer over medium-high heat. Add in the fettuccine or penne and cook according to package instructions, stirring occasionally. This will allow the pasta to absorb the flavorful broth as it cooks — yum!
-
Incorporate the chicken: Once the pasta is nearly al dente (about 1-2 minutes before it’s done), add the cooked chicken into the pot. Let it mingle for a minute until it’s heated through. This is the moment when all those wonderful smells will start wafting around your kitchen!
-
Stir in the cream: Lower the heat to medium-low and pour in the heavy cream, stirring gently to combine. This creates that luscious sauce that’s going to envelop everything in creaminess. If you want to have some fun, taste it at this stage for seasoning!
-
Buffalo time!: Add the buffalo sauce, cream cheese, and grated Parmesan cheese to the pot. Stir everything together until the cheese is melted and the sauce is creamy and spicy. Keep your eye on it — you want it to be just warmed through, not boiling.
-
Cheesy goodness: Finally, sprinkle the mozzarella on top, cover the pot, and let it sit for a minute to allow the cheese to melt beautifully. It’s hard to resist peeking, but I promise the surprise will be worth it!
-
Season: Taste your pasta and adjust the seasoning with salt and pepper. The final taste should be a delightful balance of creamy, spicy, and cheesy.
And voila! Your One-Pot Creamy Spicy Buffalo Chicken Pasta is ready to astonish!
Serving Suggestions
For serving, I love to plate this dish in deep bowls, allowing the creamy pasta to take center stage. A sprinkle of extra Parmesan on top and a few sprigs of fresh parsley or chives for a pop of green makes for a beautiful presentation! Don’t forget a drizzle of extra buffalo sauce if you like it spicy. Pair it with a side salad for a refreshing crunch, or some crusty bread to soak up all that delicious sauce. Trust me, your guests will be raving!
Recipe Variations
Feel like getting a little adventurous? Here are some fun variations to try:
-
Veggie-Loaded: Toss in some sautéed broccoli, bell peppers, or spinach during the cooking process for a colorful and nutritious addition!
-
Spicy Add-Ins: If you want more heat, consider adding sliced jalapeños or a dash of cayenne pepper while cooking.
-
Herbed Twist: Fresh herbs like basil or cilantro can add a fresh note. Sprinkle some on top before serving for a beautiful finish!
-
Cheeseburger Pasta: Swap the buffalo sauce for your favorite BBQ sauce and add in some cooked ground beef or turkey for a BBQ twist!
-
Low-Carb Option: Use zoodles (zucchini noodles) instead of pasta for a lower-carb version that still delivers on flavor.
Chef’s Notes
It’s funny how a simple dish can tell a story, isn’t it? This pasta has evolved over the years as I’ve experimented with different flavors and ingredients. The first time I made it, I used a store-bought sauce and served it to friends who turned it into a game of “guess the ingredients.” Now, I love that I can make it from scratch with quality ingredients, but those early days remind me of the joy of cooking and sharing with others!
And let me tell you, I’ve made my fair share of messes in the kitchen — but each one has led me to something special, just like this dish. It’s a celebration of flavors that keeps getting better every time I make it!
FAQs and Troubleshooting
-
What if my sauce is too thick?
If your sauce has thickened too much, simply add a little more chicken broth or cream to reach your desired consistency. -
How can I reheat leftover pasta?
Reheat in a pot on low heat, adding a splash of broth or cream to revive the sauce. Stir frequently to heat evenly. -
Can I freeze leftover pasta?
Yes, you can! Just make sure to store it in an airtight container. When you’re ready to enjoy it again, thaw overnight in the fridge before reheating. -
What if I don’t have chicken broth?
If you’re in a pinch, water can substitute the broth, though you’ll lose some depth of flavor. Consider adding your favorite seasoning to boost the taste!
Nutritional Info
While this recipe is definitely indulgent, it also offers protein and comfort! If you’re looking for specific nutritional information, consider using a nutrition calculator to keep track of your servings and adjust based on your ingredients!
Conclusion
There you have it! A delightful journey through my One-Pot Creamy Spicy Buffalo Chicken Pasta that’s sure to impress. Remember, cooking is all about enjoying the process, learning, and, most importantly, gathering around the table with loved ones.
So next time you’re craving something cozy yet exciting, pull out those ingredients and let your culinary creativity flow. I can’t wait to hear how it turns out for you, and I hope it brings as much joy to your table as it has to mine. Happy cooking, friends!
PrintOne-Pot Creamy Spicy Buffalo Chicken Pasta
A comforting yet exciting pasta dish featuring the bold flavors of buffalo sauce and creamy cheese, all cooked in one pot for convenience.
- Prep Time: 10 minutes
- Cook Time: 20 minutes
- Total Time: 30 minutes
- Yield: 4 servings 1x
- Category: Main Course
- Method: Stovetop
- Cuisine: American
- Diet: Non-Vegetarian
Ingredients
- 1 lb cooked chicken (shredded or diced)
- 12 oz fettuccine or penne pasta
- 2 cups chicken broth
- 1 cup heavy cream
- 1/2 cup buffalo sauce
- 1 cup grated Parmesan cheese
- 1/2 cup shredded mozzarella cheese
- 2 tbsp cream cheese
- Salt and pepper to taste
Instructions
- Prep your ingredients by gathering and measuring them.
- Cook the pasta in a large pot with 2 cups of chicken broth, simmering over medium-high heat.
- Incorporate the cooked chicken once the pasta is nearly al dente.
- Stir in the heavy cream, mixing gently.
- Add buffalo sauce, cream cheese, and Parmesan cheese to the pot.
- Sprinkle mozzarella cheese on top and cover the pot.
- Season with salt and pepper to taste before serving.
Notes
To customize, add your favorite vegetables or adjust the spice level by modifying the amount of buffalo sauce used.
Nutrition
- Serving Size: 1 serving
- Calories: 600
- Sugar: 6g
- Sodium: 950mg
- Fat: 30g
- Saturated Fat: 15g
- Unsaturated Fat: 10g
- Trans Fat: 0g
- Carbohydrates: 55g
- Fiber: 3g
- Protein: 40g
- Cholesterol: 100mg
Keywords: one-pot pasta, buffalo chicken, creamy pasta, comfort food
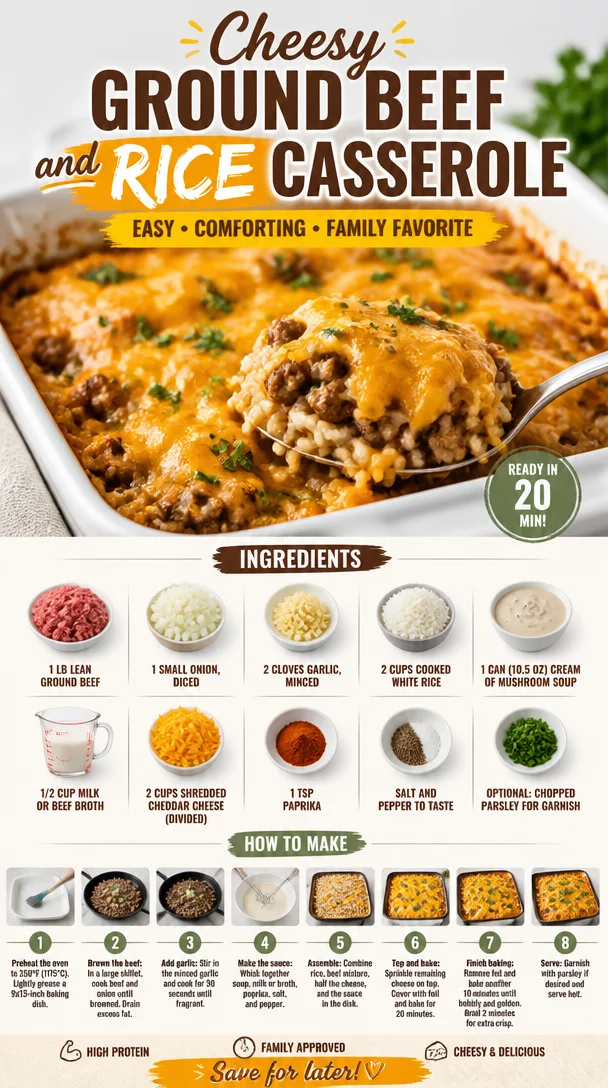
Cheesy Ground Beef and Rice Casserole
Cheesy Ground Beef and Rice Casserole: A Cozy Comfort Dish
Hello, friends! Today, we’re diving into a warm, cheesy, and oh-so-delicious dish that has nostalgia written all over it: Cheesy Ground Beef and Rice Casserole. When I think about cozy food that feels like a warm hug, this casserole instantly comes to mind. It’s simple, comforting, and perfect for those busy weeknight dinners or when company comes knocking unexpectedly. Plus, it’s incredibly adaptable, making it a staple in my kitchen.
Together, we’ll transform lean ground beef, fluffy rice, creamy goodness, and ooey-gooey cheese into a fabulous casserole that will have everyone asking for seconds. So slip on your apron, pour a glass of something cheerful, and let’s create a dish that’s as delicious as it is comforting.
My Cheesy Casserole Adventure
Let me take you back to my childhood, where one of my absolute favorite memories revolves around this casserole. Picture this: it’s a Friday night, the scent of something delicious wafts through the air, and as I come down the stairs, I can already hear laughter and clinking dishes from the dining room. My mom used to whip up this cheesy ground beef and rice casserole as a way to end the week on a high note.
She’d gather us all around the table, and while we devoured her creation, my siblings and I would share stories from our week. It was more than just a meal; it was a ritual – a moment to connect over stories and laughter, to be present for one another after the chaos of a busy week. I’ll never forget how she’d serve it straight from the oven, the melted cheese bubbling away, and the laughter spilling out like the best seasoning. It feels like yesterday yet remains etched in my heart forever. That’s the power of food! So, let’s recreate this moment in your kitchen.
Ingredients
Here’s what you’ll need to create your very own Cheesy Ground Beef and Rice Casserole:
-
1 lb lean ground beef
Ground beef is the cornerstone of this dish. Choose lean for a healthier option, but if you’re feeling indulgent, a bit of fatty beef adds rich flavor. You can also substitute with ground turkey or chicken if you prefer something lighter. -
1 small onion, diced
Onions bring a sweet and savory base to our casserole. If you’re not a fan of onions, feel free to swap with shallots or even leeks for a milder flavor. -
2 cloves garlic, minced
Garlic is a must-have! It elevates any dish and makes it feel gourmet. If you adore garlic, add an extra clove or two. If fresh isn’t available, garlic powder works too. -
2 cups cooked white rice
This is our binder that makes everything stick together. Brown rice can be used for a nuttier flavor, or even cauliflower rice for a low-carb option. -
1 can (10.5 oz) cream of mushroom soup (or cream of chicken)
This adds creaminess and richness. Don’t have any on hand? Whip up a quick white sauce using butter, flour, and milk if needed. -
1/2 cup milk or beef broth
This will help mix everything together. Chicken broth is also a great substitute, or even vegetable broth for a meat-free version. -
2 cups shredded cheddar cheese (divided)
You can’t have a cheesy casserole without cheese! Cheddar is classic, but feel free to mix it up with Monterey Jack or Pepper Jack for an extra kick. -
1 tsp paprika
Paprika adds flavor and a beautiful pop of color. Feel free to use smoked paprika for a deeper, smoky taste. -
Salt and pepper to taste
These are essential for bringing out all the flavors. Don’t shy away from seasoning it just right! -
Optional: chopped parsley for garnish
A sprinkle of parsley not only brightens the appearance but also adds a fresh element.
Step-by-Step Instructions
Ready to get cooking? Let’s break down the steps to build this delicious casserole!
-
Preheat Your Oven
Preheat your oven to 350°F (175°C). A warm oven ensures our casserole cooks evenly and the cheese gets perfectly melty. -
Cook the Ground Beef
In a large skillet over medium heat, add your lean ground beef. Cook until it’s browned, breaking it up with a wooden spoon as it cooks. This should take about 5 to 7 minutes. Look out for any pink bits—you want it all to be a nice, even browning. -
Add the Aromatics
Once the beef is browned, toss in the diced onion and garlic directly into the skillet. Sauté for another 3-4 minutes until the onion becomes translucent and fragrant. The smell is going to make you so hungry! -
Mix in the Rice
Stir in the cooked rice, and mix well with the beef and onion mixture—this will add texture and heartiness to our casserole. Make sure everything is evenly combined. -
Create the Creamy Mixture
Pour in the cream of mushroom soup and milk (or broth), followed by the paprika, and season with salt and pepper. Stir until everything is well combined. This is where the magic happens—smooth, creamy goodness! -
Add Cheese
Now comes the cheesy part! Fold in 1½ cups of shredded cheddar cheese to the mixture. Reserve ½ cup for topping later. Cheese makes everything better, don’t you think? -
Transfer and Bake
Pour your beef and rice mixture into a greased 9×13-inch baking dish. Even it out using a spatula, and then sprinkle the remaining cheese on top. Pop it into the preheated oven for about 25-30 minutes, or until it’s bubbling and golden on top. That’s the cue to drool! -
Serve it Up
Once out of the oven, let it rest for about 5 minutes. This allows everything to settle. If you’re feeling fancy, sprinkle some chopped parsley on top for that gorgeous pop of color!
Serving Suggestions
When it comes to serving your casserole, keep it classy yet homey. Scoop generous portions onto plates and serve alongside a fresh green salad to balance the richness. Warm biscuits or crusty bread can be a delightful addition too. And don’t forget—this dish is all about sharing, so gather everyone around for good times and great food!
Recipe Variations
Here are some fun ideas to put your own spin on this casserole:
- Mexican Twist: Add black beans, corn, and taco seasoning for a Tex-Mex flavor.
- Vegetarian Option: Substitute the ground beef with lentils or diced vegetables like bell peppers and zucchini for a plant-based dish.
- Spicy Kick: Mix in some jalapeños or a splash of hot sauce for those who like it spicy!
- Asian Inspired: Swap the cream of mushroom soup for a creamy sesame dressing and add stir-fried veggies for an entirely different experience.
- Herby Delight: Incorporate fresh herbs like thyme or rosemary for a fragrant twist that will add depth to every bite.
Chef’s Notes
As I reflect on how this casserole has evolved over the years, I can’t help but chuckle. What started as a simple, hearty dish has transformed into my go-to for gatherings and comforting family dinners. I once forgot to add cheese before baking and ended up creating an impromptu cheese sauce on top afterward with delicious results! Cooking is all about experimentation—and the occasional happy accident. This dish, like all recipes, is a canvas—so feel free to paint it however you like!
FAQs and Troubleshooting
1. Can I make this dish ahead of time?
Absolutely! You can prepare everything up to the baking step, cover it tightly, and refrigerate for up to 24 hours. When you’re ready to enjoy, simply pop it in the oven, likely extending the cooking time by about 10 minutes.
2. What if my casserole is too dry?
If you find your casserole drying out while baking, don’t panic! You can add a splash more broth or milk to the mixture before baking, or a drizzle of olive oil will do the trick too!
3. How do I store leftovers?
Leftovers can be stored in an airtight container in the refrigerator for up to 3 days. Reheat in the microwave or in the oven for the best results—just cover it with foil to keep it from drying out.
4. Can I freeze the casserole?
Yes, you can freeze it before baking! Just wrap it tightly in plastic wrap and foil. When you’re ready, thaw it in the fridge overnight and bake as directed.
Nutritional Info (Optional)
For those watching their intake, here’s a quick nutritional overview per serving (approx. 1 cup):
- Calories: 350
- Protein: 25g
- Carbohydrates: 30g
- Fat: 18g
- Fiber: 2g
Note: Values may vary based on specific ingredient choices and portion sizes.
And there you have it—my take on a classic Cheesy Ground Beef and Rice Casserole that will warm your heart and fill your belly. I hope you take this recipe into your kitchen, create your own cherished memories, and share it with loved ones for years to come. Happy cooking!
PrintCheesy Ground Beef and Rice Casserole
A warm and cheesy dish perfect for cozy family dinners, combining lean ground beef, fluffy rice, and gooey cheese.
- Prep Time: 15 minutes
- Cook Time: 30 minutes
- Total Time: 45 minutes
- Yield: 4 servings 1x
- Category: Main Course
- Method: Baking
- Cuisine: American
- Diet: Beef
Ingredients
- 1 lb lean ground beef
- 1 small onion, diced
- 2 cloves garlic, minced
- 2 cups cooked white rice
- 1 can (10.5 oz) cream of mushroom soup (or cream of chicken)
- 1/2 cup milk or beef broth
- 2 cups shredded cheddar cheese (divided)
- 1 tsp paprika
- Salt and pepper to taste
- Optional: chopped parsley for garnish
Instructions
- Preheat your oven to 350°F (175°C).
- Cook the ground beef in a large skillet over medium heat until browned, about 5 to 7 minutes.
- Add the diced onion and garlic, sauté for another 3-4 minutes.
- Mix in the cooked rice and combine well.
- Create the creamy mixture by adding cream of mushroom soup, milk (or broth), paprika, and seasoning.
- Add 1½ cups shredded cheddar cheese, then transfer to a greased 9×13-inch baking dish.
- Transfer the mixture and bake for about 25-30 minutes until bubbling and golden on top.
- Serve hot, optionally garnished with chopped parsley.
Notes
This casserole can be made ahead of time and is very adaptable; consider adding black beans for a Mexican twist.
Nutrition
- Serving Size: 1 serving
- Calories: 350
- Sugar: 2g
- Sodium: 600mg
- Fat: 18g
- Saturated Fat: 8g
- Unsaturated Fat: 8g
- Trans Fat: 0g
- Carbohydrates: 30g
- Fiber: 2g
- Protein: 25g
- Cholesterol: 70mg
Keywords: casserole, comfort food, ground beef, easy dinner, family recipe
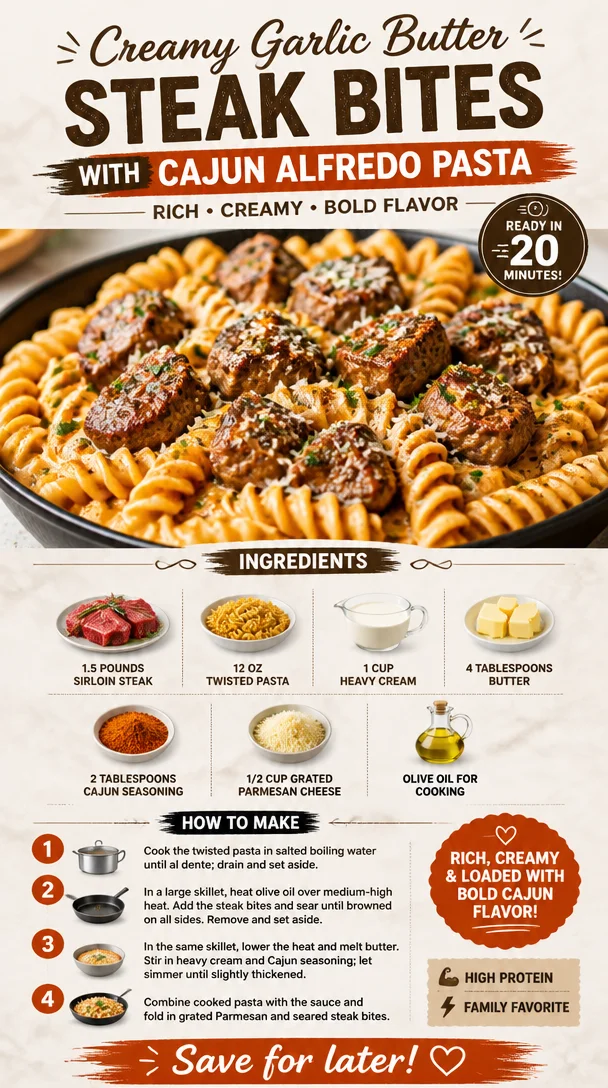
Creamy Garlic Butter Steak Bites with Cajun Alfredo Pasta
Creamy Garlic Butter Steak Bites with Spicy Cajun Alfredo Twisted Pasta
Welcome back to the kitchen, friends! Today, I’m super excited to invite you on a culinary adventure that’s all about indulgence and flavor-packed goodness. We’re diving into a dish that combines the rich, savory flavors of perfectly cooked steak bites with a creamy, spicy Alfredo sauce tossed with twisted pasta. Trust me, this recipe will have your taste buds dancing with joy!
Let’s set the scene: Imagine a cozy evening with friends gathered around the table, laughter filling the air, and the tantalizing aroma of garlic and butter wafting through the room. That’s the magic we’re aiming for with these creamy garlic butter steak bites and spicy Cajun Alfredo twisted pasta. Whether you’re hosting an intimate dinner party or just looking to elevate your weeknight meal, this dish is a guaranteed crowd-pleaser. So, roll up your sleeves, and let’s get cooking!
Personal Story
This recipe actually takes me back to my college days when I would gather my friends in my tiny apartment for “Pasta Night.” We’d crank up some tunes, pour ourselves a little wine, and whip up whatever pasta dishes we could dream up with the ingredients we had on hand. I remember one particular night when I decided to spice things up (quite literally) by adding Cajun seasoning to my Alfredo sauce. The moment those creamy garlic butter steak bites hit the dining table, it was like a flavor explosion! We all laughed, enjoyed every bite, and even debated our favorite pasta shapes (like how can you resist those cute spirals of fusilli?). Those carefree evenings made me realize how cooking can create memories that stay with us forever. That’s what I want to share with you today: a dish that inspires connection and joy.
Ingredients
Here’s what you’ll need for this rich and creamy delight:
-
1.5 pounds sirloin steak (or chicken/turkey): Sirloin is my go-to for this dish due to its tenderness and flavor. If you prefer chicken or turkey, both work beautifully, though you may need to adjust the cooking time slightly. Look for cuts that are well-marbled for extra juiciness.
-
12 oz twisted pasta (rotini or fusilli): Twisted pasta is perfect for grabbing that creamy Alfredo sauce! If you’re feeling adventurous, use whole wheat or gluten-free pasta to mix things up.
-
1 cup heavy cream: This is where the magic happens! Heavy cream gives the sauce its luxurious texture. You can substitute with half-and-half for a lighter option, but the sauce will be slightly less decadent.
-
4 tablespoons butter: Because butter makes everything better! Unsalted butter is my choice, but feel free to use salted if that’s what you have on hand.
-
2 tablespoons Cajun seasoning: This is the secret ingredient for some exciting flavor! If you prefer a milder taste, reduce the amount, or try using Italian seasoning if you want to skip the spice.
-
1/2 cup grated Parmesan cheese: Parmesan adds a lovely umami flavor to the sauce. Make sure to use freshly grated if you can; it melts beautifully and enhances the dish.
-
Olive oil for cooking: A drizzle for the pan; it helps to sear the steak to perfection.
Step-by-Step Instructions
Ready to bring this dreamy dish to life? Here’s how to do it!
-
Prep Your Ingredients: Start by gathering all your ingredients. Wash and dry your steak (or chicken/turkey), then cut it into bite-sized pieces. If you are using chicken or turkey, make sure to cut it into uniform pieces for even cooking.
-
Cook the Pasta: Bring a large pot of salted water to a boil. Add your twisted pasta and cook according to package instructions until al dente (about 8-10 minutes usually). Save about a cup of the pasta cooking water before draining it—this starchy water helps create a creamy sauce later!
-
Sear the Steak: While your pasta is cooking, heat a large skillet over medium-high heat. Add a drizzle of olive oil to the pan. Once it’s shimmering, carefully add your steak bites (or chicken/turkey). Sear for about 3-4 minutes until they’re beautifully browned on the outside. If you’re cooking chicken or turkey, make sure they’re cooked through before moving to the next step. Don’t overcrowd the pan; work in batches if needed!
-
Add Garlic and Butter: Lower the heat to medium and add the butter to the skillet. Let it melt, then add minced garlic (2-3 cloves should do the trick). Stir for about a minute until it’s fragrant and heavenly. This is the moment when your kitchen starts smelling amazing!
-
Combine the Sauce: Pour in the heavy cream and add the Cajun seasoning. Stir gently and let it simmer for a few minutes until the sauce thickens slightly. You may want to add a splash of the reserved pasta water to help create that smooth, creamy consistency.
-
Finish with Cheese: Toss in the grated Parmesan cheese and stir until it’s completely melted and you have a luscious sauce. Go ahead and taste—this is your chance to adjust the seasoning if needed!
-
Mix in the Pasta: Add the cooked twisted pasta to the skillet and toss everything together until the pasta is coated in that dreamy sauce. If it’s too thick, add a touch more reserved pasta water until you achieve your desired consistency.
-
Serve It Up: Transfer to a large serving dish or individual bowls. It’s all about how you present it—garnish with a sprinkle of chopped parsley or extra Parmesan cheese for that restaurant-worthy finish!
Serving Suggestions
For a stunning presentation, I love to serve this dish in wide, shallow bowls with a sprinkle of fresh herbs (like parsley or basil) on top and a twist of black pepper. Pair it with a crisp side salad and some warm, crusty bread to soak up any leftover sauce. And don’t forget a little something sparkling to drink—perhaps a nice white wine or a homemade sparkling lemonade!
Recipe Variations
- Spicy: For those who crave heat, try adding sliced jalapeños or a pinch of red pepper flakes to the sauce!
- Veggie Lovers: Toss in some sautéed mushrooms, bell peppers, or spinach for added color and nutrition.
- Low Carb: Swap the twisted pasta for zucchini noodles (zoodles) for a gluten-free, low-carb alternative.
- Herbaceous Twist: Infuse the sauce with fresh herbs like thyme or oregano for a fragrant boost!
- Cheesy Delight: Mix in a different cheese, like mozzarella or cheddar, for a gooey texture that’ll make your heart sing.
Chef’s Notes
Over the years, this dish has evolved from a spontaneous pasta night favorite to a staple I keep coming back to. Every time I make it, I try to add something new—like smuggling in some seasonal veggies or playing with the spices. I still remember that night in college when my friends proclaimed it ‘the best pasta ever!’ It’s the kind of recipe that’s perfect for making memories, whether you’re serving it to a few close friends or a larger gathering. Plus, the leftovers (if there are any!) are amazing for lunch the next day!
FAQs and Troubleshooting
Q: My sauce turned out too thick! What can I do?
A: No worries! Just add a bit more of the reserved pasta water while stirring until you reach your desired consistency. This starchy water is your best friend for adjusting the sauce.
Q: Can I prep this dish ahead of time?
A: Absolutely! You can prepare the steak bites and sauce in advance, then combine everything just before serving. Just reheat gently on the stovetop, adding a bit of reserved pasta water as needed.
Q: What’s the best way to store leftovers?
A: Store any leftovers in an airtight container in the fridge for up to 3 days. When reheating, add a splash of cream or pasta water to get that creamy texture back!
Q: Can I use a different type of meat?
A: Yes! Chicken or turkey works wonderfully. Just adjust the cooking time, making sure it’s cooked through before adding it to the sauce.
Nutritional Info
While I believe in enjoying good food without too much worry about the numbers, if you’re curious, this dish is a hearty meal packed full of protein from the steak and creaminess from the butter and cheeses. Just be mindful of portion sizes if you’re keeping an eye on your dietary needs!
There you have it, my friends! I hope you feel inspired to create a little magic in your kitchen with these creamy garlic butter steak bites and spicy Cajun Alfredo twisted pasta. No matter the occasion, it’s all about enjoying good food and good company. So, let’s tie on those ivory aprons, pour ourselves a lovely drink, and celebrate the art of cooking together. Bon appétit!
PrintCreamy Garlic Butter Steak Bites with Spicy Cajun Alfredo Twisted Pasta
Indulge in the rich flavors of garlic butter steak bites paired with creamy, spicy Cajun Alfredo twisted pasta—a perfect dish for special gatherings or an elevated weeknight meal.
- Prep Time: 15 minutes
- Cook Time: 30 minutes
- Total Time: 45 minutes
- Yield: 4 servings 1x
- Category: Main Course
- Method: Searing and Simmering
- Cuisine: Italian
- Diet: None
Ingredients
- 1.5 pounds sirloin steak (or chicken/turkey)
- 12 oz twisted pasta (rotini or fusilli)
- 1 cup heavy cream
- 4 tablespoons butter
- 2 tablespoons Cajun seasoning
- 1/2 cup grated Parmesan cheese
- Olive oil for cooking
Instructions
- Prep Your Ingredients: Start by gathering all your ingredients. Wash and dry your steak (or chicken/turkey), then cut it into bite-sized pieces.
- Cook the Pasta: Bring a large pot of salted water to a boil. Add your twisted pasta and cook according to package instructions until al dente (about 8-10 minutes). Save about a cup of the pasta cooking water before draining it.
- Sear the Steak: While your pasta is cooking, heat a large skillet over medium-high heat. Add a drizzle of olive oil to the pan. Once it’s shimmering, add your steak bites (or chicken/turkey). Sear for about 3-4 minutes until they’re browned.
- Add Garlic and Butter: Lower the heat to medium and add the butter. Let it melt, then add minced garlic and stir for about a minute until it’s fragrant.
- Combine the Sauce: Pour in the heavy cream and add the Cajun seasoning. Let it simmer for a few minutes until the sauce thickens slightly.
- Finish with Cheese: Toss in the grated Parmesan cheese and stir until it’s melted and the sauce is luscious.
- Mix in the Pasta: Add the cooked twisted pasta and toss everything together until the pasta is coated. Adjust with reserved pasta water for consistency.
- Serve It Up: Transfer to a serving dish and garnish with chopped parsley or extra Parmesan cheese.
Notes
For a stunning presentation, serve in wide bowls and pair with a crisp side salad and warm, crusty bread.
Nutrition
- Serving Size: 1 serving
- Calories: 600
- Sugar: 5g
- Sodium: 600mg
- Fat: 40g
- Saturated Fat: 20g
- Unsaturated Fat: 15g
- Trans Fat: 0g
- Carbohydrates: 45g
- Fiber: 3g
- Protein: 30g
- Cholesterol: 80mg
Keywords: steak bites, Cajun alfredo, creamy pasta, comfort food, dinner party
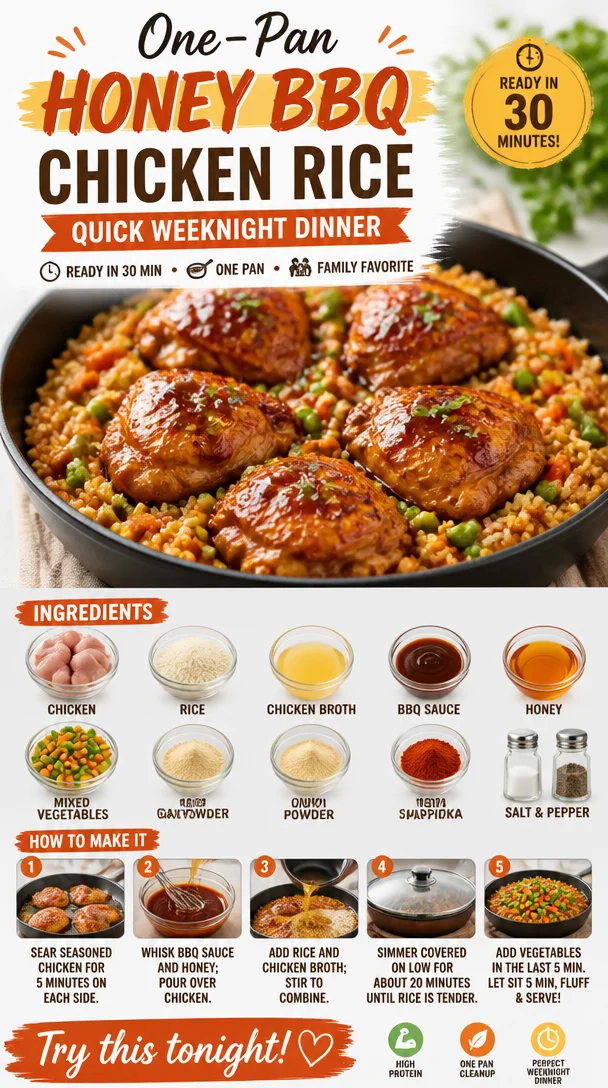
One-Pan Honey BBQ Chicken Rice: Quick Weeknight Dinner
One-Pan Bold Honey BBQ Chicken Rice: A Symphony of Flavor
Hello, fellow food enthusiasts! Are you ready to dive into a delicious dish that will not only satisfy your taste buds but also simplify your weeknight cooking? Today, I’m excited to share my One-Pan Bold Honey BBQ Chicken Rice recipe with you. This is a delightful meal that marries rich BBQ flavors with tender chicken, fluffy rice, and vibrant veggies—all cooked in one convenient pan. Who doesn’t love a recipe that’s easy to make and clean up?
Cooking is a journey, and I believe every dish we create tells a story. This one, in particular, is close to my heart because it encapsulates the joys of gathering friends and family around the dinner table. Honestly, what could be better than a gathering full of laughter and delicious scents wafting through the air? So, let’s grab our aprons and get ready to make some memories with this easy, flavorful dish!
A Trip Down Memory Lane
Growing up, my family had this tradition of Sunday dinners. We would all gather around the table, and my mom would whip up something that could feed an army. One of our favorite meals was her BBQ chicken. The aroma would fill our home, enticing everyone to come to the table. I remember watching her pour that sticky-sweet BBQ sauce over the chicken, giggling as the sauce splashed while she tossed everything together. There was just something magical about those moments—the laughter, the warmth, and, of course, the food.
Fast forward a few years, and I found myself hosting my first dinner party. With the memory of those Sunday dinners fresh in my mind, I thought, “Why not recreate that magic?” But in true Savannah fashion, I wanted to keep it simple and easy. That’s when I developed my One-Pan Bold Honey BBQ Chicken Rice recipe! It’s a dish that embodies everything I love about cooking: simplicity, flavor, and the joy of bringing people together.
Ingredients
Let’s talk about what you’ll need to whip up this mouthwatering meal:
-
1 lb boneless, skinless chicken thighs or breasts
You can’t go wrong with either cut! I love thighs for their juicy texture, but breasts work just as well. If you’re looking for a leaner option, chicken breasts are the way to go! -
1 cup long-grain rice
Long-grain rice beautifully fluffs up and is perfect for absorbing the BBQ sauce. If you’re in a pinch, jasmine or basmati rice will work like a charm, too! -
2 cups chicken broth
This is the secret to tender, flavorful rice! You can use low-sodium broth if you’re watching your salt intake, or make your own for a personal touch. -
½ cup BBQ sauce
Choose your favorite brand or homemade sauce! Got a spice tolerance? Opt for a spicy BBQ sauce to kick things up a notch. -
¼ cup honey
This is the sweetness that balances the BBQ flavors. Light or dark honey works; if you’re looking for a swap, maple syrup can also bring that lovely sweetness. -
1 cup mixed vegetables (frozen or fresh)
I love using a colorful mix of bell peppers, carrots, and peas. Feel free to swap in your favorites! -
1 tsp garlic powder
A flavor powerhouse! Fresh minced garlic can be used as well; just be cautious about adding too much. -
1 tsp onion powder
Onion powder adds depth. If you have a fresh onion on hand, sautéing it with the chicken can bring even more flavor! -
½ tsp smoked paprika
This adds a delicious smoky flavor. Regular paprika can work in a pinch, though the smokiness is divine! -
Salt and pepper to taste
Always adjust according to your preference! Don’t be shy—seasoning makes all the difference in elevating your dish.
Step-by-Step Instructions
Ready to get cooking? Let’s jump right in! This dish is as concise as it is delicious:
-
Prep Your Ingredients
- Before you begin, gather all your ingredients. This makes the cooking process smoother. Chop your mixed veggies if you’re using fresh ones, and season your chicken thighs or breasts generously with salt, pepper, garlic powder, and onion powder.
-
Sear the Chicken
- In a large skillet or a deep frying pan over medium-high heat, heat a splash of oil. Once hot, place the chicken in the pan. Sear each side for about 4-5 minutes until golden brown. This step locks in the juices and adds flavor. Chef’s Tip: Do not overcrowd the pan; cook them in batches if needed!
-
Make Your BBQ Sauce Mixture
- While the chicken is searing, in a bowl, whisk together the BBQ sauce and honey. This flavorful combo will become the star of your dish!
-
Add the Rice and Broth
- Once the chicken is nicely browned, remove it from the pan (it will continue cooking later) and add your rice to the same pan. Stir it for about a minute to coat it in the drippings left behind. Then, pour in the chicken broth. Stir gently to combine and bring to a gentle simmer.
-
Stir in Your Chicken
- Place the seared chicken back into the pan, then drizzle the BBQ-honey mixture all over it. Give everything a gentle stir to ensure the chicken and rice are coated.
-
Add the Vegetables
- Finally, stir in your mixed vegetables. Cover the skillet with a lid and reduce the heat to low. Let it all simmer for about 20-25 minutes, or until the rice is cooked through and has absorbed all the delicious liquid. Chef’s Hack: Check occasionally to ensure the rice isn’t sticking; give it a gentle stir if needed.
-
Fluff and Serve
- Once done, turn off the heat and let it sit for an additional 5 minutes. This resting time allows the flavors to meld together beautifully. Fluff up the rice with a fork, ensuring everything is mixed well.
Serving Suggestions
Now comes the best part—serving it up! Plate a generous scoop of the chicken and rice in a bowl and drizzle any remaining BBQ sauce over the top. Garnish with freshly chopped parsley or even some sliced green onions for a pop of color! You can also serve this dish with a simple side salad or some crusty bread to soak up all that lovely sauce.
Recipe Variations
Feeling a bit adventurous? Here are some creative twists you can try:
-
Spicy Kick: Add a splash of hot sauce or crushed red pepper flakes to the BBQ honey mixture for a fiery twist.
-
Herb-Infused Rice: Add fresh herbs like thyme or rosemary to the broth for an aromatic twist.
-
Southwest Style: Substitute the BBQ sauce with a chipotle sauce and include corn and black beans for a southwestern flavor profile.
-
Quinoa Substitute: Swap out the rice for quinoa for a protein-packed dish!
-
Vegetarian Version: Replace the chicken with chickpeas or tofu for a plant-based meal that retains all those wonderful flavors.
Chef’s Notes
This recipe has been a staple in my home, and it has evolved over time. It began with just the chicken and BBQ sauce, but I couldn’t resist adding rice and veggies to enhance the dish’s substance. The flavors are bold, but the approach remains effortless. One of my fondest memories is the first time I served this at my dinner party—everyone went back for seconds! A little laughter mixed with good food creates an unforgettable evening.
FAQs and Troubleshooting
-
Q: My rice turned out mushy! What went wrong?
A: It’s likely that it absorbed too much liquid. Always measure your broth carefully, and avoid stirring too much while cooking. -
Q: Can I make this dish ahead of time?
A: Absolutely! You can prepare it in advance and store it in the fridge. Just reheat it gently on the stove or in the microwave before serving. -
Q: What if I don’t have chicken broth?
A: Water will work in a pinch! Just season to taste, or you can use vegetable broth for a lighter option. -
Q: How can I store leftovers?
Transfer them to an airtight container and refrigerate for up to 3 days. It also freezes well, so keep that in mind for future meals!
Nutritional Info
If you’re curious about the nutritional benefits of this dish, here are the estimated values per serving (based on 4 servings):
- Calories: 425
- Protein: 30g
- Carbohydrates: 50g
- Fat: 9g
- Fiber: 3g
There you have it, my friends! A deliciously easy, one-pan meal that’s perfect for any evening when you want something hearty yet simple. I hope you embrace the joy of cooking as much as I do and enjoy making the One-Pan Bold Honey BBQ Chicken Rice. Remember, it’s all about the little moments around the table—happy cooking!
PrintOne-Pan Bold Honey BBQ Chicken Rice

A delightful meal that marries rich BBQ flavors with tender chicken, fluffy rice, and vibrant veggies—all cooked in one convenient pan.
- Prep Time: 10 minutes
- Cook Time: 30 minutes
- Total Time: 40 minutes
- Yield: 4 servings 1x
- Category: Main Course
- Method: Stovetop
- Cuisine: American
- Diet: None
Ingredients
- 1 lb boneless, skinless chicken thighs or breasts
- 1 cup long-grain rice
- 2 cups chicken broth
- ½ cup BBQ sauce
- ¼ cup honey
- 1 cup mixed vegetables (frozen or fresh)
- 1 tsp garlic powder
- 1 tsp onion powder
- ½ tsp smoked paprika
- Salt and pepper to taste
Instructions
- Prep Your Ingredients
- Sear the Chicken
- Make Your BBQ Sauce Mixture
- Add the Rice and Broth
- Stir in Your Chicken
- Add the Vegetables
- Fluff and Serve
Notes
Feel free to personalize this recipe with your favorite BBQ sauce or additional vegetables!
Nutrition
- Serving Size: 1 serving
- Calories: 425
- Sugar: 20g
- Sodium: 500mg
- Fat: 9g
- Saturated Fat: 2g
- Unsaturated Fat: 7g
- Trans Fat: 0g
- Carbohydrates: 50g
- Fiber: 3g
- Protein: 30g
- Cholesterol: 70mg
Keywords: BBQ chicken, one-pan meal, easy dinner, flavorful rice, weeknight cooking
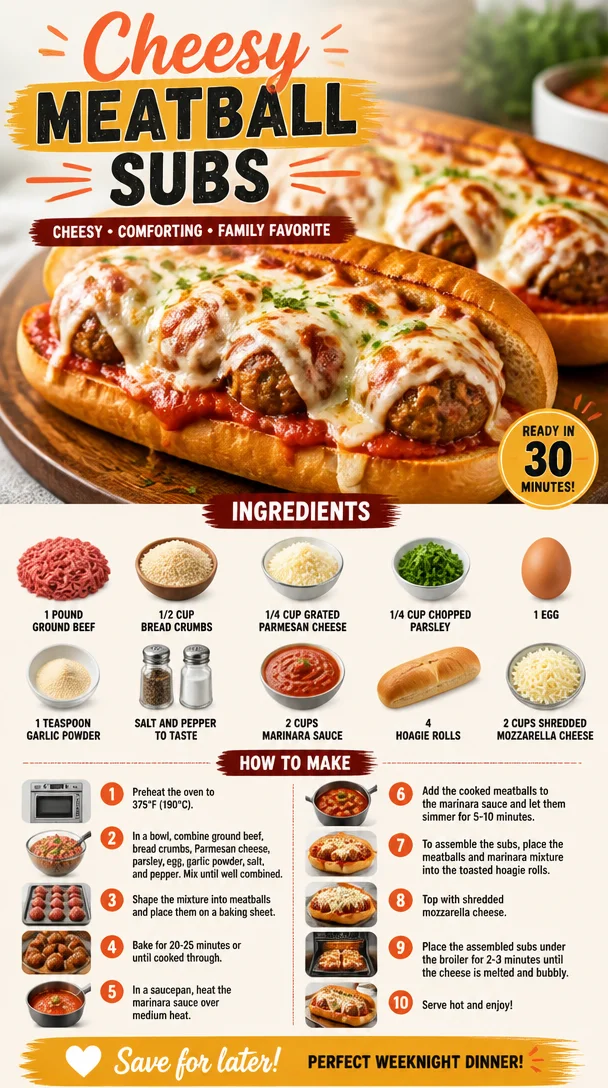
Cheesy Meatball Subs
Cheesy Meatball Subs: A Slice of Nostalgia and Flavor
Hello, lovely foodies! Today, we’re diving into a dish that is pure comfort food bliss: Cheesy Meatball Subs. Picture this: a warm, crusty hoagie roll stuffed with juicy meatballs, slathered in rich marinara sauce, and bubbling over with melted mozzarella cheese. It’s the kind of dish that wraps you up in a cozy hug and makes even the dreariest of days feel special.
These subs not only deliver on taste but come with a delightful dash of nostalgia for many of us. They evoke memories of family gatherings, game nights, and lazy afternoons when takeout always felt justified (because, let’s be honest, who could possibly resist a hearty sub?). Whether you’re hosting friends for a weekend movie marathon or just want a satisfying weeknight dinner, this recipe has you covered. Let’s roll up our sleeves and get to work!
A Taste of Nostalgia
I can still remember the first time I had a meatball sub. It was during my college days when every corner deli offered them as a quick, reliable option. I vividly remember sinking my teeth into that sandwich, the warm meatballs collapsing into the marinara sauce with each bite. I was instantly hooked. Not only was it delicious, but it was also a perfect post-study snack; just what I needed after a long day of classes.
Fast forward years later, and I find myself recreating that very same dish in my kitchen, infusing it with my own twists while keeping the essence of those deli memories alive. Now, every time I make Cheesy Meatball Subs, it’s not just about the flavors—it’s about the warm, inviting memories they hold.
Ingredients
Let’s gather what you need to create these cheesy wonders. Here’s the list, along with some tips and tricks to get the most out of each ingredient:
-
1 pound ground beef: This is your meatball’s foundation. Look for a blend with a bit of fat, like 80/20, for juicier meatballs. If you prefer, you can substitute turkey or chicken for a leaner option.
-
1/2 cup bread crumbs: These give structure to the meatballs. You can use plain or Italian seasoned bread crumbs, or even crushed crackers if that’s what you have on hand!
-
1/4 cup grated Parmesan cheese: A great way to add a subtle nutty flavor. If you’re aiming for a vegan option, use nutritional yeast or omit altogether.
-
1/4 cup chopped parsley: This adds fresh color and flavor. If parsley isn’t your thing, fresh basil or oregano can work well too!
-
1 egg: This acts as a binder, helping to hold everything together. If you’re vegan or egg-free, try a flax egg instead (1 tablespoon ground flaxseed mixed with 2.5 tablespoons water).
-
1 teaspoon garlic powder: A flavorful powerhouse that amplifies the taste of your meatballs. Freshly minced garlic works, too, if you want that extra punch!
-
Salt and pepper to taste: Essential for enhancing flavors. Don’t shy away from using freshly cracked pepper for a more robust taste.
-
2 cups marinara sauce: Choose your favorite jarred variety, or make your own for a personal touch. Simply simmer canned tomatoes with garlic, onion, and herbs for a quick homemade sauce.
-
4 hoagie rolls: Soft yet sturdy rolls are ideal for holding all that goodness. Substitutes could include baguettes or even sturdy burger buns.
-
2 cups shredded mozzarella cheese: The gooey element that makes this sub irresistible! For a twist, try a blend of Italian cheeses or even some provolone.
Step-by-Step Instructions
Alright, let’s bring these flavors to life! Follow me closely to create these flavorful Cheesy Meatball Subs.
-
Preheat your oven to 400°F (200°C). We want to ensure our meatballs bake to perfection while the cheese melts gloriously on top.
-
Mix the meatball ingredients: In a large mixing bowl, combine the ground beef, bread crumbs, Parmesan cheese, chopped parsley, egg, garlic powder, salt, and pepper. Use your hands to gently mix everything together, but be careful not to overmix—this keeps the meatballs tender!
-
Form the meatballs: Using your hands, scoop out about 2 tablespoons of the mixture and roll it into a ball. Repeat until all the mixture is used, placing the meatballs on a baking sheet lined with parchment paper for easy cleanup.
-
Bake the meatballs: Slide them into the preheated oven and let them bake for about 20-25 minutes, or until they are nicely browned and cooked through. The internal temperature should reach 160°F (70°C). Turn on the broiler for the last 2-3 minutes for an extra golden touch!
-
Simmer the marinara sauce: While the meatballs are baking, pour the marinara sauce into a medium saucepan and let it heat on low, stirring occasionally. Don’t skip this step; the flavors meld beautifully as they warm together!
-
Assemble the subs: Once the meatballs are cooked, take them out of the oven and gently toss them in the warmed marinara sauce. Load the hoagie rolls with several meatballs, ensuring you drizzle extra sauce on top.
-
Top with mozzarella: Generously sprinkle the shredded mozzarella over the top of each loaded hoagie. Trust me, this is where the magic happens!
-
Broil for gooey goodness: Place the subs back under the broiler for another 2-3 minutes, just until the cheese is bubbling and starting to brown. Keep a close eye on this; it can go from perfectly golden to burnt in the blink of an eye!
-
Serve: Remove from the oven, let cool for a minute, then devour!
Serving Suggestions
To really impress, serve your Cheesy Meatball Subs on a rustic wooden board with a side of crispy potato chips or a simple arugula salad topped with a squeeze of lemon. You can even sprinkle some extra chopped parsley or basil over the top for a pop of color!
Recipe Variations
Feeling adventurous? Here are some delightful twists you can try:
-
Spicy Meatball Subs: Add crushed red pepper flakes to the meatball mixture or drizzle some sriracha on top for a kick.
-
BBQ Meatball Subs: Swap out the marinara for your favorite BBQ sauce and mix it into the baked meatballs. Top with coleslaw for a Southern twist.
-
Veggie Meatball Subs: Replace the ground beef with lentils, black beans, or a pre-made veggie meat product for a plant-based option.
-
Mediterranean Meatball Subs: Incorporate feta cheese and herbs like oregano into the meatball mixture, then serve with a tzatziki sauce instead of marinara.
Chef’s Notes
Whenever I make these subs, I can’t help but reminisce about the countless friendly debates over who can craft the ultimate meatball. There’s so much room for creativity! Over the years, I’ve played around with different meat blends, sauces, and toppings, often laughing about the ‘fails’ that turned into kitchen improv nights.
One time, I accidentally mixed up my garlic powder with cinnamon while making a batch. Long story short, it was a culinary disaster, but that’s how recipes evolve and take on a life of their own!
FAQs and Troubleshooting
1. Why are my meatballs dry?
If your meatballs turn out dry, it could be due to overmixing or not enough moisture. Ensure you’re using enough fat (like the right meat blend) and consider adding a splash of milk or broth to the mixture for added moisture.
2. How can I make my meatballs more flavorful?
Enhance flavors by adding more aromatic ingredients like minced onion, fresh herbs, or even Worcestershire sauce. Some people like to add a dash of hot sauce in the meat mixture for a flavor boost!
3. Can I prepare these ahead of time?
Absolutely! You can make the meatballs in advance and store them in the fridge or freeze them. Just reheat in sauce before assembling your subs. Just remember to adjust bake times if using frozen meatballs!
4. What’s the best way to store leftovers?
If you happen to have leftovers (which is rare!), store any extra subs in an airtight container in the fridge for up to 3 days. You can reheat them in the oven to regain that crispy bread texture, or microwave them for convenience.
Nutritional Info
While I don’t generally focus on nutritional charts, a rough estimate for one meatball sub would be about 500 calories, depending on the sauce and bread used. They’re a hearty option, packed with flavors to keep you satisfied!
So there you have it! My twist on Cheesy Meatball Subs that infuse flavor and fond memories alike. I hope this recipe not only tantalizes your taste buds but also inspires you to gather your loved ones around the table. Happy cooking, and don’t forget to tie that apron—I’m here with you in spirit!
PrintCheesy Meatball Subs
A delicious comfort food featuring juicy meatballs, rich marinara sauce, and melted mozzarella cheese, all wrapped in a warm hoagie roll.
- Prep Time: 15 minutes
- Cook Time: 25 minutes
- Total Time: 40 minutes
- Yield: 4 servings 1x
- Category: Main Course
- Method: Baking
- Cuisine: American
- Diet: None
Ingredients
- 1 pound ground beef
- 1/2 cup bread crumbs
- 1/4 cup grated Parmesan cheese
- 1/4 cup chopped parsley
- 1 egg
- 1 teaspoon garlic powder
- Salt and pepper to taste
- 2 cups marinara sauce
- 4 hoagie rolls
- 2 cups shredded mozzarella cheese
Instructions
- Preheat your oven to 400°F (200°C).
- Mix the meatball ingredients: In a large mixing bowl, combine the ground beef, bread crumbs, Parmesan cheese, chopped parsley, egg, garlic powder, salt, and pepper.
- Form the meatballs: Scoop out about 2 tablespoons of the mixture and roll it into a ball.
- Bake the meatballs: Place the meatballs on a baking sheet and bake for about 20-25 minutes, until they are browned and cooked through.
- Simmer the marinara sauce: Heat the marinara sauce in a medium saucepan on low.
- Assemble the subs: Toss the cooked meatballs in the sauce and load them into the hoagie rolls.
- Top with mozzarella: Sprinkle shredded mozzarella over the subs.
- Broil for gooey goodness: Broil for another 2-3 minutes until the cheese is bubbling.
- Serve: Remove from the oven, let cool for a minute, then enjoy!
Notes
Feel free to experiment with different meats and sauces. These subs are versatile and can be customized to your taste.
Nutrition
- Serving Size: 1 sub
- Calories: 500
- Sugar: 8g
- Sodium: 800mg
- Fat: 20g
- Saturated Fat: 10g
- Unsaturated Fat: 8g
- Trans Fat: 0g
- Carbohydrates: 45g
- Fiber: 2g
- Protein: 28g
- Cholesterol: 80mg
Keywords: meatball subs, cheesy subs, comfort food, easy recipes, Italian food
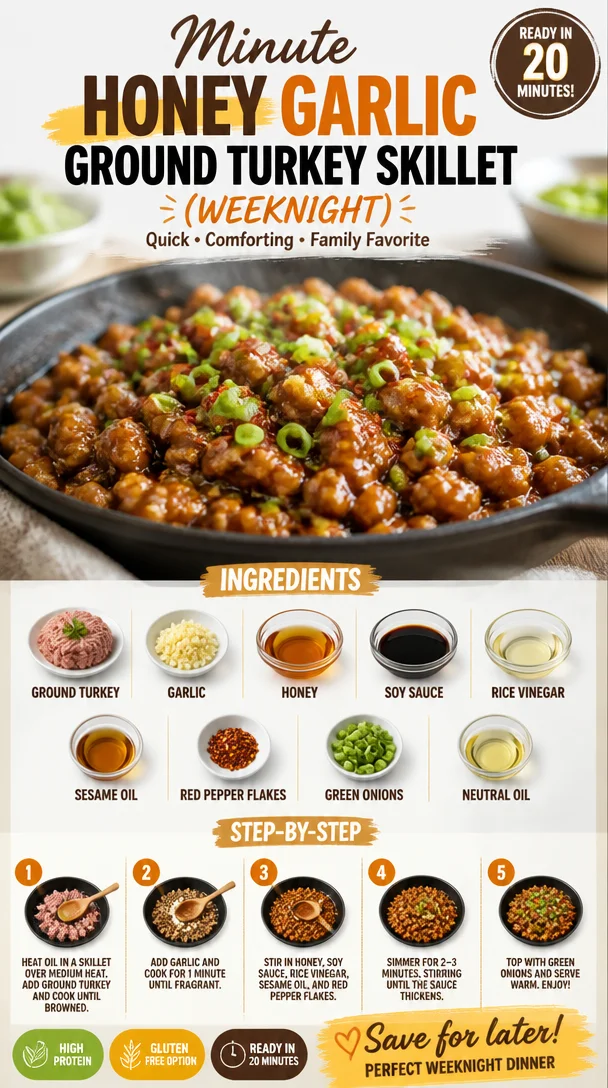
Minute Honey Garlic Ground Turkey Skillet (Weeknight)
Sweet and Savory Honey Garlic Ground Turkey Recipe in 25 Minutes
Hello, fellow food lovers! Welcome back to Ivory Apron, where we embrace the elegance of cooking while keeping things deliciously simple. Today, I’m excited to share a dish that’s not only quick to whip up but also bursting with flavor—Sweet and Savory Honey Garlic Ground Turkey. In just 25 minutes, you can create a meal that feels both comforting and sophisticated. Are you ready? Let’s dive in!
Introduction
There’s something magical about a meal that comes together in a flash but tastes like it took hours of effort. Life can get busy, and that’s exactly why we need go-to recipes that fit seamlessly into our everyday hustle without compromising on flavor. This Sweet and Savory Honey Garlic Ground Turkey checks all those boxes. With its sticky, sweet glaze and hearty flavor, it’s perfect for a weeknight dinner or a gathering with friends.
Picture this: you walk into your kitchen after a long day, and something sweet and savory is about to unfold. It’s like magic! Your kitchen fills with the comforting smells of garlic and honey, while the colors of the veggies dance in your pan. Your loved ones are already stopping by, lured in by the aroma. Cheerful conversations, laughter, and a beautifully plated meal become the highlights of your evening.
Sounds enchanting, right? Well, this dish makes it all possible! So grab your apron, and let’s craft something extraordinary that tastes like a culinary celebration.
Personal Story
When I first ventured into the world of cooking, it was my mom’s kitchen that took me on a journey. I recall standing on a little stool, peering over the counter as she prepared dinner. One of her favorite dishes was a simple honey garlic chicken that would fill our home with warmth and comfort. The way the honey glazed over the meat and the garlic created a symphony of aromas was nothing short of enchanting.
Fast forward to my young adult years, and I found myself recreating that dish but with a healthier twist—using ground turkey instead. The easy sautéing method and sweet-savory flavor profiles became my signature move for impromptu dinner parties. I was hooked! This recipe reminds me of my roots but allows me to add my flair. The best part? It’s the perfect crowd-pleaser. Friends always ask for the recipe, and when I tell them how quick it is, there’s always a collective gasp of disbelief. So trust me—this one’s a keeper!
Ingredients
Now, let’s round up our lovely cast of ingredients! Here’s what you’ll need for this scrumptious meal:
-
1 lb Ground Turkey
Opt for extra-lean turkey for a healthier dish. Ground chicken or beef can be great substitutes if you prefer something different. -
3-4 cloves Garlic
Fresh minced garlic truly enhances the flavor of the dish. If you’re in a pinch, garlic powder can work, but fresh is always best for that aromatic punch! -
1/4 cup Honey
This creates a sticky glaze that envelops the turkey in sweetness. If you need a vegan alternative, maple syrup works beautifully too. -
1/4 cup Low-Sodium Soy Sauce
It adds that salty, umami punch to balance the sweetness. Use tamari for a gluten-free option, or coconut aminos for a soy-free alternative. -
1 tbsp Rice Vinegar
Just a dash of acidity brightens the dish. Apple cider vinegar can step in if you don’t have rice vinegar on hand. -
1 tsp Sesame Oil
Adds a nutty depth to the overall flavor. If you prefer a lighter version, feel free to omit it. -
Optional Red Pepper Flakes
If you like a spicy kick, these provide the perfect heat. Fresh chili or chili paste can also add that fiery touch. -
2 stalks Green Onions
These bring freshness and a lovely crunch to the dish. Chives work as a great substitute if you have them on hand. -
1 tbsp Neutral Oil (Canola or Avocado)
Essential for sautéing the ground turkey evenly. Use whatever neutral oil you have on hand!
Step-by-Step Instructions
Let’s get cooking! Follow these steps for your Sweet and Savory Honey Garlic Ground Turkey:
-
Prep Your Ingredients
Start by gathering and measuring your ingredients. Mince the garlic, chop the green onions, and have everything ready to go. Prepping ahead saves time and keeps the cooking process smooth—it’s one of my key kitchen tips! -
Heat the Oil
In a large skillet, over medium heat, add your neutral oil. Let it warm up until it shimmers—this is crucial for achieving a beautiful sear on your turkey. -
Cook the Garlic
Add minced garlic to the skillet and sauté for about 30 seconds. You want to cook it until it becomes aromatic but not browned, as burnt garlic can add a bitter taste to your dish. -
Add the Ground Turkey
Stir in the ground turkey, breaking it up with a spatula as it cooks. This is where you can get a little messy—it’s okay! Cook until the turkey is fully browned, about 5-7 minutes. Use this time to season it lightly with salt and pepper to enhance the overall flavor. -
Combine the Glaze
In a small bowl, whisk together the honey, soy sauce, rice vinegar, and sesame oil (if using). This glaze is what will transform your turkey from delicious to utterly divine. -
Pour on the Goodness
Once the turkey is cooked through, pour the glaze over the turkey, stirring to coat everything evenly. Allow it to bubble gently on low heat for about 2-3 minutes—this helps the turkey soak up all that sweet goodness. -
Taste and Adjust
Here’s a little chef trick—taste the mixture! If you want it sweeter, add a touch more honey. For more saltiness, splash in a bit more soy sauce. Cooking is about personal preferences! -
Finish with Green Onions
Stir in half of the chopped green onions, reserving the rest for garnish. This adds freshness that brightens every bite. If you’re feeling adventurous, toss in a pinch of red pepper flakes now or leave them for individual servings. -
Serve Hot
Turn off the heat, and you’re ready to dish up! Serve the turkey immediately, as it’s best enjoyed fresh and hot.
Serving Suggestions
Plating is where you can have some fun! Serve your Sweet and Savory Honey Garlic Ground Turkey over a bed of fluffy jasmine rice or crispy quinoa. Garnish with a sprinkle of the remaining green onions and a few sesame seeds for that extra pop. A side of steamed broccoli or a fresh salad will round out the meal beautifully. Ah, elegance meets simplicity—just like that!
Recipe Variations
Feeling adventurous? Here are some creative twists you might consider for this dish:
-
Teriyaki Turkey: Swap the honey for brown sugar and add a splash of ginger for a classic teriyaki vibe.
-
Spicy Thai Twist: Add a tablespoon of peanut butter to the sauce for a Thai-inspired flavor.
-
Vegetarian Option: Use crumbled tofu or tempeh instead of ground turkey for a plant-based alternative.
-
Zucchini Noodles: Serve the turkey atop zucchini noodles for a low-carb twist that’s equally satisfying.
-
Crispy Lettuce Wraps: Spoon the turkey into butter lettuce leaves and top with cilantro and lime juice for fresh, crunchy bites.
Chef’s Notes
Ah, the memories! When I first experimented with this recipe, I accidentally spilled an entire bottle of sesame oil into my pan, thinking it was the soy sauce. Well, it turned out beautifully, and I’ve kept that “mistake” in my back pocket ever since! Sometimes the best meals come from happy little accidents in the kitchen. It reminds me that cooking is as much about flexibility and creativity as it is about following a recipe. Embrace the chaos, and you’ll find delightful surprises waiting for you!
Moreover, this recipe has evolved over the years. What started as a weeknight necessity has transformed into a crowd favorite at potlucks and parties. You never know how a simple dish can become so beloved!
FAQs and Troubleshooting
Q: Can I use other types of meat?
A: Absolutely! This recipe works great with ground chicken, beef, or even pork. Just be mindful of the cooking time since different meats may vary slightly.
Q: What do I do if my sauce is too thick?
A: If your honey garlic sauce thickens too much, simply add a splash of water or extra soy sauce to loosen it up. Stir well, and it should come together beautifully!
Q: How do I make this dish vegan?
A: You can use crumbled tofu or tempeh instead of ground turkey, and switch the honey for maple syrup to create a completely plant-based dish.
Q: Is this dish freezer-friendly?
A: Yes! Allow it to cool completely, then transfer it to a freezer-safe container. It can be stored in the freezer for up to three months. Just defrost and reheat when you’re ready to enjoy!
Nutritional Info
While I believe in enjoying food without guilt, here’s a quick glance at the nutritional aspects of the recipe (per serving, based on ground turkey):
- Calories: 320
- Protein: 30g
- Fat: 10g
- Carbohydrates: 24g
- Fiber: 1g
- Sugar: 11g
Remember to adjust these values according to your ingredient choices!
Thank you for joining me in this flavorful journey! With the Sweet and Savory Honey Garlic Ground Turkey, you’ve got a fantastic, easy dish that impresses without overwhelming. Enjoy every moment of cooking, and as always, happy hosting!
PrintSweet and Savory Honey Garlic Ground Turkey
A quick and delicious sweet and savory dish made with ground turkey, honey, and garlic that can be prepared in just 25 minutes.
- Prep Time: 10 minutes
- Cook Time: 15 minutes
- Total Time: 25 minutes
- Yield: 4 servings 1x
- Category: Main Course
- Method: Sautéing
- Cuisine: Asian
- Diet: Gluten-Free
Ingredients
- 1 lb Ground Turkey
- 3–4 cloves Garlic, minced
- 1/4 cup Honey
- 1/4 cup Low-Sodium Soy Sauce
- 1 tbsp Rice Vinegar
- 1 tsp Sesame Oil (optional)
- Red Pepper Flakes (optional)
- 2 stalks Green Onions, chopped
- 1 tbsp Neutral Oil (Canola or Avocado)
Instructions
- Prep your ingredients by gathering and measuring everything. Mince the garlic and chop the green onions.
- Heat the oil in a large skillet over medium heat until it shimmers.
- Cook the garlic in the skillet for about 30 seconds until aromatic.
- Add the ground turkey, breaking it up as it cooks for about 5-7 minutes until fully browned.
- Combine the glaze by whisking together honey, soy sauce, rice vinegar, and sesame oil in a small bowl.
- Pour the glaze over the cooked turkey and stir to coat evenly, allowing it to simmer for 2-3 minutes.
- Taste and adjust the seasoning if needed.
- Finish by stirring in half of the chopped green onions and reserving the rest for garnish.
- Serve immediately and enjoy!
Notes
Serve over rice or quinoa and garnish with green onions and sesame seeds for added flair. This dish works beautifully as a weeknight dinner or a crowd-pleaser at gatherings.
Nutrition
- Serving Size: 1 serving
- Calories: 320
- Sugar: 11g
- Sodium: 400mg
- Fat: 10g
- Saturated Fat: 1.5g
- Unsaturated Fat: 7g
- Trans Fat: 0g
- Carbohydrates: 24g
- Fiber: 1g
- Protein: 30g
- Cholesterol: 80mg
Keywords: ground turkey, honey garlic, quick dinner, easy recipe, asian cuisine
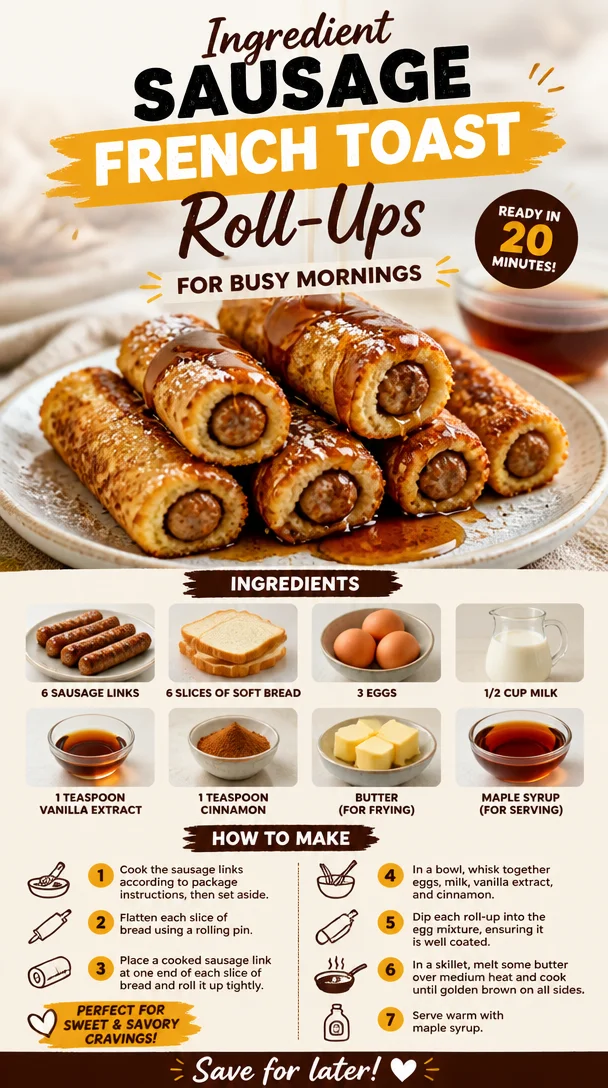
Ingredient Sausage French Toast Roll-Ups for Busy Mornings
Indulge in Breakfast Bliss: Sausage French Toast Roll-Ups
Hello, lovely foodies! Today, I am absolutely thrilled to share a dish that combines comfort, nostalgia, and a delightful twist on two breakfast classics. Say hello to Sausage French Toast Roll-Ups! Imagine crispy sausage wrapped in fluffy, sweet French toast, dipped in syrup, and devoured hot. This recipe embraces everything we love about breakfast while adding a playful touch that’ll make everyone at your table smile. Ready to dive in? Let’s get started!
A Morning to Remember
I’ll never forget the morning I first made this dish for my closest friends during a cozy brunch gathering. The sun was streaming through the windows, and we were savoring our morning coffee when I decided to shake things up a bit. With leftover sausage and some soft bread sitting in the pantry, inspiration struck! Before I knew it, my kitchen was bustling, laughter filled the air, and the aroma of sizzling butter mingled with cinnamon and sweetness — a perfect recipe for great memories.
As I rolled out the French toast and filled it with sausage, I couldn’t help but feel that I was creating something more than just dish; I was crafting a delightful experience. My friends were enchanted, and I instantly knew I had stumbled upon something special. From that day forward, this recipe became a staple in my brunch rotation, and every time I serve it, it’s like hosting a little morning celebration.
Ingredients
Let’s gather our ingredients! Here’s what you’ll need to whip up these divine Sausage French Toast Roll-Ups:
- 6 sausage links: Opt for your favorite type — breakfast sausage, spicy sausage, or even turkey sausage for a leaner option. You can also swap in plant-based sausage for a vegetarian twist!
- 6 slices of soft bread: White bread, brioche, or challah are perfect for this recipe. If gluten-free is your jam, feel free to use gluten-free bread too!
- 3 eggs: Eggs give our French toast that lovely, custardy texture. You can also use flax eggs (1 tablespoon of ground flaxseed mixed with 3 tablespoons of water) as a vegan alternative.
- 1/2 cup milk: Whole milk will make it creamy, but feel free to substitute almond milk, oat milk, or any nut milk for a dairy-free option.
- 1 teaspoon vanilla extract: This adds a warm, comforting flavor that elevates the dish. Use the real deal for the best taste, but if you’re in a pinch, imitation vanilla will do.
- 1 teaspoon cinnamon: A must for that true French toast flavor! You can swap it out with pumpkin pie spice for a seasonal twist.
- Butter (for frying): The key to that beautiful golden crust! Coconut oil or any neutral oil can work if you’re looking for a dairy-free option.
- Maple syrup (for serving): A drizzle on top is a must! You can also try honey or agave nectar if that’s more your style.
Step-by-Step Instructions
Alright, let’s get cooking! Here’s how to make these irresistible roll-ups:
-
Cook the Sausage: Start by cooking the sausage links in a skillet over medium heat until they’re browned and cooked through. This usually takes about 8-10 minutes. Once they’re done, remove them from the skillet and let them cool slightly. Pro tip: You can bake the sausages in the oven at 400°F (200°C) for an easier hands-off approach!
-
Prepare the Bread: While the sausages are cooling, trim the crusts off the bread slices. This step is key, as it allows the bread to roll more easily. If you’re feeling adventurous, try using a mix of different breads! Once the crusts are off, gently flatten each slice using a rolling pin. This gives us the perfect canvas for our roll-ups.
-
Make the Custard Mixture: In a shallow bowl, whisk together the eggs, milk, vanilla extract, and cinnamon. Ensure everything is well-combined. This mixture will soak into our bread and add that dreamy flavor.
-
Roll It Up: Take one slice of the flattened bread, place one cooked sausage link at the edge, and roll it up tightly. Pinch the ends to seal and keep the filling inside. Repeat with the remaining slices and sausage links.
-
Heat the Skillet: Add a generous pat of butter to the same skillet over medium heat. If you’re feeling like a true chef, sprinkle some cinnamon in the butter to create a fragrant base!
-
Dip & Fry: Dip each roll-up into the custard mixture, making sure to coat all sides. Place them seam-side down in the skillet. Cook for about 2-3 minutes per side or until golden brown and crispy. Don’t rush this step; patience will give you that gorgeous crust!
-
Serve with Love: Once they’re done, remove them from the skillet and let them rest on a paper towel to soak up any excess butter. Serve warm with a drizzle of maple syrup — the crowning glory of this dish!
Serving Suggestions
When it comes to presentation, I love to serve these roll-ups arranged on a beautiful platter, drizzled with maple syrup, and garnished with fresh berries or a sprinkle of powdered sugar. It’s all about creating that enticing look that makes everyone want to dig in right away! If you want to amp up the experience, add a side of fresh fruit or yogurt to balance the richness.
Recipe Variations
Ready to get creative? Here are a few ideas to switch things up with your Sausage French Toast Roll-Ups:
- Sweet Potato Surprise: Mash some cooked sweet potato into the custard mixture for a deliciously sweet twist.
- Add Cheese: Place a slice of cheese inside the roll-up before adding the sausage. Melty cheese will take these to a whole new level!
- Berry Bliss: Add fresh berries or chocolate chips to the bread before rolling for added sweetness and flavor.
- Savory Spin: Use seasoned sausage patties, and swap in herbs like fresh thyme or chives in the custard mixture. You’ll create a unique breakfast experience!
Chef’s Notes
These roll-ups have quickly become a crowd favorite in my home, and they’ve undergone a few transformations over the years. Originally, I made them as a quick fix for breakfast, but today they hold a special place in my heart as a brunch mainstay. The joy of watching friends and family indulge in these delightful bites never gets old!
Oh, and here’s a fun kitchen story: One time, I accidentally combined breakfast sausage with chorizo, thinking I’d enhance the flavor. What a surprise it was when everyone around the table perked up at the unexpected heat! Sometimes kitchen mistakes lead to the best discoveries!
FAQs and Troubleshooting
1. What can I do if my roll-ups unravel while cooking?
If your roll-ups aren’t holding together, ensure you’ve pinched the ends well, and consider securing them with a toothpick before frying.
2. Can I make the roll-ups in advance?
Absolutely! You can prepare the roll-ups ahead of time and refrigerate them. Just add a few minutes to the cooking time if you’re frying them cold.
3. How can I make these more kid-friendly?
Try using sweet or mild sausages and let your kids dip the roll-ups into their favorite sauces or toppings—even fruit preserves for a fun twist!
4. What if I don’t have eggs?
For an egg-free version, you can use aquafaba (the liquid from canned chickpeas). About 3 tablespoons of aquafaba can replace one egg in the custard mixture.
Nutritional Info
While keeping comfort food in mind, here’s a quick breakdown (approx. per serving):
- Calories: 320
- Protein: 15g
- Carbohydrates: 36g
- Fat: 15g
- Fiber: 1g
This recipe is delicious but watch out for the syrup! It’s best enjoyed occasionally for a special treat.
And there you have it, dear friends—a cozy recipe for Sausage French Toast Roll-Ups that’s sure to become a beloved staple in your kitchen! I hope you enjoy making these as much as I do. Remember, cooking is about creating connections and sharing joy, so gather your loved ones, tie on your apron, and let’s make some unforgettable breakfasts together! Happy Cooking!
PrintSausage French Toast Roll-Ups

Indulge in crispy sausage wrapped in fluffy, sweet French toast, dipped in syrup, and devoured hot. A delightful twist on two breakfast classics!
- Prep Time: 15 minutes
- Cook Time: 20 minutes
- Total Time: 35 minutes
- Yield: 4 servings 1x
- Category: Breakfast
- Method: Frying
- Cuisine: American
- Diet: Omnivore
Ingredients
- 6 sausage links (breakfast, spicy, or turkey sausage)
- 6 slices of soft bread (white, brioche, challah, or gluten-free)
- 3 eggs (or flax eggs for a vegan alternative)
- 1/2 cup milk (whole, almond, oat, or nut milk)
- 1 teaspoon vanilla extract
- 1 teaspoon cinnamon
- Butter (for frying)
- Maple syrup (for serving)
Instructions
- Cook the sausage: Cook the sausage links in a skillet over medium heat until browned and cooked through, about 8-10 minutes. Let cool slightly.
- Prepare the bread: Trim the crusts off the bread slices and flatten them with a rolling pin.
- Make the custard mixture: Whisk together the eggs, milk, vanilla extract, and cinnamon in a shallow bowl.
- Roll it up: Place a sausage link at the edge of a bread slice and roll tightly, pinching the ends to seal.
- Heat the skillet: Melt butter in the skillet over medium heat, optionally adding cinnamon.
- Dip & Fry: Dip each roll-up into the custard mixture, coating all sides, and cook seam-side down for 2-3 minutes per side until golden brown.
- Serve with love: Let them rest on paper towels and serve warm with maple syrup.
Notes
Feel free to get creative with fillings and serve with fresh berries.
Nutrition
- Serving Size: 1 roll-up
- Calories: 320
- Sugar: 10g
- Sodium: 500mg
- Fat: 15g
- Saturated Fat: 6g
- Unsaturated Fat: 7g
- Trans Fat: 0g
- Carbohydrates: 36g
- Fiber: 1g
- Protein: 15g
- Cholesterol: 120mg
Keywords: Sausage, French Toast, Breakfast, Brunch, Comfort Food
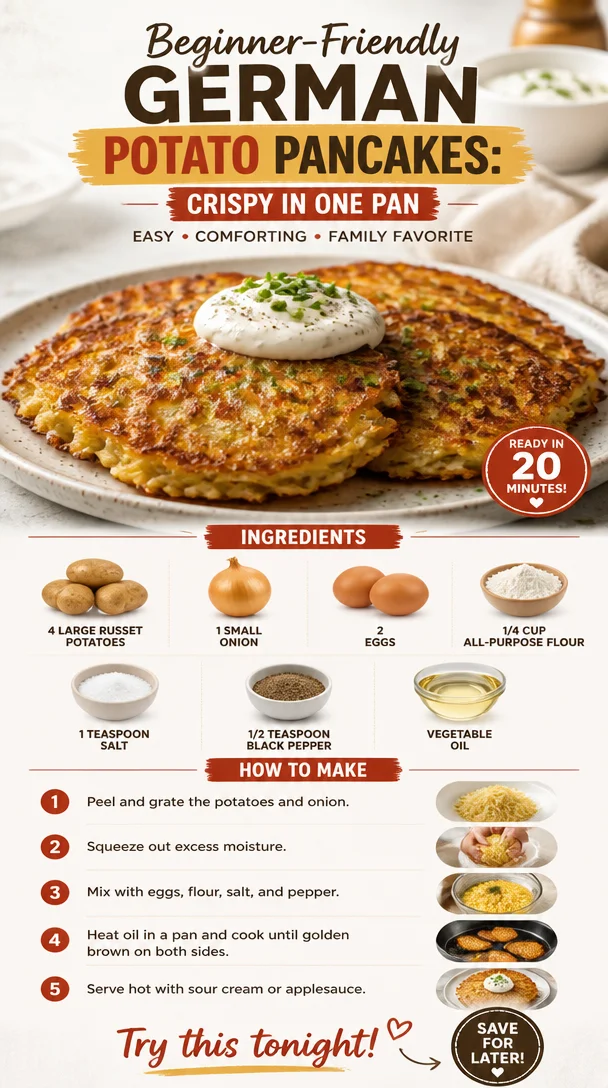
Beginner-Friendly German Potato Pancakes: Crispy in One Pan
Crispy German Potato Pancakes You’ll Fall in Love With
Hello, fellow food enthusiasts! Today, we’re diving into the irresistible world of Crispy German Potato Pancakes, or as they lovingly call them—Reibekuchen! If you’ve never experienced the golden-brown, crispy perfection of these delights, get ready to have your taste buds dance with joy. You might want to set a larger table because once you make these, everyone will want to dig in!
Introduction
Picture this: a chilly evening, the aroma of fresh potatoes sizzling in a hot skillet, and your loved ones gathered around the table, eager to take their first bite of crispy, savory goodness. It’s moments like these that remind me why I adore cooking—food brings people together in the most delightful way. The journey of making these crispy potato pancakes is not just a culinary adventure; it’s a chance to create lasting memories.
These potato pancakes are a beloved classic in German cuisine, often served with applesauce or sour cream. They’re not overly complicated but require a bit of love and technique to achieve that dreamy crunch on the outside while remaining fluffy on the inside. And with each bite, you’ll find yourself transported back to grandma’s kitchen or a bustling market in Germany, where the enticing smell of fried potatoes wafts through the air.
Now, I believe in making cooking accessible—and that means you don’t need a fancy kitchen or extensive culinary experience to whip these up. You just need a handful of quality ingredients, a chilling vibe, and a willingness to gather those you cherish around your table. Ready to get started? Let’s roll up our sleeves!
Personal Story
As a child, every visit to my grandmother’s house was a culinary treasure hunt, with each room filled with the mouthwatering scents of her signature dishes. But it was her potato pancakes that left a lasting impression on me—a crispy exterior that gracefully gave way to tender, fluffy potato goodness. I vividly remember her inviting me into the kitchen, teaching me how to peel potatoes and grate them just right.
With a mischievous smirk, she always said, “Savannah, the secret is in the love you put in!” As we prepared the batter, she’d encourage me to take a taste, eliciting giggles and plenty of flour on our noses. Those moments paved the way for my passion for cooking, and every bite of a potato pancake now carries a piece of that nostalgia. Let’s recreate a bit of that magic together!
Ingredients
Gather ‘round, let’s talk about the ingredients that make these potato pancakes sing!
-
4 large russet potatoes
The starchy texture is key to achieving the perfect crispiness. Russets hold up beautifully during frying, giving you that delightful crunch. An alternative could be Yukon Gold if you want a creamier texture. -
1 small onion
This onion adds a touch of sweetness and savory depth to the pancakes, balancing the flavors. If you prefer, shallots make a lovely substitute, adding a milder taste. -
2 eggs
Acting as a binding agent, eggs help hold everything together. If you want a vegan option, consider using flax eggs—mix 1 tablespoon of flaxseed meal with 2.5 tablespoons of water and let it sit for a few minutes until it thickens. -
1/4 cup all-purpose flour
This provides necessary structure and helps achieve that crunchy exterior. For a gluten-free option, almond flour or a gluten-free blend can work wonders. -
1 teaspoon salt
Salt enhances flavors, and trust me, you don’t want to skip this; it’s what makes each bite pop! -
1/2 teaspoon black pepper
Adds a subtle kick. Feel free to jazz things up with a pinch of cayenne if you like some heat! -
Vegetable oil
For frying, you’ll want something with a high smoke point. Canola or sunflower oil works well; however, if you’re feeling fancy, duck fat adds an exquisite richness!
Step-by-Step Instructions
Ready to dive into the cooking process? Let’s get crispy!
-
Prep the Potatoes
Start by peeling your russet potatoes. This is where the magic begins! After peeling, rinse them under cold water to remove excess starch. This step is crucial for achieving ultimate crispiness, so don’t skip it! -
Grate the Potatoes
Using a box grater or a food processor, coarsely grate the potatoes into a mixing bowl. The texture will determine the pancake’s crunch, so stick with a coarse grate for a fabulous outcome. Pro tip: if you have a food processor with a grating attachment, this task becomes a breeze! -
Squeeze Out Excess Moisture
This is one of the most important steps! Place the grated potatoes in a clean dish towel or cheese cloth and wring out as much moisture as possible. A dry mixture equals a crispy pancake—trust me! -
Add Grated Onion
Grate the small onion and add it to the potatoes. This not only enhances the flavor but gives you that classic Reibekuchen taste. If you find yourself teary-eyed from the onion, a quick hack is to chill the onion in the fridge first! -
Incorporate the Eggs and Flour
Now, it’s time to add the eggs, flour, salt, and black pepper. Mix everything well until fully incorporated. This may get a bit messy, but I promise it’s worth it! Feel free to use a fork or your clean hands—whichever you find more satisfying. -
Heat the Oil
In a large skillet, pour in enough vegetable oil to create about 1/4-inch of oil in the pan. Heat the oil over medium-high heat until it shimmers. To test if it’s ready, drop a small spoonful of potato mixture into the oil—if it sizzles, you’re golden! -
Form and Fry
Take a generous spoonful of the mixture and shape it into a patty. Carefully place it into the hot oil. Don’t crowd the pan—give each pancake space to breathe (and get crispy)! Fry each side for about 4-5 minutes until they become a beautiful golden brown. -
Drain Excess Oil
Once they’re perfectly crispy, transfer the pancakes to a plate lined with paper towels to absorb any excess oil. A little sprinkle of salt while they’re still hot brings out the flavors beautifully! -
Repeat
Repeat the process until all the mixture is cooked up—don’t worry, they’ll disappear fast!
Serving Suggestions
These crispy German potato pancakes shine when served hot straight from the skillet. Plate them up beautifully atop a rustic wooden board, paired with a dollop of cool sour cream and a side of applesauce for that perfect sweet-savory combo. If you’re feeling adventurous, sprinkle a bit of fresh chives or parsley on top for a vibrant touch!
Recipe Variations
Want to switch things up? Here are a few delicious twists to try:
-
Cheesy Delight: Add 1/2 cup of shredded cheese (like cheddar or Gruyère) to the mixture for an indulgent twist.
-
Herb Infusion: Stir in fresh herbs like dill or chives for a fresh flavor profile.
-
Sweet Potato Swap: For a sweeter take, substitute half the potatoes with sweet potatoes.
-
Spicy Kick: Mix in some finely chopped jalapeños for a spicy kick.
-
Zucchini Addition: Grate a zucchini along with the potatoes—just make sure to squeeze out excess moisture!
Chef’s Notes
I have to confess, there have been times when I’ve tried to multitask in the kitchen and ended up with a burnt pancake or two… Okay, maybe more than two! But each time, I remind myself that cooking is all about learning and evolving. Every crispy pancake is a story waiting to be told, and in the spirit of vulnerability, I’ve embraced the charred crumbs!
Over time, I’ve refined my technique and these pancakes have become a staple in my entertaining repertoire. They evoke stories and laughter and, of course, the joy of connecting with friends and family over good food.
FAQs and Troubleshooting
Q: Why didn’t my pancakes get crispy?
A: The secret to crispiness lies in removing excess moisture from the potatoes. Make sure to squeeze out as much liquid as possible before frying!
Q: Can I make the potato mixture ahead of time?
A: It’s best to fry them fresh. However, you can prep the grated potatoes and onion in the fridge for a couple of hours. Just make sure to squeeze them out again before mixing!
Q: What if my pancakes fall apart while frying?
A: This might happen if you don’t add enough binder (eggs and flour) or if there’s too much moisture in the mixture. A little extra flour can help rectify this.
Q: Are they freezeable?
A: Yes! You can freeze cooked pancakes. Just let them cool completely, then layer them between parchment paper, seal them in a freezer bag, and pop them in the freezer. Reheat in the oven or air fryer when you’re ready to enjoy!
Nutritional Info
(Optional: If you would like to track the nutritional information, here’s a calorie estimate per serving (1 pancake):)
- Calories: 120
- Total Fat: 7g
- Carbohydrates: 15g
- Protein: 2g
So there you have it—delicious, crispy German potato pancakes that are sure to impress! With just a bit of practice and love, you’ll create a dish that brings warmth and joy to your table. Whether you’re enjoying them at a festive gathering or a casual weeknight dinner, these pancakes are more than just food; they’re an invite to share moments with those you cherish. Now, tie on that apron, pour a bubbly drink, and let’s savor the joy of cooking together! Happy frying!
PrintCrispy German Potato Pancakes

Deliciously crispy German Potato Pancakes, also known as Reibekuchen, perfect for gathering around the table with loved ones.
- Prep Time: 15 minutes
- Cook Time: 30 minutes
- Total Time: 45 minutes
- Yield: 4 servings 1x
- Category: Side Dish
- Method: Frying
- Cuisine: German
- Diet: Vegetarian
Ingredients
- 4 large russet potatoes
- 1 small onion
- 2 eggs
- 1/4 cup all-purpose flour
- 1 teaspoon salt
- 1/2 teaspoon black pepper
- Vegetable oil (for frying)
Instructions
- Prep the potatoes: Peel and rinse the russet potatoes under cold water to remove excess starch.
- Grate the potatoes into a mixing bowl using a box grater or food processor.
- Squeeze out excess moisture using a clean dish towel or cheese cloth.
- Add the grated onion to the potatoes.
- Incorporate the eggs, flour, salt, and black pepper, mixing until well combined.
- Heat the oil in a large skillet over medium-high heat until shimmering.
- Form patties from the mixture and carefully place them in the hot oil.
- Fry each side for about 4-5 minutes until golden brown.
- Drain excess oil on paper towels and sprinkle with salt.
- Repeat the process with the remaining mixture.
Notes
Serve hot with sour cream and applesauce for a classic combination. Feel free to add cheese or herbs for variations.
Nutrition
- Serving Size: 1 pancake
- Calories: 120
- Sugar: 1g
- Sodium: 200mg
- Fat: 7g
- Saturated Fat: 1g
- Unsaturated Fat: 6g
- Trans Fat: 0g
- Carbohydrates: 15g
- Fiber: 2g
- Protein: 2g
- Cholesterol: 30mg
Keywords: potato pancakes, Reibekuchen, German cuisine, crispy pancakes, comfort food